Windows 10. Absolute Beginner’s Guide (2016)
Part III: Being Productive
21. File and Folder Basics
In This Chapter
• Learning About Folders and Files
• Learning About Libraries
• Learning How to Use the Navigation Pane
• Learning How to Customize the Appearance of File Explorer
The exciting new Windows 10 environment, with its broad palette of active tiles, gives the perception that everything you do in Windows can be accomplished through the immersive, colorful screens you see on the Start screen, as well as on the Web in advertisements, videos, and reviews.
The reality is that although you’ll certainly work with the Windows 10 apps and features, you’ll also spend a lot of time just managing your files and folders as you might have done with the previous version of Windows. This chapter helps you understand the basics about files and folders and how to keep them all under control using File Explorer.
Files and Folder Basics
Before diving into the methods of managing your files and folders, you should have a firm grasp of the basics. The following sections offer an overview of both and look at how you can use a somewhat hidden feature called libraries to manage them all.
Understanding Files
At their absolute simplest, files store data. Different types of files serve different purposes. But for this discussion, it’s best to categorize all files in two ways:
• System files
• User files
System files are the parts of the Windows 10 engine. Windows 10 uses these files to do its job, from connecting to the Internet to recognizing a mouse-click from a finger tap on the screen to figuring how much time you have before your battery runs out. These system files are important, and Windows 10 expects not only that they remain located on your computer, but also that they are in a specific location. You generally do not need to worry about accidentally erasing a system file and causing Windows to stop working. System files are stored in system folders, and these folders are in a location generally difficult to access unless you are an administrator. Even so, it’s best to avoid these folders and all their subfolders:
\Windows
\Program Files
\Program Files (x86)
Many programs enable you to select the folders into which the system files for the program are installed. Unless you know better, it’s best to use the default folder option the programs offer and remove them only via the Windows Uninstall a Program feature. The steps for uninstalling Desktop applications are discussed in Chapter 7, “Working with Windows Desktop Applications.”
These system files contrast with user files. User files are the files you use and create every day, such as text documents, spreadsheets, music, photos, and so on. Software programs define the format of the user files that work with their program. You usually cannot use one of these files in a program other than the one that created it, although there are exceptions. For example, you can’t open a file created by your tax preparation tool in your photo editing program, but you can open a Notepad text file in Microsoft Word.
User files are normally stored in a person’s own folders. As you read next, all users in Windows 10 have their own set of folders that other users usually cannot access.
Understanding Folders
Whereas files are containers for data, folders are containers for files. It’s as simple as that. A folder can contain other folders, and those folders can contain yet other folders, and so on. A folder in Windows is represented by, no surprise here, the Folder icon, as shown in Figure 21.1.
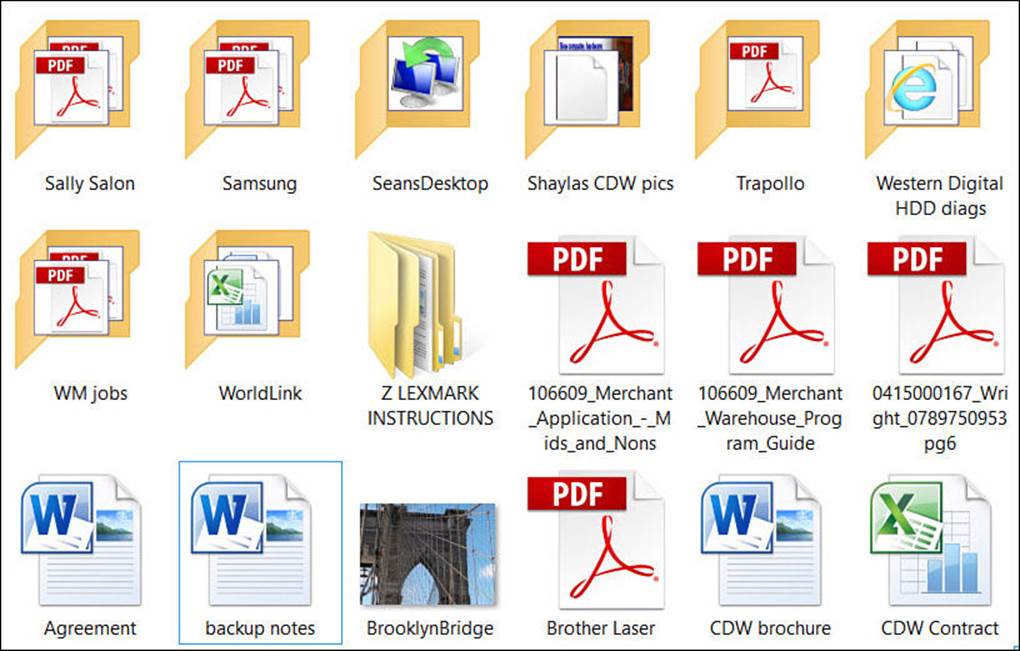
FIGURE 21.1 You can easily tell which of the items in Windows are files or folders.
Adding new users to Windows by creating an account for them also creates a set of unique user folders. Windows creates these folders in a parent folder. The folder is named after the user’s first name if the account is a Microsoft account. If the account is a local account, the folder name is the same as the username you provided when you created the account. This folder is known as the user’s home folder, and you can see an example of it in Figure 21.2. (To learn more about creating accounts and the difference between account types, see Chapter 19, “Sharing Your Windows Computer with Others.”)
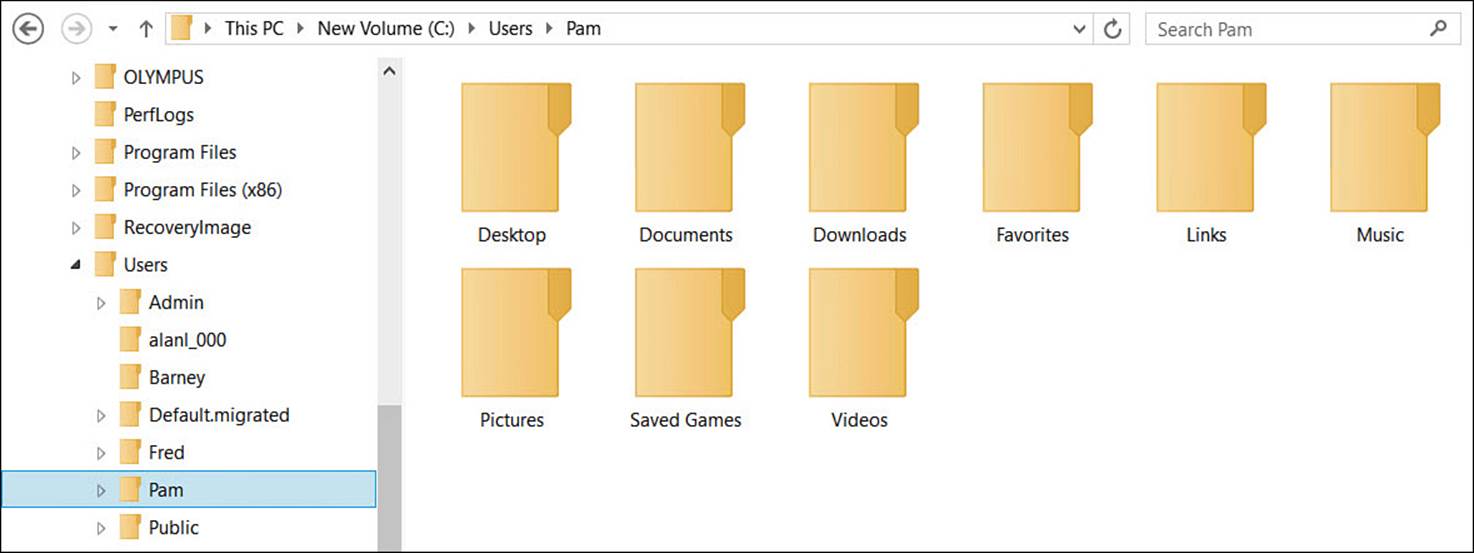
FIGURE 21.2 A set of folders is created for each Windows user.
You can store files anywhere you like in your own home folder and subfolders. You can create as many folders and subfolders as you like in your home folder. It makes sense to store certain special files, such as music files, in the folders specially designed for them. You cannot save or create files in any other folder in Windows, including the home folders of other users, unless you are a system administrator—and even then, it’s generally not a great idea.
With some planning, you can create a hierarchy of folders to help organize all the files related to a task, subject, project, hobby, and so on. Figure 21.3 shows an example of a folder tree used to store photos. As you’ll soon see, you do not need to be a Windows expert to stay organized.
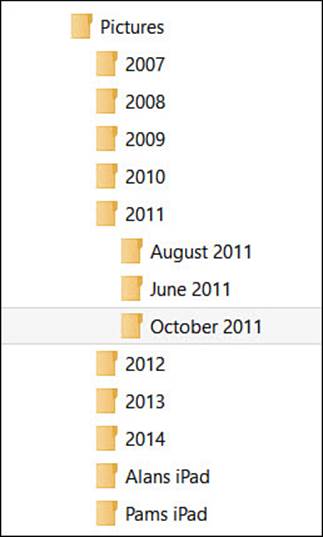
FIGURE 21.3 You can design a folder system for specific needs.
 Caution
Software programs you purchase also leverage folders to organize their files. When you install programs, they often create their own folders. You should never move, rename, or delete program folders, even if you know you will never use the program again. Sometimes these folders contain files that are used by other programs. When you manually delete a folder that contains files, all the files are deleted along with the containing folder, which can cause unintended consequences.
Exploring with File Explorer
You use File Explorer to manage your files and folders. Although Microsoft keeps changing the name—it was previously known as Windows Explorer and before that File Manager—File Explorer has been around for many years, and the version that comes with Windows 10 has been further refined to make it even easier to use.
You can launch File Explorer from the Desktop, and its icon appears on the taskbar by default. If you use a keyboard, it is worth remembering that the keyboard shortcut for opening File Explorer is the Windows key + E.
 Tip
Tip
You can also add a File Explorer tile to the Start menu by using the Search tool to locate an app named “explorer.” When File Explorer appears in the list of results, right-click the icon and select Pin to Start from the menu that appears.
After opening File Explorer, you’ll see a new window like the one in Figure 21.4.
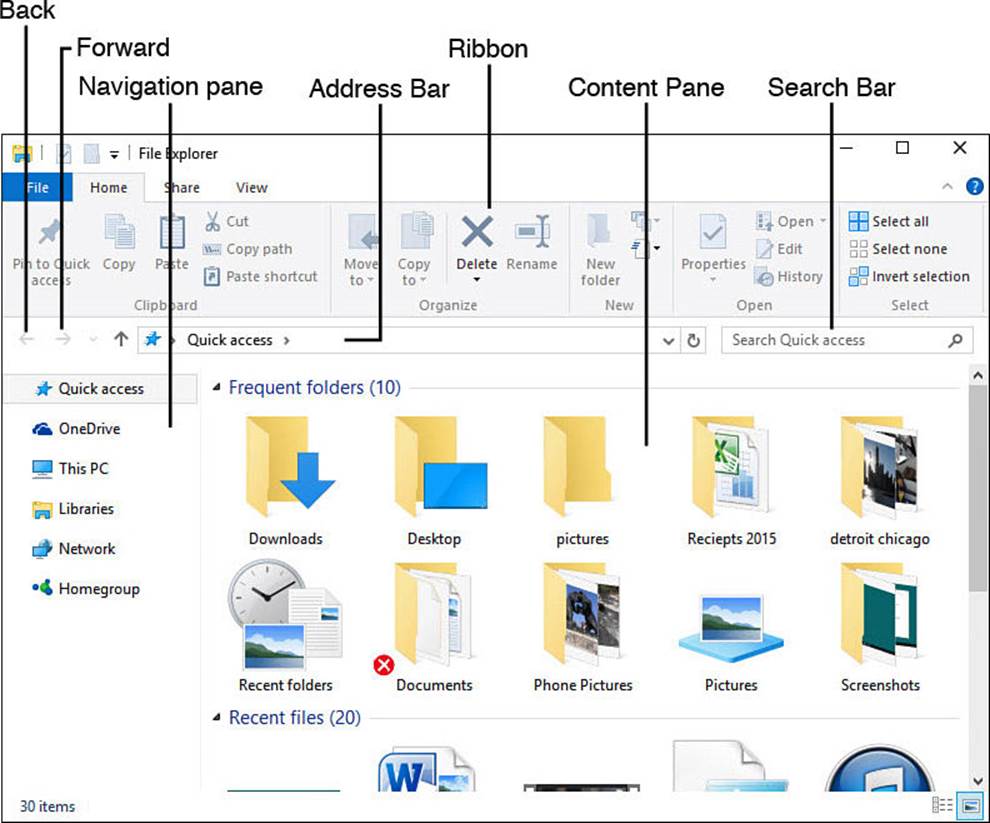
FIGURE 21.4 File Explorer includes a number of controls to enable you to navigate through your file system.
The Navigation pane, as shown here, drives almost all the activity in File Explorer. Whatever you select in the Navigation pane determines what appears in the Content pane.
Working with Quick Access
Quick Access is a twist on the recently used folder and file lists that you would see in previous versions of Windows. Now when you open File Explorer, you land in Quick Access, where you see two sections: frequently used folders and below that a list of recently opened files (refer toFigure 21.4). Quick Access also appears when you open or save a file from another application using File Explorer.
One way to make Quick Access work for you is to pin folders to Quick Access so they will be front and center anytime you open File Explorer. To do this, simply right-click or select and hold on a touch screen to bring up the context menu, as shown in Figure 21.5. Select Pin to Quick Access, and you will see this folder appear in Quick Access with a small thumbtack to remind you it is pinned there.
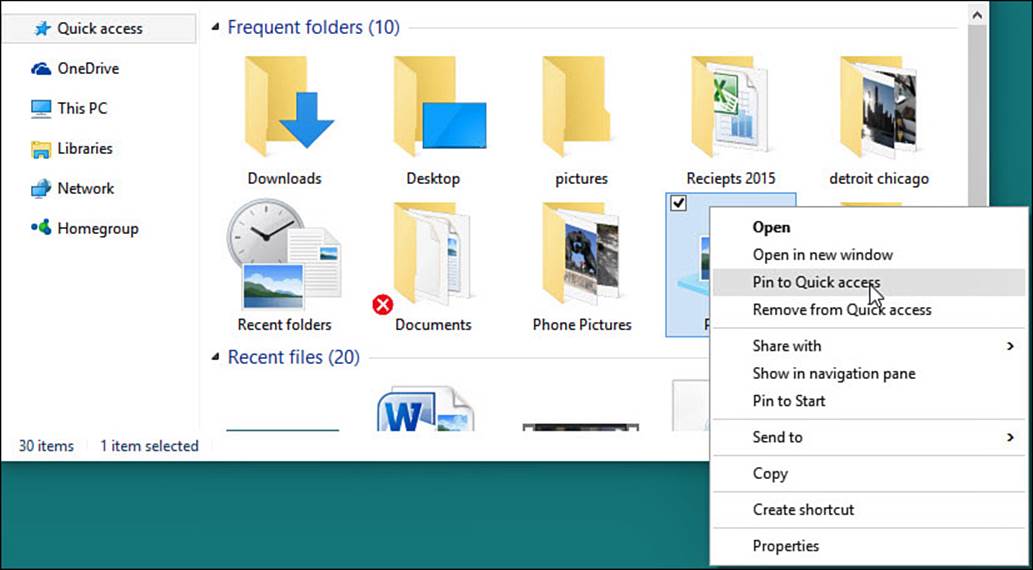
FIGURE 21.5 Pin folders to Quick Access using the context menu so you can find them easily.
Tip
If you do not like Quick Access keeping track of your recent files and folders you can disable this feature. Right-click Quick Access to bring up the context menu and select Options. The Folder Options dialog box will open to the General tab. Under Privacy uncheck the boxes Show Recently Used Files In Quick Access and Show Frequently Used Folder In Quick Access. In addition, you can clear the File Explorer history in this same section by selecting the Clear button.
Working with Libraries
The library, introduced in Windows 7, is an extremely useful tool to organize your files. Windows 10 continues to use libraries even if you do not notice their presence right away. A library usually appears as a themed folder in File Explorer that contains folders that can actually be located anywhere on your device, on attached media, or even on separate computers.
When you select a library, all the folders designated by the library appear as if they were in the same place. A library does not store a file the way a folder does; it does not actually move your files and folders. As an example of how you might use a library, you can add folders that have pictures that are saved on your Desktop, external storage device, and another computer that is always connected to the same network. When you open your Pictures library, you will see all these folders in one place. This provides you with a very powerful way to organize with a minimum of effort.
 Note
Note
Libraries are already used by Windows 10 even if they have not been made visible in File Explorer. When you open the modern Video, Photos, or Music apps, they display the contents of your corresponding library and not merely the folder of that same name in your user profile. Because libraries are often confusing to new users, they have been hidden by default in Windows 10.
Windows creates a number of libraries automatically, including one for pictures, one for documents, one for videos, and another for music files. You can create additional libraries yourself. You might create a library to organize all the files related to your career, or you might consolidate all the folders for all the projects you’re working on.
To work with libraries, you first need to make sure they are visible in File Explorer. To do this, follow these steps:
1. Open File Explorer using the icon on the Desktop taskbar. In the Navigation pane to the left, you will see clusters of folders labeled Quick Access, This PC, Network, and likely Homegroup and OneDrive.
2. Select the View tab and then select the Navigation pane button, as shown in Figure 21.6. Select Show Libraries.
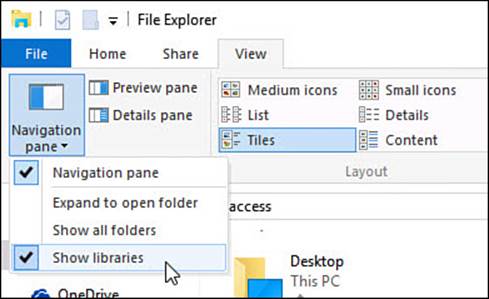
FIGURE 21.6 File Explorer does not show libraries by default.
3. You will see that a group of default libraries is now visible in the Navigation pane of File Explorer. Select one of your Library folders to view its contents, as shown in Figure 21.7.
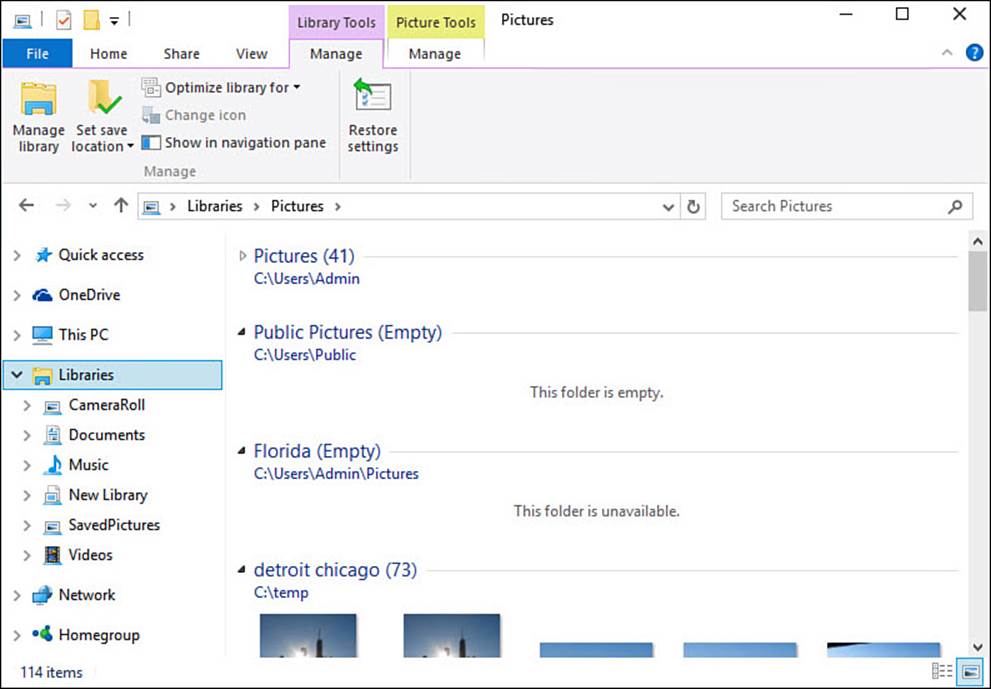
FIGURE 21.7 After you have enabled Show Libraries, you will see them in your Navigation pane as a cluster of folders.
4. When you have a library selected, File Explorer will show a Library Tools tab. Select this tab.
5. Click Manage Library to open the Library Locations dialog box for that library, as shown in Figure 21.8.
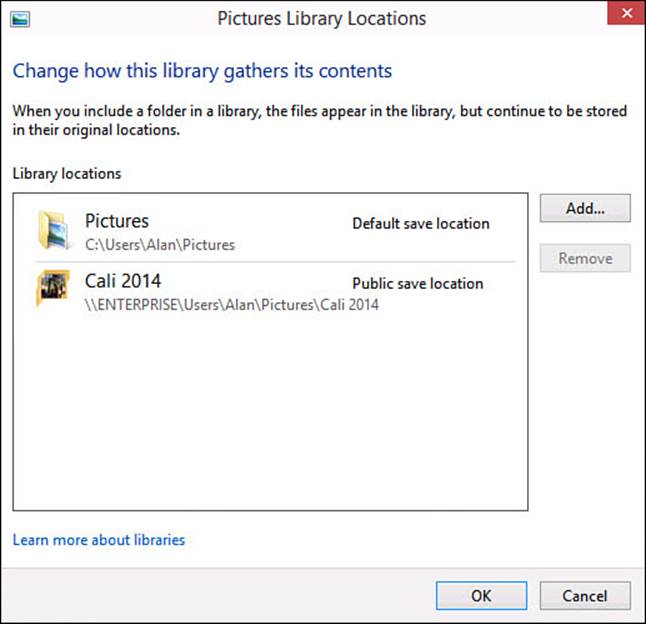
FIGURE 21.8 Edit a library’s location settings to add folders to include in the library.
There are a few basic ways you can manage a library:
• To add a folder to a library, use the steps in this section to open the Library Locations dialog box shown in Figure 21.8. Click Add. A small File Explorer type window appears. Navigate to the folder to include and then click Include Folder. In this example, the second folder is actually located on a different computer in the homegroup. You can read how to navigate in File Explorer later in this chapter.
• To remove a folder from the library, select the folder and then click Remove.
• To define where files are stored when you save to a library, close the Library Locations dialog box. With the library still selected in the Navigation pane, under Library Tools, select the Manage tab; then select Set Save Location (refer to Figure 21.7). Finally, select the library folder to which you would prefer to save files by default.
• When navigating in File Explorer, you can right-click a folder to open the context menu, select Include in Library, and then select the library. This is the easiest way to add folders to your libraries.
• To create a new library, right-click/press-and-hold on Libraries in the Navigation pane. Then select New, and select Library. An empty library appears in the list of libraries. Enter a name for the new library and click Enter. Next, add folders to the library.
Navigating the Folder Tree
The center of attention of the Navigation pane is the folder tree. The folder tree shows all your computer’s drives, folders, libraries, and other content as hierarchal directories that let you easily see how everything is related. Think of your computer as the main trunk of the tree, and think of those leftmost-positioned items as the primary branches growing from the trunk. In many cases, those branches have other branches growing from them.
Each of the five primary branches in the Navigation pane folder tree contains related kinds of items.
• Quick Access—Just as you can specify websites as Favorites, making it easy to reach these sites by choosing from the Favorites menu of your web browser, you can pin folders to Quick Access. Folders that have been pinned appear with a thumbtack in Quick Access. You might find it easier to think of these as shortcuts because the folders have not moved; they are simply easier to navigate to when pinned.
• Libraries—As you read earlier in this chapter, a library organizes related folders, making it easy for you to see and work with all the related files and folders. The Libraries branch contains all your libraries. Once it’s enabled, you will see this branch below the library name showing all of a library’s folders.
• Homegroup—This node shows all the content shared with the homegroup to which your Windows 10 device belongs. The tree is organized by the user that joined the computer to the workgroup. Under each user are the computers to which the user has access. You will not see anything in this branch until you join or start a homegroup.
• This PC—This PC is the branch that contains all the computer’s physical objects, such as hard drives and removable drives. You will also find your principle user folders and network locations your device can see on the network.
• Network—The Network branch shows all the computers on the network to which the computer connects.
You can tell if an item in the Navigation pane has concealed directories (or branches) by the appearance of a small triangle symbol besides its name. That triangle icon is black or white, as shown in Figure 21.9. If it is black, the branches growing from it are visible. When the triangle is white, the branch’s sub-branches are hidden.
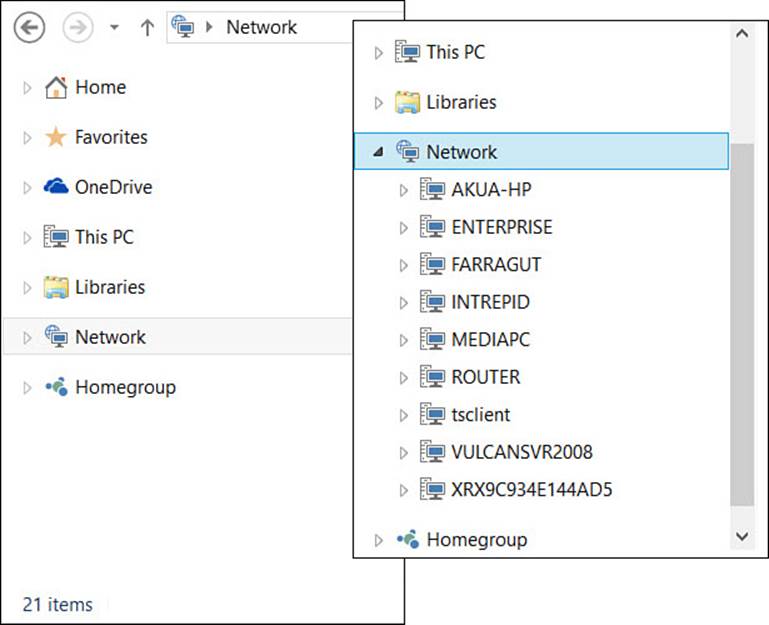
FIGURE 21.9 Show and hide branches in the folder tree by selecting the triangle-shaped icon.
To display more branches in the tree, select the white, triangle-shaped icon. To hide the branches growing from a main branch, select the black, triangle-shaped icon.
Following are a few options to help you organize the Navigation pane. Each of the following, with the exception of the Navigation pane width, can be set by accessing the Navigation pane options menu. Under the View tab in the ribbon’s Panes group, select the Navigation pane down arrow (see Figure 21.10):
• Show/hide the Navigation pane—After you navigate to the folder with which you want to work, you can close the Navigation pane to maximize your screen real estate.
To show or hide the Navigation pane, on the View tab in the Panes group, select the Navigation pane down arrow (see Figure 21.10). Then select the Navigation pane to toggle the appearance of the pane on and off.
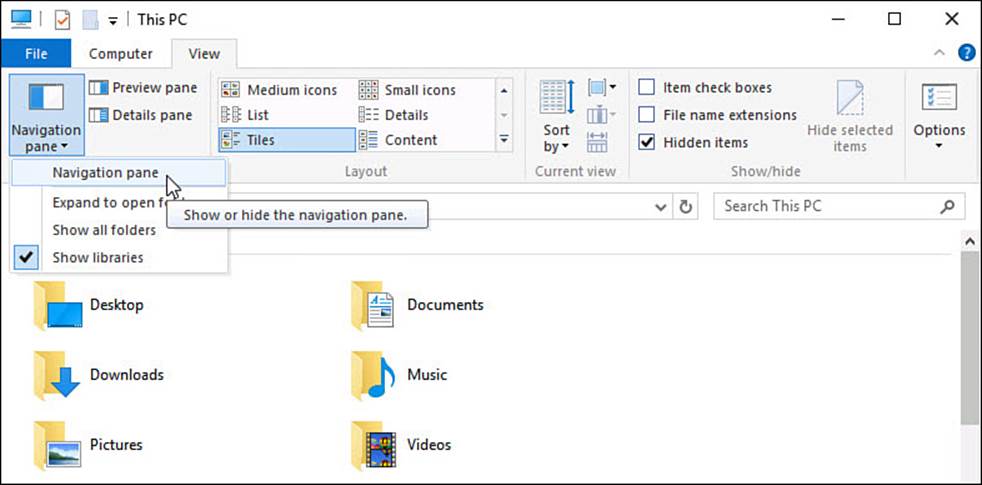
FIGURE 21.10 Show and hide the Navigation pane to suit your needs.
• Change the width of the Navigation pane—If your folder names are particularly long, or if you have several levels of folders in your file system, you can increase the width of the Navigation pane. You can also decrease the width of the Navigation pane to see more of the Explorer pane.
To change the width of the Navigation pane, point to or tap-and-hold on the right edge of the slider bar that separates the Navigation pane from the Content pane. When the pointer becomes a double-headed arrow, drag the bar to change the width of the Navigation pane.
• Showing/hiding Favorites—If you tend to work with some folders more than others, even temporarily as you work on a project, you can add a folder to the list of Favorites. Keeping a folder on the Favorites list makes it easier to access the folder than having to navigate through your file system each time you want to work with it. If you just do not use Favorites, you can hide Favorites in the Navigation pane.
To show or hide Favorites in the Navigation tree, on the View tab in the Panes group, select the Navigation pane down arrow (refer to Figure 21.10). Then select Show Favorites to toggle the appearance of the Favorites on and off.
• Showing/hiding all folders—A few objects in the Navigation pane are a bit different from files, folders, drives, or libraries, and they are generally not displayed by default. The Control Panel, Recycle Bin, and user profile are actually special folders. The Control Panel contains small programs used to configure different aspects of Windows 10. Recycle Bin stores files and folders you have deleted. Your user profile folder contains many more folders than the six displayed in the This PC directory. You can enable these folders if you like, although you might find the Navigation pane to be more cluttered by doing so.
To show or hide these special folders in the Navigation tree, on the View tab in the Panes group, select the Navigation pane down arrow. Then select Show All Folders to toggle on and off the appearance of the Control Panel, your user profile folder, and Recycle Bin. Notice that Desktop appears also as a higher-level container in the Navigation pane when this is enabled.
• Automatically expand to current folder—If you open a folder without using the Navigation pane, you can configure the folder tree in the Navigation pane to expand automatically to that folder. You can also turn off this feature.
• To update the folder tree in the Navigation pane when the address is entered, under the View tab in the Panes group, select the Navigation pane down arrow. Then select Expand to Open Folder to toggle this feature on or off.
Customizing the Content Pane
The Content pane is the main attraction of File Explorer. It shows you the contents of the folder, drive, branch, or computer selected in the Navigation pane (see Figure 21.11). Think of the Content pane as your workbench. It’s the place where you maintain and organize your computer’s folder and files, such as copying, renaming, moving, deleting, burning, and so on.
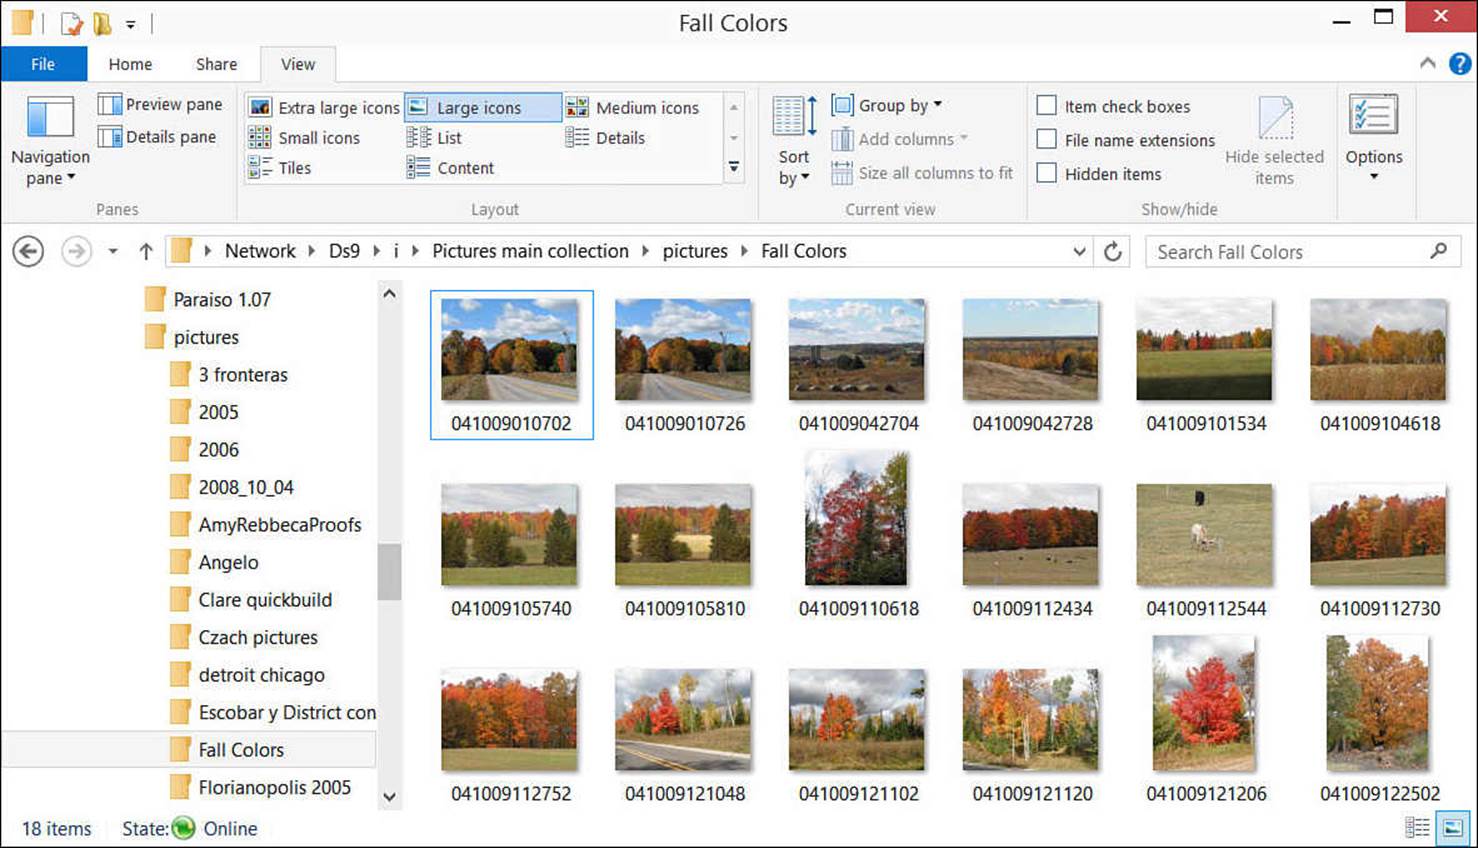
FIGURE 21.11 The Content pane shows the contents of the folder selected in the Navigation pane.
Selecting items in the Content pane is important because the commands you execute, such as Copy, Share, Delete, and all the others, affect the items selected in the Content pane. To learn more about selecting files and folders, refer to the section “Selecting Files and Folders” in the next chapter.
You can change the appearance of the icons listed on the Content pane by choosing the size or layout you want from the ribbon under the View tab in the Layout group. The Current view group contains commands to change the order in which objects appear:
• The choice of icon size (small, medium, large, and extra large) is a matter of personal choice and the size of your display. If you have a large display (perhaps greater than 24″) and a high resolution (greater than 1024×768), you can fit more of the large icons on the screen.
• The List view is helpful when you must select items, especially when you need to make a noncontiguous selection, as shown in Figure 21.12.
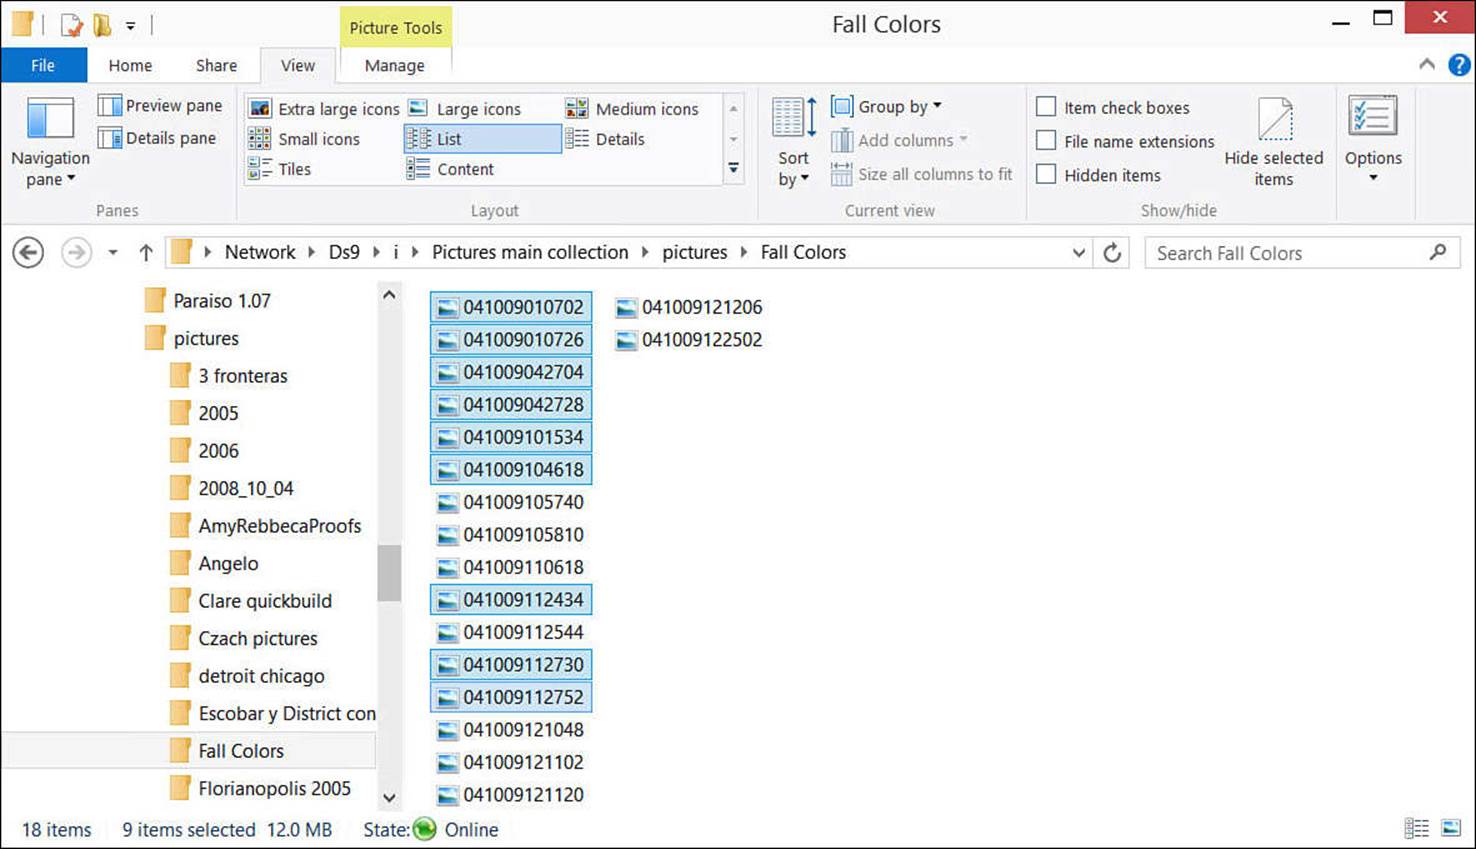
FIGURE 21.12 The List view is extremely helpful when you need to select items that do not appear next to one another.
• The Content and Details views are useful if you need to see (and sort by) the size, the type, and the date the items were last modified. Click the name of the column to sort by that field. Click it again to change the sort order. Select Add Columns in the Current view group on the View tab to add more information in columns to the view.
• Experiment with the various options on the View tab. As the name of the tab indicates, the commands change only the appearance of the icons on the screen. It is impossible to mistakenly delete anything by making a selection from the View tab.
Exploring the Preview and Details Pane
The rightmost area of File Explorer is also capable of displaying one of two bonus panes: the Preview pane and the Details pane. Only one of these panes can be visible at a time. Select the view you want from the ribbon’s View tab by selecting Preview pane or Details pane from the Panes group, as shown in Figure 21.13.
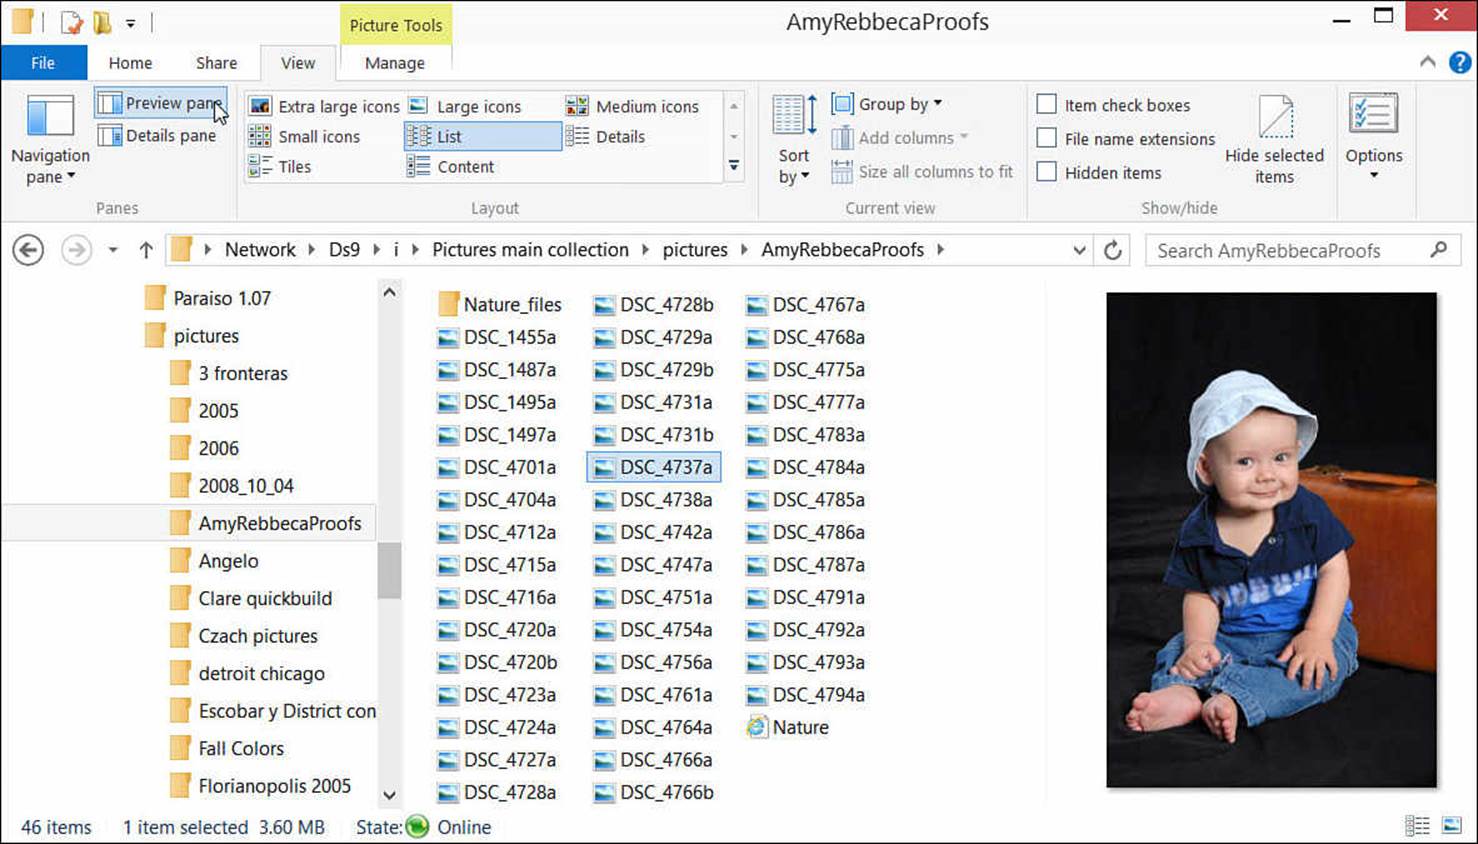
FIGURE 21.13 You can select one of two views to show in the Preview/Details pane.
Where possible, the Preview pane shows a snapshot of the object selected in the Content pane. If the software used to create the file is installed in Windows 10, or if the file is of a common type, you see a snapshot, such as the one shown in Figure 21.13.
The Details pane shows information about the file and enables you to input some personalized information. The data in the fields you see might have been entered manually by persons who have worked with the file, whereas other fields might have been filled by the software when the file was created. The file shown in Figure 21.14 displays size, rating, author, title, and tags fields. The specific fields displayed will differ depending on the file type selected. Modifying these values can prove useful later when searching for data you have added to tags, authors, and title fields.

FIGURE 21.14 The Details pane displays information about the item selected in the Content pane.
Note
If you want to see a preview of how the Preview pane will appear using any of the icon views shown in the Layout section under the View tab, just pass the mouse cursor over each choice without clicking. The Preview pane changes to the view you hover over.
Tip
When using the Details pane, you can select multiple files at once and indicate a common rating as well as add tag and author information that will be applied to all selected files at once. Depending on the selected files, you might be able to add other data as well, such as comments or categories.
Folder Options
A number of configurable options affect how folders work and appear. Occasionally you might need to change a setting here when troubleshooting an issue or to find something that is hidden. Just remember that many of these settings are set as they are by default to protect you from accidently altering or deleting system files and folders your computer uses to operate correctly. To change one or more of these settings, follow these steps in an open File Explorer window:
1. On the ribbon, under the View tab, look for a button labeled Options on the far right of the ribbon (refer to Figure 21.14). Select Options. If you select the down arrow under Options, you will get the same results if you select Change Folder and Search Options. The Folder Options dialog box appears.
2. Select the View tab, as shown in Figure 21.15.
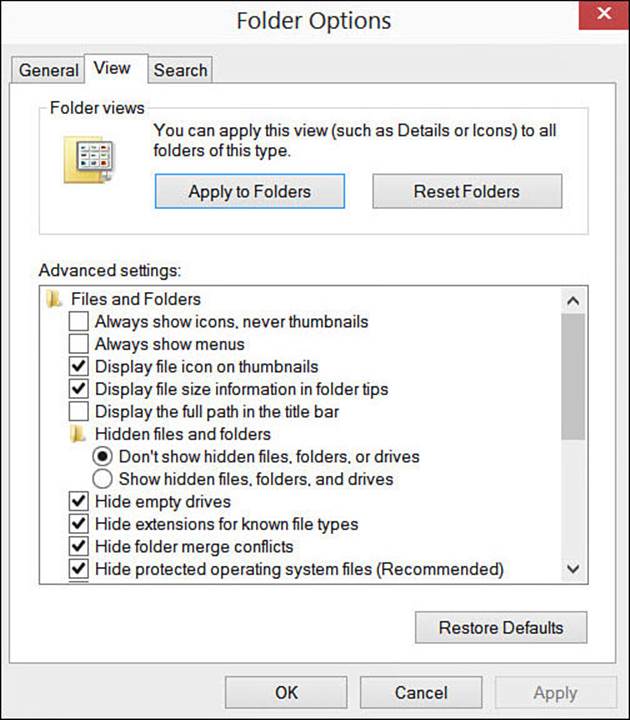
FIGURE 21.15 Nearly 20 options help you control exactly how folders work in File Explorer.
3. Adjust the options you’re interested in.
4. Click OK.
You can review the most useful of these options in Table 21.1.
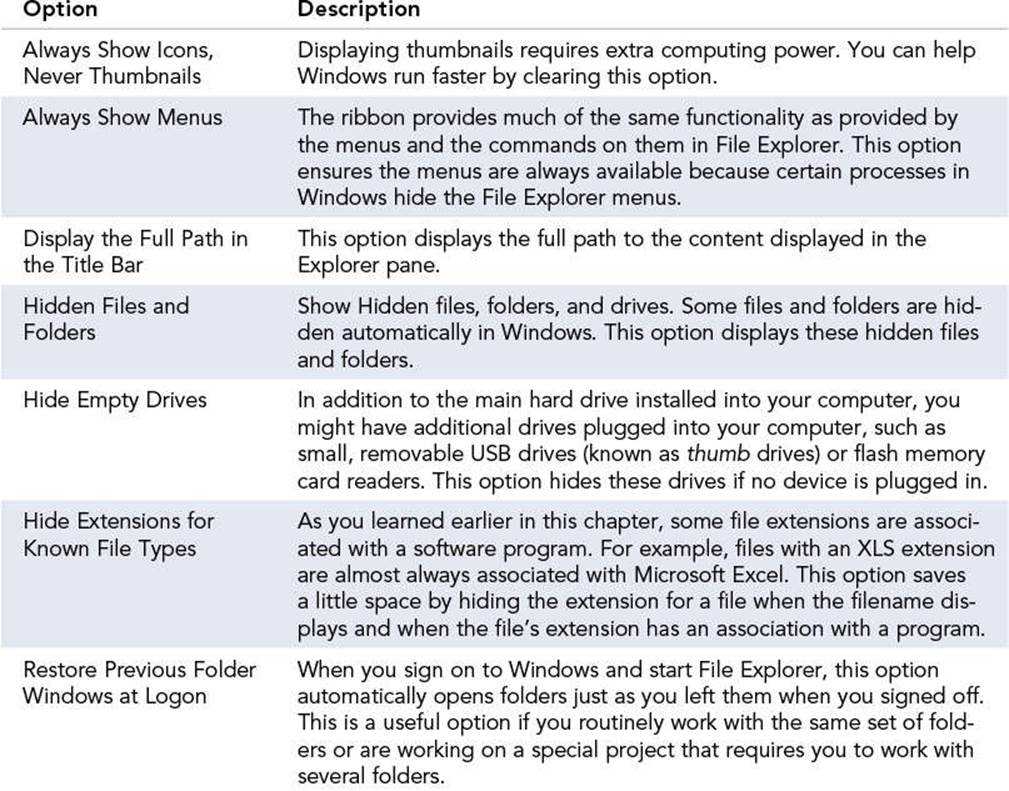
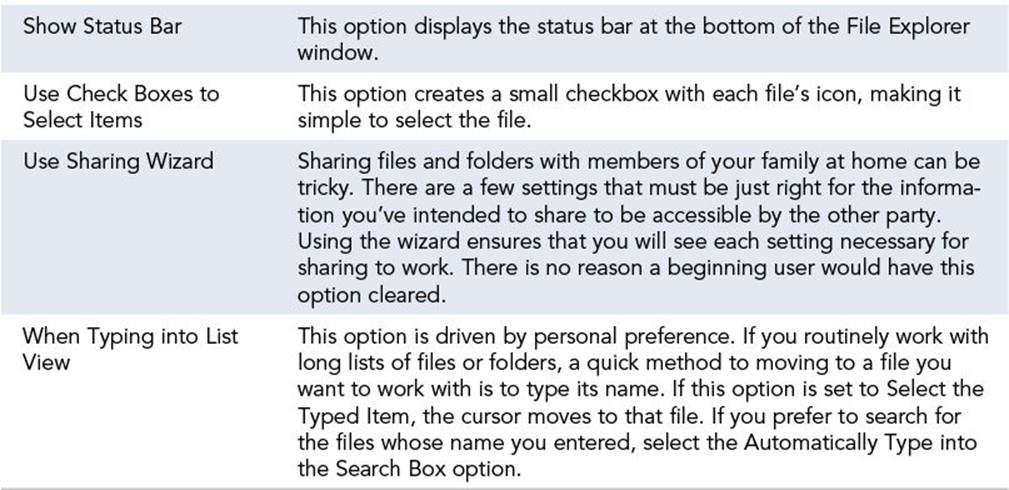
TABLE 21.1 Folder Options
The Absolute Minimum
• The raw materials of your Windows 10 system are files and the folders that store and organize them. Files are categorized as either system files, which are used by Windows 10 and the programs that run in Windows 10, or user files, which are the files you work with every day. You normally do not directly interact with system files.
• File Explorer is the tool used to manage your user files. You can start File Explorer from an icon on the desktop taskbar. If you find it a hassle to go to the desktop, you should locate the tile and then pin it to the Start menu if you anticipate using File Explorer often on a touchscreen device.
• Consider pinning folders to your Quick Access directory in File Explorer.
• Libraries are often misunderstood. Take time to consider how you can use their dynamic nature to simplify your life.
• Invest in your sanity by organizing your folders and files. Think about a folder structure that will help you find your files easily.
• You must first select those files that you need to interact with, such as when you plan to copy or move the files.
All materials on the site are licensed Creative Commons Attribution-Sharealike 3.0 Unported CC BY-SA 3.0 & GNU Free Documentation License (GFDL)
If you are the copyright holder of any material contained on our site and intend to remove it, please contact our site administrator for approval.
© 2016-2026 All site design rights belong to S.Y.A.