Windows 10. Absolute Beginner’s Guide (2016)
Part III: Being Productive
22. Working with OneDrive
In This Chapter
• Learning About Microsoft OneDrive
• Using OneDrive to Store Files
• Using OneDrive to Sync Your Settings
• Using OneDrive with Windows Apps
Cloud storage is by no means unique to Windows 10. You can choose from many cloud storage services and many websites—and even apps in the Windows Store—to manage their use from inside Windows. Microsoft created OneDrive (formerly known as SkyDrive) to provide a valuable alternative to traditional storage methods. It has become an integral part of Windows 10, which makes it incomparable for ease of use and availability. If you have never used OneDrive before, you will certainly have questions about what it is, how to use it, and why it will become increasingly important to you. If you have used OneDrive in the past, you might be surprised by how integrated it is in Windows 10. This chapter helps you understand how to manage OneDrive.
 Note
Note
In the exercises, this chapter relies on basic file and folder navigation skills using File Explorer that were considered in Chapter 21, “File and Folder Basics.”
Introducing OneDrive
It’s amazing how much content, files, and data users have access to today. You can have several gigabytes (if not terabytes!) of pictures, video, and music. Documents may be small, but they add up. Many people find that they work with several devices between home, work, and when traveling. It isn’t practical to carry all your important data with you. That’s where the cloud comes in. OneDrive is an Internet-based (cloud) storage area in which you can put files such as pictures and documents and have access to them from virtually any Internet-enabled device. Synchronization even enables you to keep local copies that you can take with you when you’re not connected to the Internet.
If you are skeptical about “free stuff,” be assured that OneDrive is the real thing. You automatically get 15GB of free cloud-based storage with your Microsoft account. Additional free storage is often offered through promotions, and you can pay a fee to add further storage to your OneDrive.
If you have an Office 365 subscription, OneDrive or OneDrive for Business is included, which generally means you have 1TB of OneDrive space by default. OneDrive for Business is really a similar product to the personal OneDrive with a few additional tools aimed at collaboration and security that are more important for managing a business.
Besides file storage, OneDrive provides tools that care for synchronizing your settings between multiple devices so that your color choices, wallpaper, apps, music playlists, and many other features will behave the same way on any Windows 10 device. As you read through this chapter, it’s important to keep in mind that I’m assuming that you are logged in to a device with a Microsoft account and that you have an Internet connection. Both are needed to access OneDrive.
OneDrive can be accessed using File Explorer, but you also can jump straight to your OneDrive by selecting the OneDrive tile from the Start menu. To open OneDrive, select the OneDrive tile, shown in Figure 22.1. You might find it practical to right-click OneDrive and select Pin to Start to keep OneDrive highly available.
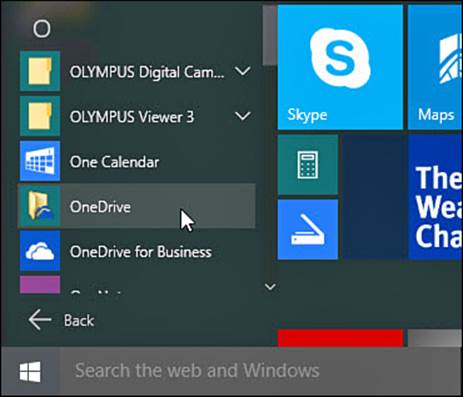
FIGURE 22.1 OneDrive is available from the Start menu.
Anticipated OneDrive Improvements
OneDrive is an important service for Microsoft. This can be seen by looking at the many planned improvements Microsoft has revealed as of this writing.
While a OneDrive app existed for Windows 8.1, Windows 10 does not include an app upon its official release. A universal Windows 10 app is planned for release toward the end of 2015, which will make it easier for touch-driven devices to manage their OneDrive content as well as include additional tools to manage files and folders in OneDrive without visiting a website. Apps are already available for Android and iOS, making management and access to files stored in OneDrive a breeze from most any mobile device you might be using.
Although OneDrive and OneDrive for Business are two different products, there will continue to be tighter integration—for example, both can already be managed from the same app if you are using a mobile device.
Further expected improvements include greater control over which files and folders are synced, improvements to managing user permissions when sharing files and folders, usage reporting, offline file editing, PDF annotation tools, expiring share links, larger file support, increased storage, and control over quotas for shared OneDrives.
As you can tell from Figure 22.2, OneDrive looks like a normal set of folders on your device with one big difference—OneDrive folders include a sync indicator that provides you with sync status information.
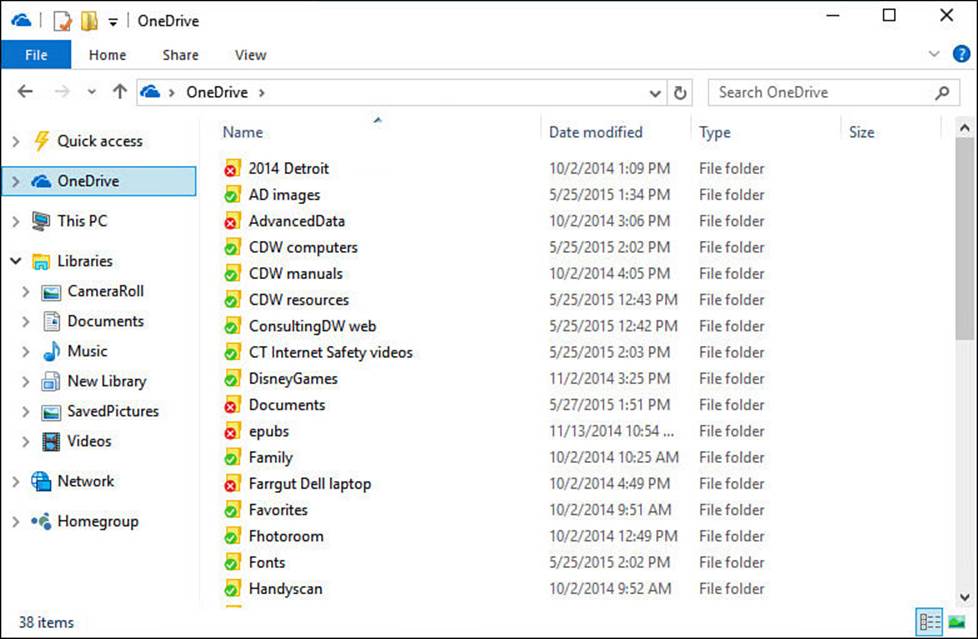
FIGURE 22.2 OneDrive opens to your folders and shows you their sync status with your device.
There are many practical reasons to use this new form of storage. Consider some of these common uses:
• If you work with the same document on a number of computers, such as your work computer and your home computer, or if you also work on a tablet, use the OneDrive account to store the documents. This saves you from emailing the document to yourself. You can even access your OneDrive from most smartphones.
• If you have a tablet, you might be faced with the reality of having limited storage space on the device itself. OneDrive provides a flexible storage solution to hardware limitations on your device.
• OneDrive enables you to easily share with others. You can specify by email address those people who have access to one or more of your OneDrive folders.
• OneDrive stores your data on servers that are maintained, backed up, and kept highly available. This provides a lot more protection from disaster than most people are in a position to provide when it comes to important personal data like pictures and documents. Theft, hard drive failure, alien invasion...they’re pretty much all covered.
• If you work with a small team, all the documents can be stored in a folder of a OneDrive account. Instead of emailing files around the group, you can use the OneDrive folders as the source for all team or project documents.
Note
OneDrive and OneDrive for Business are both cloud-based storage tools that will provide you with the most complete and robust controls while accessed using the web browser. This chapter focuses on OneDrive features that are built in to the Windows 10 operating system.
Setting Up OneDrive
Unless you set up your OneDrive when initially signing in to your device, the first time you actually open OneDrive on a device you will need to set up the way OneDrive will be used on that device. Follow these steps when prompted to set up OneDrive:
1. Open the OneDrive shortcut from the Start menu (refer to Figure 22.1).
2. If OneDrive has not been set up, you will see a Welcome to OneDrive window, as shown in Figure 22.3. If OneDrive opens to your OneDrive folders, then you are already set up and you can skip the following steps.
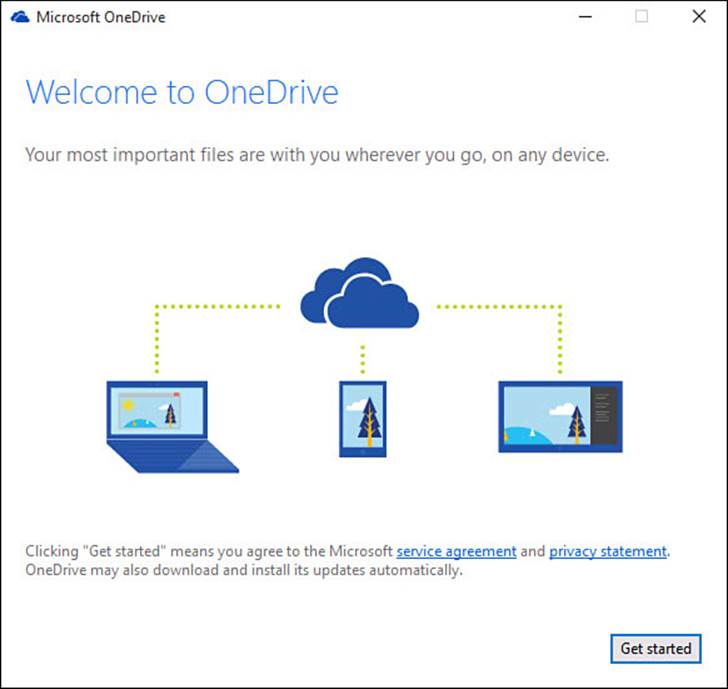
FIGURE 22.3 If OneDrive has yet to be configured, you will be prompted to set it up the first time you use it.
3. Select the Get Started button.
4. Sign in to your Microsoft account, as shown in Figure 22.4, and select Sign In. If you do not have a Microsoft account, you can create one from here by selecting Sign Up Now. (Setting up a new Microsoft account is covered in Chapter 19, “Sharing Your Windows Computer with Others.”)
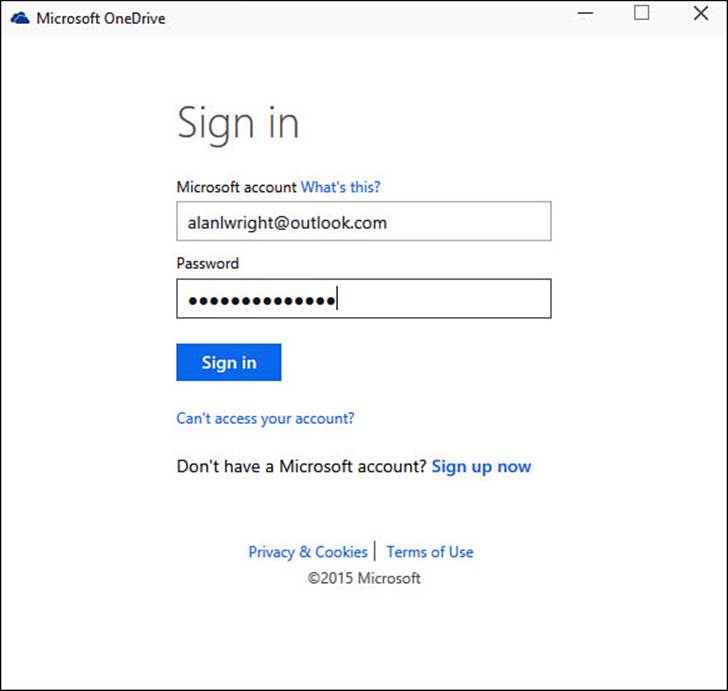
FIGURE 22.4 You can sign in to OneDrive with an existing Microsoft account or create one.
5. You will see the Introducing Your OneDrive Folder screen. A location is indicated where a local copy of your OneDrive will be saved on this device. You can modify the location by selecting Change if you need to; however, it is generally best to leave it where it is. Select Next.
6. The next screen is one of the more important choices you will face. Choose what you want to sync. As shown in Figure 22.5, you have two choices: Sync All Files and Folders in My OneDrive or Sync Only These Folders. When using Sync Only These Folders, use check boxes to indicate the folders you want to copy to your local drive. After making your choices, select Next.
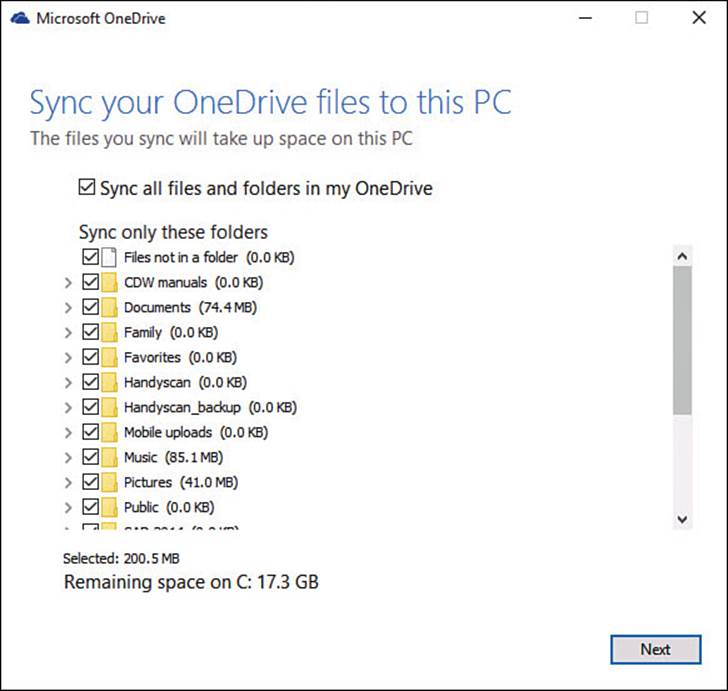
FIGURE 22.5 Use selective syncing to select just the folders you want to sync to your device.
7. Fetch Your Files from Anywhere enables you to access files on your device remotely from OneDrive when accessing it through a web browser. This can be a useful feature if you frequently work with more than one Windows computer. Select the checkbox to enable this feature, and then select Done.
After OneDrive is enabled and set up, you will see the folders you have elected to sync when opening OneDrive from your device.
 Tip
Tip
If your tablet has limited storage, you might find it advantageous to change your OneDrive storage to an SD card. Your tablet will not lose valuable storage space, and you will have more control over the size of SD card used for this type of roll-over storage space.
 Caution
I recommend you select folders you want to sync. You might have more storage space on OneDrive than your device can handle, so storage is a factor. Sync itself can be a factor because OneDrive will verify and update any files that have changed in the folders you sync locally.
Note
Enabling the Fetch Your Files from Anywhere option while setting up OneDrive will create a tile for your computer in the online OneDrive web page. To access files remotely, make sure the computer is powered up and connected to the Internet. Additionally, as a security measure you will need to generate and input a security code through the phone or email contacts of your Microsoft account to actually gain access to the computer.
Adding Files to Your OneDrive
The process to load your files to OneDrive is pretty straightforward and is identical to the way you would copy or move files and folders between folders and drives on your device. To add files and folders to OneDrive, follow these steps:
1. Open File Explorer and navigate to the folder or file you want to add to your OneDrive.
2. Copy the file or folder to create a second copy and retain the original, or use Cut to remove the original and paste it into a new location. Tap and hold or right-click to reveal these choices in a context menu.
3. Open the OneDrive shortcut (refer to Figure 22.1), or from File Explorer select OneDrive in the navigation pane.
4. Navigate to the folder within your OneDrive where you want to paste the file or folder you have copied, and then paste. Your file or folder will appear with a small blue sync icon showing synchronization is pending.
5. After a few seconds, the icon should change to a green checkmark letting you know that the item is synced.
Note
It might take some time to upload especially large files. Status messages appear near the notifications area. You also can select these status messages or select the OneDrive icon in the notifications area to view details regarding sync progress.
Managing Your OneDrive Files
You have as many options for managing your OneDrive files as you do for your local drives. You can create folders and subfolders, select multiple files, delete files, and see thumbnails of a file’s contents. Another useful tool for managing your OneDrive is located in your notifications area. From here, you can change settings that might have been selected when setting up OneDrive for the device as well as find links to your online OneDrive.
To access OneDrive settings, follow these steps:
1. Select the Show Hidden Icons button from the notifications area of the taskbar. Locate and right-click the OneDrive icon, as shown in Figure 22.6. From here, you could select Go to OneDrive.com or Manage Storage to jump to your online OneDrive account; instead, we will focus on settings related to your device.
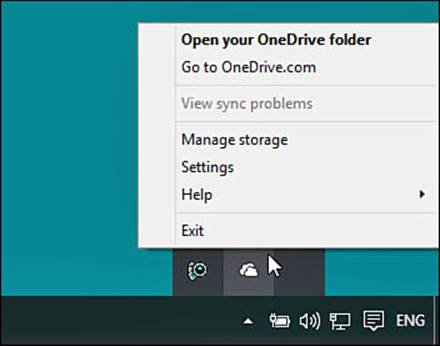
FIGURE 22.6 You can access settings from the OneDrive icon in the notifications area.
2. Select Settings. The Microsoft OneDrive window will appear, as shown in Figure 22.7.
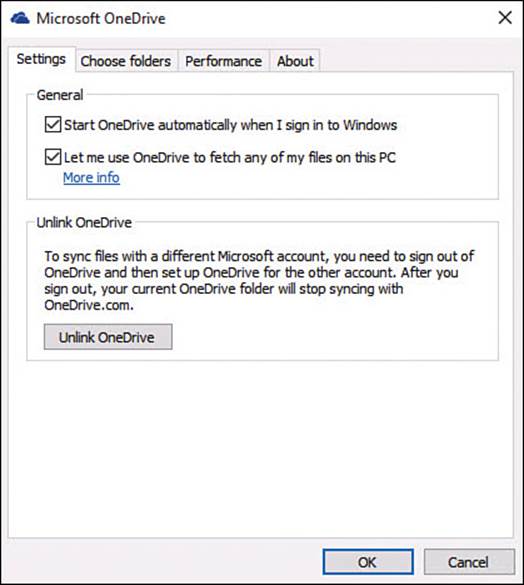
FIGURE 22.7 You can make changes to how OneDrive works on a device after setup or unlink a device from your OneDrive.
3. From the Settings tab, you can make changes using a few checkboxes:
• Start OneDrive Automatically When I Sign In to Windows—This should be enabled unless you simply do not use OneDrive.
• Let Me Use OneDrive to Fetch Any of My Files on This PC—You should enable this only if you expect to remotely access files on this device from the web-based OneDrive.
• Use Office to Sync Files Faster...—This is fine to leave enabled. It permits the OneDrive integration available in Office 2013 and Office 2016 as well as collaboration tools that exist in these Office products. If you do not have Office products installed you will not see this option.
4. At the bottom of the Settings tab is the option to Unlink OneDrive. This tool will cut the cords between your device and OneDrive. To reconnect OneDrive, you will need to go through the setup process all over again outlined earlier in this chapter.
5. A common task with OneDrive is to change which folders are synced with a device. In the Choose Folders tab, select the button Choose Folders to open the same selection window shown back in Figure 22.5.
6. From the Performance tab, you can enable the Improve Upload Speed by Uploading Files in Batches checkbox. This can negatively impact other activities like video streaming when OneDrive is syncing. Otherwise, this is a good feature to leave enabled.
7. Select OK to save any changes and close the Microsoft OneDrive window.
Sharing a File on Your OneDrive
Sharing a file as a link rather than an email has many advantages. Email can be rejected by servers when attachments are too large, and even when a large email makes it to your recipient, the recipient might not thank you for having another attachment in her mailbox. OneDrive makes it easy to share a link to a file that can then be sent by email, posted to a social network site, or sent as a text message.
To generate a link for a file on your OneDrive, follow these steps:
1. Open OneDrive by selecting it from the Start menu or by opening File Explorer and navigating to OneDrive. Locate the folder or file you want to share.
2. Right-click the file or folder to reveal the context menu, as shown in Figure 22.8. Select Share a OneDrive Link.
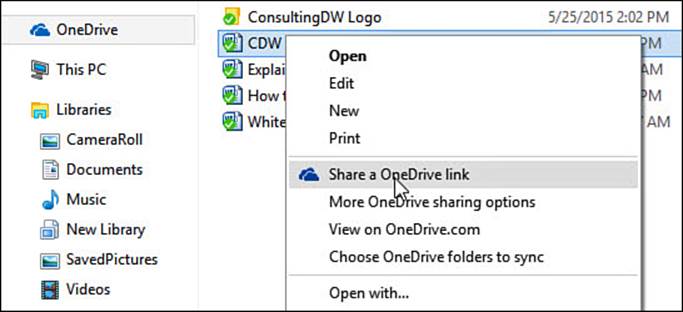
FIGURE 22.8 The context menu includes a tool for generating links to share OneDrive files and folders.
3. After a few seconds a notification will appear letting you know that a link has been prepared (refer to Figure 22.9).
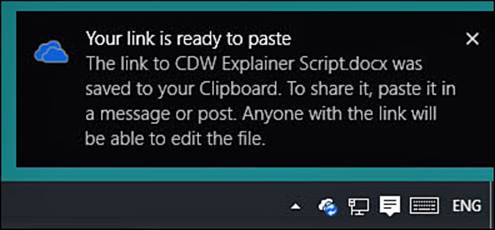
FIGURE 22.9 Windows prepares a link for sharing and stores it in the Windows clipboard ready to paste.
4. Paste the link into an email or a text message to share it.
Figure 22.10 shows an example of what the link would look like. Even though this link grants access to only the document or folder it was generated for, there is nothing to identify who used the link, and it could be shared with anyone. Nothing prevents downloading or editing the files shared in this way. For greater control, you might want to share from the web interface, which will allow you to share with specific email addresses and grant limited access to the file to prevent changes to the original.
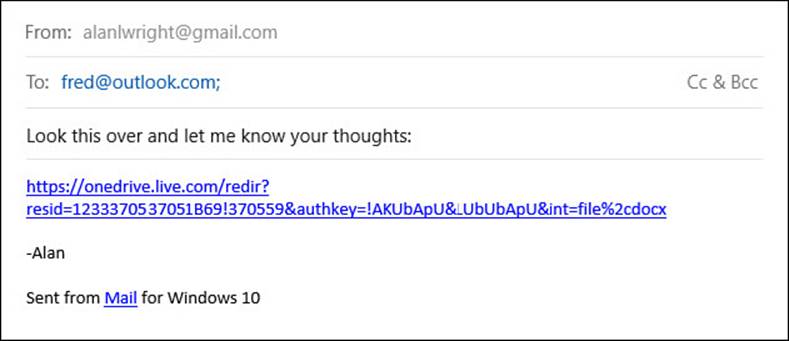
FIGURE 22.10 Sharing a OneDrive link is fast but does not provide access controls.
Note
The yet-to-be-released universal OneDrive app will include sharing tools that will enable you to generate links for sharing limited to specific emails and with limitations on their permissions, such as read-only access.
Viewing OneDrive Status
Storage space is limited on OneDrive. To see how much space you have available, follow these steps:
1. Select the Show Hidden Icons button from the notifications area of the taskbar. Locate and right-click the OneDrive icon (refer to Figure 22.5).
2. Select Manage Storage. Your web browser will open a web page to your online account, as shown in Figure 22.11.
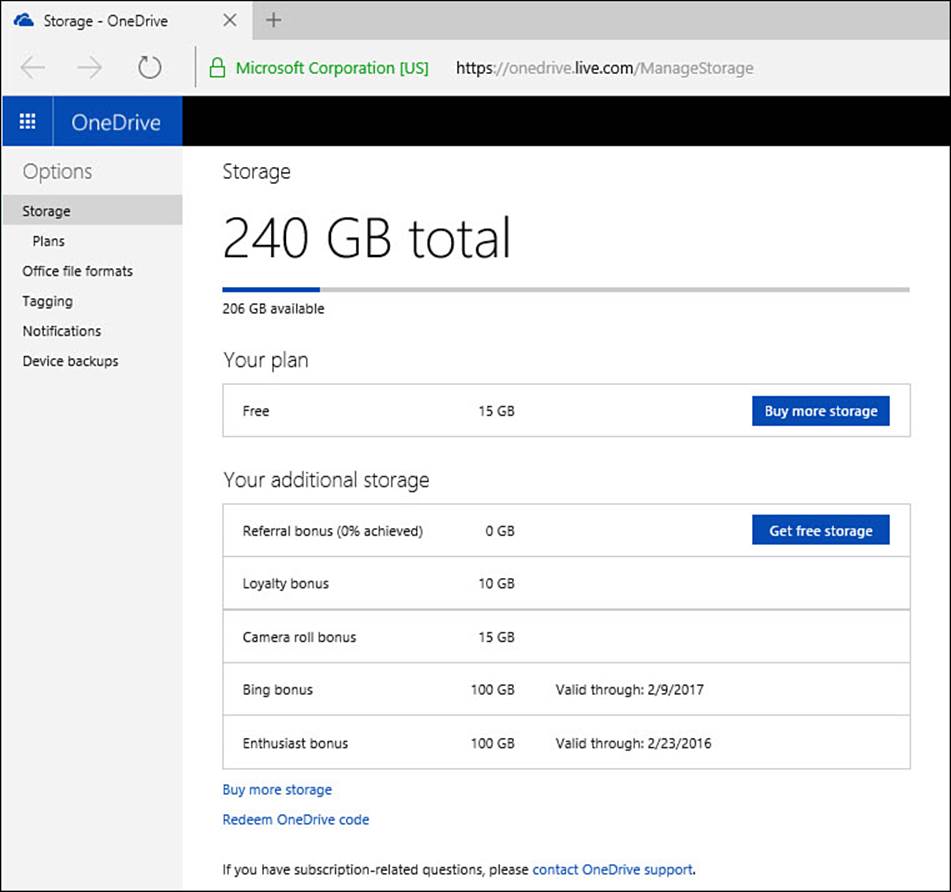
FIGURE 22.11 Check your storage space status using the Manage Storage setting from the OneDrive icon in the notifications area.
3. Your current total storage is indicated, as well as promotions and expiration dates that might be connected to promotional storage space.
4. If you need more space, there is a convenient Buy More Storage button. Select this to see current offers, as shown in Figure 22.12, which include incremental storage plans with monthly rates indicated. You will also see an option for an Office 365 subscription that includes a hefty 1TB of OneDrive storage.
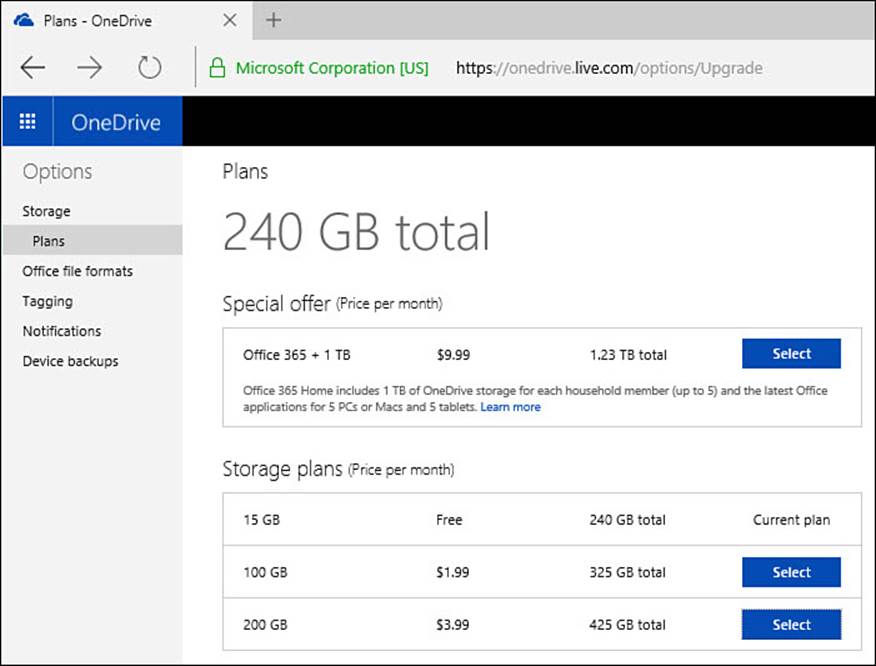
FIGURE 22.12 You can buy additional OneDrive space for a monthly subscription price.
5. Press the Select button for a plan to get more details and confirm payment methods. Select Confirm to proceed or Cancel to stay with your current storage level.
You might hesitate to purchase additional space. Consider a few factors that perhaps will put things into perspective:
• Ease of use—You do not need to carry a flash drive around, and it will be there any time you log in to a computer with your Microsoft account—even if you choose to log in to your Microsoft account from a web browser on someone else’s computer.
• Security—What happens if you lose a flash drive or, worse yet, your laptop? Will you get your data back if your hard drive fails? OneDrive space is encrypted and is backed up on Microsoft servers, so you do not have to worry if a hard drive fails.
• Convenience—By sharing files with other people, you can simplify collaboration and avoid issues with email attachments.
Tip
Before buying additional space, make sure you are wisely using the space you already have. Just because you can save all your music and videos to your OneDrive does not mean it is practical or even a good idea. Things that you share or that need to be highly available should get priority.
Configuring OneDrive Preferences
There are a few settings that enable you to customize how your device uses OneDrive storage; many of these are found in apps that are capable of using OneDrive. You learn about some of these setting in this and the following sections.
Sync Settings with OneDrive
Perhaps the most obvious setting related to OneDrive preferences is how your device preferences can be synced to other Windows 10 devices using OneDrive. This provides many advantages, but there might be times that you do not want changes to one device to influence or change other devices. Although OneDrive is not mentioned in the Settings app in the steps that follow, the mechanism for transferring settings is actually using OneDrive.
To disable this feature, follow these steps:
1. Open the Settings app from the Start menu.
2. Select Accounts.
3. Select Sync Your Settings from the vertical navigation menu, as shown in Figure 22.13.
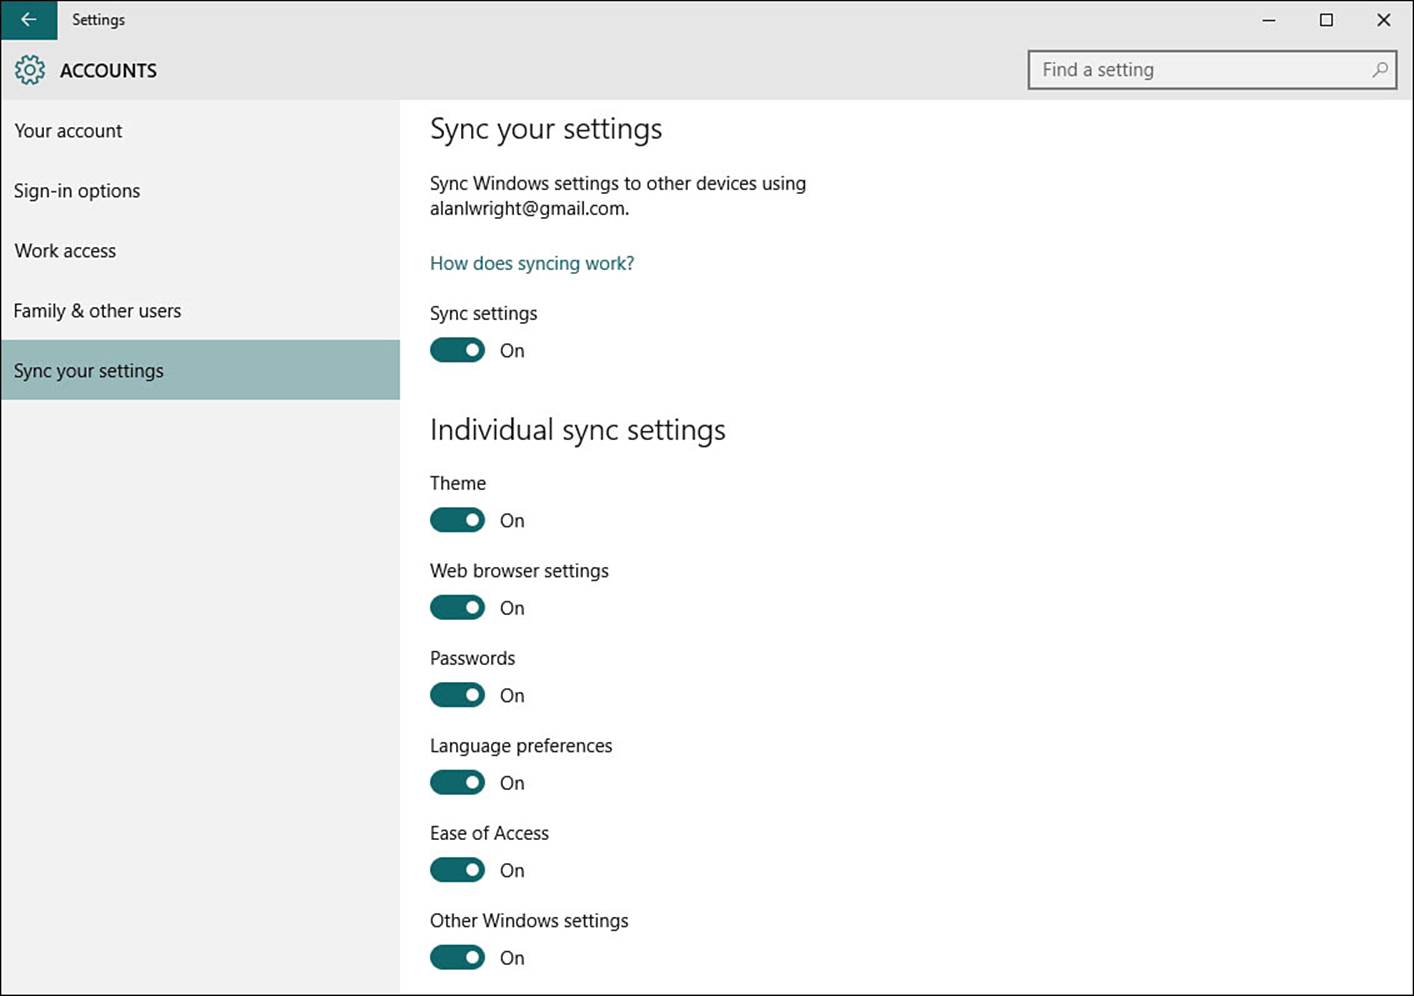
FIGURE 22.13 Disable the synchronization of device settings through OneDrive in the Settings app.
4. Turn Sync Settings to Off to disable this feature entirely. You can leave Sync Settings On and just turn off individual settings if there is a specific change you are trying to avoid.
Using OneDrive in the Photo App
The Photo app is a great app for viewing, editing, and managing your photos. The Photo app is considered in detail in Chapter 26, “Working with Photos in Windows,” but there is a setting related to OneDrive you should be aware of. If you have an Android or iOS device, you might want to install the OneDrive app. You will be able to auto-upload photos from that device to your OneDrive, gaining an extra 15GB of free storage in the bargain, which now gives you a total of 30GB of free storage! The Photo app will look for photos in your OneDrive by default, which automates the process of seeing pictures from your phone on your Windows 10 device.
To manage whether your device looks for pictures on your OneDrive, follow these steps:
1. Open the Photos app from the Start menu.
2. Select the gear-shaped Settings icon to open the Settings pane.
3. Scroll down to show Sources; any current photo sources that the photo app is aware of will be listed. Below this list is a slider switch, labeled Show My Photos and Videos from OneDrive, as shown in Figure 22.14. Slide the switch to Off to disable this feature.
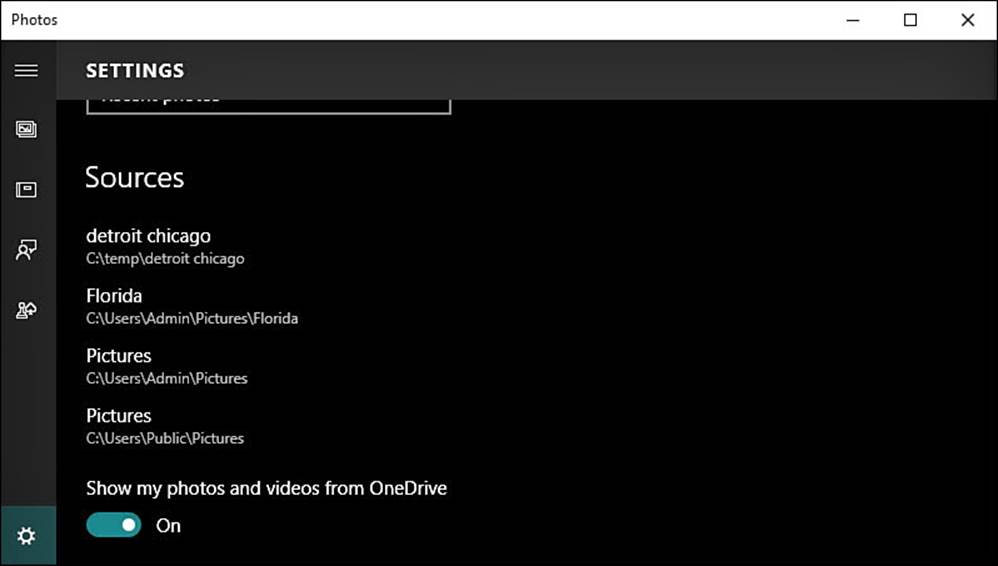
FIGURE 22.14 You can control whether the Photos app sees photos in your OneDrive.
Using OneDrive with the Music App
OneDrive integration in the Groove Music app is a new feature and one that is sure to see improvements with time. OneDrive now includes a special Music folder by default designed to accommodate MP3, M4A (AAC), and unprotected WMA-formatted music files as of the time of this writing. Copy music files to this folder in your OneDrive using the web browser, and it will be seen automatically by the Music app. Songs can then be streamed without downloading them to your Windows 10 device using the Music app.
Tip
You might find that the Music folder is also set to sync to your device. If you do not want to sacrifice local storage space because of a large music collection saved to your OneDrive, remove this folder from the folders that are synced using the steps outlined in the section “Managing Your OneDrive Files,” found earlier in this chapter. You will still be able to stream your music using an Internet connection.
To stream music from your OneDrive music folder, follow these steps:
1. Open the Music app from the Start menu.
2. Select Albums, Artists, or Songs from the hamburger menu to display your music. Select the current Filter option above your music to reveal the drop-down list shown in Figure 22.15. Select On OneDrive to see only music that is in your OneDrive Music folder. You will see a small icon indicating this song or album is available for streaming.
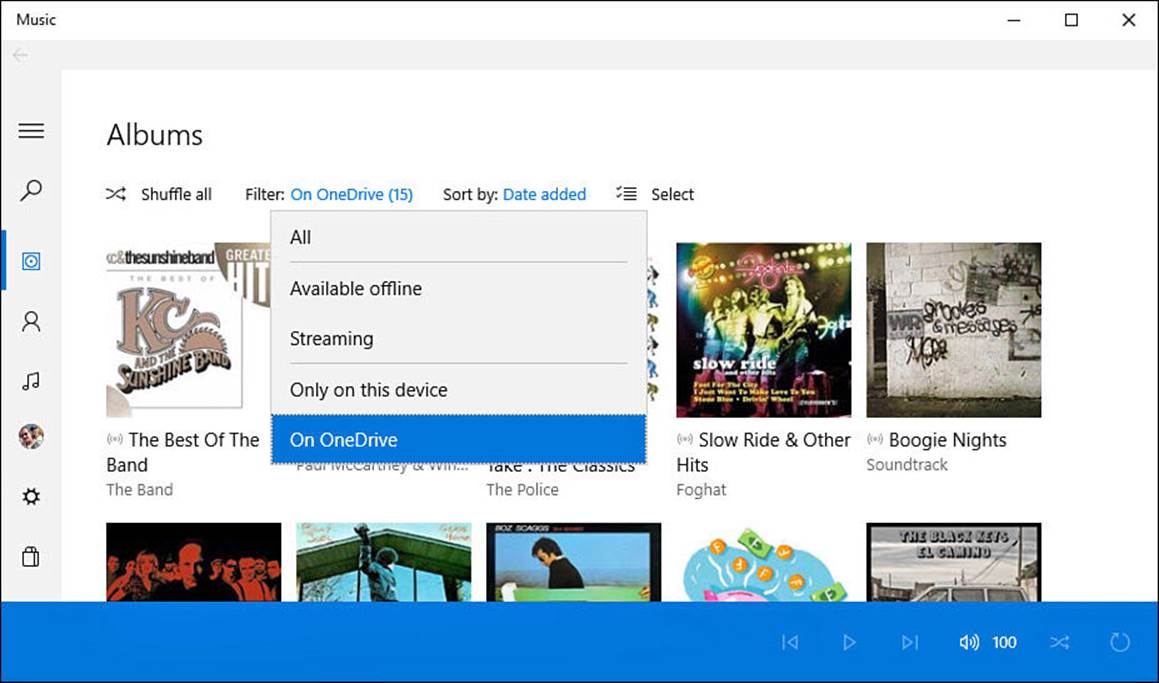
FIGURE 22.15 From the Music app you can stream music that is saved to your OneDrive.
3. To download a song or album from OneDrive to your device for times when you might be offline, right-click the song or album and select Download. The selection will be download to the Music>Xbox Music>OneDrive Cache folder on your device.
4. To hide duplicate songs from your Music collection that are in the OneDrive Music folder, select the gear-shaped Settings icon. Scroll down to the switch under OneDrive and make sure the switch is On for Automatically Clean Up Duplicate Tracks, as shown in Figure 22.16.
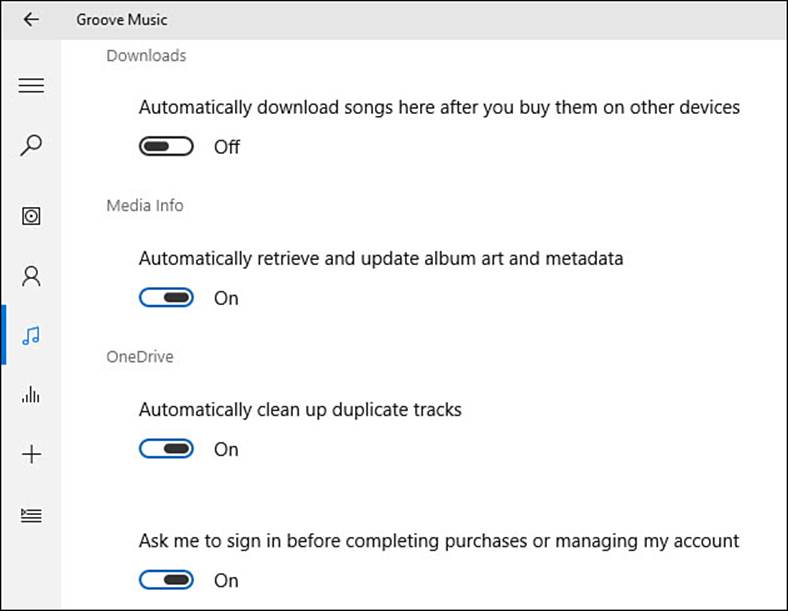
FIGURE 22.16 The Music app can hide duplicate songs when you already have a copy in your OneDrive Music folder.
There are many other features and settings that you can use in the Music app. The Music app is covered in detail in Chapter 26, “Enjoying Music.”
Tip
You can save music to any folder in your OneDrive and then add it to the locations that the Music app monitors for your music.
Caution
If you delete a song from your collection in the Music app that is in your OneDrive Music folder, that song is also deleted from the Music folder and placed in the OneDrive recycle bin where it will remain for 90 days before disappearing.
Managing Metered Connections Considerations
Occasionally, I am out on the road and I will share the Internet from my smartphone. This enables me to use a process called tethering to connect to the Internet with my laptop and tablet using the same cellular Internet connection my smartphone uses. This is handy, but depending on your plan, it could quickly suck up your monthly data allotment. I exceeded my quota for the month the first time I used it because my older Windows laptop downloaded a bunch of updates, and I didn’t notice what was happening in the background until it was too late. This illustrates why it’s important that you protect your more costly connections to the Internet from unnecessary data consumption. OneDrive is certainly another factor that can increase your data consumption with updates and syncing taking place behind the scenes.
Another factor could be bandwidth. Hotels can be terribly slow and stingy with “free Wi-Fi,” and I have friends who still live with dial-up connections. If you have a slow connection, you might need to consider what type of data gets priority when you connect to the Internet.
Microsoft uses the term metered Internet connection to refer to a connection that has restrictions on data, especially related to quotas or limits. Fortunately, Windows enables you to categorize a connection as metered, which in turn lets Windows know that lower-priority data such as updates and some OneDrive tasks should be postponed until using a nonmetered connection. Some apps that use OneDrive can indicate that you are on a Limited Network while you work from a metered connection.
To mark a Wi-Fi network connection as metered, follow these steps. (You must be connected to the Wi-Fi connection to indicate that it is metered.)
1. From the Start menu, select the Settings app, and then select Network & Internet.
2. Under Wi-Fi, make sure that you are connected to the network connection you intend to modify. Select Advanced Options from the bottom of the Wi-Fi list.
3. Above the properties for the current network you will see a switch for Metered Connection, as shown in Figure 22.17. Slide the switch to On to mark it as a metered connection.
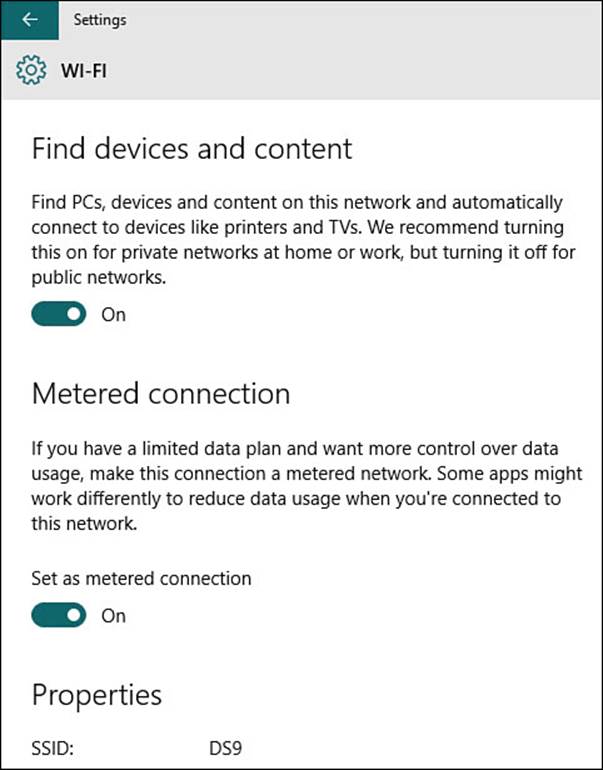
FIGURE 22.17 Make sure you identify a network as metered if you are concerned about data consumption.
Troubleshooting OneDrive Issues
OneDrive is so integrated into Windows 10 that you might forget you are connected to cloud-based storage until things go wrong. Most OneDrive issues are related to what happens to files on your device while you are offline or when the same file is being accessed in two places at once. Perhaps a filename has changed or you have moved or modified a file. Syncing may have been interrupted. All these factors can contribute to an alert that appears in the notifications area letting you know that there is a problem with a file (see Figure 22.18).
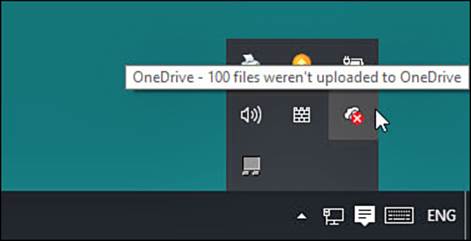
FIGURE 22.18 The OneDrive icon in the notifications area can alert you to sync problems and help you resolve them.
To look at sync issues and try resolutions, follow these steps:
1. From the notification area, select the Show Hidden Icons button and then right-click the OneDrive icon (refer to Figure 22.5).
2. Select View Sync Problems. If this option is grayed out, then good news—you have no sync problems to resolve.
3. The Microsoft OneDrive window will open, as shown in Figure 22.19, with filenames and folder names, error messages, and proposed resolutions.
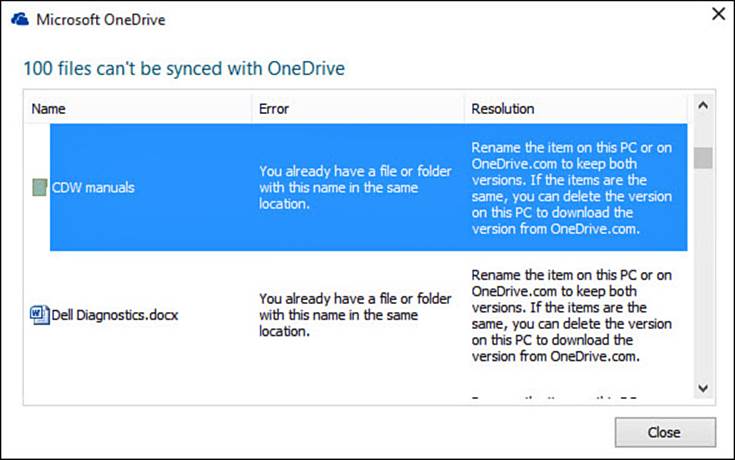
FIGURE 22.19 OneDrive will propose solutions and help you troubleshoot sync issues.
4. Select the entry to open File Explorer, where you can implement the proposed resolution.
Other factors that could cause problems include
• OneDrive currently has a file size limit of 10GB.
• When updates are not appearing, check to see whether you are using a metered connection that is preventing sync.
• The filename may be an issue if it contains certain characters. Change the name of the file so that it doesn’t begin or end with a space, end with a period, or include any of these characters: / \ < > : * ” ? |
• The file path might be too long. The entire path, including the filename, must contain fewer than 255 characters.
• Missing files can be the result of accidental deletion by you or someone sharing a folder. Check the Recycle Bin and restore the file if it is there. Files are retained up to 90 days.
• Verify that you have the latest Windows updates installed.
The Absolute Minimum
• OneDrive is an integral part of Windows 10. Take some time to open your OneDrive and add files and folders.
• You can check your available drive space and even purchase additional OneDrive space by opening OneDrive in your web browser.
• Using the OneDrive app, you can add files, create and manage folders, and delete files.
• Use selective sync to control which folders are available offline and to control how much space your OneDrive files take up on your local device.
• Look for settings in Windows apps that manage how OneDrive is used.
• Check your settings for metered connections, and tag connections as metered if data consumption is a concern.
All materials on the site are licensed Creative Commons Attribution-Sharealike 3.0 Unported CC BY-SA 3.0 & GNU Free Documentation License (GFDL)
If you are the copyright holder of any material contained on our site and intend to remove it, please contact our site administrator for approval.
© 2016-2026 All site design rights belong to S.Y.A.