Windows 10. Absolute Beginner’s Guide (2016)
Part IV: Having Fun
23. Working with Photos in Windows
In This Chapter
• Using the Photos App
• Browsing Through Pictures Using the Slide Show
• Editing Your Pictures in the Photos App
• Organizing Your Pictures
• Using the Camera App
It’s nearly impossible to find people who take photos with film anymore. The moment it became cheaper and easier to snap shots on a digital camera, store pictures on a computer, make excellent prints on affordable consumer printers, and share photos on the Internet, film cameras were obsolete. Windows 10 makes it easy to view and edit pictures you have shot and even share photos by email or to other apps. The Photos app has been designed to do more than showcase your photos; it includes tools for managing your photos and editing tools that are noteworthy and worth exploring. This chapter covers the basics of the app, how to access editing tools, and how to manage your photo collection.
We will also look at the Camera app included with Windows 10. Even though this app is pretty straightforward, it adds an important element to devices equipped with a webcam or camera.
You might find it useful to understand Libraries and how to control what is included in a Library by reviewing Chapter 21, “File and Folder Basics.”
Using the Photos App
Everyone likes to look at their digital photos and share their pictures with others. For many, it’s a race to get home from an event to load photos onto a computer and then upload them to a website for others to enjoy. Those with smartphones can upload photos right away so that the entire world can get instant visual updates of what happens. The Photos app provides an easy-to-use hub for your digital pictures and videos with features designed to enhance your photo viewing experience. Keeping with design principles found throughout Windows 10, the focus remains on your photos; tools and menus are hidden or minimized until needed.
To open the Photos app, select the Photos tile from your Start menu. If you cannot locate that tile, start entering the word “photos” into the Search bar next to the Start button. Select the Photos tile from the list of results. After you do so, the Photos app will open, as shown in Figure 23.1. It quickly analyzes your device for any new photos that have been added since it was last used.
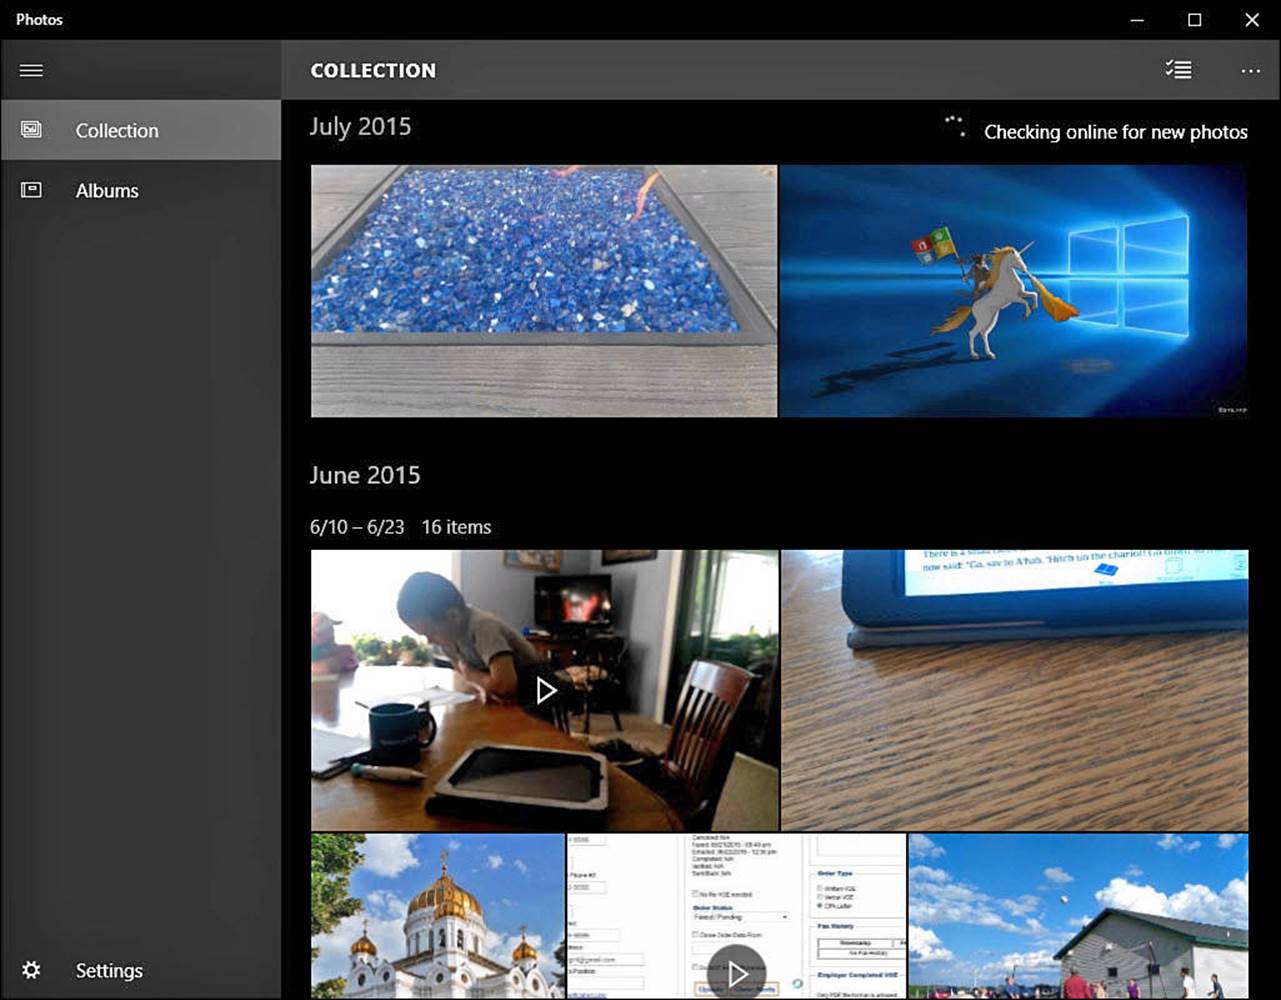
FIGURE 23.1 The Photos app enables you to view your pictures stored in the Pictures library.
The capabilities and features in the Photos app might seem limited compared to some of the applications available in the Windows Store; you can find applications that create fancier slideshows or ones with professional tools for editing photos. However, the ease of use of the Photos app can’t be challenged. If you’re more dedicated to photography and working with photos, the app can still be used as a streamlined, simple, central library for your photos, enabling you to leverage other applications to do the interesting work.
Viewing Your Collection
The Photos app presents you initially with a collection of large thumbnails of photos and videos that are located in your Pictures library. You can either import or add pictures to your Pictures folder or add folders to your Picture library so the Photos app will see them. If you are logged in to your device with a Microsoft account, you also might see pictures from your OneDrive, which are included by default. All pictures are grouped by date to help you easily navigate through all your pictures with no reference to folder.
To look at a specific photo, simply select it from the Collection. The photo will fill the window, as shown in Figure 23.2. A toolbar will be visible across the top with tools that can be used when viewing a photo.
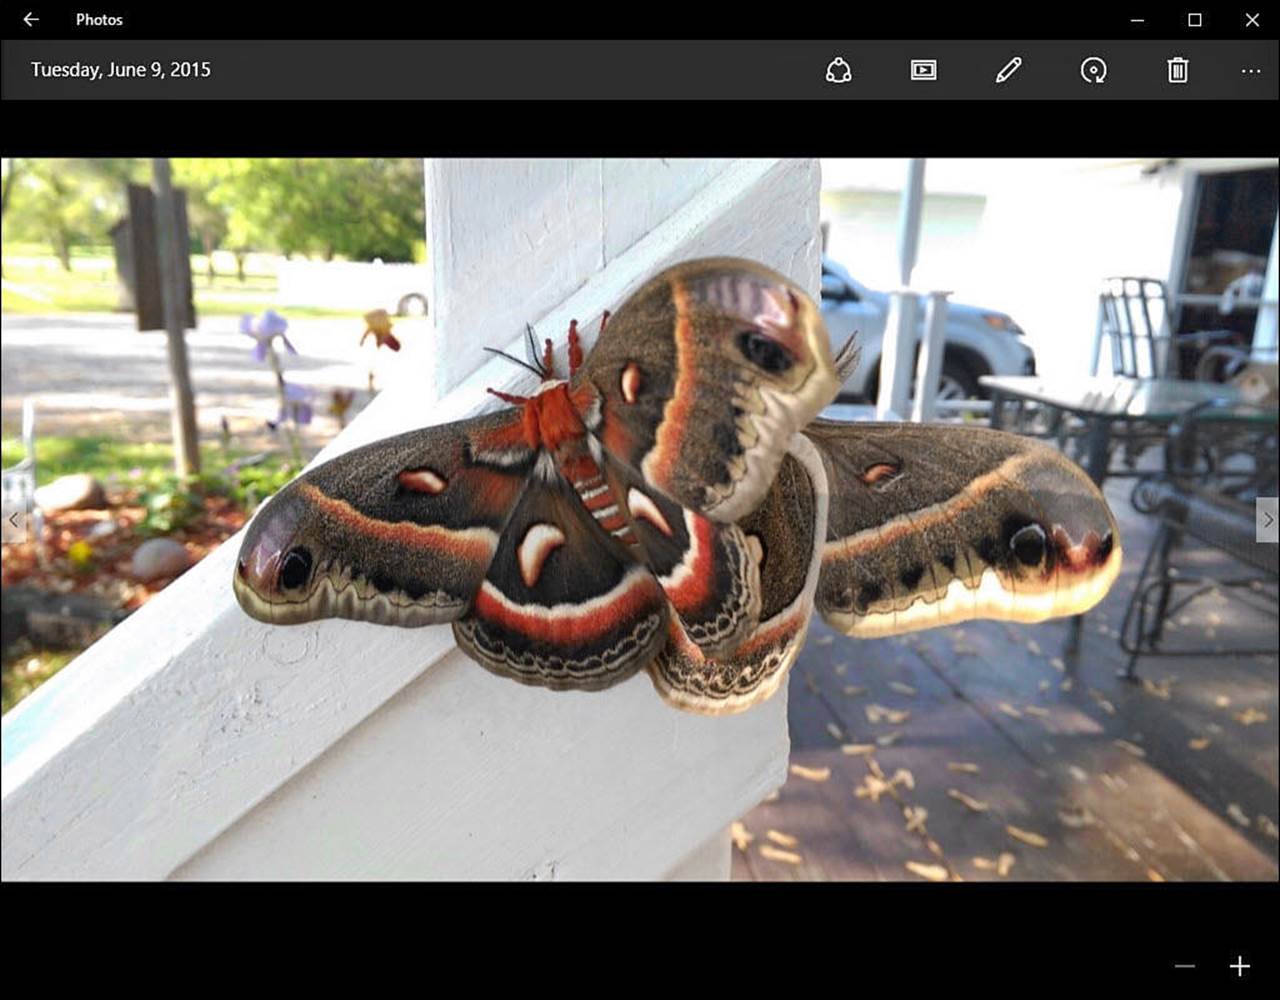
FIGURE 23.2 Selecting a photo in the Photos app lets you view the photo with no screen clutter.
Navigation is intuitive within the Photos app. Scroll using a mouse, swipe left or right with a touchscreen, or select the arrows that appear at the middle of the left or right edges of the photo. To reveal additional options available for a photo, select the ellipsis (...), as shown in Figure 23.3, to expand the upper toolbar. Return to the initial Collection view of the Photos app by selecting the back arrow located to the far left on the title bar or down on the taskbar if using a touchscreen device.
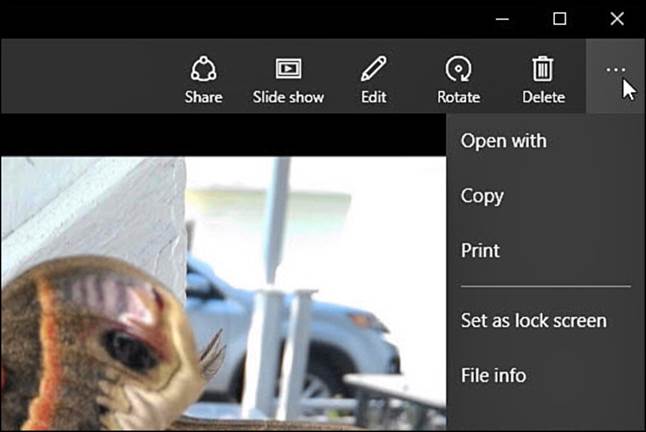
FIGURE 23.3 Essential tools are revealed when selecting the ellipsis on the toolbar while viewing a specific photo.
When you are looking at a photo, several tools are available on the toolbar:
• Share—Share opens a Share pane that will offer apps designed to accept photos. Figure 23.4 shows the Share pane for a photo that offers to open the photo in several apps, including a few social media apps.
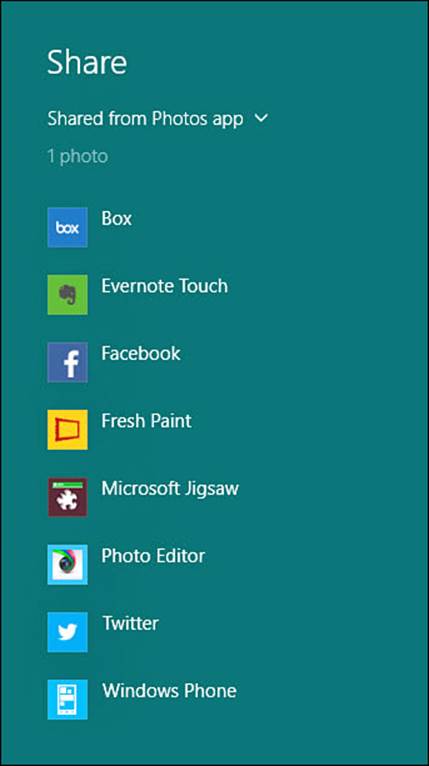
FIGURE 23.4 You can select Share to send your photos to other apps for a variety of reasons.
• Slide Show—Slide show will initiate a full-screen slideshow starting with the current photo that will run until interrupted by selecting somewhere on the screen.
• Edit—Edit opens the photo in the edit interface surrounded by a number of tools that enable you to tweak the current image properties. Edit is discussed in more detail later in this chapter.
• Rotate—Rotate will rotate a photo 90° clockwise each time it is selected.
• Delete—Delete asks you to confirm a deletion if it’s selected. Select Delete to remove a picture from your device or Cancel to change your mind.
• Open With—Select Open With to open this photo in another application that can work with images. A pop-up window will appear with a list of applications to choose from.
• Copy—Select Copy to add the picture to the Windows Clipboard. You can then paste the picture into another application.
• Print—Select Print to hand the picture over to Windows to print. A print window will open and allow you to control how the picture is printed, as shown in Figure 23.5.
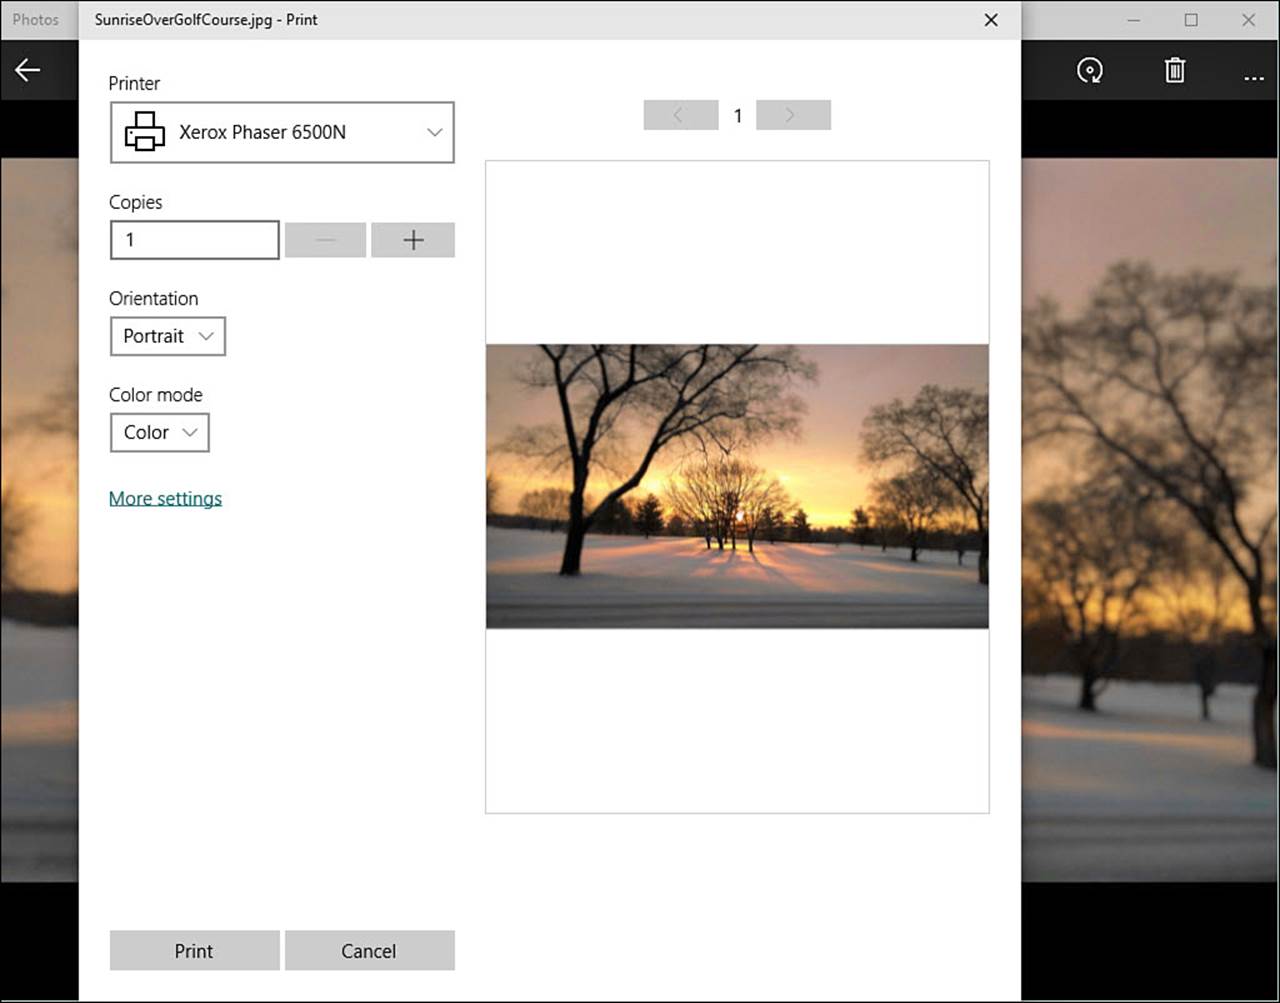
FIGURE 23.5 Send pictures to your printer by selecting Print from the Photos app.
• Set as Lock Screen—Set as Lock Screen will replace the current choice your device has for an image that is displayed when the device is not in use. Lock screen options are considered in more detail in Chapter 8, “Tweaking Windows to Reflect Your Personality.”
• File Info—As shown in Figure 23.6, File Info will show details regarding the photo, including size, resolution, and even the device that took the photo. Scroll up or press Esc to return to the photo.
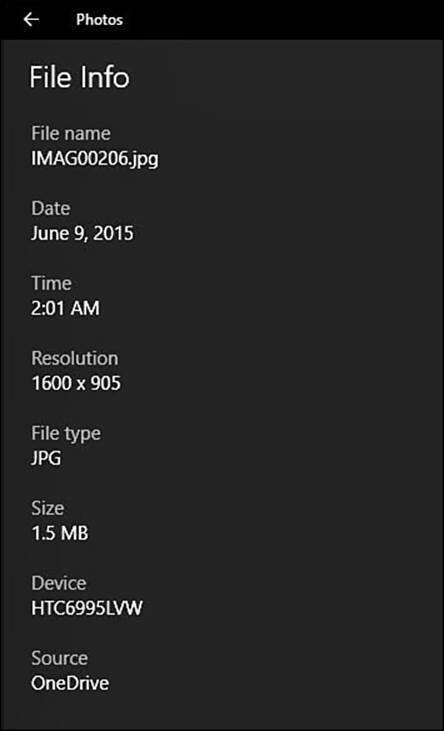
FIGURE 23.6 File information can be viewed when looking at photos in the Photos app.
The Windows Photo Viewer
The Windows Photo Viewer has been around for years (a version was included with Windows XP), and it is still a handy way to quickly view an image file, browse through images in a folder, or even run a quick slideshow for a folder full of images. By default, if you are viewing image files in File Explorer, the Photos app is used to open the image file when double-clicking or using the Open command from the context menu for an image file. If you would rather use the Windows Photo Viewer to view images from File Explorer, just right-click (tap and hold on a touchscreen) and select Open With from the context menu; then select Windows Photo Viewer to open the image with the Windows Photo Viewer application.
Using Albums
Albums is a new feature that provides a way of grouping your photos (and videos) in an attractive way; Windows will actually analyze your photos and create albums for you automatically. Photos are dynamically enhanced when viewing. To view the albums currently available on your device, select Albums from the hamburger menu. As shown in Figure 23.7, photos that share common dates appear grouped together into albums with the date as a title.
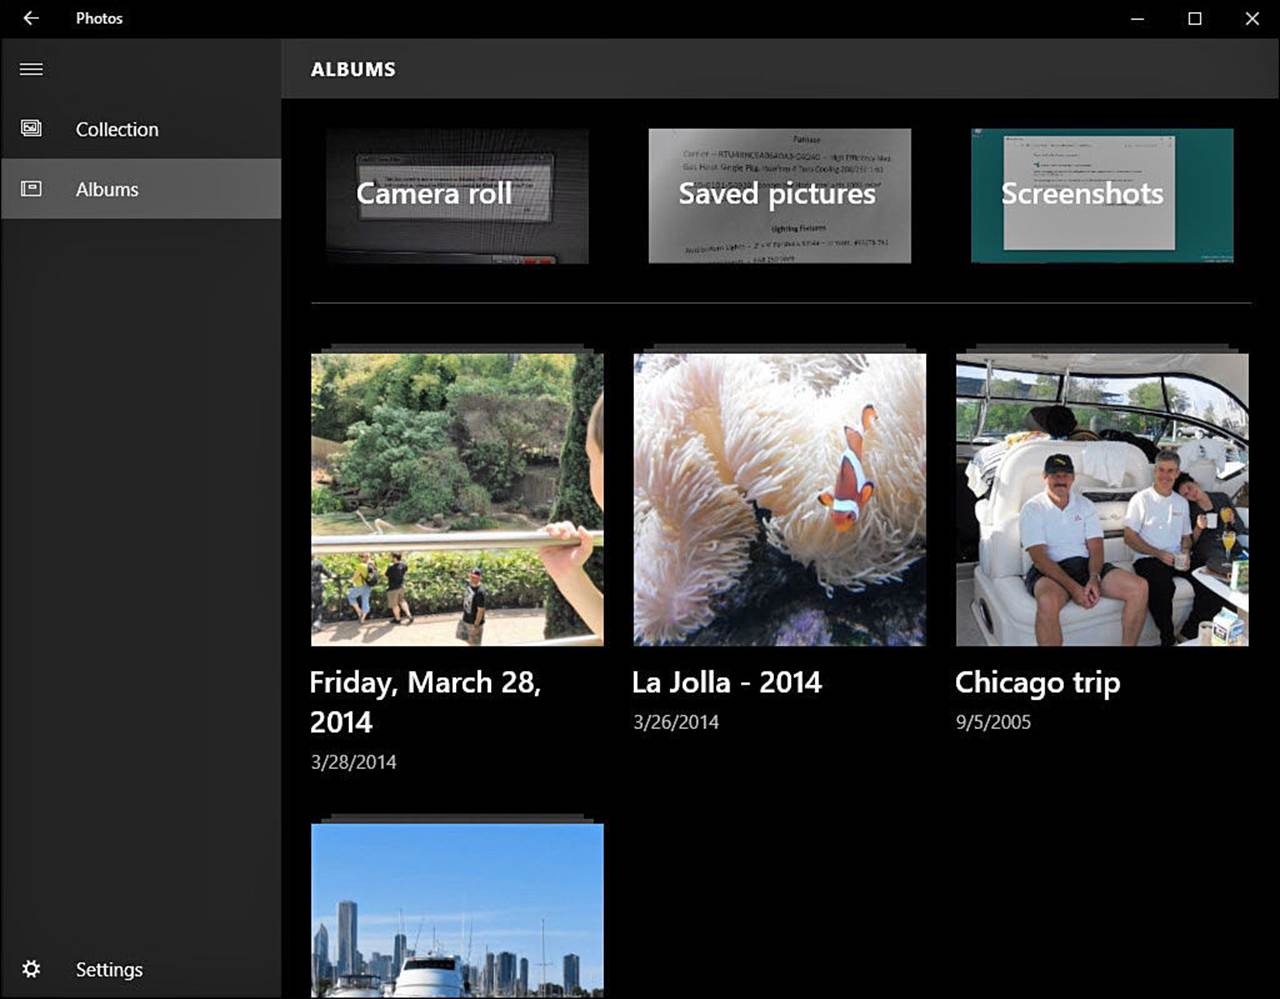
FIGURE 23.7 Select Albums to view grouped photos available on your device.
To view an album, simply select it, and the album is displayed as shown in Figure 23.8. A cover photo is shown, sometimes referred to as a hero image, which is used to represent the album with smaller thumbnails of other photos that are currently in the album shown below. Select a photo in the album, and the photo will fill the window. While you’re viewing individual photos in your album, the same tools are available that you would see when viewing a photo from the collection (refer to Figure 23.3)—the exception being that the Slide Show will show only pictures from the album.
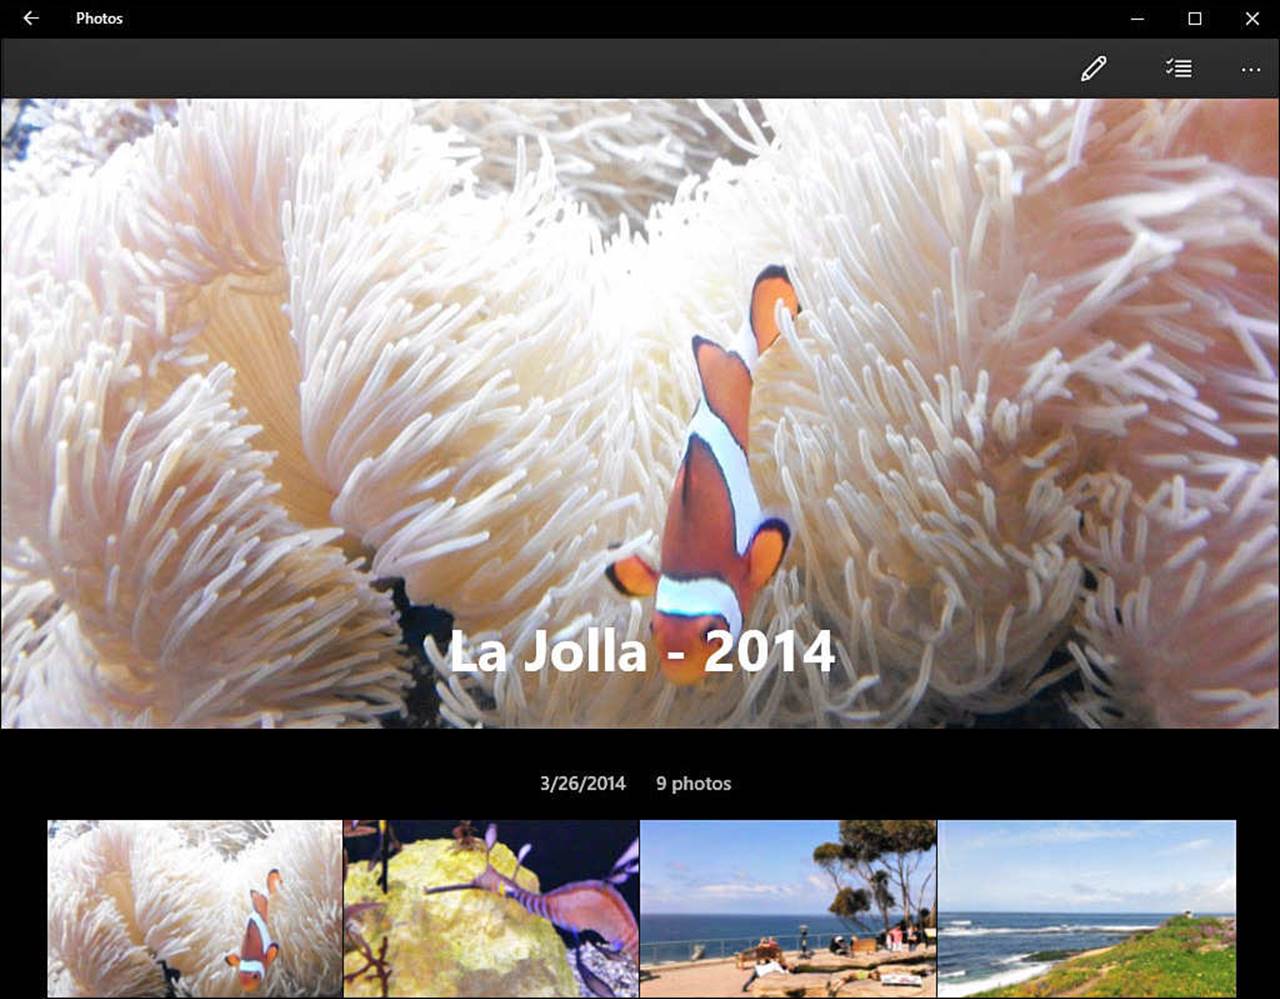
FIGURE 23.8 Albums provide a new and attractive way to organize and present your photos.
Albums can be edited in a couple of ways, allowing you to change the photos that are included or to change the cover photo and title for the album. To edit an album, follow these steps:
1. To simply edit the photos included in an album, you can scroll to the bottom of the album and select the box Add or Remove Photos. (This choice is also available in step 3 when selecting Edit.)
2. A mosaic of available photos will be shown, and photos that are currently included in the album will be outlined and marked with a checkmark. Add or remove photos from the album by simply selecting them. When finished, select the checkmark to make the changes or select the Xto cancel any changes (see Figure 23.9). You are returned to the album view.
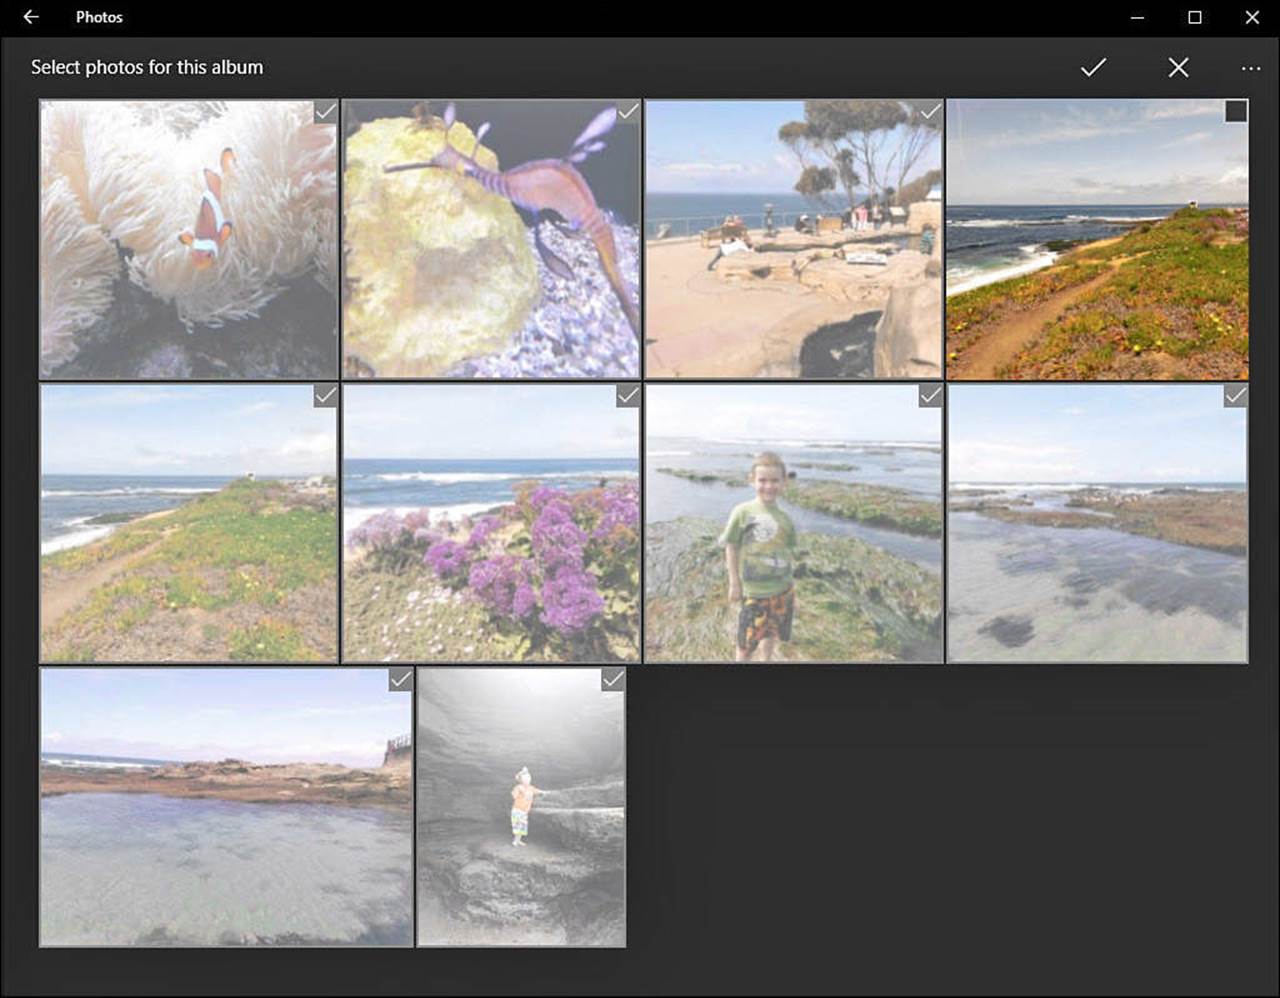
FIGURE 23.9 Adding photos to or removing photos from an album is easy.
3. To change the title or cover photo, select the Edit tool from the upper menu bar of the Photo app (represented by a pencil). The edit options in Figure 23.10 will be shown.
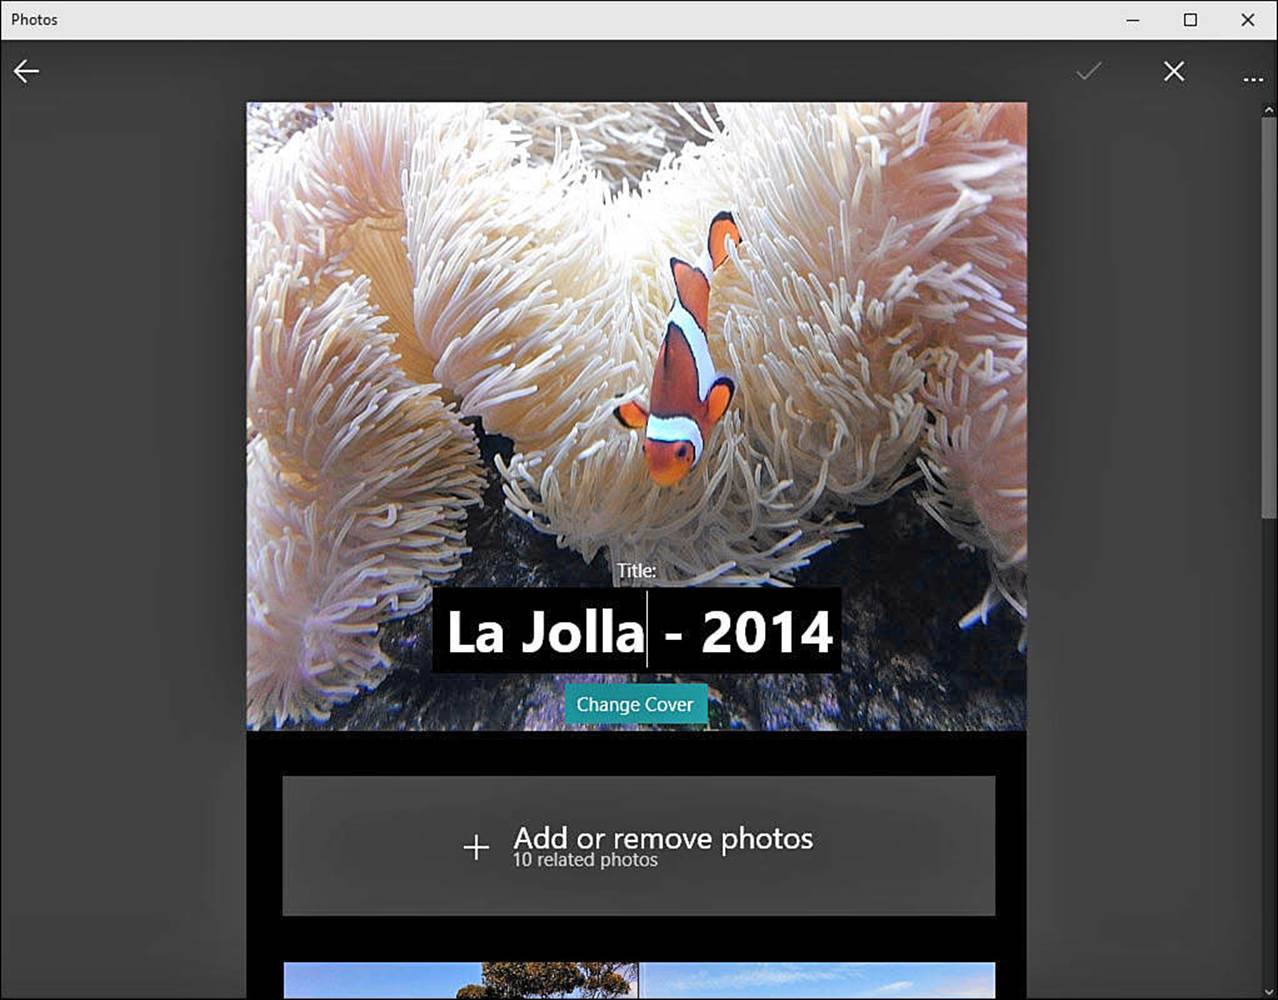
FIGURE 23.10 Customize the appearance of albums by changing the Title and Cover photo.
4. Select the text box of the current title to make changes to the title. After making your changes, select the checkmark to make the changes or select the X to cancel any changes
5. To change the cover photo, select the Change Cover button. The images of the current album are displayed, and whichever photo is selected is the cover photo. Make any changes here; then select the checkmark to apply the change, or select the X to cancel any change. You are returned to the edit options from step 3.
6. When finished, select the checkmark to make the changes or select the X to cancel any changes. You are returned to the album view.
 Note
Note
Albums is a new feature that is intended to sync across your devices using the power of OneDrive. The Photos app can create albums from OneDrive photos, and these albums will be seen by other Windows 10 devices such as a Windows phone or Xbox One. This creates a nice sense of continuity and can make it more rewarding when taking the time to customize your albums.
Tweaking the Photos App with Settings
The Photos app has a few important settings you should be aware of. Most casual photographers should appreciate the auto-enhance feature that can straighten and correct photos for viewing. Some individuals such as professional photographers might not want subtle changes being applied to their work. This is just one of the settings you can control in the Photos app.
To change your settings within the Photos app, follow these steps:
1. Select Settings from the hamburger menu of the Photos app. The app opens to Settings, as shown in Figure 23.11.
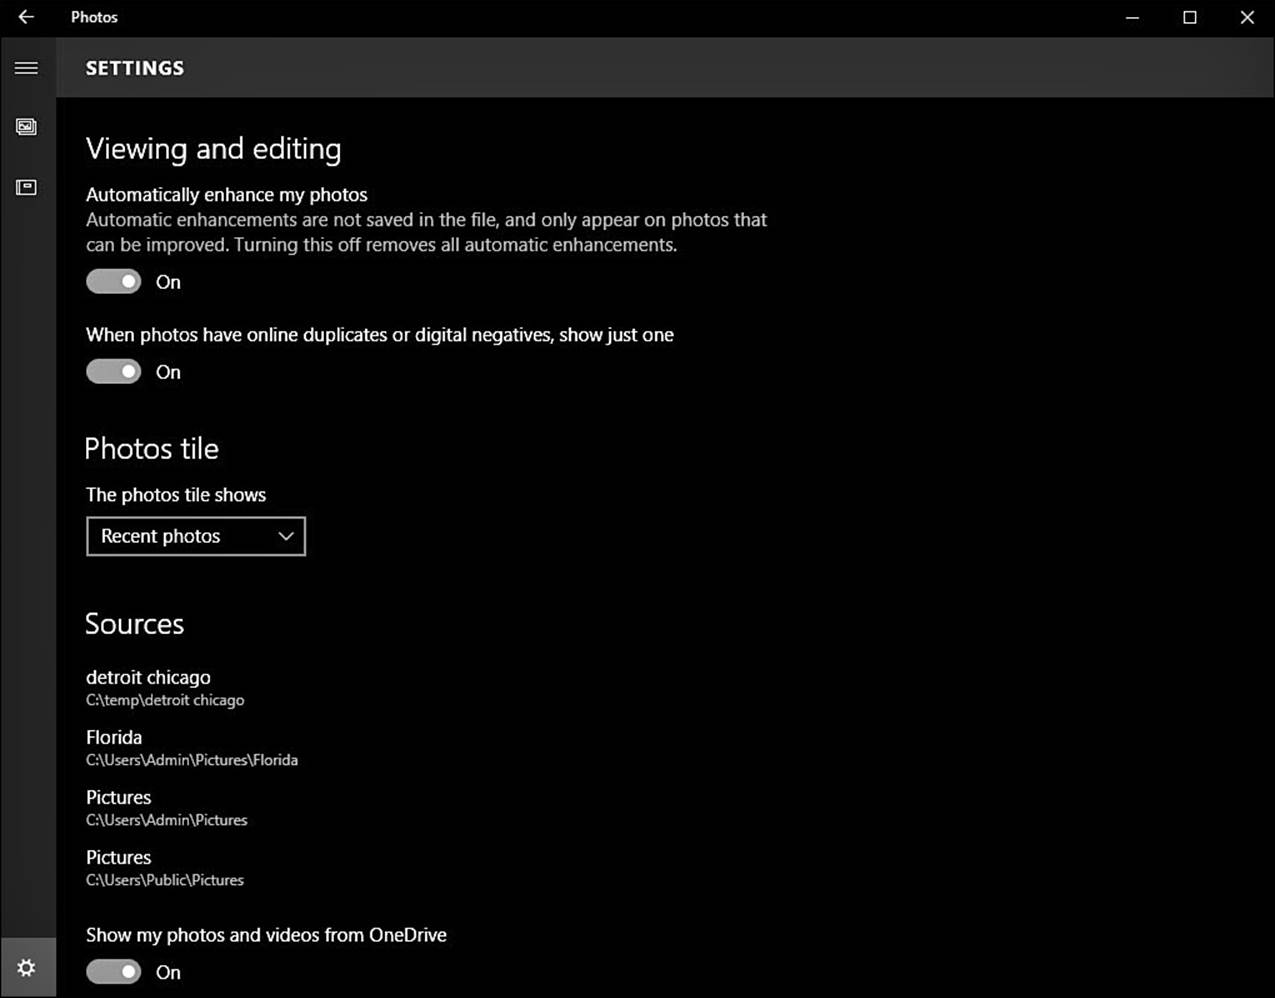
FIGURE 23.11 The Photos app has its very own Settings tools you can tweak.
2. Under Viewing and Editing, slide the switch for Automatically Enhance My Photos to Off if you do not want any enhancements to be applied.
3. I recommend that you leave the next switch enabled. The Photos app will try to filter out duplicate photos that might have been added over time to a large collection of photos. To prevent this default action, slide the switch When Photos Have Online Duplicates or Digital Negatives, Show Just One to Off.
4. Under Photos Tile, select the drop-down menu to change how your Photos app tile appears in the Start menu. By default, the live tile will flip through Recent Photos. You can assign a specific photo to appear on the tile by selecting A Single Photo. A Choose Photo option appears, and you can select a photo using File Explorer. (If you wish to disable Live tile, right-click the actual tile in the Start menu and select Turn Live Tile Off).
5. Under Sources, information is provided regarding the current photos, sources that the Photos app is monitoring. Any folders that have been added to your Pictures library on the device will appear here. To change the folders that the Photos app sees, add them to your Pictures library. Adding folders to libraries is examined in Chapter 21.
6. The last setting shown here is a switch labeled Show My Photos and Videos from OneDrive. This is enabled by default and will work at adding everything that is in your OneDrive camera roll to the Collection and Albums. Although this is generally a nice feature, you might prefer to not include OneDrive photos for a variety of reasons. If this is the case, simply slide this switch to Off.
Note
OneDrive options are available only when using a Microsoft account.
Editing Your Photos
Besides viewing and managing your photos, it is important to have a reliable way to edit photos. The Photos app has you covered. Some powerful tools are built in to the Photos app and are sure to please the casual photographer. This is certainly no replacement for high-end photo editing software, and it is unfair to compare it to more expensive (and complicated) applications dedicated to photo editing. When considering the ease of use and the fact that it is included in Windows 10, you might not ever need to install additional apps for working with your photos. Several categories of tools are included in the Photos app, including Basic Fixes, Filters, Light, Color, and Effects.
Let’s take a closer look at the tools included in the Photos app for editing.
To edit a photo in the Photos app, follow these steps:
1. With a photo open in the Photos app, select Edit from the upper toolbar (refer to Figure 23.3). The app opens the original unenhanced photo in the Edit workspace, as shown in Figure 23.12.
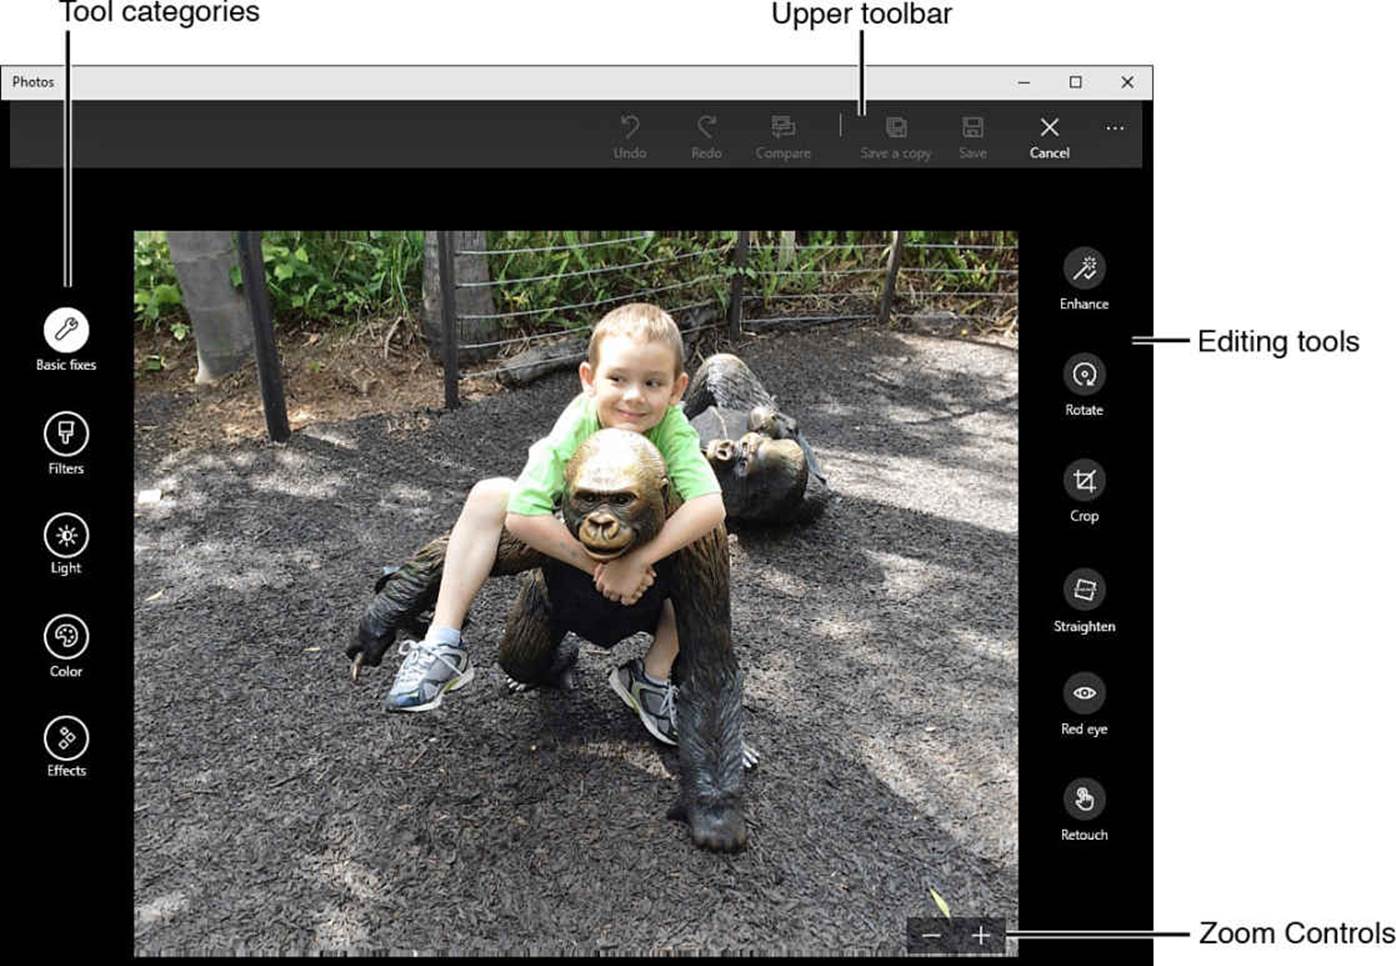
FIGURE 23.12 The Photos app includes a nice variety of basic editing tools.
2. Take a moment to familiarize yourself with available tools shown here. Editing tool categories are located to the left of the photo, while individual tools belonging to the selected tool category are shown to the right. There is an upper toolbar with several more icons. Selecting the ellipsis (...) on the upper toolbar reveals the names for the icons: Undo, Redo, Compare, Save a Copy, Save, and Cancel. In the lower-right corner of the photo, zoom controls are available using the - and + symbols. The zoom controls will autohide until moving the cursor or selecting the photo.
3. Select the Basic Fixes category to access the most commonly used tools for correcting a photo:
• Select Enhance to allow the Photo app to determine which set of adjustments to apply to a picture.
• Select Rotate to rotate the photo 90° in a clockwise rotation with each click.
• Select Crop to zoom into the photo with touch-friendly controls so that you can select and drag the corners of the area to crop. A grid is provided to give you a sense of proportions. From the upper toolbar, while using the Crop tool, you can also select from preset crop sizes (seeFigure 23.13).
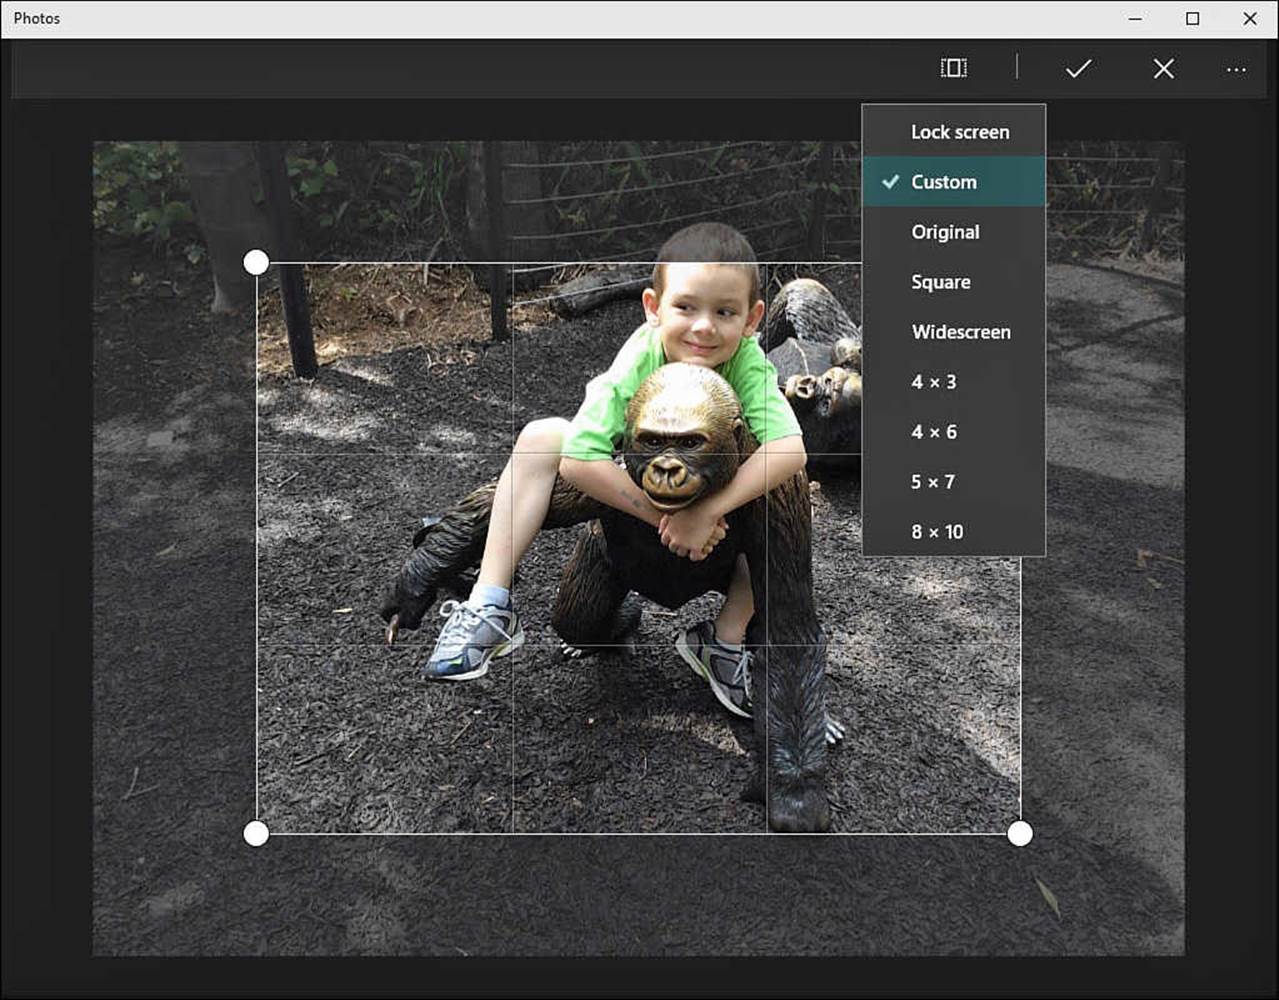
FIGURE 23.13 Crop tools in the Photo app are easy to use and take all guesswork out of getting the correct size.
• Straighten enables you to rotate a photo gradually using a radial control. A useful grid is overlaid that helps you to orient objects such as the horizon in the photo.
• The Red Eye tool presents a small shaded area that follows the cursor. This lets you see the area to which it will be applied. To better control the area of application, zoom into the photo using the zoom control to the bottom right of the photo.
• The Retouch tool is easy to use. A shaded area will follow the cursor until you select a spot in the photo. The Photo app will magically remove blemishes and spots that might mar an otherwise perfect photo. Again, you will have better control when zooming into the photo. This tool works very well.
4. Select the Filters category and use the filters that appear to the right of the photo to apply the filters to your photo. These will adjust the saturation of colors and even convert the photo to black and white. This is where the Compare tool comes in handy. You can select Compare in the upper toolbar to toggle the filter effect on and off when evaluating a filter effect.
5. Select the Light category, and then select Brightness, Contrast, Highlights, or Shadows from the tools that appear to the right of the photo. Each tool uses a touch-friendly radial slider to increase or decrease each property by values ranging from 100 to -100.
6. Select the Color category, and then select Temperature, Tint, or Saturation from the tools that appear to the right of the photo. Each tool uses a touch-friendly radial slider tool to increase or decrease each property by values ranging from 100 to -100.
7. To exaggerate or remove a color, use the Color Boost tool also located in the Color category. Select and drag the Color Boost tool into the photo, or simply select a spot on the photo to have the tool jump to that location. As it moves, you will see the color picker display the color currently selected in the photo. After you have selected the color you would like to boost, use the radial slider control to heighten or diminish the color from all areas of the photo, as shown in Figure 23.14. This tool also works very well.
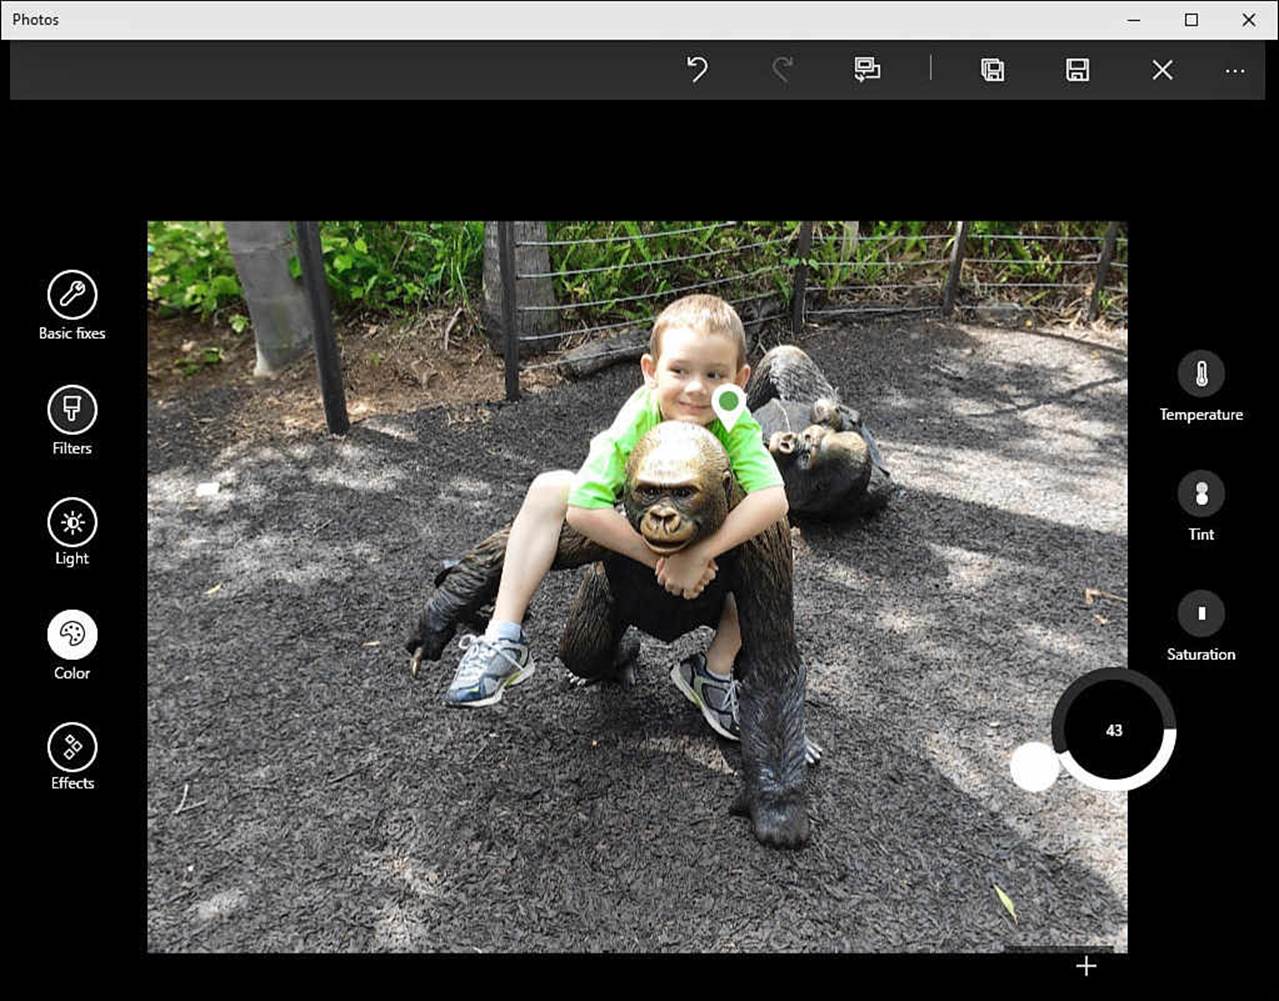
FIGURE 23.14 Color Boost is an easy-to-use tool to increase or remove a color from a photo, adding that dramatic look.
8. Select the Effects category to apply a couple professional effects to your photos. Select Vignette to darken or lighten the outer area of the photo using a radial slider control.
9. To apply a tilt shift focus effect, select the Effects category and then Selective Focus. As shown in Figure 23.15, an area of focus is overlaid on the photo with touch-friendly control points. Drag the focus area to the desired location and shape. From the upper toolbar, while using the Selective Focus tool, you can select the Blur tool to manage the strength of the blur effect outside of your focus area.
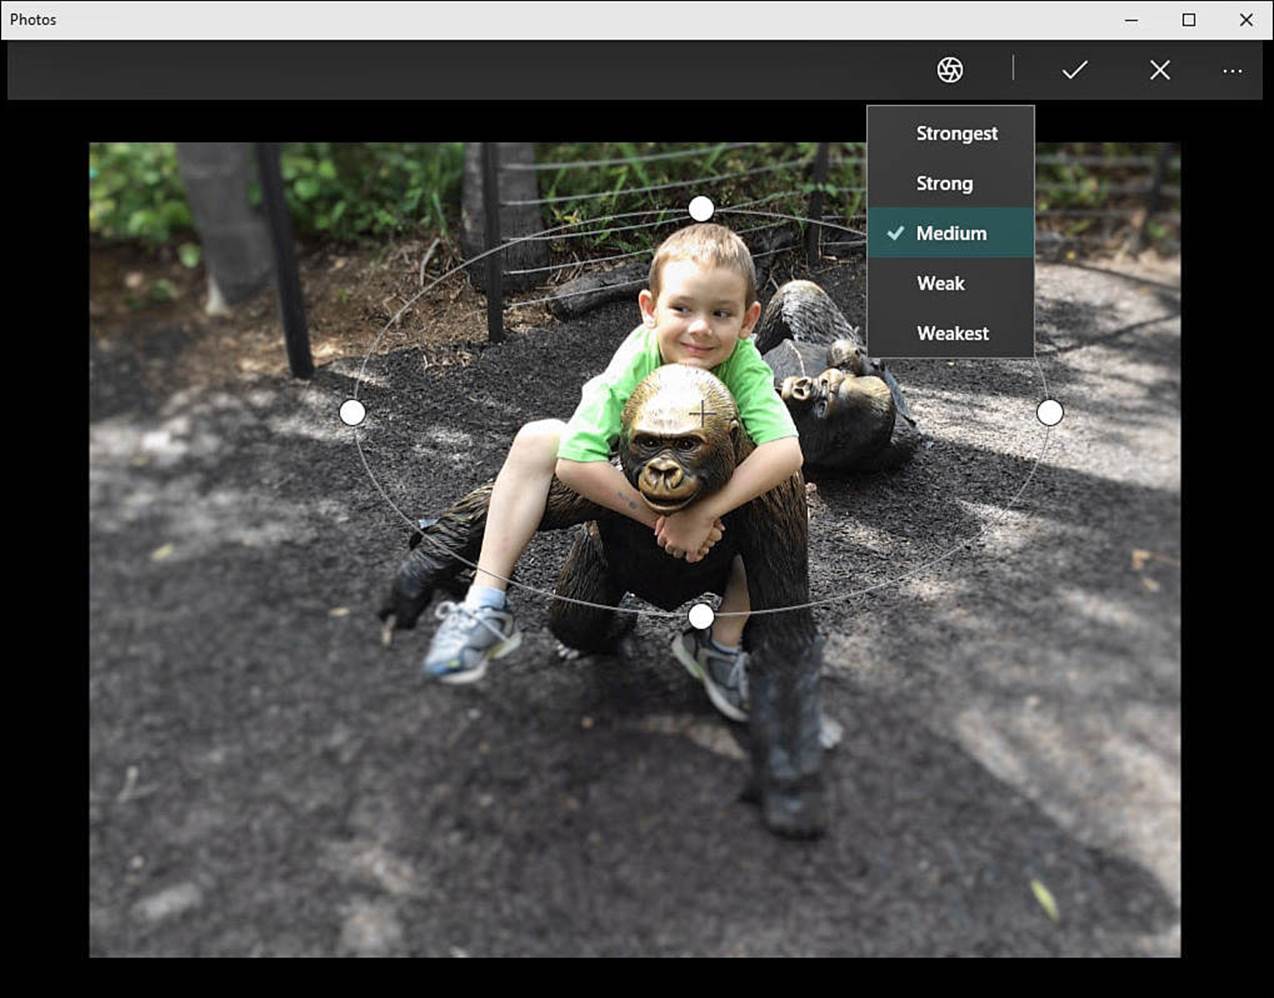
FIGURE 23.15 Selective Focus makes it easy to add a tilt shift effect to your photos.
 Tip
Tip
If you get carried away when editing your photos, remember that the tools located in the upper toolbar let you easily Undo changes that perhaps are undesirable. You can also use Cancel to back out of the editing workspace without making any permanent changes.
 Caution
Consider using Save a Copy when creating radical changes to a photo. If you select Save, you will overwrite the original photo, and changes cannot be undone.
Using the Camera App
Most portable devices running Windows 10 include at least one camera or webcam, and many have both rear- and front-facing cameras. You also can inexpensively add a USB-powered webcam for videoconferencing or Skype to a desktop computer; thus, the Camera app is a standard app included in Windows 10.
The options you see will be affected by your hardware, and if you open the camera app on a device without a camera, it will prompt you to connect a camera. Figure 23.16 shows the Camera app open on a tablet that has two cameras. The Camera app has basic settings related to photo and video properties, which you can configure if needed.
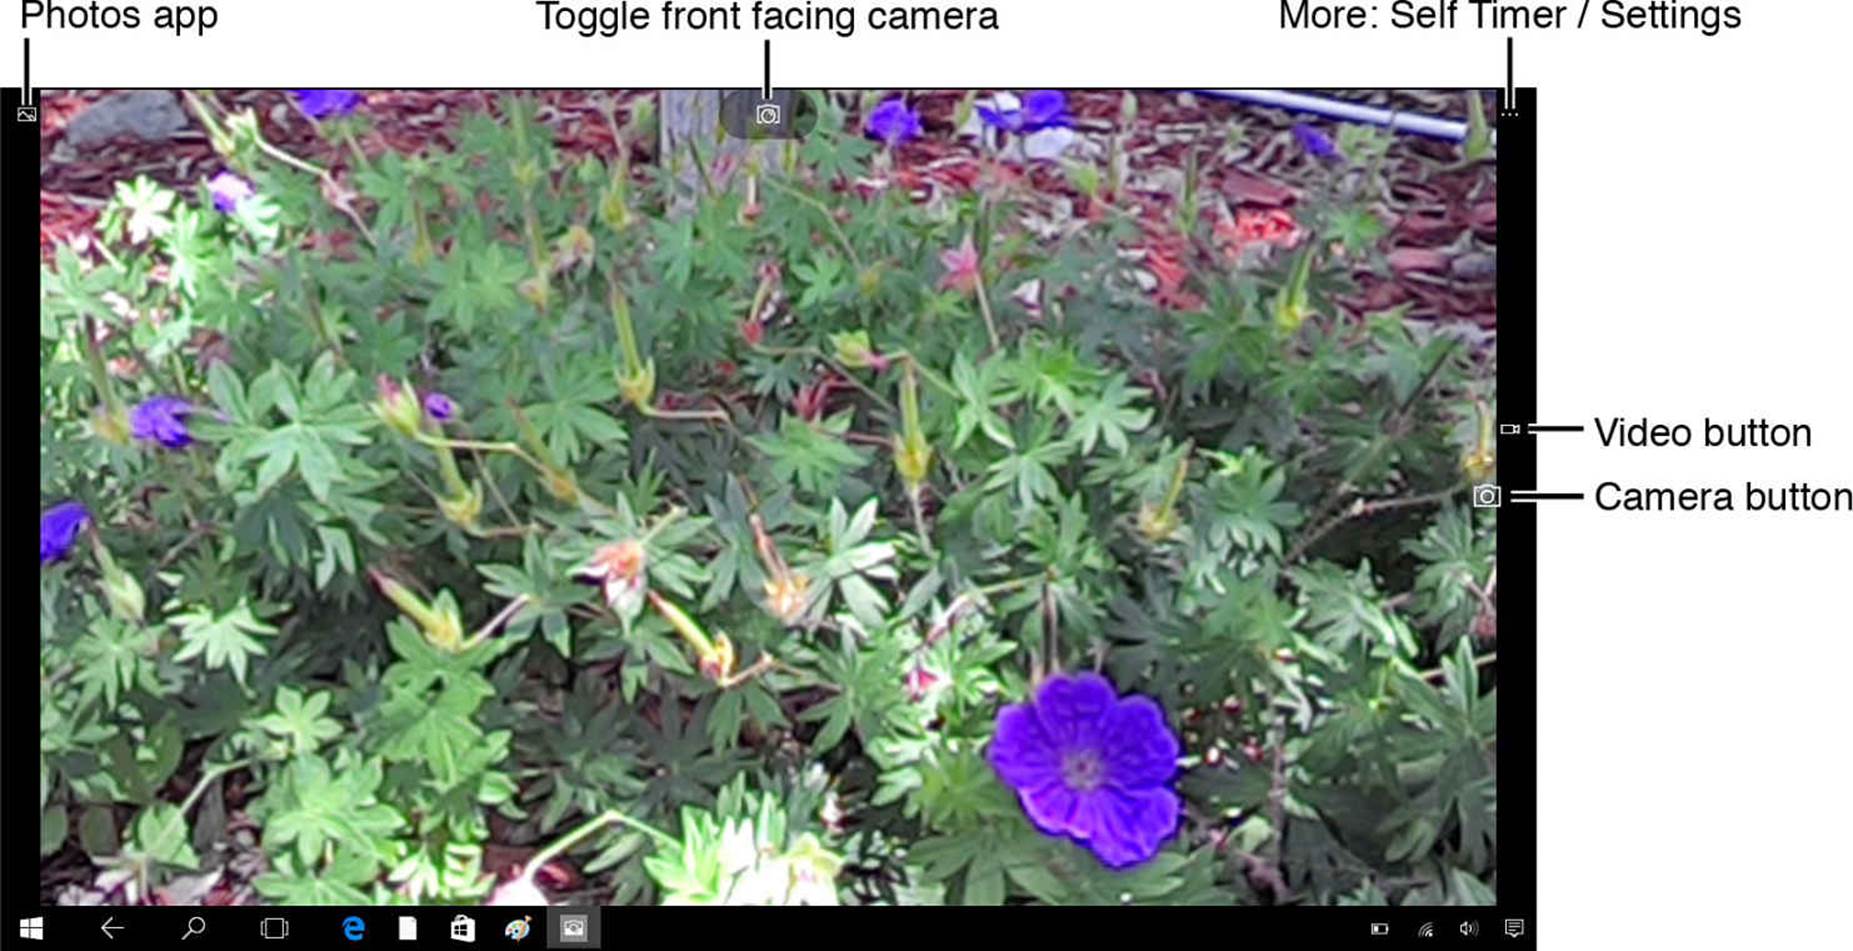
FIGURE 23.16 The Camera app has a pretty basic interface.
To use the Camera app, follow these steps:
1. To take a picture, make sure the device is in Camera mode. Aim the device and press the camera key. Some devices might include focus tools allowing you to tap or select a region of the display to target the autofocus; however, this is not very common on computer hardware.
Tip
You can also enable the Self Timer from the More ellipsis (...) menu. Select a delay for the shutter, and you can enable a continuous mode that takes a photo every 5 seconds until you press the camera button again. This is a great way to make sure you get at least one perfect group shot.
2. To record a video, you actually have two methods from which to choose:
• Position your device and select the video key to switch to Video mode. A timer will appear at the bottom of the Camera app. To begin recording, select the video key once. The camera will begin recording using the current settings for video, and the timer will begin to display the length of the recording. To stop recording, select the video key again. The timer will reset to 00:00.
• While in Camera mode, press and hold the camera key. A timer will appear, and the camera will begin recording video using High Quality settings.
3. To view a picture or video that was taken using the Camera app, select the Photos app icon from the upper-left corner of the Camera app to open the Photos app to the last image taken. (This icon might not appear until after a picture has been taken.) New pictures are saved by default to the Camera Roll folder located in the Pictures library of your device.
4. To modify your preferences, select the More ellipsis (...) and then Settings (refer to Figure 23.16). The Settings view will open, as shown in Figure 23.17.
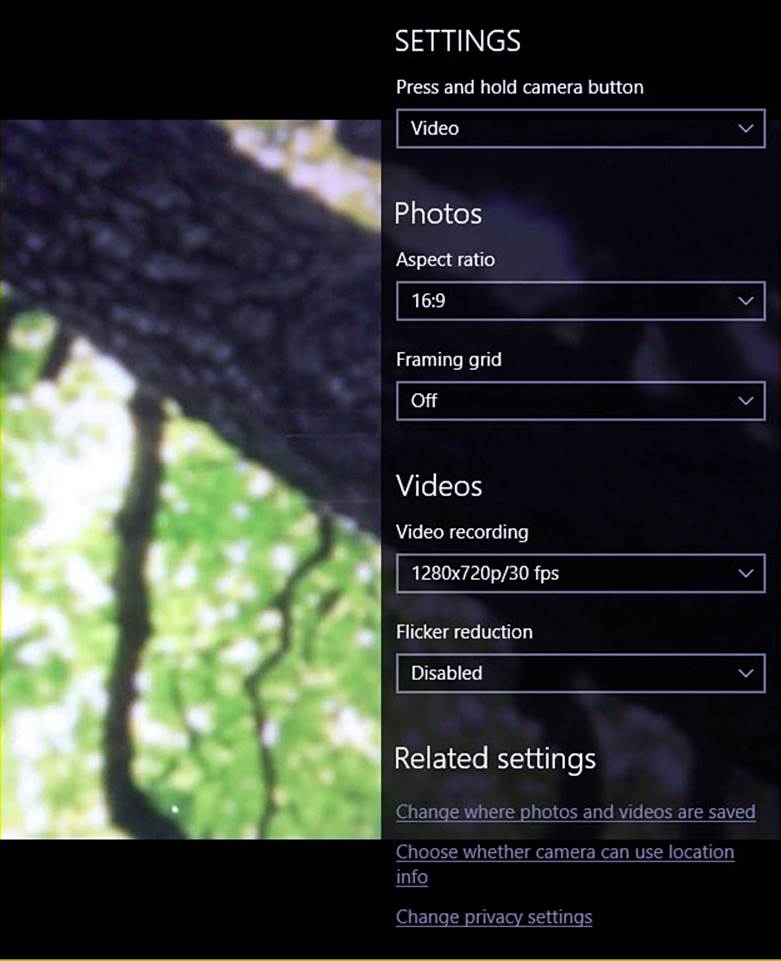
FIGURE 23.17 Make changes to your preferences for the Camera app using Settings.
• Press and Hold Camera Button allows you to change what happens when you select and hold the camera key button. The default is Video, but you can select Photo Burst or Disabled.
• Under Photos you can select your Aspect Ratio. The drop-down lets you toggle 16:9 (widescreen) or 4:3.
• Use onscreen guides by enabling a Framing Grid. The drop-down menu offers a variety of framing grids, such as Rule of Thirds and Golden Ratio. You can also keep it simple and select Crosshairs or Square.
• Settings for Videos includes a setting for Resolution. The drop-down menu offers a list of video resolutions possible with the camera hardware. Choices are presented with pixel size and frame rate. A higher resolution provides a much sharper image; a higher fps (frames per second) results in smoother playback.
• Flicker Reduction allows you to choose between 50 and 60 Hz. This adjusts the frame rate of video to work with the electrical current where you are that may make artificial lighting appear to flicker in a video.
5. Make adjustments in the Settings section or select Use Default Settings to undo your changes. Select the back arrow to return to the Camera app.
Note
When making changes to your video settings, bigger is not always better. 30fps is very smooth, while 15fps would seem a bit choppy to the eye. Lower rates would naturally be even lower quality. The higher numbers selected for both pixel resolution and fps will result in larger file sizes in the final video file. Your final preferences here will be determined by your purpose in recording the video.
Controlling Camera Security
Webcams are useful tools that let us video chat and videoconference with people across the Internet. They also can be exploited to create an unexpected window into our environment by skilled individuals, which is why some people place tape over their webcams “just in case.” Windows 10 works with apps by allowing the app to access hardware resources and system information in a controllable manner. This means that hardware such as webcams can be made unavailable to apps to prevent misuse. It also means that apps can unexpectedly fail to work correctly when a resource is not available.
To allow apps to access your webcam, or to remove this access, follow these steps:
1. From the Start menu, select Settings. The Settings app will open.
2. Select Privacy. From the vertical menu to the left, select Camera, as shown in Figure 23.18.
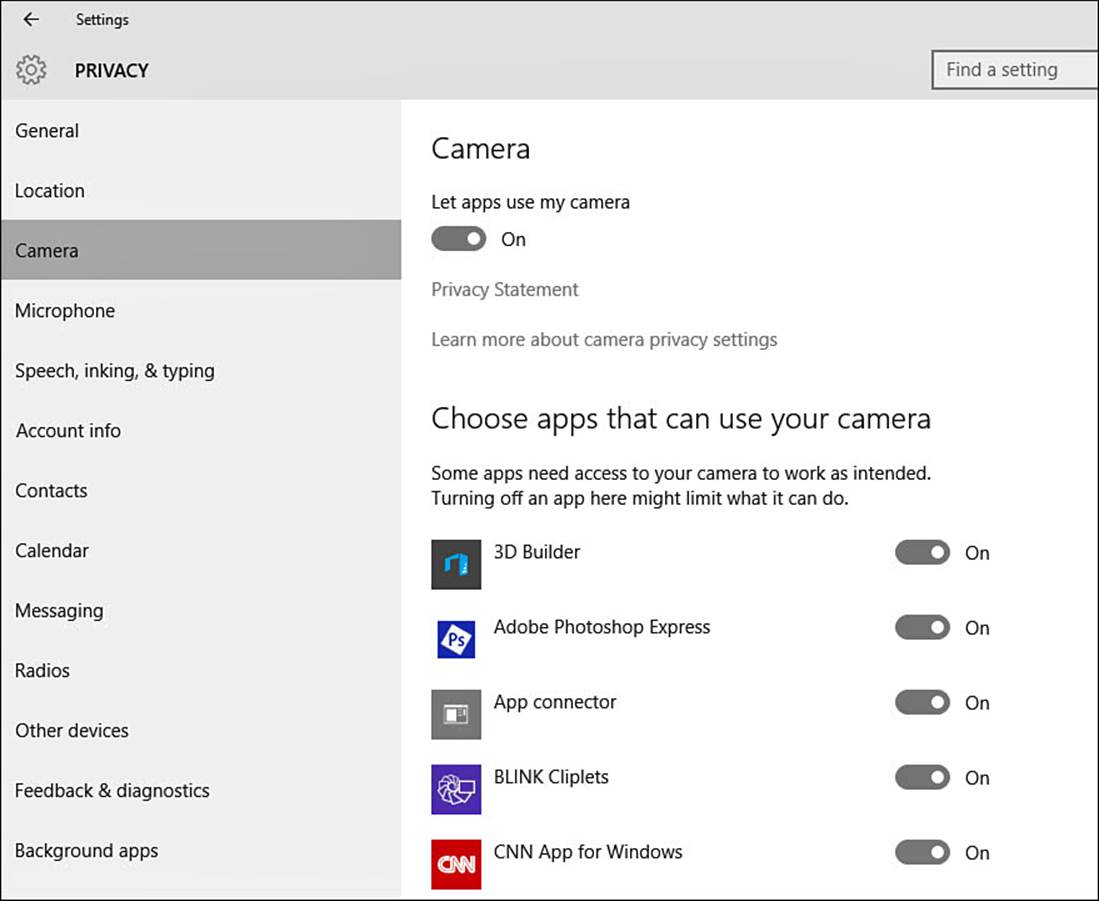
FIGURE 23.18 Windows 10 lets you control which apps have access to your webcam using the Settings app.
3. If you never use your webcam, access can be disabled with a single action by changing the first switch, Let Apps Use My Camera, to Off. This list can become quite long, and apps by default are generally granted access when they are installed if the app indicates it needs this access.
4. Access for individual apps can be granted under Choose Apps That Can Use Your Camera by switching access to either On or Off.
5. Review the apps listed, and make any changes you feel are appropriate. Close the Settings app.
Note
Most modern webcams include an indicator light that lets you know when they are in use. This is true of built-in and external webcams. If the light is on, it is wise to act under the assumption that whatever is in the camera’s line of sight is visible to someone or something.
Organizing the Pictures Library
Digital photography has made it so easy to take pictures and make them available on our devices that it becomes a challenge to keep things organized. You will find it to your advantage to accept the concept of keeping your pictures in the Pictures library or on your OneDrive rather than saving folders of pictures to a desktop or another location. Tools like the new Albums feature of the Photos app considered earlier in this chapter help us by automating the process of grouping photos together by date.
Even so, when viewing our photos we often like to see our photos grouped together based on other criteria, even though they may span many dates or locations. For example, family, friend, or pet photos can be scattered throughout our digital camera roll with names like Image23 or 20110321. No software exists that can anticipate how you might like to organize your photos.
It is a good practice to periodically organize your photos in some way using folders. You might simply create folders with years and subfolders with months, or you could create folders that use categories like “Family” and “Flowers.” I encourage you to give the matter some thought and then implement your plan. Creating folders and then managing their content is considered in greater detail in Chapter 21.
The methods you use to organize your folders will ultimately depend on what makes sense to you and is the easiest to maintain. It takes time to keep pictures organized into folders, but it is well worth the effort. Otherwise, you will find that things spiral out of control, and trying to find a particular picture becomes a time-consuming effort when you can least afford it.
Renaming Your Pictures
One last detail that will help you keep things organized is to rename important pictures you want to find later. You can use the powerful search assistant Cortana to quickly locate photos you have named. To try this, follow these steps:
1. From the Start menu, select File Explorer and navigate to a folder containing photos.
2. Right-click (or tap and hold using a touchscreen) a picture to open the context menu. Select Rename. Type a name for the picture, and then press Enter.
3. Next to the Start button, select the search field and type all or part of the name of the photo you renamed in step 2, as shown in Figure 23.19. (Do not press Enter.) A list of web and store search results will appear. Select Search My Stuff to direct the search to your device.
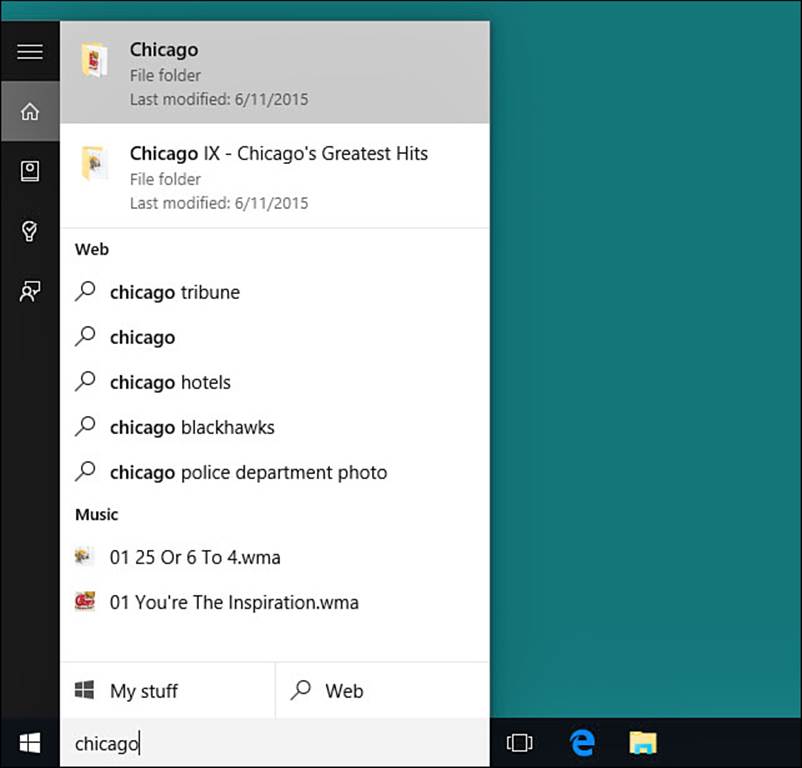
FIGURE 23.19 You can search for pictures on your device by searching for their names and then selecting Search My Stuff.
4. Your search results will now offer documents, photos, and anything else that might be on your device and match your search. To filter the search even further, select the drop-down menu next to Show and select Photos, as shown in Figure 23.20. Your photo will be included in the search results.
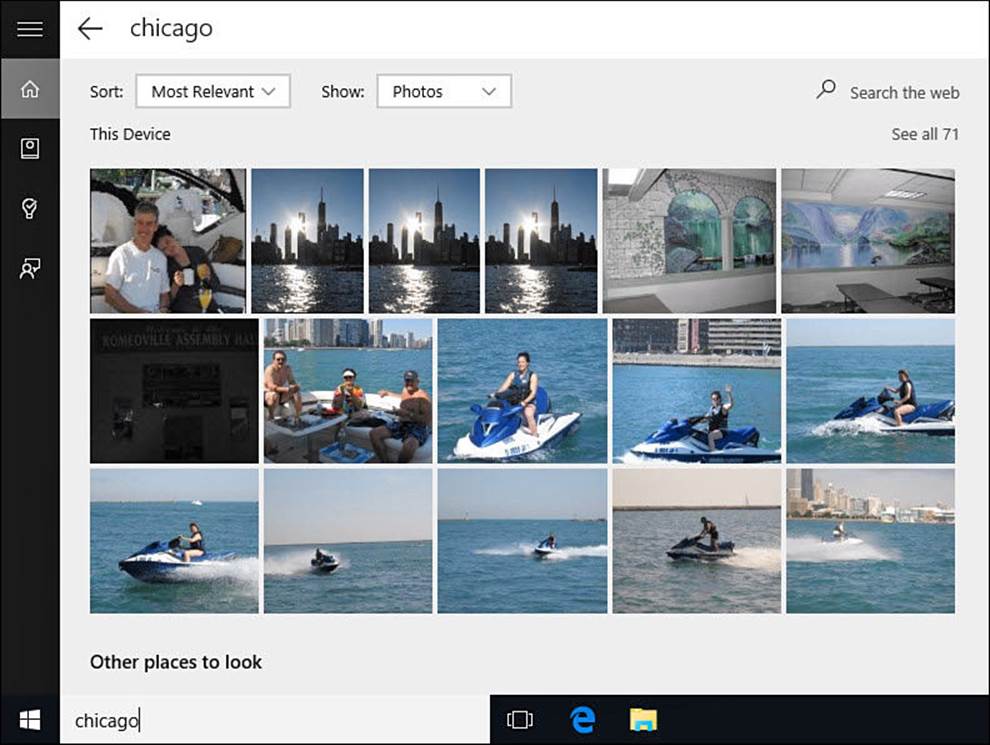
FIGURE 23.20 Filter search results by using Photos to quickly locate photos.
Taking the time to rename all your photos is probably unrealistic. Select pictures you really like. In some cases, it may be enough to name a couple of key pictures in a folder because right-clicking the search item allows you to jump to the folder in File Explorer by selecting Open File Location.
The Absolute Minimum
• The Photos app uses Albums to organize your photos in an attractive way. Take the time to customize the title and cover photos to further polish this manner of presentation.
• OneDrive is integrated into your Photos app, which makes it a good choice for saving pictures. Weigh the benefits against the possibility of not having access to OneDrive if traveling and not having an Internet connection.
• Take time to familiarize yourself with the tools available in edit mode. You might not use some tools as often, but knowing how to use Selective Focus or Vignette to enhance a picture can make you even prouder of your great pictures.
• If you are having trouble with an app that does not work correctly when attempting to use the camera, check the Settings app under Privacy to ensure that the app has permission to use the camera.
• Organize your pictures using folders, and keep them in the Pictures library. Consider how renaming pictures will make it easier for you to locate them later using Search.
All materials on the site are licensed Creative Commons Attribution-Sharealike 3.0 Unported CC BY-SA 3.0 & GNU Free Documentation License (GFDL)
If you are the copyright holder of any material contained on our site and intend to remove it, please contact our site administrator for approval.
© 2016-2026 All site design rights belong to S.Y.A.