Windows 10. Absolute Beginner’s Guide (2016)
Part IV: Having Fun
24. Using Your Microsoft Account for Purchases
In This Chapter
• Understanding Xbox Services
• Adding a Method of Payment in the Windows Store
• Managing Payment Information for Your Microsoft Account
If you watch movies, listen to music, or play videogames on your computer, you will want to know how to use your Microsoft account to make purchases in the Windows Store and elsewhere. Microsoft has gathered several services together and tied them all to the Microsoft account. So even if a person has used separate services in the past like Xbox Live or Xbox Music, these are now managed by your Microsoft account. Having a Microsoft account allows you to sync content, preferences, and gaming achievements across several devices. A Microsoft account is required to purchase and subscribe to additional content that is offered in the entertainment apps that use Xbox services. In this short chapter you will see how to set up and manage your Microsoft account for purchases. The various entertainment apps are themselves discussed in separate chapters.
What Are Xbox Services?
If you don’t even own an Xbox, you might be wondering what Xbox services are. Xbox Live is Microsoft’s digital online entertainment service and has actually been around since 2002. This entertainment service offers gaming, music, and video content through subscriptions or purchases. Xbox services (sometimes referred to as Xbox Live services) require an Xbox Live account membership profile that is linked to an email account. An Internet connection is required to use the service. Games, music, and videos you have purchased through Xbox services are linked to your Xbox Live account, and they can be accessed from other devices as long as you use your credentials. Payment information can be entered and stored with your account to make purchases a simple process.
Although it can seem confusing to talk about two different accounts, what is really happening is that your Xbox account membership is being added to your Microsoft account. You can think of it as an enhancement or added feature for an automobile. In the end, your Microsoft account will be used to manage any services or memberships that have been added to it.
If you created a Microsoft account with your Windows 10 device, then you will find that your Microsoft account includes access to Xbox services automatically. Because Xbox services have been around longer than Microsoft accounts have, you may have had an Xbox Live account in the past. If that is the case, it’s a good idea to use the same email account for your Microsoft account so your Xbox account can be added to your Microsoft account. Because these two accounts are linked, you might never even see a reference to Xbox or Xbox Live on your device unless you are working with the Xbox gaming system.
When using a Microsoft account with the Xbox app or with an Xbox device, you will see a username has been associated with your account profile known as a gamertag. Although the Music and Video apps do not display a gamertag, they do attempt to sign in to the Xbox services automatically when you open the app using the Microsoft account used to log in to the Windows 10 device. Any purchases or subscriptions made with the Xbox account used when signing in will be available.
If you open an entertainment app using a local account and no Microsoft account has been used in the past, you will be able to use the app; however, features related to Xbox services will not be available. In the upper-right corner of the app will be a prompt to sign in, as shown in Figure 24.1.
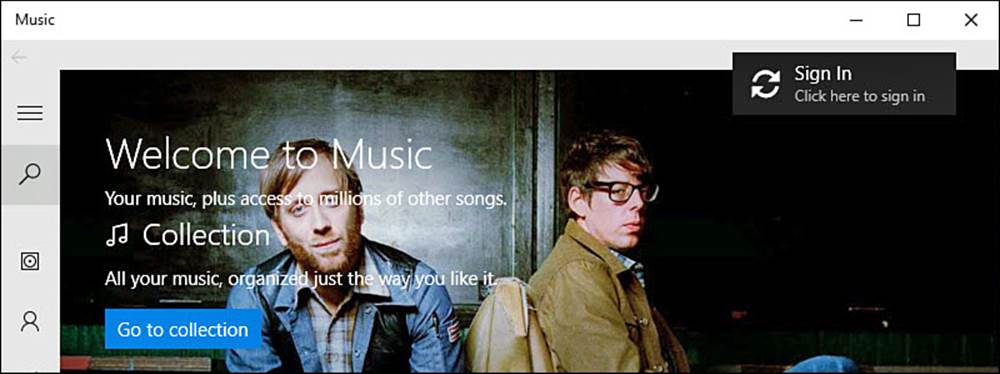
FIGURE 24.1 You will be directed to sign in if you do not have an account with Xbox Live.
 Note
Note
If you have trouble syncing an Xbox account, or if you have an Xbox Live ID already but it’s not connected to your Microsoft account, you can find more details about joining the two, as well as support for other issues, at www.xbox.com.
Purchasing with Your Microsoft Account
Although your Microsoft account has access to Xbox services, you will still need to add payment methods to ensure that you can make hassle-free purchases. Setting up a Microsoft account for purchasing is an easy process. Purchases can be expected in the following scenarios:
• You want to purchase music or listen to streamed music through the Music app.
• You want to purchase or rent videos through the Movies & TV app.
• You want to purchase an app in the Windows Store.
• You want to purchase additional cloud storage for your OneDrive.
In the first three cases, you will be working with your payment methods through the Windows Store. For other purchases or upgrades, you will complete purchases online using the same payment methods that are tied to your Microsoft account. If the Microsoft account does not currently have any methods of payment associated with it, you will be prompted to add a new payment method, as shown in Figure 24.2. Setting up a payment method only needs to be done once, and then you will see that method listed as your default for future purchases.
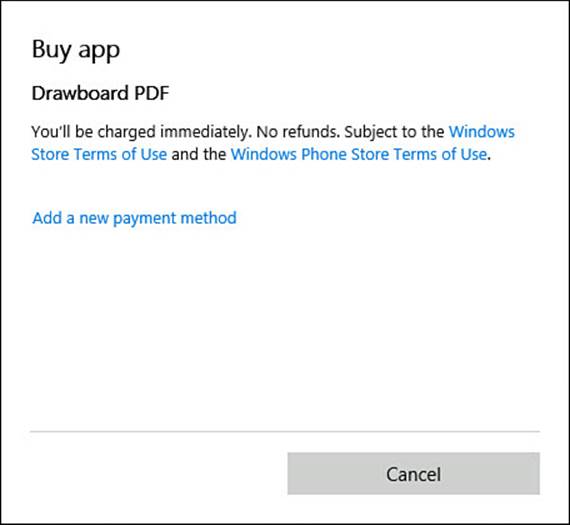
FIGURE 24.2 You might need to add a method of payment to your Microsoft account.
Let’s look at the steps required to add a payment method when making a purchase through the Windows Store:
1. Open the Store app and locate an app, song, or video that you would like to purchase.
2. Select the button with the price to start the purchase process. (You may be asked to provide your Microsoft password as a security measure when making purchases.) A window will pop up showing the amount to be charged to your current default payment method. You can select Buyto proceed with your purchase. To add a new method, select Change and then proceed to step 3.
3. Select Add a New Payment Method (refer to Figure 24.2).
4. Under Add a New Way to Pay, you will see several fields for entering information related to a credit or debit card, as shown in Figure 24.3. Enter your card holder name as it appears on the card, card number, CVV number, expiration month and year, billing address, city, state, postal code, and country/region. Select Next when finished.
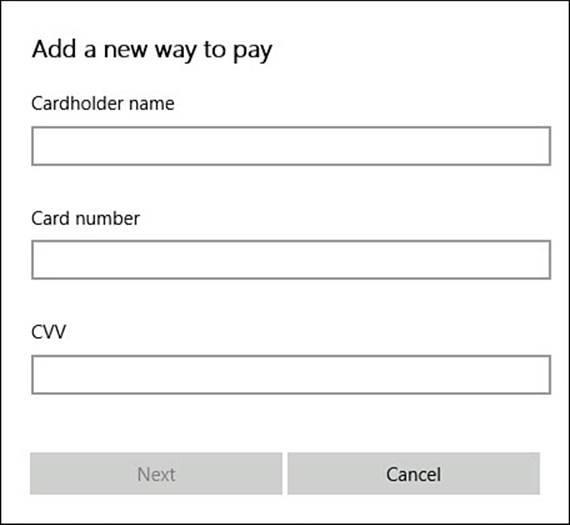
FIGURE 24.3 Add credit card information to create a new payment method when making a purchase in the Windows Store.
5. Under Check Your Info, you will see the information you just entered. Confirm that it is correct. To make changes, select Edit. If everything looks good, select Save This Info.
6. Your Microsoft account is updated and the purchase information from step 2 will be regenerated, this time showing the amount to be charged using the method of payment that you just added.
This method works fine for adding standard methods of payment. However, you may wish to perform basic tasks related to your billing information, such as update existing payment methods or add other types of payment information to your Microsoft account.
Managing Your Microsoft Account
The Microsoft account has many details associated with a membership profile. Many tasks related to your Microsoft account are best handled online, and you will find helpful links in various apps that help you to jump to your online account (refer to Figure 24.4). To go to your account profile manually, you can use this link: https://commerce.microsoft.com.
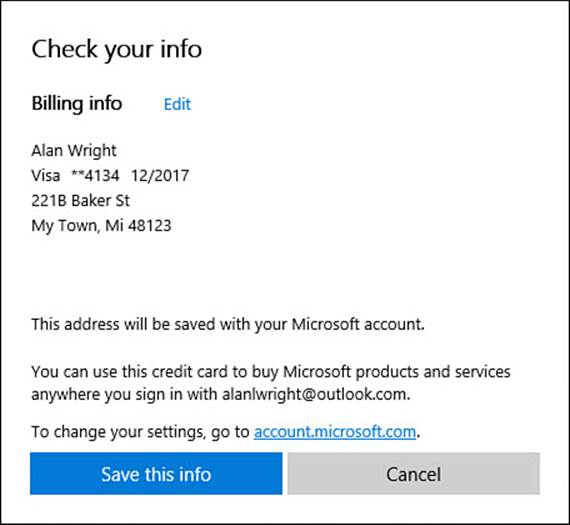
FIGURE 24.4 Confirm your payment information is correct when adding a method of payment.
To manage or review billing information for your Microsoft account, follow these steps:
1. Open the Store app. Select your account picture to open the account drop-down menu, as shown in Figure 24.5.
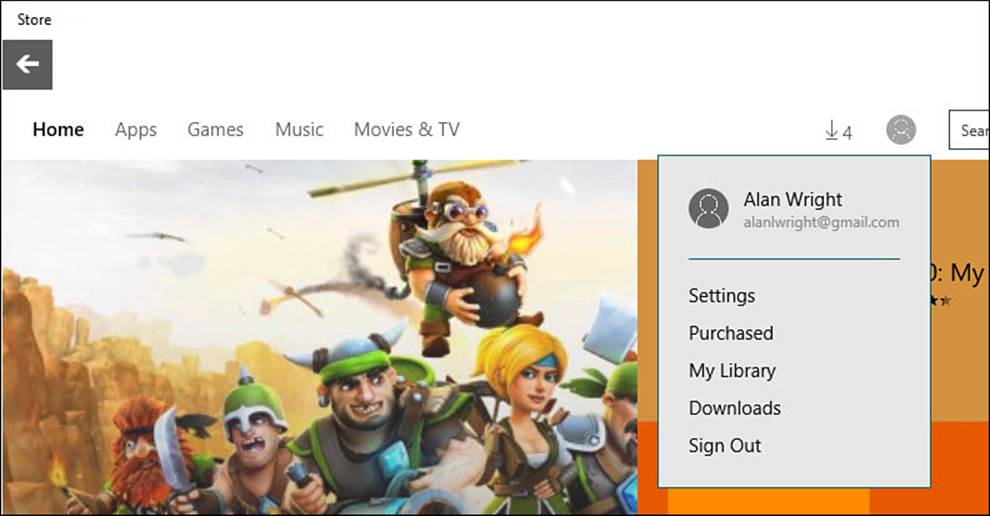
FIGURE 24.5 Access your online Microsoft account profile from links in apps like the Windows Store.
2. Select Purchased, and your web browser will open to the Billing Overview for your Microsoft account. (You will likely be prompted to sign in to the website as a security measure.) Recent purchases and current payment options are shown, as you can see in Figure 24.6. Notice that you can add funds to your Microsoft account by redeeming gift cards or using Bitcoins.

FIGURE 24.6 Go online to view your billing information and recent purchases for your Microsoft account.
3. Select Payment Options. As a security measure you will again have to provide your password. Payment Options will be shown under Manage Your Payment Options, as shown in Figure 24.7.

FIGURE 24.7 From online you can manage your payment options that are linked to your Microsoft account.
4. Select an existing method of payment to edit or remove it from your Microsoft account.
5. Select Add Payment Option to add a new credit or debit card or to add other options that may be listed here, such as PayPal (see Figure 24.8).
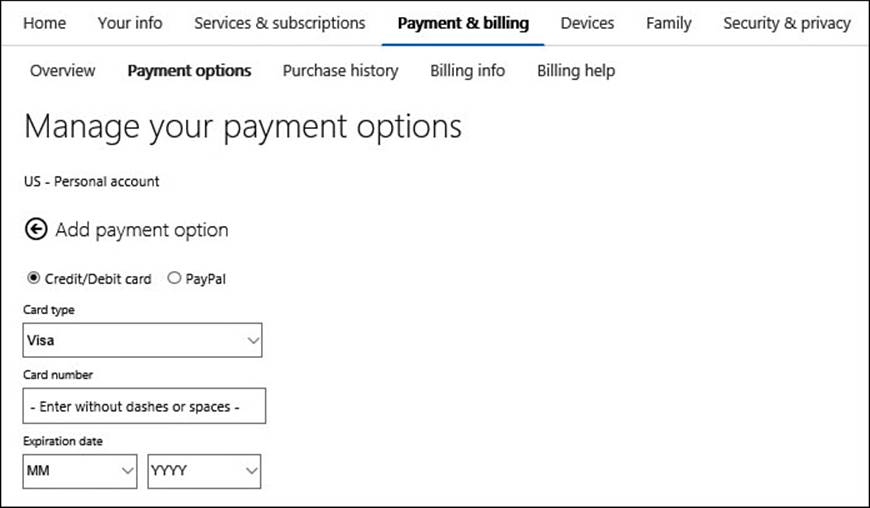
FIGURE 24.8 You can add additional types of payment to your Microsoft account using online tools.
6. Follow the prompts to finish entering information required for your method of payment.
Accepted payment methods can vary depending on the country or region you are in, and they can be found listed under Billing Help. Credit and debit cards, PayPal, as well as a few prepaid methods can be added, which should cover most situations that are likely to face a computer user.
From the online Microsoft account dashboard, you can manage several vital elements of your profile, including the following:
• Purchase subscriptions for Xbox Live, Xbox Music Pass, or EA Access.
• Redeem codes from gift cards, prepaid cards, or promotional codes.
• Review transactions made using your Microsoft account.
• Manage payment information, including credit card and PayPal accounts, as well as update your billing address.
• Manage devices associated with your Microsoft account.
• Review and change privacy settings for you and any family members managed by your Microsoft account profile.
• Connect directly to your Xbox profile to handle tasks such as editing your gamertag or avatar.
The Absolute Minimum
Keep the following points in mind after you’ve completed reading this chapter:
• Xbox Live membership is added to your Microsoft account.
• If you plan to purchase games, music, or videos in Windows 10, you will need a Microsoft account that has at least one linked method of payment. It can save some work by doing it upfront.
• If you have different IDs for your Microsoft account and an existing Xbox Live account, look into merging these two accounts. You can find information about merging accounts on www.xbox.com.
• To manage billing issues for your Microsoft account, use links from the Store, Video, Movies & TV, or Xbox apps to quickly jump into your online account profile.
All materials on the site are licensed Creative Commons Attribution-Sharealike 3.0 Unported CC BY-SA 3.0 & GNU Free Documentation License (GFDL)
If you are the copyright holder of any material contained on our site and intend to remove it, please contact our site administrator for approval.
© 2016-2026 All site design rights belong to S.Y.A.