Windows 10. Absolute Beginner’s Guide (2016)
Part V: Online Bonus Content
Bonus Chapter 4. Keeping Your Computer Healthy
In This Chapter
• Learning About Internet Threats and Risks to Your Privacy
• Understanding How to Defend Yourself Against Internet Threats
• Learning About Windows Defender
• Learning About SmartScreen, InPrivate Browsing, and Windows Firewall
• Managing Your User IDs and Passwords
Just like people, computers can catch a nasty virus and may even stop functioning. Periodic Windows updates and reliable antivirus software can do much to protect a computer from dangers that lurk on the Internet. However, the biggest threat to the health of a computer is actually the person using the computer!
You inadvertently can expose your computer to viruses or malware simply by visiting a disreputable website, installing software that has been offered as a “free” download, or opening an email attachment.
You might accidently visit a fake version of your favorite websites through a simple spelling error that has been designed to fool you into entering private information. It’s sad that individuals seek to ruin your Internet experience or try to take what’s yours, but after you accept the reality of the situation, you must address the threat and prepare your defenses. This chapter reviews the important tools available to a beginning Windows 10 user to ensure your computer is kept healthy so you can enjoy safe and private Internet computing.
Understanding Internet Threats and Risks
It is easy to compare the Internet to the allure of a large city with its schools, museums, restaurants, shopping malls, and a variety of people from different backgrounds. Although you can certainly benefit from having the entire Internet at your fingertips, you also need to be street smart and limit your exposure to the seedier side of the Internet. For example, you need to resist the urge to click anything that appears on your screen before reading it, as you do not always know where a link might take you. Even if you are working with familiar websites and social media, you should never completely let down your guard. After all, in a large city we all realize that crime can and does occur in any neighborhood, so we take precautions and keep alert.
Malware
You have no doubt heard the term virus used when referring to a computer that is out of sorts. The term malware might be new to you, however.
Malware is a general term that refers to a growing variety of malicious or intrusive software referred to as viruses, Trojans, worms, ransomware, spyware, and adware, just to name a few.
Reputable antivirus software that scans and actively protects your system is crucial. Even though you may realize that threats can be presented to your device from casual browsing and email, they can also be spread through infected network drives, external hard drives, or USB flash drives that are plugged into your device.
You might be surprised at the large number and variety of risks and threats in the Internet world. I often hear the question, “Why do people do this?” Their motives vary—some seek to steal your personal information for the purpose of identity theft or to sell to marketers that would love to know your favorite websites and web searches; others may try to scare you into buying a service, while yet others just seem to be trying to build a reputation. Despite the increasing proliferation of all these threats and risks, there are just two parts to the strategy needed to protect you: learn the threats, and raise the defense.
Web Browsing Risks
The web browser is your doorway to information, news, fun stuff, art, science, and everything in between. The browser can also be a doorway to your personal information, as well as a launchpad for viruses and other malware. The following is a list of risks that exist while you innocently browse the Web:
• Most websites use small files known as cookies to help keep track of your preferences as you move from page to page, as well as to remind the site who you are when you return to the site. These cookies are created and then stored on your computer. Cookies can contain whatever information a website needs to provide a pleasant browsing experience, including personal information. You have probably figured out by now that cookies would be attractive to people interested in you and your personal details. Although cookies are not a risk on their own, a risk is created when access to them is not controlled.
 Note
Note
There is some wisdom to never allowing cookies onto your computer. You could direct Microsoft Edge to reject all cookies. Doing so, however, prevents some sites from working with your browser. Instead, you can use a feature of Microsoft Edge called InPrivate browsing, which enables cookies to be temporarily stored only in a secured area of your computer and then be removed when you leave the site. You can read about InPrivate browsing later in the chapter in the section “Browsing Quietly and Invisibly with InPrivate Browsing.”
• Web pages cannot automatically run programs on your computer, except to show pages in your browser. Websites with bad intentions have been known to display a pop-up message in which the buttons, if selected by the user, trigger a program that can run on your computer. These programs can do anything, including installing a virus, spreading the virus through your contacts, accessing the network you’re attached to, and so on. Not only are pop-up messages annoying, but they represent a potential high safety risk. Never activate a pop-up message if you don’t know what it is. Most modern browsers have pop-up blocking enabled by default.
• If you download software from the Web, either to try or for purchase, you are introducing risk to your system. Most of these software downloads are safe, particularly if they come from a known publisher or developer. The installation program does nothing more than load the software onto your computer. Some of these installation programs, especially for smaller try-before-you buy programs, secretly install spyware when they install the program you selected.
Note
Spyware is software that secretly tracks your clicks and web browsing, creating a profile of your interests. Worse, though, spyware can capture your keystrokes, making it easy to determine your passwords, as well as credit card and banking information.
There are other less-significant risks associated with browsing the Web, but the preceding list represents the most significant threats. To summarize, viruses can land on your computer from pop-ups and other malicious sites (see “Learning Phishing Threats” later in this chapter); cookies can expose personal information; and downloads from the Web potentially can contain dangerous, hidden spyware.
Understanding threats exposed by browsing the Web is just half the battle. Up next is a review of threats exposed through email.
Learning About Risky Attachments and Other Email-Related Threats
If you have ever opened an attachment in an email sent by someone you didn’t know, or even from someone you do know, when you were not quite sure of the contents, you might have dropped yourself in the middle of a minefield.
Attachments represent more risk than just about any other email or computer practice. Someone looking to ruin your day can package anything he likes in an otherwise friendly-looking attachment, including viruses. What might appear to be a file filled with jokes or containing a cute movie (maybe the file is called “funny_kitty_video”) can contain a program that not only infects your computer, but also sends a virus in an attachment to every address in your contact list. I don’t imagine that’s something your family and friends would appreciate.
Be suspicious of any email with an attachment. If your suspicions outweigh your confidence, see if you can figure out the email address of the sender. Maybe you already have it. Ask whether the person sent the email before you open the attachment. If so, you should be in good shape. If the sender doesn’t recall sending it, delete it immediately because it’s likely a piece of malware automatically sent through email from your associate’s email account. Be especially cautious with unexpected emails from large organizations that are designed to create panic or that require immediate action (see Figure BC4.1). Banks, eBay, PayPal, shipping organizations, and government entities like the IRS all have websites that alert you to current scams and help you distinguish legitimate emails from fraudulent ones.
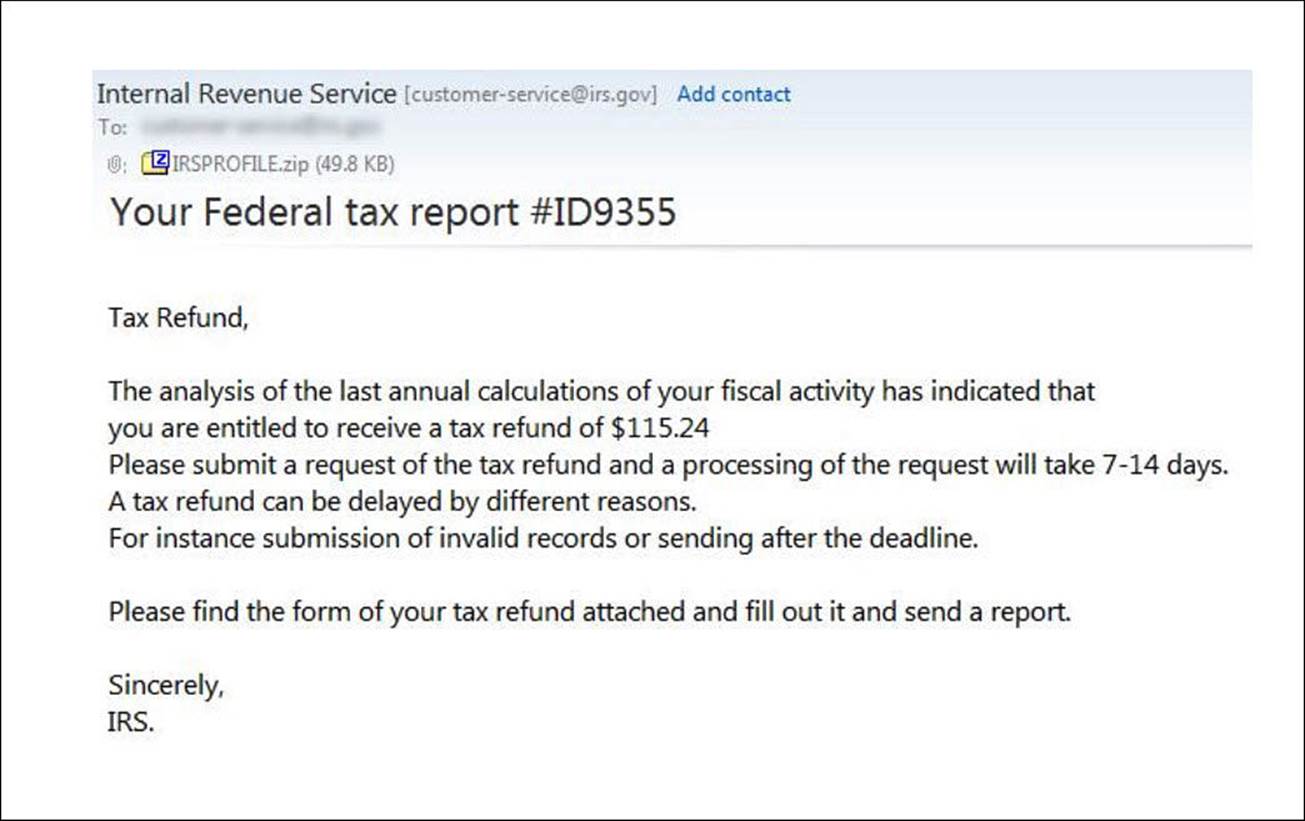
FIGURE BC4.1 A sample of a fraudulent email with malware included in an attachment that appears to be from the IRS.
Consider the following questions. If you answer no to even one of the questions, you should not open the attachment or click on the link:
• Do you know the sender?
• If you hover over any links without clicking on them to reveal the URL, does it appear to be a legitimate website?
• Does the message contain spelling errors? Rarely will a legitimate organization send an email with glaring spelling errors!
• Have you received email from the sender before? Have you received an email from this sender with an attachment before?
• Were you expecting an email with attachments? Can you guess what’s in the attachment?
Learning Phishing Threats
Phishing has nothing to do with pulling creatures out of the sea. Rather, phishing refers to the practice of trying to gain access to personal information by posing via email (or Twitter, or instant messaging, and so on) as a reputable or official organization, like your bank, credit card company, or another online company you respect.
Phishing scams usually come in the form of an email informing you of some situation that requires confidential information from you. The email appears official, possibly incorporating the organization’s colors or logo. You might be told that your account has been upgraded, although your account number or some other form of ID is needed to complete the process. Phishing scams also involve a request for your help in claiming millions of dollars for a cousin or friend (which would require use of your personal account to hold the funds), or you might even be the unknowing beneficiary of a transaction or event (see Figure BC4.2).
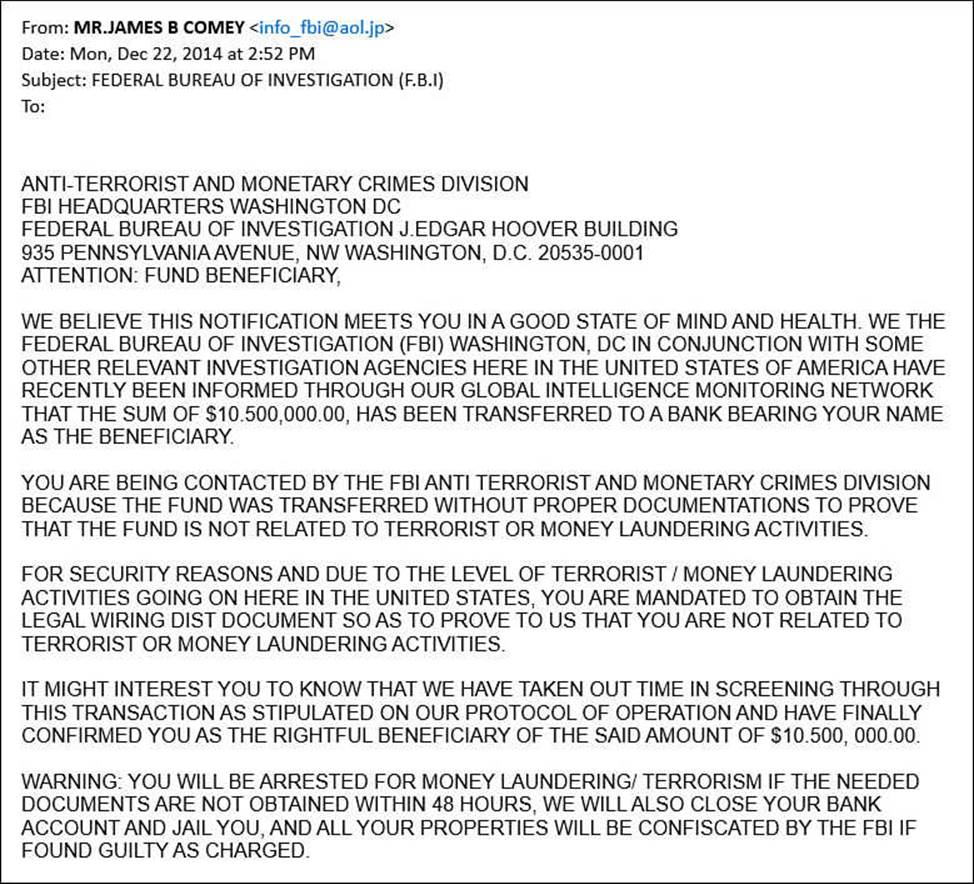
FIGURE BC4.2 Scams can arrive at your desktop in many forms, including news that you might be arrested for having $10,500,000.00 in a bank account you did not know about!
A typical phishing practice is to use a website address that resembles that of a real organization. For example, the website address of one of the largest banks in North America is www.bankofamerica.com. You might find yourself directed to a website with the addresswww.bankamericacom.net that has absolutely no relation to the actual Bank of America website.
Note
The techniques described in this section are sometimes referred to as social engineering, which is the use of pressure, surprise, or misdirection to trick you into clicking something, opening a website, or providing information that opens you or your system up to persons who are trying to exploit you. This is always evolving, and currently Facebook and Twitter are popular methods used to get you to click or open things that may expose your computer to malicious individuals. The greatest security risk a computer will face is likely to be caused inadvertently by the user himself.
The best and only advice is to ignore and delete these emails if you have even the smallest bit of suspicion. Here are some other thoughts about phishing emails:
• Ignore the urgency of the request. Just because the request claims action must be taken in some period of time or something terrible will occur, that doesn’t mean you should trust the claim.
• A bank would never request your account information or Social Security number through an email—wouldn’t your bank have this information already?
• Ask the question, “Why me?” Why would you be singled out to help a needy individual get the fortune of money due to him?
• Do not click a link. A link could launch a program or collect information you didn’t plan to provide.
• Resist the urge to reply with some sort of message saying the sender didn’t fool you. That just tells the sender your email address is current and active and should be targeted in the future.
 Caution
Be careful about using your email for everything. Many people keep a junk email account with Gmail, Yahoo, or some other free email service just for filling out those website forms for free contests, newsletters, coupons, and other situations where a website requires an email address. Doing so protects you from websites whose intention is to share your email with other advertisers and bombard you with their own emails in the future.
The strategy to defend against phishing attempts has improved over time, with most email providers including a spam blocker or filter as a basic service. Spam is the term used for unwanted email or advertisements or junk email. Gmail, Yahoo, and Outlook.com are examples of email service providers that already include filtering for this type of email by default. A spam blocker monitors your inbound email and traps spam as it travels to your inbox.
With most spam blockers, you can configure whether spam is immediately deleted, filed to a Junk email folder, or left for you to deal with. A spam blocker can sometime capture phishing scam emails. Your Internet service provider (ISP) probably provides a spam blocker also. If you do not have any option for filtering spam on your email account, you should search the Web for a highly rated option, free or otherwise. MX Guarddog is one example of a spam filtering service that can handle filtering for an email domain that you control, and it offers options that can result in free spam filtering service.
 Tip
Tip
Spam filters can inadvertently catch emails you wanted to receive based on wording in the subject line or a suspicious attachment. For that reason, it is a good idea to occasionally review the list of emails that have been filtered as spam just to verify that messages from your favorite uncle are not being deleted without your knowledge.
Avoiding Virus Threats
When you hear about Internet risks in the news, it is generally related to viruses. Usually, a virus doesn’t simply reproduce itself and then go dormant. Viruses can make unwanted changes to your computer’s setup, sometimes significantly damaging your system. Also, because a virus replicates itself, it usually is concerned with finding its way to other computers, such as by leveraging a contact list or attempting to infiltrate other computers if you connect to a network.
A virus can get onto to your computer in a number of ways:
• On a CD/DVD you acquire
• Attached to an email
• Through downloaded software or files
• On a removable drive you attach to your computer
• From a network to which you connect
A good antivirus program defends against a virus accessing your system in each of these methods. It can scan emails before they are visible for you to read or automatically initiate a scan of a USB that has been plugged in. The good news is that with Windows 10, you have built-in protection for these threats by means of Windows Defender, which is discussed later in this chapter.
Caution
It’s worth overstating that your antivirus program can do its job only if it’s kept up-to-date. You should regularly confirm that your antivirus program is updated with the latest virus definitions.
Defending Yourself
You need to maintain a number of defenses to ensure your data, equipment, reputation, privacy, personal information, and finances are protected. Each of the following sections describes a component of your Internet defense strategy. The last section of the chapter describes how to bring the various pieces together to create a whole strategy.
Reviewing All-in-One Internet Defense Suites
Many beginners ask the same question about protecting themselves and their computers from Internet threats: should they buy one of those all-in-one Internet defense suites? With Windows 10, you have a solid antivirus and malware protection included with Windows Defender. Even so, you might feel more comfortable with one of the top Internet security suites for a few reasons:
• Internet threats are constantly evolving and growing. It makes sense to rely on a larger organization that has the sole focus of keeping pace with new threats.
• Many purchased Internet security suites offer additional features such as email virus scanning, enhanced parental controls, Internet browser plug-ins to verify websites, or more robust firewall features.
• Protecting yourself requires a wide strategy of defense. Although you are capable of defensing yourself using the tools available in Windows 10, a commercial suite has a more vested interest in ensuring that there are no holes in your defense.
• Many of the paid solutions also provide coverage for more than one computer.
You should expect to pay approximately $100 and then a nominal annual fee to stay up-to-date from year to year. Plenty of unbiased reviews are available on the Internet to help you select a suite.
Note
With Windows 10, Windows Defender is designed to assume all responsibilities for viruses and malware. If you install a third-party Internet security suite, Defender will be deactivated but not uninstalled. If you uninstall the third-party application, Defender resumes operation.
Defending with Windows Defender
Windows 10 has a built-in antivirus/spyware application known as Windows Defender. Although free software sometimes is viewed skeptically, Windows Defender is quite good. There is no reason not to use it.
Some of the most important Windows Defender features and options you should know about include the following:
• Updated definitions—Windows automatically and regularly updates both virus and spyware definitions. You can also force an update if you like. As soon as the Microsoft security engineers detect the introduction of a new virus into the Internet, a definition of the virus is created and downloaded to all Windows Defender users by means of updates.
• Choose how to deal with potential problems—Windows Defender enables you to review past situations in which the software identified content that had the potential to be a problem. You can see the list of everything suspected as being malicious, the list of those you identified as known and okay, and the list of programs that indeed were found to be malicious and have been quarantined.
• Real-Time Protection—This option determines whether Windows Defender continually scans your system activity, assessing programs and files your computer comes in contact with. The alternative is to set up Windows Defender to review for malicious files during a regularly scheduled scan. Real-Time Protection should be enabled at all times.
• Exclude File Types, Names, Locations—You can specify that certain files be excluded from scanning. You can identify these files by their name, location, or type. Many people exclude their photos library and music library if they know for sure that they were the provider of the songs and pictures.
• Scan Removable Drives—This option determines whether external drives connected to your computer also should be scanned for viruses, and so on. It is highly recommended that you enable Scan Removable Drives.
Configuring Windows Defender
Windows Defender protects your system from the moment you install Windows 10, but you can change how it operates. Follow these steps to review the current configuration of Windows Defender:
1. Select the search box on the taskbar.
2. Enter defender into the Search box, and then select Windows Defender Settings when it appears at the top of the results list. The Settings app will open, as shown in Figure BC4.3.
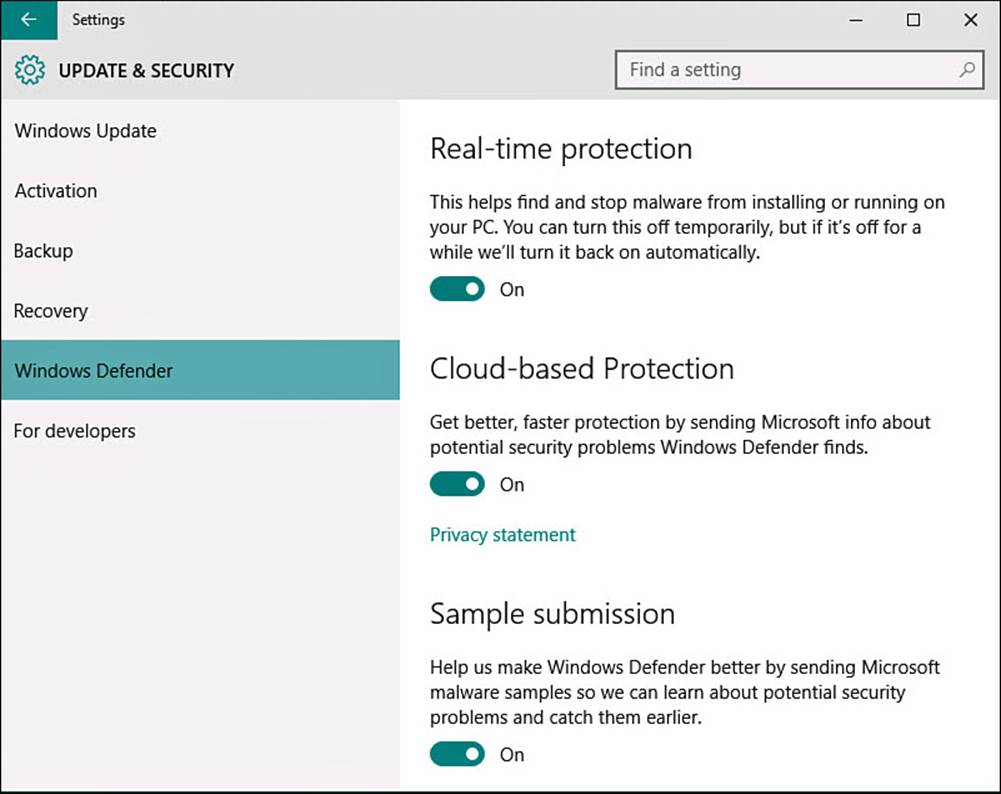
FIGURE BC4.3 Windows Defender is now integrated into Windows 10.
3. The switch Real-Time Protection should be On. This way, dangerous or malicious programs are identified instantly as soon as they approach your computer. You might occasionally need to turn real-time protection Off to install an application. If you forget to turn this back on, it will turn itself back on with the next reboot of your device.
4. The switches Cloud-Based Protection and Sample Submission are both On by default. These settings upload anonymous information to Microsoft to help improve Windows Defender and to create new definitions.
5. Scroll down to Exclusions and select Add an Exclusion. The Add an Exclusion screen appears, as shown in Figure BC4.4. Unless you have been told to exclude certain files, folders, file types, or processes from protection by Windows Defender, the lists on the screen should be empty. If there is an entry in the bottom of the two lists that you do not recognize, such as EXE files or folders, select it and then select Remove. You would not want a key folder, such as Documents, excluded.
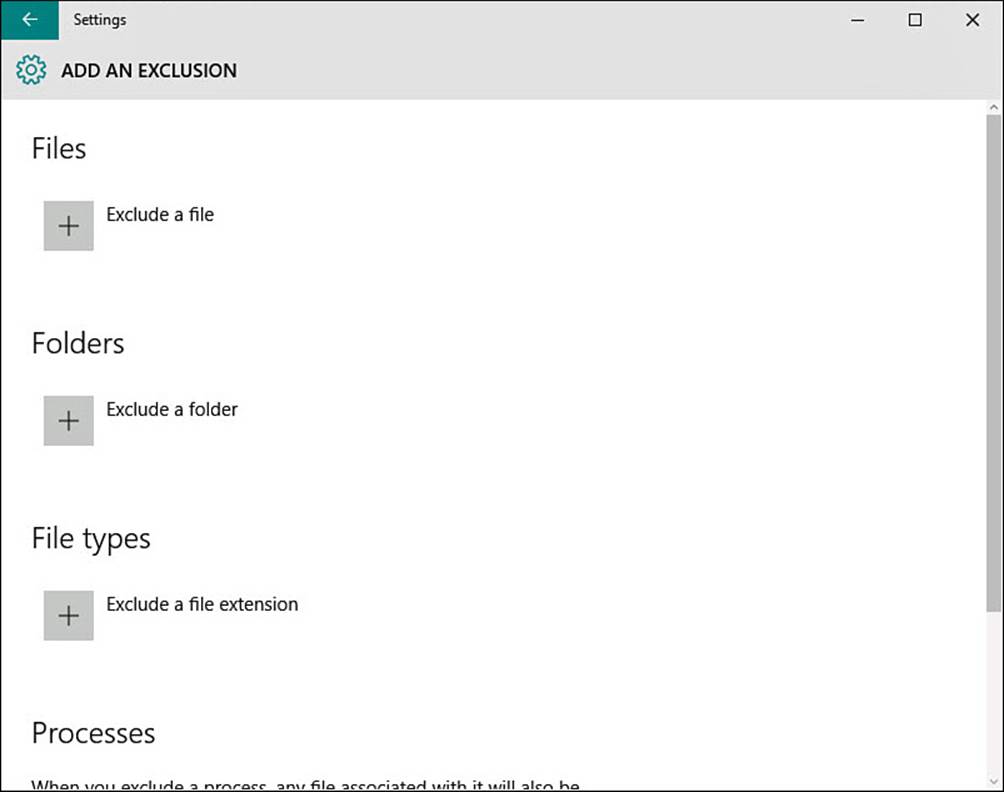
FIGURE BC4.4 Files, folders, file types, and processes can all be added to the Windows Defender exclusion list in the Settings app.
6. Select the back arrow to return to Windows Defender settings (refer to Figure BC4.3).
7. Scroll down to the bottom of Version Info and select Use Windows Defender to launch Windows Defender interface shown in Figure BC4.5. The status should show Real-Time Protection is On and that definitions are up to date. Close the interface.

FIGURE BC4.5 Windows Defender still has its own somewhat hidden interface.
With the steps completed, Windows Defender is set up to provide solid protection against viruses and spyware. You know how to launch the interface for Windows Defender.
Using Windows Defender
There is little for you to do while Windows Defender is running; by default it should automatically receive updated definitions. From the Windows Defender interface, you can initiate scans manually and check the History tab for information on detected threats and actions taken. The only occasion in which you need to take action is when Windows Defender detects a threat, and even then, you might not even be notified that there was a problem. After saving a known infected file to my desktop, it simply disappeared when Windows Defender detected it. The only notice of a problem I saw was in the brief alert that malware had been detected and the PC Status being shown as At Risk in Windows Defender when it was launched (see Figure BC4.6). In some cases you might also see a toast notification when Windows Defender detects and handles malware.
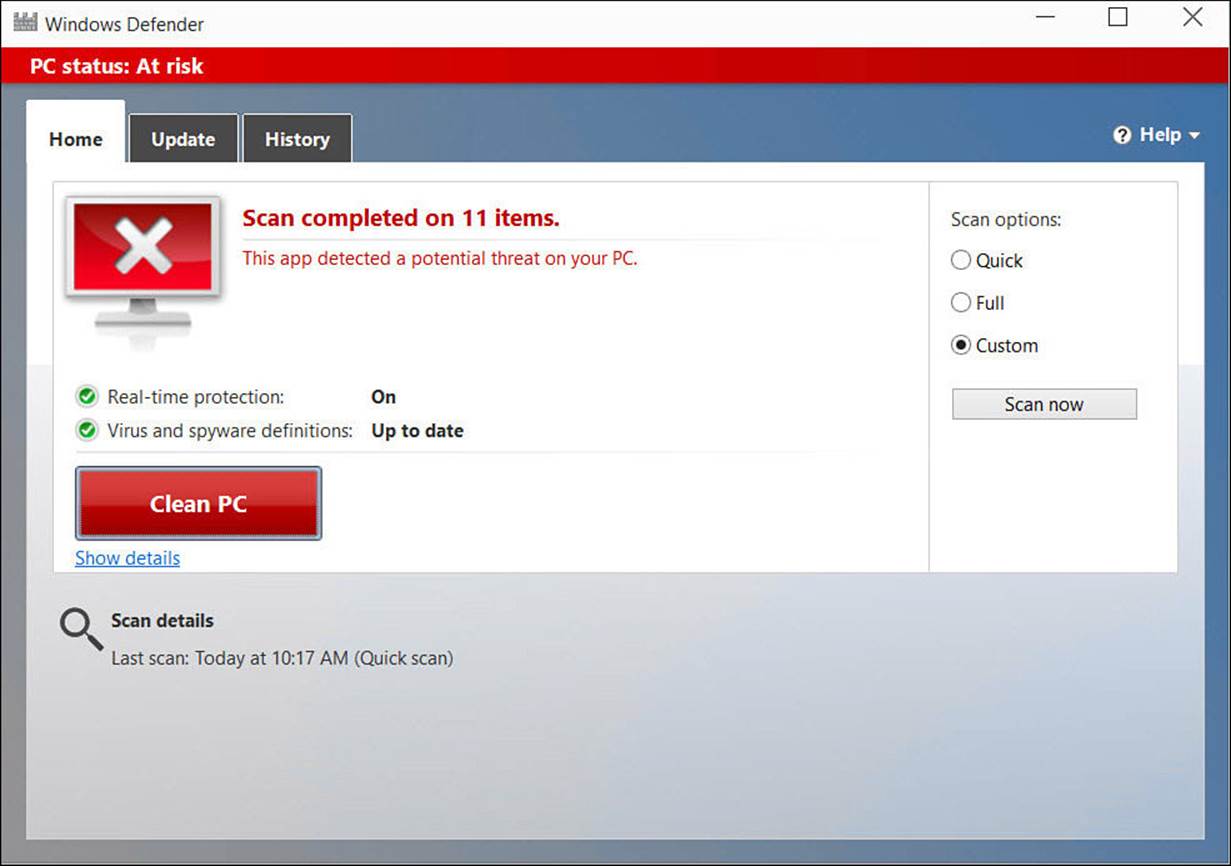
FIGURE BC4.6 Windows Defender is quick to pounce on infected files detected.
In this case, I had used a file that is designed to be identified as an infected file for testing antivirus software. Figure BC4.7 shows the infected file in quarantine, which can be viewed from the History tab. At this point, Defender has already removed the file from the Desktop. This is exactly how the program would react to a real virus introduced unintentionally to your computer.
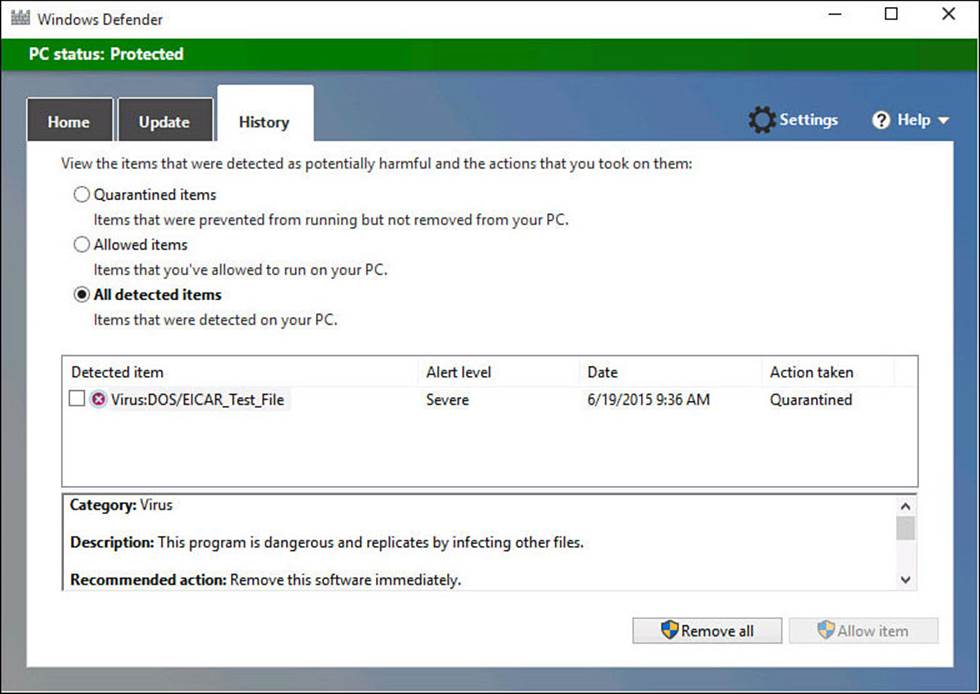
FIGURE BC4.7 You can view files quarantined in Windows Defender.
Checking Your Security Status in Security and Maintenance
Windows 10 provides a means of checking the status of all the settings and controls for protecting your privacy and important personal information. To access the Security and Maintenance, search for a setting named Security and Maintenance. When the Security and Maintenance window appears, expand the Security section by selecting the down arrow to the right of the label, as shown in Figure BC4.8. Some links are provided to enable you to jump to a different interface to modify a particular security setting, but this is just an easy way to verify the status for all security settings in one place.
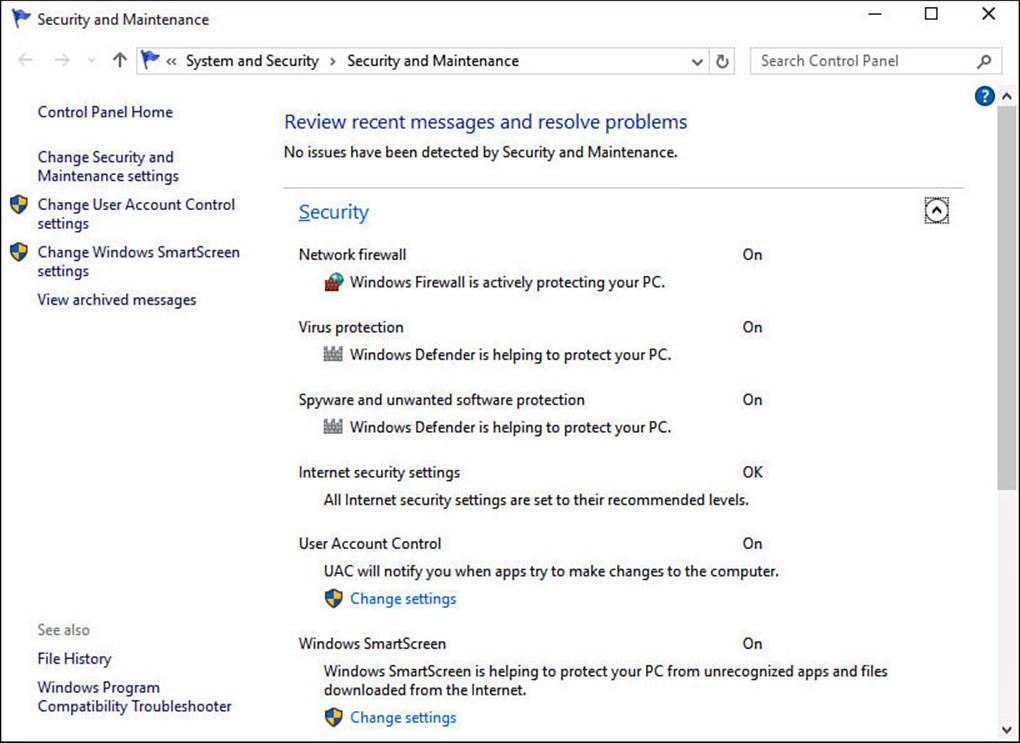
FIGURE BC4.8 Security and Maintenance shows you a status of your security options and settings.
To change settings related to notifications, use the link off to the left labeled Change Security and Maintenance Settings (refer to Figure BC4.8). This will display a long list of checkboxes related to the types of security and maintenance messages for which you want to see alerts. By default, they are all enabled.
Using SmartScreen to Avoid Dangerous Websites
All this discussion about bad people and dangerous sites is made worse by how difficult it can be to tell the good sites from the bad. The SmartScreen feature is designed to stop you before you visit bad sites, and it assists you in a few other areas related to malicious websites.
SmartScreen is built in to Windows 10 and monitors the sites you browse to and the files you download for both suspicious files and sites, as well as for sites that are confirmed dangerous and malicious. SmartScreen is passive and unobtrusive, which means you can usually do your thing and not be bothered unless it notices you are doing something it considers dangerous. There is no reason to turn off SmartScreen filtering except if advised to by a knowledgeable, reputable technical support professional.
Figure BC4.9 shows a typical warning when you try to browse to an unsafe site.
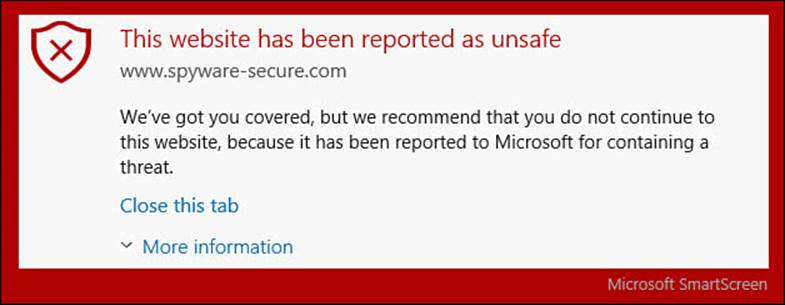
FIGURE BC4.9 This is how SmartScreen reports an unsafe website.
An important part of the defense SmartScreen provides is the ability to block unknown applications and files from being downloaded and run on your computer. When you download an application from a website, SmartScreen kicks in to check if this is a known application or from a known publisher. If the application does not appear on SmartScreen’s list of known applications, the default behavior is to stop the download and require administrator approval to download the application.
Although this can seem a nuisance at times, imagine a child who is just clicking links to download who knows what. The parent, having the administrator account, can look at the application or file to verify this is something she really wants to download. In some rare cases, you may feel the need to change this setting. To do so, follow these steps:
1. Select Cortana’s search box on the taskbar.
2. Enter smartscreen into the Search box, and then select Change SmartScreen Settings from the results list. The Security and Maintenance window will open.
3. Select Change Windows SmartScreen Settings from the links displayed to the left (refer to Figure BC4.8). This will require an administrator account. The Windows SmartScreen dialog box shown in Figure BC4.10 should appear on your Desktop.

FIGURE BC4.10 Windows SmartScreen protects your computer from potentially dangerous application and file downloads.
4. Select one of the radio buttons to change the level of protection, and select OK.
Covering Your Internet Tracks
Your web browser keeps a record of the sites you have visited recently. It keeps this record to help speed up your browsing experience the next time you visit those sites, as well as to make it easy to select a site from a list of those you know the next time you want to visit. This browsing record presents a clear picture of the sites you visit and the pages you browse to. If your computer has multiple users, you might want to delete your browsing history when you are done surfing the Internet.
To delete your browsing history in Microsoft Edge:
1. With Microsoft Edge open, select the More Actions ellipsis (...) from the tab toolbar and select Settings.
2. Under Clear Browsing Data select Choose What to Clear. The list shown in Figure BC4.11 is appears. Check off the items that you want to delete; you won’t break anything if you delete everything. The worst result from clearing all browsing data is reentering passwords that were stored earlier in the browser (which is never a good idea) or reentering certain form data, such as your address and phone number.
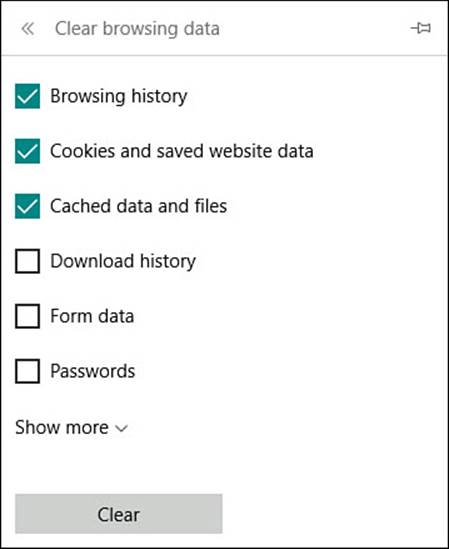
FIGURE BC4.11 To remove browsing history and personal information, you can clear your browsing data in Microsoft Edge.
3. Select Clear to delete your selections.
Note
Internet Explorer 11 is also included with Windows 10 for compatibility with older websites. To delete your browsing history in IE11, select Tools, Safety, and then Delete Browsing History.
Browsing Quietly and Invisibly with InPrivate Browsing
Microsoft Edge provides a mode of browsing that leaves no trail, evidence, or history of your browsing. It is virtually impossible for anyone using your computer to determine the sites you visited using InPrivate browsing. Windows uses a number of features and tools to make your browsing experience a good one, including recording information about your activity at a website and using different technologies to show different content (such as movies or animation) on websites. With InPrivate browsing, Windows engages these tools only as needed and quickly erases any evidence that they were used. Although InPrivate browsing might seem similar to the Clear Browsing History explained earlier, InPrivate browsing actively maintains anonymity while you browse instead of just after the fact.
To switch to InPrivate browsing with Microsoft Edge, select the More Actions ellipsis (...) from the tab toolbar and then select New InPrivate Window. You will see an indicator that this mode has been enabled, as shown in Figure BC4.12. To return to normal browsing, open a new instance of Microsoft Edge or select the More Actions ellipsis (...) from the tab toolbar and then select New Window.
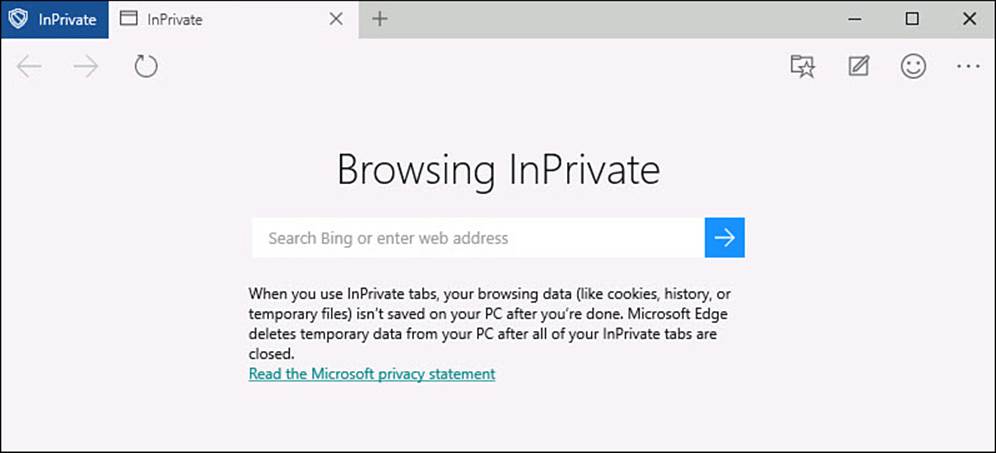
FIGURE BC4.12 To protect your privacy when surfing the Web, InPrivate Browsing can be enabled.
Note
Internet Explorer 11 is also included with Windows 10 for compatibility with older websites. To switch to InPrivate browsing in IE11, select Tools, Safety, and then InPrivate Browsing.
Using Windows Firewall
A software firewall is a defensive barrier between the computer and the network outside of the computer; the Internet is the network with which firewalls are most concerned. Like a physical firewall, a software firewall blocks traffic at the most critical point. A firewall running on a computer like yours usually works with a policy. The policy mandates what information can come through and reach the computer and what will be rejected. The Windows Firewall is aware of most of the mainstream and popular software programs, services, and sites, and it permits traffic out and back between these known sources and your computer.
When the firewall detects communication from an unknown source, it prompts you for action. You can decide whether to permit or deny access. When you acquire new software, there is a chance that the firewall might not recognize it, and you will be asked to create a policy that determines how the firewall should handle communication with the program in the future.
Dozens of rules control the firewall’s behavior, and each rule has at least a dozen settings. It makes sense to keep the firewall running. When the firewall detects a new application/service/site and alerts you to it, you can determine whether to allow it. If you recognize the application/service/site, allow it. If you don’t recognize it, you should deny and then note the source of the warning. You can look into the source, perhaps by searching the Internet, and can later change the rule of the firewall to either deny always or allow connections for this application/service/site.
To check your Firewall settings, follow these steps:
1. From the Search box on the taskbar, enter firewall.
2. Select Windows Firewall from the search results; the Windows Firewall dialog box will open on your Desktop.
3. You can see the current status and policy on incoming connections, as shown in Figure BC4.13. The Notification state lets you see whether you are to be notified or not for specific events.
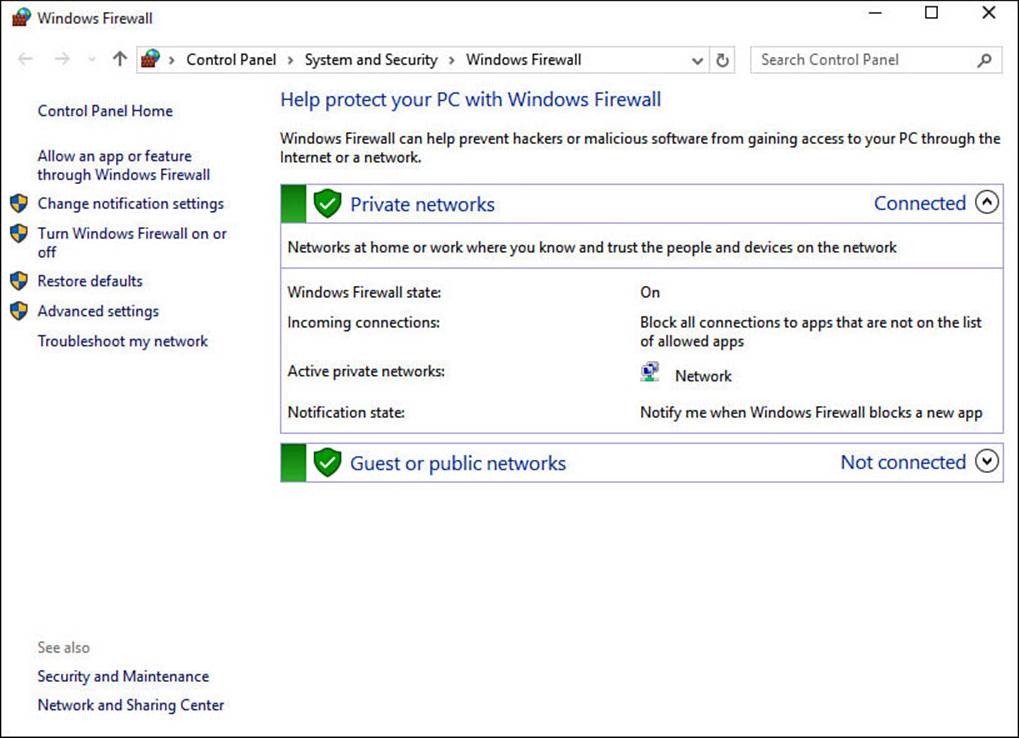
FIGURE BC4.13 You can review current settings and make changes to Windows Firewall.
4. To make changes to policies or settings, select from the choices to the left. This is not recommended unless you have instructions directing you to make specific changes to your firewall. Restore defaults is one of the choices if you suspect changes have been made that should not have been.
One setting you should be aware of is the option to Allow an App or Feature Through Windows Firewall. Select this to open the Allowed Apps list. Use the checkboxes to enable or disable communication through the firewall for specific applications. You can also enable communication while distinguishing between Private and Public networks. This lets you restrict some applications or features from reaching out from your computer on public networks (like a coffee shop), while they can be allowed through the firewall when safely connected to a home network, as shown in Figure BC4.14.
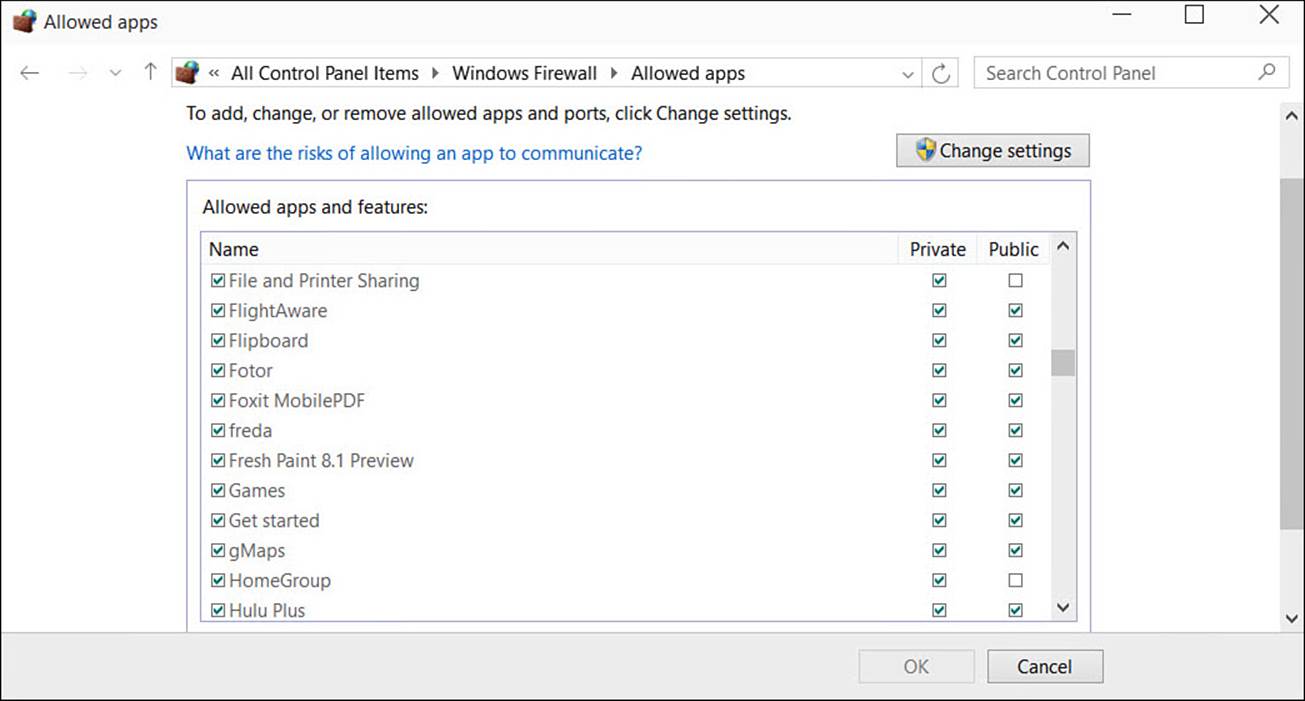
FIGURE BC4.14 You can change whether applications can communicate with networks by allowing or denying them through the Windows Firewall.
Managing All Your IDs and Passwords
If you’ve used the Internet for any length of time, you know that most sites these days insist that you register with them, providing at least your email address and asking you to create a password. It can be frustrating, but unless you want to be a web hermit and visit only sites that enable you to use all their features anonymously, you must comply—and that’s how the trouble starts. How do you maintain all of those user IDs and passwords?
You are certain to have read advice that says not to use the same user ID and password at every site that requires credentials. The thinking is that if somehow your user ID and password is disclosed from one site (which does happen, unfortunately, on a regular basis), then you have put at risk your information at all the other sites where you must sign in. But if you follow that advice, how do you possibly remember all those IDs and passwords?
Hackers have long used dictionaries and other software that takes into consideration personal information for a target. They increasingly analyze common password patterns and tricks that have often been recommended for years, like substituting symbols for certain letters or numbers. While “P@$$w0rd” is certainly stronger than “password,” hackers with current password-cracking software wouldn’t even break a sweat if they tried to crack it. The main idea to take away from this is that you need to make it as hard as possible for unauthorized individuals to gain access to your personal information, and you need to have some password policy in place to manage your passwords.
Here’s some advice you can put to good use:
• Group the sites you visit as follows:
1. Sites that hold important financial or personal information, such as credit card, bank, email, and health-related sites.
2. Sites that have your credit or bank information to make purchases or renew a service.
3. Sites that ask you to register simply to save your preferences.
4. Sites that do not ask you for credentials.
Create unique user ID/password combinations for each site in Group 1 and Group 2. Use just one user ID/password combination for all the sites in Group 3.
• Do not save passwords for Group 1 or 2 in a web browser.
• You can find a number of password generators on the Web. Generate a password for each site in Group 1 and 2.
• Update your passwords at least every few months for Group 1 and 2.
• Pay attention to security questions, and remember the answers you provide. They will save you if you need to reset that complex password.
• If supported, use two-factor authentication for Group 1 and 2. Microsoft has implemented this option, which requires both a password and a short-lived code to complete authentication.
• Avoid any of the following in any part of your password for Group 1 and 2:
• Your name, first or last, or the name of a family member
• Your pet’s name
• A favorite anything, such as food, car, color, actor, and musical act
• Any number relevant to you, such as a street address, part of your birthdate, age, number of children, and so on
• Anything descriptive about you, such as SoccerMom, LionsFan, or JustTurned30
Some good password managers are designed to work with web browsers by keeping all your complex passwords encrypted and then providing the password as needed—you just remember a single password for the password manager. There are also several apps for smartphones that are designed to generate passwords and store passwords for you, which is handy if you need to keep all your passwords with you.
Besides completely random passwords, password-cracking software has a difficult time with creative passwords that avoid common patterns. Try techniques that make it much harder for password-cracking software to recognize patters. The example mentioned previously would be further complicated by adding backward spelling, turning “password” into “dr0w$$@P”. Use phrases rather than words to create memorable passwords. “My two kids love the movie Frozen” could become “M2KlTmF” by using the first letter of each word and then alternating upper- and lower-case letters.
I know that, realistically, people often break down and resort to writing notes for their passwords despite the warnings. In fact, look around your computer area right now; chances are you have a sticky note with a password. Too often people have found themselves in trouble because a co-worker has been able to use their written credentials to cause mischief. At work you might even find that this practice can be grounds for dismissal.
At home this is generally not such a security concern and can actually be a good idea if it will motivate you to use more complex passwords. If you write down passwords, you can still be smart about it. Follow these suggestions if you do find that you need to put passwords down on paper:
• Do not have a neat list of passwords that sits next to the keyboard with sites and passwords. Instead, use some code to help you recall which website a password is for and, if possible, use a password hint rather than the actual password.
• Keep any password information out of sight, and know that under the keyboard is the first place that will be checked. If possible, keep any list locked in a drawer or in your wallet.
The Absolute Minimum
The following are the absolute minimum steps you should take, as well as how often, to protect yourself from Internet threats:
• Consider investing in an all-in-one Internet security suite. This way, you gain access to all the tools you need in one package. Or make sure you know how Windows Defender is configured on your device.
• If your computer is available to others, consider clearing your browsing data from Microsoft Edge when finished, or use InPrivate browsing.
• Exercise extreme caution when you receive an email with attachments. Unless you know the sender and you expect the email with attachments, do not open the attachment.
• Ignore any emails from anyone who asks you for any kind of personal information. Show extreme caution when these emails appear regardless of how official they appear. Just think, would your bank or other financial institution ask you for your account number? Wouldn’t they have it already?
• Implement a password policy if you have not already done so. Keep passwords complex for sensitive websites, and if you do write things down, follow the tips outlined in this chapter.
All materials on the site are licensed Creative Commons Attribution-Sharealike 3.0 Unported CC BY-SA 3.0 & GNU Free Documentation License (GFDL)
If you are the copyright holder of any material contained on our site and intend to remove it, please contact our site administrator for approval.
© 2016-2026 All site design rights belong to S.Y.A.