Windows 10. Absolute Beginner’s Guide (2016)
Part V: Online Bonus Content
Bonus Chapter 5. Resolving Common Problems
In This Chapter
• Solving Basic Windows Startup Issues
• Knowing How to Find and Use the Troubleshooting Wizards
• Using the Contact Support App
• Using Task Manager to Halt a Program
• Learning When and How to Reset Your Windows 10 Device
Microsoft has invested thousands of hours in testing to ensure Windows runs properly, but with a system as complex as Windows 10, it’s impossible to catch every potential issue.
These issues aren’t limited to a feature not working, which is known as a bug in the software business. Sometimes a feature or capability is difficult to use, making it easy for a user to make a mistake or to configure Windows the wrong way. Some problems occur when your computer loses power at the wrong moment or when system files are damaged by malware.
You don’t have to be a Microsoft engineer to fix many of the problems you will encounter, and Windows 10 is resilient when problems do occur. In addition, the troubleshooting tools in Windows 10 can help solve many of these problems. When all else fails and you want to start over, the Refresh and Reset functions enable you to do that.
Although this chapter does not attempt to cover all the problems you might encounter, it does acquaint you with tools and options you might encounter in different circumstances. Keep in mind that Bonus Chapter 4, “Keeping Your Computer Healthy,” has good information related to virus and malware protection. First up is some advice for handling problems that can arise when you start Windows.
Handling Windows Startup Problems
Starting up Windows is usually a predictable and boring event. The computer jumps into action when you press the power button, a splash screen might appear for your device manufacturer, your Lock screen appears, you enter your credentials, and then the familiar Windows Desktop appears. Every once in a while, though, the unexpected happens. A message appears from Windows that you’ve never seen before, or perhaps Windows refuses to start. When the unexpected happens, it’s worth the time it takes to identify the cause. And who knows? Perhaps having read through this chapter, you might even have taken some preventive measures to ensure you are quickly back up and running.
Restarting Windows After a Problem
Microsoft built Windows to handle many problems, but there is always a chance that something can go wrong. Some software programs might interfere with others; hardware you add to your computer might interfere with Windows; and programs you download from the Internet can cause issues. As a result, Windows can freeze, become sluggish, or shut down unexpectedly, and sometimes you might need to force your computer to power down. If Windows unexpectedly shuts down, you might see the screen shown in Figure BC5.1 when your computer restarts.

FIGURE BC5.1 Windows 10 can still get a “blue screen of death,” but you have many more tools at your disposal to recover.
This can certainly be alarming, but notice that even with error messages like this, Windows often is able to reboot automatically and roll back changes that might have contributed to the error. The cause of the error is given, and even though it may not mean too much to you, an Internet search can lead you to an explanation that indicates a resolution.
Startup problems are caused by either software or hardware issues. The steps outlined in this section will resolve pretty much any software problem, with some solutions causing a loss of data. Hardware failures, however, usually require contacting a manufacturer or computer technician to repair the device.
 Tip
Tip
Many device manufacturers install their own diagnostic tools for hardware such as memory, hard drives, and other components. In some cases, these can even be accessed when having trouble booting into Windows. Consult your device’s documentation to see whether diagnostic tools might be available.
When Windows has been unable to boot correctly, it will begin a series of reboots, automatically working through steps to recover from the error. I have found this to often fix boot problems. After perhaps several reboots, if unable to repair the issue, Windows should boot into the Windows Recovery Environment—often referred to as Windows RE. You will see a recovery screen, as shown in Figure BC5.2.
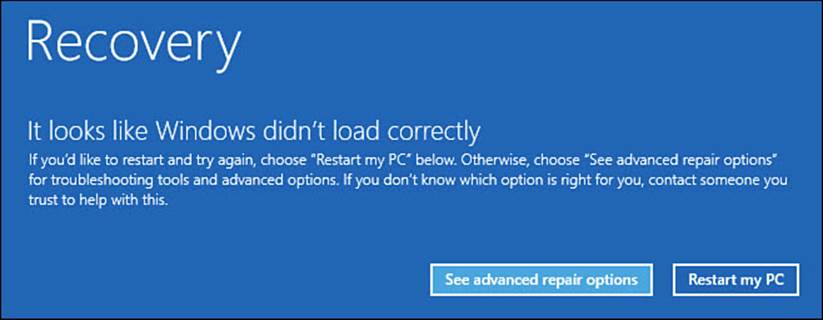
FIGURE BC5.2 The Windows 10 Recovery screen may not be what you had hoped to see, but it will help get you back up and running.
Tip
If your computer will not boot into Windows RE, then you will need to use a bootable Windows RE media (this can be a CD, DVD, or USB drive) to troubleshoot your device. You might want to create a disc or USB drive for this purpose ahead of time just in case—Windows 10 includes a tool to Create a Recovery Drive. To access this tool, type recovery drive into the Start menu search box and then select Create a Recovery Drive.
If you find yourself staring at the Windows Recovery Environment screen, look over the following steps to determine your best option:
1. From the Recovery screen, you have two choices. Select Restart My PC if you think there was some factor that interfered with a normal bootup that is no longer a factor, such as a power outage. Otherwise, select See Advanced Repair Options.
2. You will next see a Troubleshoot screen; again you have two options. Select Reset This PC only as a last resort. Resetting the PC is covered later in this chapter. Select Advanced Options.
 Caution
Reset This PC will remove applications, and it can even remove data. Read onscreen instructions carefully and try everything else before resorting to the Reset tool.
3. The Advanced Options screen will look something like Figure BC5.3.
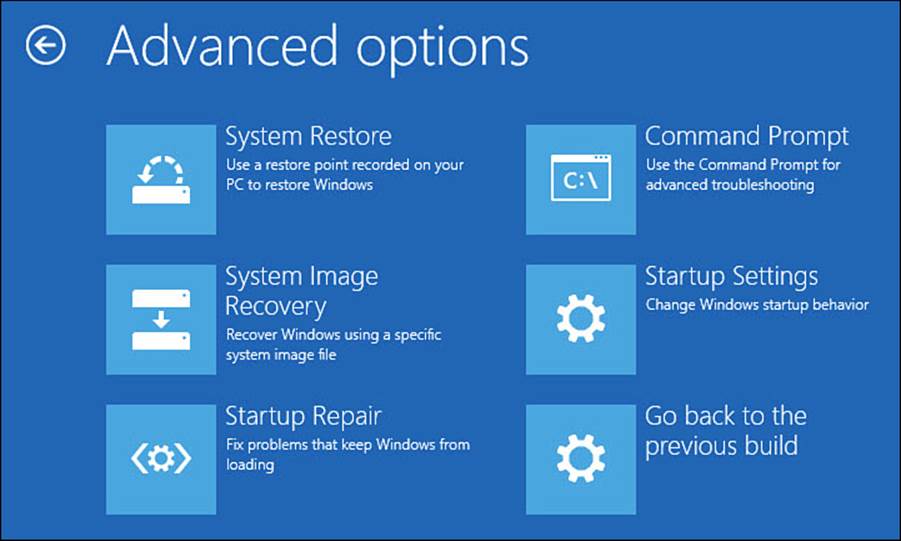
FIGURE BC5.3 The Windows Recovery Environment provides a few powerful tools for resolving bootup problems.
4. The first tool you should try is Startup Repair. This will attempt to repair common problems that prevent the operating system from booting up using diagnostics and running repair tasks.
5. If step 4 failed to resolve the issue, select System Restore to roll back your device to a restore point that has been saved ahead of time. (System files and settings are overwritten using the settings that were good at the time the restore point was saved.) The device will reboot, and you will see a System Restore screen. To proceed, you will be required to select your account and provide your password. Restore points are then shown if available; you might have created several, or you might not see any if you have never created one. Select a restore point and follow the directions to revert to the settings from that date.
6. Another tool that can save you is System Image Recovery. This also requires that an image has been prepared ahead of time. The image could be saved to a hard drive or on a series of DVDs. An image is more extensive than a system restore—all files and settings that are on the computer are recorded into one huge image file. All data that has changed on your device since the image was created will be lost. Think of this as a time machine—essentially your device will step back in time to the moment the image was created. This will resolve a problem caused by viruses, damaged files, or even a replaced hard drive, but it will not resolve a hardware problem. If you have an image that you can use, select System Image Recovery and follow the directions for reimaging your device.
7. Another tool you might use in some situations is to boot into the Startup Settings boot menu. An important tool found here is Safe Mode. Safe Mode allows a person who is a bit more knowledgeable about computers to manually troubleshoot issues related to drivers and run more effective antivirus scans. The boot menu also lets you disable some Windows settings that might inadvertently complicate a problem. Select Startup Settings if you feel comfortable attempting manual troubleshooting in Safe Mode. The Startup Setting screen will appear. SelectRestart.
8. The boot menu shown in Figure BC5.4 will appear. Select 7 or 8 if you have been directed to disable driver signature enforcement or early launch antimalware protection. Do not disable these features without good reason and under direction from a trusted source. Select 9 if you are trying to stop an endless boot cycle while troubleshooting startup issues. Select 5 to boot into Safe Mode with a network connection. Figure BC5.5 shows the Desktop in Safe Mode. Only essential drivers and services are loaded—problem drivers can be rolled back, and because non-Windows services are not running, virus removal can be much more effective.
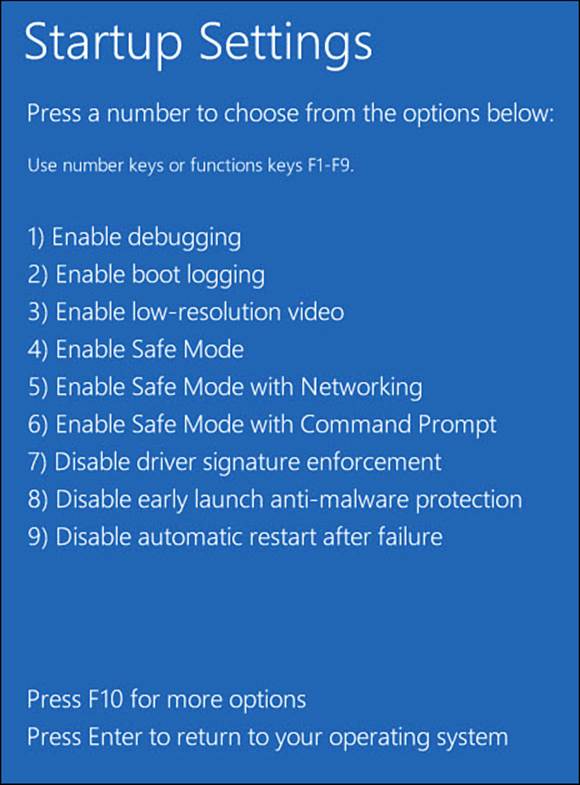
FIGURE BC5.4 The Startup Settings boot menu can provide valuable tools for manual troubleshooting.

FIGURE BC5.5 Safe Mode might enable you to take care of drivers or run more effective virus scans.
9. If none of these methods work and you do not want to take your device to a computer technician, you will have to consider resetting your device using the Reset This PC option. See the section “Understanding Refresh and Reset,” later in this chapter before proceeding.
As you can see, Windows 10 offers some powerful recovery tools that can be used to repair or undo damage that prevents a device from booting up into Windows. However, many of these tools require that preventive steps are taken before the disaster, and some require a bit more knowledge than an absolute beginner will have. Although it can seem unrealistic to have anticipated the need for these measures, it will make you extremely relieved if you have prepared a Recovery Drive, restore point, or even an image when the worst happens. Steps for creating a recovery image or creating system restore points go beyond the scope of this book. You may find it beneficial to consult with a computer repair specialist or research the topic using Microsoft websites. It makes sense to create restore points now and then when things are going well. Recent image files are great resources to have created, but they can be very large and can quickly become dated. Take reasonable steps to create some of these resources, and refresh them periodically.
Password Problems
As much as we hate to admit it, we all forget passwords from time to time. When we forget the password to our computer, it can be especially frustrating. This can happen after a recent password change or when we have unwittingly managed to create a misspelled password. After a failed password attempt, you will see something like Figure BC5.6.
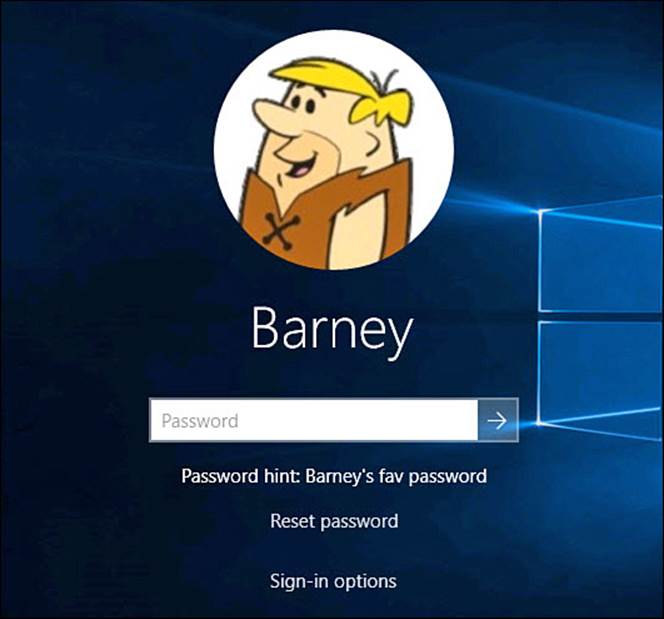
FIGURE BC5.6 If unable to remember a password, you might have a few options to access your account.
Depending on a few factors, you may have a few ways to recover from a forgotten password:
• Select Sign-In Options (refer to Figure BC5.6). If you have another sign-in method in place, use one of those that you do remember. PIN and picture passwords will at least allow you access to the device. You will still need to know the old password to change it, however.
• Look at your Password Hint (refer to Figure BC5.6). Hopefully, you used a hint that helps you to recall the password without making it obvious to an unauthorized person trying to sign in using your account.
• If you are using a Microsoft account, the device will use the last password it knew about. So, if your Microsoft account password has changed, try the old one on your device.
• If you are not able to recall your Microsoft password, use the online forgot password reset tool. Links such as www.live.com will redirect you to a sign-in page for your Microsoft account. Select Can’t Access Your Account, and then follow the prompts to reset the password. Your Microsoft account will have alternative contact information that can be used to verify you are the owner of the account and then allow you to reset the password. You will still face issues of signing into a device that cannot connect to the Internet to verify the new password.
• Select Reset Password (refer to Figure BC5.6) if you have created a password reset disk and are prepared to use it now. The Password Reset Wizard will guide you through the steps needed to reset your password. Windows 10 includes a tool to create a Reset Password Disk with the disk being a USB drive in most cases. It is rare that someone will have created one of these, so if you have and this saves you, congratulations!
• If someone else has an account on this device, she can change your password if her account type is administrator.
Using the Troubleshooting Wizards
Windows 10 has over 20 different tools for dealing with difficulties and trouble you encounter in the software. Each of these troubleshooting wizards focuses on a particular aspect of the software, such as sound problems or connecting to the Internet.
To use a troubleshooting wizard, follow these steps:
1. Select the Start menu search box on the taskbar, and enter troubleshooting.
2. Select Troubleshooting from the list of results. A screen similar to the one shown in Figure BC5.7 appears.
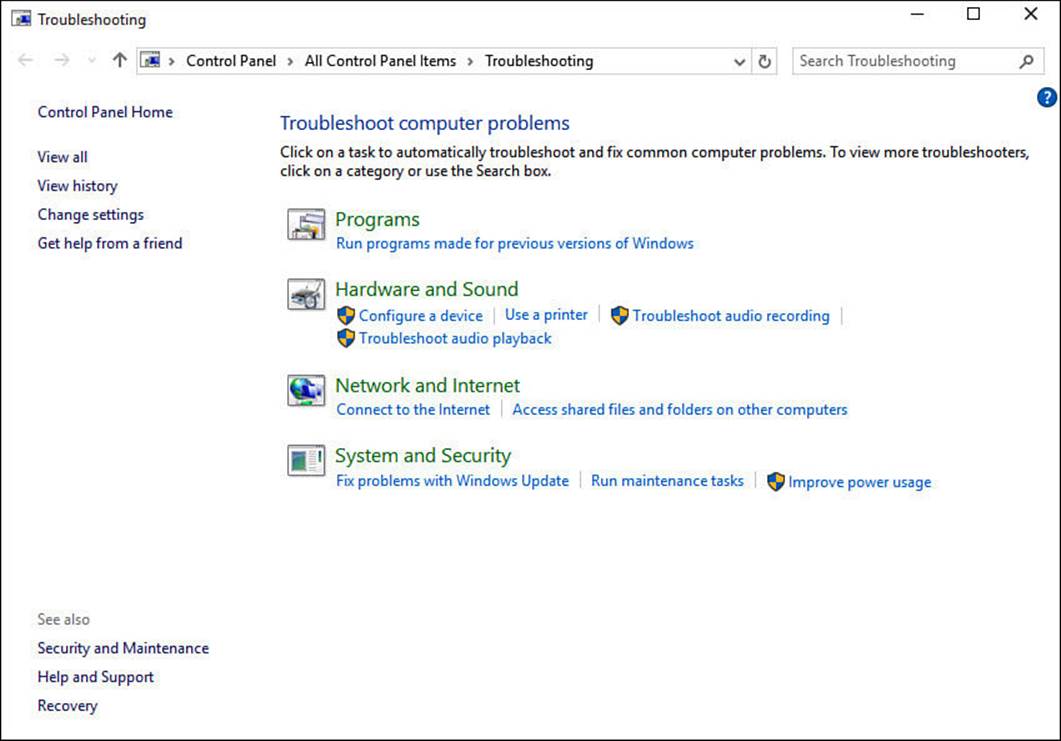
FIGURE BC5.7 Windows shows troubleshooting wizards for many common problems.
3. Select View All. The entire list of troubleshooting wizards appears, as shown in Figure BC5.8. Select the wizard that matches your issue.
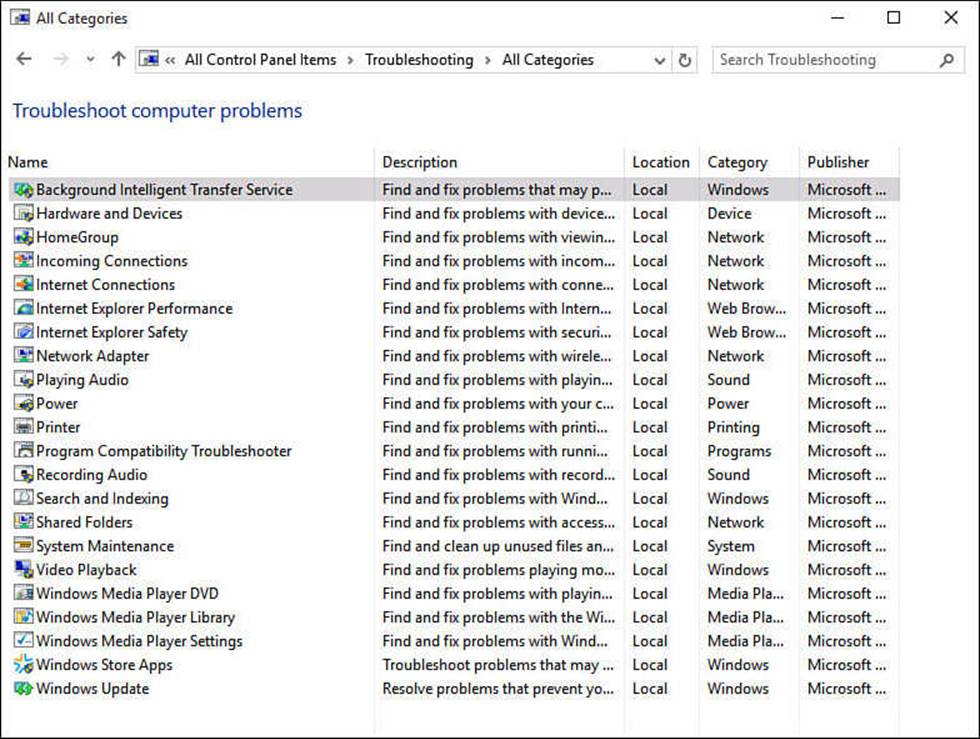
FIGURE BC5.8 You can leverage a number of troubleshooting wizards to solve problems you encounter.
Depending on the wizard you select, you will be prompted to try different solutions and indicate the results. The wizard will try different steps until resolving the issue or until it has exhausted its options. You will be able to try something else or use links to look for further information for the issue online.
Using Contact Support
The Contact Support app is a new feature in Windows 10. Its success is yet to be determined, but it is a very ambitious idea that could prove to be very useful to you when looking for help with a computer problem. The app helps you to set an appointment for a callback from Microsoft, request a callback ASAP, or initiate a chat session.
Follow these steps to use the Contact Support app:
1. Select the Start menu search box on the taskbar, and enter contact.
2. Select the Contact Support app from the list of results. The app will open, as shown in Figure BC5.9. Select from the list of issues to indicate the nature of your support request. Each selection will open subcategories for general issues. Use the back arrow to return to the previous screen. Some issues can take you to a Microsoft website for support information.
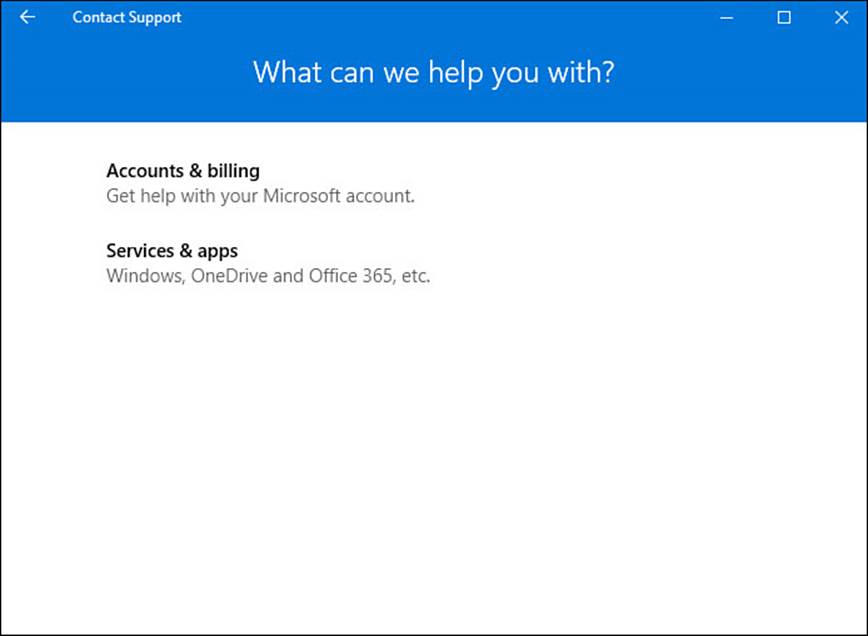
FIGURE BC5.9 Windows 10 includes a Contact Support app designed to get expert help with Windows-related issues.
3. After you have identified your issue, select the type of support you are requesting from the available choices, as shown in Figure BC5.10.
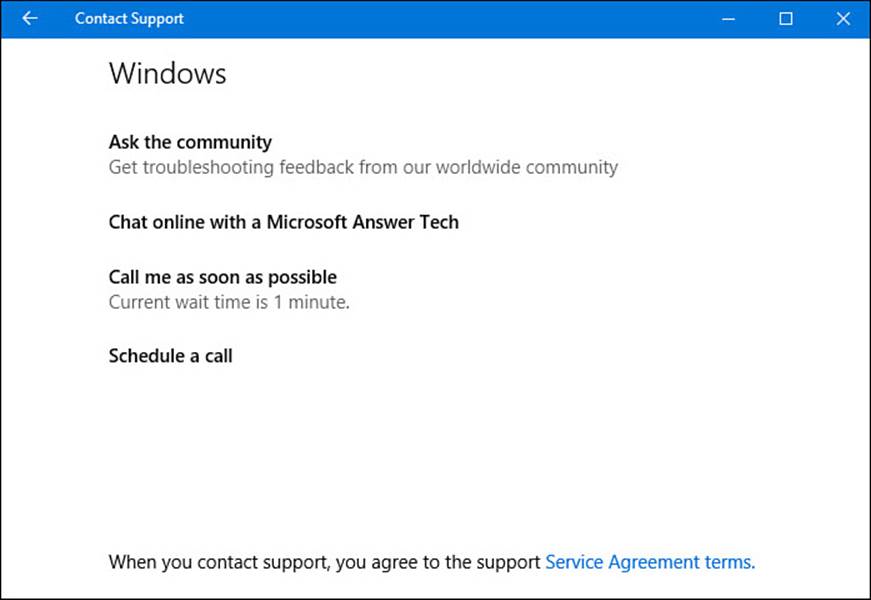
FIGURE BC5.10 Identify your issue and then indicate what form of support you want to request in the Contact Support app.
Using the Contact Support app requires a Microsoft account. The potential scope of this service is impressive. The wait time depends on how many people are using the service before you.
Tip
It is recommended that you use this tool only after you have tried to find an answer on your own. It would be a shame to see this service suspended as a result of frivolous questions and abuse.
Using Task Manager
The Task Manager is a utility that lets users with administrator access see the programs running in Windows 10 and the impact they have on system resources. You can see how much memory a program is gobbling up, whether one program is dominating use of the CPU or other system resources, how much data is transmitted by certain programs, and lots more.
Not everyone needs a deep appreciation for all the information presented in Task Manager. Actually, you would need expert knowledge in computer science and technology to truly understand the significance and meaning of many of the reports shown. However, one item of interest a beginning Windows 10 user might appreciate and learn to leverage is how to shut down a stuck Desktop application.
Once in a while, a program stops functioning for no apparent reason. You know when this occurs because the program seems to dim on the screen and the title of the program has the phrase Not Responding tagged on to the end of it. When the program is unresponsive to your mouse clicks or tap for more than a couple minutes, it’s likely the program has left and is not coming back.
In the past, you might have been forced to shut down your entire computer to bypass an issue with one locked program. Those days are gone. In Windows 10, if a program locks up, you can close it down with help from the Task Manager.
To shut down an unresponsive application using Task Manager, follow these steps:
1. Press Ctrl+Alt+Delete on your keyboard, or right click the taskbar, or search for task manager in the search box on the taskbar. In any of these cases, select Task Manager.
2. The Task Manager will open, as shown in Figure BC5.11. Select an unresponsive application, and then select End Task.
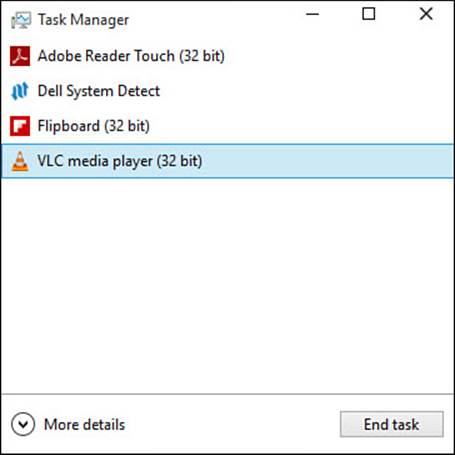
FIGURE BC5.11 Task Manager can be used to stop an unresponsive application.
3. To see more details about your system, select More Details. Task Manager will expand a bit to show multiple tabs and much more detail, as shown in Figure BC5.12.
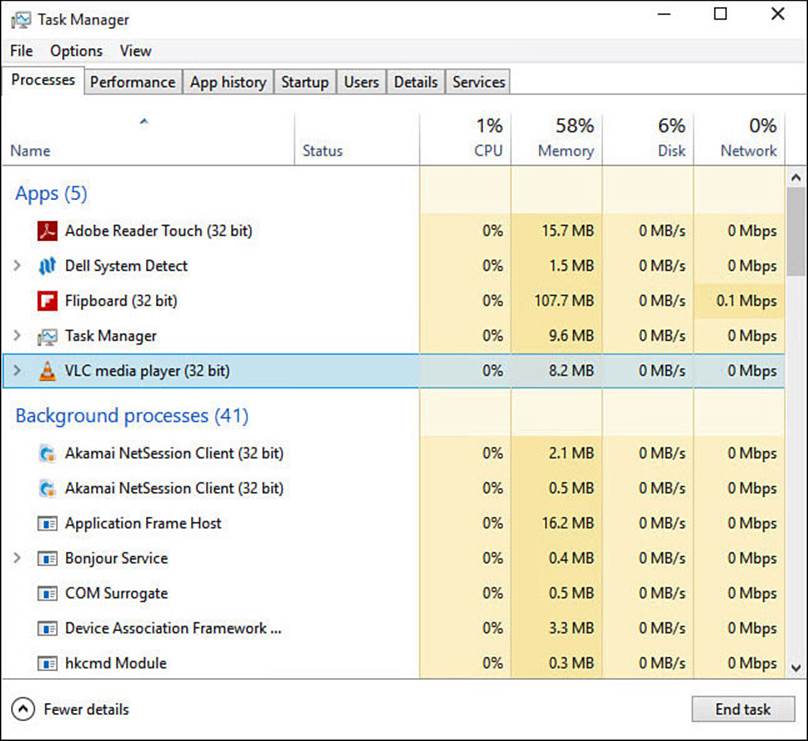
FIGURE BC5.12 Task Manager can reveal a lot about the performance of your device by means of many types of detailed reports.
The detailed Processes view of the Task Manager will show which applications and processes are responsible for CPU, Memory, Disk, and Network load. This can help identify an application that is causing an excessive system load. Sometimes you might see multiple instances of the same application, such as several web browser instances that relate to individual open tabs or multiple documents open using the same desktop application.
Other tabs that can be useful for troubleshooting problems to an absolute beginner include
• Startup—The Startup tab lists processes that are queued to automatically start with Windows. Many processes can make their way here over time, especially when installing Desktop applications. The column Startup Impact lets you know how much extra load the process creates when you start Windows. Low will have little effect; High can contribute to noticeable delays when starting Windows. Look over your list, and if you see nonessential processes, you can select them and then select Disable to prevent the process from automatically starting in the future (refer to Figure BC5.13). Do not disable processes you are not sure about until first checking them out. Right-click a process, and select Search Online to find out whether the process is needed.
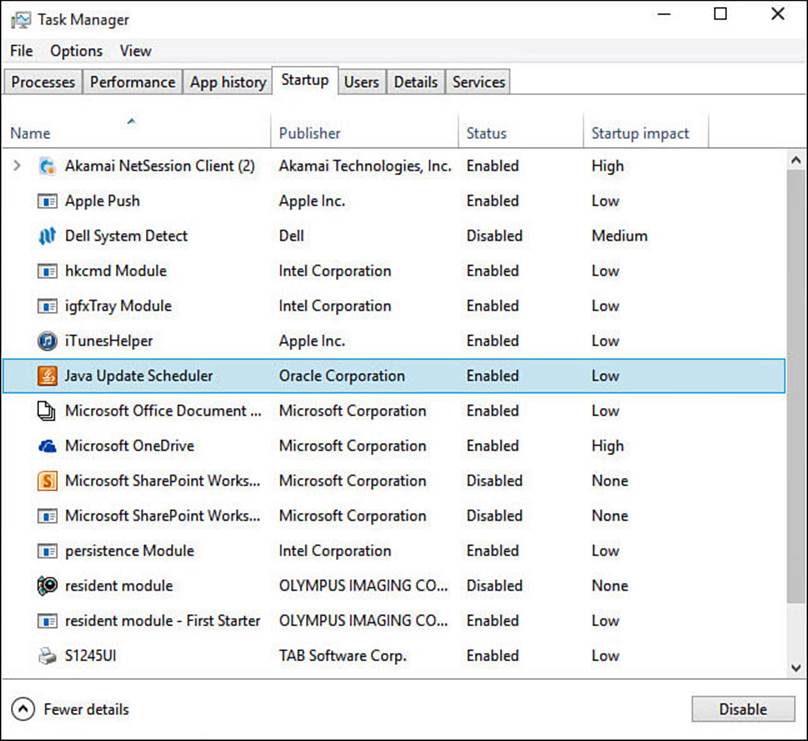
FIGURE BC5.13 Task Manager allows you to manage the applications that start up with Windows.
• Services—The Services tab can be used to manage all services used on your device. You can verify services are running, start and stop services, and even change whether they should start automatically or disable them altogether. Again, caution should be used here, and changes should not be made unless instructed by a trustworthy resource.
Caution
The Task Manager has many settings that could negatively affect the performance of your device if you disable or change the wrong thing. Always research before making changes, and note changes made in case you need to undo changes to processes and services that have caused unexpected changes.
Understanding Reset
Once in a while, no matter how much advice you’ve received or troubleshooting you have tried, you might need to take a step back and restart your experience with Windows. This doesn’t refer to forgetting what you’ve learned. Rather, it may be wise to reinstall Windows or to go back to a point before you started customizing Windows 10 and installing applications. Short of backing up everything, deleting everything on your computer, and reinstalling Windows and all your other programs, you have two options to start over. The options are both part of Reset, and they include a partial refresh of the device, retaining your documents, or a complete and fresh reinstallation of Windows 10.
Getting a Do-Over with Reset
Reset is designed to undo everything that might have been done that has made the computer perform less sharply than before. You can choose to reset your device without deleting your personal files or any of the settings that affect the appearance of Windows. Rather, the settings that control how Windows 10 operates are set back to their original values. This type of reset was introduced with Windows 8 under the name Refresh, and for this reason, it is sometimes still referred to as refresh.
This reset option is a great way to restore Windows to a state where it was running properly without investing the time to reload all your files and modern apps. The drawback is that you will need to reinstall applications. Any modern apps you have acquired through the Windows Store will need to be reinstalled—not such a big deal. A bigger pain is that any Desktop applications will need to be reinstalled, and you will need to have any required licenses or keys on hand to reactivate them. If you have purchased and downloaded applications, this can require some preparation to locate emails or to note license information from within an application.
To refresh your system, follow these steps:
1. Select Settings from the Start menu to open the Settings app.
2. Select Update & Security and then Recovery to find the Reset tool, as shown in Figure BC5.14.
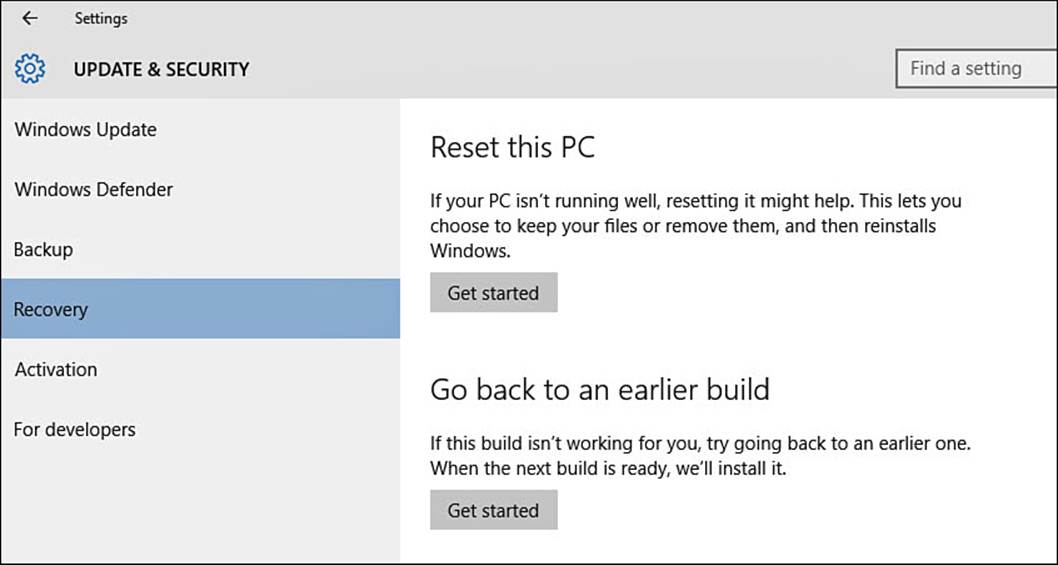
FIGURE BC5.14 When you need to start over, use the Reset tool to get a clean start.
3. Select Get Started under Reset This PC. A pop-up will appear, as shown in Figure BC5.15.

FIGURE BC5.15 Choose from two types of reset: with your documents or without.
4. Select Keep My Files. Windows will start to prepare for the reset, and you will see a summary of what will be reset, as shown in Figure BC5.16. Select Reset to begin the process.
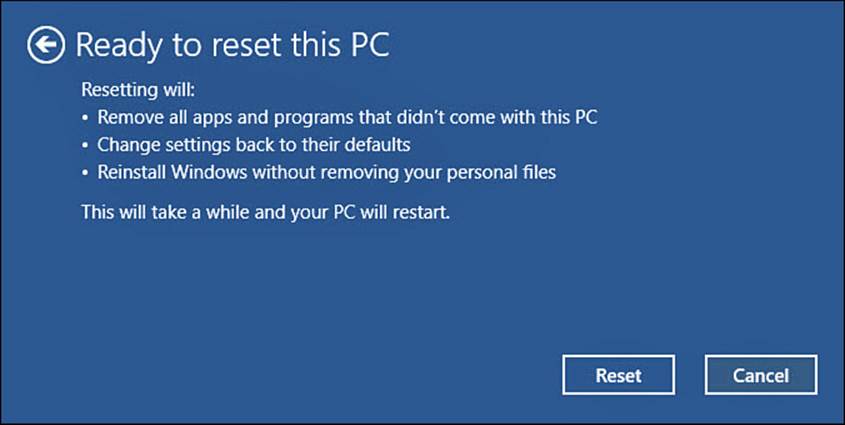
FIGURE BC5.16 Refresh your Windows 10 device to get a fresh start without losing your files and settings while returning Windows to its just-installed state.
This type of reset will retain your account information, and you will be able to sign in with the same password you had before. Your documents, photos, and videos will all be in the same place when finished.
Starting from Scratch with Reset
Reset can also restore the computer to a like-new state. The computer is returned to default settings with a newly installed copy of Windows, removing any trace of your accounts, applications, or files.
Use the Reset option in these situations:
• You want to rebuild your Windows 10 environment from scratch, installing everything again and setting every option again. Use the Reset option in this scenario only if you have backed up your personal information to an external drive (not to the drive on which Windows 10 is installed).
• You want to give away or sell the computer but want Windows 10 running on it when you do.
Before Windows 10 is reinstalled, the Reset program can clean all of your hard drives of your files or just the main system hard drive. You also have the option to completely erase any drives beforehand. You might have heard that some clever individuals can still access files that have been deleted or were stored on a file that has been formatted. This option specially formats the drive so that it would be extremely unlikely for someone to recover your files from the drive.
To completely reset your system, follow these steps:
1. Select Settings from the Start menu to open the Settings app.
2. Select Update & Security and then Recovery to find the Reset tool (refer to Figure BC5.14).
3. Select Get Started under Reset This PC. A pop-up will appear (refer to Figure BC5.15).
4. Select Remove Everything. Windows will ask whether you want the hard drives cleaned, which is the more secure option, or if you just want to do a quick reformat of the hard drive as shown in Figure BC5.17.
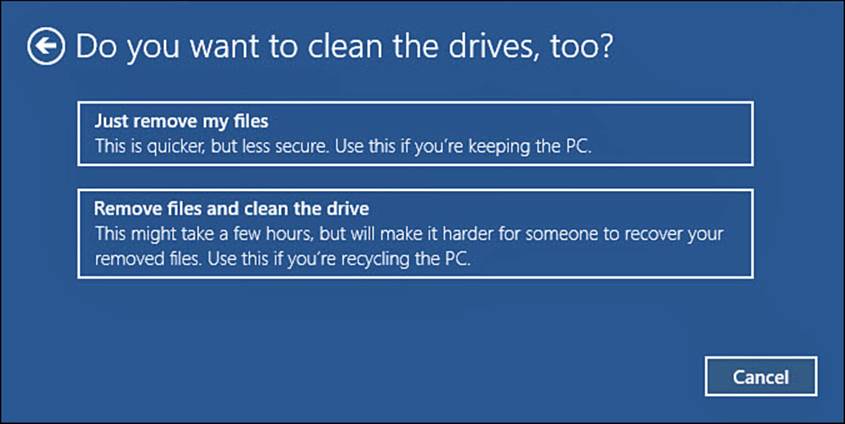
FIGURE BC5.17 Reset can securely clean your hard drives before selling or donating your device with a new copy of Windows 10.
5. A summary similar to the one shown in Figure BC5.16 will indicate what steps are about to be taken. Select Reset to begin the process.
This type of reset will remove your account information, and if you have multiple hard drives, it might offer to clean these as well. Make sure that you read the choices before you wipe all hard drives if you only wanted to clean the main system hard drive.
The Absolute Minimum
• You might want to save a Restore Point or even an image to ensure that you have a place to jump back to if your device develops problems that prevent booting up.
• Use the Contact Support app to chat with a Microsoft expert when you run into problems you cannot resolve.
• Use the Task Manager to troubleshoot performance issues.
• Use the Reset program to retain your files while resetting Windows 10 to the default settings.
• Use the Reset program to prepare your computer to be sold or donated or to create a fresh copy of Windows 10 loaded in your computer.
All materials on the site are licensed Creative Commons Attribution-Sharealike 3.0 Unported CC BY-SA 3.0 & GNU Free Documentation License (GFDL)
If you are the copyright holder of any material contained on our site and intend to remove it, please contact our site administrator for approval.
© 2016-2026 All site design rights belong to S.Y.A.