Windows 10. Absolute Beginner’s Guide (2016)
Part I: Getting Started
6. Finding Your Way Around the Windows Desktop
In This Chapter
• Learning About the Windows Desktop
• Learning About Desktop in Tablet Mode
• Working with Virtual Desktops in Task View
• Working with the Taskbar
• Keeping the Desktop Organized
Change is never easy to get used to, especially when it involves a device we use and rely on day in and day out. Microsoft has done an admirable job in bringing changes and updates to the Windows platform without sacrificing many of the familiar features that have made Windows the go-to computer operating system for businesses and consumers.
Windows 8 had relegated the Desktop to such an extent that many people were uncomfortable with the drastic departure from previous versions. Many popular features have been reintroduced into Windows 10, so whether you’re a long-time user or a newbie, this chapter is sure to be useful in familiarizing yourself with the Windows 10 Desktop.
Introducing the Desktop
One of the goals Microsoft pursued in designing Windows 10 was to combine the media-driven computer user experience that was the focus of Windows 8 with the Desktop-centric experience familiar to the productivity-oriented user from previous versions of Windows. Modern apps and Desktop applications can be used together without fighting for screen space.
The Desktop, shown in Figure 6.1, provides an environment where apps can be positioned strategically on your display or can be full screen. Folders and documents can be saved on the Desktop. The taskbar that runs along the bottom of the Desktop can be customized, and it is home to many important tools.
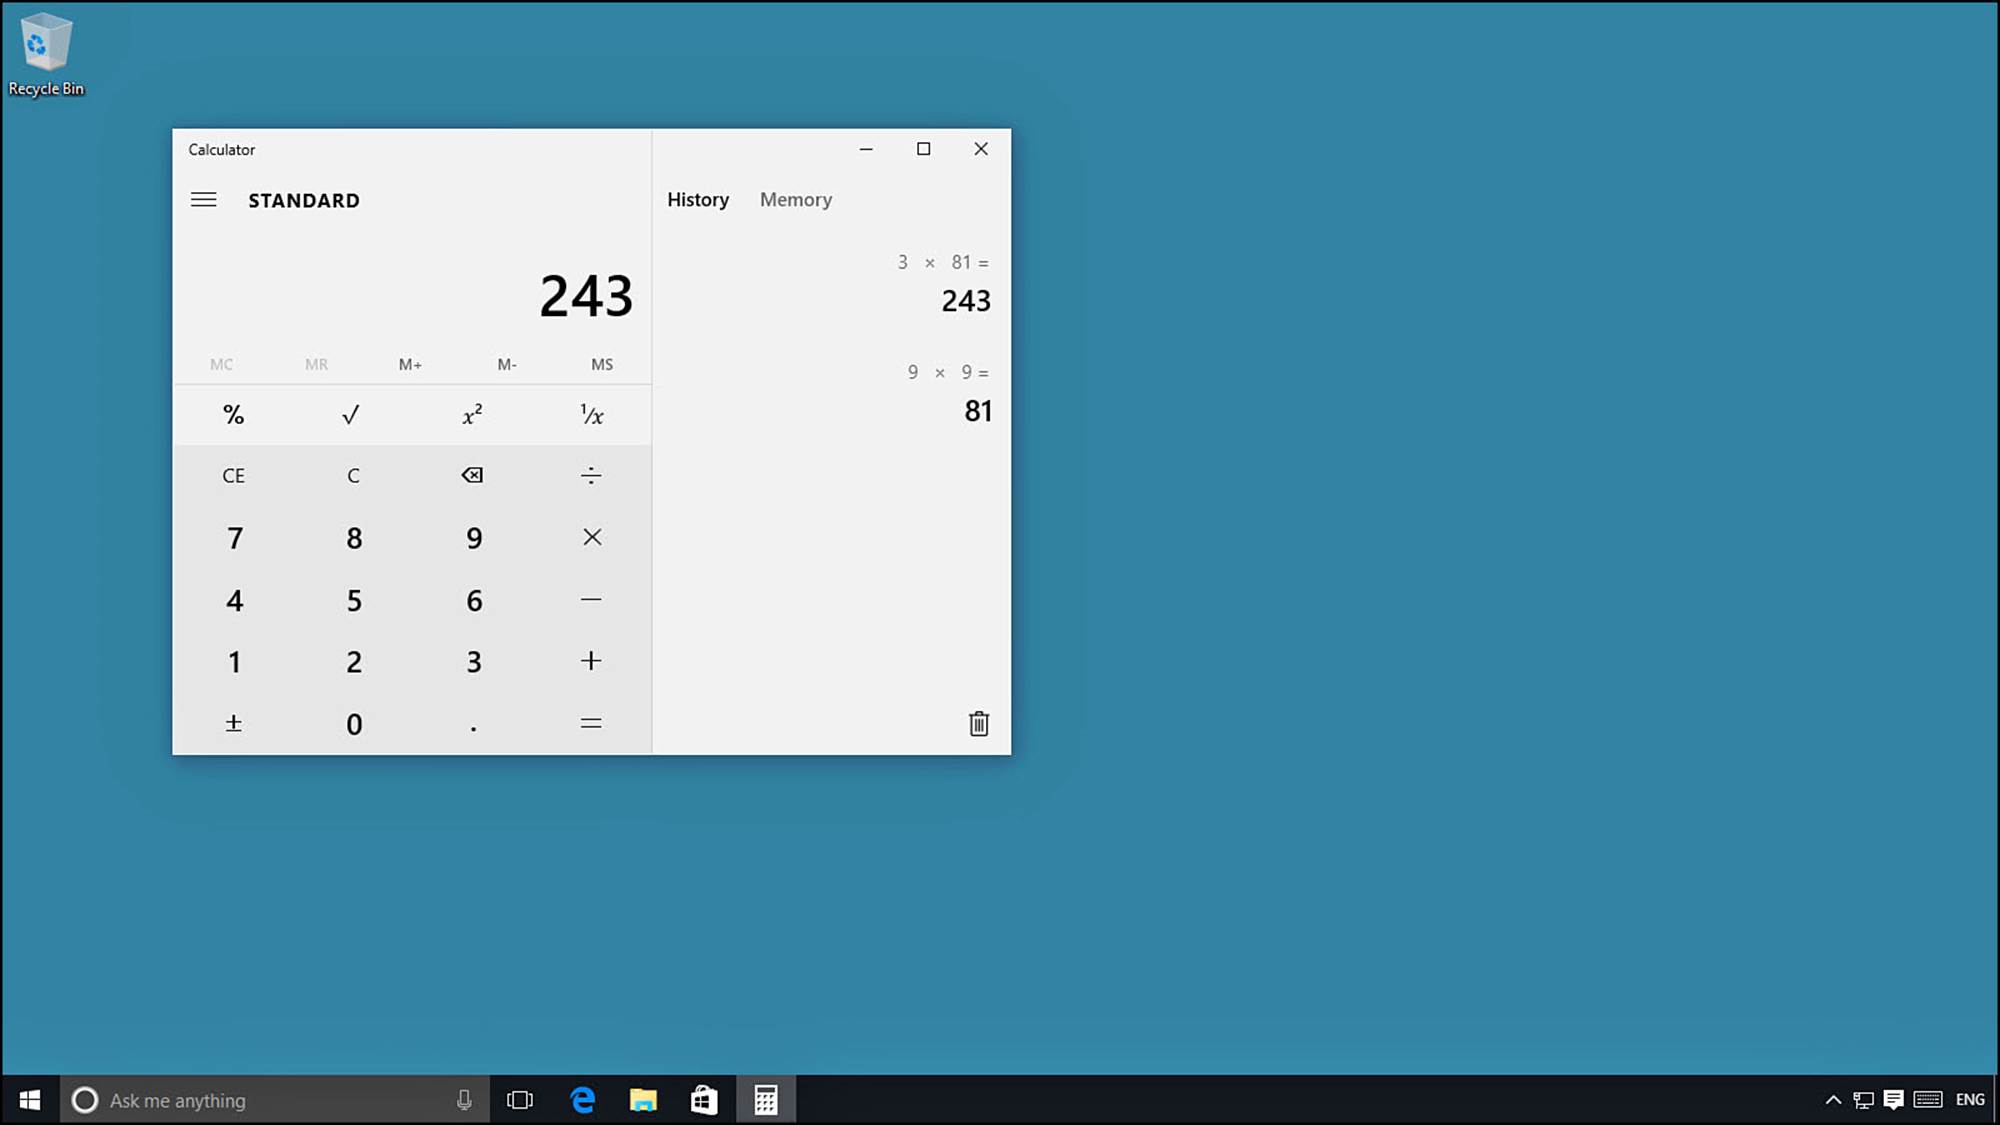
FIGURE 6.1 The Windows 10 Desktop is similar to the Desktop of previous versions of Windows.
The desktop will behave differently depending on whether you are in Tablet mode or Desktop mode. You can quickly change modes by opening the Action Center and selecting Tablet mode to enable or disable Tablet mode. (Tablet mode is covered in more detail in Chapter 2, “Interacting with Windows.”) In Desktop mode, applications run in resizable windows by default, and several open windows can be accommodated and positioned at whim. While in Tablet mode, applications run full screen by default. Several applications can be open and “snapped” to portions of the screen if your screen size accommodates this. The differences are highlighted in the following two sections.
Using the Desktop in Desktop Mode
While your device is in Desktop mode, open applications can be resized and positioned with few restrictions. Applications or apps that are open appear on the taskbar (refer to Figure 6.1). Windows makes some tasks easy by using snap to quickly locate and resize an application. Snapping an application takes place when you drag the title bar of the application’s window to an edge of the display. As shown in Figure 6.2, Windows offers an outline on the screen to show you where the application will appear when snapped.
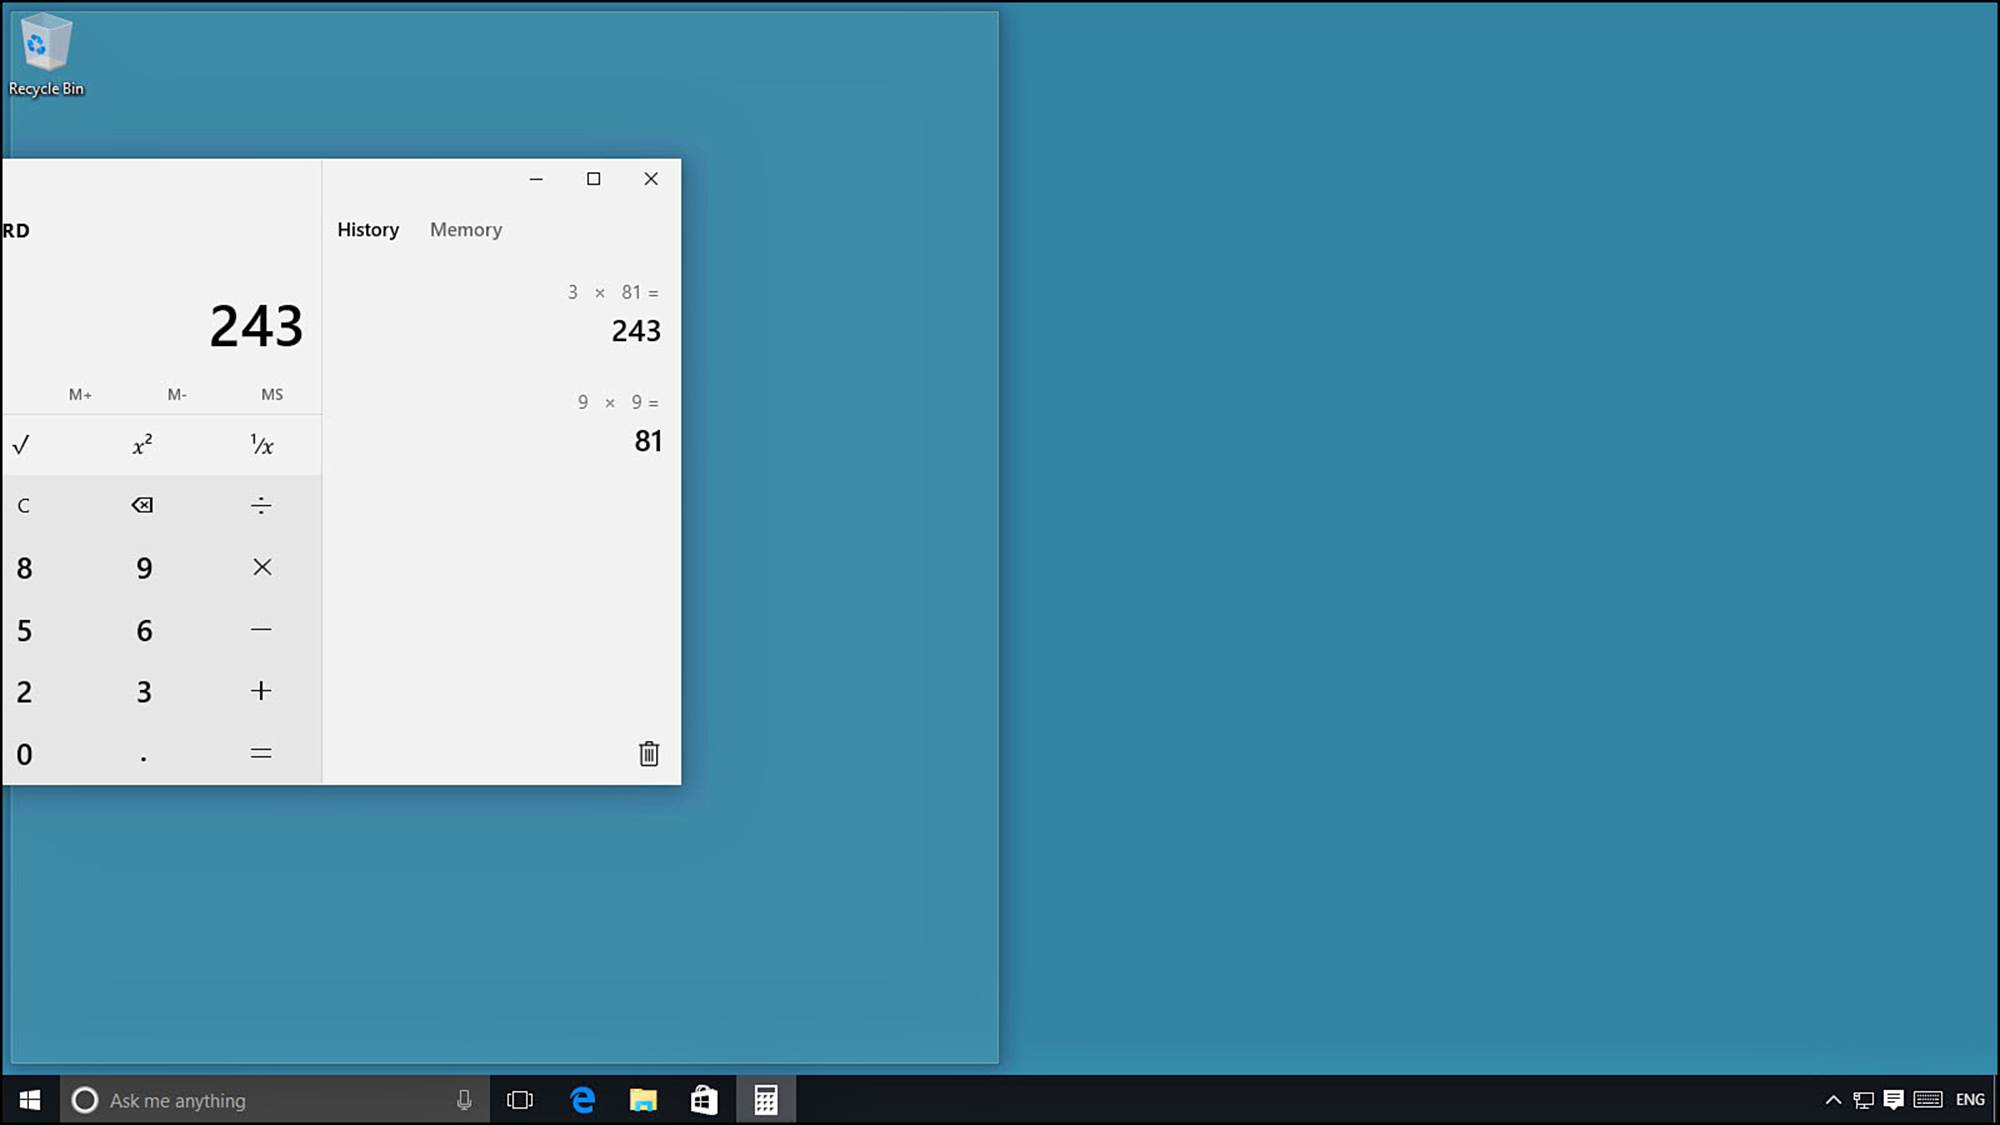
FIGURE 6.2 Snap applications to edges of the display to quickly locate and resize them.
To snap an application in Desktop mode, follow these steps:
1. Open an application or an app while in Desktop mode.
2. Select the title bar of the application or app, and drag it to the left or right edge of the screen. Windows will show an outline for the resized application. Release the application to snap it to this location.
3. After an application has been snapped, Windows will offer to snap another open app to fill the rest of the screen. As shown in Figure 6.3, select one of the very large thumbnails to fill the rest of the screen.
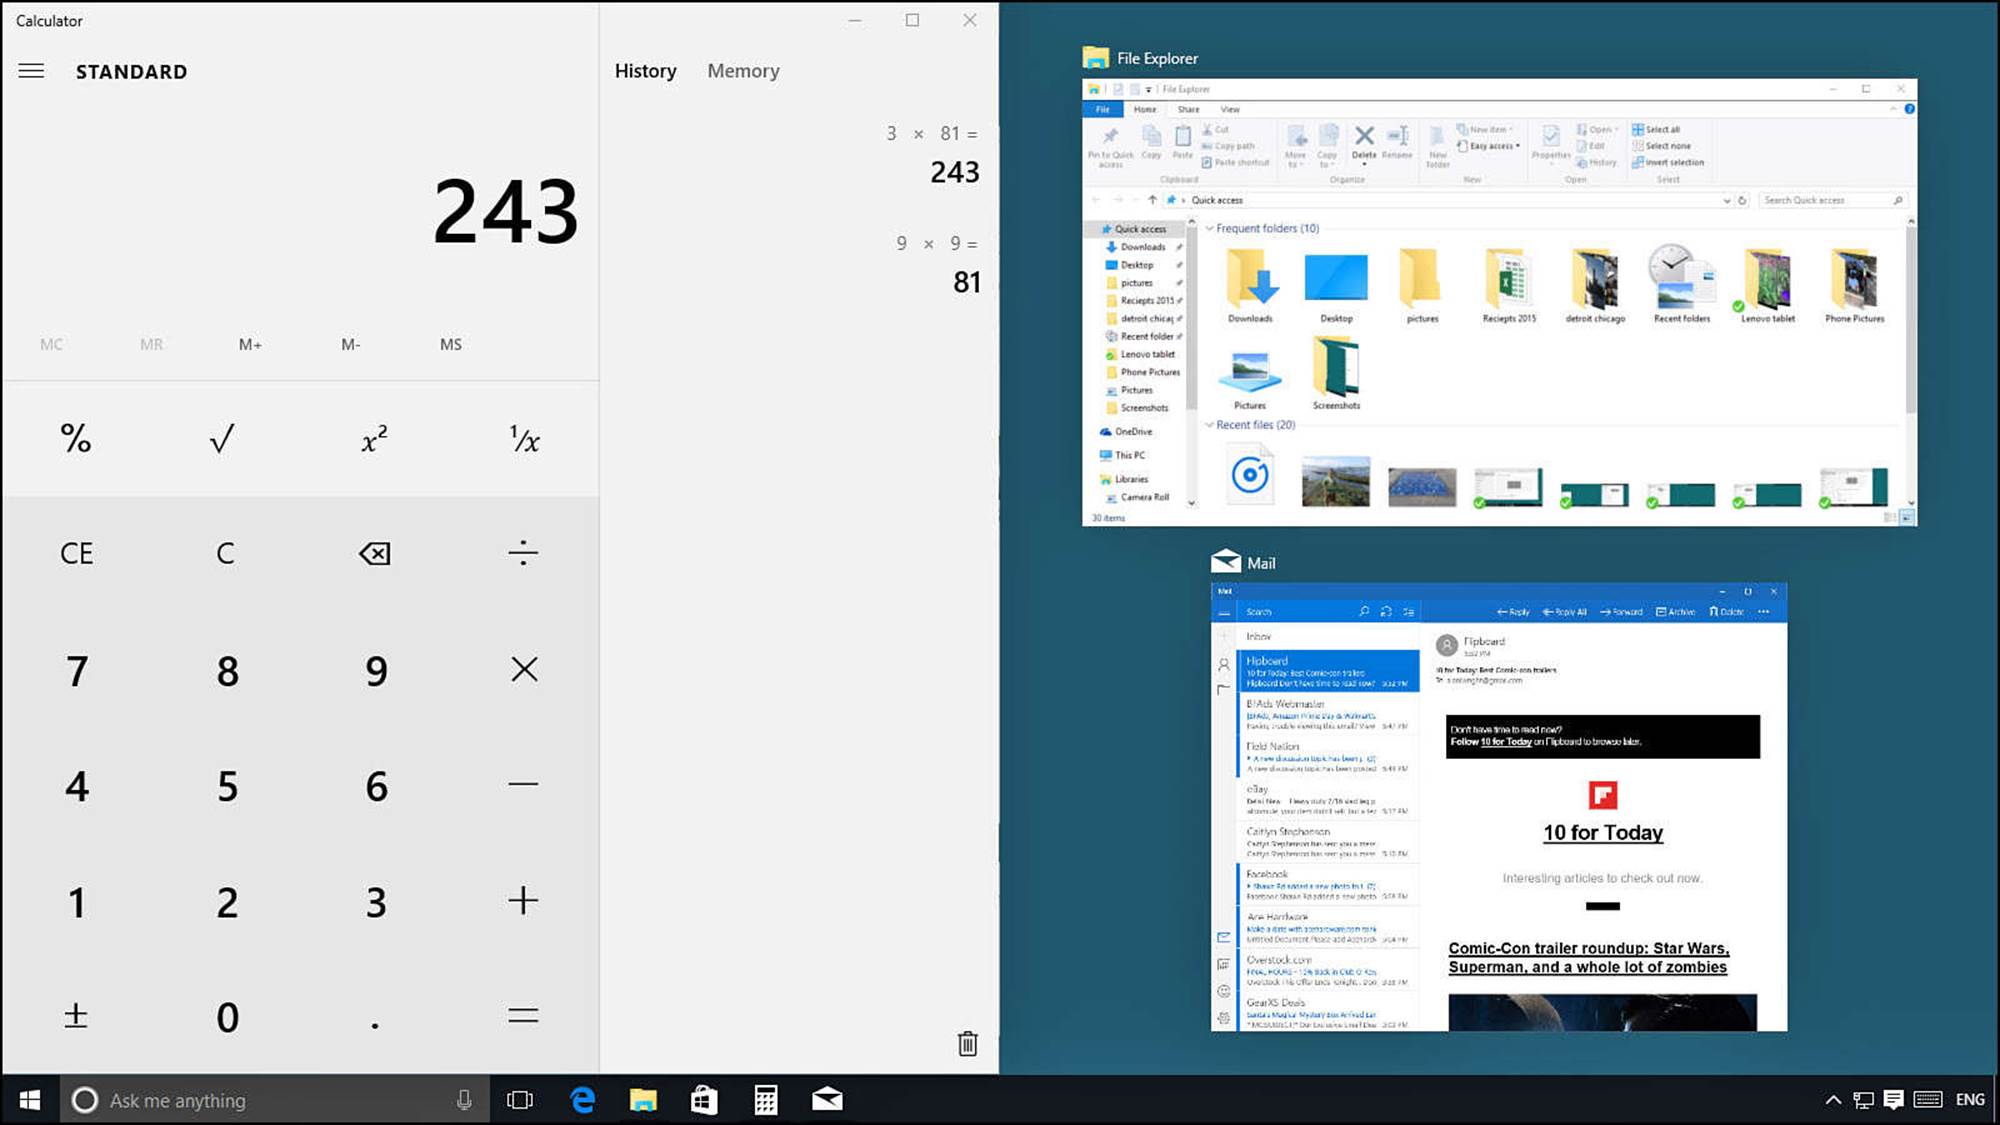
FIGURE 6.3 When snapping applications to the screen, Windows will proactively offer to fill the rest of the screen with other open applications.
4. Select the title bar again and drag away from the edge of the display. The app will resume its normal size and can be released to position it.
5. Select the title bar again and drag to the top edge of the display. The outline will swell to fill the entire screen. Release and the application will be full screen. (You also can accomplish this by double-clicking the title bar.) Other applications will remain open and running behind the full screen application.
6. Select and drag the title bar again and drag to an edge in one of the corners of the display. If your screen resolution allows for it, the application will fill a quarter of the screen. Lower resolution settings will allow you to snap to only half of the screen.
When running multiple applications on the Desktop, the taskbar becomes very important for keeping track of what is open. All open applications appear on the taskbar with a line under their icon. Whichever application is currently selected will also show its icon highlighted (refer to Figure 6.1).
A desktop can quickly become cluttered after several applications are open and overlapping. While in Desktop mode, the taskbar has a useful tool that was first introduced in Windows 7 and that allows you to temporarily become Superman. Bring your cursor to the far right end of the taskbar, and hover it over the Peek tool—also called the Show Desktop button—for a second or two. (The Show Desktop button appears as a narrow vertical piece of the taskbar to the right of the notification area.)
As shown in Figure 6.4, when Peek is activated all open windows become transparent, and you can see through them with your x-ray vison to the desktop. The Peek tool can do more; simply select it to minimize everything revealing your Desktop.
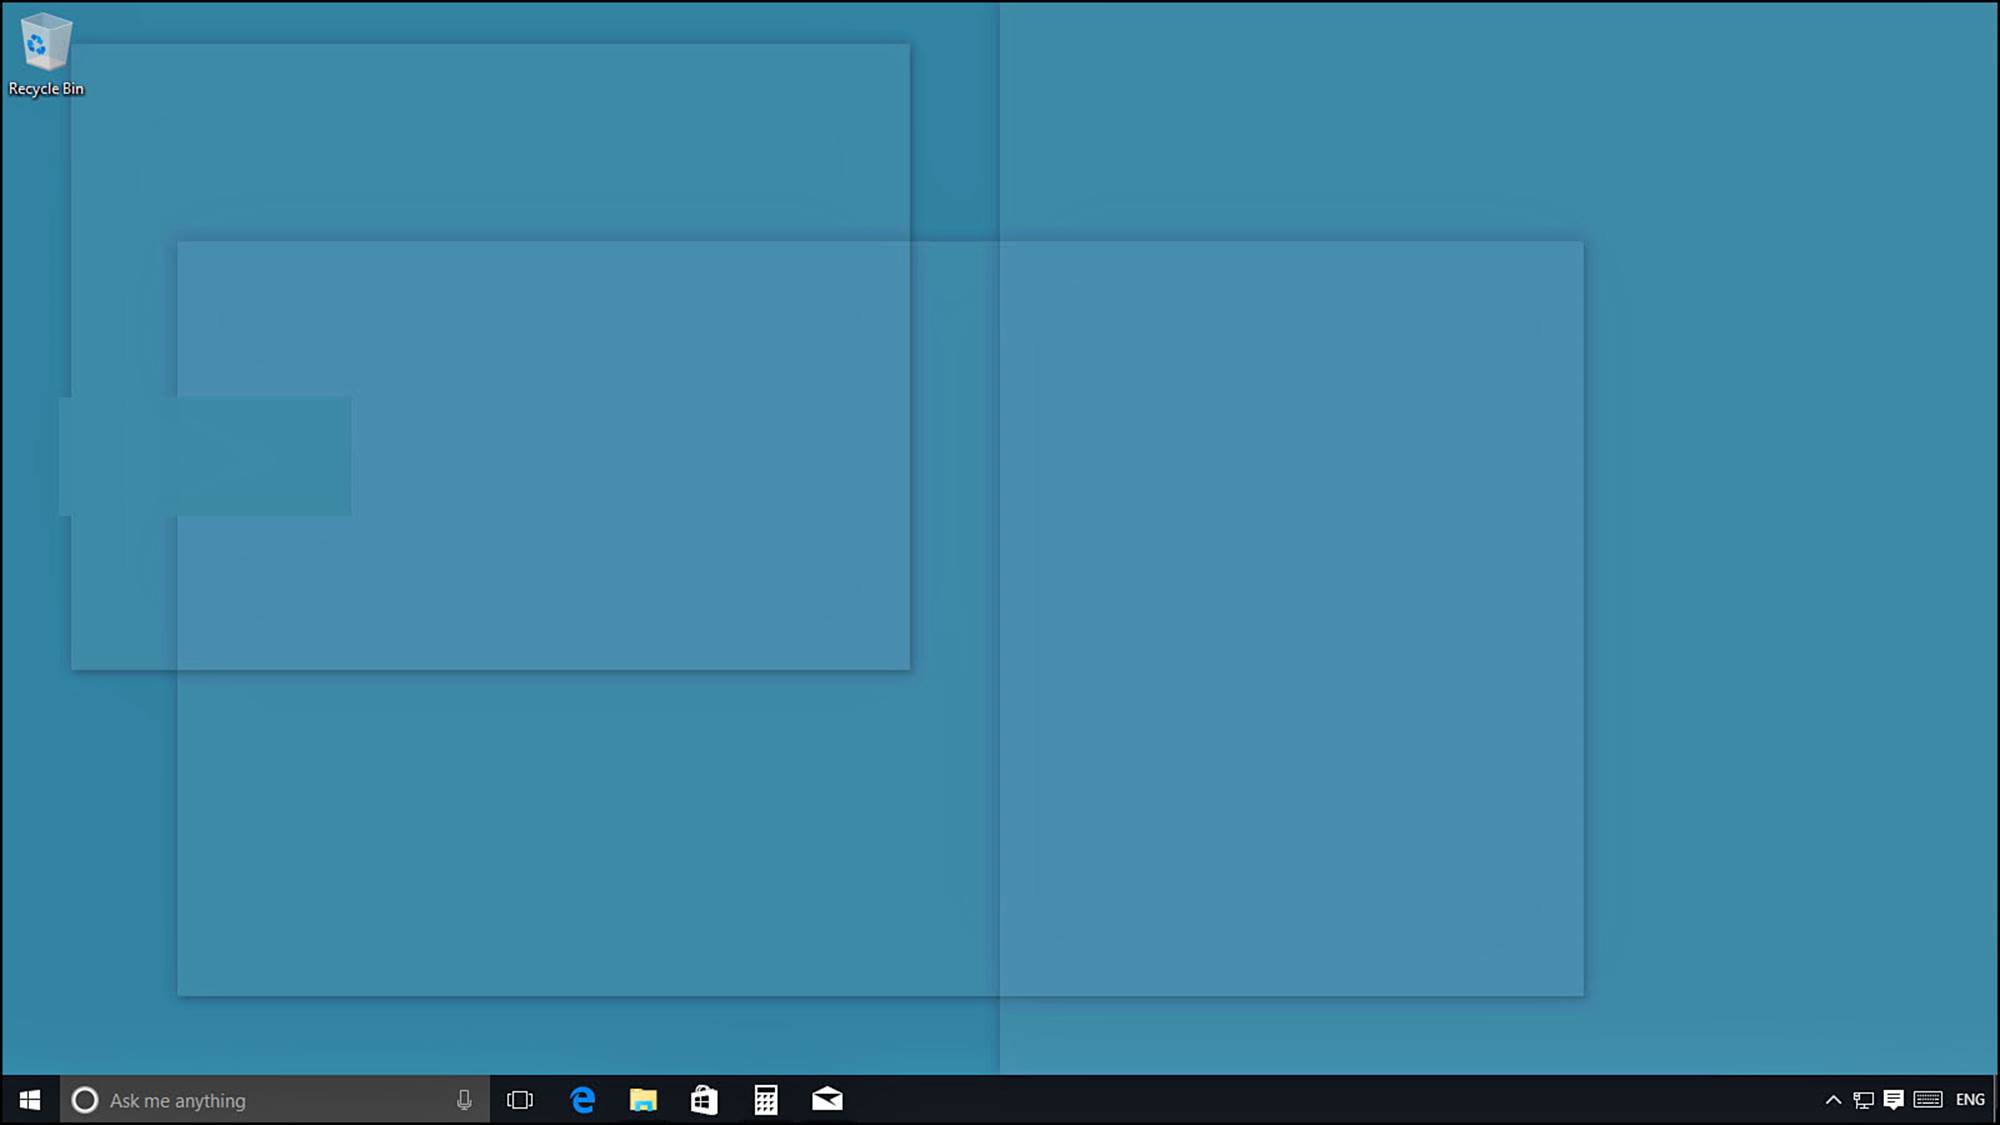
FIGURE 6.4 The Show Desktop button is a handy way to see and access your Desktop when you have many applications open in Desktop mode.
Using the Desktop in Tablet Mode
While you are in Tablet mode, you will see and use the Desktop less as a work space. The focus will remain on the Start menu and applications, while the Desktop is rarely if ever seen. Documents and folders that are on the desktop are hidden by default, and tools like Peek are not available. Snap behaves differently while in Tablet mode as well.
To snap an application in Tablet mode, follow these steps:
1. Open an application or an app while in Tablet mode. The application will open full screen.
2. Swipe down from the top of the display, and drag the application to the left or right edge of the screen. Windows will show an outline for the resized application. Release the application to snap it to this location. A wide vertical border will appear at the center of the screen on the edge of the application that was just snapped.
3. After an application has been snapped, Windows will offer to snap another open app to fill the rest of the screen (refer to Figure 6.3). If no other applications are open, the next application you open will snap into the remainder of the screen.
4. Use the vertical border between two applications to adjust how much screen space each one gets. As shown in Figure 6.5, drag the bar to the left or right to establish the shared border. Both applications will snap to this new size when the border is released.
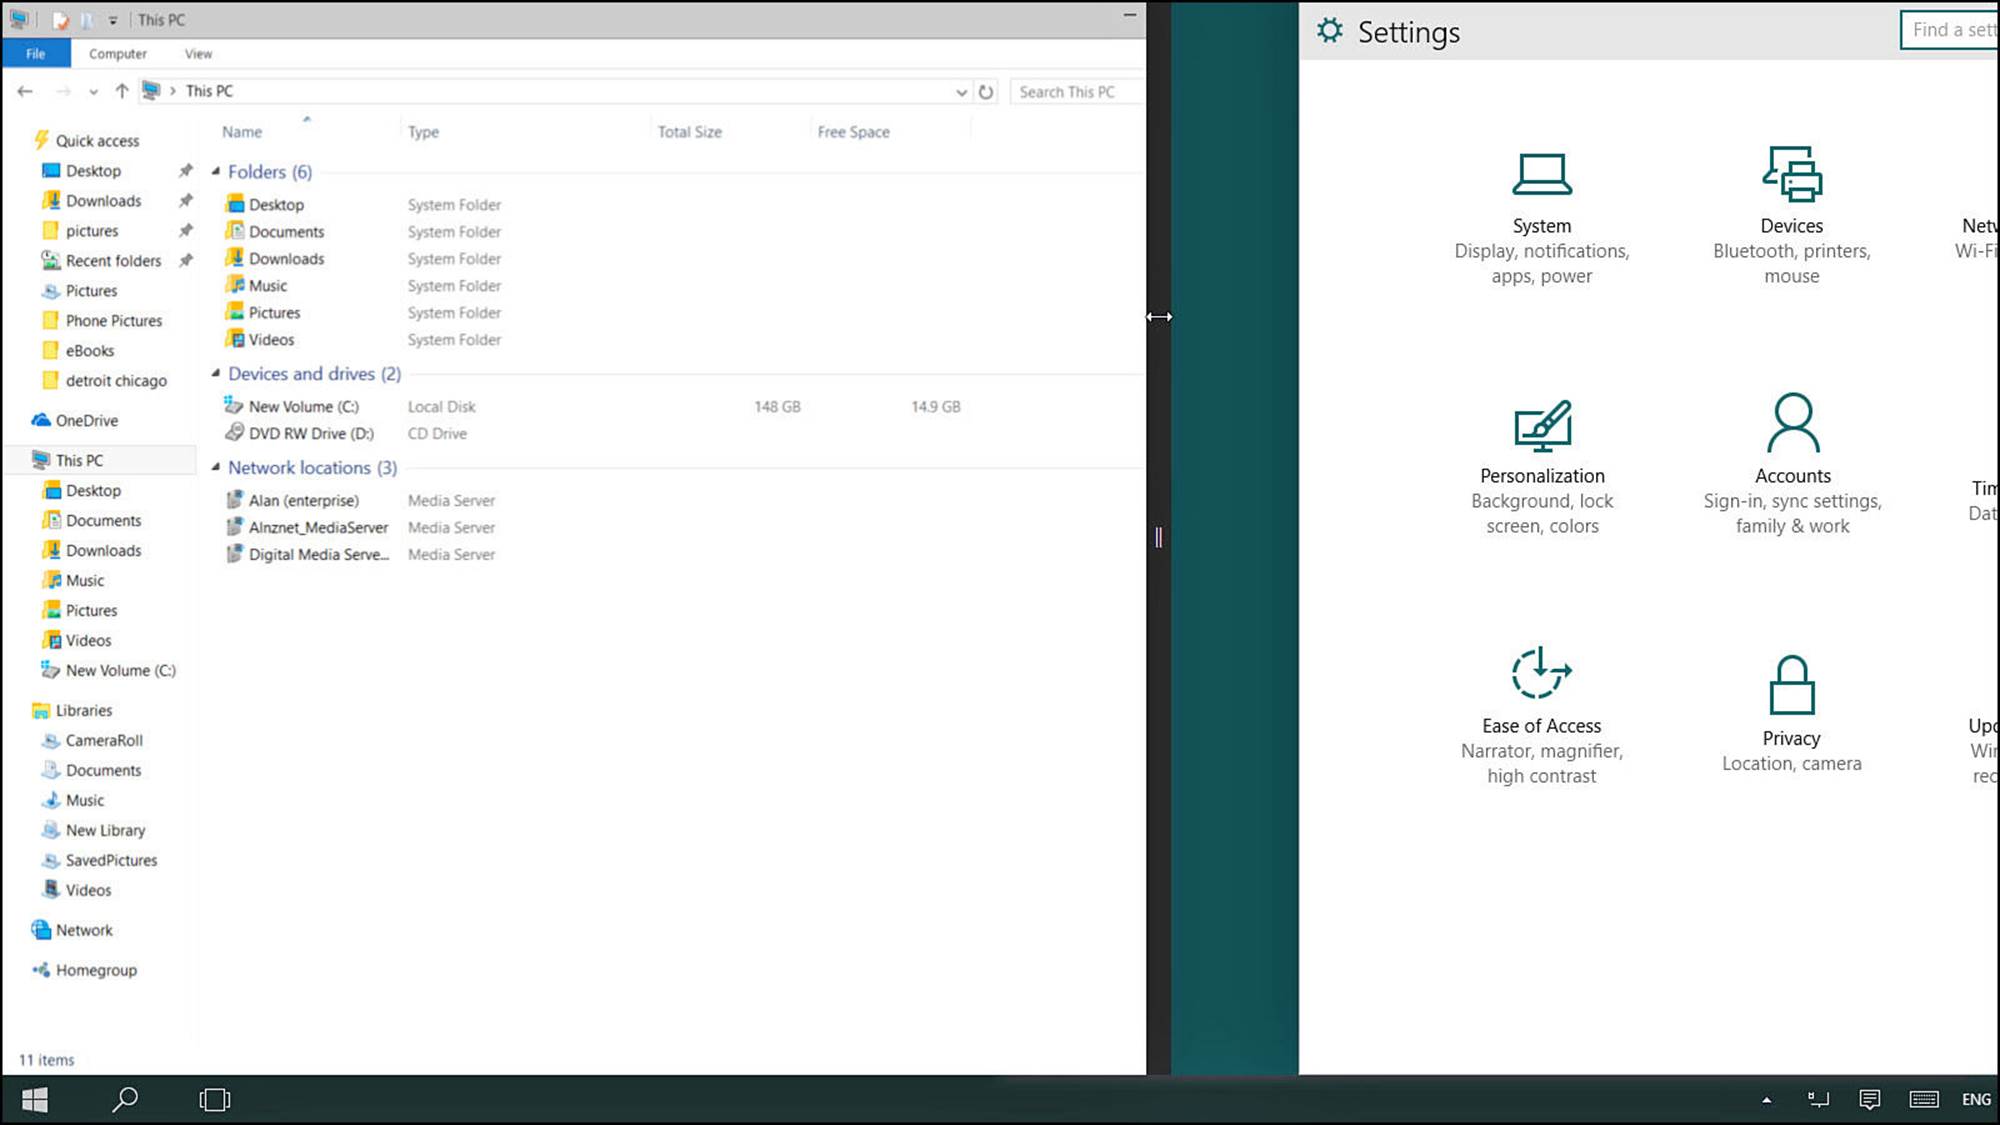
FIGURE 6.5 Snapped applications can be nudged into sharing more or less screen space while in Tablet mode.
Using Task View
Today we tend to multitask when using a computer or tablet. A great solution to this is having several displays that we can use to spread all of our applications out so that no application obscures any other. This is not very realistic in many situations, however. Beside the cost, we certainly wouldn’t want to sit on an airplane next to someone that had two or three monitors connected to his laptop.
Task View is a new feature that has been built in to Windows 10 to address this very issue, allowing you to improve your Desktop experience on a single display by creating virtual Desktops. As shown in Figure 6.6, you can have multiple Desktops open with different application running on each one. Rather than minimizing applications or moving things around when you need to switch tasks throughout the day, you can just jump between Desktops. Applications can even be taken from one Desktop and placed into a different one. Task View works with Desktop mode and Tablet mode with subtle differences and has been referred to as a poor man’s cheat for having multiple displays.
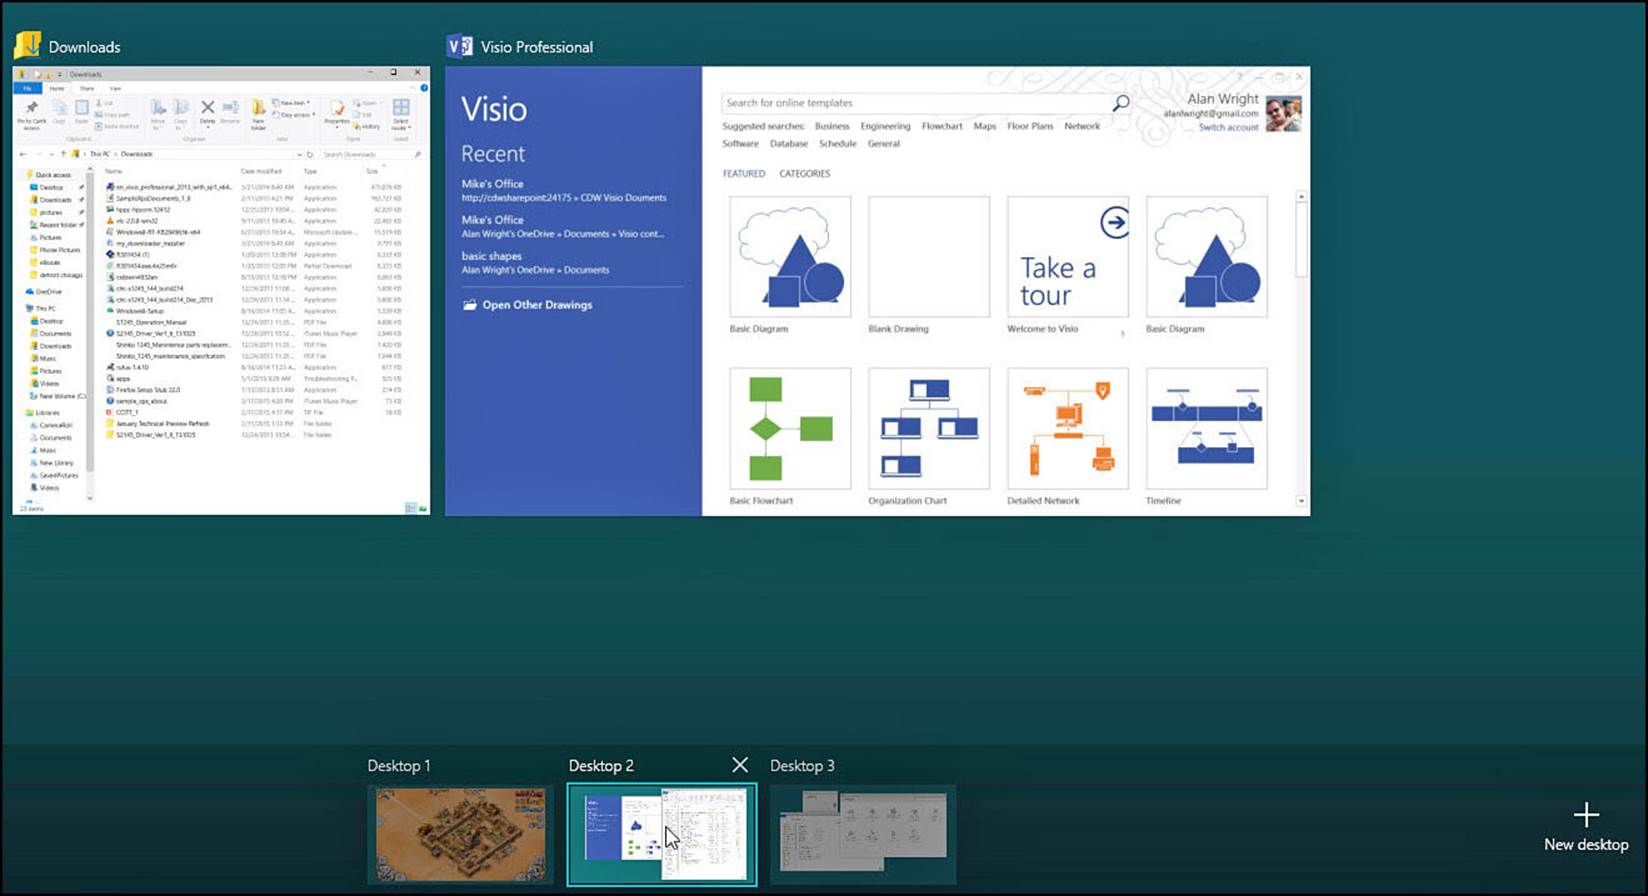
FIGURE 6.6 Task View enables you to get around the hassle of working with a single display when multitasking.
To use Task View, follow these steps in Desktop mode:
1. Open an application or two, including the Settings app, and arrange them on your Desktop.
2. Select the Task View icon on the taskbar. Your open applications will appear as large thumbnails.
3. Select the New Desktop button that appears in the lower-right corner of the screen.
4. As shown in Figure 6.7, a new Desktop named Desktop 2 will appear above the taskbar, while your original Desktop will be named Desktop 1. No application thumbnails will be visible.
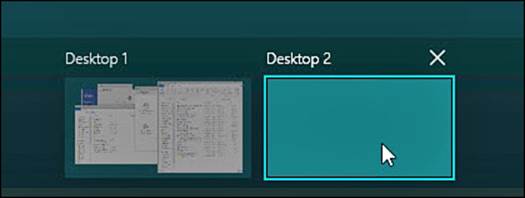
FIGURE 6.7 Add and remove Desktops on-the-fly with Task View.
5. Hover your cursor over Desktop 1 until the open applications from Step 2 are again visible. Select the Settings app and drag it to Desktop 2, as shown in Figure 6.8. Release the app. The app will no longer have a thumbnail on Desktop 1, and Desktop 2 will now show that the Settings app is on that desktop.
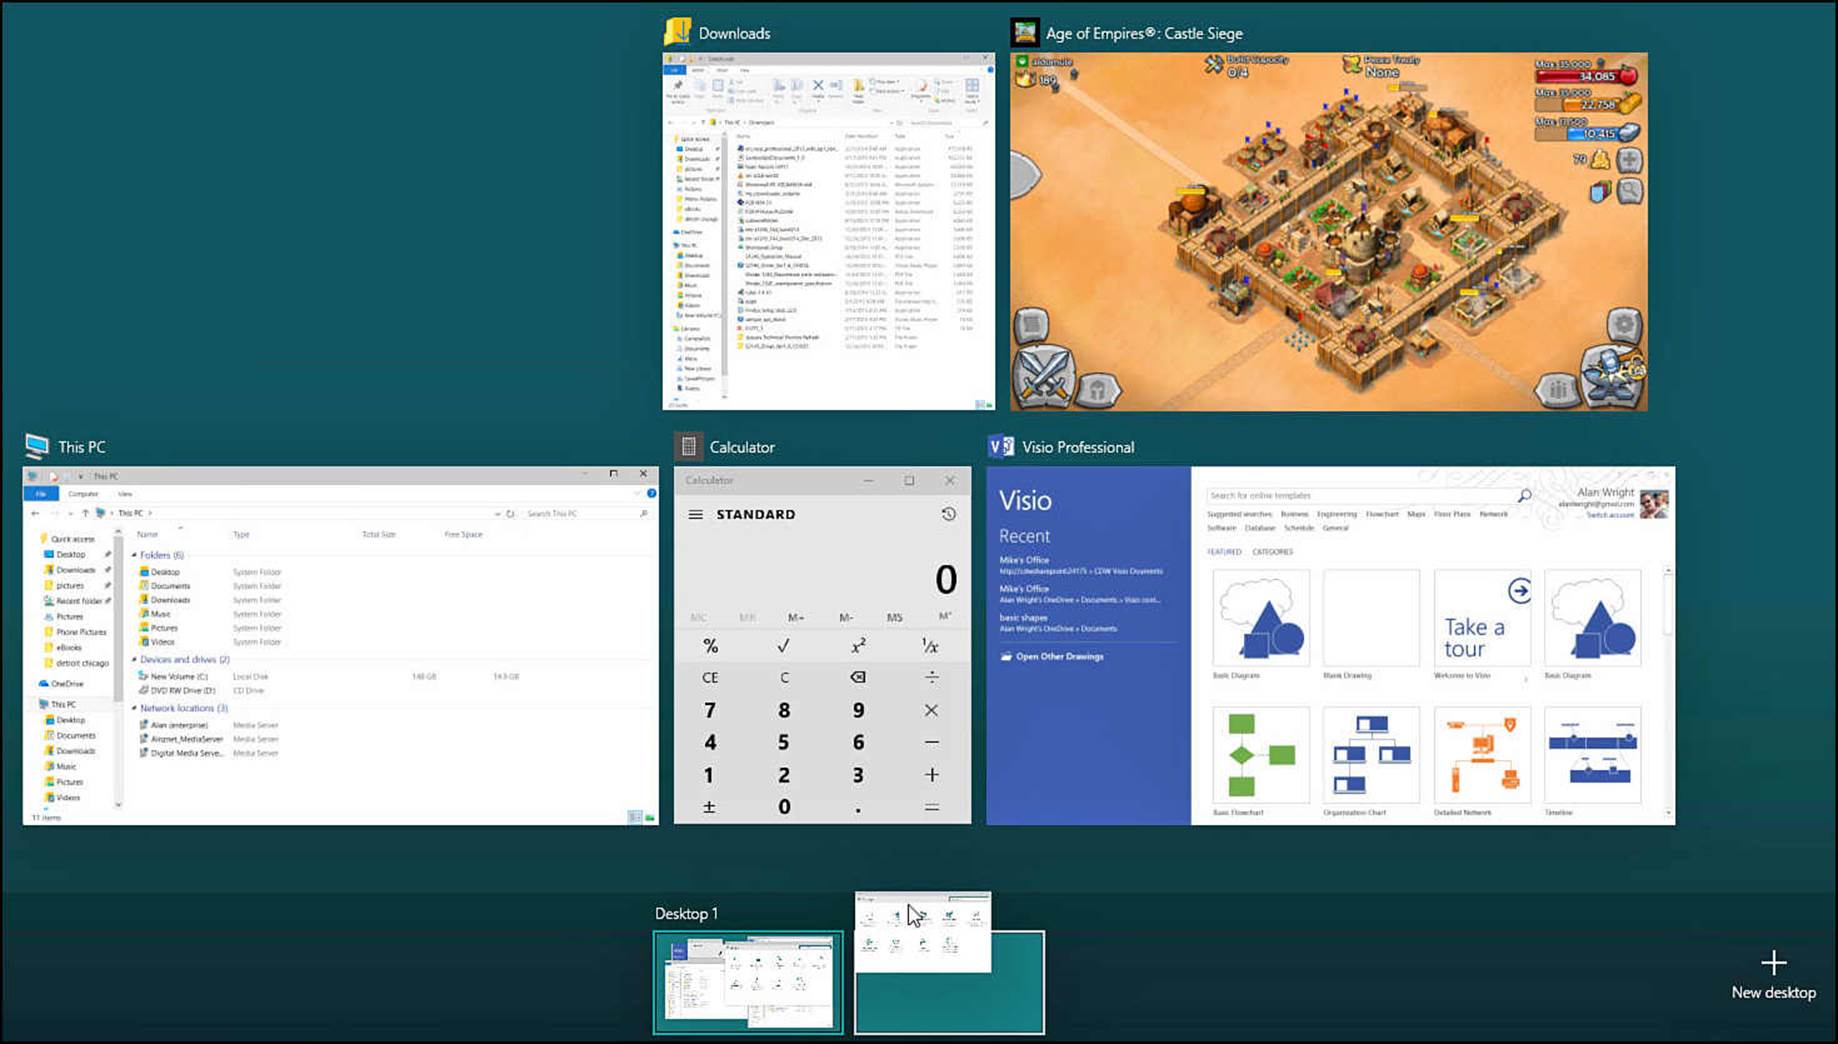
FIGURE 6.8 Move applications between Desktops while using Task View.
6. Select Desktop 2. You will jump to a desktop that has only the Settings app open. Select the Start menu and open another application.
7. Select the Task View icon again on the taskbar. Notice that both Desktops accurately reflect the open applications on each desktop. Select Desktop 1. You will now be back to where you started in step 1 minus the Settings app.
8. Select the Task View icon again on the taskbar. Hover over Desktop 2 and select the X to close Desktop 2. You will now be looking at thumbnails for all of the open applications that had been on Desktop 1 and Desktop 2. They are both open in the original Desktop.
Virtual desktops are not a new concept; there have been third-party versions available in the past for Windows. However, this is the first time they are integrated into Windows. Also, you should recognize that multiple desktops and open applications will still need to share the same hardware resources. If your device has a slower CPU and less RAM, it will impact how many items can be open. Take some time to experiment with creating Desktops for different tasks. The Windows+Tab keyboard shortcut, which activates Task view, can become your best friend if you start using Task View regularly.
 Tip
Tip
When using a touchscreen, whether in Desktop mode or Tablet mode, you can swipe in from the left to enter Task View.
Working with the Taskbar
An important element of the Desktop is the taskbar. Although the taskbar (shown in Figure 6.9) takes up little space, it performs a number of important tasks. Here is the full list of the taskbar’s capabilities:
• Provides the Start button to invoke the Start menu
• Lists the programs currently running on the Desktop, even if a program is obscured from view
• Enables you to switch to a running program by selecting the program’s icon on the taskbar
• Includes the notification area, which is home to the Action Center, as well as other icons that provide you status alerts and messages from applications that might be running or system resources
• Displays the current time and date
• Displays various toolbars you can choose to show or hide
• Enables you to quickly enter text for searching locally or across the Internet or just enter a website address
• Allows you to pin shortcuts for applications
• Includes a shortcut to File Explorer
• Provides a shortcut to Task View and additional virtual desktops

FIGURE 6.9 The taskbar is a critical part of the Desktop.
The taskbar can be resized, be moved to a different part of the screen, and be hidden when not needed. Toolbars can be added or removed, and shortcuts to applications can be pinned to the taskbar. All these options are considered in this section.
Using the Action Center
The Action Center is an important feature of the taskbar. Located in the notification area, the Action Center is home to settings you are most likely to access on a routine basis. Notifications from modern apps and from Windows will appear here as well. While many apps show a brief toast notification that you might or might not have time to read, you can look for notifications you may have missed in the Action Center.
As shown in Figure 6.10, settings such as Wi-Fi, screen brightness, Bluetooth, and Tablet mode are found right here. All Settings is a shortcut to open the Settings app. The exact settings that appear here will depend on your device. Remember that on a touch screen the Action Center can be opened by simply swiping in from the right side of the screen.
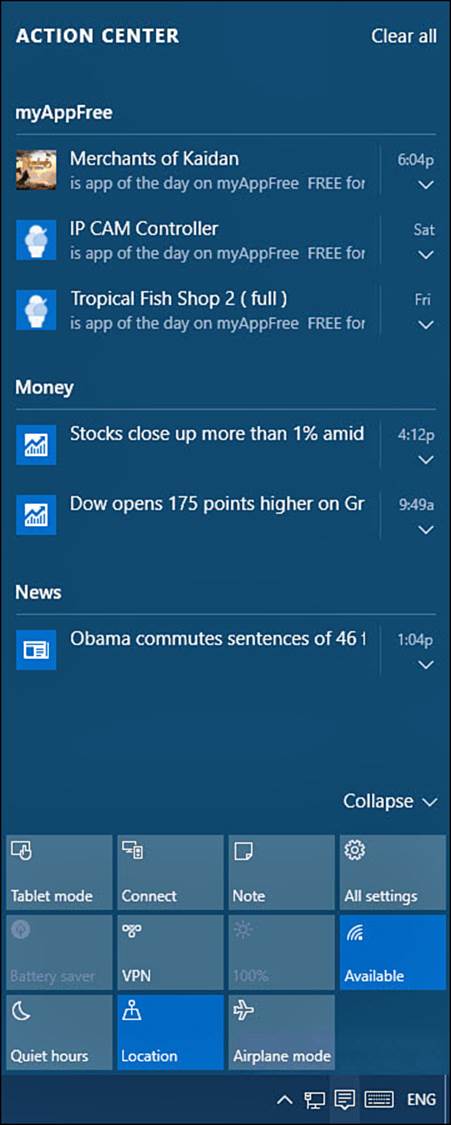
FIGURE 6.10 The settings and notifications feature found in the Action Center is one of the best features in Windows 10.
Notifications will continue to collect until you reboot your computer or take some action. To act on a notification, follow these steps:
1. Open the Action Center, selecting its icon in the notification area or swiping in from the right edge of a touchscreen.
2. Hover your cursor over a notification in the Action Center. The notification will appear highlighted, as shown in Figure 6.11.
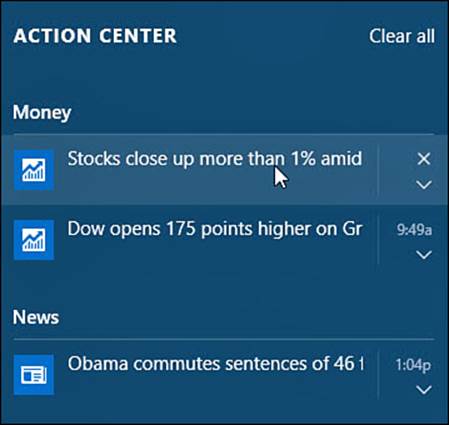
FIGURE 6.11 Select notifications from the Action Center.
3. Select the notification to launch the app that originated the notification. The notification will disappear from the Action Center.
4. To disregard a notification and remove it from the Action Center, hover your cursor over the notification and select the X. You also can clear all notifications for a specific app at once by selecting the X next to the app name in the Action Center.
 Note
Note
Microsoft has indicated that it intends notifications to become more interactive in the future, enabling a person to take action on a notification without ever opening the app that sent the notification.
Modern apps tend to be enabled by default to send notifications. If you would like to limit which apps have this permission, these can be managed in the Settings app. This subject is covered in more detail in Chapter 12, “Configuring Notifications and Advanced Settings.”
Customizing the Taskbar
Many features of the taskbar can be customized. The notification area, previously referred to as the system tray, already might include additional tools such as language or the Touch keyboard. Other items on the taskbar may not be used and seem like a waste of space. You might have other preferences, like relocating the taskbar or having it hide when not needed. Features such as these can be tweaked, added, or removed by customizing the properties for the taskbar.
To customize the taskbar, follow these steps:
1. Right-click the taskbar (or tap and hold on a touchscreen) to reveal the taskbar context menu (shown in Figure 6.12).
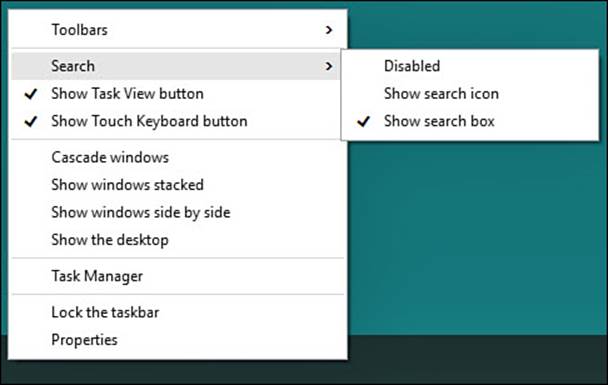
FIGURE 6.12 Customizing the taskbar starts with the taskbar context menu.
2. Select Toolbars to show a list of toolbars available on this device. Select a toolbar to enable it; a checkmark will appear when enabled. Select it again to disable it.
3. Select Search to reveal three choices regarding the Search field. (Search is replaced with Cortana when enabled.) Show Search Box is enabled by default; you can replace the text field with an icon or disable it altogether.
4. The Show Task View Button can be disabled by selecting it to remove the checkmark.
5. The Show Touch Keyboard Button can be enabled or disabled. It will appear in the notification area when enabled.
6. The option Lock the Taskbar prevents changes to the shape, position, and size when enabled. The taskbar can be relocated by simply selecting it and dragging it to another edge of the display.
7. Select Properties to open the Taskbar and Start Menu Properties dialog box shown in Figure 6.13.
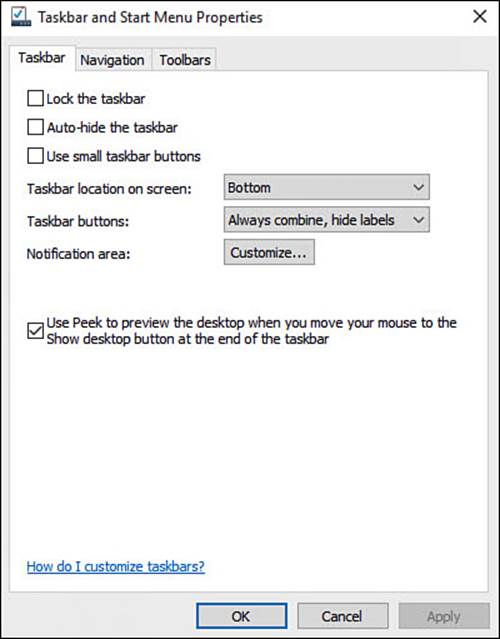
FIGURE 6.13 Some taskbar features are tweaked from the Taskbar and Start Menu Properties dialog box.
8. Use checkboxes to enable Lock the Taskbar, Auto-Hide the Taskbar, or Use Small Taskbar Buttons.
9. The Taskbar Location On Screen drop-down list enables you to relocate the taskbar to the bottom, left, right, or top of the display.
10. The Taskbar Buttons drop-down list refers to how separate windows for the same application are displayed on the taskbar. Multiple Word documents or web pages, for example, can appear as separate labeled buttons on the taskbar or can be stacked under a single icon to conserve space. The default is set to Always Combine, Hide Labels.
11. The last checkbox is enabled by default to enable the Show Desktop button, which allows the Peek tool to reveal the Desktop in Desktop mode.
12. Select Customize for Notification Area to open the Settings app to the Notifications & Actions pane, as shown in Figure 6.14.
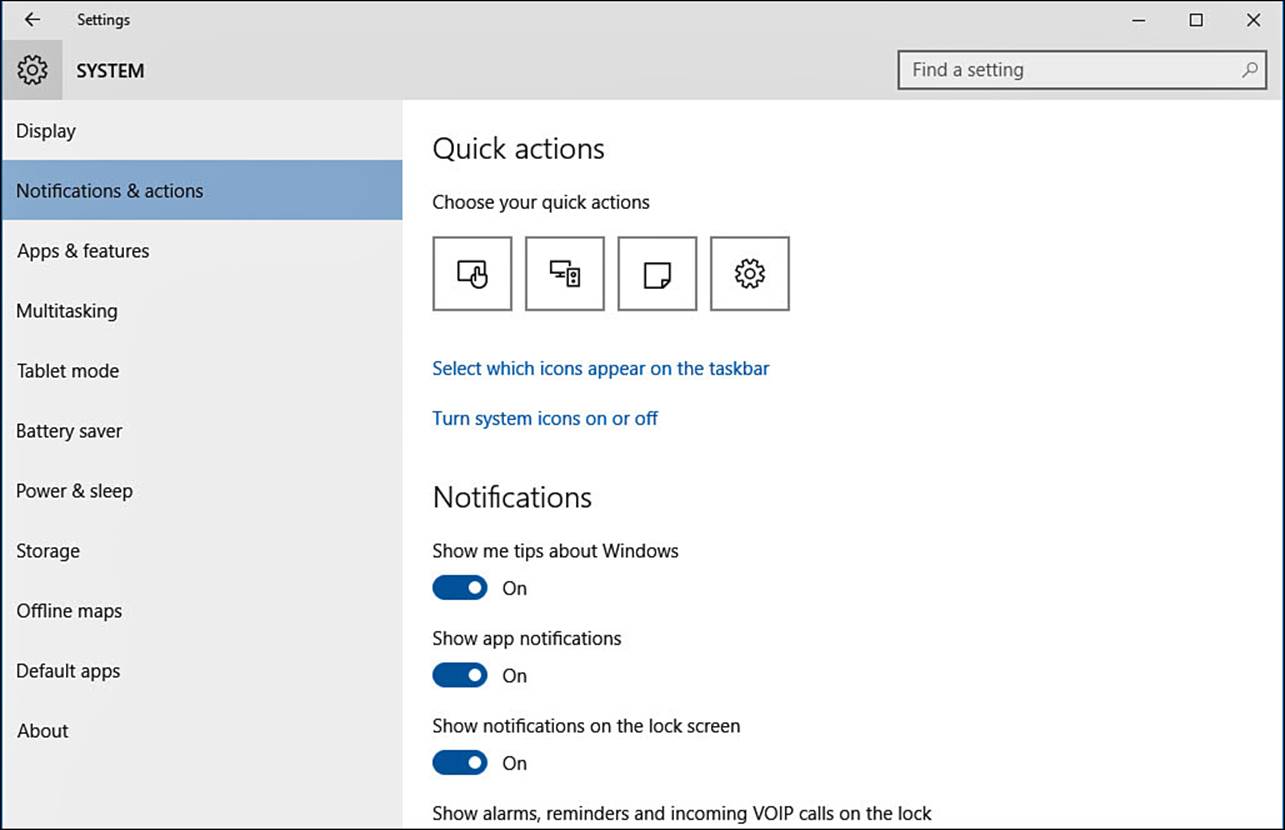
FIGURE 6.14 Further customize the taskbar from the Settings app.
13. Select a Quick Action button to choose from a list of settings buttons that can be included in the Action Center. Under Notifications you can make changes to some of the types of notifications that appear in the Action Center and elsewhere.
14. Below the Quick Actions settings buttons, select the link Select Which Icons Appear on the Taskbar. You will see a list of icons for system resources such as Network and Volume. There might be other notification icons unique to your device for printers or touchpads. Slide the switch to On to make the icon always visible in the notification area of the taskbar. When the switch is Off, the icon will be hidden until accessed from the taskbar by selecting the Show Hidden Icons button (shaped like a triangle).
15. Select the back arrow to return to the Notifications & Actions pane from step 12.
16. Select Turn System Icons On or Off. A list of system icons will be displayed for essential systems, including Clock, Volume, Network, Power, Input Indicator, Location, and Action Center. Slide the switch to On or Off to completely remove the notification icon from the notification area of the taskbar. When set to Off, these icons are also removed from the hidden icons mentioned in step 14. Some icons might be grayed out depending on your device’s hardware.
17. Close the Settings app and select OK or Apply to save changes in the Taskbar and Start Menu Properties dialog box before closing it.
Working with Applications from the Taskbar
When in Desktop mode, the taskbar is an important tool for keeping track of applications that are open or that we use often. As shown in Figure 6.15, applications that are currently open, even when there may be multiple instances, can be easily identified from the taskbar. Open applications appear with a solid line below their icon on the taskbar. Additionally, shortcuts to applications can be pinned to the taskbar to keep them highly available. Use restraint because real estate is limited when pinning applications to the taskbar. You can also pin folders to make them easy to open from the taskbar.
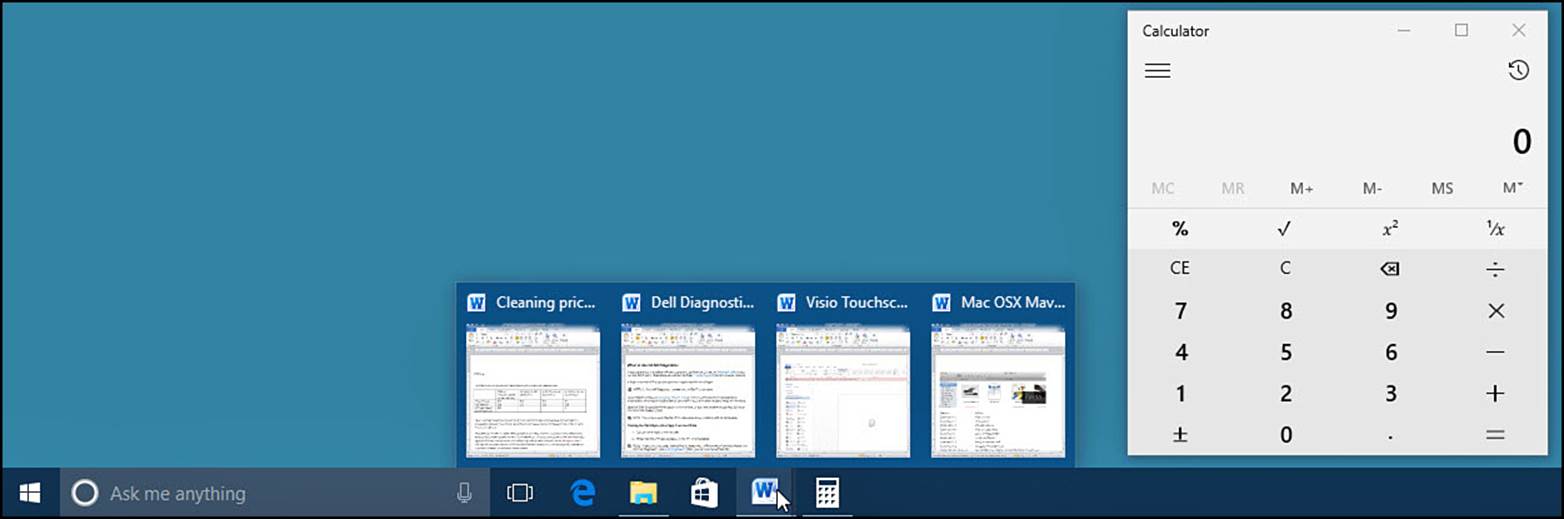
FIGURE 6.15 You can manage applications from the taskbar while in Desktop mode.
To pin items to the taskbar, follow these steps:
1. Open the Start menu and locate an application you want to pin to the taskbar.
2. Right-click the application, as shown in Figure 6.16.
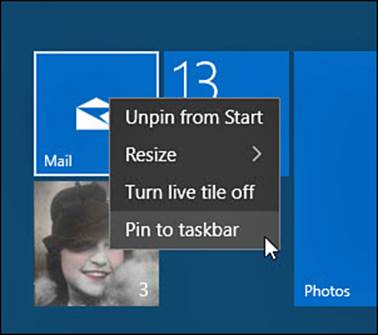
FIGURE 6.16 Pin applications to the taskbar to make it even easier to find them.
3. Select Pin to Taskbar. The application will now appear as an icon on the taskbar.
4. To pin a folder to the taskbar, open File Explorer and navigate to a folder you want to make highly available.
5. Select and drag the folder to the File Explorer icon on the taskbar. You will see the action Pin to File Explorer indicated. Release the folder.
6. Right-click the File Explorer icon to reveal the context menu shown in Figure 6.17. Your folder will appear under Pinned. A list of folders may appear under Frequent. Hover the cursor over a folder in the Frequent list and select the thumbtack Pin to This List. The folder will also appear under Pinned.
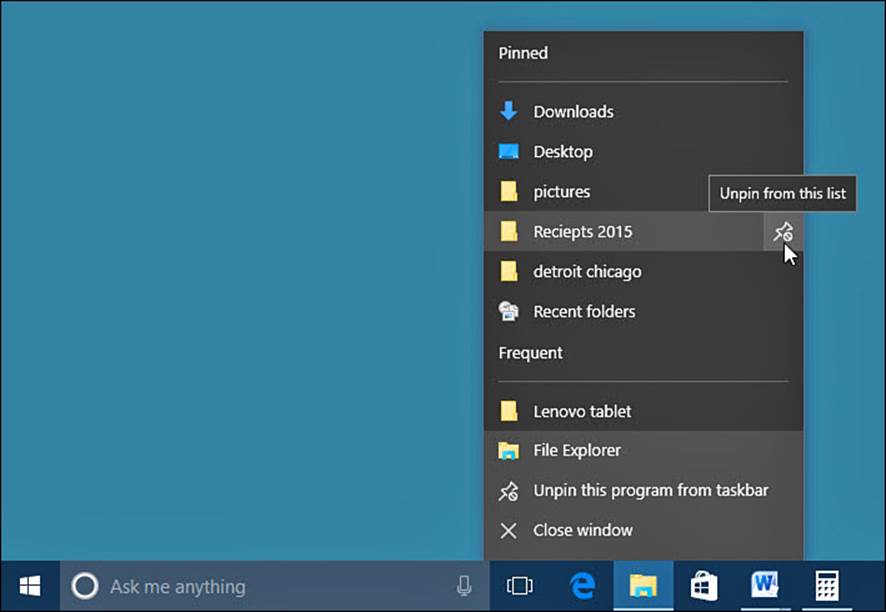
FIGURE 6.17 Pin folders to File Explorer on the taskbar to make it even easier to find them.
Tip
To remove a pinned application, right-click the icon on the taskbar. Select Unpin This Program from Taskbar. The icon will disappear from the taskbar. To remove a folder from the Pinned list, hover over the folder with your cursor or right-click the folder and select Unpin from This List. The folder will no longer appear here.
People have used the Desktop as a place to save shortcuts for decades, resulting in cluttered Desktops that become their own challenge to navigate. Pinning a few well-chosen items to the taskbar is a much better way to keep them visible while working with other applications that can cover the Desktop. It also reduces the clutter you might otherwise have to deal with at some point in the future. Having said that....
Keeping the Desktop Organized
You can use the area of the Desktop above the taskbar much as you use your desktop in your office or at home. You can keep the files associated with a project you are working on anywhere on the Desktop. You can organize the files into folders, and the folders also can be kept on the Desktop; however, I don’t necessarily recommend this because it clutters the Desktop. Back at home or in the office, when you acquire new files or folders or other items, you might temporarily drop them onto your desk to file away or store later. In Windows, when you download content from the Internet or create a new document, you can just as easily drop the content onto the Desktop.
With all the files potentially moving on and off of the Desktop, even organized users might find their Desktop in a state of disorder and mess from time to time. Fortunately, it’s not hard to keep the Desktop clutter under control with a few built-in tools.
 Caution
It is good to remember that the Desktop is actually a special folder that is unique for each person who can sign in to the same device. Contents of the Desktop are kept out of sight of other users inside of your Users folder. Documents and pictures saved to the Desktop will not appear automatically appear in the Documents and Pictures libraries. Many people have forgotten to copy files from the desktop and subsequently lost data that was saved to their Desktop when moving to a new computer.
Caution
Files and folders saved to the desktop will be hidden when your device is in Tablet mode. Consider saving documents to other locations, and pin folders to File Explorer on the taskbar to avoid this issue.
Arranging the Desktop
The Desktop has an invisible grid that keeps every item positioned in uniform columns and rows. When you save, move, download, or copy a file to the Desktop, or if a program you use saves a file to the Desktop, Windows immediately snaps the file into an empty cell in the grid. Windows normally fills the grid from left to right and from the top down, but you can turn this option off. Turning this option off enables you to place an item anywhere on the Desktop, although it’s still lined up in one of the invisible rows and columns. This is just one of the ways you can control how things are arranged on your Desktop.
To configure how Windows arranges the Desktop, follow these steps:
1. Right-click or tap and hold an unused spot on the Desktop; then select View (see Figure 6.18).
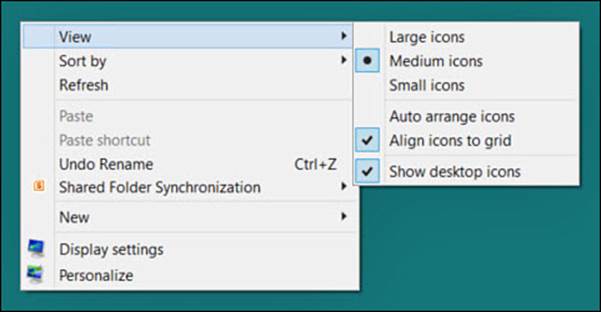
FIGURE 6.18 Use tools like Auto Arrange Icons and Align Icons to Grid to keep the Desktop organized.
2. If Align Icons to Grid is checked, the invisible grid is in use. If Align Icons to Grid is not checked, select it to turn the grid on.
3. To allow Windows to arrange the Desktop, select Auto Arrange Icons. To keep icons anywhere you like on the Desktop (but still lined up), select Auto Arrange Icons to clear the check mark and leave Align Icons enabled.
4. Other options you can select here include indicating the icon size that Windows will display on the Desktop and the option Show Desktop Icons. Disabling Show Desktop Icons will hide everything on the Desktop. Select the option again to make everything visible again. Besides being a great way to scare someone, this can make it easy to quickly tidy up if someone else will need to access your computer.
5. Right-click or tap and hold an unused spot on the Desktop; then select to Sort By.
6. Sort categories include Name, Size, Item Type, and Date Modified. Select a criteria to immediately rearrange the icons on the Desktop based on that category.
The Absolute Minimum
• The way you use the Desktop is determined by the mode your device is using. Use the Action Center to manually switch between Tablet mode and Desktop mode.
• Use Task View to add virtual desktops when using a single display to let you easily jump between tasks without rearranging open applications.
• The Action Center hosts important settings buttons such as Brightness or Tablet mode and maintains a history of notifications.
• You can customize the taskbar by opting to show and hide icons as well as pin applications and folders to the taskbar.
• The notification area of the taskbar allows icons to provide alerts and status information. You can select which icons appear here.
All materials on the site are licensed Creative Commons Attribution-Sharealike 3.0 Unported CC BY-SA 3.0 & GNU Free Documentation License (GFDL)
If you are the copyright holder of any material contained on our site and intend to remove it, please contact our site administrator for approval.
© 2016-2026 All site design rights belong to S.Y.A.