WINDOWS 10 TIPS AND TRICKS (2016)
11. Browsing the Internet Safely
In This Chapter
![]() Navigating Microsoft Edge like a pro
Navigating Microsoft Edge like a pro
![]() Controlling Microsoft Edge with keyboard shortcuts
Controlling Microsoft Edge with keyboard shortcuts
![]() Configuring Microsoft Edge for comfort and security
Configuring Microsoft Edge for comfort and security
Windows 10 comes with a new browser, Microsoft Edge, with which Microsoft is gradually replacing Internet Explorer. Windows 10 still includes Internet Explorer, and you can use it if you need it—for example, for websites that require Internet Explorer.
Microsoft Edge features a stripped-down interface but includes plenty of features for a full browsing experience, including favorites, Reading List, Reading mode, and the ability to annotate web pages.
Navigating Microsoft Edge Like a Pro
If you’ve used other web browsers, you’ll have no problem coming to grips with the essentials of browsing with Microsoft Edge. The new browser has a streamlined interface (see Figure 11.1) with easy-to-find controls, most of which work in the same way as those on other browsers.
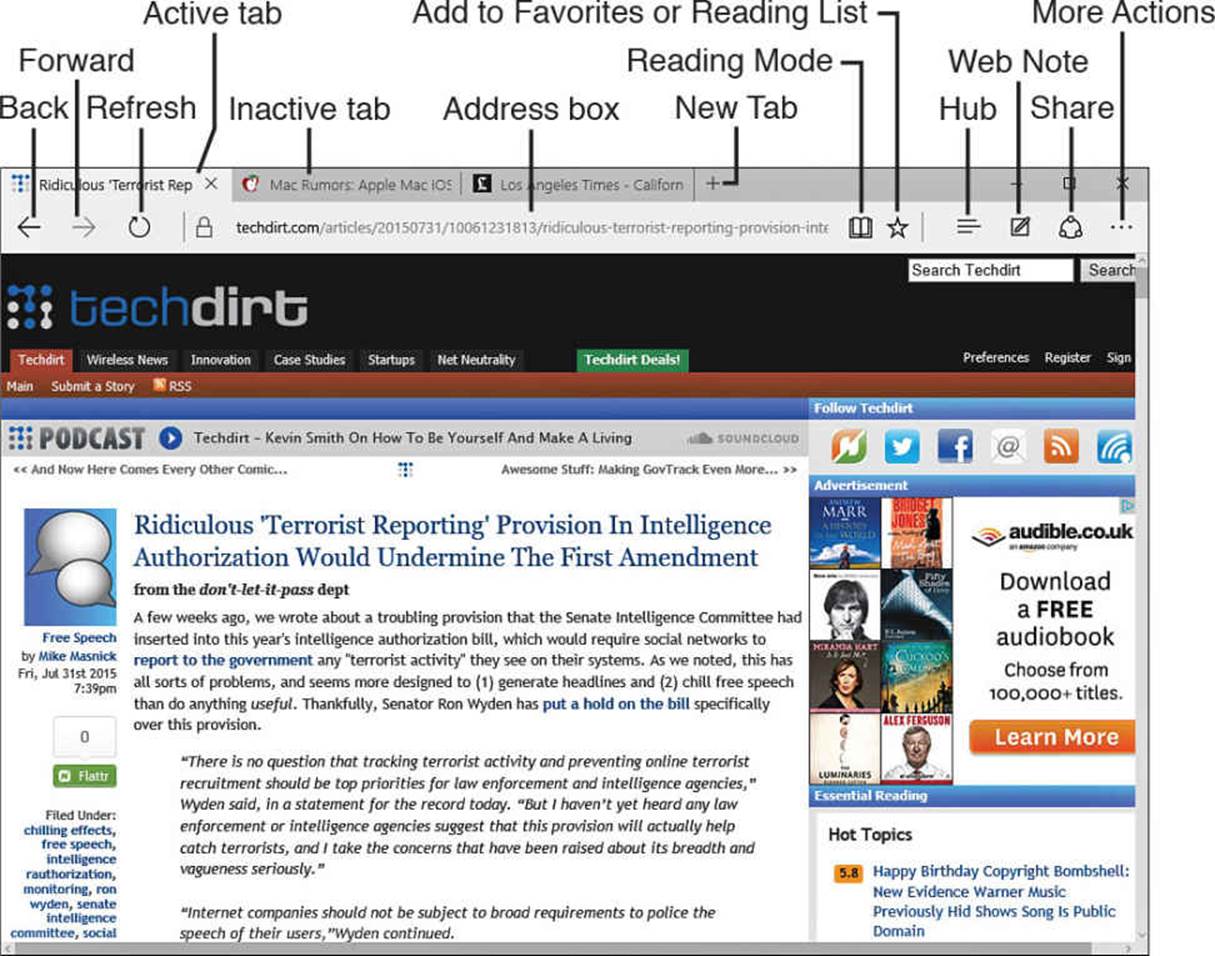
FIGURE 11.1 Microsoft Edge has a streamlined interface with easy-to-use controls.
The More Actions menu (see Figure 11.2), which you display by clicking the More Actions button (the three dots, ...) at the right end of the toolbar, contains the following commands:
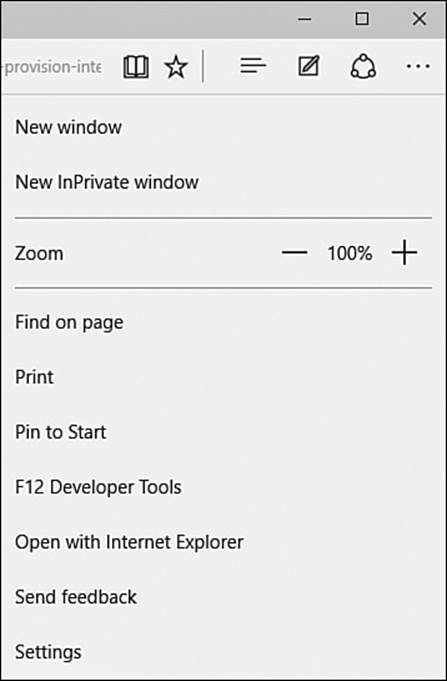
FIGURE 11.2 The Microsoft Edge More Actions menu contains only a few commands.
![]() New Window. Click this item to open a new Microsoft Edge window (as opposed to a new tab in the same window). If your hands are on the keyboard, it’s quicker to press Ctrl+N.
New Window. Click this item to open a new Microsoft Edge window (as opposed to a new tab in the same window). If your hands are on the keyboard, it’s quicker to press Ctrl+N.
![]() New InPrivate Window. Click this item to open a new Microsoft Edge window for InPrivate browsing. InPrivate browsing enables you to browse without saving data such as the pages you visit, temporary files used to display those pages, and cookies from the websites, beyond the end of your InPrivate browsing session.
New InPrivate Window. Click this item to open a new Microsoft Edge window for InPrivate browsing. InPrivate browsing enables you to browse without saving data such as the pages you visit, temporary files used to display those pages, and cookies from the websites, beyond the end of your InPrivate browsing session.
![]() Caution
Caution
InPrivate browsing enables you to make sure the details of browsing sessions are not stored on your computer, but it doesn’t confer anonymity on the Internet. As usual, your Internet service provider can determine—and may log—the pages you visit, and government agencies may be able to access any information the Internet service provider has logged.
![]() Zoom. Click the – button to zoom out by a 25% increment or the + button to zoom in by 25%.
Zoom. Click the – button to zoom out by a 25% increment or the + button to zoom in by 25%.
![]() Tip
Tip
You can zoom more quickly with keyboard shortcuts. Press Ctrl+– to zoom out by 25% or Ctrl++ to zoom in by 25%, or press Ctrl+0 to zoom to 100%. For full-screen and restore, use the standard Windows keyboard shortcuts—press Windows Key+up arrow to switch to full screen and Windows Key+down arrow to restore the window.
![]() Find on Page. Click Find on Page to display the Find on Page controls, which enable you to search for specific text on the page. You can also press Ctrl+F to display the Find on Page controls.
Find on Page. Click Find on Page to display the Find on Page controls, which enable you to search for specific text on the page. You can also press Ctrl+F to display the Find on Page controls.
![]() Print. Click Print, or press the Ctrl+P keyboard shortcut, to display the Print dialog box.
Print. Click Print, or press the Ctrl+P keyboard shortcut, to display the Print dialog box.
![]() Pin to Start. Click this item to pin the current page to the Start menu to give you instant access to it.
Pin to Start. Click this item to pin the current page to the Start menu to give you instant access to it.
![]() F12 Developer Tools. Click this item to open the Developer Tools window, which you can use for troubleshooting web page layout and script issues.
F12 Developer Tools. Click this item to open the Developer Tools window, which you can use for troubleshooting web page layout and script issues.
![]() Open with Internet Explorer. Click this command to open the current page in Internet Explorer.
Open with Internet Explorer. Click this command to open the current page in Internet Explorer.
![]() Send Feedback. Click this item to display the Feedback & Reporting pane, which enables you to send Microsoft feedback about Microsoft Edge. For example, you can report problems with a particular website, report problems with Microsoft Edge itself, or suggest features you’d like to see Microsoft add to the browser.
Send Feedback. Click this item to display the Feedback & Reporting pane, which enables you to send Microsoft feedback about Microsoft Edge. For example, you can report problems with a particular website, report problems with Microsoft Edge itself, or suggest features you’d like to see Microsoft add to the browser.
![]() Settings. Click Settings to open the Settings pane, which enables you to configure Microsoft Edge. See the section “Configuring Microsoft Edge for Comfort and Security,” later in this chapter, for information on choosing settings.
Settings. Click Settings to open the Settings pane, which enables you to configure Microsoft Edge. See the section “Configuring Microsoft Edge for Comfort and Security,” later in this chapter, for information on choosing settings.
Viewing Pages
As with most browsers, you can click the Address box and then type or paste in the address—the Uniform Resource Locator, or URL—of the web page you want to view. But in most cases, you’re better off getting to the page in other ways, such as by clicking a link on a page you’re already viewing, clicking a link in another app, or searching for what you want and then clicking a link on the page of results that the search engine produces.
![]() Tip
Tip
From the keyboard, press Ctrl+L to select the current contents of the Address box. Alternatively, press F4 to select the current contents of the Address box and open the drop-down menu showing the pages you’ve viewed recently.
To make a page easier to view, you can zoom in and out, either by using the Zoom buttons on the More Actions menu or by using the keyboard: Press Ctrl++ to zoom in by 25% increments or press Ctrl+– to zoom out by 25% increments.
![]() Tip
Tip
If your computer has a touchscreen, you can also zoom in by placing two fingers (or finger and thumb) together on the screen and then pinching apart, or zoom out by placing two digits apart on the screen and then pinching them together.
Working with Tabs and Windows
As with most browsers, Microsoft Edge enables you to browse using multiple tabs within a window. Tabs are great when you’re looking at separate pages that you don’t need to compare with each other.
When you do need to compare two web pages with each other, you’re better off using multiple windows than multiple tabs. You can then position the windows so that you can see both—for example, by snapping one window left and the other right—and compare them directly.
And you can open multiple tabs in each window if you need to—for example, when you’re shopping for multiple products.
These are the moves you need to know for working with tabs and windows:
![]() Open a linked page in the same tab. Click the link. If you’re navigating with the keyboard, press Tab (to move forward) or Shift+Tab (to move back) until the link is selected, and then press Enter.
Open a linked page in the same tab. Click the link. If you’re navigating with the keyboard, press Tab (to move forward) or Shift+Tab (to move back) until the link is selected, and then press Enter.
![]() Open a linked page in a new tab. Either right-click the link and then click Open in New Tab on the shortcut menu, or simply Ctrl+click the link.
Open a linked page in a new tab. Either right-click the link and then click Open in New Tab on the shortcut menu, or simply Ctrl+click the link.
![]() Open a new tab. Click the New Tab button (the + button) on the tab bar or press Ctrl+T.
Open a new tab. Click the New Tab button (the + button) on the tab bar or press Ctrl+T.
![]() Refresh all open tabs. Right-click a tab and then click Refresh All Tabs on the shortcut menu.
Refresh all open tabs. Right-click a tab and then click Refresh All Tabs on the shortcut menu.
![]() Rearrange your tabs. Click a tab and drag it to where you want it.
Rearrange your tabs. Click a tab and drag it to where you want it.
![]() Duplicate a tab. Right-click the tab and then click Duplicate Tab. Microsoft Edge puts the duplicate tab immediately after the original tab.
Duplicate a tab. Right-click the tab and then click Duplicate Tab. Microsoft Edge puts the duplicate tab immediately after the original tab.
![]() Tip
Tip
Duplicating a tab is useful when you want to keep your current page open but also go browsing to pages linked to it. You can also duplicate a tab by pressing Ctrl+K.
![]() Move a tab to a new window. Right-click the tab and then click Move to New Window on the shortcut menu. You can also drag the tab out of the current window and onto the desktop to create a new window containing the tab.
Move a tab to a new window. Right-click the tab and then click Move to New Window on the shortcut menu. You can also drag the tab out of the current window and onto the desktop to create a new window containing the tab.
![]() Open a new window. Press Ctrl+N.
Open a new window. Press Ctrl+N.
![]() Close a tab you don’t need. Click × to close the tab. You can also press Ctrl+W to close the active tab.
Close a tab you don’t need. Click × to close the tab. You can also press Ctrl+W to close the active tab.
![]() Tip
Tip
You can close multiple tabs at once in two ways. If there’s just one tab you want to keep, right-click that tab, and then click Close Other Tabs on the shortcut menu. If you want to close all the tabs to the right of a particular tab, right-click that tab, and then click Close Tabs to the Right on the shortcut menu.
Browsing Fast with Page Prediction
The Page Prediction feature enables you to quickly display the next page in a website by swiping across the screen or by clicking a Next button (a > arrow) that appears on the right side of the page. Similarly, you can go back by clicking the Previous button (a < arrow) on the left side of the screen. Page Prediction works only with pages designed for the feature, but you’ll find quite a lot of those on the web these days.
![]() Tip
Tip
If Page Prediction isn’t working, you may need to enable it. Click the More Actions button, click Settings, and then click View Advanced Settings to display the Advanced Settings pane. You can then set the “Use Page Prediction to Speed Up Browsing, Improve Reading, and Make My Overall Experience Better” switch to On.
![]() Caution
Caution
Enabling the Page Prediction feature makes Microsoft Edge share your browsing history with Microsoft to help Microsoft improve Page Prediction.
Copying Text with Caret Browsing
The Caret Browsing feature enables you to select text on a web page by using the keyboard. Press F7 to toggle Caret Browsing on. Microsoft Edge displays a cursor in the text. Press the arrow keys to move the cursor to where you want to start your selection. You can then hold down Shift while you press the arrow keys to select the text you want.
After you select the text, press Ctrl+C to copy it to the Clipboard so you can paste it elsewhere. You can also copy the text by right-clicking the selection and then clicking Copy on the shortcut menu.
When you finish using Caret Browsing, press F7 to toggle it off again.
Removing Distractions with Reading Mode
When you want to focus on the text of the web page you’re reading, switch to Reading mode. Reading mode hides everything except the main story, helping you avoid distractions such as ads, items at the top of the page, and items in sidebars.
To toggle Reading mode on or off, click the Reading Mode icon—the open book—at the right end of the Address box, or simply press Ctrl+Shift+R.
Browsing the Smart Way with Favorites
When you find a web page you want to be able to visit again easily, create a favorite for it. Here’s what to do:
1. With the page active, click Add to Favorites or Reading List on the toolbar to open the Add to Favorites or Reading List pop-up panel (see Figure 11.3).
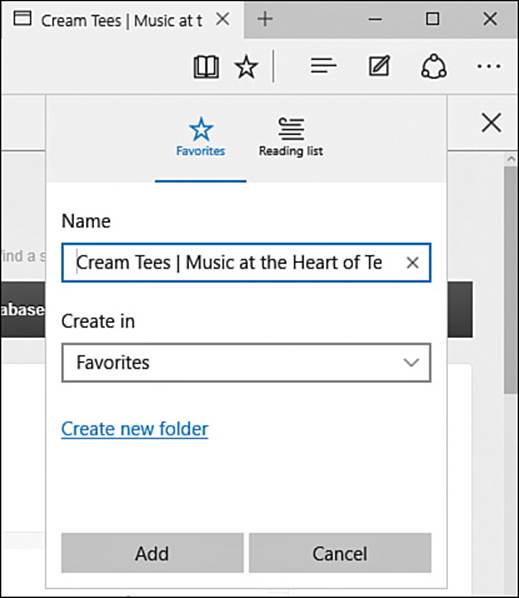
FIGURE 11.3 Use the Add to Favorites or Reading List pop-up panel to create a favorite for a page you want to visit again.
2. Click Favorites at the top if Reading List is selected.
3. In the Name box, edit the default name as needed, or simply type a descriptive name that will enable you to identify the page easily. The default name is the title of the web page.
4. Click the Create In drop-down menu and then click the folder in which you want to store the favorite. You can create a new folder by clicking Create New Folder.
5. Click Add to add the favorite.
![]() Tip
Tip
If you’ll want to go to the favorite frequently, create it on the Favorites bar. You can access the favorite without opening the Hub panel.
After you’ve created the favorite, you can go back to it quickly:
1. Click Hub on the toolbar to display the Hub panel, which contains the Favorites, Reading List, History, and Downloads tabs.
2. Click Favorites (the star icon) to display the Favorites list, unless it’s displayed already.
3. If the favorite is in a folder, click that folder to display its contents.
4. Click the favorite to display the web page.
Returning to Pages You Viewed Earlier
Microsoft Edge keeps a list of all the pages you visit. This list is called your history, and you can use it to return to a page you visited before but for which you didn’t create a favorite.
To access your history, click Hub on the toolbar to display the Hub panel, which contains four tabs: Favorites, Reading List, History, and Downloads. Click History (the clock icon with an arrow going counterclockwise) to display the History list. You can then click the page you want to view.
Deleting Unwanted History Items
Microsoft Edge makes it easy to delete history items you don’t want to keep: You simply click the × button to the right of an item to remove it.
To remove a single item, move the mouse pointer over it, and then click the × button that appears. To remove a section of history, such as Last Hour or Today, click the × that appears to its right. Or click Clear All History at the top of the History tab to clear all your history.
For instructions on clearing other browsing data, see the section “Clearing Your Browsing Data,” later in this chapter.
Catching Up with Your Reading List
Microsoft Edge has a Reading List feature that makes it easy to line up web pages for reading later.
![]() Tip
Tip
Reading List saves the page in its current state, so when you return to it, the page is the same. By contrast, when you display a favorite, Microsoft Edge downloads the latest version of the page.
Here’s how to add the current page to Reading List:
1. Click the Add to Favorites or Reading List button (the star icon) at the right end of the Address box to display the Add to Favorites or Reading List pop-up panel.
2. Click the Reading List tab to display its contents.
3. Optionally, click in the Name box and change the name of the page. The default name is the title of the web page, which might be long and might contain information you don’t need. You can click the × button at the right end of the Name box to delete the current name, and then type a descriptive name.
4. Click Add. Microsoft Edge adds the page to your reading list.
When you want to read something on Reading List, follow these steps:
1. Click Hub on the toolbar to display the Hub panel.
2. Click Reading List (the icon showing a stack of papers) to display Reading List, unless it’s displayed already.
3. Click the page you want to view.
![]() Note
Note
To remove a page from Reading List, right-click or long-press it, and then click Remove on the drop-down menu.
Annotating Web Pages with Web Note
The Web Note feature in Microsoft Edge enables you to annotate a web page you’re viewing. You can then save the marked-up version on your computer or share it with someone else.
To use Web Note, browse to the page you want to annotate, and then click the Web Note button (the pen-on-paper icon) on the toolbar. The Web Note toolbar appears (see Figure 11.4), allowing you to take the following actions:
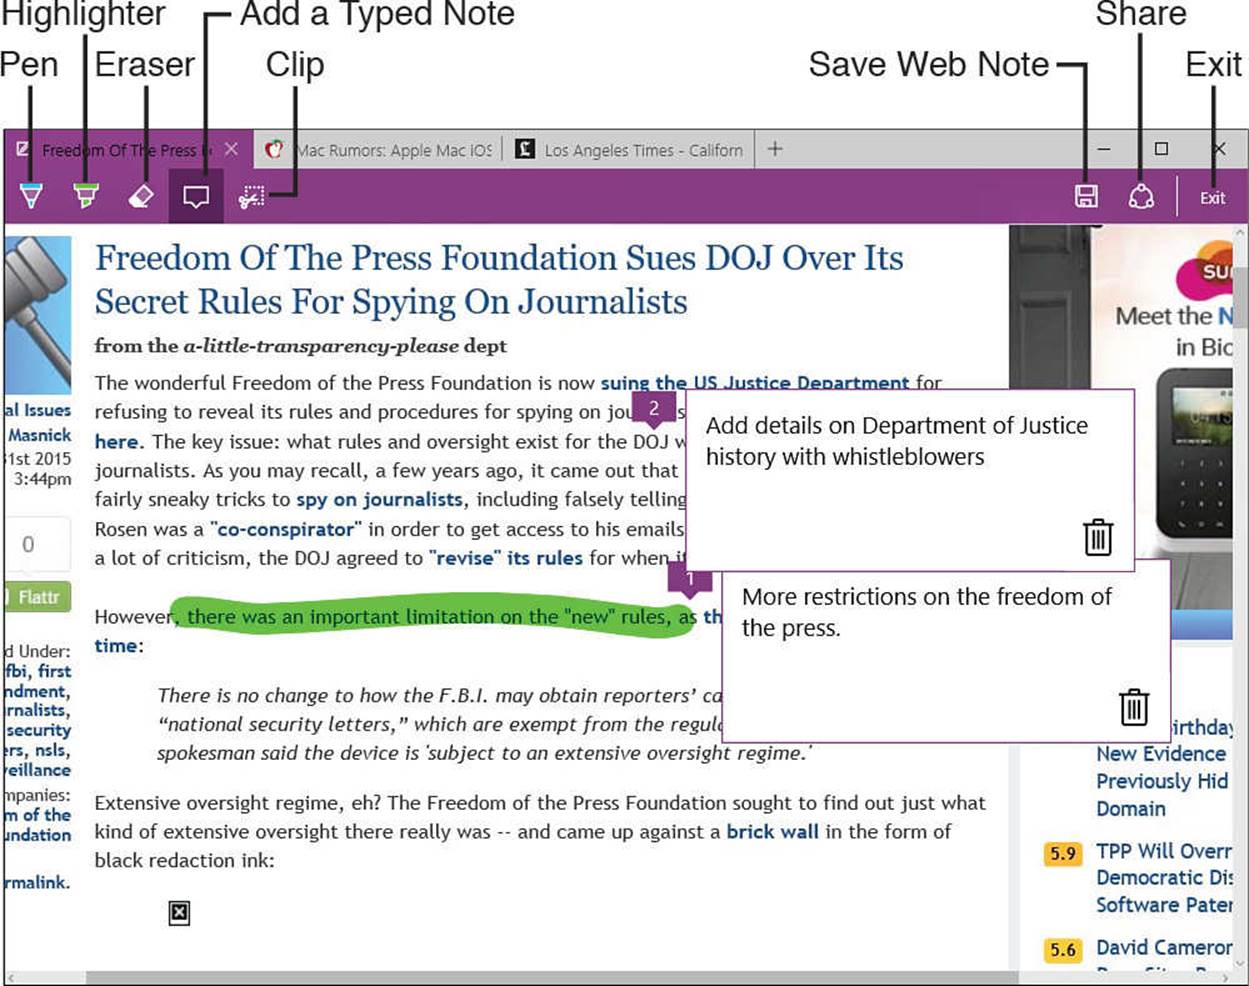
FIGURE 11.4 The Web Note toolbar provides easy-to-use tools for making notes, saving them, and sharing them.
![]() Choose the pen color and size. Click Pen to activate the pen. A triangle appears in the lower-right corner of the button. Click Pen again to display the pop-up panel, and then click the color you want. To change the size, click Pen once more to open the pop-up panel again, and then click the size you need.
Choose the pen color and size. Click Pen to activate the pen. A triangle appears in the lower-right corner of the button. Click Pen again to display the pop-up panel, and then click the color you want. To change the size, click Pen once more to open the pop-up panel again, and then click the size you need.
![]() Choose the highlighter color and shape. Click Highlighter to activate the highlighter. A triangle appears in the lower-right corner of the button. Click Highlighter again to display the pop-up panel, and then click the highlight color you want. To change the highlighter shape, click Highlighter again to open the pop-up panel, and then click the shape.
Choose the highlighter color and shape. Click Highlighter to activate the highlighter. A triangle appears in the lower-right corner of the button. Click Highlighter again to display the pop-up panel, and then click the highlight color you want. To change the highlighter shape, click Highlighter again to open the pop-up panel, and then click the shape.
![]() Erase what you’ve drawn. Click Eraser to activate the eraser. A triangle appears in the lower-right corner of the button. Click Eraser again to display the pop-up panel, and then click Clear All Ink.
Erase what you’ve drawn. Click Eraser to activate the eraser. A triangle appears in the lower-right corner of the button. Click Eraser again to display the pop-up panel, and then click Clear All Ink.
![]() Type in some text. Click Add a Typed Note to activate the Typed Note feature, and then click with the crosshair pointer that appears on the point in text where you want to attach the note. Microsoft Edge opens a box in which you can type the text.
Type in some text. Click Add a Typed Note to activate the Typed Note feature, and then click with the crosshair pointer that appears on the point in text where you want to attach the note. Microsoft Edge opens a box in which you can type the text.
![]() Note
Note
To get rid of a typed note, click the Delete icon (the trash icon) inside it.
![]() Clip part of the page. When you want to clip part of a page as a picture, click Clip to activate clipping mode. You can then drag to select the part of the page you want to clip; when you finish, the Copied! button appears, letting you know that Microsoft Edge has copied the material. You can then paste the clipping into pretty much any app that accepts pictures. For example, you might paste the clipping into OneNote and then add text to it.
Clip part of the page. When you want to clip part of a page as a picture, click Clip to activate clipping mode. You can then drag to select the part of the page you want to clip; when you finish, the Copied! button appears, letting you know that Microsoft Edge has copied the material. You can then paste the clipping into pretty much any app that accepts pictures. For example, you might paste the clipping into OneNote and then add text to it.
![]() Save your notes. To save your notes, click Save Web Note (the disk icon) at the right end of the Web Note toolbar. In the Add To panel that appears, click OneNote, Favorites, or Reading List, as needed. For OneNote, open the Choose a Section drop-down menu and choose the section in which to store the note, and then click Send. For Favorites, change the name in the Name box if you want, select the folder in the Create In drop-down menu, and then click Add. For Reading List, change the name in the Name box as needed, and then click Add.
Save your notes. To save your notes, click Save Web Note (the disk icon) at the right end of the Web Note toolbar. In the Add To panel that appears, click OneNote, Favorites, or Reading List, as needed. For OneNote, open the Choose a Section drop-down menu and choose the section in which to store the note, and then click Send. For Favorites, change the name in the Name box if you want, select the folder in the Create In drop-down menu, and then click Add. For Reading List, change the name in the Name box as needed, and then click Add.
![]() Share your notes. Click Share at the right end of the Web Note toolbar to display the Share pane, and then click the means of sharing you want to use.
Share your notes. Click Share at the right end of the Web Note toolbar to display the Share pane, and then click the means of sharing you want to use.
![]() Stop using Web Note. Click Exit at the right end of the Web Note toolbar.
Stop using Web Note. Click Exit at the right end of the Web Note toolbar.
Controlling Microsoft Edge with Keyboard Shortcuts
You can use the keyboard shortcuts explained in Table 11.1 to control Microsoft Edge.
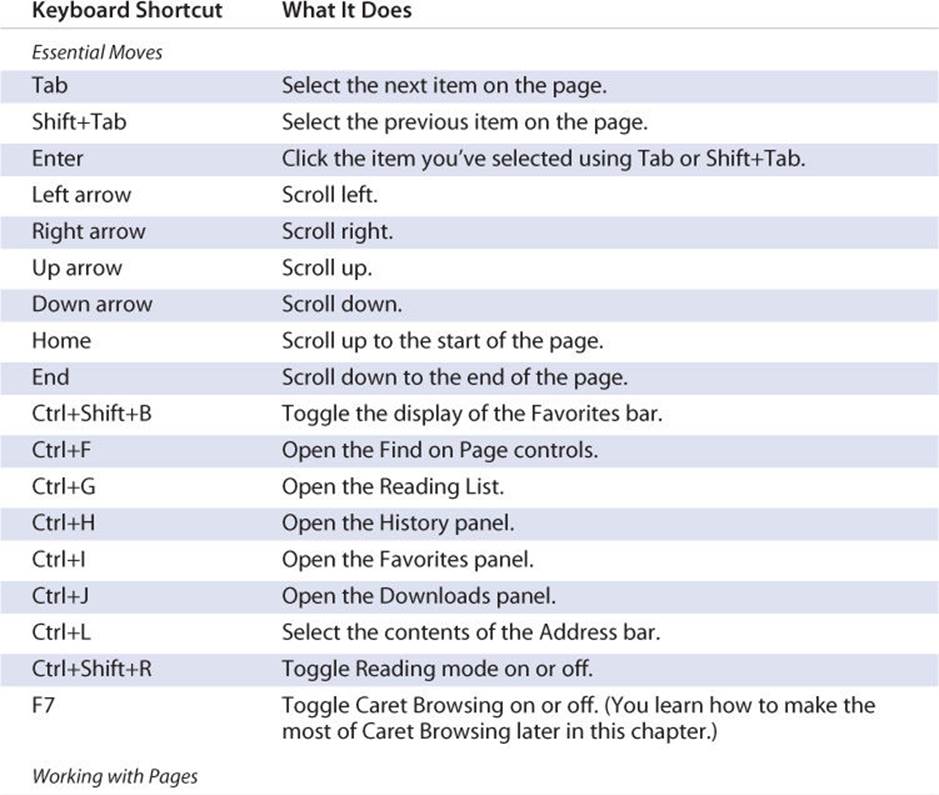
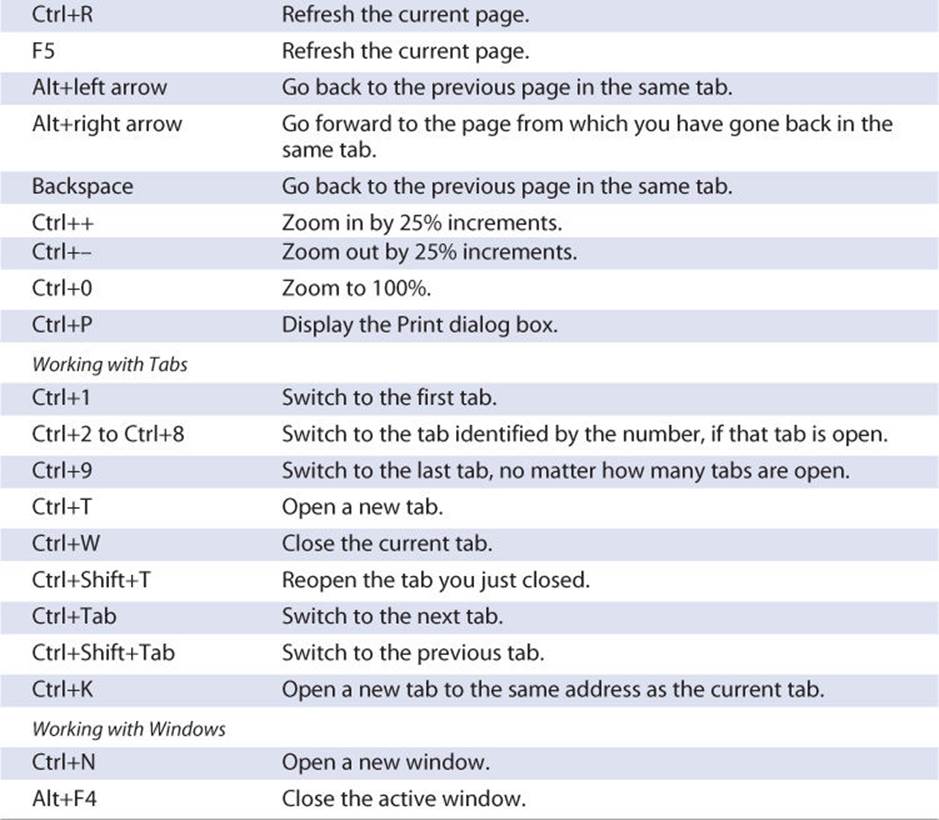
Table 11.1 Keyboard Shortcuts for Microsoft Edge
Configuring Microsoft Edge for Comfort and Security
It’s a good idea to spend a few minutes configuring Microsoft Edge to make it work the way you prefer. Click the More Actions button to open the More Actions menu, and then click Settings to open the Settings pane. The left screen in Figure 11.5 shows the upper part of the Settings pane, and the right screen shows the lower part.
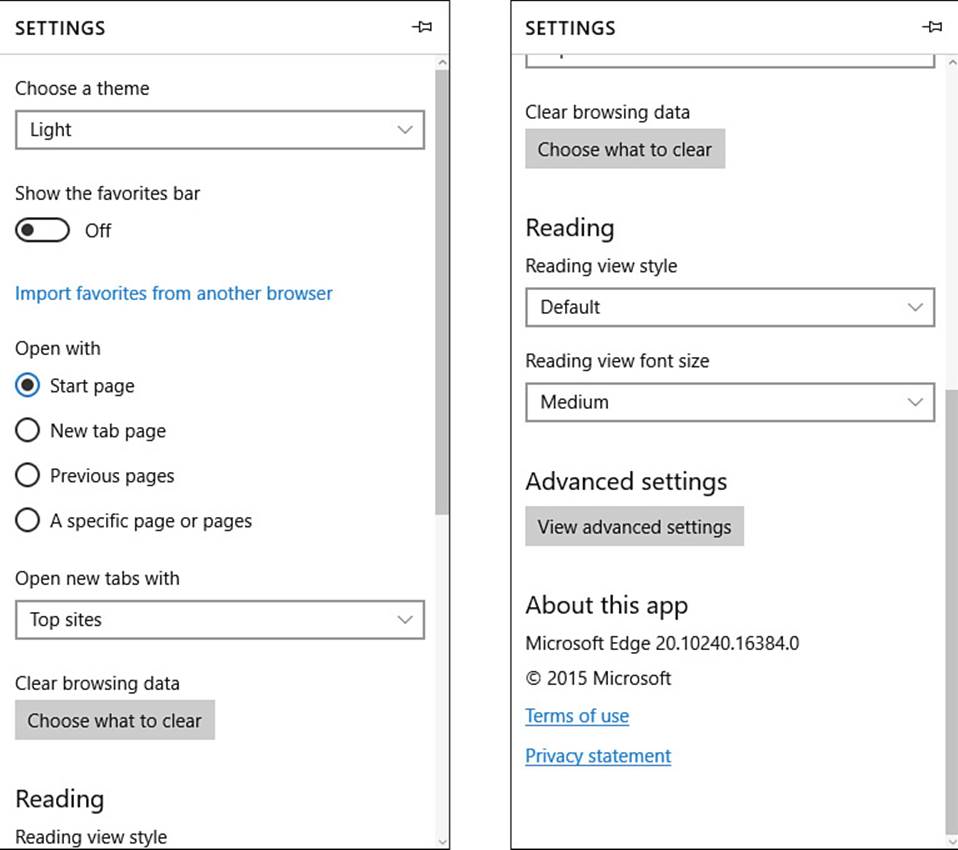
FIGURE 11.5 Use the Settings pane to configure Microsoft Edge to work your way.
Configuring General Settings
At the top of the Settings pane, you can configure settings to control Microsoft Edge’s appearance, startup behavior, and searching:
![]() Choose a Theme. Open this drop-down menu and choose Light or Dark to control the overall look of Microsoft Edge.
Choose a Theme. Open this drop-down menu and choose Light or Dark to control the overall look of Microsoft Edge.
![]() Show the Favorites Bar. Set this switch to On if you want the Favorites bar to appear all the time. The Favorites bar is useful, especially if you customize it, but you may want to hide it if your computer has a small screen.
Show the Favorites Bar. Set this switch to On if you want the Favorites bar to appear all the time. The Favorites bar is useful, especially if you customize it, but you may want to hide it if your computer has a small screen.
![]() Tip
Tip
You can toggle the display of the Favorites bar by pressing Ctrl+Shift+B.
![]() Import Favorites from Another Browser. Click this link to import favorites from another web browser, such as Internet Explorer.
Import Favorites from Another Browser. Click this link to import favorites from another web browser, such as Internet Explorer.
![]() Open With. In this area, choose what you want Microsoft Edge to display when you open the browser for a new session. Select the Start Page option button to use the Microsoft Edge start page. Select the New Tab Page option button to open the new tab page. Select the Previous Pages option button to have Microsoft Edge open the last set of tabs you had open. If you prefer a particular page, click the A Specific Page or Pages option button, click the drop-down menu, and then click the option you want. To use a page that isn’t listed, click Custom, and then enter the address in the text box that appears. You can then click the + button and add another page if you want.
Open With. In this area, choose what you want Microsoft Edge to display when you open the browser for a new session. Select the Start Page option button to use the Microsoft Edge start page. Select the New Tab Page option button to open the new tab page. Select the Previous Pages option button to have Microsoft Edge open the last set of tabs you had open. If you prefer a particular page, click the A Specific Page or Pages option button, click the drop-down menu, and then click the option you want. To use a page that isn’t listed, click Custom, and then enter the address in the text box that appears. You can then click the + button and add another page if you want.
![]() Caution
Caution
The Previous Pages setting can be great for resuming your browsing where you left off, but you might find that it opens pages you didn’t want to see again—or pages you don’t want nearby people to see.
![]() Tip
Tip
You can also make Microsoft Edge start with a blank page. To do so, click the New Tab Page option button, open the Open New Tabs With drop-down menu, and click A Blank Page.
![]() Open New Tabs With. Open this drop-down menu and click Top Sites and Suggested Content, Top Sites, or A Blank Page, as needed.
Open New Tabs With. Open this drop-down menu and click Top Sites and Suggested Content, Top Sites, or A Blank Page, as needed.
![]() Clear Browsing Data. Click the Choose What to Clear button to choose which browsing data to clear. We’ll go over this in the section “Clearing Your Browsing Data,” later in this chapter.
Clear Browsing Data. Click the Choose What to Clear button to choose which browsing data to clear. We’ll go over this in the section “Clearing Your Browsing Data,” later in this chapter.
![]() Reading View Style. Open this drop-down menu and click Default, Light, Medium, or Dark to specify the color scheme you want to use for Reading view. The Default color is beige, which is easier on the eyes than white.
Reading View Style. Open this drop-down menu and click Default, Light, Medium, or Dark to specify the color scheme you want to use for Reading view. The Default color is beige, which is easier on the eyes than white.
![]() Reading View Font Size. Open this drop-down menu and click Small, Medium, Large, or Extra Large to select the font size you find most comfortable for reading.
Reading View Font Size. Open this drop-down menu and click Small, Medium, Large, or Extra Large to select the font size you find most comfortable for reading.
Configuring Essential Advanced Settings
When you finish choosing settings in the Settings pane, click the View Advanced Settings button to display the Advanced Settings pane. The left screen in Figure 11.6 shows the upper part of the Advanced Settings pane, and the right screen shows the lower part.

FIGURE 11.6 The Advanced Settings pane includes settings for blocking pop-ups, saving passwords and form entries, and controlling search suggestions and cookies.
These are the settings you can configure in the upper part of the Advanced Settings pane:
![]() Show the Home Button. Set this switch to On to display the Home button to the right of the Refresh button. After setting this switch to On, you can enter the address for the Home page in the text box and click Save.
Show the Home Button. Set this switch to On to display the Home button to the right of the Refresh button. After setting this switch to On, you can enter the address for the Home page in the text box and click Save.
![]() Block Pop-Ups. Set this switch to On if you want to block pop-up windows. These are the windows that open automatically on websites that are keen to show you things you don’t want to see.
Block Pop-Ups. Set this switch to On if you want to block pop-up windows. These are the windows that open automatically on websites that are keen to show you things you don’t want to see.
![]() Use Adobe Flash Player. Set this switch to On if you want Microsoft Edge to use Adobe Flash Player. Flash is a technology that many websites use as of this writing, so you need to set this switch to On to experience such websites fully.
Use Adobe Flash Player. Set this switch to On if you want Microsoft Edge to use Adobe Flash Player. Flash is a technology that many websites use as of this writing, so you need to set this switch to On to experience such websites fully.
![]() Caution
Caution
Flash Player has suffered many security problems in the past. If you set the Use Adobe Flash Player switch to On, you should keep Flash Player up to date. Flash Player normally notifies you when an update is available.
![]() Always Use Caret Browsing. Set this switch to On if you want to use the Caret Browsing feature in every window and tab. If you set the switch to Off, you can press F7 to enable Caret Browsing in the active tab when you need it.
Always Use Caret Browsing. Set this switch to On if you want to use the Caret Browsing feature in every window and tab. If you set the switch to Off, you can press F7 to enable Caret Browsing in the active tab when you need it.
Configuring Privacy and Services Settings
In the Privacy and Services section of the Advanced Settings pane, you can configure the following settings:
![]() Offer to Save Passwords. Set this switch to On if you want Microsoft Edge to offer to save passwords you enter on websites. You can click the Manage My Saved Passwords link to display the Manage Passwords pane, in which you can delete passwords as needed.
Offer to Save Passwords. Set this switch to On if you want Microsoft Edge to offer to save passwords you enter on websites. You can click the Manage My Saved Passwords link to display the Manage Passwords pane, in which you can delete passwords as needed.
![]() Save Form Entries. Set this switch to On if you want Microsoft Edge to save items you enter in web forms. For example, by storing your address information, Microsoft Edge can enter it for you in subsequent web forms, saving you time and typos.
Save Form Entries. Set this switch to On if you want Microsoft Edge to save items you enter in web forms. For example, by storing your address information, Microsoft Edge can enter it for you in subsequent web forms, saving you time and typos.
![]() Send Do Not Track Requests. Set this switch to On to have Microsoft Edge send Do Not Track requests to websites you visit.
Send Do Not Track Requests. Set this switch to On to have Microsoft Edge send Do Not Track requests to websites you visit.
![]() Caution
Caution
As the name says, Do Not Track requests are only requests. Many websites do not honor Do Not Track requests, so don’t rely on their having any effect.
![]() Have Cortana Assist Me in Microsoft Edge. Set this switch to On if you want to use the Cortana assistant in Microsoft Edge.
Have Cortana Assist Me in Microsoft Edge. Set this switch to On if you want to use the Cortana assistant in Microsoft Edge.
![]() Search in the Address Bar With. Open this drop-down menu and choose the search provider you want to use for search terms you type in the address bar. You can click the <Add new> item to add a new provider.
Search in the Address Bar With. Open this drop-down menu and choose the search provider you want to use for search terms you type in the address bar. You can click the <Add new> item to add a new provider.
![]() Show Search Suggestions as I Type. Set this switch to On to have Microsoft Edge send what you type in the Address box to Microsoft’s servers so that they can return search suggestions. This feature can help you find what you’re looking for, but it increases the amount of information you are giving Microsoft.
Show Search Suggestions as I Type. Set this switch to On to have Microsoft Edge send what you type in the Address box to Microsoft’s servers so that they can return search suggestions. This feature can help you find what you’re looking for, but it increases the amount of information you are giving Microsoft.
![]() Cookies. Open this drop-down menu and click Don’t Block Cookies, Block Only Third Party Cookies, or Block All Cookies, as needed. Block Only Third Party Cookies is the best choice for general browsing.
Cookies. Open this drop-down menu and click Don’t Block Cookies, Block Only Third Party Cookies, or Block All Cookies, as needed. Block Only Third Party Cookies is the best choice for general browsing.
![]() Caution
Caution
Choosing the Block All Cookies setting in the Cookies drop-down menu might seem a good idea—but it prevents many websites from working correctly. Normally, it’s best to block third-party cookies and allow cookies from the sites you visit.
![]() Let Sites Save Protected Media Licenses on My Device. Set this switch to On if you will play protected media files, such as movies or TV shows. Letting sites save the licenses for these files on your device enables you to play back protected files even when your computer doesn’t have an Internet connection.
Let Sites Save Protected Media Licenses on My Device. Set this switch to On if you will play protected media files, such as movies or TV shows. Letting sites save the licenses for these files on your device enables you to play back protected files even when your computer doesn’t have an Internet connection.
![]() Use Page Prediction to Speed Up Browsing, Improve Reading, and Make My Overall Experience Better. Set this switch to On if you want Microsoft Edge to try to predict the next page you will want to load from the current page and to automatically download the next page so that the Page Prediction feature works.
Use Page Prediction to Speed Up Browsing, Improve Reading, and Make My Overall Experience Better. Set this switch to On if you want Microsoft Edge to try to predict the next page you will want to load from the current page and to automatically download the next page so that the Page Prediction feature works.
![]() Caution
Caution
Page Prediction can speed up your browsing, but you should bear two concerns in mind. First, Page Prediction may cause your computer to download (but not display) some pages that you wouldn’t choose to view; this may make it look to your ISP, or any agency getting data from your ISP, as though you viewed those pages. Second, Page Prediction can increase your data usage substantially, which can be a concern if you’re browsing via a cellular connection or some other metered plan.
![]() Help Protect Me from Malicious Sites and Downloads with SmartScreen Filter. Set this switch to On to enable the SmartScreen Filter feature. When you try to download an app, SmartScreen Filter checks with Microsoft’s servers to see whether the app is considered dangerous; if so, SmartScreen Filter prevents Microsoft Edge from downloading it. SmartScreen Filter also tries to protect your computer against “drive-by downloads,” which is when a website you visit attempts to install software on your computer without your knowledge or permission.
Help Protect Me from Malicious Sites and Downloads with SmartScreen Filter. Set this switch to On to enable the SmartScreen Filter feature. When you try to download an app, SmartScreen Filter checks with Microsoft’s servers to see whether the app is considered dangerous; if so, SmartScreen Filter prevents Microsoft Edge from downloading it. SmartScreen Filter also tries to protect your computer against “drive-by downloads,” which is when a website you visit attempts to install software on your computer without your knowledge or permission.
![]() Note
Note
These are some of the settings you can configure when setting up Windows in the first place if you click Customize Settings rather than Use Express Settings on the Set Up for You, So You Can Get Going Fast screen in Windows Setup.
![]() Caution
Caution
The services in the Privacy and Services section of the Advanced Settings pane can help speed up your browsing, get you more relevant results, and protect your computer against malevolent sites. But be clear that, simply in order to work, these services require Microsoft Edge to share with Microsoft your browsing history and the keystrokes you type in the app. If you see this sharing as a threat to your privacy, disable these features.
Clearing Your Browsing Data
As you browse, Microsoft Edge stores a large amount of data about the pages you visit and the files you download. Websites also place small files called cookies on your computer to help them track your movements on their sites and to implement features such as shopping carts and tailored product recommendations.
When you want to get rid of some—or all—of the stored data, click the Choose What to Clear button under the Clear Browsing Data heading in the Settings pane. The Clear Browsing Data pane appears showing its regular list of items (see the left screen in Figure 11.7). You can then check the check box for each item you want to delete:
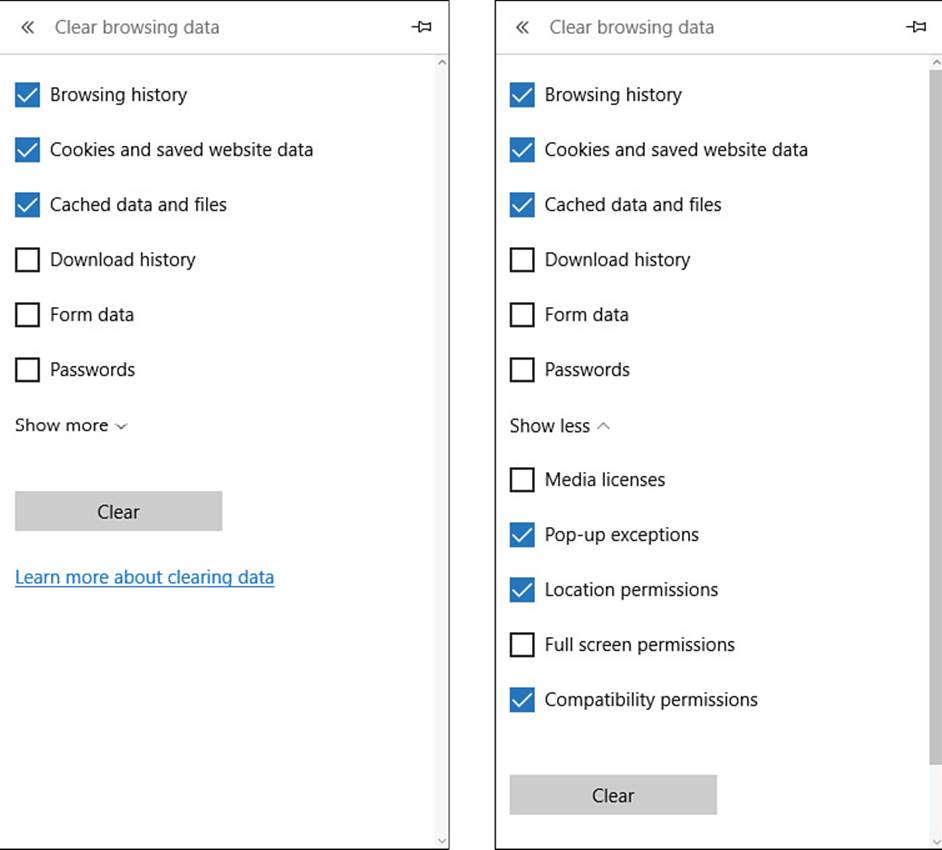
FIGURE 11.7 The Clear Browsing Data pane enables you to delete your browsing history, cookies, temporary Internet files, and more. Click the Show More link (left) to display the full list of items you can clear (right).
![]() Browsing History. Check this box to delete all your history. This is an easy way of getting rid of potentially embarrassing history items, but it also prevents you from using history to return to pages you found interesting but didn’t make favorites.
Browsing History. Check this box to delete all your history. This is an easy way of getting rid of potentially embarrassing history items, but it also prevents you from using history to return to pages you found interesting but didn’t make favorites.
![]() Cookies and Saved Website Data. Check this check box to delete all the cookies and website data that sites have stored on your computer.
Cookies and Saved Website Data. Check this check box to delete all the cookies and website data that sites have stored on your computer.
![]() Caution
Caution
After deleting cookies and website data, you may need to log in manually to accounts that you could log in to automatically using cookies. You may also have to reset your preferences for websites.
![]() Cached Data and Files. Check this check box to delete the temporary files that Microsoft Edge has stored on your computer to help it display web pages quickly. If you delete these files, Microsoft Edge may take longer to visit sites you visit frequently, because it has to download all the images for each page instead of being able to pull unchanged images from its cache on your computer.
Cached Data and Files. Check this check box to delete the temporary files that Microsoft Edge has stored on your computer to help it display web pages quickly. If you delete these files, Microsoft Edge may take longer to visit sites you visit frequently, because it has to download all the images for each page instead of being able to pull unchanged images from its cache on your computer.
![]() Download History. Check this check box to delete the list of the files you have downloaded. The files themselves stay in your computer’s file system until you delete them.
Download History. Check this check box to delete the list of the files you have downloaded. The files themselves stay in your computer’s file system until you delete them.
![]() Form Data. Check this check box to delete any form data, such as your name and address, that Microsoft Edge has saved to help you fill in web forms more quickly and accurately.
Form Data. Check this check box to delete any form data, such as your name and address, that Microsoft Edge has saved to help you fill in web forms more quickly and accurately.
![]() Passwords. Check this check box to delete any passwords you’ve allowed Microsoft Edge to save.
Passwords. Check this check box to delete any passwords you’ve allowed Microsoft Edge to save.
When you’ve made your choices, you can click Clear to implement them. But you can also click the Show More link to display the other items you can clear:
![]() Media Licenses. Check this check box to clear media licenses you have installed on your computer.
Media Licenses. Check this check box to clear media licenses you have installed on your computer.
![]() Pop-Up Exceptions. Check this check box to clear the list of sites that you have allowed to display pop-up windows in Microsoft Edge.
Pop-Up Exceptions. Check this check box to clear the list of sites that you have allowed to display pop-up windows in Microsoft Edge.
![]() Location Permissions. Check this check box to clear any permissions you have granted to websites to track your location in Microsoft Edge.
Location Permissions. Check this check box to clear any permissions you have granted to websites to track your location in Microsoft Edge.
![]() Full Screen Permissions. Check this check box to clear any permissions you have granted for websites to switch to full screen.
Full Screen Permissions. Check this check box to clear any permissions you have granted for websites to switch to full screen.
![]() Compatibility Permissions. Check this check box to clear any permissions you have granted for websites to use compatibility features.
Compatibility Permissions. Check this check box to clear any permissions you have granted for websites to use compatibility features.
After checking the appropriate check boxes, click the Clear button to clear the data.
When you finish choosing settings, click the More Actions button to close the Settings pane. You can also click anywhere in the Microsoft Edge window outside the Settings pane.
All materials on the site are licensed Creative Commons Attribution-Sharealike 3.0 Unported CC BY-SA 3.0 & GNU Free Documentation License (GFDL)
If you are the copyright holder of any material contained on our site and intend to remove it, please contact our site administrator for approval.
© 2016-2026 All site design rights belong to S.Y.A.