WINDOWS 10 TIPS AND TRICKS (2016)
5. Customizing Windows to Suit Your Needs
In This Chapter
![]() Customizing the Start menu
Customizing the Start menu
![]() Customizing the taskbar
Customizing the taskbar
![]() Customizing the lock screen, the Recycle Bin, and notifications
Customizing the lock screen, the Recycle Bin, and notifications
Windows provides a wide variety of settings you can customize to make the operating system work your way. In this chapter, we’ll start by digging into the ways you can customize the Start menu, which is arguably the key component of the Windows interface. We’ll then move on to customizing the taskbar, which can make a huge difference in the speed and efficiency with which you use Windows.
After that, we’ll look at how you can set up automatic login, if you’re certain you need it; customize the lock screen to show the information you find most useful on it; make the Recycle Bin work your way; and configure notifications to prevent Windows from bombarding you with news you don’t need at times when you’d prefer peace.
Customizing the Start Menu
You can customize the Start menu by choosing which categories of items appear on it and by pinning or removing specific items. You use the Start pane in the Settings app to specify the categories of items. To pin and remove specific items, you work directly on the Start menu.
Choosing Which Categories of Items to Display on the Start Menu
To choose categories of items, follow these steps to open the Start pane on the Personalization screen in the Settings app:
1. Right-click or long-press open space on the desktop to display the shortcut menu.
2. Click Personalize to display the Personalization screen in the Settings app.
3. Click Start in the left column to display the Start pane (see Figure 5.1).

FIGURE 5.1 Use the Start pane on the Personalization screen in Settings to choose which categories of items appear on the Start menu and to control whether the Start menu appears full-screen.
In the Start pane, you can configure the following settings:
![]() Show Most Used Apps. Set this switch to On to display the Most Used section. This section is usually helpful for giving you access to the apps you use most, but if you find the section unhelpful or indiscreet, set the switch to Off to suppress it.
Show Most Used Apps. Set this switch to On to display the Most Used section. This section is usually helpful for giving you access to the apps you use most, but if you find the section unhelpful or indiscreet, set the switch to Off to suppress it.
![]() Show Recently Added Apps. Set this switch to On to display the Recently Added section, which helps you find apps you’ve added recently. If you don’t find Recently Added helpful, set the switch to Off.
Show Recently Added Apps. Set this switch to On to display the Recently Added section, which helps you find apps you’ve added recently. If you don’t find Recently Added helpful, set the switch to Off.
![]() Use Start Full Screen. Set this switch to On if you want the Start menu to appear full-screen when you open it.
Use Start Full Screen. Set this switch to On if you want the Start menu to appear full-screen when you open it.
![]() Show Recently Opened Items in Jump Lists on Start or the Taskbar. Set this switch to On if you want Windows to display jump lists on the Start menu and on the taskbar to give you quick access to recent items. Again, this feature is usually handy, but turn it off if you don’t want these items to show—for example, because other people can observe your screen.
Show Recently Opened Items in Jump Lists on Start or the Taskbar. Set this switch to On if you want Windows to display jump lists on the Start menu and on the taskbar to give you quick access to recent items. Again, this feature is usually handy, but turn it off if you don’t want these items to show—for example, because other people can observe your screen.
After setting the switches in the Start pane, click Choose Which Folders Appear on Start to display the Choose Which Folders Appear on Start screen. You can then set the switch for each of the items listed in Table 5.1 to On or Off, as needed.
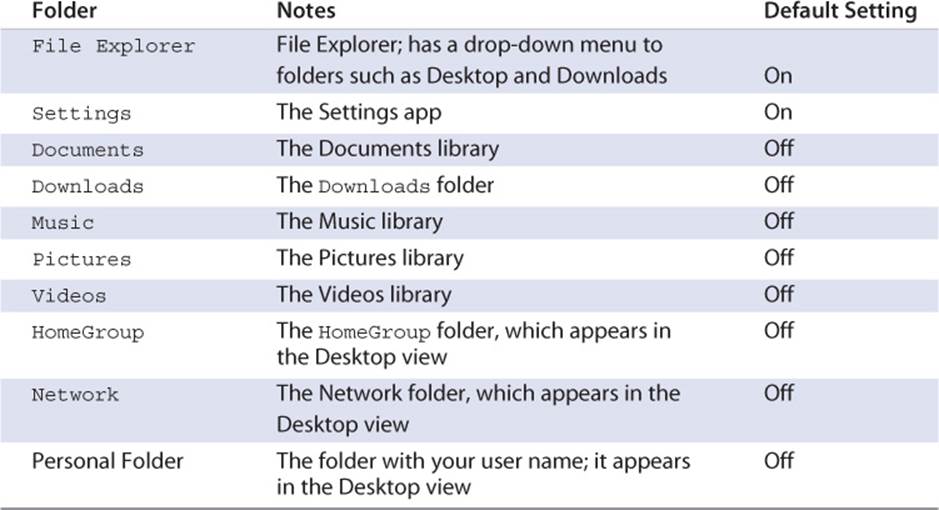
Table 5.1 Items on the Choose Which Folders Appear on Start Screen
Choosing Colors for the Start Menu
To choose colors for the Start menu, click Colors in the left pane on the Personalization screen. You can then choose an accent color for your Windows look by setting the Automatically Pick an Accent Color from My Background switch to Off and clicking the appropriate color in the Choose Your Accent Color grid.
Set the Show Color on Start, Taskbar, and Action Center switch to On if you want Windows to use your color choice on the Start menu, the taskbar, and Action Center. Set the Make Start, Taskbar, and Action Center Transparent switch to On if you want to make these three interface items transparent so that you can see the desktop background through them.
Customizing the Start Menu Directly
These are the moves you need to know to make the Start menu work the way you prefer:
![]() Resize the Start menu. Move the pointer over a border, and then click and drag.
Resize the Start menu. Move the pointer over a border, and then click and drag.
![]() Pin an item to the Start menu. Right-click or long-press the item and click Pin to Start on the shortcut menu.
Pin an item to the Start menu. Right-click or long-press the item and click Pin to Start on the shortcut menu.
![]() Tip
Tip
If you want quick access to the Recycle Bin, pin the Recycle Bin to the Start menu. Right-click or long-press the Recycle Bin icon on the desktop, and then click Pin to Start. You can then remove the icon from the desktop if you want.
![]() Unpin a pinned item from the Start menu. Right-click or long-press the item and then click Unpin from Start on the shortcut menu.
Unpin a pinned item from the Start menu. Right-click or long-press the item and then click Unpin from Start on the shortcut menu.
![]() Remove an item from the Start menu. Right-click or long-press the item and click Don’t Show in This List on the shortcut menu.
Remove an item from the Start menu. Right-click or long-press the item and click Don’t Show in This List on the shortcut menu.
![]() Tip
Tip
You can also remove an item from the Start menu by dragging it off the menu and dropping it elsewhere.
![]() Resize a tile. Right-click or long-press the tile, click or highlight Resize on the shortcut menu, and then click Small, Medium, Wide, or Large, as needed. Some tiles don’t support all four sizes—for example, if you add the Notepad tile to the Start menu, you can only apply the Small or Medium size to the tile.
Resize a tile. Right-click or long-press the tile, click or highlight Resize on the shortcut menu, and then click Small, Medium, Wide, or Large, as needed. Some tiles don’t support all four sizes—for example, if you add the Notepad tile to the Start menu, you can only apply the Small or Medium size to the tile.
![]() Turn a live tile off or on. Right-click or long-press the tile to display the shortcut menu, and then click Turn Live Tile Off or Turn Live Tile On.
Turn a live tile off or on. Right-click or long-press the tile to display the shortcut menu, and then click Turn Live Tile Off or Turn Live Tile On.
![]() Move a tile. Drag the tile to where you want it.
Move a tile. Drag the tile to where you want it.
![]() Create a new tile group. Drag a tile down to open space at the bottom of the Start menu. When Windows displays a horizontal bar, drop the tile to create a new tile group. Move the pointer above the tile to display the Name Group bar. Click the bar, type the name for the group in the edit box that appears, and then press Enter.
Create a new tile group. Drag a tile down to open space at the bottom of the Start menu. When Windows displays a horizontal bar, drop the tile to create a new tile group. Move the pointer above the tile to display the Name Group bar. Click the bar, type the name for the group in the edit box that appears, and then press Enter.
![]() Note
Note
The shortcut menu for the File Explorer app item on the Start menu offers several commands. Click Manage to open a Computer Management window. Click Map Network Drive to launch the Map Network Drive wizard, or click Disconnect Network Drive to launch the Disconnect Network Drives wizard. Click Properties to display the System screen in Control Panel.
![]() Tip
Tip
The shortcut menu for an app on the Start menu also contains two other handy commands. You can click Run as Administrator to run the app with administrator privileges instead of the level of privileges your account has. You can click Open File Location to open a File Explorer window showing the folder that contains the item.
Customizing the Taskbar
After the Start menu, the taskbar is perhaps the second most important item in the Windows interface, giving you quick access both to the apps you’re already running and to those you need to run.
You can customize the taskbar by moving and resizing it, changing its behavior, and putting the apps you need on it. You can also configure taskbar toolbars and choose which icons to display in the notification area.
Moving and Resizing the Taskbar
The taskbar appears at the bottom of the screen by default, but you can move it to whichever side of the screen you find most helpful.
If the taskbar is locked, you need to unlock it before you can move it or resize it. To toggle locking on or off, right-click or long-press open space in the taskbar, and then click Lock the Taskbar, either placing a check mark (to lock the taskbar) or removing the check mark (to unlock it).
With the taskbar unlocked, click open space in the taskbar and drag it to the edge of the screen you want it to inhabit.
To resize the taskbar, move the pointer over the border between the taskbar and the rest of the screen. When the pointer becomes a two-headed arrow, click and drag the border.
![]() Tip
Tip
After you’ve gotten the taskbar to the position and size that suits you best, it’s a good idea to lock the taskbar to avoid accidental changes.
Configuring the Taskbar’s Behavior
To configure the taskbar’s behavior, open the Taskbar and Start Menu Properties dialog box by right-clicking or long-pressing open space in the taskbar and then clicking Properties on the shortcut menu. You can then configure the following settings on the Taskbar tab (see Figure 5.2):

FIGURE 5.2 Use the controls on the Taskbar tab of the Taskbar and Start Menu Properties dialog box to configure the taskbar.
![]() Lock the taskbar. Check or uncheck this check box to toggle locking. You can also unlock the taskbar by clicking the Lock the Taskbar command on the taskbar’s shortcut menu.
Lock the taskbar. Check or uncheck this check box to toggle locking. You can also unlock the taskbar by clicking the Lock the Taskbar command on the taskbar’s shortcut menu.
![]() Auto-Hide the Taskbar. Check this check box to make the taskbar hide itself automatically when the pointer is not over it. This is a good way of saving screen real estate, but having to move the pointer to the edge of the screen to produce the taskbar can slow down your work rate a little.
Auto-Hide the Taskbar. Check this check box to make the taskbar hide itself automatically when the pointer is not over it. This is a good way of saving screen real estate, but having to move the pointer to the edge of the screen to produce the taskbar can slow down your work rate a little.
![]() Use Small Taskbar Buttons. Check this check box if you want to use the smaller version of taskbar buttons. This is useful if the taskbar tends to get full.
Use Small Taskbar Buttons. Check this check box if you want to use the smaller version of taskbar buttons. This is useful if the taskbar tends to get full.
![]() Taskbar Location on Screen. In this drop-down menu, choose Bottom, Left, Right, or Top, as needed. When the taskbar is unlocked, you can also drag it to the side of the screen you want.
Taskbar Location on Screen. In this drop-down menu, choose Bottom, Left, Right, or Top, as needed. When the taskbar is unlocked, you can also drag it to the side of the screen you want.
![]() Taskbar Buttons. In this drop-down menu, specify how you want taskbar buttons to behave. Choose “Always Combine, Hide Labels” to make Windows combine related taskbar buttons into a single button. Choose Combine When Taskbar Is Full to keep separate taskbar buttons until Windows runs out of space for them. Choose Never Combine if you prefer to keep taskbar buttons separate and harvest by scythe.
Taskbar Buttons. In this drop-down menu, specify how you want taskbar buttons to behave. Choose “Always Combine, Hide Labels” to make Windows combine related taskbar buttons into a single button. Choose Combine When Taskbar Is Full to keep separate taskbar buttons until Windows runs out of space for them. Choose Never Combine if you prefer to keep taskbar buttons separate and harvest by scythe.
![]() Notification Area. Click the Customize button to open the Notifications & Actions pane on the System screen in the Settings app. We’ll look at choosing settings in the Notifications & Actions pane in the section “Telling Windows Which Notifications You Want to Receive,” later in this chapter.
Notification Area. Click the Customize button to open the Notifications & Actions pane on the System screen in the Settings app. We’ll look at choosing settings in the Notifications & Actions pane in the section “Telling Windows Which Notifications You Want to Receive,” later in this chapter.
![]() Use Peek to Preview the Desktop When You Move Your Mouse to the Show Desktop Button at the End of the Taskbar. Check this check box if you want to enable the Peek feature, which shows previews of your open windows, when you move the pointer over the Show Desktop button on the taskbar.
Use Peek to Preview the Desktop When You Move Your Mouse to the Show Desktop Button at the End of the Taskbar. Check this check box if you want to enable the Peek feature, which shows previews of your open windows, when you move the pointer over the Show Desktop button on the taskbar.
![]() Note
Note
The Navigation tab of the Taskbar and Start Menu Properties dialog box contains a single check box called Replace Command Prompt with Windows PowerShell in the Menu When I Right-Click the Lower-Left Corner or Press Windows Key+X. Check this check box if you want an easy way to open either a standard-user Windows PowerShell window or an administrator-level Windows PowerShell window.
The Toolbars tab of the Taskbar and Start Menu Properties dialog box enables you to display or hide taskbar toolbars. As you’ll see a little later in this chapter, you can also toggle the display of taskbar toolbars from the taskbar shortcut menu, which is usually quicker.
When you finish choosing settings in the Taskbar and Start Menu Properties dialog box, click OK to close it.
Putting the Apps You Need Most on the Taskbar
What you’ll probably want to do next is put some of the apps you use most on the taskbar so that you can launch them instantly. You can put an app on the taskbar in moments by opening the Start menu, right-clicking or long-pressing the app’s icon, and then clicking Pin to Taskbar.
![]() Tip
Tip
You can rearrange the items on the taskbar by dragging them into the order you prefer.
![]() Note
Note
To remove an item from the taskbar, right-click or long-press the app’s taskbar icon and then click Unpin This Program from Taskbar on the shortcut menu.
Making the Most of Taskbar Toolbars
Windows includes three built-in taskbar toolbars that you can display and use if you find them helpful or hide if you don’t. These are the toolbars:
![]() Address. This toolbar contains a box into which you can type an address and press Enter to go to it. You can type in a URL to go to it using Microsoft Edge (or your default browser, if you have configured another), or type in a folder path to go to that folder in a File Explorer window.
Address. This toolbar contains a box into which you can type an address and press Enter to go to it. You can type in a URL to go to it using Microsoft Edge (or your default browser, if you have configured another), or type in a folder path to go to that folder in a File Explorer window.
![]() Links. The Links toolbar gives you a quick way to go to websites you’ve bookmarked.
Links. The Links toolbar gives you a quick way to go to websites you’ve bookmarked.
![]() Desktop. The Desktop toolbar gives you quick access to all the objects on the desktop. This can be handy if the desktop is obscured; otherwise, you may prefer to give the Show the Desktop command and simply access these items directly on the desktop.
Desktop. The Desktop toolbar gives you quick access to all the objects on the desktop. This can be handy if the desktop is obscured; otherwise, you may prefer to give the Show the Desktop command and simply access these items directly on the desktop.
To toggle the display of a taskbar toolbar, right-click or long-press open space in the taskbar, click or highlight Toolbars on the shortcut menu, and then click the toolbar’s name on the Toolbars submenu, either placing a check mark next to the name (to display the toolbar) or removing the check mark (to hide the toolbar).
![]() Note
Note
Depending on the apps you have installed, your computer may have other taskbar toolbars. For example, if you install Apple’s iTunes app, you’ll find that the iTunes taskbar toolbar is available too.
You can also create new taskbar toolbars as needed. A taskbar toolbar displays the contents of a folder that you choose, giving you quick access to the files it contains—and to any subfolders and their files.
Follow these steps to create a new taskbar toolbar:
1. Right-click or long-press open space on the taskbar to display the shortcut menu.
2. Click or highlight Toolbars to display the Toolbars submenu.
3. Click New Toolbar. The New Toolbar – Choose a Folder dialog box opens.
4. Navigate to the folder whose contents you want the toolar to display, and then click Select Folder.
The new toolbar appears on the taskbar, and you can click it to display a drop-down menu of its contents. You can then click the item you want to open.
![]() Note
Note
When you no longer need a custom taskbar toolbar, turn it off using the same technique as for hiding a built-in taskbar toolbar: Right-click or long-press open space on the taskbar, click or highlight Toolbars, and then click the toolbar’s name on the Toolbars submenu to remove the check mark next to it. Windows removes the taskbar toolbar from display and from the Toolbars list; if you need it again, set it once more as you did before.
Why Did My Taskbar Icons Just Disappear?
On a tablet or other touchscreen computer, Windows can automatically hide the app icons on the taskbar when the device goes into tablet mode. Windows hides the icons to simplify the interface and give you more space to work in.
To control whether Windows hides the app icons when your computer goes into tablet mode, choose Start, Settings, click System to display the System screen, and then click Tablet Mode in the left column. In the Tablet Mode pane, set the Hide App Icons on the Taskbar in Tablet Mode switch to On or Off, as needed.
Choosing Which Icons to Display in the Notification Area
Next on your customization list is the notification area at the right end of the taskbar (or, if you’ve put the taskbar at the left or right side of the screen, at the bottom of the taskbar).
![]() Note
Note
The notification area is also sometimes called the system tray. The selection of notification-area icons varies depending on your computer’s hardware and software and on the services you use.
Right-click or long-press the notification area and click Customize Notification Icons on the shortcut menu to display the Notifications & Actions pane on the System screen in the Settings app (see Figure 5.3).
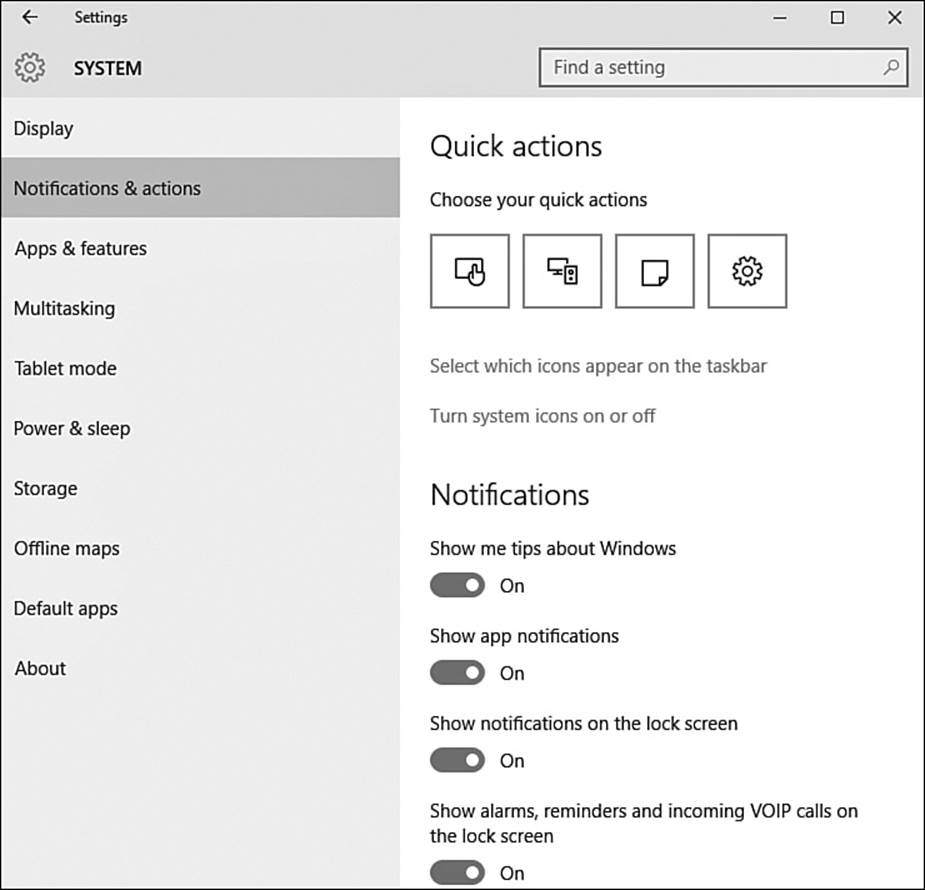
FIGURE 5.3 From the Notifications & Actions pane in the Settings app, you can choose which icons to display in the notification area.
Next, click the Select Which Icons Appear on the Taskbar link to display the Select Which Icons Appear on the Taskbar screen (see Figure 5.4). Here, you can either set the Always Show All Icons in the Notification Area switch to On to make all the icons appear all the time or set this switch to Off and then set each individual switch to On or Off, as needed.
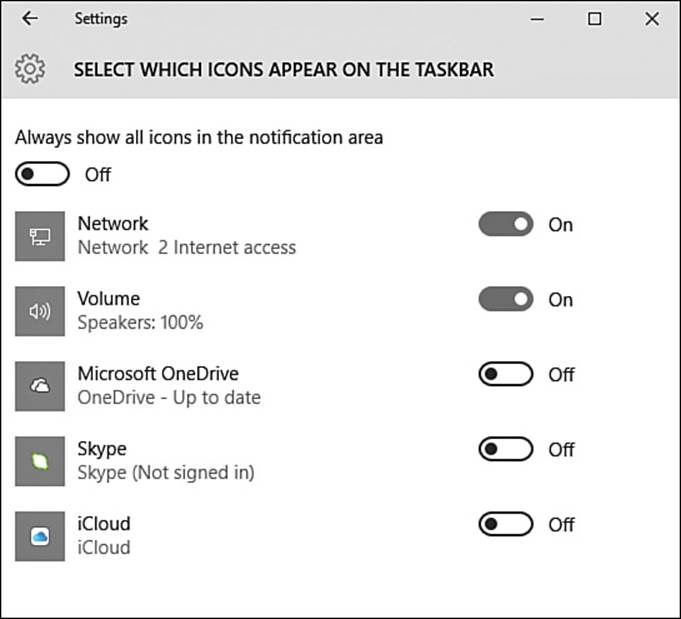
FIGURE 5.4 The Select Which Icons Appear on the Taskbar screen enables you to set all icons to display all the time or choose which ones to display.
After making your choices on the Select Which Icons Appear on the Taskbar screen, click the Back button in the upper-left corner of the window to return to the Notifications & Actions pane. You can then click the Turn System Icons On or Off link to display the Turn System Icons On or Off screen, on which you can set the switches for the following system icons to On or Off, as needed:
![]() Clock. The Clock icon is usually useful, because it shows the date and time and enables you to display the Date and Time fly-out, which shows the current month’s calendar and gives you quick access to the Date and Time settings.
Clock. The Clock icon is usually useful, because it shows the date and time and enables you to display the Date and Time fly-out, which shows the current month’s calendar and gives you quick access to the Date and Time settings.
![]() Volume. The Volume icon is useful for adjusting the volume unless your computer provides hardware volume keys, which can be faster and easier. If you right-click or long-press the Volume icon, the shortcut menu provides access to settings for playback devices, recording devices, sounds, and (on some computers) a volume mixer.
Volume. The Volume icon is useful for adjusting the volume unless your computer provides hardware volume keys, which can be faster and easier. If you right-click or long-press the Volume icon, the shortcut menu provides access to settings for playback devices, recording devices, sounds, and (on some computers) a volume mixer.
![]() Network. The Network icon is useful if your computer connects frequently to wireless networks. If your computer stays connected to a wired network, you can probably dispense with this icon if you’re short of space.
Network. The Network icon is useful if your computer connects frequently to wireless networks. If your computer stays connected to a wired network, you can probably dispense with this icon if you’re short of space.
![]() Power. On a laptop or tablet, the Power icon is useful for seeing how much power is left and verifying that the battery is charging when it should be.
Power. On a laptop or tablet, the Power icon is useful for seeing how much power is left and verifying that the battery is charging when it should be.
![]() Tip
Tip
You can right-click or long-press the Power icon to display shortcut-menu commands for adjusting screen brightness, opening Windows Mobility Center, and accessing the Power Options screen.
![]() Note
Note
The switches for the Power icon and the Location icon may be unavailable on a desktop computer.
![]() Input Indicator. The Input Indicator icon is useful if you need to be able to switch among multiple input sources, such as between touchscreen input and keyboard input on a convertible computer or between different keyboard layouts on a desktop or laptop. Otherwise, you may not need it.
Input Indicator. The Input Indicator icon is useful if you need to be able to switch among multiple input sources, such as between touchscreen input and keyboard input on a convertible computer or between different keyboard layouts on a desktop or laptop. Otherwise, you may not need it.
![]() Location. The Location indicator can be useful on a tablet or device you use out and about. You can click Open Location Privacy Settings on the shortcut menu to go to the Location pane on the Privacy screen in the Settings app.
Location. The Location indicator can be useful on a tablet or device you use out and about. You can click Open Location Privacy Settings on the shortcut menu to go to the Location pane on the Privacy screen in the Settings app.
![]() Action Center. The Action Center icon enables you to see at a glance whether you have notifications in Action Center (the icon appears white) or not (the icon appears dark). You can click the icon to toggle the display of Action Center.
Action Center. The Action Center icon enables you to see at a glance whether you have notifications in Action Center (the icon appears white) or not (the icon appears dark). You can click the icon to toggle the display of Action Center.
![]() Note
Note
On a touchscreen device, you may find it easier simply to swipe Action Center open when you need to check what’s new.
Saving Time with Automatic Login—and Why You Shouldn’t
Windows sets up your computer to use the lock screen by default to help prevent unauthorized people from using your computer. Normally, you’ll want to continue using the lock screen, to keep others out of your account and to keep your data secure.
That said, Windows does enable you to turn off the lock screen if necessary. For example, if your computer stays in a secure room and doesn’t connect to the Internet or any network, you might want to set it to log in by default to your account so that you can get right to work without even typing your password. Or if you set up a computer in a café or library situation, you might set it to log in to a default account so that anyone there can use it anytime.
![]() Caution
Caution
Turn off the lock screen only if you’re certain doing so is safe. Normally, it is not safe.
If you do decide to set up automatic login, follow these steps:
1. Click Start or press the Windows key to open the Start menu.
2. Type netplwiz in the Search box.
3. Click the “netplwiz: Run Command” item that appears in the search results. The User Accounts dialog box opens, with the Users tab at the front (see Figure 5.5).
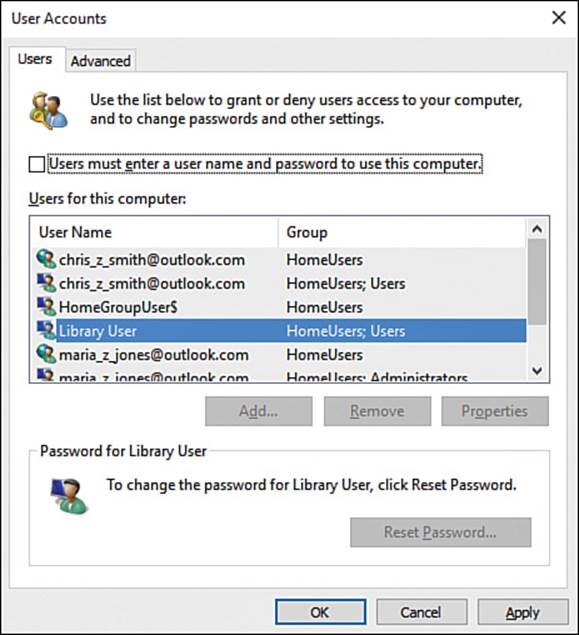
FIGURE 5.5 On the Users tab of the User Accounts dialog box, uncheck the Users Must Enter a User Name and Password to Use This Computer check box to set up automatic login.
4. In the Users for This Computer list, click the account you want to sign in automatically.
5. Uncheck the Users Must Enter a User Name and Password to Use This Computer check box on the Users tab.
6. Click the OK button. The Automatically Sign In dialog box opens (see Figure 5.6), with the user name entered in the User Name box.
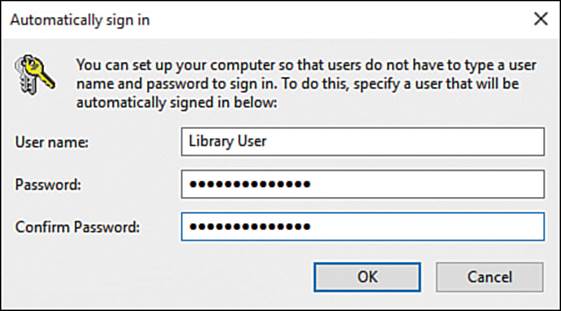
FIGURE 5.6 In the Automatically Sign In dialog box, type the password for the user account twice, and then click OK.
7. Type the account’s password in the Password box and the Confirm Password box.
8. Click OK.
After setting up automatic login, test it at once and make sure it works as you expect.
Making the Lock Screen Show the Information You Need
Windows enables you to configure the lock screen with three items:
![]() The picture of your choice—or a slideshow
The picture of your choice—or a slideshow
![]() One app showing detailed status
One app showing detailed status
![]() Up to seven apps showing quick status
Up to seven apps showing quick status
You can also configure screen timeout settings and set up a screen saver.
Displaying the Lock Screen Pane
To configure the lock screen, you use the Lock Screen pane in the Settings app. Follow these steps to display the Lock Screen pane:
1. Choose Start, Settings to open the Settings window.
2. Click Personalization to display the Personalization screen.
3. Click Lock Screen in the left column to display the Lock Screen pane.
Setting the Picture or Slideshow
In the Lock Screen pane, click the Background drop-down menu and choose Picture or Slideshow, as needed.
If you choose Picture, you can click one of the default pictures in the Choose Your Picture area or click Browse and use the Open dialog box to select a picture of your own.
If you choose Slideshow, go to the Choose Albums for Your Slideshow list and click the folder you want to use. You can click Add a Folder to select a folder that isn’t listed.
After you’ve chosen the folder, click Advanced Slideshow Settings to display the Advanced Slideshow Settings pane (see Figure 5.7). Here, you can configure the following settings:
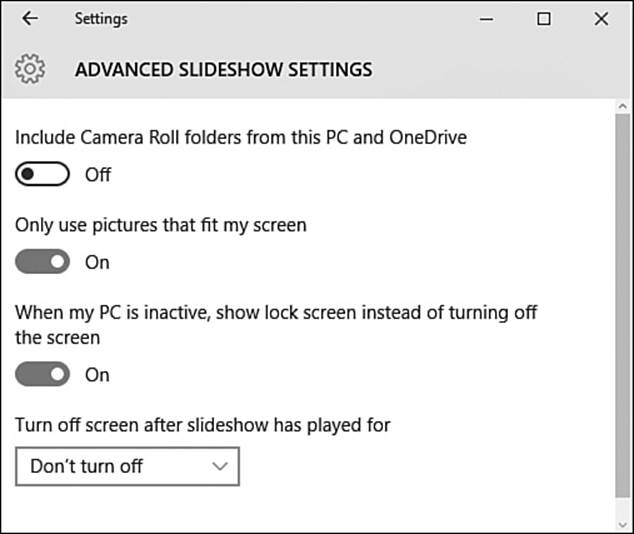
FIGURE 5.7 On the Advanced Slideshow Settings screen, choose which pictures to use for your slideshow and when to end the slideshow.
![]() Include Camera Roll Folders from This PC and OneDrive. Set this switch to On to include the pictures in your Camera Roll folders on your computer and on OneDrive.
Include Camera Roll Folders from This PC and OneDrive. Set this switch to On to include the pictures in your Camera Roll folders on your computer and on OneDrive.
![]() Only Use Pictures That Fit My Screen. Set this switch to On if you want the slideshow to use only photos that have the right aspect ratio for your computer’s screen. Experiment with this switch set to Off and see whether your pictures look okay before turning it on.
Only Use Pictures That Fit My Screen. Set this switch to On if you want the slideshow to use only photos that have the right aspect ratio for your computer’s screen. Experiment with this switch set to Off and see whether your pictures look okay before turning it on.
![]() Play a Slideshow When Using Battery Power. Set this switch to On if you want a slideshow to display when you are using battery power on a laptop or tablet.
Play a Slideshow When Using Battery Power. Set this switch to On if you want a slideshow to display when you are using battery power on a laptop or tablet.
![]() When My PC Is Inactive, Show Lock Screen Instead of Turning Off the Screen. Set this switch to On if you want the lock screen to appear (and your slideshow to play) when Windows would otherwise have turned off the screen.
When My PC Is Inactive, Show Lock Screen Instead of Turning Off the Screen. Set this switch to On if you want the lock screen to appear (and your slideshow to play) when Windows would otherwise have turned off the screen.
![]() Turn Off Screen After Slideshow Has Played For. In this drop-down menu, choose Don’t Turn Off if you want to keep the slideshow playing until you return. Otherwise, choose 30 Minutes, 1 Hour, or 3 Hours.
Turn Off Screen After Slideshow Has Played For. In this drop-down menu, choose Don’t Turn Off if you want to keep the slideshow playing until you return. Otherwise, choose 30 Minutes, 1 Hour, or 3 Hours.
Adding Apps to the Lock Screen for Quick Reference
You can add one app showing detailed status to the lock screen and up to seven apps showing quick status.
Click the app icon in the Choose an App to Show Detailed Status area to display the drop-down menu. You can then click None or one of the apps—such as Weather, Calendar, or Xbox—as needed.
![]() Caution
Caution
Remember that any information you display on the lock screen will be visible to anybody within eyeshot of your computer.
Click the first + button in the Choose Apps to Show Quick Status area to display the drop-down menu. You can then click None or one of the apps—such as Weather, People, Alarms & Clock, Calendar, Mail, Store, or Xbox—as needed.
Making the Recycle Bin Work the Way You Prefer
As you know, when you give the Delete command for a file on a fixed local drive, Windows doesn’t actually delete the file immediately but instead puts the file in the Recycle Bin. The file stays there until one of these three things happens:
![]() You realize you didn’t mean to delete the file, retrieve it, and wipe the sweat of averted disaster from your brow.
You realize you didn’t mean to delete the file, retrieve it, and wipe the sweat of averted disaster from your brow.
![]() Note
Note
If the file you’re deleting is larger than the Recycle Bin, Windows deletes the file immediately. This situation is rare but can happen with a giant file (such as a monster video file) or a small Recycle Bin.
![]() You empty the Recycle Bin manually.
You empty the Recycle Bin manually.
![]() The Recycle Bin gets full and Windows deletes old files to make room for new arrivals.
The Recycle Bin gets full and Windows deletes old files to make room for new arrivals.
![]() Note
Note
Windows uses the Recycle Bin only for fixed local drives, not for removable drives or for network drives. When you give the Delete command for a file on a removable drive or a network drive, Windows deletes it immediately.
![]() Caution
Caution
Never rely on the Recycle Bin to save your bacon if you delete files by mistake. Back up your files regularly, and make sure your backups work.
By default, Windows keeps a separate Recycle Bin for each of your computer’s fixed local drives. You can configure the Recycle Bin in three ways:
![]() You can change the amount of space set aside for the Recycle Bin on a drive. The default size is 10% of the drive size.
You can change the amount of space set aside for the Recycle Bin on a drive. The default size is 10% of the drive size.
![]() You can stop using the Recycle Bin for a drive so that Windows deletes files immediately when you give the Delete command.
You can stop using the Recycle Bin for a drive so that Windows deletes files immediately when you give the Delete command.
![]() You can choose whether to display the Delete confirmation dialog box.
You can choose whether to display the Delete confirmation dialog box.
To configure the Recycle Bin, follow these steps:
1. Right-click or long-press the Recycle Bin icon on the desktop to display the shortcut menu.
![]() Tip
Tip
If the Recycle Bin doesn’t appear on the desktop, and you want to put it back there, click Start, type desktop icons, and then click the Show or Hide Common Icons on the Desktop search result. In the Desktop Icon Settings dialog box, check the Recycle Bin check box, and then click OK.
2. Click Properties to display the Recycle Bin Properties dialog box (see Figure 5.8).

FIGURE 5.8 Open the Recycle Bin Properties dialog box when you want to configure the Recycle Bin for one or more local fixed drives.
3. In the box at the top, click the drive you want to affect. If your computer has only one fixed local drive, it should be selected already.
4. In the Settings for Selected Location box, select the “Don’t Move Files to the Recycle Bin. Remove Files Immediately When Deleted” option button if you don’t want to use the Recycle Bin for this drive. Otherwise, select the Custom Size option button and type the maximum size in the Maximum Size box. You specify this in megabytes—for example, 8192 MB to devote 8 gigabytes to the Recycle Bin.
![]() Note
Note
If your computer has multiple fixed local drives, repeat steps 3 and 4 to configure each of them.
5. If you want Windows to display a confirmation dialog box each time you give the Delete command, check the Display Delete Confirmation Dialog check box.
![]() Note
Note
The Display Delete Confirmation Dialog setting is for all your drives. You can’t have delete confirmation for one drive but not for other drives.
6. When you finish making choices, click OK to close the Recycle Bin Properties dialog box.
Telling Windows Which Notifications You Want to Receive
Like most modern-day operating systems, Windows seems convinced that it can improve your life by bombarding you with notifications. To preserve your sanity, you’ll likely want to spend a while telling Windows which notifications you do want to see and—more important—which notifications to suppress.
Opening the Notifications & Actions Pane
To configure notifications, first open the Notifications & Actions pane like this:
1. Choose Start, Settings to open the Settings window.
2. Click System to display the System screen.
3. Click Notifications & Actions to display the Notifications & Actions pane (shown in Figure 5.3, earlier in this chapter).
Choosing Essential Notifications Settings
In the Notifications list, you can configure the following settings:
![]() Show Me Tips About Windows. Set this switch to Off or On, as needed.
Show Me Tips About Windows. Set this switch to Off or On, as needed.
![]() Show App Notifications. Set this switch to On if you want to see notifications from the apps in the Show Notifications from These Apps list. (We’ll get to this list in a moment.) Set this switch to Off if you want to turn off all notifications from apps.
Show App Notifications. Set this switch to On if you want to see notifications from the apps in the Show Notifications from These Apps list. (We’ll get to this list in a moment.) Set this switch to Off if you want to turn off all notifications from apps.
![]() Show Notifications on the Lock Screen. Set this switch to On or Off, as needed.
Show Notifications on the Lock Screen. Set this switch to On or Off, as needed.
![]() Caution
Caution
Remember that any notifications you set Windows to display on the lock screen will be visible to anyone who can see your computer’s screen. On a laptop or tablet, it’s best to err on the side of caution with lock-screen notifications.
![]() Show Alarms, Reminders and Incoming VOIP Calls on the Lock Screen. Set this switch to On if you want to see these items on the lock screen. This is usually helpful.
Show Alarms, Reminders and Incoming VOIP Calls on the Lock Screen. Set this switch to On if you want to see these items on the lock screen. This is usually helpful.
![]() Hide Notifications While Presenting. Set this switch to On if you want Windows to hide all notifications when you’re using PowerPoint in Slide Show view. Hiding notifications while presenting is usually a good idea.
Hide Notifications While Presenting. Set this switch to On if you want Windows to hide all notifications when you’re using PowerPoint in Slide Show view. Hiding notifications while presenting is usually a good idea.
In the Show Notifications from These Apps list, set the switch for each app to On or Off, as needed, to specify which apps can give you notifications and which cannot.
![]() Tip
Tip
You can configure the length of time for which Windows displays notifications. To do so, choose Start, Settings, click Ease of Access, and then click Other Options. In the Visual Options list, click the Show Notifications For drop-down menu, and then click the length of time. Your choices range from 5 Seconds to 5 Minutes.
All materials on the site are licensed Creative Commons Attribution-Sharealike 3.0 Unported CC BY-SA 3.0 & GNU Free Documentation License (GFDL)
If you are the copyright holder of any material contained on our site and intend to remove it, please contact our site administrator for approval.
© 2016-2026 All site design rights belong to S.Y.A.