WINDOWS 10 TIPS AND TRICKS (2016)
6. Sorting Out Your Files, Folders, and Storage
In This Chapter
![]() Navigating and customizing File Explorer
Navigating and customizing File Explorer
![]() Using libraries and folders the smart way
Using libraries and folders the smart way
![]() Managing your storage and using storage spaces
Managing your storage and using storage spaces
Windows 10 provides the file-management app called File Explorer to help you keep your files and folders in order. To get the most out of your computer, you will want to navigate File Explorer like a pro and customize it so that it works the way you prefer. To manage your files efficiently, you must exploit the powerful file libraries Windows provides instead of merely creating folders. And to give yourself space in which to keep your files, you will likely need to manage your storage tightly, perhaps using the Storage Spaces feature if your computer is suitable for it.
Navigating File Explorer Quickly and Efficiently
Chances are you’ll do a lot of work in File Explorer windows, so learning to navigate quickly and efficiently in File Explorer can save you time, effort, and frustration.
Opening a File Explorer Window
You can open a File Explorer window in several ways. These are usually the most convenient ways:
![]() Taskbar. Click the File Explorer button to open a window to your default location. To open another frequently used location, right-click or long-press the File Explorer button, and then click the location on the shortcut menu.
Taskbar. Click the File Explorer button to open a window to your default location. To open another frequently used location, right-click or long-press the File Explorer button, and then click the location on the shortcut menu.
![]() Tip
Tip
If you already have multiple File Explorer windows open, hold the pointer over the File Explorer button on the taskbar to display thumbnails of the windows, and then click the thumbnail for the window you want.
![]() Start menu. Choose Start, File Explorer. You can click the Show Jump List button (the > button) to the right of File Explorer and then click the frequently used location you want.
Start menu. Choose Start, File Explorer. You can click the Show Jump List button (the > button) to the right of File Explorer and then click the frequently used location you want.
![]() File Explorer. You can open a new window by choosing File, Open New Window or by simply pressing Ctrl+N.
File Explorer. You can open a new window by choosing File, Open New Window or by simply pressing Ctrl+N.
After you’ve opened a window, File Explorer should look something like Figure 6.1—but only something like it, because you can customize File Explorer extensively.
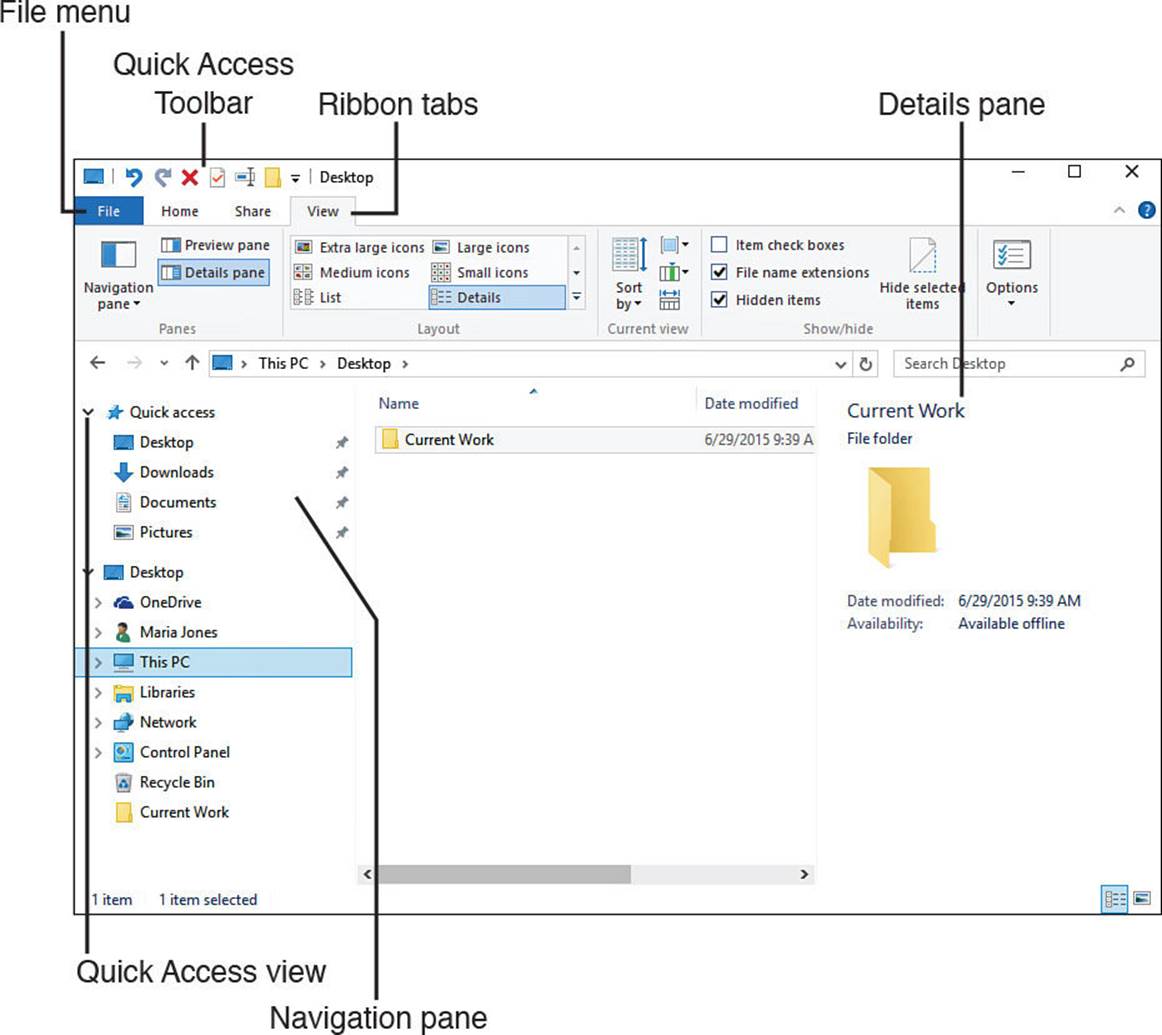
FIGURE 6.1 The main components of a File Explorer window.
Putting Useful Buttons on the Quick Access Toolbar
By default, the Quick Access Toolbar appears at the left end of the title bar in File Explorer windows and contains only the Properties button and the New Folder button. You can change the buttons displayed on the Quick Access Toolbar and move it to appear below the Ribbon. Many of the figures in this chapter show the Quick Access Toolbar customized with several extra buttons for additional functionality.
To customize the Quick Access Toolbar, click the drop-down button at its right end to display the Customize Quick Access Toolbar drop-down menu. You can then click a button to check it (putting it on the Quick Access Toolbar) or uncheck it (removing the button).
![]() Tip
Tip
You can control the order in which the buttons appear on the Quick Access Toolbar. Uncheck each check box to remove all the buttons, and then check the boxes in the order you want the buttons displayed.
Click the Show Below the Ribbon command on the drop-down menu if you want the Quick Access Toolbar displayed below the Ribbon rather than in the title bar. This takes up more space but puts the Quick Access Toolbar closer to the files and folders, which you may find helpful.
Using the File Menu
The File menu, at the left end of the Ribbon, gives you access to essential commands and frequent places. Figure 6.2 shows the File menu open.
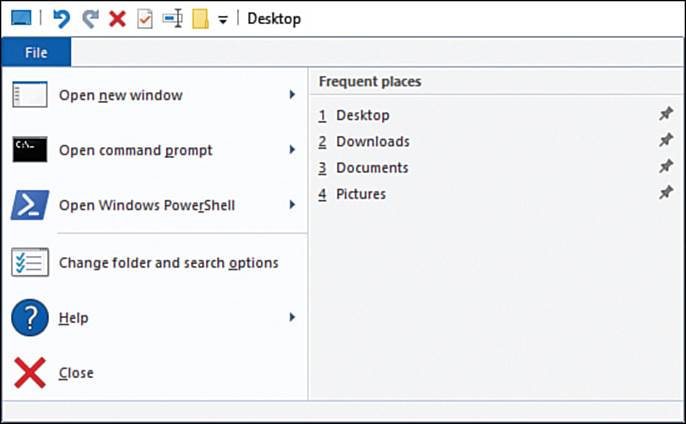
FIGURE 6.2 From the File menu, you can open a new window, a command prompt, or Windows PowerShell; change folder and search options; or go to a frequently visited place.
Here’s what you can do from the File menu:
![]() Open a new window. Click the main part of the Open New Window button to open a new window in the same process. Point to the arrow button to the right of Open New Window and then click Open New Window in New Process if you want to open the new window in a separate process (see the nearby tip).
Open a new window. Click the main part of the Open New Window button to open a new window in the same process. Point to the arrow button to the right of Open New Window and then click Open New Window in New Process if you want to open the new window in a separate process (see the nearby tip).
![]() Tip
Tip
Opening a window in a new process gives you better protection against crashes. If errors occur in File Explorer and it crashes (or you force it to close), all windows in the affected process close. If all your File Explorer windows are running in the same process, that means all of them close. If the windows are running in separate processes, only the process that suffered the error crashes; the other processes are—or at least should be—unaffected. The disadvantage to opening windows in new processes is that doing so takes up more memory.
![]() Open Command Prompt. Click the main part of the Open Command Prompt button to open a regular command prompt, one that has the same level of permissions as your user account. If you need to give commands as an administrator, click the arrow button to the right of Open Command Prompt and then click Open Command Prompt as Administrator.
Open Command Prompt. Click the main part of the Open Command Prompt button to open a regular command prompt, one that has the same level of permissions as your user account. If you need to give commands as an administrator, click the arrow button to the right of Open Command Prompt and then click Open Command Prompt as Administrator.
![]() Note
Note
If the Open Command Prompt button and the Open Windows PowerShell button are dimmed and unavailable, select another folder or location in the Navigation pane and open the File menu again.
![]() Open Windows PowerShell. Click the main part of the Open Windows PowerShell button to launch a Windows PowerShell session. If you need to issue Windows PowerShell commands as an administrator, click the arrow button to the right of Open Windows PowerShell and then click Open Windows PowerShell as Administrator.
Open Windows PowerShell. Click the main part of the Open Windows PowerShell button to launch a Windows PowerShell session. If you need to issue Windows PowerShell commands as an administrator, click the arrow button to the right of Open Windows PowerShell and then click Open Windows PowerShell as Administrator.
![]() Change Folder and Search Options. Click this button to display the Folder Options dialog box. We’ll cover the Folder Options dialog box in the section “Adjusting Folder and Search Options,” later in this chapter. Depending on your selection in the Navigation pane, you might see Options as the button name instead of Change Folder and Search Options. Both versions display the Folder Options dialog box.
Change Folder and Search Options. Click this button to display the Folder Options dialog box. We’ll cover the Folder Options dialog box in the section “Adjusting Folder and Search Options,” later in this chapter. Depending on your selection in the Navigation pane, you might see Options as the button name instead of Change Folder and Search Options. Both versions display the Folder Options dialog box.
![]() Help. Click this button to open a Help window.
Help. Click this button to open a Help window.
![]() Close. Click this button to close the File Explorer window. It’s usually easier to click the Close button at the right end of the window’s title bar.
Close. Click this button to close the File Explorer window. It’s usually easier to click the Close button at the right end of the window’s title bar.
![]() Frequent Places. You can click one of these places to display it in the File Explorer window.
Frequent Places. You can click one of these places to display it in the File Explorer window.
![]() Tip
Tip
You can unpin a place from the Frequent Places list by clicking the pushpin to the right of its name.
Finding Your Way Around the Ribbon
To the right of the File menu, the Ribbon in File Explorer windows contains three static tabs—the Home tab, the Share tab, and the View tab—plus various context-sensitive tabs that appear only when needed. For example, the context-sensitive Library Tools tab appears only when you have selected a library.
The Home tab of the Ribbon (see Figure 6.3) contains the following five groups of controls:

FIGURE 6.3 The Home tab of the Ribbon in File Explorer windows contains commands for creating, organizing, and working with files and folder.
![]() Clipboard group. This group contains the Pin to Quick Access button; the Copy, Cut, and Paste buttons; and the Copy Path and Paste Shortcut buttons.
Clipboard group. This group contains the Pin to Quick Access button; the Copy, Cut, and Paste buttons; and the Copy Path and Paste Shortcut buttons.
![]() Organize group. This group contains the Move To drop-down menu, the Copy To drop-down menu, the Delete button and Delete drop-down menu, and the Rename button.
Organize group. This group contains the Move To drop-down menu, the Copy To drop-down menu, the Delete button and Delete drop-down menu, and the Rename button.
![]() New group. This group contains the New Folder button for creating a new folder; the New Item drop-down menu for creating new items including shortcuts, contacts, text documents, and compressed (zipped folders); and the Easy Access drop-down menu, which provides ways to give yourself easy access to a particular file or folder.
New group. This group contains the New Folder button for creating a new folder; the New Item drop-down menu for creating new items including shortcuts, contacts, text documents, and compressed (zipped folders); and the Easy Access drop-down menu, which provides ways to give yourself easy access to a particular file or folder.
![]() Open group. This group contains the Properties button and Properties drop-down menu; the Open button and Open drop-down menu; the Edit button; and the History button, which takes you to the File History feature (more on this later in this chapter).
Open group. This group contains the Properties button and Properties drop-down menu; the Open button and Open drop-down menu; the Edit button; and the History button, which takes you to the File History feature (more on this later in this chapter).
![]() Select group. This group contains the Select All button for selecting all the items in the current location; the Select None button for deselecting all the selected items; and the Invert Selection button for inverting the selection—deselecting all selected items and selecting all deselected items.
Select group. This group contains the Select All button for selecting all the items in the current location; the Select None button for deselecting all the selected items; and the Invert Selection button for inverting the selection—deselecting all selected items and selecting all deselected items.
We’ll look at Pin to Quick Access, Easy Access, and File History later in this chapter.
The Share tab of the Ribbon contains the Send group and the Share With group. We’ll look at how you use these controls in Chapter 7, “Securing and Sharing Your Computer.”
The View tab of the Ribbon contains commands for customizing the layout and the view. We’ll look at these commands in the next section.
Customizing How File Explorer Looks and Works
Until you change it, File Explorer opens with a default view that presumably pleased some testers in Microsoft’s usability labs. To get quickly to the files you want, you’ll likely need to customize the view. You can do this in several ways: by changing the layout in File Explorer; by sorting and grouping items; by choosing which items to show and, more important, which to hide; and by choosing folder and search options.
Changing the Layout
You can change the layout in File Explorer to suit your needs. Start by clicking the View tab of the Ribbon to display its contents (see Figure 6.4) and choosing settings in the Panes group.

FIGURE 6.4 The View tab of the Ribbon enables you to customize the layout and look of a File Explorer window.
The Panes group contains three buttons:
![]() Navigation Pane. Click this button to display the Navigate Pane drop-down menu. You can then click Navigation Pane to turn off the display of the Navigation pane altogether, or click one of the other three commands to enable or disable it: Expand to Open Folder, which controls whether the Navigation pane expands the folders needed to reach the current folder; Show All Folders, which controls whether the Navigation pane displays all folders automatically; or Show Libraries, which controls whether the libraries appear in the Navigation pane.
Navigation Pane. Click this button to display the Navigate Pane drop-down menu. You can then click Navigation Pane to turn off the display of the Navigation pane altogether, or click one of the other three commands to enable or disable it: Expand to Open Folder, which controls whether the Navigation pane expands the folders needed to reach the current folder; Show All Folders, which controls whether the Navigation pane displays all folders automatically; or Show Libraries, which controls whether the libraries appear in the Navigation pane.
![]() Preview Pane. Click this button to display the Preview pane on the right side of the File Explorer window instead of the Details pane.
Preview Pane. Click this button to display the Preview pane on the right side of the File Explorer window instead of the Details pane.
![]() Note
Note
The Preview Pane button works as an option button pair with the Details Pane button: Turning Preview Pane on turns Details Pane off, and vice versa. To hide both panes, click the button for the pane that’s currently displayed.
![]() Details Pane. Click this button to display the Details pane on the right side of the File Explorer window instead of the Preview pane.
Details Pane. Click this button to display the Details pane on the right side of the File Explorer window instead of the Preview pane.
Customizing the Quick Access View
The Quick Access view appears at the top of the Navigation pane in File Explorer windows by default. As its name suggests, the point of Quick Access is to give you rapid access to the files and folders you need, so you’ll likely want to customize its contents to suit your needs.
Here’s how to customize the Quick Access view:
![]() Add an item. To keep a particular file or folder in Quick Access, select it and then choose Home, Clipboard, Pin to Quick Access. Alternatively, right-click or long-press the item and then click Pin to Quick Access on the shortcut menu.
Add an item. To keep a particular file or folder in Quick Access, select it and then choose Home, Clipboard, Pin to Quick Access. Alternatively, right-click or long-press the item and then click Pin to Quick Access on the shortcut menu.
![]() Remove an item. Right-click or long-press the item and then click Unpin from Quick Access on the shortcut menu.
Remove an item. Right-click or long-press the item and then click Unpin from Quick Access on the shortcut menu.
![]() Rearrange the items. Drag items up or down the list as needed.
Rearrange the items. Drag items up or down the list as needed.
![]() Remove recently used files. Choose File, Change Folder and Search Options and uncheck the Show Recently Used Files in Quick Access check box in the Privacy group on the General tab of the Folder Options dialog box. Click OK.
Remove recently used files. Choose File, Change Folder and Search Options and uncheck the Show Recently Used Files in Quick Access check box in the Privacy group on the General tab of the Folder Options dialog box. Click OK.
![]() Remove frequently used folders. Choose File, Change Folder and Search Options, and uncheck the Show Frequently Used Folders in Quick Access check box in the Privacy group on the General tab of the Folder Options dialog box. Click OK.
Remove frequently used folders. Choose File, Change Folder and Search Options, and uncheck the Show Frequently Used Folders in Quick Access check box in the Privacy group on the General tab of the Folder Options dialog box. Click OK.
Choosing How to Lay Out the Items
You can use the controls in the Layout group of the View tab of the Ribbon to control how files and folders appear in the main part of the File Explorer window. You have the following eight layout options; if the last few don’t appear, click the More button in the lower-right corner of the Layout group to display the others.
![]() Extra Large Icons. This view displays a massive icon for each file, with the filename under the icon. It’s most useful for sorting through graphics, because the icon is large enough to identify most files. The icons appear in a grid pattern, at least if the window is large enough.
Extra Large Icons. This view displays a massive icon for each file, with the filename under the icon. It’s most useful for sorting through graphics, because the icon is large enough to identify most files. The icons appear in a grid pattern, at least if the window is large enough.
![]() Tip
Tip
When using Extra Large Icons view, display the Details pane rather than the Preview pane, because the icon is effectively a preview.
![]() Large Icons. This view displays a large icon for each file, with the filename under the icon. The icons appear in a grid pattern.
Large Icons. This view displays a large icon for each file, with the filename under the icon. The icons appear in a grid pattern.
![]() Medium Icons. This view displays a medium-size icon for each file, with the filename under the icon. The icons appear in a grid pattern.
Medium Icons. This view displays a medium-size icon for each file, with the filename under the icon. The icons appear in a grid pattern.
![]() Small Icons. This view displays a small icon for each file, to the left of the filename.
Small Icons. This view displays a small icon for each file, to the left of the filename.
![]() List. This view displays a list of the folder names and filenames. Scroll right rather than down to see other items in the list.
List. This view displays a list of the folder names and filenames. Scroll right rather than down to see other items in the list.
![]() Details. This view displays a list of the filenames and folder names together with other columns of information such as Date, Type, and Size. You can sort the rows by clicking the column heading by which you want to sort.
Details. This view displays a list of the filenames and folder names together with other columns of information such as Date, Type, and Size. You can sort the rows by clicking the column heading by which you want to sort.
![]() Tiles. This view displays a tile for each item. The tile shows a small icon, the filename, the file type, and the size.
Tiles. This view displays a tile for each item. The tile shows a small icon, the filename, the file type, and the size.
![]() Content. This view displays a tablelike layout with one item per row. For each item, a small icon appears, followed by the filename, the type, and the size.
Content. This view displays a tablelike layout with one item per row. For each item, a small icon appears, followed by the filename, the type, and the size.
Sorting and Grouping Items
You can use the controls in the Current View group on the View tab of the Ribbon to sort and group items however you find most helpful. These are the controls:
![]() Sort By. Click this drop-down menu and choose the item you want to sort by, such as Name, Date, Type, or Size. You can then click again and click Ascending to sort in ascending order (A to Z, low numbers to high, older to newer, and so on) or Descending to sort in descending order (Z to A, high numbers to low, and so forth).
Sort By. Click this drop-down menu and choose the item you want to sort by, such as Name, Date, Type, or Size. You can then click again and click Ascending to sort in ascending order (A to Z, low numbers to high, older to newer, and so on) or Descending to sort in descending order (Z to A, high numbers to low, and so forth).
![]() Note
Note
The selection of sortable fields depends on the view and type of folder you have chosen. Details view is usually the best view for sorting items because it gives you a wide choice of columns for sorting. You can click Choose Columns on the Sort By drop-down menu and then choose the columns and their order in the Choose Details dialog box that opens.
![]() Group By. Click this drop-down menu and choose the item by which you want to group the items, such as Date or Type. Here, too, you can click Choose Columns and use the Choose Details dialog box to choose which columns to display and the order in which to display them.
Group By. Click this drop-down menu and choose the item by which you want to group the items, such as Date or Type. Here, too, you can click Choose Columns and use the Choose Details dialog box to choose which columns to display and the order in which to display them.
![]() Add Columns. You can click this drop-down menu and then click to check or uncheck the items on the menu to control which items appear. Again, you can click Choose Columns and select columns using the Choose Details dialog box.
Add Columns. You can click this drop-down menu and then click to check or uncheck the items on the menu to control which items appear. Again, you can click Choose Columns and select columns using the Choose Details dialog box.
![]() Size All Columns to Fit. You can click this button to resize all columns to fit their contents. How helpful this is depends on how big a screen and window you’re using and how well the information fits in it.
Size All Columns to Fit. You can click this button to resize all columns to fit their contents. How helpful this is depends on how big a screen and window you’re using and how well the information fits in it.
Choosing Which Items to Show and Which to Hide
The controls in the Show/Hide group on the View tab of the Ribbon enable you to control which items are visible and which are not. These are your options:
![]() Item Check Boxes. Check this check box if you want Windows to display a check box on each item as you hold the pointer over it. You can click the item (or the check box) to check the box, selecting the item. The advantage of displaying check boxes is that you can select multiple items easily without having to hold down Ctrl or Shift and without dragging. They also make it easier to select items when you are using a touchscreen.
Item Check Boxes. Check this check box if you want Windows to display a check box on each item as you hold the pointer over it. You can click the item (or the check box) to check the box, selecting the item. The advantage of displaying check boxes is that you can select multiple items easily without having to hold down Ctrl or Shift and without dragging. They also make it easier to select items when you are using a touchscreen.
![]() File Name Extensions. Check this check box if you want File Explorer to display filename extensions, such as the .xlsx file extensions on Excel workbook files or the .txt file extensions on text files.
File Name Extensions. Check this check box if you want File Explorer to display filename extensions, such as the .xlsx file extensions on Excel workbook files or the .txt file extensions on text files.
![]() Hidden Items. Check this check box if you want File Explorer to display hidden files and folders.
Hidden Items. Check this check box if you want File Explorer to display hidden files and folders.
![]() Hide Selected Items. You can click this button to apply the Hidden attribute to files or to remove the attribute from them. When the Hidden attribute is on for an item, Windows hides that item—unless you check the Hidden Items check box to display hidden items.
Hide Selected Items. You can click this button to apply the Hidden attribute to files or to remove the attribute from them. When the Hidden attribute is on for an item, Windows hides that item—unless you check the Hidden Items check box to display hidden items.
Adjusting Folder and Search Options
If you really want to take control of File Explorer and your computer’s file system, spend a few minutes choosing folder and search options. Choose File, Change Folder and Search Options or View, Options (clicking the main part of the Options button, not the drop-down button) to display the Folder Options dialog box, and then get to work.
![]() Note
Note
You’ll notice that the options in the Folder Options dialog box overlap with some of the options on the Ribbon, even though some of the individual names vary somewhat. When there’s overlap, you can use whichever means of giving a command you find most helpful.
Selecting the Right General Options for Your Needs
You’ll want to explore all the options on the General tab of the Folder Options dialog box (see Figure 6.5), because they make a huge difference in your use of File Explorer.
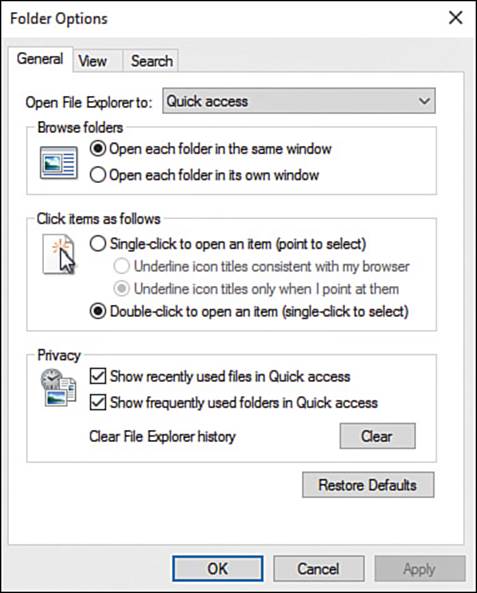
FIGURE 6.5 The General tab of the Folder Options dialog box enables you to configure a wide range of options to make File Explorer work the way you prefer.
Start by clicking the Open File Explorer To drop-down menu and choosing what each new File Explorer window you open should show. Your choices are Quick Access or This PC.
![]() Tip
Tip
You can’t choose a specific folder in the Open File Explorer To drop-down menu. If you need to open new File Explorer windows to a particular folder, create a shortcut to that folder and place it somewhere convenient, such as on your desktop.
In the Browse Folders box, select the Open Each Folder in the Same Window option button or the Open Each Folder in Its Own Window option button, as needed. If you need to browse deep into the file system, Open Each Folder in the Same Window is usually the better choice, because Open Each Folder in Its Own Window will leave a trail of windows cluttering the screen.
In the Click Items as Follows box, choose the effect of mouse clicks, which this list explains in reverse order for clarity:
![]() Double-Click to Open an Item (Single-Click to Select). Select this option button for normal Windows 'margin-top:4.0pt;margin-right:0cm;margin-bottom:4.0pt; margin-left:40.0pt;text-indent:-10.5pt;line-height:normal'>
Double-Click to Open an Item (Single-Click to Select). Select this option button for normal Windows 'margin-top:4.0pt;margin-right:0cm;margin-bottom:4.0pt; margin-left:40.0pt;text-indent:-10.5pt;line-height:normal'>![]() Single-Click to Open an Item (Point to Select). Select this option button to turn on the alternate mode, in which you point at an item (without clicking) to select it and click an item to open it—like clicking a link in a web page to open it. This behavior can be faster than the normal Windows behavior, but you might find it takes a while to get used to. If you choose this option, you can choose when to underline icon titles—select the Underline Icon Titles Consistent with My Browser option button or the Underline Icon Titles Only When I Point at Them option button.
Single-Click to Open an Item (Point to Select). Select this option button to turn on the alternate mode, in which you point at an item (without clicking) to select it and click an item to open it—like clicking a link in a web page to open it. This behavior can be faster than the normal Windows behavior, but you might find it takes a while to get used to. If you choose this option, you can choose when to underline icon titles—select the Underline Icon Titles Consistent with My Browser option button or the Underline Icon Titles Only When I Point at Them option button.
In the Privacy box, you can check or uncheck the following two check boxes as needed:
![]() Show Recently Used Files in Quick Access. Check this check box to make the Quick Access view display files you’ve used recently. This can be handy for quick access to files, but you may want to turn it off if you prefer not to have these files displayed (for example, for discretion).
Show Recently Used Files in Quick Access. Check this check box to make the Quick Access view display files you’ve used recently. This can be handy for quick access to files, but you may want to turn it off if you prefer not to have these files displayed (for example, for discretion).
![]() Show Frequently Used Folders in Quick Access. Check this check box to make the Quick Access view display folders you use frequently. As with the previous setting, having these folders displayed can be handy, but you may prefer to turn off this option.
Show Frequently Used Folders in Quick Access. Check this check box to make the Quick Access view display folders you use frequently. As with the previous setting, having these folders displayed can be handy, but you may prefer to turn off this option.
![]() Tip
Tip
You can click the Clear button in the Privacy box on the General tab of the Folder Options dialog box to clear your File Explorer history. You might want to do this to prevent private or sensitive files or folders from appearing in the Quick Access view.
Configuring View Options
On the View tab of the Folder Options dialog box (see Figure 6.6), you can manipulate a wide range of advanced settings. You can also apply your current view to all folders of the same type.
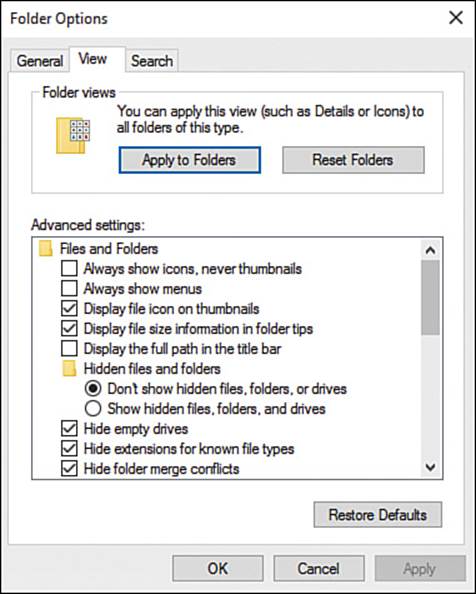
FIGURE 6.6 The View tab of the Folder Options dialog box enables you to apply your preferred view to all folders of the same type and to choose advanced settings.
To apply the current view to folders of the same type, set up the active File Explorer window with the view you prefer. For example, after navigating to a folder of the appropriate type, you might choose View, Layout, Details to switch to Details view, and then use the controls in the Current View group on the View tab of the Ribbon to customize the columns displayed. Then choose View, Options (clicking the main part of the Options button, not the drop-down arrow) to open the Folder Options dialog box, click the View tab, and then click Apply to Folders. Windows displays the Folder Views dialog box to confirm that you want all folders of this type to match the current folder’s view settings; click Yes to apply the change.
![]() Note
Note
If you don’t like the effect of the folder view you applied, click Reset Folders in the Folder Views box. Again, Windows displays the Folder Views dialog box to confirm the move; again, click Yes to effect the change.
In the Advanced Settings box, you can adjust the following settings:
![]() Always Show Icons, Never Thumbnails. Check this check box to display icons for files rather than thumbnails, small pictures of the files’ contents. Displaying icons is faster than generating thumbnails, so you might want to use this setting if your computer isn’t the fastest.
Always Show Icons, Never Thumbnails. Check this check box to display icons for files rather than thumbnails, small pictures of the files’ contents. Displaying icons is faster than generating thumbnails, so you might want to use this setting if your computer isn’t the fastest.
![]() Always Show Menus. Check this check box to make File Explorer always show menus in the interface rather than hiding them when they’re not available. This setting doesn’t have much effect in File Explorer windows that use the Ribbon because the Ribbon tabs and the File menu remain visible anyway. But if you check the Always Show Menus check box and click Apply and then open a Control Panel window, you’ll see that the menu bar appears instead of being hidden until you press Alt.
Always Show Menus. Check this check box to make File Explorer always show menus in the interface rather than hiding them when they’re not available. This setting doesn’t have much effect in File Explorer windows that use the Ribbon because the Ribbon tabs and the File menu remain visible anyway. But if you check the Always Show Menus check box and click Apply and then open a Control Panel window, you’ll see that the menu bar appears instead of being hidden until you press Alt.
![]() Display File Icon on Thumbnails. Check this check box to make File Explorer display an icon indicating the file type in the lower-right corner of a document thumbnail. For example, if you have created a Word document and saved a thumbnail preview for it, File Explorer shows the thumbnail with a Word icon on the lower-right corner.
Display File Icon on Thumbnails. Check this check box to make File Explorer display an icon indicating the file type in the lower-right corner of a document thumbnail. For example, if you have created a Word document and saved a thumbnail preview for it, File Explorer shows the thumbnail with a Word icon on the lower-right corner.
![]() Note
Note
To save a thumbnail preview of a Word document, you check the Save Thumbnail check box in the Save As dialog box. If you want thumbnail previews for all documents, open the Properties dialog box for an open document (on Windows), click the Summary tab, and then check the Save Thumbnails for All Word Documents check box; on the Mac, open the Save preferences and check the Save Preview Picture with New Documents check box.
![]() Display File Size Information in Folder Tips. Check this check box to include the file size in the ScreenTip that appears when you hold the pointer over a folder. Calculating the file size makes your computer work a fraction harder, so if you don’t find the size useful, uncheck this check box.
Display File Size Information in Folder Tips. Check this check box to include the file size in the ScreenTip that appears when you hold the pointer over a folder. Calculating the file size makes your computer work a fraction harder, so if you don’t find the size useful, uncheck this check box.
![]() Display the Full Path in the Title Bar. Check this check box to make File Explorer show the full path (such as C:\Users\Maria\Pictures\Best Pics) in the window’s title bar instead of just the folder name (such as Best Pics).
Display the Full Path in the Title Bar. Check this check box to make File Explorer show the full path (such as C:\Users\Maria\Pictures\Best Pics) in the window’s title bar instead of just the folder name (such as Best Pics).
![]() Tip
Tip
Displaying the full path in the title bar is especially helpful if you work with standardized folder structures. For example, say you work with projects, and each project folder contains a folder named Documents, a folder called Spreadsheets, and a folder called Presentations. Displaying the full path enables you to identify the windows you need more quickly. If all your folders have unique names, you probably don’t need to display the full path.
![]() Hidden Files and Folders. Select the Don’t Show Hidden Files, Folders, or Drives option button if you don’t want to see hidden items; this is the default setting. Select the Show Hidden Files, Folders, and Drives option button when you want to see these items.
Hidden Files and Folders. Select the Don’t Show Hidden Files, Folders, or Drives option button if you don’t want to see hidden items; this is the default setting. Select the Show Hidden Files, Folders, and Drives option button when you want to see these items.
![]() Hide Empty Drives. Check this check box if you want File Explorer to hide any drives that are empty. This setting works on optical drives (so that when there’s no DVD in it, the optical drive doesn’t appear) and removable drives such as USB flash drives.
Hide Empty Drives. Check this check box if you want File Explorer to hide any drives that are empty. This setting works on optical drives (so that when there’s no DVD in it, the optical drive doesn’t appear) and removable drives such as USB flash drives.
![]() Caution
Caution
The Hide Empty Drives feature can cause plenty of confusion, especially when you plug in a USB flash drive that happens to be empty but that you don’t know is empty. For clarity, uncheck the Hide Empty Drives check box—and tuck this feature away in your mental troubleshooting toolbox for when someone complains that Windows won’t recognize a USB flash drive.
![]() Hide Extensions for Known File Types. Check this check box to hide file extensions for file types that are registered in Windows. For example, after you install Microsoft Word, its various file types are registered, so Windows knows that (say) the .docx file extension is associated with the Word Document file type. Because the file type is registered, File Explorer windows don’t show the .docx file extension, just the document name.
Hide Extensions for Known File Types. Check this check box to hide file extensions for file types that are registered in Windows. For example, after you install Microsoft Word, its various file types are registered, so Windows knows that (say) the .docx file extension is associated with the Word Document file type. Because the file type is registered, File Explorer windows don’t show the .docx file extension, just the document name.
![]() Hide Folder Merge Conflicts. Check this check box if you want Windows to merge folders without warning you. A merge conflict occurs when you copy or move a folder to a destination that already contains a folder of the same name. Instead of overwriting the existing folder with the incoming folder, Windows merges the contents of each folder into a single folder. If you uncheck this check box, Windows displays the Confirm Folder Replace dialog box (see Figure 6.7) when a merge conflict occurs; you can then click Yes to merge the folders or click No to stop the operation.
Hide Folder Merge Conflicts. Check this check box if you want Windows to merge folders without warning you. A merge conflict occurs when you copy or move a folder to a destination that already contains a folder of the same name. Instead of overwriting the existing folder with the incoming folder, Windows merges the contents of each folder into a single folder. If you uncheck this check box, Windows displays the Confirm Folder Replace dialog box (see Figure 6.7) when a merge conflict occurs; you can then click Yes to merge the folders or click No to stop the operation.
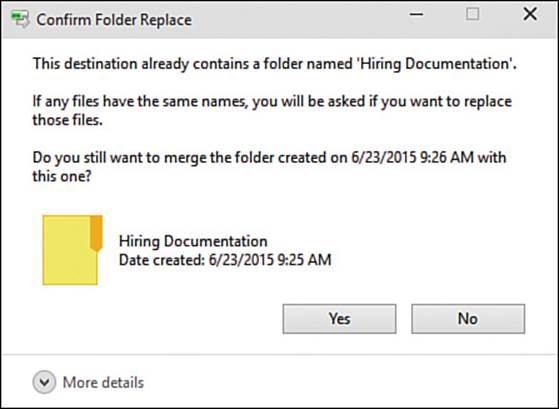
FIGURE 6.7 Uncheck the Hide Folder Merge Conflicts check box if you want to see the Confirm Folder Replace dialog box when you merge folders in File Explorer.
![]() Tip
Tip
If your work (or play) includes projects that use a standard set of folders (such as a project folder containing Documents, Presentations, and Receipts subfolders), uncheck the Hide Folder Merge Conflicts check box to make sure that Windows warns you when you drag a folder to the wrong project.
![]() Note
Note
Even if you check the Hide Folder Merge Conflicts check box, Windows warns you about file merge conflicts—when a copy or move operation will cause one file to overwrite a file of the same name.
![]() Hide Protected Operating System Files (Recommended). Leave this check box checked (as it is by default) to hide the Windows protected operating system files. These are files marked System and Hidden to stop you from messing with them. Normally, you won’t need to change the protected operating system files; if you do, uncheck this check box, and then click Yes in the Warning dialog box (see Figure 6.8) that Windows displays, acknowledging that you are aware that deleting or editing the files may make your computer stop working.
Hide Protected Operating System Files (Recommended). Leave this check box checked (as it is by default) to hide the Windows protected operating system files. These are files marked System and Hidden to stop you from messing with them. Normally, you won’t need to change the protected operating system files; if you do, uncheck this check box, and then click Yes in the Warning dialog box (see Figure 6.8) that Windows displays, acknowledging that you are aware that deleting or editing the files may make your computer stop working.
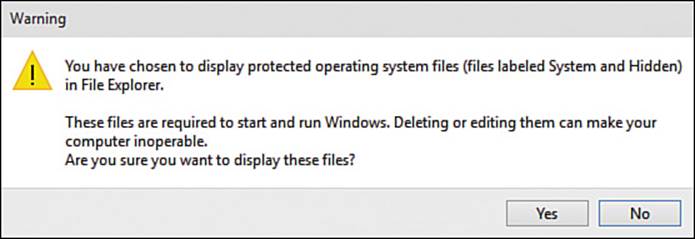
FIGURE 6.8 Click Yes in the Warning dialog box if you are determined to explore your computer’s protected operating system files—or make changes to them.
![]() Launch Folder Windows in a Separate Process. Check this check box if you want Windows to open each folder in a separate area of the computer’s memory. This feature is turned off by default because it may reduce your computer’s performance, but it can make Windows run more stably.
Launch Folder Windows in a Separate Process. Check this check box if you want Windows to open each folder in a separate area of the computer’s memory. This feature is turned off by default because it may reduce your computer’s performance, but it can make Windows run more stably.
![]() Tip
Tip
Check the Launch Folder Windows in a Separate Process check box if your computer has plenty of RAM and normally runs well. Launching folder windows separately from each other can help you avoid crashes that freeze the desktop and force you to restart your computer. If you find that your computer slows down after you turn on this feature, turn it off again.
![]() Restore Previous Folder Windows at Logon. Check this check box if you want Windows to automatically open at login the same folders you were using when you logged out. This can be a great time-saver for picking up where you left off.
Restore Previous Folder Windows at Logon. Check this check box if you want Windows to automatically open at login the same folders you were using when you logged out. This can be a great time-saver for picking up where you left off.
![]() Show Drive Letters. Check this check box to make Windows display drive letters (such as C: or D:) as well as drive names (such as Local Disk or DVD Drive).
Show Drive Letters. Check this check box to make Windows display drive letters (such as C: or D:) as well as drive names (such as Local Disk or DVD Drive).
![]() Show Encrypted or Compressed NTFS Files in Color. Check this check box to make File Explorer display encrypted files in green characters and compressed files in blue characters instead of black characters.
Show Encrypted or Compressed NTFS Files in Color. Check this check box to make File Explorer display encrypted files in green characters and compressed files in blue characters instead of black characters.
![]() Show Pop-Up Description for Folder and Desktop Items. Check this check box if you want Windows to display a ScreenTip (also called a ToolTip) containing information when you hold the pointer over an item. For example, when you hold the pointer over a file in the Recent Files list, the ScreenTip shows Path: and the folder path to the file.
Show Pop-Up Description for Folder and Desktop Items. Check this check box if you want Windows to display a ScreenTip (also called a ToolTip) containing information when you hold the pointer over an item. For example, when you hold the pointer over a file in the Recent Files list, the ScreenTip shows Path: and the folder path to the file.
![]() Show Preview Handlers in Preview Pane. Check this check box if you want to view previews in the Preview pane. Previews can help you identify the files you need, but because displaying previews can sap your computer’s performance, you may want to turn them off.
Show Preview Handlers in Preview Pane. Check this check box if you want to view previews in the Preview pane. Previews can help you identify the files you need, but because displaying previews can sap your computer’s performance, you may want to turn them off.
![]() Show Status Bar. Check this check box to display the status bar at the bottom of each File Explorer window. The status bar displays information such as the number of items in the current folder or other container and the file size of the selected item. Usually, the status bar is helpful unless you need every square inch for displaying other information.
Show Status Bar. Check this check box to display the status bar at the bottom of each File Explorer window. The status bar displays information such as the number of items in the current folder or other container and the file size of the selected item. Usually, the status bar is helpful unless you need every square inch for displaying other information.
![]() Use Check Boxes to Select Items. Check this check box if you want Windows to display a check box on each item as you hold the pointer over it.
Use Check Boxes to Select Items. Check this check box if you want Windows to display a check box on each item as you hold the pointer over it.
![]() Use Sharing Wizard (Recommended). Check this check box to make File Explorer use the Sharing Wizard for sharing items (such as folders). The Sharing Wizard simplifies the process of sharing, but you can uncheck this check box if you prefer to control sharing manually.
Use Sharing Wizard (Recommended). Check this check box to make File Explorer use the Sharing Wizard for sharing items (such as folders). The Sharing Wizard simplifies the process of sharing, but you can uncheck this check box if you prefer to control sharing manually.
![]() When Typing into List View. Select the Select the Typed Item in the View option button if you want to be able to “type down” to select an item: You start typing its name, and File Explorer selects the matching item as soon as you’ve typed enough to identify it. Select the Automatically Type into the Search Box option button if you want any characters you type to go into the search box instead.
When Typing into List View. Select the Select the Typed Item in the View option button if you want to be able to “type down” to select an item: You start typing its name, and File Explorer selects the matching item as soon as you’ve typed enough to identify it. Select the Automatically Type into the Search Box option button if you want any characters you type to go into the search box instead.
In the Navigation Pane settings at the bottom of the Advanced Settings list, you can check or uncheck the following three check boxes as needed:
![]() Expand to Open Folder. Check this check box to make File Explorer automatically expand the Navigation pane showing the path to the open folder. This setting is usually helpful.
Expand to Open Folder. Check this check box to make File Explorer automatically expand the Navigation pane showing the path to the open folder. This setting is usually helpful.
![]() Show All Folders. Check this check box to display all the folders in the Navigation pane when you open a window. If you have a screen big enough for large File Explorer windows, or you prune the list of items in the Navigation pane to fit your window size, this setting is useful, because it saves you from having to expand items all the time to reach the ones you need.
Show All Folders. Check this check box to display all the folders in the Navigation pane when you open a window. If you have a screen big enough for large File Explorer windows, or you prune the list of items in the Navigation pane to fit your window size, this setting is useful, because it saves you from having to expand items all the time to reach the ones you need.
![]() Show Libraries. Check this check box to display libraries in the Navigation pane. If you work with libraries much, you’ll probably want to use this setting.
Show Libraries. Check this check box to display libraries in the Navigation pane. If you work with libraries much, you’ll probably want to use this setting.
![]() Tip
Tip
You can set the three Navigation Pane settings more easily from the Ribbon: Choose View, Panes, Navigation Pane to open the Navigation Pane drop-down menu, and then click Expand to Open Folder, Show All Folders, or Show Libraries, placing or removing a check mark next to the appropriate item.
Configuring Search Options
On the Search tab of the Folder Options dialog box (see Figure 6.9), you can choose a few options to configure searching.
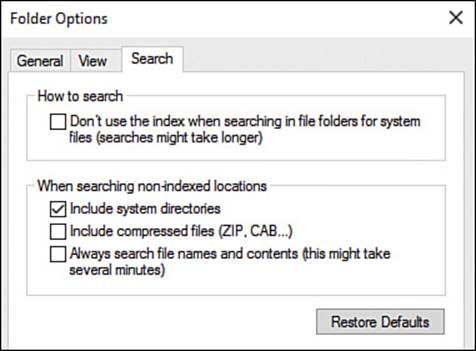
FIGURE 6.9 The Search tab of the Folder Options dialog box enables you to turn off use of the index and control how Windows searches non-indexed locations.
In the How to Search box, you can check the Don’t Use the Index When Searching in File Folders for System Files (Searches Might Take Longer) check box if you’re searching for a system file and can’t find it. Normally, you’ll want to leave this check box unchecked.
In the When Searching Non-Indexed Locations box, you can check or uncheck these three check boxes:
![]() Include System Directories. Check this check box to include system folders in searches of locations that are not in the search index that Windows keeps.
Include System Directories. Check this check box to include system folders in searches of locations that are not in the search index that Windows keeps.
![]() Include Compressed Files (ZIP, CAB, ...). Check this check box if you want to search through compressed files, which Windows normally excludes from searches. Searching through compressed files takes longer, so you’ll probably want to uncheck this check box unless you keep files in compressed files.
Include Compressed Files (ZIP, CAB, ...). Check this check box if you want to search through compressed files, which Windows normally excludes from searches. Searching through compressed files takes longer, so you’ll probably want to uncheck this check box unless you keep files in compressed files.
![]() Note
Note
ZIP is a widely used standard for compressed files. CAB files are cabinet files, a compressed format used by Microsoft mostly for distributing Windows files.
![]() Always Search File Names and Contents (This Might Take Several Minutes). Check this check box if you need to be able to search by the contents of files as well as by their names. Searching through file contents can take a while, so normally it’s best to leave this check box unchecked unless your searches aren’t turning up files that you know are there.
Always Search File Names and Contents (This Might Take Several Minutes). Check this check box if you need to be able to search by the contents of files as well as by their names. Searching through file contents can take a while, so normally it’s best to leave this check box unchecked unless your searches aren’t turning up files that you know are there.
When you finish choosing settings in the Folder Options dialog box, click OK to close it.
Finding the Files and Folders You Need
To find the files and folders you need, you can search in File Explorer. Follow these steps:
1. Open a File Explorer window. For example, click File Explorer on the Taskbar.
2. Navigate to the folder from which you want to start the search. The more you can narrow down the area you’re searching, the fewer irrelevant results you’ll need to wade through.
3. Click in the Search box below the right side of the Ribbon. The Search Tools tab appears on the Ribbon (see Figure 6.10).
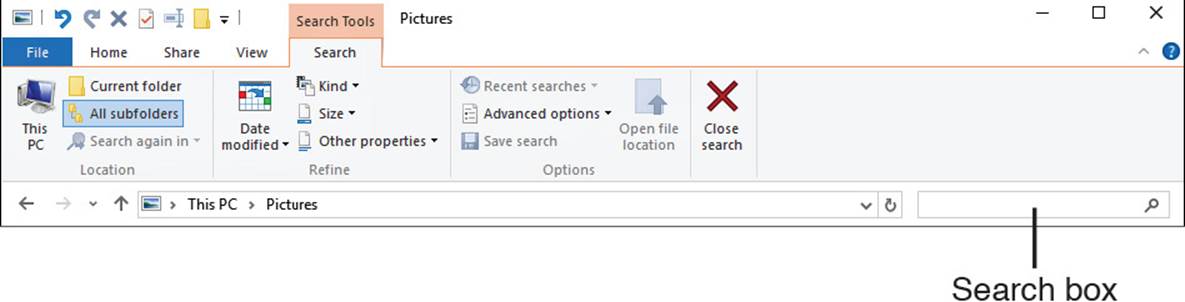
FIGURE 6.10 The Search Tools tab on the Ribbon provides controls for focusing your searches and saving them for future use.
4. Type your search term or terms.
5. In the Location group, make sure the right item is selected. Normally, you’ll want All Subfolders to search the current folder and all its subfolders. If you want to restrict the search to the current folder, excluding its subfolders, click Current Folder. If you need to widen the search to your computer’s entire file system, click This PC.
6. In the Refine group, specify any constraints needed to refine the search. You can click Date Modified and specify a date range, such as Yesterday or This Week; click Kind and select the file type, such as Folder, Picture, or Task; click Size and specify the approximate size, such as Tiny (0–10 KB) or Huge (16–128 MB); or click Other Properties and then choose a property appropriate to the file type, such as Tags or Date Taken for a photo or video.
7. In the Options group, you can click Advanced Options to display the Advanced Options drop-down menu. You can then click Change Indexed Locations to change the locations that Windows indexes for searching. Alternatively, you can enable or disable the options on the In Non-Indexed Locations part of the Advanced Options drop-down menu: File Contents, System Files, or Zipped (Compressed) Folders. Look back to the previous section, “Configuring Search Options,” for coverage of these options and their effects.
By this point, the File Explorer window should be displaying the items you need. If not, you’ll need to go back and change the location, your search parameters, or both.
Using Libraries and Folders the Smart Way
Windows enables you to use both libraries and folders to store and organize your files. To make the most of libraries and folders, you need to be clear on the difference between the two:
![]() Folder. A folder is a special kind of file that acts as a container for other files and folders (technically, subfolders). Each folder is stored at a specific point in your computer’s file system.
Folder. A folder is a special kind of file that acts as a container for other files and folders (technically, subfolders). Each folder is stored at a specific point in your computer’s file system.
![]() Library. A library is a kind of smart folder that presents files from different folders as if they were all stored in the same location. In fact, each file remains in the folder in which you stored it, but the library gives you an easy way to access it.
Library. A library is a kind of smart folder that presents files from different folders as if they were all stored in the same location. In fact, each file remains in the folder in which you stored it, but the library gives you an easy way to access it.
![]() Note
Note
Any library can be optimized for one of four categories of content—Documents, Music, Pictures, or Videos—or for General Items. The optimization controls which options File Explorer gives you for sorting files in the library. For example, if the library is optimized for documents, you can sort them by author; if it’s optimized for music, you can sort by album; if it’s optimized for pictures, you can sort by tags; and if it’s optimized for videos, you can sort by length.
If File Explorer isn’t displaying the list of libraries in the Navigation pane, choose View, Panes, Navigation Pane, Show Libraries to display them.
Coming to Grips with the Default Libraries
Windows comes with six default libraries to take care of essential types of files such as documents, music, and pictures. Table 6.1 gives you brief details. You can create other libraries as needed; the next section shows you how to do this.
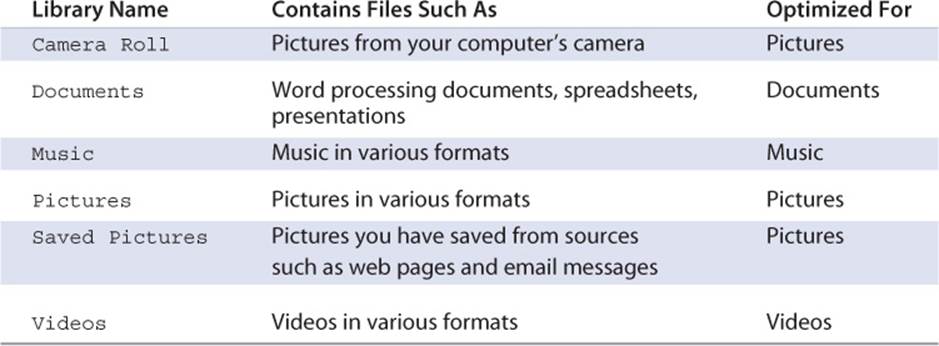
Table 6.1 The Six Default Windows Libraries
Windows stores libraries in the Libraries folder, which you can access through File Explorer. The Libraries folder doesn’t actually appear on your computer’s desktop unless you put it there, so you’ll normally want to go through File Explorer.
![]() Note
Note
Windows also displays some libraries in the Quick Access view of the Navigation pane by default. You can customize the Quick Access view as needed; see the section “Customizing the Quick Access View,” earlier in this chapter, for details.
Each user account on your computer has separate libraries, so your library items don’t appear in other users’ libraries unless you choose to share them. But Windows also provides public libraries for items that you want to share with all users. Windows keeps these public libraries in theUsers\Public\ folder; each user’s libraries draw in these files automatically, so they appear alongside the user’s private content.
![]() Tip
Tip
You can include external drives in your libraries. Just add the appropriate folders as explained in the section “Including Folders in Your Library,” later in this chapter. After you add folders on an external drive, Windows automatically pulls new files in those folders into the appropriate libraries, giving you easy access to them without navigating around your computer’s file system.
Creating a New Library
If the default libraries don’t cover your needs, you can create new libraries of your own. For example, if you work with many documents, you might want to create a separate library for each document category, such as Spreadsheets, Word Processing Documents, and Presentations.
Follow these steps to create a new library:
1. Open a File Explorer window. For example, click the File Explorer icon on the Taskbar or choose Start, File Explorer.
2. In the Navigation pane, click Libraries to display the Libraries folder.
![]() Note
Note
If you can’t see the Libraries folder in the Navigation pane, you’ll need to display this. If you can find open space in the Navigation pane, right-click or long-press there and then click Show Libraries, placing a check mark by the Show Libraries item on the menu that appears. If you can’t find open space, go to the Ribbon and choose View, Panes, Navigation Pane, Show Libraries.
3. Choose Home, New, New Item, Library. File Explorer creates a new library, gives it the default name New Library, and selects the name so you can change it.
![]() Tip
Tip
You can also create a new library by right-clicking or long-pressing in open space in the main part of the window and then choosing New, Library from the shortcut menu.
4. Type the new name and press Enter to apply it.
You now have a new library, but it’s not going to do anything until you tell Windows which folders to include in it. Read on.
Including Folders in Your Library
You can include folders in a library using several methods. Here’s the method you’ll probably want to use with your freshly minted library:
1. Open a File Explorer window to the Libraries folder. If you just created a library in the preceding section, you should be here already.
2. Click the library file you just created. When you select the library file, the Library Tools tab appears on the Ribbon.
3. Choose Library Tools, Manage, Manage, Manage Library to open the Library Locations dialog box for the library (shown in Figure 6.11 with a folder included).
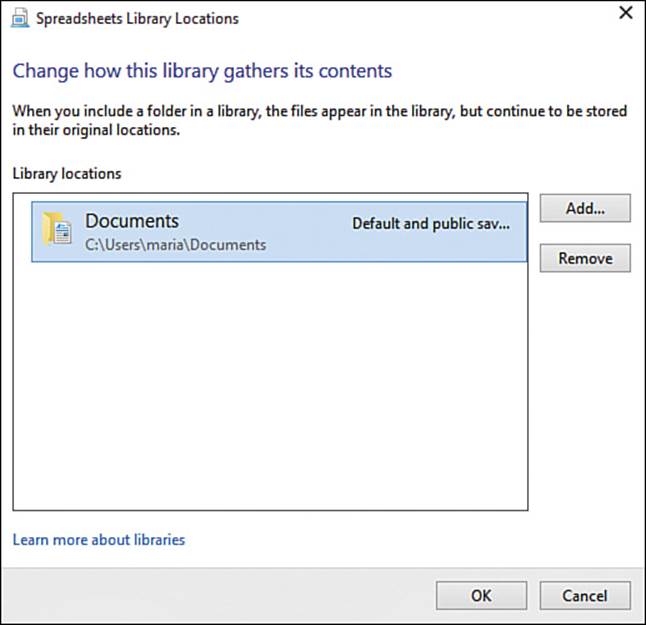
FIGURE 6.11 Use the Library Locations dialog box to specify which folders to include in your new library. The dialog box’s title shows the library’s name, such as Spreadsheets Library Locations.
4. To add a folder, click Add, select the file in the Include Folder in Library dialog box that opens, and then click Include Folder.
![]() Note
Note
The first folder you include in the library becomes its default save location. I’ll explain the two save locations and how to change them in the next section.
5. To remove a folder, click it in the list box and then click Remove.
6. When you finish setting up the list of folders, click OK to close the Library Locations dialog box.
![]() Note
Note
You can’t add individual files to a library directly. Instead, put the files in a folder, and add the folder to the library.
![]() Tip
Tip
Another way to add a folder to a library is to open a File Explorer window, right-click or long-press the folder, click or highlight Include in Library on the shortcut menu, and then click the library on the submenu that opens. This method is great for adding individual folders to a library as needed. The submenu also contains a Create New Library command that enables you to start a new library containing the folder you picked.
Setting the Library’s Default Save Location and Public Save Location
After you’ve included two or more folders in the library, you need to set its save locations. There are two save locations:
![]() Default Save Location. This is the folder in which the library saves new documents you create. The default save location enables you to save a file to the library rather than having to save the file to a folder. This is a small convenience provided that you set the appropriate folder as the default save location.
Default Save Location. This is the folder in which the library saves new documents you create. The default save location enables you to save a file to the library rather than having to save the file to a folder. This is a small convenience provided that you set the appropriate folder as the default save location.
![]() Public Save Location. This is the folder in which the library saves new documents that other users create.
Public Save Location. This is the folder in which the library saves new documents that other users create.
You can set the default save location and public save location in a couple of ways. The easiest way is to select the library in a File Explorer window, go to the Ribbon, and choose Library Tools, Manage, Manage, Set Save Location to open the Set Save Location drop-down menu (see Figure 6.12). You can then set the default save location by choosing the appropriate folder on the drop-down menu, which shows the folders you’ve included in the library. To set the public save location, click or highlight Set Public Save Location on the drop-down menu, and then click the appropriate folder on the submenu, which also shows the folders included in the library.
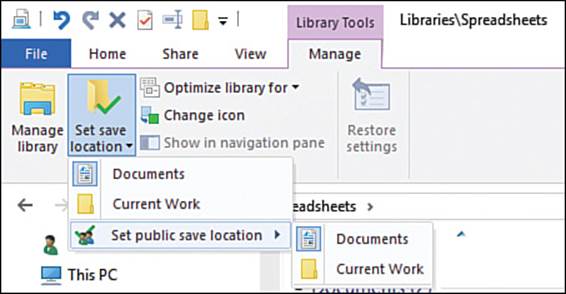
FIGURE 6.12 Use the Set Save Location drop-down menu to set the default save location and the public save location for a library.
Configuring the Library to Work Your Way
From the Library Tools tab of the Ribbon, you can also choose the type of files for which to optimize the library: Choose Library Tools, Manage, Manage, Optimize Library For to display the Optimize Library For drop-down menu, and then click General Items, Documents, Music, Pictures, or Videos, as needed.
You can also change the library icon to give it a different look in your folders. To change the icon, choose Library Tools, Manage, Manage, Change Icon; click the icon in the Change Icon dialog box; and then click OK.
![]() Tip
Tip
The Change Icon dialog box shows the icons in a file named SHELL32.dll, one of the dynamic link library files that Windows uses extensively. If none of these icons appeals to you, try browsing other .dll files to find other icons. You might start with moricons.dll, which contains various premillennial icons. Or if you have an icon file of your own, you might prefer to use that instead.
If you want the library to appear in the Navigation pane, choose Library Tools, Manage, Manage, Show in Navigation Pane.
You can also configure the library by working in its Properties dialog box. Right-click or long-press the library in a File Explorer window, and then click Properties on the shortcut menu to display the Properties dialog box (see Figure 6.13). You can then use the Library Locations list box at the top to review the folders in the library, and use the Add button and Remove button below the list box to change the list of folders; use the Set Save Location button and Set Public Save Location button to set the save locations; choose the means of optimization in the Optimize This Library For drop-down menu; and click the Change Library Icon button to change the icon.
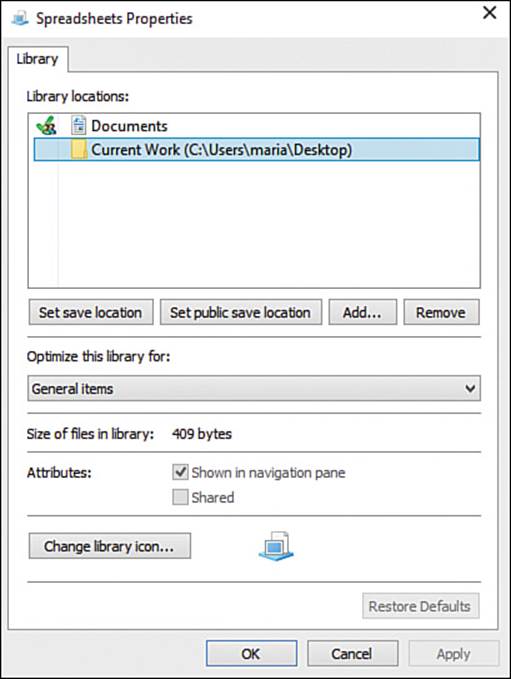
FIGURE 6.13 In the Properties dialog box for the library, click Add to start adding folders to the Library Locations list box.
![]() Note
Note
The Properties dialog box for a library provides a handy one-stop place to work on the library, but it has no particular advantage over using the Library Tools tab on the Ribbon.
Restoring Your Default Libraries
If you delete any of your default libraries by mistake, you can restore them easily. To do so, open a File Explorer window, right-click or long-press Libraries in the Navigation pane, and then click Restore Default Libraries on the shortcut menu.
If you mess up the settings for an individual library, you can restore them to their defaults to get the library working normally again. Open a File Explorer window to the Libraries folder, click the library, and then choose Library Tools, Manage, Manage, Restore Settings.
Managing Your Storage
When you need to manage your computer’s storage, use the Storage feature in the Settings app. Follow these steps to display the Storage pane:
1. Choose Start, Settings to open a Settings window.
2. Click System to display the System pane.
3. Click Storage in the left column to display the Storage screen (see Figure 6.14).
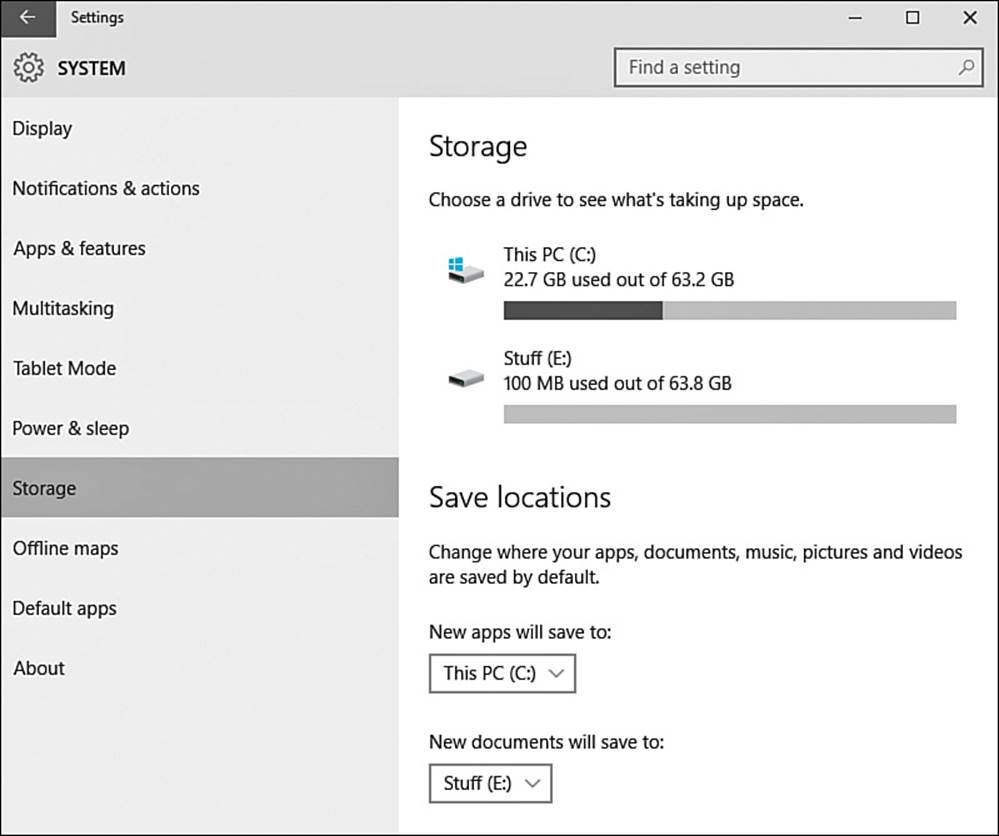
FIGURE 6.14 From the Storage pane in Settings, you can see what’s taking up space on your computer and choose default locations for storing files.
Seeing What’s Taking Up Space on Your Computer
To see what’s taking up space on your PC, click This PC in the Storage section. The This PC screen appears (see Figure 6.15), showing how much space the different categories of items are taking up. Click the item whose details you want to see. Windows displays the corresponding screen, which shows details of the files in the category and actions that you can perform on them.
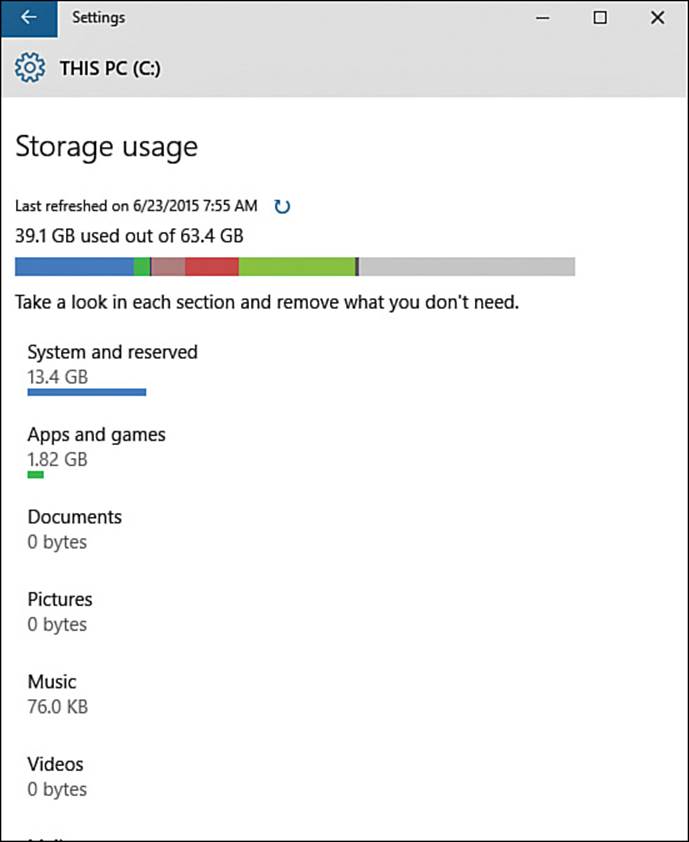
FIGURE 6.15 On the This PC screen, you can see how much space is free overall and how much space each category of items is occupying.
These are the items you’ll find on the This PC screen:
![]() System and Reserved. System files are Windows files that you shouldn’t change. Reserved files include backup files with which Windows can repair itself after you do change or delete something vital; the paging file, which Windows uses to supplement virtual memory; the hibernation file, which Windows uses for deep sleep; and System Restore files, which save snapshots of your computer’s configuration so that you can restore it to an earlier configuration (for example, after something goes wrong). You can click Manage System Restore to display the System Protection tab of the System Properties dialog box.
System and Reserved. System files are Windows files that you shouldn’t change. Reserved files include backup files with which Windows can repair itself after you do change or delete something vital; the paging file, which Windows uses to supplement virtual memory; the hibernation file, which Windows uses for deep sleep; and System Restore files, which save snapshots of your computer’s configuration so that you can restore it to an earlier configuration (for example, after something goes wrong). You can click Manage System Restore to display the System Protection tab of the System Properties dialog box.
![]() Note
Note
See Chapter 8, “Optimizing Your Computer’s Performance,” for instructions on configuring the paging file. See Chapter 13, “Updating and Troubleshooting Windows,” for details on how to use System Restore.
![]() Apps and Games. These are apps (programs) and games, both those that come preinstalled on your computer and those you have installed yourself. On the Apps and Games screen, you can sort the apps by size, by name, or by install date; search for an app by name; and uninstall an app by clicking it and then clicking Uninstall. You can also click the Manage Optional Features link to display the Manage Optional Features window, which enables you to add or remove items such as handwriting recognition and optical character recognition.
Apps and Games. These are apps (programs) and games, both those that come preinstalled on your computer and those you have installed yourself. On the Apps and Games screen, you can sort the apps by size, by name, or by install date; search for an app by name; and uninstall an app by clicking it and then clicking Uninstall. You can also click the Manage Optional Features link to display the Manage Optional Features window, which enables you to add or remove items such as handwriting recognition and optical character recognition.
![]() Documents. These are the files in the Documents library, such as Microsoft Office documents, spreadsheets, presentations, and databases. On the Documents screen, you can click View Documents to display the Documents library in a File Explorer window.
Documents. These are the files in the Documents library, such as Microsoft Office documents, spreadsheets, presentations, and databases. On the Documents screen, you can click View Documents to display the Documents library in a File Explorer window.
![]() Pictures. These are the files in the Pictures library. On the Pictures screen, you can click View Pictures to display the Pictures library in a File Explorer window.
Pictures. These are the files in the Pictures library. On the Pictures screen, you can click View Pictures to display the Pictures library in a File Explorer window.
![]() Music. These are the files in the Music library. On the Music screen, you can click View Music to display the Music library in a File Explorer window.
Music. These are the files in the Music library. On the Music screen, you can click View Music to display the Music library in a File Explorer window.
![]() Videos. These are the files in the Videos library. On the Videos screen, you can click View Videos to display the Videos library in a File Explorer window.
Videos. These are the files in the Videos library. On the Videos screen, you can click View Videos to display the Videos library in a File Explorer window.
![]() Mail. This readout shows the amount of space your mail is taking up. On the Mail screen, you can click Manage Mail to open the system’s default mail app.
Mail. This readout shows the amount of space your mail is taking up. On the Mail screen, you can click Manage Mail to open the system’s default mail app.
![]() OneDrive. These are copies of files stored on OneDrive that you have downloaded to your computer so that they are available even when an Internet connection is not. On the OneDrive screen, you can click Manage OneDrive to open the Sync Your OneDrive Files to This PC dialog box, in which you can specify which files to sync.
OneDrive. These are copies of files stored on OneDrive that you have downloaded to your computer so that they are available even when an Internet connection is not. On the OneDrive screen, you can click Manage OneDrive to open the Sync Your OneDrive Files to This PC dialog box, in which you can specify which files to sync.
![]() Desktop. These are files on your desktop, because many people store many files there. On the Desktop screen, you can click View Desktop to display the Desktop folder in a File Explorer window.
Desktop. These are files on your desktop, because many people store many files there. On the Desktop screen, you can click View Desktop to display the Desktop folder in a File Explorer window.
![]() Maps. These are files containing map data that the Map app has downloaded. On the Maps screen, you can click Manage Maps to display the Offline Maps pane in System settings. Here, you can click Delete All Maps if you want to get rid of all the downloaded maps.
Maps. These are files containing map data that the Map app has downloaded. On the Maps screen, you can click Manage Maps to display the Offline Maps pane in System settings. Here, you can click Delete All Maps if you want to get rid of all the downloaded maps.
![]() Other Users. This shows the amount of space that other users’ files are taking. On the Other Users screen, you can click Manage Other Users to display the Accounts screen in Settings, where you can work with user accounts.
Other Users. This shows the amount of space that other users’ files are taking. On the Other Users screen, you can click Manage Other Users to display the Accounts screen in Settings, where you can work with user accounts.
![]() Temporary Files. This shows the amount of space that various types of temporary files are taking up. We’ll look at the details in a moment, because this is where you’ll likely want to start recovering space.
Temporary Files. This shows the amount of space that various types of temporary files are taking up. We’ll look at the details in a moment, because this is where you’ll likely want to start recovering space.
![]() Other. This category contains the largest folders Windows has identified that don’t fit into any of the other categories.
Other. This category contains the largest folders Windows has identified that don’t fit into any of the other categories.
Normally, the best place to start when you need to reclaim space is the Temporary Files screen, because you can often reclaim several gigabytes of space here simply by getting rid of files you no longer need. Follow these steps:
1. Click Temporary Files on the This PC screen to display the Temporary Files screen (see Figure 6.16).
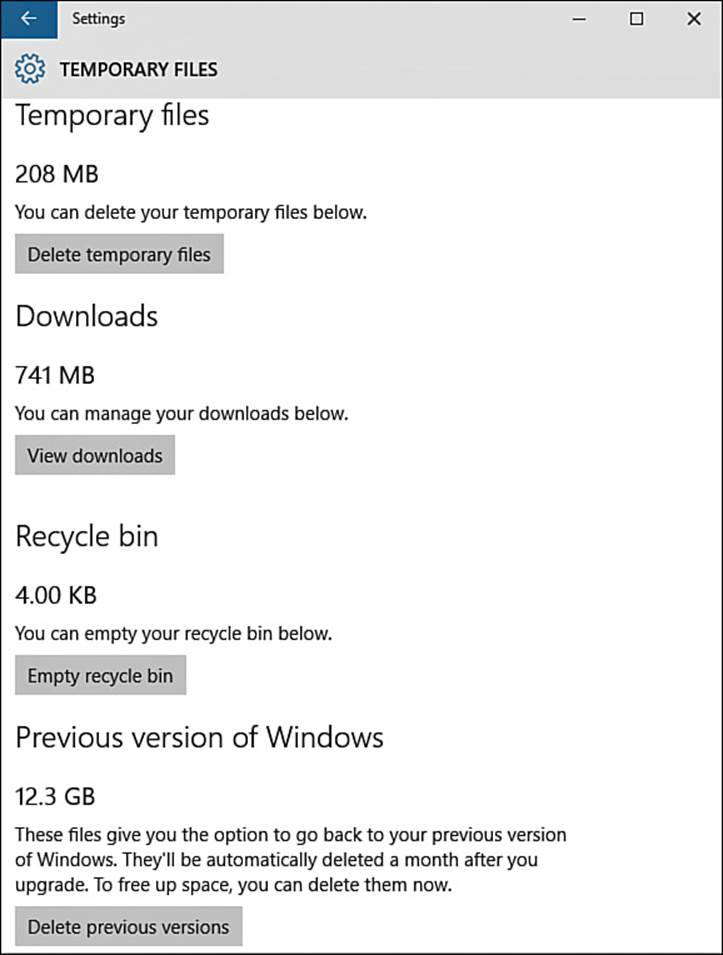
FIGURE 6.16 The Temporary Files screen is normally the best place to start recovering space on your PC.
2. In the Temporary Files area, click Delete Temporary Files, and then click Yes, I’m Sure in the confirmation dialog box that opens.
3. In the Downloads area, look at the amount of space that files in the Downloads folder are taking up. If there’s enough space to be worth recovering, click View Downloads to display the Downloads folder in a File Explorer window, and then delete any files you don’t need.
![]() Tip
Tip
When reclaiming space from the Downloads folder, move any files you want to keep to other folders. If you treat your Downloads folder as temporary storage rather than long-term storage, you’ll have a much easier time avoiding wasting space in it.
4. In the Recycle Bin area, look at the amount of space that files in the Recycle Bin are taking up. If you’re confident that the Recycle Bin doesn’t contain anything you’ll miss, go ahead and click Empty Recycle Bin and then click Yes, I’m Sure in the confirmation dialog box; if you’re not confident, first open the Recycle Bin and check through it for any files whose loss would hurt.
5. In the Previous Version of Windows area, look at the amount of space that files from your previous version of Windows are taking up. You can delete these files if you’re certain that you won’t want to roll Windows back to an earlier state or version.
![]() Caution
Caution
Don’t delete your Previous Version of Windows files unless you’re completely sure you won’t need to roll Windows back. Windows automatically deletes the files a month after an upgrade, so they won’t hang around forever if you leave them be.
6. When you finish on the Temporary Files screen, click Back (the arrow at the top) to return to the This PC screen.
Back on the This PC screen, click the next item you want to clear out, such as Apps and Games, and work on the screen that appears.
Controlling Where Windows Saves Games, Apps, Music, and Other Items
The Save Locations list on the Storage screen in the Settings app enables you to control where Windows saves your apps, games, documents, music, pictures, and videos by default. Simply click the appropriate location button, such as the New Apps Will Save To button, and then choose where to save the items. The default setting is This PC, which is usually the best choice until you start running out of space.
![]() Caution
Caution
Before moving items to another location, make sure it will always be available when you need those items.
Creating Pooled Storage with Storage Spaces
If your computer has two or more drives, you can combine them into a single pooled drive by using the Storage Spaces feature. Storage spaces are useful for improving performance, enabling you to work with large files, and avoiding data loss.
![]() Note
Note
Technically, you can use storage spaces on any computer that has multiple drives. But because most tablets and laptops have only a single drive, and no means to connect another drive permanently, in practice you’d normally use storage spaces only on a desktop computer.
Understanding Simple Spaces, Mirror Spaces, and Parity Spaces
Windows enables you to create three types of storage spaces, each of which works in a different way—so it’s vital that you understand the differences and choose the type you need.
These are the three types of storage spaces:
![]() Simple Space. A simple space is a space that gives better performance and (usually) more storage but doesn’t provide any protection against data loss or drive failure. You can create a simple space with a single drive, but normally you’ll want to use two or more drives in order to give yourself space.
Simple Space. A simple space is a space that gives better performance and (usually) more storage but doesn’t provide any protection against data loss or drive failure. You can create a simple space with a single drive, but normally you’ll want to use two or more drives in order to give yourself space.
![]() Mirror Space. A mirror space is a space that gives better performance and also protects your files against drive failure by keeping multiple copies. You can create a two-way mirror space by using two or more drives; for a three-way mirror space, which gives greater protection and redundancy, you need at least five drives.
Mirror Space. A mirror space is a space that gives better performance and also protects your files against drive failure by keeping multiple copies. You can create a two-way mirror space by using two or more drives; for a three-way mirror space, which gives greater protection and redundancy, you need at least five drives.
![]() Parity Space. A parity space is a space that provides efficient storage and protects your files against drive failure; it does not provide better performance. You need at least three drives to protect your data against a single drive failing; to protect against two drives failing, you need at least seven drives.
Parity Space. A parity space is a space that provides efficient storage and protects your files against drive failure; it does not provide better performance. You need at least three drives to protect your data against a single drive failing; to protect against two drives failing, you need at least seven drives.
Which Storage Space Type Should You Use?
Create a simple space when you need somewhere to put large files temporarily, such as when you are rendering video, not for long-term storage.
Create a mirror space for general-purpose use, such as when you are sharing files with others on a network.
Create a parity space for storing data in the long term or for streaming music and video files.
Creating a Storage Space
Now that you know the different types of storage spaces and have decided which type to create, follow these steps to create it:
1. Right-click or long-press Start to display the shortcut menu.
2. Click Control Panel to open a Control Panel window.
3. Click System and Security to display the System and Security pane.
4. Click the Storage Spaces heading to display the Storage Spaces pane. Figure 6.17 shows the Storage Spaces pane as you’ll see it at first, before you’ve set up any storage spaces.
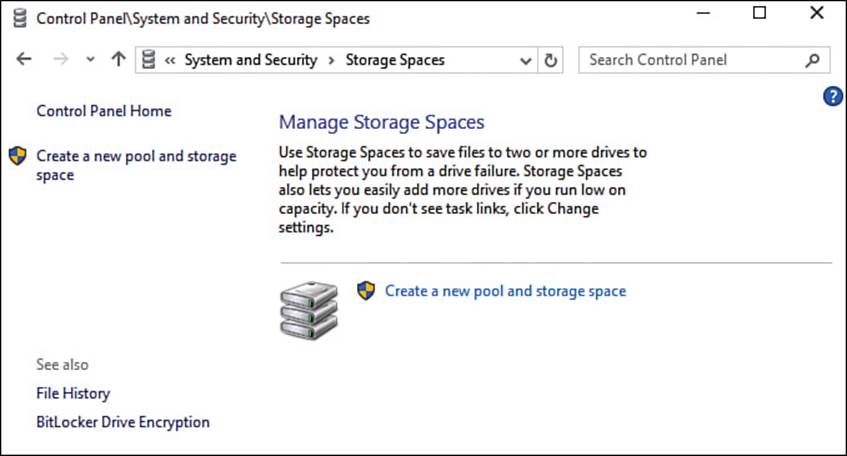
FIGURE 6.17 To start creating a storage space, click Create a New Pool and Storage Space in the Storage Spaces pane in Control Panel.
5. Click Create a New Pool and Storage Space. The Select Drives to Create a Storage Pool screen appears (see Figure 6.18).
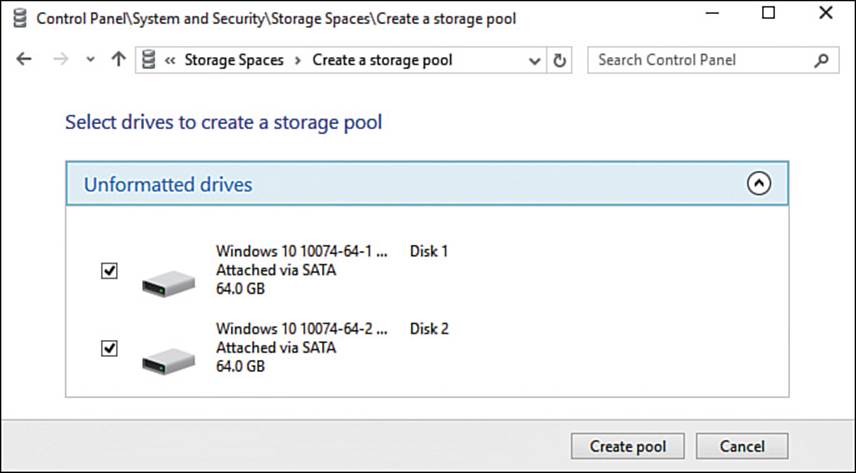
FIGURE 6.18 On the Select Drives to Create a Storage Pool screen, check the check box for each drive you want to use, and then click Create Pool.
![]() Note
Note
If the User Account Control dialog box opens when you click Create a New Pool and Storage Space, verify that the program name is Storage Spaces Settings, and then click Yes.
6. Check the check box for each drive to include in the pool.
7. Click Create Pool. Windows creates the pool and then displays the Enter a Name, Resiliency Type, and Size for the Storage Space screen (see Figure 6.19).

FIGURE 6.19 On this screen, name your storage space, choose its drive letter and file system, and select the resiliency type.
8. Type the name for the storage space in the Name box. If you’re creating a single storage space for your own use, you can call it whatever you like; but if you’re creating multiple storage spaces, you’ll usually be better off using a naming convention.
9. In the Drive Letter drop-down menu, choose the letter you want to assign to the drive. Windows suggests the next unused letter, such as E: if your computer has drives C: and D:.
10. In the File System drop-down menu, make sure NTFS is selected. Depending on your computer’s configuration, this may be the only choice.
11. Open the Resiliency Type drop-down menu and choose the storage space type you want: Simple (No Resiliency), Two-Way Mirror, Three-Way Mirror, or Parity. As I mentioned earlier, Three-Way Mirror needs a minimum of five drives, and Parity needs a minimum of three drives; you can create a Simple or Two-Way Mirror storage space with two drives.
12. In the Size area, look at the readouts and make sure they show what you expect. Briefly, a Simple (No Resiliency) storage space gives you the full amount of space on the drives minus a small overhead for administration; a Two-Way Mirror storage space gives you half the total drive space minus some overhead; a Three-Way Mirror storage space gives you a third of the total drive space minus the overhead; and a Parity storage space with three drives gives you two-thirds of the total space minus the overhead.
![]() Note
Note
You can set the Size (Maximum) for the storage space to a value larger than the space provided by the drives you’ve chosen. Do this if you plan to add more drives to the storage space later.
13. Click Create Storage Space. Windows creates the storage space, and it appears on the Storage Spaces screen (see Figure 6.20).
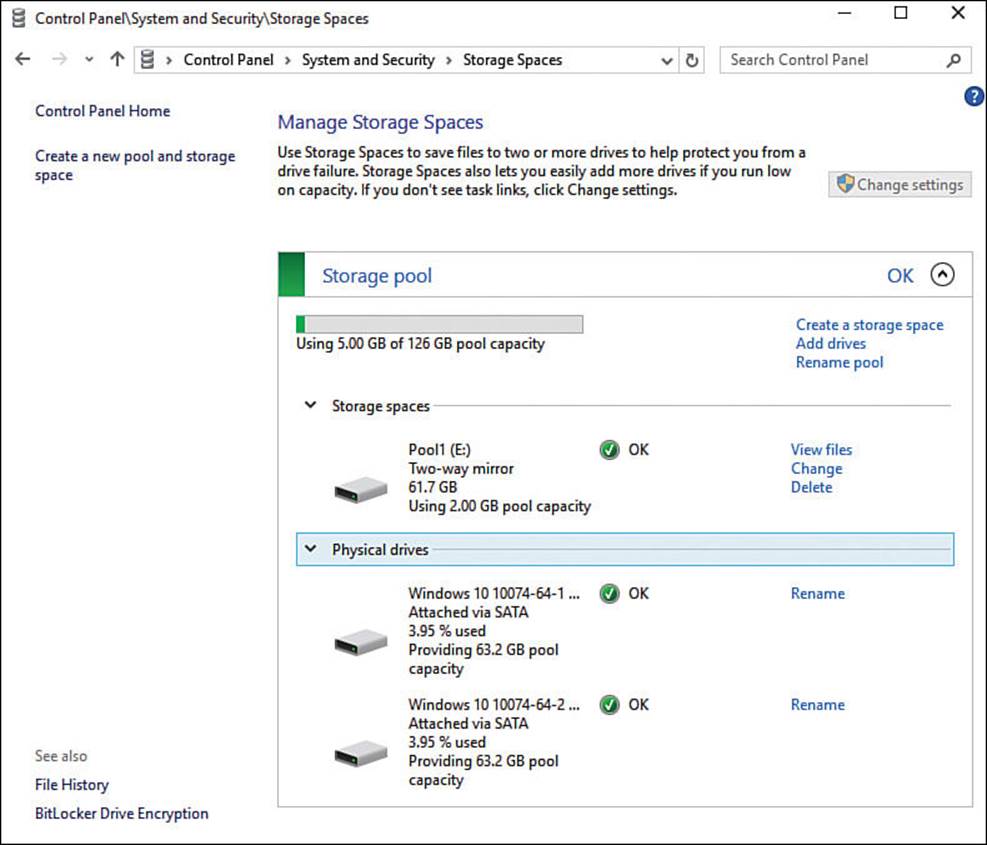
FIGURE 6.20 Your new storage space appears on the Storage Spaces screen. You can view the usage of the storage space and the physical drives, add drives, or reconfigure the storage space.
Using the Storage Space
After creating a storage space, you can use it as you would use any other drive. The storage space appears in your computer’s file system under the drive letter you specified in the Drive Letter drop-down menu, and you can create files and folders on it using File Explorer and other apps.
Changing an Existing Storage Space
You can change an existing storage space by displaying the Manage Storage Spaces screen and clicking Change to the right of the storage space. Windows displays the Change a Storage Space screen, in which you can change the name, the drive letter, and the maximum size of the storage space. When you finish, click Change Storage Space to commit the changes.
![]() Note
Note
You cannot change the type of an existing storage space. If you find you need a different type of storage space than you have created, you will need to delete the existing storage space and set up a new storage space of the right type.
Deleting a Storage Space
When you no longer need a storage space, you can delete it.
![]() Caution
Caution
Deleting a storage space deletes all the files it contains. Unless you have been using the storage space only for temporary files, you must copy or move the files to another location—and verify the copied or moved files—before deleting the storage space.
To delete a storage space, display the Manage Storage Spaces screen and click Delete to the right of the storage space. Windows displays the Confirm Deletion of the Storage Space screen; click Delete Storage Space if you’re certain you want to proceed.
All materials on the site are licensed Creative Commons Attribution-Sharealike 3.0 Unported CC BY-SA 3.0 & GNU Free Documentation License (GFDL)
If you are the copyright holder of any material contained on our site and intend to remove it, please contact our site administrator for approval.
© 2016-2026 All site design rights belong to S.Y.A.