Windows 8.1 Administration Pocket Consultant: Storage, Security, & Networking (2014)
Chapter 10. Managing Mobile Networking and Remote Access
§ Configuring networking for mobile devices
§ Understanding mobile networking and remote access
§ Creating connections for remote access
§ Configuring connection properties
§ Establishing connections
§ Wireless networking
Users often want to connect to their organization’s network from an off-site computer. To do so, they need a dial-up, broadband, virtual private network (VPN), or DirectAccess connection. Dial-up networking enables users to connect off-site computers to their organization’s network by using a modem and a standard telephone line. Broadband enables users to connect off-site computers to their organization’s network by using high-speed Digital Subscriber Line (DSL) routers or cable modems. VPN and DirectAccess use encryption to provide secure connectivity over an existing connection, which can be a local area, dial-up, or broadband connection. Increasingly, wireless connections are also being used. With a wireless connection, computers establish connections by using a network adapter that has an antenna that enables it to communicate with similar wireless devices.
Configuring networking for mobile devices
Most mobile devices need more than one network configuration: one for the office, one for home, and maybe another for when the user is traveling. At the office, the mobile device uses settings that are assigned by a DHCP server on the corporate network. At home, the mobile device uses different network settings to communicate on the home network and access a shared printer and a broadband Internet device. In some cases, a mobile device might need a configuration that makes a Wi-Fi connection when the user is away from his or her desk, and a configuration that uses DHCP when the mobile device is physically connected to the network, or vice versa. When a system uses DHCP to obtain its primary network settings, you can configure alternate network settings for those times when a DHCP server isn’t available, such as when the user is traveling or at home. Systems can use alternate configurations either automatically or through user interaction. When in meeting rooms or elsewhere on the go, mobile device users are also likely to need to connect to networked projectors, a task for which the Connect To A Network Projector Wizard provides an easy solution.
Working with mobility settings
Windows Mobility Center, shown in Figure 10-1, provides a single location for managing important settings for mobile devices and includes a series of control tiles that provide quick access to the commonly used settings. On a mobile device, you can access Windows Mobility Center by pressing and holding or right-clicking the Power icon in the taskbar’s notification area and then tapping or clicking Windows Mobility Center. In Control Panel, you can open Mobility Center by selecting Adjust Commonly Used Mobility Settings under the Hardware And Sound heading.
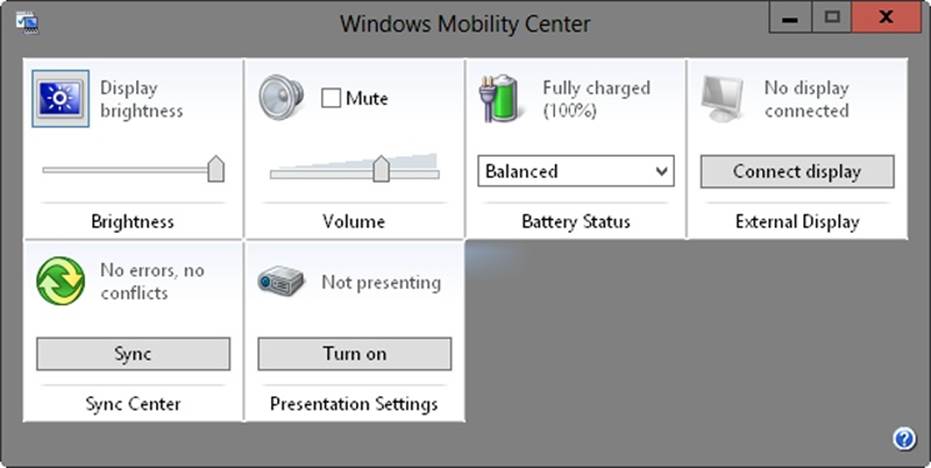
Figure 10-1. Manage important settings for mobile devices.
The control tiles of Windows Mobility Center enable you to adjust mobility settings by using options such as sliders to adjust the display’s brightness, a selection list to change the power plan, and a toggle button to turn presentation settings on or off. Although the set of control tiles available depends on the type of mobile device and the manufacturer, the following are the most common control tiles:
§ Battery Status Shows the status of the mobile device’s battery. You can use the selection list provided to change from one power plan to another. If you’ve created any custom power plans, these are also available. Tap or click the related icon to open the Power Options page in Control Panel.
§ Brightness Enables you to manage the brightness setting for the display. If brightness is configurable on the mobile device, use the slider to adjust the brightness. Tap or click the related icon to open the Power Options page in Control Panel. Note that the Power icon in the notifications area of the taskbar has similar options. Note that the Settings panel also has a Brightness control.
§ External Display Enables you to connect to a secondary display device, which might be necessary to give a presentation. Tap or click Connect Display to access a secondary display device connected through a cable. Tap or click the related icon to open the Screen Resolution page in Control Panel.
§ Presentation Settings Enables you to turn presentation mode on or off. In presentation mode, the mobile device’s display and hard disk do not enter sleep mode when the computer is inactive. Tap or click Turn On to enter presentation mode. Tap or click the related icon to open the Presentation Settings dialog box.
§ Sync Center Enables you to view the status of file synchronization and initiate syncing. Tap or click Sync to start a new sync by using Sync Center. Tap or click the related icon to open the Sync Center page in Control Panel.
§ Volume Enables you to manage the current volume setting. If volume is configurable on your mobile device, use the slider to adjust the volume. Select Mute to mute the sound. Tap or click the related icon to open the Sound dialog box. Note that the Volume icon in the notifications area of the taskbar has similar options.
NOTE
Some mobile device manufacturers customize Windows Mobility Center by adding their own control tiles to extend these common options. For example, some HP mobile devices include the HP Wireless Assistant control tile, which you can use to configure wireless networking settings for the integrated wireless device.
Travelling users will want to know how to turn off networking quickly. There are several ways to do this but the easiest is to turn on Airplane Mode. When Airplane Mode is on, all networking is temporarily disabled. When you later turn Airplane Mode off, all networking is re-enabled. To turn on Airplane Mode, open the Networks pane by tapping or clicking the Network icon in the notification area of the task bar. Enable Airplane Mode by tapping or clicking the related option. Airplane Mode should then be set to On.
You also can turn Airplane Mode on by following these steps:
1. Slide in from the right side of the screen, or press Windows key + I.
2. Tap or click the icon for the current network.
3. Tap or click the Airplane Mode toggle switch, which should be set to On.
If you repeat either procedure, the next time you tap or click the Airplane Mode toggle, the mode should be set to Off.
Configuring dynamic IP addresses
DHCP gives you centralized control over IP addresses and TCP/IP default settings. If a network has a DHCP server, you can assign a dynamic IP address to any of the network adapter cards on a computer. Afterward, you rely on the DHCP server to supply the basic information necessary for TCP/IP networking. To enable dynamic IP addressing for both IPv4 and IPv6, separate DHCP services must be set up for both IPv4 and IPv6.
To configure dynamic IP addresses, complete these steps:
1. In Control Panel, tap or click View Network Status And Tasks under the Network And Internet heading.
2. In the left pane in Network And Sharing Center, tap or click Change Adapter Settings.
3. Network Connections displays a list of all network connections configured for use on the computer. Press and hold or right-click the connection you want to configure, and then tap or click Properties.
4. Double-tap or double-click Internet Protocol Version 4 (TCP/IPv4), or select Internet Protocol Version 4 (TCP/IPv4), and then tap or click Properties. This displays the Internet Protocol Version 4 (TCP/IPv4) Properties dialog box, as shown in Figure 10-2.
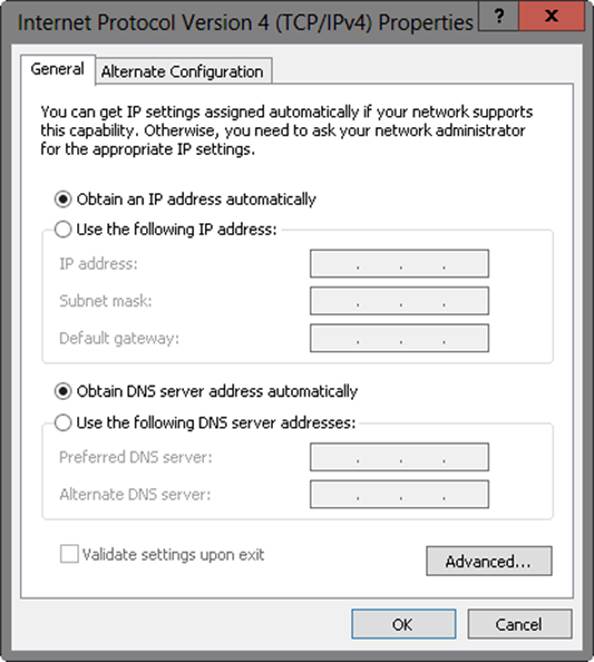
Figure 10-2. To use DHCP, configure the computer to obtain an IP address automatically.
5. Select Obtain An IP Address Automatically. You can also select Obtain DNS Server Address Automatically, or select Use The Following DNS Server Addresses, and then enter preferred and alternate Domain Name System (DNS) server addresses in the text boxes provided.
6. Tap or click OK.
7. If your organization or network uses IPv6, double-tap or double-click Internet Protocol Version 6 (TCP/IPv6). Select Obtain An IPv6 Address Automatically. You can also select Obtain DNS Server Address Automatically, or select Use The Following DNS Server Addresses, and then enter preferred and alternate DNS server addresses. Tap or click OK.
8. Configure alternate private IP addressing as necessary (as discussed in the next section).
Configuring alternate private IP addresses
Only IPv4 connections have alternate configurations. When you use DHCP with an IPv4 connection, an automatic private IP address is assigned when the DHCP server can’t be reached during startup or when the current IP address lease expires. The automatic private IP address is in the range 169.254.0.1 to 169.254.255.254, with a subnet mask of 255.255.0.0. Because the automatic private IP address configuration does not include default gateway, DNS, or WINS server settings, a computer using the alternate IP addressing is isolated on a separate network segment in theAutomatic Private IP Addressing (APIPA) range.
If you want to ensure that a computer uses specific IP address and network configuration settings when a DHCP server is not available, you need to specify an alternate configuration. One of the key reasons for using an alternate configuration is to accommodate mobile device users who take their computers home from work. In this way, the user’s mobile device can be configured to use a dynamically assigned IP address at work and an alternate IP address configuration at home. Before you get started, you might want to ask users for their home networking settings, including the IP address, gateway, and DNS server addresses required by their Internet service provider (ISP).
To configure alternate private IP addresses, complete the following steps:
1. In Control Panel, tap or click View Network Status And Tasks under the Network And Internet heading.
2. In the left pane in Network And Sharing Center, tap or click Change Adapter Settings.
3. Network Connections displays a list of all network connections configured for use on the computer. Press and hold or right-click the connection you want to configure, and then tap or click Properties.
4. Double-tap or double-click Internet Protocol Version 4 (TCP/IPv4) to open the Internet Protocol Version 4 (TCP/IPv4) Properties dialog box. You can also select Internet Protocol Version 4 (TCP/IPv4), and then tap or click Properties.
5. If you have already configured the adapter to obtain an IP address automatically, you should be able to tap or click the Alternate Configuration tab, as shown in Figure 10-3.
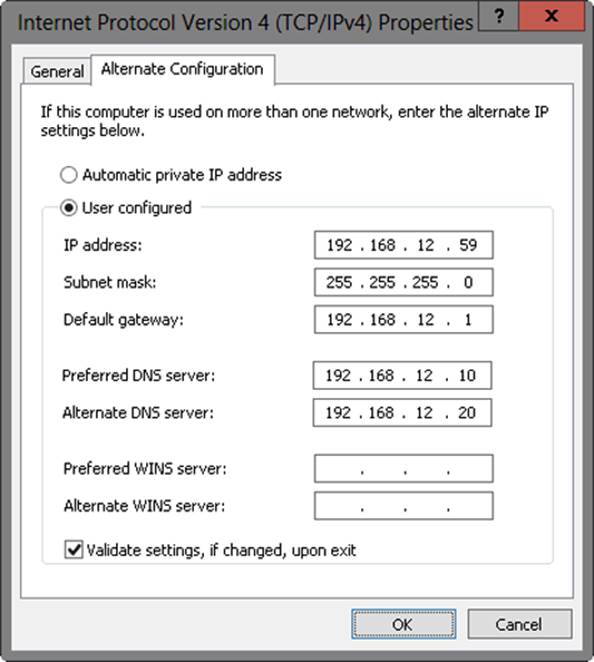
Figure 10-3. Use the Alternate Configuration tab to configure private IP addresses for the computer.
6. On the Alternate Configuration tab, select the User Configured option. Then, in the IP Address text box, enter the IP address you want to use. The IP address you assign to the computer should be a private IP address, and it must not be in use anywhere else at the time the settings are applied. Private IP addresses are typically in the range 10.0.0.1 to 10.255.255.254, 172.16.0.1 to 172.31.255.254, or 192.168.0.1 to 192.168.255.254 (excluding IP addresses reserved for network IDs and broadcasts).
7. The subnet mask ensures that the computer communicates over the network properly. Windows 8.1 should insert a default value into the box for the subnet mask. If the network doesn’t use subnets, the default value should suffice. However, if the network does use subnets, you need to change this value as appropriate for the target network.
8. If the computer needs to access other TCP/IP networks, the Internet, or other subnets, you must specify a default gateway. Enter the IP address of the network’s default router in the Default Gateway box.
9. DNS servers are needed for domain name resolution. Enter a preferred and an alternate DNS server address in the boxes provided.
10.If WINS is used on the network for compatibility with previous versions of Windows, configure a preferred and an alternate WINS server by using the boxes provided.
11.When you’ve finished, tap or click OK twice, and then tap or click Close.
Connecting to networked projectors
Many meeting rooms and conference centers have networked projectors that are used for making presentations. To use this type of projector, you must connect your computer to the LAN, and then access the projector over the network by using the Connect To A Network Projector Wizard. This wizard walks you through the steps of finding projectors on a network and establishing a connection.
Before a mobile device can use the wizard, you must add the Network Projection feature. To do this, follow these steps:
1. In Control Panel, tap or click Programs, and then tap or click Turn Windows Features On Or Off under the Programs And Features heading.
2. In the Windows Features dialog box, tap or click the Network Projection check box, and then tap or click OK.
When you install the Network Projection feature, the Connect To A Network Projector utility is added to the Apps screen under the Windows Accessories heading. The utility also should be available on the Start screen. Before giving a presentation, users might want to configure the following standard settings for presentations:
§ Turn Off The Screen Saver
§ Set The Volume
§ Show A Specific Background Or Background Image
These settings are configured in the Presentation Settings dialog box. When working with Mobility Center, you can open this dialog box by tapping or clicking the Network Projector icon on the Presentation Settings tile.
You can use the Connect To A Network Projector Wizard by following these steps:
1. Tap or click Connect To A Network Projector on the Start screen or the Apps screen.
2. If you haven’t previously attempted to connect to a network projector and Windows Firewall is active, tap or click Allow The Network Projector To Communicate With My Computer. This enables the network projector to communicate with the computer through Windows Firewall.
3. If you want to select from projectors found on the local network, tap or click Search For A Projector. The wizard searches for projectors on the network and returns its results along with a list of any projectors you’ve recently used. Tap or click the projector you want to use, provide the access password for the projector if necessary, and then tap or click Next.
4. If you know the network address of the projector, tap or click Enter The Projector Network Address. On the Enter The Network Address Of A Network Projector page, enter the network address of the projector, such as http://intranet.cpandl.local/projectors/confb-proj1. Enter any required access password, and then tap or click Connect.
5. After you’ve established a connection to the projector, tap or click Finish to exit the wizard and begin using the projector.
Understanding mobile networking and remote access
Although the underlying technologies are fundamentally different, direct-dial, broadband, VPN, and DirectAccess connections all make it possible for users to access your organization’s network remotely. With a typical direct-dial network configuration, off-site users use their computer’smodem and a standard telephone line to connect to a modem pool located at the office. A Windows server managing the modem pool and running Routing And Remote Access authenticates the logon ID and password and authorizes the user to connect to the internal network. The user can then access network resources just as she does when working on site.
Figure 10-4 shows a direct-dial connection that uses a modem pool. Analog modems use dedicated telephone lines to connect users to the internal network at speeds up to 33.6 kilobits per second (Kbps) per line. Digital modems use channels of a T1 line to connect users to the internal network at speeds up to 56 Kbps per line. In a standard configuration, you might have 8, 12, or 16 modems configured in the pool, each with its own line (or channel). Typically, the modem pool has a lead number that users can call. This number connects to the first modem in the pool. When the lead number is busy, the line rolls over to the next number, which connects to the next modem in the pool, and so on, enabling users to dial a single number to gain access to all modems in the pool.
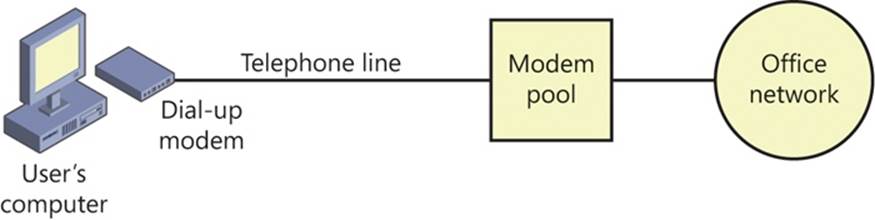
Figure 10-4. Use a dial-up connection to access an office network through a modem pool.
Unlike direct-dial connections, which can be made directly to the office network, broadband connections are made through an ISP’s network. The user’s DSL router, cable modem, or cellular modem establishes a connection to the ISP, which in turn connects the user to the public Internet. To connect to the office network, a broadband user must establish a VPN or DirectAccess connection between his computer and the office network. Figure 10-5 shows how VPN and DirectAccess work when the user has either a telephone line and DSL router or a cable and a cable modem.
A VPN is an extension of a private network across the public Internet. After a user is connected, it appears to her that she is directly connected to the office network, and she can access network resources just as she does when working on site. These seamless connections are possible because a virtual tunnel is established between the user’s computer and the office network, where the VPN technology takes care of routing information over the public Internet. One of two VPN technologies is typically used: Point-to-Point Tunneling Protocol (PPTP) or Layer 2 Tunneling Protocol (L2TP).
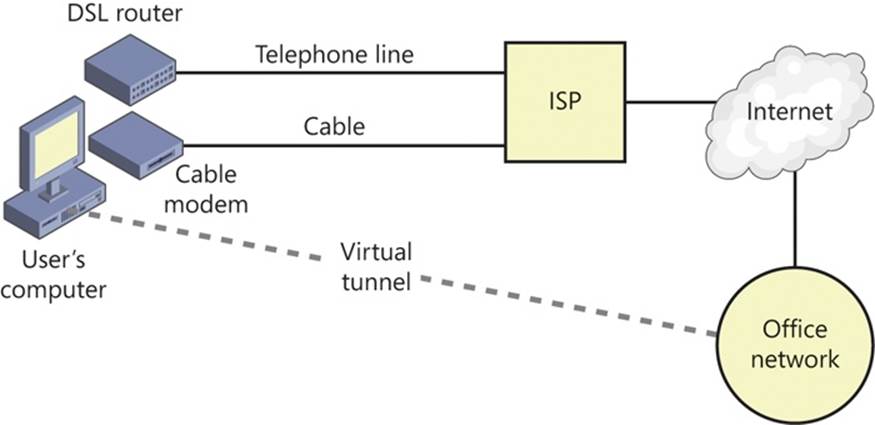
Figure 10-5. Use a virtual tunnel to access an office network.
Both L2TP and PPTP offer encryption and protection from attacks, but only L2TP uses Internet Protocol security (IPsec) for advanced encryption, making it the more secure of the two technologies. Unfortunately, L2TP is more difficult to configure. When you use L2TP, you need to use Microsoft Certificate Services or a third-party certificate server to issue individual certificates for each system that will connect to the network by using L2TP.
In addition to using a VPN with a broadband connection, you can use a VPN with a dial-up connection. In this configuration, users go through their ISP to establish a connection to the public Internet and then establish a private connection to the office network. When this configuration becomes standard procedure for dial-up users, your organization won’t need dedicated private lines like those reserved for a modem pool.
Another virtual tunneling option is DirectAccess. Although fundamentally different from VPN, the basic idea is the same—a DirectAccess connection is an extension of a private network across the public Internet. After a user is connected (which happens automatically after the feature is enabled), it appears to him that he is directly connected to the office network, and he can access network resources just as he does when working on site. These seamless connections are possible because a virtual tunnel is established between the user’s computer and the office network, where the DirectAccess technology takes care of routing information over the public Internet.
For Windows Server 2012 R2, DirectAccess and Routing And Remote Access Service (RRAS) are combined into the Remote Access server role, and the new implementation works differently than the original implementation for Windows Server 2008 R2. With the new implementation, DirectAccess remains a client/server technology that relies on IPv6 and IPsec, but it no longer requires public key infrastructure (PKI). Although Windows Server 2008 R2 DirectAccess uses two IPsec tunnels to establish connectivity to the corporate network, Windows Server 2012 R2 DirectAccess uses a single IPsec tunnel by default (because the standard implementation doesn’t rely on certificate-based authentication). However, for two-factor authentication, such as with smart cards and Network Access Protection (NAP) integration, you’ll need to deploy DirectAccess by using two IPsec tunnels.
Windows Server 2012 R2 DirectAccess supports multiple domains and has built-in support for network load balancing. Although DirectAccess clients communicate by using IPv6 while connected remotely, the RemoteAccess server includes a built-in protocol translation (NAT64) and a name resolution gateway (DNS64) that can convert IPv6 communications from DirectAccess clients to IPv4 for internal servers. This makes it possible for DirectAccess clients to access IPv4-only intranet computers, but doesn’t allow IPv4-only intranet computers to initiate connections to DirectAccess clients. The reason for this is that network address translation is unidirectional and meant for communications initiated by DirectAccess clients.
Client computers must run the Enterprise edition of Windows 7 or later. Server computers must run Windows Server 2008 Release 2 or later. To use DirectAccess, you must set up and configure IPv6 for use by both client and server computers throughout the enterprise, including DNSv6 and DHCPv6 as appropriate.
In the Administrative Templates policies for Computer Configuration under Network\Network Connections, you can use the Route All Traffic Through The Internal Network policy to control how DirectAccess works. By default, when a user is connected to a workplace, the user’s computer accesses Internet resources directly rather than going through the workplace network. If you enable the routing policy, the user’s computer accesses the Internet through the workplace network.
Obviously, both configuration approaches have advantages and disadvantages. If you don’t route Internet traffic through the internal network, you reduce the workload and traffic levels on the workplace’s connection to the Internet, but you lose the additional security and safeguards that might be in place to protect the internal network. If you route Internet traffic through the internal network, you increase the workload and traffic levels on the workplace’s connection to the Internet, and possibly dramatically increase latency and response times when the user works with Internet resources. However, you also ensure that any additional security and safeguards in place to protect the internal network are enforced.
Creating connections for remote access
As discussed previously, you can create both dial-up and broadband connections for remote access. If you want additional security, you can also configure these connections to use VPN. After it is enabled, DirectAccess is seamless for the user, and the user needs only to establish a connection to the Internet to access the workplace network.
Windows 8.1 provides a wizard for creating these connections. In most cases, you’ll want to access this wizard through Network And Sharing Center. In Network And Sharing Center, tap or click Set Up A New Connection Or Network. You can then create a dial-up, broadband, or VPN connection.
NOTE
REAL WORLD Consider whether Group Policy can help you reduce your workload. If you want to use the same connection settings on multiple computers, you can create dial-up and VPN connections by using Group Policy preferences. You also can import the settings into Group Policy. Either way, the connections are then available to all computers affected by the Group Policy Object. You can use this technique to deploy new connection configurations, update existing configurations when you need to make changes, and delete existing configurations and replace them with new ones.
Creating a dial-up connection
Windows 8.1 provides two options for making dial-up connections. You can create a dial-up connection to an ISP or a dial-up connection to a workplace. Although the connections are created by using slightly different techniques, the settings for the connection options are the same, with the following exceptions:
§ A dial-up connection to an ISP does not use the Client For Microsoft Networks component, and it redials by default if the line is dropped.
§ A dial-up connection to a workplace does use the Client For Microsoft Networks component, and it does not redial by default if the line is dropped.
The networking component Client For Microsoft Networks enables Windows 8.1 systems to communicate in a Windows domain or workgroup. Because most workplaces use Windows domains or workgroups and some ISPs don’t, the component is configured for workplace environments and not for ISPs.
Creating dial-up connections is a two-part process. Before you create a dial-up connection, you should check the current phone and modem options, which specify dialing rules. After the dialing rules are configured, you can create the dial-up connection.
Working with dialing rules and locations
Dialing rules are used with modems to determine how phone lines are accessed, the caller’s area code, and what additional features should be used when dialing connections. Sets of dialing rules are saved as dialing locations in the Phone And Modem tool.
Viewing and Setting the Default Dialing Location
To view and set the default dialing location, follow these steps:
1. In Control Panel, select either Large Icons or Small Icons in the View By drop-down list.
2. Tap or click Phone And Modem. The first time you start this tool, you’ll get the Location Information dialog box, as shown in Figure 10-6.
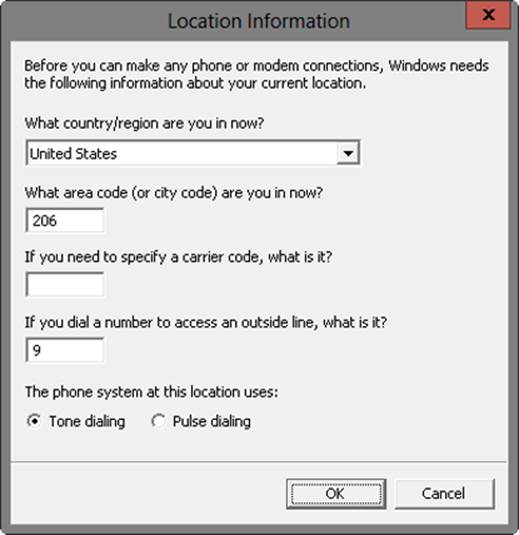
Figure 10-6. The first time you use the Phone And Modem tool, you must configure the initial location.
3. Answer the following questions to configure the default location, which is named (My Location):
o What Country/Region Are You In Now? Select the country or region you are in, such as United States.
o What Area Code (Or City Code) Are You In Now? Enter the appropriate area or city code, such as 212.
o If You Need To Specify A Carrier Code, What Is It? You can specify the telephone carrier to use when dialing and establishing connections by entering its carrier code. A carrier code might be necessary if you are making long-distance or international calls.
o If You Dial A Number To Access An Outside Line, What Is It? Enter the number you need, if any, to access an outside line. An access number might be necessary to bypass a switch panel within a company or when dialing from a hotel.
4. In The Phone System At This Location Uses option, select Tone Dialing or Pulse Dialing. Most areas of the United States and Canada use tone dialing.
5. After you configure an initial location and tap or click OK, you’ll get the Phone And Modem dialog box, as shown in Figure 10-7.
From this point on, you no longer need to set up an initial location.
Locations configured for the computer are shown by name and area code in the Locations list. The location from which you are currently dialing is selected and highlighted in bold.
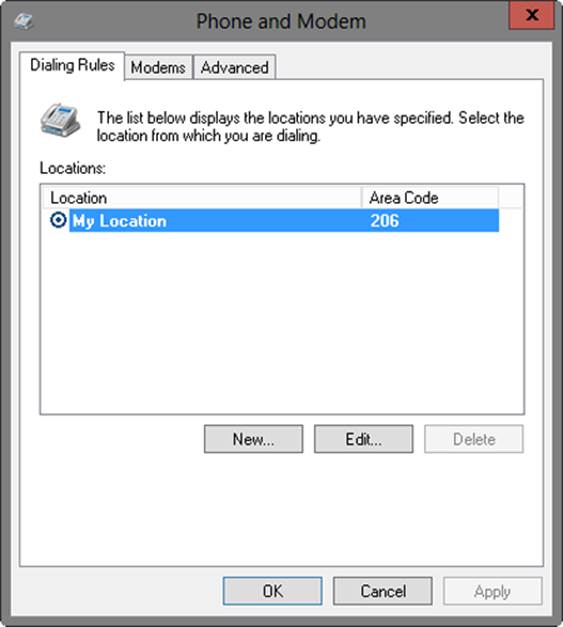
Figure 10-7. Check dialing rules to ensure that they are configured properly.
6. Initially, the default location is set as My Location. By selecting a different location, you can make it the current or default location. I recommend editing the default location (My Location) to rename it so that the name includes the city or office location. To view the configuration of a selected location, tap or click Edit. To rename the location, enter a new value in the Location Name text box on the General tab, and then tap or click OK.
NOTE
Of all the available dialing rules, the area code is the one that you’ll work with most often. During installation of the operating system, a default location might have been created with the area code specified by the person who set up the computer. In many cases, the default area code is not the one that the user needs to use when dialing another location from home.
Creating Dialing Locations
You can create dialing locations to set unique rules for each area code from which the user makes dial-up connections. To create a dialing location, follow these steps:
1. In Control Panel, select either Large Icons or Small Icons in the View By drop-down list.
2. Tap or click Phone And Modem. In the Phone And Modem dialog box, on the Dialing Rules tab, tap or click New. This displays the New Location dialog box.
3. The New Location dialog box has three tabs:
o General Sets the location name, country/region, and area code. On this tab, you can also set access numbers for outside lines for local or long-distance calls, disable call waiting, and specify whether tone or pulse dialing is used. Be sure to use an appropriate location name. Typically, this is the name of the city or metropolitan area from which the user is dialing.
o Area Code Rules Sets rules that determine how phone numbers are dialed from the location’s area code to other area codes and within the location’s area code. These rules are useful when multiple area codes that are not long distance are included in the same location. They are also useful when calls within the area code might be local or long distance based on phone number prefixes.
o Calling Card Sets a calling card to use when dialing from this location. Calling card information for major carriers is provided, and you can also create calling card records.
4. When you have finished creating the location, check that the default location in the Phone And Modem dialog box is correct. You might need to select a different entry. Tap or click OK.
Deleting Dialing Locations
To delete a dialing location, follow these steps:
1. In Control Panel, select either Large Icons or Small Icons in the View By drop-down list. Tap or click Phone And Modem.
2. In the Phone And Modem dialog box, select the location you want to permanently remove, and then tap or click Delete. If prompted to confirm the action, tap or click Yes.
3. Select the dialing location that you want to use as the default, and then tap or click OK.
Creating a dial-up Internet connection to an ISP
You can create dial-up connections in the following ways:
§ If users are dialing up through an ISP that has point of presence (POP) locations throughout the United States and the world, you’ll usually want to configure dialing rules and connections for specific locations. For example, you could create a dial-up location called Seattle and a dial-up connection called Connect To ISP In Seattle. In this configuration, you would specify the area code for Seattle, in addition to any special dialing rules, and then configure the connection to use the ISP’s access numbers for Seattle. You would also need to show users how to change their current locations for when they travel from place to place.
§ If users are dialing an 800 number or long distance to access the office modem pool or a special out-of-area access number for an ISP, you’ll usually want to configure separate connections rather than separate locations. Here, you would create a connection that dials long distance to establish the connection, and a connection that is used when the user is in the local area. You would then need only one dialing location.
To create a dial-up Internet connection, follow these steps:
1. Before you create a dial-up connection, you should check the current phone and modem options, as discussed in the Working with dialing rules and locations section earlier in this chapter.
NOTE
If you use dialing rules with a connection and then set area and country codes, you are enabling the connection to be used for long-distance calls, which sometimes can be very expensive. If this isn’t what you want, you might want to reconsider those selections.
2. In Network And Sharing Center, tap or click Set Up A New Connection Or Network. This starts the Set Up A Connection Or Network Wizard.
3. Select Connect To The Internet, and then tap or click Next. If the computer is already connected to the Internet, tap or click Set Up A New Connection Anyway. If you have an existing dial-up connection, you can reconfigure that connection or create a new connection. Typically, you’ll want to create a new connection, so tap or click No, Create A New Connection.
4. Select Dial-Up. In the Dial-Up Phone Number text box, specify the phone number to dial for this connection.
5. Set account information for the connection. Enter the user name in the text box provided, and then enter the password. Although you can specify that the password is remembered by selecting Remember This Password, doing so is a poor security practice because it enables anyone with access to the computer to use the connection.
6. In the Connection Name text box, enter the name for the connection, such as Service Provider. Keep in mind that the name should be short (50 or fewer characters), but descriptive.
7. If you want the connection to be available to all users of the computer, select Allow Other People To Use This Connection. This option is useful when you plan to assign the connection through Group Policy and have not provided user logon information.
8. Tap or click Connect to create the dial-up connection and begin establishing a connection. Next, if you don’t want to establish a connection now, tap or click Skip to bypass connection activation. Tap or click Close. To test the connection settings, follow the steps outlined in theEstablishing connections section later in this chapter.
NOTE
REAL WORLD Most organizations use digital phone systems, which don’t allow you to make an analog connection to an outside line. If this is the case at your office, you need to access an analog line before you can test the connection. Some digital phones can be equipped with digital-to-analog converters that you can use for testing dial-up connections. You might find these converters used with conference phones or fax machines, or you might find that conference phones or fax machines are already connected to analog phone lines.
Creating a dial-up connection to a workplace
Creating a dial-up connection to a workplace is similar to creating a dial-up connection to the Internet. You create a dial-up connection to a workplace by following these steps:
1. In Network And Sharing Center, tap or click Set Up A New Connection Or Network. This starts the Set Up A Connection Or Network Wizard.
2. Select Connect To A Workplace, and then tap or click Next. If you have a connection already, you can reconfigure that connection or create a new connection. Typically, you’ll want to create a new connection, so tap or click No, Create A New Connection.
3. On the How Do You Want To Connect page, tap or click Dial Directly.
4. Specify the phone number to dial for this connection by using the Telephone Number text box. In the Destination Name text box, enter the name for the connection, such as Corporate Office or Seattle Office. Keep in mind that the name should be short (50 or fewer characters), but descriptive.
5. If you want to use a smart card for the connection, select Use A Smart Card.
6. If you want the connection to be available to all users of the computer, select Allow Other People To Use This Connection. This option is best when you plan to assign the connection through Group Policy and have not provided user logon information.
7. If you don’t want to test the connection now, select Don’t Connect Now. In most cases, you’ll want to use this option to bypass the connection activation. Otherwise, the connection might fail because you are setting up a connection for an alternate location, such as the user’s home Internet connection, and these settings won’t work through the organization’s network.
8. Tap or click Next. Set account information for the connection. Enter the user name in the text box provided, and then enter the password.
NOTE
SECURITY ALERT Although you can specify that the password is remembered by selecting Remember This Password, this is a poor security practice because it enables anyone with access to the computer to use the connection.
9. If you are connecting to a domain, you can specify the logon domain in the Domain text box.
10.If you previously specified that you didn’t want to connect now, tap or click Create to create the connection. Otherwise, tap or click Connect to create the connection and connect to it. Tap or click Close.
In Group Policy, you can create, edit, and remove dial-up connections by using network options preferences. To configure network options preferences, follow these steps:
1. Open a Group Policy Object for editing in the Group Policy Management Editor. To configure preferences for computers, expand Computer Configuration\Preferences\Control Panel Settings, and then select Network Options. To configure preferences for users, expand User Configuration\Preferences\Control Panel Settings, and then select Network Options.
2. Press and hold or right-click the Network Options node, point to New, and then tap or click Dial-Up Connection. This opens the New Dial-Up Properties dialog box.
3. In the Action list, select Create, Update, or Replace, as appropriate.
4. If you want the connection to be available to all users of the computer, select All Users Connection. Otherwise, select User Connection to apply the connection only to the user for whom the policy is being processed.
5. Enter a connection name and connection phone number.
6. Use the options on the Common tab to control how the preference is applied. Often, you’ll want to apply a policy only once. If so, select Apply Once And Do Not Reapply.
7. Tap or click OK. The next time Group Policy is refreshed, the preference item will be applied as appropriate for the Group Policy Object in which you defined the preference item.
Creating a broadband connection to the Internet
In many respects, broadband connections are much easier to configure than dial-up connections. When you work with broadband, you don’t need to set up dial-up rules or locations. You don’t need to worry about calling cards, ISP access numbers, or redialing preferences, and this makes broadband much easier to work with.
Most broadband providers give users a router or a modem that users will need to connect to the service provider. Each user must also have a network adapter on his or her computer that is connected to a DSL router or cable modem. In this configuration, the necessary connection is established over a LAN rather than a specific broadband connection. Therefore, it is the network connection that must be properly configured to gain access to the Internet. You won’t need to create a broadband connection.
You can, however, create a specific broadband connection if needed. In some cases, you need to do this to set specific configuration options, such as secure authentication, required by an ISP, or you might want to use this technique to set the user name and password required by the broadband provider.
You create a broadband connection to the Internet by following these steps:
1. In Network And Sharing Center, tap or click Set Up A New Connection Or Network. This starts the Set Up A Connection Or Network Wizard.
2. Select Connect To The Internet, and then tap or click Next. If the computer is already connected to the Internet, tap or click Set Up A New Connection Anyway. If you have another usable connection already, you can reconfigure that connection for use or create a new connection. Typically, you’ll want to create a new connection, so tap or click Set Up A New Connection Anyway. Tap or click No, Create A New Connection, and then tap or click Next.
3. On the How Do You Want To Connect page, tap or click Broadband (PPPoE) to create a broadband connection to the Internet.
4. Do the following, and then tap or click Next:
o Set account information for the connection. Enter the user name in the text box provided, and then enter the password.
o In the Connection Name text box, enter the name for the connection, such as Seattle Office Secure Broadband. Keep in mind that the name should be short (50 or fewer characters), but descriptive.
o If you want the connection to be available to all users of the computer, select Allow Other People To Use This Connection. This option is best when you plan to assign the connection through Group Policy and have not provided user logon information.
5. Tap or click Connect to create the connection and connect to it. In most cases, the connection will fail because you are setting up a connection for an alternate location, such as a remote office, and these settings won’t work through the organization’s network. As a result, you’ll have an option to tap or click Skip to bypass connection activation. Tap or click Close.
TIP
With a broadband connection, you need a DSL router or cable modem to test the connection. Be sure to configure any special settings required by the ISP, as detailed in the Configuring connection properties section later in this chapter.
Creating a VPN connection
VPNs are used to establish secure communications channels over an existing dial-up or broadband connection. You must know the IP address or fully qualified domain name of the remote access server to which you are connecting. If the necessary connection is available and you know the host information, you can create the connection by following these steps:
1. In Network And Sharing Center, tap or click Set Up A New Connection Or Network. This starts the Set Up A Connection Or Network Wizard.
2. To create a VPN connection, select Connect To A Workplace, and then tap or click Next.
3. If you have an existing dial-up connection, select No, Create A New Connection, and then tap or click Next.
4. Tap or click Use My Internet Connection (VPN).
5. Users will need to establish a connection to the Internet—via dial-up or broadband—before attempting to use the VPN. Select an existing connection to use, and then tap or click Next.
6. Enter the IPv4 or IPv6 address or fully qualified domain name of the computer to which you are connecting, such as 157.54.0.1 or external.microsoft.com. In most cases, this address is for the remote access server configured for the office network.
7. Enter a name for the connection in the Destination Name text box. If the computer is configured to use a smart card for authentication, select Use A Smart Card.
8. If you want the connection to be available to all users of the computer, select Allow Other People To Use This Connection. This option is best when you plan to assign the connection through Group Policy and have not provided user logon information.
9. Tap or click Create.
In Group Policy, you can create, edit, and remove VPN connections by using network options preferences. To configure network options preferences, follow these steps:
1. In the Group Policy Management Editor, open a Group Policy Object for editing. To configure preferences for computers, expand Computer Configuration\Preferences\Control Panel Settings, and then select Network Options. To configure preferences for users, expand User Configuration\Preferences\Control Panel Settings, and then select Network Options.
2. Press and hold or right-click the Network Options node, point to New, and then tap or click VPN Connection. This opens the New VPN Properties dialog box.
3. In the Action list, select Create, Update, or Replace, as appropriate.
4. If you want the connection to be available to all users of the computer, select All Users Connection. Otherwise, select User Connection to apply the connection only to the user for whom the policy is being processed.
5. Enter a connection name and connection IP address. Alternatively, select Use DNS Name, and then enter the fully qualified domain name to use.
6. On the Security tab, select Advanced. Use the Data Encryption list to specify whether and how encryption should be used. In most cases, you’ll want to require encryption. Under Logon Security, specify the security options to use.
7. Use the options on the Common tab to control how the preference is applied. Often, you’ll want to apply a policy only once. If so, select Apply Once And Do Not Reapply.
8. Tap or click OK. The next time Group Policy is refreshed, the preference item will be applied as appropriate for the Group Policy Object in which you defined the preference item.
Joining a device to a workplace
You can join a device to a workplace to have the device become a known device. After the device is joined to a workplace, the device can access workplace resources and applications. You can join a Windows device to a workplace by following these steps:
1. Log on to the device by using a Microsoft account.
2. Open PC Settings. One way to do this is by pressing the Windows key + I, and then clicking Change PC Settings.
3. Under PC Settings\Network, select Workplace.
4. When prompted for credentials, log on by using a domain account, such as tedb@pocket-consultant.com. After you enter your password and select OK, you should get a message stating “This device has joined your workplace network.”
For a workplace join to work, the Windows device must trust the SSL certificate that was used to configure the Device Registration Service (DRS). DRS is a role service that you must configure as part of the initial setup of the Active Directory Federation role. DRS provisions devices in Active Directory Domain Services and creates a certificate on the device that represents the device identity.
Devices that are not based on Windows can also join workplaces. For example, you can join an iOS device to a workplace by following these steps:
1. The iOS device doesn’t trust the certificate used to configure the Device Registration Service (DRS), so you will need to install the certificate.
2. Open Safari and enter the URL for the DRS Over-The-Air Profile endpoint, such as https://corpservices.pocket-consultant.com/enrserver/otaprofile.
3. Log on to the page by using a domain account, such as tedb@pocket-consultant.com.
4. The first time you access apps by using an iOS device, you will be prompted to install a profile. On the Install Profile screen, select Install.
5. If you need to enter a PIN to unlock the device, enter the PIN when prompted.
6. When the profile installation is complete, you’ll encounter the Profile Installed screen. Select Done.
Configuring connection properties
Whether you are working with dial-up, broadband, or VPN connections, you’ll often need to set additional properties after creating a connection. The key properties that you will work with are examined in this section.
NOTE
As you work with connection properties, keep in mind that VPN connections use existing connections and that the configuration of each connection is separate. With VPN, the primary connection is established first by using the settings assigned to that connection, and then the VPN connection is attempted by using the VPN connection settings. With this in mind, you should configure the primary connection first, and then configure the options for VPN. You should change this approach only when you are troubleshooting problems with VPN. In this case, you should start with the VPN configuration and work your way back to the settings for the primary connection.
Configuring automatic or manual connections
Windows 8.1 can be configured to establish dial-up, broadband, or VPN connections automatically when users access programs, such as a web browser, that need to connect to the Internet. The ways in which automatic connections work depend on settings in the Internet Options tool. The dial-up options include the following:
§ Never Dial A Connection Users must manually establish a connection.
§ Dial Whenever A Network Connection Is Not Present The connection is established automatically when it’s needed, but only when the network connection isn’t working.
§ Always Dial My Default Connection The default connection is always established when an Internet connection is needed (even if other connections are already established).
TIP
The way you configure automatic connections really depends on the way your organization works. Contrary to what some administrators think, mobile device users are usually less frustrated when their computers are set to never dial a connection. Users might not have access to a dial-up connection when they are out of the office, for example, and having the computer attempt to dial a connection when a user is meeting with customers or giving a presentation can be disruptive. On the other hand, if you are configuring dial-up networking for users with desktops at a remote or home office, they’ll probably want to use automatic connections.
To configure computers to connect manually, follow these steps:
1. In Control Panel, tap or click Network And Internet. In Network And Internet, tap or click Internet Options. In the Internet Properties dialog box, tap or click the Connections tab, as shown in Figure 10-8.
2. Select Never Dial A Connection, and then tap or click OK.
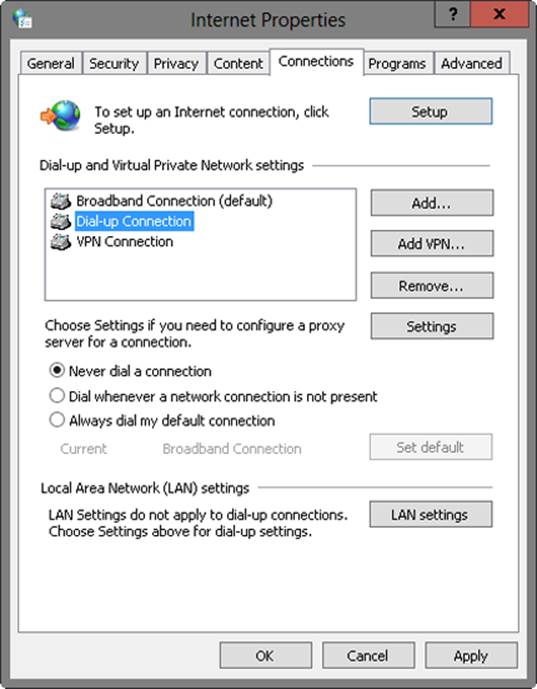
Figure 10-8. Configure manual or automatic connections by using the Connections tab.
You can configure automatic connections by following these steps:
1. In Control Panel, tap or click Network And Internet. In Network And Internet, tap or click Internet Options. In the Internet Properties dialog box, tap or click the Connections tab.
2. Select Dial Whenever A Network Connection Is Not Present to establish a connection automatically if a network connection isn’t working. Select Always Dial My Default Connection to always attempt to establish a connection.
3. The Dial-Up And Virtual Private Network Settings list shows the dial-up, broadband, and VPN connections that are currently configured. Select the connection you want to use by default when establishing a connection, and then tap or click Set Default.
4. Tap or click OK.
Configuring proxy settings for mobile connections
As with connections themselves, proxy server settings can be set manually or automatically. With manual configuration, you need to configure each proxy server property step by step. With automatic configuration, the computer attempts to detect proxy server settings and then configure the appropriate options, or the computer reads a configuration script to use in configuring the proxy.
NOTE
Proxy settings can be configured for multiple systems through Group Policy. If you elect not to configure proxy settings through Group Policy, you can configure them on a per-connection basis, as discussed in this section.
Configuration scripts can be stored in a file on the local computer or at an Internet address. Using configuration scripts can save a lot of time, especially when you consider that each connection you create is configured separately. Further, because VPN connections are established on top of an existing setting, the proxy settings for the VPN can be different from those set in the original connection.
To use automatic proxy configuration for a connection, complete the following steps:
1. In Control Panel, tap or click Network And Internet. In Network And Internet, tap or click Internet Options. In the Internet Properties dialog box, tap or click the Connections tab.
2. In the Dial-Up And Virtual Private Network Settings list, select the dial-up connection that you want to configure, and then tap or click Settings. This displays a Settings dialog box similar to the one shown in Figure 10-9.

Figure 10-9. Proxy settings can be automatically configured through detection or scripts.
3. To attempt to detect proxy settings automatically when establishing the connection, select Automatically Detect Settings.
4. To use a configuration script, select Use Automatic Configuration Script, and then enter the file path or URL for the script. With file paths, you can use environment variables, such as %UserProfile%\PROXY.VBS. With URLs, be sure to use the computer URL, such ashttp://proxy.microsoft.com/proxy.vbs.
5. To ensure that only automatic settings are used, clear the Use A Proxy Server For This Connection check box.
6. Tap or click OK twice.
To use manual proxy configuration, complete the following steps:
1. In Control Panel, tap or click Network And Internet. In Network And Internet, tap or click Internet Options. In the Internet Properties dialog box, tap or click the Connections tab.
2. In the Dial-Up And Virtual Private Network Settings list, select the dial-up connection you want to configure, and then tap or click Settings.
3. Clear the Automatically Detect Settings and Use Automatic Configuration Script check boxes if they are selected.
4. Select Use A Proxy Server For This Connection. The Bypass Proxy Server For Local Addresses check box is not selected by default. In most cases, however, you won’t want to use a proxy for requests made to servers on the same network segment, so you’ll also want to select Bypass Proxy Server For Local Addresses. It is important to note that if Bypass Proxy Server For Local Addresses is not selected, users might need additional permissions to access intranet servers through your proxy servers.
5. Tap or click Advanced to display the Proxy Settings dialog box, as shown in Figure 10-10.
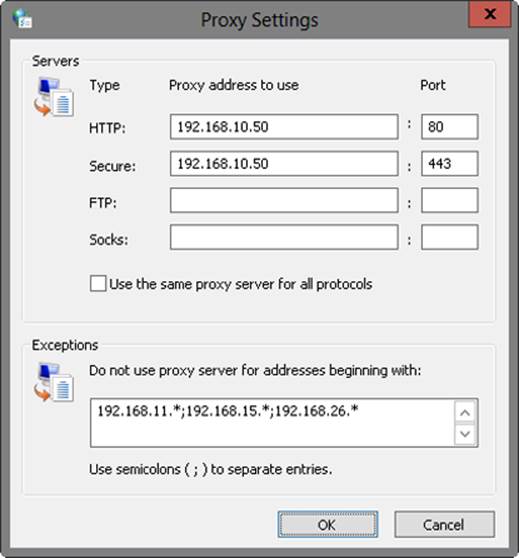
Figure 10-10. You can use the same proxy for all services, or you can configure multiple proxies.
6. By using the text boxes in the Servers area, set the IP address for proxies. You’ll find the following two columns of text boxes:
o Proxy Address To Use Sets the IP address of the related proxy server or servers. Enter the IP address for each service. If multiple proxies are configured for a particular service, enter the IP address for each proxy server in the order in which you want the web client to attempt to use them. Each address must be separated by a semicolon. If a proxy isn’t configured for a service, do not fill in the related text box.
o Port Sets the port number on which the proxy server responds to requests. Most proxies respond to port 80 for all requests. That said, the standard ports are port 80 for Hypertext Transfer Protocol (HTTP), port 443 for Secure Sockets Layer (SSL; listed as Secure), port 21 for File Transfer Protocol (FTP), and port 1081 for Socks. Check with your organization’s web administrator for the proper settings.
7. The Use The Same Proxy Server For All Protocols check box enables you to use the same IP address and port settings for the HTTP, SSL, FTP, and Socks services. You have the following options:
o If your organization has one proxy server that handles all requests, select the Use The Same Proxy Server For All Protocols check box. Enter the IP address that you want to use, and the port number on which the server responds.
o If you want to use a unique proxy server or servers for each type of service, clear the Use The Same Proxy Server For All Protocols check box, and then enter the necessary IP addresses and port numbers in the text boxes provided.
8. If your network has multiple segments or specific servers that shouldn’t use proxies, enter the appropriate IP addresses or IP address ranges in the Exceptions list. Multiple entries must be separated by a semicolon. The asterisk (*) character can be used as a wildcard character to specify an address range of 0 through 255, such as 192.*.*.*, 192.168.*.*, or 192.168.10.*.
9. Tap or click OK three times.
Configuring connection logon information
Each connection that you create has separate settings for logon information. You can set a user name, password, and domain by performing the following steps:
1. In Control Panel, tap or click Network And Internet. In Network And Internet, tap or click Internet Options. In the Internet Properties dialog box, tap or click the Connections tab.
2. In the Dial-Up And Virtual Private Network Settings list, select the connection you want to configure, and then tap or click Settings.
3. Enter the user name and password for the connection in the User Name and Password text boxes.
4. If a domain name is required, enter the domain name in the Domain text box.
5. Tap or click OK twice.
Setting a connection to use the appropriate logon information isn’t the last step in ensuring a proper configuration. You should also set options that specify whether users are prompted for logon information or a phone number. If a logon domain is required to establish a connection, you should ensure that the logon domain is passed with the other logon information. By default, the domain name is not included.
To configure additional options, follow these steps:
1. In Control Panel, tap or click Network And Internet. In Network And Internet, tap or click Internet Options. In the Internet Properties dialog box, tap or click the Connections tab.
2. In the Dial-Up And Virtual Private Network Settings list, select the connection you want to configure, and then tap or click Settings.
3. In the Settings dialog box, tap or click Properties.
4. In the Properties dialog box, tap or click the Options tab. You can now configure the following options:
o To display status messages while connecting, select Display Progress While Connecting.
o To ensure that users are prompted for logon information if necessary, select Prompt For Name And Password, Certificate, Etc.
o To ensure that the logon domain is included when requested, select Include Windows Logon Domain.
o To prompt for a phone number when needed, select Prompt For Phone Number.
5. Tap or click OK three times.
Configuring automatic disconnection
For dial-up connections, you can specify whether Windows 8.1 disconnects the phone line when the connection hasn’t been actively used for a specified amount of time and when the connection might no longer be needed. To configure disconnect options, follow these steps:
1. In Control Panel, tap or click Network And Internet. In Network And Internet, tap or click Internet Options. In the Internet Properties dialog box, tap or click the Connections tab.
2. In the Dial-Up And Virtual Private Network Settings list, select the connection you want to configure, and then tap or click Settings.
3. In the Settings dialog box, tap or click Properties. In the Properties dialog box, tap or click the Options tab. Use the Idle Time Before Hanging Up option to specify whether Windows 8.1 disconnects the phone line when the connection hasn’t been actively used for a specified time. The available values are Never, 1 Minute, 5 Minutes, 10 Minutes, 20 Minutes (the default), 30 Minutes, 1 Hour, 2 Hours, 4 Hours, 8 Hours, and 24 Hours.
4. Tap or click OK to return to the Settings dialog box. In the Settings dialog box, tap or click Advanced on the Dial-Up Connection Settings panel. Select or clear Disconnect When Connection May No Longer Be Needed to specify whether Windows 8.1 disconnects when a user quits all Internet programs that would otherwise use the connection.
5. Tap or click OK three times.
TIP
If users complain about getting disconnected during dial-up sessions, the Disconnect settings might be the problem. Talk with the users about how they use the Internet and then determine whether you should change the settings to better meet their needs. Another reason for disconnection is if the Idle Time Before Hanging Up option is used. However, you typically want an idle connection to be disconnected at some point.
Setting a connection to use dialing rules
Dial-up connections can be configured with or without dialing rules. If you don’t use dialing rules with a connection, the seven-digit phone number assigned to the connection is dialed at all times. When you assign dialing rules, the current dialing location determines whether the connection is attempted as a local or long-distance phone call.
To view or set the dialing rules for a connection, follow these steps:
1. In Control Panel, tap or click Network And Internet. In Network And Internet, tap or click Internet Options. In the Internet Properties dialog box, tap or click the Connections tab.
2. In the Dial-Up And Virtual Private Network Settings list, select the dial-up connection that you want to configure, and then tap or click Settings.
3. In the Dial-Up Connection Settings dialog box, tap or click Properties. This displays the Dial-Up Connection Properties dialog box.
4. To ensure that the connection uses the appropriate dialing rules, on the General tab, select Use Dialing Rules, and then enter an area code and select a country/region code.
5. If you don’t want to use dialing rules, clear the Use Dialing Rules check box.
6. Tap or click OK three times.
Configuring primary and alternate phone numbers
With dial-up connections, you can configure two types of phone numbers: the primary number to dial whenever a connection is attempted, and alternate phone numbers to try if a primary number fails. To configure phone numbers, follow these steps:
1. In Control Panel, tap or click Network And Internet. In Network And Internet, tap or click Internet Options. In the Internet Properties dialog box, tap or click the Connections tab.
2. In the Dial-Up And Virtual Private Network Settings list, select the dial-up connection that you want to configure, and then tap or click Settings.
3. In the Dial-Up Connection Settings dialog box, tap or click Properties. This displays the Dial-Up Connection Properties dialog box.
4. The primary phone number is listed in the Phone Number text box. Enter a new number as necessary.
5. Tap or click Alternates. This displays the Alternate Phone Numbers dialog box. You can now manage primary and alternate phone numbers by using the following techniques:
o To add a phone number, tap or click Add to open the Add Alternate Phone Number dialog box. Next, enter the seven-digit alternate local number in the Phone Number text box. You can use a dash if you want to, as in 555-1234. If you want to set dialing rules, select Use Dialing Rules, and then enter an area code and select a country/region code. Tap or click OK.
o To change the order in which numbers are dialed, select a number, and then use the up or down arrow icon to change its position in the Phone Numbers list. The top number in the list becomes the primary number.
o To edit a phone number, select the number in the Phone Numbers list, and then tap or click Edit. Next, use the Edit Alternate Phone Number dialog box to change the number.
o To remove a number, select the number in the Phone Numbers list, and then tap or click Delete.
6. If you want to use alternate numbers automatically, select If A Number Fails, Try The Next Number. You can also have Windows 8.1 move a number to the top of the list (making it the primary number) if Windows 8.1 is able to dial it successfully after a previous number fails. To do this, select Move Successful Numbers To Top Of The List.
7. Tap or click OK four times.
Configuring identity validation
Proper identity validation is essential to maintaining the integrity of your network. When users dial in to the office, you should ensure that identities are validated securely if at all possible. This isn’t the default setting for standard dial-up connections, however. With most connections, the user’s logon information can be passed in cleartext over the connection. If you don’t allow unencrypted passwords to be used, this forces Windows 8.1 to attempt to pass logon information by using a secure technique, such as Challenge Handshake Authentication Protocol (CHAP) or MS-CHAP Version 2 rather than cleartext. You can also configure connections to use Extensible Authentication Protocol.
With dial-up and broadband connections, you can use any of these options. With VPN, you can use only the secure techniques. When you require a secured password, you can also automatically pass the Windows logon name, password, and domain specified in the configuration. Passing the Windows logon information automatically is useful when users connect to the office and must be authenticated in the Windows domain. With both secure validation techniques, you can require data encryption and force Windows 8.1 to disconnect if encryption cannot be used. Data encryption is automatically used with Windows Authentication for both secured passwords and smart cards.
To configure identity validation, follow these steps:
1. In Control Panel, tap or click Network And Internet. In Network And Internet, tap or click Internet Options. In the Internet Properties dialog box, tap or click the Connections tab.
2. In the Dial-Up And Virtual Private Network Settings list, select the connection you want to configure, and then tap or click Settings.
3. In the Settings dialog box, tap or click Properties.
4. In the Properties dialog box, tap or click the Security tab. With VPNs, you can specify the connection protocol to use or use automatic detection. If you require secure passwords, you can also set automatic logon and require data encryption. Both options are useful when logging on to a Windows domain. The settings must be supported, however; if they aren’t, users won’t be able to validate their logons and connections won’t be completed.
If you use smart cards, you should also require data encryption. Data encryption is essential to ensuring the integrity and security of the data passed between the originating computer and the authenticating computer. If you select Require Encryption and the connection is not secured with encryption, the client computer will drop the connection.
5. Specify the allowed authentication protocols, and then tap or click OK.
Configuring networking protocols and components
The way in which networking protocols and components are configured depends on the type of connection. As shown in Table 10-1, dial-up connections can use either Point-to-Point Protocol (PPP) or Serial Line Internet Protocol (SLIP) as the connection protocol. Broadband connections use Point-to-Point Protocol over Ethernet (PPPoE). Most VPN connections use either PPTP or L2TP. Newer VPN connections, however, can use Secure Sockets Tunneling Protocol (SSTP) or IKEv2. With IKEv2, connections can use machine certificates during authentication.
Table 10-1. Connection protocol availability by connection type
|
CONNECTION TYPE |
CONNECTION PROTOCOL |
DESCRIPTION |
|
Dial-up |
PPP |
Used to establish connections to Windows servers over dial-up. |
|
Dial-up |
SLIP |
Used to establish connections to UNIX servers over dial-up; available if you’ve installed third-party software. |
|
Broadband |
PPPoE |
Used to establish a point-to-point broadband connection over Ethernet. |
|
VPN |
Automatic |
Used to detect automatically which VPN protocol is available and establish a virtual tunnel by using that protocol. |
|
VPN |
PPTP VPN |
Sets the PPTP for a VPN. PPTP is an extension of PPP. |
|
VPN |
L2TP IPsec VPN |
Sets the L2TP for a VPN. L2TP uses IPsec to enhance security. |
|
VPN |
IKEv2 |
Sets the IKE Version 2 for a VPN. IKEv2 uses IPsec tunnel mode to enhance security. |
|
VPN |
SSTP |
Sets the SSTP for a VPN. SSTP transports PPP or L2TP traffic through an SSL channel. |
|
DirectAccess |
IPv6 over IPsec |
Used to establish a secure tunnel to a workplace over an existing connection. |
Three network components are used with mobile networking: Transmission Control Protocol/Internet Protocol (TCP/IP), File And Printer Sharing For Microsoft Networks, and Client For Microsoft Networks. As Table 10-2 shows, the way these components are configured by default depends on the type of connection that was created originally. You can change these settings to suit your needs. If necessary, you can also install additional networking components.
Table 10-2. Default component configuration by connection type
|
DIAL-UP COMPONENT |
DESCRIPTION |
BROADBAND |
STANDARD DIAL-UP |
DIAL-UP TO OFFICE |
VPN |
|
Transmission Control Protocol/Internet Protocol (TCP/IP) |
TCP/IPv4 and TCP/IPv6 are required for network communications. By default, DHCP is used with connections unless overridden in the property settings. |
Yes |
Yes |
Yes |
Yes |
|
File And Printer Sharing For Microsoft Networks |
Enables the sharing of printers and files over the network connection; allows for mapping printers and drives. |
No |
No |
No |
Yes |
|
Client For Microsoft Networks |
Enables Windows Authentication in Windows domains; enables the computer to act as the domain client. |
No |
No |
Yes |
Yes |
To view or change the networking options for a connection, follow these steps:
1. In Control Panel, tap or click Network And Internet. In Network And Internet, tap or click Internet Options. In the Internet Properties dialog box, tap or click the Connections tab.
2. In the Dial-Up And Virtual Private Network Settings list, select the connection that you want to configure, and then tap or click Settings.
3. In the Settings dialog box, tap or click Properties.
4. In the Properties dialog box, tap or click the Networking tab. You can now do the following:
o Enable network components by selecting the related check box in the This Connection Uses The Following Items list.
o Disable network components by clearing the related check box in the This Connection Uses The Following Items list.
TIP
If any of the network components shown in Table 10-2 are not available and are necessary for the connection, you can install them by tapping or clicking Install on the Networking tab. Afterward, select the component type, tap or click Add, and then select the component to use in the list provided.
5. By default, connections use DHCP to configure network settings, including the IP address, subnet mask, default gateway, DNS servers, and WINS servers. If you want to assign a static IP address or override other default settings, select Internet Protocol Version 4 (TCP/IPv4) or Internet Protocol Version 6 (TCP/IPv6), and then tap or click Properties. This displays a Properties dialog box that can be configured as discussed earlier in the chapter.
6. Tap or click OK three times.
Enabling and disabling Windows Firewall for network connections
With dial-up, broadband, and VPN connections, you might want to give the computer added protection against attacks by using Windows Firewall. This built-in firewall protects Windows 8.1 systems by restricting the types of information that can be communicated. By enforcing the appropriate restrictions, you reduce the possibility that malicious individuals can break into a system—and reducing security risks is extremely important when users are accessing the organization’s network from outside your protective firewalls and proxy servers.
Windows Firewall is enabled by default for all connections and can be enabled or disabled for each type of network to which a user connects. To enable or disable Windows Firewall on a per-connection basis, follow these steps:
1. In Control Panel, tap or click System And Security.
2. Tap or click Windows Firewall. In the left pane of the Windows Firewall page, tap or click Turn Windows Firewall On Or Off.
3. Windows Firewall settings for each network type to which a user can connect are listed on the Customize Settings page. Select Turn On Windows Firewall or Turn Off Windows Firewall for each network type as appropriate.
4. Tap or click OK when you have finished.
Establishing connections
As discussed in the Configuring automatic or manual connections section earlier in this chapter, dial-up, broadband, and VPN connections can be established manually or automatically. The manual method lets users choose when to connect. The automatic method connects when users start a program, such as a web browser, that requires network access.
Establishing a dial-up connection
Dial-up connections use a telephone line to establish a connection between two modems. To establish a dial-up connection, follow these steps:
1. Tap or click the Network notification icon on the taskbar; or slide in from the right side of the screen, tap Settings, and then tap the Network icon.
2. On the Networks panel, tap or click the dial-up connection that you want to use, and then tap or click Connect.
3. Confirm that the user name is correct. If the password for the account was previously entered and saved, you can use the cached password without having to reenter it. Otherwise, if you need to enter a password or change the password, enter the password for the account.
4. To use the user name and password whenever you attempt to establish this connection, select Save This User Name And Password For The Following Users, and then select Me Only.
TIP
To use the user name and password when any user attempts to establish this connection, select Save This User Name And Password For The Following Users, and then select Anyone Who Uses This Computer. Don’t use this option if you plan to distribute this connection through Group Policy, because you don’t want to give out your connection password.
5. The Dial drop-down list shows the number that will be dialed. The primary number is selected by default. To choose an alternate number, tap or click the drop-down list, and then select the number you want to use.
6. Tap or click Dial. When the modem connects to the ISP or office network, the connection speed is displayed. The connection speed is negotiated on a per-call basis and depends on the maximum speed of the calling modem and the modem being called, the compression algorithms available, and the quality of the connection.
You can view the connection properties by pressing and holding or right-clicking the dial-up connection on the Networks panel and then selecting View Connection Properties. If you have problems connecting with a dial-up connection, use these tips to help you troubleshoot:
§ Problem: The modem dials and reaches the other modem but cannot connect. It continues to make connection noises until you cancel the operation.
Resolution: The phone lines are usually the source of the problem. Static or noise on the line can cause connection failures. Check the connections between the modem and the wall. Check with the phone company to find out if they can test the line and resolve the problem.
§ Problem: The modem dials and seems to connect, but then the service provider or office network connection is dropped unexpectedly. The connection doesn’t seem to complete successfully.
Resolution: Check your networking protocols and components, as discussed in the Configuring networking protocols and components section earlier in this chapter. If these settings seem to be okay, determine whether you are passing Windows logon and domain information, because this might be required. See the Configuring connection logon information section earlier in this chapter for more details.
§ Problem: The user cannot access resources in the Windows domain.
Resolution: The Client For Microsoft Networks component might be required to access resources on the office network. Enable this component and ensure that the domain information is being passed as necessary.
§ Problem: The user can never get through. The modem seems to be dialing the number incorrectly. You can hear it dialing too many or too few numbers.
Resolution: Check the dialing rules for the connection, in addition to the currently selected dialing location. Be sure that these are configured properly for the user’s current location.
§ Problem: A No Dial Tone message is displayed, but the modem is installed correctly and seems to be okay.
Resolution: Check the phone cord and ensure that it is connected properly. Some modems have two line jacks, one labeled Phone/In and one labeled Line/Out. The phone cord from the wall jack should be plugged into the Line/Out jack. Some phone jacks are configured for data only, indicating a plug for a high-speed line rather than a phone or modem. Try a different jack.
§ Problem: The computer freezes when the user tries to use the modem.
Resolution: This is most likely caused by a device conflict. For configuring and troubleshooting devices, follow the techniques discussed in Chapter 8, “Managing hardware devices and drivers” in Windows 8.1 Administration Pocket Consultant: Essentials & Configuration by William R. Stanek (Microsoft Press, 2013).
§ Problem: Some services freeze or don’t work.
Resolution: Check the proxy and firewall settings. These settings can restrict the services that are available.
Establishing a broadband connection
Broadband connections are established by using a cable modem and a cable line or a DSL router and a telephone line. To establish a broadband connection, follow these steps:
1. Tap or click the Network notification icon on the taskbar; or slide in from the right side of the screen, tap Settings, and then tap the Network icon.
2. On the Networks panel, tap or click the broadband connection that you want to use, and then tap or click Connect.
3. If the user name and password for the connection haven’t been set previously, enter the user name and password when prompted, and then tap or click OK.
You can view the connection properties by pressing and holding or right-clicking the broadband connection on the Networks panel and then selecting View Connection Properties.
Windows 8.1 caches the credentials for broadband connections and uses the credentials each time you connect. To clear the cached credentials so that you can provide new credentials, press and hold or right-click the broadband connection on the Networks panel, and then select Clear Cached Credentials.
If you have problems connecting with broadband, use these tips to help you troubleshoot:
§ Problem: You cannot connect. The connection doesn’t seem to work at all.
Resolution: Check your network connections. Be sure that the lines connecting the DSL router or cable modem and the computer are plugged in properly.
§ Problem: The connection is dropped unexpectedly. The connection doesn’t seem to complete successfully.
Resolution: Check your networking protocols and components as discussed in the section Configuring networking protocols and components. If these settings seem to be okay, determine whether you are passing Windows logon and domain information, because this might be required. See the Configuring connection logon information section earlier in this chapter for more details.
§ Problem: Some services freeze or don’t work.
Resolution: Check the proxy and firewall settings. These settings can restrict the services that are available.
§ Problem: You cannot access resources in the Windows domain.
Resolution: The Client For Microsoft Networks component might be required to access resources on the office network. Enable this component and ensure that the domain information is being passed as necessary.
Establishing a VPN connection
A VPN connection is made over an existing network connection, dial-up connection, or broadband connection. VPN connections are displayed separately from dial-up, broadband, and LAN connections. To establish a VPN connection, follow these steps:
1. Tap or click the Network notification icon on the taskbar; or slide in from the right side of the screen, tap Settings, and then tap the Network icon.
2. On the Networks panel, tap or click the VPN connection that you want to use, and then tap or click Connect.
3. If the connection is configured to dial another type of connection first, Windows 8.1 tries to establish this connection before attempting the VPN connection. If prompted to establish this connection, tap or click Yes, and then dial the connection, as discussed in the Establishing a dial-up connection section earlier in this chapter.
4. After the necessary connection is established, you’ll get the Connect dialog box. After you confirm that the user name is correct and enter the password for the network account (if it doesn’t already appear), tap or click Connect.
You can view the connection properties by pressing and holding or right-clicking the VPN connection on the Networks panel and then selecting View Connection Properties. If you have problems establishing the connection, use these tips to help you troubleshoot:
§ Problem: You cannot connect. The connection doesn’t seem to work at all.
Resolution: Check your network connections. Be sure that the lines connecting the DSL router or cable modem and the computer are plugged in properly. For a dial-up connection, make sure that the phone line is connected to the modem.
§ Problem: You get an error message regarding the host name.
Resolution: The host name might be incorrectly specified. Check the settings to be sure that the host name is fully expressed, such as external01.microsoft.com rather than just external01. DNS resolutions might not be working properly, either. If this is the case, enter the IP address for the host rather than the host name.
§ Problem: You get an error message regarding a bad IP address.
Resolution: Check or reenter the IP address. If the IP address is correct, TCP/IP networking might be improperly configured. Check your networking protocols and components, as discussed in the Configuring networking protocols and components section earlier in this chapter. You might need to set a default gateway and a static IP address for the connection.
§ Problem: A message stating that the protocol isn’t supported is displayed, and the connection doesn’t seem to complete successfully.
Resolution: Set the protocol to automatic rather than to a specific setting of PPTP, L2TP, SSTP, or IKEv2. Check the secure logon settings. They might be set to require a secure password instead of a smart card, or vice versa. If these settings seem to be okay, determine whether you are passing Windows logon and domain information, because this might be required. See the Configuring connection logon information section earlier in this chapter for more details.
§ Problem: You cannot map network drives or access printers.
Resolution: The File And Printer Sharing For Microsoft Networks component is required to map drives and printers. Enable this component, as discussed in the Configuring networking protocols and components section earlier in this chapter.
§ Problem: Some services freeze or don’t work.
Resolution: Check the proxy and firewall settings. These settings can restrict the services that are available.
Connecting to a workplace
After you join a device to a workplace, you can connect to the workplace and access applications. To connect to a workplace by using a Windows device, follow these steps:
1. Log on to the device by using a Microsoft account.
2. In Internet Explorer, enter the URL for the app you want to use, such as https://corpservices.pocket-consultant.com/claimapp.
3. The first time you access the workplace, you will need to log on. Log on to the app by using a domain account, such as tedb@pocket-consultant.com.
To connect to a workplace by using an iOS device, follow these steps:
1. In Safari, enter the URL for the app you want to use, such as https://corpservicespocket-consultant.com/claimapp.
2. The first time you access the workplace, you will need to log on. Log on to the app by using a domain account, such as tedb@pocket-consultant.com.
The browser will maintain the credentials in its credentials cache and you will only need to log on again if the credentials are removed or changed.
Wireless networking
To make it easier for users to take their mobile devices with them to meetings and to other locations in the office, many organizations have wireless networks. Wireless networks can be deployed and used in many different configurations. This section examines the most common configurations.
Wireless network devices and technologies
When you are working with wireless networks, the most common terms you’ll run across are wireless network adapter and wireless access point. Wireless adapters include PC cards for laptops, Peripheral Component Interconnect (PCI) cards for desktops, and USB devices (which can be used with laptops or desktops). However, most of today’s mobile devices have the wireless adapter built in. A wireless adapter uses a built-in antenna to communicate with an access point. Typically, an access point is directly connected to the organization’s physical network and might also function as a network switch or hub itself, meaning it has physical ports that enable direct cable connections in addition to wireless connections. Other names for access points include wireless base stations and wireless gateways.
The most widely used wireless network adapters and access points are based on the IEEE 802.11 specification. Wireless devices that are based on this specification can be Wi-Fi certified to show that they have been thoroughly tested for performance and compatibility. Table 10-3 compares the features of the current wireless technologies based on IEEE 802.11, including 802.11ac, which is newly supported in Windows 8.1. As shown in the table, each standard has its benefits and drawbacks. It should be noted that 802.11a is not included in the table, because the standard has largely been supplanted by 802.11b, 802.11g, and other more current standards.
Table 10-3. Wireless networking technologies
|
WIRELESS STANDARD |
||||
|
FEATURES |
802.11B |
802.11G |
802.11N |
802.11AC |
|
Speed |
Up to 11 Mbps |
Up to 54 Mbps |
Up to 540 Mbps |
Up to 1.35 Gbps |
|
Transmission frequency |
2.4 GHz |
2.4 GHz |
2.4 GHz, 5 GHz, or both |
5 GHz |
|
Effective indoor range |
Approximately 100 to 150 feet |
Approximately 100 to 150 feet |
Approximately 200 to 300 feet |
Approximately 200 to 300 feet |
|
Compatibility |
Can interoperate with 802.11g devices (at 11 Mbps); 802.11g wireless adapters can operate with 802.11b access points (at 11 Mbps) |
Can operate with 802.11b devices (at 11 Mbps) |
Can operate with 802.11b devices (at 11 Mbps) and 802.11g devices (at 54 Mbps) |
Backward compatible with 802.11n and 802.11a devices |
Newer 802.11 transmission specifications include 802.11n and 802.11ac. 802.11n offers speeds up to 540 megabits per second (Mbps) and can interoperate with devices that use 802.11b and 802.11g. 802.11ac offers speeds up to 1.3 gigabits per second (Gbps) and can interoperate with devices that use 802.11n and 802.11a. To achieve high transmission speeds, 802.11n and 802.11ac can use multiple receivers and multiple transmitters. Each transmitter can transmit one or more streams of data. The more streams of data that a device can use across all transmitters and receivers, the higher the throughput. However, many standard 802.11n and 802.11ac devices with multiple transmitters and receivers combine strong, weak, and reflected signals into one data stream to maximize the range. 802.11ac can be more reliable over longer distances that other technologies because the technology provides directional signal transmission and reception. Thus, unlike other standards, which use omnidirectional signals that are transmitted indiscriminately in every possible direction, 802.11ac transmitters can determine the relative direction of a receiver and strengthen the signal in that direction.
For added security, IEEE has defined the 802.11i standard. Unlike the 802.11b, 802.11g, 802.11n, and 802.11ac standards, the 802.11i standard isn’t about transmission speeds and frequencies. 802.11i is a security standard that you can add to the existing standards. More specifically, it adds security functionality to the radio specifications of 802.11a, 802.11b, 802.11g, and 802.11n. This means that 802.11a network adapters and access points can include the 802.11i security functionality, as can 802.11b, 802.11g, and 802.11n wireless products.
NOTE
Keep in mind that some computers (particularly mobile devices) contain integrated chip sets that support multiple wireless networking technologies. Wi-Fi Protected Access 2 (WPA2) is the approved Wi-Fi Alliance implementation of 802.11i. WPA2 implements all mandatory elements of the 802.11i standard.
NOTE
REAL WORLD Take a close look at compatibility issues before you deploy wireless devices that aren’t based on IEEE 802.11. Increasingly, you’ll notice devices that achieve high speeds. Some of these devices achieve speed boosts through compression and other similar techniques while staying within the guidelines of the IEEE 802.11 specification. Others might use network technologies that are proprietary, requiring you to use that company’s wireless adapters and access points to achieve the transmission improvements. For more information on wireless standards and certified devices, go to www.wi-fi.org.
Wireless security
Securing a wireless network is very different from securing a wired network. With a wired network, a cable is used to connect a computer to the network. A user must use a cable to be physically connected to the network and must have access to one of your internal switches or hubs. If an unauthorized person connects a machine to the network, it is fairly easy to determine this and trace the physical cable to the intruder’s computer.
When you install wireless networking, anyone within range of one of your wireless access points has access to your network. Not only can they intercept the wireless signals that are being broadcast, they can also try to crack into the network. The bad news is that it is difficult to locate the intruder because there’s no physical wire to trace. The really bad news is that if intruders can gain access to a wireless access point, they are usually inside your organization’s firewall. To protect the network, you should configure its firewall, if one is available, and configure the wireless devices to encode all wireless transmissions.
The most basic wireless encryption scheme is Wired Equivalent Privacy (WEP). With WEP, you encrypt data by using 40-bit, 128-bit, 152-bit, or higher private key encryption. With WEP, all data is encrypted by using a symmetric key derived from the WEP key or password before it is transmitted, and any computer that wants to read the data must be able to decrypt it by using the key. In a typical wired environment, the shared key encryption alone is sufficient to safeguard your data. In a wireless environment with high traffic volume, it is possible that someone could successfully break the shared key, and because the shared key doesn’t change automatically over time, the intruder would then have access to your organization’s internal network.
Because WEP provides only the most basic security, its use is strongly discouraged except in cases in which no alternative exists. The preferred alternatives to WEP are Wi-Fi Protected Access (WPA) and WPA2. WPA was adopted by the Wi-Fi Alliance as an interim standard prior to the ratification of 802.11i. WPA2 is based on the official 802.11i standard and is fully backward compatible with WPA.
WPA and WPA2 are able to rotate keys for added security and to change the way in which keys are derived. By changing the encryption keys over time and ensuring that they aren’t derived in one specific way, WPA and WPA2 can improve security significantly over WEP. WPA-compatible and WPA2-compatible devices can operate in enterprise mode or in a personal, home/small office configuration, as explained in the following points:
§ Enterprise mode provides authentication by using IEEE 802.1X and EAP. In the enterprise mode, wireless devices have two sets of keys: session keys and group keys. Session keys are unique to each association between an access point and a wireless client. They are used to create a private virtual port between the access point and the client. Group keys are shared among all clients connected to the same access point. Both sets of keys are generated dynamically and are rotated to help safeguard the integrity of keys over time.
§ Personal mode provides authentication via a preshared key or password. In a personal, home/small office configuration, WPA uses a preshared encryption key rather than a changing encryption key. Here, the user enters a master key (the group key) into the access point and then configures all the other wireless devices to use this master key. A wireless device uses the master key as a starting point to generate the session key mathematically. It then regularly changes the session key so that the same session key is never used twice. Because the key rotation is automatic, key management is handled in the background.
§ WPA and WPA2 are fully compatible with 802.11a, 802.11b, 802.11g, and 802.11n. Many wireless devices that shipped before WPA and WPA2 became available can be made fully compatible with WPA and WPA2 through a software upgrade. With WPA, no additional modifications are necessary. The same is not necessarily true with WPA2, because some wireless devices might require processor or other hardware upgrades to be able to perform the computationally intensive Advanced Encryption Standard (AES) encryption.
When working with WPA and WPA2, keep the following in mind:
§ All products that are Wi-Fi certified for WPA2 are interoperable with products that are Wi-Fi certified for WPA.
§ Both WPA and WPA2 have personal and enterprise modes of operation.
§ Both WPA and WPA2 use 802.1X and EAP for authentication.
§ WPA provides strong data encryption via Temporal Key Integrity Protocol (TKIP).
§ WPA2 provides enhanced data encryption via AES, which makes it possible for WPA2 to meet the Federal Information Processing Standard (FIPS) 140-2 requirement of some government agencies.
NOTE
Both WPA and WPA2 offer a high level of security to help ensure that private data remains private and that access to wireless networks is restricted to authorized users. Only WPA2 provides strong encryption through AES, which is a requirement for some corporate and government users.
Another advanced wireless security technology is Robust Security Network (RSN), which is supported by 802.11i-compatible devices. RSN enables wireless devices to negotiate their authentication and encryption algorithms dynamically. This means that the authentication and encryption algorithms used by RSN-compatible devices can be changed. New authentication techniques and algorithms can be added to address security issues. RSN is based on EAP and AES.
Installing and configuring a wireless adapter
Other than mobile devices with built-in wireless adapters, the two main types of wireless adapters you’ll use are PC cards for laptops and PCI cards for desktops. These adapters are the easiest to configure—and I’ve found them to be the most reliable. The other type of wireless adapter that you might encounter is a device that connects to a laptop or desktop computer with a USB cable. When using USB wireless devices, keep in mind that there are several USB specifications, including USB 2.0 and USB 3.0, the faster, newer specification. A wireless device that complies with USB 3.0 must be connected to a USB 3.0 port to function properly and at the speeds you expect.
As part of the installation process, most installation software will help you configure the wireless device. In the process, you might need to specify the name of the wireless network to which you want to connect and the mode in which the wireless device will run. Wireless adapters can run in one of two operating modes:
§ Ad hoc In ad hoc mode, you configure the wireless adapter to connect directly to other computers with wireless adapters.
§ Infrastructure In infrastructure mode, you configure the wireless adapter for use on a wireless network. In this configuration, the adapter expects to connect to an access point rather than to another computer directly.
After you specify the adapter mode, you might need to specify the encryption key that will be used. If your organization uses WEP security, in most cases you will have to enter the required encryption key, which is usually referred to as the network key. With WPA/WPA2 security, you most often use a certificate or a smart card to supply the required encryption key.
Working with wireless networks and wireless connections
After you’ve completed the installation of the device, you should be able to connect over the wireless network. Much like a wired network card, which has an Ethernet connection, a wireless network card has a Wi-Fi connection that is in turn connected to a specific network that is designated as a public network, private network, or domain network. If a computer has both a wired and a wireless connection, it might have two active connections: one to a wired network and one to a wireless network.
Wi-Fi connections provide the following additional details about the network and the connection:
§ The name of the wireless network in parentheses after the connection type designator
§ The current signal strength (signal strength of one bar is poor; signal strength of five bars is excellent)
§ A Disconnect link for disconnecting the wireless connection
To view the settings for a wireless connection, complete these steps:
1. In Control Panel, tap or click View Network Status And Tasks under the Network And Internet heading.
2. In the left pane in Network And Sharing Center, tap or click Change Adapter Settings.
3. Network Connections displays a list of all network connections configured for use on the computer. Press and hold or right-click the wireless connection with which you want to work, and then tap or click Properties.
4. You’ll get a dialog box similar to the one shown in Figure 10-11. You can use the Wi-Fi Status dialog box to check the status of the connection and to maintain the connection, in much the same way as you can for other types of connections. The duration and speed of the connection is also displayed.
Figure 10-11. Determine the status and signal strength of a wireless network connection.
As with Ethernet connections, Wi-Fi connections have configurable properties. This means that every discussion about configuring network connection properties also applies to Wi-Fi connections. You can do the following:
§ Install and uninstall networking features for clients, services, and protocols. In the Wi-Fi Status dialog box, tap or click Wireless Properties, and then tap or click Install or Uninstall as appropriate.
§ Set TCP/IPv6 and TCP/IPv4 settings for DHCP, static IP, and dynamic IP addressing. In the Wi-Fi Status dialog box, tap or click Properties, and then double-tap or double-click Internet Protocol Version 6 (TCP/IPv6) or Internet Protocol Version 4 (TCP/IPv4).
§ Disable or diagnose wireless connections. In the Wi-Fi Status dialog box, tap or click Disable or Diagnose as appropriate.
If you have problems establishing a wireless connection and automated diagnostics can’t resolve the problem, use these tips to help you troubleshoot:
§ Problem: Limited or no connectivity to the wireless network.
Resolution: Check the signal strength. If the signal strength is low (poor), you need to move closer to the access point or redirect your antenna. For a built-in antenna, you might need to change the position of the mobile device relative to the access point. The problem could also be that the network did not connect and configure network addressing properly. To check the connection state, tap or click the connection link in Network And Sharing Center, and then review the connection status in the Status dialog box. If the media state is not set to Enabled, tap or click Diagnose to try to resolve the problem by using automatic network diagnostics.
§ Problem: Not connected or unable to connect to the wireless network.
Resolution: If you are out of the broadcast area, your computer will not be able to connect to the wireless network. Tap or click the Network notification icon on the taskbar. The computer will display the Networks sidebar, where you can determine whether networks are available and in range. You also can verify that Airplane Mode is turned off. No connections are possible when Airplane Mode is enabled. To connect to a Wi-Fi network, tap or click a connection, and then tap or click Connect. If you are unable to connect to the network or don’t find the network in the list, try moving closer to the access point or changing the position of your antenna or computer relative to the access point. The computer also might not be configured properly for establishing a wireless connection on this network.
TIP
You’ll have better connection speeds—up to the maximum possible with the wireless technology you are using—when you have a stronger signal. If the signal strength is weak, the connection speed might be reduced considerably. To improve the signal strength, try moving the adapter’s antenna (if one is available) or try changing the position of the computer relative to the access point.
Connecting to wireless networks
Any wireless access point broadcasting within range should be available to a computer with a wireless adapter. By default, Windows 8.1 automatically determines the appropriate settings. If a connection requires a password or other credentials, you are prompted for the credentials when you try to connect to the wireless network. You can also preconfigure wireless connections for users. This enables you to configure different authentication, encryption, and communication options as necessary.
You can preconfigure a connection for a wireless network by completing the following steps:
1. In Network And Sharing Center, tap or click Set Up A New Connection Or Network. This starts the Set Up A Connection Or Network Wizard.
2. Select Manually Connect To A Wireless Network, and then tap or click Next.
You now need to enter information about the wireless network to which you want to connect. Your network administrator should have this information.
3. In the Network Name box, enter the network name (also referred to as the network’s secure identifier, or service set identifier [SSID]).
4. Use the Security Type list to select the type of security being used. The encryption type is then filled in automatically for you.
5. With WEP and WPA-Personal, you must enter the required security key or password phrase in the Security Key box. For example, a WEP key typically is one of the following:
o 5 case-sensitive characters
o 13 case-sensitive characters
o 10 hexadecimal, case-insensitive characters
o 26 hexadecimal, case-insensitive characters
6. By default, the connection is started automatically whenever the user logs on. If you also want the computer to connect to the network regardless of whether the network can be reached—for example, when the computer is out of range of the wireless base—select Connect Even If The Network Is Not Broadcasting. If you don’t select this option, the connection is listed on the Networks panel only when the network is within range and broadcasting its SSID.
7. Tap or click Next, and then tap or click Close.
Typically, when you are within the broadcast range of a wireless network, you won’t need to preconfigure a connection and can instead connect directly, letting Windows determine the correct settings. To connect to a wireless network, complete the following steps:
1. Tap or click the Network notification icon on the taskbar; or slide in from the right side of the screen, tap Settings, and then tap the Network icon.
2. On the Networks panel, under the Wi-Fi heading, available wireless networks are listed by name, status, and signal strength.
3. You can now connect to or disconnect from a wireless network:
o To connect to a wireless network, select the network, and then tap or click Connect.
o To disconnect from a wireless network, select the network, and then tap or click Disconnect.
Managing and troubleshooting wireless networking
You can manage wireless networks by using the Network panel. If you press and hold or right-click a wireless connection, you have additional management options:
§ Show Estimated Data Usage Shows the estimated amount of data transferred over the connection. Tap or click Reset to reset the data usage counter.
§ Set As Metered Connection Specifies that the connection is metered, so that Windows 8.1 applies rules and policies for metered connections.
§ Set As Non-Metered Connection Specifies that the connection is not metered, so that Windows 8.1 no longer applies rules and policies for metered connections.
§ Forget This Network Removes a saved connection from the list of available connections. This is useful if a manually created connection is no longer needed.
§ Turn Sharing On Or Off Enables you to specify whether you want to turn on sharing between computers and connect to devices on this network.
§ View Connection Properties Opens the Properties dialog box for the connection with the Security tab selected. This provides a quick way to view or modify the security settings.
Windows 8.1 includes many tools for troubleshooting and testing network connectivity. The Troubleshooting and testing network settings section in Chapter 9, discusses techniques for diagnosing and resolving network issues. On wireless networks, you’ll encounter similar issues. In addition to reviewing those troubleshooting techniques, you’ll also want to do the following:
§ Review the security configuration for the wireless network and check that the settings are correct. Reenter the security key or passphrase.
§ Ensure that the wireless device is positioned correctly and within range of the wireless access point. You might want to try moving the computer closer to the access point.
§ Ensure that there is no interference from other devices that use the same transmission range or from other devices that create magnetic fields. You might want to move or turn off devices that could be causing interference.
All materials on the site are licensed Creative Commons Attribution-Sharealike 3.0 Unported CC BY-SA 3.0 & GNU Free Documentation License (GFDL)
If you are the copyright holder of any material contained on our site and intend to remove it, please contact our site administrator for approval.
© 2016-2026 All site design rights belong to S.Y.A.