Windows 8.1 Administration Pocket Consultant: Storage, Security, & Networking (2014)
Chapter 2. Using TPM and BitLocker Drive Encryption
§ Creating trusted platforms
§ BitLocker Drive Encryption: the essentials
§ Managing BitLocker Drive Encryption
Many of the security features built into the Windows 8.1 operating system are designed to protect a computer from attacks by individuals accessing the computer over a network or from the Internet. But what about when individuals have direct physical access to a computer or your data? In these instances, Windows security safeguards don’t apply. If someone can start a computer—even if it’s to another operating system he has installed—he could gain access to any data stored on the computer, perhaps even your organization’s most sensitive data. In addition, with the increased use of USB flash drives, users often take their data with them, and if they lose the USB flash drive, the data typically has no protection, meaning that anyone who finds the flash drive could read and access the data.
To protect computers and data in these instances, Windows 8.1 includes Measured Boot, BitLocker Drive Encryption, BitLocker To Go, and the Trusted Platform Module (TPM) Services architecture. Together these features help protect computers and data stored on USB flash drives. BitLocker Drive Encryption is a full-volume encryption technology. BitLocker To Go is a virtual-volume encryption technology for USB flash drives. TPM is a feature you can use with BitLocker Drive Encryption to enhance security.
Creating trusted platforms
A computer running Windows 8.1 must be equipped with a compatible TPM in addition to compatible firmware to take advantage of TPM Services. Windows 8.1 supports TPM version 1.2 or later and requires firmware that is compliant with the Trusted Computing Group (TCG). Firmware that is TCG-compliant supports the Static Root of Trust Measurement as defined by the TCG. For some configurations of TPM and BitLocker Drive Encryption, you also need to be sure that the firmware supports reading USB flash drives at startup.
TPM: the essentials
Windows 8.1 includes the Encrypting File System (EFS) for encrypting files and folders. By using EFS, users can protect sensitive data so that it can be accessed only with their public key certificate. Encryption certificates are stored as part of the data in a user’s profile. If users have access to their profiles and the encryption keys they contain, they can access their encrypted files.
Although EFS offers excellent data protection, it doesn’t safeguard a computer from attack by someone who has direct physical access. In a situation in which a user loses a computer, a computer is stolen, or an attacker is logging on to a computer, EFS might not protect the data because the attacker might be able to gain access to the computer before it boots. She could then access the computer from another operating system and change the computer’s configuration. She might then be able to hack into a logon account on the original operating system and log on as the user, or configure the computer so that she can log on as a local administrator. Either way, the attacker could eventually gain full access to a computer and its data.
To seal a computer from physical attack and wrap it in an additional layer of protection, Windows 8.1 includes the TPM Services architecture. TPM Services protect a computer by using a dedicated hardware component called a TPM. A TPM is a microchip that is usually installed on the motherboard of a computer, where it communicates with the rest of the system by using a hardware bus. Computers running Windows 8.1 can use a TPM to provide enhanced protection for data, to ensure early validation of the boot file’s integrity, and to guarantee that a disk has not been tampered with while the operating system was offline.
A TPM has the ability to create cryptographic keys and encrypt them so that they can be decrypted only by the TPM. This process, referred to as wrapping or binding, protects the key from disclosure. A TPM has a master “wrapping” key called the storage root key (SRK). The SRK is stored within the TPM to ensure that the private portion of the key is secure.
Computers that have a TPM can create a key that has been not only wrapped but sealed. The process of sealing the key ensures that the key is tied to specific platform measurements and can be unwrapped only when those platform measurements have the same values they had when the key was created. This is what gives TPM-equipped computers increased resistance to attack.
Because the TPM stores private portions of key pairs separately from memory controlled by the operating system, keys can be sealed to the TPM to provide absolute assurances about the state of a system and its trustworthiness. TPM keys are unsealed only when the integrity of the system is intact. Further, because the TPM uses its own internal firmware and logic circuits for processing instructions, it does not rely on the operating system and is not subject to external software vulnerabilities.
The TPM can also be used to seal and unseal data that is generated outside the TPM, and this is where the true power of the TPM lies. In Windows 8.1, the feature that accesses the TPM and uses it to seal a computer is called BitLocker Drive Encryption. Although BitLocker Drive Encryption can be used in both TPM and non-TPM configurations, the most secure method is to use TPM.
When you use BitLocker Drive Encryption and a TPM to seal the boot manager and boot files of a computer, the boot manager and boot files can be unsealed only if they are unchanged from the time when they were last sealed. This means that you can use the TPM to validate a computer’s boot files in the pre–operating system environment. When you seal a hard disk by using TPM, the hard disk can be unsealed only if the data on the disk is unchanged since it was last sealed. This guarantees that a disk has not been tampered with while the operating system was offline.
When you use BitLocker Drive Encryption but do not use a TPM to seal the boot manager and boot files of a computer, TPM cannot be used to validate a computer’s boot files in the pre–operating system environment. This means that in this instance, there is no way to guarantee the integrity of the boot manager and boot files of a computer.
TPM: management and policies
Windows 8.1 provides several tools for working with a TPM, including the following:
§ Trusted Platform Module Management A console for configuring and managing a TPM. You can access this tool by typing tpm.msc in the Apps Search box, and then pressing Enter.
§ Manage The TPM Security Hardware A wizard for creating the required TPM owner password. You can access this tool by typing tpminit in the Apps Search box, and then pressing Enter.
NOTE
REAL WORLD Access to the Trusted Platform Module Management console can be restricted in Group Policy. If you are unable to open the console, check whether a Group Policy Object (GPO) being processed includes Management Console restrictions under Windows Components\Microsoft Management Console.
To perform TPM management tasks on a local computer, you must be a member of the local computer’s Administrators group or be logged on as the local computer administrator. When you are working with Trusted Platform Module Management, you can determine the exact state of the TPM. If you try to start Trusted Platform Module Management without turning on TPM, you’ll get an error stating this. You’ll also get an error if you try to run the Initialize The TPM Security Hardware Wizard without turning on TPM.
You will be able to perform management tasks with the TPM tools only when you’ve turned on TPM in firmware. When you are working with the Trusted Platform Module Management console, shown in Figure 2-1, you should note the TPM status and the TPM manufacturer information. The TPM status indicates the exact state of the TPM (see Table 2-1). The TPM manufacturer information shows whether the TPM supports specification version 1.2 or 2.0. Support for TPM version 1.2 or later is required.
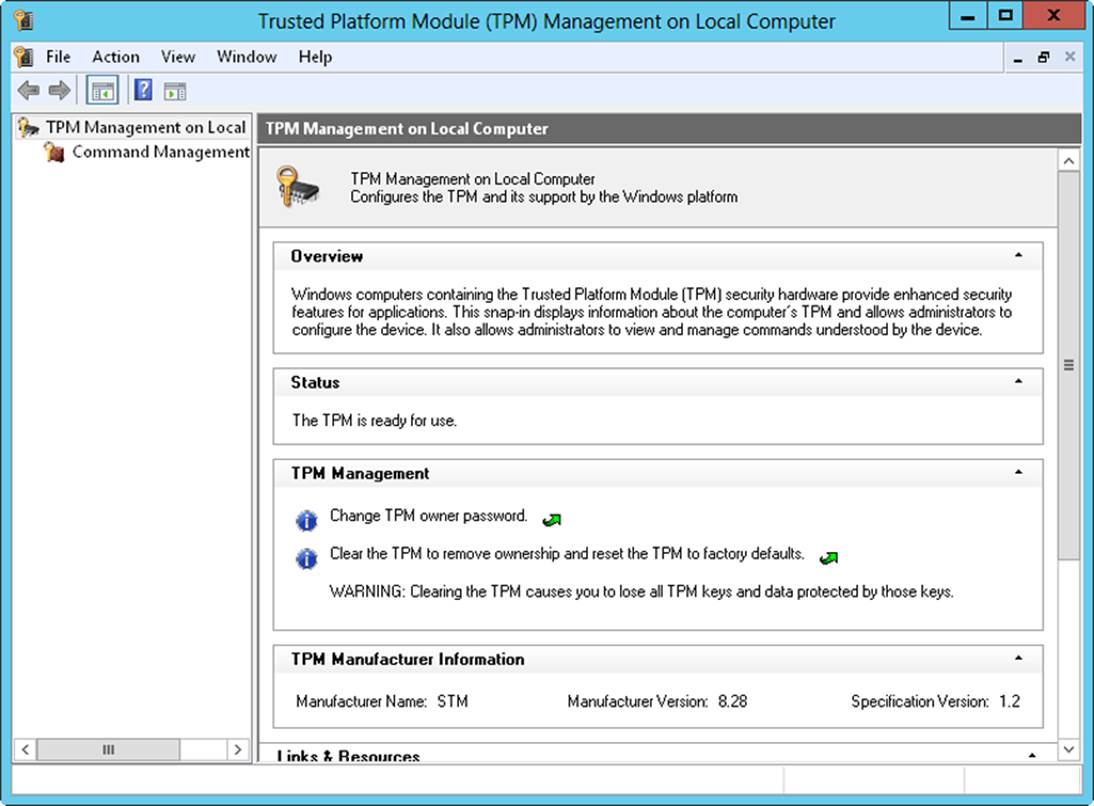
Figure 2-1. Use the Trusted Platform Module Management console to initialize and manage TPM.
Table 2-1. Understanding TPM states
|
TPM STATES |
DESCRIPTION |
|
The TPM is on and ownership has not been taken. |
The TPM is turned on in firmware but hasn’t been initialized yet. |
|
The TPM is on and ownership has been taken. |
The TPM is turned on in firmware and has been initialized. |
|
The TPM is off and ownership has not been taken. |
The TPM is turned off in software and hasn’t been initialized yet either. |
|
The TPM is off and ownership has been taken. |
The TPM has been initialized but is turned off in software. |
NOTE
Although earlier releases of Windows showed the exact TPM state, Windows 8.1 typically shows either a status of “The TPM is ready for use” or “The TPM is not ready for use.” If the TPM is ready for use, the TPM is on and ownership has been taken.
By default, Windows 8.1 and Windows Server 2012 R2 store full TPM owner authorization information in the registry of the local computer. This significant change enables administrators of the local computer to perform TPM management tasks without having to provide the TPM owner password.
The Configure The Level Of TPM Owner Authorization Information Available To The Operating System policy controls the level of authorization information stored in the registry. This policy is found in the Administrative Templates policies for Computer Configuration under System\Trusted Platform Module Services. This policy has three enabled settings:
§ Full The full TPM owner authorization, the TPM administrative delegation blob, and the TPM user delegation blob are stored in the registry. This setting enables a TPM to be used without requiring remote or external storage of the TPM owner authorization. Note that TPM-based applications designed for earlier versions of Windows or that rely on TPM anti-hammering logic might not support full TPM owner authorization in the registry.
§ Delegated Only the TPM administrative delegation blob and the TPM user delegation blob are stored in the registry. This level is appropriate for TPM-based applications that rely on TPM anti-hammering logic. When you use this setting, Microsoft recommends that you remotely or externally store the TPM owner authorization.
§ None No TPM owner authorization information is stored in the registry. Use this setting for compatibility with earlier releases of Windows and for applications that require external or remote storage of the TPM owner authorization. When this setting is used, remote or external storage of the TPM owner authorization is required, just as it was in earlier releases of Windows.
CAUTION
If you change the policy setting from Full to Delegated or vice versa, the full TPM owner authorization value is regenerated and any copies of the original TPM value will be invalid.
When this policy is set to Delegated or None, you’ll be prompted for the TPM owner password before you are able to perform most TPM administration tasks (see Figure 2-2).
With earlier releases of Windows, Microsoft recommended remotely storing the TPM owner authorization in Active Directory Domain Services (AD DS) for domain-joined computers, which could be accomplished by enabling the Turn On TPM Backup To Active Directory Domain Services policy, extending schema for the directory, and setting appropriate access controls.
Enabling backup to Active Directory changes the default way TPM owner information is stored. Specifically, when Turn On TPM Backup To Active Directory Domain Services is enabled and Configure The Level Of TPM Owner Authorization Information Available To The Operating System is disabled or not configured, only the TPM administrative delegation blob and the TPM user delegation blob are stored in the registry. Here, to store the full TPM owner information, you must use the enabled setting of Full (or disable Active Directory backup of the TPM owner authorization).
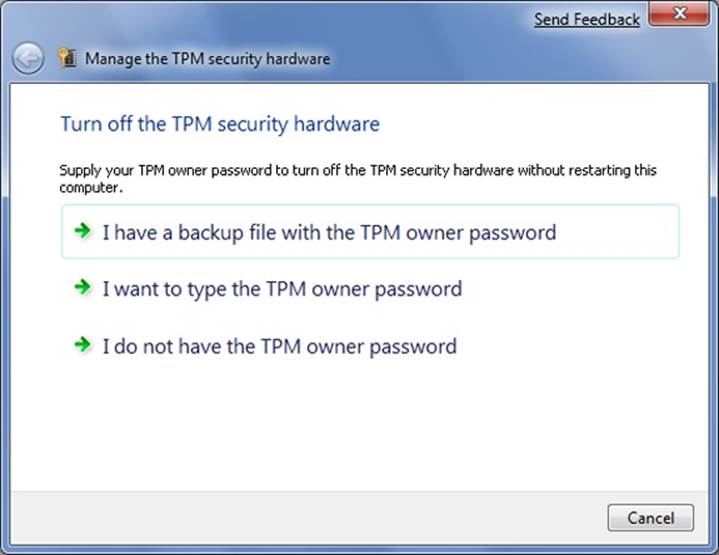
Figure 2-2. Supply the TPM owner password, if prompted for one.
Related policies under System\Trusted Platform Module Services include:
§ Ignore The Default List Of Blocked TPM Commands
§ Ignore The Local List Of Blocked TPM Commands
§ Standard User Lockout Duration
§ Standard User Individual Lockout Threshold
§ Standard User Total Lockout Threshold
These policies control the way command block lists are used and when lockout is triggered after multiple failed authorization attempts. An administrator can fully reset all lockout-related parameters in the Trusted Platform Module Management console. On the Action menu, tap or click Reset TPM Lockout. When the full TPM owner authorization is stored in the registry, you don’t need to provide the TPM owner password. Otherwise, follow the prompts to provide the owner password or select the file containing the TPM owner password.
Enabling TPM
The TPM Services architecture in Windows 8.1 provides the basic features required to configure and deploy TPM-equipped computers. This architecture can be extended with a feature called BitLocker Drive Encryption, which is discussed in the section BitLocker Drive Encryption: the essentials later in this chapter.
Before you can use TPM, you must enable TPM in firmware. In some cases, computers that have TPM might ship with it already enabled. In most cases, however, you’ll find that TPM is not enabled by default.
With one of my computers, I needed to do the following:
1. Start the computer, and then press F2 during startup to access the firmware. In the firmware, I accessed the Advanced screen and then the Peripheral Configuration screen.
2. On the Peripheral Configuration screen, Trusted Platform Module was listed as an option. After scrolling down to highlight this option, I pressed Enter to display an options menu. From the menu, I chose Enable, and then pressed Enter.
3. To save the changes to the setting and exit the firmware, I pressed F10. When prompted to confirm that I wanted to exit, I pressed Y, and the computer then rebooted.
With a different computer, I needed to do the following:
1. Start the computer, and then press F2 during startup to access the firmware. In the firmware, I accessed the Security menu and then the TPM Security screen (see Figure 2-3).
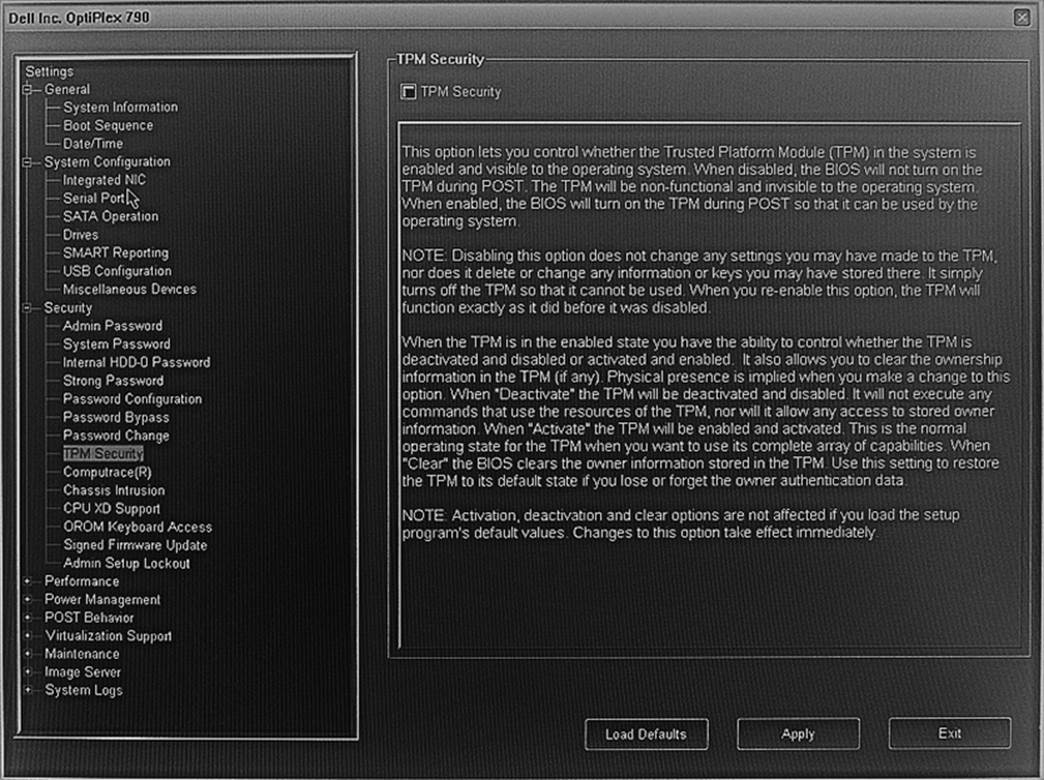
Figure 2-3. Enable the TPM in firmware, as necessary.
2. On the TPM Security screen, I needed to select the TPM Security check box, and tap or click Apply.
3. A prompt reminded me that I needed to turn off and then restart the computer for TPM security to be fully enabled.
4. When I exited firmware, the computer rebooted.
Next, you need to initialize and prepare the TPM for first use in software. As part of this process, you take ownership of the TPM, which sets the owner password on the TPM. After TPM is enabled, you can manage the TPM configuration.
Initializing and preparing a TPM for first use
Initializing a TPM configures it for use on a computer so that you can use the TPM to secure volumes on the computer’s hard drives. The initialization process involves turning on the TPM and then setting ownership of the TPM. By setting ownership of the TPM, you assign a password that helps ensure that only the authorized TPM owner can access and manage the TPM. The TPM password is required to turn off the TPM if you no longer want to use it, and to clear the TPM before the computer is recycled. In an Active Directory domain, you can configure Group Policy to save TPM passwords.
By using an administrator account, you can initialize the TPM and create the owner password by completing the following steps:
1. Start the Trusted Platform Module Management console. On the Action menu, tap or click Prepare The TPM to start the Manage The TPM Security Hardware Wizard (tpminit).
NOTE
If the Initialize The TPM Security Hardware Wizard detects firmware that does not meet Windows requirements for a TPM or a TPM is not found, you will not be able to continue and should check that the TPM has been turned on in firmware.
NOTE
REAL WORLD If a TPM was previously initialized and then cleared, you are prompted to restart the computer and follow on-screen instructions during startup to reset the TPM in firmware. The wizard should start again when you next log on; however, on my systems, this did not occur. Instead, when I clicked Restart, I needed to enter firmware by pressing F2 during startup. I then needed to disable TPM, save the changes, and exit firmware. This triggered an automatic reset. After this, I needed to enter firmware by pressing F2, which let me enable TPM, save changes, and then exit firmware. This triggered another automatic reset. When the operating system loaded, I logged on and then needed to restart the Initialize The TPM Security Hardware Wizard.
2. When the wizard finishes its initial tasks, you’ll get a prompt similar to the one shown in Figure 2-4. Tap or click Restart to restart the computer.
3. Typically, hardware designed for Windows 8.1 and Windows Server 2012 R2 can automatically complete the initialization process. On other hardware, you’ll need physical access to the computer to respond to the manufacturer’s firmware confirmation prompt. Figure 2-5 shows an example. Here, you must press F10 to enable and activate the TPM and allow a user to take ownership of the TPM.
4. When Windows starts and you log on, the Manage The TPM Security Hardware Wizard continues running. Windows will take ownership of the TPM. Setting ownership on the TPM prepares it for use with the operating system.
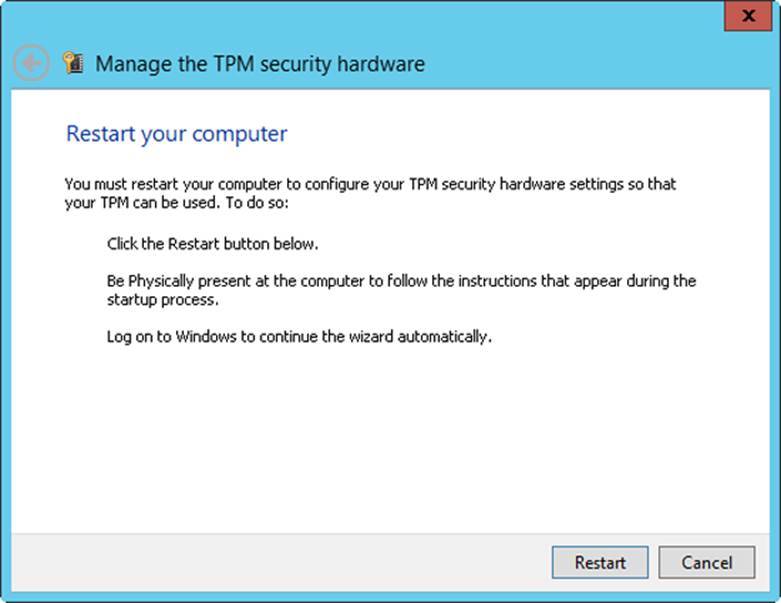
Figure 2-4. After the wizard prepares Windows to use TPM, you’ll need to restart the computer so that the TPM hardware can be initialized in firmware.
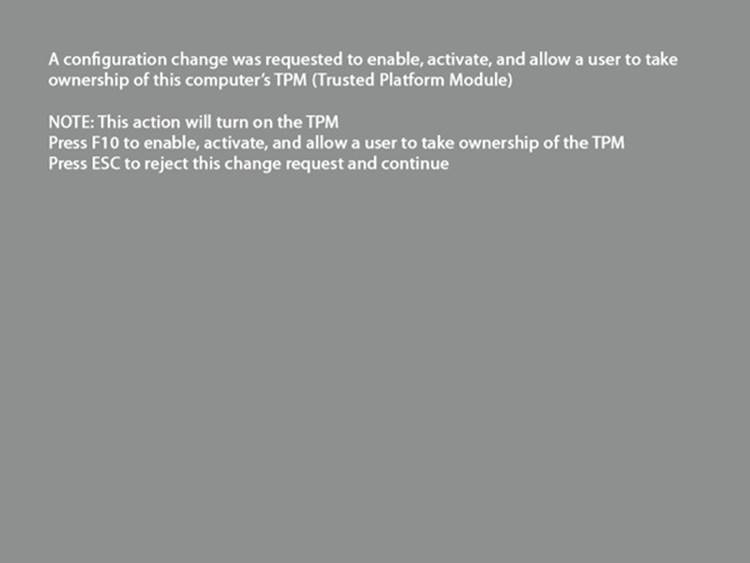
Figure 2-5. Confirm the configuration change when prompted.
5. After ownership is set, TPM is ready for use and you’ll receive confirmation of this, as shown in Figure 2-6.
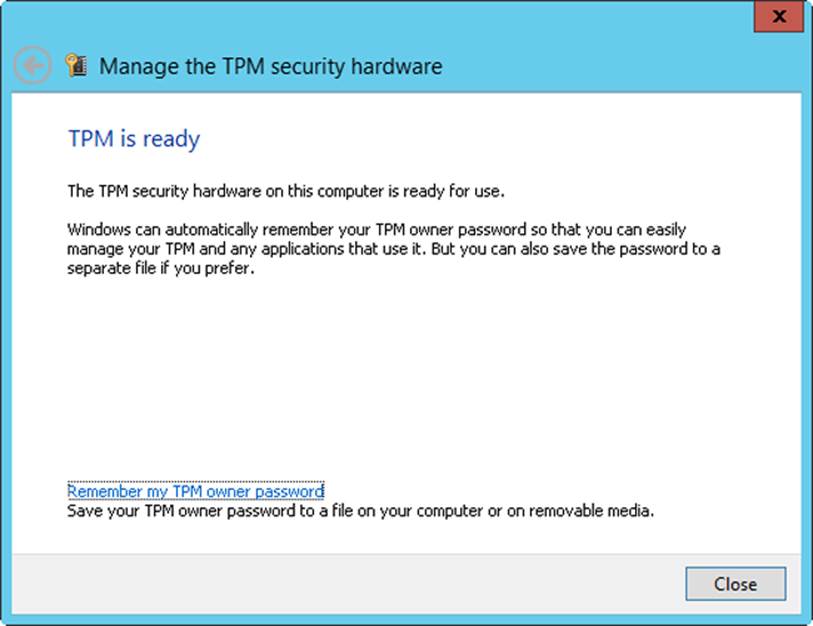
Figure 2-6. TPM ownership is set, and the TPM is ready for use.
6. Before tapping or clicking Close, you might want to save the TPM owner password. Tap or click Remember My TPM Owner Password. In the Save As dialog box, select a location to save the password backup file, and then tap or click Save.
7. In the TPM Management console, the status should be listed as “The TPM is ready for use.”
NOTE
By default, the password backup file is saved as ComputerName.tpm. Ideally, you should save the TPM ownership password to removable media, such as a USB flash drive, and store the media in a secure location. In a domain where the TPM Backup To Active Directory Domain Services policy is applied, you won’t have the option to save the TPM password. Here, the password is saved to Active Directory automatically.
NOTE
MORE INFO The password backup file is an unencrypted XML file that can be opened in any text editor to confirm the name of the computer to which the password belongs. In the following example, the password was created for ENGPC85:
<?xml version="1.0" encoding="UTF-8"?><tpmOwnerData
version="1.0" softwareAuthor="Microsoft Windows[Version 6.3]"
creationDate="2014-04-24T17:19:43-08:00"creationUser="ENGPC85\
Administrator" machineName="ENGPC85"> <tpmInfo
manufacturerId="1398033696"/> <ownerAuth>cBHECAgNV8Z2EBJbER
TSD87HJKL=</ownerAuth></tpmOwnerData>
Turning an initialized TPM on or off
Computers that have TPM might ship with TPM turned on. If you decide not to use TPM, you should take ownership of the TPM, and then turn off the TPM. This ensures that the operating system owns the TPM but that the TPM is in an inactive state. If you want to reconfigure or recycle a computer, you should clear the TPM. Clearing the TPM invalidates any stored keys, and data encrypted by these keys can no longer be accessed.
By using an administrator account, you can turn off TPM by completing the following steps:
1. Start the Trusted Platform Module Management console.
2. On the Action menu, tap or click Turn TPM Off.
3. When the full TPM owner authorization is stored in the registry, you don’t need to provide the TPM owner password. Otherwise, follow the prompts to provide the owner password or select the file containing the TPM owner password.
After you follow the previous procedure to turn off the TPM in software, you can turn on the TPM in software at any time by following the steps in the Initializing and preparing a TPM for first use section.
Clearing the TPM
Clearing the TPM erases information stored on the TPM and cancels the related ownership of the TPM. You should clear the TPM when a TPM-equipped computer is to be recycled. Clearing the TPM invalidates any stored keys, and data encrypted by these keys can no longer be accessed.
After clearing the TPM, you should take ownership of the TPM. This will write new information to the TPM. You might then want to turn off the TPM so it isn’t available for use.
By using an administrator account, you can clear the TPM, take ownership, and then turn off TPM by completing the following steps:
1. Start the Trusted Platform Module Management console. On the Action menu, tap or click Clear TPM. This starts the Manage the TPM Security Hardware Wizard.
CAUTION
Clearing the TPM resets it to factory defaults. As a result, you lose all keys and data protected by those keys. You do not need the TPM owner password to clear the TPM.
2. Read the warning on the Clear The TPM Security Hardware page, shown in Figure 2-7, and then tap or click Restart. Tap or click Cancel to exit without clearing the TPM.
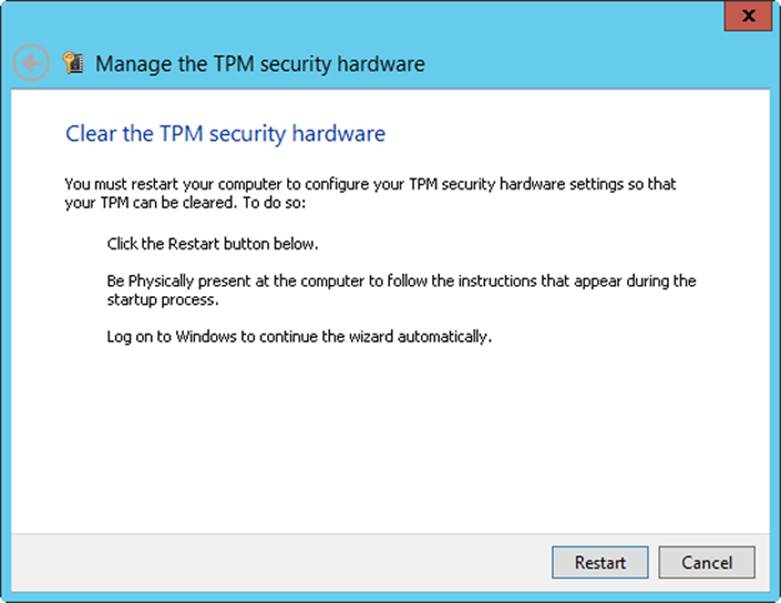
Figure 2-7. Tap or click Restart to confirm that you want to clear the TPM.
3. Typically, hardware designed for Windows 8.1 and Windows Server 2012 R2 can automatically complete the re-initialization process. On other hardware, you’ll need physical access to the computer to respond to the manufacturer’s firmware confirmation prompt. Figure 2-8 shows an example. Here, you must press F12 to clear, enable, and activate the TPM, or press ESC to cancel and continue loading the operating system.
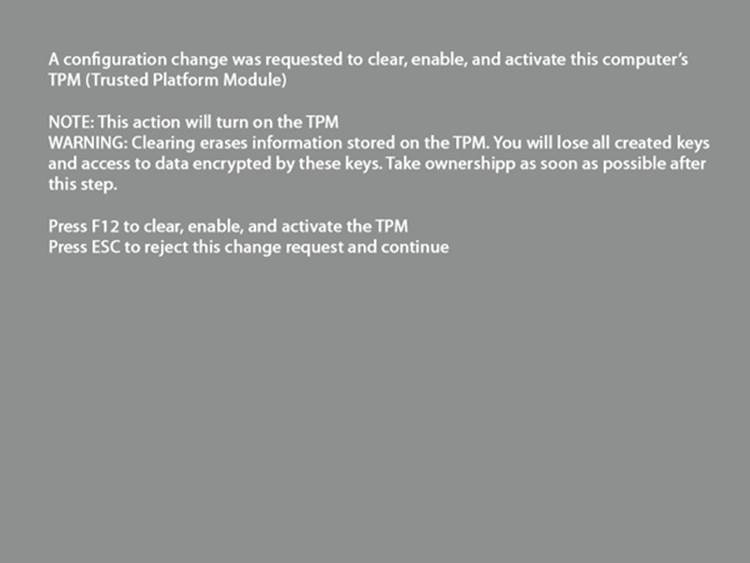
Figure 2-8. Confirm the configuration change when prompted.
4. Follow steps 4–7 in the Initializing and preparing a TPM for first use section.
Changing the TPM owner password
You can change the TPM password at any time. The key reason to do this is if you suspect that the TPM owner password has been compromised. Your company’s security policy also might require TPM owner password changes in certain situations.
To change the TPM owner password, complete the following steps:
1. Start the Trusted Platform Module Management console. On the Action menu, tap or click Change Owner Password. This starts the Manage The TPM Security Hardware Wizard.
2. When the full TPM owner authorization is stored in the registry, you don’t need to provide the TPM owner password. Otherwise, follow the prompts to provide the owner password or select the file containing the TPM owner password.
3. On the Create The TPM Owner Password page, shown in Figure 2-9, you can elect to create the password automatically or manually.
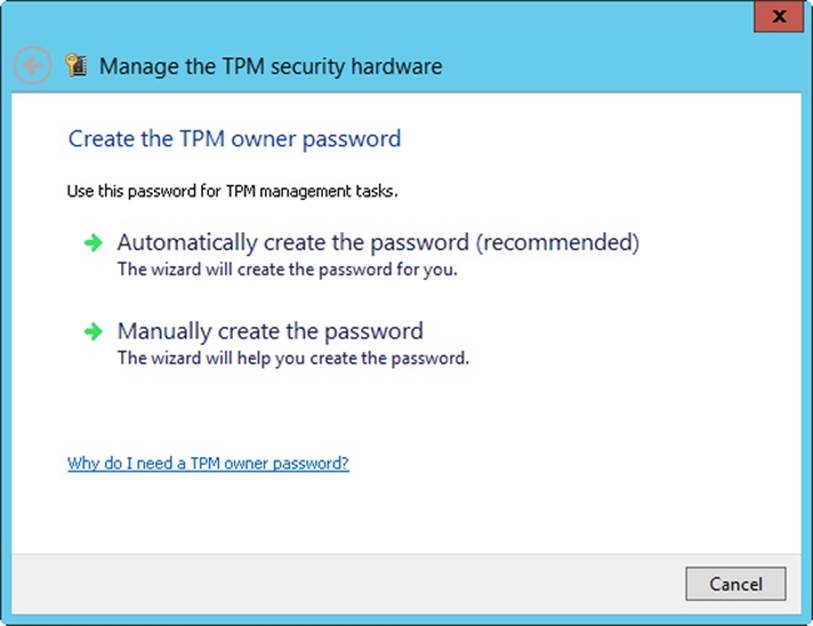
Figure 2-9. Create the new TPM owner password.
4. If you want the wizard to create the password for you, select Automatically Create The Password (Recommended). The new TPM owner password is displayed. Tap or click Change Password.
5. If you want to create the password, select Manually Create The Password. Enter and confirm a password of at least eight characters, and then tap or click Change Password.
6. Before tapping or clicking Close, you might want to save the TPM owner password. Tap or click Remember My TPM Owner Password. In the Save As dialog box, select a location to save the password backup file, and then tap or click Save.
BitLocker Drive Encryption: the essentials
BitLocker is built into all editions of Windows 8.1 and added as a feature for all editions of Windows Server. Although BitLocker Drive Encryption and BitLocker To Go are often referred to simply as BitLocker, they are separate but similar features. BitLocker Drive Encryption is designed to protect the data on the internal hard drives of lost, stolen, or inappropriately decommissioned computers and is a volume-level encryption technology. BitLocker To Go is designed to protect the data on removable data drives, such as external hard drives and USB flash drives, and is a virtual-volume encryption technology. Standard BitLocker encrypts by wrapping the entire volume or only the used portion of the volume in protected encryption. BitLocker To Go, on the other hand, creates a virtual volume on a USB flash drive. This virtual volume is encrypted by using an encryption key stored on the USB flash drive.
Understanding BitLocker Drive Encryption
On a computer without BitLocker Drive Encryption, a user with direct physical access to the computer has a variety of ways he could gain full control and then access the computer’s data, whether that data is encrypted with EFS or not. For example, a user could use a boot disk to boot the computer and reset the administrator password. A user could also install and then boot to a different operating system and then use this operating system to unlock the other installation.
BitLocker Drive Encryption prevents all access to a computer’s drives except by authorized personnel by wrapping entire drives or only the used portion of drives in tamper-proof encryption. If an unauthorized user tries to access a BitLocker-encrypted drive, the encryption prevents the user from viewing or manipulating the protected data in any way. This dramatically reduces the risk of an unauthorized person gaining access to confidential data through offline attacks.
IMPORTANT
BitLocker Drive Encryption is meant to be used when a computer is not in a physically secure location and requires additional protection. However, the encryption processes can reduce disk throughput, which in turn can affect a computer’s overall performance.
BitLocker Drive Encryption can use a TPM to validate the integrity of a computer’s boot manager and boot files at startup and to guarantee that a computer’s hard disk has not been tampered with while the operating system was offline. BitLocker Drive Encryption also stores measurements of core operating system files in the TPM.
Every time the computer is started, Windows validates the boot files, the operating system files, and any encrypted volumes to ensure that they have not been modified while the operating system was offline. If the files have been modified, Windows alerts the user and refuses to release the key required to access Windows. The computer then goes into Recovery mode, prompting the user to provide a recovery key before it permits access to the boot volume. The Recovery mode is also used if a BitLocker-encrypted disk drive is transferred to another system.
BitLocker Drive Encryption can be used in both TPM and non-TPM computers. If a computer has a TPM, BitLocker Drive Encryption uses the TPM to provide enhanced protection for that computer’s data and to ensure early boot file integrity. These features together help prevent unauthorized viewing and accessing of data by encrypting the entire Windows volume and by safeguarding the boot files from tampering. If a computer doesn’t have a TPM or its TPM isn’t compatible with Windows, BitLocker Drive Encryption can be used to encrypt entire volumes, and in this way protect the volumes from tampering. This configuration, however, doesn’t offer the added security of early boot file integrity validation.
On computers with a compatible TPM that is initialized, BitLocker Drive Encryption typically uses one of the following TPM modes:
§ TPM-Only In this mode, only TPM is used for validation. When the computer boots, TPM is used to validate the boot files, the operating system files, and any encrypted volumes. Because the user doesn’t need to provide an additional startup key, this mode is transparent to the user, and the user logon experience is unchanged. However, if the TPM is missing or the integrity of files or volumes has changed, BitLocker enters Recovery mode and requires the user to provide a recovery key or password to regain access to the boot volume.
§ TPM and PIN In this mode, both TPM and a user-entered numeric key are used for validation. When the computer boots, TPM is used to validate the boot files, the operating system files, and any encrypted volumes. The user must enter a PIN when prompted to continue startup. If the user doesn’t have the PIN or is unable to provide the correct PIN, BitLocker enters Recovery mode instead of booting to the operating system. As before, BitLocker also enters Recovery mode if the TPM is missing or the integrity of boot files or encrypted volumes has changed.
§ TPM and Startup Key In this mode, both TPM and a startup key are used for validation. When the computer boots, TPM is used to validate the boot files, the operating system files, and any encrypted volumes. The user must have a USB flash drive with a startup key to log on to the computer. If the user doesn’t have the startup key or is unable to provide the correct startup key, BitLocker enters Recovery mode. As before, BitLocker also enters Recovery mode if the TPM is missing or the integrity of boot files or encrypted volumes has changed.
§ TPM and Smart Card Certificate In this mode, both TPM and a smart card certificate are used for validation. When the computer boots, TPM is used to validate the boot files, the operating system files, and any encrypted volumes. The user must have a smart card with a valid certificate to log on to the computer. If the user doesn’t have a smart card with a valid certificate and is unable to provide one, BitLocker enters Recovery mode. As before, BitLocker also enters Recovery mode if the TPM is missing or the integrity of boot files or encrypted volumes has changed.
With Windows 8.1 and Windows Server 2012 R2, network unlock enables the system volume on a computer with TPM to be automatically unlocked on startup, if the computer is joined and connected to the domain. When it is not joined and connected to the domain, other means of validation can be used, such as a startup PIN.
On computers without a TPM or on computers that have incompatible TPMs, Windows 8.1 and Windows Server 2012 R2 can be configured to use an unlock password for the operating system drive. To configure this, you must enable the Configure Use Of Passwords For Operating System Drives policy in the Administrative Templates policies for Computer Configuration under Windows Components\BitLocker Drive Encryption. The unlock password can be configured with minimum length and complexity requirements. The default minimum password length is eight characters, meaning the password must be at least eight characters. Complexity requirements can be:
§ Always validated by using the Require Password Complexity setting.
§ Validated if possible by using the Allow Password Complexity setting.
§ Not validated by using the Do Now Allow Password Complexity setting.
The unlock password is validated when you enable BitLocker Drive Encryption and set the password, and whenever the password is changed by a user. With required complexity, you can only set a password (and enable encryption) when the computer can connect to a domain controller and validate the complexity of the password. With allowed complexity, the computer will attempt to validate the complexity of the password when you set it but will allow you to continue and enable encryption if no domain controllers are available.
On computers without a TPM or on computers that have incompatible TPMs, BitLocker Drive Encryption also can use Startup Key Only or Smart Card Certificate Only mode. Startup Key Only mode requires a USB flash drive containing a startup key. The user inserts the USB flash drive in the computer before turning it on. The key stored on the flash drive unlocks the computer.
Smart Card Certificate Only mode requires a smart card with a valid certificate. The user validates the smart card certificate after turning on the computer. The certificate unlocks the computer.
It’s also important to point out that standard users can reset the BitLocker PIN and password on operating system drives, fixed data drives, and removable data drives. If you don’t want standard users to be able to perform these tasks, enable the Disallow Standard Users From Changing The PIN Or Password policy. This Computer Configuration policy is found under Windows Components\BitLocker Drive Encryption\Operating System Drives.
Several important changes have been made to BitLocker Drive Encryption since the technology was first implemented. Specifically, you can do the following:
§ Encrypt FAT volumes and NTFS volumes. When you encrypt FAT volumes, you have the option of specifying whether encrypted volumes can be unlocked and viewed. This option is configured through Group Policy and is enabled when you turn on BitLocker. In the Administrative Templates policies for Computer Configuration under Windows Components\BitLocker Drive Encryption, there are separate policies for earlier versions of Windows that allow FAT-formatted fixed drives and FAT-formatted removable drives to be unlocked and viewed.
§ Allow a data-recovery agent to be used with BitLocker Drive Encryption. This option is configured through Group Policy. The data-recovery agent allows an encrypted volume to be unlocked and recovered by using a recovery agent’s personal certificate or a 48-digit recovery password. You can optionally save the recovery information in Active Directory. In the Administrative Templates policies for Computer Configuration, there are separate policies for operating system volumes, other fixed drives, and removable drives.
§ Deny write access to removable data drives not protected with BitLocker. This option is configured through Group Policy. If you enable this option, users have read-only access to unencrypted removable data drives and read/write access to encrypted removable data drives.
In a domain, domain administrators are the default data-recovery agents. A homegroup or workgroup has no default data-recovery agent, but you can designate one. Any user you want to designate as a data-recovery agent needs a personal encryption certificate. You can generate a certificate by using the Cipher utility and then use the certificate to assign the data-recovery agent in Local Security Policy under Public Key Policies\BitLocker Drive Encryption.
Earlier releases of Windows support AES encryption with a diffuser. Windows 8 and Windows 8.1 move away from this to support standard AES with 128-bit encryption by default or 256-bit encryption (if you enable the Choose Drive Encryption Method And Cipher Strength policy to set the cipher strength to 256-bit encryption). The cipher strength must be set prior to turning on BitLocker. Changing the cipher strength has no effect if the drive is already encrypted or encryption is in progress.
Hardware encryption, secure boot, and network unlock
Most BitLocker-related settings are controlled with the Administrative Templates policies for Computer Configuration under Windows Components\BitLocker Drive Encryption. Windows 8.1 supports disk drives with hardware encryption (referred to as encrypted hard drives). Encryption in hardware is faster and moves the processing burden from the computer’s processor to the hardware processor on the hard drive. By default, if a computer has hardware encryption, Windows 8.1 will use it with BitLocker.
In Group Policy, you can precisely control whether to permit software-based encryption when hardware encryption is not available and whether to restrict encryption to those algorithms and cipher strengths supported by hardware. Do this by enabling the Configure Use Of Hardware-Based Encryption For Fixed Data Drives policy and configuring the related options. When the policy is enabled, you must specifically allow software-based encryption when hardware-based encryption isn’t available.
NOTE
MORE INFO The Choose Drive Encryption Method And Cipher Strength policy doesn’t apply to hardware-based encryption. You can set the encryption methods you want for hardware-based policy under Fixed Data Drives in the Configure Use Of Hardware-Based Encryption For Fixed Data Drives policy. With hardware-based encryption, the encryption algorithm is set when the drive is partitioned.
Next, you might want to configure policy to control the permitted encryption types. Windows 8.1 allows users to encrypt full volumes or used space only. Encrypting full volumes takes longer, but it’s more secure because the entire volume is protected. Encrypting used space protects only the portion of the drive used to store data. By default, either option can be used. If you want to allow only one type or the other, enable and configure related Enforce Drive Encryption Type policy for BitLocker. There are separate Enforce Drive Encryption Type policies for the operating system, fixed data drives, and removable data drives.
NOTE
REAL WORLD In high-security environments, you will want to encrypt entire volumes. At the time of this writing, and unless fixed with a future update or service pack, deleted files appear as free space when you encrypt used space only. As a result, until the files are wiped or overwritten, information in the files could be recovered with certain tools.
Operating system drives are handled as special cases. Windows 8.1 enables you to pre-provision BitLocker so that you can turn on encryption prior to installation. Windows 8.1 also can be configured to do the following:
§ Require additional authentication at startup. If you enable and configure the related policy, Require Additional Authentication At Startup, user input is required, even if the platform lacks a pre-boot input capability. To enable a USB keyboard to be used on such a platform in the pre-boot environment, you should set the Enable Use Of BitLocker Authentication Requiring Preboot Keyboard Input On Slates policy to Enabled.
§ Allow secure boot for integrity validation. Secure boot is used by default to verify Boot Configuration Data (BCD) settings according to the TPM validation profile settings (also referred to as Secure Boot policy). When you use secure boot, the settings of the Use Enhanced Boot Configuration Data Validation Profile policy are ignored (unless you specifically disable secure boot support by setting Allow Secure Boot For Integrity Validation to Disabled).
You set TPM validation profile settings by platform. For BIOS-based firmware, you use the Configure TPM Platform Validation Profile For BIOS-Based Firmware Configurations policy. For firmware based on Unified Extensible Firmware Interface (UEFI), you use the Configure TPM Platform Validation Profile For Native UEFI Firmware Configurations policy. When you enable these policies, you specify exactly which platform configuration registers to validate during boot (see Figure 2-10).
For BIOS-based firmware, Microsoft recommends validating Platform Configuration Registers (PCRs) 0, 2, 4, 8, 9, 10, and 11. For UEFI firmware, Microsoft recommends validating PCRs 0, 2, 4, 7, and 11. In both instances, PCR 11 validation is required for BitLocker protection to be enforced. PCR 7 validation is required to support secure boot with UEFI (and you’ll need to enable this by selecting the related option).
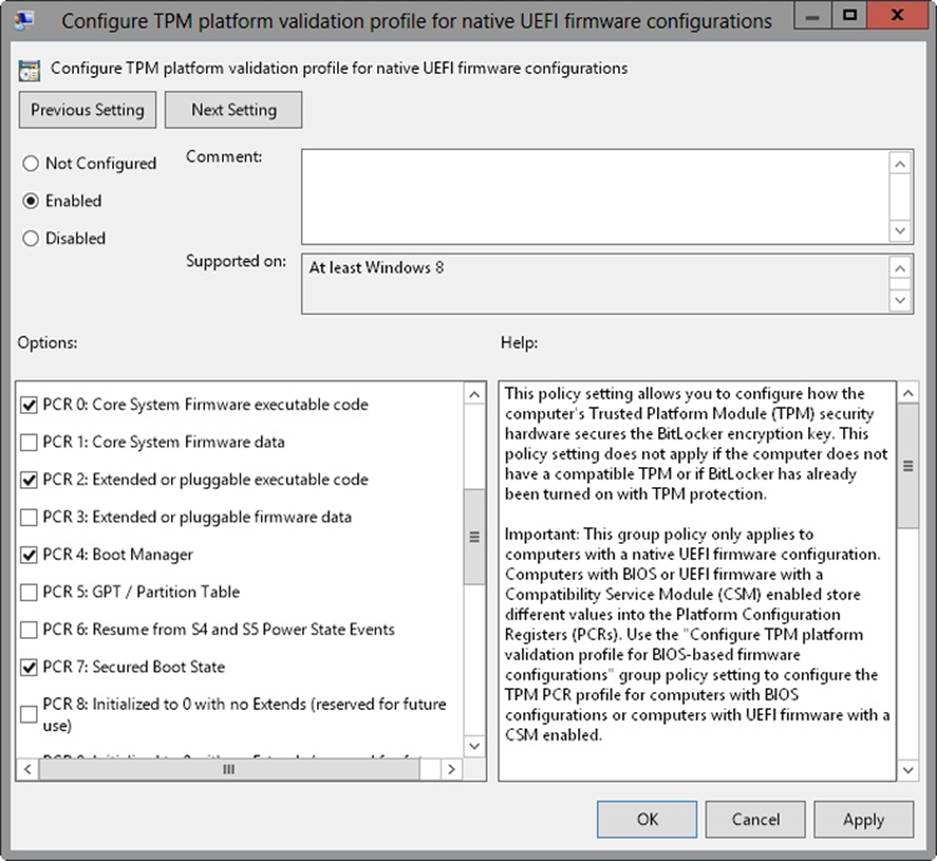
Figure 2-10. Specify the PCRs to validate.
IMPORTANT
Like Windows 8, Windows 8.1 is designed to be run on computers with UEFI. As discussed in Chapter 1, UEFI doesn’t replace all the functionality in either BIOS or EFI and can, in fact, be wrapped around BIOS or EFI. When a computer has UEFI and is running Windows 8.1, UEFI is the first link in the chain of trust for secure boot. UEFI 2.3.1 and later are able to run internal integrity checks that verify the firmware’s digital signature before running it. If the firmware’s digital signature has been modified or replaced (as an example, by a firmware rootkit), the firmware will not load.
With Secure Boot, firmware also verifies the digital signature on the Windows boot loader as part of initialization. If a rootkit is installed and the Windows boot loader has been modified, the computer will be prevented from starting. After the Secure Boot, the boot loader verifies the digital signature of the operating system kernel as part of Trusted Boot. Also as part of Trusted Boot, the kernel in turn verifies all remaining boot components, including boot drivers and startup files. Finally, Measured Boot allows third-party software running on a remote server to also verify the security of every startup component.
When you protect a computer with BitLocker, you can require additional authentication at startup. Typically, this means a user is required to have a startup key on a USB flash drive, a startup PIN, or both. The Network Unlock feature provides this additional layer of protection without requiring the startup key, startup PIN, or both by automatically unlocking the operating system drive when a computer is started, if the following conditions are met:
§ The BitLocker-protected computer has an enabled TPM.
§ The computer is on a trusted, wired network.
§ The computer is joined to and connected to a domain.
§ A Network Unlock server with an appropriate Network Unlock certificate is available.
Because the computer must be joined to and connected to the domain for network unlock to work, user authentication is still required when a computer is not connected to the domain. When connected to the domain, the client computer connects to a Network Unlock server to unlock the system drive. Typically, the Network Unlock server is a domain controller configured to use and distribute Network Unlock certificates to clients. The Network Unlock certificates in turn are used to create the network unlock keys.
You can configure a domain controller to distribute this certificate to clients. To do this, create an X.509 certificate for the server, for example by using Certmsg.mc, then use the BitLocker Driver Encryption Network Unlock Certificate setting to add this certificate to a GPO applied to the domain controller. You’ll find this Computer Configuration setting under Windows Settings\Security Settings\Public Key Policies.
Finally, Windows 8.1 also enables you to provision BitLocker during operating system deployment. You can do this from the Windows PreInstallation Environment (Windows PE). It’s important to point out that Windows PowerShell includes a DISM module that you can import. Because this module doesn’t support wildcards when searching for feature names, you can use the Get-WindowsOptionalFeature cmdlet to list feature names, as shown in this example:
get-windowsoptionalfeature -online | ft
To completely install BitLocker and related management tools, use the following command:
enable-windowsoptionalfeature -online -featurename bitlocker,bitlocker-
utilities, bitlocker-networkunlock -all
Deploying BitLocker Drive Encryption
Deploying BitLocker Drive Encryption in an enterprise changes the way administrators and users work with computers. A computer with BitLocker Drive Encryption usually requires user intervention to boot to the operating system—a user must enter a PIN, insert a USB flash drive containing a startup key, or use a smart card with a valid certificate. Because of this requirement, after you deploy BitLocker Drive Encryption, you can no longer be assured that you can perform remote administration that requires a computer to be restarted without having physical access to the computer—someone might need to be available to enter the required PIN, insert the USB flash drive with the startup key, or use a smart card with a valid certificate.
To work around this issue, you can configure network unlock on your trusted, wired networks. Before you use BitLocker Drive Encryption, you should perform a thorough evaluation of your organization’s computers. You need to develop plans and procedures for the following:
§ Evaluating the various BitLocker authentication methods and applying them as appropriate
§ Determining whether computers support TPM, and thus whether you must use TPM or non-TPM BitLocker configurations
§ Storing, using, and periodically changing encryption keys, recovery passwords, and other validation mechanisms used with BitLocker
You need to develop procedures for tasks such as these:
§ Performing daily operations with BitLocker-encrypted drives
§ Providing administrative support for BitLocker-encrypted drives
§ Recovering computers with BitLocker-encrypted drives
These procedures need to take into account the way BitLocker encryption works and the requirements to have PINs, startup keys, smart cards, and recovery keys available whenever you work with BitLocker-encrypted computers. After you evaluate your organization’s computers and develop basic plans and procedures, you need to develop a configuration plan for implementing BitLocker Drive Encryption.
Several implementations of BitLocker Drive Encryption are available. Although computers running Windows 8.1 and Windows Server 2012 R2 can work with any of the available versions, earlier versions of Windows can’t necessarily work with the latest version of BitLocker. For example, you might need to configure Group Policy to allow access from earlier versions of Windows.
To turn on BitLocker Drive Encryption on the drive containing the Windows operating system, the drive must have at least two partitions:
§ The first partition is for BitLocker Drive Encryption. This partition, designated as the active partition, holds the files required to start the operating system and is not encrypted.
§ The second is the primary partition for the operating system and your data. This partition is encrypted when you turn on BitLocker.
With implementations of BitLocker prior to Windows 7, you need to create the partitions in a certain way to ensure compatibility. This is no longer the case in Windows 7 and later. When you install Windows 7 and later, an additional partition is created automatically during setup. By default, this additional partition is used by the Windows Recovery Environment (Windows RE). However, if you enable BitLocker on the system volume, Windows usually moves Windows RE to the system volume and then uses the additional partition for BitLocker.
Using BitLocker on a hard disk is easy. On a computer with a compatible TPM, you must initialize the TPM as discussed in the Initializing and preparing a TPM for first use section earlier in this chapter, and then you need to enable BitLocker. On a computer without a compatible TPM, you need to enable BitLocker only on your hard disk.
You can use local Group Policy and Active Directory–based Group Policy to help manage and maintain TPM and BitLocker configurations. Group Policy settings for TPM Services are found in Administrative Templates policies for Computer Configuration under System\Trusted Platform Module Services. Group Policy settings for BitLocker are found in Administrative Templates policies for Computer Configuration under Windows Components\BitLocker Drive Encryption. There are separate subfolders for fixed data drives, operating system drives, and removable data drives.
Policies you might want to configure include the following:
§ Trusted Platform Module Services policies
§ Configure The Level of TPM Owner Authorization Information Available To The Operating System
§ Configure The List Of Blocked TPM Commands
§ Ignore The Default List Of Blocked TPM Commands
§ Ignore The Local List Of Blocked TPM Commands
§ Standard User Individual Lockout Threshold
§ Standard User Lockout Duration
§ Standard User Total Lockout Threshold
§ Turn On TPM Backup To Active Directory Domain Services
§ BitLocker Drive Encryption policies
§ Choose Default Folder For Recovery Password
§ Choose Drive Encryption Method And Cipher Strength
§ Prevent Memory Overwrite On Restart
§ Provide The Unique Identifiers For Your Organization
§ Validate Smart Card Certificate Usage Rule Compliance
§ Fixed Drive policies
§ Allow Access To BitLocker-Protected Fixed Data Drives From Earlier Versions Of Windows
§ Choose How BitLocker-Protected Fixed Drives Can Be Recovered
§ Configure Use Of Hardware-Based Encryption For Fixed Data Drives
§ Configure Use Of Passwords For Fixed Data Drives
§ Configure Use Of Smart Cards On Fixed Data Drives
§ Deny Write Access To Fixed Drives Not Protected By BitLocker
§ Enforce Drive Encryption Type On Fixed Data Drives
§ Operating System Drive policies
§ Allow Enhanced PINs For Startup
§ Allow Network Unlock At Startup
§ Allow Secure Boot For Integrity Validation
§ Choose How BitLocker-Protected Operating System Drives Can Be Recovered
§ Configure Minimum PIN Length For Startup
§ Configure TPM Platform Validation Profile For BIOS-Based Firmware Configurations
§ Configure TPM Platform Validation Profile For Native UEFI Firmware Configurations
§ Configure TPM Platform Validation Profile (Windows Vista, Windows 7, Windows Server 2008, Windows Server 2008 R2)
§ Configure Use Of Passwords For Operating System Drives
§ Disallow Standard Users From Changing The PIN Or Password
§ Enforce Drive Encryption Type On Operating System Drives
§ Enable User Of BitLocker Authentication Requiring Preboot Keyboard Input On Slates
§ Require Additional Authentication At Startup
§ Reset Platform Validation Data After BitLocker Recovery
§ Removable Data Drive policies
§ Allow Access To BitLocker-Protected Removable Data Drives From Earlier Versions Of Windows
§ Choose How BitLocker-Protected Removable Drives Can Be Recovered
§ Configure Use Of Hardware-Based Encryption For Removable Data Drives
§ Configure Use Of Passwords For Removable Data Drives
§ Configure Use Of Smart Cards On Removable Data Drives
§ Control Use Of BitLocker On Removable Drives
§ Deny Write Access To Removable Drives Not Protected By BitLocker
§ Enforce Drive Encryption Type On Removable Data Drives
Active Directory includes TPM and BitLocker recovery extensions for Computer objects. For TPM, the extensions define a single property of the Computer object, called ms-TPM-OwnerInformation. When the TPM is initialized or when the owner password is changed, the hash of the TPM ownership password can be stored as a value of the ms-TPM-OwnerInformation attribute on the related Computer object. For BitLocker, these extensions define Recovery objects as child objects of Computer objects and are used to store recovery passwords and associate them with specific BitLocker-encrypted volumes.
By default, Windows 8.1 stores the full TPM owner authorization, the TPM administrative delegation blob, and the TPM user delegation in the registry. Because of this change, you no longer have to save this information separately to Active Directory for backup and recovery purposes. For more information, see the TPM: management and policies section earlier in this chapter.
To ensure that BitLocker recovery information is always available, you can configure Group Policy to save recovery information in Active Directory as follows:
§ With Choose How BitLocker-Protected Fixed Drives Can Be Recovered, enable the policy and accept the default options to allow data recovery agents and save the recovery information in Active Directory.
§ With Choose How BitLocker-Protected Operating System Drives Can Be Recovered, enable the policy and accept the default options to allow data recovery agents and save the recovery information in Active Directory.
§ With Choose How BitLocker-Protected Removable Drives Can Be Recovered, enable the policy and accept the default options to allow data recovery agents, and then save the recovery information in Active Directory.
NOTE
REAL WORLD For Federal Information Processing Standard (FIPS) compliance, you cannot create or save BitLocker recovery passwords. Instead, you need to configure Windows to create recovery keys. The FIPS setting is located in the Security Policy Editor at Local Policies\Security Options\System Cryptography: Use FIPS Compliant Algorithms For Encryption, Hashing, And Signing.
To configure BitLocker to use recovery keys, enable the security option System Cryptography: Use FIPS Compliant Algorithms For Encryption, Hashing, And Signing in local Group Policy or Active Directory–based Group Policy as appropriate. With this setting enabled, users can only generate recovery keys.
Managing BitLocker Drive Encryption
You can configure and enable BitLocker Drive Encryption on both system volumes and data volumes. When you encrypt system volumes, you must unlock the computer at startup, typically by using a TPM and network unlock when connected to the domain in addition to a TPM, a startup key, a startup PIN, or any required or optional combination of these. To enforce the strictest and highest security possible, use all three authentication methods.
In the current implementation of BitLocker, you do not have to encrypt a computer’s system volume prior to encrypting a computer’s data volumes. When you use encrypted data volumes, the operating system mounts BitLocker data volumes as it would any other volume, but it requires either a password or a smart card with a valid certificate to unlock the drive.
The encryption key for a protected data volume is created and stored independently from the system volume and all other protected data volumes. To allow the operating system to mount encrypted volumes, the key chain protecting the data volume is stored in an encrypted state on the operating system volume. If the operating system enters Recovery mode, the data volumes are not unlocked until the operating system is out of Recovery mode.
Setting up BitLocker Drive Encryption requires these steps:
1. Partitioning a computer’s hard disks appropriately and installing the operating system (if you are configuring a new computer). Windows Setup partitions the drives for you automatically. However, the volume where BitLocker data is stored must always be the active, system volume.
2. Initializing and configuring a computer’s TPM (if applicable).
3. Turning on the BitLocker Drive Encryption feature (as necessary).
4. Checking firmware to ensure that the computer is set to start first from the disk containing the active, system partition and the boot partition, not from a USB or CD/DVD drive (applicable only when you encrypt system volumes).
5. Turning on and configuring BitLocker Drive Encryption.
NOTE
When you are using a Microsoft account on a non–domain-joined computer, you have an additional save option. You can save the recovery key to the Windows Live SkyDrive. The user’s SkyDrive account will then contain a BitLocker folder with a separate file for each saved recovery key.
After you’ve turned on and configured BitLocker encryption, you can use several techniques to maintain the environment and perform recovery.
Preparing for BitLocker Drive Encryption
As discussed previously, BitLocker Drive Encryption can be used in a TPM or a non-TPM configuration. Either configuration requires some preliminary work before you can turn on and configure BitLocker Drive Encryption.
With Windows 8.1 Pro and Enterprise editions, BitLocker should be installed by default. If it’s not, you can install the BitLocker Drive Encryption feature by using the Add Features Wizard. You need to restart the computer to complete the installation process.
You can determine the readiness status of a computer by accessing the BitLocker Drive Encryption console. In Control Panel, tap or click System And Security, and then tap or click BitLocker Drive Encryption. If the system isn’t properly configured, you’ll receive an error message. Note the following:
§ If you get an error message related to TPM on a computer with a compatible TPM, refer to the Enabling TPM section earlier in this chapter to learn more about TPM states and enabling TPM in firmware.
§ If you get an error message related to TPM on a computer with an incompatible TPM or no TPM, you need to change the computer’s Group Policy settings so that you can turn on BitLocker Drive Encryption without a TPM.
You can configure policy settings for BitLocker encryption in local Group Policy or in Active Directory–based Group Policy. In local policy, you apply the settings to the computer’s local GPO. For domain policy, you apply the settings to a Group Policy object processed by the computer. While you are working with domain policy, you can also specify requirements for computers with a TPM.
To configure the way BitLocker can be used with or without a TPM, follow these steps:
1. Open the appropriate GPO for editing in the Group Policy Management Editor.
2. In the Administrative Templates policies for Computer Configuration under Windows Components\BitLocker Drive Encryption\Operating System Drives, double-tap or double-click the Require Additional Authentication At Startup setting.
IMPORTANT
There are several versions of this policy and they are specific to the operating system. Configure the version or versions of this policy that are appropriate for your working environment and the computers to which the policy will be applied. The options for each related policy are slightly different because the TPM features supported are slightly different for each operating system.
3. In the Require Additional Authentication At Startup dialog box, define the policy setting by selecting Enabled.
4. Do one of the following:
o If you want to allow BitLocker to be used without a compatible TPM, select the Allow BitLocker Without A Compatible TPM check box. This changes the policy setting so that you can use BitLocker encryption with a password or startup key on a computer without a TPM.
o If you want to require BitLocker to be used with a TPM, clear the Allow BitLocker Without A Compatible TPM check box. This changes the policy setting so that you can use BitLocker encryption on a computer with a TPM by using a startup PIN, a startup key, or both.
5. On a computer with a compatible TPM, several authentication methods can be used at startup to provide added protection for encrypted data. These authentication methods can be allowed or required. Use Table 2-2 to help you configure how TPM is used with these authentication methods. The methods available depend on the operating system–specific version of the policy with which you are working.
Table 2-2. Common options for using TPM with BitLocker
|
SETTING FOR |
||||
|
WHEN THE COMPUTER STARTS |
CONFIGURE TPM STARTUP |
CONFIGURE TPM STARTUP PIN |
CONFIGURE TPM STARTUP KEY |
CONFIGURE TPM STARTUP KEY AND PIN |
|
Allow TPM to be used at startup |
Allow TPM |
Do Not Allow |
Do Not Allow |
Do Not Allow |
|
Require TPM to be used at startup |
Require TPM |
Do Not Allow |
Do Not Allow |
Do Not Allow |
|
Use TPM only with a startup key |
Allow or Require TPM |
Allow or Require Startup PIN with TPM |
Do Not Allow |
Do Not Allow |
|
Use TPM only with a startup PIN |
Allow or Require TPM |
Do Not Allow |
Allow or Require Startup Key with TPM |
Do Not Allow |
|
Use TPM only with a startup key and PIN |
Allow or Require TPM |
Do Not Allow |
Do Not Allow |
Allow or Require Startup Key and PIN with TPM |
|
Allow TPM with any other authentication method |
Allow or Require TPM |
Allow Startup PIN with TPM |
Allow Startup Key with TPM |
Allow Startup Key and PIN with TPM |
6. Tap or click OK to save your settings. This policy is enforced the next time Group Policy is applied.
7. Close the Group Policy Management Editor. To apply Group Policy immediately to the computer you are logged on to, enter gpupdate.exe /force in the Apps Search box, and then press Enter.
Computers that have a startup key or a startup PIN also have a recovery password or certificate. The recovery password or certificate is required in the event that any of the following occur:
§ Changes are made to the system startup information
§ The encrypted drive must be moved to another computer
§ The user is unable to provide the appropriate startup key or PIN
The recovery password or certificate should be managed and stored separately from the startup key or startup PIN. Although users are given the startup key or startup PIN, administrators should be the only ones with the recovery password or certificate. As an administrator, you need the recovery password or certificate to unlock the encrypted data on the volume if BitLocker enters a locked state. Generally, unless you use a common data-recovery agent, the recovery password or certificate is unique to this particular BitLocker encryption. This means you cannot use it to recover encrypted data from any other BitLocker-encrypted volume—even from other BitLocker-encrypted volumes on the same computer. To increase security, you should store startup keys and recovery data apart from the computer.
When BitLocker is installed, the BitLocker Drive Encryption console is available in Control Panel. Your configuration options for BitLocker depend on whether the computer has a TPM and on how you’ve configured Group Policy.
Enabling BitLocker on nonsystem volumes
Encrypting a nonsystem volume protects the data stored on the volume. Any volume formatted with FAT, FAT32, exFAT, or NTFS can be encrypted with BitLocker. The length of time it takes to encrypt a drive depends on the amount of data to encrypt, the processing power of the computer, and the level of activity on the computer.
Before you enable BitLocker, you should configure the appropriate Fixed Data Drive policies and settings in Group Policy, and then wait for Group Policy to be refreshed. If you don’t do this and you enable BitLocker, you might need to turn BitLocker off, and then turn BitLocker back on because certain state and management flags are set when you turn on BitLocker.
If you dual-boot a computer or move drives between computers, the Allow Access To BitLocker-Protected Fixed Data Drives From Earlier Versions Of Windows setting in Group Policy can ensure that you have access to the volume on other operating systems and computers. Unlocked drives are read-only. To ensure that you can recover an encrypted volume, you should allow data-recovery agents and store recovery information in Active Directory.
To enable BitLocker encryption on a nonsystem volume, follow these steps:
1. In File Explorer, press and hold or right-click the data volume, and then tap or click Turn On BitLocker. BitLocker then verifies that your computer meets its requirements and then initializes the drive.
NOTE
If BitLocker is already enabled, the Manage BitLocker option is displayed instead of Turn On BitLocker.
2. On the Choose How You Want To Unlock This Drive page, shown in Figure 2-11, choose one or more of the following options, and then tap or click Next:
o Use A Password To Unlock The Drive Select this option if you want the user to be prompted for a password to unlock the drive. Passwords allow a drive to be unlocked in any location and to be shared with other people.
o Use My Smart Card To Unlock The Drive Select this option if you want the user to use a smart card and enter the smart card PIN to unlock the drive. Because this feature requires a smart card reader, it’s typically used to unlock a drive in the workplace and not for drives that might be used outside the workplace.
NOTE
When you tap or click Next, the wizard generates a recovery key. You can use the key to unlock the drive if BitLocker detects a condition that prevents it from unlocking the drive during boot. Note that you should save the key on removable media or on a network share. You can’t store the key on the encrypted volume or the root directory of a fixed drive.
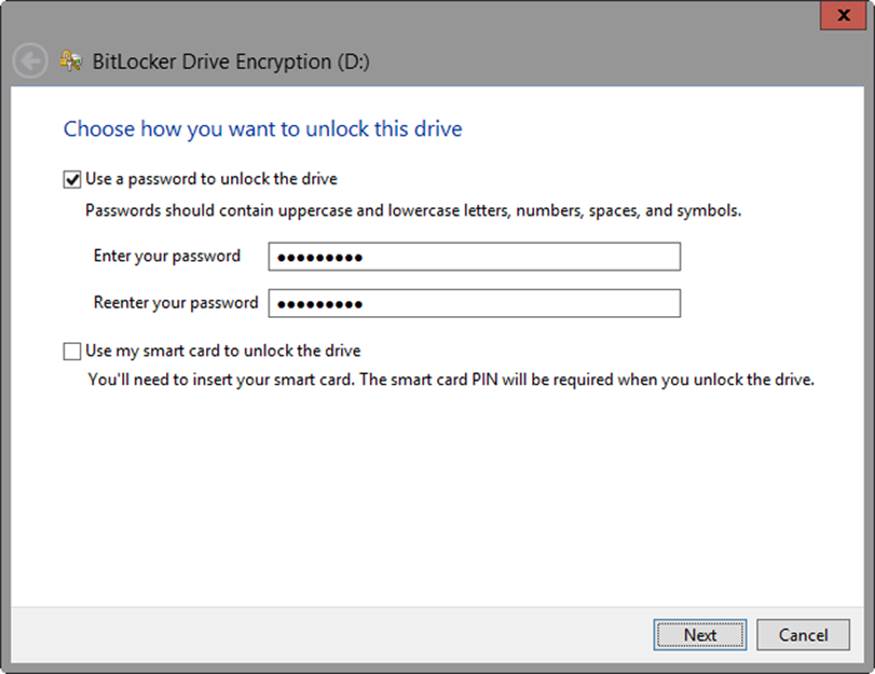
Figure 2-11. Choose an option for unlocking a drive.
3. On the How Do You Want To Back Up Your Recovery Key? page, choose a save location for the recovery key, preferably a USB flash drive or other removable media.
4. You can now optionally save the recovery key to another folder, print the recovery key, or both. For each option, tap or click the option, and then follow the wizard’s steps to set the location for saving or printing the recovery key. When you have finished, tap or click Next.
5. If allowed in Group Policy, you can elect to encrypt used disk space only or the entire drive, and then tap or click Next. Encrypting the used disk space only is faster than encrypting an entire volume. It’s also the recommended option for newer computers and drives (except in high-security environments).
6. On the Are You Ready To Encrypt This Drive? page, tap or click Start Encrypting. The amount of time the encryption process takes depends on the amount of data being encrypted and other factors.
Because the encryption process can be paused and resumed, you can shut down the computer before the drive is completely encrypted, and the encryption of the drive will resume when you restart the computer. The encryption state is also maintained in the event of a power loss.
Enabling BitLocker on USB flash drives
Encrypting USB flash drives protects the data stored on the volume. Any USB flash drive formatted with FAT, FAT32, exFAT, or NTFS can be encrypted with BitLocker. The length of time it takes to encrypt a drive depends on the size of the drive, the processing power of the computer, and the level of activity on the computer.
Before you enable BitLocker, you should configure the appropriate Removable Data Drives policies and settings in Group Policy and then wait for Group Policy to be refreshed. If you don’t do this and you enable BitLocker, you might need to turn BitLocker off and then turn BitLocker back on because certain state and management flags are set when you turn on BitLocker.
To be sure that you can recover an encrypted volume, you should allow data-recovery agents and store recovery information in Active Directory. If you use a flash drive with earlier versions of Windows, the Allow Access To BitLocker-Protected Removable Data Drives From Earlier Versions Of Windows policy can ensure that you have access to the USB flash drive on other operating systems and computers. Unlocked drives are read-only.
To enable BitLocker encryption on a USB flash drive, follow these steps:
1. Insert the USB flash drive. In File Explorer, press and hold or right-click the USB flash drive, and then tap or click Turn On BitLocker. BitLocker then verifies that your computer meets its requirements and then initializes the drive.
2. On the Choose How You Want To Unlock This Drive page, choose one or more of the following options, and then tap or click Next:
o Use A Password To Unlock This Drive Select this option if you want the user to be prompted for a password to unlock the drive. Passwords allow a drive to be unlocked in any location and to be shared with other people.
o Use My Smart Card To Unlock The Drive Select this option if you want the user to use a smart card and enter the smart card PIN to unlock the drive. Because this feature requires a smart card reader, it’s typically used to unlock a drive in the workplace and not for drives that might be used outside the workplace.
3. On the How Do You Want To Back Up Your Recovery Key? page, tap or click Save The Recovery Key To A File.
4. In the Save BitLocker Recovery Key As dialog box, choose a save location, and then tap or click Save.
5. You can now print the recovery key if you want to. When you have finished, tap or click Next.
6. If allowed in Group Policy, you can elect to encrypt used disk space only or the entire drive, and then tap or click Next. Encrypting the used disk space only is faster than encrypting an entire volume. It’s also the recommended option for newer computers and drives (except in high-security environments).
7. On the Are You Ready To Encrypt This Drive? page, tap or click Start Encrypting. Be sure to pause encryption before removing the drive and then resume to complete the encryption. Do not otherwise remove the USB flash drive until the encryption process is complete. The amount of time the encryption process takes depends on the amount of data to encrypt and other factors.
The encryption process does the following:
1. It adds an Autorun.inf file, the BitLocker To Go reader, and a Read Me.txt file to the USB flash drive.
2. It creates a virtual volume with the encrypted contents of the drive.
3. It encrypts the virtual volume to protect it. USB flash drive encryption takes approximately 6 to 10 minutes per gigabyte to complete. The encryption process can be paused and resumed, as long as you don’t remove the drive.
When you insert an encrypted drive into a USB slot on a computer running Windows 8.1, a notification on the secure desktop is displayed, as shown in Figure 2-12. If the notification disappears before you can tap or click it, just remove and then reinsert the encrypted drive.
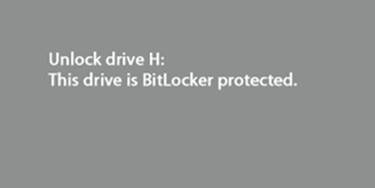
Figure 2-12. Tap or click the notification.
Tap or click the notification to display the BitLocker dialog box shown in Figure 2-13. This dialog box is also displayed on the secure desktop.
When you are prompted, enter the password. Optionally, tap or click More Options to expand the dialog box so that you can select Automatically Unlock On This Computer to save the password in an encrypted file on the computer’s system volume. Finally, tap or click Unlock to unlock the drive so that you can use it.
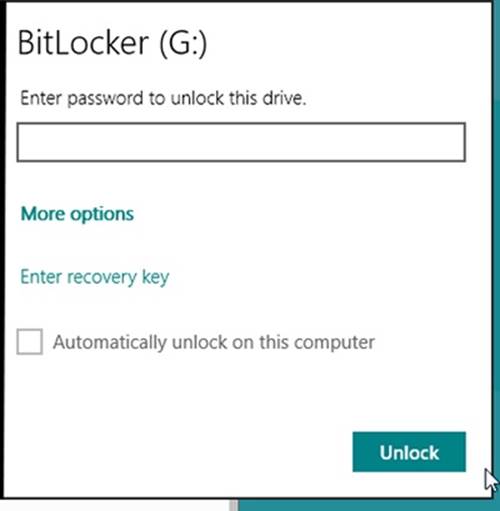
Figure 2-13. Unlock the encrypted drive.
If you forget or lose the password for the drive but have the recovery key, tap or click More Options, and then tap or click Enter Recovery Key. Enter the 48-digit recovery key, and then tap or click Unlock. This key is stored in the XML-formatted recovery key file as plain text.
Enabling BitLocker on system volumes
Before you can encrypt a system volume, you must remove all bootable media from a computer’s CD/DVD drives, in addition to all USB flash drives. You can then enable BitLocker encryption on the system volume by completing the following steps:
1. In File Explorer, press and hold or right-click the system volume, and then tap or click Turn On BitLocker. Windows checks the computer and the drive to ensure that BitLocker can be enabled. Tap or click Next.
NOTE
If BitLocker is already enabled, the Manage BitLocker option is displayed instead of Turn On BitLocker. As part of the setup, Windows prepares the required BitLocker partition, if necessary. If Windows RE is in this partition, Windows moves Windows RE to the system volume and then uses this additional partition for BitLocker.
NOTE
If the computer doesn’t have a TPM, the Allow BitLocker Without A Compatible TPM option must be enabled for operating system volumes in the Require Additional Authentication At Startup policy.
2. As Figure 2-14 shows, you can now configure BitLocker startup preferences. Continue as discussed in the separate procedures that follow. If the computer doesn’t have a TPM, your options will be different. You’ll be able to create a password to unlock the drive, or you can insert a USB flash drive and store the startup key on the flash drive.
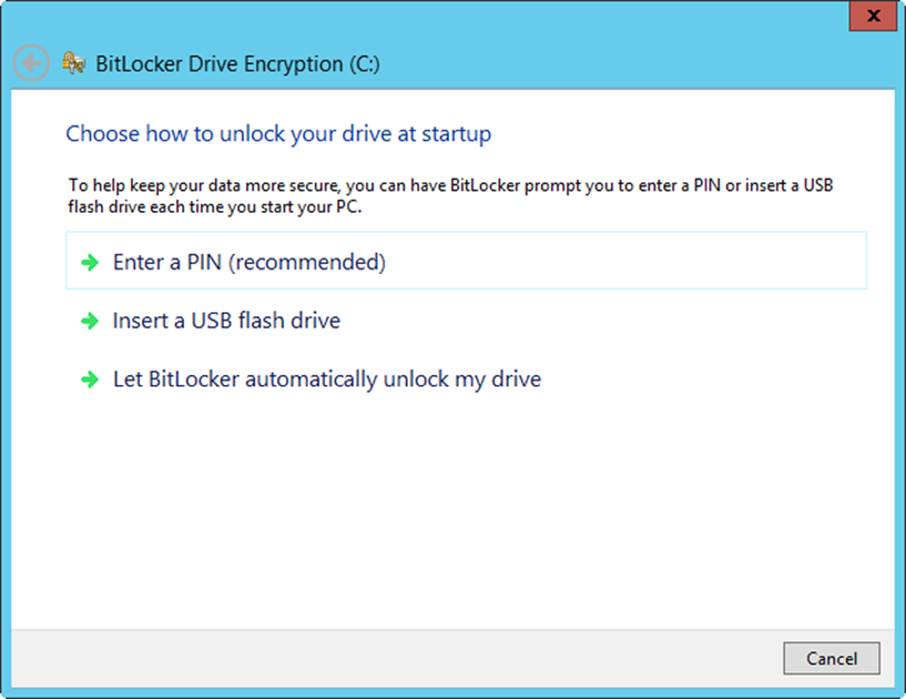
Figure 2-14. Configure BitLocker startup preferences.
When a computer has a TPM, you can use BitLocker to provide basic integrity checks of the volume without requiring any additional keys. In this configuration, BitLocker protects the system volume by encrypting it. This configuration does the following:
§ Grants access to the volume to users who can log on to the operating system
§ Prevents those who have physical access to the computer from booting to an alternative operating system to gain access to the data on the volume
§ Allows the computer to be used with or without a TPM for additional boot security
§ Does not require a password or a smart card with a PIN
To use BitLocker without any additional keys, follow these steps:
1. On the Choose How To Unlock Your Drive At Startup page, tap or click Let BitLocker Automatically Unlock My Drive.
2. On the How Do You Want To Back Up Your Recovery Key? page, tap or click Save To A File.
3. In the Save BitLocker Recovery Key As dialog box, choose the location of your USB flash drive or an appropriate network share, and then tap or click Save. Do not use a USB flash drive that is BitLocker-encrypted.
4. You can now optionally save the recovery key to another location, print the recovery key, or both. Tap or click an option, and then follow the wizard steps to set the location for saving or printing the recovery key. When you have finished, tap or click Next.
5. If allowed in Group Policy, you can elect to encrypt used disk space only or the entire drive, and then tap or click Next. Encrypting the used disk space only is faster than encrypting an entire volume. It’s also the recommended option for newer computers and drives (except in high-security environments).
6. On the Encrypt The Drive page, tap or click Start Encrypting. The amount of time the encryption process takes depends on the amount of data to encrypt and other factors.
To enhance security, you can require additional authentication at startup. This configuration does the following:
§ Grants access to the volume only to users who can provide a valid key
§ Prevents those who have physical access to the computer from booting to an alternative operating system to gain access to the data on the volume
§ Allows the computer to be used with or without a TPM for additional boot security
§ Requires a password or a smart card with a PIN
§ Optionally uses network unlock to unlock the volume when the computer is joined to and connected to the domain
You can enable BitLocker encryption for use with a startup key by following these steps:
1. Insert a USB flash drive in the computer (if one is not already there). Do not use a USB flash drive that is BitLocker-encrypted.
2. On the Choose How To Unlock Your Drive At Startup page, tap or click the Insert A USB Flash Drive option.
3. On the Back Up Your Startup Key page, tap or click the USB flash drive, and then tap or click Save.
4. Next, you need to save the recovery key. Because you should not store the recovery key and the startup key on the same medium, remove the USB flash drive and insert a second USB flash drive.
NOTE
The startup key is different from the recovery key. If you create a startup key, this key is required to start the computer. The recovery key is required to unlock the computer if BitLocker enters Recovery mode, which might happen if BitLocker suspects the computer has been tampered with while the computer was offline.
5. On the How Do You Want To Back Up Your Recovery Key? page, tap or click Save To A File.
6. In the Save BitLocker Recovery Key As dialog box, choose the location of your USB flash drive, and then tap or click Save. Do not remove the USB drive with the recovery key.
7. You can now optionally save the recovery key to a network folder, print the recovery key, or both. Tap or click an option, and then follow the wizard’s steps to set the location for saving or printing the recovery key. When you have finished, tap or click Next.
8. If allowed in Group Policy, you can elect to encrypt used disk space only or the entire drive, and then tap or click Next. Encrypting the used disk space only is faster than encrypting an entire volume. It’s also the recommended option for newer computers and drives (except in high-security environments).
9. On the Encrypt The Volume page, confirm that Run BitLocker System Check is selected, and then tap or click Continue.
10.Confirm that you want to restart the computer by tapping or clicking Restart Now. The computer restarts, and BitLocker ensures that the computer is BitLocker-compatible and ready for encryption. If the computer is not ready for encryption, you will get an error and need to resolve the error status before you can complete this procedure. If the computer is ready for encryption, the Encryption In Progress status bar is displayed. You can monitor the status of the disk volume encryption by pointing to the BitLocker Drive Encryption icon in the notification area. By double-tapping or double-clicking this icon, you can open the Encrypting dialog box and monitor the encryption process more closely. You also have the option to pause the encryption process. Volume encryption takes approximately 1 minute per gigabyte to complete.
By completing this procedure, you have encrypted the operating system volume and created a recovery key unique to that volume. The next time you turn on your computer, either the USB flash drive with the startup key must be plugged into a USB port on the computer or the computer must be connected to the domain network and using network unlock. If the USB flash drive is required for startup and you do not have the USB flash drive containing your startup key, you will need to use Recovery mode and supply the recovery key to gain access to the data.
You can enable BitLocker encryption for use with a startup PIN by following these steps:
1. On the Choose How To Unlock Your Drive At Startup page, select the Enter A PIN option.
2. On the Enter A PIN page, enter and confirm the PIN. The PIN can be any number you choose and must be 4 to 20 digits in length. The PIN is stored on the computer.
3. Insert a USB flash drive on which you want to save the recovery key, and then tap or click Set PIN. Do not use a USB flash drive that is BitLocker-encrypted.
4. Continue with steps 5-9 in the previous procedure.
When the encryption process is complete, you have encrypted the entire volume and created a recovery key unique to this volume. If you created a PIN or a startup key, you are required to use the PIN or startup key to start the computer (or the computer must be connected to the domain network and using network unlock). Otherwise, you will observe no change to the computer unless the TPM changes or cannot be accessed, or if someone tries to modify the disk while the operating system is offline. In this case, the computer enters Recovery mode, and you need to enter the recovery key to unlock the computer.
Managing and troubleshooting BitLocker
You can determine whether a system volume, data volume, or inserted removable drive uses BitLocker by tapping or clicking System And Security in Control Panel, and then double-tapping or double-clicking BitLocker Drive Encryption. You’ll find the status of BitLocker on each volume, as shown in Figure 2-15.
The BitLocker Drive Encryption service must be started for BitLocker to work properly. Usually, this service is configured for manual startup and runs under the LocalSystem account.
To use smart cards with BitLocker, the Smart Card service must be started. Typically, this service is configured for manual startup and runs under the LocalService account.
After you create a startup key or PIN and a recovery key for a computer, you can create duplicates of the startup key, startup PIN, or recovery key as necessary for backup or replacement purposes by using the options on the BitLocker Drive Encryption page in Control Panel.
NOTE
With fixed data and operating system drives, another way to access this page is to press and hold or right-click the volume in File Explorer, and then tap or click Manage BitLocker. If BitLocker is turned off, the Turn On BitLocker option is displayed instead.
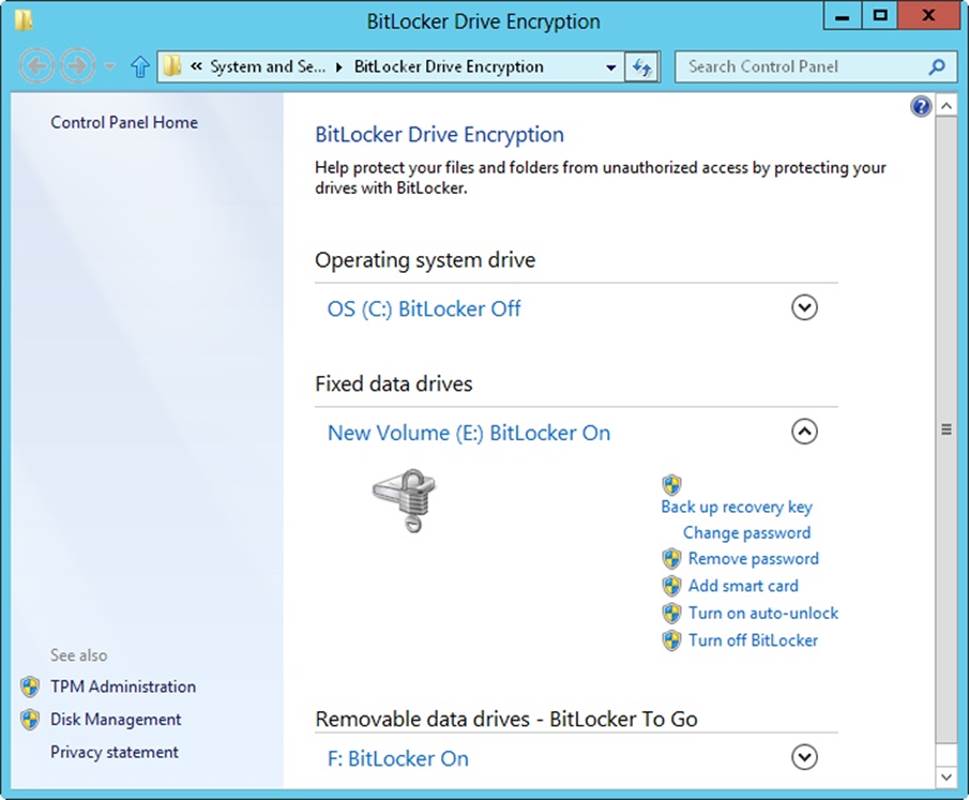
Figure 2-15. Review the current status of BitLocker for each volume.
The management options provided depend on the type of volume with which you are working and the encryption settings you choose. The available options include the following:
§ Back Up Recovery Key Enables you to save or print the recovery key. Tap or click this option, and then follow the prompts.
§ Change Password Allows you to change the encryption password. Tap or click this option, enter the old password, and then enter and confirm the new password. Tap or click Change Password.
§ Remove Password Tap or click this option to remove the encryption password requirement for unlocking the drive. You can do this only if another unlocking method is configured first.
§ Add Smart Card Enables you to add a smart card for unlocking the drive. Tap or click this option, and then follow the prompts.
§ Remove Smart Card Tap or click this option to remove the smart card requirement for unlocking the drive.
§ Change Smart Card Enables you to change the smart card used to unlock the drive. Tap or click this option, and then follow the prompts.
§ Turn On Auto-Unlock Tap or click this option to turn on automatic unlocking of the drive.
§ Turn Off Auto-Unlock Tap or click this option to turn off automatic unlocking of the drive.
§ Turn Off BitLocker Tap or click this option to turn off BitLocker and decrypt the drive.
Recovering data protected by BitLocker Drive Encryption
If you’ve configured BitLocker Drive Encryption and the computer enters Recovery mode, you need to unlock the computer. To unlock the computer by using a recovery key stored on a USB flash drive, follow these steps:
1. Turn on the computer. If the computer is locked, the computer opens the BitLocker Drive Encryption Recovery console.
2. When you are prompted, insert the USB flash drive that contains the recovery key, and then press Enter.
3. The computer will unlock and reboot automatically. You do not need to enter the recovery key manually.
If you saved the recovery key file in a folder on another computer or on removable media, you can use another computer to open and validate the recovery key file. To locate the correct file, find Password ID on the recovery console displayed on the locked computer and write down this number. The file containing the recovery key uses this Password ID as the file name. Open the file and locate the recovery key.
To unlock the computer by typing the recovery key, follow these steps:
1. Turn on the computer. If the computer is locked, the BitLocker Drive Encryption Recovery console opens.
2. Type the recovery key, and then press Enter. The computer will unlock and reboot automatically.
A computer can become locked if a user tries to enter the recovery key but is repeatedly unsuccessful. In the recovery console, you can press Esc twice to exit the recovery prompt and turn off the computer. A computer might also become locked if an error related to TPM occurs or boot data is modified. In this case, the computer halts very early in the boot process, before the operating system starts. At this point, the locked computer might not be able to accept standard keyboard numbers. If that is the case, you must use the function keys to enter the recovery password. Here, the function keys F1–F9 represent the digits 1 through 9, and the F10 function key represents 0.
Disabling or turning off BitLocker Drive Encryption
When you need to make changes to TPM or make other changes to the system, you might first need to temporarily turn off BitLocker encryption on the system volume. You cannot temporarily turn off BitLocker encryption on data volumes; you can only decrypt data volumes.
To temporarily turn off BitLocker encryption on the system volume, follow these steps:
1. In Control Panel, tap or click System And Security, and then double-tap or double-click BitLocker Drive Encryption.
2. For the system volume, tap or click Turn Off BitLocker Drive Encryption.
3. In the What Level Of Decryption Do You Want? dialog box, tap or click Disable BitLocker Drive Encryption.
By completing this procedure, you have temporarily disabled BitLocker on the operating system volume.
To turn off BitLocker Drive Encryption and decrypt a data volume, follow these steps:
1. In Control Panel, tap or click System And Security, and then double-tap or double-click BitLocker Drive Encryption.
2. For the appropriate volume, tap or click Turn Off BitLocker Drive Encryption.
3. In the What Level Of Decryption Do You Want? dialog box, tap or click Decrypt The Volume.
To turn off BitLocker Drive Encryption and decrypt a USB flash drive, follow these steps:
1. In Control Panel, tap or click System And Security, and then double-tap or double-click BitLocker Drive Encryption.
2. For the appropriate volume, tap or click Turn Off BitLocker Drive Encryption.
3. In the What Level Of Decryption Do You Want? dialog box, tap or click Decrypt The Volume.
All materials on the site are licensed Creative Commons Attribution-Sharealike 3.0 Unported CC BY-SA 3.0 & GNU Free Documentation License (GFDL)
If you are the copyright holder of any material contained on our site and intend to remove it, please contact our site administrator for approval.
© 2016-2026 All site design rights belong to S.Y.A.