Windows 8.1 Administration Pocket Consultant: Storage, Security, & Networking (2014)
Chapter 4. Configuring and Maintaining Storage
§ Working with removable storage devices
§ Working with data discs
§ Managing disk compression and file encryption
§ Troubleshooting common disk problems
In the previous chapter, I showed you how to manage disk drives and file systems. In this chapter, I discuss techniques you can use to work with other types of storage, including removable storage devices and data discs. I also discuss techniques for managing disk compression, implementing file encryption, and troubleshooting common disk problems.
Working with removable storage devices
Removable storage devices can be formatted with NTFS, FAT, FAT32, and exFAT. You connect external storage devices to a computer instead of installing them inside the computer. This makes external storage devices easier and faster to install than most internal hard drives. Most external storage devices have a USB, FireWire, or eSATA interface. When working with USB and FireWire, the transfer speed and overall performance of the device from a user’s perspective depend primarily on the version supported.
Currently, several versions of USB and FireWire are used. USB 2.0 is the industry standard while the world transitions to USB 3.0. USB 2.0 devices can be rated as either full speed (up to 12 megabits per second [Mbps]) or high speed (up to 480 Mbps). Although high-speed USB 2.0 supports data transfers at a maximum rate of 480 Mbps, sustained data transfer rates usually are from 10 to 30 Mbps. The actual sustainable transfer rate depends on many factors, including the type of device, the data that you are transferring, and the speed of the computer. Each USB controller on a computer has a fixed amount of bandwidth that all devices attached to the controller must share. The data transfer rates will be significantly slower if a computer’s USB port is an earlier version than the device you are using. For example, if you connect a USB 2.0 device to a USB 1.0 port, or vice versa, the device operates at the significantly reduced USB 1.0 transfer speed.
USB 1.0, 1.1, and 2.0 ports all look alike; however, most USB 3.0 ports I’ve seen have a special coloring to differentiate them. Still, the best way to determine which type of USB ports a computer has is to refer to the documentation that came with the computer. Newer monitors have USB 2.0 ports to which you can also connect devices. When you have USB devices connected to a monitor, the monitor acts like a USB hub device. As occurs with any USB hub device, all devices attached to the hub share the same bandwidth, and the total available bandwidth is determined by the speed of the USB input to which the hub is connected on a computer.
FireWire (IEEE 1394) is a high-performance connection standard that uses a peer-to-peer architecture in which peripherals negotiate bus conflicts to determine which device can best control a data transfer. Several versions of FireWire are currently used. FireWire 400 (IEEE 1394a) has maximum sustained transfer rates of up to 400 Mbps. IEEE 1394b supports 400 Mbps (S400), 800 Mbps (S800), and 1,600 Mbps (S1600). As with USB devices, if you connect an IEEE 1394b device to an IEEE 1394a port or vice versa, the device operates at the significantly reduced FireWire 400 transfer speed.
As with USB ports, the sustained transfer rate for IEEE 1394a and IEEE 1394b ports will be considerably less than the maximum rate possible. IEEE 1394a and IEEE 1394b ports and cables have different shapes, making it easier to tell the difference between them—if you know what you’re looking for. With that said, FireWire 400 ports and cables look exactly like early versions of FireWire that were implemented prior to the finalization of the IEEE 1394a and IEEE 1394b specifications. FireWire cables and ports that have four pins and four connectors lack bus power. FireWire 400 cables and ports have six pins and six connectors. FireWire 800 and FireWire 1600 cables and ports have nine pins and nine connectors.
Network-ready devices might connect directly to your network via Ethernet cable. Many of these devices are now rated at 1 gigabit per second (Gbps), which is the same as saying 1,000 Mbps. Devices rated at 10 Gbps are also becoming increasingly available.
Before you purchase an external device for a computer, you should consider what interfaces your computer supports and the interfaces the device uses. In some cases, you might be able to get a device with a dual interface that supports USB 2.0 and FireWire 400, or a triple interface that supports USB 2.0, FireWire 400, and FireWire 800. A device with dual or triple interfaces will give you more options.
In the This PC console or Disk Management, you can work with removable disks by pressing and holding or right-clicking a disk, and then using the following commands:
§ Tap or click Open to examine the disk’s contents in File Explorer.
§ Tap or click Format to format removable disks as discussed in the Formatting partitions and volumes section in Chapter 3. Removable disks generally are formatted with a single partition.
§ Tap or click Properties to view or set properties. On the General tab of the Properties dialog box, you can set the volume label as discussed in the Assigning, changing, or deleting a volume label section in Chapter 3.
When you work with removable disks, you can customize disk and folder views. To do this, press and hold or right-click the disk or folder, and then tap or click the Customize tab. You can then specify the default folder type to control the default details displayed. For example, you can set the default folder type as Documents or Pictures And Videos. You can also set folder pictures and folder icons.
Removable disks support network file and folder sharing. You configure sharing on removable disks in the same way that you configure standard file sharing. You can assign share permissions, configure caching options for offline file use, and limit the number of simultaneous users. You can share an entire removable disk, in addition to individual folders stored on the removable disk. You can also create multiple share instances.
Removable disk sharing differs from standard NTFS sharing in that there isn’t necessarily an underlying security architecture. With exFAT, FAT, or FAT32, folders and files that are stored do not have any security permissions or features other than the basic read-only or hidden attribute flags that you can set.
Working with data discs
CD and DVD disc images are often stored as ISO files, as are Blu-ray discs. Windows 8.1 has built-in capabilities to recognize ISO images and burn them to CD or DVD. Windows 8.1 also has built-in disc burning features that you can use to create data discs. Before you burn data discs, you should familiarize yourself with the disc types and disc file system options that are available.
Disc burning: the essentials
By default, when you insert a blank disc, Windows 8.1 shows a Burn button on the File Explorer toolbar. Tapping or clicking this button starts the Burn A Disc Wizard, which you can use to create a data disc. Keep in mind that computer disc players are different from players for homes or cars. Typically, your computer disc player is designed to read commercially produced discs, in addition to computer-burned discs in specific formats, but a home or car disc player won’t necessarily be able to recognize a disc you create on a computer.
Most disc burners support multiple disc types. Windows 8.1 natively supports burning data CDs to CD-R, CD+R, and CD-RW and burning data DVDs to DVD-R, DVD-RW, DVD+R, DVD+RW, and DVD-RAM. DVDs can be single-sided and single-layered or single-sided and dual-layered. Windows 8.1 also natively supports Blu-ray. If a computer has a Blu-ray burner, you might also be able to burn Blu-ray discs.
Windows 8.1 supports two approaches to burning discs:
§ Disc mastering
§ Live file system
Most Windows-based programs create data discs by using a mastered approach, and discs are written in an appropriate file system format automatically. With a mastered approach, you select a collection of files that you want to copy to a disc, and then burn all the files at once. When you are burning large collections of files, this is a convenient approach, with the added bonus of compatibility with any computer or device that supports the type of data disc you are using.
When you burn files to data discs by using mastering, you burn files in a session. In many disc burning programs, you have the option of leaving a session open in order to add files later, and then you close the session when you are done adding files. By closing the session, you finalize the disc and enable it to be read on other computers and devices. Otherwise, while a session is open, the disc can be read only on a compatible computer.
In contrast, a data disc with a live file system works like any other type of removable storage, such as a USB flash drive or a removable disk drive. You can add files to the disc without having to burn them by just copying and pasting files or by dragging and dropping files. If the disc is re-recordable, you can remove files by selecting them and deleting them. If you eject the disc, you can insert it into your CD/DVD drive later and continue to use it like removable storage.
Data discs with a live file system are formatted by using the Universal Disc Format (UDF) rather than the standard CD File System (CDFS). Generally, only computers can read UDF-formatted data discs. Windows 8.1 supports burning data discs in several UDF versions, including UDF 1.5, UDF 2.0, UDF 2.01 (the default), and UDF 2.5. Although all of these formats will work with current versions of Windows, you’ll typically want to use UDF 2.01 or UDF 2.5 to ensure optimal performance. If you must specify the UDF version, such as for compatibility with an operating system not based on Windows, you can do so by pressing and holding or right-clicking the disc in the This PC window and then selecting Format. In the Format dialog box, you’ll then be able to specify the UDF version to use.
Mounting ISO images
You mount an ISO image to create a virtual disk that you can work with much like a physical disc. For example, if you mount an ISO image for an application, you can use the mounted ISO image to install the application.
To mount an ISO image as a virtual disk, do one of the following:
§ In File Explorer, press and hold or right-click the .iso file that you want to mount, and then tap or click Mount.
§ In File Explorer, tap or click the .iso file that you want to use to create a data disk. Next, press and hold or right-click the .iso file that you want to mount, and then tap or click Mount.
Burning ISO images to disc
You burn an ISO image to create a physical disc. You can then use the disc with disc drives in other computers. To burn an ISO image, complete the following steps:
1. Insert a blank disc into your disc burner. If the AutoPlay dialog box is displayed, tap or click the Close button.
2. In File Explorer, press and hold or right-click the .iso file that you want to use to create a data disc, and then tap or click Burn Disc Image.
3. In the Windows Disc Image Burner dialog box, shown in Figure 4-1, use the Disc Burner list to select the disc burner, and then tap or click Burn.
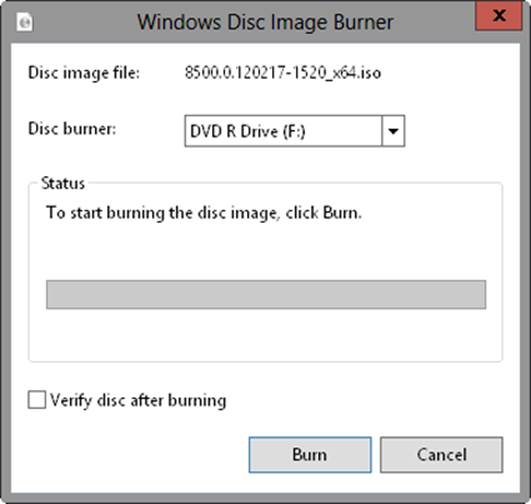
Figure 4-1. Burn ISO images to disc.
Burning mastered discs
You can burn a mastered disc by completing the following steps:
1. Insert a blank disc into your disc burner. Do one of the following:
o In the AutoPlay dialog box, tap when prompted and then select Burn Files To Disc–File Explorer.
o If the AutoPlay dialog box is not displayed, open the This PC window. In the Computer window, press and hold or right-click the disc burner, and then tap or click Open AutoPlay. In the AutoPlay dialog box, select Burn Files To Disc–File Explorer.
2. In the Burn A Disc Wizard, shown in Figure 4-2, enter a disc title. To create a mastered disc, select With A CD/DVD Player. When you tap or click Next, the data disc is opened in File Explorer. The main pane displays an empty burn list. Don’t close this window.
3. In File Explorer, drag files to the burn list or select and copy files to the burn list. Files in the burn list are copied from their original location and written as temporary files to a temporary folder. This temporary folder is created in the user’s personal profile. Copies of these files are created to be sure that all the files are in one place and that you have appropriate permissions to access the files before trying to burn the disc.
4. When you are ready to continue, press and hold or right-click an empty area in the Files Ready To Be Written To The Disc panel, and then tap or click Burn To Disc. In the Burn To Disc Wizard, the disc title is set by using the title you provided previously, and the recording speed is set to the maximum speed supported by the disc drive.
5. When you tap or click Next, Windows 8.1 adds the files you selected to a disc image and then writes the files to your data disc. When finished burning the disc, Windows 8.1 automatically ejects the disc by default. Also by default, the temporary files are deleted, and you can then tap or click Finish to exit the Burn To Disc Wizard. If you want to burn the same files to another disc, select the Yes, Burn These Files To Another Disc check box before tapping or clicking Finish.
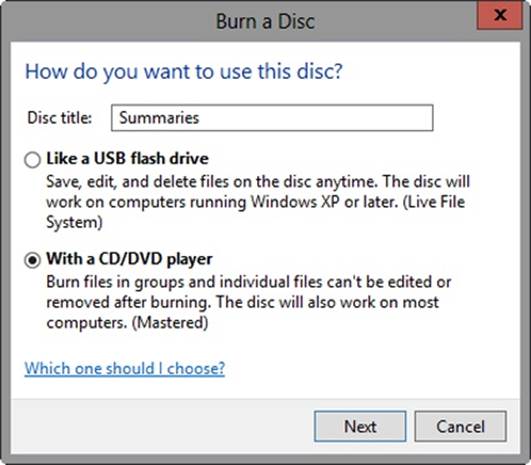
Figure 4-2. Prepare to burn data to a disc.
If an error occurs while burning, you’ll get an error message. You’ll have the option of trying again with a different disc, deleting the temporary files that have not burned, or saving all the temporary files and trying to burn them later. If you try again, make sure you select a slower burn speed. Although your disc drive might be able to burn at a high speed, the disc itself might not be rated for burning at the speed you selected.
Generally, if you get a burn error, only a portion of your files will have been written to the disc. If the burn session is still open, you can try to burn to the disc again. Occasionally, you might find that you have to use a new blank disc.
Burning discs with live file systems
You can burn a data disc with a live file system by completing the following steps:
1. Insert a blank disc into your disc burner. If the Burn A Disc Wizard doesn’t start automatically, open the This PC window. In the This PC window, double-tap or double-click the disc burner. Or if the AutoPlay dialog box is displayed instead, select Burn Files To Disc–File Explorer.
2. In the Burn A Disc Wizard, enter a disc title. To create a UDF disc with a live file system, select Like A USB Flash Drive. When you tap or click Next, Windows creates a live file system on the disc and then opens the data disc in File Explorer.
3. The Files Ready To Be Written To The Disc pane displays an empty burn list. Don’t close this window.
4. Because you are working with a live disc, there is no burn list. You can now add files to and remove files from the disc as you would with any other disc device. With re-recordable discs, when files are deleted, they are removed and the space is freed for other files. With standard recordable discs, the files are marked as deleted but actually still exist on the disc. Because of this, the space used by the deleted files is still allocated and cannot be used by other files.
5. While the disc is inserted, Windows 8.1 maintains an open burn session for the disc. If you eject the live data disc, Windows 8.1 closes the burn session so that you can use the disc with other computers. From then on, whenever you insert the disc, you can add or remove files by using File Explorer. Windows will open another burn session only if you modify the disc’s contents. As before, you can close the session by ejecting the disc. You can also close a burn session by pressing and holding or right-clicking the disc drive in the This PC window and then tapping or clicking Close Session.
Changing the default burning options
You can change a computer’s default burning options by completing the following steps:
1. Open the This PC window. In the This PC window, press and hold or right-click the disc drive, and then tap or click Properties.
2. On the Recording tab, use the Disc Burning list to set the default burner on a computer with multiple disc burners.
3. Use the options provided to specify where temporary files are stored.
4. If you don’t want mastered discs to be ejected automatically after they are burned, clear the related check box.
5. By default, Windows closes discs with live file systems when you eject them. To confirm or modify this behavior, tap or click Global Settings. In the Global Settings dialog box, specify whether and when sessions are closed by using the options provided, and then tap or click OK.
6. Tap or click OK to save your settings.
Managing disk compression and file encryption
In Windows 8.1, when you format a drive for NTFS, you can enable disk compression or file encryption. You use compression to reduce the disk space that files require, and you use encryption to add an extra layer of protection to your data. Disk compression and file encryption are mutually exclusive. You can use one feature or the other, and neither feature is affected by BitLocker Drive Encryption, which encrypts disks at the volume level and protects a computer from external tampering prior to startup of the operating system.
NOTE
As discussed in Chapter 3, Windows 8.1 enables you to format volumes with Resilient File System (ReFS) when you use storage spaces. ReFS does not support disk compression or file encryption.
Compressing drives and data
With compression, all files and directories stored on a drive are automatically compressed when they’re created. Because this compression is transparent to users, compressed data can be accessed just like regular data. The difference is that you can store more information on a compressed drive than you can on an uncompressed drive. Note that File Explorer shows the names of compressed resources in blue.
NOTE
REAL WORLD Although compression is certainly a useful feature when you want to save disk space, you can’t encrypt compressed data. Compression and encryption are mutually exclusive alternatives for NTFS volumes. You can’t use both techniques. For more information on encryption, see the Encrypting drives and data section later in the chapter. If you try to compress encrypted data, Windows 8.1 automatically decrypts the data and then compresses it. Likewise, if you try to encrypt compressed data, Windows 8.1 uncompresses the data and then encrypts it.
Compressing drives
To compress a drive and all its contents, follow these steps:
1. In File Explorer or Disk Management, press and hold or right-click the drive that you want to compress, and then tap or click Properties.
2. Select Compress This Drive To Save Disk Space, and then tap or click OK.
Compressing directories and files
If you decide not to compress a drive, Windows 8.1 lets you selectively compress directories and files. To compress a file or directory, follow these steps:
1. In File Explorer, press and hold or right-click the file or directory that you want to compress, and then tap or click Properties.
2. On the General tab of the Properties dialog box, tap or click Advanced. In the Advanced Attributes dialog box, select the Compress Contents To Save Disk Space check box, as shown in Figure 4-3. Tap or click OK twice.
For an individual file, Windows 8.1 marks the file as compressed and then compresses it. For a directory, Windows 8.1 marks the directory as compressed and then compresses all the files in it. If the directory contains subfolders, Windows 8.1 displays a dialog box that enables you to compress all the subfolders associated with the directory. Just select Apply Changes To This Folder, Subfolders And Files, and then tap or click OK. After you compress a directory, any new files added or copied to the directory are compressed automatically.
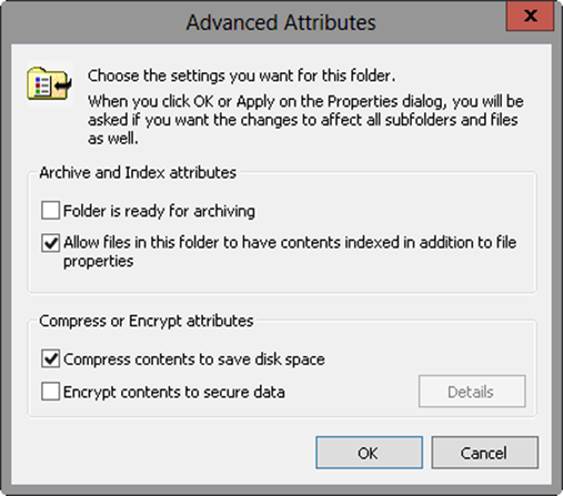
Figure 4-3. Compress the selected file or directory.
NOTE
If you move an uncompressed file from a different drive to a compressed folder, the file is compressed. However, if you move an uncompressed file to a compressed folder on the same NTFS drive, the file isn’t compressed. Note also that you can’t encrypt compressed files.
Expanding compressed drives
File Explorer shows the names of compressed files and folders in blue. You can remove compression from a drive by following these steps:
1. In File Explorer or Disk Management, press and hold or right-click the drive that contains the data you want to expand, and then tap or click Properties.
2. Clear the Compress This Drive To Save Disk Space check box, and then tap or click OK.
TIP
Windows always checks the available disk space before expanding compressed data. You should, too. If less free space is available than used space, you might not be able to complete the expansion. For example, if a compressed drive uses 150 GB of space and has 70 GB of free space available, you won’t have enough free space to expand the drive. Generally, you need about 1.5 to 2 times as much free space as you have compressed data.
Expanding compressed directories and files
If you decide later that you want to expand a compressed file or directory, reverse the process by following these steps:
1. In File Explorer, press and hold or right-click the file or directory, and then tap or click Properties.
2. On the General tab of the Properties dialog box, tap or click Advanced. Clear the Compress Contents To Save Disk Space check box. Tap or click OK twice.
With files, Windows 8.1 removes compression and expands the file. With directories, Windows 8.1 expands all the files within the directory. If the directory contains subfolders, you have the opportunity to remove compression from the subfolders. To do this, select Apply Changes To This Folder, Subfolders And Files when prompted, and then tap or click OK.
TIP
Windows 8.1 also provides command-line utilities for compressing and uncompressing your data. The compression utility is called Compact (Compact.exe). The uncompression utility is called Expand (Expand.exe).
Encrypting drives and data
NTFS has many advantages over other file systems that you can use with Windows 8.1. One of the major advantages is the capability to automatically encrypt and decrypt data by using the Encrypting File System (EFS). When you encrypt data, you add an extra layer of protection to sensitive data—and this extra layer acts as a security blanket blocking all other users from reading the contents of the encrypted files. Indeed, one of the great benefits of encryption is that only the designated user can access the data. This benefit is also a disadvantage in that the user must remove encryption before authorized users can access the data.
NOTE
As discussed previously, you can’t compress encrypted files. The encryption and compression features of NTFS are mutually exclusive. You can use one feature or the other, but not both.
Understanding encryption and EFS
File encryption is supported on a per-folder or per-file basis. Any file placed in a folder marked for encryption is automatically encrypted. Files in encrypted format can be read only by the person who encrypted the file. Before other users can read an encrypted file, the user must decrypt the file.
Every encrypted file has a unique encryption key. This means that an encrypted file can be copied, moved, and renamed just like any other file—and in most cases, these actions don’t affect the encryption of the data. (For details, see the Working with encrypted files and folders section later in this chapter.) The user who encrypts the file always has access to the file if the user’s public-key certificate is available on the computer that he or she is using. For this user, the encryption and decryption process is handled automatically and is transparent.
EFS is the process that handles encryption and decryption. The default setup for EFS allows users to encrypt files without needing special permission. Files are encrypted by using a public/private key that EFS automatically generates on a per-user basis.
Encryption certificates are stored as part of the data in user profiles. If a user works with multiple computers and wants to use encryption, an administrator needs to configure a roaming profile for that user. A roaming profile ensures that the user’s profile data and public-key certificates are accessible from other computers. Without this, users won’t be able to access their encrypted files on another computer.
Although they are separate features, both BitLocker Drive Encryption and EFS have a built-in data recovery system to guard against data loss. This recovery system ensures that encrypted data can be recovered in the event that a user’s public key certificate is lost or deleted. The most common scenario for this is when a user leaves the company and the associated user account is deleted. A manager might have been able to log on to the user’s account, check files, and save important files to other folders, but if the user account has been deleted, encrypted volumes and files will be accessible only if the encryption is removed or if the files are moved to a FAT or FAT32 volume (where EFS encryption isn’t supported and BitLocker encryption is not enabled).
To access encrypted files after the user account has been deleted, you need to use a recovery agent. Recovery agents have access to the file encryption key necessary to unlock data in encrypted files. To protect sensitive data, however, recovery agents don’t have access to a user’s private key or any private key information.
Windows 8.1 will encrypt volumes without designated BitLocker recovery agents, but Windows 8.1 won’t encrypt files without designated EFS recovery agents. EFS recovery agents are designated automatically, and the necessary recovery certificates are also generated automatically. This ensures that encrypted files can always be recovered.
Recovery agents are configured at two levels:
§ Domain The recovery agent for a domain is configured automatically when the first domain controller is installed. By default, the recovery agent is the domain administrator. Through Group Policy, domain administrators can designate additional recovery agents. Domain administrators can also delegate recovery agent privileges to designated security administrators.
§ Local computer When a computer is part of a workgroup or in a stand-alone configuration, the recovery agent is the administrator of the local computer by default. Additional recovery agents can be designated. Further, if you want local recovery agents in a domain environment rather than domain-level recovery agents, you must delete the recovery policy from the Group Policy for the domain.
You can delete recovery agents if you don’t want to use them. However, if you delete all recovery agents for EFS, files can no longer be encrypted by using EFS. One or more recovery agents must be configured for EFS to function.
Encrypting directories and files
With NTFS volumes, Windows 8.1 lets you select files and folders for encryption. When you encrypt files, the file data is converted to an encrypted format that can be read only by the person who encrypted the file. Users can encrypt files only if they have the proper access permissions. When you encrypt folders, the folder is marked as encrypted, but only the files within it are actually encrypted. All files that are created in or added to a folder marked as encrypted are encrypted automatically. Note that File Explorer shows the names of encrypted resources in green.
To encrypt a file or directory, follow these steps:
1. In File Explorer, press and hold or right-click the file or directory that you want to encrypt, and then tap or click Properties.
2. On the General tab of the Properties dialog box, tap or click Advanced, and then select the Encrypt Contents To Secure Data check box. Tap or click OK twice.
NOTE
You can’t encrypt compressed files, system files, or read-only files. If you try to encrypt compressed files, the files are automatically uncompressed and then encrypted. If you try to encrypt system files, you’ll get an error.
For an individual file, Windows 8.1 marks the file as encrypted and then encrypts it. For a directory, Windows 8.1 marks the directory as encrypted and then encrypts all the files in it. If the directory contains subfolders, Windows 8.1 displays a dialog box that enables you to encrypt all the subfolders associated with the directory. Just select Apply Changes To This Folder, Subfolders And Files, and then tap or click OK twice.
NOTE
On NTFS volumes, files remain encrypted even when they are moved, copied, and renamed. If you copy or move an encrypted file to a FAT, FAT32, or exFAT drive, the file is automatically decrypted before it is copied or moved. This means that you must have proper permissions to copy or move the file.
Working with encrypted files and folders
Previously, I said that you can copy, move, and rename encrypted files and folders just like any other files. This is true, but I qualified this by saying “in most cases.” When you work with encrypted files, you’ll have few problems so long as you work with NTFS volumes on the same computer. When you work with other file systems or other computers, you might run into problems. Two of the most common scenarios are these:
§ Copying between volumes on the same computer When you copy or move an encrypted file or folder from one NTFS volume to another NTFS volume on the same computer, the files remain encrypted. However, if you copy or move encrypted files to a FAT, FAT32, or exFAT volume, the files are decrypted before transfer and then transferred as standard files and therefore end up in their destinations as unencrypted files. FAT, FAT32, and exFAT don’t support encryption.
§ Copying between volumes on different computers When you copy or move an encrypted file or folder from one NTFS volume to another NTFS volume on a different computer, the files remain encrypted so long as the destination computer allows you to encrypt files and the remote computer is trusted for delegation. Otherwise, the files are decrypted and then transferred as standard files. The same is true when you copy or move encrypted files to a FAT, FAT32, or exFAT volume on another computer. FAT, FAT32, and exFAT don’t support encryption.
After you transfer a sensitive file that has been encrypted, you might want to confirm that the encryption is still applied. Press and hold or right-click the file, and then tap or click Properties. On the General tab of the Properties dialog box, tap or click Advanced. The Encrypt Contents To Secure Data option should be selected.
Configuring recovery policy
In domains, EFS and BitLocker recovery policies are configured automatically for domain controllers and member computers. By default, domain administrators are the designated EFS and BitLocker recovery agents for all computers in domains. In workgroups or homegroups, the local administrator is the designated EFS recovery agent for a stand-alone workstation. BitLocker has no default recovery agent for homegroups or workgroups.
Through the Group Policy console, you can view, assign, and delete recovery agents by following these steps:
1. Open a Group Policy Object for editing in the Group Policy Management Editor.
2. Open the Encrypted Data Recovery Agents node in Group Policy. To do this, expand Computer Configuration\Windows Settings\Security Settings\Public Key Policies, and then select either Encrypting File System or BitLocker Drive Encryption, as appropriate for the type of recovery agent with which you want to work.
3. The right pane lists the recovery certificates currently assigned. Recovery certificates are listed according to who issued them, to whom they are issued, expiration date, purpose, and other properties.
4. To designate an additional recovery agent, press and hold or right-click the Encrypting File System or BitLocker Drive Encryption node, and then tap or click Add Data Recovery Agent. This starts the Add Recovery Agent Wizard, which you can use to select a previously generated certificate that has been assigned to a user and then mark it as a designated recovery certificate. Tap or click Next.
5. On the Select Recovery Agents page, tap or click Browse Directory. In the Find Users, Contacts, And Groups dialog box, select the user with which you want to work.
NOTE
Before you can designate additional recovery agents, you must set up a root certificate authority (CA) in the domain. Then you must use the Certificates snap-in to generate a personal certificate that uses the EFS Recovery Agent template. The root CA must then approve the certificate request so that the certificate can be used.
6. To delete a recovery agent, select the recovery agent’s certificate in the right pane, and then press Delete. When prompted to confirm the action, tap or click Yes to permanently and irrevocably delete the certificate. With EFS, if the recovery policy is empty (meaning that it has no other designated recovery agents), EFS will be turned off so that files can no longer be encrypted; existing EFS-encrypted resources won’t have a recovery agent.
Sharing decrypted files
By default, encrypted files can be viewed only by the file owner. If you want other users to be able to access an encrypted file, you must decrypt the file or grant the users special access to the file. If user certificates have been assigned, you can grant access to a file by completing the following procedure:
1. In File Explorer, press and hold or right-click the file or folder, and then select Properties.
2. On the General tab of the Properties dialog box, tap or click Advanced, and then tap or click Details in the Advanced Attributes dialog box.
The User Access To dialog box appears. Users who have access to the encrypted file are listed by name.
3. To allow another user to access the file, tap or click Add.
4. If a user certificate is available for the user to whom you are granting access, select the user’s name in the list provided, and then tap or click OK. Otherwise, tap or click Find User to locate the certificate for the user.
Decrypting files and directories
File Explorer shows the names of encrypted resources in green. If you decide later that you want to decrypt a file or directory, reverse the process by following these steps:
1. In File Explorer, press and hold or right-click the file or directory, and then select Properties.
2. On the General tab of the related Properties dialog box, tap or click Advanced. Clear the Encrypt Contents To Secure Data check box. Tap or click OK twice.
With files, Windows 8.1 decrypts the file and restores it to its original format. With directories, Windows 8.1 decrypts the files within the directory. If the directory contains subfolders, you have the opportunity to remove encryption from the subfolders. To do this, select Apply Changes To This Folder, Subfolders And Files when prompted, and then tap or click OK.
TIP
Windows 8.1 also provides a command-line utility called Cipher (Cipher.exe) for encrypting and decrypting your data. Entering cipher at the command prompt without additional parameters shows you the encryption status of all folders in the current directory.
Troubleshooting common disk problems
Windows 8.1 makes extensive use of disk drives during startup and normal operations. You can often dramatically improve operating system and application performance by optimizing a computer’s disk drives. You should focus on disk space usage, disk errors, and disk fragmentation. You might also want to compress data to reduce the space used by data files, freeing up space for additional files.
NOTE
Disk maintenance tools, such as Disk Cleanup, Check Disk, and Disk Defragmenter, take advantage of resource prioritization features in Windows 8.1, as discussed in the Understanding and using Windows SuperFetch section in Chapter 3. The changes enable these tools to run in the background to take advantage of system idle time while running. As a result, users get a consistently good performance level even when background maintenance tasks are running.
You should closely monitor disk space usage on all system drives. As drives begin to fill up, their performance and the performance of the operating system as a whole can be reduced, particularly if the system runs low on space for storing virtual memory or temporary files. One way to reduce disk space usage is to use the Disk Cleanup tool to remove unnecessary files and compress old files. To do this, complete the following steps:
1. In the Everywhere Search box, open Disk Cleanup by entering cleanmgr and then pressing Enter, or by tapping or clicking the related option on the Apps screen.
2. If the computer has multiple hard disk drives, the Drive Selection dialog box is displayed. Use the Drives drop-down list to choose the drive you want to clean up, and then tap or click OK.
Disk Cleanup then examines the selected drive, looking for temporary user files that can be deleted and user files that are candidates for deletion. The more files on the drive, the longer the search process takes.
When Disk Cleanup finishes its initial run, you can add temporary system files that can be deleted and system files that are candidates for deletion by tapping or clicking Clean Up System Files, selecting a system drive to examine, and then tapping or clicking OK. You will then receive a report on files that you can clean up.
3. Use the check boxes provided in the Files To Delete list to choose files that you want to remove. Then tap or click OK. When prompted to confirm the action, tap or click Yes.
To eliminate the need to remind users to run Disk Cleanup, you can schedule Disk Cleanup to run regularly by completing the following steps:
1. Open Computer Management. You are connected to the local computer by default. If you want to view tasks on a remote computer, press and hold or right-click the Computer Management entry in the console tree (left pane), and then tap or click Connect To Another Computer. In the Select Computer dialog box, enter the name of the computer that you want to access, and then tap or click OK.
2. Select and then press and hold or right-click the Task Scheduler node, and then tap or click Create Task. This starts the Create Task Wizard.
3. Configure the task. On the Actions tab, select New. In the New Action dialog box, select Start A Program, and then enter %WinDir%\System32\cleanmgr.exe in the Program/Script text box.
By using Disk Management, you can determine the status of disks and the volumes they contain. Disk status is displayed below the physical disk number in the Graphical view and in the Status column in the Disk List view. Volume status is displayed as part of the volume information in Graphical view and in the Status column in Volume List view.
Table 4-1 lists status messages you might receive for disks. You’ll find a diagnosis and suggested corrective action in the Resolution column.
Table 4-1. Understanding and resolving disk status issues
|
STATUS |
DESCRIPTION |
RESOLUTION |
|
Online |
The standard disk status. This means the disk is accessible and doesn’t have problems. |
The drive doesn’t have any known problems. You don’t need to take any corrective action. |
|
Online (Errors) |
I/O errors have been detected on the disk. |
You can try to correct temporary errors by pressing and holding or right-clicking the disk, and then tapping or clicking Reactivate Disk. If this doesn’t work, the disk might have physical damage, or you might need to run a thorough check of the disk. |
|
Offline |
The disk isn’t accessible and might be corrupted or temporarily unavailable. If the disk status changes to Missing, the disk can no longer be located or identified on the system. |
Check for problems with the drive, its controller, and its cables. Make sure that the drive has power and is connected properly. Use the Reactivate Disk command to bring the disk back online (if possible). |
|
Foreign |
The disk has been moved to your computer but hasn’t been imported for use. A failed drive brought back online might sometimes be listed as Foreign. |
Press and hold or right-click the disk, and then tap or click Import Foreign Disks to add the disk to the system. |
|
Unreadable |
The disk isn’t accessible currently, which can occur when disks are being rescanned. |
With FireWire/USB card readers, you might encounter this status if the card is unformatted or improperly formatted. You might also encounter this status after the card is removed from the reader. Otherwise, if the drives aren’t being scanned, the drive might be corrupted or have I/O errors. Press and hold or right-click the disk, and then tap or click Rescan Disk (the command is also on the Action menu) to try to correct the problem. You might also want to reboot the system. |
|
Unrecognized |
The disk is of an unknown type and can’t be used on the system. A drive from a system not based on Windows might display this status. |
If the disk is from another operating system, don’t do anything. You can’t use the drive on the computer, so try a different drive. |
|
Not Initialized |
The disk doesn’t have a valid signature. A drive from a system not based on Windows might display this status. |
If the disk is from another operating system, don’t do anything. You can’t use the drive on the computer, so try a different drive. To prepare the disk for use on Windows 8.1, press and hold or right-click the disk, and then tap or click Initialize Disk. |
|
No Media |
No media has been inserted into the DVD or removable drive, or the media has been removed. Only DVD and removable disk types display this status. |
Insert a DVD or a removable disk to bring the disk online. With FireWire/USB card readers, this status is usually but not always displayed when the card is removed. |
Table 4-2 lists status messages you might receive for volumes. You’ll find a diagnosis and suggested corrective action in the Resolution column.
Table 4-2. Understanding and resolving volume status issues
|
STATUS |
DESCRIPTION |
RESOLUTION |
|
Data Incomplete |
Spanned volumes on a foreign disk are incomplete. You must have forgotten to add the other disks from the spanned volume set. |
Add the disks that contain the rest of the spanned volume and then import all the disks at one time. |
|
Data Not Redundant |
Fault-tolerant volumes on a foreign disk are incomplete. You must have forgotten to add the other disk from a mirror set. |
Add the remaining disk, and then import the disks at one time. |
|
Failed |
An error disk status. The disk is inaccessible or damaged. |
Ensure that the related disk is online, and, as necessary, press and hold or right-click the disk, and then tap or click Reactivate Disk. Press and hold or right-click the volume, and then tap or click Reactivate Volume. You might need to check the disk for a faulty connection. |
|
Failed Redundancy |
Fault-tolerant disks are out of sync. |
You can try to put the disks back in sync by pressing and holding or right-clicking the failed volume and selecting Reactivate Volume. |
|
Formatting |
A temporary status that indicates the volume is being formatted. |
The progress of the formatting is indicated as the percent complete, unless the Perform A Quick Format option was selected. |
|
Healthy |
The usual volume status. |
The volume doesn’t have any known problems. You don’t need to take any corrective action. |
|
Healthy (At Risk) |
Windows had problems reading from or writing to the physical disk on which the volume is located. This status appears when Windows encounters errors. |
Press and hold or right-click the disk, and then tap or click Reactivate Disk. If the disk continues to have this status or has this status periodically, the disk might be failing and you should back up all data on the disk. |
|
Healthy (Unknown Partition) |
Windows does not recognize the partition. This can occur because the partition is from a different operating system or is a manufacturer-created partition used to store system files. |
No corrective action is necessary. |
|
Initializing |
A temporary status that indicates the disk is being initialized. |
The drive status should change after a few seconds. |
|
Resynching |
A temporary status that indicates that a mirror set is being resynchronized. |
Progress is indicated as the percent complete. The volume should return to Healthy status. |
|
Stale Data |
Data on foreign disks that are fault tolerant are out of sync. |
Rescan the disks or restart the computer, and then check the status. A new status should be displayed, such as Failed Redundancy. |
|
Unknown |
The volume cannot be accessed. It might have a corrupted boot sector. |
The volume might have a boot sector virus. Check it with an up-to-date antivirus program. If no virus is found, boot from the Windows 8.1 media and use the Recovery Console’s Fixmbr command to fix the master boot record. |
Repairing disk errors and inconsistencies
Windows 8.1 includes feature enhancements that reduce the amount of manual maintenance you must perform on disk drives. The following enhancements have the most impact on the way you work with disks:
§ Transactional NTFS
§ Self-healing NTFS
Transactional NTFS enables file operations on an NTFS volume to be performed transactionally. This means programs can use a transaction to group together sets of file and registry operations so that all of them succeed or none of them succeed. While a transaction is active, changes are not visible outside the transaction. Changes are committed and written fully to disk only when a transaction is completed successfully. If a transaction fails or is incomplete, the program rolls back the transactional work to restore the file system to the state it was in prior to the transaction.
Transactions that span multiple volumes are coordinated by the Kernel Transaction Manager (KTM). The KTM supports independent recovery of volumes if a transaction fails. The local resource manager for a volume maintains a separate transaction log and is responsible for maintaining threads for transactions separate from threads that perform the file work.
Traditionally, you have had to use the Check Disk tool to fix errors and inconsistencies in NTFS volumes on a disk. Because this process can disrupt the availability of Windows-based systems, Windows 8.1 uses self-healing NTFS to protect file systems without having to use separate maintenance tools to fix problems. Because much of the self-healing process is enabled and performed automatically, you might need to perform volume maintenance manually only when you are notified by the operating system that a problem cannot be corrected automatically. If such an error occurs, Windows 8.1 notifies you about the problem and provides possible solutions.
Self-healing NTFS has many advantages over Check Disk, including the following:
§ Check Disk must have exclusive access to volumes, which means system and boot volumes can be checked only when the operating system starts up. On the other hand, with self-healing NTFS, the file system is always available and does not need to be corrected offline (in most cases).
§ Self-healing NTFS attempts to preserve as much data as possible if corruption occurs and reduces failed file system mounting that previously could occur if a volume was known to have errors or inconsistencies. During restart, self-healing NTFS repairs the volume immediately so that it can be mounted.
§ Self-healing NTFS reports changes made to the volume during repair through existing Chkdsk.exe mechanisms, directory notifications, and update sequence number (USN) journal entries. This feature also makes it possible for authorized users and administrators to monitor repair operations through Verification, Waiting For Repair Completion, and Progress Status messages.
§ Self-healing NTFS can recover a volume if the boot sector is readable but does not identify an NTFS volume. In this case, you must run an offline tool that repairs the boot sector and then allow self-healing NTFS to initiate recovery.
Although self-healing NTFS is a terrific enhancement, at times you might want to (or might have to) manually check the integrity of a disk. In these cases, you can use Check Disk (Chkdsk.exe) to check for and, optionally, repair problems found on FAT, FAT32, exFAT, and NTFS volumes. Although Check Disk can check for and correct many types of errors, the utility primarily looks for inconsistencies in the file system and its related metadata. Beyond this, the usefulness of Check Disk is rather limited.
Checking for disk errors
As part of automated maintenance, Windows 8.1 performs a proactive scan of your computer’s NTFS volumes. As with other automated maintenance, Windows scans disks by using Check Disk at 2:00 A.M. if the computer is running on AC power and the operating system is idle. Otherwise, Windows scans disks the next time the computer is running on AC power and the operating system is idle. To change this schedule, you need to modify the run time for automated maintenance by opening Action Center, expanding the Maintenance panel, selecting Change Maintenance Settings, and then selecting a new run schedule.
Although automated maintenance triggers the disk scan, the process of calling and managing Check Disk is handled by a separate task. In Task Scheduler, you’ll find the ProactiveScan task in the scheduler library under Microsoft\Windows\Chkdsk, and you can get detailed run details by reviewing the information provided on the task’s History tab.
You can periodically use the Check Disk tool to also check the integrity of disks. Check Disk examines disks and can correct many types of common errors on FAT16, FAT32, exFAT, and NTFS drives.
One of the ways Check Disk locates errors is by comparing the volume bitmap with the disk sectors assigned to files in the file system. Check Disk can’t repair corrupted data within files that appear to be structurally intact, however. You can run Check Disk from the command line or through the GUI.
IMPORTANT
Because ReFS has a built-in data scrubber that provides proactive error identification, isolation, and correction, Windows automatically repairs and corrects data integrity issues on ReFS volumes. You can, however, run Check Disk on ReFS volumes if you’d like.
With Windows 8.1, Check Disk performs enhanced scan and repair automatically, instead of the legacy scan and repair available with earlier releases of Windows. Here, when you use Check Disk with NTFS volumes, Check Disk performs an online scan and analysis of the disk for errors. Check Disk writes information about any detected corruptions in the $corrupt system file. If the volume is in use, detected corruptions can be repaired by taking the volume offline temporarily. However, unmounting the volume for the repair invalidates all open file handles. With the boot/system volume, the repairs are performed the next time you start the computer.
Storing the corruption information and then repairing while the volume is dismounted enables Windows to rapidly repair volumes. It also enables you to keep using the disk while a scan is being performed. Typically, offline repair will only take a few seconds, compared to what otherwise would have been hours for very large volumes using the legacy scan and repair technique.
FAT, FAT32, and exFAT (FAT volumes) do not support the enhanced Check Disk features offered in Windows 8.1. When you use Check Disk with FAT volumes, Windows 8.1 uses the legacy scan and repair process. This means the scan and repair process typically requires taking the volume offline and preventing it from being used.
Running Check Disk from the command line
You can run Check Disk from an elevated command prompt or within other tools. At the elevated command prompt, you can test the integrity of drive C by entering the following command:
chkdsk /scan C:
Check Disk then performs an analysis of the disk and returns a status message regarding any problems it encounters. Unless you specify further options, Check Disk won’t repair problems, however. To repair errors on drive C, use this command:
chkdsk /spotfix C:
Fixing the volume requires exclusive access to the volume. The way this works depends on the type of volume:
§ For non-system volumes, you’ll get a prompt asking whether you would like to force a dismount of the volume for the repair. In this case, you can enter Y to proceed or N to cancel the dismount. If you cancel the dismount, you’ll get the prompt asking whether you would like to schedule the volume for the repair the next time the computer is started. In this case, you can enter Y to schedule the repair or N to cancel the repair.
§ For system volumes, you’ll get a prompt asking whether you would like to schedule the volume for the repair the next time the computer is started. In this case, you can enter Y to schedule the repair or N to cancel the repair.
You can’t run Check Disk with both the /scan and /spotfix options. The reason for this is that the scan and repair tasks are now independent of each other.
The complete syntax for Check Disk is as follows:
CHKDSK [volume[[path]
filename]] [/F] [/V] [/R] [/X] [/I] [/C] [/B]
[/L[:size]] [/scan] [/forceofflinefix] [/perf] [/spotfix] [/sdcleanup]
[/offlinescanandfix]
The options and switches for Check Disk are used as follows:
§ volume Sets the volume with which to work
§ path/filename Specifies files to check for fragmentation (FAT volumes only)
§ /B Re-evaluates bad clusters on the volume (NTFS only; implies /R)
§ /C Skips checking of cycles within the folder structure (NTFS only)
§ /F Fixes errors on the disk by using the offline (legacy) scan and fix behavior
§ /I Performs a minimum check of index entries (NTFS only)
§ /L:size Sets the log file size (NTFS only)
§ /R Locates bad sectors and recovers readable information (implies /F)
§ /V Displays the full path and name of every file on the disk (FAT volumes); displays cleanup messages if any (NTFS)
§ /X Forces the volume to dismount first if necessary (implies /F)
On NTFS volumes, these options can be used to manage the enhanced Check Disk capabilities of Windows 8.1:
§ /forceofflinefix Must be used with /scan. Bypasses all online repair and queues errors for offline repair.
§ /scan Performs an online scan of the volume, the default. Errors detected during the scan are added to the $corrupt system file.
§ /perf Performs the scan as fast as possible by using more system resources.
§ /spotfix Enables certain types of errors to be repaired online (the default).
§ /sdcleanup Cleans up unneeded security descriptor data. Implies /F (with legacy scan and repair).
§ /offlinescanandfix Performs an offline scan and fix of the volume.
Running Check Disk interactively
You can also run Check Disk interactively by using Computer Management. You can check disk drives on the local computer by following these steps:
1. In Computer Management, select the Storage node and then the Disk Management node. In the Volume List or Graphical view, press and hold or right-click a drive, and then tap or click Properties.
2. On the Tools tab, tap or click Check. This displays the Error Checking dialog box, shown in Figure 4-4. For NTFS volumes, you’ll have a Scan Drive option. For FAT volumes, you’ll have a Scan And Repair Drive option.
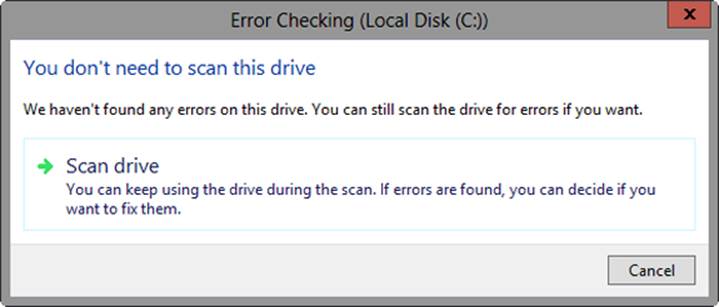
Figure 4-4. Check Disk is available by tapping or clicking Check on the Tools tab in the Properties dialog box. Use it to check a disk for errors and repair them.
3. Click Scan Drive or Scan And Repair Drive, as appropriate, to start the scan. If no errors are found, Windows will confirm this. If errors are found, you’ll be prompted with additional options. As with checking disks at a prompt, the way this works depends on whether you are working with a system or non-system volume and whether the volume is formatted with NTFS or FAT.
Defragmenting disks
Any time you add files to or remove files from a drive, the data on the drive can become fragmented. When a drive is fragmented, large files can’t be written to a single continuous area on the disk. As a result, the operating system must write the file to several smaller areas on the disk, which means more time is required to read the file from the disk. To reduce fragmentation, Windows 8.1 automatically defragments disks as part of automated maintenance. As with error checking, the process of calling and managing disk optimization is handled by a separate task. In Task Scheduler, you’ll find the Scheduled Defrag task in the scheduler library under Microsoft\Windows\Defrag, and you can get detailed run details by reviewing the information provided on the task’s History tab.
Windows 8.1 uses the Optimize Drives utility to analyze and optimize drives. Automatic analysis and optimization of disks can occur while the disks are online if the computer is on AC power and the operating system is running but otherwise idle. By default, disk optimization is a weekly task rather than a daily task—and there’s a good reason for this. Typically, you need to optimize your computer’s disks only periodically, and optimization once a week should be sufficient in most cases. Note, however, that although non-system disks can be rapidly analyzed and optimized, it can take significantly longer to optimize system disks online. As a result, very large system volumes might not get fully analyzed and optimized on some computers, especially if the computer is powered off during schedule maintenance and then actively used while plugged into AC power.
With manual optimization, Optimize Drives performs an online analysis of a computer’s volumes and then reports the percentage of fragmentation. You can then elect to defragment the volumes. Because system, boot, and other volumes can be defragmented online, Windows does not need to take volumes offline before optimizing them.
You can manually optimize FAT, FAT32, exFAT, NTFS, and ReFS volumes by following these steps:
1. In Computer Management, select the Storage node and then the Disk Management node. Press and hold or right-click a drive, and then tap or click Properties.
2. On the Tools tab, tap or click Optimize. In the Optimize Drives dialog box, tap or click the drive you want to check, and then tap or click Analyze. Optimize Drives analyzes the disk to determine whether the disk needs to be defragmented. If so, it recommends that you optimize the drive.
3. The Current Status column shows the status of each drive and the percentage of fragmentation when last checked. You can optimize a drive by tapping or clicking it, and then tapping or clicking Optimize.
NOTE
Depending on the size of the disk, defragmentation can take several hours. You can tap or click Stop at any time to stop defragmentation.
Although you previously could set a specific run day and time, Windows now handles the run schedule as part of automated maintenance. By default, analysis (and optimization, if necessary) occur approximately once a week, and you can control the approximate start time by changing the automated maintenance start time. Windows also will notify you if three consecutive runs are missed. All internal drives and certain external drives are optimized automatically as part of the regular schedule, as are new drives that you connect to the computer.
You can configure and manage automated defragmentation by following these steps:
1. In Computer Management, select the Storage node and then the Disk Management node. Press and hold or right-click a drive, and then tap or click Properties.
2. On the Tools tab, tap or click Optimize. This displays the Optimize Drives dialog box, shown in Figure 4-5.
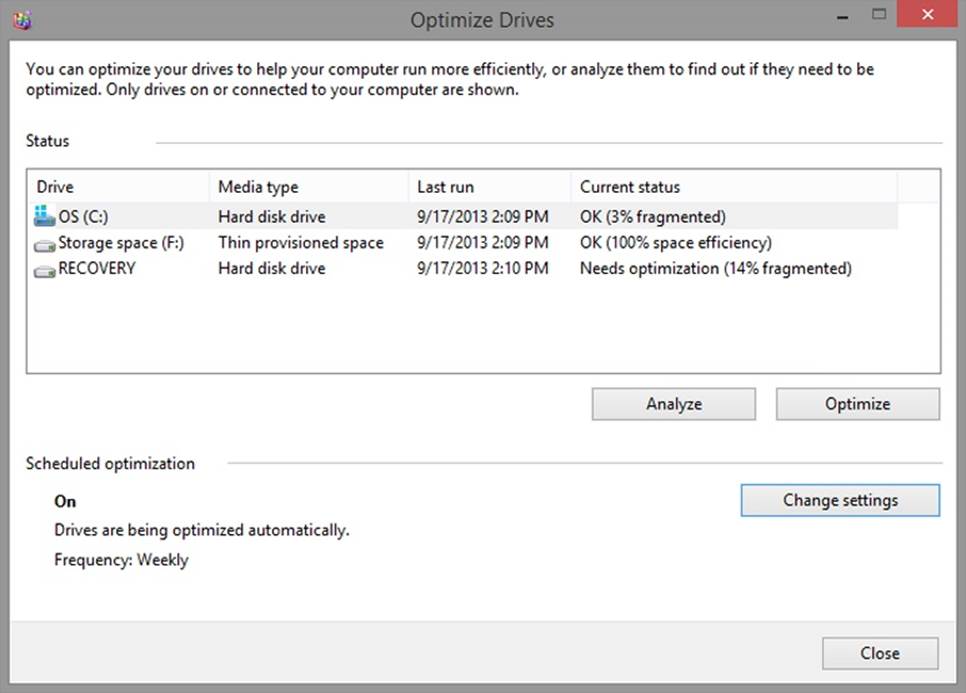
Figure 4-5. Windows optimizes drives to maintain read-write performance levels for disk drives.
3. If you want to change how optimization works, tap or click Change Settings. This displays the dialog box shown in Figure 4-6. To cancel automated defragmentation, clear Run On A Schedule. To enable automated defragmentation, select Run On A Schedule.
4. The default run frequency is set as shown. In the Frequency list, you can choose Daily, Weekly, or Monthly as the run schedule. If you don’t want to be notified about missed runs, clear the Notify Me check box.
5. If you want to manage which disks are defragmented, tap or click Choose and then select the volumes to defragment. By default, all disks installed within or connected to the computer are defragmented, and any new disks are also defragmented automatically. Select the check boxes for disks that should be defragmented automatically and clear the check boxes for disks that should not be defragmented automatically. Tap or click OK to save your settings.
6. Tap or click OK, and then tap or click Close.
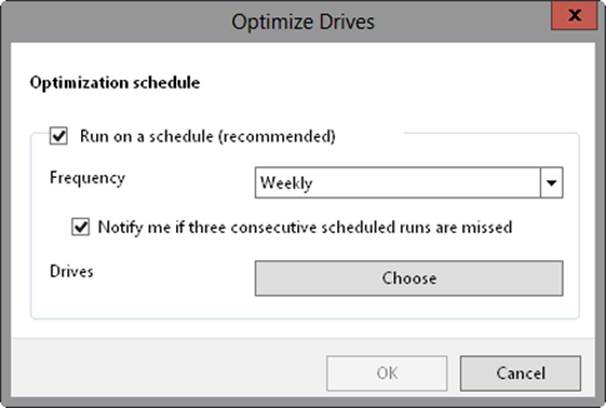
Figure 4-6. Specify the run schedule for automated defragmentation.
NOTE
Windows automatically performs cyclic pickup defragmentation. With this feature, when a scheduled defragmentation pass is stopped and rerun, the computer automatically picks up the next unfinished volume in line to be defragmented.
Resynchronizing and repairing a mirrored set
Windows 8.1 automatically synchronizes mirrored volumes on drives. However, data on mirrored drives can become out of sync. For example, if one of the drives goes offline, data is written only to the drive that’s online.
You can resynchronize and repair mirrored sets, but you must rebuild the set by using disks with the same partition style—either MBR or GPT. You need to get both drives in the mirrored set online. Because a disk in the set has failed, the mirrored set’s status should read Failed Redundancy. The corrective action you take depends on the failed volume’s status:
§ If the status is Missing or Offline, make sure that the drive has power and is connected properly. Then start Disk Management, press and hold or right-click the failed volume, and then tap or click Reactivate Volume. The drive status should change to Regenerating and then to Healthy. If the volume doesn’t return to Healthy status, press and hold or right-click the volume, and then tap or click Resynchronize Mirror.
§ If the status is Online (Errors), press and hold or right-click the failed volume, and then tap or click Reactivate Volume. The drive status should change to Regenerating and then to Healthy. If the volume doesn’t return to Healthy status, press and hold or right-click the volume, and then tap or click Resynchronize Mirror.
§ If one of the drives shows a status of Unreadable, you might need to rescan the drives on the system by choosing Rescan Disks from Disk Management’s Action menu. If the drive status doesn’t change, you might need to reboot the computer.
§ If one of the drives still won’t come back online, press and hold or right-click the failed volume, and then tap or click Remove Mirror. Next, press and hold or right-click the remaining volume in the original mirror, and then tap or click Add Mirror. You now need to mirror the volume on an unallocated area of a different drive. If you don’t have unallocated space on another drive, you need to create space by deleting other volumes or replacing the failed drive.
Repairing a mirrored system volume to enable boot
The failure of a mirrored drive might prevent your system from booting. Typically, this happens when you’re mirroring the system or boot volume, or both, and the primary mirror drive has failed.
When you mirror a system volume, the operating system should add an entry to the system’s boot manager that enables you to boot to the secondary mirror. Resolving a primary mirror failure is much easier with this entry in the boot manager file than without it because all you need to do is select the entry to boot to the secondary mirror. If you mirror the boot volume and a secondary mirror entry is not created for you (as verified when you enter bcdedit at an elevated command prompt), you can modify the boot entries in the boot manager to create one by using the BCD Editor (Bcdedit.exe).
If a system fails to boot to the primary system volume, restart the system and select the Boot Mirror – Secondary Plex option for the operating system you want to start. The system should start as usual. After you successfully boot the system to the secondary drive, you can schedule the maintenance necessary to rebuild the mirror if you want to. You’ll need to follow these steps:
1. Shut down the system, replace the failed volume or add a hard disk drive, and then restart the system.
2. Break the mirror set, as discussed in the Breaking a mirrored set section in Chapter 3, and then re-create the mirror on the drive you replaced, which is usually Drive 0. Press and hold or right-click the remaining volume that was part of the original mirror, and then tap or click Add Mirror. This displays the Add Mirror dialog box.
3. In the Disks list, select a location for the mirror, and then tap or click Add Mirror. Windows 8.1 begins the mirror creation process. In Disk Management, you’ll receive a status of Resynching on both volumes. The disk on which the mirrored volume is being created has a warning icon.
4. If you want the primary mirror to be on the drive that you added or replaced (the original system volume), use Disk Management to break the mirror again. Make sure that the primary drive in the original mirror set has the drive letter that was previously assigned to the complete mirror. If it doesn’t, assign the appropriate drive letter.
5. Press and hold or right-click the drive that you added or replaced, and then tap or click Add Mirror. Now re-create the mirror.
6. Check the boot configuration and be sure that the drive that you added or replaced is used during startup. You might need to modify the boot configuration to ensure this.
All materials on the site are licensed Creative Commons Attribution-Sharealike 3.0 Unported CC BY-SA 3.0 & GNU Free Documentation License (GFDL)
If you are the copyright holder of any material contained on our site and intend to remove it, please contact our site administrator for approval.
© 2016-2026 All site design rights belong to S.Y.A.