Windows 8.1 Administration Pocket Consultant: Storage, Security, & Networking (2014)
Chapter 5. Configuring User and Computer Policies
§ Group Policy essentials
§ Configuring policies
§ Working with file and data management policies
§ Working with access and connectivity policies
§ Working with computer and user script policies
§ Working with logon and startup policies
Group Policy is a set of rules that you can apply to help manage users and computers. In Windows 8.1, Group Policy includes both managed settings, referred to as policy settings, and unmanaged settings, referred to as policy preferences. Policy settings enable you to control the configuration of the operating system and its components. Policy preferences enable you to configure, deploy, and manage operating system and application settings. The key difference between policy settings and policy preferences is enforcement. Group Policy strictly enforces policy settings, but does not strictly enforce policy preferences.
Group Policy essentials
You use policy settings to control the configuration of the operating system and also to disable options and controls in the user interface for settings that Group Policy is managing. Most policy settings are stored in policy-related branches of the registry. The operating system and compliant applications check these branches to determine whether—and how—various aspects of the operating system are controlled.
Two types of Group Policy are available: local Group Policy and Active Directory–based Group Policy. Local Group Policy is used to manage settings only for local machines. Active Directory–based Group Policy is used to manage the settings of computers throughout sites, domains, and organizational units (OUs). Group Policy simplifies administration by giving administrators centralized control over the privileges, permissions, and capabilities of users and computers. Careful management of policies is essential to proper operations. Policy settings are divided into two broad categories: those that apply to computers and those that apply to users. Computer policies are generally applied during system startup, and user policies are generally applied during logon.
During startup and logon, policies are applied in an exact sequence, which is often important to keep in mind when troubleshooting system behavior. When multiple policies are in place, they are applied in the following order:
1. Local policies
2. Site policies
3. Domain policies
4. OU policies
5. Child OU policies
By default, if policy settings conflict, settings applied later take precedence and overwrite previous policy settings. For example, OU policies take precedence over domain policies. As you might expect, there are exceptions to the precedence rule that enable administrators to block, oversee, and disable policies.
The Group Policy client service isolates Group Policy notification and processing from the Windows logon process, which reduces the resources used for background processing of policy, increases overall performance, and enables delivery and application of new Group Policy files as part of the update process without requiring a restart. By using Network Location Awareness, the Group Policy client can determine the computer state, the network state, and the available network bandwidth for slow-link detection. As a result, the Group Policy client has a better understanding of the operational environment and can better determine which policies should be applied and when they should be applied.
Group Policy event messages are written to a computer’s system log. In addition, when you are troubleshooting, you have several options. You can use the detailed event messages in the operational log, which you can access in Event Viewer under Applications And Services Logs\Microsoft\Windows\GroupPolicy\Operational. You also can use Gpupdate.exe to verify that the most current settings have been applied. Although you typically run this command-line tool on the computer you are diagnosing, Windows Server 2012 R2 enables you to schedule Gpupdate.exe to refresh Group Policy on remote computers. For more information, see Chapter 6, “Automating administrative tasks, policies, and procedures,” in Windows Server 2012 R2 Pocket Consultant: Essentials & Configuration by William R. Stanek (Microsoft Press, 2014).
Accessing and using local group policies
Local Group Policy applies to any user or administrator who logs on to a computer that is a member of a workgroup, in addition to any user or administrator who logs on locally to a computer that is a member of a domain.
As with Windows 7, a computer running Windows 8.1 can have one or more local policy objects associated with it. Local Group Policy is managed through the local Group Policy Object (GPO). The local GPO is stored on individual computers in the %SystemRoot%\System32\GroupPolicy folder. Additional user-specific and group-specific local GPOs are stored in the %SystemRoot%\System32\GroupPolicyUsers folder.
When using computers in a stand-alone configuration rather than a domain configuration, you might find multiple local GPOs useful. You can implement one local GPO for administrators and another local GPO for non-administrators and then you would no longer have to explicitly disable or remove settings that interfere with your ability to manage a computer before performing administrator tasks. In a domain configuration, however, you might not want to use multiple local GPOs. In domains, most computers and users already have multiple GPOs applied to them, and adding multiple local GPOs to this already varied mix can make it confusing to manage Group Policy.
Windows 8.1 has three layers of local GPOs:
§ Local Group Policy Local Group Policy is the only local GPO that allows both computer configuration and user configuration settings to be applied to all users of the computer.
§ Administrators and Non-Administrators local Group Policy Administrators and Non-Administrators local Group Policy contains only user configuration settings. This policy is applied based on whether the user account being used is a member of the local Administrators group.
§ User-specific local Group Policy User-specific local Group Policy contains only user configuration settings. This policy is applied to individual users and groups.
These layers of local GPOs are processed in the following order: local Group Policy, Administrators and Non-Administrators local Group Policy, user-specific local Group Policy.
Because the available User Configuration settings are the same among all local GPOs, a setting in one GPO might conflict with a setting in another GPO. Windows 8.1 resolves conflicts in settings by overwriting any previous setting with the last read and most current setting. The final setting is the one Windows 8.1 uses. When Windows 8.1 resolves conflicts, only the enabled or disabled state of settings matters. A setting of Not Configured does not affect the state of the setting from a previous policy application. To simplify domain administration, you can disable processing of local GPOs on computers running Windows 8.1 by enabling the Turn Off Local Group Policy Objects Processing policy setting in a domain GPO. In Group Policy, this setting is located under the Administrative Templates policies for Computer Configuration under \System\Group Policy.
NOTE
If enabled, local GPOs are always processed. However, they have the least precedence, which means their settings can be superseded by site, domain, and OU settings.
The only local policy object that exists on a computer by default is the local GPO. You can create and manage other local policy objects by using the Group Policy Object Editor. Because local Group Policy is a subset of Group Policy, there are several things you can’t do locally that you can do in a domain setting. First, you can’t manage any policy preferences. Second, you can manage only a subset of policy settings. Beyond these fundamental differences, local Group Policy and Active Directory–based Group Policy are managed in much the same way.
To work with local GPOs, you must use an administrator account. The quickest way to access the top-level local GPO on a local computer is to enter the following command in the Search box or at a command prompt:
gpedit.msc /gpcomputer: "%ComputerName%"
This command starts the Group Policy Management Editor in a Microsoft Management Console (MMC) with its target set to the local computer.
You can also manage the top-level local GPO on a computer by following these steps:
1. Open the MMC. One way to do this is by pressing the Windows key, typing mmc.exe, and then pressing Enter.
2. In the MMC, tap or click File, and then tap or click Add/Remove Snap-In.
3. In the Add Or Remove Snap-Ins dialog box, tap or click Group Policy Object Editor, and then tap or click Add.
4. In the Select Group Policy Object dialog box, tap or click Finish (because the local computer is the default object). Tap or click OK.
As shown in Figure 5-1, you can now manage local Group Policy settings by using the options provided. Because local Group Policy does not have policy preferences, you will not find separate Policies and Preferences nodes under Computer Configuration and User Configuration.
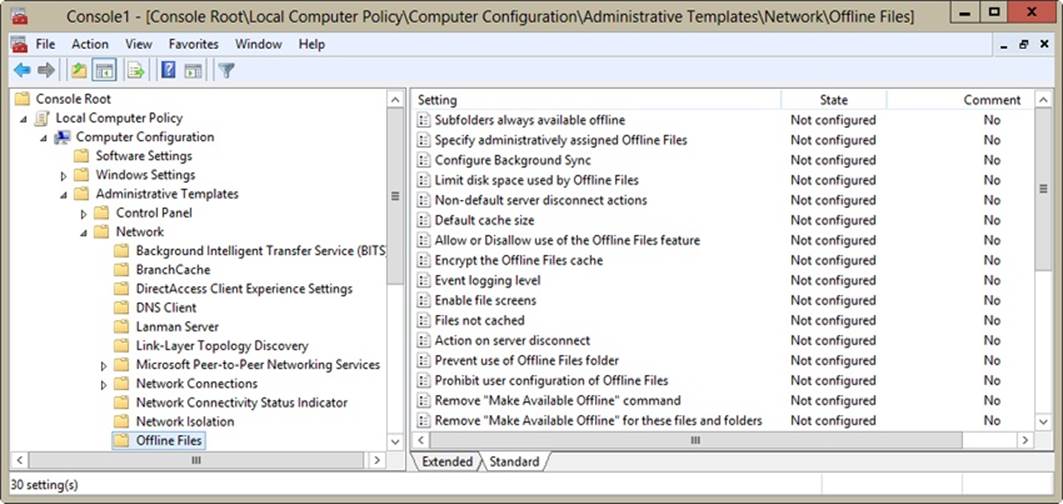
Figure 5-1. Access the top-level local GPO.
You can create and manage other local policy objects as necessary. To create or access other local GPOs, follow these steps:
1. In the MMC, tap or click File, and then tap or click Add/Remove Snap-In.
2. In the Add Or Remove Snap-Ins dialog box, tap or click Group Policy Object Editor, and then tap or click Add.
3. In the Select Group Policy Object dialog box, tap or click Browse. In the Browse For A Group Policy Object dialog box, tap or click the Users tab.
4. On the Users tab, shown in Figure 5-2, the entries in the Group Policy Object Exists column specify whether a particular local policy object has been created. Do one of the following:
o Select Administrators to create or access the Administrators local GPO. You select Administrators instead of the Administrator user to ensure that the policy is applied to all local administrators.
o Select Non-Administrators to create or access the Non-Administrators local GPO.
o Select the local user whose user-specific local GPO you want to create or access.
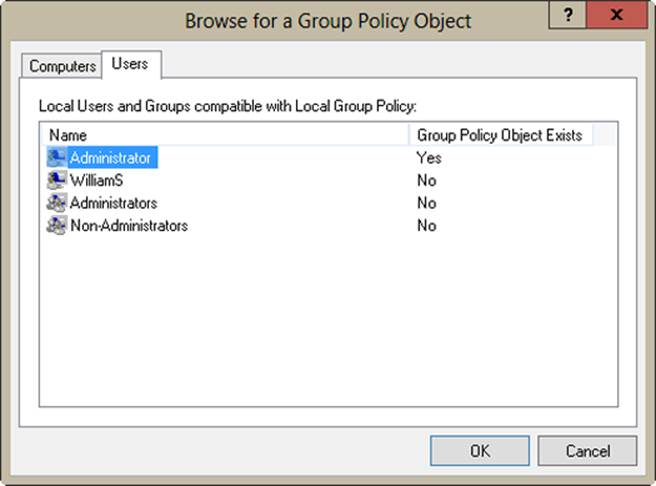
Figure 5-2. Access additional local GPOs.
5. Tap or click OK. Tap or click Finish, and then tap or click OK again. If the selected object doesn’t already exist, it will be created. Otherwise, you’ll open the object for review and editing.
Accessing and using site, domain, and OU policies
With Active Directory, each site, domain, and OU can have one or more group policies. When you want to work with Active Directory–based Group Policy, you use the Group Policy Management Console (GPMC) to access and work with GPOs. To work with GPOs, you must use an administrator account.
On a computer running a server edition of Windows, the GPMC is available as part of the standard installation. On a computer running a desktop edition of Windows, the GPMC is included in the Remote Server Administration Tools (RSAT). You can download the RSAT for Windows 8.1 by visiting the Microsoft Download Center (http://download.microsoft.com/).
After you install the GPMC as part of the RSAT, you can run the GPMC from Server Manager. In Server Manager, tap or click Tools, and then tap or click Group Policy Management.
As shown in Figure 5-3, the left pane of the GPMC has two upper-level nodes by default: Group Policy Management (the console root) and Forest (a node representing the forest to which you are currently connected, which is named after the forest root domain for that forest). When you expand the Forest node, you find the following nodes:
§ Domains Provides access to the policy settings for domains in the forest being administered. You are connected to your logon domain by default; and you can add connections to other domains. If you expand a domain, you can access the Default Domain Policy GPO, the Domain Controllers OU (and the related Default Domain Controllers Policy GPO), and GPOs defined in the domain.
§ Sites Provides access to the policy settings for sites in the related forest. Sites are hidden by default.
§ Group Policy Modeling Provides access to the Group Policy Modeling Wizard, which helps you plan policy deployment and simulate settings for testing purposes. Any saved policy models are also available.
§ Group Policy Results Provides access to the Group Policy Results Wizard. For each domain to which you are connected, all the related GPOs and OUs are available to work with in one location.
GPOs found in domain, site, and OU containers in the GPMC are actually GPO links and not GPOs themselves. The actual GPOs are found in the Group Policy Objects container of the selected domain. Notice also that the icons for GPO links have a small arrow at the bottom left, similar to shortcut icons. You can open a GPO for editing by pressing and holding or right-clicking it and then selecting Edit.
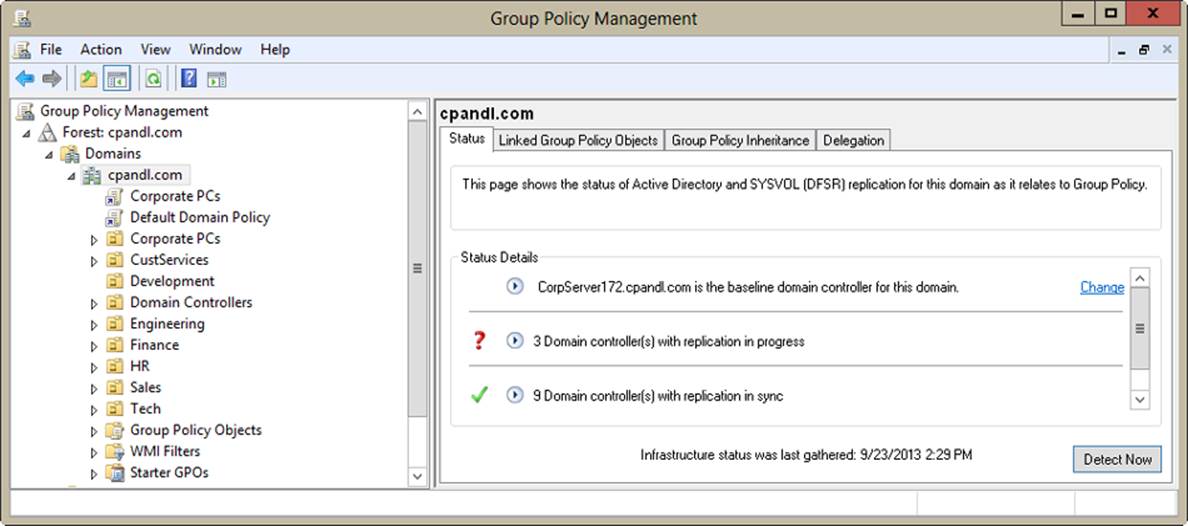
Figure 5-3. Access GPOs for domains, sites, and OUs.
After you’ve selected a policy for editing or created a new policy, use the Group Policy Management Editor to work with the GPOs. As Figure 5-4 shows, the Group Policy Management Editor has two main nodes:
§ Computer Configuration Enables you to set policies that should be applied to computers, regardless of who logs on
§ User Configuration Enables you to set policies that should be applied to users, regardless of which computer they log on to
NOTE
Keep in mind that user configuration options set through local policy objects apply only to computers on which the options are configured. If you want the options to apply to all computers that the user might use, you must use domain, site, or OU policies.
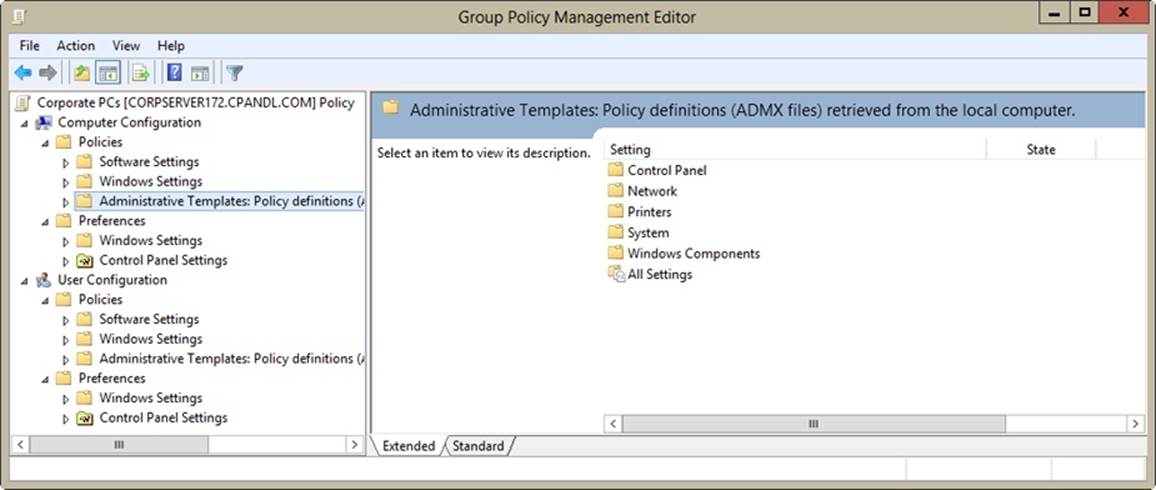
Figure 5-4. Group Policy options depend on the type of policy you’re creating and the add-ons installed.
You will find separate Policies and Preferences nodes under Computer Configuration and User Configuration. When you are working with policy settings, you use the Policies node. The options available under a Policies node depend on the add-ons installed and which type of policy you’re creating. You’ll usually find that both nodes have the following subnodes:
§ Software Settings Sets policies for software settings and software installation. When you install software, subnodes might be added to Software Settings.
§ Windows Settings Sets policies for folder redirection, scripts, and security.
§ Administrative Templates Sets policies for the operating system, Windows components, and programs. These policies, examined later in this chapter, apply specifically to users and computers.
Configuring policies
To manage users and computers, you need to configure the administrative template policies. These policies provide easy access to registry-based policy settings that control the operating system, Windows components, and programs. Although earlier versions of Windows that support Group Policy use administrative template (ADM) files with a proprietary markup language to store registry-based policy settings, Windows 8.1 uses a standards-based XML file format called ADMX. Unlike ADM files, which are stored in the GPO to which they relate, ADMX files are stored in a central repository. In domains, central storage of ADMX files makes it easier to work with and manage the files.
Viewing policies and templates
As shown in Figure 5-5, you can view the currently configured templates in the Group Policy Management Editor’s Administrative Templates node, which contains policies that can be configured for local systems, OUs, domains, and sites. Different sets of templates are found under Computer Configuration and User Configuration. You can add templates containing new policies manually through the Group Policy Management Console and when you install new Windows components.
Any changes you make to policies available through the administrative templates are saved in the registry. Computer configurations are saved in HKEY_LOCAL_MACHINE, and user configurations are saved in HKEY_USER. Browsing the Administrative Templates node in the Group Policy Management Editor is the best way to become familiar with available administrative template policies. As you browse the templates, you’ll find that policies are in one of three states:
§ Not Configured The policy isn’t used, and its settings do not affect the existing configuration on the computer.
§ Enabled The policy is active, and its settings are saved in the registry.
§ Disabled The enabled behavior of the policy is not on. The policy might have a specific disabled behavior that is contrary to its enabled setting. This setting is saved in the registry.
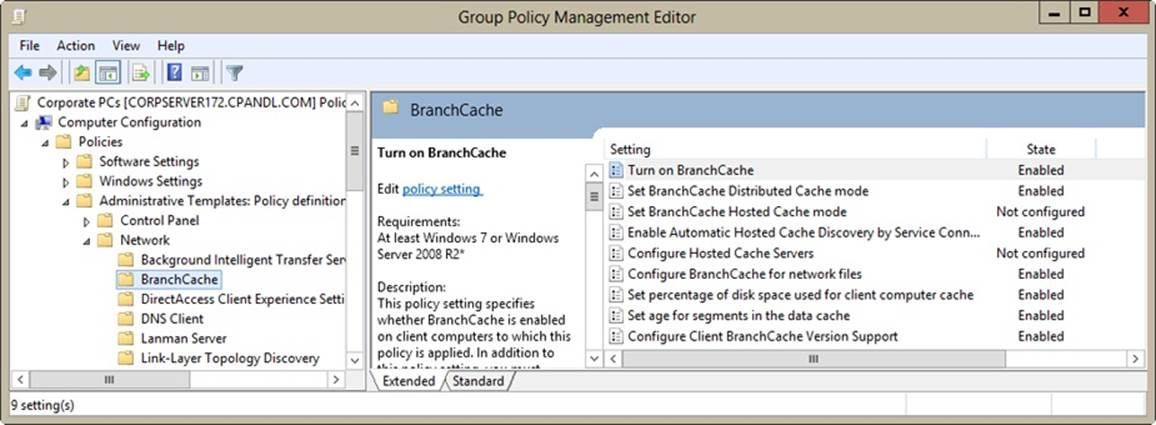
Figure 5-5. Set user and computer policies through administrative templates.
Enabling, disabling, and configuring policies
In the Group Policy Management Editor, you’ll find administrative templates in two nodes: Computer Configuration and User Configuration. In most cases, the policies in these areas don’t overlap or conflict with each other. If there is a conflict, however, computer policies have precedence, which means that the computer policy is enforced. Later in this chapter, you’ll find details on commonly used policies and how to employ them.
Before you can work with policies, you must access the Group Policy Management Editor for the site, domain, or OU with which you want to work. To access a GPO for a domain or OU, follow these steps:
1. In the GPMC, expand the entry for the forest with which you want to work, and then expand the related Domains node.
2. Expand the node for the domain with which you want to work, and then expand the related Group Policy Objects node.
3. Press and hold or right-click the GPO with which you want to work, and then select Edit. This opens the GPO for editing in the Group Policy Management Editor.
After you’ve opened a GPO in the Group Policy Management Editor, you can enable, disable, and configure policies by completing the following steps:
1. Under the Computer Configuration or User Configuration node (whichever applies to the type of policy you want to set), access the Administrative Templates folder.
2. In the left pane, tap or click the subfolder containing the policies with which you want to work. The related policies are displayed in the right pane.
3. Double-tap or double-click a policy (or press and hold or right-click a policy and select Edit) to display a properties dialog box.
4. Use the following options to change the state of the policy:
o Not Configured The policy is not configured.
o Enabled The policy is enabled.
o Disabled The policy is disabled.
5. If you enable the policy, set any additional parameters specified on the Setting tab, and then tap or click Apply.
6. Use the Previous Setting or Next Setting button to manage other policies in the current folder. Configure the policies as described in steps 3–5.
7. Tap or click OK when you have finished managing policies.
Adding or removing templates
You can add or remove template folders in the Group Policy Management Editor. To do this, complete the following steps:
1. Access the Group Policy Management Editor for the site, domain, or OU with which you want to work.
2. In the Computer Configuration or User Configuration node, press and hold or right-click the Administrative Templates folder, and then tap or click Add/Remove Templates. This displays the Add/Remove Templates dialog box.
3. To add a template, tap or click Add. Then, in the Policy Templates dialog box, select the template you want to add, and then tap or click Open.
4. To remove a template, select the template, and then tap or click Remove.
5. When you have finished adding and removing templates, tap or click Close.
Working with file and data management policies
Every system administrator needs to be familiar with file and data management policies, which affect the amount of data a user can store on systems, how offline files are used, and whether the System Restore feature is enabled.
Configuring disk quota policies
Policies that control disk quotas are applied at the system level. You access these policies by using the Administrative Templates policies for Computer Configuration under System\Disk Quotas. The available policies are summarized in Table 5-1.
Table 5-1. Disk quota policies
|
POLICY NAME |
DESCRIPTION |
|
Apply Policy To Removable Media |
Determines whether to extend quota policies to NTFS volumes on removable media. If you do not enable this policy, quota limits apply only to fixed media drives. |
|
Enable Disk Quotas |
Turns disk quotas on or off for all NTFS volumes on the computer and prevents users from changing the setting. |
|
Enforce Disk Quota Limit |
Specifies whether quota limits are enforced. If quotas are enforced, users are denied disk space if they exceed the quota. This setting overrides settings on the Quota tab for the NTFS volume. |
|
Log Event When Quota Limit Is Exceeded |
Determines whether an event is logged when users reach their limit and prevents users from changing their logging options. |
|
Log Event When Quota Warning Level Is Exceeded |
Determines whether an event is logged when users reach the warning level. |
|
Specify Default Quota Limit And Warning Level |
Sets a default quota limit and warning level for all users. This setting overrides other settings and affects only new users of a volume. |
Whenever you work with quota limits, you’ll want to use a standard set of policies on all systems. Typically, you won’t need to enable all the policies. Instead, you can selectively enable policies and then use the standard NTFS features to control quotas on various volumes. If you want to enable quota limits, use the following technique:
1. Access Group Policy for the system, site, domain, or OU with which you want to work. Next, access the Disk Quotas node by using the Administrative Templates policies for Computer Configuration under System\Disk Quotas.
2. Double-tap or double-click Enable Disk Quotas. Select Enabled, and then tap or click OK.
3. Double-tap or double-click Enforce Disk Quota Limit. If you want to enforce disk quotas on all NTFS volumes residing on this computer, select Enabled. Otherwise, select Disabled, and then set specific limits on a per-volume basis, as discussed in Chapter 8. Tap or click OK.
4. Double-tap or double-click Specify Default Quota Limit And Warning Level. The Specify Default Quota Limit And Warning Level dialog box, shown in Figure 5-6, appears. Select Enabled.
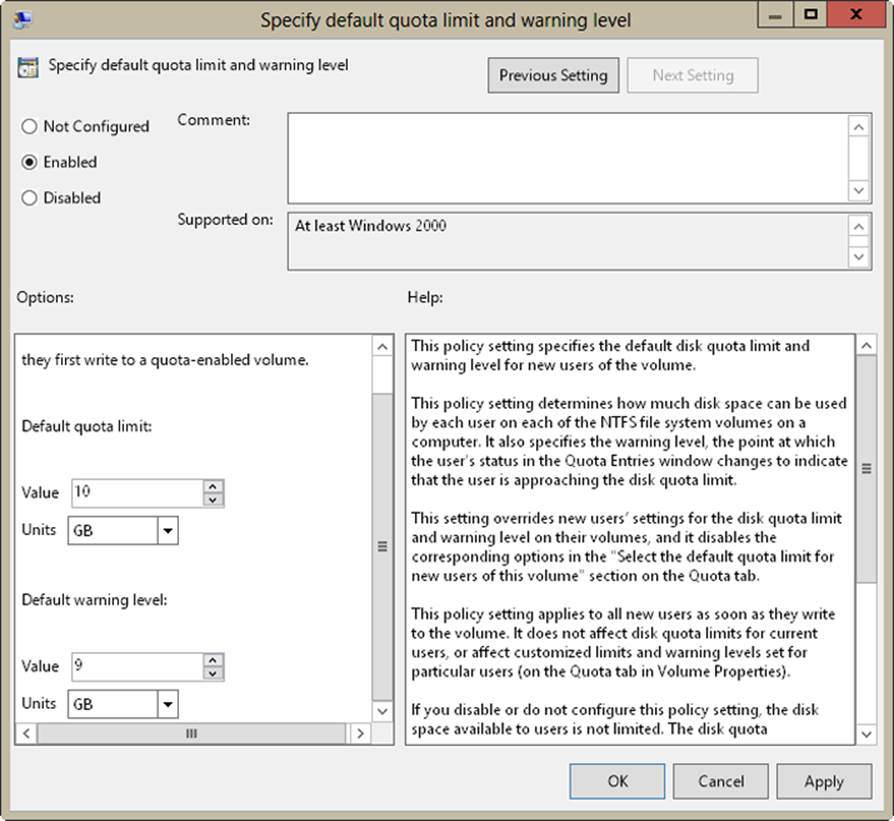
Figure 5-6. Use the Specify Default Quota Limit And Warning Level dialog box to establish disk quota values.
5. Drag the Options scroll bar down. Under Default Quota Limit, set a default limit that is applied to new users when they first write to the quota-enabled volume. The limit does not apply to current users and does not affect current limits. On a corporate network share, such as a share used by all members of a team, a good limit is between 1 GB and 5 GB. Of course, this depends on the size of the data files with which users routinely work. Graphic designers and data engineers, for example, might need much more disk space.
6. Drag the Options scroll bar down to set a warning level. A good warning level is about 90 percent of the default quota limit, meaning that if you set the default quota limit to 10 GB, you should set the warning level to 9 GB. Tap or click OK.
7. Double-tap or double-click Log Event When Quota Limit Is Exceeded. Select Enabled so that limit events are recorded in the application log. Tap or click OK.
8. Double-tap or double-click Log Event When Quota Warning Level Is Exceeded. Select Enabled so that warning events are recorded in the application log. Tap or click OK.
9. Double-tap or double-click Apply Policy To Removable Media. Select Disabled so that the quota limits apply only to fixed media volumes on the computer. Tap or click OK.
Configuring System Restore policies
System Restore is designed to save the state of system volumes and enable users to restore a system in the event of a problem. It is a helpful feature for the average user, but it can use a tremendous amount of disk space. By using the System Protection settings in Control Panel, you can turn System Restore off for individual drives or for all drives on a computer.
In the Group Policy console, you’ll find the System Restore policies under the Administrative Templates policies for Computer Configuration under System\System Restore. Through System Restore policies, you can override and disable management of this feature. The following policies are available:
§ Turn Off System Restore If you enable this policy, System Restore is turned off and can’t be managed by using the System utility or the System Restore Wizard. If you disable this policy, System Restore is enforced and cannot be turned off.
§ Turn Off Configuration If you enable this policy, you prevent configuration of the System Restore feature. Users can’t access the Settings dialog box but can still turn off System Restore. If you disable this policy, users can access the Settings dialog box but can’t manipulate it, and they can still turn off System Restore.
To configure System Restore policies, follow these steps:
1. Access Group Policy for the system, site, domain, or OU with which you want to work. Next, access the System Restore node by using the Administrative Templates policies for Computer Configuration under System\System Restore.
2. To enable or disable System Restore, double-tap or double-click Turn Off System Restore. Select either Enabled or Disabled, and then tap or click OK.
3. To enable or disable configuration of System Restore, double-tap or double-click Turn Off Configuration. Select either Enabled or Disabled, and then tap or click OK.
Configuring Offline File policies
Offline file policies are set at both the computer and the user level, and you’ll find identically named policies at each level. If you work with identically named policies at both levels, keep in mind that computer policies override user policies and that these policies can be applied at different times.
The primary policies you’ll want to use are summarized in Table 5-2. As the table shows, most offline policies affect access, synchronization, caching, and encryption. You’ll find Offline File policies under Administrative Templates for Computer Configuration in Network\Offline Files and under Administrative Templates policies for User Configuration in Network\Offline Files.
Table 5-2. Offline file policies
|
POLICY TYPE |
POLICY NAME |
DESCRIPTION |
|
Computer |
Allow Or Disallow Use Of The Offline Files Feature |
Forces enabling or disabling of the offline files feature and prevents overriding by users. Enables administrative control of offline file settings for a system. |
|
Computer |
Configure Background Sync |
Controls when background synchronization occurs while on slow links. Enabled: background synchronization occurs periodically to synchronize files in shared folders between the client and server. Disabled: default behavior for background synchronization is used. |
|
Computer |
Configure Slow-Link Mode |
Controls how slow links are used. Enabled: slow-link values for each shared folder used with offline files are configured. Disabled: offline files will not use slow-link mode. |
|
Computer |
Enable File Screens |
Controls the types of files that can be saved to offline folders. Enabled: users cannot create files with screened extensions. Disabled: users can create any type of file in offline folders. |
|
Computer |
Enable File Synchronization On Costed Networks |
Controls whether background sync occurs on slow networks that could incur extra data charges. Enabled: sync can occur when the user’s network is roaming or near or over plan limit. Disabled: sync won’t run in the background. |
|
Computer |
Enable Transparent Caching |
Controls caching of network files over slow links. Enabled: optimizes caching on the client to reduce the number of transmissions over slow links. Disabled: transparent caching is not used. |
|
Computer |
Encrypt The Offline Files Cache |
Determines whether offline files are encrypted to improve security. |
|
Computer |
Files Not Cached |
Enables you to specify file extensions of file types that should not be cached. |
|
Computer |
Limit Disk Space Used By Offline Files |
Limits the amount of disk space that can be used to store offline files. |
|
Computer |
Turn On Economical Application Of Administratively Assigned Offline Files |
Determines how administratively assigned files and folders are synced at logon. Enabled: only new files and folders are synced at logon. Disabled: all files and folders are synced at logon. |
|
Computer/User |
Remove “Make Available Offline” Command |
Prevents users from making files available offline. |
|
Computer/User |
Remove “Work Offline” Command |
Removes Work Offline option from File Explorer to prevent users from manually changing offline or online mode. |
|
Computer/User |
Specify Administratively Assigned Offline Files |
Uses a Universal Naming Convention (UNC) path to specify files and folders that are always available offline. |
You can administratively control which files and folders are available for offline use. Typically, you’ll want to do this on file servers or other systems sharing resources on the network. You can use several techniques to administratively control which resources are available offline. Follow these steps to set offline file configuration policies:
1. Access Group Policy for the system, site, domain, or OU with which you want to work. Most offline file policies can be configured for either computer or user policy (with user policy having precedence by default) by using the Offline Files node. You can access the policies for offline files by using either the Administrative Templates policies for Computer Configuration under Network\Offline Files or the Administrative Templates policies for User Configuration under Network\Offline Files, unless specifically noted otherwise.
2. To assign resources that are automatically available offline, double-tap or double-click Specify Administratively Assigned Offline Files. Select Enabled, and then tap or click Show. In the Show Contents dialog box, specify resources according to their UNC path, such as \\CorpServer23\Data. Figure 5-7 shows a list of resources that have been added to the Show Contents dialog box. Tap or click OK until all open dialog boxes are closed.
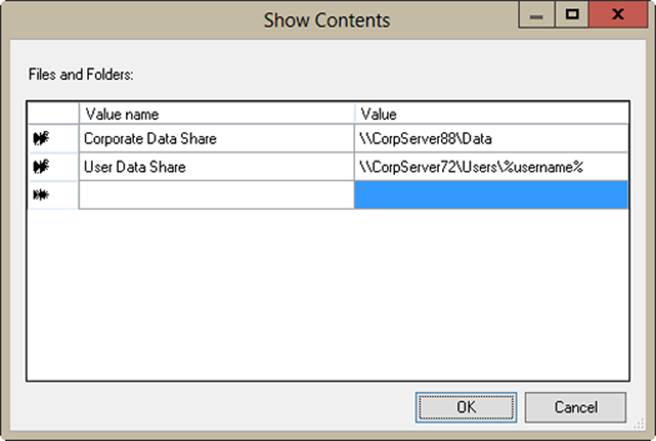
Figure 5-7. Use the Show Contents dialog box to specify resources according to their UNC path.
CAUTION
You should carefully consider which resources are automatically made available offline. The more resources you assign through this technique, the more network traffic is generated to maintain offline file caches.
3. To prevent users from making files and folders available offline, double-tap or double-click Remove “Make Available Offline” Command. Select Enabled, and then tap or click OK. After this policy is enforced, users are unable to specify files for use offline.
4. To restrict the types of files that can be created in offline folders, double-tap or double-click Enable File Screens. Select Enabled. In the Extensions box, enter a semicolon-separated list of file extensions to exclude, and then tap or click OK. Be sure to precede each file extension with an asterisk and a period, such as *.vbs or *.js. After this policy is enforced, users are unable to create files with the specified extensions in offline folders.
5. For Windows 8 and later, you might want to double-tap or double-click Remove “Work Offline” Command, and then select Enabled. After you select this option, users cannot manually change whether Offline Files is in online or offline mode. They can, however, continue to use Offline Files as appropriate.
Offline files are synchronized automatically, with background synchronization used whenever a computer is connected to a slow network. For Windows 8 and later, a slow network is any network with a latency of more than 35 milliseconds. Otherwise, a slow link generally is any network with a latency of more than 80 milliseconds.
You can prevent a computer from entering the slow-link mode and using background synchronization by disabling the Configure Slow-Link Mode policy. If you enable the Configure Slow-Link Mode policy, you can specify slow-link triggers based on network throughput and latency.
To modify the way slow links work, follow these steps:
1. Access Group Policy for the system, site, domain, or OU with which you want to work. Next, access the Offline Files node by using the Administrative Templates policies for Computer Configuration under Network\Offline Files.
2. To modify the triggers for slow links, double-tap or double-click Configure Slow-Link Mode. Select Enabled, and then tap or click Show. In the Show Contents dialog box, you use Value Name to specify resources to manage and Value to specify throughput and latency settings. Keep the following in mind:
o In Value Name, you can specify values for individual servers according to their UNC path. For example, enter \\corpserver172\* to control slow-link triggers for all shares on CorpServer172, or \\corpserver85\data\* for all files and folders on the Data share for CorpServer85.
o In Value Name, you can specify values for all servers affected by the current policy by entering a value of *.
o In Value, you can specify a throughput trigger in bits per second, a latency trigger in milliseconds or a combined throughput and latency trigger. For example, enter Throughput=1024 to apply slow-link mode when network throughput is less than 1,024 bits per second (bps), enterLatency=60 to apply slow-link mode when network latency is greater than 60 milliseconds, or enter Throughput=1024, Latency=60 to define both triggers.
Figure 5-8 shows a list of resources that have been added to the Show Contents dialog box. Tap or click OK until all open dialog boxes are closed.
CAUTION
You should carefully consider which resources are automatically made available offline. The more resources you assign through this technique, the more network traffic is generated to maintain offline file caches.
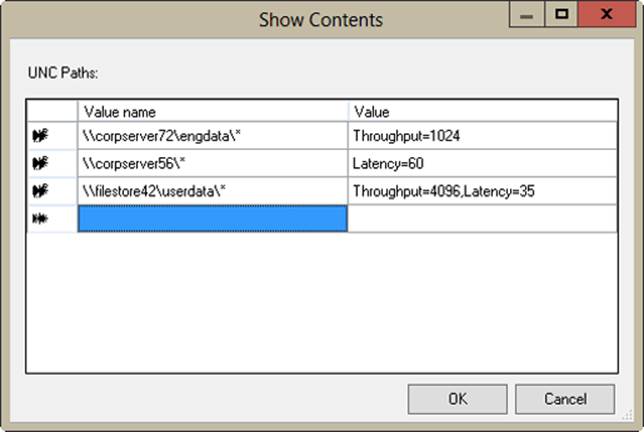
Figure 5-8. Specify resources and triggers for slow-link mode.
3. By default, Windows syncs in the background while operating in slow-link mode. This sync occurs approximately every six hours. To fine tune background syncing, double-tap or double-click Configure Background Sync. Select Enabled, configure settings as appropriate, and then tap or click OK. When configuring background sync, keep the following in mind:
o Sync Interval and Sync Variance are used together to define the refresh interval. By default, the Sync Interval is 360 minutes with up to a 60-minute Sync Variance to avoid overloading the network and servers with numerous client requests at the same time.
o Use Maximum Allowed Time Without A Sync to help ensure that all network folders are refreshed periodically. The value is set in minutes. Thus, if you wanted to ensure that network folders were refreshed at least once a day, you’d enter a value of 1440.
o Use Blockout Start Time and Blockout Duration to prohibit refresh during specific times of the day. Blockout Start Time is set using 24-hour–clock time, and Blockout Duration is set in minutes. Thus, if you wanted to ensure that network folders weren’t refreshed from 2 P.M. to 6 P.M. daily, you’d enter a start time of 1400 and a duration of 240.
4. With Windows 8 and later, you can use Enable File Synchronization On Costed Networks to control whether background sync is enabled on cellular and other networks that might charge fees when roaming or near or over data plan usage. By default, syncing on costed networks is disabled. To enable syncing on costed networks, double-tap or double-click Enable File Synchronization On Costed Networks, select Enabled, and then tap or click OK.
Configuring policy for Work Folders
Computers that are members of a workplace can access internal network resources, such as internal websites and business applications. Work Folders make it possible for users to synchronize their corporate data to their devices and vice versa. Those devices can be joined to the corporate domain or a workplace. To deploy Work Folders, an administrator adds the File And Storage Services\Work Folders role to a server, and then configures Work Folders by using Server Manager. Devices access Work Folders via a remote web gateway running on Internet Information Services (IIS).
You can use policy settings to control whether users can change settings when setting up Work Folders on a domain-joined computer. You can also configure policy settings for Work Folders that control the server to which users can connect remotely and access Work Folders. You do this in one of two ways:
§ By specifying the exact URL of the file server hosting the Work Folders for the user, such as https://server18.cpandl.com
§ By specifying the URL used within your organization for Work Folders discovery, such as https://workfolders.cpandl.com
With Work Folders, clients use secure encrypted communications as long as the file servers hosting the Work Folders have valid SSL certificates. When a device initiates an SSL connection, the server sends the certificate to the client. The client evaluates the certificate and continues only if the certificate is valid and can be trusted. If you configure a connection to an exact URL, the client can connect directly to the specified sever and synchronize data in Work Folders. The server’s certificate must have a common name (CN) or a subject alternative name (SAN) that matches the host header in the request. For example, if the client makes a request to https://server18.cpandl.com, the CN or SAN must be server18.cpandl.com.
The discovery process is different. Any server configured with Work Folders acts as a discovery server by default. If you configure a discovery URL, a client connects to one of several servers and the email address of the user is used to discover which specific server hosts the Work Folders for the client. The client is then connected to this server. Each discovery server will need to have a certificate with multiple subject alternative names, which includes the server name and the discovery name. For example, if a client makes a request to https://workfolders.cpandl.com and connects to FileServer23.cpandl.com, the server’s certificate must have a CN or SAN of fileserver23.cpandl.com and a SAN of workfolders.cpandl.com.
If you want to configure Work Folders in Group Policy, use the following technique:
1. Access Group Policy for the system, site, domain, or OU with which you want to work. Next, access the Work Folders node by using the Administrative Templates policies for User Configuration under Windows Components\Work Folders.
2. Double-tap or double-click Specify Work Folders Settings, and then select Enabled.
3. In the Work Folders URL text box, enter the URL of the file server that hosts the Work Folders for the user or the URL used within your organization for Work Folders discovery.
4. If you want to prevent users from changing settings when setting up Work Folders, select Force Automatic Setup.
5. Tap or click OK.
Working with access and connectivity policies
Access and connectivity policies control network connections, dial-up connections, and Remote Assistance configurations. These policies affect a system’s connectivity to the network, and remote access to the system.
Configuring network policies
Many network policies are available. Network policies that control Internet Connection Sharing, Internet Connection Firewall, Windows Firewall, and Network Bridge are configured at the computer level. Network policies that control LAN connections, TCP/IP configuration, and remote access are configured at the user level. The primary policies that you’ll want to use are summarized in Table 5-3. You’ll find network policies under the Administrative Templates policies for Computer Configuration under Network\Network Connections and the Administrative Templates policies for User Configuration under Network\Network Connections.
Table 5-3. Network policies
|
POLICY TYPE |
POLICY NAME |
DESCRIPTION |
|
Computer |
Prohibit Installation And Configuration Of Network Bridge On Your DNS Domain Network |
Determines whether users can install and configure network bridges. This policy applies only to the domain in which it is assigned. |
|
Computer |
Require Domain Users To Elevate When Setting A Network’s Location |
Determines whether the elevation prompt is displayed prior to setting a network’s location. |
|
Computer |
Route All Traffic Through The Internal Network |
Used with DirectAccess. Determines whether remote computers access the Internet via the internal corporate network or via their own Internet connection. |
|
User |
Ability To Change Properties Of An All User Remote Access Connection |
Determines whether users can view and modify the properties of remote access connections available to all users of the computer. |
|
User |
Prohibit Deletion Of Remote Access Connections |
Determines whether users can delete remote access connections. |
As shown in Table 5-3, network policies for computers are designed to restrict actions on an organization’s network. When you enforce these restrictions, users are prohibited from using features such as Internet Connection Sharing in the applicable domain. This is designed to protect the security of corporate networks, but it doesn’t prevent users with laptops, for example, from taking their computers home and using these features on their own networks. To enable or disable these restrictions, follow these steps:
1. Access Group Policy for the resource with which you want to work. Next, access the Network Connections node by using the Administrative Templates policies for Computer Configuration under Network\Network Connections.
2. Double-tap or double-click the policy that you want to configure. Select Enabled or Disabled, and then tap or click OK.
User policies for network connections usually prevent access to certain configuration features, such as the advanced TCP/IP property settings. To configure these policies, follow these steps:
1. Access Group Policy for the resource with which you want to work. Next, access the Administrative Templates policies for User Configuration under Network\Network Connections.
2. Double-tap or double-click the policy that you want to configure. Select Enabled or Disabled, and then tap or click OK.
Configuring Remote Assistance policies
Remote Assistance policies can be used to prevent or permit use of remote assistance on computers. Typically, when you set Remote Assistance policies, you’ll want to prevent unsolicited offers for remote assistance while permitting requested offers. You can also force a specific expiration for invitations through policy rather than by setting this time limit through the System Properties dialog box of each computer. To improve security, you can use strong invitation encryption. This enhancement, however, limits who can answer Remote Assistance invitations to only those running Windows Vista or later releases of Windows.
To configure policy in this manner, follow these steps:
1. Access Group Policy for the computer with which you want to work. Next, access the Administrative Templates policies for Computer Configuration under System\Remote Assistance.
2. Double-tap or double-click Configure Solicited Remote Assistance. Select Enabled. When enabled, this policy makes it possible for authorized users to solicit remote assistance.
3. You can now specify the level of access for assistants. The Permit Remote Control Of This Computer selection list has two options:
o Allow Helpers To Remotely Control The Computer Permits viewing and remote control of the computer
o Allow Helpers To Only View This Computer Permits only viewing; assistants cannot take control to make changes
4. Next, as shown in Figure 5-9, use the Maximum Ticket Time (Value) and Maximum Ticket Time (Units) options to set the maximum time limit for remote assistance invitations. The default maximum time limit is 1 hour. Tap or click OK.

Figure 5-9. Set a time expiration limit for Remote Assistance invitations.
NOTE
REAL WORLD The method for sending email invitations can be set to Mailto or Simple MAPI. Mailto is a browser-based mail submission technique in which the invitation’s recipient connects through an Internet link. Simple MAPI uses Messaging Application Programming Interface (MAPI) for sending the email invitation as an attachment to an email message. If computers can establish a connection with each other over port 80 and you’re using a standard email program such as Microsoft Outlook or Windows Mail, you’ll probably want to use Mailto.
5. Double-tap or double-click Configure Offer Remote Assistance. In the Configure Offer Remote Assistance dialog box, select Disabled. Disabling this policy prevents unsolicited assistance offers. Tap or click OK.
6. If you want to use strong invitation encryption and limit connections so they can come only from computers running current releases of Windows, double-tap or double-click Allow Only Windows Vista Or Later Connections. In the Allow Only Windows Vista Or Later Connections dialog box, select Enabled. Tap or click OK.
To prevent remote assistance and remote control, follow these steps:
1. Access Group Policy for the computer with which you want to work. Next, access the Administrative Templates policies for Computer Configuration under System\Remote Assistance.
2. Double-tap or double-click Configure Solicited Remote Assistance. Select Disabled, and then tap or click Previous Setting or Next Setting, as appropriate.
3. In the Configure Offer Remote Assistance dialog box, select Disabled, and then tap or click OK.
Working with computer and user script policies
Script policies control the behavior and assignment of computer and user scripts. Four types of scripts can be configured:
§ Computer startup Executed during startup
§ Computer shutdown Executed prior to shutdown
§ User logon Executed when a user logs on
§ User logoff Executed when a user logs off
You can write these scripts as command-shell batch scripts, Windows scripts, or Windows PowerShell scripts. Batch scripts use the shell command language. Windows scripts use Windows Script Host (WSH) and are written in a scripting language such as Microsoft Visual Basic Scripting Edition (VBScript) or Microsoft JScript. Windows PowerShell scripts are written in the Windows PowerShell language. Note that policy preferences can in many cases eliminate the need to use computer and user scripts.
Controlling script behavior through policy
Policies that control script behavior are found under the Administrative Templates policies for Computer Configuration under System\Scripts and the Administrative Templates policies for User Configuration under System\Scripts. Through policy, you can control the behavior of startup, shutdown, logon, and logoff scripts. The key policies that you’ll use are described in Table 5-4. As you’ll observe, there are numerous options for configuring script behavior.
Table 5-4. Computer and user script policies
|
POLICY TYPE |
POLICY NAME |
DESCRIPTION |
|
Computer |
Display Instructions In Shutdown Scripts As They Run |
Displays shutdown scripts and their instructions as they execute. |
|
Computer |
Display Instructions In Startup Scripts As They Run |
Displays startup scripts and their instructions as they execute. |
|
Computer |
Run Startup Scripts Asynchronously |
Enables the system to run startup scripts simultaneously, rather than one at a time. |
|
Computer |
Run Windows PowerShell Scripts First At Computer Startup, Shutdown |
Determines whether Windows PowerShell scripts are run before other types of scripts at startup and shutdown. |
|
Computer |
Specify Maximum Wait Time For Group Policy Scripts |
Sets the maximum time to wait for scripts to finish running. The default value is 600 seconds (10 minutes). |
|
Computer/User |
Run Logon Scripts Synchronously |
Ensures that the system waits for logon scripts to finish before displaying the Windows interface. |
|
Computer/User |
Run Windows PowerShell Scripts First At User Logon, Logoff |
Determines whether Windows Power-Shell scripts are run before other types of scripts at logon and logoff. |
|
User |
Display Instructions In Logoff Scripts As They Run |
Displays logoff scripts and their instructions as they execute. |
|
User |
Display Instructions In Logon Scripts As They Run |
Displays logon scripts and their instructions as they execute. |
|
User |
Run Legacy Logon Scripts Hidden |
Hides logon scripts configured through the System Policy Editor in Microsoft Windows NT 4. |
Although you can control script behavior in many ways, you’ll usually want scripts to behave as follows:
§ Windows PowerShell scripts should run first.
§ Logon and startup scripts should run simultaneously (in most cases).
§ All scripts should be hidden rather than visible.
§ The system should wait no more than one minute for a script to complete (in most cases).
To enforce this behavior, follow these steps:
1. Access Group Policy for the computer with which you want to work. Next, access the Administrative Templates policies for Computer Configuration under System\Scripts.
2. Double-tap or double-click Run Windows PowerShell Scripts First At Computer Startup, Shutdown. Select Enabled, and then tap or click OK.
3. Double-tap or double-click Run Windows PowerShell Scripts First At User Logon, Logoff. Select Enabled, and then tap or click OK.
4. Double-tap or double-click Run Logon Scripts Synchronously. Select Disabled, and then tap or click OK.
5. Double-tap or double-click Run Startup Scripts Asynchronously. Select Enabled, and then tap or click OK.
6. Double-tap or double-click Display Instructions In Startup Scripts As They Run. Select Disabled, and then tap or click OK.
7. Double-tap or double-click Display Instructions In Shutdown Scripts As They Run. Select Disabled, and then tap or click OK.
8. Double-tap or double-click Specify Maximum Wait Time For Group Policy Scripts. Select Enabled, and then enter a value of 60 for the wait time in the Seconds box. Tap or click OK.
9. Access the Administrative Templates policies for User Configuration under System\Scripts.
10.Double-tap or double-click Run Legacy Logon Scripts Hidden. Select Enabled, and then tap or click OK.
11.Double-tap or double-click Display Instructions In Logon Scripts As They Run. Select Disabled, and then tap or click OK.
12.Double-tap or double-click Display Instructions In Logoff Scripts As They Run. Select Disabled, and then tap or click OK.
13.Double-tap or double-click Run Windows PowerShell Scripts First At User Logon, Logoff. Select Enabled, and then tap or click OK.
Assigning computer startup and shutdown scripts
Computer startup and shutdown scripts can be assigned as part of Group Policy. In this way, a computer and all its users—or all computers that are members of the site, domain, or OU—execute scripts automatically when they’re started or shut down.
To assign computer scripts, follow these steps:
1. For easy management, copy the scripts you want to use to the Scripts\Startup or Scripts\Shutdown folder for the related policy. Scripts are stored in the %SystemRoot%\Sysvol\Sysvol\%UserDnsDomain%\Policies\GUID\Machine folder on domain controllers and %WinDir%\System32\GroupPolicy\Machine on workstations running Windows 8.1.
2. Access the Group Policy console for the resource with which you want to work. Then access policies for Computer Configuration under Windows Settings\Scripts.
3. To work with startup scripts, press and hold or right-click Startup, and then select Properties. To work with shutdown scripts, press and hold or right-click Shutdown, and then select Properties. Next, tap or click Show Files. If you copied the computer scripts to the correct location, you should get the scripts you want to assign.
4. Tap or click Add to assign a script. This opens the Add A Script dialog box. For the Script Name, enter the name of a script you copied to the Scripts\Startup or the Scripts\Shutdown folder for the related policy. For the Script Parameters, enter any command-line arguments to pass to the command-line script or parameters to pass to the scripting host for a WSH script. Repeat this step to add other scripts.
5. During startup or shutdown, scripts are executed in the order in which they’re listed in the Properties dialog box. Select a script name, and then tap or click Up or Down to reposition the script as necessary.
6. If you want to edit the script name or parameters later, select the script in the scripts list, and then tap or click Edit.
7. To delete a script, select the script in the scripts list, and then tap or click Remove.
Assigning user logon and logoff scripts
User scripts can be assigned as part of Group Policy. In this way, all users who access a computer or are members of the site, domain, or OU execute scripts automatically when they log on or log off.
To assign user scripts, complete the following steps:
1. Copy the scripts you want to use to the Scripts\Logon or the Scripts\Logoff folder for the related policy. User scripts are stored in the %SystemRoot%\Sysvol\Sysvol\%UserDnsDomain%\Policies\GUID\User folder on domain controllers and under %WinDir%\System32\GroupPolicy\User on workstations running Windows 8.1.
2. Access the Group Policy console for the resource with which you want to work. Then access policies for User Configuration under Windows Settings\Scripts.
3. To work with logon scripts, press and hold or right-click Logon, and then tap or click Properties. To work with logoff scripts, press and hold or right-click Logoff, and then tap or click Properties. Next, tap or click Show Files. If you copied the user scripts to the correct location, you should find the scripts you want to assign.
4. Tap or click Add to assign a script. This opens the Add A Script dialog box. For the Script Name, enter the name of a script you copied to the Scripts\Logon or the Scripts\Logoff folder for the related policy. For the Script Parameter, enter any command-line arguments to pass to the command-line script or parameters to pass to the scripting host for a WSH script. Repeat this step to add other scripts.
5. During logon or logoff, scripts are executed in the order in which they’re listed in the Properties dialog box. Select a script name and tap or click Up or Down to reposition scripts as necessary.
6. If you want to edit the script name or parameters later, select the script in the Scripts list, and then tap or click Edit.
7. To delete a script, select the script in the Scripts list, and then tap or click Remove.
Working with logon and startup policies
Windows 8.1 provides a set of policies to control the logon process, some of which enable you to configure the way programs run at logon. This makes them similar to logon scripts in that you can execute specific tasks at logon. Other policies change the view in the welcome and logon screens. The main logon and startup policies that you’ll use are available by using Administrative Templates policies for Computer Configuration and User Configuration under System\Logon and are summarized in Table 5-5.
Table 5-5. Logon and startup policies
|
POLICY TYPE |
POLICY NAME |
DESCRIPTION |
|
Computer |
Always Use Classic Logon |
For Windows 7 and earlier, this policy overrides the default simple logon screen and uses the logon screen displayed in previous versions of Windows. |
|
Computer |
Allow Users To Select When A Password Is Required When Resuming |
Controls whether the user can configure the amount of time after a device’s screen turns off before a password is required when waking the device. |
|
Computer |
Always Wait For The Network At Computer Startup And Logon |
Requires the computer to wait for the network to be fully initialized. At startup, this Group Policy is fully applied rather than applied through a background refresh. At logon, this means the user account cannot be authenticated against cached credentials and must be authenticated against a domain controller. |
|
Computer |
Do Not Enumerate Connected Users On Domain-Joined Computers |
When a computer is joined to a domain, prevents the Windows Logon user interface from enumerating connected users during logon. |
|
Computer |
Enumerate Local Users On Domain-Joined Computers |
Enables the Windows Logon user interface to enumerate local users during logon. |
|
Computer |
Show First Sign-in Animation |
Controls whether Microsoft account users receive an opt-in prompt for services when they log on for the first time. Also controls whether other users encounter the sign-in animation when they log on for the first time. |
|
Computer |
Turn Off App Notifications On the Lock Screen |
Prevents app notifications from appearing on the lock screen. |
|
Computer |
Turn On PIN Sign-In |
Enables a domain user to sign in by using a PIN. |
|
Computer |
Turn Off Picture Password Sign-in |
Prevents a domain user from creating and using a picture password for sign-in. |
|
Computer/User |
Do Not Process The Legacy Run List |
Disables running legacy run-list applications other than those set through the System Policy Editor in Windows NT 4. |
|
Computer/User |
Do Not Process The Run Once List |
Forces the system to ignore customized run-once lists. |
|
Computer/User |
Run These Programs At User Logon |
Sets programs that all users should run at logon. Use the full file path (unless the program is in %SystemRoot%). |
Setting policy-based startup programs
Although users can configure their startup applications separately, it usually makes more sense to handle this through Group Policy, especially in an enterprise in which the same applications should be started by groups of users. To specify programs that should start at logon, follow these steps:
1. Access Group Policy for the computer with which you want to work. Next, access the Administrative Templates policies for Computer Configuration under System\Logon.
2. Double-tap or double-click Run These Programs At User Logon. Select Enabled.
3. Tap or click Show. In the Show Contents dialog box, specify applications by using their full file or UNC path, such as C:\Program Files (x86)\Internet Explorer\Iexplore.exe or \\DCServ01\Apps\Stats.exe.
4. Close all open dialog boxes.
Disabling run lists through policy
By using Group Policy, you can disable legacy run lists and run-once lists. Legacy run lists are stored in the registry in HKEY_LOCAL_MACHINE\SOFTWARE\Microsoft\Windows\CurrentVersion\Run and HKEY_CURRENT_USER\Software\Microsoft\Windows\CurrentVersion\Run.
Run-once lists can be created by administrators to specify programs that should run the next time the system starts but not on subsequent restarts. Run-once lists are stored in the registry under HKEY_LOCAL_MACHINE\SOFTWARE\Microsoft\Windows\CurrentVersion\RunOnce and HKEY_CURRENT_USER\Software\Microsoft\Windows\CurrentVersion\RunOnce.
To disable run-once lists, follow these steps:
1. Access Group Policy for the computer with which you want to work. Next, access the Administrative Templates policies for Computer Configuration under System\Logon or the Administrative Templates policies for User Configuration under System\Logon.
2. Double-tap or double-click Do Not Process The Run Once List. Select Enabled, and then tap or click OK.
3. Double-tap or double-click Do Not Process The Legacy Run List. Select Enabled, and then tap or click OK.
All materials on the site are licensed Creative Commons Attribution-Sharealike 3.0 Unported CC BY-SA 3.0 & GNU Free Documentation License (GFDL)
If you are the copyright holder of any material contained on our site and intend to remove it, please contact our site administrator for approval.
© 2016-2026 All site design rights belong to S.Y.A.