Windows 8.1 Administration Pocket Consultant: Storage, Security, & Networking (2014)
Chapter 6. Optimizing File Security
§ File security and sharing options
§ Controlling access to files and folders with NTFS permissions
§ Applying permissions through inheritance
Whether you are using Windows 8.1 in a domain, a workgroup, or a homegroup, few aspects of the operating system are more important than file security and file sharing. File security and file sharing are so interconnected that talking about one without talking about the other is difficult. File security protects important data on your systems by restricting access, and file sharing enables you to share data so that it can be accessed by other users.
File security and sharing options
For computers running Windows 8.1, two factors control file security and sharing options: the disk format and computer settings. The format of the disk determines the degree of file security options available. Disks can be formatted for the FAT file system (FAT16, FAT32, or exFAT), the NTFS file system, or the Resilient File System (ReFS).
IMPORTANT
ReFS is built on the foundations of NTFS and is designed specifically for storage technologies. Because ReFS maintains compatibility with the core features of NTFS, access permissions and share permissions work the same on both ReFS and NTFS volumes. Where NTFS and ReFS diverge is when it comes to extended features, such as compression, encryption, and disk quotas, which are supported by NTFS but not supported by ReFS.
The security options on FAT, NTFS, and ReFS volumes differ greatly:
§ With FAT, you have very limited control over file access. Files can be marked only as read-only, hidden, or system. Although these flags can be set on files and folders, anyone with access to the FAT volume can override or change these settings, which means that there are no safeguards for file access or deletion. Any user can access or delete any file without restriction.
§ With NTFS or ReFS, you can control access to files and folders by using NTFS permissions. NTFS permissions specifically allow or deny access and can be set for individual users and for groups of users. These permission settings give you very granular control over file and folder access. For example, you could specify that users in the Sales Managers group have full control over a folder and its files, but users in the Sales Reps group have no access to the folder whatsoever.
The settings on a computer determine the way in which files can be shared. For Server Message Block (SMB), Windows 8.1 supports two file-sharing models:
§ Standard folder sharing Enables you to share the files in any folder on a computer, including those on FAT, NTFS, and ReFS volumes. Two sets of permissions are used to determine who has access to shared folders: access permissions (discussed in the Controlling access to files and folders with NTFS permissions section later in this chapter) and share permissions (discussed in the Sharing files and folders over the network section in Chapter 7). Access permissions and share permissions together enable you to control who has access to shared folders and the level of access assigned. You do not need to move the files you are sharing.
§ Public folder sharing Enables you to share files that are in a computer’s %SystemDrive%\Users\Public folder. Access permissions on the Public folder determine which users and groups have access to publicly shared files, in addition to what level of access those users and groups have. When you copy or move files to the Public folder, access permissions on the files are changed to match those of the Public folder. Some additional permissions are also added. For more information, see the Using and configuring public folder sharing section in Chapter 7.
NOTE
With standard folder sharing, local users don’t have automatic access to any data stored on a computer. Local access to files and folders is fully controlled by the security settings on the local disk. If a local disk is formatted with FAT, you can use the read-only, system, or hidden flags to help protect files and folders, but you cannot restrict access. If a local disk is formatted with NTFS or ReFS, you can control access by allowing or denying access to individual users and groups of users.
With public folder sharing, files copied or moved to the Public folder are available to anyone who logs on locally regardless of whether he or she has a standard user account or an administrator user account on the computer. Network access can be granted to the Public folder. Doing so, however, makes the Public folder and its contents open to everyone who can access the computer over the network.
Windows Server 2012 R2 adds new layers of security through compound identities, claims-based access controls, and central access policies. With both Windows 8.1 and Windows Server 2012 R2, you can assign claims-based access controls to file and folder resources on NTFS and ReFS volumes. With Windows Server 2012 R2, users are granted access to files and folder resources, either directly with access permissions and share permissions or indirectly with claims-based access controls and central access policies.
Unlike with early releases of Windows, where only one sharing model could be used at a time, computers running Windows 8.1 can use both sharing models at the same time. The key advantage to standard sharing is that users can share any folder on a computer and don’t have to move files or folders from their current location. Public folders, on the other hand, are open drop boxes. When users copy files and folders to public folders (and public folder sharing is enabled), the files and folders are available to other users on the computer and on the network.
File Explorer has several options when you are working with folders. Two key options are:
§ Include In Library Creates a link between the folder and its contents in the user’s Documents, Music, Pictures, Videos, or another library folder. This lets the user browse and work with the folder’s contents as if it were part of the specified library. However, anytime the user works with a file in a library folder, he is actually working with the file in its original location.
§ Share With Shares the folder by using standard folder sharing. In a homegroup, users have the option to share the folder with anyone in the homegroup as read-only or read/write. In a workgroup or domain, users have the option of sharing with specific people. In any configuration, users can also select the sharing option Nobody, which effectively removes sharing.
The default sharing configuration for computers depends on whether the computers are members of homegroups, workgroups, or domains. When you set up a homegroup, you specify the types of files to share, and whether to share printers. Computers that are members of the same homegroup can then automatically share printers and files such as pictures, music, videos, and documents.
Sharing folders within a homegroup as read-only or read/write is fairly straightforward. To enable sharing in a homegroup, you complete the following steps:
1. In File Explorer, press and hold or right-click the folder you want to share.
2. Select Share With, and then select Homegroup (View) or Homegroup (View And Edit).
This simple approach to sharing might make homegroups seem appealing to users in your office. However, it also grants very wide access to users’ data and is generally inadvisable for the workplace. This is why you should encourage users in a homegroup to share with specific people rather than with everyone. Sharing with specific people is the only technique you can use in workgroups and domains.
To enable sharing with specific people, you complete the following steps:
1. In File Explorer, press and hold or right-click the folder.
2. Select Share With, and then select Specific People. This displays the File Sharing Wizard. By default, the System group is specified as the owner of the share, and the currently logged-on user is granted read/write access.
3. In the File Sharing Wizard, use the options provided to choose the people with whom to share. For example, if you want to include all users with local accounts on the computer, enter Users, and then tap or click Add. This is different from sharing with everyone because the Everyone group includes anyone with access permission to the computer, not just those who are domain or local users.
4. The default sharing permission is read-only. To set a permission level for a user or group, tap or click the user or group name, and then select Read or Read/Write.
5. Tap or click Share to share the folder, and then tap or click Done.
To remove sharing, you complete the following steps:
1. In File Explorer, press and hold or right-click the folder.
2. Select Share With, and then select Stop Sharing.
3. In the File Sharing Wizard, select Stop Sharing.
By default, when you create the first standard folder share on a computer, Windows creates the File And Printer Sharing exception in Windows Firewall. This inbound exception makes it possible for other computers on the network to send inbound SMB traffic through Windows Firewall to access the share. To accommodate this, Windows opens the following ports:
§ UDP port 137, which is used for NetBIOS name resolution
§ UDP port 138, which is used for NetBIOS datagram transmission and reception
§ TCP port 139, which is used by the NetBIOS Session service
§ Dynamic ports for ICMPv4 and ICMPv6, which are used for echo requests, if applicable
In a nutshell, that is how standard folder sharing works. I’ll go into more detail about sharing with specific people in Chapter 7. However, before anyone can share anything, network sharing must be enabled.
Network sharing settings are meant to provide the appropriate level of security for each of the various categories of networks to which a computer can connect. For this reason, Windows maintains a separate network profile for each type of network a computer uses. Generally, most network discovery and sharing settings are disabled by default. You can configure network discovery and sharing settings by following these steps:
1. In Control Panel, under Network And Internet, tap or click Choose Homegroup And Sharing Options, and then tap or click the Change Advanced Sharing Settings link.
2. Each available network profile has a separate management panel with configuration settings. Use the expand button to display the profile with which you want to work.
3. Network Discovery, an option for the Private, Guest Or Public, and Domain profiles, affects whether a computer can find other computers and devices on the network and whether other computers on the network can find this computer. Turn Network Discovery on or off by selecting the related option.
4. File And Printer Sharing, an option for the Private, Guest Or Public, and Domain profiles, controls whether a computer can share files and printers. Turn File And Printer Sharing on or off by selecting the related option.
5. In the All Networks profile, Public Folder Sharing controls whether a computer can share files in the Public folders. Turn Public Folder Sharing on or off by selecting an appropriate option.
6. In the All Networks profile, Media Streaming makes it possible for users to share music, videos, and pictures and to access music, videos, and pictures on other computers. Turn Media Streaming on by tapping or clicking the related button, and then configure the Media Streamingoptions as appropriate. Enabling other users to listen to music, play videos, and view pictures from another computer can adversely affect performance, so you might not want to enable this feature.
7. Windows uses encryption to securely transfer your shared data. By default, the encryption level is set to 128-bit encryption (in most configurations). However, you should be sure that the computers and devices you are sharing with support this level of encryption. Otherwise, select the lower encryption level or upgrade the encryption support on the other devices and computers.
8. In workgroups and homegroups, Password Protected Sharing allows only people with a user account and password on the local computer to access shared resources. Turn Password Protected Sharing on or off by selecting the related option.
9. Tap or click Save Changes to save your settings.
In Group Policy, you can prevent computers from joining homegroups by enabling the Prevent The Computer From Joining A Homegroup policy. This policy is found in the Administrative Templates policies for Computer Configuration under Windows Components\Homegroup.
In Group Policy, you also can restrict the way in which sharing works. The key restrictions on how sharing can be used come from the Prevent Users From Sharing Files Within Their Profile policy. This policy, found in Administrative Templates policies for User Configuration under Windows Components\Network Sharing, controls whether sharing is allowed within folders associated with user profiles, primarily the %SystemDrive%\Users folder. Keep the following in mind when working with the Prevent Users From Sharing Files Within Their Profile setting:
§ When this setting is Not Configured, which is the default state, users are allowed to share files within their profile with other users on their network, if a user with administrator privileges on the computer opts in for file sharing. To opt in for file sharing, an administrator has only to share a file within his or her profile.
§ When this setting is Enabled, users cannot share files within their profile by using the File Sharing Wizard, and the File Sharing Wizard will not create shares within the %SystemDrive%\Users folder.
§ When this setting is Disabled, as might be necessary to override an inherited Enabled setting, users are allowed to share files within their profile with other users on their network, if a user with administrator privileges on the computer opts in for file sharing.
To configure the Prevent Users From Sharing Files Within Their Profile policy in Group Policy, follow these steps:
1. Open a Group Policy Object for editing in the appropriate Group Policy editor. Next, expand Administrative Templates policies for User Configuration under Windows Components\Network Sharing.
2. Double-tap or double-click Prevent Users From Sharing Files Within Their Profile.
3. Select Not Configured, Enabled, or Disabled, and then tap or click OK.
Although it is tempting to use public folder sharing, most organizations—even small businesses—should encourage the use of standard folder sharing for all company files and data. Simply put, standard folder sharing offers more security and better protection. Rather than opening the floodgates to data, standard folder sharing closes them and blocks access appropriately. Increasing security is essential to protecting one of the most valuable assets of any organization—its data.
Share permissions are used only when a user attempts to access a file or folder from a different computer on the network, whereas access permissions are always used whether the user is logged on locally or using a remote system to access the file or folder over the network. When data is accessed remotely, first the share permissions are applied, and then the access permissions are applied.
In many ways, this means that file access permissions and standard folder sharing permissions are like wrappers around your data. File access permissions, the first wrapper, protect your data with regard to local access. If a user logs on to a system locally, file access permissions can allow or deny access to files and folders. File sharing permissions, the second wrapper, are used when you want to enable remote access. If a user accesses data remotely, file sharing permissions allow or deny initial access, but because your data is also wrapped in a file security blanket, the user must successfully pass file access permissions before working with files and folders.
Controlling access to files and folders with NTFS permissions
NTFS permissions, which apply to both NTFS and ReFS volumes, are always evaluated when a file is accessed. NTFS permissions are fairly complex, and to understand their management, you need to understand the following concepts:
§ Basic permissions What the basic permissions are and how they are used
§ Claims-based permissions What user and device claims are and how they are used
§ Special permissions What the special permissions are and how they are used
§ File ownership What is meant by file ownership and how file ownership is used
§ Inheritance What is meant by inheritance and how inheritance is used
§ Effective permissions How to determine the effective permissions on files
Understanding and using basic permissions
In Windows 8.1, the owner of a file or a folder has the right to allow or deny access to that file or folder, as do members of the Administrators group and other authorized users. By allowing a permission, you grant that permission to a user or a group. By denying a permission, you deny that permission to a user or a group. Keep in mind that entries that deny permissions take precedence over entries that allow permissions. As a result, if a user is a member of two groups, and one group is allowed a permission and the other is denied that permission, the user is denied that permission.
By using File Explorer, you can view the currently assigned basic permissions by pressing and holding or right-clicking a file or a folder, tapping or clicking Properties, and then tapping or clicking the Security tab in the Properties dialog box.
As shown in Figure 6-1, the Group Or User Names list shows the users and groups with permissions set for the selected resource. If you select a user or a group, the assigned permissions are shown in the Permissions For list. If permissions are shaded (unavailable), it means they have been inherited from a parent folder. Inheritance is covered in detail in the Applying permissions through inheritance section later in this chapter.
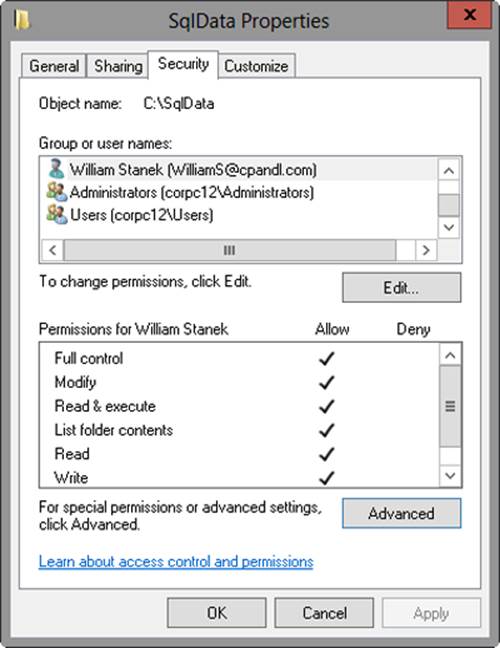
Figure 6-1. The Security tab shows the currently assigned basic permissions.
Working with and setting basic permissions
All permissions are stored in the file system as part of the access control list (ACL) assigned to a file or a folder. As described in Table 6-1, six basic permissions are used with folders, and five are also used with files. Although some permissions are inherited based on permissions of a parent folder, all permissions are defined explicitly at some level of the file system hierarchy. Permissions are listed in this table in approximate order of their scope, from Full Control, which grants the most permissions, to Read and Write, which grant specific permissions.
Table 6-1. Basic file and folder permissions
|
PERMISSION |
DESCRIPTION |
|
Full Control |
Grants the user or group full control over the selected file or folder and permits reading, writing, changing, and deleting files and subfolders. A user with Full Control permission for a file or folder can change permissions, delete files in the folder regardless of the permission on the files, and also take ownership of a folder or a file. Selecting this permission also selects all the other permissions. |
|
Modify |
Allows the user or group to read, write, change, and delete files. A user with Modify permission can also create files and subfolders, but the user cannot take ownership of files. Selecting this permission selects all the permissions below it. |
|
Read & Execute |
Permits viewing and listing files and subfolders in addition to executing files. If applied to a folder, this permission is inherited by all files and subfolders within the folder. Selecting this permission also selects the List Folder Contents and Read permissions. |
|
List Folder Contents (folders only) |
Similar to the Read & Execute permission, but available only for folders. Permits viewing and listing files and subfolders, in addition to executing files. Unlike Read & Execute, this permission is inherited by subfolders, but not by files within the folder or subfolders. |
|
Read |
Allows the user or group to view and list the contents of a folder. A user with this permission can view file attributes, read permissions, and synchronize files. Read is the only permission needed to run scripts. Read access is required to access a shortcut and its target. |
|
Write |
Allows the user or group to create new files and write data to existing files. A user with this permission can also view file attributes, read permissions, and synchronize files. Giving a user permission to write but not delete a file or a folder doesn’t prevent the user from deleting the folder’s or file’s contents. |
Equally as important as the basic permissions are the users and groups to which you assign those permissions. If a user or a group whose permissions you want to assign is already selected in the Group Or User Names list on the Security tab, you can modify the assigned permissions by tapping or clicking Edit and then by using the Allow and Deny columns in the Permissions list. Select check boxes in the Allow column to add permissions, or clear check boxes to remove permissions, and then tap or click OK.
To expressly forbid a user or a group from using a permission, select the appropriate check boxes in the Deny column. Because denied permissions have precedence over other permissions, Deny is useful in two specific scenarios:
§ If a user is a member of a group that has been granted a permission, but you don’t want the user to have the permission and don’t want to or can’t remove the user from the group, you can override the inherited permission by denying that specific user the right to use the permission.
§ If a permission is inherited from a parent folder and you prefer that a user or a group not have the inherited permission, you can override the allowed permission (in most cases) by expressly denying the user or group the use of the permission.
If users or groups whose permissions you want to assign aren’t already available in the Group Or User Names list on the Security tab, you can easily add them. To set basic permissions for users or groups not already listed on a file or a folder’s Security tab, follow these steps:
1. On the Security tab, tap or click Edit. This displays the Permissions For dialog box.
2. In the Permissions For dialog box, tap or click Add to display the Select Users, Computers, Service Accounts, Or Groups dialog box, as shown in Figure 6-2.
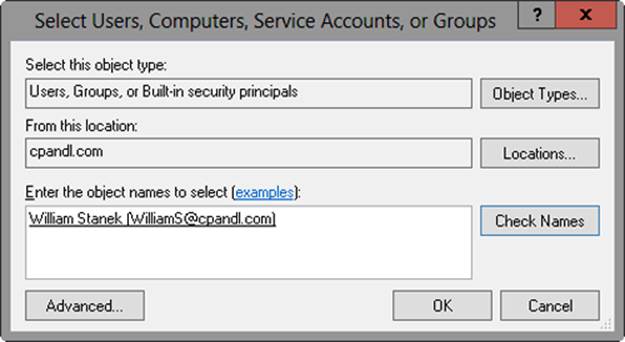
Figure 6-2. Use the Select Users, Computers, Service Accounts, Or Groups dialog box to specify users or groups whose permissions you want to configure.
NOTE
In a workgroup, this dialog box is titled “Select Users Or Groups.” Both dialog boxes serve the same purpose.
TIP
Always double-check the value of the From This Location box. In workgroups, computers will always show only local accounts and groups. In domains, this text box is changeable and is set initially to the default (logon) domain of the currently logged-on user. If this isn’t the location you want to use for selecting user and group accounts with which to work, tap or click Locations to find a list of locations you can search, including the current domain, trusted domains, and other resources that you can access.
3. Enter the name of a user or a group account. Be sure to reference the user account name rather than the user’s full name. When entering multiple names, separate them with semicolons.
4. Tap or click Check Names. If a single match is found for each entry, the dialog box is automatically updated, and the entry is underlined. Otherwise, you’ll get an additional dialog box. If no matches are found, you’ve either entered the name incorrectly or you’re working with an incorrect location. Modify the name in the Name Not Found dialog box and try again, or tap or click Locations to select a new location. When multiple matches are found, in the Multiple Names Found dialog box, select the name you want to use, and then tap or click OK. The users and groups are added to the Group Or User Names list.
5. You can now configure permissions for each user and group you added by selecting an account name and then allowing or denying access permissions as appropriate.
Special identities and best practices for assigning permissions
When you work with basic permissions, it’s important to understand not only how the permissions are used, but how special identities can be used to help you assign permissions. The special identities you’ll encounter the most are Creator Owner and Users, but others are also used occasionally, as described in Table 6-2. Special identities are members of some groups automatically. To configure permissions for a special identity, enter the special identity’s name as you would the name of any other user or group.
Table 6-2. Special identities used when setting permissions
|
SPECIAL IDENTITY |
DESCRIPTION |
|
Anonymous Logon |
Includes any network logons for which credentials are not provided. This special identity is used to enable anonymous access to resources, such as those available on a web server. |
|
Authenticated Users |
Includes users and computers who log on with a user name and password; does not include users who log on by using the Guest account, even if the account is assigned a password. |
|
Creator Owner |
The special identity for the account that created a file or a folder. Windows 8.1 uses this group to identify the account that has ultimate authority over the file or folder. |
|
Dialup |
Includes any user who accesses the computer through a dial-up connection. This identity is used to distinguish dial-up users from other types of users. |
|
Everyone |
Includes all interactive, dial-up, and authenticated users. Although this group includes guests, it does not include anonymous users. |
|
Interactive |
Includes any user logged on locally or through a remote desktop connection. |
|
Network |
Includes any user who logs on over the network. This identity is used to allow remote users to access a resource and does not include interactive logons that use remote desktop connections. |
|
Users |
Includes authenticated users and domain users only. The built-in Users group is preferred over Everyone. |
A solid understanding of these special identities can help you more effectively configure permissions on NTFS and ReFS volumes. Additionally, whenever you work with permissions, you should keep the following guidelines in mind:
§ Follow the file system hierarchy Inheritance plays a big part in how permissions are set. By default, permissions you set on a folder apply to all files and subfolders within that folder. With this in mind, start at the root folder of a local disk or at a user’s profile folder (both of which act as top-level folders) when you start configuring permissions.
§ Have a plan Don’t set permissions without a clear plan. If permissions on folders get out of sync, and you are looking for a way to start over so that you have some continuity, you might want to configure the permissions as they should be in a parent folder and then reset the permissions on all subfolders and files in that folder by using the technique discussed in the Restoring inherited permissions section later in this chapter.
§ Grant access only as necessary An important aspect of the file access controls built into NTFS is that permissions must be explicitly assigned. If you don’t grant a permission to a user and that user isn’t a member of a group that has a permission, the user doesn’t have that permission—it’s that simple. When assigning permissions, it’s especially important to keep this rule in mind because it’s tempting just to give users full control rather than the specific permissions they really need. Granting only the specific permissions users need to do their job is known as theprinciple of least privilege.
§ Use groups to manage permissions more efficiently Whenever possible, you should make users members of appropriate groups, and then assign permissions to those groups rather than to individual users. In this way, you can grant permissions to new users by making them members of the appropriate groups. Then, when a user leaves or goes to another group, you can change the group membership as appropriate. For example, when Sarah joins the sales team, you can add her to the SalesUS and SalesCan groups so that she can access those groups’ shared data. If she later leaves the sales team and joins the marketing team, you can remove her from the SalesUS and SalesCan groups and add her to the MarketingUS and MarketingCan groups. This is much more efficient than editing the properties for every folder Sarah needs access to and assigning permissions.
§ Use central access policies to enhance existing access controls On your domain servers running Windows Server 2012 R2, use central access policies to very precisely define the specific attributes that users and devices must have to access resources.
Assigning special permissions
Windows 8.1 uses special permissions to carefully control the permissions of users and groups. Behind the scenes, whenever you work with basic permissions, Windows 8.1 manages a set of related special permissions that exactly specify the permitted actions. The special permissions that are applied for each of the basic permissions are as follows:
§ Read
§ List Folder/Read Data
§ Read Attributes
§ Read Extended Attributes
§ Read Permissions
§ Read & Execute or List Folder Contents
§ All special permissions for Read
§ Traverse Folder/Execute File
§ Write
§ Create Files/Write Data
§ Create Folders/Append Data
§ Write Attributes
§ Write Extended Attributes
§ Modify
§ All special permissions for Read
§ All special permissions for Write
§ Delete
§ Full Control
§ All special permissions listed previously
§ Change Permissions
§ Delete Subfolders And Files
§ Take Ownership
Table 6-3 describes how Windows 8.1 uses each special permission.
Table 6-3. Special permissions for files and folders
|
SPECIAL PERMISSION |
DESCRIPTION |
|
Change Permissions |
Allows you to change basic and special permissions assigned to a file or a folder. |
|
Create Files/Write Data |
Create Files allows you to put new files in a folder. Write Data allows you to overwrite existing data in a file (but not add new data to an existing file, which is covered by Append Data). |
|
Create Folders/Append Data |
Create Folders allows you to create subfolders within folders. Append Data allows you to add data to the end of an existing file (but not to overwrite existing data, which is covered by Write Data). |
|
Delete |
Allows you to delete a file or a folder. If a folder isn’t empty and you don’t have Delete permission for one or more of its files or subfolders, you won’t be able to delete it unless you have the Delete Subfolders And Files permission. |
|
Delete Subfolders And Files |
Allows you to delete the contents of a folder. If you have this permission, you can delete the subfolders and files in a folder even if you don’t specifically have Delete permission on the subfolder or the file. |
|
List Folder/Read Data |
List Folder lets you view file and folder names. Read Data allows you to view the contents of a file. |
|
Read Attributes |
Allows you to read the basic attributes of a file or a folder. These attributes include Read-Only, Hidden, System, and Archive. |
|
Read Extended Attributes |
Allows you to view the extended attributes (named data streams) associated with a file. |
|
Read Permissions |
Allows you to read all basic and special permissions assigned to a file or a folder. |
|
Take Ownership |
Allows you to take ownership of a file or a folder. By default, administrators can always take ownership of a file or a folder and can also grant this permission to others. |
|
Traverse Folder/Execute File |
Traverse Folder allows direct access to a folder in order to reach subfolders, even if you don’t have explicit access to read the data that the folder contains. Execute File allows you to run an executable file. |
|
Write Attributes |
Allows you to change the basic attributes of a file or a folder. These attributes include Read-Only, Hidden, System, and Archive. |
|
Write Extended Attributes |
Allows you to change the extended attributes (named data streams) associated with a file. |
In File Explorer, you can view special permissions for a file or folder by pressing and holding or right-clicking the file or folder with which you want to work, and then tapping or clicking Properties. In the Properties dialog box, select the Security tab, and then tap or click Advanced to display the Advanced Security Settings dialog box, shown in Figure 6-3. In this dialog box, the permissions are presented much as they are on the Security tab. The key differences are that you view individual allow or deny permission sets, whether and from where permissions are inherited, and the resources to which the permissions apply.
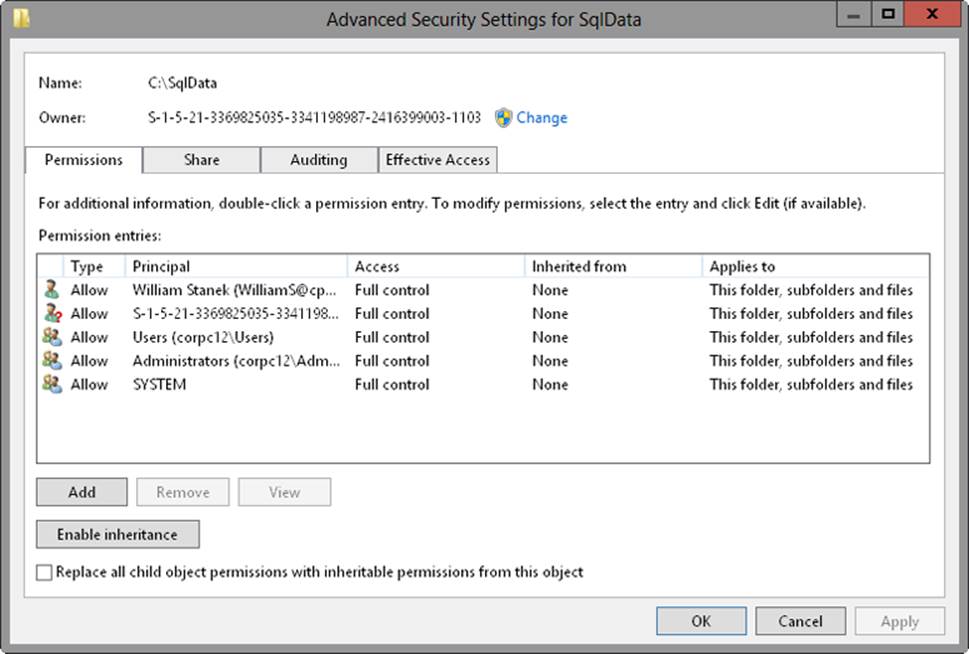
Figure 6-3. Use the Advanced Security Settings dialog box to configure special permissions.
NOTE
MORE INFO In Figure 6-3, note that the folder shows the GUID for the owner rather than a user name. With Windows 8.1, this typically is an indicator that the folder or file was created originally by a user running a different operating system on the computer, such as on a computer that is being dual booted.
After you open the Advanced Security Settings dialog box, you can set special permissions for a security principal by completing the following steps:
1. If the user or group already has directly assigned permissions for the file or folder, you can view or modify special permissions by tapping or clicking Edit and then skipping steps 2–5.
2. Tap or click Add to display the Permission Entry For dialog box. Tap or click Select A Principal to display the Select User, Computer, Service Account, Or Group dialog box.
3. Enter the name of a user or a group account. Be sure to reference the user account name rather than the user’s full name. Only one name can be entered at a time.
4. Tap or click Check Names. If a single match is found for each entry, the dialog box is automatically updated, and the entry is underlined. Otherwise, you’ll get an additional dialog box. If no matches are found, you’ve either entered the name incorrectly or you’re working with an incorrect location. Modify the name in the Name Not Found dialog box and try again, or tap or click Locations to select a new location. When multiple matches are found, in the Multiple Names Found dialog box, select the name you want to use, and then tap or click OK.
5. Tap or click OK. The user and group is added as the Principal and the Permission Entry For dialog box is updated to show this.
6. Only basic permissions are listed by default. Tap or click Show Advanced Permissions to display the special permissions, as shown in Figure 6-4.
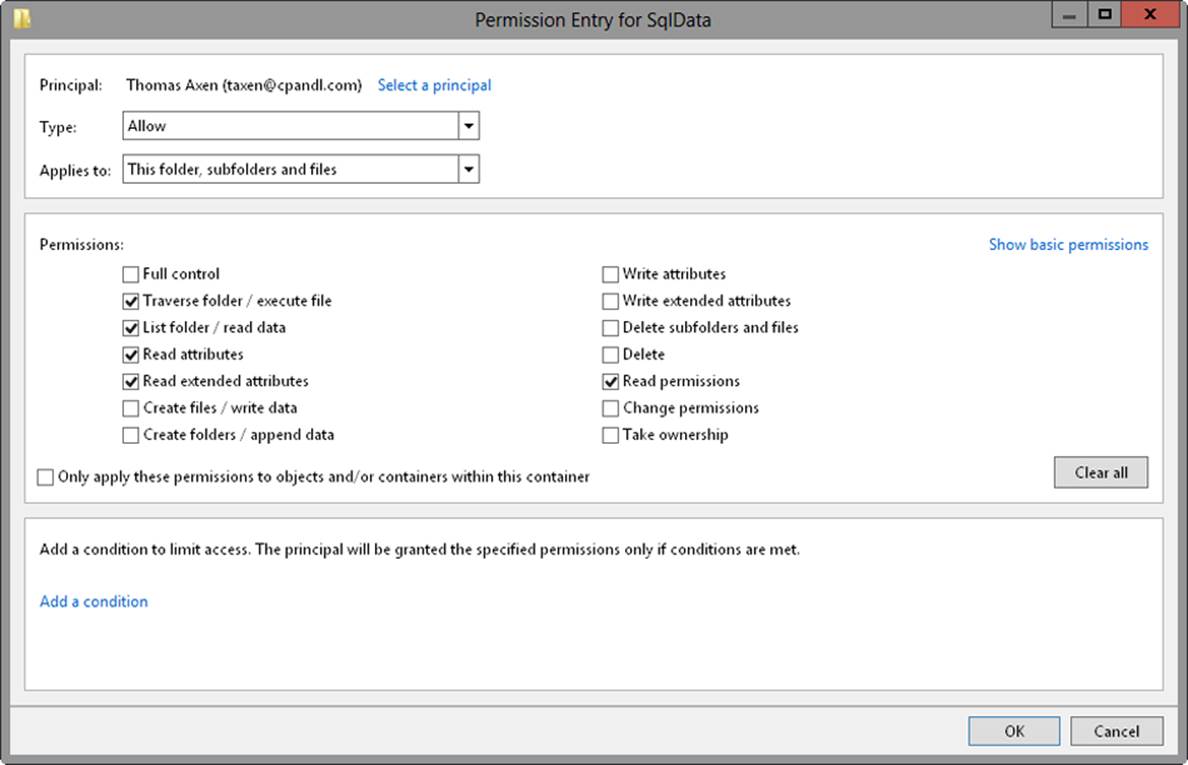
Figure 6-4. Configure the special permissions that should be allowed or denied.
7. Use the Type list to specify whether you are configuring allowed or denied special permissions, and then select the special permissions that you want to allow or deny. If any permissions are dimmed (unavailable), they are inherited from a parent folder.
NOTE
You allow and deny special permissions separately. Therefore, if you want to both allow and deny special permissions, you’ll need to configure the allowed permissions and then repeat this procedure starting with step 1 to configure the denied permissions.
8. If the options in the Applies To list are available, choose the appropriate option to ensure that the permissions are properly inherited. The options include the following:
o This Folder Only The permissions apply only to the currently selected folder.
o This Folder, Subfolders And Files The permissions apply to this folder, any subfolders of this folder, and any files in any of these folders.
o This Folder And Subfolders The permissions apply to this folder and any subfolders of this folder. They do not apply to any files in any of these folders.
o This Folder And Files The permissions apply to this folder and any files in this folder. They do not apply to any subfolders of this folder.
o Subfolders And Files Only The permissions apply to any subfolders of this folder and any files in any of these folders. They do not apply to this folder itself.
o Subfolders Only The permissions apply to any subfolders of this folder but not to the folder itself or any files in any of these folders.
o Files Only The permissions apply to any files in this folder and any files in subfolders of this folder. They do not apply to this folder itself or to subfolders.
9. When you have finished configuring permissions, tap or click OK.
Assigning claims-based permissions
Claims-based access controls use compound identities to control access to resources. When resources are remotely accessed, claims-based access controls and central access policies rely on Kerberos with armoring for authentication of computer device claims. Kerberos with armoring improves domain security by allowing domain-joined clients and domain controllers to communicate over secure, encrypted channels.
The most basic approach for creating a claim is to define conditions that limit access based on groups to which a user or device can or can’t be a member. More advanced approaches use access rules, claims types, and resources properties to carefully define specific criteria that must be met before access is granted.
Put another way, claims define the specific attributes that users and devices must have to access a file or folder. For example, with basic claims based on group membership, you can specify that:
§ A user or device can be a member of a group listed in a claim. For example, the device can be a member of the Engineering Computers group.
§ A user or device must be a member of each of the groups listed in a claim. For example, the device must be a member of the Engineering Computers and Restricted Access groups.
§ A user or device cannot be a member of a group listed in a claim. For example, the device cannot be a member of the Temp Computers group.
§ A user or device must not be a member of each group listed in a claim. For example, the device cannot be a member of the Temp Computer or Contract Computers group.
NOTE
MORE INFO With central access policies, you define central access rules in Active Directory Domain Services (AD DS) and those rules are applied dynamically throughout the enterprise. Central access rules use conditional expressions that require you to determine the resource properties, claim types, and/or security groups required for the policy, in addition to the servers where the policy should be applied.
Before you can define and apply claim conditions to a computer’s files and folders, claims-based policy must be enabled. For non–domain-joined computers, you can do this by enabling and configuring the KDC Support For Claims, Compound Authentication And Kerberos Armoring policy in the Administrative Templates policies for Computer Configuration under System\KDC. The policy must be configured to use a specific mode. The available modes are:
§ Supported Domain controllers support claims, compound identities, and Kerberos armoring. Client computers that don’t support Kerberos with armoring can be authenticated.
§ Always Provide Claims Same as Supported, but domain controllers always return claims for accounts.
§ Fail Unarmored Authentication Requests Kerberos with armoring is mandatory. Client computers that don’t support Kerberos with armoring cannot be authenticated.
For application throughout a domain, claims-based policy should be enabled for all domain controllers in a domain to ensure consistent application. Because of this, you typically enable and configure this policy through the Default Domain Controllers Group Policy Object, or the highest Group Policy Object linked to the domain controllers organizational unit (OU).
NOTE
REAL WORLD You might have heard that you cannot or should not edit the Default Domain Controllers Group Policy Object. The truth is that this object should only be used to configure a very specific subset of policy.
In Group Policy Management, you’ll find the Default Domain Controllers Group Policy Object in the Group Policy Objects container. By default, the Default Domain Controllers Policy GPO has the highest precedence among GPOs linked to the Domain Controllers OU and this is why the GPO has precedence. As a best practice, you should edit the Default Domain Policy GPO only to manage password policy, account lockout policy, and Kerberos policy.
To manage other areas of policy, you should create a new GPO and link it to the domain or an appropriate OU within the domain. That said, several policy settings located under Computer Configuration\Policies\Windows Settings\Security Settings\Local Policies\Security Options are exceptions to the rule, including:
§ Accounts: Rename Administrator Account
§ Accounts: Administrator Account Status
§ Accounts: Guest Account Status
§ Accounts: Rename Guest Account
§ Network Security: Force Logoff When Logon Hours Expire
§ Network Security: Do Not Store LAN Manager Hash Value On Next Password Change
§ Network Access: Allow Anonymous SID/Name Translation
Kerberos Client Support For Claims, Compound Authentication And Kerberos Armoring policy controls whether the Kerberos client running on Windows 8.1 and Windows Server 2012 R2 requests claims and compound authentication. The policy must be enabled for compatible Kerberos clients to request claims and compound authentication for Dynamic Access Control and Kerberos armoring. You’ll find this policy in the Administrative Templates policies for Computer Configuration under System\Kerberos.
After you’ve enabled and configured claims-based policy, you can define claim conditions by completing these steps:
1. In File Explorer, press and hold or right-click the file or folder with which you want to work, and then tap or click Properties. In the Properties dialog box, select the Security tab, and then tap or click Advanced to display the Advanced Security Settings dialog box, shown earlier inFigure 6-3.
2. If the user or group already has directly assigned permissions for the file or folder, you can edit their existing permissions. Here, tap or click the user with which you want to work, tap or click Edit, and then skip steps 3–6.
3. Tap or click Add to display the Permission Entry For dialog box. Tap or click Select A Principal to display the Select User, Computer, Service Account, Or Group dialog box.
4. Enter the name of a user or a group account. Be sure to reference the user account name rather than the user’s full name. Only one name can be entered at a time.
5. Tap or click Check Names. If a single match is found for each entry, the dialog box is automatically updated, and the entry is underlined. Otherwise, you’ll get an additional dialog box. If no matches are found, you’ve either entered the name incorrectly or you’re working with an incorrect location. Modify the name in the Name Not Found dialog box and try again, or tap or click Locations to select a new location. When multiple matches are found, in the Multiple Names Found dialog box, select the name you want to use, and then tap or click OK.
6. Tap or click OK. The user and group are added as the Principal. Tap or click Add A Condition.
7. Use the options provided to define the condition or conditions that must be met to grant access. With users and groups, set basic claims based on group membership, previously defined claim types, or both. With resource properties, define conditions for property values.
8. When you have finished configuring conditions, tap or click OK.
File ownership and permission assignment
The owner of a file or a folder has the right to allow or deny access to that resource. Although members of the Administrators group and other authorized users also have the right to allow or deny access, the owner has the authority to lock out nonadministrator users, and then the only way to regain access to the resource is for an administrator or a member of the Restore Operators group to take ownership of it. This makes the file or folder owner important with respect to what permissions are allowed or denied for a given resource.
The default owner of a file or folder is the person who creates the resource. Ownership can be taken or transferred in several different ways. The current owner of a file or folder can transfer ownership to another user or group. A member of the Administrators group can take ownership of a file or folder or transfer ownership to another user or group—even if administrators are locked out of the resource according to the permissions. Any user with the Take Ownership permission on the file or folder can take ownership, as can any member of the Backup Operators group (or anyone else with the Restore Files And Directories user right, for that matter).
To assign ownership of a file or a folder, complete these steps:
1. In File Explorer, open the file or folder’s Properties dialog box by pressing and holding or right-clicking the file or folder and then tapping or clicking Properties.
2. On the Security tab, tap or click Advanced to display the Advanced Security Settings dialog box where the current owner is listed under the file or folder name.
3. Tap or click Change. Use the options in the Select User, Computer, Service Account, Or Group dialog box to select the new owner. If you’re taking ownership of a folder, you can take ownership of all subfolders and files within the folder by selecting the Replace Owner On Subcontainers And Objects option (see Figure 6-5).
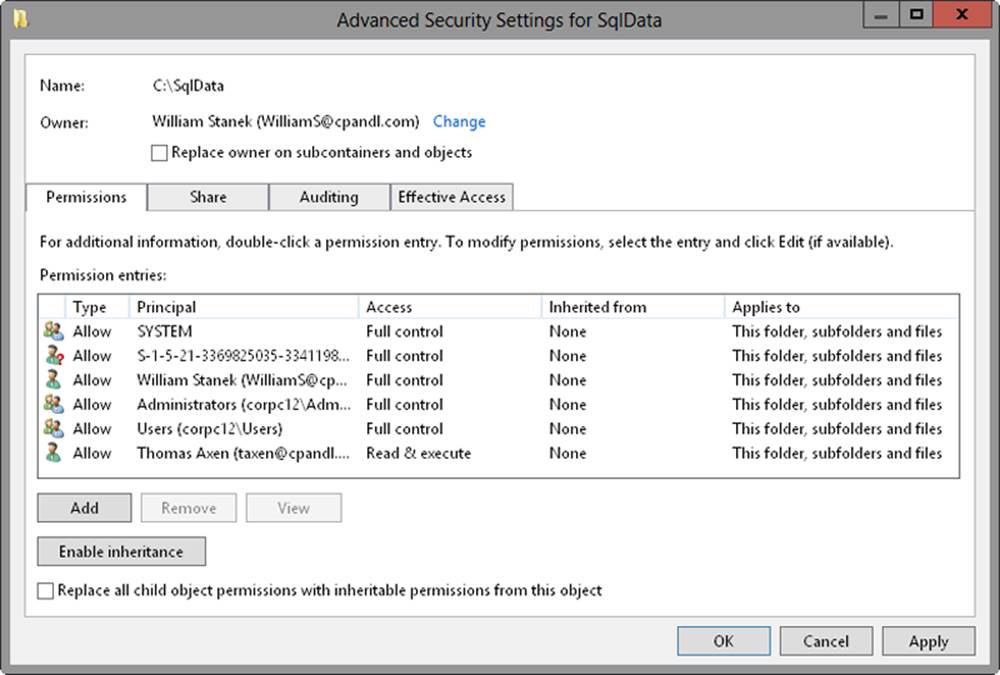
Figure 6-5. Use the Advanced Security Settings dialog box to take ownership of a file or a folder.
4. Tap or click OK twice when you have finished.
Applying permissions through inheritance
In the file and folder hierarchy used by Windows 8.1, the root folder of a local disk and the %UserProfile% folder are the parent folders of all the files and folders they contain by default. Anytime you add a resource, it inherits the permissions of the local disk’s root folder or the user’s profile folder. You can change this behavior by modifying a folder’s inheritance settings so that it no longer inherits permissions from its parent folder. This step creates a new parent folder, and any subfolders or files you add will then inherit the permissions of this folder.
Inheritance essentials
Inheritance is automatic, and inherited permissions are assigned when a file or folder is created. If you do not want a file or folder to have the same permissions as a parent, you have several choices:
§ Stop inheriting permissions from the parent folder, and then either convert inherited permissions to explicit permissions or remove all inherited permissions.
§ Access the parent folder, and then configure the permissions for the files and folders it contains.
§ Try to override an inherited permission by selecting the opposite permission. In most cases, Deny overrides Allow.
Inherited permissions are shaded (unavailable) on the Security tab of a file or folder’s Properties dialog box. Also, when you assign new permissions to a folder, the permissions propagate to the subfolders and files contained in that folder and either supplement or replace existing permissions. This propagation lets you grant additional users and groups access to a folder’s resources or to further restrict access to a folder’s resources independently of a parent folder.
To better understand inheritance, consider the following examples:
§ On drive C, you create a folder named Data, and then create a subfolder named CurrentProjects. By default, Data inherits the permissions of the C:\ folder, and these permissions are in turn inherited by the CurrentProjects folder. Any files you add to the C:\, C:\Data, and C:\Data\CurrentProjects folders have the same permissions—those set for or inherited from the C:\ folder.
§ On drive C, you create a folder named Docs, and then create a subfolder named Working. You disable inheritance on the Working folder, and then remove the inherited permissions of the parent, C:\. Any files you add to the C:\Docs\Working folder inherit the permissions of the C:\Docs folder and no other.
§ On drive C, you create a folder named Backup, and then create a subfolder named Sales. You add permissions to the Sales folder that grant access to members of the Sales group. Any files added to the C:\Backup\Sales folder inherit the permissions of the C:\ folder and also have additional access permissions for members of the Sales group.
NOTE
REAL WORLD Many new administrators wonder what the advantage of inheritance is and why it is used. Although inheritance occasionally seems like more trouble than it’s worth, inheritance enables you to very efficiently manage permissions. Without inheritance, you’d have to configure permissions on every file and folder you create. If you wanted to change permissions later, you’d have to go through all your files and folders again. With inheritance, all new files and folders automatically inherit a set of permissions. If you need to change permissions, you can make the changes in a top-level or parent folder, and the changes can be automatically applied to all subfolders and files in that folder. In this way, a single permission set can be applied to many files and folders without editing the security of individual files and folders.
Viewing inherited permissions
To view the inherited permissions on a file or folder, press and hold or right-click the file or folder in File Explorer, and then tap or click Properties. On the Security tab of the Properties dialog box, tap or click Advanced to display the Advanced Security Settings dialog box, shown earlier inFigure 6-3. The Access column lists the current permissions assigned to the resource. If the permission is inherited, the Inherited From column shows the parent folder. If the permission is inherited by other resources, the Applies To column shows the types of resources that inherit the permission.
Stopping inheritance
When you disable inheritance in a file or folder’s security settings, the file or folder stops inheriting permissions from parent folders. You can then elect to either convert inherited permissions to explicit permissions on the file or folder, which would make the permissions editable, or remove all inherited permissions from the file or folder.
If you want a file or folder to stop inheriting permissions from a parent folder, follow these steps:
1. In File Explorer, press and hold or right-click the file or folder, and then tap or click Properties. On the Security tab, tap or click Advanced. This opens the Advanced Security Settings dialog box with the Permissions tab selected by default.
2. On the Permissions tab, you’ll find a Disable Inheritance button if inheritance currently is enabled. Tap or click Disable Inheritance.
3. As shown in Figure 6-6, you can now either convert the inherited permissions to explicit permissions or remove all inherited permissions and apply only the permissions that you explicitly set on the folder or file.
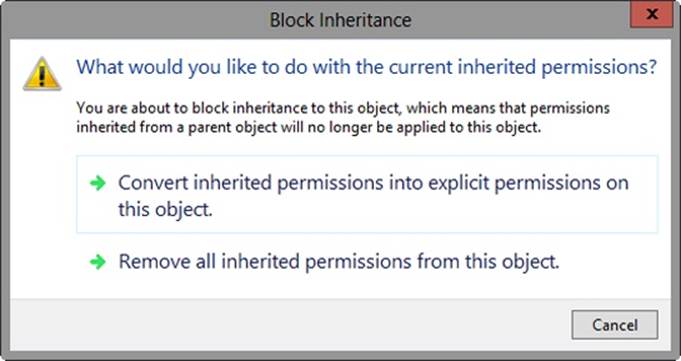
Figure 6-6. Copy or remove the inherited permissions.
TIP
If you remove the inherited permissions and no other permissions are assigned, everyone but the owner of the resource is denied access. This effectively locks out everyone except the owner of a folder or file. However, administrators still have the right to take ownership of the resource regardless of the permissions. Thus, if an administrator is locked out of a file or a folder and truly needs access, she can take ownership and then have unrestricted access.
Restoring inherited permissions
Over time, the permissions on files and subfolders can become so dramatically different from those of a parent folder that it is nearly impossible to effectively manage access. To make managing file and folder access easier, you might want to take the drastic step of removing all existing permissions on all resources contained in a parent folder and replacing them with permissions inherited from that parent folder. In this way, permissions set on the folder you are working with (the parent folder) replace the permissions set on every file and subfolder contained within this parent folder.
To replace existing permissions with the inherited permissions of a parent folder, follow these steps:
1. In File Explorer, press and hold or right-click the folder, and then tap or click Properties. On the Security tab, tap or click Advanced.
2. On the Permissions tab, select Replace All Child Object Permission Entries With Inheritable Permission Entries From This Object, and then tap or click OK.
3. As shown in Figure 6-7, you receive a prompt explaining that this action will replace all explicitly defined permissions and enable propagation of inheritable permissions. Tap or click Yes.
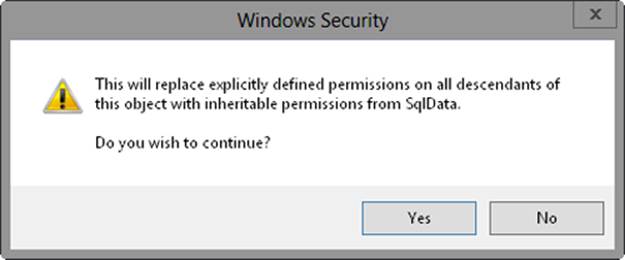
Figure 6-7. Tap or click Yes to confirm that you want to replace the existing permissions.
However, you don’t have to completely replace existing permissions to start inheriting permissions from a parent folder. If a file or folder was configured to stop inheriting permissions from a parent folder, you can re-enable inheritance to have the file or folder include the inherited permissions from a parent folder. To do this, follow these steps:
1. In File Explorer, press and hold or right-click the file or folder that should include inherited permissions, and then tap or click Properties. On the Security tab, tap or click Advanced.
2. On the Permissions tab, tap or click Enable Inheritance, and then tap or click OK. Note that the Enable Inheritance button is available only if permission inheritance currently is disabled.
Determining the effective permissions and troubleshooting
NTFS permissions are complex and can be difficult to manage. Sometimes a change—even a very minor one—can have unintended consequences. Users might suddenly find that they are denied access to files they could previously access or that they have access to files to which access should never have been granted. In either scenario, something has gone wrong with permissions. You have a problem, and you need to fix it.
You should start troubleshooting these or other problems with permissions by determining the effective permissions for the files or folders in question. As the name implies, the effective permissions tell you exactly which permissions are in effect with regard to a particular user or group. Theeffective permissions are important because they enable you to quickly determine the cumulative set of permissions that apply.
For a user, the effective permissions are based on all the permissions the user has been granted or denied, no matter whether the permissions are applied explicitly or obtained from groups of which the user is a member. For example, if JimB is a member of the Users, Sales, Marketing, SpecTeam, and Managers groups, the effective permissions on a file or a folder are the cumulative set of permissions that JimB has been explicitly assigned and the permissions assigned to the Users, Sales, Marketing, SpecTeam, and Managers groups. If JimB is a member of a group that is specifically denied a permission, JimB will also be denied that permission, even if another group is allowed that permission. This occurs because deny entries have precedence over allow entries.
The same is true for user and device claims. If you’ve configured a claims-based policy and added a user claim, that user claim can prevent access. Similarly, if there’s a device claim, that device claim can prevent access.
To determine the effective permissions for a user or a group with regard to a file or folder, complete the following steps:
1. In File Explorer, press and hold or right-click the file or folder with which you want to work, and then tap or click Properties. In the Properties dialog box, tap or click the Security tab, and then tap or click Advanced.
2. In the Advanced Security Settings dialog box, tap or click the Effective Access tab. Use the options provided to determine the effective permissions for users, groups, and devices. Keep the following in mind:
o If you only want to determine access for a particular user or user group, tap or click Select A User, enter the name of the user or group, and then tap or click OK.
o If you only want to determine access for a particular device or device group, tap or click Select A Device, enter the name of the device or the device group, and then tap or click OK.
o If you want to determine access for a particular user or user group on a particular device or in a device group, specify both a user/user group and a device/device group.
3. Tap or click View Effective Access. The effective permissions for the specified user or group are displayed by using the complete set of special permissions. If a user has full control over the selected resource, he or she will have all the permissions, as shown in Figure 6-8. Otherwise, a subset of the permissions is selected, and you have to carefully consider whether the user or group has the appropriate permissions. Use Table 6-3, earlier in the chapter, to help you interpret the permissions.
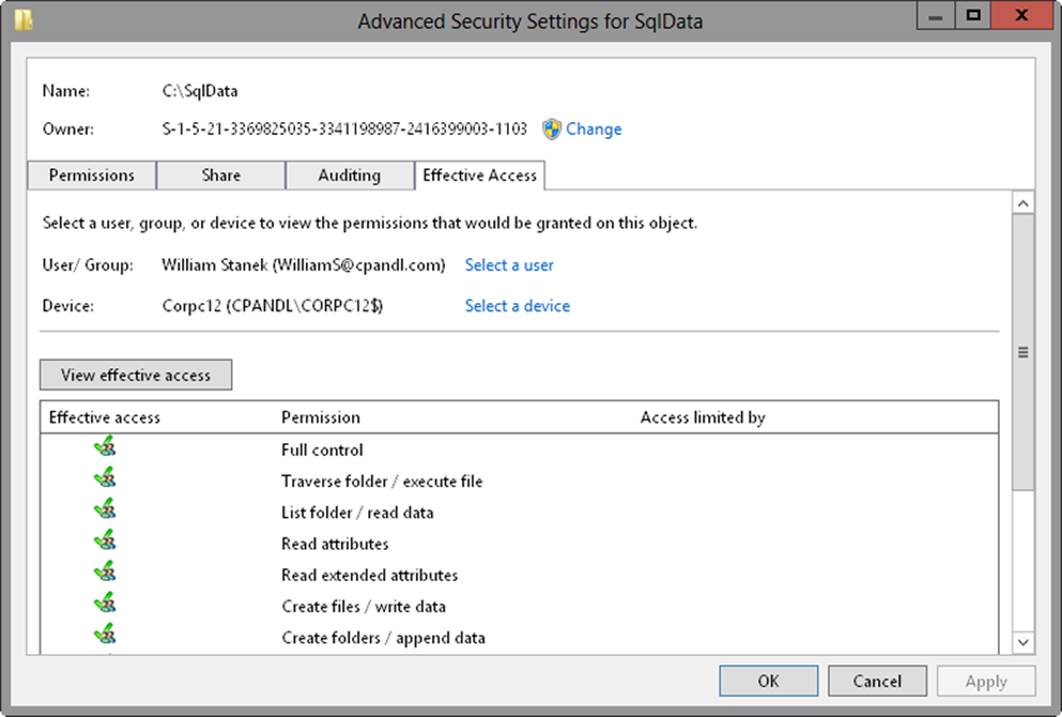
Figure 6-8. Any checked permissions have been granted to the specified user or group.
NOTE
You must have appropriate permissions to view the effective permissions of any user or group. It’s also important to remember that you cannot determine the effective permissions for implicit groups or special identities, such as Authenticated Users or Everyone. Furthermore, the effective permissions do not take into account those permissions granted to a user because he or she is the Creator Owner.
All materials on the site are licensed Creative Commons Attribution-Sharealike 3.0 Unported CC BY-SA 3.0 & GNU Free Documentation License (GFDL)
If you are the copyright holder of any material contained on our site and intend to remove it, please contact our site administrator for approval.
© 2016-2026 All site design rights belong to S.Y.A.