Windows 8.1 Administration Pocket Consultant: Storage, Security, & Networking (2014)
Chapter 7. Managing File Sharing and Auditing
§ Sharing files and folders over the network
§ Using and configuring public folder sharing
§ Implementing synced sharing
§ Auditing file and folder access
Sharing files enables users to access files from across the network. The most basic way to share files is to create a shared folder and make it accessible to users through a mapped network drive. Although this standard approach to sharing files requires a computer that is joined and connected to the enterprise domain, synced sharing does not. With sync shares, users can use an Internet connection to sync data to their devices from folders located on enterprise servers. You implement synced sharing by using Work Folders, a feature that is available when you deploy servers running Windows Server 2012 R2 or later.
Sharing files and folders over the network
Windows 8.1 supports two file-sharing models: public folder sharing and standard folder sharing. Either or both models can be used in workgroups and domains, but standard folder sharing is preferred because it’s more secure than public folder sharing. Standard folder sharing enables you to use a standard set of permissions to allow or deny initial access to files and folders over a network. Standard folder sharing settings are enabled or disabled on a per-computer basis. You can turn file sharing on or off by following these steps:
1. In Control Panel, under the Network And Internet heading, tap or click the Choose Homegroup And Sharing Options link, and then tap or click Change Advanced Sharing Settings.
2. Each available network profile has a separate management panel with configuration settings. Use the expand button to display the profile with which you want to work.
3. To enable file and printer sharing, select Turn On File And Printer Sharing. To disable file and printer sharing, select Turn Off File And Printer Sharing. Tap or click Apply.
The Server Message Block (SMB) protocol is the primary network file sharing protocol used by computers running Windows. When folders are shared over a network, an SMB client reads and writes to files and requests services from the computer hosting the shared folder. Windows 8.1 and Windows Server 2012 R2 support SMB version 3.0 and include an SMB 3.0–compatible client.
SMB 3.0 brings many enhancements for performance, especially when you use clustered file servers. An out-of-the-box enhancement that doesn’t rely on a special configuration is end-to-end encryption of SMB data, which eliminates the need to use IPsec, specialized hardware, or wide area network (WAN) accelerators to protect data from eavesdropping. SMB encryption can be enabled on a per-share basis or for an entire server.
Controlling access to network shares
When a user accesses a file or folder over a network and standard folder sharing is enabled, two levels of permissions are used that together determine the actions a user can perform with regard to a particular shared file or folder. The first level of permissions includes those set on the share itself. These permissions define the maximum level of access. A user or a group can never have more permissions than those granted by the share. The second level of permissions includes those set on the files and folders. These permissions serve to further restrict the permitted actions.
Three share permissions are available:
§ Owner Users with this permission have Full Control, Read, and Change permissions, in addition to the further capabilities to change file and folder permissions and take ownership of files and folders. If you have Owner permissions on a shared resource, you have full access to the shared resource.
§ Read/Write Users with this permission have Read and Change permissions and the additional capabilities to create files and subfolders, modify files, change attributes on files and subfolders, and delete files and subfolders. If you have Read/Write permissions on a shared resource, you can read, change, and delete data, but you cannot take ownership.
§ Read Users with this permission have only Read permission. They can view file and subfolder names, access the subfolders of the share, read file data and attributes, and run program files. If you have Read permission on a shared resource, the most you can do is perform read operations.
Permissions assigned to groups work like this: If a user is a member of a group that is granted share permissions, the user also has those permissions. If a user is a member of multiple groups, the permissions are cumulative. For example, if one group has Read access and another has Read/Write access, the user will have Read/Write access. If one group has Read access and another has Owner access, the user will have Owner access.
You can override this behavior by specifically denying an access permission. Denying permission takes precedence and overrides permissions that have been granted. If you don’t want a user or a group to have a permission, configure the share permissions so that the user or group is denied that permission. For example, if a user is a member of a group that has been granted Owner permissions for a share, but the user should have only Read/Write permissions, configure the share to deny Owner permissions to that user.
Creating a shared resource
Folders can be shared both in workgroups and domains. To share the first resource on a computer, you must be a local administrator. Sharing the first resource sets up the computer for sharing other resources and enables other users to share resources they own, or to which they have appropriate access permissions.
You can create shares by using several different tools, including the following:
§ File Explorer Use File Explorer when you want to share folders on the computer you are logged on to.
§ Computer Management Use Computer Management when you want to share folders on any computer to which you can connect.
§ Net Share Use Net Share from the command line when you want to use a script to share folders. Enter net share /? at the command prompt for the syntax of the command.
§ SmbShare Use the SmbShare module to create and manage shares. Enter get-help smbshare at a Windows PowerShell prompt for a list of related cmdlets.
Creating a shared resource is a multipart process. First, you share the folder so that it can be accessed, and then you set the share permissions. Afterward, you should check and modify the file-system permissions as necessary. This section examines sharing a resource and setting its permissions by using File Explorer and Computer Management. For details on working with file system permissions, see the Controlling access to files and folders with NTFS permissions section in Chapter 6.
Sharing a resource and setting share permissions in File Explorer
File Explorer supports basic sharing and advanced sharing. With basic sharing, you can share any folder except the root folder of a drive. With advanced sharing, you can share the root folder of a drive and any other folder. The root folders of drives are shared automatically as administrative shares.
To share a folder by using basic sharing, follow these steps:
1. In File Explorer, press and hold or right-click the folder you want to share, select Share With, and then select Specific People. This opens the File Sharing Wizard, shown in Figure 7-1.
2. Enter a name and then tap or click Add, or tap or click the arrow to find a user. In workgroups, computers will always show only local accounts and groups. In domains, you can view local users and groups and also find users in domains.
3. When you tap or click Add, the selected users and groups are added to the Name list. You can then configure permissions for each user and group by tapping or clicking an account name to display the Permission Level options and then choosing the appropriate permission level. The options for permission levels are Read and Read/Write.
4. Finally, tap or click Share to create the share. After Windows 8.1 creates the share and makes it available for use, note the share name. This is the name by which the shared resource can be accessed. If you want to email a link to the shared resource to someone, tap or click the E-mail link. If you want to copy a link to the shared resource to the Clipboard, tap or click the Copy link. Tap or click Done when you have finished.
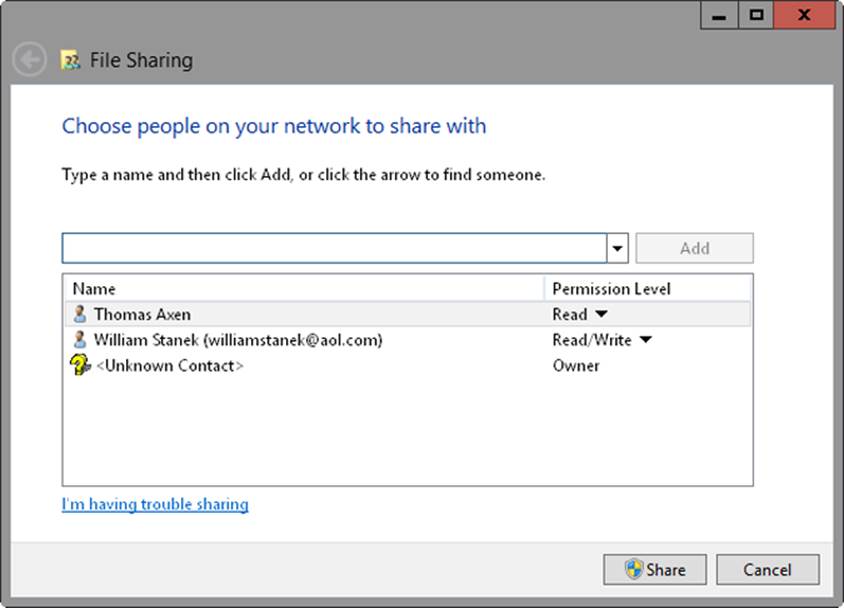
Figure 7-1. Use the File Sharing Wizard to configure sharing of the selected file or folder.
NOTE
Typically, when you create a share, users access the share by using an abbreviated Universal Naming Convention (UNC) path to the share. For example, if you share the C:\Data\Reports\Current folder as Reports on CorPC85, users can access the folder by using the UNC path \\CorPC85\Reports. However, when you share a folder within a user’s profile, users access the share by using a path that is relative to the Users folder on the computer. This occurs because Windows configures sharing in relation to where the folder is located in the Users folder. For example, if MollyH shares her Documents folder on CustPC27, the UNC path to the share is \\CustPC27\Users\MollyH\Documents.
To share a folder by using advanced sharing, follow these steps:
1. In File Explorer, press and hold or right-click the folder you want to share, and then tap or click Properties. This opens the folder’s Properties dialog box.
2. On the Sharing tab, tap or click Advanced Sharing. In the Advanced Sharing dialog box, select Share This Folder.
3. Windows sets the share name to the folder name by default. Either accept the default share name or enter a different name.
4. Tap or click Permissions. Use the Permissions For dialog box to configure access permissions for the share. Tap or click OK.
5. Tap or click Caching. Use the Offline Settings dialog box to specify whether and how data is cached for offline use. Tap or click OK.
6. Tap or click OK. Click OK again to close the Advanced Sharing dialog box, and then tap or click Close.
Changing or stopping sharing
If you press and hold or right-click a folder that is shared, point to Share With, and then tap or click Stop Sharing, you remove sharing settings and stop sharing the folder. To change sharing permissions, press and hold or right-click the shared folder, point to Share With, and then tap or click Specific People. You can then grant access to additional users and groups, as discussed previously. To remove access for a user or group, select the user or group in the Name list, and then tap or click Remove. When you have finished making changes, tap or click Share to reconfigure sharing options, and then tap or click Done.
When you are using advanced sharing, you can configure sharing by pressing and holding or right-clicking the folder and then tapping or clicking Properties. On the Sharing tab, tap or click Advanced Sharing. You’ll then be able to enable or disable alternate shares and specify connection limits for users. You’ll also be able to configure permissions and caching.
Sharing a folder and setting share permissions in Computer Management
By using Computer Management, you can share a folder on any computer to which you have administrator access. By connecting remotely to the computer rather than logging on locally, you usually save time because you don’t need to access the computer or leave your desk. Follow these steps to use Computer Management to share a folder:
1. Start Computer Management from the Administrative Tools in Control Panel or enter compmgmt.msc in the Apps Search box, and then press Enter. By default, Computer Management connects to the local computer, and the root node of the console tree displays the Computer Management (Local) label.
TIP
If you want to use the Create A Shared Folder Wizard to share a folder on a local computer, start the wizard directly and skip steps 1–4. Just enter shrpubw at an elevated command prompt, and then tap or click Next when the wizard starts.
2. Press and hold or right-click Computer Management in the console tree, and then tap or click Connect To Another Computer. In the Select Computer dialog box, the Another Computer option is selected by default. Enter the fully qualified domain name of the computer with which you want to work, such as engpc08.microsoft.com, where engpc08 is the computer name and microsoft.com is the domain name. If you don’t know the computer name and network discovery is enabled, tap or click Browse to search for the computer.
3. Expand System Tools\Shared Folders, and then select Shares to display the shared folders on the system with which you are working, as shown in Figure 7-2.
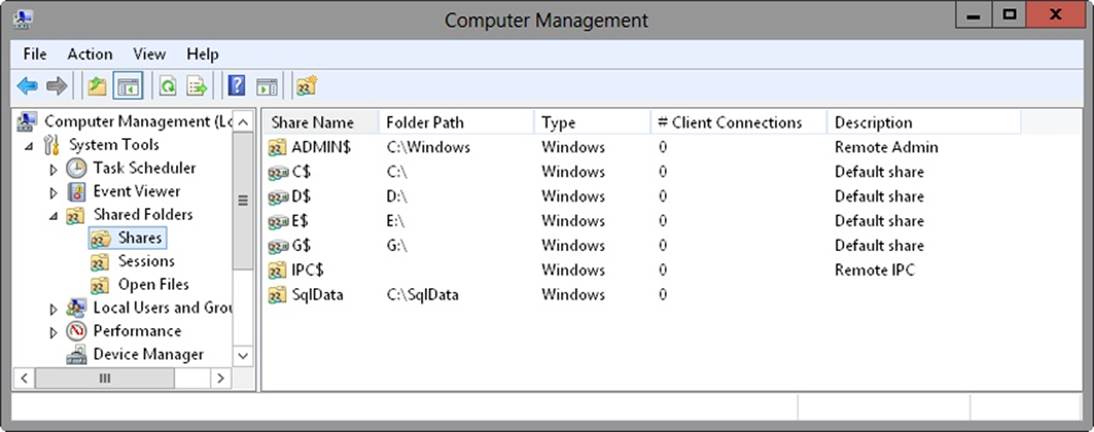
Figure 7-2. All available shared folders on the computer are listed in the Shares node.
4. To start the Create A Shared Folder Wizard, press and hold or right-click Shares, and then tap or click New Share. Tap or click Next to display the Folder Path page.
5. In the Folder Path text box, enter the full path to the folder that you want to share, such as C:\Data. If you don’t know the full path, tap or click Browse, and then use the Browse For Folder dialog box to find the folder you want to share. The Browse For Folder dialog box also lets you create a new folder that you can then share. Tap or click Next to display the Name, Description, And Settings page.
6. In the Share Name text box, enter a name for the share. Share names must be unique for each system. They can be up to 80 characters in length and can contain spaces.
7. Enter a description of the share’s contents in the Share Description text box.
TIP
By default, only files and programs that users specify are available for offline use. Tap or click Change if you want to modify the default offline file settings. You can make all files and programs available for offline use by selecting All Files And Programs That Users Open From The Shared Folder Are Automatically Available Offline, or you can make no files and programs available for offline use by selecting No Files Or Programs From The Shared Folder Are Available Offline. Tap or click OK after making your selection.
8. When you are ready to continue, tap or click Next to display the Shared Folder Permissions page. The available options are as follows:
o All Users Have Read-Only Access Default option. Gives users the right to view files and read data but restricts them from creating, modifying, or deleting files and folders.
o Administrators Have Full Access; Other Users Have Read-Only Access Gives administrators full access to the share and gives other users read-only access. Administrators can create, modify, and delete files and folders. On NTFS, this option also gives administrators the right to change permissions and to take ownership of files and folders. Other users can only view files and read data. They can’t create, modify, or delete files and folders.
o Administrators Have Full Access; Other Users Have No Access Gives only administrators full access to the share.
o Customize Permissions Enables you to configure access for specific users and groups, which is usually the best technique to use. To use this option, select Customize Permissions, tap or click Custom, and then set permissions as appropriate for the share.
9. After you set up permissions on the share, tap or click Finish to share the folder. Tap or click Finish again to exit the wizard.
If you later want to stop sharing the folder, you can do this in Computer Management by pressing and holding or right-clicking the shared folder and then tapping or clicking Stop Sharing. When prompted to confirm the action, tap or click Yes.
Creating and managing shared folders in Group Policy
You can share folders by using Group Policy preferences. I recommend this approach only when you can carefully target computers so that only computers that should actually share data are configured with shared folders.
To create a preference item to create, update, replace, or delete shared folders, follow these steps:
1. Open a Group Policy Object for editing in the Group Policy Management Editor. Expand Computer Configuration\Preferences\Windows Settings, and then select Network Shares.
2. Press and hold or right-click the Network Shares node, point to New, and then tap or click Network Share. This opens the New Network Share Properties dialog box.
3. In the New Network Share Properties dialog box, select Create, Update, Replace, or Delete in the Action list.
4. In the Share Name text box, enter a name for the share. Share names must be unique for each system. They can be up to 80 characters in length and can contain spaces.
5. In the Folder Path text box, enter the full path to the folder that you want to share, such as C:\Data. If you don’t know the full path you want to use but there is an existing folder with the correct path, tap or click the related options button, and then use the Folder Selection dialog box to find the folder like the one you want to share on other computers.
NOTE
REAL WORLD If you want to use an environment variable in the folder path, press F3 to display a list of system-defined variables. Tap or click the variable you’d like to use, such as LogOnUser. By default, variables are resolved by Group Policy before they are applied to a user’s computer. To use the variable as a placeholder that is resolved on the user’s computer instead, clear the Resolve Variable check box before you tap or click Select. This inserts a placeholder for the variable to be resolved on the user’s computer.
In Group Policy preferences, you can easily distinguish between variables resolved by Group Policy and variables resolved on a user’s computer. Variables resolved by Group Policy have the syntax %VariableName%, such as %ProgramFiles%. Variables resolved on a user’s computer have the syntax %<VariableName>%, such as %<ProgramFiles>%.
6. In the Comment text box, enter a description of the share’s contents.
7. When you are updating or deleting shares, you can modify or delete all shares of a particular type rather than an individual share. You can do any or all of the following:
o Update or delete all regular shares (meaning shares that are not hidden, administrative, or special shares) by selecting Update All Regular Shares or Delete All Regular Shares.
o Update or delete all hidden shares except the administrative shares and special shares (which include drive-letter shares, ADMIN$, FAX$, IPC$, and Print$) by selecting Update All Hidden Non-Administrative Shares or Delete All Hidden Non-Administrative Shares.
o Update or delete all administrative shares (which include only the drive-letter shares) by selecting Update All Administrative Drive-Letter Shares or Delete All Administrative Drive-Letter Shares.
NOTE
If you want to modify special shares, such as ADMIN$, FAX$, IPC$, and Print$, or other system shares, such as SYSVOL and NETLOGON, you can create a preference item for the share and set the Share Name to the name of the special share.
8. Specify the number of users who can connect to the share. Select Maximum Allowed to enable the maximum number of users allowed by the operating system. Select Allow This Number Of Users to specify a limit.
9. Use the Access-based Enumeration options to specify whether access controls should be used to determine whether users can view folders in the share. Select Enable if you want only users with Read permission to be able to view the folders within the share. Select Disable if you want all users to be able to view the folders within the share.
10.Use the options on the Common tab to control how the preference is applied. Because you are enforcing a control, you will usually want to apply the setting every time Group Policy is refreshed. In this case, do not select Apply Once And Do Not Reapply.
11.Tap or click OK. The next time Group Policy is refreshed, the preference item will be applied as appropriate for the Group Policy Object in which you define the preference item.
Using and accessing shared resources
After you share a file or folder, users can connect to it as a network resource or map it to a drive letter on their machines. When a network drive is mapped, users can access it as they do a local drive on their computer.
You can map a network drive to a shared file or folder by completing the following steps:
1. When you open File Explorer, the This PC node should be opened by default. If you have an open File Explorer window and This PC is not the selected node, tap or click the leftmost option button in the address list, and then tap or click This PC.
2. Select the Map Network Drive button on the Computer panel, and then select Map Network Drive. This displays the Map Network Drive dialog box, as shown in Figure 7-3.
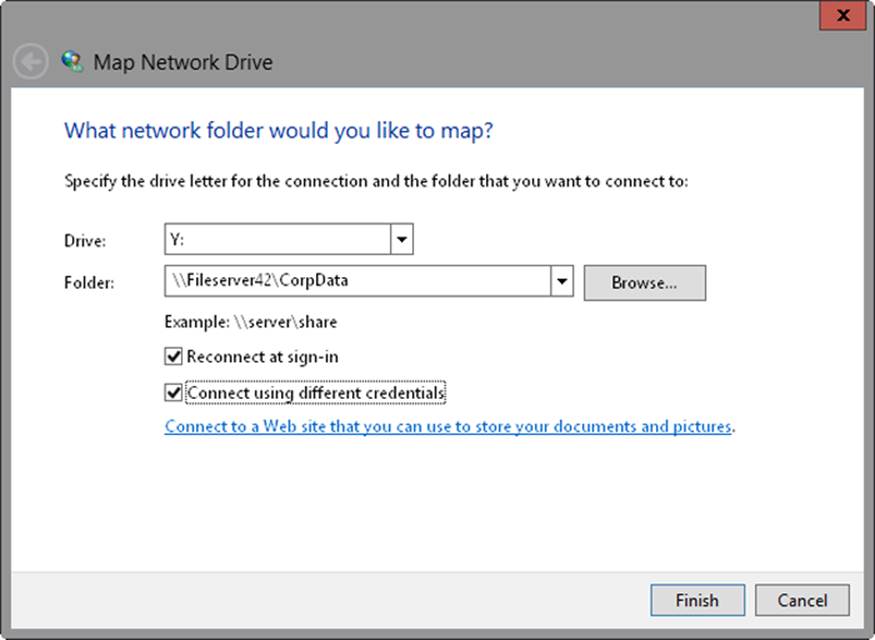
Figure 7-3. Map the share you want to use to a network drive.
3. Use the Drive list to select a free drive letter to use, and then tap or click the Browse button to the right of the Folder list. In the Browse For Folder dialog box, expand the network folders until you can select the name of the workgroup or the domain with which you want to work. Keep in mind that network discovery must be enabled before you will be able to view shared folders in the Browse For Folder dialog box.
4. When you expand the name of a computer in a workgroup or a domain, you’ll view a list of shared folders. Select the shared folder with which you want to work, and then tap or click OK.
5. Select Reconnect At Sign-In if you want Windows 8.1 to connect to the shared folder automatically at the start of each session.
6. Tap or click Finish. If the currently logged-on user doesn’t have appropriate access permissions for the share, select Connect Using Different Credentials, and then tap or click Finish. After you tap or click Finish, you can enter the user name and password of the account with which you want to connect to the shared folder. Enter the user name in Domain\Username format, such as Cpandl\Williams. Before tapping or clicking OK, select Remember My Credentials if you want the credentials to be saved. Otherwise, you’ll need to provide credentials in the future.
When mapping network drives, keep in mind that a computer switches to offline mode in the following scenarios:
§ When the server is unavailable
§ When on a slow network (as configured in Group Policy)
§ When a user selects the Work Offline option in File Explorer
§ When the mapped drive is configured to use the Always Offline mode
To enable the Always Offline mode, press and hold or right-click the mapped network drive in File Explorer, and then select Always Available Offline. If necessary, Windows 8.1 will then configure and start the Offline Files service before using the service to copy files and programs that can be cached from the server to the computer with which you are working. Note that if the computer is currently on a slow network, Group Policy settings for slow networks might affect whether files are copied. You can specify how slow links are used with offline files by enabling and configuring the Configure Slow Link Mode policy under Computer Configuration\Administrative Templates\Network\Offline Files.
Always Offline mode is a feature of Windows 8.1 and Windows Server 2012 R2 that only domain-joined computers can use. When the feature is enabled, Windows 8.1 always uses the mapped network drive in offline mode and the caching options configured on the server determine what files and programs are stored on the computer for offline use. By default, only files and programs that users specify are available for offline use and you must modify the shared folder configuration on the server (or via Group Policy) to use a different caching option.
The Offline Files service is responsible for maintaining the offline files cache and synchronizing changes back to the server. By default, the service synchronizes changes in the background every two hours. You can specify how background sync works with offline files by enabling and configuring the Configure Background Sync policy under Computer Configuration\Administrative Templates\Network\Offline Files.
If you later decide that you don’t want to map the network drive, open File Explorer and select the This PC node. Under Network Location, press and hold or right-click the network drive icon, and then tap or click Disconnect.
You can access Group Policy and use a preference item to configure the network drives on computers throughout the domain by completing the following steps:
1. Open a Group Policy Object for editing in the Group Policy Management Editor. Expand User Configuration\Preferences\Windows Settings, and then select Drive Maps.
2. Press and hold or right-click the Drive Maps node, point to New, and then tap or click Mapped Drive. This opens the New Drive Properties dialog box.
3. In the New Drive Properties dialog box, select Create, Update, Replace, or Delete in the Action list.
4. In the Location text box, enter the UNC path to the network share, such as \\CorpServer45\corpdatashare, or tap or click the related options button to locate a share.
NOTE
REAL WORLD If you want to use an environment variable in the share path, click the Location text box and then press F3 to display a list of system-defined variables. Tap or click the variable you’d like to use, such as LogonUser. By default, variables are resolved by Group Policy before they are applied to a user’s computer. To use the variable as a placeholder that is resolved on the user’s computer instead, clear the Resolve Variable check box before you tap or click Select. This inserts a placeholder for the variable to be resolved on the user’s computer.
In Group Policy preferences, you can easily distinguish between variables resolved by Group Policy and variables resolved on a user’s computer. Variables resolved by Group Policy have the syntax %VariableName%, such as %ProgramFiles%. Variables resolved on a user’s computer have the syntax %<VariableName>%, such as %<ProgramFiles>%.
5. Select Reconnect if you want Windows 8.1 to connect to the shared folder automatically at the start of each session.
6. Enter the label for the network drive in the Label As text box.
7. Under Drive Letter, specify how the drive letter should be assigned. To use the first available drive letter starting after a drive letter that you specify, select Use First Available, Starting At, and then specify the starting drive letter. To always use a specific drive letter, choose Use, and then choose the drive letter. Unless you know for sure that a drive letter is available, you’ll usually want to use the first available drive letter.
8. Optionally, specify the credentials to use when connecting to the network share.
o If you want to map a network drive by using credentials other than those of the user, enter the credentials to be used. The password is encrypted and stored as part of the Group Policy Object in the Sysvol on domain controllers.
o If you want to force a user to enter the required credentials, enter %<LogonUser>% in the User Name text box and do not enter anything in the Password and Confirm Password text boxes.
NOTE
Entering the credentials for a network drive is a poor security practice that should be used only in a limited number of situations. If you use this technique, be sure to periodically change the password on the related user account, and then update the passwords in your preference items that use this account.
9. Additional options are provided for hiding or showing either the drive you are configuring or all drives. When you show or hide all drives, both network drives and physical drives are affected.
10.Use the options on the Common tab to control how the preference is applied. Because you are enforcing a control, you will usually want to apply the setting every time Group Policy is refreshed. In this case, do not select Apply Once And Do Not Reapply.
11.Tap or click OK. The next time policy is refreshed, the preference item will be applied as appropriate for the Group Policy Object in which you defined the preference item.
Using and accessing shared folders for administration
In Windows 8.1, several special shares are created automatically and are intended for use by administrators or the operating system. Most of the special shares have a dollar sign ($) added to the end of their names, which hides the shares from users. As an administrator, you might occasionally need to create your own hidden shares or work with the standard special shares.
Creating a hidden share is fairly easy. All you need to do is add a dollar sign ($) to the end of the share name. For example, if you want to share the C:\Reports folder but don’t want it to be displayed in the standard file share lists, name it Reports$ rather than Reports. Hiding a share doesn’t control access to the share, however. Access to shares is controlled by using permissions, regardless of whether a share is visible or hidden.
Which special shares are available on a system depends on the system’s configuration. This means that some computers might have more special shares than others. The most commonly found special and administrative shares are listed in Table 7-1.
The best tools to use when you want to work with special or otherwise hidden shares are the Net Share command and Computer Management. To view a list of all shares on the local computer, including special shares for administrators, just enter net share at a command prompt. To view a list of all shares available on any computer on the network, complete the following steps:
1. Start Computer Management from the Administrative Tools in Control Panel, or enter compmgmt.msc in the Apps Search box, and then press Enter. By default, Computer Management connects to the local computer, and the root node of the console tree has the Computer Management (Local) label.
2. Press and hold or right-click Computer Management in the console tree, and then tap or click Connect To Another Computer. In the Select Computer dialog box, the Another Computer option is selected by default. Enter the host name or the fully qualified domain name of the computer with which you want to work, such as engpc08 or engpc08.microsoft.com, where engpc08 is the computer name and microsoft.com is the domain name. If you don’t know the computer name and network discovery is enabled, tap or click Browse to search for the computer with which you want to work.
3. Expand System Tools and Shared Folders, and then select Shares to display a list of the shares on the system with which you are working.
Table 7-1. Special and administrative shares
|
SHARE NAME |
DESCRIPTION |
|
C$, D$, E$, and other local disk shares |
A special share to the root of a drive. All local disks, including CD/DVD-ROM drives and their shares, are known as C$, D$, E$, and so on. These shares enable members of the Administrators and Backup Operators groups to connect to the root folder of a local disk and perform administrative tasks. For example, if you map to C$, you are connecting to C:\ and have full access to this local disk. |
|
ADMIN$ |
An administrative share for accessing the %SystemRoot% folder in which the operating system files reside. This share is meant to be used for remote administration. For administrators working remotely with systems, ADMIN$ provides a convenient shortcut for directly accessing the operating system folder. |
|
IPC$ |
An administrative share used to support named pipes that programs use for interprocess (or process-to-process) communications. Because named pipes can be redirected over the network to connect to local and remote systems, they also enable remote administration. |
|
PRINT$ |
Supports printer sharing by providing access to printer drivers. Whenever you share a printer, the system puts the printer drivers in this share so that other computers can access them as needed. |
Sometimes when you are managing folders or files, you might not want users to be connected to a shared folder. For example, if you need to move files to a new location, before you move the files, you might want to ensure that no one is using them. One way to determine who is working with shared folders and their related files is to examine user sessions and open files.
Every user who connects to a shared folder creates a user session. To determine who is currently connected, tap or click Sessions under Shared Folders in the console tree. The current users are listed in the right pane. To disconnect a user and end his or her session, press and hold or right-click the session entry in the right pane, tap or click Close Session, and then tap or click OK to confirm the action. To disconnect all user sessions, press and hold or right-click Sessions in the console tree, tap or click Disconnect All Sessions, and then tap or click OK to confirm the action.
Every shared file that is being accessed is listed as an open file. To determine which files are open, tap or click Open Files under Shared Folders in the console tree. The currently open files are listed in the right pane. To close an open file, press and hold or right-click the related entry in the right pane, tap or click Close Open File, and then tap or click OK to confirm the action. To close all open files, press and hold or right-click Open Files in the console tree, tap or click Disconnect All Open Files, and then tap or click OK to confirm the action. Keep in mind that users might lose unsaved changes in files if they are disconnected. Therefore, if possible, notify users before closing files.
Troubleshooting file sharing
You can diagnose and resolve most issues with file sharing by doing the following:
§ Check the connectivity between the computer that is sharing resources and the computer from which the user is trying to access the shared resources Both computers must be connected to the network and configured with the appropriate TCP/IP settings. Both computers must have firewall configurations that permit inbound and outbound connectivity. The computer that is sharing resources must have a File And Printer Sharing exception in Windows Firewall. Windows Firewall supports multiple active profiles, and the active and applicable profile must be configured correctly. If you are using third-party firewall software, inbound connections must be allowed on UDP port 137, UDP port 138, TCP port 139, and all ports for ICMPv4 and (if applicable for echo requests) ICMPv6.
§ Check the connection credentials When both computers are members of a domain, the user should connect to the share by using domain credentials. If the user has logged on to his or her computer as a local user rather than a domain user, you want to ensure that the user connects to the share with alternative credentials and that those alternative credentials are for an appropriate user account in the appropriate domain.
§ Check the Advanced Sharing settings in the Network And Sharing Center To successfully share files on a desktop computer running Windows 8.1, File And Printer Sharing must be enabled for the active (current) network profile and the Prevent Users From Sharing Files Within Their Profiles policy must not be enabled. Computers can be connected to multiple networks simultaneously, and the network type for each active network must be correctly configured in the Network And Sharing Center.
§ Check the network type for the active network In the Network And Sharing Center, the network type on both computers must be set appropriately. If the network type is set to Public, many sharing and connection settings are locked down and restricted.
§ Check share permissions, the underlying NTFS permissions, and the access flags on files The share permissions must be configured to grant the user access. The underlying NTFS permissions must be configured to grant the user access. Access flags on files must be cleared to remove read-only, hidden, or system flags as appropriate.
For deeper troubleshooting, you need to look at the DNS configuration of both computers, in addition to the domain membership of both computers. Ideally, both computers should be on the same network or on networks connected by fast Ethernet connections. Ideally, both computers should be members of the same domain or be in trusted domains.
The Server service is required to share files. On the computer that is sharing files, check to be sure that the Server service is running and is configured correctly. Typically, the Server service should be configured for automatic startup and should run under the LocalSystem account. The Server service depends on a Server SMB driver being available, and you can check this dependency on the Dependencies tab in the Server Properties dialog box.
In Group Policy for the computer that is sharing files, ensure that the user has the Access This Computer From The Network user right. This user right is set by using policies for Computer Configuration under Policies\Windows Settings\Security Settings\Local Policies\User Rights Assignment. By default, all authenticated users have this user right.
In Group Policy, you also can configure Access-Denied Assistance policies to help users determine who to contact if they have trouble accessing files. When you enable and configure Access-Denied Assistance policies, you can customize Access Denied errors with additional help text, links to help pages or documents, and an email address for requesting help.
To enable Access-Denied Assistance for all file types, configure the Enable Access-Denied Assistance On Client For All File Types option as Enabled, and then customize Access-Denied errors by enabling and configuring Customize Message For Access-Denied Errors. These policies are found in the Administrative Templates policies for Computer Configuration under System\Access-Denied Assistance.
Using and configuring public folder sharing
Public folder sharing is designed to enable users to share files and folders from a single location. It enables users to quickly determine everything they’ve publicly shared with others and organize publicly shared files by type. In this section, I’ll examine how public folder sharing works and how public folder sharing can be configured.
Using public folder sharing
With public folder sharing, you copy or move files that you want to share to a computer’s %SystemDrive%\Users\Public folder. The Public folder has several subfolders that can be used to help organize public files, including:
§ Public Desktop A hidden folder used for shared desktop items
§ Public Documents, Public Music, Public Pictures, Public Recorded TV, Public Videos Folders used for shared document and media files
§ Public Downloads A folder used for shared downloads
Any content placed in these subfolders is available to all users who log on to the computer (and to all network users, if network access has been granted to the Public folder).
By default, everyone with a user account and password on a computer can access that computer’s Public folder. When you copy or move files to the Public folder, access permissions are changed to match those of the Public folder, and some additional permissions are also added.
The default permissions for the Public folder enable local computer users to read, write, change, and delete any public files. In the Public Music, Public Pictures, and Public Videos folders, %ComputerName%\Users is granted Read & Execute and Read permissions.
The default Public folder sharing configuration can be changed in two key ways:
§ Allow users with network access to view and open public files but restrict them from changing, creating, or deleting public files. When you configure this option, the implicit group Everyone is granted Read & Execute and Read permissions to public files and Read & Execute, List Folder Contents, and Read permissions on public folders.
§ Allow users with network access to view and manage public files. This enables network users to open, change, create, and delete public files. When you configure this option, the implicit group Everyone is granted Full Control permissions to public files and public folders.
Configuring public folder sharing by using these approaches is discussed in the next section.
Configuring public folder sharing
Public folder sharing settings are set on a per-computer basis. The same public folder setting is used for the Public folder and all its subfolders. You can configure public folder sharing by following these steps:
1. In Control Panel, tap or click Choose Homegroup And Sharing Options under Network And Internet. Next, tap or click the Change Advanced Sharing Settings link.
2. Expand All Networks. Under Public Folder Sharing, select the public folder sharing option you want to use. The options available are:
o Turn On Sharing So Anyone With Network Access Can Read And Write Files In The Public Folders Select this option to grant co-owner access to the public folders and all public data to anyone who can access the computer over the network. Windows Firewall settings might prevent external access.
o Turn Off Public Folder Sharing Select this option to turn off network access to the public folders and allow only locally (console) logged-on users access to public data.
3. On private networks, Windows usually manages the connections to other homegroup computers. If you have the same user accounts and passwords on all of your computers, you can have Windows use your account instead to access shared files, shared printers, and the Public folder. Start by expanding the Private network profile. Next, under HomeGroup Connections, select the Use User Accounts And Passwords To Connect To Other Computers option.
4. Tap or click Save Changes to save the changes.
Implementing synced sharing
With sync shares, users can use an Internet or corporate network connection to sync data to their devices from folders located on enterprise servers. You implement synced sharing by using Work Folders. Work Folders is a feature that you can add to servers running Windows Server 2012 R2 or later. Work Folders use a client/server architecture. A Work Folders client is natively integrated into Windows 8.1, and clients for Windows 7, Apple iPad, and other devices are also becoming available.
Understanding work folders
Work Folders make use of the IIS hostable web core. If you deploy roles and features that require a full version of the Web Server (IIS) role, you might find that these roles and features or the Work Folders feature itself don’t work together. A conflict can occur because the full version of the Web Server (IIS) role has a Default Web Site that uses port 80 for HTTP communications and port 443 for secure HTTP communications. For example, running Windows Essentials Experience and Work Folders together on the same server requires a special configuration. Typically, you need to change the ports used by Windows Essentials Experience so that they don’t conflict with the ports used by Work Folders.
When users access a sync share, a user folder is created as a subfolder of the sync share and this subfolder is where the user’s data is stored. The folder naming format for the user-specific folder is set when you create a sync share. The folder can be named by using only the user alias portion of the user’s logon name or the full logon name in alias@domain format. The format you choose primarily depends on the level of compatibility required. Using the full logon name eliminates potential conflicts when users from different domains have identical user aliases, but this format is not compatible with redirected folders.
To maintain compatibility with redirected folders, you should configure the sync folder to use aliases. However, in enterprises with multiple domains, the drawback to this approach is that conflicts could exist between identical user aliases in different domains. Although the automatically configured permissions for a user folder would prevent johng from the cpandl.com domain from accessing a user folder created for johng from the adatum.com domain, the conflict would cause problems. If there was an existing folder for johng from the cpandl.com domain, the server would not be able to create a user folder for johng from the adatum.com domain.
With Work Folders, you have several important options during initial setup. You can:
§ Select Encrypt Work Folders to encrypt files in Work Folders on client devices.
§ Select Automatically Lock Screen And Require A Password to ensure the screens on client devices lock automatically and require an access password.
Encryption is implemented by using the Encrypting File System (EFS). EFS encrypts files with an enterprise encryption key rather than an encryption key generated by the client device. The enterprise encryption key is specific to the enterprise ID of the user (which by default is the primary SMTP address of the user). Having an enterprise encryption key that is separate from a client’s standard encryption key is important to ensure encrypted personal files and encrypted work files are managed separately.
When files are encrypted, administrators can use a selective wipe to remove enterprise files from a client device. The selective wipe simply removes the enterprise encryption key and thus renders the work files unreadable, but it does not affect any encrypted personal files. Because the work files remain encrypted, there’s no need to actually delete the work files from the client device. That said, you could run Disk Optimizer on the drive where the work files were stored. During optimization, Disk Optimizer should then overwrite the sectors where the work files were stored. Selective wipe only works when you’ve enabled the encryption option on Work Folders.
Although encryption is one way to protect enterprise data, another way to protect enterprise data is to configure client devices to lock screens and require a password for access. The exact policy enforced requires:
§ A minimum password length of 6 characters
§ A maximum password retry of 10
§ A screen that automatically locks in 15 minutes or less
If you enforce the use of automatic lock screens and passwords, any device that doesn’t support these requirements is prevented from connecting to the Work Folder.
By default, sync shares are not available in the same way as standard file shares. Because of this, users can only access sync shares by using the Work Folders client. If you want to make sync shares available to users as standard file shares, you must enable SMB access. After you enable SMB access, users can access files stored in Work Folders by using syncing and by mapping network drives.
NOTE
REAL WORLD When a user makes changes to files in Work Folders, the changes might not be immediately apparent to others using the same Work Folders. For example, if a user deletes a file from a Work Folder by using SMB, other users accessing the Work Folder might still perceive the file as available. This inconsistency can occur because by default clients only poll the sync server every 10 minutes for SMB changes. A sync server also uses a Work Folders client to check periodically for changes users have made by using SMB; the default polling interval is 5 minutes. When the server identifies changes, the server relays the changes the next time a client syncs. Following this, you can determine that it could take up to 15 minutes for a change made using SMB to fully propagate. You can specify how frequently the server checks for changes made locally on the server or through SMB by using the Set-SyncServerSetting cmdlet with the -MinimumChangeDetectionMins parameter. However, because the server must check the change information for each file stored in the sync share, you need to be careful that you don’t configure a server to try to detect changes too frequently. A server that checks for changes too frequently can become overloaded. Remember, change detection uses more resources as the number of files stored in the sync share increases.
To enable detailed logging of Work Folders, you can enable and configure the Audit Object Access policy setting for a Group Policy Object (GPO) processed by the server. You’ll find this setting in the Administrative Templates for Computer Configuration under Windows Settings\Security Settings\Local Policies\Audit Policy. After you enable Audit Object Access, add an audit entry for the specific folders you want to audit. In File Explorer, press and hold or right-click a folder you want to audit, and then select Properties. In the Properties dialog box, on the Security tab, select Advanced. In the Advanced Security Settings dialog box, use the options on the Auditing tab to configure auditing.
You deploy Work Folders in the enterprise by performing these procedures:
1. Add the Work Folders role to servers that you want to host sync shares.
2. Use Group Policy to enable discovery of Work Folders.
3. Create sync shares on your sync servers and, optionally, enable SMB access to sync shares.
4. Configure clients to access Work Folders.
As detailed in the Configuring policy for Work Folders section in Chapter 5, you must add the Work Folders role to servers that you want to host sync shares, and then use Group Policy to enable discovery of Work Folders. Afterward, you can create sync shares, enable SMB access, and configure clients as discussed in this section.
Creating sync shares and enabling SMB access
You create a sync share to identify a local folder on a sync server that will be synchronized and accessible to domain users via the Work Folders client. Because sync shares are mapped to local paths on sync servers, I recommend that you create any folders that you want to use before creating sync shares. This will make it easier to select the exact folders with which you want to work.
To create a sync share, complete the following steps:
1. In Server Manager, select File And Storage Services, and then select Work Folders.
2. On the Work Folders panel, select Tasks, and then select New Sync Share. This opens the New Sync Share Wizard. If the Before You Begin page is displayed, select Next.
3. On the Select The Server And Path page, shown in Figure 7-4, select the server with which you want to work. Keep in mind that only servers that have the Work Folders role installed are available for selection.
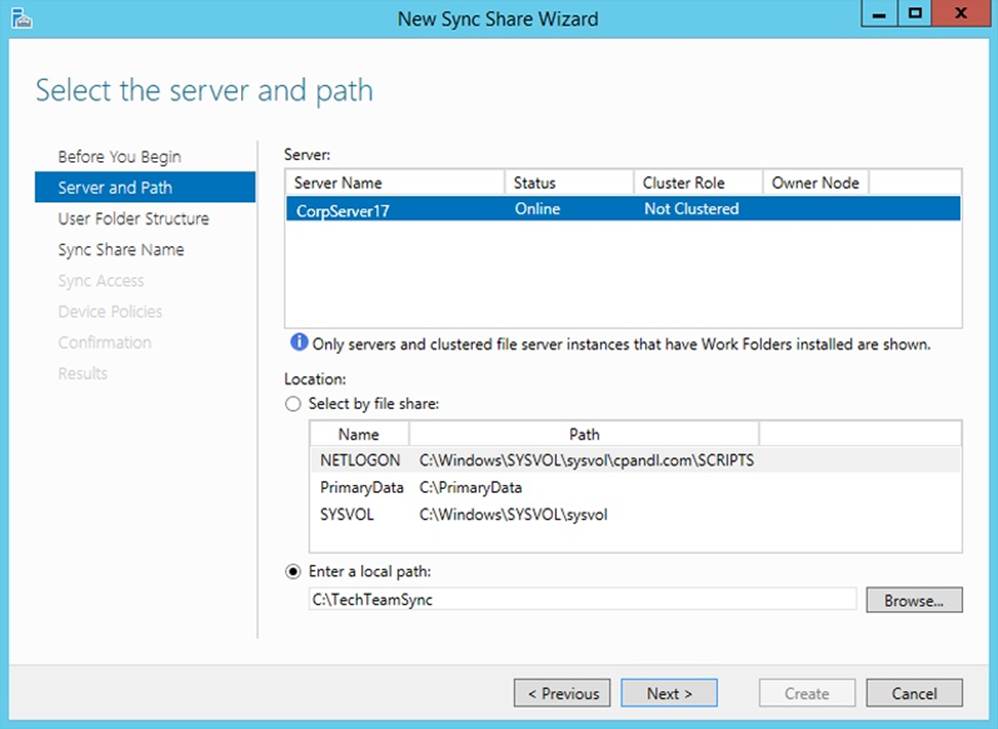
Figure 7-4. Specify the server and folder to use.
4. When configuring sync shares, you have several options. You can:
o Add syncing to an existing file share by choosing the Select By File Share option and then selecting the file share that should also be synced.
o Add syncing to an existing local folder by choosing Enter A Local Path, selecting Browse, and then using the Select Folder dialog box to locate and choose the folder to sync.
o Add syncing to a new local folder by choosing Enter A Local Path and then entering the path to use.
5. When you are ready to continue, tap or click Next. If you specified a new folder location, you are prompted to confirm whether you want to create this folder. Select OK to create the folder and continue.
6. On the Specify The Structure For User Folders page, choose a folder-naming format for the subfolders where user data is stored. To use only the user alias portion of the user’s logon name for naming user folders, choose User Alias. To use the full logon name for naming user folders, choose User Alias@Domain.
7. By default, all folders and files stored under the user folder are synced automatically. If you’d prefer that only a specific folder is synced, select the Sync Only The Following Subfolder check box, and then enter the name of the folder, such as Documents. Select Next to continue.
8. On the Enter The Sync Share Name page, enter a share name and description before selecting Next to continue.
9. On the Grant Sync Access To Groups page, shown in Figure 7-5, use the options provided to specify the users and groups that should be able to access the sync share. To add a user or group, select Add and then use the Select User Or Group dialog box to specify the user or group that should have access to the sync share.
NOTE
SECURITY ALERT Any users and groups you specify will be granted permissions on the base folder, which allows the users and groups to create folders and access files in their folders. Specifically, Creator/Owner is granted Full Control on subfolders and files only. The users and groups are granted List Folder/Read Data, Create Folders/Append Data, Traverse Folder/Execute File, and Read/Write attributes on the base folder. Local System is granted Full Control of the base folder, subfolders, and files. Administrator is granted Read permission on the base folder.
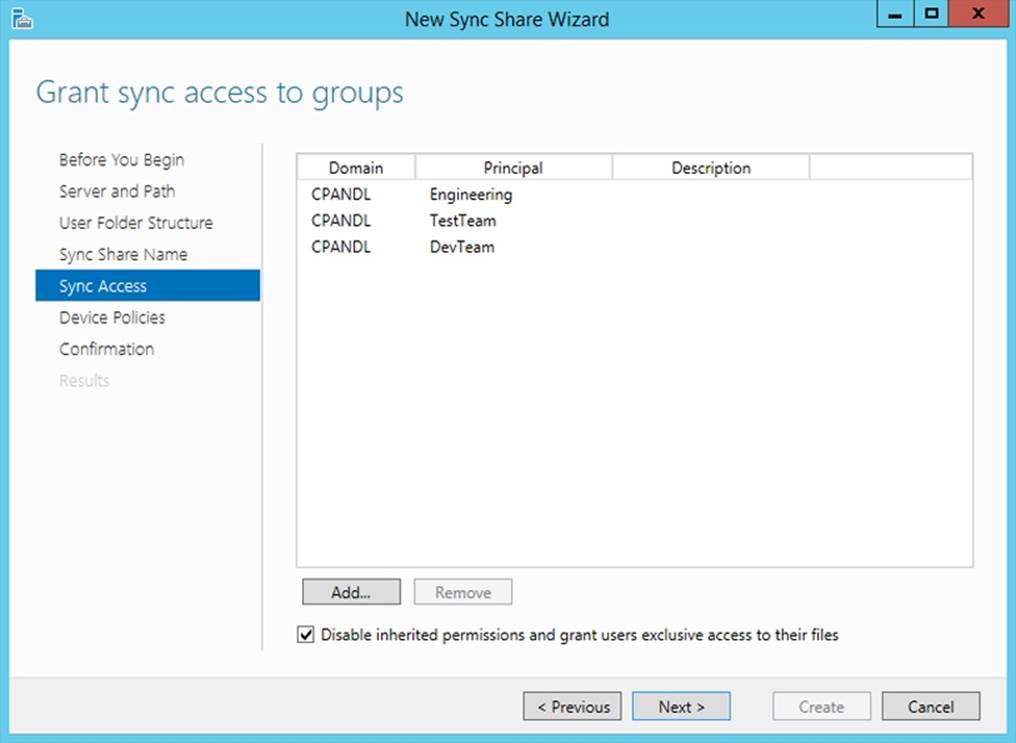
Figure 7-5. Specify the users and groups that should have access to the sync share.
10.By default, inherited permissions are disabled and users have exclusive access to their user folders. Because of this, only the user who stores a file has access to this file on the share. If the base folder for the share has permissions that you want to be applied to user folders, such as those that would grant administrators access to user folders, clear the Disable Inherited Permissions And Grant Users Exclusive Access To Their Files check box. When you are ready to continue, select Next.
11.On the Specify Device Policies page, you have two options. You can select Encrypt Work Folders to encrypt files in Work Folders on client devices. You can select Automatically Lock Screen And Require A Password to ensure the screens on client devices lock automatically and require a password for access.
12.Select Next to continue, and then confirm your selections. Select Create to create the sync share. If the wizard is unable to create the sync share, you’ll get an error and will need to note the error and take appropriate corrective action. A common error you might get occurs when theserver hosts both Work Folders (which use the hostable web core) and the full Web Server (IIS) role. Before you can create sync shares, you’ll need to modify the ports used so they do not conflict, or install Work Folders on a server that doesn’t have the full Web Server (IIS) role.
If you did not select an existing file share during setup and want to enable the sync share for SMB access, open File Explorer. In File Explorer, press and hold or right-click the folder, select Share With, and then select Specific People. Finally, configure file sharing as discussed earlier in this chapter.
Accessing Work Folders on clients
Users with a domain user account can access Work Folders from a client device over the Internet or over the corporate network. You can configure Work Folder access for a user by completing the following steps:
1. In Control Panel, select System And Security, and then select Work Folders. On the Manage Work Folders page, select Set Up Work Folders.
2. On the Enter Your Work Email Address page, enter the user email address, such as johng@cpandl.com, and then select Next. If the client device is joined to the domain, you will not be prompted for the user’s credentials. Otherwise, you are prompted for the user’s credentials. After the user enters her credentials, you can select Remember My Credentials to store the user’s credentials for future use, and then select OK to continue.
3. On the Introducing Work Folders page, note where the work files for the user will be stored. By default, work files are stored in a user profile subfolder called Work Folders. For example, the work files for JohnG would be stored under %SystemDrive%\Users\JohnG\WorkFolders. To store work files in another location, select Change, and then use the options provided to specify a new save location for work files. When you are ready to continue, select Next.
4. On the Security Policies page, review the security policies that will be applied, and then have the user select the I Accept These Policies On My PC check box. You will not be able to continue if you do not select this check box.
5. Select Set Up Work Folders to create Work Folders on the client device.
After you configure Work Folders for initial use on a client device, the user can access Work Folders in File Explorer. When a user opens File Explorer, the This PC node should be opened by default. If so, the user just needs to double-tap or double-click Work Folders to view work files. If a user has an open File Explorer window and This PC is not the selected node, she just needs to tap or click the leftmost option button in the address list, and then tap or click This PC.
As the user works with files, the changes the user makes trigger sync actions with the server. If the user doesn’t change any files locally for an extended period of time, the client connects to the server every 10 minutes to determine whether there are changes to sync.
Auditing file and folder access
Although access permissions help protect data, they don’t indicate who was trying to access files and folders inappropriately or who’s been deleting important files, either accidentally or intentionally. To track who accessed files and folders and what they did, you must configure auditing for file and folder access. You can track file and folder access by enabling auditing, specifying which files and folders to audit, and then monitoring the security logs.
Enabling auditing for files and folders
You configure auditing policies by using Group Policy or local security policy. Use Group Policy when you want to set auditing policies throughout the enterprise. Use local security policy when you want to set auditing policies on a specific computer, keeping in mind that local policy can be overridden by Group Policy.
To enable auditing of files and folders, do one of the following:
§ To configure local policy for a specific computer, start the Local Security Policy tool. If you’ve enabled Show Administrative Tools as a Start setting, you’ll find a related tile on the Start screen. Another way to do this is by pressing the Windows key, typing secpol.msc, and then pressing Enter. In Local Security Policy, expand Local Policies, and then select Audit Policy.
§ To configure enterprise policy, open a Group Policy Object for editing in the Group Policy Management Editor. Next, under Computer Configuration, expand Policies\Windows Settings\Security Settings\Local Policies, and then select Audit Policy.
Next, double-tap or double-click Audit Object Access. This displays the Audit Object Access Properties dialog box. Under Audit These Attempts, select the Success check box to log successful access attempts, the Failure check box to log failed access attempts, or both check boxes, and then tap or click OK. This enables auditing, but it doesn’t specify which files and folders should be audited.
Configuring and tracking auditing
After you’ve enabled Audit Object Access, you can control whether and how folder and file usage is tracked by setting the level of auditing for individual folders and files. Keep in mind that auditing is available only on NTFS volumes and that inheritance rules apply to auditing of files and folders. This enables you, for example, to audit access to every file or folder on a volume by specifying that you want to audit the root folder of the volume.
You specify files and folders to audit by completing the following steps:
1. In File Explorer, press and hold or right-click the file or folder to be audited, and then tap or click Properties.
2. In the Properties dialog box, tap or click the Security tab, and then tap or click Advanced.
3. In the Advanced Security Settings dialog box, tap or click Continue on the Auditing tab. This displays an editable version of the Auditing tab, shown in Figure 7-6.
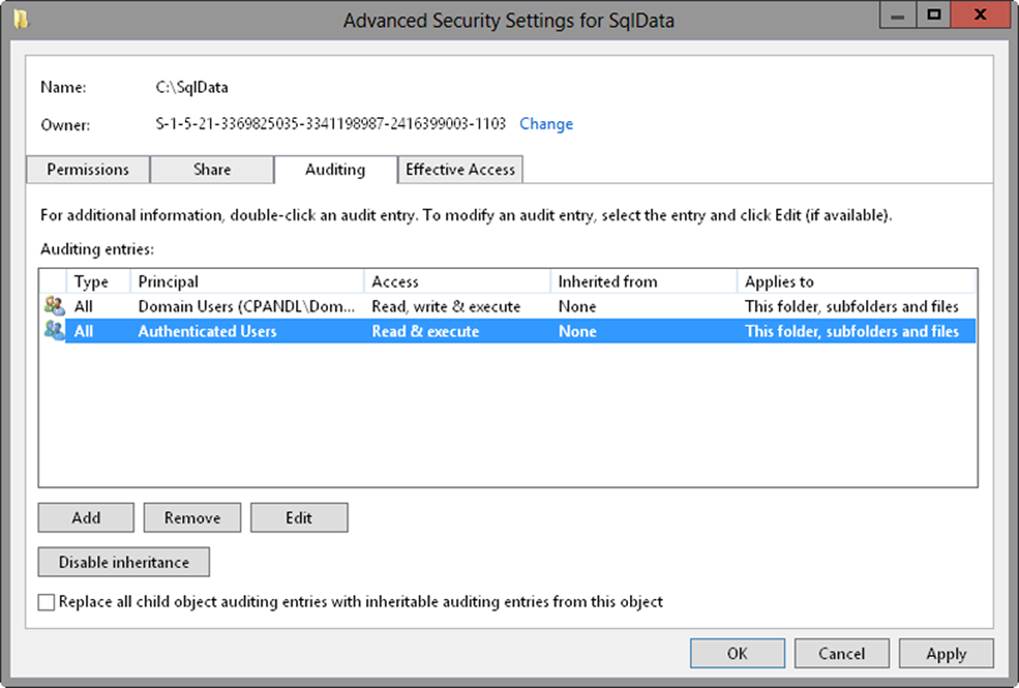
Figure 7-6. Review the current auditing settings and make new selections.
4. Tap or click Add to display the Auditing Entry For dialog box. Tap or click Select A Principal to display the Select User, Computer, Service Account, Or Group dialog box.
5. Enter the name of a user or a group account. Be sure to reference the user account name rather than the user’s full name. Only one name can be entered at a time.
6. Tap or click Check Names. If a single match is found, the dialog box is automatically updated, and the entry is underlined. Otherwise, you’ll get an additional dialog box. If no matches are found, you’ve either entered the name incorrectly or you’re working with an incorrect location. Modify the name in the Name Not Found dialog box and try again, or tap or click Locations to select a new location. When multiple matches are found, in the Multiple Names Found dialog box, select the name you want to use, and then tap or click OK.
7. Tap or click OK. The user and group are added, and the Principal in the Auditing Entry For dialog box is updated to show this. Only basic permissions are listed by default. Tap or click Show Advanced Permissions to display the special permissions, as shown in Figure 7-7.

Figure 7-7. Specify the actions to audit for the designated user, group, or computer.
8. Use the Applies To list to specify how the auditing entry is to be applied. The options include the following:
o This Folder Only The auditing entries apply only to the currently selected folder.
o This Folder, Subfolders And Files The auditing entries apply to this folder, any subfolders of this folder, and any files in any of these folders.
o This Folder And Subfolders The auditing entries apply to this folder and any subfolders of this folder. They do not apply to any files in any of these folders.
o This Folder And Files The auditing entries apply to this folder and any files in this folder. They do not apply to any subfolders of this folder.
o Subfolders And Files Only The auditing entries apply to any subfolders of this folder and any files in any of these folders. They do not apply to this folder itself.
o Subfolders Only The auditing entries apply to any subfolders of this folder, but not to the folder itself or any files in any of these folders.
o Files Only The auditing entries apply to any files in this folder and any files in subfolders of this folder. They do not apply to this folder itself or to subfolders.
9. Use the Type list to specify whether you are configuring auditing for successful access, failed access, or both, and then specify which actions should be audited. The events you can audit are the same as the special permissions listed in Tables Table 6-1 and Table 6-3 in Chapter 6.
10.If you are working with a folder and want to replace the auditing entries on all child objects of this folder (and not on the folder itself), select Only Apply These Settings To Objects And/Or Containers Within This Container.
NOTE
REAL WORLD The Apply To option lets you specify the locations where you want the auditing settings to apply. The Only Apply These Settings To Objects And/Or Containers Within This Container option controls how auditing settings are applied. When this option is selected, auditing settings on the parent object replace settings on child objects. When this option is cleared, auditing settings on the parent are merged with existing settings on child objects.
11.If you’re using claims-based policies and want to limit the scope of the auditing entry, you can add claims-based conditions to the auditing entry. For example, if all corporate computers are members of the Domain Computers group, you might want to closely audit access by devices that aren’t members of this group.
12.When you have finished configuring auditing, tap or click OK. Repeat this process to audit other users, groups, or computers.
Often you’ll want to track only failed actions. This way, you know if someone was trying to perform an action and failed. Keep in mind that a failed attempt doesn’t always mean that someone is trying to break into a file or folder. A user just might have double-tapped or double-clicked a folder or file to which he or she doesn’t have access. In addition, some types of actions can cause multiple failed attempts to be logged even when the user performed the action only once. Regardless, you should always check multiple failed attempts because of the possibility that someone is attempting to break into a computer.
Any time files and folders that you’ve configured for auditing are accessed, the action is written to the system’s security log, which you can open in Event Viewer. Successful actions, such as successful file reads, cause successful events to be recorded. Failed actions, such as failed file deletions, cause failed events to be recorded. To configure advanced audit policy, open a Group Policy Object for editing in the Group Policy Management Editor. Next, expand Windows Settings\Security Settings\Advanced Audit Policy Configuration, and then expand Audit Policies. You’ll then have separate nodes for configuring policies related to:
§ Account Logon
§ Account Management
§ Detailed Tracking
§ DS Access
§ Logon/Logoff
§ Object Access
§ Policy Change
§ Privilege Use
§ System
§ Global Object Access Auditing
In the left pane, select a category you’d like to audit, such as Account Logon, to view the available subcategories in the right pane. Next, double-tap or double-click the subcategory you want to configure, such as Audit Credential Validation. In the related properties dialog box, select Configure The Following Audit Events. Next, select Success, Failure, or both to indicate the related events to track, and then tap or click OK. This enables auditing for that subcategory.
All materials on the site are licensed Creative Commons Attribution-Sharealike 3.0 Unported CC BY-SA 3.0 & GNU Free Documentation License (GFDL)
If you are the copyright holder of any material contained on our site and intend to remove it, please contact our site administrator for approval.
© 2016-2026 All site design rights belong to S.Y.A.