Windows 8.1 Administration Pocket Consultant: Storage, Security, & Networking (2014)
Chapter 8. Maintaining Data Access and Availability
§ Configuring File Explorer options
§ Managing offline files
§ Configuring disk quotas
§ Using branch caching
Maintaining data access and availability is a key part of user and system administration. Beyond standard file and folder management, the main tasks you’ll perform frequently include configuring File Explorer options, managing offline file settings, working with disk quotas, and managing branch caching. File Explorer options control the available file and folder management features, in addition to the available file types. Offline file settings control the availability of files and folders when users are working offline. Quotas help limit the amount of disk space available to users. Branch caching stores downloaded documents and files locally for faster retrieval.
Configuring File Explorer options
When you think about it, most of your time working with a computer is spent managing files and folders. You create files and folders to store and organize information. You move the files and folders from one location to another. You set file and folder properties, and perform other related tasks. Because you spend so much time working with files and folders, a few simple management techniques can go a long way toward saving you time and effort.
Customizing File Explorer
File Explorer is the tool of choice for working with files and folders. Unfortunately, its default settings are configured for the widest cross-spectrum of users and not experienced users or administrators. For example, as an administrator, you often want to view hidden items and file extensions, but, by default, File Explorer doesn’t display hidden file types or file extensions.
With Windows 8.1, related options can be quickly enabled in the View panel. In File Explorer, tap or click View to open the View panel. Next, select Hidden Items to display hidden items (but not protected operating system files), and then select File Name Extensions to display file name extensions. To override other settings, complete the following steps:
1. In the View panel in File Explorer, tap or click Options. This displays the Folder Options dialog box with the General tab selected.
2. As shown in Figure 8-1, select the View tab to display the advanced settings for File Explorer.
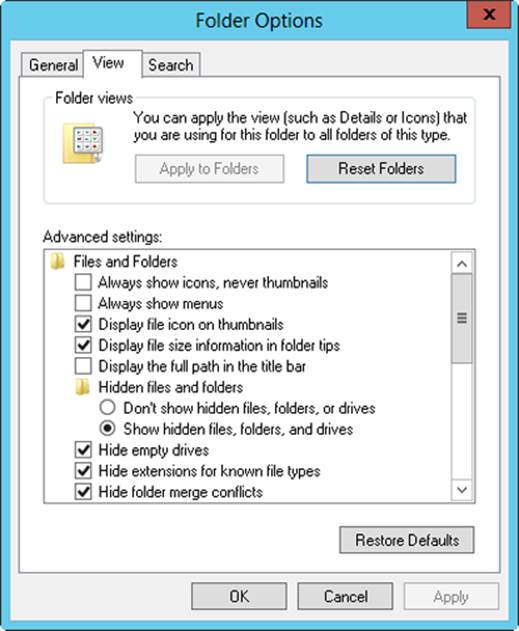
Figure 8-1. Set options for File Explorer by using the Folder Options dialog box.
3. You can now customize File Explorer settings. Options available include:
o Always Show Icons, Never Thumbnails By default, File Explorer shows large thumbnail images of the actual content for pictures and other types of files. For folders that have many pictures, this option can be annoying because File Explorer has to render the thumbnail representation of each image. To disable thumbnails except when you select the Thumbnails option on the View menu, select this option.
o Display File Icon On Thumbnails By default, File Explorer adds file icons to the thumbnails it displays. To display thumbnails without file icons, clear this option.
o Display File Size Information In Folder Tips By default, when you point to a folder name or folder icon, File Explorer displays a tooltip showing the folder’s creation date and time, the size of the folder, and a partial list of files. To display less information (only the creation date and time), clear this option.
o Display The Full Path In The Title Bar By default, when you press Alt+Tab and then hold down the Alt key, Windows opens the flip view, which shows a preview of all open windows without requiring you to click the taskbar. In this view, you can cycle through the open windows by pressing the Tab key or by using your mouse. By default, Windows displays the folder name for a File Explorer window. Select this option to display the file path for File Explorer windows instead.
o Hidden Files And Folders By default, File Explorer does not display hidden files, folders, or drives. To display hidden files, folders, and drives, select Show Hidden Files, Folders, And Drives. (The Hidden Items option on the View menu can also be used to manage this option.)
o Hide Empty Drives By default, File Explorer does not display information about empty drives in the This PC window. To display information about empty drives, clear this option.
o Hide Extensions For Known File Types By default, File Explorer does not display file extensions for known file types. To display file extensions for all file types, clear this option. (The File Name Extensions option on the View menu can also be used to manage this option.)
o Hide Folder Merge Conflicts By default, File Explorer does not display information about merge conflicts for folders. To display information about merge conflicts, clear this option.
o Hide Protected Operating System Files By default, File Explorer does not display operating system files. To display operating system files, clear this option.
o Launch Folder Windows In A Separate Process By default, Windows runs all instances of File Explorer in the same process. This saves memory and generally speeds up the process of opening new windows, but it also means that all instances of File Explorer are dependent on each other. If one instance crashes, they all crash, and if one instance is in a pending or wait state, all instances could become locked. To modify this behavior and have Windows start a new process for each instance of File Explorer, select this option.
o Restore Previous Folder Windows At Logon File Explorer can track folders that users have open when they log off and reopen the folders the next time they log on. By default, this feature is disabled. To enable this feature, select this option.
o Show Drive Letters By default, File Explorer displays drive letters as part of the information on the Locations bar. Clear this option if you don’t want to view drive letters.
o Show Encrypted Or Compressed NTFS Files In Color By default, File Explorer lists encrypted files and compressed files by using different colors than the colors used for standard files. Encrypted files are displayed with green text, and compressed files are displayed with blue text. Clear this option if you don’t want to use different colors.
o Show Pop-Up Description For Folder And Desktop Items By default, File Explorer shows tooltips with additional information about a file or folder when you point to the file or folder. Clear this option if you don’t want to view tooltips.
o Show Preview Handlers In Preview Pane By default, when the Preview pane is visible, File Explorer displays previews of selected files and folders. Clear this option if you don’t want to view previews.
o Show Status Bar By default, File Explorer displays a status bar. If you want to hide the status bar, clear this option.
o Use Check Boxes To Select Items By default, File Explorer enables you to select files, folders, and other items by using only the standard selection techniques, such as click, Shift+click, and Ctrl+click. Select this option if you want File Explorer to display check boxes to select multiple files and folders.
o Use Sharing Wizard By default, File Explorer uses the File Sharing Wizard for configuring file sharing, as discussed in Chapter 7. If you prefer to use only the advanced file sharing options, clear this option. When you try to share files, you need to tap or click Advanced Sharing on the Sharing tab so that you can configure permissions, caching, and connections settings separately.
o When Typing Into List View By default, when you are working with the list view and press a letter key, File Explorer selects the first file or folder with that letter at the start of its name. If you would rather have File Explorer enter the text that you type into the Search box, select the Automatically Type Into The Search Box option.
Configuring advanced File Explorer options
Both users and administrators spend a lot of time working with File Explorer or one of the related views, such as This PC. As an administrator, you’ll often want to do more with File Explorer. You might want to perform one of the following tasks:
§ Deploy computers that have certain File Explorer features blocked out. For example, you might want to block users’ access to the Hardware tab, preventing them from viewing or changing hardware on a computer.
§ Hide or restrict access to local disks. For example, you might want to prevent users from accessing the CD/DVD-burning features on the computers that you deploy.
These and other advanced configuration options for computers are discussed in this section.
Setting Group Policy for File Explorer and folder views
As with many other Windows 8.1 features, you can use Group Policy to control the options available in File Explorer. Because many of these options extend to folder views and settings, they are useful to examine. Table 8-1 provides an overview of policies that you might want to implement and how these policies are used when they are enabled. These Administrative Templates policies for User Configuration are located in Windows Components\File Explorer.
Table 8-1. Policies for File Explorer
|
POLICY NAME |
POLICY DESCRIPTION |
|
Allow Only Per User Or Approved Shell Extensions |
Shell extensions extend the feature set available in File Explorer. This setting permits a computer to run only shell extensions that have been approved by an administrator or that don’t affect other users on that computer. Approved shell extensions must have a registry entry in HKEY_LOCAL_MACHINE\SOFTWARE\Microsoft\Windows\CurrentVersion\Shell Extensions\Approved. |
|
Display Confirmation Dialog When Deleting Files |
Displays a confirmation dialog box whenever you delete files or move files to the Recycle Bin. |
|
Hide The Manage Item On The File Explorer Context Menu |
Removes the Manage item from the shortcut menu in File Explorer views and the Start screen. This shortcut menu option group is used to open Computer Management. |
|
Hide These Specified Drives In My Computer |
In File Explorer views, hides icons representing selected hard drives. Users can still gain access to drives through other methods. |
|
Location Where All Default Library Definition Files For Users/Machines Reside |
Can be used to control where default library definition files reside. |
|
Prevent Access To Drives From My Computer |
Prevents users from accessing files on selected drives in File Explorer views. Users also can’t use the Run or Map Network Drive command to access files on these drives. |
|
Remove “Map Network Drive” And “Disconnect Network Drive” |
Prevents users from mapping or disconnecting network drives by using File Explorer. This doesn’t prevent the use of other techniques, such as the command prompt. |
|
Remove CD Burning Features |
Removes CD creation and modification features from File Explorer. Users are not prevented from using other CD-burning programs. |
|
Remove DFS Tab |
Removes the DFS tab from File Explorer and File Explorer–based windows, preventing users from using the tab to view or change Distributed File System (DFS) settings. Note that the DFS tab is available only when DFS is configured in the workgroup or domain. |
|
Remove File Explorer’s Default Context Menu |
Prevents users from pressing and holding or right-clicking and displaying shortcut menus on the desktop and in File Explorer. |
|
Remove File Menu From File Explorer |
Removes the File menu from File Explorer views but doesn’t prevent users from using other means to perform tasks that are available on this menu. |
|
Remove Hardware Tab |
Removes the Hardware tab from all dialog boxes, preventing users from using the tab to view, change, or troubleshoot hardware devices. |
|
Remove Security Tab |
Removes the Security tab from the Properties dialog boxes for files, folders, shortcuts, and drives. This prevents users from changing or viewing the related file and folder permissions. |
|
Start File Explorer With Ribbon Minimized |
Controls whether File Explorer displays the full or minimized ribbon. Options are available for when File Explorer is first opened or for all new windows. |
|
Turn Off Caching Of Thumbnail Pictures |
Disables the caching of thumbnail views. |
|
Turn Off The Display Of Thumbnails And Only Display Icons |
Disables the creation and display of thumbnails when users access local computer folders. This can reduce wait times and make accessing a folder the first time faster for users, although users might need to view media files to distinguish between them. |
|
Turn Off The Display Of Thumbnails And Only Display Icons On Network Folders |
Disables the creation and display of thumbnails when users access network folders. This can reduce wait times and make accessing a folder the first time faster for users, although users might need to view media files to distinguish between them. |
|
Turn Off Windows Libraries Features That Rely On Indexed File Data |
Disables all Arrangement views except By Folder, and all Search filter suggestions other than Date Modified and Size. Also disables the view of file content snippets in Content mode and excludes libraries from Start searches. |
As detailed in Table 8-1, many File Explorer policies control the availability of options such as menu items and tabs in dialog boxes. To configure these options for all users of a computer, follow these steps:
1. Open a Group Policy Object for editing in the Group Policy Management Editor. The related Administrative Templates policies for User Configuration are located in Windows Components\File Explorer.
2. Double-tap or double-click the policy you want to configure. This displays a properties dialog box. Select one of the following options:
o Not Configured Specifies that no changes will be made to the registry for this policy
o Enabled Enables the policy and updates the registry
o Disabled Disables the policy and updates the registry
3. Tap or click OK.
NOTE
You’ll find detailed coverage of some of these policies in later sections of this chapter. In particular, be sure to read the next section, Managing drive access in File Explorer, which covers hiding or preventing access to drives in File Explorer.
Managing drive access in File Explorer
You might want to block access to files on certain drives or even hide certain drives on a system. You manage this through Group Policy. The policies you use are Hide These Specified Drives In My Computer and Prevent Access To Drives From My Computer.
Hiding drives prevents users from accessing the drives in File Explorer views, but it doesn’t prevent users from using other techniques to access the drives. In contrast, blocking access to drives prevents users from accessing any files on the drives and ensures that these files cannot be accessed by using File Explorer or the Run or Map Network Drive command. It doesn’t, however, hide drive icons or the folder structure in File Explorer.
To hide selected drives or to prevent access to files on selected drives, follow these steps:
1. Open a Group Policy Object for editing in the Group Policy Management Editor. The related Administrative Templates policies for User Configuration are located in Windows Components\File Explorer.
2. To hide drives, double-tap or double-click Hide These Specified Drives In My Computer, and then select Enabled. Next, specify which drives you are hiding, and then tap or click OK. Key options are the following:
o Select Restrict All Drives to restrict access only to all internal hard drives and floppy disk drives.
o Select Restrict A And B Drives Only to restrict access only to floppy disk drives.
o Select Restrict A, B And C Drives Only to restrict access only to floppy disk drives and drive C.
o Select Restrict C Drive Only to restrict access only to drive C.
o Select Restrict D Drive Only to restrict access only to drive D.
o Select Do Not Restrict Drives to remove additional restrictions that would otherwise apply.
3. To block access to files on specific drives, double-tap or double-click Prevent Access To Drives From My Computer, and then select Enabled. Next, select the drives to which you want to restrict access, and then tap or click OK.
NOTE
The List Folder Contents permission controls whether a user can view files in a folder. If you want to ensure that users cannot view the names of folders on drives, you should also hide the drives. This is the easiest way to hide all the folders on a drive from view.
Managing offline files
Configuring offline files is a multistep process that begins with appropriate settings in Group Policy, continues with configuring specific offline folders, and ends with setting user options for working offline. Although users who work offline primarily use laptops that they take home or to other locations, all users can benefit from offline file configurations. Configuring Group Policy for offline files is discussed in Chapter 5. This section provides more details about offline files and provides specific steps for configuring them.
Understanding offline files
Offline files enable users to store network files on their computers so that the files are available when the users are not connected to the network or a network outage occurs. After offline files are configured, Windows 8.1 automatically uses them whenever network files are not available. This enables users to continue working on network files without interruption. When the connection to the network is reestablished, Windows 8.1 synchronizes the files on the user’s computer with the files in the network folder.
The way that changes are applied depends on how they were made. If multiple users make changes to a particular offline file, they can use conflict resolution features to save their version of the file over the existing version, keep the existing version, or save both versions on the network. If a user deletes an offline file, the file is also deleted on the network, except if someone has modified the file on the network so that it has a more recent date and time stamp. In this exceptional case, the file is deleted from the user’s computer, but not from the network. If users change an offline file that someone else deletes from the network, they can choose to save their version to the network or delete it from their computer.
Windows 8.1 provides several features that affect the way that offline files are used, including:
§ Change-only syncing Windows 8.1 provides faster synchronization by syncing only the changed blocks of files. Only the changed blocks are written back to the server during synchronization.
§ Unavailable file and folder ghosting When part of the contents of a folder is made available offline, Windows 8.1 creates ghosted entries of other files and folders to preserve the online context. When you are not connected to a remote location, you’ll find ghost entries for online items, in addition to entries for offline items.
§ Offloaded Data Transfer When data is being copied or moved within or between compatible storage arrays, this transparent and automatically enabled feature of Windows Server 2012 R2 offloads the file transfer to the storage devices, bypassing the host computers. As an example, if a user copies or moves a folder from a shared folder from one file server to another and those servers use compatible storage arrays (or the same storage array), the data would be transferred directly, bypassing the host servers.
§ Synchronization on costed networks By default, offline files are not synchronized in the background on cellular and other networks that might charge fees when roaming or near or over data plan usage. Adjust the threshold for slow-link mode by using Configure Slow-Link Mode, and configure background syncing by using Enable File Synchronization On Costed Networks. The related Administrative Templates policies for Computer Configuration are located under Network\Offline Files.
§ Caching of redirected folders By default, special folders that are redirected to network shares are available offline automatically. If you don’t want redirected special folders to be available offline, you can exclude specific or all folders from being cached offline by using Do Not Automatically Make Specific Redirected Folders Available Offline. The related Administrative Templates policy for User Configuration is located under System\Folder Redirection.
Both users and administrators have control over when offline files are synchronized. Automatic synchronization can be triggered by user logon and logoff and by computers entering the sleep or hibernate modes. The exact settings for automatic synchronization depend on Group Policy and user settings. For details on configuring offline files through Group Policy, see the Configuring Offline File policies section in Chapter 5.
Users can initiate a sync of an entire network folder, a specific folder and its contents, or a specific file by pressing and holding or right-clicking the resource in File Explorer, selecting Sync, and then selecting Sync Selected Offline Files.
You also can manually control synchronization through Sync Center. You can open Sync Center in several ways:
§ In Control Panel, tap or click View By, and then select either Large Icons or Small Icons. Next, tap or click Sync Center.
§ In the Settings Search box, type Sync Center, and then press Enter.
Making files or folders available offline
Shared network folders can be made available for use offline. By default, all subfolders and files within the shared folders are also available offline. If necessary, you can change the availability of individual files and subfolders. Keep in mind that new files added to a shared folder that is designated for offline use are not automatically distributed to users working offline. The offline folder must be synchronized to obtain the updates.
You can configure offline files by using File Explorer or the Computer Management console. Because Computer Management enables you to work with and manage offline files on any of your network computers, it’s usually the best tool to use. Making files or folders available offline is a three-step process. First you share folders, then you make those folders available for offline use, and finally, you have the users specify the files and folders they want to use offline.
Step 1: Share folders
In the Computer Management console, you make a folder available for sharing by completing the following steps:
1. Press and hold or right-click Computer Management in the console tree, and then tap or click Connect To Another Computer. Use the Select Computer dialog box to choose the computer with which you want to work.
2. In the console tree, expand System Tools and Shared Folders, and then select Shares. The current shares on the system are displayed in the Details pane.
3. Press and hold or right-click Shares, and then tap or click New Share. This starts the Create A Shared Folder Wizard, which can be used to share folders, as discussed in Chapter 7 in the Sharing a folder and setting share permissions in Computer Management section.
Step 2: Make folders available for offline use
In the Computer Management console, you make a shared folder available for offline use by completing these steps:
1. Press and hold or right-click Computer Management in the console tree, and then tap or click Connect To Another Computer. Use the Select Computer dialog box to choose the computer with which you want to work.
2. In the console tree, expand System Tools and Shared Folders, and then select Shares.
3. Double-tap or double-click the share you want to configure for offline use. On the General tab, tap or click Offline Settings.
4. In the Offline Settings dialog box, shown in Figure 8-2, select one of the following options:
o Only The Files And Programs That Users Specify Are Available Offline Use this setting when you want users to specify any files that they want to work with offline. This is the default option and is the best choice when multiple users want to modify the same files within a folder. After they are configured for manual caching, files are automatically downloaded and made available for offline use. If an older version of a document was cached previously, the older version is deleted. When a file is used online, the server version always reflects that the file is in use. With this option, you can also enable BranchCache. This makes it possible for computers in a branch office to cache files that are downloaded from a shared folder, and then securely share the files to other computers in the branch office.
o All Files And Programs That Users Open From The Shared Folder Are Automatically Available Offline Use this setting for folders containing user data and programs. Opened files and program executables are automatically downloaded and made available for offline use. If an older version of a document was cached previously, the older version is deleted from the local cache. When a file is used online, the server version always reflects that the file is in use. Prompts are displayed if version conflicts occur.
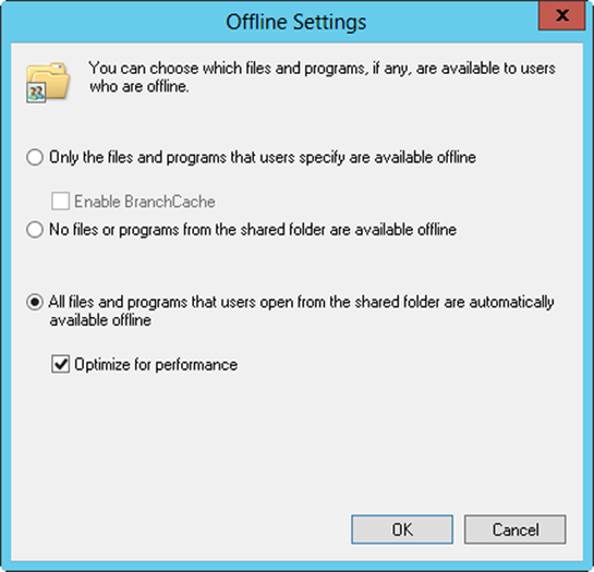
Figure 8-2. Configure caching options for offline files in the Offline Settings dialog box.
With this option, you can also select Optimize For Performance to enable expanded caching of programs. Expanded caching enables programs that are shared over the network to be cached so that they can be run locally, which improves performance.
5. Tap or click OK twice.
Step 3: Specify the offline files and folders to use
After you’ve created the shares and configured offline use of those shares as appropriate, you can specify the files and folders to use offline by following these steps:
1. Map a network drive to a shared file or folder, as discussed in Chapter 7 in the Using and accessing shared resources section.
2. In File Explorer, tap or click the location path selection button, and then tap or click This PC. This opens the This PC window.
3. Create the offline file cache by doing one of the following:
o To copy the contents of a shared folder to the user’s computer and make it available for offline use, under Network Location, press and hold or right-click the shared location, and then tap or click Always Available Offline.
o To copy only a selected folder (and its contents) or a selected file to the user’s computer and make it available offline, use the This PC console to locate a specific file or folder on the network share, and then press and hold or right-click the file or folder and tap or click Always Available Offline.
Designating files and folders for offline use creates a local cache of the contents of the files and folders on the user’s computer. It also establishes a sync partnership between the local computer and the sharing computer or extends an existing sync partnership to incorporate the additional shared files and folders. Sync partnerships can be managed by using Sync Center, as discussed in the next section, Managing offline file synchronization.
You are considered to be working offline whenever your computer is not connected to the LAN. You know you are working offline when you find a red X over Network Drives in the This PC window or over the Network icon in the notification area of the taskbar. When you work offline, you can work with network files in the same way in which you work with files when you are connected to the network. You have the same permissions when you work offline. Therefore, if you have only read access to a file when you’re connected to the network, you will still be able only to read the file, not modify it, when you’re working offline.
Managing offline file synchronization
Synchronizing the offline files cache keeps the files up to date on the client computer and merges any changes the user has made back to the shared folder. The way Windows syncs depends on whether the computer is on a fast link, a slow link, or a costed network.
Sync Center, shown in Figure 8-3, simplifies the management of cached offline files and folders. In Sync Center, a sync partnership is established for every shared folder that has locally cached contents. Each sync partnership has a set of properties that enables you to control whether and how syncing occurs.
You can open Sync Center from Control Panel. In Control Panel, tap or click View By, and then select either Large Icons or Small Icons. Next, tap or click Sync Center. After you display Sync Center, you can easily check for synchronization problems, start or stop syncing, and configure syncing.
In Sync Center, the View Sync Partnerships page is selected by default. On this page, you can manually synchronize offline files by pressing and holding or right-clicking the Offline Files entry and then selecting Sync Offline Files.
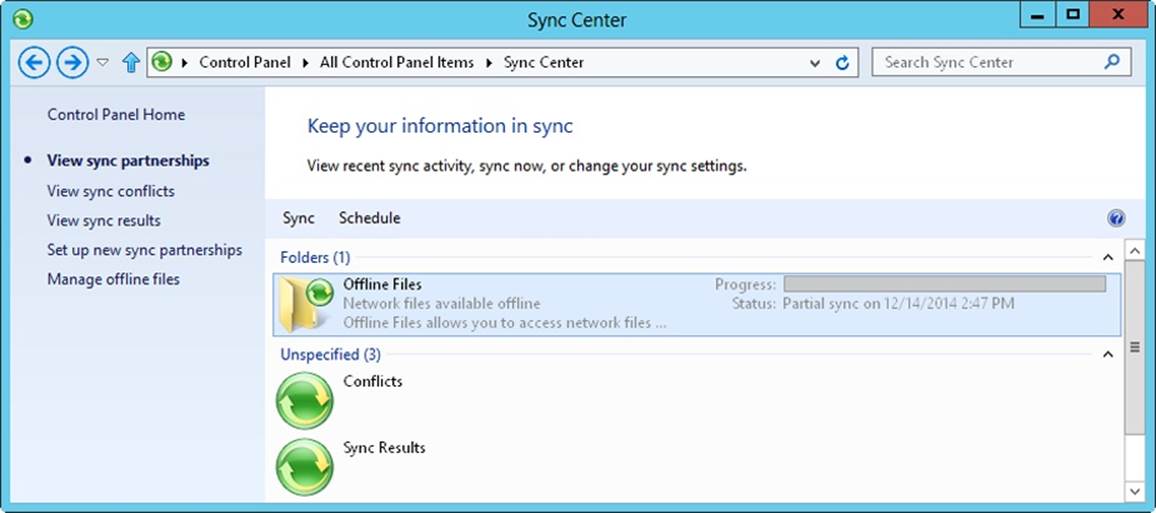
Figure 8-3. Use Sync Center to view and manage synchronization.
Group Policy settings control how offline file synchronization works. Generally, offline files are automatically synchronized when a user reconnects to the network after being disconnected from the network or electing to work offline. You can also configure synchronization so that it occurs at one of the following times:
§ At a specific, scheduled time
§ When the user logs on
§ When the computer is idle
§ When the user locks or unlocks Windows
Scheduling syncing
You can create and manage scheduled synchronization by following these steps:
1. In Sync Center, press and hold or right-click the sync partnership with which you want to work, and then tap or click Schedule For Offline Files.
2. If you’ve previously scheduled synchronization for this resource, you can do the following:
o Create a new schedule Tap or click Create A New Sync Schedule, and then follow the remaining steps in this procedure.
o View or edit an existing schedule Tap or click View Or Edit An Existing Sync Schedule, tap or click the schedule to change, tap or click Next, and then follow the remaining steps in this procedure.
o Delete an existing schedule Tap or click Delete An Existing Sync Schedule, tap or click the schedule to delete, and then tap or click Delete. Tap or click OK, and then skip the remaining steps in this procedure.
3. Review the items you are configuring and clear the check boxes for any items you don’t want to configure. Tap or click Next, and then tap or click At A Scheduled Time.
4. The Start On and At options are configured so that scheduled syncing will start immediately, as shown in Figure 8-4. If you want to start scheduled syncing on a different date and time, use the options provided to change the start date and time.
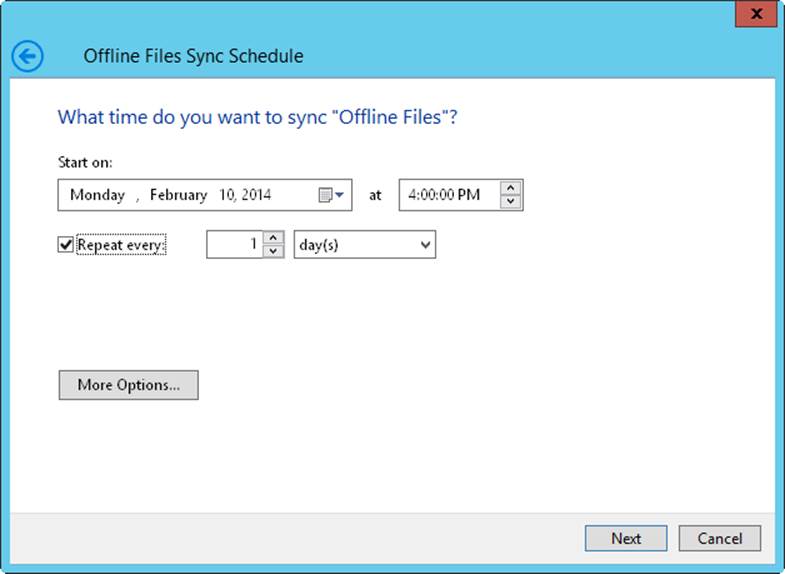
Figure 8-4. Create a sync schedule.
5. The Repeat Every option sets the sync interval. The default interval is once every day. You can set the repeat interval to a value in minutes, hours, days, weeks, or months. Because only changes are synced, you might want to sync more frequently than you would with early Windows operating systems. For example, with important files, you might want to sync every three to four hours.
6. If you want to configure when syncing starts or stops, tap or click More Options. By default, sync starts only if the computer is awake and not in sleep or hibernate state. You also can configure syncing to:
o Start only if the computer has been idle for at least N minutes, where N is a value you provide.
o Start only if the computer is running on external power (as opposed to battery).
o Stop sync if the computer wakes up from being idle.
o Stop the sync if the computer is no longer running on external power.
7. When you are ready to continue, tap or click Next. Enter a descriptive name for the scheduled synchronization, and then tap or click Save Schedule.
Syncing on an event or action
You can create and manage synchronization based on events or actions by following these steps:
1. In Sync Center, tap or click the sync partnership with which you want to work, and then tap or click Schedule.
2. If you’ve previously scheduled synchronization for this resource, you can do the following:
o Create a new schedule Tap or click Create A New Sync Schedule, and then follow the remaining steps in this procedure.
o View or edit an existing schedule Tap or click View Or Edit An Existing Sync Schedule, tap or click the schedule to change, tap or click Next, and then follow the remaining steps in this procedure.
o Delete an existing schedule Tap or click Delete An Existing Sync Schedule, tap or click the schedule to delete, and then tap or click Delete. Tap or click OK, and then skip the remaining steps.
3. Review the items you are configuring, clear the check boxes for any items you don’t want to configure, and then tap or click Next. Tap or click When An Event Occurs.
4. As shown in Figure 8-5, use the check boxes provided to specify the events and actions that start automatic syncing. You can start synchronization:
o When a user logs on to the computer.
o When the computer has been idle for at least N minutes, where N is a value you provide.
o When a user locks the computer.
o When a user unlocks the computer.
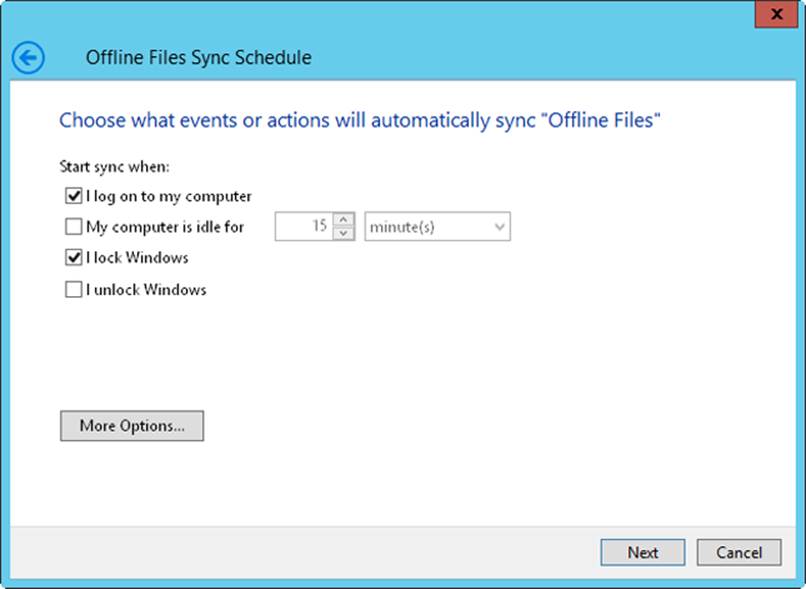
Figure 8-5. Sync based on events and actions.
5. When you are ready to continue, tap or click Next. Enter a descriptive name for the scheduled sync, and then tap or click Save Schedule.
Resolving synchronization conflicts and errors
Synchronization results provide details, errors, and warnings. To view current sync results, open Sync Center, and then tap or click View Sync Results. You can review sync details to determine when syncing was started, stopped, or completed. You can review errors and warnings to determine whether there are problems with the synchronization configuration.
Synchronization conflicts occur if a user makes changes to an offline file that is updated online by another user. You can view and resolve synchronization conflicts by following these steps:
1. In Sync Center, tap or click View Sync Conflicts. The main pane specifies whether there are any conflicts, as shown in Figure 8-6.
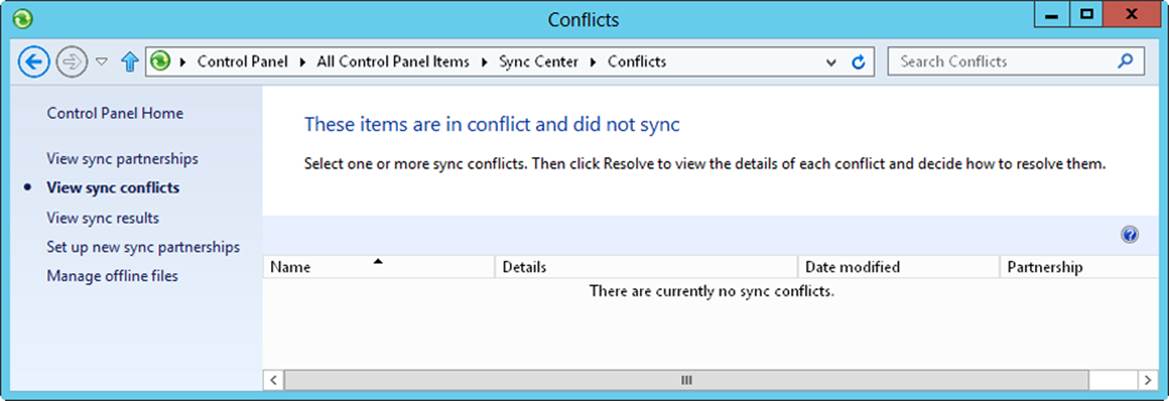
Figure 8-6. Conflicts are listed according to document name, file type, time, partnership, and conflict type.
2. To display the Resolve Conflict dialog box, double-tap or double-click a conflict you want to resolve.
3. You can now do the following:
o Tap or click the version you want to keep. If you want to keep the local version and overwrite the network version, tap or click the version listed as On This Computer. If you want to keep the network version and overwrite the local version, tap or click the version listed as being on the shared network location.
o Tap or click Keep Both Versions to write the local version to the shared network location with a new file name. Generally, the new file name will be the same as the old file name, but with a numeric suffix indicating the version increment. If you are at all unsure about which version of a file to keep, keep both versions, and then compare the two versions carefully for changes that should be merged or discarded.
Configuring disk usage limits for offline files
In Sync Center, you can control how much space is used and available for offline files. By default, the maximum amount of space that can be used and is available for offline files is a percentage of the size of the disk on which user profiles are stored on the computer. To configure disk usage limits for offline files, follow these steps:
1. In Sync Center, tap or click Manage Offline Files. This opens the Offline Files dialog box.
2. On the Disk Usage tab, you’ll find the amount of space used by all offline files and related temporary files, as shown in Figure 8-7. Temporary files are created as users work with offline files on the computer.
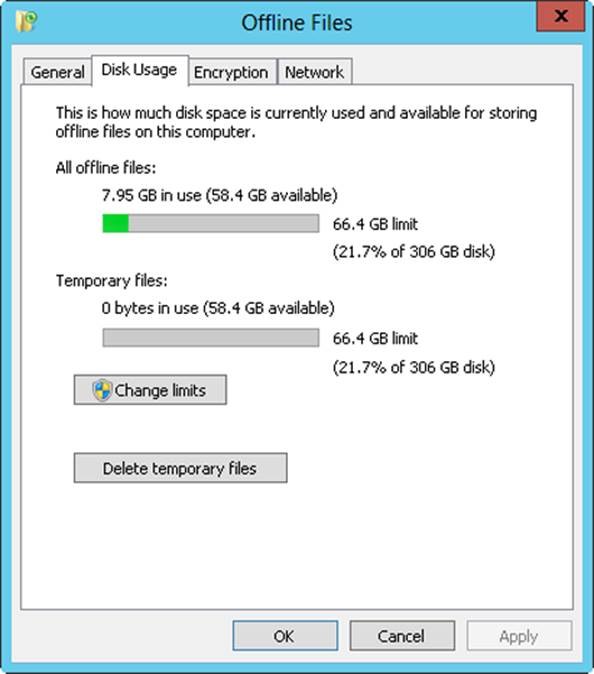
Figure 8-7. Configure disk limits for offline files.
3. Note the limit for all offline files and related temporary files. This is specified as a limit in megabytes (MB) or gigabytes (GB), in addition to a percentage of the size of the disk on which user profiles are stored on the computer.
4. Tap or click Change Limits. In the Offline Files Disk Usage Limits dialog box, use the options provided to set the limit for all offline files and related temporary files, and then tap or click OK.
5. To delete temporary files that are not in use, tap or click Delete Temporary Files. Deleting temporary files does not affect the copies of the network files stored locally.
6. Tap or click OK.
Managing encryption for offline files
To enhance security, you can specify whether offline files are encrypted. If you encrypt offline files, only the files stored on your computer are encrypted and not the files on the network. Users do not need to decrypt the encrypted files before working with them. Decryption is performed automatically by the operating system. To encrypt offline files, follow these steps:
1. In Sync Center, tap or click Manage Offline Files. This opens the Offline Files dialog box.
2. On the Encryption tab, note whether the offline files are or are not encrypted. If offline files are not encrypted, tap or click Encrypt to encrypt all offline files, and then tap or click OK.
If you want to disable encryption later, repeat this procedure but tap or click Unencrypt.
Making offline files unavailable
As an administrator, you can specify files that should not be available for offline use. Typically, you’ll do this when a shared folder contains specific files that users shouldn’t manipulate. To make a file unavailable for offline use, you should set a specific exclusion policy, as described in theConfiguring Offline File policies section of Chapter 5.
In the Computer Management console, you make a shared folder unavailable for offline use by completing these steps:
1. Press and hold or right-click Computer Management in the console tree, and then tap or click Connect To Another Computer. Use the Select Computer dialog box to choose the computer with which you want to work.
2. In the console tree, expand System Tools and Shared Folders, and then select Shares.
3. Double-tap or double-click the share you want to configure for offline use. On the General tab, tap or click Offline Settings.
4. In the Offline Settings dialog box, select No Files Or Programs From The Shared Folder Are Available Offline.
5. Tap or click OK.
To completely disable the use of offline files on a client computer, complete these steps:
1. In Sync Center, tap or click Manage Offline Files. This opens the Offline Files dialog box.
2. On the General tab, tap or click Disable Offline Files, and then tap or click OK.
If you want to enable offline files later, repeat this procedure, but tap or click Enable Offline Files.
Configuring disk quotas
The following sections discuss how to use and manage disk quotas. Disk quotas enable you to manage disk space usage and are configured on a per-volume basis. Only NTFS file system volumes can have quotas. The first step in configuring quotas is to enable disk quota policies, asdescribed in the Configuring disk quota policies section of Chapter 5. After you configure the necessary policies, you can set up quotas for specific volumes on a system.
Using disk quotas
Administrators use disk quotas to manage disk space usage for critical volumes, such as those that provide corporate or user data shares. When you enable disk quotas, you set a disk quota limit and a disk quota warning level. The disk quota limit sets the maximum space that can be used (which prevents users from writing additional information to a volume), logs events when a user exceeds the limit, or both. You use the disk quota warning to warn users and to log warning events when users approach their disk quota limits.
NOTE
REAL WORLD Although most administrators configure quotas that are enforced, you can set disk quotas that are not enforced. You might wonder why you would do this. Sometimes you might want to track disk space usage on a per-user basis and know when users have exceeded some predefined limit. Instead of denying the users additional disk space, however, you can track the overage by recording an event in the application log.
Disk quotas apply only to standard users, not to administrators. Administrators can’t be denied disk space even if they exceed enforced disk quota limits. Disk quota limits and warnings can be set in kilobytes (KB), megabytes (MB), gigabytes (GB), terabytes (TB), petabytes (PB), and exabytes (EB). In a typical environment, you’ll use megabytes or gigabytes. For example, on a corporate data share that is used by members of a department, you might limit disk space usage to between 20 and 100 GB. For a user data share, you might set the level much lower, such as 5 to 20 GB, restricting the user from creating large amounts of personal data. Often, you’ll set the disk quota warning as a percentage of the disk quota limit. For example, you could set the warning at 90 to 95 percent of the disk quota limit.
Because disk quotas are tracked on a per-volume, per-user basis, disk space used by one user does not affect the disk quotas for other users. Thus, if one user exceeds his limit, any restrictions applied to this user don’t apply to other users. For example, if a user exceeds a 5-GB disk quota limit and the volume is configured to prevent writing over this limit, the user can no longer write data to the volume. He can, however, remove files and folders from the volume to free up disk space, move files and folders to a compressed area on the volume, or elect to compress files. Moving files to a different location on the volume doesn’t affect the quota restriction. The amount of file space is the same unless the user moves uncompressed files and folders to a folder with compression. In any case, the restriction on a single user does not affect other users’ ability to write to the volume (as long as the volume has free space).
You can enable disk quotas on local volumes and on remote volumes. To manage disk quotas on local volumes, you work with the local disk itself. To manage disk quotas on remote volumes, you must share the root directory for the volume and then set the disk quota on the volume. Keep in mind that when you enable disk quotas on a local volume, operating system and application program files are not included in the volume usage for the user who installed those files. Generally, system files are owned by the TrustedInstaller account, and program files are owned by the System account.
Only members of the Domain Administrators group or the local system Administrators group can configure disk quotas. Through local Group Policy, you can enable disk quotas for an individual computer. Through site, domain, or organizational unit (OU) policies, you can enable disk quotas for groups of users and computers. Keeping track of disk quotas does cause some overhead on computers, which is a function of the number of disk quotas being enforced, the total size of volumes and their data, and the number of users to which the disk quotas apply.
Although disk quotas appear to be tracked on a per-user basis, behind the scenes, Windows 8.1 manages disk quotas according to security identifiers (SIDs). Because disk quotas are tracked by SIDs, you can safely modify user names without affecting the disk quota configuration. Tracking by SIDs causes some additional overhead when you view disk quota statistics for users because Windows 8.1 must correlate SIDs to user account names so that the account names can be displayed in dialog boxes. This requires contacting the local user manager service or the domain controller as necessary. After names are looked up, they are cached to a local file so that they are available immediately the next time they are needed. The query cache is updated infrequently, so if you notice a discrepancy between what is displayed and what is configured, you need to refresh the information. Usually, this is done by selecting Refresh or pressing F5 in the current window.
Enabling disk quotas on NTFS volumes
Disk quotas are set on a per-volume basis. Because only NTFS volumes can have disk quotas, you cannot configure disk quotas on FAT or ReFS volumes. The best way to configure disk quotas is through Group Policy, as discussed in Chapter 5. After the appropriate policies are configured, you can create disk quota entries to manage per-user and per-group quotas.
If you’d rather configure quotas on each computer, you can enable disk quotas on an NTFS volume by following these steps:
1. Start Computer Management. You are connected to the local computer by default. If you want to configure disk quotas on a remote computer, press and hold or right-click Computer Management in the console tree, and then tap or click Connect To Another Computer. In the Select Computer dialog box, select the computer with which you want to work.
2. In the console tree, expand Storage, and then select Disk Management. The volumes configured on the selected computer are displayed in the details pane.
3. By using the Volume List or Graphical view, press and hold or right-click the volume with which you want to work, and then tap or click Properties.
4. Tap or click the Quota tab, as shown in Figure 8-8. Select the Enable Quota Management check box.
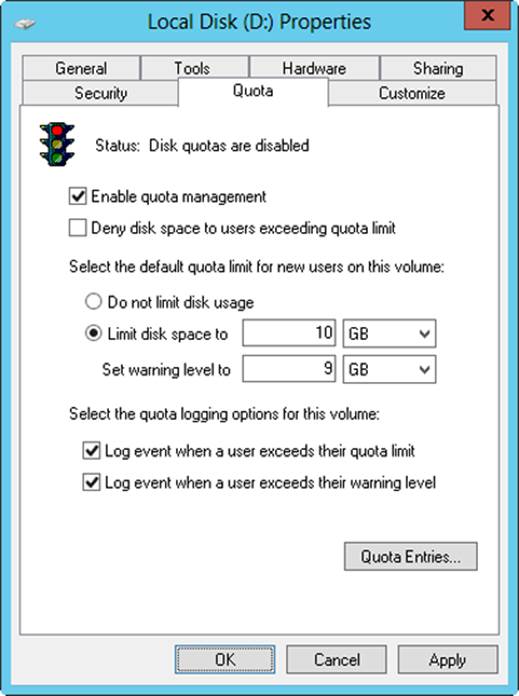
Figure 8-8. After you enable quota management, you can configure a quota limit and quota warning for all users on this computer.
5. To set a default disk quota limit that is applied to each user on this computer, select Limit Disk Space To, and then use the options provided to set a limit. Next, set the default warning limit by using Set Warning Level To. The disk quota warning limit should usually be 90 to 95 percent of the disk quota limit.
TIP
Although the default quota limit and warning apply to all users, you can use the Quota Entries dialog box to override the default and configure different levels for individual users. If you create many unique quota entries and don’t want to re-create them on a volume with similar characteristics and usage, you can export the quota entries and import them on a different volume.
6. To enforce the disk quota limit and prevent users from going over the limit, select the Deny Disk Space To Users Exceeding Quota Limit check box. Keep in mind that this creates a physical limitation for users, but not for administrators.
7. To configure logging when users exceed a warning limit or the quota limit, use the Log Event check boxes.
8. If the quota system isn’t currently enabled, you’ll get a prompt asking you to enable the quota system. Tap or click OK so that Windows 8.1 can rescan the volume and update disk usage statistics. Actions can be taken against users who exceed the current limit or warning levels. These include preventing users from writing to the volume, notifying users the next time they access the volume, and logging applicable events in the application log.
Viewing disk quota entries
Disk space usage is tracked on a per-user basis. When disk quotas are enabled, each user storing data on a volume has an entry in the disk quota file. This entry is updated periodically to show the current disk space used, the applicable quota limit, the applicable warning level, and the percentage of allowable space being used. As an administrator, you can modify disk quota entries to set different limits and warning levels for particular users. You can also create disk quota entries for users who have not yet saved data on a volume. By creating entries, you ensure that when a user does make use of a volume, she has an appropriate limit and warning level.
To view the current disk quota entries for a volume, follow these steps:
1. Start Computer Management. You are connected to the local computer by default. If you want to view disk quotas on a remote computer, press and hold or right-click Computer Management in the console tree, and then tap or click Connect To Another Computer. In the Select Computer dialog box, select the computer with which you want to work.
2. In the console tree, expand Storage, and then select Disk Management. The volumes configured on the selected computer are displayed in the Details pane.
3. By using the Volume List or Graphical view, press and hold or right-click the volume with which you want to work, and then tap or click Properties.
4. On the Quota tab, tap or click Quota Entries. This displays the Quota Entries For dialog box.
Disk quota entries show current disk space usage on a particular volume in addition to applicable quota limits and warning levels. The status is meant to quickly depict whether a user has gone over the limit. A status of OK means the user is working within the quota boundaries. Any other status usually means that the user has reached the warning level or the quota limit.
Creating disk quota entries
You can create disk quota entries for users who have not yet saved data on a volume in addition to users who have already saved data on a volume. This enables you to set custom limits and warning levels for any user as necessary. Usually, you’ll use this feature when one user frequently stores more information than others do. For example, a graphic designer might have much larger storage needs than a customer-support person does. The good news about custom quota entries is that you can export them to other volumes, which enables you to quickly apply the same set of rules to multiple volumes.
To create a quota entry on a volume, follow these steps:
1. In Computer Management, expand Storage, and then select Disk Management. By using the Volume List or Graphical view, press and hold or right-click the volume with which you want to work, and then tap or click Properties.
2. On the Quota tab, tap or click Quota Entries. Current quota entries for all users are listed. To refresh the listing, tap or click Refresh on the View menu.
3. If the user doesn’t have an existing entry on the volume, create one by tapping or clicking New Quota Entry on the Quota menu. This opens the Select Users dialog box.
4. In the Select Users dialog box, type the name of a user in the Enter The Object Names To Select box, and then tap or click Check Names. If multiple matches are found, select the account you want, and then tap or click OK. If no matches are found, update the name you entered and try again. Repeat this step as necessary, and then tap or click OK.
5. After you’ve selected a name, the Add New Quota Entry dialog box is displayed. You have several options. You can remove all quota restrictions for this user by selecting Do Not Limit Disk Usage. In addition, you can set a specific limit and warning level by selecting Limit Disk Space To and then entering the appropriate values.
6. Tap or click OK to close the Add New Quota Entry dialog box.
Updating and customizing disk quota entries
You can modify and customize disk quota entries for individual users at any time by following these steps:
1. In Computer Management, expand Storage, and then select Disk Management. By using the Volume List or Graphical view, press and hold or right-click the volume with which you want to work, and then tap or click Properties.
2. On the Quota tab, tap or click Quota Entries. Current quota entries for all users are listed. To refresh the list, tap or click Refresh on the View menu.
3. Double-tap or double-click the quota entry for the user. This displays the Quota Settings For dialog box, which is similar to the dialog box shown previously in Figure 8-8.
4. To remove all quota restrictions for this user, select Do Not Limit Disk Usage.
5. To modify the current limit and warning level, select Limit Disk Space To, and then enter the appropriate values.
6. Tap or click OK.
Deleting disk quota entries
When you’ve created disk quota entries on a volume and a user no longer needs to use the volume, you can delete the associated disk quota entry. When you delete a disk quota entry, all files owned by the user on the volume are collected and displayed in a dialog box so that you can permanently delete the files, take ownership of the files, or move the files to a folder on a different volume.
To delete a disk quota entry for a user and manage the remaining files on the volume, follow these steps:
1. In Computer Management, expand Storage, and then select Disk Management. By using the Volume List or Graphical view, press and hold or right-click the volume with which you want to work, and then tap or click Properties.
2. On the Quota tab, tap or click Quota Entries. Current quota entries for all users are listed. To refresh the listing, press F5 or tap or click Refresh on the View menu.
3. Select the disk quota entry that you want to delete, and then press Delete or select Delete Quota Entry from the Quota menu. You can select multiple entries by using the Shift key or Ctrl key.
4. When prompted to confirm the action, tap or click Yes. This displays the Disk Quota dialog box with a list of files owned by the selected user or users.
5. Use the List Files Owned By list to display files for the user whose quota entry you are deleting. You must then specify how to handle the files for the user. You can handle each file separately by selecting a file and then choosing an appropriate option. Select multiple files by using the Shift key or Ctrl key. The following options are available:
o Show Folders Only Changes the view to show only folders in which the user has files. In this way, you can delete, move, or take ownership of all the user’s files in a particular folder.
o Show Files Only Shows all files that the user owns according to the folder in which they were created.
o Permanently Delete Files Select the files to delete, and then tap or click Delete. When prompted to confirm the action, tap or click Yes.
o Take Ownership Of Files Select the files of which you want to take ownership, and then tap or click Take Ownership.
o Move Files To Select the files that you want to move, and then, in the boxes provided, enter the path to a folder on a different volume. If you don’t know the path that you want to use, tap or click Browse to display the Browse For Folder dialog box. After you find the folder, tap or click Move.
6. Tap or click Close when you have finished managing the files. If you’ve handled all user files appropriately, the disk quota entries are deleted.
Exporting and importing disk quota settings
Rather than re-create custom disk quota entries on individual volumes, you can export the settings from a source volume and import them to another volume. Both volumes must be formatted by using NTFS. To export and then import disk quota entries, perform the following steps:
1. Start Computer Management. You are connected to the local computer by default. If you want to work with disk quotas on a remote computer, press and hold or right-click Computer Management in the console tree, and then tap or click Connect To Another Computer. In the Select Computer dialog box, select the computer with which you want to work.
2. In the console tree, expand Storage, and then select Disk Management. The volumes configured on the selected computer are displayed in the details pane.
3. By using the Volume List or Graphical view, press and hold or right-click the source volume, and then tap or click Properties.
4. On the Quota tab, tap or click Quota Entries. This displays the Quota Entries For dialog box.
5. On the Quota menu, tap or click Export. This displays the Export Quota Settings dialog box. Choose the location in which to save the file containing the quota settings. Specify a name for the file in the File Name box, and then tap or click Save.
TIP
If you save the settings file to a mapped drive on the target volume, you’ll have an easier time importing the settings. Quota files are usually fairly small, so you don’t need to worry about disk space usage.
6. From the Quota menu, choose Close to close the Quota Entries dialog box. Tap or click OK to close the Properties dialog box.
7. In the console tree, press and hold or right-click Computer Management. On the shortcut menu, tap or click Connect To Another Computer. In the Select Computer dialog box, select the computer containing the target volume on which you want to use the exported settings.
8. Expand Storage, and then select Disk Management. By using the Volume List or Graphical view, press and hold or right-click the target volume, and then tap or click Properties.
9. Tap or click the Quota tab, ensure that Enable Quota Management is selected, and then tap or click Quota Entries. This displays the Quota Entries dialog box for the target volume.
10.On the Quota menu, tap or click Import. In the Import Quota Settings dialog box, select the quota settings file that you saved previously. Tap or click Open.
11.If the volume had previous quota entries, you can replace or keep existing entries. When prompted about a conflict, tap or click Yes to replace an existing entry, or tap or click No to keep the existing entry. The option to replace or keep existing entries can be applied to all entries on the volume by selecting Do This For All Quota Entries prior to tapping or clicking Yes or No.
Disabling disk quotas
You can disable quotas for individual users or all users on a volume. When you disable quotas for a particular user, that user is no longer subject to the quota restrictions, but disk quotas are still tracked for other users. When you disable quotas on a volume, quota tracking and management are completely removed. To disable quotas for a particular user, follow the technique outlined in the Updating and customizing disk quota entries section earlier in this chapter.
To disable quota tracking and management on a volume, follow these steps:
1. Start Computer Management. You are connected to the local computer by default. If you want to disable disk quotas on a remote computer, press and hold or right-click Computer Management in the console tree, and then tap or click Connect To Another Computer. In the Select Computer dialog box, select the computer with which you want to work.
2. In the console tree, expand Storage, and then select Disk Management. The volumes configured on the selected computer are displayed in the details pane.
3. By using the Volume List or Graphical view, press and hold or right-click the volume, and then tap or click Properties.
4. On the Quota tab, clear the Enable Quota Management check box. Tap or click OK. When prompted to confirm, tap or click OK.
Using branch caching
Windows BranchCache is a file-caching feature that works in conjunction with Background Intelligent Transfer Service (BITS). By using Group Policy, administrators can enable branch caching so that computers can retrieve documents and other types of files from a local cache rather than retrieving files from servers over the network.
Branch caching works with files transferred by using HTTP and Server Message Block (SMB). This means that files transferred from both intranet web servers and internal file servers are cached. Caching can dramatically improve response times and reduce transfer times for documents, webpages, and multimedia content.
BranchCache uses a client-server architecture and is tightly integrated into Windows File and Storage Services. Two versions of BranchCache are available:
§ Branch caching version 1 was released originally with Windows 7 and Windows Server 2008 Release 2 (and made available to Windows Vista with BITS 4.0 installed).
§ Branch caching version 2 was released with Windows 8 and Windows Server 2012.
The two versions work in different ways and use incompatible caching approaches. Version 1 uses a traditional caching approach. With Version 2, BranchCache takes advantage of data deduplication techniques to optimize data transfers over the wide area network (WAN) to branch offices. Because of this, BranchCache version 2 uses variable-size chunking and compression to achieve greater efficiencies when transferring files. Cached files aren’t stored as data streams and instead are replaced with stubs that point to data blocks within a common cache store. Chunking files ensures that compatible client computers download only one instance of duplicate content and that BranchCache stores only one instance of duplicate content. Chunking files also makes it possible to transfer only the part of a file that has changed rather than an entire file. It is also important to note that if the shared folder is on a volume that has already been deduplicated, BranchCache can use the already chunked files and there is no need to reprocess the files for transfer.
Generally speaking, LAN boundaries determine how the feature works after it is implemented. If a LAN is connected to the central office over a network on which the round-trip network latency is more than 80 milliseconds, clients on that LAN will use the local cache when it is available. Note also that multiple LANs connected together over a fast network can also use a single local cache.
When you enable branch caching, the first time that a file is accessed from an intranet website or file server over the network, Windows transfers the file from the originating server and caches the file locally within the remote office. When the same user or a different user at the remote office accesses the file later, Windows looks for the file in the local cache. If it finds the file, Windows queries the originating server to determine if the file has changed since it was cached. If the file has not changed, Windows retrieves the file from the local cache, eliminating the need to transfer the file over the WAN. If the file has changed, Windows retrieves the file from the originating server and updates the copy of the file in the cache.
With version 2, cached data is stored encrypted by default to enhance security, and hosted cache on Windows servers is maintained with Extensible Storage Engine (ESE) database technology. Using an ESE database enables a hosted cache server to store terabytes of data and serve many clients efficiently. Additionally, administrators can preload content onto hosted cache servers before the content is requested. Preloading ensures the content is available for quick access from local cache. If you preload content from media, such as an external drive or DVD, you eliminate the need to transfer the content over the network.
You can configure branch caching in one of two modes:
§ Distributed cache In this mode, the user’s desktop computer running a compatible version of Windows hosts a distributed file cache. A server running at the remote office is not needed because each local computer caches and sends out files.
§ Hosted cache In this mode, compatible file servers located in the remote office host the local file cache. The servers cache files and send them to clients located in the remote office.
NOTE
Although BranchCache version 2 enables you to scale the caching solution across multiple servers, BranchCache version 1 enables only one hosted cache server in a remote office.
Obviously, there are advantages and disadvantages to both caching modes. With the distributed cache mode, you do not need to install servers before you can enable branch caching, but users’ desktops have to maintain the cache and distribute files, which requires processing power and could adversely affect performance. With the host cache mode, you must install servers before you can enable branch caching, but after the servers are up and running, all the processing and overhead for maintaining the cache is handled by the servers, and this is a significant advantage over the distributed cache mode.
Keep the following in mind:
§ Branch caching doesn’t prevent users from saving files locally—it works with read requests, such as when a user requests a file from a file server.
§ Branch caching works seamlessly with encryption and secure transfer technologies, such as SMB Signing and SMB Encryption.
§ By default, network files are cached in the remote office only when the round-trip network latency is more than 80 milliseconds.
You install and configure BranchCache by doing the following:
§ Install a BranchCache-enabled file server by adding the BranchCache For Network Files role service to the file server.
§ Install a BranchCache-enabled content server (such as a web server or BITS-based applications server) by adding the BranchCache feature to the server.
§ Install a hosted cache server by adding the BranchCache feature to the server in the branch office.
§ Install a BranchCache-enabled client by enabling BranchCache and a BranchCache mode (either distributed or hosted) on the client.
You can enable and configure branch caching by completing the following steps:
1. Open a Group Policy Object for editing in the appropriate Group Policy editor. The related Administrative Templates policies for Computer Configuration are located in Network\BranchCache.
2. Double-tap or double-click Turn On BranchCache. In the Properties dialog box, select Enabled, and then tap or click OK.
3. Do one of the following:
o To enable distributed branch caching, double-tap or double-click Set BranchCache Distributed Cache Mode. In the Properties dialog box, select Enabled, and then tap or click OK.
o To enable hosted branch caching to support BranchCache version 1 clients, double-tap or double-click Set BranchCache Hosted Cache Mode. In the Properties dialog box, select Enabled, enter the host name of the BranchCache version 1 caching server, and then tap or click OK.
o To enable hosted branch caching to support BranchCache version 2 clients, double-tap or double-click Configure Hosted Cache Servers. In the Properties dialog box, select Enabled and then select Show. Use the Show Contents dialog box to enter the fully qualified host name or IP address of each version 2 caching server for the office location to which the Group Policy Object will be applied. Tap or click OK twice.
NOTE
If you enable the Configure Hosted Cache Server policy, Windows 8.1 clients will ignore the settings of the Set BranchCache Hosted Cache Mode policy.
NOTE
REAL WORLD In a mixed environment, the different caching approaches of version 1 and version 2 of BranchCache can result in caching inefficiencies and compatibility problems. If you want Windows 8.1 clients to use version 1 rather than version 2, you can do this by enabling the Configure Client BranchCache Version Support policy and setting the related version option to Windows Vista With BITS 4.0 Installed, Windows 7, or Windows Server 2008 R2.
4. If you want to specify the network latency required to trigger caching, double-tap or double-click Configure BranchCache For Network Files. In the Properties dialog box, select Enabled. Enter the round-trip network latency above which network files must be cached. This value is specified in milliseconds. If you enter 0, files will always be cached.
5. If you enabled hosted branch caching, double-tap or double-click Set Percentage Of Disk Space Usage For Client Computer Cache. In the Properties dialog box, select Enabled. Enter the percentage of total disk space that client computers should dedicate to BranchCache, and then tap or click OK. By default, the maximum cache size is 5 percent of the total disk space.
With BranchCache version 2, it is also possible for compatible clients to search Active Directory for hosted cache servers associated with their current Active Directory site and automatically configure themselves for hosted cache mode if applicable. To do this, use the Enable Automatic Hosted Cache Discovery By Service Connection Point policy.
All materials on the site are licensed Creative Commons Attribution-Sharealike 3.0 Unported CC BY-SA 3.0 & GNU Free Documentation License (GFDL)
If you are the copyright holder of any material contained on our site and intend to remove it, please contact our site administrator for approval.
© 2016-2026 All site design rights belong to S.Y.A.