Windows 8.1 Administration Pocket Consultant: Storage, Security, & Networking (2014)
Chapter 9. Configuring and Troubleshooting TCP/IP Networking
§ Navigating Windows 8.1 networking features
§ Installing networking components
§ Configuring network connections
§ Managing network connections
§ Troubleshooting and testing network settings
This chapter focuses on managing network and wireless connections, which are used to communicate on a network. For networking to work properly, you must install networking components and configure network communications by using Dynamic Host Configuration Protocol (DHCP), Domain Name System (DNS), and Windows Internet Naming Service (WINS). DHCP is used for dynamic configuration of networking and IP address settings. Both DNS and WINS provide name resolution services. DNS is the preferred service, and WINS is maintained for backward compatibility with earlier releases of the Windows operating system.
Navigating Windows 8.1 networking features
The networking features in Windows 8.1 include:
§ Network Explorer Provides a central console for browsing computers and devices on the network
§ Network And Sharing Center Provides a central console for viewing and managing a computer’s networking and sharing configurations
§ Network Diagnostics Provides automated diagnostics to help resolve networking problems
Before looking at how these networking tools are used, I’ll discuss the Windows 8.1 features on which these tools rely: network discovery, which controls the ability to view other computers and devices, and network awareness, which reports changes in network connectivity and configuration.
Understanding network discovery and network categories
The network discovery settings of the computer with which you are working determine the computers and devices you can browse or view in Windows 8.1 networking tools. Network discovery settings work in conjunction with a computer’s Windows Firewall settings to block or allow the following:
§ Discovery of network computers and devices
§ Discovery of your computer by others
Network discovery settings are meant to provide the appropriate level of security for each type of network to which a computer can connect. Three categories of networks are defined:
§ Domain network Intended as a designation for a network in which computers are connected to a corporate domain to which they belong
§ Private network Intended as a designation for a network in which computers are being used in a workgroup or homegroup and are not connected directly to the public Internet
§ Public network Intended as a designation for a network in a public place, such as a coffee shop or airport, rather than an internal network
NOTE
By default, network discovery and file sharing are not enabled, but they can be enabled on domain, work, and home networks. By using the Network window or Change Advanced Sharing Settings option in Network And Sharing Center, you can enable network discovery and file sharing. This step reduces restrictions and permits computers on the network to discover other computers and devices on that network and share files. However, by default, network discovery and file sharing are blocked on a public network. This enhances security by preventing computers on the public network from discovering other computers and devices on that network. When network discovery and file sharing are disabled, files and printers that you have shared from the computer cannot be accessed from the network. Additionally, some programs might not be able to access the network.
Because a computer saves settings separately for each category of network, you can specify different settings for blocking and allowing network traffic for each category. The first time you connect your computer to a network, Windows 8.1 attempts to determine whether you are at home, at work, or in a public location. The selection sets the network category. If you change your network connection or connect to a new network, Windows 8.1 will try to determine the category for that network. If Windows 8.1 is unable to determine the network category, it uses the public network category. If you join a computer to a domain, the network to which the computer is connected changes to a domain network.
Based on the network category, Windows 8.1 configures settings that either turn network discovery on or off. The On (enabled) state means that this computer can discover other computers and devices on the network and that other computers on the network can discover this computer. TheOff (disabled) state means that this computer cannot discover other computers and devices on the network and that other computers on the network cannot discover this computer.
Sometimes Windows 8.1 assigns the public network category when a computer actually is in a private network and part of a workgroup (or prior to joining a homegroup). Typically, this problem occurs because the TCP/IP settings are improperly configured. However, even when the TCP/IP settings and the computer are properly configured, you might also experience this problem.
For networking to work properly, you will need to change the network category. Otherwise, the computer might not connect to and work with other resources on the network. Why? Windows Firewall and Windows Firewall With Advanced Security both use the network category to determine how to secure the computer. Computers have separate Windows Firewall profiles for each network category, and the strictest firewall profile is the Public profile.
One way to resolve this problem is to use the HomeGroup Troubleshooter to change the network category from Public to Private. To make this change, follow these steps:
1. In Control Panel, under Network And Internet, select Choose HomeGroup And Sharing Options. Tap or click Start The HomeGroup Troubleshooter.
2. When the troubleshooter starts, tap or click Next.
3. On the Troubleshoot Network Problems page, you should receive a message stating that some networking problems are HomeGroup-related. Choose Skip This Step.
4. The troubleshooter should detect that the network location is incorrectly set. When prompted to change the network location to private, select Apply This Fix.
5. If you are trying to create or join a homegroup, follow the prompts. Otherwise, tap or click Cancel to exit the troubleshooter.
NOTE
REAL WORLD Sometimes a computer with the network category set as public will have problems joining a domain. Although the computer’s TCP/IP settings can be the source of the problem, so can the firewall profile being applied. Because the Public firewall profile is the strictest by default, the settings could block connections required to join the domain. You can work around this by temporarily disabling Windows Firewall or by following the steps in the previous procedure to force Windows to change the network category from public to private.
Working with Network Explorer
Network Explorer displays a list of discovered computers and devices on the network. You can access Network Explorer in several ways:
§ On the Start screen, tap or click File Explorer. In File Explorer, tap or click the location path selection button, and then tap or click Network.
§ In Control Panel, tap or click Network And Internet. Under the Network And Sharing Center heading, tap or click View Network Computers And Devices.
NOTE
In File Explorer, the Address Path has four interface elements: a Location Indicator icon, a Location Path Selection list button, Location Path entries, and a Previous Locations button. Be sure to tap or click the Location Path Selection list button and not the Location Indicator icon.
The network discovery settings for the computer determine which computers and devices are listed in Network Explorer. If network discovery is enabled, you’ll find other computers on the network, as shown in Figure 9-1. If network discovery is blocked, you’ll receive a message about this in the notification area of Network Explorer. Tapping or clicking this warning message and then selecting Turn On Network Discovery enables network discovery and opens the appropriate Windows Firewall ports so that network discovery is allowed. If no other changes have been made with regard to network discovery, the computer will be in the discovery-only state. You need to configure sharing of printers, files, and media manually, as discussed in Chapter 7.

Figure 9-1. Use Network Explorer to allow network discovery and to browse resources as permitted by the current configuration.
If you have appropriate permissions, you can browse any computer or device listed in Network Explorer. Double-tap or double-click the icon for the computer to access its shared resources. Double-tap or double-click the icon for a device to access its management interface or browse its resources.
Network Explorer’s toolbar provides several options:
§ Network And Sharing Center When you want to view network status or manage network settings, tap or click Network And Sharing Center. See the next section, Working with Network And Sharing Center, for more information.
§ Add Devices And Printers Starts the Add A Device Wizard. Use the wizard to add a local, network, wireless, or Bluetooth printer in addition to wireless devices that were detected but not configured.
§ Search Active Directory Opens the Find dialog box, which you can use to search for users, contacts, groups, computers, printers, shared folders, and more in Active Directory Domain Services (domain only).
Working with Network And Sharing Center
Network And Sharing Center, as shown in Figure 9-2, provides the current network status in addition to an overview of the current network configuration. In Control Panel, you can access Network And Sharing Center by tapping or clicking View Network Status And Tasks under the Network And Internet heading.
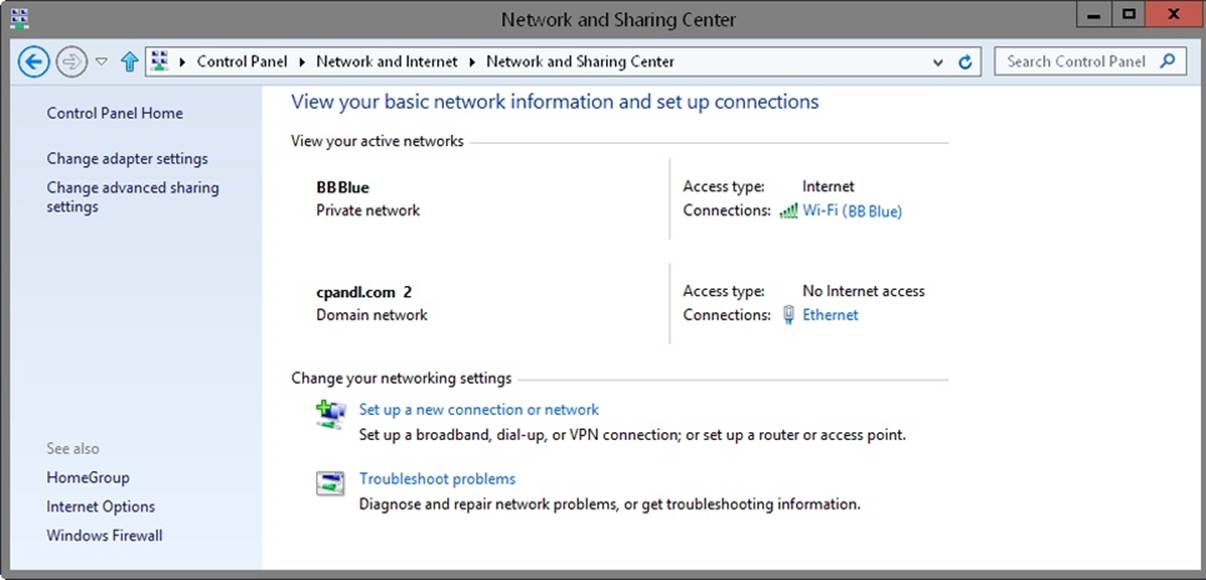
Figure 9-2. Use Network And Sharing Center to view the network status and details.
Network And Sharing Center lists the currently active networks by name and provides an overview of the networks. Network names are listed in bold. The value below the network name shows the category of the current network as Domain Network, Private Network, or Public Network. The Access Type specifies whether and how the computer is connected to its current network. Values for the Access Type are No Network Access, No Internet Access, or Internet. If you tap or click the name of a network connection, you can display the related status dialog box.
Tapping or clicking Change Adapter Settings displays the Network Connections page, which you can use to manage network connections. To configure sharing, tap or click Change Advanced Sharing Settings. You’ll then find options for configuring the computer’s sharing and network discovery settings for each network profile. To manage a profile, expand the profile’s view panel by tapping or clicking the Expand button (showing a down arrow), tap or click the setting with which you want to work, and then tap or click Save Changes. To turn on or off network discovery, tap or click Turn On Network Discovery or Turn Off Network Discovery as appropriate, and then tap or click Save Changes.
From Network And Sharing Center, you can attempt to diagnose a networking problem. To do this, tap or click Troubleshoot Problems, tap or click a troubleshooter to run, such as Incoming Connections or Network Adapter, and then follow the prompts. Windows Network Diagnostics attempts to identify the network problem and provide a possible solution.
Installing networking components
If you want to install networking on a computer, you must install TCP/IP networking and a network adapter. Windows 8.1 uses TCP/IP as the default LAN and WAN protocol. Networking components are typically installed during Windows 8.1 installation. You can also install TCP/IP networking through the network connection Properties dialog box.
Working with TCP/IP and the Dual TCP/IP stack
The TCP and IP protocols enable computers to communicate across various networks and the Internet by using network adapters, such as network interface cards, USB-attachable network adapters, PC Card network adapters, or built-in adapters on the motherboard. Windows 8.1 has a dual IP-layer architecture in which both Internet Protocol version 4 (IPv4) and Internet Protocol version 6 (IPv6) are implemented and share common Transport and Frame layers.
IPv4 and IPv6 are used in very different ways. IPv4 has 32-bit addresses and is the primary version of IP used on most networks, including the Internet. IPv6 has 128-bit addresses and is the next generation of IP.
IPv4’s 32-bit addresses are commonly expressed as four separate decimal values, such as 127.0.0.1 or 192.168.1.20. The four decimal values are referred to as octets because each represents 8 bits of the 32-bit number. With standard unicast IPv4 addresses, a variable part of the IP address represents the network ID and another variable part represents the host ID. There is no correlation between a host’s IPv4 address and the internal machine (MAC) address used by the host’s network adapter.
IPv6’s 128-bit addresses are divided into eight 16-bit blocks delimited by colons. Each 16-bit block is expressed in hexadecimal form. With standard unicast IPv6 addresses, the first 64 bits represent the network ID and the last 64 bits represent the network interface. Here is an example of an IPv6 address:
FEC0:0:0:02BC:FF:BECB:FE4F:961D
Because many IPv6 address blocks are set to 0, a contiguous set of 0 blocks can be expressed as “::”, a notation referred to as the double-colon notation. By using double-colon notation, the two 0 blocks in the previous address are compressed as follows:
FEC0::02BC:FF:BECB:FE4F:961D
If three or more 0 blocks are included, they would be compressed in the same way. For example, FFE8:0:0:0:0:0:0:1 becomes FFE8::1.
When networking hardware is detected during installation of the operating system, both IPv4 and IPv6 are enabled by default, and there is no need to install a separate component to enable support for IPv6. The modified IP architecture is referred to as the Dual TCP/IP stack. Table 9-1summarizes the key TCP/IP features implemented in the Dual TCP/IP stack. Table 9-2 summarizes the key features that are specific to IPv6.
Table 9-1. Key TCP/IP features in the Dual TCP/IP stack
|
FEATURES SUPPORTED |
DESCRIPTION |
|
Automatic Black Hole Router Detection |
Prevents TCP connections from terminating because of intermediate routers silently discarding large TCP segments, retransmissions, or error messages. |
|
Automatic Dead Gateway Retry |
Ensures that an unreachable gateway is checked periodically to determine whether it has become available. |
|
Compound TCP |
Optimizes TCP transfers for the sending host by increasing the amount of data sent in a connection while ensuring that other TCP connections are not affected. |
|
Extended Selective Acknowledgments |
Extends the way Selective Acknowledgments (SACKs) are used, enabling a receiver to indicate up to four noncontiguous blocks of received data and to acknowledge duplicate packets. This helps the receiver determine when it has retransmitted a segment unnecessarily and adjust its behavior to prevent future retransmissions. |
|
Modified Fast Recovery Algorithm |
Provides faster throughput by altering the way in which a sender can increase the sending rate if multiple segments in a window of data are lost and the sender receives an acknowledgment stating that only part of the data has been successfully received. |
|
Neighbor Unreachability Detection for IPv4 |
Determines when neighboring nodes and routers are no longer reachable and reports the condition. |
|
Network Diagnostics Framework |
Provides an extensible framework that helps users recover from and troubleshoot problems with network connections. |
|
Receive Window Auto Tuning |
Optimizes TCP transfers for the host receiving data by automatically managing the size of the memory buffer (the receive window) to use for storing incoming data based on the current network conditions. |
|
Routing Compartments |
Prevents unwanted forwarding of traffic between interfaces by associating an interface or a set of interfaces with a logon session that has its own routing tables. |
|
SACK-Based Loss Recovery |
Makes it possible to use SACK information to perform loss recovery when duplicate acknowledgments have been received and to recover more quickly when multiple segments are not received at the destination. |
|
Spurious Retransmission Timeout Detection |
Provides correction for sudden, temporary increases in retransmission timeouts and prevents unnecessary retransmission of segments. |
|
TCP Extended Statistics |
Helps determine whether a performance bottleneck for a connection is the sending application, the receiving application, or the network. |
|
Windows Filtering Platform |
Provides application programming interfaces (APIs) for extending the TCP/IP filtering architecture so that it can support additional features. |
Table 9-2. Key Dual TCP/IP stack features for IPv6
|
FEATURE SUPPORTED |
DESCRIPTION |
|
DHCPv6-Capable DHCP Client |
Extends the DHCP client to support IPv6, and enables stateful address autoconfiguration with a DHCPv6 server. |
|
IP Security |
Enables use of Internet Key Exchange (IKE) and data encryption for IPv6. |
|
IPv6 over Point-to-Point Protocol (PPPv6) |
Allows native IPv6 traffic to be sent over PPP-based connections, which in turn enables remote access clients to connect with an IPv6-based Internet service provider (ISP) through dial-up or PPP over Ethernet (PPPoE)–based connections. |
|
Link-Local Multicast Name Resolution (LLMNR) |
Allows IPv6 hosts on a single subnet without a DNS server to resolve each other’s names. |
|
Multicast Listener Discovery version 2 (MLDv2) |
Provides support for source-specific multicast traffic and is equivalent to Internet Group Management Protocol version 3 (IGMPv3) for IPv4. |
|
Random Interface IDs |
Prevents scanning of IPv6 addresses based on the known company IDs of network adapter manufacturers. By default, Windows 8.1 generates random interface IDs for nontemporary, autoconfigured IPv6 addresses, including public and link-local addresses. |
|
Symmetric Network Address Translators |
Maps the internal (private) address and port number to different external (public) addresses and ports, depending on the external destination address. |
The DNS client for Windows 8.1 has a number of enhancements that improve name resolution on IPv4 and IPv6 networks. These new features include:
§ Adaptive query timeout With adaptive query timeout, the DNS client adapts the timeout interval based on the time required for previous queries. Thus, instead of waiting 1,000 milliseconds (ms) before timing out a query, Windows adjusts the timeout based on past performance for the network, resulting in timeouts between 25ms and 1,000ms.
§ Query coalescing With query coalescing, the DNS client combines multiple DNS queries for the same name. This results in only one query and optimizes performance.
§ Parallel queries With parallel queries, the DNS client issues IPv4 and IPv6 queries for A and AAAA records in parallel when both IP interfaces are enabled, which streamlines the query process and improves performance. Link-local multicast name resolution (LLMNR) and NetBIOS queries also are issued in parallel for IPv4 and IPv6.
§ Persistent cache With a persistent cache, the DNS client maintains the DNS cache across changes that occur on the same network. For example, the DNS client now persists the cache after address change notifications and when the computer is resuming from the sleep or standby state.
Installing network adapters
Network adapters are hardware devices that are used to communicate on networks. You can install and configure network adapters by completing the following steps:
1. Follow the manufacturer’s instructions. For example, you might need to use the software provided by the manufacturer to modify the Interrupt setting or the Port setting of the adapter.
2. If you are installing an internal network interface card (NIC), shut down the computer, unplug it, and install the adapter card in the appropriate slot on the computer. When you’ve finished, plug in and start the computer.
3. Windows 8.1 should detect the new adapter during startup. If you have a separate driver disc for the adapter, you should insert it now. Otherwise, you might be prompted to insert a driver disc.
4. If Windows 8.1 doesn’t detect the adapter automatically, follow the installation instructions in Chapter 8, “Managing hardware devices and drivers” of Windows 8.1 Administration Pocket Consultant: Essentials & Configuration by William R. Stanek (Microsoft Press, 2013).
5. If networking services aren’t installed on the system, install them as described in the next section.
Installing networking services and TCP/IP
If you’re installing TCP/IP after installing Windows 8.1, log on to the computer by using an account with administrator privileges, and then follow these steps:
1. In Control Panel, tap or click Network And Internet, and then tap or click Network And Sharing Center.
2. In Network And Sharing Center, under View Your Active Networks, tap or click the link for the network connection.
TIP
If the network connection you want to work with isn’t active, tap or click Connect To A Network. In Network Connections, press and hold or right-click the connection you want to work with, and then tap or click Properties.
3. In the Status dialog box, tap or click Properties. This displays a Properties dialog box for the connection with the Networking tab selected, as shown in Figure 9-3.
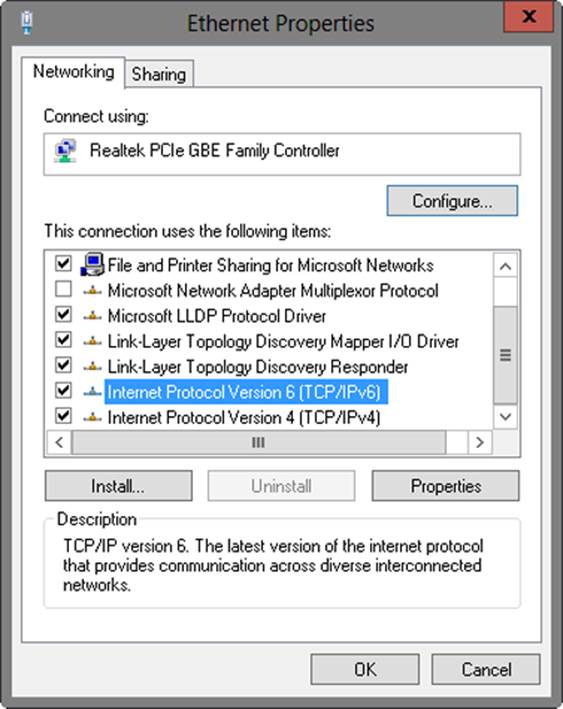
Figure 9-3. Use the Properties dialog box for a connection to install and configure TCP/IP.
4. If Internet Protocol Version 6 (TCP/IPv6), Internet Protocol Version 4 (TCP/IPv4), or both aren’t shown in the list of installed components, you need to install them. Tap or click Install, tap or click Protocol, and then tap or click Add. In the Select Network Protocol dialog box, select the protocol to install, and then tap or click OK. To install both TCP/IPv6 and TCP/IPv4, repeat this step.
5. In the Properties dialog box for the network connection, make sure that the following are selected, as appropriate: Internet Protocol Version 6 (TCP/IPv6), Internet Protocol Version 4 (TCP/IPv4), or both. Tap or click OK.
6. As necessary, follow the instructions in the next section for configuring network connections for the computer.
Configuring network connections
A network connection is created automatically if a computer has a network adapter and is connected to a network. If a computer has multiple network adapters and is connected to a network, a network connection is created for each adapter. If no network connection is available, you should connect the computer to the network or create a different type of connection, as explained in the Managing network connections section later in this chapter.
Computers use IP addresses to communicate over TCP/IP. Windows 8.1 provides the following ways to configure IP addressing:
§ Manually IP addresses that are assigned manually are called static IP addresses. Static IP addresses are fixed and don’t change unless you change them. You usually assign static IP addresses to Windows servers. When you do this, you need to configure additional information to help the server navigate the network.
§ Dynamically A DHCP server (if one is installed on the network) assigns dynamic IP addresses at startup, and the addresses might change over time. Dynamic IP addressing is the default configuration.
§ Alternatively (IPv4 only) When a computer is configured to use DHCPv4 and a DHCPv4 server is not available, Windows 8.1 assigns an alternate private IP address automatically. By default, the alternate IPv4 address is in the range 169.254.0.1 to 169.254.255.254, with a subnet mask of 255.255.0.0. You can also specify a user-configured alternate IPv4 address, which is particularly useful for laptop users.
Configuring static IP addresses
When you assign a static IP address, you need to provide the computer with the IP address you want to use, the subnet mask for this IP address, and, if necessary, the default gateway to use for internetwork communications and the IP addresses of DNS servers for name resolution. An IP address is a numeric identifier for a computer. IP addressing schemes vary according to how your network is configured, but they’re typically assigned based on a particular network segment.
IPv6 addresses and IPv4 addresses are very different, as discussed in the Working with TCP/IP and the Dual TCP/IP stack section earlier in this chapter. In IPv6, the first 64 bits represent the network ID, and the remaining 64 bits represent the network interface. In IPv4, a variable number of the initial bits represent the network ID, and the rest of the bits represent the host ID. For example, if you’re working with IPv4 and a computer on the network segment 10.0.10.0 with a subnet mask of 255.255.255.0, the first three octets identify the network. The network’s unique ID is 10.0.10.0. The address range you have available for computer hosts is 10.0.10.1 to 10.0.10.254. In this range, the address 10.0.10.255 is reserved for network broadcasts.
If you’re on a private network (meaning a network that is indirectly connected to the Internet), you should use private IPv4 addresses. Private network IPv4 addresses are summarized in Table 9-3.
Table 9-3. Private IPv4 network addressing
|
PRIVATE NETWORK ID |
SUBNET MASK |
USABLE IP ADDRESS RANGE |
BROADCAST ADDRESS |
|
10.0.0.0 |
255.0.0.0 |
10.0.0.0–10.255.255.254 |
10.255.255.255 |
|
172.16.0.0 |
255.240.0.0 |
172.16.0.0–172.31.255.254 |
172.31.255.255 |
|
192.168.0.0 |
255.255.0.0 |
192.168.0.0–192.168.255.254 |
192.168.255.255 |
All other IPv4 network addresses are public and must be leased or purchased. If the network is connected directly to the Internet and you’ve obtained a range of IPv4 addresses from your ISP, you can use the IPv4 addresses you’ve been assigned.
Using the Ping command to check an address
Before you assign a static IP address, you should make sure that the address isn’t already in use or reserved for use with DHCP. You can use the Ping command to find out whether an address is in use. Open a command prompt and enter ping, followed by the IP address you want to check.
To test the IPv4 address 10.0.10.12, you would use the following command:
ping 10.0.10.12
To test the IPv6 address FEC0::02BC:FF:BECB:FE4F:961D, you would use the following command:
ping FEC0::02BC:FF:BECB:FE4F:961D
If you receive a successful reply from the ping test, the IP address is in use and you should try another one. If the request times out for all four ping attempts, the IP address isn’t active on the network at this time and probably isn’t in use. However, a firewall could be blocking your ping request. Your company’s network administrator should also be able to confirm whether an IP address is in use.
Configuring a static IPv4 or IPv6 address
One LAN connection is available for each network adapter installed. These connections are created automatically. To configure static IP addresses for a particular connection, complete the following steps:
1. In Control Panel, tap or click Network And Internet, and then tap or click Network And Sharing Center.
2. In Network And Sharing Center, under View Your Active Networks, tap or click the link for the network connection.
3. In the Status dialog box for the network connection, tap or click Properties. This displays the Properties dialog box for the network connection.
4. Double-tap or double-click Internet Protocol Version 6 (TCP/IPv6) or Internet Protocol Version 4 (TCP/IPv4), depending on the type of IP address you are configuring.
5. For an IPv6 address, do the following:
o Tap or click Use The Following IPv6 Address, and then enter the IPv6 address in the IPv6 Address text box. The IPv6 address you assign to the computer must not be used anywhere else on the network.
o The Subnet Prefix Length ensures that the computer communicates over the network properly. Windows 8.1 should insert a default value for the subnet prefix in the Subnet Prefix Length text box. If the network doesn’t use variable-length subnetting, the default value should suffice. If the network does use variable-length subnets, you need to change this value as appropriate for your network.
6. For an IPv4 address, do the following:
o Tap or click Use The Following IP Address, and then enter the IPv4 address in the IP Address text box. The IPv4 address you assign to the computer must not be used anywhere else on the network.
o The Subnet Mask ensures that the computer communicates over the network properly. Windows 8.1 should insert a default value for the subnet mask into the Subnet Mask text box. If the network doesn’t use variable-length subnetting, the default value should suffice, but if it does use variable-length subnets, you need to change this value as appropriate for your network.
7. If the computer needs to access other TCP/IP networks, the Internet, or other subnets, you must specify a default gateway. Enter the IP address for the network’s default router in the Default Gateway text box.
8. DNS is needed for domain name resolution. Enter a preferred address and an alternate DNS server address in the text boxes provided.
9. When you’ve finished, tap or click OK twice, and then tap or click Close. Repeat this process for other network adapters and IP protocols you want to configure.
10.With IPv4 addressing, configure WINS as necessary, following the technique outlined in the Configuring WINS resolution section later in this chapter.
Configuring dynamic IP addresses and alternate IP addressing
Although static IP addresses can be used with workstations, most workstations use dynamic IP addressing, alternate IP addressing, or both. You configure dynamic and alternate addressing by completing the following steps:
1. In Control Panel, tap or click Network And Internet, and then tap or click Network And Sharing Center.
2. In Network And Sharing Center, under View Your Active Networks, tap or click the link for the network connection.
3. In the Status dialog box for the network connection, tap or click Properties. This displays the Properties dialog box for the network connection.
NOTE
In the Status dialog box for the network connection, one LAN connection is shown for each network adapter installed. These connections are created automatically. If you don’t find a LAN connection for an installed adapter, check the driver for the adapter. It might be installed incorrectly.
4. Double-tap or double-click Internet Protocol Version 6 (TCP/IPv6) or Internet Protocol Version 4 (TCP/IPv4), depending on the type of IP address you are configuring.
5. Select Obtain An IPv6 Address Automatically or Obtain An IP Address Automatically, as appropriate for the type of IP address you are configuring. If you want, select Obtain DNS Server Address Automatically or Use The Following DNS Server Addresses, and then enter a preferred and alternate DNS server address in the text boxes provided.
6. When you use dynamic IPv4 addressing with desktop computers, you should configure an automatic alternate address. To use this configuration, on the Alternate Configuration tab, be sure that Automatic Private IP Address is selected. Tap or click OK twice, tap or click Close, and then skip the remaining steps.
7. When you use dynamic IPv4 addressing with mobile computers, you usually want to configure the alternate address manually. To use this configuration, on the Alternate Configuration tab, select User Configured. Then, in the IP Address text box, enter the IP address you want to use. The IP address that you assign to the computer should be a private IP address, as shown earlier in Table 9-3, and it must not be in use anywhere else when the settings are applied.
8. With dynamic IPv4 addressing, complete the alternate configuration by entering a subnet mask, default gateway, and DNS and WINS settings. When you’ve finished, tap or click OK twice, and then tap or click Close.
NOTE
You’ll find more detailed information on configuring laptops in the Configuring networking for mobile devices section in Chapter 10.
Configuring multiple gateways
To provide fault tolerance in case of a router outage, you can configure computers running Windows 8.1 so that they use multiple default gateways. When multiple gateways are assigned, Windows 8.1 uses the gateway metric to determine which gateway is used and at what time. The gateway metric indicates the routing cost of using a gateway. The gateway with the lowest routing cost, or metric, is used first. If the computer can’t communicate with this gateway, Windows 8.1 tries to use the gateway with the next lowest metric.
The best way to configure multiple gateways depends on the configuration of your network. If computers use DHCP, you probably want to configure the additional gateways through settings on the DHCP server. If computers use static IP addresses, or you want to set gateways specifically, assign them by completing the following steps:
1. In Control Panel, tap or click Network And Internet, and then tap or click Network And Sharing Center.
2. In Network And Sharing Center, under View Your Active Networks, tap or click the link for the network connection.
3. In the Status dialog box for the network connection, tap or click Properties. This displays the Properties dialog box for the network connection.
4. Double-tap or double-click Internet Protocol Version 6 (TCP/IPv6) or Internet Protocol Version 4 (TCP/IPv4), depending on the type of IP address you are configuring.
5. Tap or click Advanced to open the Advanced TCP/IP Settings dialog box, as shown in Figure 9-4.
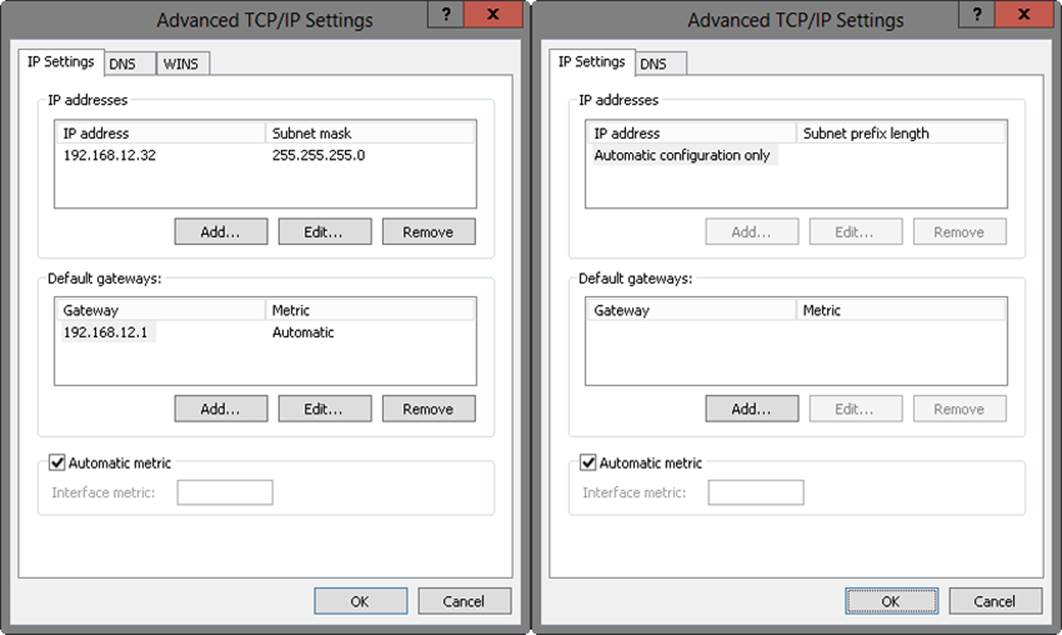
Figure 9-4. Use the Advanced TCP/IP Settings dialog box to configure multiple IP addresses and gateways (for IPv4 on the left, and IPv6 on the right).
6. The Default Gateways area shows the current gateways that have been manually configured (if any). You can enter additional default gateways as necessary. Tap or click Add, and then enter the gateway address in the Gateway text box.
7. By default, Windows 8.1 automatically assigns a metric to the gateway. You can also assign the metric manually. To do this, clear the Automatic Metric check box, and then enter a metric in the text box provided.
8. Tap or click Add, and then repeat steps 6 and 7 for each gateway you want to add.
9. Tap or click OK three times, and then tap or click Close.
Configuring DNS resolution
DNS is a host name resolution service that you can use to determine the IP address of a computer from its host name. This enables users to work with host names, such as http://www.msn.com or http://www.microsoft.com, rather than an IP address, such as 192.168.5.102 or 192.168.12.68. DNS is the primary name service for Windows 8.1 and the Internet.
As with gateways, the best way to configure DNS depends on the configuration of your network. If computers use DHCP, you’ll probably want to configure DNS through settings on the DHCP server. If computers use static IP addresses, or you want to specifically configure DNS for an individual user or system, you should configure DNS manually.
Basic DNS settings
You can configure basic DNS settings by completing the following steps:
1. In Control Panel, tap or click Network And Internet, and then tap or click Network And Sharing Center.
2. In Network And Sharing Center, under View Your Active Networks, tap or click the link for the network connection.
3. In the Status dialog box for the network connection, tap or click Properties. This displays the Properties dialog box for the network connection.
4. Double-tap or double-click Internet Protocol Version 6 (TCP/IPv6) or Internet Protocol Version 4 (TCP/IPv4), depending on the type of IP address for which you are configuring DNS.
5. If the computer is using DHCP and you want DHCP to specify the DNS server address, select Obtain DNS Server Address Automatically. Otherwise, select Use The Following DNS Server Addresses, and then enter a primary and an alternate DNS server address in the text boxes provided.
6. Tap or click OK twice, and then tap or click Close.
Advanced DNS settings
You configure advanced DNS settings by using the DNS tab of the Advanced TCP/IP Settings dialog box, as shown in Figure 9-5. You use the options on the DNS tab as follows:
§ DNS Server Addresses, In Order Of Use Use this area to specify the IP address of each DNS server that is used for domain name resolution. Tap or click Add if you want to add a server IP address to the list. Tap or click Remove to remove a selected server address from the list. Tap or click Edit to edit the selected entry. You can specify multiple servers for DNS resolution. Their priority is determined by the order. If the first server isn’t available to respond to a host name resolution request, the next DNS server in the list is accessed, and so on. To change the position of a server in the list, select it, and then use the up arrow or down arrow button.
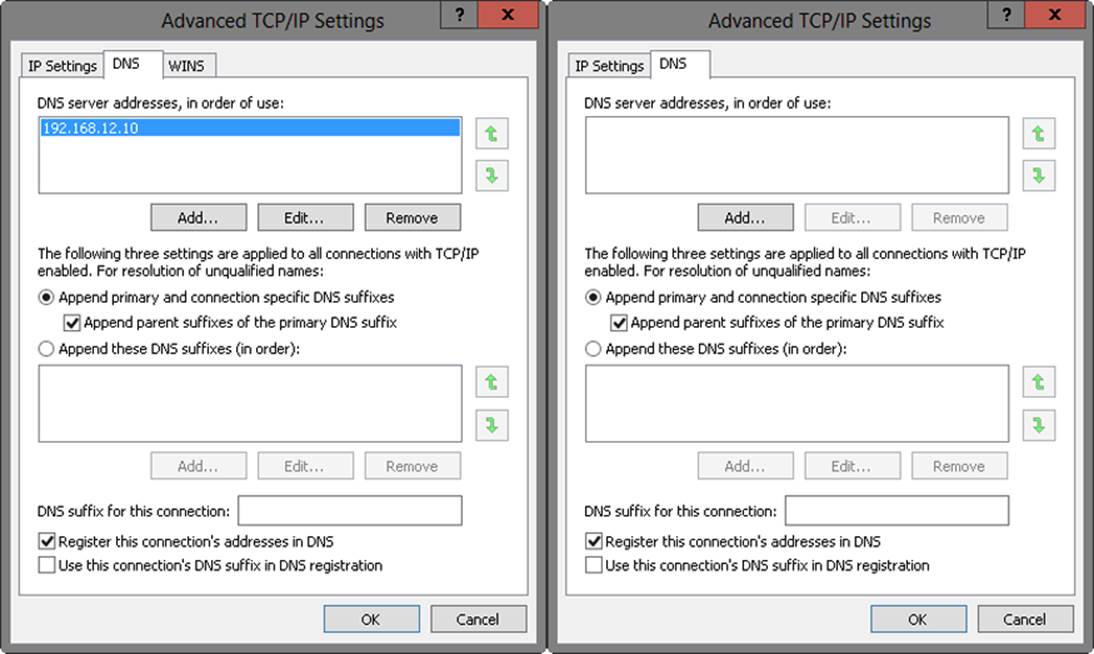
Figure 9-5. Use the DNS tab of the Advanced TCP/IP Settings dialog box to configure advanced DNS settings (for IPv4 on the left, and IPv6 on the right).
§ Append Primary And Connection Specific DNS Suffixes This option is typically selected by default. Use this option to resolve unqualified computer names in the primary domain. For example, if the computer name Gandolf is used, and the parent domain is microsoft.com, the computer name would resolve to gandolf.microsoft.com. If the fully qualified computer name doesn’t exist in the parent domain, the query fails. The parent domain used is the one set in the System Properties dialog box on the Computer Name tab. (To check the settings, tap or click System And Security in Control Panel, and then tap or click System.)
§ Append Parent Suffixes Of The Primary DNS Suffix This option is selected by default. Use this option to resolve unqualified computer names by using the parent/child domain hierarchy. If a query fails in the immediate parent domain, the suffix for the parent of the parent domain is used to try to resolve the query. This process continues until the top of the DNS domain hierarchy is reached. For example, if the computer name Gandolf is used in the dev.microsoft.com domain, DNS would attempt to resolve the computer name to gandolf.dev.microsoft.com. If this didn’t work, DNS would attempt to resolve the computer name to gandolf.microsoft.com.
§ Append These DNS Suffixes (In Order) Select this option to specify DNS suffixes to use for name resolution rather than resolving names through the parent domain. Tap or click Add if you want to add a domain suffix to the list. Tap or click Remove to remove a selected domain suffix from the list. Tap or click Edit to edit the selected entry. You can specify multiple domain suffixes, which are used in order. If the first suffix doesn’t resolve properly, DNS attempts to use the next suffix in the list. If this fails, the next suffix is used, and so on. To change the order of the domain suffixes, select the suffix, and then use the up arrow or down arrow button to change its position.
§ DNS Suffix For This Connection This option sets a specific DNS suffix for the connection that overrides DNS names already configured for this connection. However, you’ll usually set the DNS domain name by tapping or clicking System And Security in Control Panel, tapping or clicking System, and then tapping or clicking Change Settings. In the System Properties dialog box, tap or click Change on the Computer Name tab, and then tap or click More. You can now enter the primary DNS suffix for the computer in the text box provided. Tap or click OK three times to save your changes.
§ Register This Connection’s Addresses In DNS Use this option if you want all IP addresses for this connection to be registered in DNS under the computer’s fully qualified domain name. This option is selected by default.
Dynamic DNS updates are used in conjunction with DHCP to enable a client to update its A (Host Address) record if its IP address changes and to enable the DHCP server to update the PTR (Pointer) record for the client on the DNS server. DHCP servers can also be configured to update both the A and PTR records on the client’s behalf. Dynamic DNS updates are supported only by BIND 5.1 or later DNS servers, in addition to all current versions of Windows Server.
§ Use This Connection’s DNS Suffix In DNS Registration Select this option if you want all IP addresses for this connection to be registered in DNS under the parent domain.
Configuring WINS resolution
WINS is a name-resolution service that resolves computer names to IPv4 addresses. Using WINS, the computer name PC18, for example, could be resolved to an IP address that enables computers on a Microsoft network to find one another and transfer information. WINS is needed to support applications that use NetBIOS over TCP/IP, such as Microsoft Exchange Server 2003, the .NET command-line utilities, and network browsing for users in environments prior to Windows Vista and Windows Server 2008. If you don’t have NetBIOS applications on the network or infrastructure prior to Windows Vista or Windows Server 2008, you don’t need to use WINS.
You can also configure Windows 8.1–based computers to use the local file LMHOSTS to resolve NetBIOS computer names. However, LMHOSTS is consulted only if standard name resolution methods fail. In a properly configured network, these files are rarely used. Thus, the preferred method of NetBIOS computer-name resolution is WINS in conjunction with a WINS server.
As with gateways and DNS, the best way to configure WINS depends on the configuration of your network. If computers use DHCP, you’ll probably want to configure WINS through settings on the DHCP server. If computers use static IPv4 addresses, or you want to configure WINS specifically for an individual user or system, you should configure WINS manually.
You can manually configure WINS by completing the following steps:
1. Open the Advanced TCP/IP Settings dialog box, and then tap or click the WINS tab. You’ll find the WINS Addresses, In Order Of Use area, as shown in Figure 9-6.
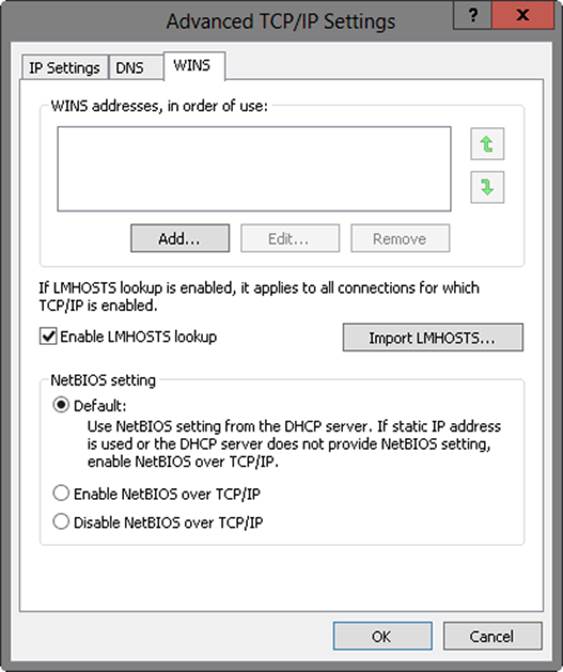
Figure 9-6. In IPv4, use the WINS tab of the Advanced TCP/IP Settings dialog box to configure WINS resolution for NetBIOS computer names.
2. In the WINS Addresses, In Order Of Use area, specify the IPv4 address of each WINS server that is used for NetBIOS name resolution. Tap or click Add if you want to add a server IPv4 address to the list. Tap or click Remove to remove a selected server from the list. Tap or click Edit to edit the selected entry.
3. You can specify multiple servers, which are used in order, for WINS resolution. If the first server isn’t available to respond to a NetBIOS name resolution request, the next WINS server in the list is accessed, and so on. To change the position of a server in the list, select it, and then use the up arrow or down arrow button.
4. To enable LMHOSTS lookups, select the Enable LMHOSTS Lookup check box. If you want the computer to use an existing LMHOSTS file defined somewhere on the network, retrieve this file by tapping or clicking Import LMHOSTS. You generally will use LMHOSTS only when other name resolution methods fail.
5. WINS name resolution requires NetBIOS Over TCP/IP services. Select one of the following options to configure WINS name resolution by using NetBIOS:
o If you use DHCP and dynamic addressing, you can get the NetBIOS setting from the DHCP server. Select Default: Use NetBIOS Setting From The DHCP Server.
o If you use a static IP address or the DHCP server does not provide NetBIOS settings, select Enable NetBIOS Over TCP/IP.
o If WINS and NetBIOS are not used on the network, select Disable NetBIOS Over TCP/IP. This eliminates the NetBIOS broadcasts that would otherwise be sent by the computer.
6. Tap or click OK three times, and then tap or click Close. As necessary, repeat this process for other network adapters.
TIP
LMHOSTS files are maintained locally on a computer-by-computer basis, which can eventually make them unreliable. Rather than relying on LMHOSTS, be sure that your DNS and WINS servers are configured properly and are accessible to the network for centralized administration of name resolution services.
Managing network connections
Network connections enable computers to access resources on the network and the Internet. One network connection is created automatically for each network adapter installed on a computer. This section examines techniques that you can use to manage these connections.
Enabling and disabling network connections
Network connections are created and enabled automatically. If you want to disable a connection so that it cannot be used, complete the following steps:
1. In Control Panel, tap or click Network And Internet, and then tap or click Network And Sharing Center.
2. In Network And Sharing Center, in the left pane, tap or click Change Adapter Settings.
3. In Network Connections, press and hold or right-click the connection, and then tap or click Disable.
4. Later, if you want to enable the connection, press and hold or right-click the connection, and then tap or click Enable.
If you want to disconnect from a network or start another connection, complete the following steps:
1. In Control Panel, tap or click Network And Internet, and then tap or click Network And Sharing Center.
2. In Network And Sharing Center, in the left pane, tap or click Change Adapter Settings.
3. In Network Connections, press and hold or right-click the connection, and then tap or click Disconnect. Typically, only remote access connections have a Disconnect option.
4. Later, if you want to activate the connection, press and hold or right-click the connection in Network Connections, and then tap or click Connect.
Checking the status, speed, and activity for network connections
To check the status of a network connection, follow these steps:
1. In Control Panel, tap or click Network And Internet, and then tap or click Network And Sharing Center.
2. In Network And Sharing Center, under View Your Active Networks, tap or click the link for the network connection.
3. This displays the Status dialog box for the network connection. If the connection is disabled or the media is unplugged, you won’t be able to access this dialog box. Enable the connection or connect the network cable to resolve the problem, and then try to display the Status dialog box again.
The General tab of the Status dialog box for the network connection, as shown in Figure 9-7, provides useful information about the following:
§ IPv4 Connectivity The current IPv4 connection state and type. The status typically appears as Local when you are connected to an internal network, Internet when a computer can access the Internet, or No Internet Access when not connected to a network.
§ IPv6 Connectivity The current IPv6 connection state and type. The status typically appears as Local when you are connected to an internal network, Internet when a computer can access the Internet, or No Internet Access when not connected to a network.
§ Media State The state of the media. Because the Status dialog box is available only when the connection is enabled, this usually appears as Enabled.
§ Duration The amount of time the connection has been established. If the duration is fairly short, the user either recently connected to the network or the connection was recently reset.
§ Speed The speed of the connection. This should read 10.0 Mbps for 10–megabits-per-second (Mbps) connections, 100.0 Mbps for 100-Mbps connections, and 1.0 Gbps for 1–gigabit-per-second (Gbps) connections. An incorrect setting can affect the computer’s performance.
§ Bytes The number of bytes sent and the number received by the connection. As the computer sends or receives packets, you’ll notice the computer icons indicate the flow of traffic.

Figure 9-7. The General tab of the Status dialog box for the selected network connection provides access to summary information regarding connections, properties, and support.
Viewing network configuration information
In Windows 8.1, you can view the current configuration for network adapters in several ways. To view configuration settings by using the Status dialog box, follow these steps:
1. In Control Panel, tap or click Network And Internet, and then tap or click Network And Sharing Center.
2. In Network And Sharing Center, in the left pane, tap or click Change Adapter Settings.
3. In Network Connections, double-tap or double-click the connection. This displays the Status dialog box for the network connection. If the connection is disabled or the media is unplugged, you won’t be able to access this dialog box. Enable the connection or connect the network cable to resolve the problem, and then try to display the Status dialog box again.
4. Tap or click Details to view detailed information about the IP address configuration, including the following:
o Physical Address The machine or media access control (MAC) address of the network adapter. This address is unique for each network adapter.
o IPv4 Address The IPv4 address assigned for IPv4 networking.
o IPv4 Subnet Mask The subnet mask used for IPv4 networking.
o IPv4 Default Gateway The IPv4 address of the default gateway used for IPv4 networking.
o IPv4 DNS Servers The IP addresses for DNS servers used with IPv4 networking.
o IPv4 WINS Server The IP addresses of the WINS server used with IPv4 networking.
o IPv4 DHCP Server The IP address of the DHCPv4 server from which the current lease was obtained (DHCPv4 only).
o Lease Obtained A date and time stamp for when the DHCPv4 lease was obtained (DHCPv4 only).
o Lease Expires A date and time stamp for when the DHCPv4 lease expires (DHCPv4 only).
You can also use the Ipconfig command to view advanced configuration settings by following these steps:
1. Open a command prompt. One way to do this is to enter cmd in the Apps Search box, and then press Enter.
2. At the command line, enter ipconfig /all to receive detailed configuration information for all network adapters configured on the computer.
NOTE
The command prompt is started in standard user mode. This is not an elevated command prompt.
Renaming network connections
Windows 8.1 initially assigns default names for network connections. In Network Connections, you can rename a connection by pressing and holding or right-clicking the connection, tapping or clicking Rename, and then entering a new connection name. If a computer has multiple network connections, proper naming can help you and others better understand the uses of a particular connection. Access Network Connections by tapping or clicking Change Adapter Settings in Network And Sharing Center.
Troubleshooting and testing network settings
Windows 8.1 includes many tools for troubleshooting and testing TCP/IP connectivity. The following sections look at automated diagnostics, basic tests that you should perform whenever you install or modify a computer’s network settings, and techniques for resolving difficult networking problems involving DHCP and DNS. The final section shows you how to perform detailed network diagnostics testing.
Diagnosing and resolving network connection problems
Occasionally, network cables can become unplugged or the network adapter might experience a problem that temporarily prevents it from working. After you plug the cable back in or solve the adapter problem, the connection should automatically reconnect. You can diagnose network connection problems by pressing and holding or right-clicking the Network notification icon on the taskbar and tapping or clicking Troubleshoot Problems.
Windows Network Diagnostics then tries to identify the problem. Another way to start Windows Network Diagnostics is to press and hold or right-click the connection in Network Connections, and then tap or click Diagnose.
As shown in Figure 9-8, a list of possible solutions is provided if identifiable configuration problems are detected. Some solutions provide automated fixes that can be executed by tapping or clicking the solution. Other solutions require manual fixes, such as resetting a network router or a broadband modem. If your actions don’t fix the problem, refer to other appropriate parts of this troubleshooting section.
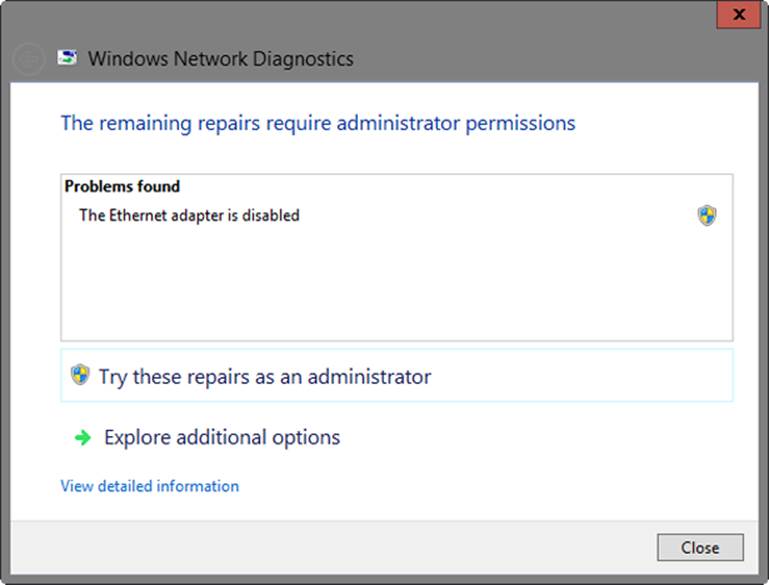
Figure 9-8. Resolve the problem by making a selection or performing a required action.
Diagnosing and resolving Internet connection problems
Because services, protocols, and configuration settings have so many interdependencies, troubleshooting network problems can be difficult. Fortunately, Windows 8.1 includes a powerful network diagnostics tool for pinpointing problems that relate to the following:
§ General network connectivity problems
§ Internet service settings for email, newsgroups, and proxies
§ Settings for modems, network clients, and network adapters
§ DNS, DHCP, and WINS configuration
§ Default gateways and IP addresses
In Network And Sharing Center, you can diagnose connection problems by tapping or clicking Troubleshoot Problems, and then tapping or clicking a troubleshooter to run, such as Network Adapter, Incoming Connections, or Internet Connection.
The troubleshooter then tries to identify the problem. If identifiable configuration problems exist, a list of possible solutions is provided. Some solutions provide automated fixes that can be executed by tapping or clicking the solution. Other solutions require manual fixes, such as resetting a network router or a broadband modem. If your actions don’t fix the problem, refer to other appropriate parts of this troubleshooting section.
Performing basic network tests
Whenever you install a new computer or make configuration changes to a computer’s network settings, you should test the configuration. The most basic TCP/IP test is to use the Ping command to test the computer’s connection to the network. To use it, enter ping <host> at the command prompt, where <host> is either the computer name or the IP address of the host computer you’re trying to reach.
With Windows 8.1, you can use the Ping command in the following ways to test the configuration:
§ Try to ping IP addresses If the computer is configured correctly and the host you’re trying to reach is accessible to the network, Ping should receive a reply, if pinging is allowed by the computer’s firewall. If Ping can’t reach the host or is blocked by a firewall, Ping times out.
§ On domains that use WINS, try to ping NetBIOS computer names If NetBIOS computer names are resolved correctly by Ping, the NetBIOS facilities, such as WINS, are correctly configured for the computer.
§ On domains that use DNS, try to ping DNS host names If fully qualified DNS host names are resolved correctly by Ping, DNS name resolution is configured properly.
You might also want to test network browsing for the computer. If the computer is a member of a Windows 8.1 domain and computer browsing is enabled throughout the domain, log on to the computer and then use File Explorer or Network Explorer to browse other computers in the domain. Afterward, log on to a different computer in the domain and try to browse the computer you just configured. These tests tell you whether DNS resolution is being handled properly in the local environment. If you can’t browse, check the configuration of the DNS services and protocols.
NOTE
REAL WORLD Access to network resources in Network Explorer is dependent on the Computer Browser service and the network discovery settings. The Computer Browser service is responsible for maintaining a list of computers on a network. If the service is stopped or isn’t working properly, a computer won’t view available resources in Network Explorer. You can check the status of the Computer Browser service in Computer Management. Expand Services And Applications, and then select Services in the left pane. The status of the Computer Browser service should be Started. If the status is blank, the service isn’t running and should be started.
In some cases, the Computer Browser service might be running as usual, but there might not be an updated list of resources in Network Explorer. This can happen because the service performs periodic updates of the resource list rather than checking continuously for updates. If a resource you want to use isn’t listed, you can wait for it to become available (which should take less than 15 minutes in most cases), or you can connect to the resource directly by using the Universal Naming Convention (UNC) name or IP address of the resource, as discussed in the Using and accessing shared resources section in Chapter 7.
In some cases, discovering and sharing might be set to block network discovery. You need to enable network discovery to resolve this by following these steps:
1. In Control Panel, tap or click View Network Status And Tasks under the Network And Internet heading.
2. In Network And Sharing Center, in the left pane, tap or click Change Advanced Sharing Settings.
3. You’ll then view options for configuring the computer’s sharing and network discovery settings for each network profile. Manage the settings for each profile, as appropriate. For example, if network discovery is disabled for a profile and should be enabled, tap or click the related Turn On Network Discovery option.
4. Tap or click Save Changes.
Resolving IP addressing problems
The current IP address settings of a computer can be obtained as described in the Viewing network configuration information section earlier in this chapter. If a computer is having problems accessing network resources or communicating with other computers, an IP addressing problem might exist. Take a close look at the IP address currently assigned, in addition to other IP address settings, and use the following pointers to help in your troubleshooting:
§ If the IPv4 address currently assigned to the computer is in the range 169.254.0.1 to 169.254.255.254, the computer is using Automatic Private IP Addressing (APIPA). An automatic private IP address is assigned to a computer when it is configured to use DHCP, and its DHCP client cannot reach a DHCP server. When using APIPA, Windows 8.1 will periodically check for a DHCP server to become available. If a computer doesn’t eventually obtain a dynamic IP address, this usually means the network connection has a problem. Check the network cable and, if necessary, trace the cable back to the switch or hub to which it is connected. You also should check the status of the DHCP server to verify that it’s running.
§ If the IPv4 address and the subnet mask of the computer are currently set as 0.0.0.0, the network is either disconnected or someone attempted to use a static IP address that duplicated another IP address already in use on the network. In this case, you should access Network Connections and determine the state of the connection. If the connection is disabled or disconnected, this status should be shown. Press and hold or right-click the connection, and then tap or click Enable or Repair. If the connection is already enabled, you need to modify the IP address settings for the connection.
§ If the IP address is dynamically assigned, check to be sure that another computer on the network isn’t using the same IP address. You can do this by disconnecting the network cable for the computer that you are troubleshooting and then pinging the IP address in question from another computer. If you receive a response from the Ping command, you know that another computer is using the IP address. This computer probably has an improper static IP address or a reservation that isn’t set up properly.
§ If the IP address appears to be set correctly, check the network mask, gateway, DNS, and WINS settings by comparing the network settings of the computer you are troubleshooting with those of a computer that is known to have a good network configuration. One of the biggest problem areas is the network mask. When subnetting is used, the network mask for one area of the network might be very similar to that of another area. For example, the network mask in one IPv4 area might be 255.255.255.240, and it might be 255.255.255.248 in another IPv4 area.
Releasing and renewing DHCP settings
DHCP servers can assign many network configuration settings automatically. These include IP addresses, default gateways, primary and secondary DNS servers, primary and secondary WINS servers, and more. When computers use dynamic addressing, they are assigned a lease on a specific IP address. This lease is good for a specific time period and must be renewed periodically. When the lease needs to be renewed, the computer contacts the DHCP server that provided the lease. If the server is available, the lease is renewed and a new lease period is granted. You can also renew leases manually on individual computers or by using the DHCP server itself.
Problems can occur during the lease assignment and renewal process that prevent network communications. If the server isn’t available and cannot be reached before a lease expires, the IP address can become invalid. If this happens, the computer might use the alternate IP address configuration to set an alternate address, which in most cases has settings that are inappropriate and prevent proper communications. To resolve this problem, you need to release and then renew the DHCP lease.
Another type of problem occurs when users move around to various offices and subnets within an organization. In being moved from location to location, their computers might obtain DHCP settings from the wrong server. When the users return to their offices, the computers might seem sluggish or perform incorrectly due to the settings assigned by the DHCP server at another location. If this happens, you need to release and then renew the DHCP lease.
You can release and renew DHCP leases by completing the following tasks:
1. In Network And Sharing Center, in the left pane, tap or click Change Adapter Settings.
2. In Network Connections, press and hold or right-click the connection with which you want to work, and then tap or click Diagnose.
3. After Windows Network Diagnostics tries to identify the problem, a list of possible solutions is provided. If the computer has one or more dynamically assigned IP addresses, one of the solutions should be Automatically Get New IP Settings. Tap or click this option.
You can also follow these steps to use the Ipconfig command to release and renew settings:
1. Open an elevated command prompt. One way to do this is to enter cmd in the Apps Search box, press and hold or right-click Command Prompt on the Apps screen, and then tap or click Run As Administrator.
2. To release the current settings for all network adapters, enter ipconfig /release at the command line. Then renew the lease by entering ipconfig /renew.
3. To only renew a DHCP lease for all network adapters, enter ipconfig /renew at the command line.
4. You can check the updated settings by entering ipconfig /all at the command line.
NOTE
REAL WORLD If you don’t release the old DHCP settings before trying to renew the DHCP settings, the computer will try to renew the settings on the network to which it was last connected. If the computer is on a new network, the computer might not be able to establish a connection to the server or device that assigned the DHCP settings previously.
If a computer has multiple network adapters and you want to work with only one or a subset of the adapters, you can do this by specifying all or part of the connection name after the ipconfig /renew or ipconfig /release command. Use the asterisk as a wildcard character to match any characters in a connection’s name. For example, if you want to renew the lease for all connections with names starting with Loc, you can enter the command ipconfig /renew Loc*. If you want to release the settings for all connections containing the word Network, you can enter the command ipconfig /release *Network*.
Registering and flushing DNS
The DNS resolver cache maintains a history of DNS lookups that have been performed when a user accesses network resources by using TCP/IP. This cache contains forward lookups, which provide host-name-to-IP-address resolution, and reverse lookups, which provide IP-address-to-host-name resolution. After a DNS entry is stored in the resolver cache for a particular DNS host, the local computer no longer has to query external servers for DNS information on that host. This enables the computer to resolve DNS requests locally, which provides a quicker response.
The period of time in which entries are stored in the resolver cache depends on the Time to Live (TTL) value assigned to the record by the originating server. To view current records and find the remaining TTL value for each record, in an elevated command prompt, enter ipconfig /displaydns. These values are given as the number of seconds that a particular record can remain in the cache before it expires. These values are continually being counted down by the local computer. When the TTL value reaches 0, the record expires and is removed from the resolver cache.
Occasionally, you’ll find that the resolver cache needs to be cleared to remove old entries and enable computers to check for updated DNS entries before the usual expiration and purging process takes place. Typically, this happens because server IP addresses have changed, and the current entries in the resolver cache point to the old addresses rather than the new ones. Sometimes the resolver cache itself can become out of sync, particularly when DHCP has been misconfigured.
NOTE
REAL WORLD Skilled administrators know that several weeks in advance of the actual change, they should start to decrease the TTL values for DNS records that are going to be changed. Typically, this means reducing the TTL from a number of days (or weeks) to a number of hours, which allows for quicker propagation of the changes to computers that have cached the related DNS records. After the change is complete, administrators should restore the original TTL value to reduce renewal requests.
In most cases, you can resolve problems with the DNS resolver cache by flushing the cache or reregistering DNS. When you flush the resolver cache, all DNS entries are cleared out of the cache and new entries are not created until the next time the computer performs a DNS lookup on a particular host or IP address. When you reregister DNS, Windows 8.1 attempts to refresh all current DHCP leases and then performs a lookup on each DNS entry in the resolver cache. By looking up each host or IP address again, the computer renews and reregisters the entries in the resolver cache. You’ll generally want to flush the cache completely and enable the computer to perform lookups as needed. Reregister DNS only when you suspect that there are problems with DHCP and the DNS resolver cache.
You can use the Ipconfig command to flush and reregister entries in the DNS resolver cache by following these steps:
1. Open an elevated command prompt. One way to do this is to enter cmd in the Apps Search box, press and hold or right-click Command Prompt on the Apps screen, and then tap or click Run As Administrator.
2. To clear out the resolver cache, enter ipconfig /flushdns at the command line.
3. To renew DHCP leases and reregister DNS entries, enter ipconfig /registerdns at the command line.
4. When the tasks are complete, you can check your work by entering ipconfig /displaydns at the command line.
All materials on the site are licensed Creative Commons Attribution-Sharealike 3.0 Unported CC BY-SA 3.0 & GNU Free Documentation License (GFDL)
If you are the copyright holder of any material contained on our site and intend to remove it, please contact our site administrator for approval.
© 2016-2026 All site design rights belong to S.Y.A.