Using Windows 8.1: Return of the Start Button (2014)
Chapter 6. Common Tasks
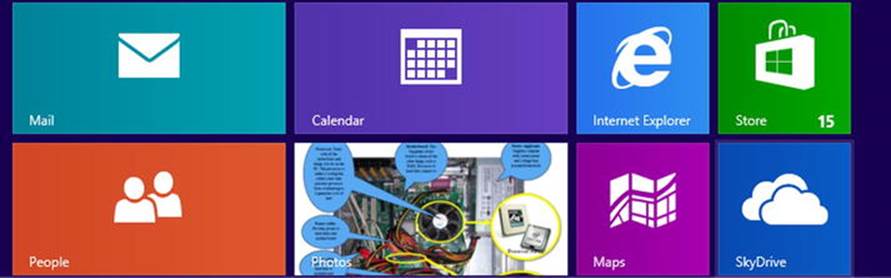
Finding Applications
Most common applications can be found on the Start screen.
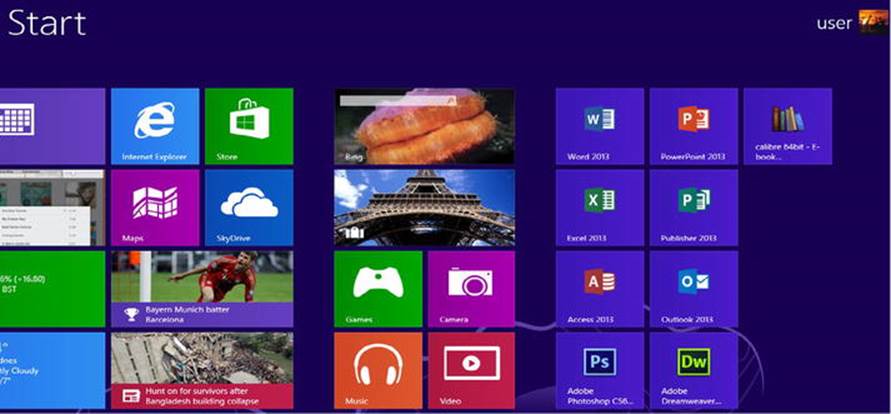
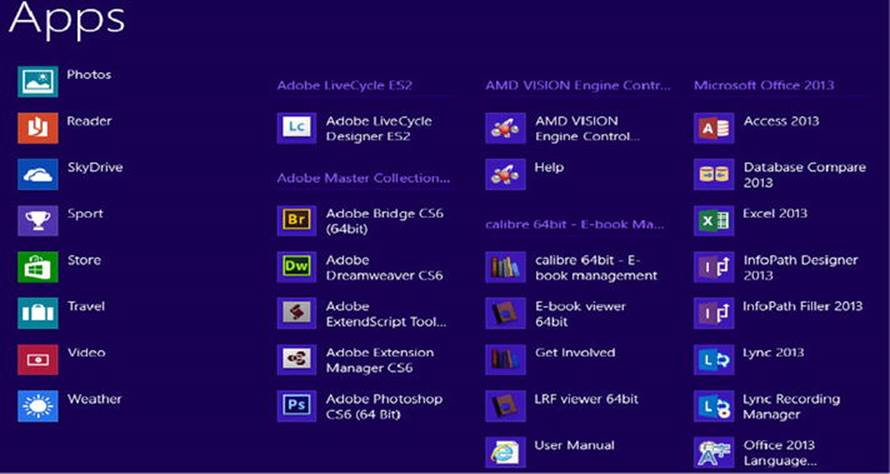
Move your mouse to the very bottom of the screen until the downward pointing arrow appears, then click on it to reveal all the installed applications on your computer.

A quick way to find applications is to activate the Charms Bar by moving your mouse to the top right-hand corner of the screen. Then, in the bar that appears, click Search.
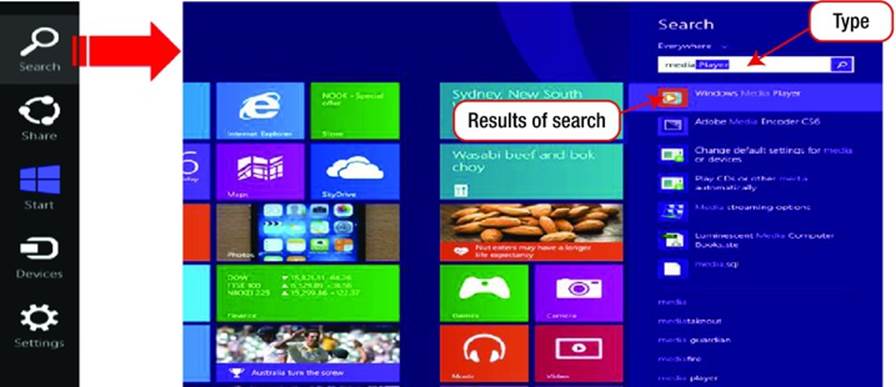
You can search different types of things on your computer; for example, applications such as Word or Media Player, Disk Defragment, or Windows Update. You can also search for more specific things, such as documents, letters, photos, and so on by clicking the dropdown box that says Everything and changing it to Settings.

Finding Files
There are a number of different ways you can find your files in Windows 8. You can use the search feature or you can browse through your files on the desktop.
Searching for Files
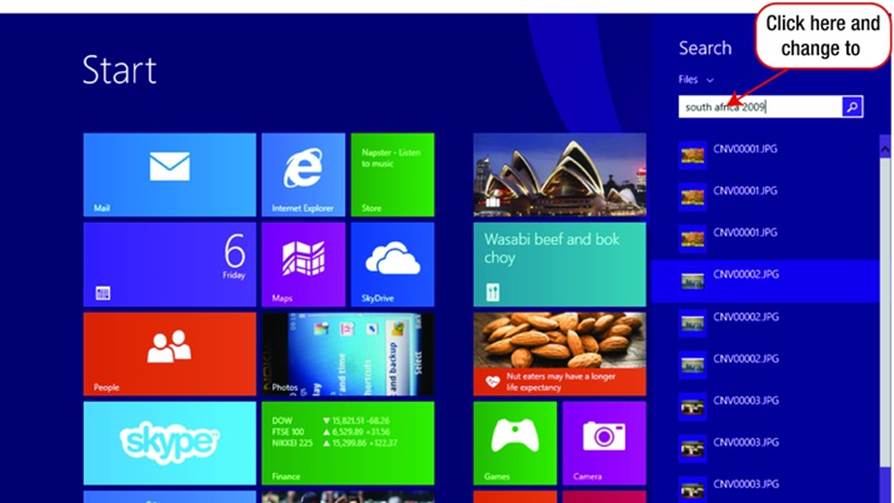
On your Start screen, type in the name of the file you are looking for. Windows will return search results down the right-hand side.
Files in Desktop
You can also find files when you are on your desktop using File Explorer. To open File Explorer, click the icon on the bottom left of the following screen.
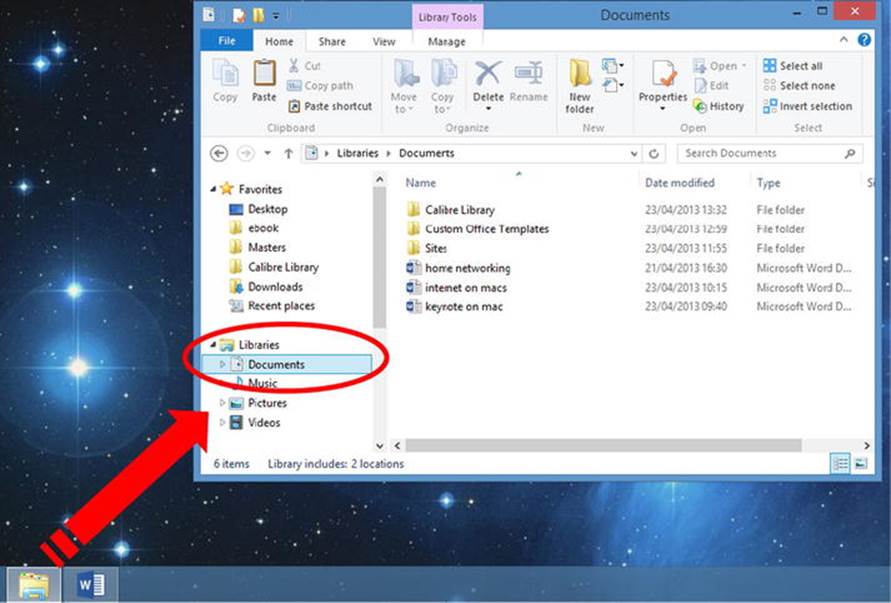
Notice the Libraries folder in the window that appears (circled in the lower left-hand side). Your libraries will be grouped into subfolders: Documents, Music, Pictures, and Videos. It's good practice to save your files in the appropriate folders. For example, Word documents in the Documents folder, pictures and photos in the Pictures folder, etc.
Quick Search the Internet
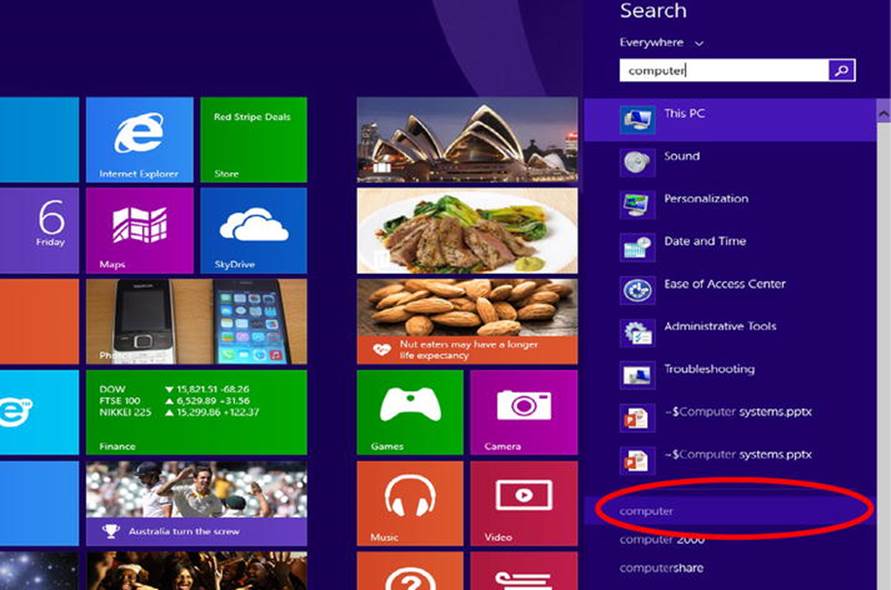
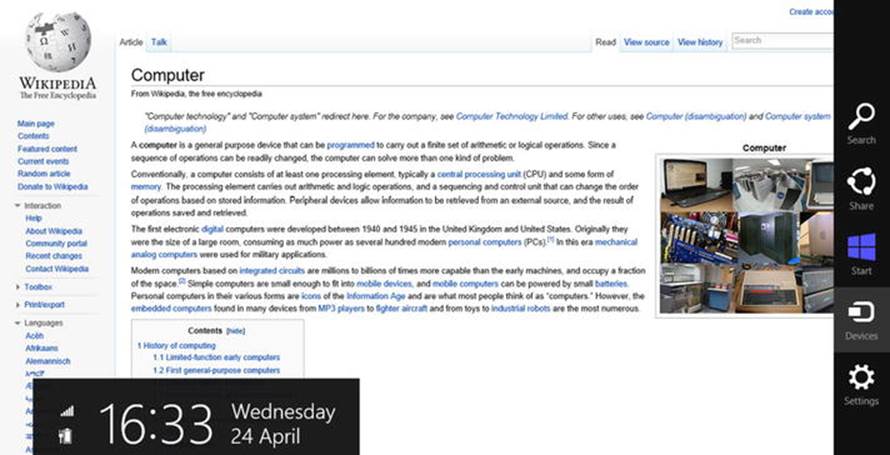
You can even use the search tool on the Charms Bar to search using the Bing search engine. For example, if I wanted to find websites and images about computers, I would type "computer" into the search box. At the bottom right of the following screen you will see some suggested web searches. Click on the one that closely matches your search query.
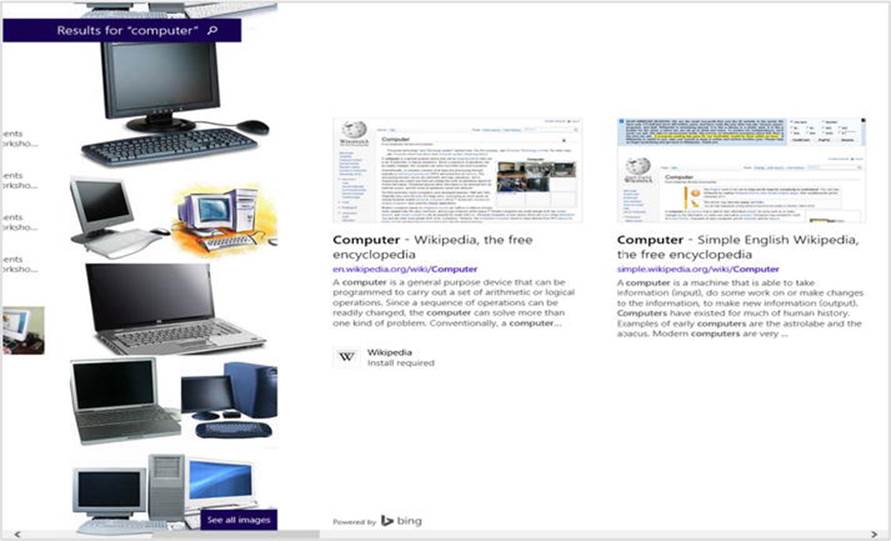
If you scroll across your screen, you will see a list of images and websites for your keyword search.
This makes using Windows 8 on a touch screen easier.
Burning CD/DVDs
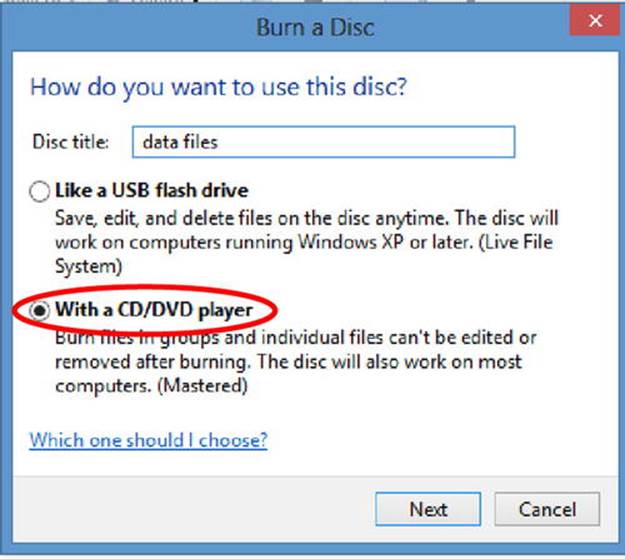
Insert a blank DVD or CD and select "With a CD/DVD player."
Once you have set up your disk, drag the files and folders you want to burn to the disk to the DVD drive in your File Explorer window.
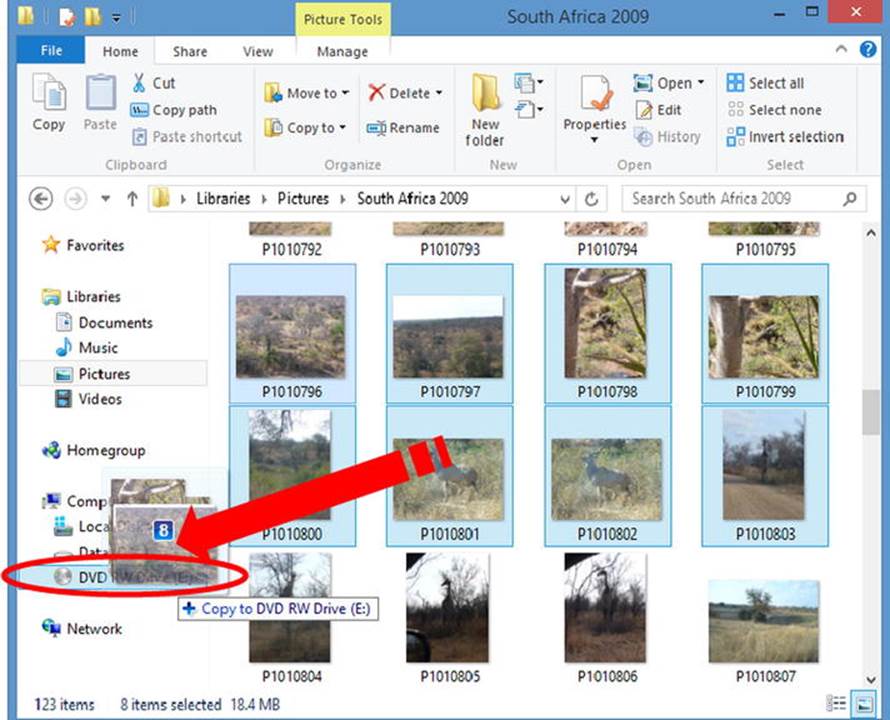
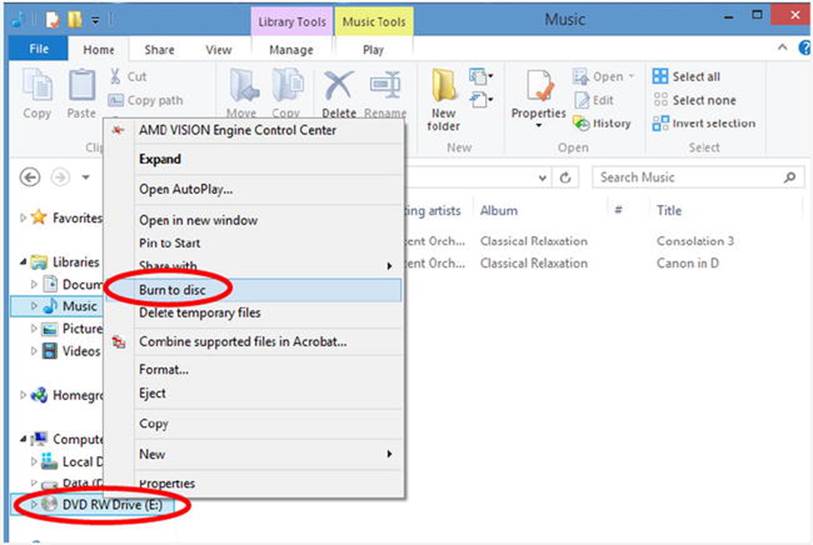
To burn the data to the disk, right click on the DVD drive in the File Explorer window and select "Burn to disc" from the menu.
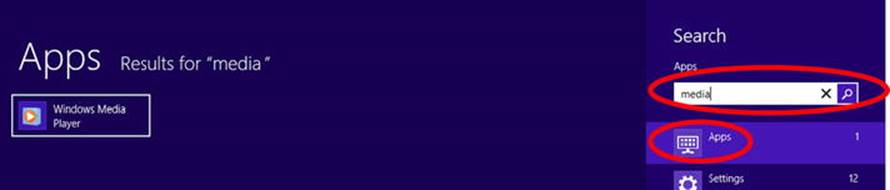
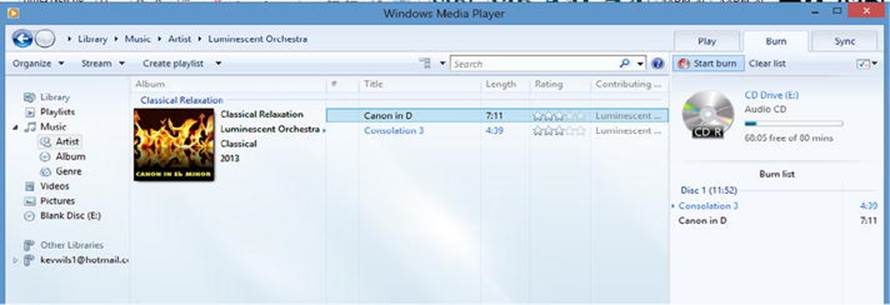
Burning Audio CDs
Burning audio CDs can be done from media player. From the Charms Bar go to Search and type "media."
Once in Media Player click on the Burn tab. You can now click and drag tracks to the Burn tab to create a playlist.
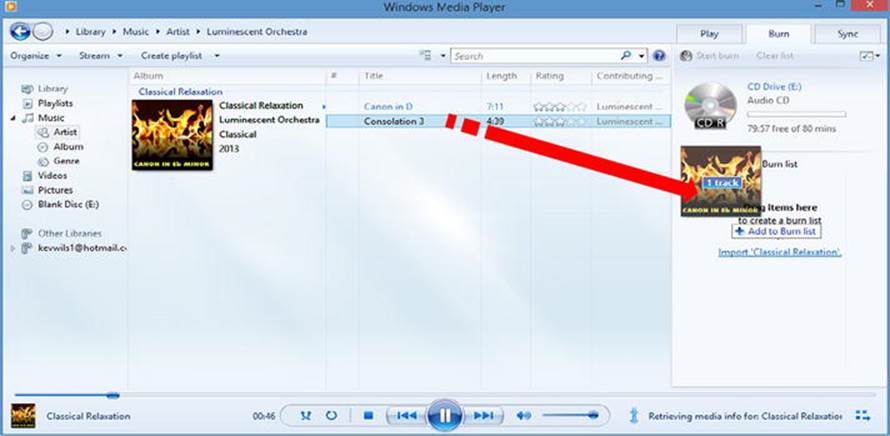
Once your disk is full or you have the number of tracks you want, click Start Burn to create your CD.
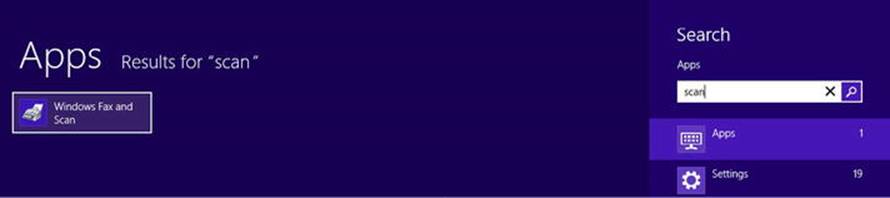
Scanning Documents
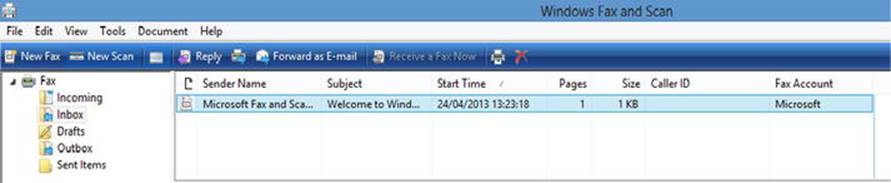
By default Windows uses Windows Fax and Scan to scan documents. There are other apps available that are bundled with scanners and available for purchase, but for simplicity I am going to use Windows Fax and Scan. Activate the Charms Bar, go to Search, and type "scan."
Click Windows Fax and Scan, and you should see the main screen.
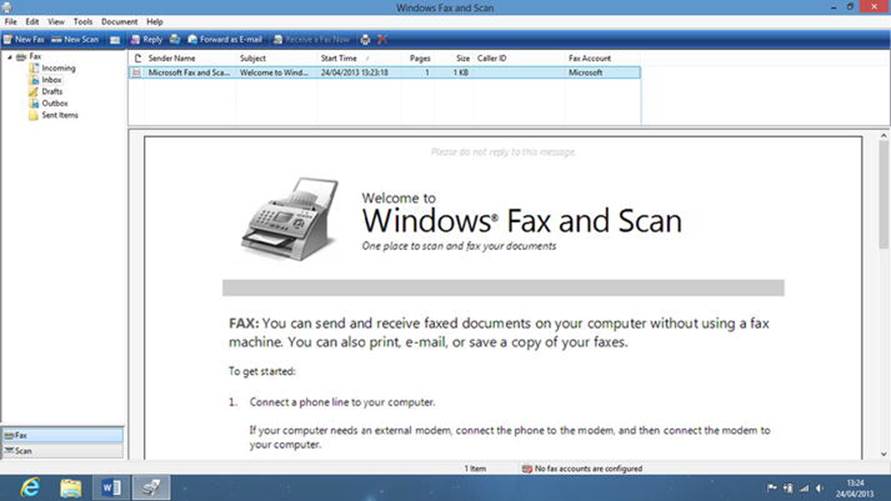
Plug your scanner in. If this is the first time, Windows 8 will try to automatically install it.
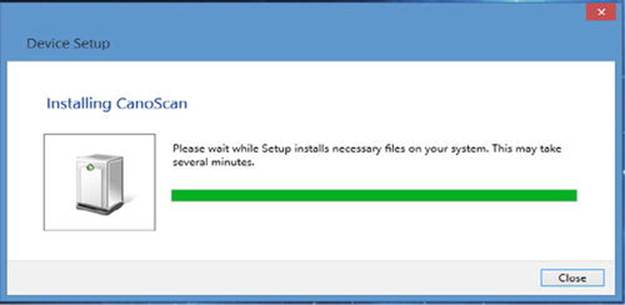
If it fails to install, run the software that comes with the scanner; see the manufacturer's website for more information. To scan a document, click New Scan.
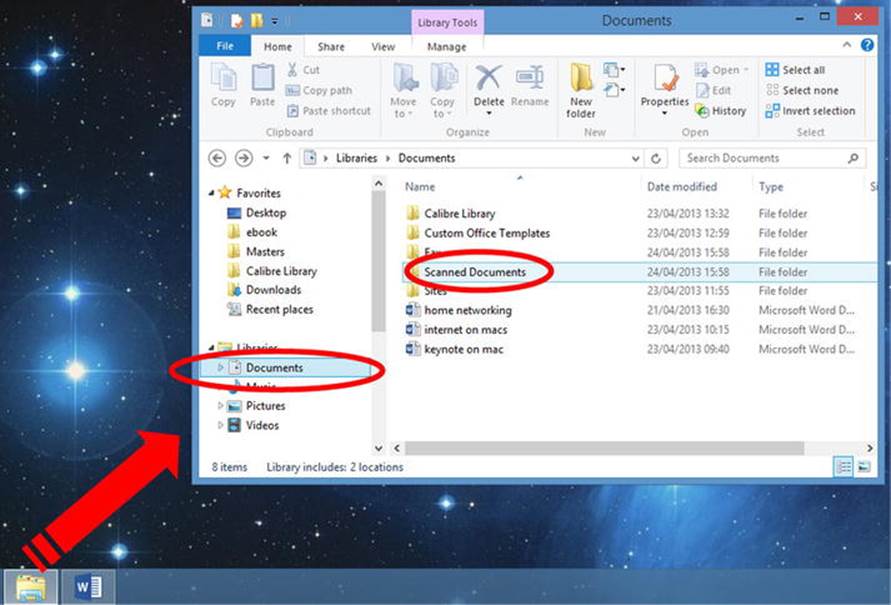
You will find all your scans in your Scanned Documents folder in your Documents library. This can be accessed from your desktop.
Printing Documents
There is a difference between printing from Metro apps and Windows 8 applications. Let's review both now.
Printing in Windows 8 Metro
Printing from Windows 8 Metro apps are a little different than Windows 8, but the process works fine once you get used to it. From within the application you want to print from (in this example I want to print a web page from Internet Explorer), activate the Charms Bar by moving your mouse pointer to the top right corner of the screen and select Devices.
Select your printer from the list. Click on the name of the printer that you wish to use. A settings screen for your printer appears, where you can change the number of copies, print orientation, color mode, and other settings.

Click on the Print button to print.
Printing in Windows 8
Printing from desktop Windows 8 applications, such as Word, works the same as it does in previous versions of Windows.
File -> Print

Uploading Files from Digital Cameras
Plug in your camera using the USB cable. As soon as you plug in for the first time, a message will appear on the top right of the screen asking you what to do with the device you have just plugged in. Tap or click it.
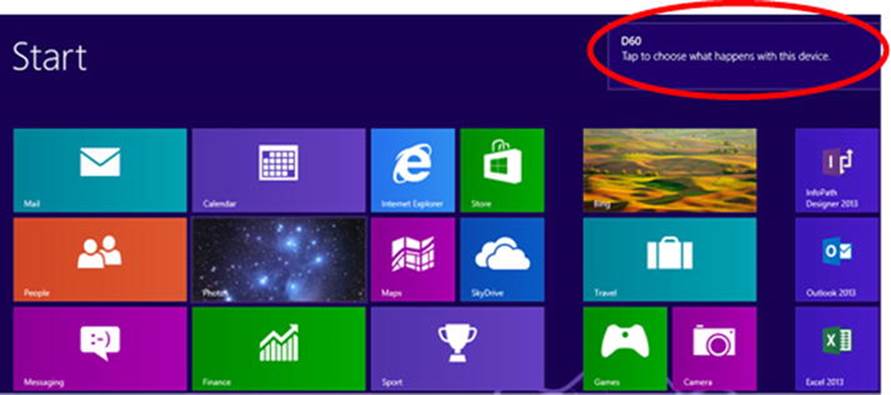
Once you click on it, click "Import photos and videos."

![]() Note You will only have to do this the first time you plug your camera into your computer. When you plug your camera in again you will go straight to the photo app.
Note You will only have to do this the first time you plug your camera into your computer. When you plug your camera in again you will go straight to the photo app.
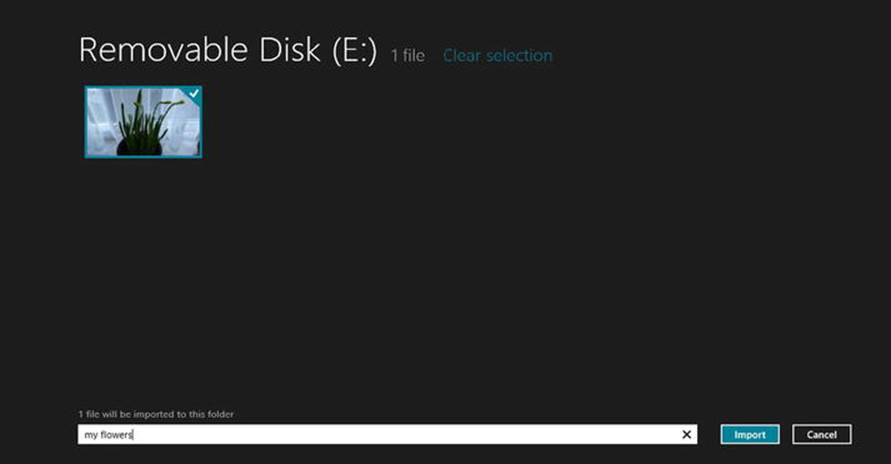
Select the photos you want by clicking on them, then type in the name of the album in which you want to group your photos. This could be Wedding or Birthday. Then click Import.
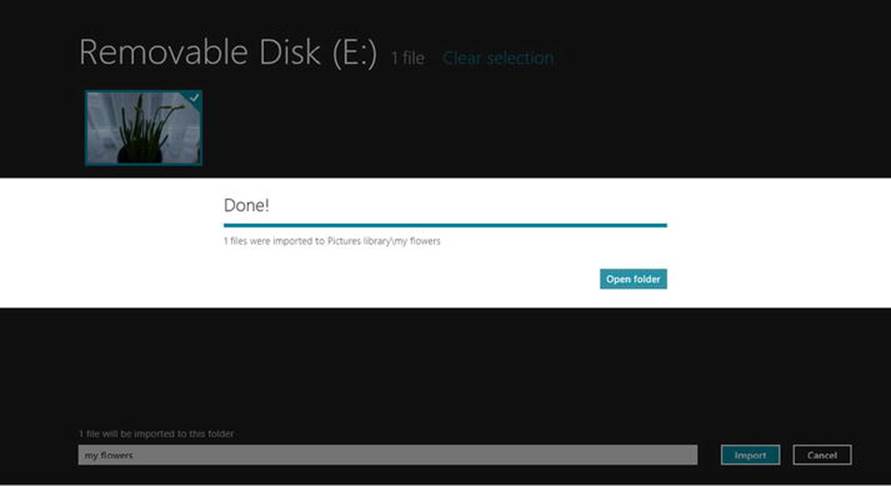
Once you are done importing, click Open Folder. Here you will be able to see the photos you just imported.
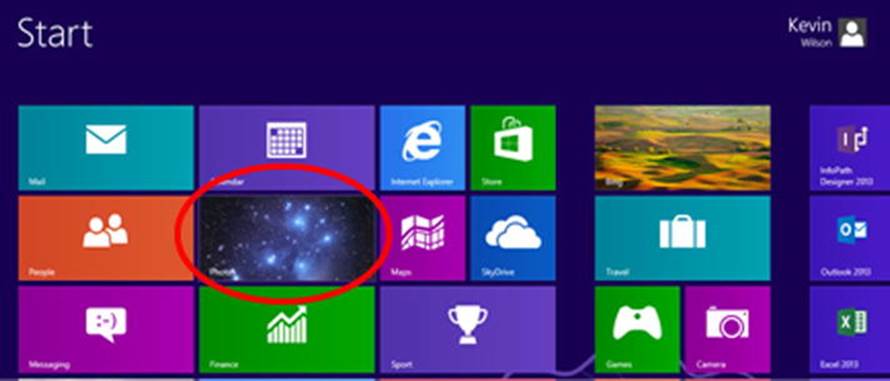
To access your photos at any time, click Photos app on the Start screen.
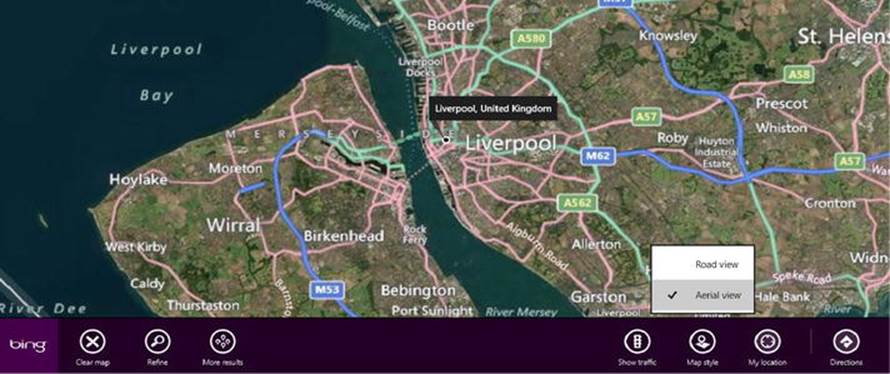
Maps
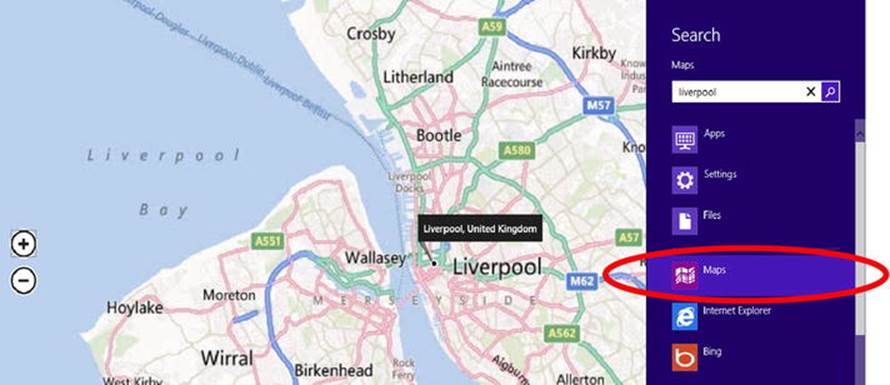
Activate the Charms Bar and select Search. In the search field type the place you are looking for. Make sure you click Maps to tell Windows to search in Bing Maps.
Right click on the map to reveal the options bar. On map style you can select street map or satellite map (aerial view). I find the aerial view to be more descriptive when finding directions.
Right click on the map and select Directions. Enter your current location and destination.
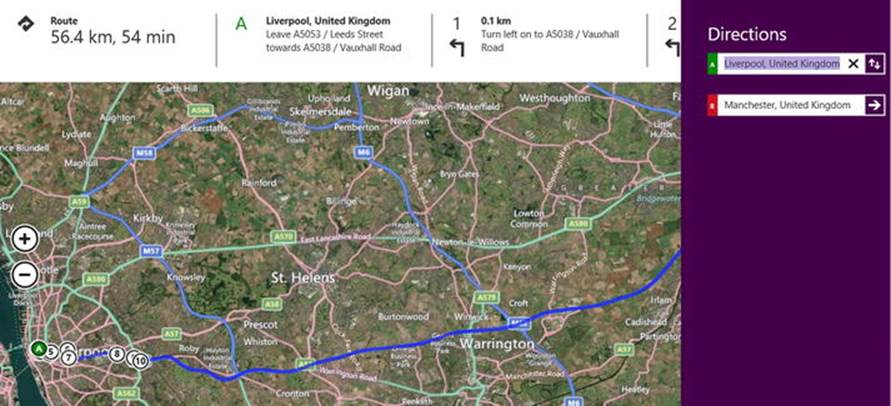
Hit Enter, and Bing Maps will bring up a route, shown at the top of the screen and indicated by a blue line on the map.
Calendar
To access Calendar click on it from the Start screen.
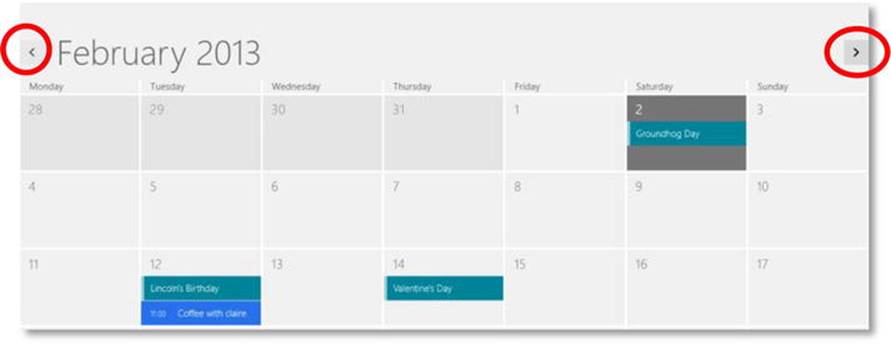
Once Calendar has started, it will show you the current month; it also shows public holidays.
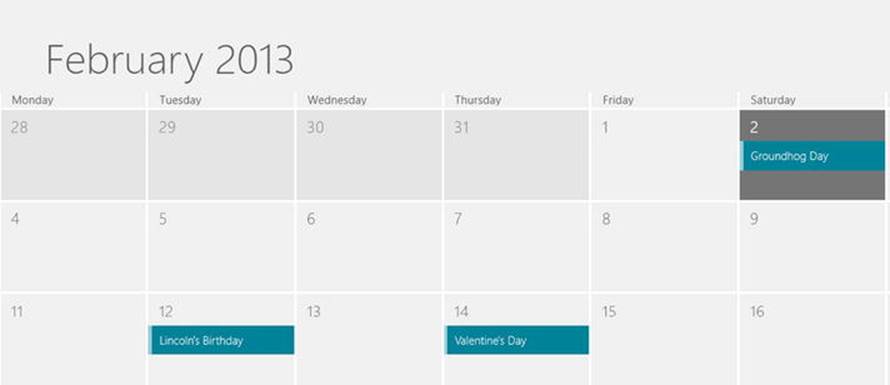
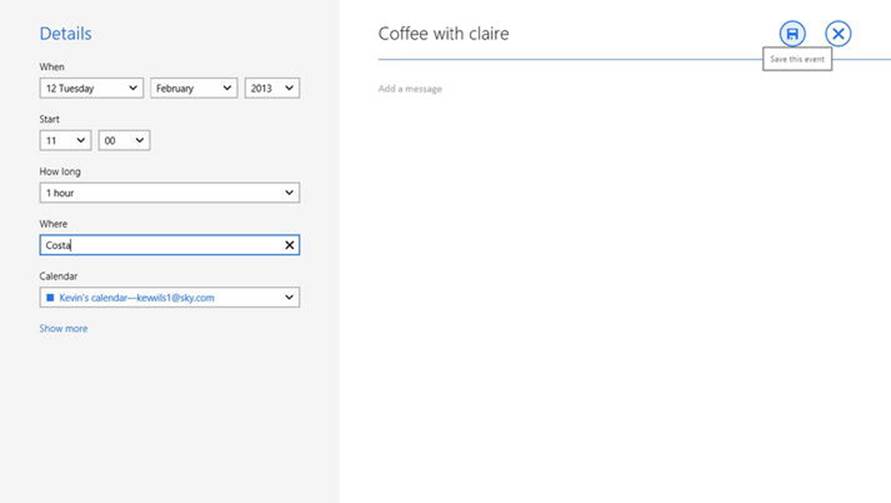
To add an appointment, double click on the day in the month and fill in the fields as shown below. Then click Save when done.
To move to previous or next month, move your pointer over to the top left or right to reveal the arrows
Using Internet Explorer
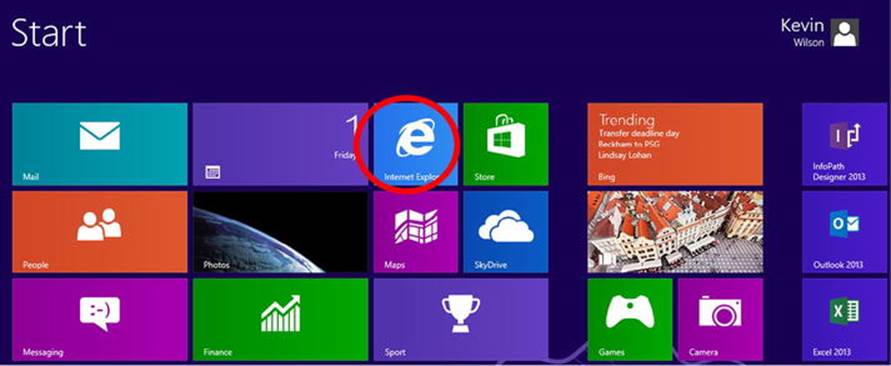
On your Start screen tap or click Internet Explorer.
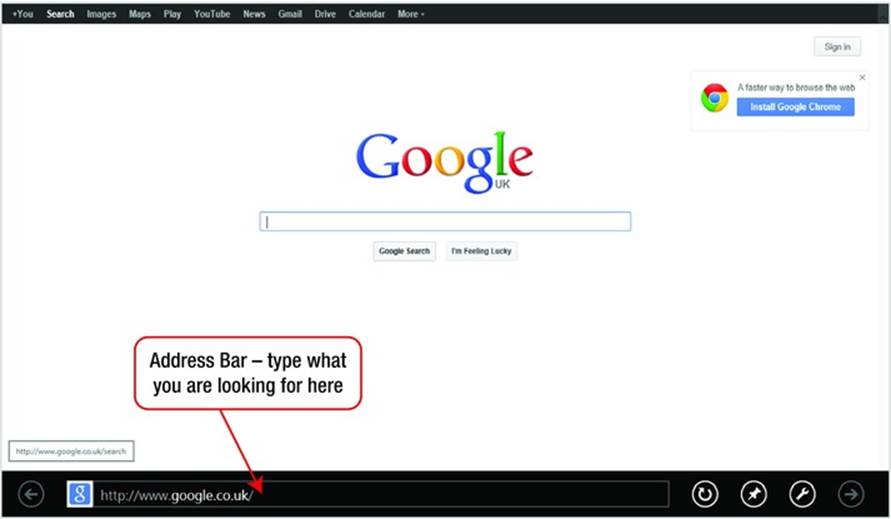
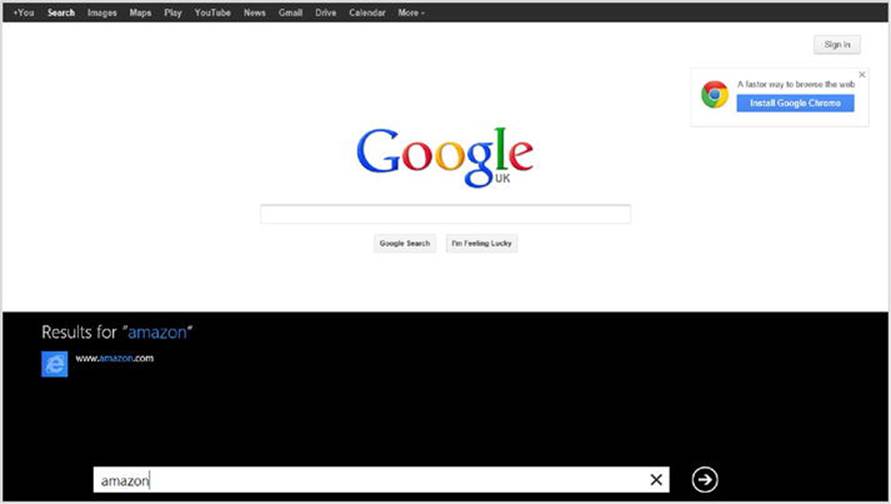
In the URL address bar below, type the name of the thing you are looking for. For example, I’m looking for the Amazon website. So I will type "Amazon" into the address bar.
As you start to type, Internet Explorer will try to find the website. You can see below that Internet Explorer has found Amazon’s website. Just click or tap on the result, and it will take you to the website.
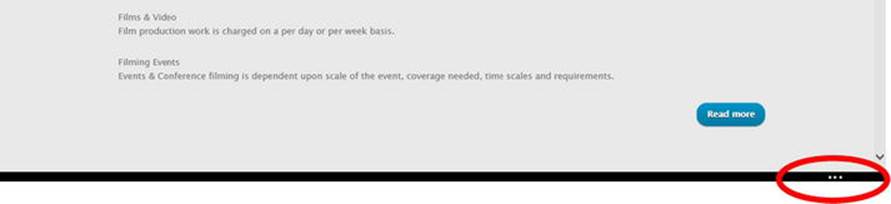
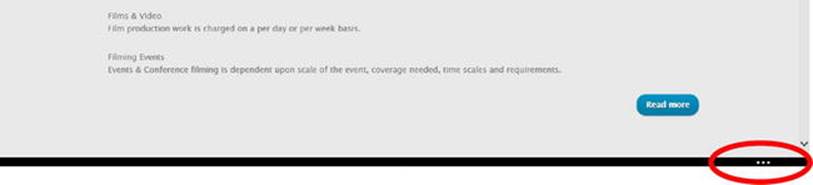
When browsing the web, Internet Explorer may hide your address bar. You can get it back by clicking on the three dots on the bottom right of the screen, circled below.
Adding a Site to Favorites
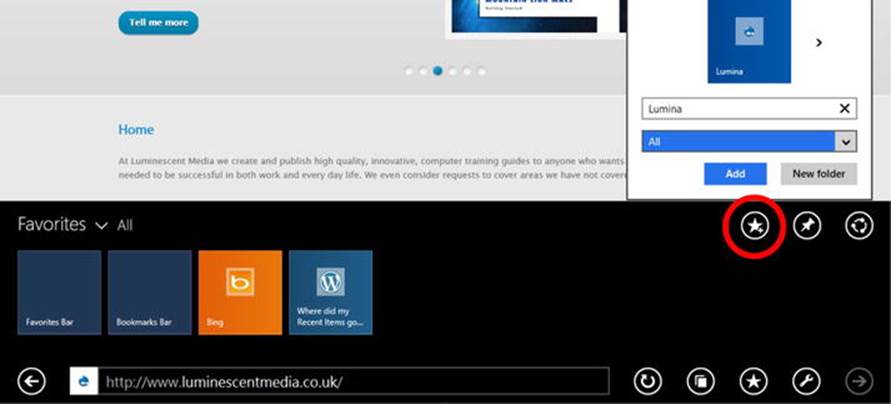
To add the site to Favorites, find your address bar by clicking on the three dots on the bottom right-hand side of the previous screen. Internet Explorer hides this bar when you are not using it.
Click the star icon, shown in the following screen. This will reveal your Favorites panel.

Then click the Add to Favorites icon, circled in the following screen.
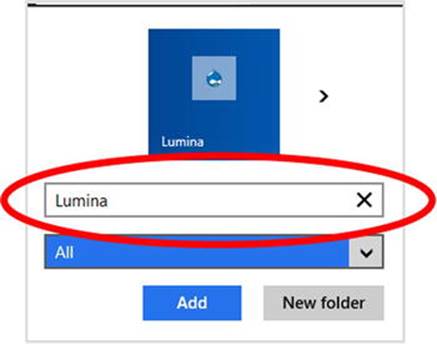
In the popup box that appears, give your favorite a name, then click Add.
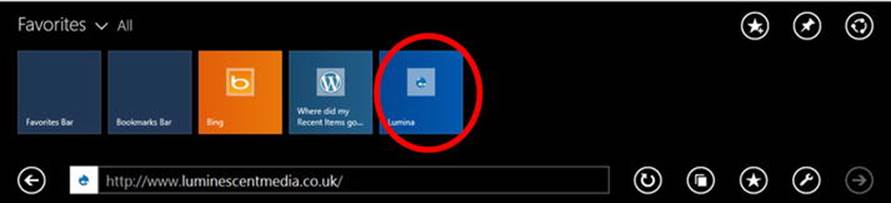
You can access your Favorites by clicking the three dots on the bottom right of your screen to reveal the address bar.
Then click a favorite site (circled below) to go straight to the website.
Using Email
When you first set up an account in Windows 8 you'll be offered the chance to log in with your Windows Live ID. If you don't have one, it's worth setting one up.
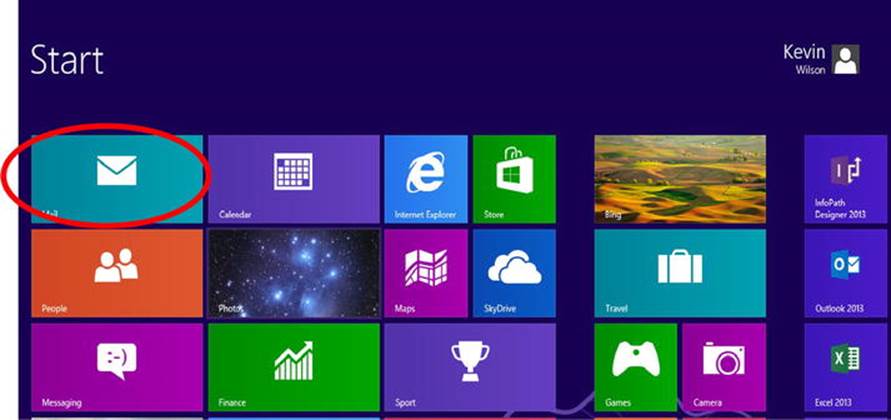
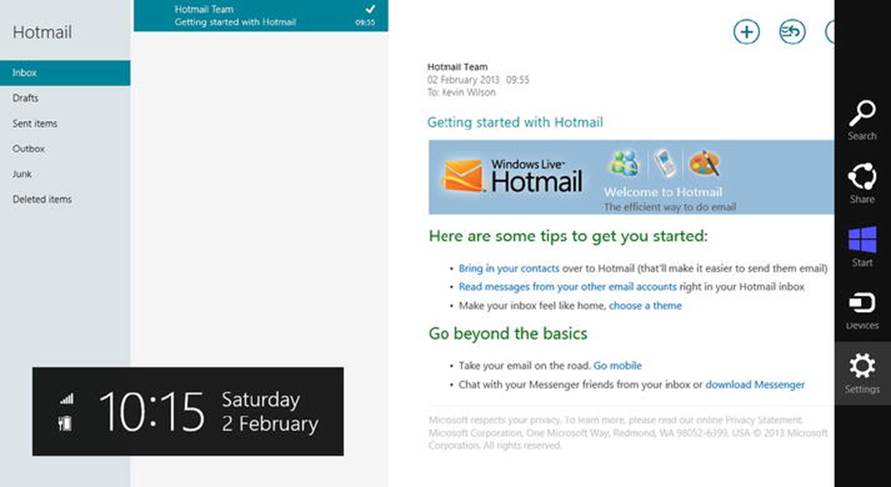
From the Start screen, click on the Mail icon.
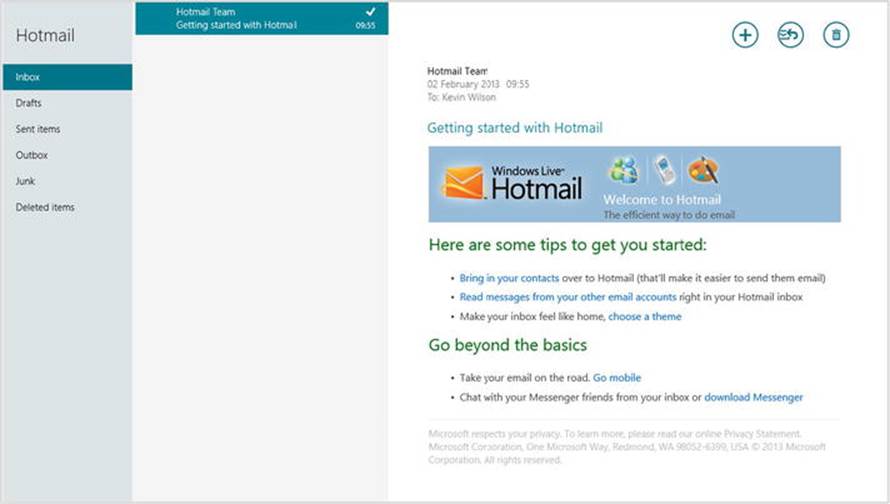
The left pane in the following screen shows your account's inbox, drafts, and so on. The middle pane shows a list of messages corresponding to the box selected in the left-hand pane. The right pane displays the full email message that you selected in the middle pane.
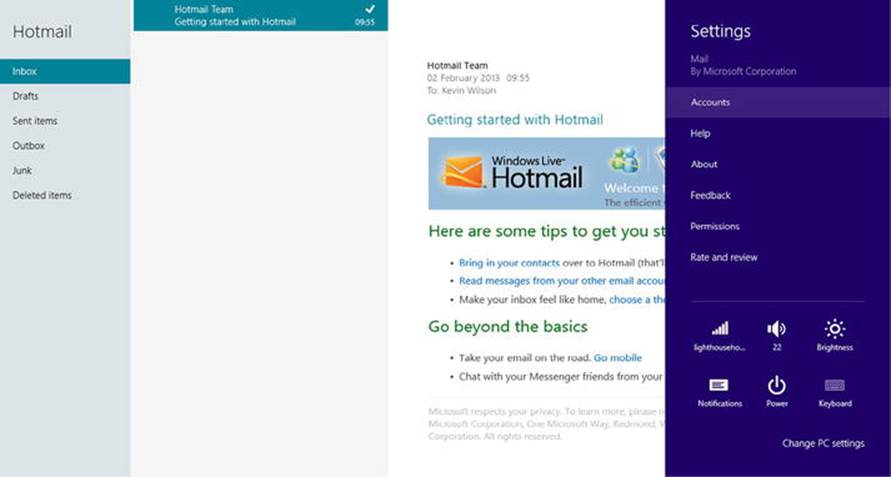
If you want to add other email accounts—perhaps you have a Google mail or Yahoo mail account—you can do this.
You can add a new account with the Settings charm. Sweep a finger inwards from the right side of the screen or move the mouse pointer to the top right corner of the screen. Then choose Settings.
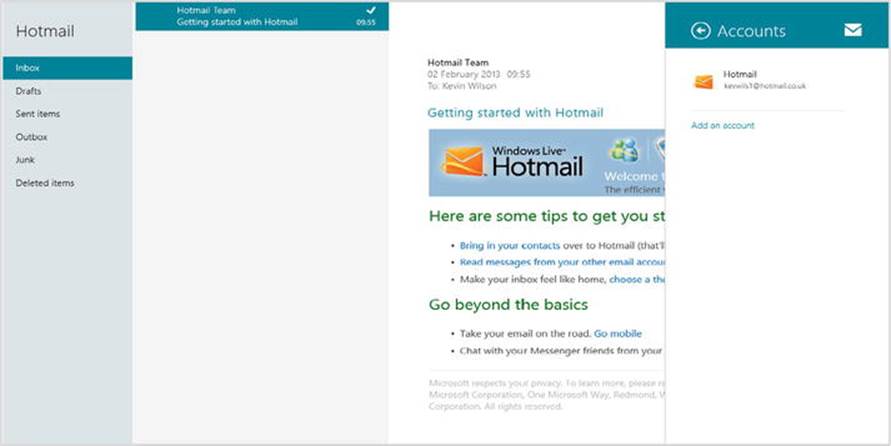
Next, choose Accounts.
A new pane will appear. Tap or click Add an Account and enter the details for a new email account.
Pick the account type. You can choose between Hotmail, Google, Yahoo, and Exchange, depending on the type of email you want.
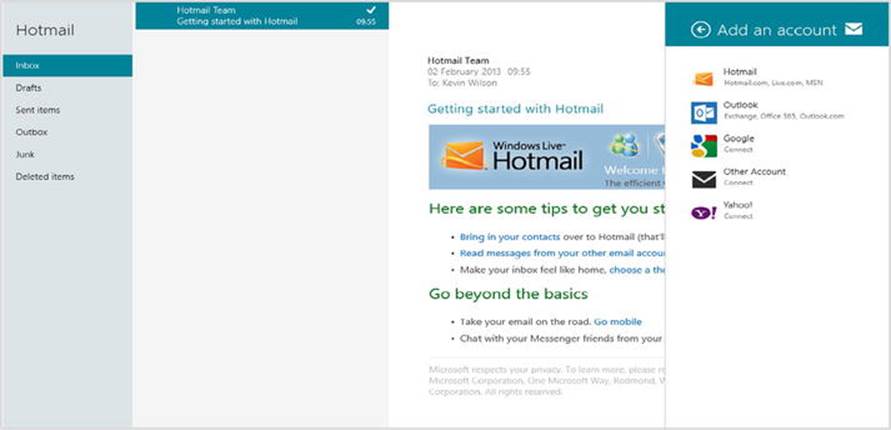
Now just type in your email address and password for the account you want to add and click Connect. You can repeat this process to add more accounts.
If you want to delete an account, just tap and hold, or click and hold on it, and a Delete option will appear.
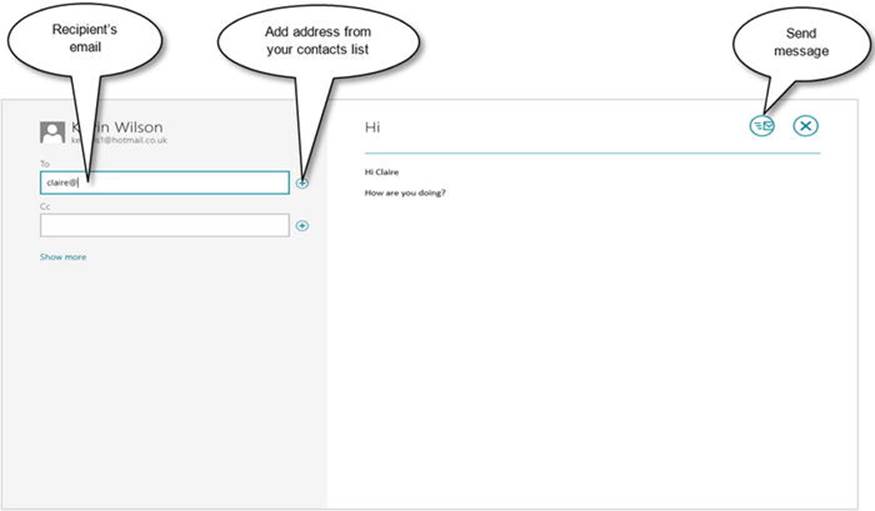
Sending an Email
To send a new email message click Send New Message.
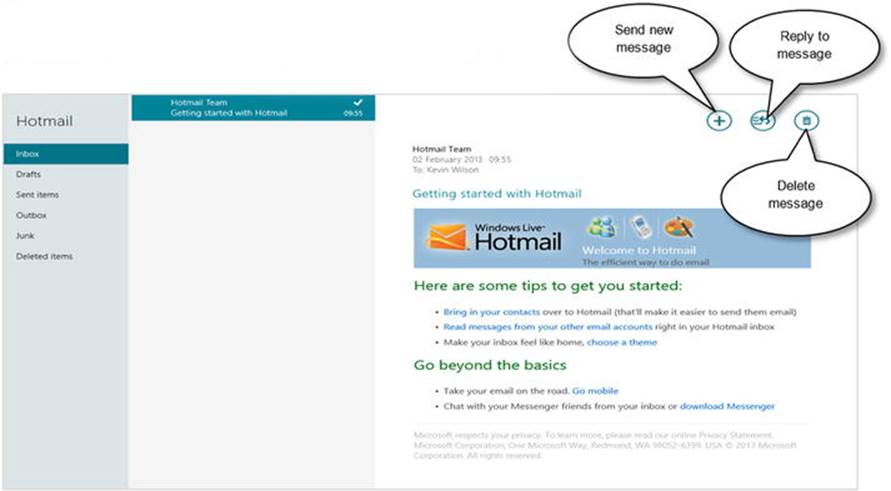
Fill in the email address and type your message. Once you are done, click Send Message.
Family Safety
Keeping your kids safe while using the Internet is an ongoing concern for parents. With Windows 8, you can monitor what your kids are doing, no matter where they use their PC. To do this you have to create a Windows user account for each child and check the box to turn on Family Safety.
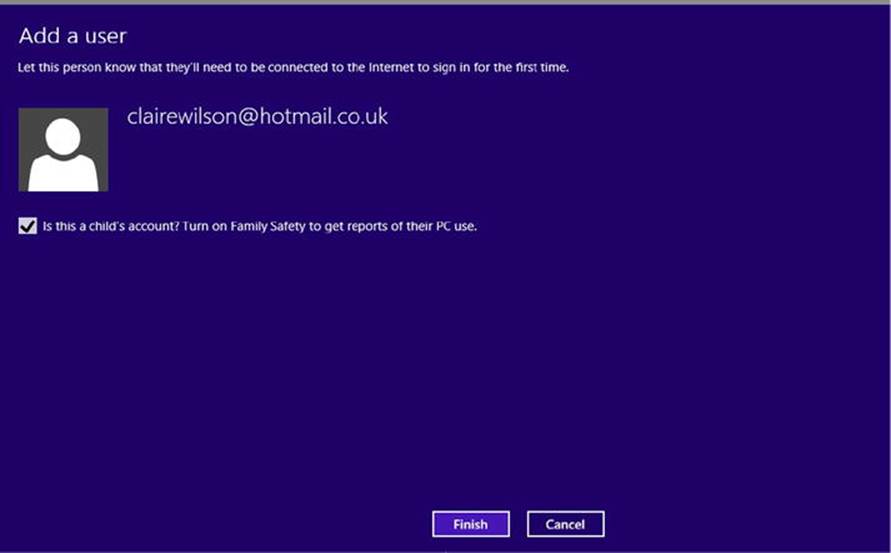
This enables parents to review weekly reports that tell you what your child is up to. You’ll also be able to make sure children aren’t associating with online predators.
After creating a new account with Family Safety turned on, you'll automatically be taken to the Family Safety setup section in the Control Panel.
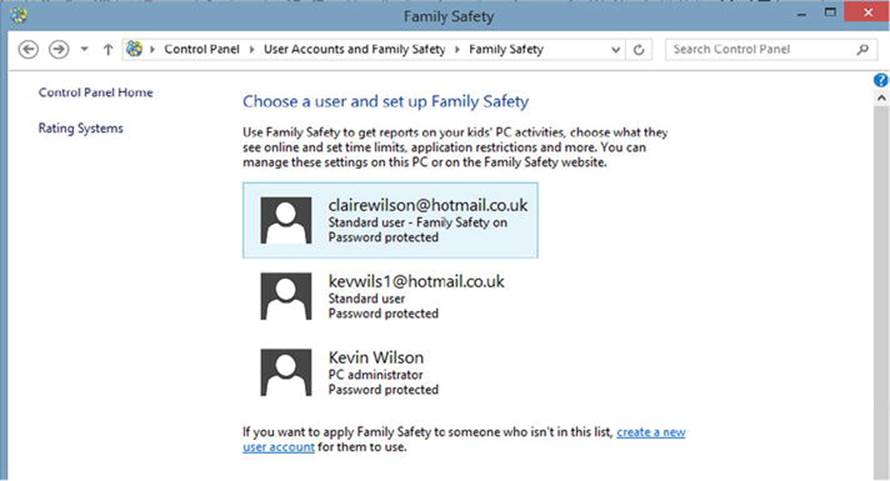
Click on the user account you want to configure.
On the Configure screen you can select settings to filter and monitor web activity, set time limits, and even restrict which applications the user can access.
So, for example, homework hour could allow use of Microsoft Office apps such as Word and not allow use of Internet, email, etc.
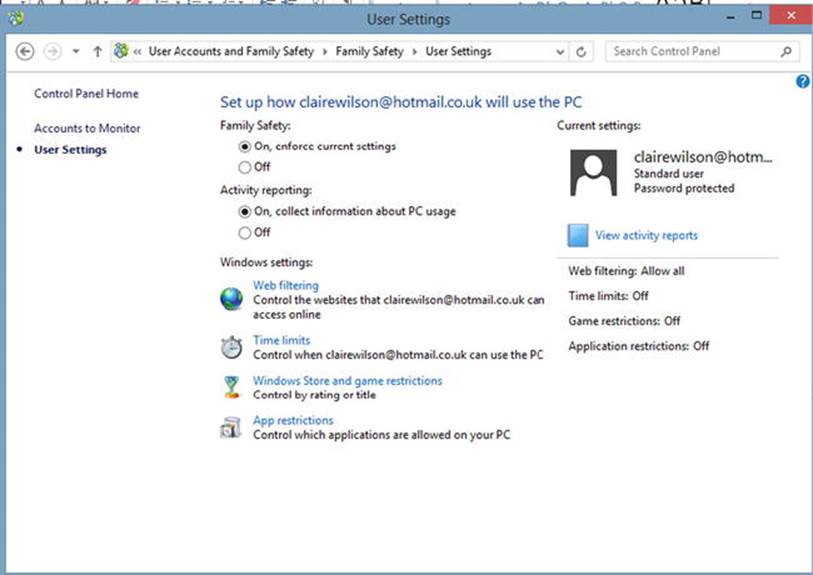
Web filtering allows you to restrict websites and downloads. You can allow or block specific websites. You can filter websites by enabling the strict mode for SafeSearch, which filters out adult content from search engines such as Google.
Time limits allow you to set a time allowances.
Windows Store and game restrictions allows you to control which apps and games the user can use based on Entertainment Software Rating Board ratings, or you can block certain games specifically.
App restrictions lets you control which apps and programs the user can use.
Using SkyDrive
SkyDrive, not to be confused with SkyDrive Pro, is a free file-hosting service that allows users to upload and sync files to cloud storage and then access them from a web browser. It also allows users to keep the files private, share them with contacts, or make the files public. Publicly shared files do not require a Microsoft account to access.
To access your SkyDrive in a web browser go to:
skydrive.live.com
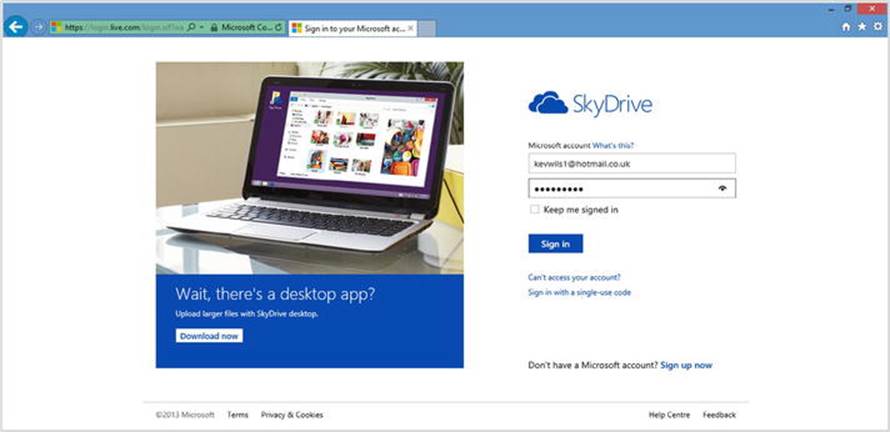
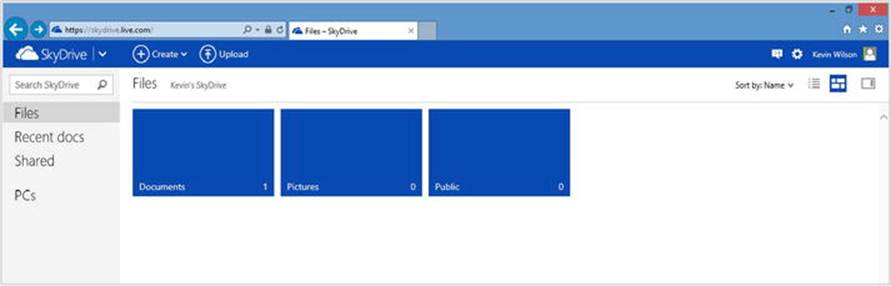
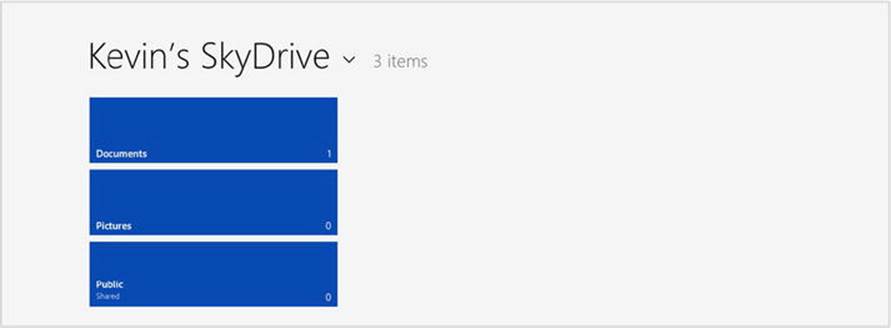
Once logged on you can access documents, pictures, and your public area.
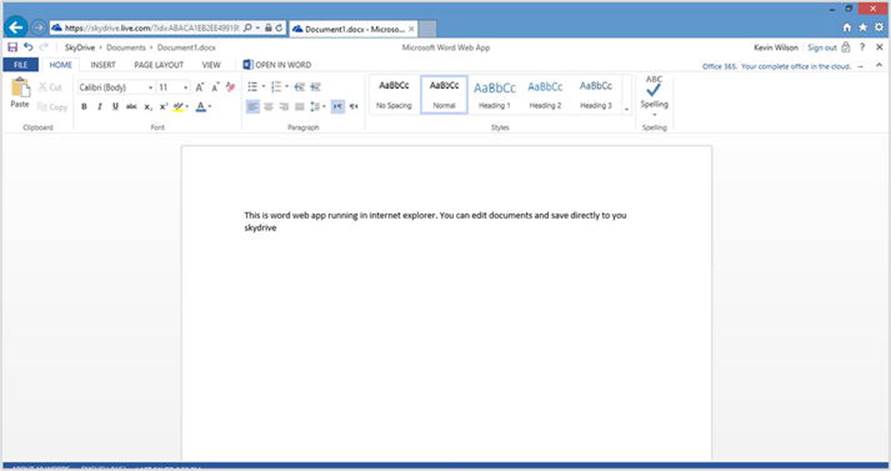
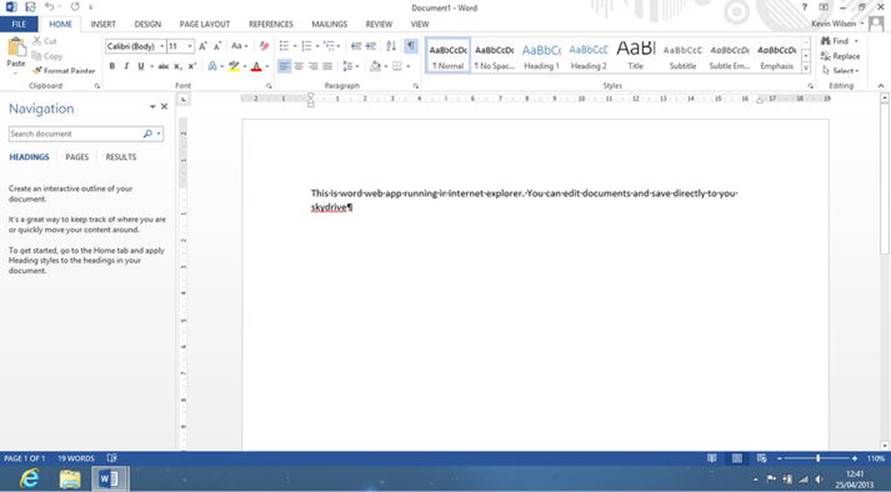
In your documents area you can actually use a web-based version of Microsoft Word 2013 to edit your document and save it back to your SkyDrive.
If you are using Windows 8, you can access these files and upload others to SkyDrive by using the SkyDrive app on your Start screen.
Click in the documents section to find your files.
When you open them up they will load directly into your installation of Microsoft Word 2013.
If Word asks you to log in, enter your Microsoft Account email address and password.
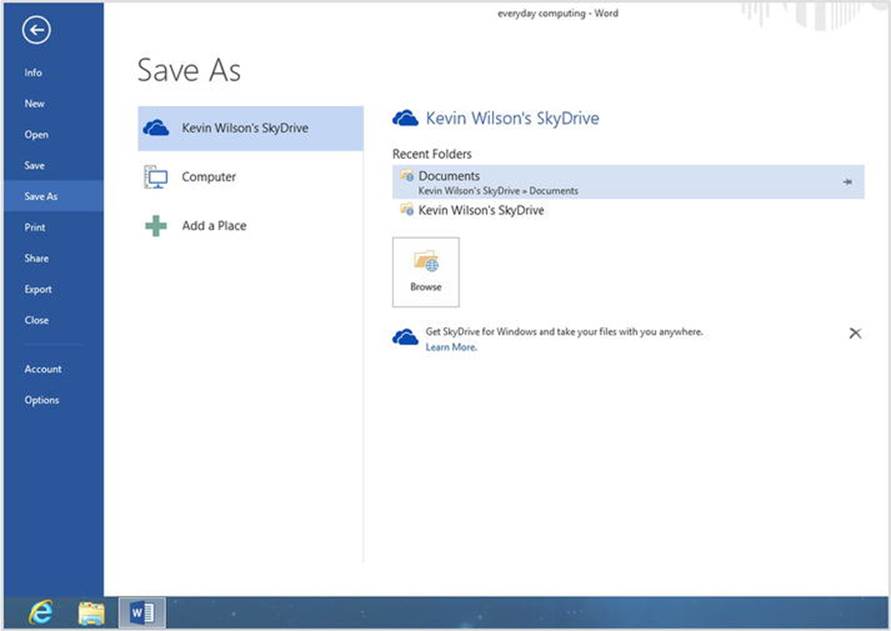
Saving onto SkyDrive is the same as if you were saving the file to your computer. Just select SkyDrive from the options in the Save As screen in Office.
Organizing Your Music
Music app links in with your Windows account so you can buy any albums or tracks you want.
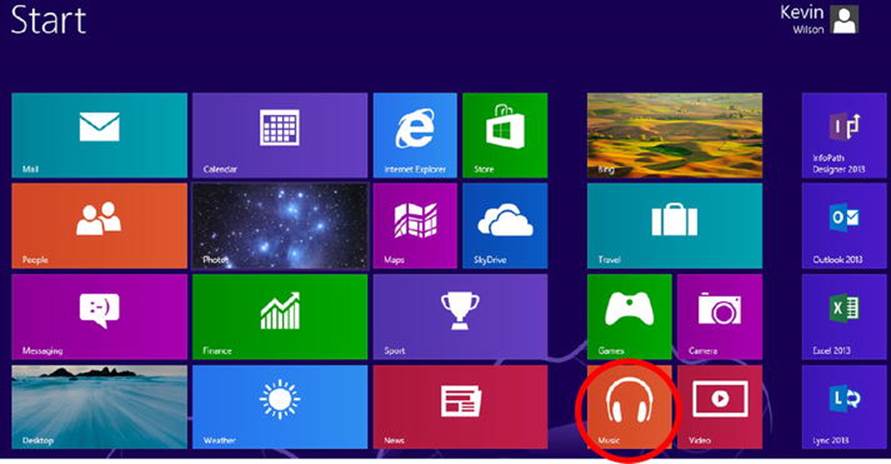
The Music app also automatically scans your computer for any music and adds it to your Music library.
Buying Songs and Albums
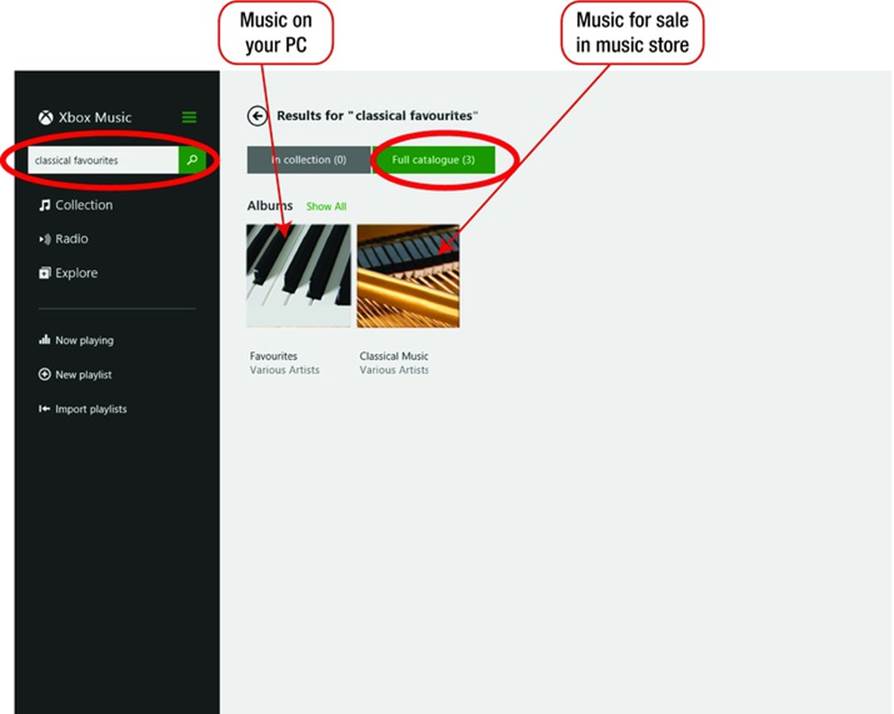
You can buy songs or albums by your favorite artist right from the Music app.
To buy an album or song, type the name of the artist into the search field on the left-hand side of the screen. Click Full Catalogue to view all the albums in the music store that correspond with your search term.
To buy any of the albums, click on an album cover. Then in the screen that appears, click "Buy album for…," as shown circled in the screen.
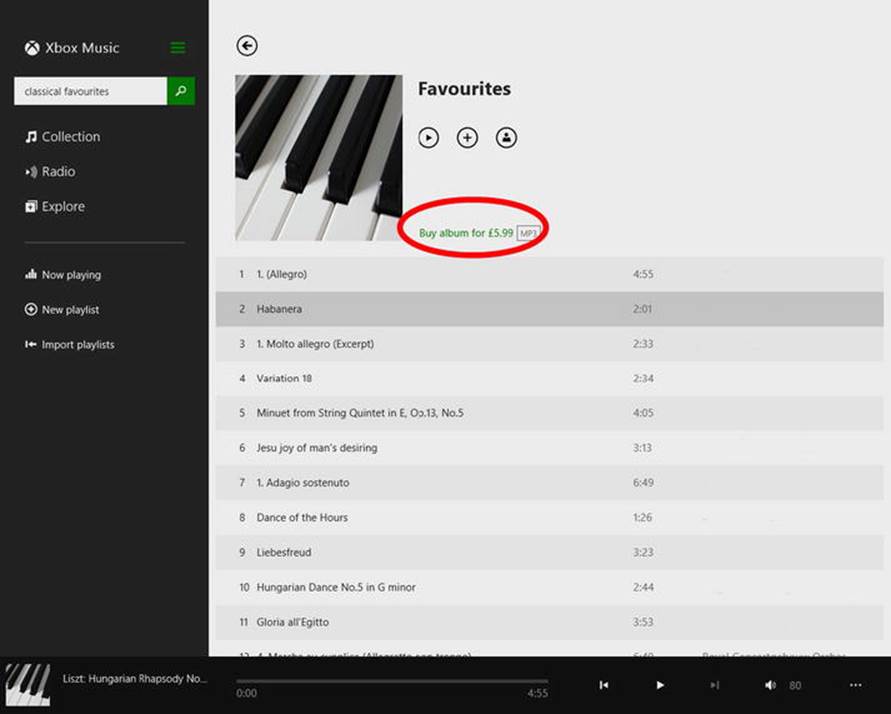
The album songs will download to your computer to the Collection folder, located on the left-hand side of the screen.
Playing Music
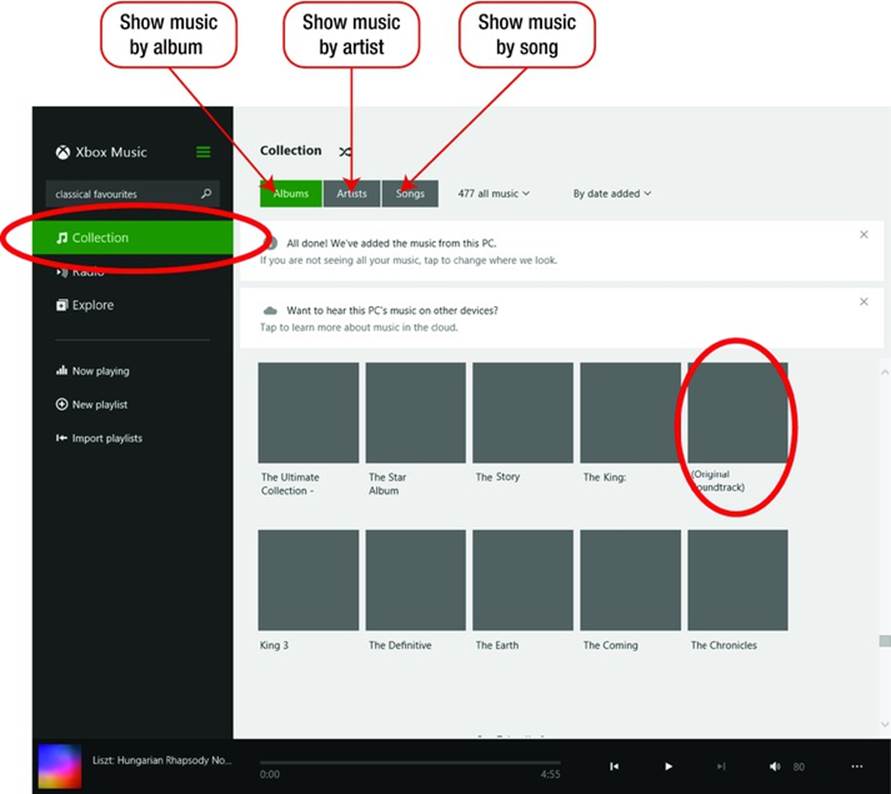
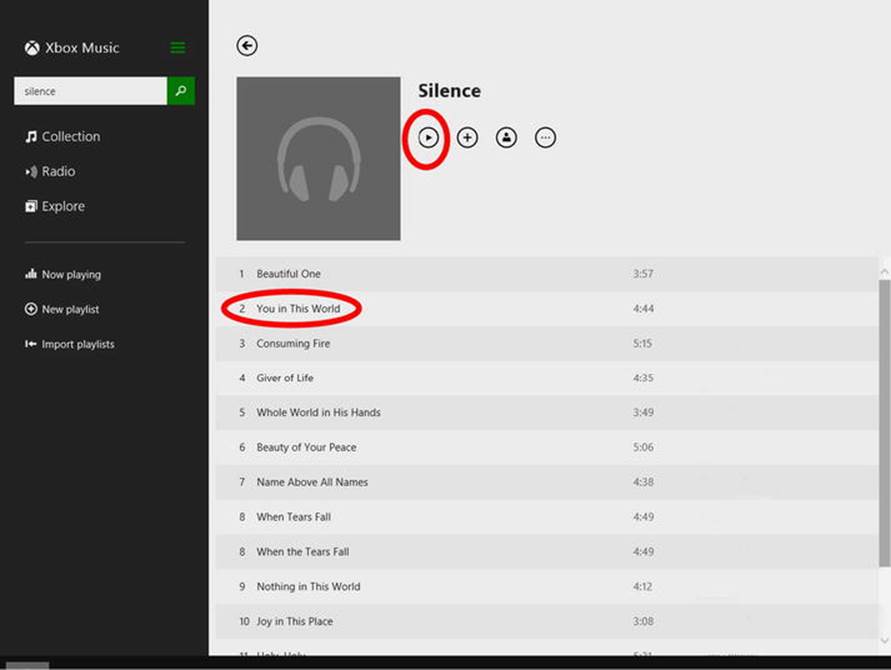
To access your songs, click Collection. This lists all the albums on your computer. Then double click one of the album covers on the right.
To play the album, click the Play icon circled the following screen. Or to play a specific track, double click the track name.
Copying Songs from a CD to Your PC
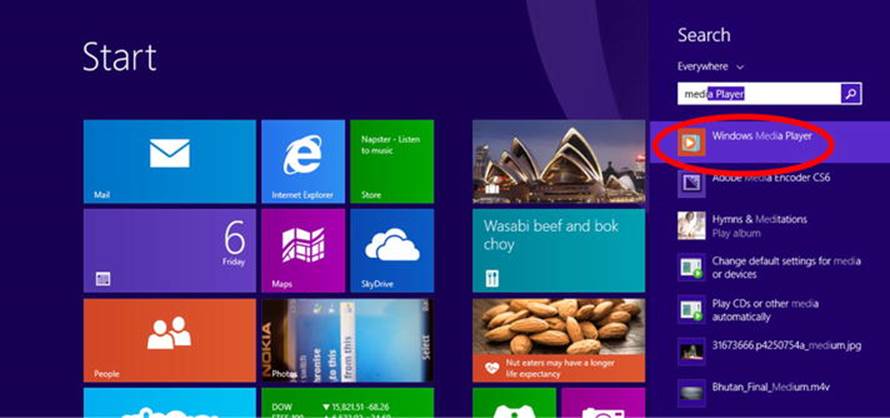
If you want to copy music from a CD onto your computer, use Windows Media Player. Open the Search charm.

Enter Windows Media Player into the search field and then tap or click Windows Media Player in the results on the left-hand side.
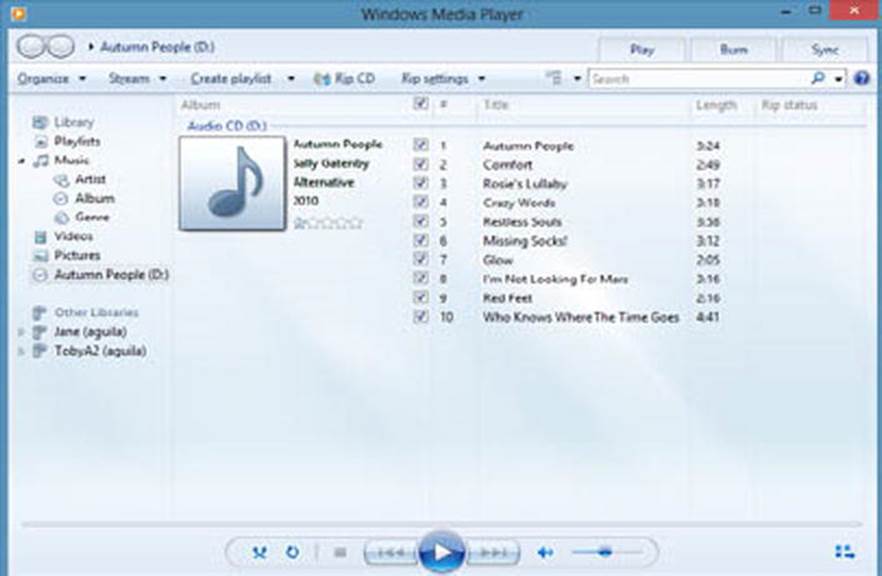
Insert an audio CD into the CD drive. Select the check boxes next to the songs you want to rip, and then tap or click Rip CD.
When your songs have been copied, you can find and play them in the Music app.
Videos and DVDs
You can watch movies, TV programs, and other videos on your computer. Some are free and some you must pay for. You can buy movies or rent them and have them streamed directly to your computer.
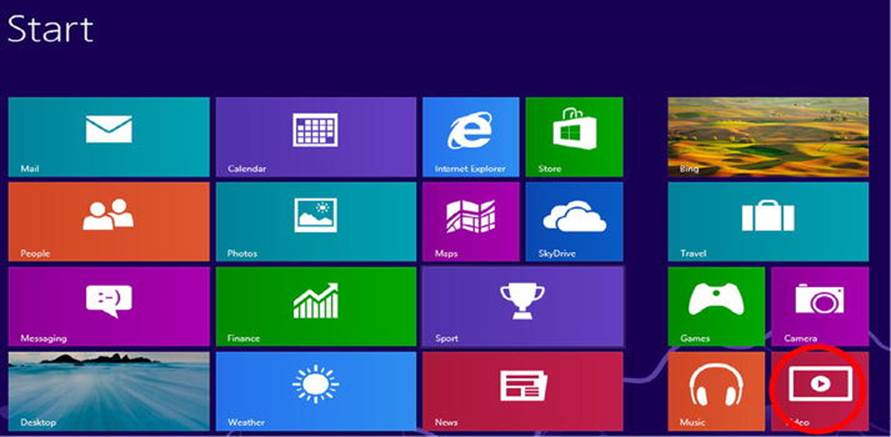
To go to the movie store click Video on the Start screen.
You can browse the store or, if you are searching for a specific genre or movie/TV show title, click the Search icon and type in your desired title, as shown below.

In the search field that appears, enter the film title or TV program you are looking for.

To buy, rent, or watch them just click the image. From here click Rent to watch the entire movie or click Play Trailer to watch just the trailer.

Playing DVDs
If you like watching DVDs on your PC, you’ll have to download a free player as Windows 8 can't play DVD videos out of the box. The best-supported player is VLC Media Player, which plays back DVDs and CDs along with a range of other file types.
Just go to their website and click Download: www.videolan.org.

When prompted with your download, click Run and follow the instructions.
Using Microsoft App Store
The app store allows you to download and install apps. It has both free and paid apps.
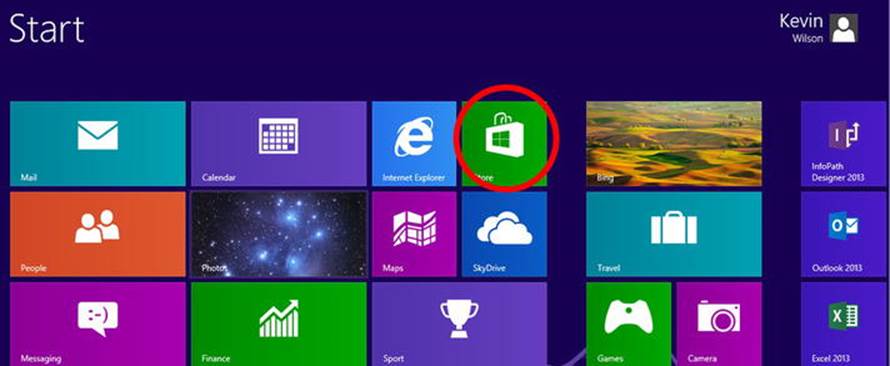
Opening App Store
You can start the app store by clicking or tapping the tile on the Start screen.
Once the store opens, you can browse through the top paid apps, top free apps, or new releases, or, if you are searching for a specific app, activate your Charms Bar and select Search.
Browse the App Store
On the main screen you can scroll left and right to view the top-rated apps in different categories, such as entertainment, photos, music, sports, news, etc.
These are broken down into sections for the top 100 apps you have to pay for, top 100 free apps, and apps that have just been released.
Search the App Store
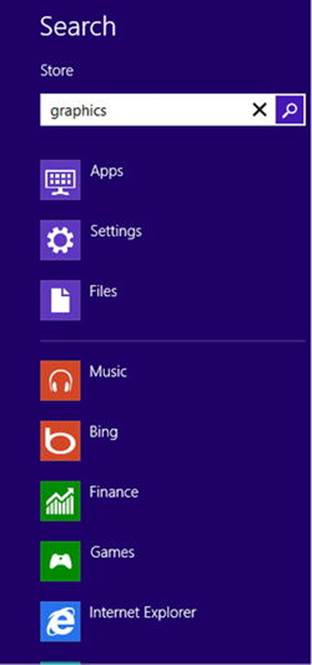
If you are searching for a specific app, activate the Charms Bar and select Search.

In the search field, enter a word describing the type of app you are looking for. In this example, I am looking for graphics apps to edit my photographs.
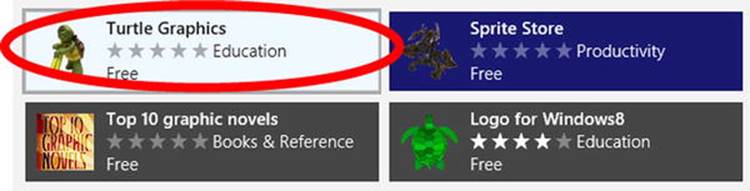
To see details on the app, click its icon.
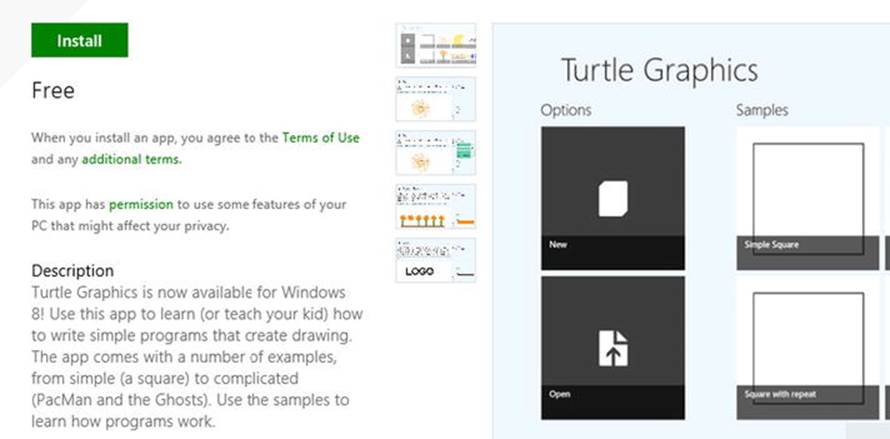
From here you will see a write up describing the app, the price, and some screen shots so you can see what the app looks like.
Downloading an App
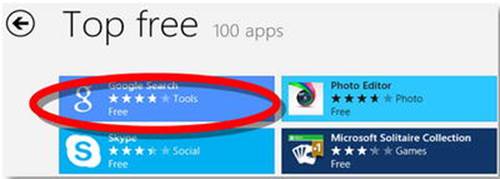
To download an app, select the app you want; in this example I am going to download Google Search from the top 100 free apps.
After selecting the app you want, the app store will show you the app details screen telling you about the app with descriptions, system requirements, and reviews.
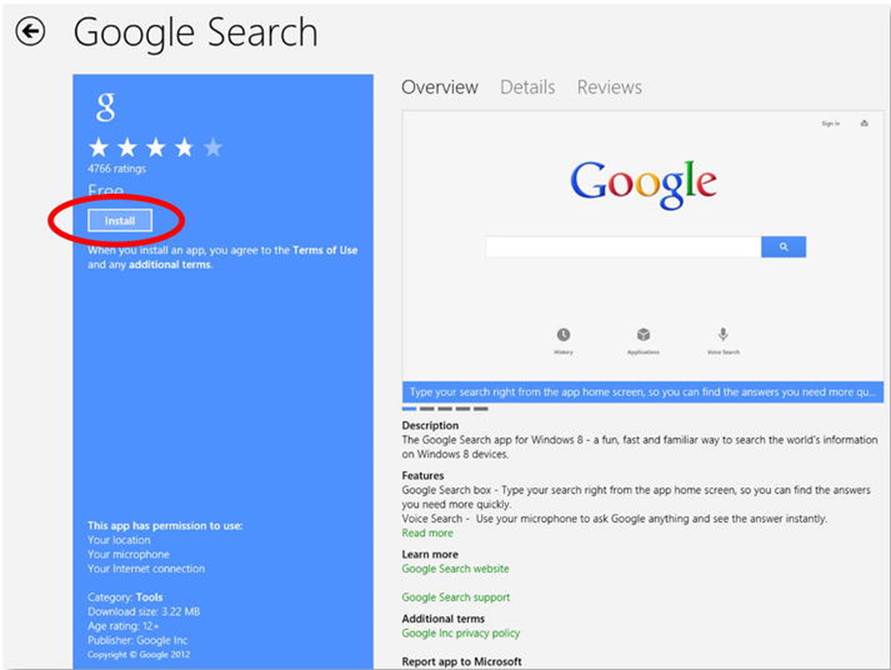
Click the Install button. You may be asked for your Microsoft Account email and password.
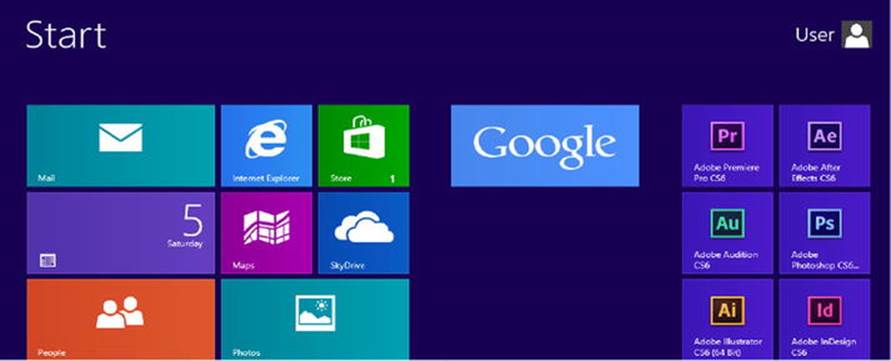
Once the app is installed it will appear on your Start screen.
Click the app icon to run the app.
Connecting to Projectors
Open the Charms Bar, select Devices, then click Second Screen.
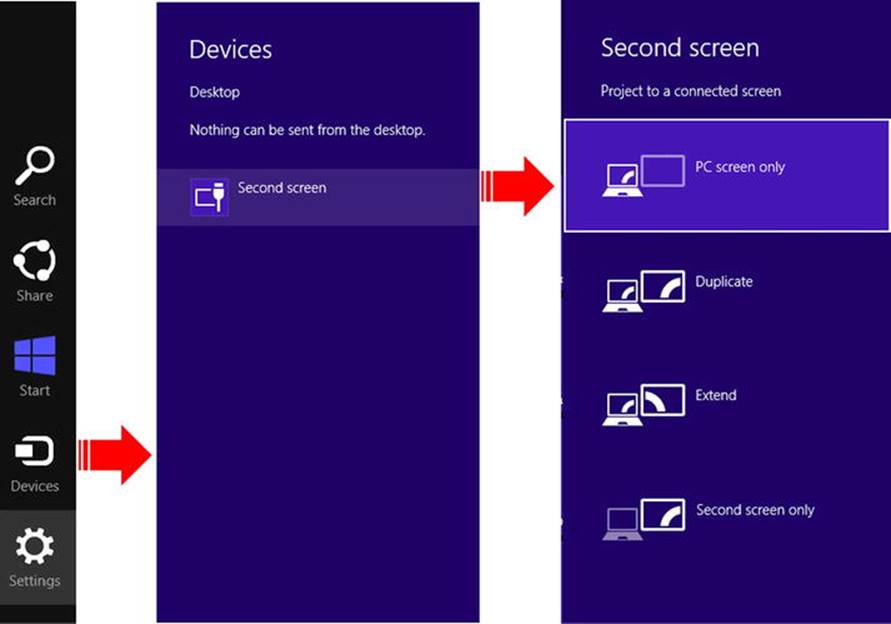
From there, you have the following options:
· PC Screen Only. This disables the projector so the information is only seen on the PC’s monitor.
· Duplicate PC Screen on Projector. Everything you do on the monitor will be duplicated on the projected screen.
· Extend PC Screen onto Projector. The projector acts as an extension of your PC screen rather than just a duplicate. This allows you to move windows from the PC’s screen to the projector screen and vice versa.
· Second Screen Only. This disables the PC’s monitor so the display only appears on the projected screen.
Keyboard Shortcuts
Windows 8 was designed with both tablet and PC users in mind. While touchscreen users can swipe and tap their way through the new interface, those who prefer the traditional PC setup might find the system a bit awkward to navigate. Fortunately, keyboard shortcuts make it a bit easier to navigate without a touch screen.
To close an app, hold down Alt, press F4.

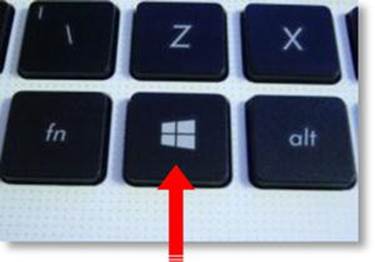
To get back to the Start screen, press the Windows key.
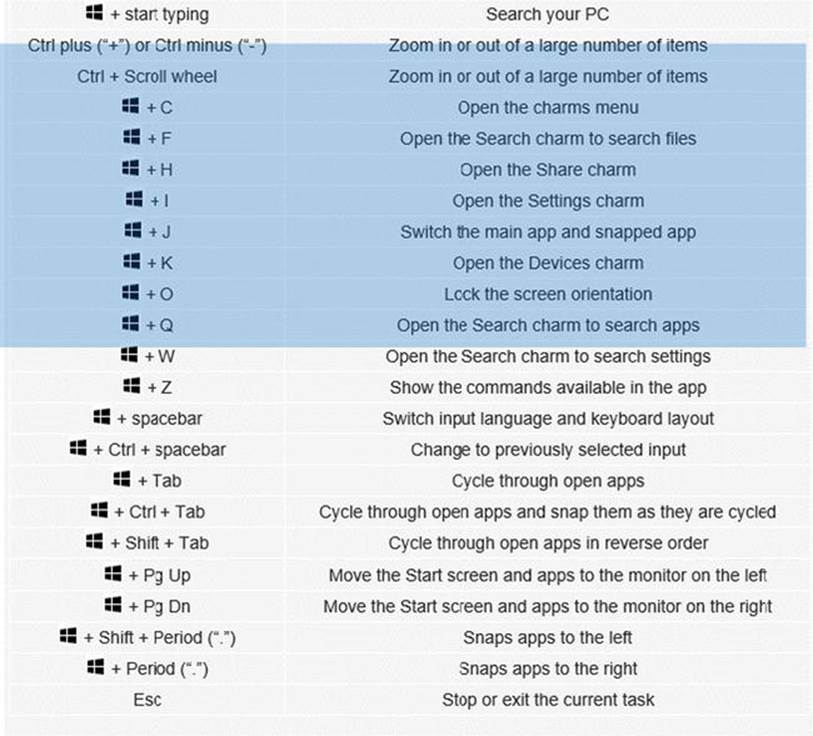
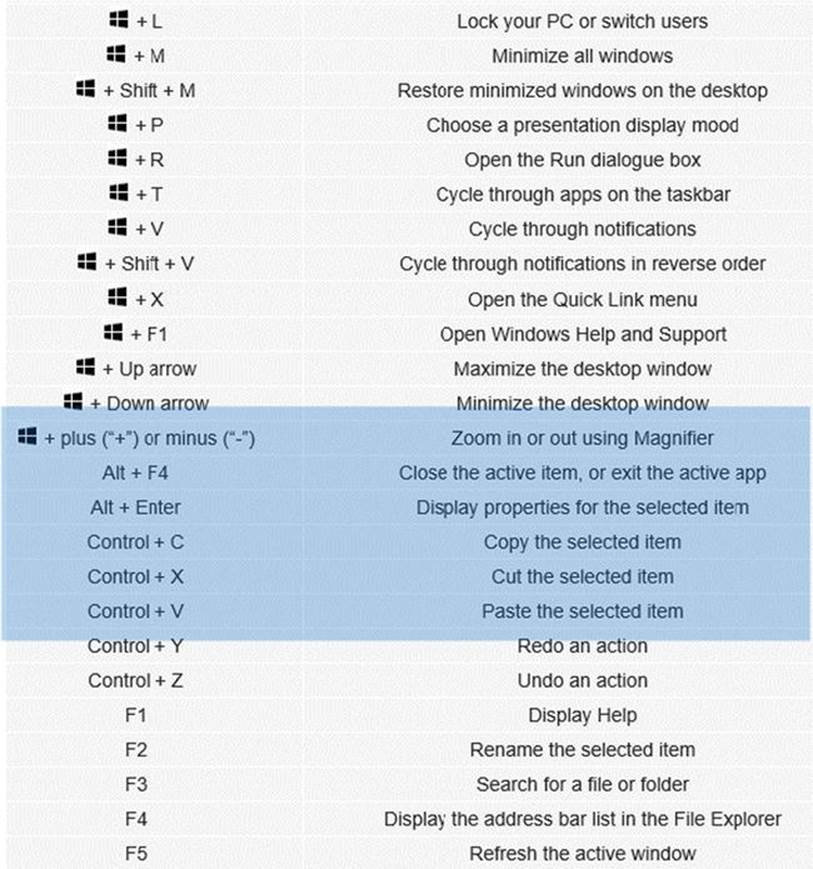
Here are some common shortcuts to keep in mind:
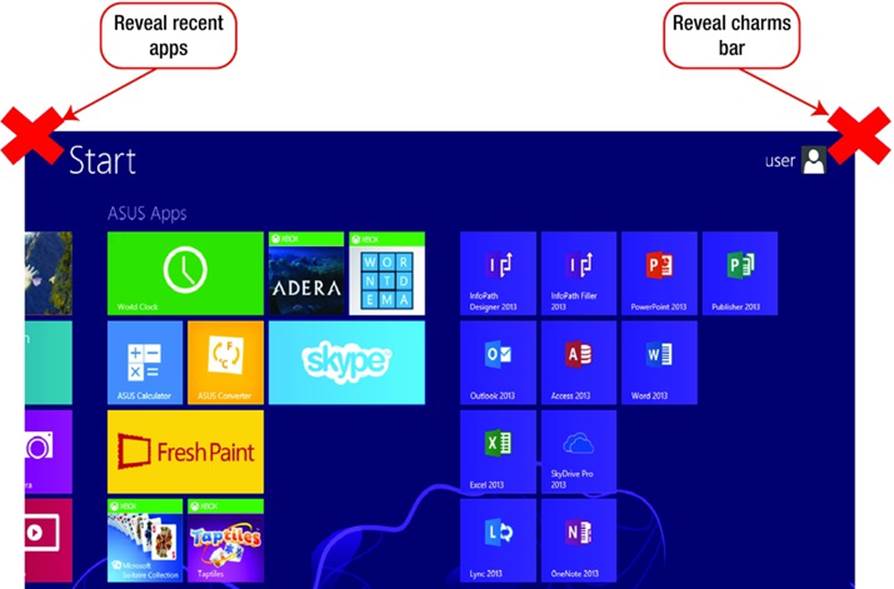
Hot Corners
Windows 8 makes use of what it calls hotspots. These can be accessed by moving the pointer to various corners of the screen to reveal certain tools.
All materials on the site are licensed Creative Commons Attribution-Sharealike 3.0 Unported CC BY-SA 3.0 & GNU Free Documentation License (GFDL)
If you are the copyright holder of any material contained on our site and intend to remove it, please contact our site administrator for approval.
© 2016-2026 All site design rights belong to S.Y.A.