Word 2016 For Dummies (2016)
Part V
The Rest of Word
Chapter 25
Word for Writers
In This Chapter
![]() Creating an outline in Word
Creating an outline in Word
![]() Adding topics, subtopics, and text topics
Adding topics, subtopics, and text topics
![]() Rearranging topics in an outline
Rearranging topics in an outline
![]() Demoting and promoting topics
Demoting and promoting topics
![]() Printing an outline
Printing an outline
![]() Making a master document
Making a master document
![]() Using the thesaurus
Using the thesaurus
![]() Pulling a word count
Pulling a word count
The word processor is the best tool for writers since the ghostwriter. Of course, cobbling together words in a word processor doesn’t make you a writer any more than working with numbers in a spreadsheet makes you an accountant. Even so, beyond its basic word-processing capabilities, Word comes with an armada of tools for making a writer’s job easier. Whether you’re writing your first guest piece for the church newsletter or crafting your 74th horror-thriller, you’ll enjoy Word’s features for writers.
Organize Your Thoughts
Good writers use an outline to organize their thoughts. Back in the old days, an outline would dwell on a stack of 3-by-5 cards. Today, an outline is a Word document. That makes it easier not to confuse your outline with grandma’s recipes.
Word’s Outline view presents your document in a unique way. By using Word’s header styles, you can group and organize thoughts, ideas, or a plotline in a hierarchical fashion. Outline view makes it easy to shuffle around topics, make subtopics, and mix in text to help get your thoughts organized. Even if you’re not a writer, you can use Word’s Outline mode to create lists, work on projects, or look busy when the boss comes around.
Entering Outline view
To enter Outline view, click the View tab, and in the Views group, click the Outline button. The document’s presentation changes to show Outline view, and the Outlining tab appears on the Ribbon, as shown in Figure 25-1.
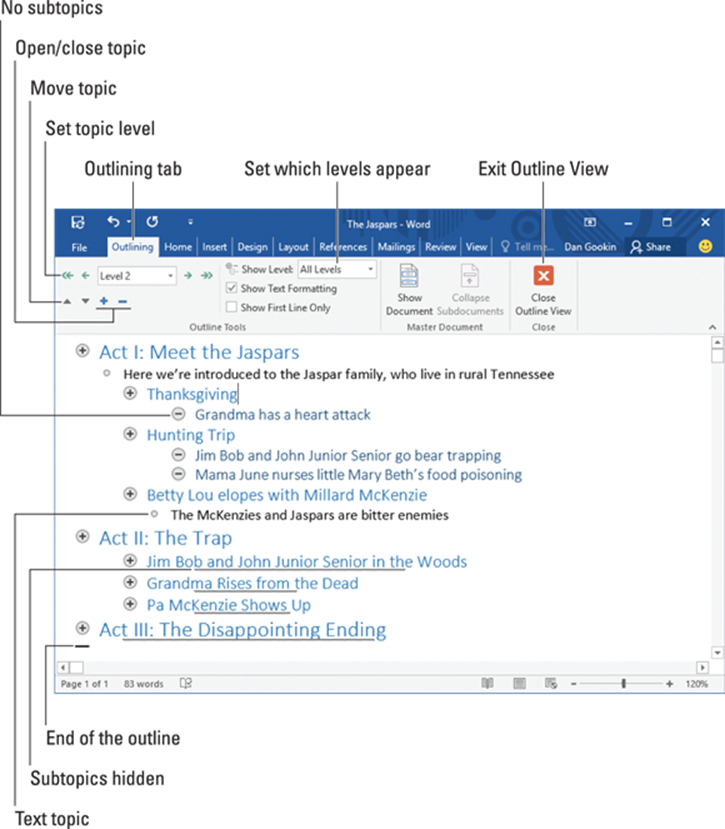
Figure 25-1: A typical outline.
To exit Outline view, click the View tab and choose another document view. You can also click the big, honkin’ Close Outline View button (labeled in Figure 25-1).
· A squat, horizontal bar marks the end of your outline. You cannot delete that bar.
· All basic Word commands work in Outline view. You can use the cursor keys, delete text, check spelling, save, insert oddball characters, print, and so on.
· Don't worry about the text format in Outline view. Format your text later.
· Word uses the Heading 1 through Heading 9 styles for your outline’s topics. Main topics are formatted in Heading 1, subtopics in Heading 2, and so on.
· Use the Body or Normal style to make notes or add text to the outline. See the section “Adding a text topic,” later in this chapter.
·  An outline isn’t a special type of document. It’s just another Word document, presented with Outline view active.
Typing topics in the outline
Outlines are composed of topics and subtopics. Topics are your main ideas; subtopics describe the details. Subtopics can contain their own subtopics going down to several levels of detail. The amount of detail you use depends on how organized you want to be.
To create a topic, type the text. Word automatically formats the topic using a specific Heading style based on the topic level, as shown in Figure 25-2.
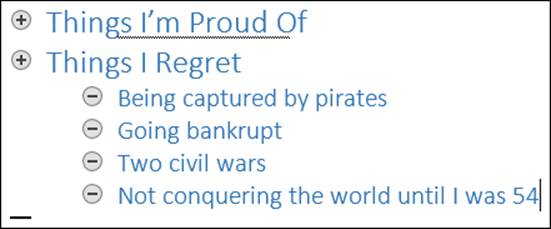
Figure 25-2: Topics in an outline.
Keep your main topic levels short and descriptive. Deeper topics can go into more detail. Press the Enter key when you’re done typing one topic and want to start another.
· Use the Enter key to split a topic. For example, to split the topic Pots and Pans, delete the word and, and then with the insertion pointer placed between the two words, press the Enter key.
· To join two topics, press the End key to send the insertion pointer to the end of the first topic. Then press the Delete key. (This method works just like joining two paragraphs in a regular document.)
·  Don’t worry about organizing your outline when you first create it. In Word’s Outline view, you can rearrange topics as your ideas solidify. My advice is to start writing things down now and concentrate on organization later.
Rearranging topics
As you organize an outline, things change. In Outline view, you can reset a topic’s priority, moving it up or down in the list. You can also promote and demote topics, moving subtopics to main topics and vice-versa.
To help your topics flow in a logical progression, change their order up or down as follows:
· ![]() Click the Move Up button (or press Alt+Shift+↑) to move a topic up a line.
Click the Move Up button (or press Alt+Shift+↑) to move a topic up a line.
· ![]() Click the Move Down button (or press Alt+Shift+↓) to move a topic down a line.
Click the Move Down button (or press Alt+Shift+↓) to move a topic down a line.
 You can also drag a topic up or down: Point the mouse pointer at the circle to the topic’s left. When the mouse is positioned just right, the mouse pointer changes to a four-way arrow (see the margin). I recommend using this trick only when you’re moving topics a short distance; dragging beyond the current screen can prove unwieldy.
If you need to move a topic and all its subtopics, first collapse the topic. When the topic is expanded (open), only that line is moved. See the later section, “Expanding and collapsing topics.”
Demoting and promoting topics
Outline organization also includes demoting topics that are really subtopics and promoting subtopics to a higher level. Making such adjustments is a natural part of working in Outline view.
 To demote a topic into a subtopic, place the insertion pointer in the topic’s text. Then on the Outlining tab, in the Outline Tools group, click the Demote button, shown in the margin.
 To promote a subtopic, place the insertion pointer in the topic's text and click the Promote command button, shown in the margin.
You can continue creating subtopics by typing them and then pressing the Enter key at the end of each subtopic. Word keeps giving you subtopics, one for each press of the Enter key.
· The keyboard shortcut to demote a topic is Alt+Shift+→.
· The keyboard shortcut to promote a topic is Alt+Shift+←.
· ![]() To instantly make any topic a main-level topic, click the Promote to Heading 1 button.
To instantly make any topic a main-level topic, click the Promote to Heading 1 button.
· You can use the mouse to promote or demote topics: Drag the topic’s circle left or right. I admit that this move can be tricky, which is why I use the keyboard shortcuts or buttons on the Ribbon to promote or demote topics.
· You don’t really create subtopics in Word as much as you demote higher-level topics.
· Promoting or demoting a topic changes the text format. For example, demoting a top-level topic changes the style from Heading 1 to Heading 2. The subtopic also appears indented on the screen. (Refer to Figures 25-1 and 25-2.)
· The Level item in the Outlining tab’s Outline Tools group changes to reflect the current topic level. You can also use this item’s drop-down list to promote or demote the topic to any specific level in the outline
· Unlike main topics, you can get wordy with your subtopics. After all, the idea here is to expand on the main topic.
·  According to Those Who Know Such Things, there must be at least two subtopics for them to qualify as subtopics. When you have only one subtopic, either you have a second main topic or you’ve created a text topic. See the later section, “Adding a text topic,” for information.
Expanding and collapsing topics
A detailed outline is wonderful, the perfect tool to help you write that novel, organize a meeting, or set your priorities. To help you pull back from the detail and see the Big Picture, you can collapse all or part of an outline. Even when you’re organizing, sometimes it helps to collapse a topic to help keep it in perspective.
Any topic with subtopics shows a plus sign in its circle. To collapse the topic and temporarily hide its subtopics, you have several choices:
· ![]() Click the Collapse button on the Outlining toolbar (shown in the margin).
Click the Collapse button on the Outlining toolbar (shown in the margin).
· Press the Alt+Shift+_ (underline) keyboard shortcut.
· Double-click the plus sign to the topic’s left.
When a topic is collapsed, it features a fuzzy underline, in addition to a plus sign in the icon to the topic’s left. To expand a collapsed topic, you have several choices:
·  Click the Expand button on the Outlining toolbar (shown in the margin).
· Press Alt+Shift++ (plus sign).
· Click the topic’s plus sign.
The joy of collapsible headers
You may have seen a side effect of Word’s Outline view when using the Heading styles in your document: A tiny triangle button appears next to a Heading-style paragraph when a document is shown in Print Layout view. Click that button to expand or collapse the heading and all its contents — including any subheadings. Using this trick is a great way to collapse parts of a document without having to switch to Outline view.
The fastest way to display an outline at a specific topic level is to choose that level from the Show Level drop-down list. To find that command, look on the Outlining toolbar, in the Outline Tools group.
For example, to show only Level 1 and Level 2 topics, choose Level 2 from the Show Level button’s menu. Levels 3 and higher topics remain collapsed.
To see the entire outline, choose Show All Levels from the Show Level menu.
When some of your subtopics get wordy, place a check mark by the Show First Line Only option. (Look on the Outlining tab in the Outline Tools group for this setting.) When active, Word displays only the first topic line of text in any topic.
Adding a text topic
Outline view doesn’t prevent you from actually writing text. When the mood hits you, write! Rather than write prose as a topic, use the Demote to Body Text command. Here’s how:
1. Press the Enter key to start a new topic.
2. ![]() On the Outlining tab, in the Outline Tools group, click the Demote to Body Text button (shown in the margin).
On the Outlining tab, in the Outline Tools group, click the Demote to Body Text button (shown in the margin).
The keyboard shortcut is Ctrl+Shift+N, which is also the keyboard shortcut for the Normal style.
These steps change the text style to Body Text. That way, you can write text for your speech, some instructions in a list, or a chunk of dialogue from your novel, and not have it appear as a topic or subtopic.
Outline manipulation shortcut keys
I prefer using Word’s shortcut keys whenever possible. Especially when working an outline, when I’m typing more than mousing, it helps to know these outline manipulate shortcut keys:
|
Key Combo |
What It Does |
|
Alt+Shift+→ |
Demotes a topic |
|
Alt+Shift+← |
Promotes a topic |
|
Alt+Shift+↑ |
Moves a topic up one line |
|
Alt+Shift+↓ |
Moves a topic down one line |
|
Ctrl+Shift+N |
Demotes a topic to body text |
|
Alt+Shift+1 |
Displays only top topics |
|
Alt+Shift+2 |
Displays first- and second-level topics |
|
Alt+Shift+n |
Displays all topics up to level n, such as Alt+Shift+4 for the fourth level |
|
Alt+Shift+A |
Displays all topics |
|
Alt+Shift++ (plus sign) |
Displays all subtopics in the current topic |
|
Alt+Shift+_ (underline) |
Hides all subtopics in the current topic |
Printing an outline
Printing an outline works just like printing any other document in Word but with one big difference: Only visible topics are printed.
To control visible topics, use the Show Level menu, as discussed earlier in the “Expanding and collapsing topics” section. For example, to print the entire outline, choose All Levels from the Show Level menu and then print.
To print only the first two levels of your outline, choose Level 2 from the Show Level drop-down list and then print.
· Word uses the Heading styles when it prints the outline, although it does not indent topics.
· See Chapter 9 for more information on printing documents in Word.
Large Documents
The first novel I wrote (and never published, of course) was several hundred pages long. It was saved as a single document. Although Word documents can be any length, putting everything into one document that way is impractical. Editing, copying and pasting, searching and replacing, and all other word-processing operations become less efficient the larger the document.
A better solution for long documents is to keep each chapter, or large chunk, as its own file. You can then take advantage of Word’s Master Document feature to put everything together when it comes time to print or publish.
· The master document stitches together all individual documents, or subdocuments, even continuing page numbers, headers, footers, and other ongoing elements. The end result is a large document that you can print or publish.
· What qualifies as a large document? Anything over 100 pages qualifies, as far as I’m concerned.
· When writing a novel, create each chapter as its own document. Keep all those chapter documents in their own folder. Further, use document filenames to help with organization. For example, I name chapters by using numbers: The first chapter is 01, the second is 02, and so on.
· This book is comprised of several dozen individual Word documents — one for each chapter, each part introduction, the front matter, the index, and so on.
Creating a master document
Word’s Master Document feature helps you collect and coordinate individual documents — called subdocuments — and cobble them into one large document. When you have a master document, you can assign continuous page numbers to your work, apply headers and footers throughout the entire project, and take advantage of Word’s Table of Contents, Index, and other list-generating features.
To create a big, whopping document from many smaller documents — to create a master document — obey these steps:
1. Start a new, blank document in Word.
Press Ctrl+N to quickly summon a new, blank document.
2. Save the document.
Yeah, I know — you haven’t yet written anything. Don’t worry: By saving now, you get ahead of the game and avoid some weird error messages.
3. Switch to Outline view.
Click the View tab, and then click the Outline button.
4. On the Outlining tab in the Master Document group, click the Show Document button.
The Master Document group is instantly repopulated with more buttons. One of these is the Insert button, used to build the master document.
5. Click the Insert button.
6. Use the Insert Subdocument dialog box to hunt down the first document to insert in the master document.
The documents must be inserted in order. I hope you used a clever document-naming scheme, as recommended in the preceding section.
7. Click the Open button to stick the document in the master document.
The document appears in the window, but it’s ugly because Outline view is active. Don’t worry: It won’t be ugly when it is printed!
If you’re asked a question about conflicting styles, click the Yes to All button. It keeps all subdocument styles consistent with the master document. (Although it’s best when all documents use the same document template.)
Word sets itself up for you to insert the next document:
8. Repeat Steps 5 through 7 to build the master document.
9. Save the master document when you’ve finished inserting all subdocuments.
At this point, the master document is created. It’s what you’ll use to print or save the entire, larger document.
You can still edit and work on the individual documents. Any changes you make are reflected in the master document. In fact, the only time you really need to work in the master document is when you choose to edit the headers and footers, create a table of contents, or work on other items that affect the entire document.
· When you’re ready, you can publish the master document just as you publish any individual document. See Chapter 9 for information on publishing a document.
· Use the Collapse Subdocuments button to hide all subdocument text. For example, if you need to create a table of contents or work on the master document’s headers and footers, collapsing the subdocuments makes the process easier.
· See Chapter 21 for more information on creating a table of contents and an index for your document.
Splitting a document
Splitting a document isn’t a part of creating a master document, but it might be the way you start. If you mistakenly wrote your novel as one long document, I recommend that you split it into smaller documents. A simple shortcut doesn’t exist; instead you have to cut and paste to create smaller documents out of a huge one.
Here’s how to split a document:
1. Select half the document — the portion you want to split into a new document.
Or if you’re splitting a document into several pieces, select the first chunk that you want to plop into a new document. For example, split the document at the chapter breaks or a main heading break.
2. Cut the selected block.
Press Ctrl+X to cut the block.
3. Summon a new, blank document.
Ctrl+N does the trick. Or, if you’re using a template (and you should be), start a new document with that template. See Chapter 16.
4. Paste the document portion.
 Press Ctrl+V to paste. If the text doesn’t paste in with the proper formatting, click the Home tab, and in the Clipboard group, click the Paste Options button. Choose the command button Keep Source Formatting (shown in the margin).
5. Save the new document.
Continue splitting the larger document by repeating these steps. After you’ve finished splitting the larger document, you can safely delete it.
Dan’s Writing Tips
Nothing beats advice from someone who has been there and done that. As a professional writer, I’m excited to pass along my tips, tricks, and suggestions to any budding scrivener. That’s why I wrote this section.
Choosing the best word
When two words share the same meaning, they're said to be synonyms — for example, big and large. Synonyms are helpful in that they allow you to find better, more descriptive words and, especially, to avoid using the same tired old words over and over. Obviously, knowing synonyms is a handy skill for any writer.
To find a word’s synonym, right-click the word in your document. From the pop-up menu, choose the Synonyms submenu to see a list of words that have a similar meaning. Choose a word from the menu and it replaces the word in your document.
· To see more word alternatives, right-click a word and choose Synonyms ⇒ Thesaurus. The Thesaurus pane appears, listing multitudinous alternative words.
· To use a word from the Thesaurus pane, right-click the word and choose the Insert command. The word is placed in your document at the toothpick cursor’s location.
· Antonyms, or words that mean the opposite of the selected word, might also appear on the Synonyms submenu.
· For more research on a specific word, right-click and choose the Smart Lookup command. The Insights pane appears, which lists sources from online references to help you determine whether or not you’re using the best word.
Counting every word
You pay the butcher by the pound. The dairyman is paid by the gallon. Salespeople keep a percentage of their sales. Writers? They’re paid by the word.
If you’re lucky enough to be paid for your writing, you know that word count is king. Magazine editors demand articles based on word length. “I need 350 hilarious words on tech-support phone calls,” an editor once told me. And novel writers typically boast about how many words are in their latest efforts. “My next book is 350,000 words,” they say in stuffy, nasal voices. How do they know how many words they wrote?
The best way to see how many words dwell in your document is to view the status bar. The word count appears by the Words label, and the count is updated as you type.
If you don’t see the word count at the bottom of the window, right-click the status bar and choose Word Count.
 To obtain more than a word count, click the Review tab. In the Proofing group, click the Word Count button (shown in the margin). The detailed Word Count dialog box appears, listing all sorts of word-counting trivia.
Also see Chapter 23 for information on inserting a Word Count field in your document.
Writing for writers
Here’s a smattering of tips for any writer using Word:
· You’ll notice that, thanks to AutoFormat, Word fixes ellipses for you. When you type three periods in a row, Word inserts the ellipsis character (…). Don’t correct it! Word is being proper. When you don’t use the ellipsis character, be sure to separate the three periods with spaces.
· You can format paragraphs by separating them with a space or by indenting the first line of each paragraph. Use one or the other, not both.
· Keep the proper heading formats: Heading 1, Heading 2, and so on. Or create your own heading styles that properly use the Outline Level format. That way, you can easily create a table of contents as well as use other Word features that display headings in your documents.
· Use Outline view to collect your thoughts. Keep working on the outline and organizing your thoughts. When you find yourself writing text-level topics, you’re ready to write.
· Use the soft return (Shift+Enter) to split text into single lines. I use the soft return to break up titles and write return addresses, and I use it at other times when text must appear one line at a time.
· Word is configured to select text one word at a time. This option isn’t always best for writers, where it sometimes pays to select text by character, not by word. To fix that setting, from the File tab menu, choose Options. In the Options dialog box, click the Advanced item. Remove the check mark by the When Selecting, Automatically Select Entire Word item. Click OK.
All materials on the site are licensed Creative Commons Attribution-Sharealike 3.0 Unported CC BY-SA 3.0 & GNU Free Documentation License (GFDL)
If you are the copyright holder of any material contained on our site and intend to remove it, please contact our site administrator for approval.
© 2016-2026 All site design rights belong to S.Y.A.