IPv6 Address Planning (2015)
Part III. Maintenance
The next three chapters explore topics related to maintaining and future-proofing your IPv6 address plan. Chapter 8 covers working with IPAM and DDI, two practices critical to the management of IPv6 networks and addressing plans. Chapter 9 will discuss dealing with network and Internet growth and change (and how they are likely to impact your address plan). Chapter 10 looks at the routing concepts you’ll need to keep in mind to keep the IPv6 addresses of your plan reachable.
Chapter 8. Working with IPAM and DDI
Introduction
As computer networks grow and become more complex, better tools and methods are needed to manage their resources. This is especially true as we enter the next stage of the evolution of the Internet and networking technology. Mobile devices, the Internet of Things, and cloud and virtualization architectures all require more efficient methods of provisioning and tracking basic network data like host addresses and names. These methods work best when they move beyond the traditional labor and opex-intensive processes that rely on manual changes or scripting (the latter usually only slightly more scalable than the former). Automation and orchestration of host and node provisioning become critical elements in enabling improvements in business agility, SLA enforcement, and reduction in IT costs in traditional networks (and the minimum requirement for many next-generation networks).
At first glance, IPv6 would appear to greatly complicate this picture. The larger address space, as well as the more complex address representation, would seem to necessitate more complex management requirements. And in the immediate term, managing IPv6 addresses does indeed introduce additional complexity.
But as mentioned, in the medium to long term, IPv6 is likely to facilitate improved provisioning and address management practices, helping realize the promise of automation, even in the hyper-scale environments of emerging networks and the applications they support.
In this chapter, we’ll be focusing on tools that are available today to help effectively manage your IPv6 address plan and begin to build practices that will provide a foundation for the provisioning and management requirements of tomrrow’s networks.
We’ll introduce current IPAM methods and tools (and the concepts they apply, including how they differ from IPv4 to IPv6), and then expand our discussion to include DDI (DNS, DHCP, and IPAM) functionality that exists to facilitate provisioning of hosts and nodes through better management of address assignment, tracking, host naming, etc. (You might think of DDI as IPAM on steroids.)
Finally, we’ll examine the likely future of IPAM and DDI in the context of managing the address and naming data for emerging networks like SDN, cloud and virtualization, IoT, and mobile.
IP Address Management
Let’s begin our discussion of IPAM with a basic definition:
IP Address Management (or IPAM) is the collection of practices and tools required by an organization to effectively manage their IP address resources. It includes allocating, administering, reporting, and tracking of IP addresses along with the associated network devices and associated data (such as DNS and DHCP).[106]
IPAM as a Cornerstone of Network Management
Before we dig in to what IPAM practices and tools are composed of, let’s examine some of the concepts that IPAM is based on.
At its most basic, IPAM (along with DNS and DHCP) is merely one facet of network management as a whole. But if you consider the role it plays in keeping devices properly addressed (and users online with access to the services and applications they rely on), it becomes more evident that effective IP address management is critical to effective overall management of networks.
Far too often, in many organizations, IPAM as a formal element of network management is given short shrift or overlooked entirely. Instead of being approached with the same administrative rigor and operational zeal as, say, keeping routers and switches online, it is relegated to ad-hoc processes (nonstandardized scripting) and inadequate tools (e.g., spreadsheets or text files).
The proof of this lies in a simple test: let’s suppose you were asked to go generate a report showing how your address space is allocated or assigned along with perhaps what hosts are currently online and at what addresses, how quickly and easily could you produce one?
Or to put it slightly differently: if your manager came to you tomorrow and tasked you with integrating the network of a new merger or acquisition, how much time and energy would you need to spend accounting for what IP space is currently allocated? Or where and how much additional space you might need? Or even what is the most proper allocation to assign any new space from?
At the least, of course, you’d muddle through. But the inordinate energy required by many organizations to track the basic yet essential resource of IP addressing creates an inevitable opportunity cost in the form of cycles that could (and should) be better applied to other IT tasks and projects. Ultimately, there can be little if any business agility without the requisite agility in the IT network and organization. Big bets on cloud, virtualization, and SDN are all proof-positive of this.
Why More Than 1.8x10¹⁹ Addresses Aren’t a Substitute for Proper IPAM
Perhaps you’re thinking the vast scale of IPv6 eliminates (or lessens) the importance of IPAM. After all, the persistent struggle in IPv4 to find a few more addresses or another contiguous subnet is merely a function of the scarcity of individual public IPv4 addresses (or subnets of private ones). When the next project or department head sidles up with their proverbial bowl emptied of IP addresses or prefixes and asks “Please, sir, I want more” wouldn’t we be able to just slop another /64 or /48 into it, harrumph, and say “There. Go away.”
There are at least a couple of reasons why this isn’t the case.
For one thing, remember that we’re still going to need IPv4 addresses for the foreseeable future. In fact, managing IPv4 space can become more critical than ever for some organizations as they adopt IPv6.
For example, how quickly are you using up your remaining IPv4 resources and will you have enough addresses to keep up with the demands of legacy or new projects? What about continuing or emerging trends, like the flood of mobile devices connecting to the network?
Without an effective IPAM practice and proper IPAM tools in place, it will be much more difficult and time-consuming to generate capacity reports and track consumption of IPv4 addresses in order to determine where and when IPv6 deployment might be mandatory.
Regardless of how we might have tracked (or failed to track) IPv4, ad-hoc and primitive IPAM methods that might marginally work with the legacy protocol are entirely unsuitable for IPv6.
We’ve demonstrated that, despite its potential length and its use of hexadecimal, the presentation of an IPv6 address needn’t automatically be unwieldy and thus more prone to transcription error. But the fact remains that any hosts or nodes utilizing addresses that require EUI-64 presentation or privacy extensions are indeed vulnerable to such errors, especially in the host ID of the address.
To get some idea of the potential for transcription errors, take a look at Table 8-1. It depicts a short sample list of IPv6 addresses, derived from either EUI-64 or temporary address algorithms.
Table 8-1. A sample list of EUI-64/temporary IPv6 addresses
|
Host |
IPv6 address |
|
1 |
2001:db8:abba:2112:13e9:5aff:fe39:bbe7/64 |
|
2 |
2001:db8:abba:2112:23e5:3cff:fe07:1f1a/64 |
|
3 |
2001:db8:abba:2112:c93d:32ff:fe2f:1196/64 |
|
4 |
2001:db8:abba:2112:6b27:73ff:fe68:51a0/64 |
|
5 |
2001:db8:abba:2112:40d5:97ff:fee5:6846/64 |
|
6 |
2001:db8:abba:2112:4b39:2aff:fee1:2bc7/64 |
|
7 |
2001:db8:abba:2112:34cd:d7ff:fe31:d85b/64 |
|
8 |
2001:db8:abba:2112:08a8:8bff:fe23:db50/64 |
|
9 |
2001:db8:abba:2112:9ab3:12ff:fed1:c1af/64 |
|
10 |
2001:db8:abba:2112:3a53:d6ff:fe7e:4f46/64 |
IPAM Policy
Like security policy, IPAM lends itself well to the application of a policy cycle. At its most essential, a policy cycle is a process whereby the application and effectiveness of an administrative policy is tested against the environment the policy applies to, and then updated and validated at regular intervals.
For instance, in IP address management, following the design of the address plan (i.e., policy formulation) and the allocation and assignment of addresses (i.e., policy application), continuous monitoring of the state of the network addressing through IPAM-focused tools and software allows the original plan to be kept current, inventory tracked, and capacity planned (policy enforcement and update) and any failures to be isolated, summarization maintained, etc. (policy validation and monitoring). Figure 8-1 illustrates this process cycle.
With the right tools in place, the policy in the form of an address plan can be reviewed and validated at any time through reporting that accounts for the current allocation and assignment of addresses.
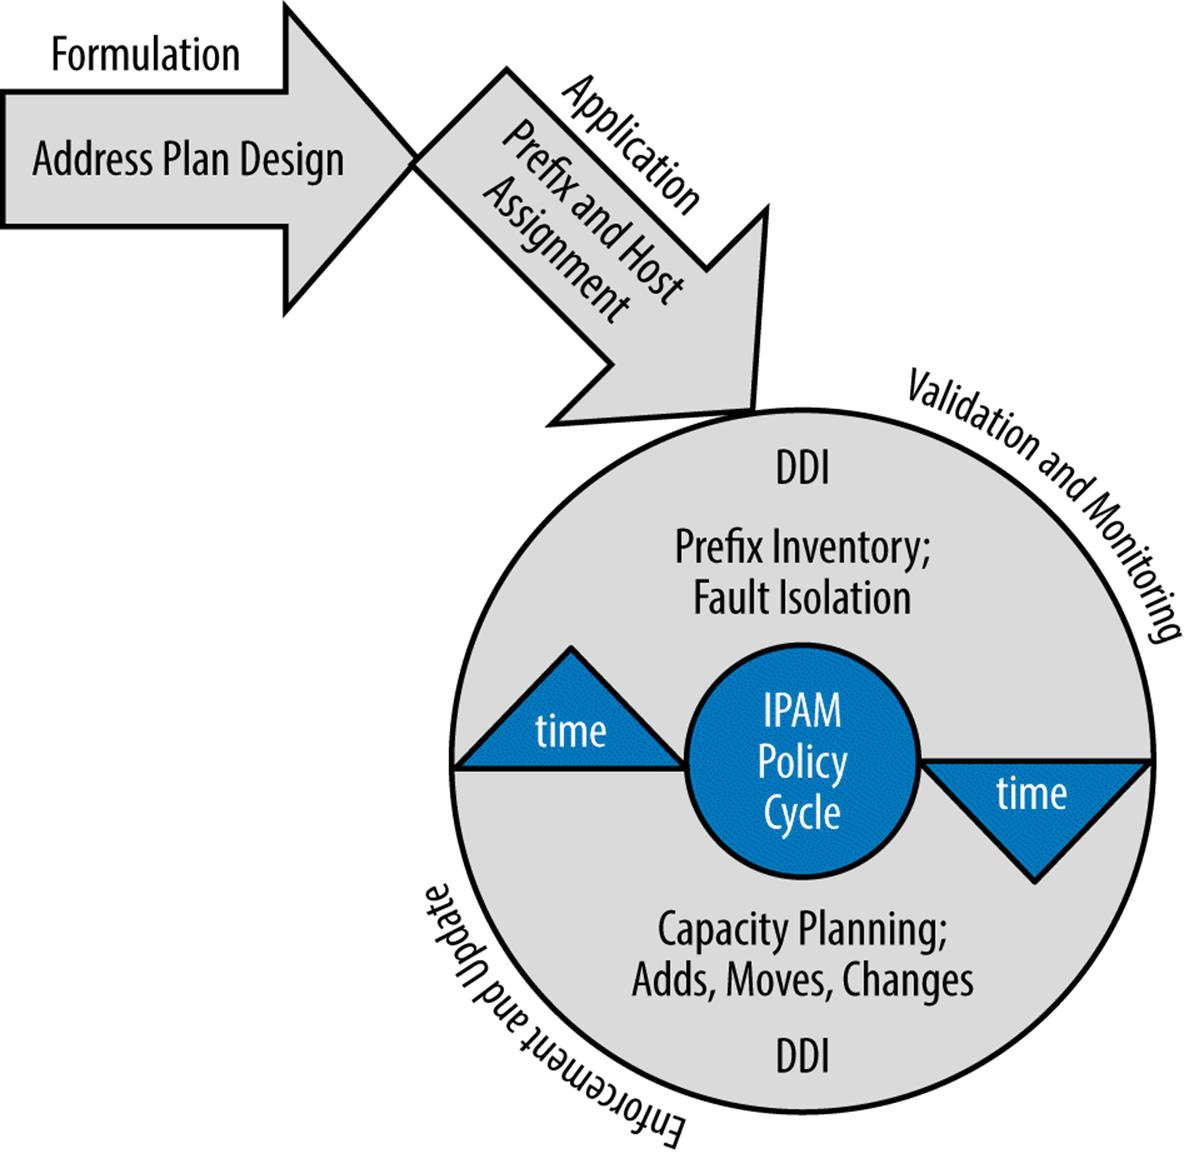
Figure 8-1. IPAM policy cycle
IPAM Features
There are a number of IPAM providers, but the tasks performed by their software and tools are generally similar. Here’s a list of possible features along with a brief description for each. An assessment of the overall quality of an IPAM system can be based on how many of these features are implemented (as well as the general depth and ease-of-use of said features).
Later in the chapter, we’ll take a look at what some of these features actually look like when configured in an actual IPAM system.
Display of IPv6 address space
There are different formats for displaying the IPv6 address space under management, and a good IPAM system will offer more than one view. Common views are a graphical map of the network space (Figure 8-2), a list, or a table view.

Figure 8-2. IPv6 net map, Infoblox IPAM
The parent network (aka, supernet or network container) is identified by the red box marked 1 with the value 2001:db8:def0::/44. This is the level of hierarchy the net map illustrates and contains.
The box marked 2 shows the entire range of addresses possible at this level of hiearchy:
2001:db8:def0:0000:0000:0000:0000:0000 to 2001:db8:deff:ffff:ffff:ffff:ffff:ffff
The arrow labeled 3 points to a network container, similar in role to the formal definition of an allocation: additional subnets within it will be assigned later. Note that the arrow is pointing to the fifth network container on the network map, which would correspond to the subnet2001:db8:def4::/48.
4 is pointing to the second network container, as well as a mouse-over box that shows some relevant detail for that allocation. This information includes the network (2001:db8:def1::/48); the number of networks the block contains (1 block); the start address (2001:db8:def1:: or2001:db8:def1:0000:0000:0000:0000:0000); the end address (2001:db8:def1:ffff:ffff:ffff:ffff:ffff); and finally, the percentage of IPAM utilization for that container — currently at 31.2% because we’ve allocated and assigned some subnets within this block. The black dots within the block represent these.
Finally, 5 points to the entirety of the unallocated space in our top-level allocation. Since we’ve only allocated 6 of the available 16 /48s, this leaves 10 /48s unallocated. Note that the unallocated space doesn’t correspond to the two most logical ways we’d be likely to represent it — either as 10 individual /48s or as networks aggregated to the greatest extent possible (i.e., 2001:db8:def6::/46 and 2001:db8:def8::/45).
A list or table view presents the defined subnets as, well, a list or table (Figure 8-3).
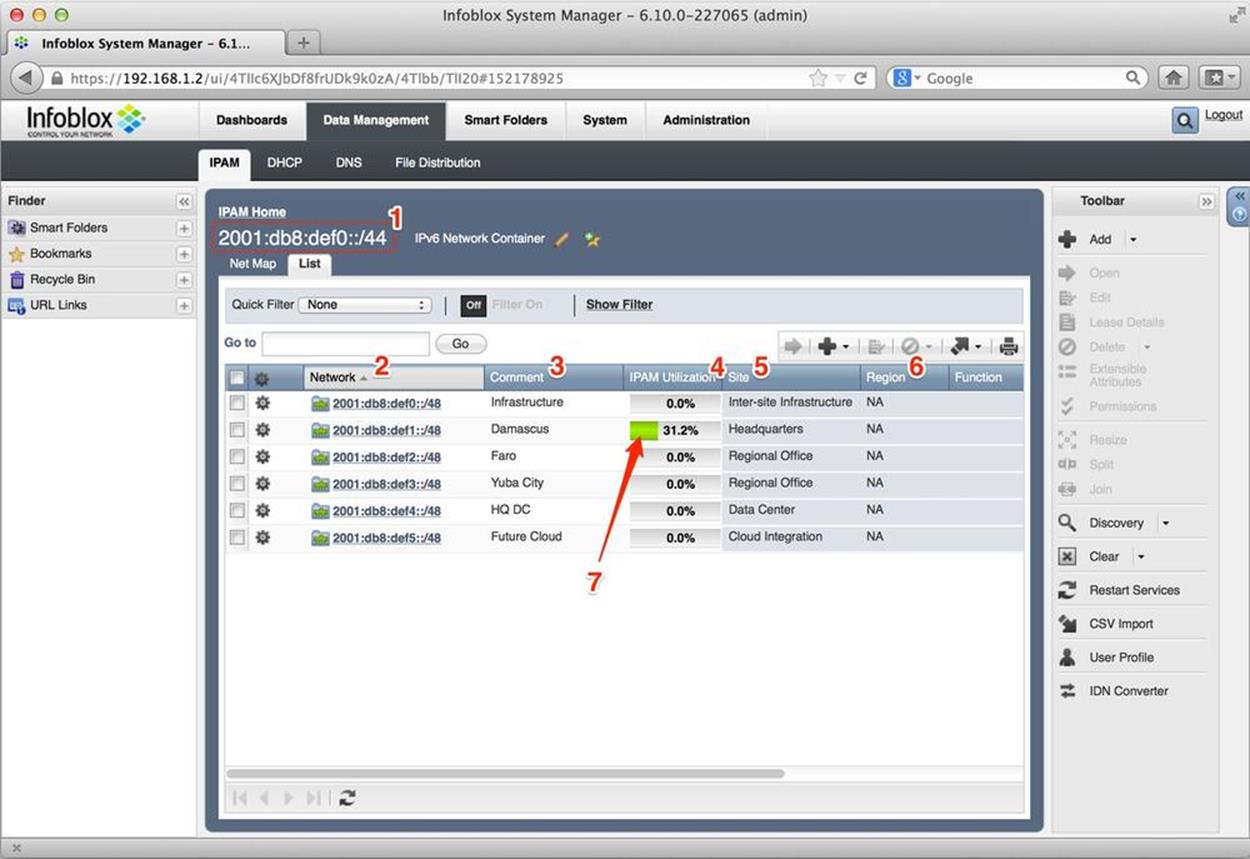
Figure 8-3. IPv6 list view, Infoblox IPAM
Once again, the parent network (aka, supernet or network container) is identified by the red box marked 1 with the value 2001:db8:def0::/44. This is the level of hierarchy the list illustrates and contains.
The column titled Network (indicated by the number 2) lists the 6 /48 prefixes we’ve defined from our parent allocation.
The next column, Comment (3), offers the site descriptions corresponding to each prefix.
IPAM Utilization (4), shows the number of subnets defined within that network container as a percentage.
Site (5), provides a descriptor for the generic type of site (e.g., Headquarters Regional Office, etc.). These extensible attributes, as they are referred to in the Infoblox IPAM system, offer a way of finding, grouping, and filtering IPAM elements and objects based on common or user-defined classes. Column 6, Region, is another of these attributes — in this case, NA for North America.
Another format for displaying IPv6 networks is the tree (or outline) view (Figure 8-4).
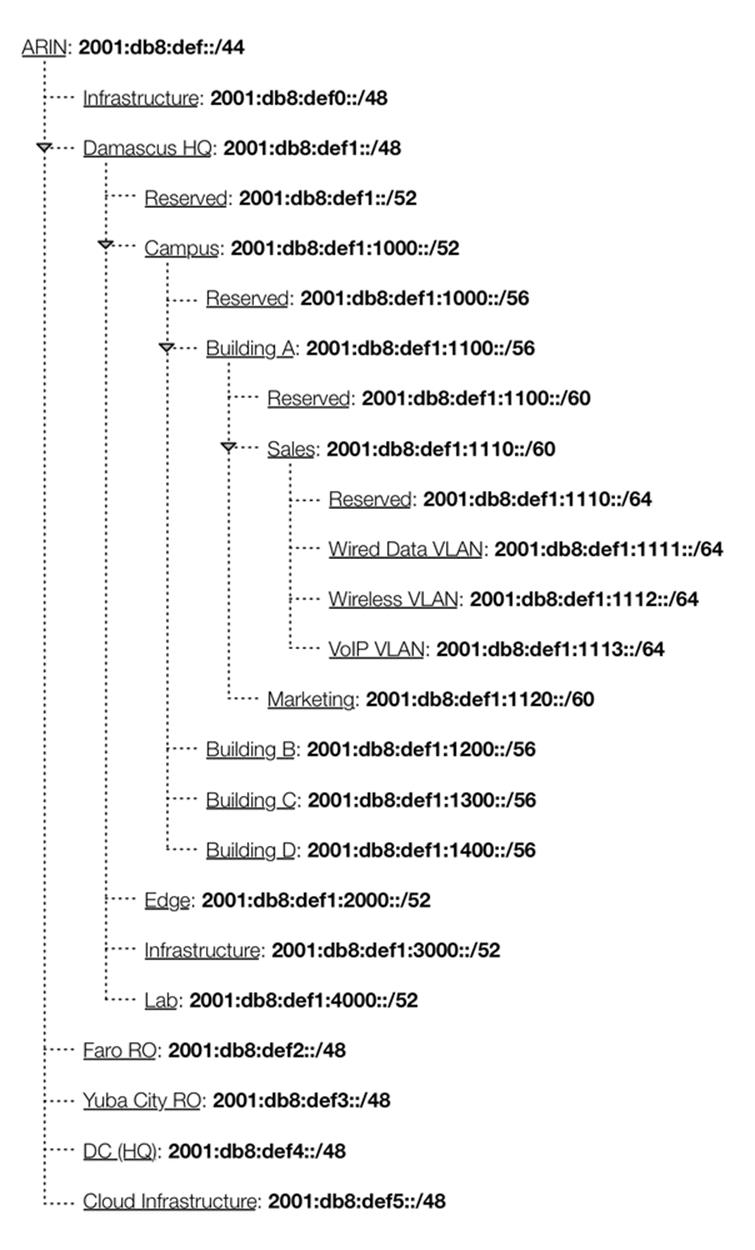
Figure 8-4. IPv6 tree (or outline) View
This view is effective at immediately conveying the network hierarchy, as well as the relationship between the various hierarchy levels.
Network aggregation
The ability to combine smaller prefixes into larger ones, for example:
2001:db8:abba:2000::/52
2001:db8:abba:3000::/52
can be aggregated to:
2001:db8:abba:2000::/51
Network splitting
The ability to split a larger prefix into two or more smaller prefixes is typically supported. For example:
2001:db8:abba:2000::/51
can be subnetted to:
2001:db8:abba:2000::/52
2001:db8:abba:3000::/52
or
2001:db8:abba:2000::/51
can be subnetted to:
2001:db8:abba:2000::/53
2001:db8:abba:2800::/53
2001:db8:abba:3000::/53
2001:db8:abba:3800::/53
NOTE
Network resizing is a common task in IPv4 address management, due to the need to right-size subnet assignments in order to conserve address space. Because of the astronomical number of hosts in a typical IPv6 prefix assignment, network resizing is not generally used.
Measuring consumption of IPv6 address resources
An IPAM system should offer the ability to measure and track the consumption of available IPv6 address resources — but measured in subnets rather than hosts. Recall that we’re generally not concerned with tracking host address consumption in IPv6. This, in combination with reporting features, allows for better capacity planning and overall network management.
Reporting
A critical benefit of an IPAM system is the ability to generate reports that capture IPv6 network and subnet inventories for use in IT planning and strategy. Any major network numbering tasks or projects brought about by organizational change can be more effectively managed given the data that an IPAM system can provide. Address and capacity planning that reports provide can be correlated with existing or planned architectures to determine if any need for additional addressing exists.
IPv6 address plan design
An IPAM system certainly seems like a logical setting in which to build an IPv6 address plan. Application of address planning principles and best practices can be combined with the IPAM system’s ability to display allocations and assignments according to organizational hierarchy, both within and between sites. Initial planning can be iterated before deployment begins, making the ultimately deployed plan much more ideal and ensuring that the overall allocation size is the right one (i.e., in most cases, large enough).
RIR registration updating
Since more end-user organizations and enterprises are obtaining IPv6 allocations directly from the RIRs, they’ll need to abide by the same rules and regulatory requirements that ISPs and LIRs do. In most cases, this additional administrative burden is very light since organizations outside of ISPs seldom assign networks from their own allocation to businesses or entities under independent management. These kinds of assignments require updates to the Shared Whois Project or the Referral Whois database and having an IPAM system that can track, and even push, updates can be useful.
Policy compliance
An IPAM system tracking address resource can make it easier to validate that new or ongoing addressing assignments will comply with existing security, SLA, or routing policy requirements (such as integration with firewall and QoS ACLs, as well as routing subnet aggregation).
Integration with DNS and DHCPv6
Integrated management of DNS and DHCPv6 is always present in IPAM tools that are part of a larger DDI system. We’ll cover this in more detail in the next section.
Example: Using IPAM Software
Let’s take a look at how one DDI vendor accomplishes three basic IPAM tasks using their web interface.[107] This example is provided by Infoblox vNIOS software (version 6.10.0). The three tasks are:
1. Adding an IPv6 prefix (in this case a site /48)
2. Splitting the IPv6 prefix into /52s for assignment
3. Creating reverse-mapped DNS zones for the prefixes
Adding an IPv6 Prefix
After logging into the vNIOS web interface, users are presented with an IPAM tasks dashboard (Figure 8-5).
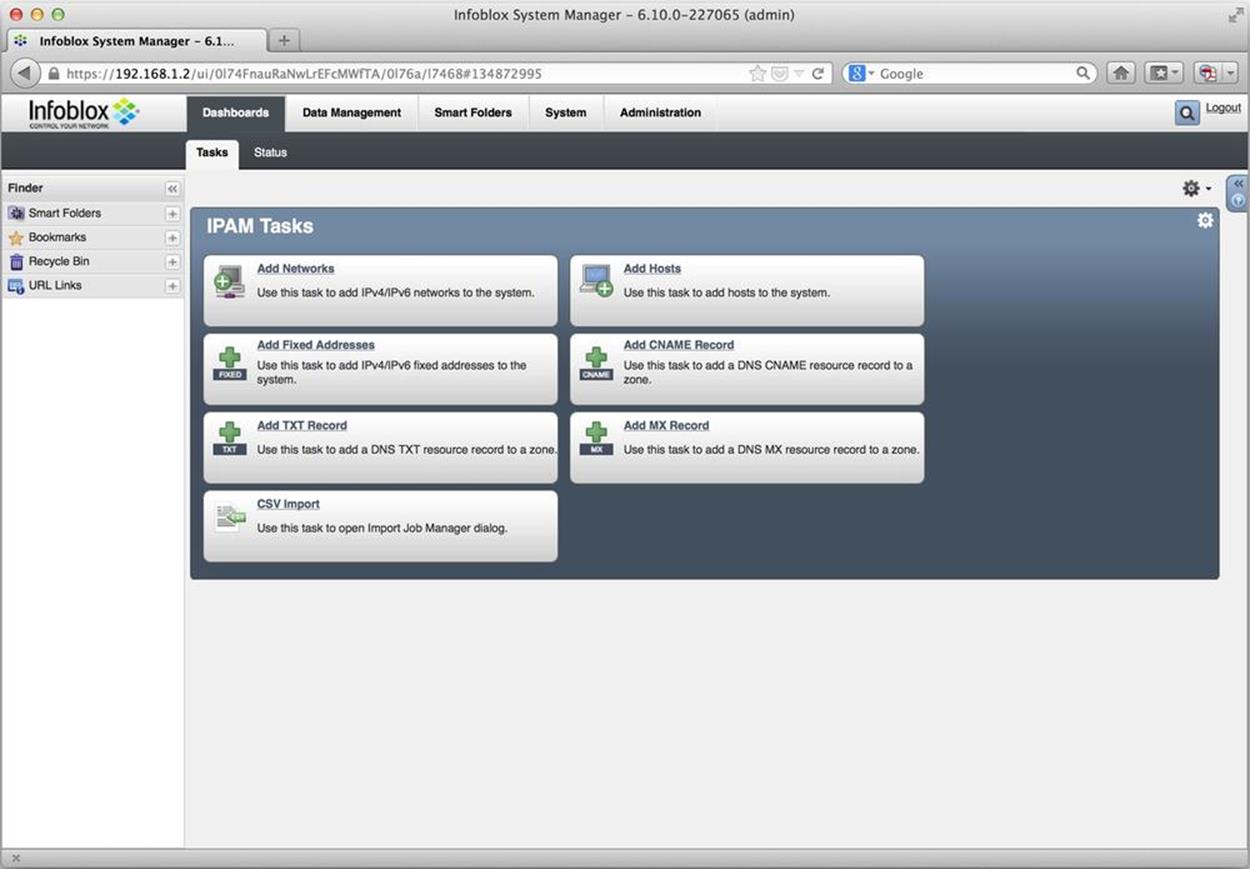
Figure 8-5. Infoblox vNIOS IPAM Tasks dashboard
Several common, predefined tasks are offered. We simply want to add an IPv6 network. After selecting the Add Networks link, a wizard opens (Figure 8-6).
On this screen, we first select the protocol (1), and then set the number of bits in the network ID (2), before finally entering the allocated prefix (3); in this case, 2001:db8:2112::/48.
After a few additional steps, the network appears in the main IPAM Data Management screen (Figure 8-7).
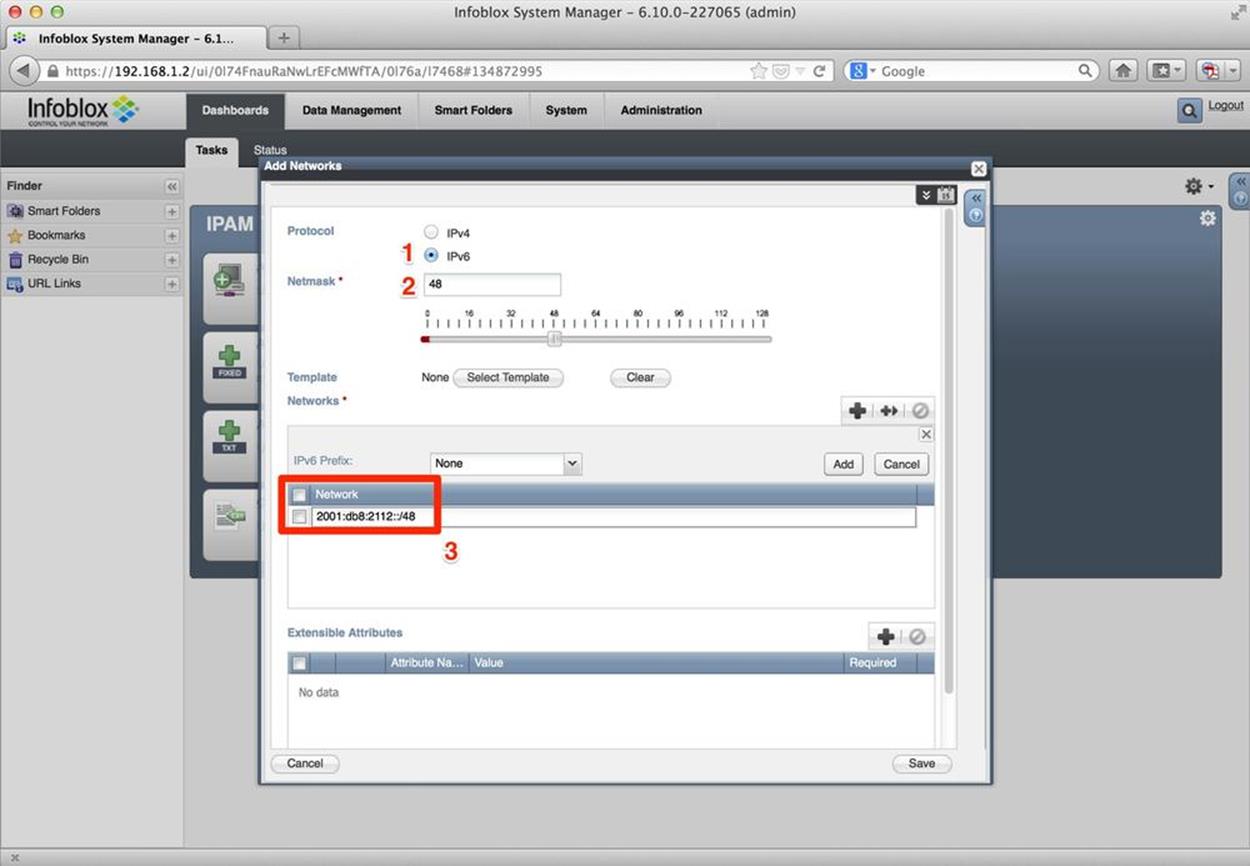
Figure 8-6. Add Networks wizard
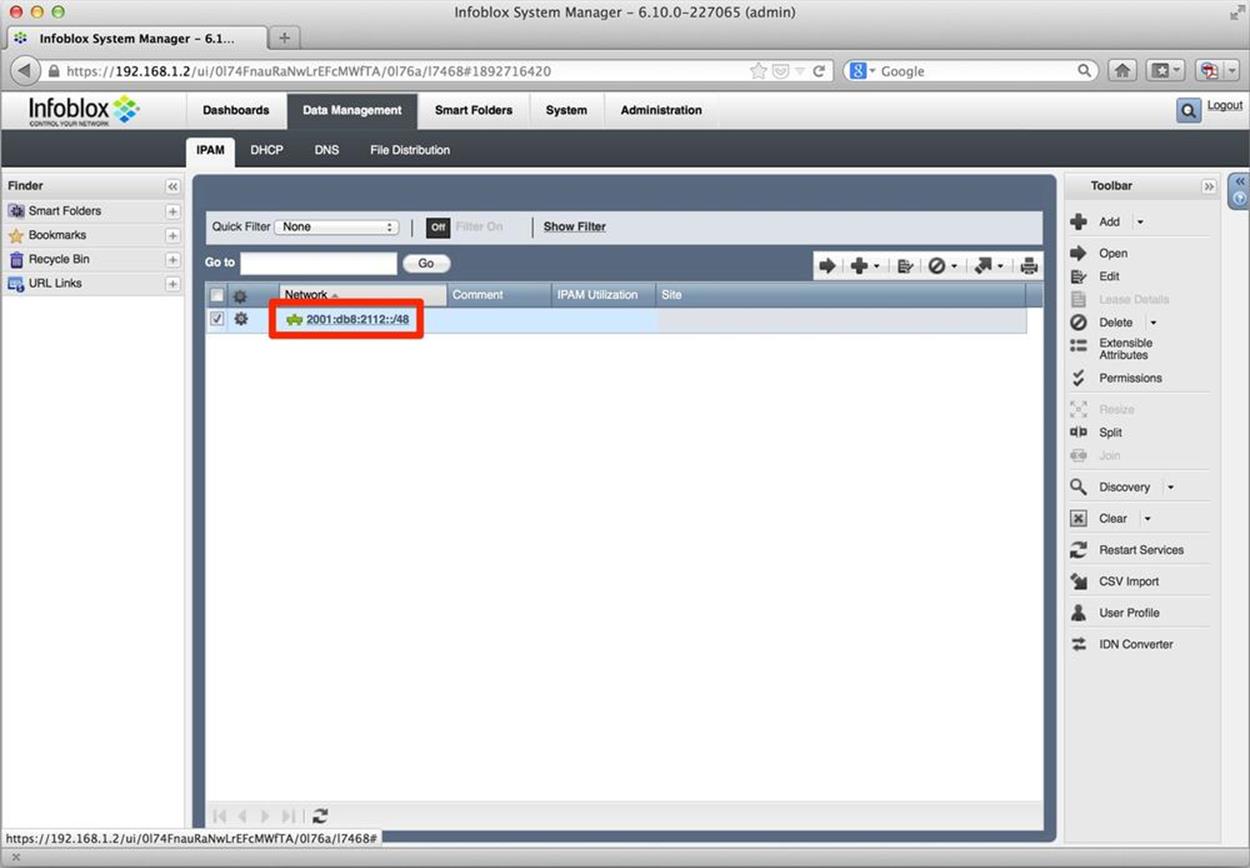
Figure 8-7. IPv6 Network added
Splitting an IPv6 Prefix
After some additional design and address planning, we decide that we’re going to use the next 4 bits for our first level of hierarchy. Theoretically, we could use the same procedure above to create the 16 resulting /52s, but any good IPAM program will allow us to split an allocation (provided the bits feasible for the desired subnetting are not already in use).
Also in Figure 8-7, notice that off to the right of our highlighted network, we have an option to Split the selected network.
Once we click on Split, a new wizard opens (Figure 8-8).
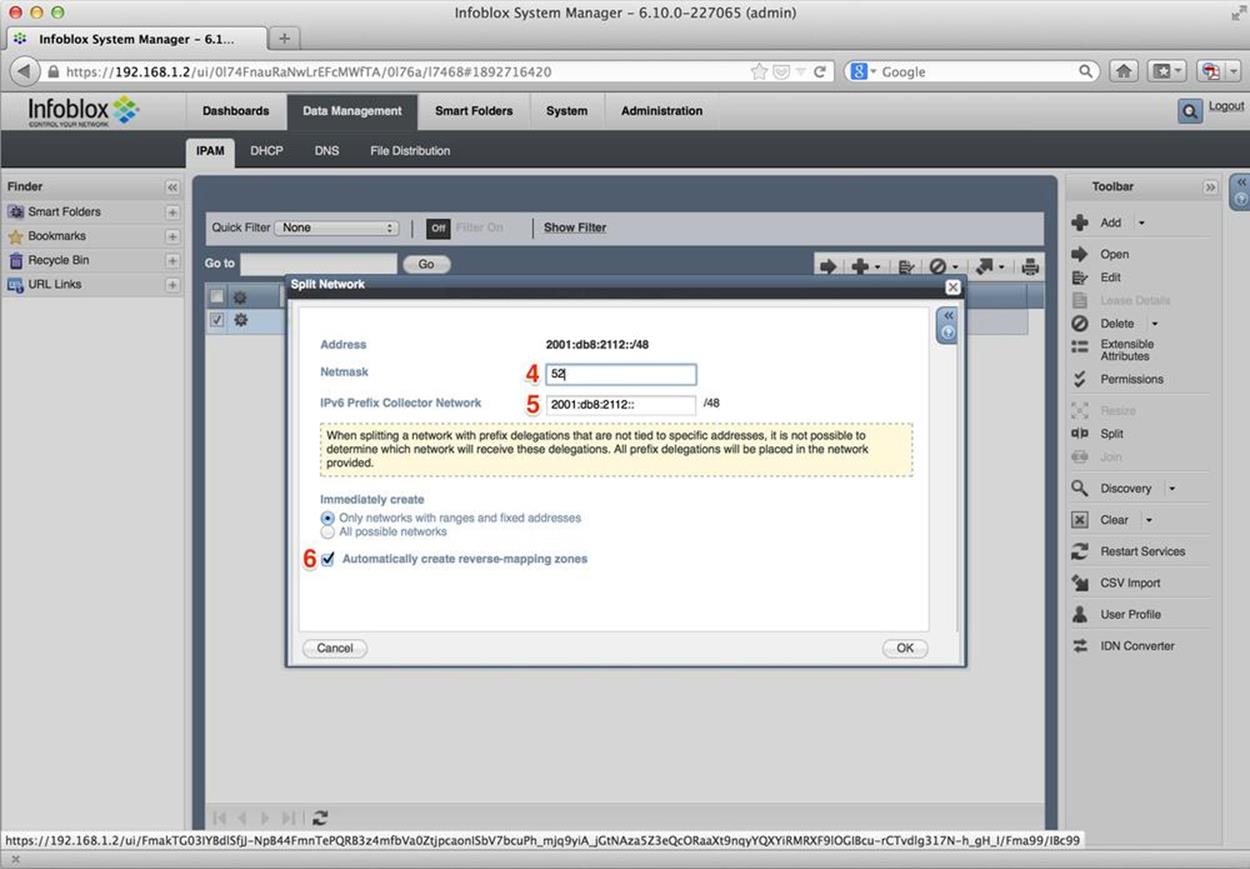
Figure 8-8. IPv6 split network
Here, we first specify the number of bits the subnets we’re creating with the split function should have (4), and then enter the subnet from which the subnets are to be created (5) (still our original assignment of 2001:db8:2112::/48).
Were we to click OK at this point, our 16 /52s would be created — something we could easily verify (Figure 8-9).
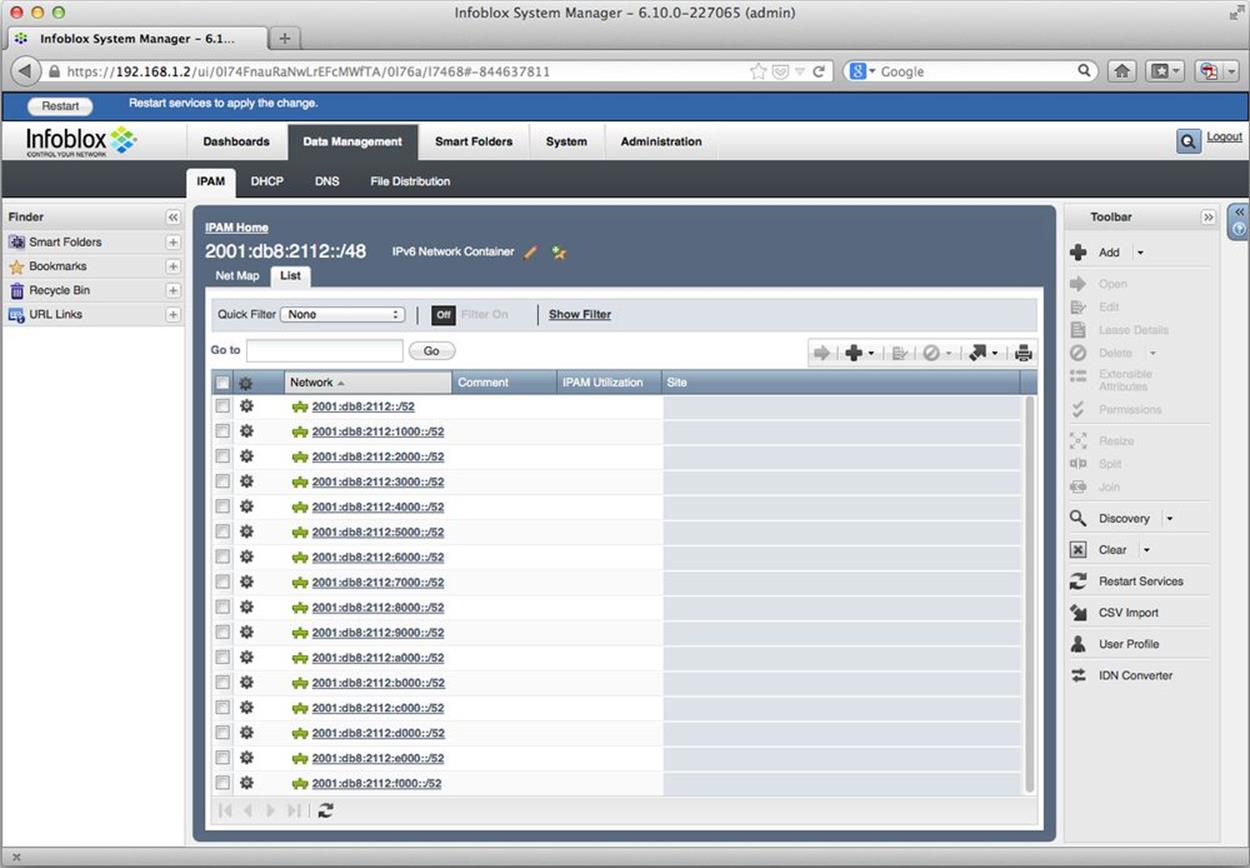
Figure 8-9. IPv6 — 16 newly-created /52s
Creating Reverse-Mapping DNS Zones
Instead of clicking OK, however, we typically would want to check the Automatically create reverse-mapping zones checkbox first. When checked, this does exactly what it says and creates reverse DNS zones for each new subnet.
Next, we’ll verify our reverse zone files were created for each associated /52 prefix by navigating to the DNS tab in the vNIOS web interface. Here we see the individual zone entries for each generated /52 in their proper ip6.arpa format (Figure 8-10).

Figure 8-10. Auto-generated reverse DNS zones
We’ve just observed one of the key advantages of working with a DDI system. What would have been the labor-intensive creation of 16 reverse zone files is instead painlessly automated. And since the repitition (and drudgery!) associated with this type of task often leads to the introduction of errors, not to mention the requisite time required to find and fix them, additional time and effort is conserved.[108]
DDI: IPAM with 200% More Goodness
Based on the acronym, IPAM is obviously a component of DDI — yes, it’s an acronym nested within an abbreviation (where will the madness end?). And as you might suspect, although all DDI includes IPAM, not all IPAM includes DNS and DHCPv6.
But some of the tasks we just listed as recommended or required for effective IPAM will only be possible where IPAM itself is integrated with DNS and DHCPv6. And while we can certainly accomplish rudimentary IPAM with legacy methods and tools, without said integration of DNS and DHCPv6 into IPAM, more complex automation and network control tasks will only be possible through complicated scripting or API programming.
Indeed, once we start looking at best practices for IPAM policy, the integration of DNS and DHCPv6 becomes essential.
NOTE
The market view of DDI is perhaps best encapsulated by Gartner (who, incidentally, coined the DDI abbreviation in the first place): “Infrastructure and operations personnel can use DNS, DHCP and IP address management solutions to improve network availability, reduce operational expenditure, and simplify and streamline administration of critical infrastructure.”[109]
One view of IPAM is that it helps provide proper lifecycle management of IP addresses. But since actual hosts (presumably with users running applications) are not only using but dependent on both address and name resources, DDI may be similarly understood as a critical part of thelifecycle management of a given host.
At a high-level, this process isn’t significantly different for a host with IPv6 enabled. But the configuration of any DDI solution will require additional steps.
We’ve already looked at examples of how IPAM might be configured. We’ll soon explore what IPv6 DNS and DHCPv6 configuration might look like using DDI. But first, let’s take a look at some of the operational challenges of each.
Managing DHCPv6 and IPv6 DNS
If you’ve managed an enterprise network (or any network) that hosts periodically connect and disconnect from, you’re already intimately familiar with how DHCP and DNS facilitate operations by automating both address and name assignment in IPv4 (as well as additional information about the network in options provided to the host by the DHCP server). In fact, it’s safe to argue that the recent Bring Your Own Device (BYOD) phenomenon, driven by the explosion of personal mobile devices such as smartphones and tablets brought into the workplace, would be throw-up-your-hands-and-start-your-new-life-as-a-hermit-in-the-woods unmanageable without at least DHCP and DNS (to say nothing of IPAM or DDI).
DHCPv6 and IPv6 DNS differ enough from their counterparts in IPv4 that operational benefits, as well as challenges, are the result (with DHCPv6 arguably facing the most challenges of the two). While many of these challenges are at least partly met by the right DDI solution, protocol and operational standards are perhaps not yet mature enough to ensure that all of them will solved by a DDI solution alone.
DHCPv6 Basics
Auto-addressing in IPv6 can be accomplished using stateful DHCPv6, stateless DHCPv6 (a combination of SLAAC and DHCPv6), and plain old SLAAC. In stateful DHCPv6, the server provides an IPv6 address to the host. By comparison, in stateless DHCPv6, the host uses SLAAC to autoconfigure an address while a DHCPv6 server provides options.
With either stateful or stateless DHCPv6, the server provides additional options to the host, including DNS server and search domain information. Also, stateful and stateless DHCPv6 both rely on RAs from one or more routers to provide default gateway information. And depending on which mode is selected, deploying either requires a specific router configuration on the interface leading to the relevant link.
As far as which of these auto-addressing methods you should select, that will depend on the particulars of your deployment (and may vary, depending on what part of the network you’re addressing).
In IPv4 DHCP, the only time you typically need to touch the router configuration is if you’re configuring a DHCP relay helper address. In DHCPv6, however, you always have to set the proper router advertisement flags, depending on which auto-address configuration method you’re using. Figure 8-11 shows the proper settings and the resulting differences in address configuration.[110]
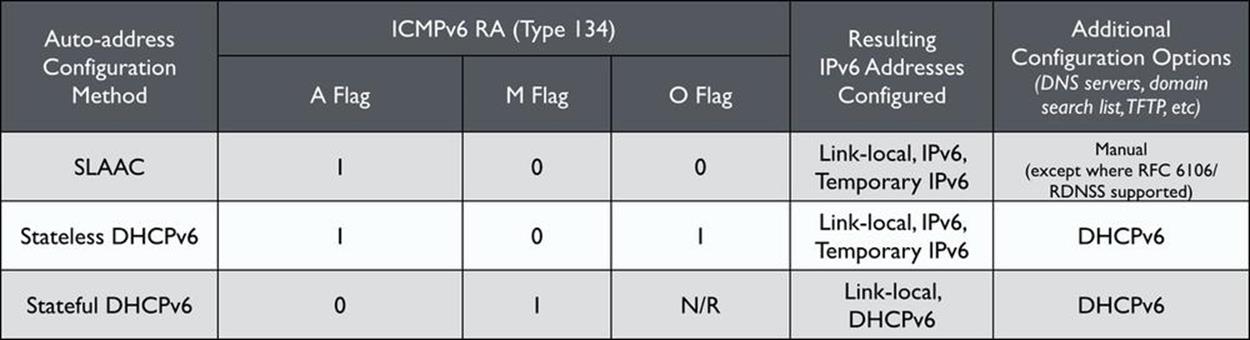
Figure 8-11. SLAAC, stateful and stateless DHCPv6 comparison
When IPv6 is enabled on a router interface, the default flag settings are shown in Table 8-2:
Table 8-2. Default router interface RA flags
|
RA flag |
Setting |
|
O |
0 |
|
A |
1 |
|
M |
0 |
As you can see from the above table, these settings correspond to SLAAC as the auto-address configuration method. Setting the flags for stateful DHCPv6 is relatively easy, provided you know the proper router configurations. Figure 8-12 shows the appropriate settings for Cisco IOS.
CAUTION
As you might imagine, in LAN environments where some combination of stateful DHCPv6, stateless DHCPv6, and SLAAC are deployed on the same link, host address assignments and resulting host/network interaction can be unpredictable and more difficult to manage.[111] To the extent possible, choosing a single host platform and auto-addressing method per link will minimize any such operational challenges.
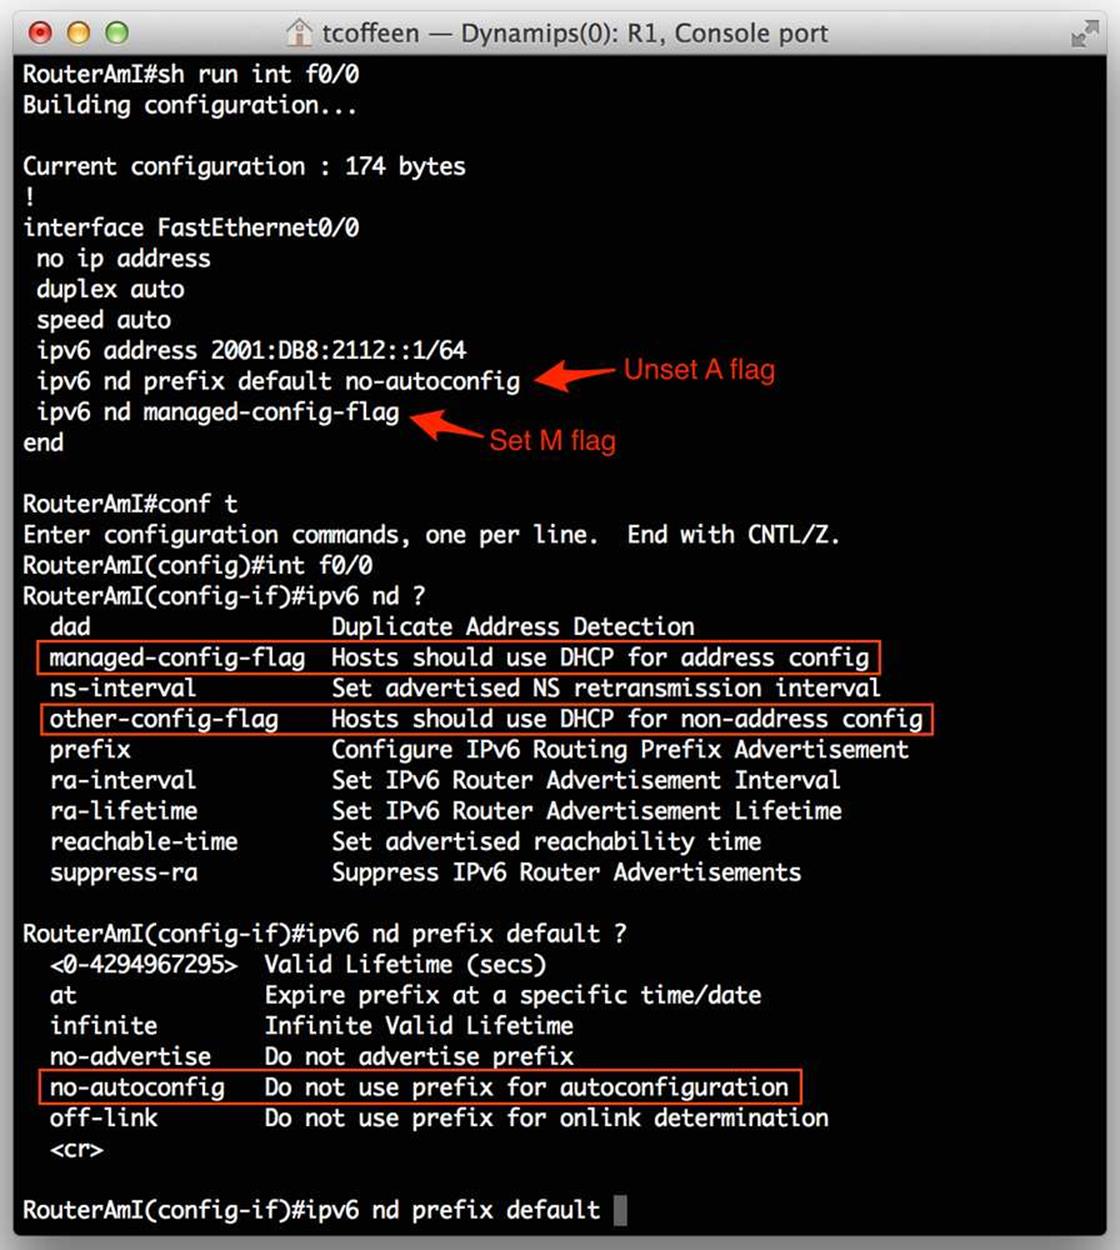
Figure 8-12. Cisco RA flag configuration
Configuring DHCPv6 in DDI
Now let’s take a look at configuring stateful DHCPv6, again using the Infoblox DDI solution (vNIOS software, version 6.10.0). Figure 8-13 provides a view of the DHCP configuration tab (1).
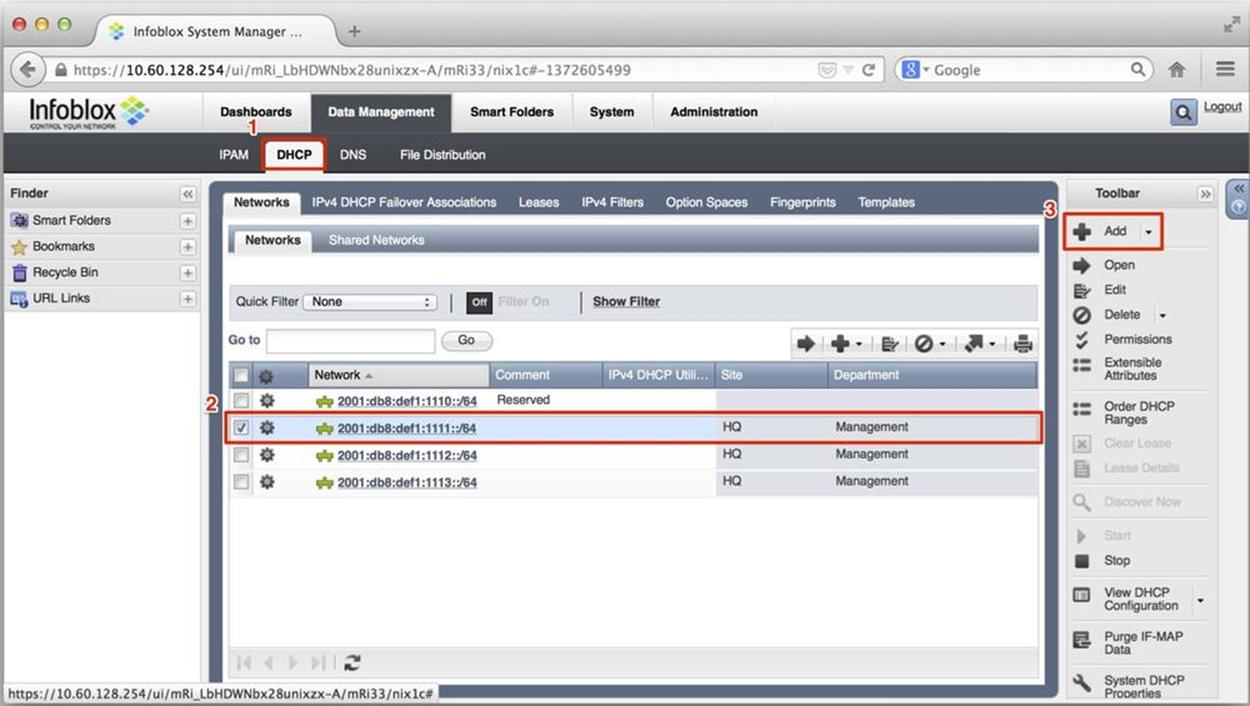
Figure 8-13. DHCPv6 configuration, network selection
The networks listed here (e.g., 2001:db8:def1:1110::/64, 2001:db8:def1:1111::/64, etc.) appear automatically based on the same networks being defined in our IPAM example earlier in the chapter. (2) indicates the network that we will select to configure a sample DHCPv6 range. Clicking on Add (3) opens a wizard to define this IPv6 range.
Figure 8-14 jumps to the second screen of the wizard, where we can see our selected network (4), as well as the fields to define the (inclusive) start and end addresses of our DHCPv6 range (5). You’ll also notice that we have the option of doing prefix delegation (by itself or along with an address from the defined range). There are also fields here to name this particular range (and provide a comment if we need to).

Figure 8-14. DHCPv6 configuration, range definition
After some additional steps, including restarting the DHCP service, the DHCPv6 server in Infoblox NIOS begins assigning IPv6 addresses from the defined range. Figure 8-15 shows a small sample of client leases.
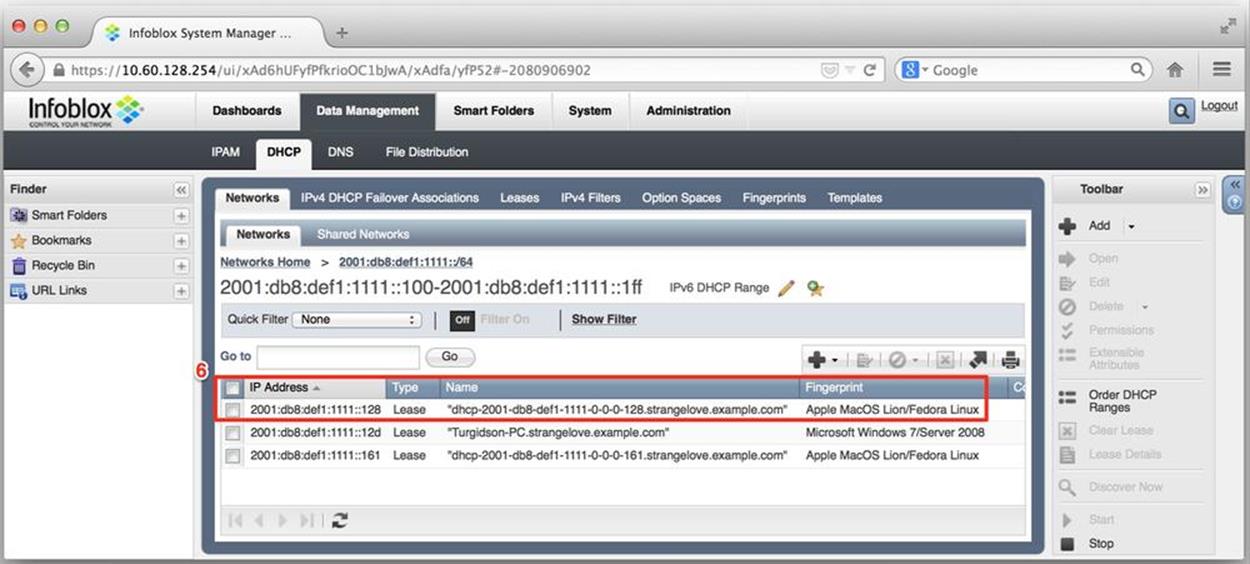
Figure 8-15. DHCPv6 configuration, acquired leases
By default, the lease information (6) includes the assigned address, the type of assignment (a DHCPv6 lease, in this case, as compared with, say, a fixed address), the hostname provided by the client, and the DHCP fingerprint identifying the device type and OS.
Figure 8-16 illustrates that, if we need or want to, we can get a more detailed look at the lease info.
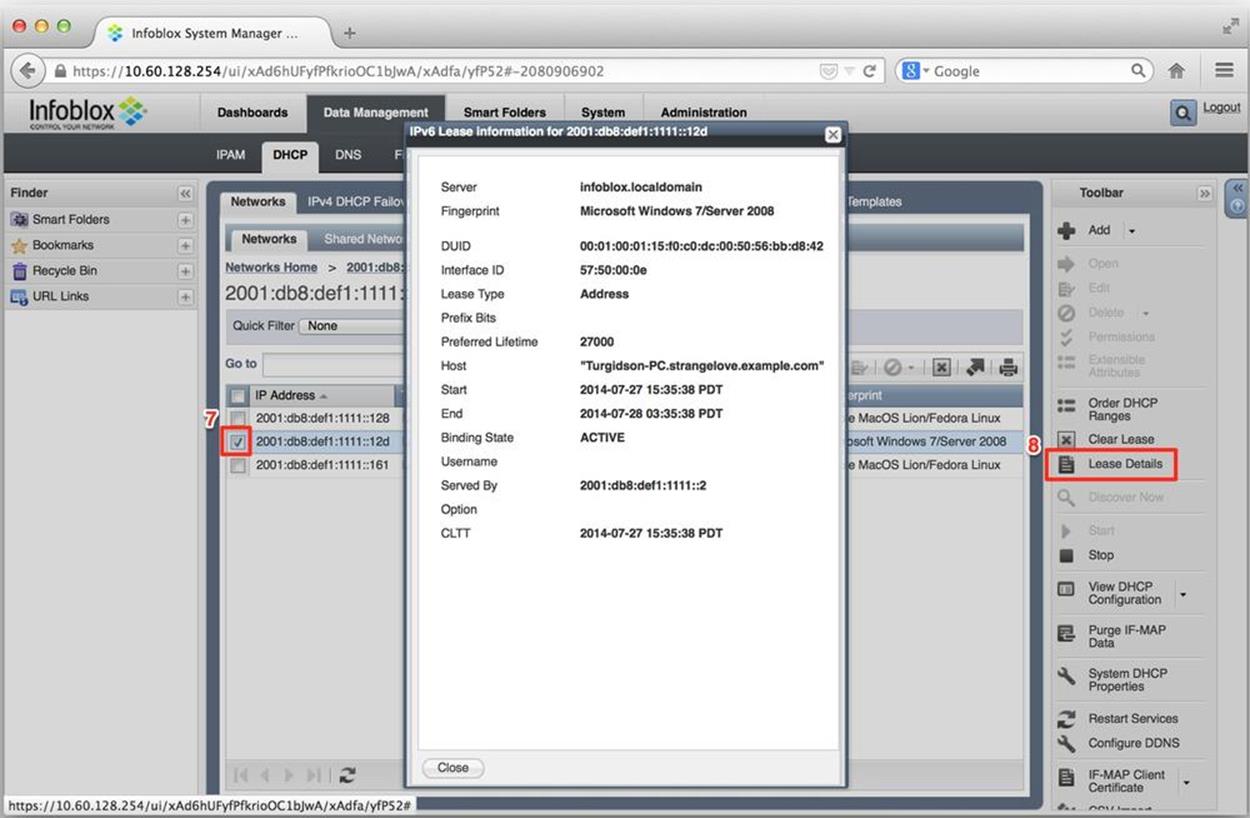
Figure 8-16. DHCPv6 configuration, lease detail
We can accomplish this by selecting the checkbox (7) next to a lease we’re interested in (e.g., the address 2001:db8:def1:1111::12d) and then selecting Lease Details (8). The IPv6 Lease Information window that appears contains lots of useful info (in addition to the hostname and DHCP fingerprint from the previous screen), such as the DUID, the IAID, the preferred lifetime, lease end and start times, lease state, and the IPv6 address of the DHCPv6 server that provided the lease.
Figure 8-17 shows the screen accessed by clicking on DNS (9) → Zones → Records.
Here, we can see the dynamic DNS records (10) that have been generated by the DHCPv6 server and sent to the DNS server. Both the DHCPv6 server and DNS server may exist (as they do in this example) within a single instance of a virtual NIOS or physical Infoblox appliance.
Figure 8-17. DDNS records from DHCPv6 leases
DHCPv6 Challenges
Most enterprise networks (along with any network environment where tighter control over hosts is desired) choose to run DHCPv6 instead of SLAAC. Based on our knowledge of how SLAAC operates, the reason for this choice should be evident. For one thing, as long as the router is sending appropriately configured RAs, SLAAC allows the host to autoconfigure an address and access the network.
Many IT network administrators have already encountered this scenario on their corporate LANs, given that most versions of modern OSes are installed with IPv6 on by default.
This has led to a regression in IPv6 adoption, where these administrators faced with little or no IPv6 expertise and an uncertain security environment opt to disable IPv6 altogether on host OSes.
Obviously, we want to be able to deploy IPv6 in a controlled manner and maintain the goals of our security policy. But disabling IPv6 on hosts can cause unintended consequences. On recent Microsoft Windows versions (including 7 and Server 2012), IPv6 is required to support features like Windows Server Clustering and applications like Direct Access.[112]
TIP
We don’t have to disable IPv6 on host OSes. Indeed, it’s possible to reasonably secure your LAN while phasing in IPv6 by adopting some simple practices:
§ Ensure that only router interfaces to links participating in phased IPv6 adoption are configured to send RAs.
§ Where such interfaces are configured, make sure that the RAs have the proper flags set for the desired choice of auto-addressing (stateful/stateless DHCPv6 or SLAAC).
§ Ensure that your firewall ACLs are configured to filter address ranges and ports that transition technologies like Teredo, 6to4, and ISATAP rely on.
Regarding the last practice, without a connection to an IPv6 ISP, it shouldn’t be possible for hosts to use their IPv6 address to connect to the Internet. But keep in mind that older versions of Windows [TBD] have the transition technology Teredo enabled by default, which could allow certain hosts to bypass existing security checks and gain unauthorized access to the Internet. Other transition technologies like 6to4 and ISATAP may allow similar breaches. These three simple steps will instantly enhance the degree of security in place across your IPv6 adoption effort.
DUID versus MAC
One of the persistent operational challenges of working with DHCPv6 is the fact that there is no simple equivalent to the method in IPv4 DHCP of identifying a host by its 48-bit MAC address. The benefit of this method is well known to IT administrators: once hosts are uniquely identified by their layer 2 address they can be assigned a particular address, given DHCP options, or even blocked from obtaining an address at all.
By contrast, DHCPv6 standard relies on a Device Unique Identifier (DUID) for unambiguous host identification, given that there is only ever supposed to be one DUID per host.[113]
While it is possible to construct a DUID to include link layer information like the MAC address, most hosts don’t yet manageably support this. Additionally, link layer information doesn’t persist in requests relayed to DHCPv6 servers on a different link.
The end result of this difference in host identication methods is that it is still more difficult to identify IPv4 and IPv6 addresses as belonging to the same host than would be preferable for easier host management in a dual-stack environment.
IPv6 DNS Considerations in DDI
From the standpoint of ease of deployment, IPv6 DNS is much less operationally complex as compared with DHCPv6. As we’ve already observed in the case of automatically generating reverse zones, using a DDI solution makes it even simpler.
We’ll examine the very basics of IPv6 DNS. Then, as with DHCPv6 and IPAM, we’ll briefly cover what configuring DNS in a DDI system looks like.
IPv6 DNS Basics
Getting IPv6 into DNS in the first place involved introducing a new record type and a new domain, respectively. They are:
§ AAAA
§ ip6.arpa
AAAA
Quad A records are for forward mapping domain names to IPv6 addresses. Why are they called AAAAs? Well, recall that forward mapping a domain name to an IPv4 address requires an A record. And since IPv6 addresses have 4 times as many bits, a touch of pseudo-arithmetic gives us: 4xA = AAAA.[114]
A AAAA record in a standard DNS master file configuration looks like this:
www IN AAAA 2001:db8:def2:2000::1
ip6.arpa
PTR records in the ip6.arpa domain are for, you guessed it, reverse mapping IPv6 addresses to domain names. Unlike the IPv6 address in a AAAA record, we’re not allowed to compress the address in an ip6.arpa record. And as with PTR records for IPv4 addresses in in-addr.arpa zones, the address is reversed to maintain the proper delegation hierarchy within the ip6.arpa name space:
1.0.0.0.0.0.0.0.0.0.0.0.0.0.0.0.0.0.0.2.2.f.e.d.8.b.d.1.0.0.2.ip6.arpa. IN PTR www.strangelovesolutions.com.
That’s a lot of characters to account for in a single PTR record. But since every 4 bits of the 128-bit IPv6 address represents a subdomain under ip6.arpa in the namespace, we have to include all 32 hexadecimal characters to account for all 32 subdomains. (The automatic generation of these PTR records is part of the reason DDI makes IPv6 DNS much more manageable, as we observed in our earlier IPAM example with the automatic generation of ip6.arpa reverse zones).
Configuring IPv6 DNS in DDI
Once again using the Infoblox DDI solution (vNIOS 6.10.0), let’s explore configuring IPv6 DNS. Figure 8-18 shows the first window of the DNS Add Authoritative Zone wizard.
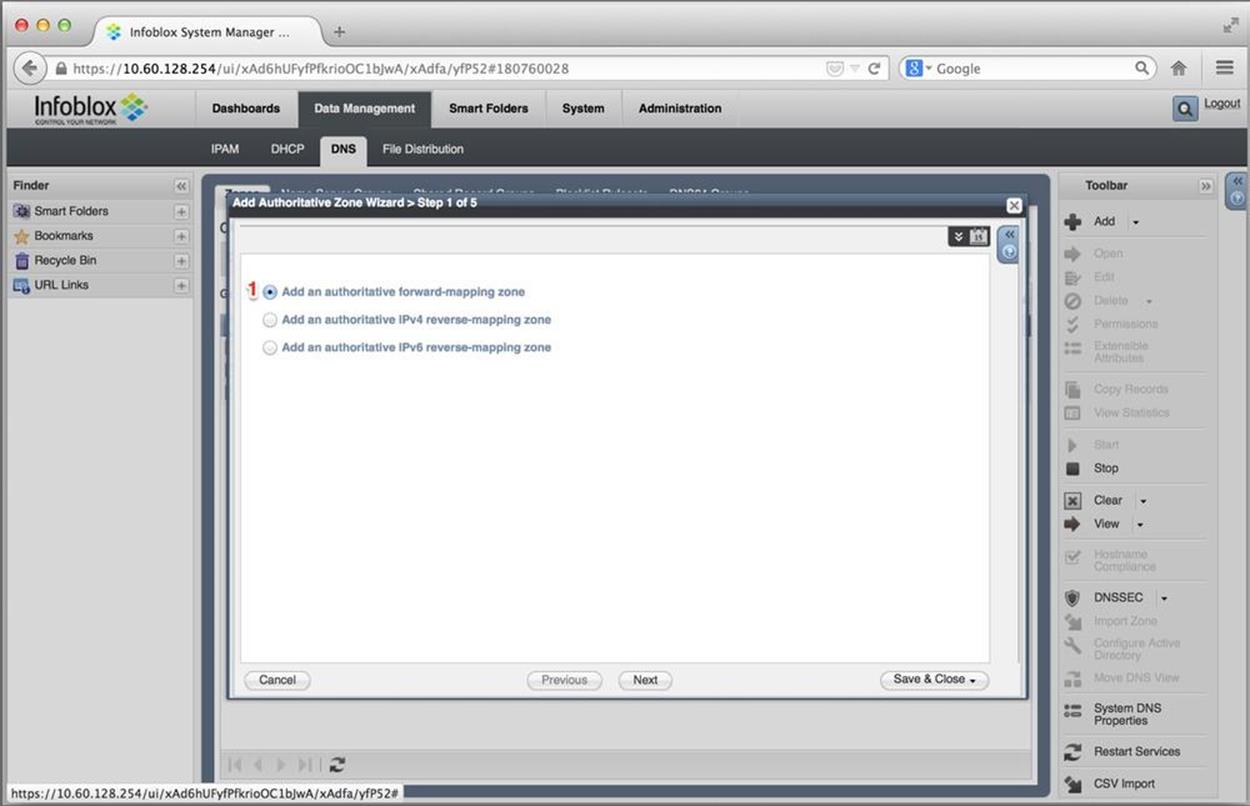
Figure 8-18. IPv6 DNS configuration, authoritative zone wizard, type of zone
We’ve got the choice to add a forward-mapping authoritative zone or a reverse-mapping authoritative zone for either IPv4 or IPv6. In this example, we’ll create a forward-mapping zone (1).
The domain name that we’re creating the forward-mapping zone for is entered in the next screen of the wizard, Figure 8-19.
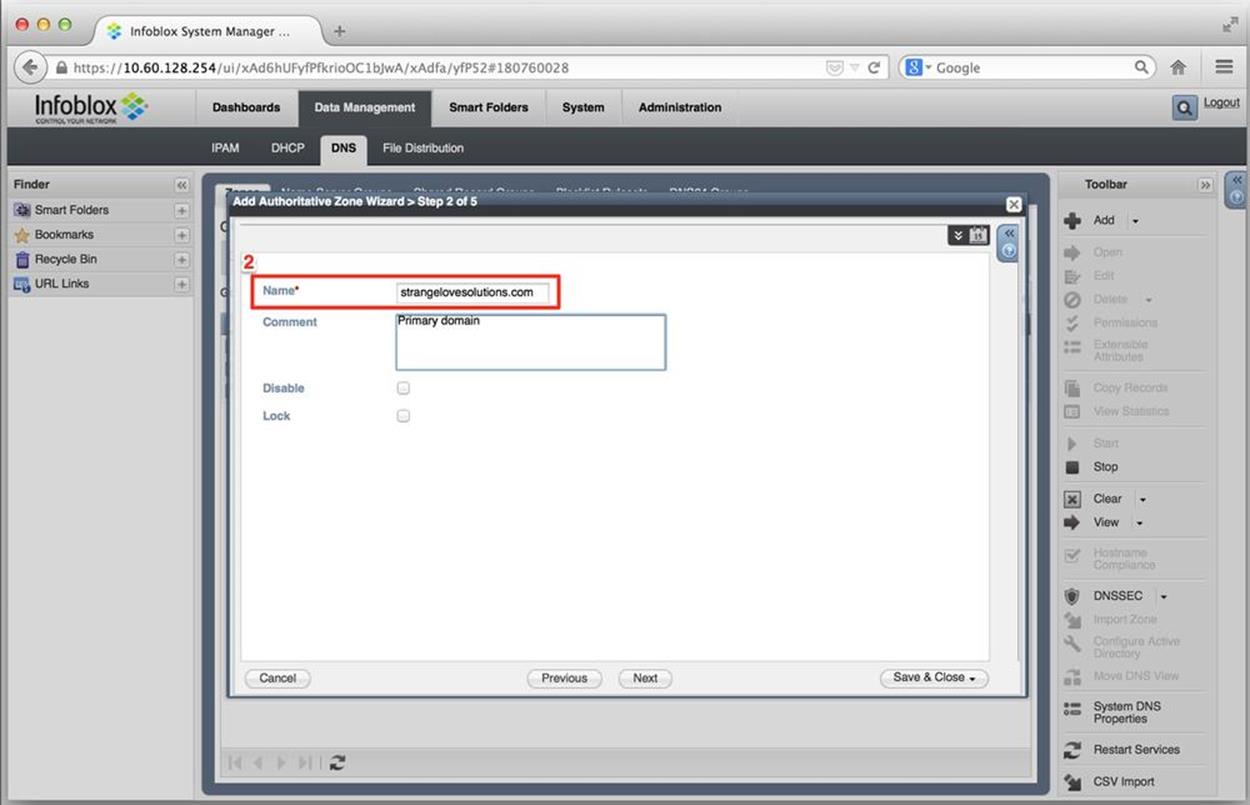
Figure 8-19. IPv6 DNS configuration, authoritative zone wizard, name
In addition to entering our domain name (2), we can enter a comment here if we’d like. (Also, note the checkboxes that allow the zone to be temporarily disabled or locked to keep others from making changes to it.)
Next up is the third screen of the wizard, Figure 8-20.
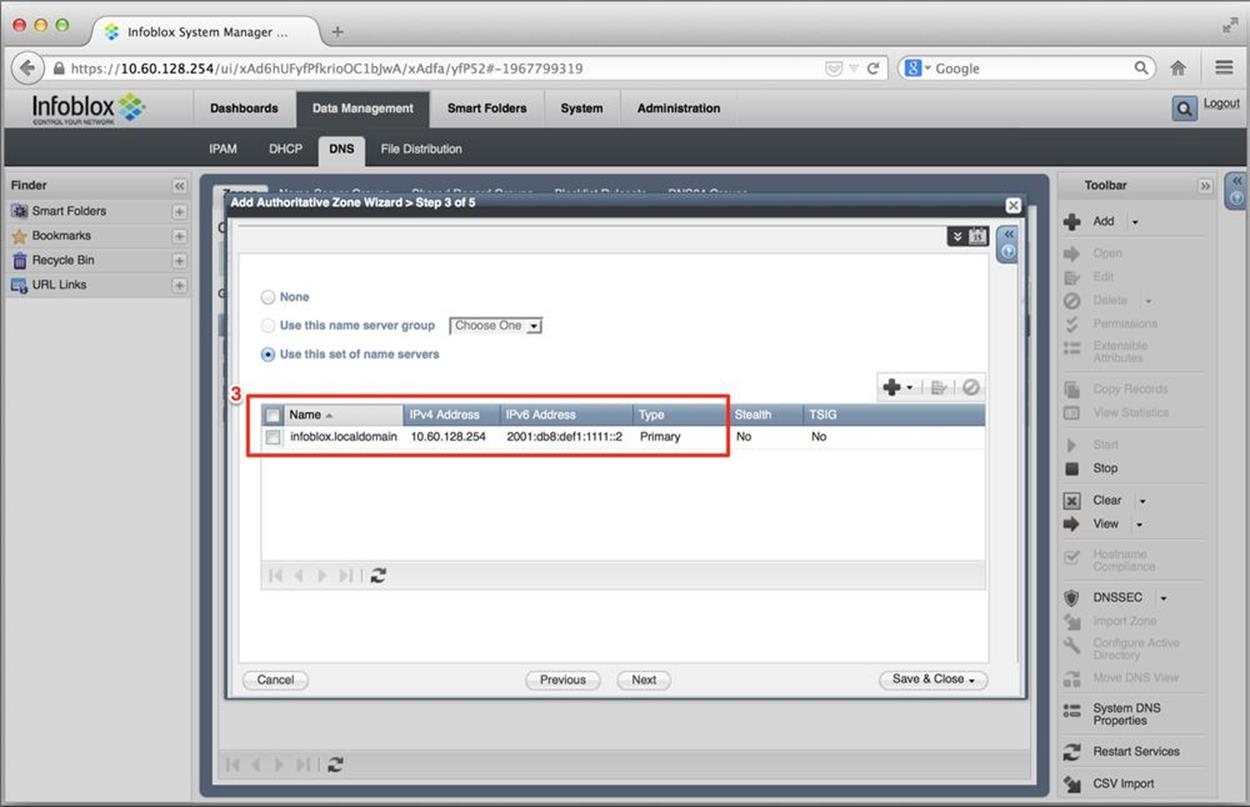
Figure 8-20. IPv6 DNS configuration, authoritative zone wizard, name server selection
Here, we define the name servers (including primary and secondaries) for our newly created zone. (3) shows the defined name server name, its IPv4 and IPv6 address, and whether it’s a primary or secondary name server.
Once we finish the wizard and create the zone, Figure 8-21 displays the results.
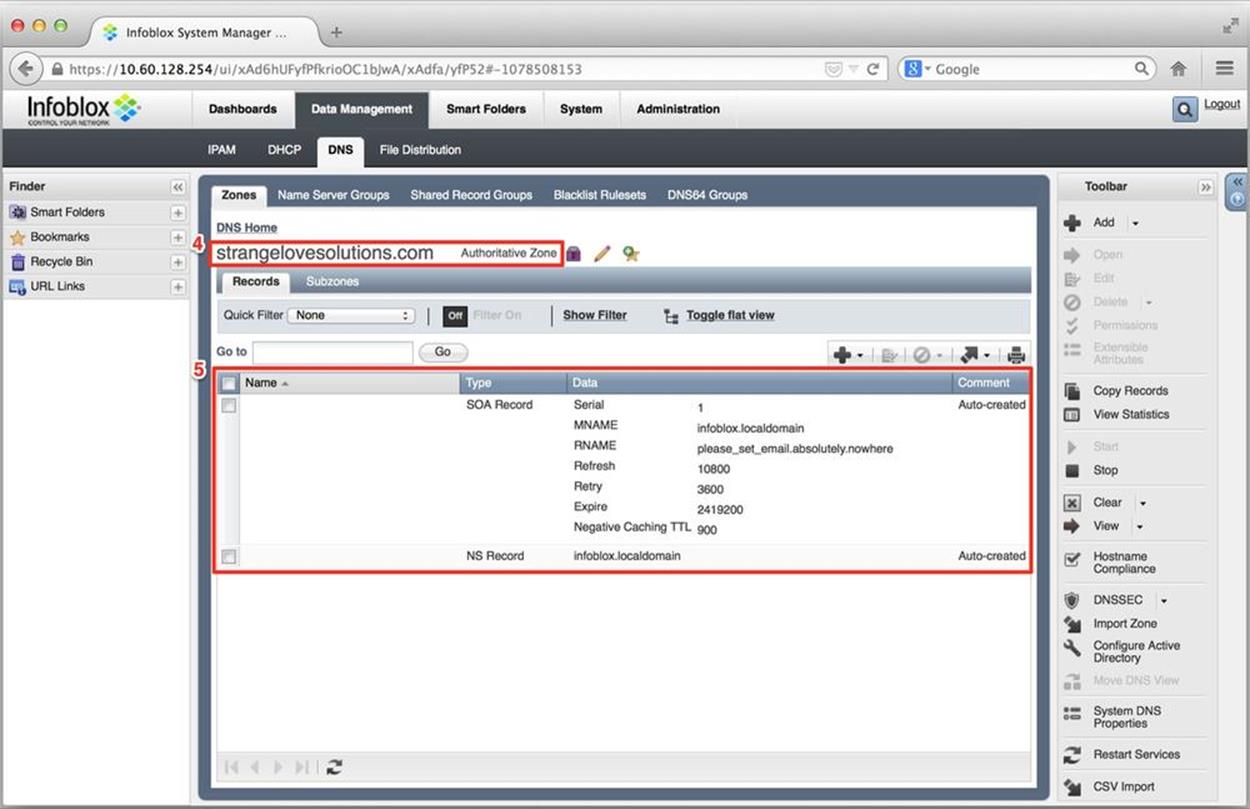
Figure 8-21. IPv6 DNS configuration, authoritative zone view
(4) indicates the name of the new authoritative zone and (5) shows details for the zone, including the start of authority (with requisite serial and TTL info) and NS record.[115]
Next, we’ll add a AAAA record. Figure 8-22 is our previous screen with the pull-down menu activated to select the addition of a AAAA (6).

Figure 8-22. IPv6 DNS configuration, add AAAA record
The Add AAAA record wizard appears (Figure 8-23).
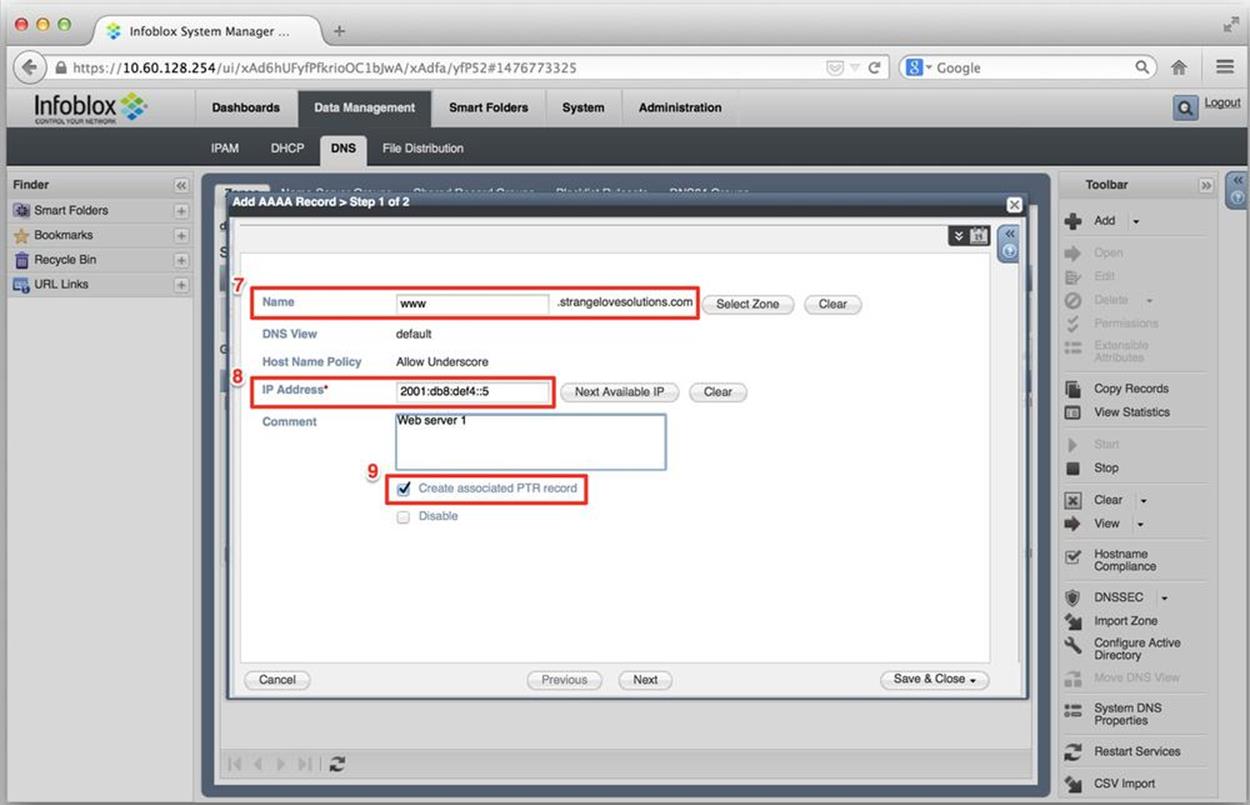
Figure 8-23. IPv6 DNS configuration, add AAAA record, detail
On this screen, we enter the forward-mapping name (in this case www) for the record (7), the IPv6 address (8), and check the box to automatically generate a PTR record for it (9).
Figure 8-24 displays the added record (10).
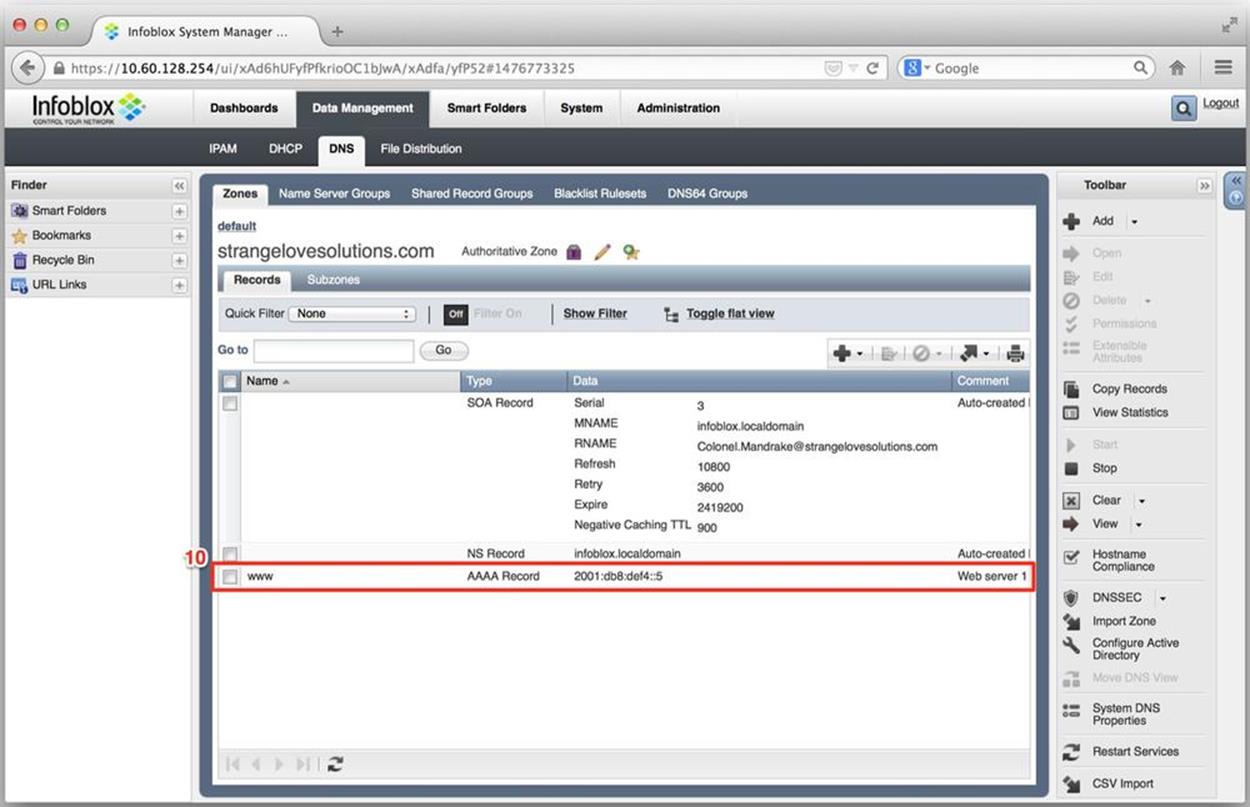
Figure 8-24. IPv6 DNS configuration, authoritative zone view with added AAAA record
Lastly, Figure 8-25 shows the records available for our ip6.arpa reverse zone. Here, we can verify the creation of the PTR record and associated information (11).
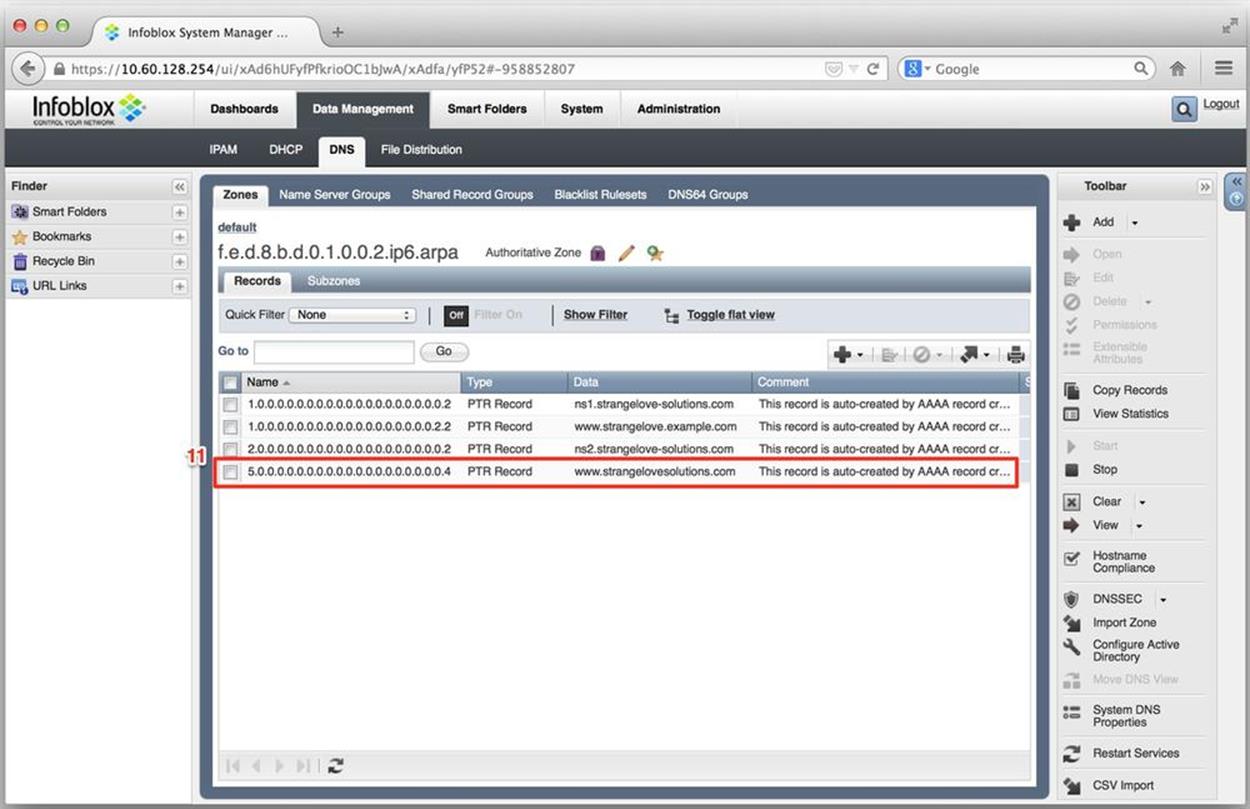
Figure 8-25. IPv6 DNS configuration, ip6.arpa zone with auto-generated PTR record
Summary
IPAM and DDI have become essential components for effectively managing larger networks — especially ones planning or running IPv6 deployments. The ability to closely track address assignments and utilization is critical for ensuring the most efficient use of the now-scarce resource that is IPv4. It’s also necessary in helping establish and develop an IPAM practice for IPv6 that will facilitate address planning and grow with the organization.
These operational efficiencies are further enhanced by integration with DNS and DHCP. Beyond simply tracking address allocations, automating the process of numbering and naming of hosts on the network shortens provisioning time and helps eliminate any errors along the way. While enterprise networks will no doubt realize a reduction in operational expenses, hyper-scale deployments, like most cloud architectures, will simply not be feasible without some form of DDI (whether off the shelf or in the form of a custom-developed solution).
We explored the IPAM policy cycle and the features we should expect to see from most IPAM systems. We also looked at some examples of how to configure IPAM, as well as DHCPv6 and IPv6 DNS using Infoblox virtual NIOS. And reviewing some of the operational challenges of DHCPv6 suggests that we’re going to be very busy managing dual-stack (and perhaps IPv6-only) environments.
[106] Though not strictly IP addresses, BGP ASNs are often included as part of IPAM practice and in some IPAM tools.
[107] This is not intended to be a how-to guide for using Infoblox IPAM, but rather to illustrate how one version of IPAM software handles IPv6 management.
[108] Of course, such a task could also be scripted — assuming that the appropriate personnel have cultivated (or have access to) a reasonably mature scripting or devops practice.
[109] “Gartner Market Guide for DNS, DHCP, and IP Address Management,” Andrew Lerner, Lawrence Orans, 25: April 2014.
[110] The prefix information provided by Router Advertisements include an On-Link Flag (or L flag), which is usually set by default. This flag specifies whether or not the advertised prefix is on-link (i.e., other nodes with IPv6 addresses in that prefix are directly reachable on the shared segment). If the L flag is not set, traffic destined to addresses in the prefix advertised in the RA must be sent to the gateway router for processing (behavior that isn’t generally expected or desirable for standard DHCPv6 or SLAAC deployments).
[111] See the IETF Draft DHCPv6/SLAAC Address Configuration Interaction Problem Statement.
[112] In fact, a Windows host with IPv6 disabled may be considered out of scope for support from Microsoft. You can learn more about this along with best practices for Windows IPv6 configuration in Ed Horley’s excellent book on the subject, Practical IPv6 for Windows Administrators. (See Appendix C.)
[113] Individual interfaces on a host are identified by an Identity Association Identifier (IAID), which when combined with the DUID creates an explicit identification for a DHCPv6 reservation.
[114] We can all look forward to the next iteration of IP, which I expect should have no fewer than 256 bits for addressing resulting in AAAAAAAA DNS records.
[115] For our limited example, we’ve configured only one NS record. In a production network, you should have at least two.
All materials on the site are licensed Creative Commons Attribution-Sharealike 3.0 Unported CC BY-SA 3.0 & GNU Free Documentation License (GFDL)
If you are the copyright holder of any material contained on our site and intend to remove it, please contact our site administrator for approval.
© 2016-2026 All site design rights belong to S.Y.A.