Packet Tracer Network Simulator (2014)
Chapter 9. Setting Up a Wireless Network
Wireless networks are growing everywhere; one can find Wi-Fi hotspots at most public places. Packet Tracer has a limited number of wireless devices but provides an unlimited number of possibilities. When configuring a wireless network, one has to consider the physical range of connectivity. Even though it is only a simulator, the physical workspace of Packet Tracer will enable us to test the wireless range of our network using its capability of moving around devices. Towards the end of this chapter, we'll also configure a RADIUS server to provide authentication for our wireless network.
Wireless devices and modules
Packet Tracer provides wireless modules for PCs/laptops and for routers to enable wireless connectivity. Following are the wireless modules:
· Linksys-WMP300N: This is available for servers, PCs, and laptops. It provides one 2.4 GHz wireless interface with protocols supporting Ethernet. Once plugged in, this module is configurable through the PC Wireless utility available in the Desktop tab.
· PC-HOST-NM-1W: This is a basic wireless interface that provides one 2.4 GHz wireless interface with support for Ethernet. This module isn't configurable.
· PC-HOST-NM-1W-A: This is similar in features to the preceding module, except that it provides a 5 GHz wireless interface.
· HWIC-AP-AG-B: This is a router module that works with 1841 and 2811 routers. It functions as an integrated access point and supports single band 802.11b/g or dual band 802.11a/b/g radios.
Now, we will look into the devices; Packet Tracer has wireless end devices as well as access points.
· TabletPC-PT / PDA-PT / WirelessEndDevice-PT: These three devices provide the same functionality, they only represent different things. These devices come with a built-in wireless interface.
· AccessPoint-PT / AccessPoint-PT-A / AccessPoint-PT-N: These are generic wireless access points with minimal configuration options. All of them have an antenna and a port to connect to a device, such as a router or DHCP server.
· Linksys-WRT300N: This wireless device provides a web interface similar to the one provided by a real Linksys model for configuring a SSID (Service Set Identifier), wireless authentication, WAN port, and much more. This device has 4 Ethernet LAN ports and 1 Ethernet WAN port which can be connected to a router or model that provides internet.
Now that we know the network devices available in Packet Tracer, let's start configuring a wireless network. We will use two access points with two different SSIDs, as shown in the following figure:
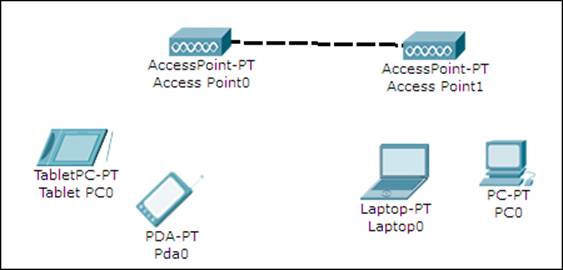
For a change, we will use TabletPC-PT and PDA-PT as wireless end devices. Once this topology is created, you'll find that these devices pair haphazardly with different access points. So, we will set the SSID field of Access Point0 to Office and that of Access Point1 to Guest.
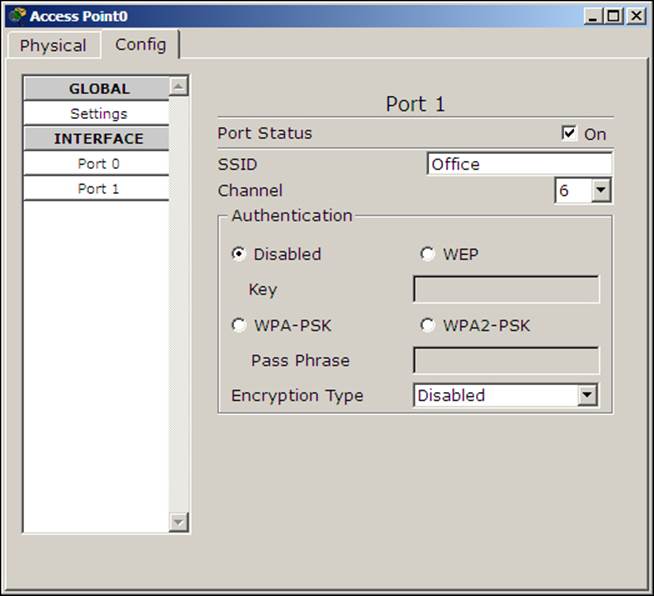
Open each access point, go to the Config tab, select Port 1, and change the SSID field, as shown in the following screenshot:
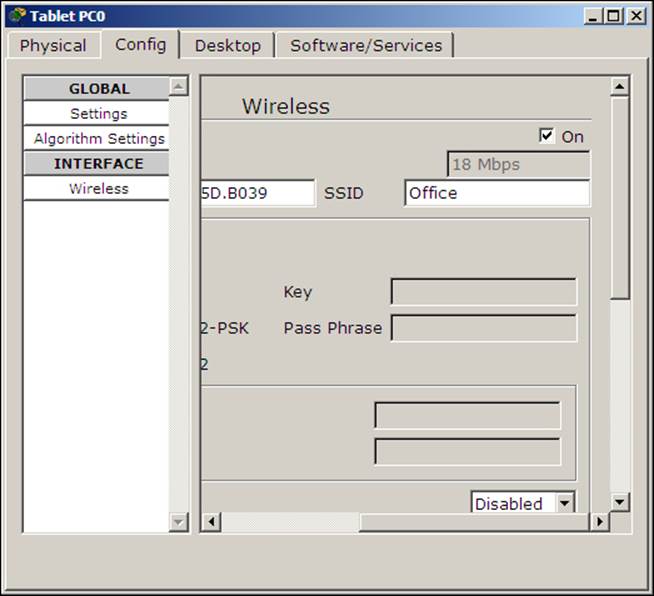
Now open each wireless end device, go to its Config tab, choose the Wireless option under INTERFACE, and change its SSID, as shown in the following screenshot:
You'll now see wireless lines from each end device connecting to their respective access points. Assign IP addresses to all of them from the same subnet space and use the simple PDU tool to check connectivity.
Wireless networks and physical workspaces
In the real world, each wireless device has a range upto which it can provide wireless connectivity. Packet Tracer simulates this range with the use of physical workspaces. We can see what happens when a laptop with a wireless interface is moved out of wireless range. For this exercise, we'll use the following topology:
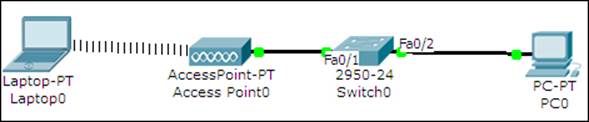
This topology has a wireless access point (Access Point0) connected to a switch (Switch0), which is connected to a PC (PC0). We also have a laptop with a wireless interface.
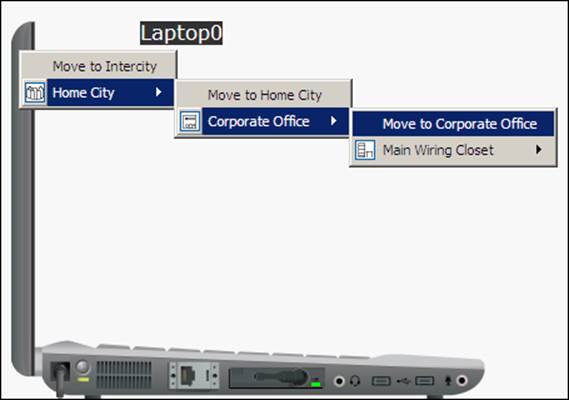
Configure IP addresses on both the PC and laptop; we'll use IP addresses 10.0.0.1 and 10.0.0.2 respectively. Now ping these devices from one another to test connectivity. Moving to the physical workspace, navigate to Home City | Corporate Office. You'll find a round mesh that represents the range of the wireless access point. We are now going to move the laptop to the new office building, out of the wiring closet, and place it in the corporate office, as shown in the following screenshot:
Going back to the corporate office, move the laptop out of this wireless range and test the connectivity by pinging the PC. We will find that this fails because the laptop is out of range, as shown in the following screenshot:

Thus, we've demonstrated the range of wireless devices using the physical workspace.
Configuring a Linksys access point
So far, we have configured wireless networks without additional features such as encryption or DHCP. In this section, we'll use the Linksys devices available in Packet Tracer and create a topology with all these features.
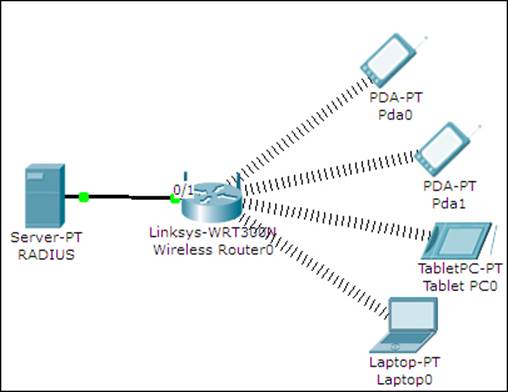
We will also add a server (RADIUS) to this topology and enable RADIUS authentication. WPA2-PSK enterprise will be the mode of authentication we will choose in the Linksys router (Wireless Router0). After building this topology, switch the default module of the laptop (Laptop0) with a Linksys-WMP300N module. Open the Linksys router, go to the GUI tab, navigate to the Wireless tab, and change the SSID field. We'll be using Linksys for this demo, as shown in the following figure:
Open the server, navigate to the Config tab, select AAA, and configure RADIUS authentication with four user credentials. Configuration will be as follows.
Network configuration will be as follows:
|
ClientName |
ClientIP |
ServerType |
Key |
|
Linksys |
192.168.0.1 |
Radius |
password |
User setup will be as follows:
|
UserName |
Password |
|
alice |
pwd |
|
bob |
s3ret |
|
john |
secr3t |
|
user1 |
passwd |
Configure a static IP for the server as 192.168.0.50. Next, under the GUI tab of the Linksys router, navigate to Wireless | Wireless security and enter the following settings:
|
Security Mode |
WPA2 Enterprise |
|
Encryption |
AES |
|
RADIUS Server |
192.168.0.50 |
|
RADIUS Port |
1645 |
|
Shared Secret |
password |
Move on to the wireless end devices, go to the Config tab, select Wireless, and enter the following settings:
· SSID: Linksys
· Authentication: WPA2
· User ID: john
· Password: secr3t
Make sure you use a different pair of credentials for each wireless end device. Once this is configured, the end device will get an IP address and you'll see the wireless link indicating a connection.
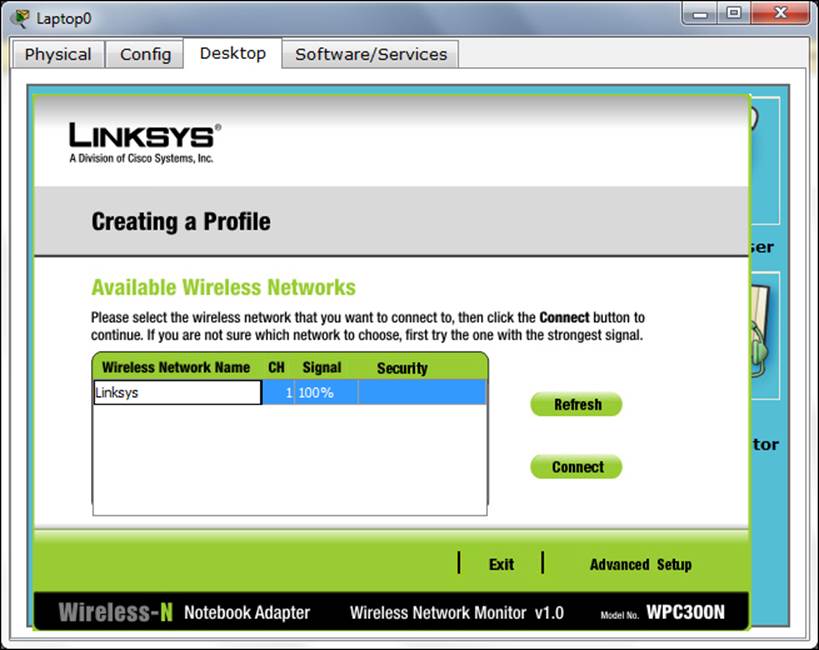
Now, we'll configure the laptop that has the Linksys module. Go to the Desktop tab, open the PC Wireless utility, choose the Profiles tab, and click on New. Enter any name here, you'll see a list with the SSID name shown, click on Advanced Setup and a wizard will guide you through the process.
Use the simple PDU tool to test the connectivity. If you use the simulation mode before a wireless connection is established between two devices, you will see the RADIUS packet being sent to the server by the router.
Summary
This chapter introduced you to the wireless devices used in Packet Tracer. We also configured a simple wireless topology without any authentication and used the physical workspace to demonstrate the range of wireless devices. Finally, we mixed technologies such as WPA2, RADIUS, and DHCP and created a topology that uses Linksys devices.
In the next chapter, we'll see how to segment a network at Layer 2 by configuring VLANs, and also see how to configure routing between VLANs.
All materials on the site are licensed Creative Commons Attribution-Sharealike 3.0 Unported CC BY-SA 3.0 & GNU Free Documentation License (GFDL)
If you are the copyright holder of any material contained on our site and intend to remove it, please contact our site administrator for approval.
© 2016-2026 All site design rights belong to S.Y.A.