Packet Tracer Network Simulator (2014)
Chapter 7. Border Gateway Protocol (BGP)
The Internet is a huge network and is made up of many smaller networks. To learn about routes in other networks, each network has to run a routing protocol. While protocols such as EIGRP (Enhanced Interior Gateway Routing Protocol), OSPF (Open Shortest Path First), and RIP (Routing Information Protocol) work well for many networks, they do not scale to support the needs of a gigantic network like the Internet, nor do they provide the level of administrative separation required. So, BGP (Border Gateway Protocol) is used by ISP (Internet Service Provider) and large enterprises to advertise IP routes to one another.
In this chapter, we'll learn about BGP and its features when compared to other routing protocols. We will also learn the commands used in BGP and configure it in Cisco Packet Tracer.
What is BGP?
BGP is a very robust routing protocol that is used to exchange routing information between multiple Autonomous Systems (AS). This brings up the question of what an AS is. An AS is a collection of IP prefixes (read IP networks) that are maintained by a network operator. This network operator could be an enterprise or an ISP.
Each AS has a number assigned to it called ASN (Autonomous System Number). Public AS numbers are assigned by the IANA (Internet Assigned Numbers Authority) to the RIRs (Regional Internet Registries). These RIRs, in turn, assign them to individual enterprises or ISPs.
Configuration of BGP largely depends on how an organization is connected to an ISP. There are four possible ways in which this can be done:
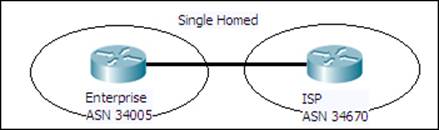
· Single homed (one link to one ISP): This is the simplest design (shown in the following screenshot) and has one link from the enterprise connecting to the ISP. This design has no redundancy or failover:
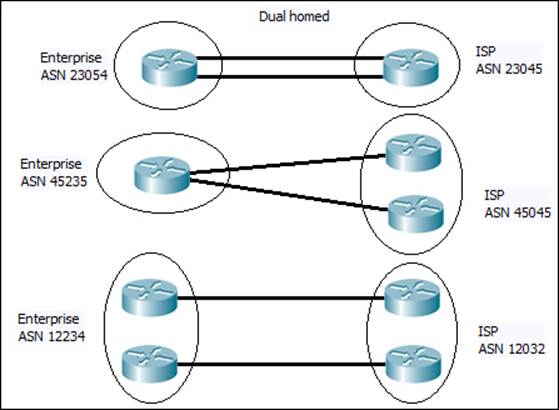
· Dual homed (two or more links to one ISP): This design has a single ISP but has two or more links connecting to it. This provides some amount of reliability in the event of link issues. The following screenshot has examples of dual homed design:
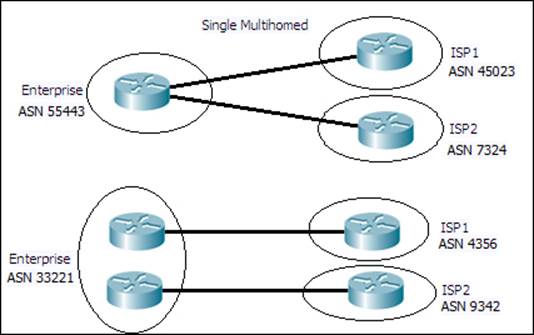
· Single multihomed (one link to two or more ISPs): This case (shown in the following screenshot) has multiple ISPs with one link connecting to each of them:
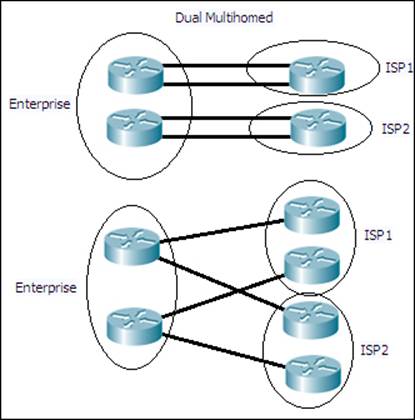
· Dual mutihomed (two or more links per ISP to two or more ISPs): This design (shown in the following screenshot) provides the highest level of reliability and availability. In this case, there are two or more ISPs with two or more links connecting each of them:
BGP may not always be used in all the previously-discussed designs. For some designs such as single homed, it is better to just have a static default route in the enterprise router towards the ISP, and another on the ISP side for just the network prefix of the enterprise. However, implementing BGP on multihomed networks ensures that the most efficient route is used as these networks have two or more links to ISP(s).
There are two types of BGP:
· eBGP (External BGP)
· iBGP (Internal BGP)
External BGP
This type of BGP is used to exchange routes between two types of AS. The administrative distance of eBGP is 20. By default, the update packets in eBGP have the TTL set to 1, so that only directly connected BGP routers receive it. However, this behavior can be changed by using commands. Also, an eBGP peer will advertise all the valid routes it has learned from its eBGP and iBGP peers. When an eBGP neighbor advertises a route, it sets the next-hop field of the route to its own address.
Internal BGP
This type of BGP is used to exchange routes within an AS. The administrative distance of iBGP is 200. Updates in iBGP do not have TTL value limitations. An iBGP peer does not advertise a route to another iBGP peer if the route was learned via iBGP. This is done to prevent routing loops within an AS. The next-hop field of the route updates remains unchanged when one iBGP peer advertises to another iBGP peer. This behavior can be modified with the use of commands.
Note
Cisco Packet Tracer Version 5.3.3 does not support iBGP.
BGP versus dynamic routing protocols
Even though BGP works like any other routing protocol, it differs from them a lot. IGPs (Interior Gateway Protocols) such as RIP, OSPF, and EIGRP are enabled interface-wise. The network statement in the routing protocol configuration is used to mention a network IP address, and all interfaces' IP addresses that fall within the specific network range have a particular protocol enabled. On these enabled interfaces, these IGPs send out broadcast or multicast messages containing network route information. For this to work, two routers running IGPs have to be directly connected. The metrics used by IGPs to choose the best path are the number of hops, bandwidth, delay, and so on.
On the other hand, BGP doesn't have the concept of interfaces because the entire router is considered to be in the AS. Its neighbors are not automatically discovered and have to be mentioned statically with the neighbor command. After this, BGP messages are unicasted to TCP packets. BGP runs on TCP port 179 and listens to BGP messages. A neighbor doesn't have to be directly connected and can be several hops away. But, by default, the TTL value of a BGP message is 1. So, if a peer is not directly connected, it has to be increased. BGP's way of choosing the best path is entirely different from IGPs. It uses a variety of path attributes (PA) such as next hop reachability, weight, and AS_PATH (number of ASs in the path to the destination). Moreover, BGP is designed for handling hundreds of thousands of IP routes, which consumes a lot of resources if done with an IGP.
Configuring BGP in Packet Tracer
First, let's look at the commands used in BGP:
router bgp <asn>
For example:
R1(config)#router bgp 120
This command enables BGP on a router and moves to the router configuration mode. The ASN can be any value between 1 and 65535. Once enabled, the BGP process must choose a router ID. By default, BGP uses the following methods priority-wise, to pick a router ID.
· Configured: This is the router ID configured by using the bgp router-id router subcommand
· Highest loopback: This is the highest numeric IP address configured on any up loopback interface at the time the BGP process is initialized
· Highest other interfaces: This is the highest numeric IP address configured on any up non-loopback interface at the time the BGP process is initialized
A router ID can be explicitly configured using the following command:
bgp router-id X.X.X.X
For example, we can use the following command to configure the router ID:
R1(config-router)#bgp router-id 1.1.1.1
For configuring a BGP neighbor, we can use the following command:
R1(config-router)#neighbor X.X.X.X remote-as <asn>
For example:
R1(config-router)#neighbor 10.0.0.2 remote-as 130
The ASN entered for remote-as should be the ASN of the neighboring router. This changes in eBGP and is the same in iBGP. Let us look at an example.
The following commands are used to change the eBGP:
R1(config)#router bgp 120
R1(config-router)#neighbor 10.0.0.2 remote-as 130
The following commands are used to change the iBGP:
R1(config)#router bgp 120
R1(config-router)#neighbor 192.168.1.20 remote-as 120
As mentioned earlier, when exchanging routes within an AS, iBGP doesn't modify the next-hop field. This can become problematic because the next hop is the IP of the neighboring AS's router, and unless it is redistributed by using an IGP, the internal network will reject the routes because the next hop is invalid. So, the following command sets its own IP as the next-hop of a route:
R1(config-router)#neighbor X.X.X.X next-hop-self
BGP also has a network command. This is used to specify a route that will be advertised in BGP. This route should exist in the routing table to be advertised in BGP:
R1(config-router)#network 10.20.20.0 mask 255.255.255.0
It is also possible to omit the mask command, doing which it takes the network as a classful one.
There are a lot of other commands in BGP that Packet Tracer doesn't support, so we'll go ahead and configure a topology using these commands.
For this exercise, we'll use a single mutihomed design (shown in the following screenshot) as Packet Tracer doesn't support iBGP:
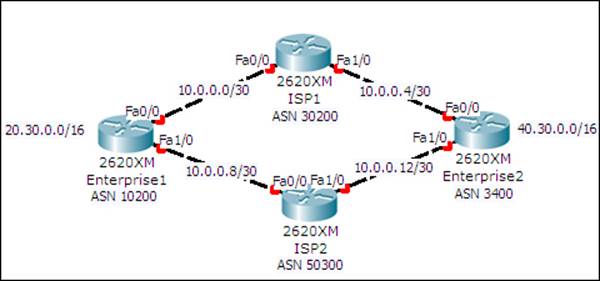
This topology has four routers—two belonging to different enterprises and the other two belonging to different ISPs. Both the enterprise routers have loopback interfaces configured with the IP addresses shown in the topology. This is to demonstrate the injecting of routes into BGP.
The following table lists the interfaces and their IP addresses:
|
Device |
Interface |
IP address / Subnet Mask |
|
Enterprise1 |
Loopback0 |
20.30.0.1 / 255.255.0.0 |
|
FastEthernet0/0 |
10.0.0.1 / 255.255.255.252 |
|
|
FastEthernet1/0 |
10.0.0.9 / 255.255.255.252 |
|
|
Enterprise2 |
Loopback0 |
40.30.0.1 / 255.255.0.0 |
|
FastEthernet0/0 |
10.0.0.5 / 255.255.255.252 |
|
|
FastEthernet1/0 |
10.0.0.13 / 255.255.255.252 |
|
|
ISP1 |
FastEthernet0/0 |
10.0.0.2 / 255.255.255.252 |
|
FastEthernet1/0 |
10.0.0.6 / 255.255.255.252 |
|
|
ISP2 |
FastEthernet0/0 |
10.0.0.10 / 255.255.255.252 |
|
FastEthernet1/0 |
10.0.0.14 / 255.255.255.252 |
The following are the steps to configure BGP on the meshed network topology:
1. Let's start configuring BGP on the enterprise routers:
2. Enterprise1(config)#router bgp 10200
3. Enterprise1(config-router)# bgp router-id 0.0.0.1
4. Enterprise1(config-router)#neighbor 10.0.0.2 remote-as 30200
5. Enterprise1(config-router)# neighbor 10.0.0.10 remote-as 50300
6. Enterprise1(config-router)# network 20.30.0.0 mask 255.255.0.0
7.
8. Enterprise2(config)#router bgp 3400
9. Enterprise2(config-router)# bgp router-id 0.0.0.2
10.Enterprise2(config-router)#neighbor 10.0.0.6 remote-as 30200
11.Enterprise2(config-router)# neighbor 10.0.0.14 remote-as 50300
12.Enterprise2(config-router)# network 40.30.0.0 mask 255.255.0.0
13. Now let's configure the ISP routers:
14.ISP1(config)#router bgp 30200
15.ISP1(config-router)# bgp router-id 1.1.1.1
16.ISP1(config-router)# neighbor 10.0.0.1 remote-as 10200
17.ISP1(config-router)# neighbor 10.0.0.5 remote-as 3400
18.ISP2(config)#router bgp 50300
19.ISP2(config-router)# bgp router-id 2.2.2.2
20.ISP2(config-router)#neighbor 10.0.0.9 remote-as 10200
21.ISP2(config-router)# neighbor 10.0.0.13 remote-as 3400
22. You should now see console messages indicating that a BGP neighbor is up:
23.%BGP-5-ADJCHANGE: neighbor 10.0.0.9 Up
24.%BGP-5-ADJCHANGE: neighbor 10.0.0.13 Up
25. Now try pinging from Enterprise1 to the loopback address of Enterprise2:
26.Enterprise1>ping 40.30.0.1
27.
28.Type escape sequence to abort.
29.Sending 5, 100-byte ICMP Echos to 40.30.0.1, timeout is 2 seconds:
30.Success rate is 0 percent (0/5)
31. We see that it fails. This is because the ICMP request packet uses a source address of 10.0.0.1, so when this packet is received by Enterprise2, it doesn't have a route to 10.0.0.0/30 for sending a reply. We used the network command to inject only the routes of loopback addresses, hence we shall use the source address of the loopback itself using an extended ping:
32.Enterprise1>enable
33.Enterprise1#ping
34.Protocol [ip]:
35.Target IP address: 40.30.0.1
36.Extended commands [n]: y
37.Source address or interface: loopback0
38.Type escape sequence to abort.
39.Sending 5, 100-byte ICMP Echos to 40.30.0.1, timeout is 2 seconds:
40.Packet sent with a source address of 20.30.0.1
41.!!!!!
42.Success rate is 100 percent (5/5), round-trip min/avg/max = 62/62/63 ms
43. So, we have successfully configured eBGP. Let us take a look at the routing table of BGP:
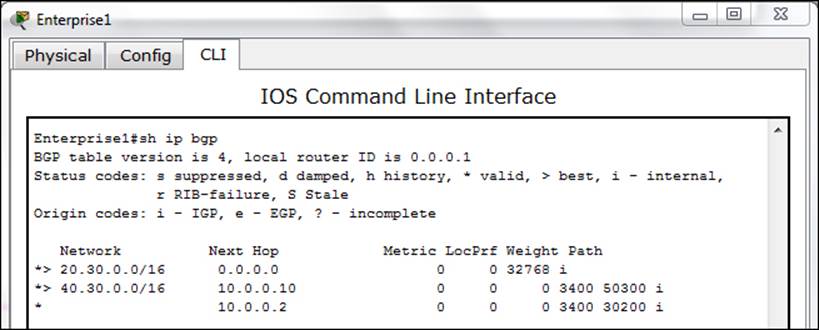
If you look at the Path column, you can see the ASNs that come in the path to the destination. The > symbol indicates a preferred route.
Summary
In this chapter, we learned the various designs used by organizations to connect to the Internet. Then we saw the widely used routing protocol BGP, its features when compared to IGPs, and its configuration. Sadly, Packet Tracer doesn't support iBGP, but if you can get your hands on the real hardware or dynamips, do try it out.
In the next chapter, we will learn about the latest game changer of networks—IPv6. We will start by learning how to assign IP addresses to it and then go about configuring routing. Finally, we'll learn how to use both IPv4 and IPv6 in a network.
All materials on the site are licensed Creative Commons Attribution-Sharealike 3.0 Unported CC BY-SA 3.0 & GNU Free Documentation License (GFDL)
If you are the copyright holder of any material contained on our site and intend to remove it, please contact our site administrator for approval.
© 2016-2025 All site design rights belong to S.Y.A.