PHP Advanced and Object-Oriented Programming (2013)
Visual Quickpro Guide
11. PHP and the Server
In This Chapter
Compressing Files
Establishing a cron
Using MCrypt
Review and Pursue
A lot of the standard PHP actions, such as communicating with databases and sending emails, actually occur between applications on the server and PHP (as opposed to between the server and the client). As PHP is increasingly used for advanced purposes and not simply to generate Web content, its ability to manipulate and use the features the server has to offer becomes more important.
This chapter will show you how to better take advantage of the other services and libraries that your server may have. Starting off is a demonstration of how to compress files using PHP. The second topic shows how to automatically run your PHP scripts using cron on Unix (and Mac OS X). The chapter ends with instructions for implementing cryptography for better security.
Compressing Files
Most users are familiar with client-based GUI compression utilities such as WinZip or StuffIt, used to compress and decompress files. Thanks to zlib, available from www.zlib.net, you can have PHP compress files as well. The zlib library was written by two of the major compression/decompression developers as a patent-free, lossless data-compression tool. Zlib is available on every major platform and is frequently built into a server’s configuration. I would be surprised if a Unix brand of operating system did not include zlib, and PHP on Windows has built-in support for zlib ever since version 4.3.
Once zlib is installed and PHP is made to support it  , you can use it for writing to or reading from compressed files. Most of the functions work exactly like the standard file functions: fopen(), fwrite(), fclose(), and so forth. You start by opening a file, indicating the mode:
$fp = gzopen('filename.gz', 'mode');
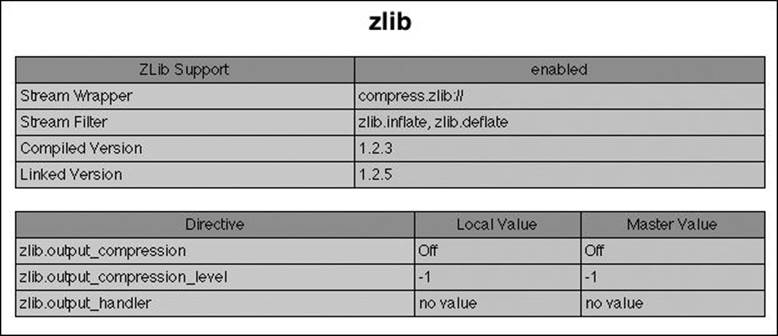
 Before attempting to use the zlib functions, run a phpinfo() script to confirm PHP’s support for the library.
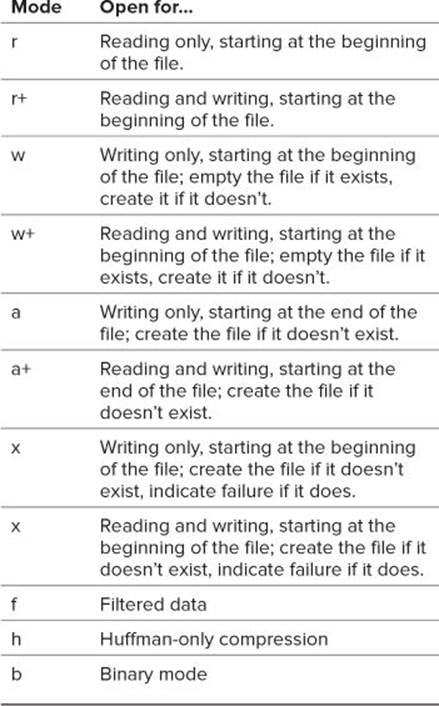
The modes, shown in Table 11.1, are the same as those used with fopen(). Added to this can be a compression level on a scale of 1 (least compressed) to 9 (most). And you can add the f, h, and b flags to further modify the mode.
Table 11.1. File Open Modes
With an open file, you can then write data to it:
$fp = gzopen('filename.gz', 'w5');
gzwrite($fp, 'data');
Finally, close the file:
gzclose($fp);
Reading from files can be even easier. You can use readgzfile(), which reads in a compressed file, decompresses the data, and sends it to the output. There is also the gzfile() function, which reads in a compressed file, decompresses it, and returns it as an array (one element for each line in the file).
In this next example, I’ll have PHP create a compressed file on the fly. The PHP script itself will retrieve all of the data stored in a named database and will create files listing said data in comma-delineated format. In short, this PHP script will create a compressed backup of a database’s records.
To compress a file
1. Create a new PHP document in your text editor or IDE, to be named db_backup.php, beginning with the standard HTML (Script 11.1):
<!doctype html>
<html lang="en">
<head>
<meta charset="utf-8">
<title>Database Backup</title>
</head>
<body>
<?php # Script 11.1 - db_backup.php
2. Set the name of the database:
$db_name = 'test';
First, I set a variable with the name of the database to be backed up. I do so mostly because the database name will be referenced several times over in this script and I want to make changes easily.
Script 11.1. This very useful script will back up a database, table by table, to a compressed, comma-separated text file.
1 <!doctype html>
2 <html lang="en">
3 <head>
4 <meta charset="utf-8">
5 <title>Database Backup</title>
6 </head>
7 <body>
8 <?php # Script 11.1 - db_backup.php
9
10 /* This page retrieves all the data from a database
11 * and writes that data to a text file.
12 * The text file is then compressed using zlib.
13 */
14
15 // Establish variables and setup:
16 $db_name = 'test';
17
18 // Backup directory:
19 $dir = "backups/$db_name";
20
21 // Make the database-specific directory, if it doesn't exist:
22 if (!is_dir($dir)) {
23 if (!@mkdir($dir)) {
24 die("<p>The backup directory--$dir--could not be created.</p></body></html>");
25 }
26 }
27
28 // Get the current time for use in all filenames:
29 $time = time();
30
31 // Connect to the database:
32 $dbc = @mysqli_connect('localhost', 'username', 'password', $db_name) OR die("<p>The database--$db_name--could not be backed up.</p></body></html>");
33
34 // Retrieve the tables:
35 $r = mysqli_query($dbc, 'SHOW TABLES');
36
37 // Back up if at least one table exists:
38 if (mysqli_num_rows($r) > 0) {
39
40 // Indicate what is happening:
41 echo "<p>Backing up database '$db_name'.</p>";
42
43 // Fetch each table name:
44 while (list($table) = mysqli_fetch_array($r, MYSQLI_NUM)) {
45
46 // Get the records for this table:
47 $q = "SELECT * FROM $table";
48 $r2 = mysqli_query($dbc, $q);
49
50 // Back up if records exist:
51 if (mysqli_num_rows($r2) > 0) {
52
53 // Attempt to open the file:
54 if ($fp = gzopen ("$dir/{$table}_{$time}.sql.gz", 'w9')) {
55
56 // Fetch all the records for this table:
57 while ($row = mysqli_fetch_array($r2, MYSQLI_NUM)) {
58
59 // Write the data as a comma-delineated row:
60 foreach ($row as $value) {
61 $value = addslashes($value);
62 gzwrite ($fp, "'$value', ");
63 }
64
65 // Add a new line to each row:
66 gzwrite ($fp, "\n");
67
68 } // End of WHILE loop.
69
70 // Close the file:
71 gzclose ($fp);
72
73 // Print the success:
74 echo "<p>Table '$table' backed up.</p>";
75
76 } else { // Could not create the file!
77 echo "<p>The file--$dir/{$table}_{$time}.sql.gz--could not be opened for writing.</p>";
78 break; // Leave the WHILE loop.
79 } // End of gzopen() IF.
80
81 } // End of mysqli_num_rows() IF.
82
83 } // End of WHILE loop.
84
85 } else {
86 echo "<p>The submitted database--$db_name--contains no tables.</p>";
87 }
88
89 ?>
90 </body>
91 </html>
3. Make sure that the backup directory exists:
$dir = "backups/$db_name";
if (!is_dir($dir)) {
if (!@mkdir($dir)) {
die("<p>The backup directory--$dir--could not be created.</p></body></html>");
}
}
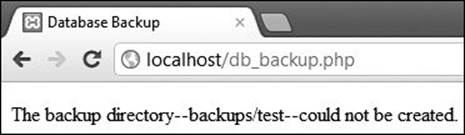
The backups will be stored in a directory called backups. Within this directory, each database will have its own directory. First, a variable is given the value of the final destination. Next, the script checks to see if that directory already exists. If not, the script attempts to create it. The script terminates if the directory could not be created  , since there’d be no point in continuing.
The result if the destination directory does not exist and could not be created.
One assumption here is that an existing directory is already writable, something you could easily check for (using the is_writable() function). This section of the code, which is secondary to what’s really being taught, assumes you already understand what permissions must exist for PHP to write to directories. And you’ll obviously need to change the particulars to match your system.
4. Get the current time:
$time = time();
Each table backup will be its own file and this value will be used in each filename. Because every file should reflect the same backup time, I assign this to a variable once, instead of invoking the function once for each file.
5. Connect to the database:
$dbc = @mysqli_connect ('localhost', 'username', 'password', $db_name) OR die ("<p>The database--$db_name--could not be backed up.</p></body></html>");
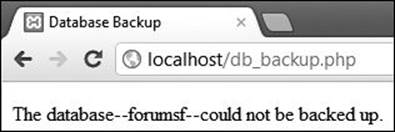
Next, the script attempts to connect to the named database. If it can’t, a message indicating a problem is displayed in the Web browser  , and the HTML page is concluded. Again, you’ll obviously need to change the parameters to match what’s appropriate for your server.
 The result if a database connection could not be made.
6. Retrieve the tables in this database:
$r = mysqli_query($dbc, 'SHOW TABLES');
This query will return a list of every table in the current database  .
.
 Running the same query that the script runs (the first of two) using the mysql client.
7. Confirm that at least one record was returned and print a message:
if (mysqli_num_rows($r) > 0) {
echo "<p>Backing up database '$db_name'.</p>\n";
No need to back up an empty database!
8. Create a loop that fetches each table name:
while (list($table) = mysqli_fetch_array($r, MYSQLI_NUM)) {
9. Retrieve all the records for this table:
$q = "SELECT * FROM $table";
$r2 = mysqli_query($dbc, $q);
This query returns every record for a given table  . Since this query is run within a while loop for another query, you have to use a different result variable ($r2 here instead of $r), or you’ll overwrite the first query’s results.
 The main query, the results of which will be written to a file.
10. If the table contains some records, open the text file for writing:
if (mysqli_num_rows($r2) > 0) {
if ($fp = gzopen ("$dir/{$table}_{$time}.sql.gz", 'w9')) {
Each table will be backed up to its own file, the name of which is derived from the table name ($table), the current timestamp ($time), and a .sql.gz extension. All of the files will be written to a database-specific folder within a backup folder. Both directories must have appropriate permissions for PHP to write to them.
The gzopen() function takes two parameters: the filename and the mode of opening. The modes correspond directly to fopen()’s modes (w, r, a along with b for writing binary data) but can also indicate a level of compression. The acceptable compression levels are on a scale from 1 (minimal compression) to 9 (maximum) with a trade-off between compression and performance. For relatively small files like these text documents, maximum compression is fine.
11. Retrieve all of the table’s data, and write it to the file:
while ($row = mysqli_fetch_array($r2, MYSQLI_NUM)) {
foreach ($row as $value) {
$value = addslashes($value);
gzwrite ($fp, "'$value', ");
}
gzwrite ($fp, "\n");
} // End of WHILE loop.
This loop will take every row out of the table and write that to a text file in the format 'value',[SPACE]. Instead of using the fwrite() function that you may be familiar with, there is gzwrite(), which works just the same (except that it writes to a compressed file).
In case the retrieved data contains an apostrophe, it’s run through the adds-lashes() function prior to storage.
12. Close the file and print a message to the browser:
gzclose ($fp);
echo "<p>Table '$table' backed up.</p>";
13. Complete the conditionals:
} else {
echo "<p>The file--$dir/{$table}_{$time}.sql. gz--could not be opened for writing.</p>\n";
break;
} // End of gzopen() IF.
} // End of mysqli_num_rows() IF.
} // End of WHILE loop.
} else {
echo "<p>The submitted database--$db_name--contains no tables.</p>\n";
}
14. Complete the page:
?>
15. Save the file as db_backup.php and place it in your Web directory.
16. Create a folder called backups, in the same directory as db_backup.php, and change the folder’s permissions (if necessary).
How you do this depends on your operating system, which I assume as an experienced PHP developer you’ve already discovered. If you don’t know how to change a directory’s permissions, search the Web or check out the book’s corresponding support forum (www.LarryUllman.com/forums/).
17. Test the PHP script in your Web browser  .
.
 What the Web page shows after successfully backing up the tables found within the test database.
18. Check the directory on your computer to see the new files  .
.
 Viewing the directory within my computer shows the newly created compressed files, one for each table in the database.
Tip
The zlib functions can also work with compressed binary files. (Windows makes a distinction between binary and plain text files, but Unix and Mac OS X do not.) Binary files offer the advantage of being readable and writable in a nonlinear fashion.
Tip
The zlib library can also be used to automatically compress PHP output on the fly. By sending compressed data to the browser, which the browser would automatically decompress, less data will need to be transmitted, thereby improving the page’s performance.
Tip
You can create ZIP archives using the zlib library and the PHP ZIP extension.
Establishing a cron
A cron is a service on Unix servers that allows tasks to be scheduled and executed automatically. The cron application runs constantly and will carry out its orders when instructed to do so. These orders are stored in a file called crontab. This file is a to-do list that contains lines that might look like
30 22 * * * wget -q http://www.example.com
The crontab format dictates that each line contain six fields separated by spaces or tabs. The first five fields represent, in order: minutes, hours, days, months, and day of the week (from 0 to 6, with 0 being Sunday). You can specify the day of operation as either a day of the month (1–31) or a day of the week (Sunday through Saturday), the latter being date-indifferent.
An asterisk as one of the first five parameters means that value is not limited (i.e., it always applies). In the preceding example, the instruction is to be carried out at 10:30 p.m. (22 being 10 p.m. on the 24-hour clock) every day of the month, every month of the year.
You can also set ranges using the hyphen (1–6 for the month field would mean that the job applies to the first six months of the year) or list elements separated by comma (1, 3, 5 for Monday, Wednesday, Friday). The sixth field on each line is the task itself.
Looking at the preceding example, the actual command is to open the URL http://www.example.com with wget, a command-line URL tool built into Unix. The -q flag says to access the page quietly. This command would be, for example, how I might run a script whose output is not important (likedb_backups.php).
To use cron to run a PHP script, you have a couple of options. The first is to use the server’s own Web browser—like wget—to run a PHP script, as just explained. Another would be to use the server’s installation of cURL. This program is designed to access URLs, although it’s not a Web browser per se (Chapter 10, “Networking with PHP,” discusses cURL in some detail). A final option is to run the PHP script using the Command-Line Interface (see Chapter 12, “PHP’s Command-Line Interface”).
For this example, I’ll run the db_backup.php script (Script 11.1) created earlier in the chapter, using cURL. The syntax for using cURL is easy:
curl yourURLhere
So:
curl http://www.example.com/page.php
To add an item to the crontab file, you can manually edit it by typing crontab -e in a command prompt. This will allow you to edit the file using your default command-line text editor. Unfortunately, if you don’t know how to already use said text editor—a surprisingly daunting task—this does you no good. So instead I’ll show you another method.
To establish a cron for a PHP file
1. Access your server via a command-line interface.
If you’re not clear as to how to do this, see the next chapter. If you’re using a remote (i.e., hosted) server, there may just be a control panel for you to set cron jobs instead of using a command-line interface.
2. Test the command  :
:
curl http://localhost/db_backup.php
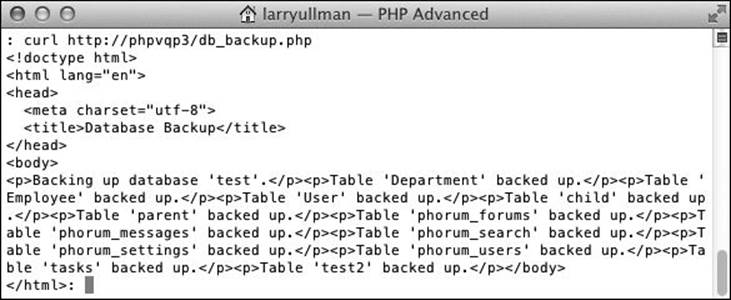
Before entering the command into the crontab file, I test it once to confirm the results.
It’s always best to test the command you’ll have cron execute so that you know that it works. Do so just by entering the command within the command-line interface you’re using. You’ll obviously need to change your URL to match where you put your copy of db_backup.php (as in the figure). In my case, the PHP script is running on the same server as this cron job.
3. View the current contents of the crontab file:
crontab -l
This command will show you the current crontab, which you should be careful with, as the following steps will replace any existing instructions. If you’ve never worked with the crontab file before, it’s probably blank, but better safe than sorry!
If there are already commands entered, copy them for later.
4. Create a new document in your text editor or IDE (Script 11.2):
1 0 * * 5 curl http://localhost/db_backup.php
First, you’ll write a dummy cronjob file, and then you’ll install this into the actual crontab. This file should contain the entire command. Make sure you press Enter/Return once at the end of the line.
The command itself says that cURL should be invoked with that URL every Friday (5) at 12:01 a.m.
5. If Step 3 revealed anything in the current crontab, add it to the text document begun in Step 4.
Just copy-paste whatever was returned in Step 3 to the text document. Each task should be on its own line. It won’t matter, in this case, which instruction comes first.
6. Save this file as cronjob1 (without any extension) and upload it to the server in a convenient location (not necessarily within the Web document root).
Script 11.2. The cronjob1 file lists the command to be added to crontab.
1 # Script 11.2 - cronjob
2 # Run a PHP script every Friday at 12:01 am:
3 1 0 * * 5 curl http://localhost/db_backup.php
7. Within your server’s command prompt, enter the following code and then press Enter/Return once:
crontab /path/to/cronjob1
In my example , cronjob1 is stored on my desktop. The full path is therefore /Users/larryullman/Desktop/ cronjob1, and the shortcut reference is ~/Desktop/cronjob1. Replace that part of the code with the applicable location of your cronjob1 file on the server.
Adding the new instruction to the crontab file.
8. Confirm the cron task list by viewing the crontab file .
crontab –l

 Confirming the contents of the crontab file.
Tip
The crontab file is unique for each user on the server. This also means that the instructions in the crontab file will run as that user, so permissions conflicts may arise. This is another reason why it’s a good idea to test the command before entering it into the crontab file.
Tip
On Windows, you can replicate cron using scheduled tasks. Search online or use my support forums (www.LarryUllman.com/forums/) if you need assistance with this.
Using MCrypt
Frequently, Web applications will encrypt and decrypt data stored in a database, using the database-supplied functions. This is appropriate, as you want the database to do the bulk of the work whenever possible. But what if you want to encrypt and decrypt data that’s not being stored in a database? In that situation, MCrypt provides a good solution. To use MCrypt with PHP, you’ll need to install the MCrypt library (libmcrypt, available from http://sourceforge.net/projects/mcrypt/) and configure PHP to support it  . As of PHP 5, you need at least version 2.5.6 of MCrypt. It is built into PHP on Windows since PHP 5.3.
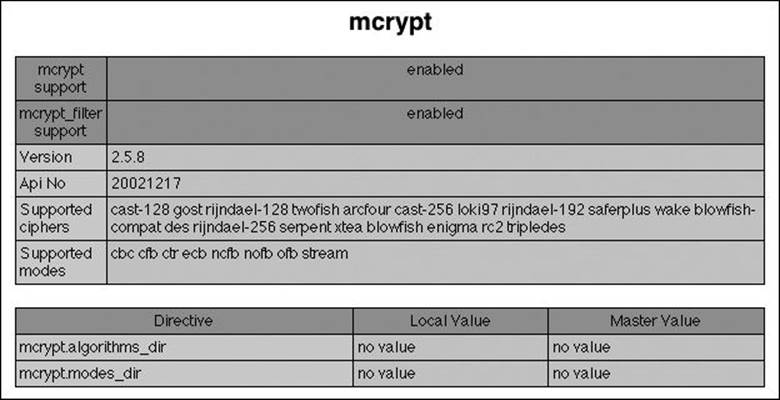
Check your PHP installation for MCrypt support before trying this next script.
For this next example, I’ll show you how to encrypt data stored in the session. As you should know, session data is normally stored as plain text in readily available files. In other words, session data normally has few security protections. Using MCrypt, you could encrypt that stored data, adding a layer of security. As the encryption process creates binary data, the base64_encode() function will be applied to the encrypted data, to convert it to a textual format prior to storing it. Therefore, the corresponding base64_decode() function needs to be used prior to decoding the data. Other than that little tidbit, the focus in the next two scripts is entirely on using MCrypt.
Do keep in mind that in the next several pages I’ll be introducing and teaching security concepts to which people have dedicated entire careers. The information covered here will be secure, useful, and valid, but it’s just the tip of the proverbial security iceberg.
Encrypting data
With MCrypt libraries 2.4.x and higher, you start by identifying which algorithm and mode to use by invoking the mcrypt_module_open() function:
$m = mcrypt_module_open (algorithm, algorithm_dir, mode, mode_dir);
MCrypt comes with dozens of different algorithms, or ciphers, each of which encrypts data differently. You can run the mcrypt_list_algorithms() function to see which ones your installation supports . If you are interested in how each works, see the MCrypt home page or search the Web. In my examples, I’ll be using the Rijndael algorithm, also known as the Advanced Encryption Standard (AES). It’s a very popular and secure encryption algorithm, even up to United States government standards. I’ll be using it with 256-bit keys, for extra security.
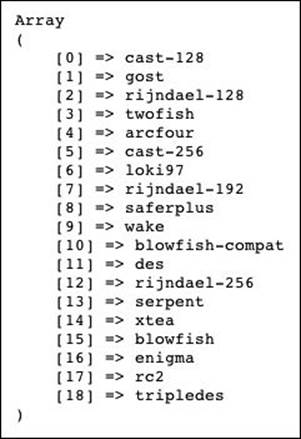
The list of MCrypt algorithms supported by this PHP installation.
As for the mode, there are four main modes: ECB (electronic codebook), CBC (cipher block chaining), CFB (cipher feedback), and OFB (output feedback). CBC will suit most of your needs, especially when encrypting blocks of text as in this example. The mcrypt_list_modes() function shows which modes are available to your installation.
 The list of MCrypt modes supported by this PHP installation.
With the algorithm and mode selected, to indicate that you want to use Rijndael 256 in CBC mode, you would code
$m = mcrypt_module_open ('rijndael-256', '', 'cbc', '');
The second and fourth arguments fed to the mcrypt_module_open() function are for explicitly stating where PHP can find the algorithm and mode files. These are not required unless PHP is unable to find a cipher and you know for certain it is installed.
Once the module is open, you create an IV (initialization vector). This may be required, optional, or unnecessary, depending on the mode being used. I’ll use it with CBC to increase the security. Here’s how the PHP manual recommends an IV be created:
$iv = mcrypt_create_iv(mcrypt_enc_get_iv_size ($m), MCRYPT_DEV_RANDOM);
By using the mcrypt_enc_get_iv_size() function, a properly sized IV will be created for the cipher being used. Note that on Windows with versions of PHP before 5.3, you should use MCRYPT_RAND instead of MCRYPT_DEV_RANDOM.
The final step before you are ready to encrypt data is to create the buffers that MCrypt needs to perform encryption:
mcrypt_generic_init($m, $key, $iv);
The second argument is a key, which should be a hard-to-guess string. The key must be of a particular length, corresponding to the cipher you use. The Rijndael cipher I’m using takes a 256-bit key. Divide 256 by 8 (because there are 8 bits in a byte and each character in the key string takes 1 byte) and you’ll see that the key needs to be exactly 32 characters long. To accomplish that, and to randomize the key even more, I’ll run it through md5(), which always returns a 32-character string:
$key = md5('some string');
Once you have gone through these steps, you are ready to encrypt data:
$encrypted = mcrypt_generic($m, $data);
You can encrypt as much, or as many individual pieces, of data as you need.
Finally, after you have finished encrypting everything, you should close all the buffers and modules:
mcrypt_generic_deinit($m);
mcrypt_module_close($m);
For this next example, I’m going to store an encrypted value in the session. The data will be decrypted in the subsequent example. The key and data to be encrypted will be hard-coded into this script, but I’ll mention alternatives in the following steps. Also, because the same key and IV are needed to decrypt the data, the IV will also be stored in the session. Surprisingly, doing so doesn’t hurt the security of the application, although I will again discuss alternative approaches.
To encrypt data
1. Begin a new PHP script in your text editor or IDE, to be named set_mcrypt.php (Script 11.3):
<?php # Script 11.3 - set_mcrypt.php
session_start(); ?>
Because the script will store data in the session, the session must be begun before any HTML is created.
2. Add the HTML head:
<!doctype html>
<html lang="en">
<head>
<meta charset="utf-8">
<title>A More Secure Session</title>
</head>
<body>
Script 11.3. This script uses MCrypt to encrypt some data to be stored in a session.
1 <?php # Script 11.3 - set_mcrypt.php
2
3 /* This page uses the MCrypt library
4 * to encrypt some data.
5 * The data will then be stored in a session,
6 * as will the encryption IV.
7 */
8
9 // Start the session:
10 session_start(); ?>
11 <!doctype html>
12 <html lang="en">
13 <head>
14 <meta charset="utf-8">
15 <title>A More Secure Session</title>
16 </head>
17 <body>
18 <?php // Encrypt and store the data...
19
20 // Create the key:
21 $key = md5('77 public drop-shadow Java');
22
23 // Data to be encrypted:
24 $data = 'rosebud';
25
26 // Open the cipher:
27 // Using Rijndael 256 in CBC mode.
28 $m = mcrypt_module_open('rijndael-256', '', 'cbc', '');
29
30 // Create the IV:
31 // Use MCRYPT_RAND on Windows instead of MCRYPT_DEV_RANDOM.
32 $iv = mcrypt_create_iv(mcrypt_enc_get_iv_size($m), MCRYPT_DEV_RANDOM);
33
34 // Initialize the encryption:
35 mcrypt_generic_init($m, $key, $iv);
36
37 // Encrypt the data:
38 $data = mcrypt_generic($m, $data);
39
40 // Close the encryption handler:
41 mcrypt_generic_deinit($m);
42
43 // Close the cipher:
44 mcrypt_module_close($m);
45
46 // Store the data:
47 $_SESSION['thing1'] = base64_encode($data);
48 $_SESSION['thing2'] = base64_encode($iv);
49
50 // Print the encrypted format of the data:
51 echo '<p>The data has been stored. Its value is ' . base64_encode($data) . '.</p>';
52
53 ?>
54 </body>
55 </html>
3. Define the key and the data:
<?php
$key = md5('77 public drop-shadow Java');
$data = 'rosebud';
For the key, some random words and numbers are run through the md5() function, creating a 32-character-long string. Ideally, the key should be stored in a safe place, such as a configuration file located outside of the Web document root. Or it could be retrieved from a database.
The data being encrypted is the word rosebud, although in real applications this data might come from the user or another source (and be something more worth protecting).
4. Open the cipher:
$m = mcrypt_module_open ('rijndael-256', '', 'cbc', '');
This is the same code outlined in the text before these steps.
5. Create the IV:
$iv = mcrypt_create_iv (mcrypt_enc_get_iv_size($m), MCRYPT_DEV_RANDOM);
Again, this is the same code outlined earlier. Remember that if you are running this script on Windows with an earlier version of PHP, you’ll need to change this line to
$iv = mcrypt_create_iv(mcrypt_enc_get_iv_size($m), MCRYPT_RAND);
6. Initialize the encryption:
mcrypt_generic_init($m, $key, $iv);
7. Encrypt the data:
$data = mcrypt_generic($m, $data);
If you were to print the value of $data now, you’d see something like  , which is how the browser would display binary data.
8. Perform the necessary cleanup:
mcrypt_generic_deinit($m);
mcrypt_module_close($m);
9. Store the data in the session:
$_SESSION['thing1'] = base64_encode($data);
$_SESSION['thing2'] = base64_encode($iv);
For the session names, I’m using meaningless values. You certainly wouldn’t want to use, say, IV, as a session name! For the session data itself, you have to run it through base64_encode() to make it safe to store in a plain text file. This applies to both the encrypted data and the IV (which is also in binary format).
If the data were going to be stored in a binary file or in a database (in a BLOB column), you wouldn’t need to use base64_encode().
10. Print a message, including the encoded, encrypted version of the data:
echo '<p>The data has been stored. Its value is ' . base64_encode($data) . '.</p>';
?>
I’m doing this mostly so that the page shows something , but also so that you can see the value stored in the session. If you were to open the session text file from the server, you’d see the same value.
 The result of running the page.
11. Complete the page:
</body>
</html>
12. Save the file as set_mcrypt.php, place it in your Web directory, and test in your Web browser.
Tip
There’s an argument to be made that you shouldn’t apply the MD5() function to the key because it actually decreases the security of the key. I’ve used it here regardless, but it’s the kind of issue that legitimate cryptographers think about.
Tip
If you want to determine the length of the key on the fly, use the mcrypt_end_get_key_size() function:
$ks = mcrypt_end_get_key_size($m);
Decrypting data
When it’s time to decrypt encrypted data, most of the process is the same as it is for encryption. To start:
$m = mcrypt_module_open ('rijndael-256', '', 'cbc', '');
mcrypt_generic_init($m, $key, $iv);
At this point, instead of using mcrypt_generic(), you’ll use mdecrypt_generic():
$data = mdecrypt_generic($m, $encrypted);
Note, and this is very important, that to successfully decrypt the data, you’ll need the exact same key and IV used to encrypt it.
Once decryption has taken place, you can close up your resources:
mcrypt_generic_deinit($m);
mcrypt_module_close($m);
Finally, you’ll likely want to apply the rtrim() function to the decrypted data, as the encryption process may add white space as padding to the end of the data.
To decrypt data
1. Begin a new PHP script in your text editor or IDE, to be named read_mcrypt.php (Script 11.4):
<?php # Script 11.4 - read_mcrypt.php
session_start(); ?>
Before any HMTL is sent, the session is begun, as in the previous script.
2. Add the opening HTML:
<!doctype html>
<html lang="en">
<head>
<meta charset="utf-8">
<title>A More Secure Session</title>
</head>
<body>
3. Check that the session data exists:
<?php if (isset($_SESSION['thing1'], $_SESSION['thing2'])) {
There’s no point in trying to decrypt the data if the page can’t access it!
4. Create the key:
$key = md5('77 public drop-shadow Java');
Not to belabor the point, but again, this must be the exact same key used to encrypt the data. This is another reason why you might want to store the key outside of these scripts.
5. Open the cipher:
$m = mcrypt_module_open ('rijndael-256', '', 'cbc', '');
This should also match the encryption code (you have to use the same cipher and mode for both encryption and decryption).
Script 11.4. This script uses MCrypt to decrypt previously stored session data.
1 <?php # Script 11.4 - read_mcrypt.php
2
3 /* This page uses the MCrypt library
4 * to decrypt data stored in the session.
5 */
6
7 session_start(); ?>
8 <!doctype html>
9 <html lang="en">
10 <head>
11 <meta charset="utf-8">
12 <title>A More Secure Session</title>
13 </head>
14 <body>
15 <?php
16 // Make sure the session data exists:
17 if (isset($_SESSION['thing1'], $_SESSION['thing2'])) {
18
19 // Create the key:
20 $key = md5('77 public drop-shadow Java');
21
22 // Open the cipher...
23 // Using Rijndael 256 in CBC mode:
24 $m = mcrypt_module_open('rijndael-256', '', 'cbc', '');
25
26 // Decode the IV:
27 $iv = base64_decode($_SESSION['thing2']);
28
29 // Initialize the encryption:
30 mcrypt_generic_init($m, $key, $iv);
31
32 // Decrypt the data:
33 $data = mdecrypt_generic($m, base64_decode($_SESSION['thing1']));
34
35 // Close the encryption handler:
36 mcrypt_generic_deinit($m);
37
38 // Close the cipher:
39 mcrypt_module_close($m);
40
41 // Print the data:
42 echo '<p>The session has been read. Its value is "' . trim($data) . '".</p>';
43
44 } else { // No data!
45 echo '<p>There\'s nothing to see here.</p>';
46 }
47 ?>
48 </body>
49 </html>
6. Decode the IV:
$iv = base64_decode ($_SESSION['thing2']);
The IV isn’t being generated here; it’s being retrieved from the session (because it has to be the same IV as was used to encrypt the data). The base64_decode() function will return the IV to its binary form.
7. Initialize the decryption:
mcrypt_generic_init($m, $key, $iv);
8. Decrypt the data:
$data = mdecrypt_generic($m, base64_decode($_SESSION ['thing1']));
The mdecrypt_generic() function will decrypt the data. The data is coming from the session and must be decoded first.
9. Wrap up the MCrypt code:
mcrypt_generic_deinit($m);
mcrypt_module_close($m);
10. Print the data:
echo '<p>The session has been read. Its value is "' . trim ($data) . '".</p>';
Running Server Commands
Another server-related topic not discussed in this chapter is how to run commands on the server. Whether you ever have the need to or not depends on your server OS and site needs, but you might have to, for example, tap into the ImageMagick library to do some image manipulation, or run a Perl script.
There are many PHP functions available for executing server commands. For starters, there is exec():
exec(command, $output);
This function takes a command and assigns to $output an array where each element is a line of the generated output.
Also available is system(), which just returns the output (so that it could be immediately sent to the Web browser):
system(command);
The passthru() function is similar, but it can also return binary output:
passthru(command);
Finally, you could use shell_exec() or the backticks, both of which just return the output:
$var = shell_exec(command);
$var = `command`;
For security purposes, you should use escapeshellarg() or escapeshellcmd() to sanctify any command that isn’t hard-coded.
11. Complete the page:
} else { // No data!
echo '<p>There\'s nothing to see here.</p>';
}
?>
</body>
</html>
The else clause applies if the two cookies were not accessible to the script.
12. Save the file as read_mcrypt.php, place it in your Web directory, and test in your Web browser  .
.

 The session data has been successfully decrypted.
Tip
If you rerun the first script, you’ll see that the encrypted version of the data is different each time, even though the data itself is always the same. This is because the IV will be different each time. Still, the decryption will always work, as the IV is stored in a session.
Review and Pursue
If you have any problems with these sections, either in answering the questions or pursuing your own endeavors, turn to the book’s supporting forum (www.LarryUllman.com/forums/).
Review
• How do you write data to a compressed file? (See page 354.)
• How do you read data from a compressed file? (See page 354.)
• What is cron? How do you create new cronjobs? (See page 363.)
• What security concerns surround session data? (See page 366.)
• Why are the base64_encode() and base64_decode() functions used in the encryption examples? (See page 366.)
Pursue
• Modify db_backup.php to confirm that the backups directory is writable prior to attempting to create the subdirectory.
• Check out the PHP manual’s pages on zlib to learn how to have it compress PHP output.
• If you have the need to create ZIP archives, check out PHP’s ZIP extension.
• For security purposes, you’d likely want to place the backups folder outside of the Web directory (considering its open permissions.)
• To see the effect that compression has on your file, rewrite backup_db.php to use fopen(), fwrite(), and fclose() instead.
• Read the next chapter and figure out how to run db_backups.php using PHP’s Command-Line Interface (CLI).
• If you’re using a *nix server or computer, including Mac OS X, read more about cron by typing man cron or man crontab within the command line.
• If you’re using Windows and want to automate the execution of a PHP script on that computer, look into creating a scheduled task.
• Improve the security of the MCrypt examples by storing the key in a more secure manner (e.g., in an included file stored in a secure location).
• Change the data being stored in the session just to confirm that it works. Try using, for example, a fake credit card number.
• If you have the inclination, convert any of this chapter’s examples to object-based versions.
• Read up on security. A lot!
All materials on the site are licensed Creative Commons Attribution-Sharealike 3.0 Unported CC BY-SA 3.0 & GNU Free Documentation License (GFDL)
If you are the copyright holder of any material contained on our site and intend to remove it, please contact our site administrator for approval.
© 2016-2026 All site design rights belong to S.Y.A.
In This Chapter
Compressing Files
Establishing a cron
Using MCrypt
Review and Pursue
A lot of the standard PHP actions, such as communicating with databases and sending emails, actually occur between applications on the server and PHP (as opposed to between the server and the client). As PHP is increasingly used for advanced purposes and not simply to generate Web content, its ability to manipulate and use the features the server has to offer becomes more important.
This chapter will show you how to better take advantage of the other services and libraries that your server may have. Starting off is a demonstration of how to compress files using PHP. The second topic shows how to automatically run your PHP scripts using cron on Unix (and Mac OS X). The chapter ends with instructions for implementing cryptography for better security.
Compressing Files
Most users are familiar with client-based GUI compression utilities such as WinZip or StuffIt, used to compress and decompress files. Thanks to zlib, available from www.zlib.net, you can have PHP compress files as well. The zlib library was written by two of the major compression/decompression developers as a patent-free, lossless data-compression tool. Zlib is available on every major platform and is frequently built into a server’s configuration. I would be surprised if a Unix brand of operating system did not include zlib, and PHP on Windows has built-in support for zlib ever since version 4.3.
Once zlib is installed and PHP is made to support it ![]() , you can use it for writing to or reading from compressed files. Most of the functions work exactly like the standard file functions: fopen(), fwrite(), fclose(), and so forth. You start by opening a file, indicating the mode:
, you can use it for writing to or reading from compressed files. Most of the functions work exactly like the standard file functions: fopen(), fwrite(), fclose(), and so forth. You start by opening a file, indicating the mode:
$fp = gzopen('filename.gz', 'mode');
![]() Before attempting to use the zlib functions, run a phpinfo() script to confirm PHP’s support for the library.
Before attempting to use the zlib functions, run a phpinfo() script to confirm PHP’s support for the library.
The modes, shown in Table 11.1, are the same as those used with fopen(). Added to this can be a compression level on a scale of 1 (least compressed) to 9 (most). And you can add the f, h, and b flags to further modify the mode.
Table 11.1. File Open Modes
With an open file, you can then write data to it:
$fp = gzopen('filename.gz', 'w5');
gzwrite($fp, 'data');
Finally, close the file:
gzclose($fp);
Reading from files can be even easier. You can use readgzfile(), which reads in a compressed file, decompresses the data, and sends it to the output. There is also the gzfile() function, which reads in a compressed file, decompresses it, and returns it as an array (one element for each line in the file).
In this next example, I’ll have PHP create a compressed file on the fly. The PHP script itself will retrieve all of the data stored in a named database and will create files listing said data in comma-delineated format. In short, this PHP script will create a compressed backup of a database’s records.
To compress a file
1. Create a new PHP document in your text editor or IDE, to be named db_backup.php, beginning with the standard HTML (Script 11.1):
<!doctype html>
<html lang="en">
<head>
<meta charset="utf-8">
<title>Database Backup</title>
</head>
<body>
<?php # Script 11.1 - db_backup.php
2. Set the name of the database:
$db_name = 'test';
First, I set a variable with the name of the database to be backed up. I do so mostly because the database name will be referenced several times over in this script and I want to make changes easily.
Script 11.1. This very useful script will back up a database, table by table, to a compressed, comma-separated text file.
1 <!doctype html>
2 <html lang="en">
3 <head>
4 <meta charset="utf-8">
5 <title>Database Backup</title>
6 </head>
7 <body>
8 <?php # Script 11.1 - db_backup.php
9
10 /* This page retrieves all the data from a database
11 * and writes that data to a text file.
12 * The text file is then compressed using zlib.
13 */
14
15 // Establish variables and setup:
16 $db_name = 'test';
17
18 // Backup directory:
19 $dir = "backups/$db_name";
20
21 // Make the database-specific directory, if it doesn't exist:
22 if (!is_dir($dir)) {
23 if (!@mkdir($dir)) {
24 die("<p>The backup directory--$dir--could not be created.</p></body></html>");
25 }
26 }
27
28 // Get the current time for use in all filenames:
29 $time = time();
30
31 // Connect to the database:
32 $dbc = @mysqli_connect('localhost', 'username', 'password', $db_name) OR die("<p>The database--$db_name--could not be backed up.</p></body></html>");
33
34 // Retrieve the tables:
35 $r = mysqli_query($dbc, 'SHOW TABLES');
36
37 // Back up if at least one table exists:
38 if (mysqli_num_rows($r) > 0) {
39
40 // Indicate what is happening:
41 echo "<p>Backing up database '$db_name'.</p>";
42
43 // Fetch each table name:
44 while (list($table) = mysqli_fetch_array($r, MYSQLI_NUM)) {
45
46 // Get the records for this table:
47 $q = "SELECT * FROM $table";
48 $r2 = mysqli_query($dbc, $q);
49
50 // Back up if records exist:
51 if (mysqli_num_rows($r2) > 0) {
52
53 // Attempt to open the file:
54 if ($fp = gzopen ("$dir/{$table}_{$time}.sql.gz", 'w9')) {
55
56 // Fetch all the records for this table:
57 while ($row = mysqli_fetch_array($r2, MYSQLI_NUM)) {
58
59 // Write the data as a comma-delineated row:
60 foreach ($row as $value) {
61 $value = addslashes($value);
62 gzwrite ($fp, "'$value', ");
63 }
64
65 // Add a new line to each row:
66 gzwrite ($fp, "\n");
67
68 } // End of WHILE loop.
69
70 // Close the file:
71 gzclose ($fp);
72
73 // Print the success:
74 echo "<p>Table '$table' backed up.</p>";
75
76 } else { // Could not create the file!
77 echo "<p>The file--$dir/{$table}_{$time}.sql.gz--could not be opened for writing.</p>";
78 break; // Leave the WHILE loop.
79 } // End of gzopen() IF.
80
81 } // End of mysqli_num_rows() IF.
82
83 } // End of WHILE loop.
84
85 } else {
86 echo "<p>The submitted database--$db_name--contains no tables.</p>";
87 }
88
89 ?>
90 </body>
91 </html>
3. Make sure that the backup directory exists:
$dir = "backups/$db_name";
if (!is_dir($dir)) {
if (!@mkdir($dir)) {
die("<p>The backup directory--$dir--could not be created.</p></body></html>");
}
}
The backups will be stored in a directory called backups. Within this directory, each database will have its own directory. First, a variable is given the value of the final destination. Next, the script checks to see if that directory already exists. If not, the script attempts to create it. The script terminates if the directory could not be created ![]() , since there’d be no point in continuing.
, since there’d be no point in continuing.
![]() The result if the destination directory does not exist and could not be created.
The result if the destination directory does not exist and could not be created.
One assumption here is that an existing directory is already writable, something you could easily check for (using the is_writable() function). This section of the code, which is secondary to what’s really being taught, assumes you already understand what permissions must exist for PHP to write to directories. And you’ll obviously need to change the particulars to match your system.
4. Get the current time:
$time = time();
Each table backup will be its own file and this value will be used in each filename. Because every file should reflect the same backup time, I assign this to a variable once, instead of invoking the function once for each file.
5. Connect to the database:
$dbc = @mysqli_connect ('localhost', 'username', 'password', $db_name) OR die ("<p>The database--$db_name--could not be backed up.</p></body></html>");
Next, the script attempts to connect to the named database. If it can’t, a message indicating a problem is displayed in the Web browser ![]() , and the HTML page is concluded. Again, you’ll obviously need to change the parameters to match what’s appropriate for your server.
, and the HTML page is concluded. Again, you’ll obviously need to change the parameters to match what’s appropriate for your server.
![]() The result if a database connection could not be made.
The result if a database connection could not be made.
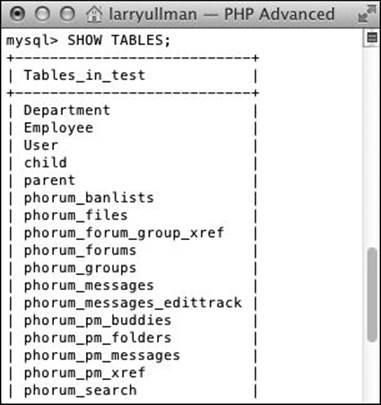
6. Retrieve the tables in this database:
$r = mysqli_query($dbc, 'SHOW TABLES');
This query will return a list of every table in the current database ![]() .
.
![]() Running the same query that the script runs (the first of two) using the mysql client.
Running the same query that the script runs (the first of two) using the mysql client.
7. Confirm that at least one record was returned and print a message:
if (mysqli_num_rows($r) > 0) {
echo "<p>Backing up database '$db_name'.</p>\n";
No need to back up an empty database!
8. Create a loop that fetches each table name:
while (list($table) = mysqli_fetch_array($r, MYSQLI_NUM)) {
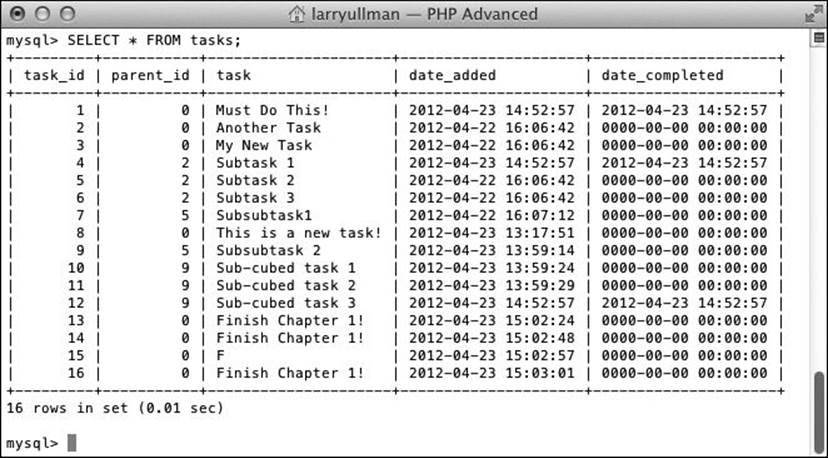
9. Retrieve all the records for this table:
$q = "SELECT * FROM $table";
$r2 = mysqli_query($dbc, $q);
This query returns every record for a given table ![]() . Since this query is run within a while loop for another query, you have to use a different result variable ($r2 here instead of $r), or you’ll overwrite the first query’s results.
. Since this query is run within a while loop for another query, you have to use a different result variable ($r2 here instead of $r), or you’ll overwrite the first query’s results.
![]() The main query, the results of which will be written to a file.
The main query, the results of which will be written to a file.
10. If the table contains some records, open the text file for writing:
if (mysqli_num_rows($r2) > 0) {
if ($fp = gzopen ("$dir/{$table}_{$time}.sql.gz", 'w9')) {
Each table will be backed up to its own file, the name of which is derived from the table name ($table), the current timestamp ($time), and a .sql.gz extension. All of the files will be written to a database-specific folder within a backup folder. Both directories must have appropriate permissions for PHP to write to them.
The gzopen() function takes two parameters: the filename and the mode of opening. The modes correspond directly to fopen()’s modes (w, r, a along with b for writing binary data) but can also indicate a level of compression. The acceptable compression levels are on a scale from 1 (minimal compression) to 9 (maximum) with a trade-off between compression and performance. For relatively small files like these text documents, maximum compression is fine.
11. Retrieve all of the table’s data, and write it to the file:
while ($row = mysqli_fetch_array($r2, MYSQLI_NUM)) {
foreach ($row as $value) {
$value = addslashes($value);
gzwrite ($fp, "'$value', ");
}
gzwrite ($fp, "\n");
} // End of WHILE loop.
This loop will take every row out of the table and write that to a text file in the format 'value',[SPACE]. Instead of using the fwrite() function that you may be familiar with, there is gzwrite(), which works just the same (except that it writes to a compressed file).
In case the retrieved data contains an apostrophe, it’s run through the adds-lashes() function prior to storage.
12. Close the file and print a message to the browser:
gzclose ($fp);
echo "<p>Table '$table' backed up.</p>";
13. Complete the conditionals:
} else {
echo "<p>The file--$dir/{$table}_{$time}.sql. gz--could not be opened for writing.</p>\n";
break;
} // End of gzopen() IF.
} // End of mysqli_num_rows() IF.
} // End of WHILE loop.
} else {
echo "<p>The submitted database--$db_name--contains no tables.</p>\n";
}
14. Complete the page:
?>
15. Save the file as db_backup.php and place it in your Web directory.
16. Create a folder called backups, in the same directory as db_backup.php, and change the folder’s permissions (if necessary).
How you do this depends on your operating system, which I assume as an experienced PHP developer you’ve already discovered. If you don’t know how to change a directory’s permissions, search the Web or check out the book’s corresponding support forum (www.LarryUllman.com/forums/).
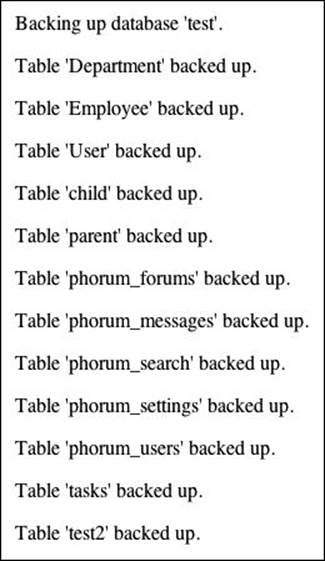
17. Test the PHP script in your Web browser ![]() .
.
![]() What the Web page shows after successfully backing up the tables found within the test database.
What the Web page shows after successfully backing up the tables found within the test database.
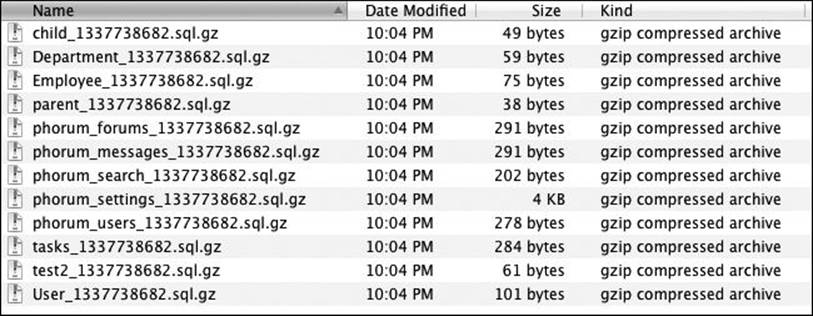
18. Check the directory on your computer to see the new files ![]() .
.
![]() Viewing the directory within my computer shows the newly created compressed files, one for each table in the database.
Viewing the directory within my computer shows the newly created compressed files, one for each table in the database.
Tip
The zlib functions can also work with compressed binary files. (Windows makes a distinction between binary and plain text files, but Unix and Mac OS X do not.) Binary files offer the advantage of being readable and writable in a nonlinear fashion.
Tip
The zlib library can also be used to automatically compress PHP output on the fly. By sending compressed data to the browser, which the browser would automatically decompress, less data will need to be transmitted, thereby improving the page’s performance.
Tip
You can create ZIP archives using the zlib library and the PHP ZIP extension.
Establishing a cron
A cron is a service on Unix servers that allows tasks to be scheduled and executed automatically. The cron application runs constantly and will carry out its orders when instructed to do so. These orders are stored in a file called crontab. This file is a to-do list that contains lines that might look like
30 22 * * * wget -q http://www.example.com
The crontab format dictates that each line contain six fields separated by spaces or tabs. The first five fields represent, in order: minutes, hours, days, months, and day of the week (from 0 to 6, with 0 being Sunday). You can specify the day of operation as either a day of the month (1–31) or a day of the week (Sunday through Saturday), the latter being date-indifferent.
An asterisk as one of the first five parameters means that value is not limited (i.e., it always applies). In the preceding example, the instruction is to be carried out at 10:30 p.m. (22 being 10 p.m. on the 24-hour clock) every day of the month, every month of the year.
You can also set ranges using the hyphen (1–6 for the month field would mean that the job applies to the first six months of the year) or list elements separated by comma (1, 3, 5 for Monday, Wednesday, Friday). The sixth field on each line is the task itself.
Looking at the preceding example, the actual command is to open the URL http://www.example.com with wget, a command-line URL tool built into Unix. The -q flag says to access the page quietly. This command would be, for example, how I might run a script whose output is not important (likedb_backups.php).
To use cron to run a PHP script, you have a couple of options. The first is to use the server’s own Web browser—like wget—to run a PHP script, as just explained. Another would be to use the server’s installation of cURL. This program is designed to access URLs, although it’s not a Web browser per se (Chapter 10, “Networking with PHP,” discusses cURL in some detail). A final option is to run the PHP script using the Command-Line Interface (see Chapter 12, “PHP’s Command-Line Interface”).
For this example, I’ll run the db_backup.php script (Script 11.1) created earlier in the chapter, using cURL. The syntax for using cURL is easy:
curl yourURLhere
So:
curl http://www.example.com/page.php
To add an item to the crontab file, you can manually edit it by typing crontab -e in a command prompt. This will allow you to edit the file using your default command-line text editor. Unfortunately, if you don’t know how to already use said text editor—a surprisingly daunting task—this does you no good. So instead I’ll show you another method.
To establish a cron for a PHP file
1. Access your server via a command-line interface.
If you’re not clear as to how to do this, see the next chapter. If you’re using a remote (i.e., hosted) server, there may just be a control panel for you to set cron jobs instead of using a command-line interface.
2. Test the command ![]() :
:
curl http://localhost/db_backup.php
![]() Before entering the command into the crontab file, I test it once to confirm the results.
Before entering the command into the crontab file, I test it once to confirm the results.
It’s always best to test the command you’ll have cron execute so that you know that it works. Do so just by entering the command within the command-line interface you’re using. You’ll obviously need to change your URL to match where you put your copy of db_backup.php (as in the figure). In my case, the PHP script is running on the same server as this cron job.
3. View the current contents of the crontab file:
crontab -l
This command will show you the current crontab, which you should be careful with, as the following steps will replace any existing instructions. If you’ve never worked with the crontab file before, it’s probably blank, but better safe than sorry!
If there are already commands entered, copy them for later.
4. Create a new document in your text editor or IDE (Script 11.2):
1 0 * * 5 curl http://localhost/db_backup.php
First, you’ll write a dummy cronjob file, and then you’ll install this into the actual crontab. This file should contain the entire command. Make sure you press Enter/Return once at the end of the line.
The command itself says that cURL should be invoked with that URL every Friday (5) at 12:01 a.m.
5. If Step 3 revealed anything in the current crontab, add it to the text document begun in Step 4.
Just copy-paste whatever was returned in Step 3 to the text document. Each task should be on its own line. It won’t matter, in this case, which instruction comes first.
6. Save this file as cronjob1 (without any extension) and upload it to the server in a convenient location (not necessarily within the Web document root).
Script 11.2. The cronjob1 file lists the command to be added to crontab.
1 # Script 11.2 - cronjob
2 # Run a PHP script every Friday at 12:01 am:
3 1 0 * * 5 curl http://localhost/db_backup.php
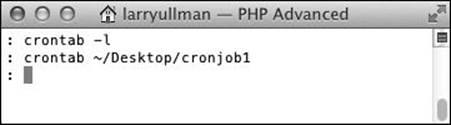
7. Within your server’s command prompt, enter the following code and then press Enter/Return once:
crontab /path/to/cronjob1
In my example ![]() , cronjob1 is stored on my desktop. The full path is therefore /Users/larryullman/Desktop/ cronjob1, and the shortcut reference is ~/Desktop/cronjob1. Replace that part of the code with the applicable location of your cronjob1 file on the server.
, cronjob1 is stored on my desktop. The full path is therefore /Users/larryullman/Desktop/ cronjob1, and the shortcut reference is ~/Desktop/cronjob1. Replace that part of the code with the applicable location of your cronjob1 file on the server.
![]() Adding the new instruction to the crontab file.
Adding the new instruction to the crontab file.
8. Confirm the cron task list by viewing the crontab file ![]() .
.
crontab –l
![]() Confirming the contents of the crontab file.
Confirming the contents of the crontab file.
Tip
The crontab file is unique for each user on the server. This also means that the instructions in the crontab file will run as that user, so permissions conflicts may arise. This is another reason why it’s a good idea to test the command before entering it into the crontab file.
Tip
On Windows, you can replicate cron using scheduled tasks. Search online or use my support forums (www.LarryUllman.com/forums/) if you need assistance with this.
Using MCrypt
Frequently, Web applications will encrypt and decrypt data stored in a database, using the database-supplied functions. This is appropriate, as you want the database to do the bulk of the work whenever possible. But what if you want to encrypt and decrypt data that’s not being stored in a database? In that situation, MCrypt provides a good solution. To use MCrypt with PHP, you’ll need to install the MCrypt library (libmcrypt, available from http://sourceforge.net/projects/mcrypt/) and configure PHP to support it ![]() . As of PHP 5, you need at least version 2.5.6 of MCrypt. It is built into PHP on Windows since PHP 5.3.
. As of PHP 5, you need at least version 2.5.6 of MCrypt. It is built into PHP on Windows since PHP 5.3.
![]() Check your PHP installation for MCrypt support before trying this next script.
Check your PHP installation for MCrypt support before trying this next script.
For this next example, I’ll show you how to encrypt data stored in the session. As you should know, session data is normally stored as plain text in readily available files. In other words, session data normally has few security protections. Using MCrypt, you could encrypt that stored data, adding a layer of security. As the encryption process creates binary data, the base64_encode() function will be applied to the encrypted data, to convert it to a textual format prior to storing it. Therefore, the corresponding base64_decode() function needs to be used prior to decoding the data. Other than that little tidbit, the focus in the next two scripts is entirely on using MCrypt.
Do keep in mind that in the next several pages I’ll be introducing and teaching security concepts to which people have dedicated entire careers. The information covered here will be secure, useful, and valid, but it’s just the tip of the proverbial security iceberg.
Encrypting data
With MCrypt libraries 2.4.x and higher, you start by identifying which algorithm and mode to use by invoking the mcrypt_module_open() function:
$m = mcrypt_module_open (algorithm, algorithm_dir, mode, mode_dir);
MCrypt comes with dozens of different algorithms, or ciphers, each of which encrypts data differently. You can run the mcrypt_list_algorithms() function to see which ones your installation supports ![]() . If you are interested in how each works, see the MCrypt home page or search the Web. In my examples, I’ll be using the Rijndael algorithm, also known as the Advanced Encryption Standard (AES). It’s a very popular and secure encryption algorithm, even up to United States government standards. I’ll be using it with 256-bit keys, for extra security.
. If you are interested in how each works, see the MCrypt home page or search the Web. In my examples, I’ll be using the Rijndael algorithm, also known as the Advanced Encryption Standard (AES). It’s a very popular and secure encryption algorithm, even up to United States government standards. I’ll be using it with 256-bit keys, for extra security.
![]() The list of MCrypt algorithms supported by this PHP installation.
The list of MCrypt algorithms supported by this PHP installation.
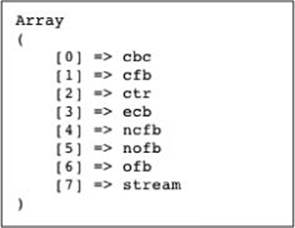
As for the mode, there are four main modes: ECB (electronic codebook), CBC (cipher block chaining), CFB (cipher feedback), and OFB (output feedback). CBC will suit most of your needs, especially when encrypting blocks of text as in this example. The mcrypt_list_modes() function shows which modes are available ![]() to your installation.
to your installation.
![]() The list of MCrypt modes supported by this PHP installation.
The list of MCrypt modes supported by this PHP installation.
With the algorithm and mode selected, to indicate that you want to use Rijndael 256 in CBC mode, you would code
$m = mcrypt_module_open ('rijndael-256', '', 'cbc', '');
The second and fourth arguments fed to the mcrypt_module_open() function are for explicitly stating where PHP can find the algorithm and mode files. These are not required unless PHP is unable to find a cipher and you know for certain it is installed.
Once the module is open, you create an IV (initialization vector). This may be required, optional, or unnecessary, depending on the mode being used. I’ll use it with CBC to increase the security. Here’s how the PHP manual recommends an IV be created:
$iv = mcrypt_create_iv(mcrypt_enc_get_iv_size ($m), MCRYPT_DEV_RANDOM);
By using the mcrypt_enc_get_iv_size() function, a properly sized IV will be created for the cipher being used. Note that on Windows with versions of PHP before 5.3, you should use MCRYPT_RAND instead of MCRYPT_DEV_RANDOM.
The final step before you are ready to encrypt data is to create the buffers that MCrypt needs to perform encryption:
mcrypt_generic_init($m, $key, $iv);
The second argument is a key, which should be a hard-to-guess string. The key must be of a particular length, corresponding to the cipher you use. The Rijndael cipher I’m using takes a 256-bit key. Divide 256 by 8 (because there are 8 bits in a byte and each character in the key string takes 1 byte) and you’ll see that the key needs to be exactly 32 characters long. To accomplish that, and to randomize the key even more, I’ll run it through md5(), which always returns a 32-character string:
$key = md5('some string');
Once you have gone through these steps, you are ready to encrypt data:
$encrypted = mcrypt_generic($m, $data);
You can encrypt as much, or as many individual pieces, of data as you need.
Finally, after you have finished encrypting everything, you should close all the buffers and modules:
mcrypt_generic_deinit($m);
mcrypt_module_close($m);
For this next example, I’m going to store an encrypted value in the session. The data will be decrypted in the subsequent example. The key and data to be encrypted will be hard-coded into this script, but I’ll mention alternatives in the following steps. Also, because the same key and IV are needed to decrypt the data, the IV will also be stored in the session. Surprisingly, doing so doesn’t hurt the security of the application, although I will again discuss alternative approaches.
To encrypt data
1. Begin a new PHP script in your text editor or IDE, to be named set_mcrypt.php (Script 11.3):
<?php # Script 11.3 - set_mcrypt.php
session_start(); ?>
Because the script will store data in the session, the session must be begun before any HTML is created.
2. Add the HTML head:
<!doctype html>
<html lang="en">
<head>
<meta charset="utf-8">
<title>A More Secure Session</title>
</head>
<body>
Script 11.3. This script uses MCrypt to encrypt some data to be stored in a session.
1 <?php # Script 11.3 - set_mcrypt.php
2
3 /* This page uses the MCrypt library
4 * to encrypt some data.
5 * The data will then be stored in a session,
6 * as will the encryption IV.
7 */
8
9 // Start the session:
10 session_start(); ?>
11 <!doctype html>
12 <html lang="en">
13 <head>
14 <meta charset="utf-8">
15 <title>A More Secure Session</title>
16 </head>
17 <body>
18 <?php // Encrypt and store the data...
19
20 // Create the key:
21 $key = md5('77 public drop-shadow Java');
22
23 // Data to be encrypted:
24 $data = 'rosebud';
25
26 // Open the cipher:
27 // Using Rijndael 256 in CBC mode.
28 $m = mcrypt_module_open('rijndael-256', '', 'cbc', '');
29
30 // Create the IV:
31 // Use MCRYPT_RAND on Windows instead of MCRYPT_DEV_RANDOM.
32 $iv = mcrypt_create_iv(mcrypt_enc_get_iv_size($m), MCRYPT_DEV_RANDOM);
33
34 // Initialize the encryption:
35 mcrypt_generic_init($m, $key, $iv);
36
37 // Encrypt the data:
38 $data = mcrypt_generic($m, $data);
39
40 // Close the encryption handler:
41 mcrypt_generic_deinit($m);
42
43 // Close the cipher:
44 mcrypt_module_close($m);
45
46 // Store the data:
47 $_SESSION['thing1'] = base64_encode($data);
48 $_SESSION['thing2'] = base64_encode($iv);
49
50 // Print the encrypted format of the data:
51 echo '<p>The data has been stored. Its value is ' . base64_encode($data) . '.</p>';
52
53 ?>
54 </body>
55 </html>
3. Define the key and the data:
<?php
$key = md5('77 public drop-shadow Java');
$data = 'rosebud';
For the key, some random words and numbers are run through the md5() function, creating a 32-character-long string. Ideally, the key should be stored in a safe place, such as a configuration file located outside of the Web document root. Or it could be retrieved from a database.
The data being encrypted is the word rosebud, although in real applications this data might come from the user or another source (and be something more worth protecting).
4. Open the cipher:
$m = mcrypt_module_open ('rijndael-256', '', 'cbc', '');
This is the same code outlined in the text before these steps.
5. Create the IV:
$iv = mcrypt_create_iv (mcrypt_enc_get_iv_size($m), MCRYPT_DEV_RANDOM);
Again, this is the same code outlined earlier. Remember that if you are running this script on Windows with an earlier version of PHP, you’ll need to change this line to
$iv = mcrypt_create_iv(mcrypt_enc_get_iv_size($m), MCRYPT_RAND);
6. Initialize the encryption:
mcrypt_generic_init($m, $key, $iv);
7. Encrypt the data:
$data = mcrypt_generic($m, $data);
If you were to print the value of $data now, you’d see something like ![]() , which is how the browser would display binary data.
, which is how the browser would display binary data.
8. Perform the necessary cleanup:
mcrypt_generic_deinit($m);
mcrypt_module_close($m);
9. Store the data in the session:
$_SESSION['thing1'] = base64_encode($data);
$_SESSION['thing2'] = base64_encode($iv);
For the session names, I’m using meaningless values. You certainly wouldn’t want to use, say, IV, as a session name! For the session data itself, you have to run it through base64_encode() to make it safe to store in a plain text file. This applies to both the encrypted data and the IV (which is also in binary format).
If the data were going to be stored in a binary file or in a database (in a BLOB column), you wouldn’t need to use base64_encode().
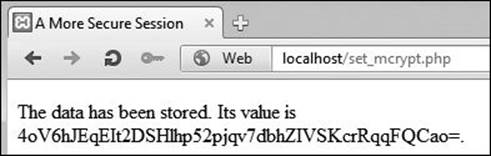
10. Print a message, including the encoded, encrypted version of the data:
echo '<p>The data has been stored. Its value is ' . base64_encode($data) . '.</p>';
?>
I’m doing this mostly so that the page shows something ![]() , but also so that you can see the value stored in the session. If you were to open the session text file from the server, you’d see the same value.
, but also so that you can see the value stored in the session. If you were to open the session text file from the server, you’d see the same value.
![]() The result of running the page.
The result of running the page.
11. Complete the page:
</body>
</html>
12. Save the file as set_mcrypt.php, place it in your Web directory, and test in your Web browser.
Tip
There’s an argument to be made that you shouldn’t apply the MD5() function to the key because it actually decreases the security of the key. I’ve used it here regardless, but it’s the kind of issue that legitimate cryptographers think about.
Tip
If you want to determine the length of the key on the fly, use the mcrypt_end_get_key_size() function:
$ks = mcrypt_end_get_key_size($m);
Decrypting data
When it’s time to decrypt encrypted data, most of the process is the same as it is for encryption. To start:
$m = mcrypt_module_open ('rijndael-256', '', 'cbc', '');
mcrypt_generic_init($m, $key, $iv);
At this point, instead of using mcrypt_generic(), you’ll use mdecrypt_generic():
$data = mdecrypt_generic($m, $encrypted);
Note, and this is very important, that to successfully decrypt the data, you’ll need the exact same key and IV used to encrypt it.
Once decryption has taken place, you can close up your resources:
mcrypt_generic_deinit($m);
mcrypt_module_close($m);
Finally, you’ll likely want to apply the rtrim() function to the decrypted data, as the encryption process may add white space as padding to the end of the data.
To decrypt data
1. Begin a new PHP script in your text editor or IDE, to be named read_mcrypt.php (Script 11.4):
<?php # Script 11.4 - read_mcrypt.php
session_start(); ?>
Before any HMTL is sent, the session is begun, as in the previous script.
2. Add the opening HTML:
<!doctype html>
<html lang="en">
<head>
<meta charset="utf-8">
<title>A More Secure Session</title>
</head>
<body>
3. Check that the session data exists:
<?php if (isset($_SESSION['thing1'], $_SESSION['thing2'])) {
There’s no point in trying to decrypt the data if the page can’t access it!
4. Create the key:
$key = md5('77 public drop-shadow Java');
Not to belabor the point, but again, this must be the exact same key used to encrypt the data. This is another reason why you might want to store the key outside of these scripts.
5. Open the cipher:
$m = mcrypt_module_open ('rijndael-256', '', 'cbc', '');
This should also match the encryption code (you have to use the same cipher and mode for both encryption and decryption).
Script 11.4. This script uses MCrypt to decrypt previously stored session data.
1 <?php # Script 11.4 - read_mcrypt.php
2
3 /* This page uses the MCrypt library
4 * to decrypt data stored in the session.
5 */
6
7 session_start(); ?>
8 <!doctype html>
9 <html lang="en">
10 <head>
11 <meta charset="utf-8">
12 <title>A More Secure Session</title>
13 </head>
14 <body>
15 <?php
16 // Make sure the session data exists:
17 if (isset($_SESSION['thing1'], $_SESSION['thing2'])) {
18
19 // Create the key:
20 $key = md5('77 public drop-shadow Java');
21
22 // Open the cipher...
23 // Using Rijndael 256 in CBC mode:
24 $m = mcrypt_module_open('rijndael-256', '', 'cbc', '');
25
26 // Decode the IV:
27 $iv = base64_decode($_SESSION['thing2']);
28
29 // Initialize the encryption:
30 mcrypt_generic_init($m, $key, $iv);
31
32 // Decrypt the data:
33 $data = mdecrypt_generic($m, base64_decode($_SESSION['thing1']));
34
35 // Close the encryption handler:
36 mcrypt_generic_deinit($m);
37
38 // Close the cipher:
39 mcrypt_module_close($m);
40
41 // Print the data:
42 echo '<p>The session has been read. Its value is "' . trim($data) . '".</p>';
43
44 } else { // No data!
45 echo '<p>There\'s nothing to see here.</p>';
46 }
47 ?>
48 </body>
49 </html>
6. Decode the IV:
$iv = base64_decode ($_SESSION['thing2']);
The IV isn’t being generated here; it’s being retrieved from the session (because it has to be the same IV as was used to encrypt the data). The base64_decode() function will return the IV to its binary form.
7. Initialize the decryption:
mcrypt_generic_init($m, $key, $iv);
8. Decrypt the data:
$data = mdecrypt_generic($m, base64_decode($_SESSION ['thing1']));
The mdecrypt_generic() function will decrypt the data. The data is coming from the session and must be decoded first.
9. Wrap up the MCrypt code:
mcrypt_generic_deinit($m);
mcrypt_module_close($m);
10. Print the data:
echo '<p>The session has been read. Its value is "' . trim ($data) . '".</p>';
Running Server Commands
Another server-related topic not discussed in this chapter is how to run commands on the server. Whether you ever have the need to or not depends on your server OS and site needs, but you might have to, for example, tap into the ImageMagick library to do some image manipulation, or run a Perl script.
There are many PHP functions available for executing server commands. For starters, there is exec():
exec(command, $output);
This function takes a command and assigns to $output an array where each element is a line of the generated output.
Also available is system(), which just returns the output (so that it could be immediately sent to the Web browser):
system(command);
The passthru() function is similar, but it can also return binary output:
passthru(command);
Finally, you could use shell_exec() or the backticks, both of which just return the output:
$var = shell_exec(command);
$var = `command`;
For security purposes, you should use escapeshellarg() or escapeshellcmd() to sanctify any command that isn’t hard-coded.
11. Complete the page:
} else { // No data!
echo '<p>There\'s nothing to see here.</p>';
}
?>
</body>
</html>
The else clause applies if the two cookies were not accessible to the script.
12. Save the file as read_mcrypt.php, place it in your Web directory, and test in your Web browser ![]() .
.
![]() The session data has been successfully decrypted.
The session data has been successfully decrypted.
Tip
If you rerun the first script, you’ll see that the encrypted version of the data is different each time, even though the data itself is always the same. This is because the IV will be different each time. Still, the decryption will always work, as the IV is stored in a session.
Review and Pursue
If you have any problems with these sections, either in answering the questions or pursuing your own endeavors, turn to the book’s supporting forum (www.LarryUllman.com/forums/).
Review
• How do you write data to a compressed file? (See page 354.)
• How do you read data from a compressed file? (See page 354.)
• What is cron? How do you create new cronjobs? (See page 363.)
• What security concerns surround session data? (See page 366.)
• Why are the base64_encode() and base64_decode() functions used in the encryption examples? (See page 366.)
Pursue
• Modify db_backup.php to confirm that the backups directory is writable prior to attempting to create the subdirectory.
• Check out the PHP manual’s pages on zlib to learn how to have it compress PHP output.
• If you have the need to create ZIP archives, check out PHP’s ZIP extension.
• For security purposes, you’d likely want to place the backups folder outside of the Web directory (considering its open permissions.)
• To see the effect that compression has on your file, rewrite backup_db.php to use fopen(), fwrite(), and fclose() instead.
• Read the next chapter and figure out how to run db_backups.php using PHP’s Command-Line Interface (CLI).
• If you’re using a *nix server or computer, including Mac OS X, read more about cron by typing man cron or man crontab within the command line.
• If you’re using Windows and want to automate the execution of a PHP script on that computer, look into creating a scheduled task.
• Improve the security of the MCrypt examples by storing the key in a more secure manner (e.g., in an included file stored in a secure location).
• Change the data being stored in the session just to confirm that it works. Try using, for example, a fake credit card number.
• If you have the inclination, convert any of this chapter’s examples to object-based versions.
• Read up on security. A lot!
All materials on the site are licensed Creative Commons Attribution-Sharealike 3.0 Unported CC BY-SA 3.0 & GNU Free Documentation License (GFDL)
If you are the copyright holder of any material contained on our site and intend to remove it, please contact our site administrator for approval.
© 2016-2026 All site design rights belong to S.Y.A.