PHP Advanced and Object-Oriented Programming (2013)
Visual Quickpro Guide
12. PHP’s Command-Line Interface
In This Chapter
Testing Your Installation
Executing Bits of Code
Interactive PHP CLI
Creating a Command-Line Script
Running a Command-Line Script
Working with Command-Line Arguments
Taking Input
Built-In Server
Review and Pursue
PHP is known and loved as one of the best technologies for generating dynamic Web sites. But through the PHP command-line interface (CLI), you can also perform shell scripting (command-line programming) using your favorite language, PHP.
PHP CLI lets you run PHP scripts and even snippets of PHP code outside of a Web browser. On Windows, the action takes place within a DOS prompt (aka a console or command window). On Unix and Mac OS X, you’ll use the Terminal (or a similar program). In this chapter, I’ll cover what you need to know to accomplish these tasks. An understanding of PHP itself is assumed, so the focus will be on the fundamentals of using this alternative interface.
Testing Your Installation
To get the ball rolling, the first thing you’ll need to do is confirm that you have an available PHP CLI and to see what version you have (see the sidebar “CLI vs. CGI”). Hopefully, this is just a matter of following these steps:
1. Open a command-line interface.
2. Type php -v and press Return or Enter.
If the CLI version of PHP is installed and is in your PATH (a list of locations on your computer where the operating system can find executable files), this should work. Worst-case scenario—assuming PHP CLI is installed, you’ll need to use the full path to the CLI executable or move into the PHP directory first.
Along with the -v option, there are three others to point out up front:
• -i reveals information about the PHP installation.
• -h accesses the help file.
• -m lists the modules compiled into this PHP installation.
I’ll run through these steps for both Windows and Unix/Mac OS X users.
Using the CLI
Just because you can perform command-line scripting using PHP does not mean that you always should. In truth, what PHP CLI offers is a way for PHP programmers to do things they might otherwise do using Perl, awk, or shell scripts. Or in some cases, PHP CLI might replicate what is already possible using built-in utilities that you’re unfamiliar with. This is fine, of course, since the benefit of PHP CLI is having a new way to use the knowledge you already possess.
The CLI is best used for such tasks as
• Quickly testing bits of PHP code
• Performing routine maintenance
• Creating your own system utilities
• Making installers for your PHP applications
I tend to use the CLI to test simple ideas or in situations where command-line actions are required as part of a PHP-based Web site.
CLI vs. CGI
There are two versions of PHP that can be used for command-line scripting. The older version is the CGI (Common Gateway Interface). It’s intended for Web pages but can also be used for shell scripts. The only drawback is that the CGI version needs to be told to behave differently or it’s likely to clutter up the command-line interface.
The CLI version is really a pared-down CGI, lacking GET and POST variables. It also does not send out Multipurpose Internet Mail Extensions (MIME) headers, which are needed for Web pages but not for consoles. And the CLI version does not use HTML in its errors or have a maximum execution time.
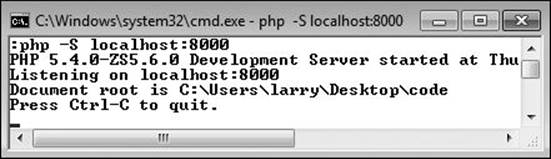
To test your installation on Windows 7
1. With the desktop showing, press Command+R to bring up the Run prompt.
This works in Windows 7. In earlier versions of Windows, you may have to click Start and then select Run.
2. At the Run prompt, type cmd  and click OK (or press Enter).
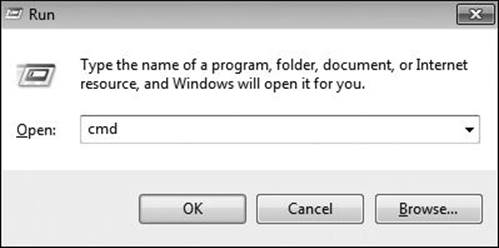
The Run prompt.
This should bring up a DOS or console window.
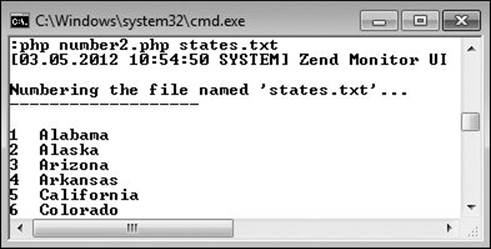
3. In the console window, type php -v and press Enter  .
.
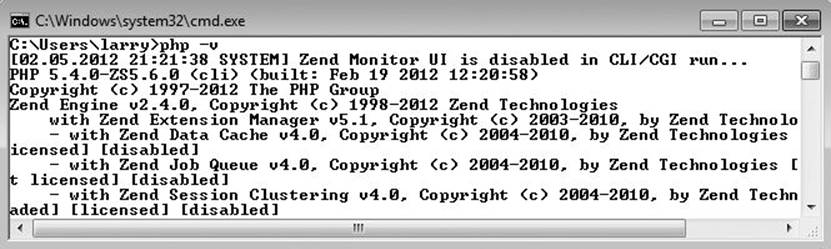
The command php -v shows the version of PHP CLI installed.
This should show you the PHP and CLI versions installed. Note that the specifics of what is shown beyond the version will depend on the PHP installation. For example, my results  reflect the version of PHP installed as part of the Zend Server Community Edition (www.zend.com), which has lots of extra features.
4. Still in the console window, type php -i and press Enter to learn more about the installation.
This is the equivalent of running a phpinfo() script within a Web browser. There’s a ton of information available here, although you’ll need to scroll back to view it all (and possibly increase the console’s buffer size before running this command).
5. (Having not left the console window...) Type php -m and press Enter to see what modules are installed  .
.
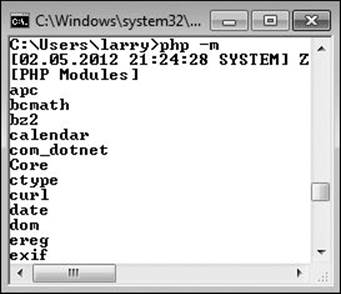
 The list of modules built into this PHP CLI installation.
This command lists the extensions that the PHP installation supports. This is important should you want to, for example, interact with MySQL using the CLI.
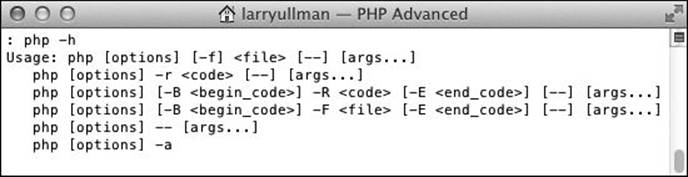
6. (Where else but...) In the console window, type php -h and press Enter to see the help menu.
The help menu, should you need...um... help, is mostly just a listing of the few basic options.
7. In the console window, type exit and press Enter to close the window.
Tip
My Windows console window may not look like yours, so don’t be alarmed. I’ve tried to “pretty it up” by changing from the default colors to black text on a white background. To do so, click the icon in the upper-left corner, and then click Properties.
Tip
Another customization I often make in my console window is that I change the prompt from the default (which is the current directory followed by >) to a simple colon. To do so, type prompt X and press Enter, where X is whatever you want the prompt to be.
To test your installation on Unix and Mac OS X
1. Open your Terminal application.
Most flavors of Unix that I’m familiar with as well as Mac OS X provide an application called Terminal, which is used for command-line operations. It’s likely present in your Applications or Utilities folder, or wherever your OS keeps its programs.
2. In the console window, type php -v and press Enter  .
.
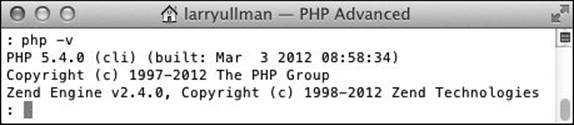
 The command php -v shows the version of PHP CLI installed.
This should show you the PHP and CLI versions installed.
3. Still in the console window, type php -i and press Enter to learn more about the installation.
This is the equivalent of running a phpinfo() script within a Web browser. There’s a ton of information available here, although you’ll need to scroll back to catch it all (and possibly increase the console’s buffer size).
4. (Having not left the console window...) Type php -m and press Enter to see what modules are installed.
This lists the extensions that the PHP installation supports. This is important should you want to, for example, interact with MySQL using the CLI.
5. (Where else but...) In the console window, type php -h and press Enter to see the help menu  .
.
 The PHP CLI help options.
The help menu, should you need...um... help, is mostly just a listing of the few basic options.
6. In the console window, type exit and press Enter to close the window.
Tip
There is, on Unix and Mac OS X, a manual page installed for the PHP CLI. To access it, type man php  .
.
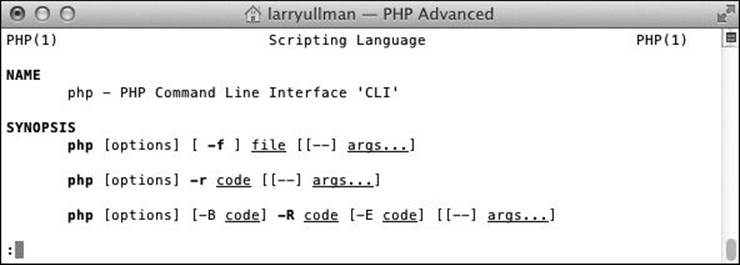
 The PHP CLI man page, quite similar to the help file
  .
.
Executing Bits of Code
One of the first uses I find for PHP CLI is to be able to test snippets of code without going through the process of:
1. Writing a formal PHP script
2. Placing it in a Web directory
3. Enabling my Web server, if it’s not already on
4. Running the PHP script in a Web browser
Instead of doing all of that, you can test small sections of code with PHP CLI using this syntax:
php -r 'php_code_here'
For a predictable example:
php -r 'echo "Hello, world!";'
A couple of things to remember with this syntax: First, using PHP tags will cause parse errors  . Second, you may need to experiment to determine whether you should use single or double quotes around the code block. For example, using PHP 5.4 on my Mac, double quotes cause errors when there are variables within the code . However, on Windows 7, PHP 5.4 complained of errors any time I used single quotes but did not complain about using double quotes, with or without variables.
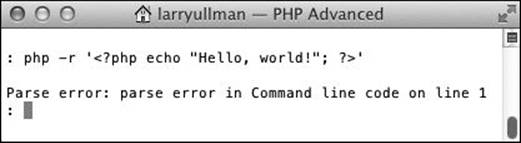
Do not use PHP tags with the php -r option.
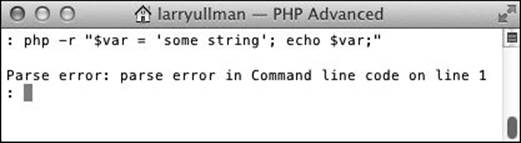
In some environments, using double quotation marks around your PHP code that contains variables might create parse errors.
Finally, you should end each statement in PHP with a semicolon, just as you would in a script.
To use PHP CLI for code blocks
1. Follow the steps in the first section of this chapter to access PHP CLI. Open a Terminal application (Mac OS X and Unix), bring up a DOS prompt (Windows), or connect to your remote server.
2. Test an echo() statement :
php -r 'echo "Hello, world!\n";'

 Among its many benefits, PHP CLI provides yet another way to say Hello, world!
The PHP code being tested is
echo "Hello, world!";
This code is wrapped within single quotes and placed after php -r to execute it. Again, on Windows or other platforms you may need to swap the single and double quotes (if you get a parse error).
Using a Remote Server
If you want to work with PHP CLI on a remote server instead of a local one, that may also be an option. To do so, you must first make sure that the server’s administrator—be it an ISP, hosting company, or whoever—allows remote logins. If so, they should provide you with a username and password.
Next, you need an SSH application to connect to that server (SSH provides a secure connection between two computers). If running Unix or Mac OS X, you can use SSH within a Terminal, typing
ssh -l username address
After the lowercase “L”, enter your username. For the address, this can be either a URL—www.example.com—or an IP address (123.123.123.123). You’ll then be prompted for the password.
For Windows users, I recommend PuTTY (search the Web for the current URL). This simple and free application provides a graphical interface along with the SSH and Telnet clients.
Once connected to the remote server, you can follow the other steps in this chapter.
3. Print the modification date of a file  :
:
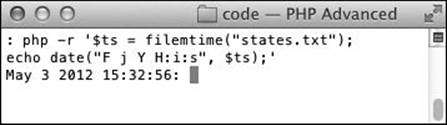
Using two lines of PHP code, I can print a formatted version of a file’s last modification date.
php -r '$ts = filemtime("/path/to/somefile.txt");
echo date("F j Y H:clear:s", $ts);'
Here, I’m actually executing two lines of PHP code. In the first line, the $ts variable is assigned the timestamp value of the last time the somefile.txt file was modified. Obviously, you’ll need to change the path and name of the file so that it’s appropriate for a file—any file—on your server.
In the second line, that timestamp is formatted using the date() function and printed. Because of the single quotes surrounding the entire PHP code block, I can enter this code over multiple lines (see the figure).
4. Add a newline or two to the printed result :
php -r 'echo "Hello, world! \n\n";'
By printing newline characters, I can add spacing to the output.
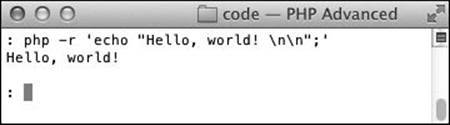
 Thanks to the printed newlines, the command prompt no longer appears immediately after the result of the code (compare with
  ).
).
Interactive PHP CLI
As of PHP 5.1, if PHP is compiled with the Readline extension, you can run PHP in an interactive shell. The interactive shell is simply a continually running version of PHP CLI that allows you to enter commands to be executed.
To invoke the interactive shell, use the -a flag:
php -a
If your PHP installation is set up to be used as an interactive shell, you should see something like . If you see Interactive mode enabled , your PHP is not configured to be used in this manner.
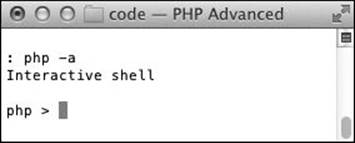
 The interactive shell interface, with the php prompt.
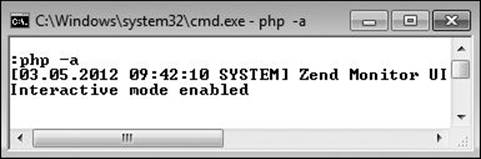
This response means that the Readline extension is not enabled, and the interactive shell cannot be used.
To use the interactive shell
1. Follow the steps in the first section of this chapter so that you can access PHP CLI.
2. Enter interactive mode:
php -a
3. Type a simple bit of PHP code and press Enter/Return to execute it :
echo 'Hello, world!';
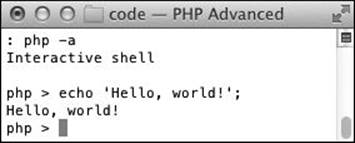
 Executing a simple line of code.
You’ll notice that PHP will execute the code and then show another prompt for you to enter more code. The prompt also nicely appears on the next line, without needing to print a newline character.
4. Create a variable:
$my_array = array('who', 'what', 'when');
echo $my_array[1];
You can create, and later reference, variables, constants, and functions in a session.
5. Type pri and press Tab to invoke the autocomplete .
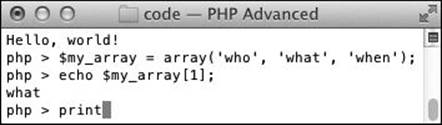
Variables can be created and used within the interactive shell.
Thanks to the Readline extension, the interactive shell includes many useful features, including tab completion and history (via the up and down array keys). As you can see in the figure, the tab completion turns pri into print.
6. Type pri and press Tab twice to see the list of possible autocompletions .
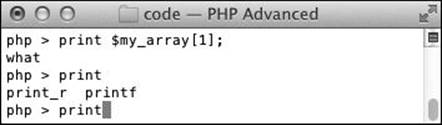
The interactive shell comes with tab completion and suggestion, such as the names of functions here.
This is an easy way to ensure that you’re getting the names of functions right.
7. Type exit and press Enter/Return to exit the session.
Tip
In theory, autocompletion works with the names of variables, functions, and constants defined in the current session, too. However, in my experience, I find support for all types of autocompletion to be inconsistent.
Creating a Command-Line Script
Being able to test little bits of PHP code from the command line is nice, but it won’t take you far. What you’ll often want to do is run entire PHP scripts from the command-line interface. Such scripts could perform file or database maintenance, run updates for your Web sites, and more.
A PHP script to be used by PHP CLI is different from a Web script in three ways:
1. It shouldn’t use or create any HTML.
2. It doesn’t need to use the .php extension (although it’s fine if it does).
3. The very first line of the script will be
#!/usr/bin/php
There’s no harm in using HTML, but it’ll just clutter up the result in the console window. As for the file’s extension, how the script is run will change (covered in the next section of the chapter), so you could literally use anything. But .php is still a fine idea. Or you could use a different extension to distinguish your Web PHP scripts from the command-line ones (or no extension at all!). But of the three rules, only the last one matters (and, frankly, it only matters on Unix and Mac OS X).
That line of code is called the shebang line. It tells the operating system where to find the executable that should be used to run this script. For Unix and Mac OS X, that executable should have been installed in /usr/bin. If you know that PHP CLI was installed elsewhere, change the shebang line accordingly. For Windows, this line is ignored, but you should keep it in there for cross-platform reliability.
The CLI php.ini
Most PHP installations will end up with two or more usable command-line versions of PHP. The one I’m focusing on in this chapter is CLI. But there are probably other PHPs lingering on your server, like the one used by Apache or IIS for handling Web pages.
An interesting point about PHP CLI is that it uses a different php.ini file than the Web PHP module. This file, of course, is where you dictate how PHP behaves. Hence, PHP CLI may run differently than you’re used to. For that matter, your PHP CLI installation may support different modules than your Web installation.
You can, when invoking PHP CLI, use options to change the php.ini 'margin-top:4.0pt;margin-right:0cm;margin-bottom:4.0pt; margin-left:60.0pt;text-indent:-7.5pt;line-height:normal;background:#DDDDDD'>• -c tells PHP CLI where to look for a php.ini file.
• -n tells PHP CLI not to use a php.ini.
• -d sets a php.ini value for PHP CLI.
For example, it is recommended that you set ignore_user_abort to true when using the CLI. Doing so will allow a command-line script to continue running even after the user aborts the connection. To do that, you could set this when invoking the CLI:
php scriptname.php -d ignore_user_abort=1
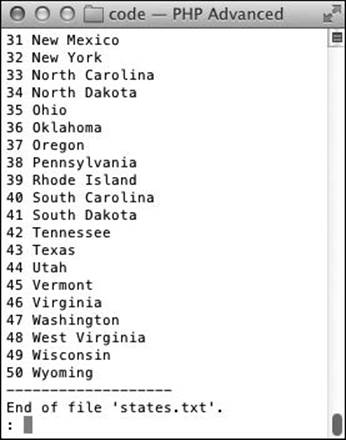
Script 12.1. This PHP script will be run from the command line. It reads in a text file and prints it out, line by line, with the lines numbered.
1 #!/usr/bin/php
2 <?php # Script 12.1 - number.php
3
4 /* This page reads in a file.
5 * It then reprints the file, numbering the lines.
6 * This script is meant to be used with PHP CLI.
7 */
8
9 // The file to number:
10 $file = 'states.txt';
11
12 // Print an intro message:
13 echo "\nNumbering the file named '$file'...
14 -------------------\n\n";
15
16 // Read in the file:
17 $data = file($file);
18
19 // Line number counter:
20 $n = 1;
21
22 // Print each line:
23 foreach ($data as $line) {
24
25 // Print number and line:
26 echo "$n $line";
27
28 // Increment line number:
29 $n++;
30
31 } // End of FOREACH loop.
32
33 echo "\n-------------------
34 End of file '$file'.\n";
35 ?>
After that line, all PHP code goes within the normal PHP tags. Anything outside of the PHP tags is sent to the standard output just like Web-based PHP scripts :
#!/usr/bin/php
<?php
// Do whatever.
?>
This text is also displayed.
<?php
// Do whatever.
?>
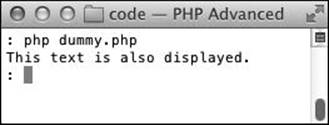
Text outside of the PHP tags is revealed in the console.
For the first implementation of this concept, I’ll create a script that reads in a text file and reprints it, numbering the lines along the way.
To create a command-line script
1. Create a new PHP script in your text editor or IDE, to be named number.php, beginning with the shebang line (Script 12.1):
#!/usr/bin/php
<?php # Script 12.1 - number.php
Remember that the first line is the most important and that you might need to change it if PHP CLI was installed in a place other than /usr/bin. And although Windows users can skip this line, it’s best to leave it in there (allowing you to use it on another computer down the road).
Finally, you still need to use the PHP tags.
2. Identify what file will be numbered:
$file = 'states.txt';
Later in the chapter, you’ll see how to write this script so that the file information can be assigned when the script is run. For this first example, I’m just going to use a simple plain text file that lists the US states. You can use any plain text file, including even another PHP script from the book.
3. Print an introductory message:
echo "\nNumbering the file named '$file'...
-------------------\n\n";
4. Read in the file:
$data = file($file);
The file() function reads an entire file into an array. Each line becomes one array element. You could use fopen() and the other file functions instead, if you prefer.
5. Print each line with its number:
$n = 1;
foreach ($data as $line) {
echo "$n $line";
$n++;
}
To start, a counter is initialized so that the first line is numbered at 1. Then a foreach loop goes through the array. Within the loop, each line is printed, prefixed by the line number and a couple of spaces. You do not need to print a newline here, because the line read in from the original file retained that newline. Finally, the counter is incremented.
6. Print a closing message:
echo "\n-------------------
End of file '$file'.\n";
7. Complete the PHP script:
?>
8. Save the file as number.php.
Running a Command-Line Script
Now that you’ve written a script especially meant for a command-line execution (and wasn’t it nice not to mess with all that pesky HTML?), it’s time to learn how to run it. There are two ways of doing so.
The first option is to directly invoke PHP CLI, as you did when executing a bit of code, this time providing it with the name of a script to execute:
php scriptname.php
You’ll also see the -f flag used. It stands for file, and whether you use it or not makes no difference on the end result:
php -f scriptname.php
This method should work just fine, as long as php is in your PATH and you are in the same directory as scriptname.php. Variations to circumvent these limitations might be
/usr/bin/php scriptname.php
php /path/to/scriptname.php
C:\php\php.exe scriptname.php
The second method for executing PHP scripts is to treat the script as if it were an application in its own right:
scriptname.php (Windows)
./scriptname.php (Unix and Mac OS X)
This method, which is preferred, can have some tricks to it, so I’ll run through the details in the following steps.
To run a command-line script in Windows
1. Use the instructions outlined earlier in the chapter to access a DOS prompt.
2. Move into the directory where number.php was saved  :
:
cd C:\path\to\directory
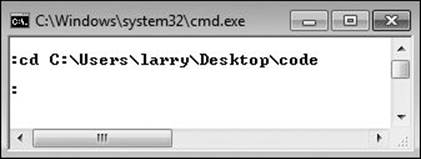
Start by moving into the same directory where the PHP script you want to execute is located.
3. Run the file using the php scriptname.php syntax :
php number.php
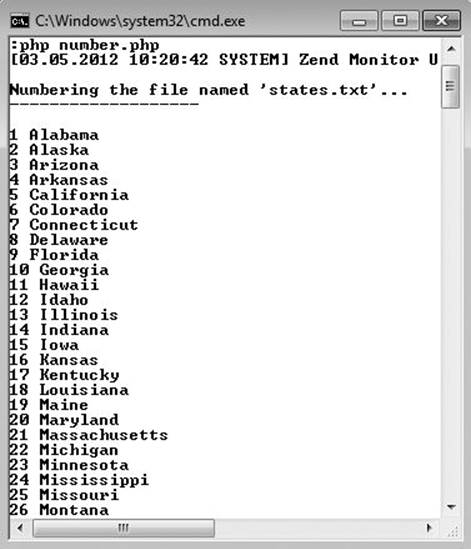
The execution of the number.php script.
Hopefully, this should work for you. If you get an error message, it’s most likely because php is not in your PATH. If you don’t know how to change your PATH, either search the Web for tutorials or turn to my support forums (www.LarryUllman.com/forums/).
4. Run the file using the alternative syntax:
number.php
If this doesn’t immediately work, it’s because you’ll need to tell Windows what program to use for running .php scripts. To do so (these instructions are for Windows 7, but should be similar on other versions of Windows):
a. Select number.php in the Windows Explorer.
b. Control+click or right-click and choose Open with > Choose default program.
c. Click Browse in the Open with dialog .
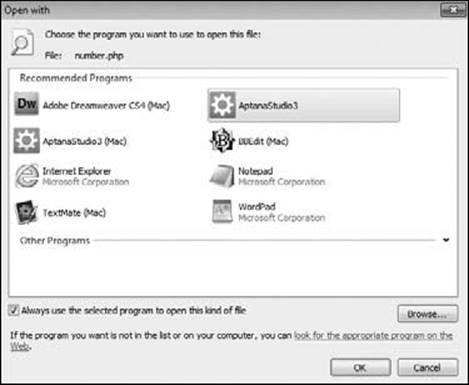
You may need to tell Windows what application to use for your scripts. The php executable will not likely come up as an option.
d. Find and select the php executable , and then click Open.
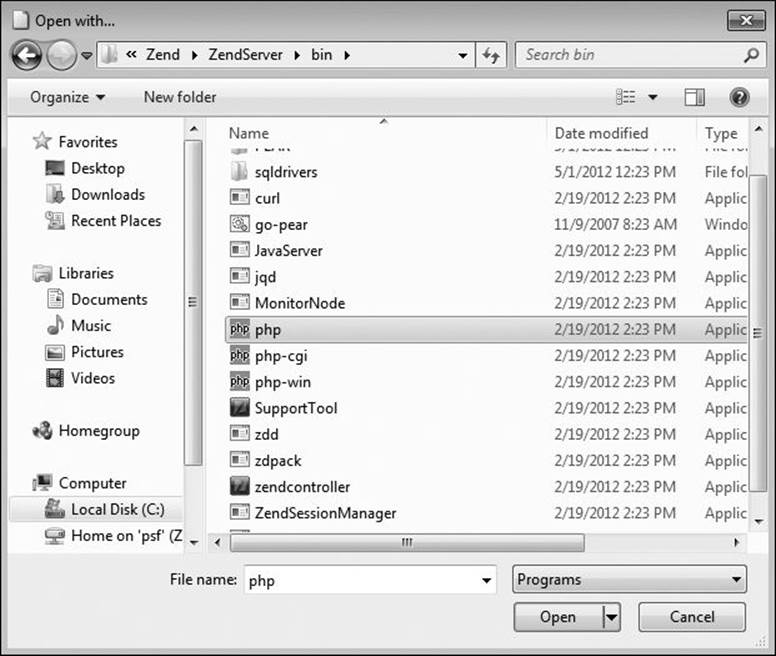
Find the installed php executable to finish the association.
e. Click OK in the Open with dialog.
From here on out, all .php scripts will run just fine from the command-line interface (assuming that you kept the Always use the selected program to open this kind of file box checked ).
To run a command-line script in Unix and Mac OS X
1. Use the instructions outlined earlier in the chapter to access a command-line prompt.
2. Move into the directory where number.php was saved:
cd /path/to/directory
3. Run the file using the php scriptname.php syntax  :
:
php number.php
The first method for running the PHP script, showing the end of the output.
Hopefully, this should work for you. If you get an error message, it’s most likely because php is not in your PATH. If you don’t know how to change your PATH, either search the Web for tutorials or turn to my support forums (www.LarryUllman.com/forums/).
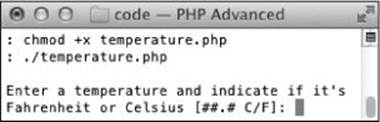
4. Make the file executable:
chmod +x number.php
If you’re not familiar with chmod, it’s a utility for changing the properties of files and directories. The +x code says to add executable status to number.php.
5. Run the file using the ./scriptname.php syntax :
./number.php
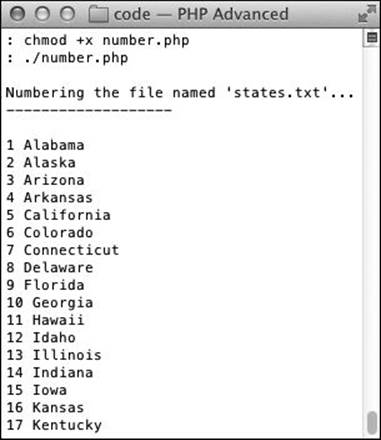
 Executables can be run using the ./ executable syntax, assuming you are in the same directory as the program to be run.
Tip
You can use php -l scriptname.php to have PHP check a script’s syntax without actually running it. The only caveats are that this doesn’t work with the -r option (for testing bits of code) and it doesn’t check for fatal errors.
Working with Command-Line Arguments
The number.php example (Script 12.1) is a reasonable-enough application of PHP CLI. The script provides a valuable service but has one limitation: the file to be numbered is hard-coded into the script. It’d be better to set that value when the application is used. This can be easily achieved by rewriting the script so that it uses command-line arguments.
Command-line arguments are values passed to an application when it is run. For example, the PHP CLI takes several configuration options, the name of a script to be run, or some code to be executed. Arguments are passed to the invoked application by adding them after the application’s name:
scriptname.php arg1 arg2...
In your PHP script, you can then access these arguments by referring to $argv and $argc (or the more formal $_SERVER['argv'] and $_SERVER['argc']). The $argv array stores every argument provided; $argc stores the number of items in $argv. The only catch to using these is that the name of the script itself is the first listed argument ($_SERVER['argv'][0]) :
#!/usr/bin/php
<?php
echo "\n{$_SERVER['argc']} arguments received. They are...\n";
foreach ($_SERVER['argv'] as $k => $v) {
echo "$k: $v\n";
}
?>
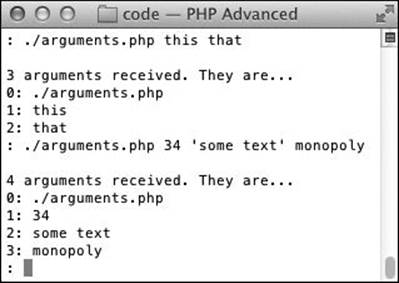
The arguments.php script just prints out the number and values of the arguments used when calling it. Notice that the script name itself is always the first received argument.
Let’s write a new number.php script so that it accepts an argument: the name of the script to number.
To use command-line arguments
1. Create a new PHP script in your text editor or IDE, to be named number2.php, beginning with the shebang line (Script 12.2).
#!/usr/bin/php
<?php # Script 12.2 - number2.php
2. Check that a filename was provided:
if ($_SERVER['argc'] == 2) {
Since the script will receive the script’s name as its first argument, $_SERVER['argc'] must be equal to 2 to indicate proper usage (because the script name itself will count, too). This conditional checks for that.
3. Make sure that the file exists:
$file = $_SERVER['argv'][1];
if (file_exists($file) && is_file($file)) {
First, the name of the file is identified as the second argument provided (the arguments list being an array, the indexing begins at 0). Then two conditionals confirm that the given file does exist and is a file (because a directory would pass the first test). You’d likely want to add code restricting the files to a certain directory for security purposes.
Script 12.2. This PHP script expects to receive the name of the file to number as a command-line argument.
1 #!/usr/bin/php
2 <?php # Script 12.2 - number2.php
3
4 /* This page reads in a file.
5 * It then reprints the file, numbering the lines.
6 * This script is meant to be used with PHP CLI.
7 * This script expects one argument (plus the script's name):
8 * the name of the file to number.
9 */
10
11 // Check that a filename was provided:
12 if ($_SERVER['argc'] == 2) {
13
14 // Get the name of the file:
15 $file = $_SERVER['argv'][1];
16
17 // Make sure the file exists and is a file:
18 if (file_exists($file) && is_file($file)) {
19
20 // Read in the file:
21 if ($data = file($file)) {
22
23 // Print an intro message:
24 echo "\nNumbering the file named '$file'...\n-------------------\n\n";
25
26 // Line number counter:
27 $n = 1;
28
29 // Print each line:
30 foreach ($data as $line) {
31
32 // Print number and line:
33 echo "$n $line";
34
35 // Increment line number:
36 $n++;
37
38 } // End of FOREACH loop.
39
40 echo "\n-------------------\nEnd of file '$file'.\n";
41 exit(0);
42
43 } else {
44 echo "The file could not be read.\n";
45 exit(1);
46 }
47
48 } else {
49 echo "The file does not exist.\n";
50 exit(1);
51 }
52
53 } else {
54
55 // Print the usage:
56 echo "\nUsage: number2.php <filename>\n\n";
57
58 // Kill the script, indicate error:
59 exit(1);
60 }
61
62 ?>
4. Read in the file and print each line:
if ($data = file($file)) {
echo "\nNumbering the file named '$file'...\n -------------------\n\n";
$n = 1;
foreach ($data as $line) {
echo "$n $line";
$n++;
} // End of FOREACH loop.
echo "\n-------------------\nEnd of file '$file'.\n";
This code matches that in number.php, except for reading the file’s contents as a conditional.
5. Return 0 to indicate proper execution of the application:
exit(0);
Command-line applications are often written to return a number indicating the successful use of that application (see the sidebar “Creating an Interface” later in this chapter). Typically, 0 represents no problems and a nonzero number represents an error of some sort. Here, the exit()function (or language construct) will terminate the execution of the script, and the value provided as an argument to exit() will be returned by the script.
6. Complete the conditional started in Step 4:
} else {
echo "The file could not be read.\n";
exit(1);
}
If the file couldn’t be read for some reason, likely a permissions issue, a message should be printed. The exit(1) line is used to indicate a problem. Returning a nonzero number when a problem occurs is a convention for command-line applications.
7. Complete the conditional started in Step 3:
} else {
echo "The file does not exist.\n";
exit(1);
}
8. Complete the conditional started in Step 2:
} else {
echo "\nUsage: number2.php <filename>\n\n";
exit(1);
}
If the script was not invoked with the proper number of arguments, how it should be used is indicated . This is a command-line convention, also discussed in the “Creating an Interface” sidebar.
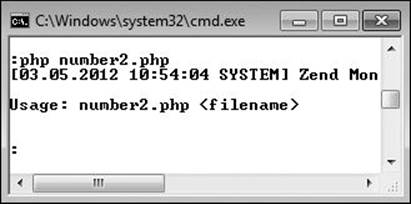
If no filename is provided, the utility’s proper usage is shown.
9. Complete the PHP script:
?>
10. Save the file as number2.php.
11. Run the script .
The states.txt script is numbered by number2.php.
Note that on Windows, you’ll need to use this syntax:
php number2.php filename
If you use
number2.php filename
the script will only recognize one argument (with a value of number2.php).
12. To fully test the script, provide an invalid file-name .
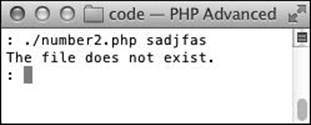
If the script cannot find the given file, an error is displayed.
Tip
To get really professional with your command-line arguments, check out the various console-related PEAR (PHP Extension and Application Repository) packages. For example, Console_Color2 lets you use ANSI colors in the output, and several PEAR packages assist in the reading of command-line arguments.
Creating an Interface
Using PHP in a command-line situation opens up a whole new world that PHP for Web development doesn’t have: the user interface. Sure, presentation and usage of Web pages is a vitally important HTML issue, but on the command line it’s a different beast.
For starters, most command-line applications indicate how the command is to be used, should it be used incorrectly. Type php -varmit and you’ll see what I mean. The number2.php script does this a little bit (showing the usage) but commands normally do more, like offer help if commandname-h or commandname --help is entered.
Finally, command-line applications often return a code indicating how successful the operation was. The number 0 is returned to indicate no problems, and some nonzero number otherwise. In number2.php, the integer 1 is returned when things go wrong.
An alternative to using command-line arguments is to request input from the user (although you could use both techniques in combination). By doing so, you can create an interactive application, where it prompts the user for information and does something with what is entered.
Taking Input
Strange as it may seem, taking input in a command-line application is exactly like reading in data from a file. But in this case, instead of using a file handle (a pointer to an opened file), you’ll use a special constant, STDIN. This stands for standard input, which would be the keyboard by default. One easy way to read in standard input would be to use the fgets() function:
echo 'Tell me something: ';
$input = fgets(STDIN);
That line of code creates a prompt . Anything typed there by the user will be assigned to $input.

Any function that attempts to read from the standard input will create a prompt where the user can type.
To be more precise with input, I like to use the fscanf() function. Like printf() and sprintf(), discussed in Chapter 1, “Advanced PHP Techniques,” this function takes formatting parameters to handle specific types of data. By using this function, instead of a more generic one, you ensure that some basic validation as to the type of data read in can take place. In the next example, fscanf() will be used to create an application that converts temperatures between degrees Fahrenheit and Celsius (in either direction).
To take user input
1. Begin a new PHP script in your text editor or IDE, to be named temperature.php, starting with the shebang line (Script 12.3):
#!/usr/bin/php
<?php # Script 12.3 - temperature.php
Script 12.3. User input is requested when this script runs. The input is read in from STDIN and validated; if proper, a temperature conversion occurs.
1 #!/usr/bin/php
2 <?php # Script 12.3 - temperature.php
3
4 /* This page convers temperatures between
5 * Fahrenheit and Celsius.
6 * This script is meant to be used with PHP CLI.
7 * This script requests input from the user.
8 */
9
10 // Prompt the user:
11 echo "\nEnter a temperature and indicate if it's Fahrenheit or Celsius [##.# C/F]: ";
12
13 // Read the input as a conditional:
14 if (fscanf (STDIN, '%f %s', $temp_i, $which_i) == 2) {
15
16 // Assume invalid output:
17 $which_o = FALSE;
18
19 // Make the conversion based upon $which_i:
20 switch (trim($which_i)) {
21
22 // Celsius, convert to Fahrenheit:
23 case 'C':
24 case 'c':
25 $temp_o = ($temp_i * (9.0/5.0)) + 32;
26 $which_o = 'F';
27 $which_i = 'C';
28 break;
29
30 // Fahrenheit, convert to Celsius:
31 case 'F':
32 case 'f':
33 $temp_o = ($temp_i - 32) * (5.0/9.0);
34 $which_o = 'C';
35 $which_i = 'F';
36 break;
37
38 } // End of SWITCH.
39
40 // Print the results:
41 if ($which_o) {
42 printf ("%0.1f %s is %0.1f %s.\n", $temp_i, $which_i, $temp_o, $which_o);
43 } else {
44 echo "You failed to enter C or F to indicate the current temperature type.\n";
45 }
46
47 } else { // Didn't enter the right input.
48
49 echo "You failed to use the proper syntax.\n";
50
51 } // End of main IF.
52 ?>
2. Prompt the user for the input:
echo "\nEnter a temperature and indicate if it's Fahrenheit or Celsius [##.# C/F]: ";
The prompt clearly indicates to the user what information is expected and in what format . Because there is no newline character printed at the end of this text, the user will be able to type immediately after the colon.
The initial prompt.
3. Read in a floating-point number and a string:
if (fscanf (STDIN, '%f %s', $temp_i, $which_i) == 2) {
There’s a lot going on in this one line. First, the fscanf() function will attempt to read in, from the standard input, one floating-point number and one string. These should match up to the temperature (e.g., 72.3) and the indicator as to the current temperature type (C or F). There is no “character” format with fscanf(), so the %s for string will have to do. If fscanf() can read in exactly these two data types in that order, they’ll be assigned to the variables $temp_i and $which_i.
The last bit of trickery is that the fscanf() function will return the number of values it assigned to variables. So if it reads in two values, assigned to $temp_i and $which_i, the conditional knows that the proper data was entered.
4. Set a variable to false:
$which_o = FALSE;
This variable will store the converted temperature (the output). It’s initially set to false and will be assigned a proper value in Step 5.
5. Perform the appropriate conversion:
switch (trim($which_i)) {
case 'C':
case 'c':
$temp_o = ($temp_i * (9.0/5.0)) + 32;
$which_o = 'F';
$which_i = 'C';
break;
case 'F':
case 'f':
$temp_o = ($temp_i - 32) * (5.0/9.0);
$which_o = 'C';
$which_i = 'F';
break;
} // End of SWITCH.
The switch checks to see if degrees Celsius is being converted to Fahrenheit or vice versa. If the second piece of input submitted is not C, c, F, or f, no conversion takes place.
6. Print the results:
if ($which_o) {
printf ("%0.1f %s is %0.1f %s.\n", $temp_i, $which_i, $temp_o, $which_o);
} else {
echo "You failed to enter C or F to indicate the current temperature type.\n";
}
If $which_o is equal to C or F, then the conditional is true and the conversion is printed, using the printf() function to handle the formatting . Otherwise, a default message is printed .
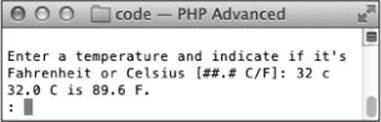
The result of the calculation is printed as a floating-point number with one decimal.
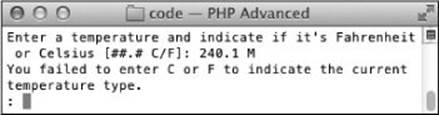
One of the possible error messages if the script is not used properly.
Taking CLI Further
This chapter covers what you need to know about running PHP code from a command-line interface. For the most part this just means that you’ll take what you already know how to do with PHP and execute it in a non-Web interface. That alone is perfect for many automated tasks that you might want to do.
On a more sophisticated level, PHP CLI can be used to interact with the operating system on a low level. One thing to look into is the pcntl (process control) extension. The extension, which isn’t available when using PHP for Web pages, lets you fork your processes (split them off). From there you can go on to the concept of signals. If you don’t know what these things are, that’s fine: you probably shouldn’t be messing with them in PHP anyway. But if you do understand these concepts, knowing that you can work with them in PHP is a welcome bit of news.
Finally, with PHP CLI you can use the backticks, exec(), system(), and similar functions to call system utilities. Using these functions with PHP CLI doesn’t differ from using them in a Web script, but your need to use them might increase.
7. Complete the conditional started in Step 3:
} else {
echo "You failed to use the proper syntax.\n";
} // End of main IF.
This else clause applies if the fscanf() function does not return the number 2, meaning it didn’t read in two values . In neither this case nor the else clause in Step 6 does the script return a number indicating a problem, but that could be added.
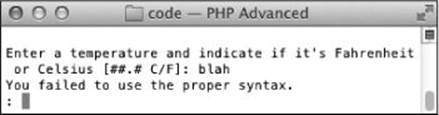
 The second of the possible error messages for misuse.
8. Complete the PHP script:
?>
9. Save the file as temperature.php.
10. Run the script  .
.
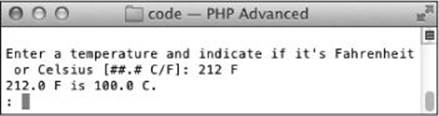
Successfully converting from Fahrenheit to Celsius.
Tip
This script could have been written to take the temperature and the temperature type as two separate inputs. But doing so would have been far less cool than using just one prompt and showing off what fscanf() can do.
Tip
Any of PHP’s file functions can be used on STDIN. This means, for example, that you could use fgetc() to retrieve just a single character or fgetcsv() to retrieve and parse an entire line.
Built-In Server
An addition to the CLI in PHP 5.4 is a builtin Web server. Using it, you can test PHP scripts in a Web browser without installing and running a Web server application such as Apache. To be absolutely clear, this is not a production-grade Web server, but it can be used to quickly test PHP scripts in browsers.
To use the built-in Web server
1. Follow the steps in the first section of this chapter so that you can access PHP CLI.
2. Enter the following command to confirm the availability of the Web server :
php -h
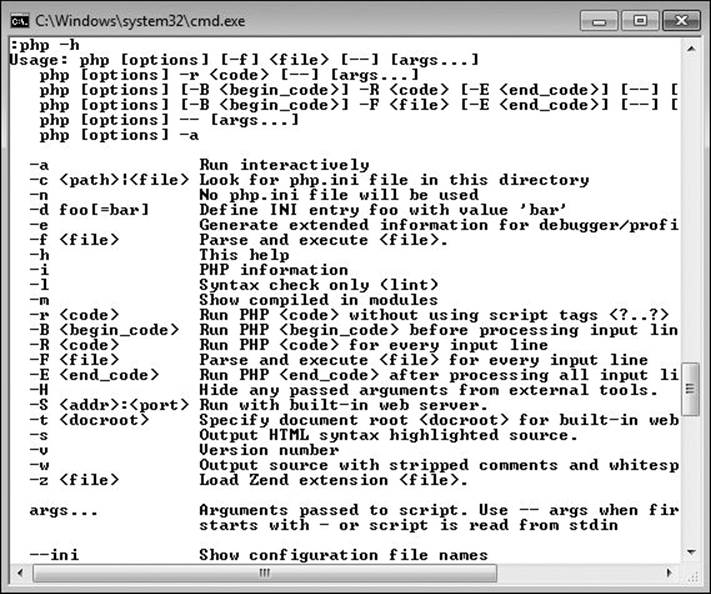
The PHP help menu will show you what options are available.
The -h flag brings up the help documentation. If the documentation includes the -S (it must be a capital letter S) and -t options, then the built-in server is supported.
3. Navigate to the directory that contains the PHP script(s) you’d like to test:
cd /path/to/directory
By default, the Web server will use the directory in which the server was started as the Web root directory, so you should navigate there first.
4. Start the server :
php -S localhost:8000
The Web server has been started.
To start the Web server, use the -S flag, followed by the hostname and port to use. On your own computer, localhost is a logical and common hostname. For the port, I would recommend 8000 or 8080, which are common alternatives to the default Apache port of 80. Using one of these ports prevents possible conflicts if you already have another Web server running.
You can also use an IP address, if you’d rather:
php -S 127.0.0.1:8000
5. Load http://localhost:8080/scriptname.php in your Web browser .
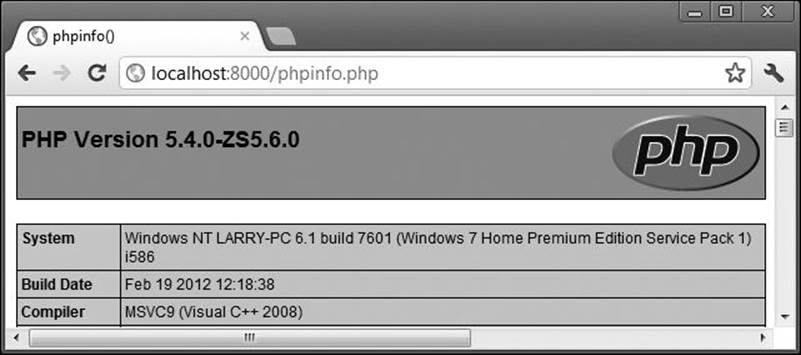
This PHP script is running through PHP’s built-in Web server.
As you load pages in the Web browser using the CLI server, you’ll notice that the console or Terminal window will reflect the history of requests  .
.
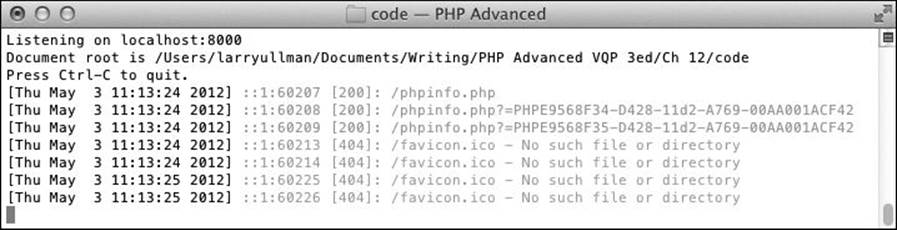
A log of server requests is shown in the window where the server was started.
6. Press Control+C in the console or Terminal window to stop the Web server.
Tip
To use a different Web root directory, regardless of where the Web server is started, use the -t option:
php -S localhost:8000 -t /path/to/directory
Tip
Keep in mind that this Web server will use the PHP CLI configuration, which, again, may run differently and include different modules than your standard PHP installation associated with Apache or IIS.
Review and Pursue
If you have any problems with these sections, either in answering the questions or pursuing your own endeavors, turn to the book’s supporting forum (www.LarryUllman.com/forums/).
Review
• How do you access a DOS console or terminal window on your computer? (See pages 379 through 382.)
• What are some good uses of the CLI? (See page 378.)
• How do you confirm the version of PHP you have? (See page 378.)
• How do you execute a line or two of code using CLI? (See page 383.)
• How do you enter the CLI interactive shell? How do you exit it? (See page 386.)
• If you want to execute a PHP script from the command line, what should the first line of code in that script be? What is that line called? (See page 388.)
• How do you run a PHP script using PHP CLI? (See page 391.)
• Through what variable do you access arguments passed when running a script through PHP CLI? What will the first item in that variable reference be? (See page 395.)
• How do you take input from the user? What are some of the ways you can validate the user’s input by type? (See pages 400 through 402.)
• How do you use PHP CLI to test a script in your Web browser? How do you change the Web root directory used by the PHP CLI server? (See page 405.)
Pursue
• Create a new version of temperature.php that takes the temperature and temperature type as two separate inputs.
• Modify number2.php so that it creates a numbered version of the text file as a new file on the server (as opposed to outputting it to the screen).
• If you like the CLI and think it might be useful to you, practice! Try creating new utilities and interactive scripts.
All materials on the site are licensed Creative Commons Attribution-Sharealike 3.0 Unported CC BY-SA 3.0 & GNU Free Documentation License (GFDL)
If you are the copyright holder of any material contained on our site and intend to remove it, please contact our site administrator for approval.
© 2016-2026 All site design rights belong to S.Y.A.
In This Chapter
Testing Your Installation
Executing Bits of Code
Interactive PHP CLI
Creating a Command-Line Script
Running a Command-Line Script
Working with Command-Line Arguments
Taking Input
Built-In Server
Review and Pursue
PHP is known and loved as one of the best technologies for generating dynamic Web sites. But through the PHP command-line interface (CLI), you can also perform shell scripting (command-line programming) using your favorite language, PHP.
PHP CLI lets you run PHP scripts and even snippets of PHP code outside of a Web browser. On Windows, the action takes place within a DOS prompt (aka a console or command window). On Unix and Mac OS X, you’ll use the Terminal (or a similar program). In this chapter, I’ll cover what you need to know to accomplish these tasks. An understanding of PHP itself is assumed, so the focus will be on the fundamentals of using this alternative interface.
Testing Your Installation
To get the ball rolling, the first thing you’ll need to do is confirm that you have an available PHP CLI and to see what version you have (see the sidebar “CLI vs. CGI”). Hopefully, this is just a matter of following these steps:
1. Open a command-line interface.
2. Type php -v and press Return or Enter.
If the CLI version of PHP is installed and is in your PATH (a list of locations on your computer where the operating system can find executable files), this should work. Worst-case scenario—assuming PHP CLI is installed, you’ll need to use the full path to the CLI executable or move into the PHP directory first.
Along with the -v option, there are three others to point out up front:
• -i reveals information about the PHP installation.
• -h accesses the help file.
• -m lists the modules compiled into this PHP installation.
I’ll run through these steps for both Windows and Unix/Mac OS X users.
Using the CLI
Just because you can perform command-line scripting using PHP does not mean that you always should. In truth, what PHP CLI offers is a way for PHP programmers to do things they might otherwise do using Perl, awk, or shell scripts. Or in some cases, PHP CLI might replicate what is already possible using built-in utilities that you’re unfamiliar with. This is fine, of course, since the benefit of PHP CLI is having a new way to use the knowledge you already possess.
The CLI is best used for such tasks as
• Quickly testing bits of PHP code
• Performing routine maintenance
• Creating your own system utilities
• Making installers for your PHP applications
I tend to use the CLI to test simple ideas or in situations where command-line actions are required as part of a PHP-based Web site.
CLI vs. CGI
There are two versions of PHP that can be used for command-line scripting. The older version is the CGI (Common Gateway Interface). It’s intended for Web pages but can also be used for shell scripts. The only drawback is that the CGI version needs to be told to behave differently or it’s likely to clutter up the command-line interface.
The CLI version is really a pared-down CGI, lacking GET and POST variables. It also does not send out Multipurpose Internet Mail Extensions (MIME) headers, which are needed for Web pages but not for consoles. And the CLI version does not use HTML in its errors or have a maximum execution time.
To test your installation on Windows 7
1. With the desktop showing, press Command+R to bring up the Run prompt.
This works in Windows 7. In earlier versions of Windows, you may have to click Start and then select Run.
2. At the Run prompt, type cmd ![]() and click OK (or press Enter).
and click OK (or press Enter).
![]() The Run prompt.
The Run prompt.
This should bring up a DOS or console window.
3. In the console window, type php -v and press Enter ![]() .
.
![]() The command php -v shows the version of PHP CLI installed.
The command php -v shows the version of PHP CLI installed.
This should show you the PHP and CLI versions installed. Note that the specifics of what is shown beyond the version will depend on the PHP installation. For example, my results ![]() reflect the version of PHP installed as part of the Zend Server Community Edition (www.zend.com), which has lots of extra features.
reflect the version of PHP installed as part of the Zend Server Community Edition (www.zend.com), which has lots of extra features.
4. Still in the console window, type php -i and press Enter to learn more about the installation.
This is the equivalent of running a phpinfo() script within a Web browser. There’s a ton of information available here, although you’ll need to scroll back to view it all (and possibly increase the console’s buffer size before running this command).
5. (Having not left the console window...) Type php -m and press Enter to see what modules are installed ![]() .
.
![]() The list of modules built into this PHP CLI installation.
The list of modules built into this PHP CLI installation.
This command lists the extensions that the PHP installation supports. This is important should you want to, for example, interact with MySQL using the CLI.
6. (Where else but...) In the console window, type php -h and press Enter to see the help menu.
The help menu, should you need...um... help, is mostly just a listing of the few basic options.
7. In the console window, type exit and press Enter to close the window.
Tip
My Windows console window may not look like yours, so don’t be alarmed. I’ve tried to “pretty it up” by changing from the default colors to black text on a white background. To do so, click the icon in the upper-left corner, and then click Properties.
Tip
Another customization I often make in my console window is that I change the prompt from the default (which is the current directory followed by >) to a simple colon. To do so, type prompt X and press Enter, where X is whatever you want the prompt to be.
To test your installation on Unix and Mac OS X
1. Open your Terminal application.
Most flavors of Unix that I’m familiar with as well as Mac OS X provide an application called Terminal, which is used for command-line operations. It’s likely present in your Applications or Utilities folder, or wherever your OS keeps its programs.
2. In the console window, type php -v and press Enter ![]() .
.
![]() The command php -v shows the version of PHP CLI installed.
The command php -v shows the version of PHP CLI installed.
This should show you the PHP and CLI versions installed.
3. Still in the console window, type php -i and press Enter to learn more about the installation.
This is the equivalent of running a phpinfo() script within a Web browser. There’s a ton of information available here, although you’ll need to scroll back to catch it all (and possibly increase the console’s buffer size).
4. (Having not left the console window...) Type php -m and press Enter to see what modules are installed.
This lists the extensions that the PHP installation supports. This is important should you want to, for example, interact with MySQL using the CLI.
5. (Where else but...) In the console window, type php -h and press Enter to see the help menu ![]() .
.
![]() The PHP CLI help options.
The PHP CLI help options.
The help menu, should you need...um... help, is mostly just a listing of the few basic options.
6. In the console window, type exit and press Enter to close the window.
Tip
There is, on Unix and Mac OS X, a manual page installed for the PHP CLI. To access it, type man php ![]() .
.
![]() The PHP CLI man page, quite similar to the help file
The PHP CLI man page, quite similar to the help file ![]() .
.
Executing Bits of Code
One of the first uses I find for PHP CLI is to be able to test snippets of code without going through the process of:
1. Writing a formal PHP script
2. Placing it in a Web directory
3. Enabling my Web server, if it’s not already on
4. Running the PHP script in a Web browser
Instead of doing all of that, you can test small sections of code with PHP CLI using this syntax:
php -r 'php_code_here'
For a predictable example:
php -r 'echo "Hello, world!";'
A couple of things to remember with this syntax: First, using PHP tags will cause parse errors ![]() . Second, you may need to experiment to determine whether you should use single or double quotes around the code block. For example, using PHP 5.4 on my Mac, double quotes cause errors when there are variables within the code
. Second, you may need to experiment to determine whether you should use single or double quotes around the code block. For example, using PHP 5.4 on my Mac, double quotes cause errors when there are variables within the code ![]() . However, on Windows 7, PHP 5.4 complained of errors any time I used single quotes but did not complain about using double quotes, with or without variables.
. However, on Windows 7, PHP 5.4 complained of errors any time I used single quotes but did not complain about using double quotes, with or without variables.
![]() Do not use PHP tags with the php -r option.
Do not use PHP tags with the php -r option.
![]() In some environments, using double quotation marks around your PHP code that contains variables might create parse errors.
In some environments, using double quotation marks around your PHP code that contains variables might create parse errors.
Finally, you should end each statement in PHP with a semicolon, just as you would in a script.
To use PHP CLI for code blocks
1. Follow the steps in the first section of this chapter to access PHP CLI. Open a Terminal application (Mac OS X and Unix), bring up a DOS prompt (Windows), or connect to your remote server.
2. Test an echo() statement ![]() :
:
php -r 'echo "Hello, world!\n";'
![]() Among its many benefits, PHP CLI provides yet another way to say Hello, world!
Among its many benefits, PHP CLI provides yet another way to say Hello, world!
The PHP code being tested is
echo "Hello, world!";
This code is wrapped within single quotes and placed after php -r to execute it. Again, on Windows or other platforms you may need to swap the single and double quotes (if you get a parse error).
Using a Remote Server
If you want to work with PHP CLI on a remote server instead of a local one, that may also be an option. To do so, you must first make sure that the server’s administrator—be it an ISP, hosting company, or whoever—allows remote logins. If so, they should provide you with a username and password.
Next, you need an SSH application to connect to that server (SSH provides a secure connection between two computers). If running Unix or Mac OS X, you can use SSH within a Terminal, typing
ssh -l username address
After the lowercase “L”, enter your username. For the address, this can be either a URL—www.example.com—or an IP address (123.123.123.123). You’ll then be prompted for the password.
For Windows users, I recommend PuTTY (search the Web for the current URL). This simple and free application provides a graphical interface along with the SSH and Telnet clients.
Once connected to the remote server, you can follow the other steps in this chapter.
3. Print the modification date of a file ![]() :
:
![]() Using two lines of PHP code, I can print a formatted version of a file’s last modification date.
Using two lines of PHP code, I can print a formatted version of a file’s last modification date.
php -r '$ts = filemtime("/path/to/somefile.txt");
echo date("F j Y H:clear:s", $ts);'
Here, I’m actually executing two lines of PHP code. In the first line, the $ts variable is assigned the timestamp value of the last time the somefile.txt file was modified. Obviously, you’ll need to change the path and name of the file so that it’s appropriate for a file—any file—on your server.
In the second line, that timestamp is formatted using the date() function and printed. Because of the single quotes surrounding the entire PHP code block, I can enter this code over multiple lines (see the figure).
4. Add a newline or two to the printed result ![]() :
:
php -r 'echo "Hello, world! \n\n";'
By printing newline characters, I can add spacing to the output.
![]() Thanks to the printed newlines, the command prompt no longer appears immediately after the result of the code (compare with
Thanks to the printed newlines, the command prompt no longer appears immediately after the result of the code (compare with ![]() ).
).
Interactive PHP CLI
As of PHP 5.1, if PHP is compiled with the Readline extension, you can run PHP in an interactive shell. The interactive shell is simply a continually running version of PHP CLI that allows you to enter commands to be executed.
To invoke the interactive shell, use the -a flag:
php -a
If your PHP installation is set up to be used as an interactive shell, you should see something like ![]() . If you see Interactive mode enabled
. If you see Interactive mode enabled ![]() , your PHP is not configured to be used in this manner.
, your PHP is not configured to be used in this manner.
![]() The interactive shell interface, with the php prompt.
The interactive shell interface, with the php prompt.
![]() This response means that the Readline extension is not enabled, and the interactive shell cannot be used.
This response means that the Readline extension is not enabled, and the interactive shell cannot be used.
To use the interactive shell
1. Follow the steps in the first section of this chapter so that you can access PHP CLI.
2. Enter interactive mode:
php -a
3. Type a simple bit of PHP code and press Enter/Return to execute it ![]() :
:
echo 'Hello, world!';
![]() Executing a simple line of code.
Executing a simple line of code.
You’ll notice that PHP will execute the code and then show another prompt for you to enter more code. The prompt also nicely appears on the next line, without needing to print a newline character.
4. Create a variable:
$my_array = array('who', 'what', 'when');
echo $my_array[1];
You can create, and later reference, variables, constants, and functions in a session.
5. Type pri and press Tab to invoke the autocomplete ![]() .
.
![]() Variables can be created and used within the interactive shell.
Variables can be created and used within the interactive shell.
Thanks to the Readline extension, the interactive shell includes many useful features, including tab completion and history (via the up and down array keys). As you can see in the figure, the tab completion turns pri into print.
6. Type pri and press Tab twice to see the list of possible autocompletions ![]() .
.
![]() The interactive shell comes with tab completion and suggestion, such as the names of functions here.
The interactive shell comes with tab completion and suggestion, such as the names of functions here.
This is an easy way to ensure that you’re getting the names of functions right.
7. Type exit and press Enter/Return to exit the session.
Tip
In theory, autocompletion works with the names of variables, functions, and constants defined in the current session, too. However, in my experience, I find support for all types of autocompletion to be inconsistent.
Creating a Command-Line Script
Being able to test little bits of PHP code from the command line is nice, but it won’t take you far. What you’ll often want to do is run entire PHP scripts from the command-line interface. Such scripts could perform file or database maintenance, run updates for your Web sites, and more.
A PHP script to be used by PHP CLI is different from a Web script in three ways:
1. It shouldn’t use or create any HTML.
2. It doesn’t need to use the .php extension (although it’s fine if it does).
3. The very first line of the script will be
#!/usr/bin/php
There’s no harm in using HTML, but it’ll just clutter up the result in the console window. As for the file’s extension, how the script is run will change (covered in the next section of the chapter), so you could literally use anything. But .php is still a fine idea. Or you could use a different extension to distinguish your Web PHP scripts from the command-line ones (or no extension at all!). But of the three rules, only the last one matters (and, frankly, it only matters on Unix and Mac OS X).
That line of code is called the shebang line. It tells the operating system where to find the executable that should be used to run this script. For Unix and Mac OS X, that executable should have been installed in /usr/bin. If you know that PHP CLI was installed elsewhere, change the shebang line accordingly. For Windows, this line is ignored, but you should keep it in there for cross-platform reliability.
The CLI php.ini
Most PHP installations will end up with two or more usable command-line versions of PHP. The one I’m focusing on in this chapter is CLI. But there are probably other PHPs lingering on your server, like the one used by Apache or IIS for handling Web pages.
An interesting point about PHP CLI is that it uses a different php.ini file than the Web PHP module. This file, of course, is where you dictate how PHP behaves. Hence, PHP CLI may run differently than you’re used to. For that matter, your PHP CLI installation may support different modules than your Web installation.
You can, when invoking PHP CLI, use options to change the php.ini 'margin-top:4.0pt;margin-right:0cm;margin-bottom:4.0pt; margin-left:60.0pt;text-indent:-7.5pt;line-height:normal;background:#DDDDDD'>• -c tells PHP CLI where to look for a php.ini file.
• -n tells PHP CLI not to use a php.ini.
• -d sets a php.ini value for PHP CLI.
For example, it is recommended that you set ignore_user_abort to true when using the CLI. Doing so will allow a command-line script to continue running even after the user aborts the connection. To do that, you could set this when invoking the CLI:
php scriptname.php -d ignore_user_abort=1
Script 12.1. This PHP script will be run from the command line. It reads in a text file and prints it out, line by line, with the lines numbered.
1 #!/usr/bin/php
2 <?php # Script 12.1 - number.php
3
4 /* This page reads in a file.
5 * It then reprints the file, numbering the lines.
6 * This script is meant to be used with PHP CLI.
7 */
8
9 // The file to number:
10 $file = 'states.txt';
11
12 // Print an intro message:
13 echo "\nNumbering the file named '$file'...
14 -------------------\n\n";
15
16 // Read in the file:
17 $data = file($file);
18
19 // Line number counter:
20 $n = 1;
21
22 // Print each line:
23 foreach ($data as $line) {
24
25 // Print number and line:
26 echo "$n $line";
27
28 // Increment line number:
29 $n++;
30
31 } // End of FOREACH loop.
32
33 echo "\n-------------------
34 End of file '$file'.\n";
35 ?>
After that line, all PHP code goes within the normal PHP tags. Anything outside of the PHP tags is sent to the standard output just like Web-based PHP scripts ![]() :
:
#!/usr/bin/php
<?php
// Do whatever.
?>
This text is also displayed.
<?php
// Do whatever.
?>
![]() Text outside of the PHP tags is revealed in the console.
Text outside of the PHP tags is revealed in the console.
For the first implementation of this concept, I’ll create a script that reads in a text file and reprints it, numbering the lines along the way.
To create a command-line script
1. Create a new PHP script in your text editor or IDE, to be named number.php, beginning with the shebang line (Script 12.1):
#!/usr/bin/php
<?php # Script 12.1 - number.php
Remember that the first line is the most important and that you might need to change it if PHP CLI was installed in a place other than /usr/bin. And although Windows users can skip this line, it’s best to leave it in there (allowing you to use it on another computer down the road).
Finally, you still need to use the PHP tags.
2. Identify what file will be numbered:
$file = 'states.txt';
Later in the chapter, you’ll see how to write this script so that the file information can be assigned when the script is run. For this first example, I’m just going to use a simple plain text file that lists the US states. You can use any plain text file, including even another PHP script from the book.
3. Print an introductory message:
echo "\nNumbering the file named '$file'...
-------------------\n\n";
4. Read in the file:
$data = file($file);
The file() function reads an entire file into an array. Each line becomes one array element. You could use fopen() and the other file functions instead, if you prefer.
5. Print each line with its number:
$n = 1;
foreach ($data as $line) {
echo "$n $line";
$n++;
}
To start, a counter is initialized so that the first line is numbered at 1. Then a foreach loop goes through the array. Within the loop, each line is printed, prefixed by the line number and a couple of spaces. You do not need to print a newline here, because the line read in from the original file retained that newline. Finally, the counter is incremented.
6. Print a closing message:
echo "\n-------------------
End of file '$file'.\n";
7. Complete the PHP script:
?>
8. Save the file as number.php.
Running a Command-Line Script
Now that you’ve written a script especially meant for a command-line execution (and wasn’t it nice not to mess with all that pesky HTML?), it’s time to learn how to run it. There are two ways of doing so.
The first option is to directly invoke PHP CLI, as you did when executing a bit of code, this time providing it with the name of a script to execute:
php scriptname.php
You’ll also see the -f flag used. It stands for file, and whether you use it or not makes no difference on the end result:
php -f scriptname.php
This method should work just fine, as long as php is in your PATH and you are in the same directory as scriptname.php. Variations to circumvent these limitations might be
/usr/bin/php scriptname.php
php /path/to/scriptname.php
C:\php\php.exe scriptname.php
The second method for executing PHP scripts is to treat the script as if it were an application in its own right:
scriptname.php (Windows)
./scriptname.php (Unix and Mac OS X)
This method, which is preferred, can have some tricks to it, so I’ll run through the details in the following steps.
To run a command-line script in Windows
1. Use the instructions outlined earlier in the chapter to access a DOS prompt.
2. Move into the directory where number.php was saved ![]() :
:
cd C:\path\to\directory
![]() Start by moving into the same directory where the PHP script you want to execute is located.
Start by moving into the same directory where the PHP script you want to execute is located.
3. Run the file using the php scriptname.php syntax ![]() :
:
php number.php
![]() The execution of the number.php script.
The execution of the number.php script.
Hopefully, this should work for you. If you get an error message, it’s most likely because php is not in your PATH. If you don’t know how to change your PATH, either search the Web for tutorials or turn to my support forums (www.LarryUllman.com/forums/).
4. Run the file using the alternative syntax:
number.php
If this doesn’t immediately work, it’s because you’ll need to tell Windows what program to use for running .php scripts. To do so (these instructions are for Windows 7, but should be similar on other versions of Windows):
a. Select number.php in the Windows Explorer.
b. Control+click or right-click and choose Open with > Choose default program.
c. Click Browse in the Open with dialog ![]() .
.
![]() You may need to tell Windows what application to use for your scripts. The php executable will not likely come up as an option.
You may need to tell Windows what application to use for your scripts. The php executable will not likely come up as an option.
d. Find and select the php executable ![]() , and then click Open.
, and then click Open.
![]() Find the installed php executable to finish the association.
Find the installed php executable to finish the association.
e. Click OK in the Open with dialog.
From here on out, all .php scripts will run just fine from the command-line interface (assuming that you kept the Always use the selected program to open this kind of file box checked ![]() ).
).
To run a command-line script in Unix and Mac OS X
1. Use the instructions outlined earlier in the chapter to access a command-line prompt.
2. Move into the directory where number.php was saved:
cd /path/to/directory
3. Run the file using the php scriptname.php syntax ![]() :
:
php number.php
![]() The first method for running the PHP script, showing the end of the output.
The first method for running the PHP script, showing the end of the output.
Hopefully, this should work for you. If you get an error message, it’s most likely because php is not in your PATH. If you don’t know how to change your PATH, either search the Web for tutorials or turn to my support forums (www.LarryUllman.com/forums/).
4. Make the file executable:
chmod +x number.php
If you’re not familiar with chmod, it’s a utility for changing the properties of files and directories. The +x code says to add executable status to number.php.
5. Run the file using the ./scriptname.php syntax ![]() :
:
./number.php
![]() Executables can be run using the ./ executable syntax, assuming you are in the same directory as the program to be run.
Executables can be run using the ./ executable syntax, assuming you are in the same directory as the program to be run.
Tip
You can use php -l scriptname.php to have PHP check a script’s syntax without actually running it. The only caveats are that this doesn’t work with the -r option (for testing bits of code) and it doesn’t check for fatal errors.
Working with Command-Line Arguments
The number.php example (Script 12.1) is a reasonable-enough application of PHP CLI. The script provides a valuable service but has one limitation: the file to be numbered is hard-coded into the script. It’d be better to set that value when the application is used. This can be easily achieved by rewriting the script so that it uses command-line arguments.
Command-line arguments are values passed to an application when it is run. For example, the PHP CLI takes several configuration options, the name of a script to be run, or some code to be executed. Arguments are passed to the invoked application by adding them after the application’s name:
scriptname.php arg1 arg2...
In your PHP script, you can then access these arguments by referring to $argv and $argc (or the more formal $_SERVER['argv'] and $_SERVER['argc']). The $argv array stores every argument provided; $argc stores the number of items in $argv. The only catch to using these is that the name of the script itself is the first listed argument ($_SERVER['argv'][0]) ![]() :
:
#!/usr/bin/php
<?php
echo "\n{$_SERVER['argc']} arguments received. They are...\n";
foreach ($_SERVER['argv'] as $k => $v) {
echo "$k: $v\n";
}
?>
![]() The arguments.php script just prints out the number and values of the arguments used when calling it. Notice that the script name itself is always the first received argument.
The arguments.php script just prints out the number and values of the arguments used when calling it. Notice that the script name itself is always the first received argument.
Let’s write a new number.php script so that it accepts an argument: the name of the script to number.
To use command-line arguments
1. Create a new PHP script in your text editor or IDE, to be named number2.php, beginning with the shebang line (Script 12.2).
#!/usr/bin/php
<?php # Script 12.2 - number2.php
2. Check that a filename was provided:
if ($_SERVER['argc'] == 2) {
Since the script will receive the script’s name as its first argument, $_SERVER['argc'] must be equal to 2 to indicate proper usage (because the script name itself will count, too). This conditional checks for that.
3. Make sure that the file exists:
$file = $_SERVER['argv'][1];
if (file_exists($file) && is_file($file)) {
First, the name of the file is identified as the second argument provided (the arguments list being an array, the indexing begins at 0). Then two conditionals confirm that the given file does exist and is a file (because a directory would pass the first test). You’d likely want to add code restricting the files to a certain directory for security purposes.
Script 12.2. This PHP script expects to receive the name of the file to number as a command-line argument.
1 #!/usr/bin/php
2 <?php # Script 12.2 - number2.php
3
4 /* This page reads in a file.
5 * It then reprints the file, numbering the lines.
6 * This script is meant to be used with PHP CLI.
7 * This script expects one argument (plus the script's name):
8 * the name of the file to number.
9 */
10
11 // Check that a filename was provided:
12 if ($_SERVER['argc'] == 2) {
13
14 // Get the name of the file:
15 $file = $_SERVER['argv'][1];
16
17 // Make sure the file exists and is a file:
18 if (file_exists($file) && is_file($file)) {
19
20 // Read in the file:
21 if ($data = file($file)) {
22
23 // Print an intro message:
24 echo "\nNumbering the file named '$file'...\n-------------------\n\n";
25
26 // Line number counter:
27 $n = 1;
28
29 // Print each line:
30 foreach ($data as $line) {
31
32 // Print number and line:
33 echo "$n $line";
34
35 // Increment line number:
36 $n++;
37
38 } // End of FOREACH loop.
39
40 echo "\n-------------------\nEnd of file '$file'.\n";
41 exit(0);
42
43 } else {
44 echo "The file could not be read.\n";
45 exit(1);
46 }
47
48 } else {
49 echo "The file does not exist.\n";
50 exit(1);
51 }
52
53 } else {
54
55 // Print the usage:
56 echo "\nUsage: number2.php <filename>\n\n";
57
58 // Kill the script, indicate error:
59 exit(1);
60 }
61
62 ?>
4. Read in the file and print each line:
if ($data = file($file)) {
echo "\nNumbering the file named '$file'...\n -------------------\n\n";
$n = 1;
foreach ($data as $line) {
echo "$n $line";
$n++;
} // End of FOREACH loop.
echo "\n-------------------\nEnd of file '$file'.\n";
This code matches that in number.php, except for reading the file’s contents as a conditional.
5. Return 0 to indicate proper execution of the application:
exit(0);
Command-line applications are often written to return a number indicating the successful use of that application (see the sidebar “Creating an Interface” later in this chapter). Typically, 0 represents no problems and a nonzero number represents an error of some sort. Here, the exit()function (or language construct) will terminate the execution of the script, and the value provided as an argument to exit() will be returned by the script.
6. Complete the conditional started in Step 4:
} else {
echo "The file could not be read.\n";
exit(1);
}
If the file couldn’t be read for some reason, likely a permissions issue, a message should be printed. The exit(1) line is used to indicate a problem. Returning a nonzero number when a problem occurs is a convention for command-line applications.
7. Complete the conditional started in Step 3:
} else {
echo "The file does not exist.\n";
exit(1);
}
8. Complete the conditional started in Step 2:
} else {
echo "\nUsage: number2.php <filename>\n\n";
exit(1);
}
If the script was not invoked with the proper number of arguments, how it should be used is indicated ![]() . This is a command-line convention, also discussed in the “Creating an Interface” sidebar.
. This is a command-line convention, also discussed in the “Creating an Interface” sidebar.
![]() If no filename is provided, the utility’s proper usage is shown.
If no filename is provided, the utility’s proper usage is shown.
9. Complete the PHP script:
?>
10. Save the file as number2.php.
11. Run the script ![]() .
.
![]() The states.txt script is numbered by number2.php.
The states.txt script is numbered by number2.php.
Note that on Windows, you’ll need to use this syntax:
php number2.php filename
If you use
number2.php filename
the script will only recognize one argument (with a value of number2.php).
12. To fully test the script, provide an invalid file-name ![]() .
.
![]() If the script cannot find the given file, an error is displayed.
If the script cannot find the given file, an error is displayed.
Tip
To get really professional with your command-line arguments, check out the various console-related PEAR (PHP Extension and Application Repository) packages. For example, Console_Color2 lets you use ANSI colors in the output, and several PEAR packages assist in the reading of command-line arguments.
Creating an Interface
Using PHP in a command-line situation opens up a whole new world that PHP for Web development doesn’t have: the user interface. Sure, presentation and usage of Web pages is a vitally important HTML issue, but on the command line it’s a different beast.
For starters, most command-line applications indicate how the command is to be used, should it be used incorrectly. Type php -varmit and you’ll see what I mean. The number2.php script does this a little bit (showing the usage) but commands normally do more, like offer help if commandname-h or commandname --help is entered.
Finally, command-line applications often return a code indicating how successful the operation was. The number 0 is returned to indicate no problems, and some nonzero number otherwise. In number2.php, the integer 1 is returned when things go wrong.
An alternative to using command-line arguments is to request input from the user (although you could use both techniques in combination). By doing so, you can create an interactive application, where it prompts the user for information and does something with what is entered.
Taking Input
Strange as it may seem, taking input in a command-line application is exactly like reading in data from a file. But in this case, instead of using a file handle (a pointer to an opened file), you’ll use a special constant, STDIN. This stands for standard input, which would be the keyboard by default. One easy way to read in standard input would be to use the fgets() function:
echo 'Tell me something: ';
$input = fgets(STDIN);
That line of code creates a prompt ![]() . Anything typed there by the user will be assigned to $input.
. Anything typed there by the user will be assigned to $input.
![]() Any function that attempts to read from the standard input will create a prompt where the user can type.
Any function that attempts to read from the standard input will create a prompt where the user can type.
To be more precise with input, I like to use the fscanf() function. Like printf() and sprintf(), discussed in Chapter 1, “Advanced PHP Techniques,” this function takes formatting parameters to handle specific types of data. By using this function, instead of a more generic one, you ensure that some basic validation as to the type of data read in can take place. In the next example, fscanf() will be used to create an application that converts temperatures between degrees Fahrenheit and Celsius (in either direction).
To take user input
1. Begin a new PHP script in your text editor or IDE, to be named temperature.php, starting with the shebang line (Script 12.3):
#!/usr/bin/php
<?php # Script 12.3 - temperature.php
Script 12.3. User input is requested when this script runs. The input is read in from STDIN and validated; if proper, a temperature conversion occurs.
1 #!/usr/bin/php
2 <?php # Script 12.3 - temperature.php
3
4 /* This page convers temperatures between
5 * Fahrenheit and Celsius.
6 * This script is meant to be used with PHP CLI.
7 * This script requests input from the user.
8 */
9
10 // Prompt the user:
11 echo "\nEnter a temperature and indicate if it's Fahrenheit or Celsius [##.# C/F]: ";
12
13 // Read the input as a conditional:
14 if (fscanf (STDIN, '%f %s', $temp_i, $which_i) == 2) {
15
16 // Assume invalid output:
17 $which_o = FALSE;
18
19 // Make the conversion based upon $which_i:
20 switch (trim($which_i)) {
21
22 // Celsius, convert to Fahrenheit:
23 case 'C':
24 case 'c':
25 $temp_o = ($temp_i * (9.0/5.0)) + 32;
26 $which_o = 'F';
27 $which_i = 'C';
28 break;
29
30 // Fahrenheit, convert to Celsius:
31 case 'F':
32 case 'f':
33 $temp_o = ($temp_i - 32) * (5.0/9.0);
34 $which_o = 'C';
35 $which_i = 'F';
36 break;
37
38 } // End of SWITCH.
39
40 // Print the results:
41 if ($which_o) {
42 printf ("%0.1f %s is %0.1f %s.\n", $temp_i, $which_i, $temp_o, $which_o);
43 } else {
44 echo "You failed to enter C or F to indicate the current temperature type.\n";
45 }
46
47 } else { // Didn't enter the right input.
48
49 echo "You failed to use the proper syntax.\n";
50
51 } // End of main IF.
52 ?>
2. Prompt the user for the input:
echo "\nEnter a temperature and indicate if it's Fahrenheit or Celsius [##.# C/F]: ";
The prompt clearly indicates to the user what information is expected and in what format ![]() . Because there is no newline character printed at the end of this text, the user will be able to type immediately after the colon.
. Because there is no newline character printed at the end of this text, the user will be able to type immediately after the colon.
![]() The initial prompt.
The initial prompt.
3. Read in a floating-point number and a string:
if (fscanf (STDIN, '%f %s', $temp_i, $which_i) == 2) {
There’s a lot going on in this one line. First, the fscanf() function will attempt to read in, from the standard input, one floating-point number and one string. These should match up to the temperature (e.g., 72.3) and the indicator as to the current temperature type (C or F). There is no “character” format with fscanf(), so the %s for string will have to do. If fscanf() can read in exactly these two data types in that order, they’ll be assigned to the variables $temp_i and $which_i.
The last bit of trickery is that the fscanf() function will return the number of values it assigned to variables. So if it reads in two values, assigned to $temp_i and $which_i, the conditional knows that the proper data was entered.
4. Set a variable to false:
$which_o = FALSE;
This variable will store the converted temperature (the output). It’s initially set to false and will be assigned a proper value in Step 5.
5. Perform the appropriate conversion:
switch (trim($which_i)) {
case 'C':
case 'c':
$temp_o = ($temp_i * (9.0/5.0)) + 32;
$which_o = 'F';
$which_i = 'C';
break;
case 'F':
case 'f':
$temp_o = ($temp_i - 32) * (5.0/9.0);
$which_o = 'C';
$which_i = 'F';
break;
} // End of SWITCH.
The switch checks to see if degrees Celsius is being converted to Fahrenheit or vice versa. If the second piece of input submitted is not C, c, F, or f, no conversion takes place.
6. Print the results:
if ($which_o) {
printf ("%0.1f %s is %0.1f %s.\n", $temp_i, $which_i, $temp_o, $which_o);
} else {
echo "You failed to enter C or F to indicate the current temperature type.\n";
}
If $which_o is equal to C or F, then the conditional is true and the conversion is printed, using the printf() function to handle the formatting ![]() . Otherwise, a default message is printed
. Otherwise, a default message is printed ![]() .
.
![]() The result of the calculation is printed as a floating-point number with one decimal.
The result of the calculation is printed as a floating-point number with one decimal.
![]() One of the possible error messages if the script is not used properly.
One of the possible error messages if the script is not used properly.
Taking CLI Further
This chapter covers what you need to know about running PHP code from a command-line interface. For the most part this just means that you’ll take what you already know how to do with PHP and execute it in a non-Web interface. That alone is perfect for many automated tasks that you might want to do.
On a more sophisticated level, PHP CLI can be used to interact with the operating system on a low level. One thing to look into is the pcntl (process control) extension. The extension, which isn’t available when using PHP for Web pages, lets you fork your processes (split them off). From there you can go on to the concept of signals. If you don’t know what these things are, that’s fine: you probably shouldn’t be messing with them in PHP anyway. But if you do understand these concepts, knowing that you can work with them in PHP is a welcome bit of news.
Finally, with PHP CLI you can use the backticks, exec(), system(), and similar functions to call system utilities. Using these functions with PHP CLI doesn’t differ from using them in a Web script, but your need to use them might increase.
7. Complete the conditional started in Step 3:
} else {
echo "You failed to use the proper syntax.\n";
} // End of main IF.
This else clause applies if the fscanf() function does not return the number 2, meaning it didn’t read in two values ![]() . In neither this case nor the else clause in Step 6 does the script return a number indicating a problem, but that could be added.
. In neither this case nor the else clause in Step 6 does the script return a number indicating a problem, but that could be added.
![]() The second of the possible error messages for misuse.
The second of the possible error messages for misuse.
8. Complete the PHP script:
?>
9. Save the file as temperature.php.
10. Run the script ![]() .
.
![]() Successfully converting from Fahrenheit to Celsius.
Successfully converting from Fahrenheit to Celsius.
Tip
This script could have been written to take the temperature and the temperature type as two separate inputs. But doing so would have been far less cool than using just one prompt and showing off what fscanf() can do.
Tip
Any of PHP’s file functions can be used on STDIN. This means, for example, that you could use fgetc() to retrieve just a single character or fgetcsv() to retrieve and parse an entire line.
Built-In Server
An addition to the CLI in PHP 5.4 is a builtin Web server. Using it, you can test PHP scripts in a Web browser without installing and running a Web server application such as Apache. To be absolutely clear, this is not a production-grade Web server, but it can be used to quickly test PHP scripts in browsers.
To use the built-in Web server
1. Follow the steps in the first section of this chapter so that you can access PHP CLI.
2. Enter the following command to confirm the availability of the Web server ![]() :
:
php -h
![]() The PHP help menu will show you what options are available.
The PHP help menu will show you what options are available.
The -h flag brings up the help documentation. If the documentation includes the -S (it must be a capital letter S) and -t options, then the built-in server is supported.
3. Navigate to the directory that contains the PHP script(s) you’d like to test:
cd /path/to/directory
By default, the Web server will use the directory in which the server was started as the Web root directory, so you should navigate there first.
4. Start the server ![]() :
:
php -S localhost:8000
![]() The Web server has been started.
The Web server has been started.
To start the Web server, use the -S flag, followed by the hostname and port to use. On your own computer, localhost is a logical and common hostname. For the port, I would recommend 8000 or 8080, which are common alternatives to the default Apache port of 80. Using one of these ports prevents possible conflicts if you already have another Web server running.
You can also use an IP address, if you’d rather:
php -S 127.0.0.1:8000
5. Load http://localhost:8080/scriptname.php in your Web browser ![]() .
.
![]() This PHP script is running through PHP’s built-in Web server.
This PHP script is running through PHP’s built-in Web server.
As you load pages in the Web browser using the CLI server, you’ll notice that the console or Terminal window will reflect the history of requests ![]() .
.
![]() A log of server requests is shown in the window where the server was started.
A log of server requests is shown in the window where the server was started.
6. Press Control+C in the console or Terminal window to stop the Web server.
Tip
To use a different Web root directory, regardless of where the Web server is started, use the -t option:
php -S localhost:8000 -t /path/to/directory
Tip
Keep in mind that this Web server will use the PHP CLI configuration, which, again, may run differently and include different modules than your standard PHP installation associated with Apache or IIS.
Review and Pursue
If you have any problems with these sections, either in answering the questions or pursuing your own endeavors, turn to the book’s supporting forum (www.LarryUllman.com/forums/).
Review
• How do you access a DOS console or terminal window on your computer? (See pages 379 through 382.)
• What are some good uses of the CLI? (See page 378.)
• How do you confirm the version of PHP you have? (See page 378.)
• How do you execute a line or two of code using CLI? (See page 383.)
• How do you enter the CLI interactive shell? How do you exit it? (See page 386.)
• If you want to execute a PHP script from the command line, what should the first line of code in that script be? What is that line called? (See page 388.)
• How do you run a PHP script using PHP CLI? (See page 391.)
• Through what variable do you access arguments passed when running a script through PHP CLI? What will the first item in that variable reference be? (See page 395.)
• How do you take input from the user? What are some of the ways you can validate the user’s input by type? (See pages 400 through 402.)
• How do you use PHP CLI to test a script in your Web browser? How do you change the Web root directory used by the PHP CLI server? (See page 405.)
Pursue
• Create a new version of temperature.php that takes the temperature and temperature type as two separate inputs.
• Modify number2.php so that it creates a numbered version of the text file as a new file on the server (as opposed to outputting it to the screen).
• If you like the CLI and think it might be useful to you, practice! Try creating new utilities and interactive scripts.
All materials on the site are licensed Creative Commons Attribution-Sharealike 3.0 Unported CC BY-SA 3.0 & GNU Free Documentation License (GFDL)
If you are the copyright holder of any material contained on our site and intend to remove it, please contact our site administrator for approval.
© 2016-2026 All site design rights belong to S.Y.A.