PHP Advanced and Object-Oriented Programming (2013)
Visual Quickpro Guide
3. Advanced Database Concepts
In This Chapter
Storing Sessions in a Database
Working with U.S. Zip Codes
Creating Stored Functions
Displaying Results Horizontally
Review and Pursue
In this book, I wanted to do a couple of things. First, I wanted to demonstrate and explain some advanced concepts and approaches. Second, I wanted to present solutions to common problems. This chapter addresses both of those goals equally.
For the first example, you’ll see how to use a database to store session data. Doing so offers many advantages, with improved security at the forefront. Next, you’ll find a thorough discussion on working with U.S. zip codes, including how to calculate the distances between two. The third example introduces stored functions, a useful database concept. The chapter ends by answering a common question: how do you lay out query results horizontally as opposed to the standard vertical layout?
Storing Sessions in a Database
By default, PHP stores all session data in text files in the server. Normally, these files are stored in a temporary folder (like /tmp on Unix and Mac OS X) with filenames matching the session IDs (e.g., ei26b4i2nup742ucho9glmbh84). However, PHP provides a mechanism for you to manage sessions in other ways, such as storing the session data in a database.
The main reason I recommend making this change is improved security. On shared hosting servers, without extra steps being taken every Web site uses the same temporary directory for its sessions. This means that dozens upon dozens of applications are all reading and writing in the same place. Knowing this, you’d find it easy to create a script that reads all the data from all the files in the sessions folder, thereby accessing the stored user data from other sites.
A second benefit to moving session data to a database is that it allows you to easily retrieve more information about your Web site’s sessions in general. Queries could be run indicating the number of active sessions and session data can even be backed up.
A third reason to store session data in a database is if you have a site running on multiple servers. When this is the case, the same user may be fed pages from different servers over the course of the same session. The session data stored in a file on one server would be unavailable to the pages on other servers. This isn’t a situation that the majority of developers face, but if you do, there’s really no other option but to go the database route.
With an understanding of why you might want to store session data in a database, let’s go through the steps you’d need to take to implement that approach.
Tip
Another fix for the security concern on a shared host is to change the session directory for your site. To do so, call the session_save_path() function prior to every session_start() call. You’ll also need to make sure that the new directory exists, of course, and that it has the proper permissions.
Creating the session table
To store session data in a database, you must first create a special database table for that express purpose. This table can be part of an already existing database (like the rest of your application) or in its own database. At a bare minimum, the table needs three columns (Table 3.1).
Table 3.1. Session Table Columns
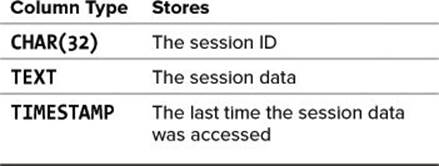
The session table can have more than those three columns, but it must have those three. Keep in mind, though, that many things you might be inclined to represent in another column—a user’s ID, for example—would likely be stored in the session data column.
To create the sessions table
1. Access your MySQL database using the mysql client.
You can also use phpMyAdmin or whatever other interface you prefer.
2. Select the test database  .
.
USE test;
Since this is just an example, I’ll create the table within the test database.
I’ll put the sessions table within the test database for this example.
3. Create the sessions table  :
:
CREATE TABLE sessions (
id CHAR(32) NOT NULL,
data TEXT,
last_accessed TIMESTAMP NOT NULL,
PRIMARY KEY (id)
);
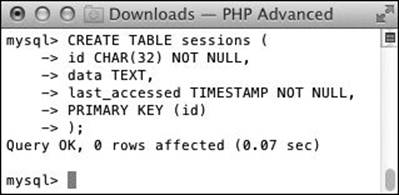
This one table will handle all the session data.
The table contains the basic three fields. The id is the primary key. It will always contain a string 32 characters long and can never be NULL. The data column is a TEXT type and it can be NULL (when the session is first started, there is no data). The last_accessed column is a TIMESTAMP. It will therefore always be updated when the session is created (on INSERT) or modified (on UPDATE).
4. Confirm the sessions table structure  : DESCRIBE sessions;

Confirming the table’s structure.
Tip
If your application stores a lot of data in sessions, you’d want to change the size of the session data column to MEDIUMTEXT or LONGTEXT.
Defining the session functions
After creating the database table, storing session data in a database is a two-part process (from a PHP perspective):
1. Define the functions for interacting with the database.
2. Tell PHP to use these functions.
For this second step, the session_set_save_handler() function is used. This function should be called with six arguments, each a function name (Table 3.2).
Table 3.2. session_set_save_handler() Arguments
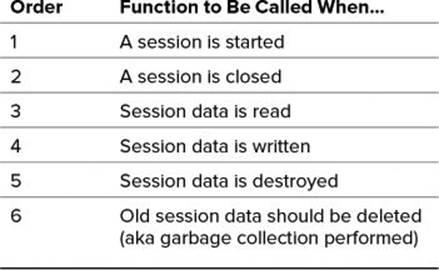
I’ll briefly discuss what each function should receive (as arguments) and do while creating them in the next script. I’ll say up front that all of the functions must return a Boolean value, except for the “read” function. That function must always return a string, even if that means an empty string.
Before getting into the script, it helps to understand when the different functions will be called  . Every time a session is started, the “open” and “read” functions are called automatically and immediately. When the “read” function is called, garbage collection may take place (depending on various factors).
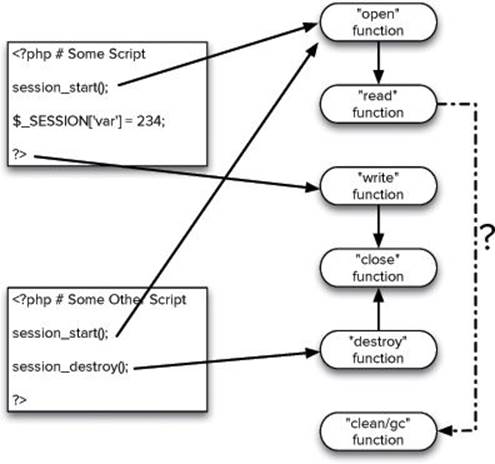
The logical flow of using sessions and the various session-handling functions.
When a script terminates, the write function is called, and then the “close” function is called. If the session is destroyed, then the “write” function won’t be invoked, but the “destroy” function will be, followed by the “close” function.
To create new session handlers
1. Begin a new PHP script in your text editor or IDE, to be named db_sessions.inc.php (Script 3.1):
<?php # Script 3.1 - db_sessions.inc.php
$sdbc = NULL;
The $sdbc variable will store the database connection. I initialize it here and then make it global in each function. Note that I’m specifically giving this variable a different name than a standard database connection variable (e.g., $dbc), so as to minimize bugs. Normally, you’d want to use only a single database connection, in which case you’d change some of this code accordingly.
Script 3.1. This script defines all the functionality required to store session data in a database. It can be included by any page that wants that feature.
1 <?php # Script 3.1 - db_sessions.inc.php
2
3 /*
4 * This page creates the functional interface for
5 * storing session data in a database.
6 * This page also starts the session.
7 */
8
9 // Global variable used for the database
10 // connections in all session functions:
11 $sdbc = NULL;
12
13 // Define the open_session() function:
14 // This function takes no arguments.
15 // This function should open the database connection.
16 // This function should return true.
17 function open_session() {
18 global $sdbc;
19
20 // Connect to the database:
21 $sdbc = mysqli_connect ('localhost', 'username', 'password', 'test');
22
23 return true;
24 } // End of open_session() function.
25
26 // Define the close_session() function:
27 // This function takes no arguments.
28 // This function closes the database connection.
29 // This function returns the closed status.
30 function close_session() {
31 global $sdbc;
32
33 return mysqli_close($sdbc);
34 } // End of close_session() function.
35
36 // Define the read_session() function:
37 // This function takes one argument: the session ID.
38 // This function retrieves the session data.
39 // This function returns the session data as a string.
40 function read_session($sid) {
41 global $sdbc;
42
43 // Query the database:
44 $q = sprintf('SELECT data FROM sessions WHERE id="%s"', mysqli_real_escape_string($sdbc, $sid));
45 $r = mysqli_query($sdbc, $q);
46
47 // Retrieve the results:
48 if (mysqli_num_rows($r) == 1) {
49 list($data) = mysqli_fetch_array($r, MYSQLI_NUM);
50
51 // Return the data:
52 return $data;
53
54 } else { // Return an empty string.
55 return '';
56 }
57 } // End of read_session() function.
58
59 // Define the write_session() function:
60 // This function takes two arguments:
61 // the session ID and the session data.
62 function write_session($sid, $data) {
63 global $sdbc;
64
65 // Store in the database:
66 $q = sprintf('REPLACE INTO sessions (id, data) VALUES ("%s", "%s")', mysqli_real_escape_string($sdbc, $sid), mysqli_real_escape_string($sdbc, $data));
67 $r = mysqli_query($sdbc, $q);
68
69 return true;
70 } // End of write_session() function.
71
72 // Define the destroy_session() function:
73 // This function takes one argument: the session ID.
74 function destroy_session($sid) {
75 global $sdbc;
76
77 // Delete from the database:
78 $q = sprintf('DELETE FROM sessions WHERE id="%s"', mysqli_real_escape_string($sdbc, $sid));
79 $r = mysqli_query($sdbc, $q);
80
81 // Clear the $_SESSION array:
82 $_SESSION = array();
83
84 return true;
85 } // End of destroy_session() function.
86
87 // Define the clean_session() function:
88 // This function takes one argument: a value in seconds.
89 function clean_session($expire) {
90 global $sdbc;
91
92 // Delete old sessions:
93 $q = sprintf('DELETE FROM sessions WHERE DATE_ADD(last_accessed, INTERVAL %d SECOND) < NOW()', (int) $expire);
94 $r = mysqli_query($sdbc, $q);
95
96 return true;
97 } // End of clean_session() function.
98
99 # **************************** #
100 # ***** END OF FUNCTIONS ***** #
101 # **************************** #
102
103 // Declare the functions to use:
104 session_set_save_handler('open_session', 'close_session', 'read_session', 'write_session', 'destroy_session', 'clean_session');
105
106 // Make whatever other changes to the session settings, if you want.
107
108 // Start the session:
109 session_start();
2. Define the function for opening a session:
function open_session() {
global $sdbc;
$sdbc = mysqli_connect ('localhost', 'username', 'password', 'test');
return true;
}
This function takes no arguments (which is to say that when PHP does something to open a session, it will call this function without sending any values to it). The intent of this function is merely to establish a database connection.
In a real application, without the constraints of a book’s limited pages, I would update the function so that it would return a Boolean indicating the success of the given operation instead of always returning true.
3. Define the function for closing a session:
function close_session() {
global $sdbc;
return mysqli_close($sdbc);
}
This function also takes no arguments. It will close the database connection, returning the success of that operation.
4. Define the function for reading the session data:
function read_session($sid) {
global $sdbc;
$q = sprintf('SELECT data FROM sessions WHERE id="%s"', mysqli_real_escape_string ($sdbc, $sid));
$r = mysqli_query($sdbc, $q);
if (mysqli_num_rows($r) == 1) {
list($data) = mysqli_fetch_array($r, MYSQLI_NUM);
return $data;
} else {
return '';
}
}
This function will receive one argument: the session ID (e.g., ei26b4i2nup742ucho9glmbh84). The function needs to retrieve the data for that session ID from the database and return it. If the function can’t do that, it should return an empty string instead. Although the session ID should be safe to use in a URL, you shouldn’t make assumptions when it comes to security, so the mysqli_real_escape_string() function is used to make it safe (alternatively, you could use prepared statements).
If you’re not familiar with the sprintf() function, which I use to compile the query, see Chapter 1, “Advanced PHP Techniques.”
5. Define the function for writing data to the database:
function write_session($sid, $data) {
global $sdbc;
$q = sprintf('REPLACE INTO sessions (id, data) VALUES ("%s", "%s")', mysqli_real_escape_string($sdbc, $sid), mysqli_real_escape_string ($sdbc, $data));
$r = mysqli_query($sdbc, $q);
return true;
}
This function receives two arguments: the session ID and the session data. The session data is a serialized version of the $_SESSION array  . For the query, an INSERT must be run the first time the session record is created in the database and an UPDATE query every time thereafter. The lesser-known REPLACE query will achieve the same result. If a record exists whose primary key is the same as that given a value in this query (i.e., the session ID), an update will occur. Otherwise, a new record will be made.
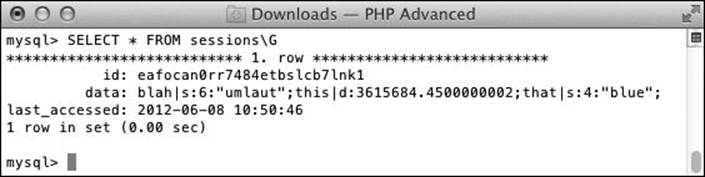
Session data is stored in the database (or in a file) as a serialized array. This serialized value says that indexed at blah is a string six characters long with a value of umlaut. Indexed at this is a decimal with a value of 3615684.4500 (and so on). Indexed at that is a string four characters long with a value of blue.
6. Create the function for destroying the session data:
function destroy_session($sid) {
global $sdbc;
$q = sprintf('DELETE FROM sessions WHERE id="%s"', mysqli_real_escape_string ($sdbc, $sid));
$r = mysqli_query($sdbc, $q);
$_SESSION = array();
return true;
}
This function, which will be called when the PHP session_destroy() function is invoked, receives one argument, the session ID. This function then runs a DELETE query in the database and clears the $_SESSION array.
As an example of changing the returned value, you could have this function return the number of affected rows: 1 would effectively be true and 0 would be false.
7. Define the garbage collection function:
function clean_session($expire) {
global $sdbc;
$q = sprintf('DELETE FROM sessions WHERE DATE_ADD (last_accessed, INTERVAL %d SECOND) < NOW()', (int) $expire);
$r = mysqli_query($sdbc, $q);
return true;
}
Garbage collection is something most PHP programmers do not think about. Garbage collection is a language or application’s tool for cleaning up resources that are no longer needed. With sessions, PHP’s garbage collection can wipe out old sessions that weren’t formally destroyed.
There are two relevant settings in PHP: what is considered to be “old” and how likely it is that garbage collection is performed. For all session activity in a site, there is an X percent chance that PHP will go into garbage collection mode (the exact percent is a PHP setting; the default value is 1%). If it does, then all “old” session data will be destroyed. So garbage collection is triggered by any session but attempts to clean up every session.
As for the garbage collection function, it will receive a time, in seconds, as to what is considered to be old. This can be used in a DELETE query to get rid of any session that hasn’t been accessed in more than the set time.
8. Tell PHP to use the session-handling functions:
session_set_save_handler ('open_session', 'close_session', 'read_session', 'write_session', 'destroy_session', 'clean_session');
9. Start the session:
session_start();
Two important things to note here: First, the session_set_save_handler() function does not start a session. You still have to invoke session_start(). Second, you must use these two lines in this order. Calling session_start() prior to session_set_save_handler() will result in your handlers being ignored.
The reason I’m choosing to start the session within this file is that this file will be included by any script that needs sessions. My concern is that were you to start the sessions separately in each script, it would allow for the possibility that a script could start a session without including this file first, thereby using the file system for that page’s session and creating bugs.
10. Save the file as db_sessions.inc.php and place it in your Web directory.
As is my rule for all PHP scripts being included by other scripts, this one does not have a terminating PHP tag.
Tip
Note that the “write” session function is never called until all of the output has been sent to the Web browser  . Then the “close” function is called.
Tip
If session.auto_start is turned on in your PHP configuration (meaning that sessions are automatically started for each page), then you cannot use the session_set_save_handler() function.
Tip
As of PHP 5.4, you can provide the session_set_save_handler() function with a single argument: an object of any class type that implements SessionHandlerInter-face. For example, you can use the Session-Handler class. This will mean more after the chapters on object-oriented programming.
Using the new session handlers
Using the newly created session handlers is only a matter of invoking the session_set_save_handler() function, as discussed in the preceding section. Almost everything else you would do with sessions is unchanged, from storing data in them to accessing stored data to destroying a session.
To demonstrate this, the next script will create some session data if it doesn’t exist, show all the session data, and even destroy the session data if a link back to this same page is clicked. As is often the case, there is one little tricky issue...
All of the session activity requires the database and, therefore, the database connection. The connection is opened when the session is started and closed when the session is closed. No problem there except that the “write” and “close” functions will be called after a script has finished running .
As you may already know, PHP does you the favor of automatically closing any database connections when a script stops running. For this next script, this means that after the script runs, the database connection is automatically closed, and then the session functions attempt to write the data to the database and close the connection. The result will be some confusing errors (and a—trust me on this—long “Where in the World Is My Database Connection?” search).
To avoid this sequential problem, the session_write_close() function should be called before the script terminates. This function will invoke the “write” and “close” functions, while there’s still a good database connection.
To use the new session handlers
1. Begin a new PHP script in your text editor or IDE, to be named sessions.php (Script 3.2):
<?php # Script 3.2 - sessions.php
Script 3.2. This script includes the db_sessions.inc.php page (Script 3.1) so that session data is stored in a database.
1 <?php # Script 3.2 - sessions.php
2
3 /* This page does some silly things with sessions.
4 * It includes the db_sessions.inc.php script
5 * so that the session data will be stored in a database.
6 */
7
8 // Include the sessions file:
9 // The file already starts the session.
10 require('db_sessions.inc.php');
11 ?><!doctype html>
12 <html lang="en">
13 <head>
14 <meta charset="utf-8">
15 <title>DB Session Test</title>
16 <link rel="stylesheet" href="style.css">
17 </head>
18 <body>
19 <?php
20 // Store some dummy data in the session, if no data is present:
21 if (empty($_SESSION)) {
22
23 $_SESSION['blah'] = 'umlaut';
24 $_SESSION['this'] = 3615684.45;
25 $_SESSION['that'] = 'blue';
26
27 // Print a message indicating what's going on:
28 echo '<p>Session data stored.</p>';
29
30 } else { // Print the already-stored data:
31 echo '<p>Session Data Exists:<pre>' . print_r($_SESSION, 1) . '</pre></p>';
32 }
33
34 // Log the user out, if applicable:
35 if (isset($_GET['logout'])) {
36
37 session_destroy();
38 echo '<p>Session destroyed.</p>';
39
40 } else { // Otherwise, print the "Log Out" link:
41 echo '<a href="sessions.php?logout=true">Log Out</a>';
42 }
43
44 // Reprint the session data:
45 echo '<p>Session Data:<pre>' . print_r($_SESSION, 1) . '</pre></p>';
46
47 // Complete the page:
48 echo '</body>
49 </html>';
50
51 // Write and close the session:
52 session_write_close();
53 ?>
2. Include the db_sessions.inc.php file:
require('db_sessions.inc.php');
?>
The session_start() function, which is in db_sessions.inc.php, must be called before anything is sent to the Web browser, so this file must be included prior to any HTML.
3. Create the initial HTML:
<!doctype html>
<html lang="en">
<head>
<meta charset="utf-8">
<title>DB Session Test</title>
<link rel="stylesheet"
href="style.css">
</head>
<body>
The style sheet can be downloaded along with all of the other code from www.LarryUllman.com.
4. Store some dummy data in a session if it is currently empty:
<?php
if (empty($_SESSION)) {
$_SESSION['blah'] = 'umlaut';
$_SESSION['this'] = 3615684.45;
$_SESSION['that'] = 'blue';
echo '<p>Session data stored.</p>';
Storing data in a database-managed session is no different than the regular method. This conditional is being used to replicate sessions on multiple pages. The first time the page is loaded, new data will be stored in the session.
5. Otherwise, print the currently stored data:
} else {
echo '<p>Session Data Exists: <pre>' . print_r($_SESSION, 1) . '</pre></p>';
}
The second time the page is loaded, the existing data will be available. As a quick way to print the session data, the print_r() function will be used.
6. Create the logout functionality:
if (isset($_GET['logout'])) {
session_destroy();
echo '<p>Session destroyed.</p>';
} else {
echo '<a href="sessions.php? logout=true">Log Out</a>';
}
Again, this conditional is used to fake a multipage site. When the page is accessed, a “Log Out” link is displayed. If the user clicks that link, ?logout=true is passed in the URL, telling this page to destroy the session.
7. Print the session data:
echo '<p>Session Data:<pre>' . print_r($_SESSION, 1) . '</pre></p>';
This is mostly a repeat of the code in Step 5. Unlike that line, this one will apply the first time the page is loaded. It will also be used to reveal the effect of destroying the session.
8. Complete the HTML:
echo '</body>
</html>';
9. Call the session_write_close() function and complete the page:
session_write_close();
?>
It really doesn’t matter where in the script this function is called, as long as all the modifications to the session data are over. If you don’t use this function, you might see some ugly results  .
.
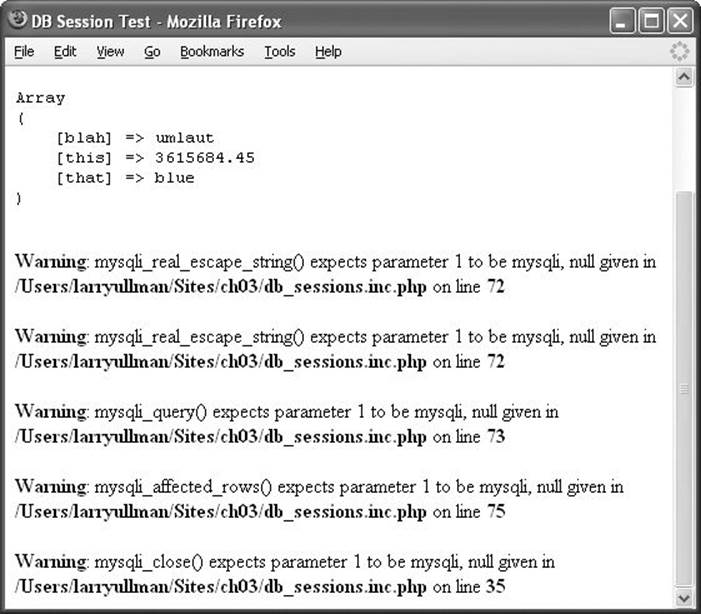
Because PHP is nice enough to close open database connections after a script runs, the write_session() and close_session() functions—called after that point—would be without a database connection.
10. Save the file as sessions.php, place it in your Web directory (in the same folder as db_sessions.inc.php), and test in your Web browser  ,
,  , and
, and  .
.
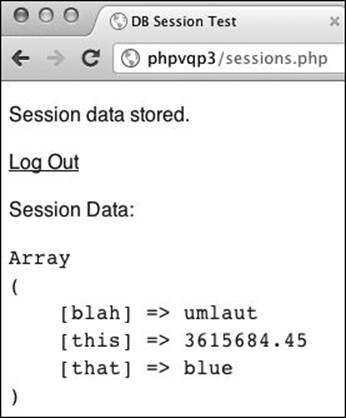
The result the first time the page is loaded.
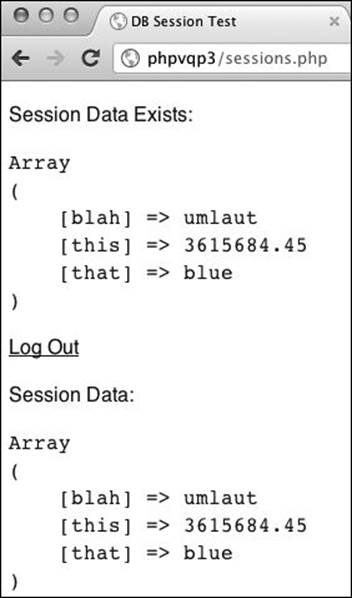
Reloading the page allows it to access the already-stored session data.
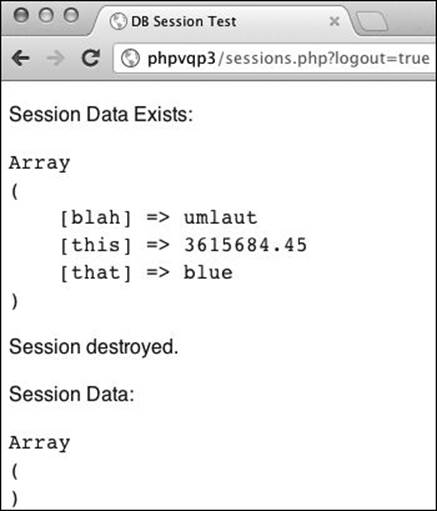
Clicking the “Log Out” link ends up destroying the session.
Tip
You should also call session_write_close() before redirecting the browser with a header() call. This only applies when you’re using your own session handlers.
Working with U.S. Zip Codes
A common need on many Web sites is to be able to perform distance calculations between addresses. Although you can always go the full MapQuest or Google Maps route, simple distance estimates can be managed using just zip codes (in the United States, that is).
For every zip code, there is an associated longitude and latitude (technically, zip codes represent multiple longitudes and latitudes, but one pair can be considered centrally located). Take two of these points on the earth, throw in some complicated math, and you have an approximate distance. In this section, I’ll discuss how to obtain the necessary zip code data, create a “store locator” table that will provide one of the two points, and then go over the formula used to calculate distances.
Creating the zip code table
This whole example is predicated on having a database with the latitude and longitude points for every zip code in the United States. You’ll find three types of sources for this information:
• Commercial zip code databases
• Free zip code databases
• Free zip code tabulation area (ZCTA) databases
The first option will provide you with the most accurate, up-to-date information, but you’ll have to pay for it (not a terrible amount, normally). The second option is free (free!) but harder to find and less likely to be current. You can search the Web for “free zip code database” to find free options.
The last option, ZCTA, is a database created by the U.S. Census Bureau for its own purposes. This database ignores around 10,000 zip codes that are used internally by the U.S. Post Office or by specific corporations. It also groups some zip codes together and uses characters to represent others. But for some uses, this information will do just fine. One source of a ZCTA database is http://zips.sourceforge.net, found by searching SourceForge.net for “zip code.”
Although having a zip code database will be necessary for subsequent examples in this chapter, what these next series of steps also convey is how to turn a comma-separated value (CSV) list of data into a usable database table.
To create the zip code database
1. Find your data source.
Which source (of the types and specific ones outlined) you use depends on your situation. How important is accuracy? How much are you willing to spend? As a secondary consideration, what resources exist as you’re reading this (search the Web and SourceForge)?
I’ll use the version from www.federalgovernmentzipcodes.us for my example. The only real criticism of this source is that the latitude and longitude are only precise to a bit more than a half mile, but the data is current, and free! For the following steps, I specifically downloaded the “primary location only” version.
2. Create the database :
CREATE DATABASE zips;
USE zips;
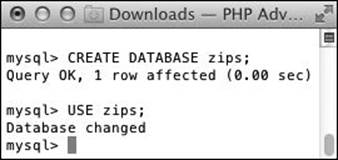
Creating a new database to be used in this example.
I’m creating a database called zips, in MySQL, using the mysql command-line client. You could do most of the following using phpMyAdmin, the MySQL Administrator, or another tool.
3. Create a table that matches the data in the data file :
CREATE TABLE zip_codes (
zip_code INT(5) UNSIGNED ZEROFILL NOT NULL,
zip_code_type VARCHAR(10),
city VARCHAR(60) NOT NULL,
state VARCHAR(14) NOT NULL,
location_type VARCHAR(10),
latitude DECIMAL(4,2),
longitude DECIMAL(5,2),
location VARCHAR(30),
decommisioned VARCHAR(30),
taxreturnsfiled INT,
population INT,
wages INT,
PRIMARY KEY (zip_code)
);
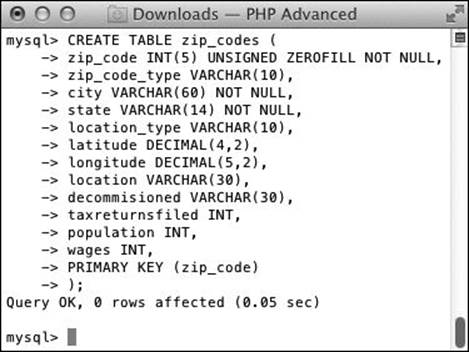
 The main table, whose structure is based on the data to be inserted
  .
.
Some sources may already provide the necessary SQL commands to create the table and even insert the data, in which case you could skip Steps 3 and 4. If not, you should create a table whose structure matches the data to be inserted  .
.
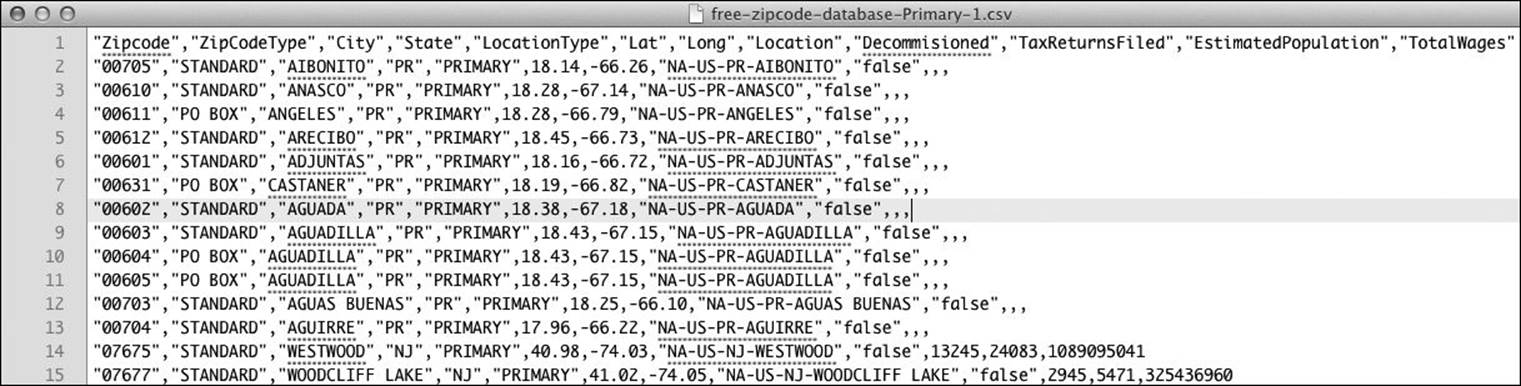
Part of the data file I’m working with.
The zip code column, which is the primary key, should be an unsigned, zero-filled integer five digits in length. The latitude and longitude columns should be some type of fixed-point number.
My data set contains several other columns, most of which I won’t actually need after the data has been imported but must be initially created in order for the import to work.
(As an aside, the word decommissioned is misspelled that way in the data file, hence the matching misspelling in the SQL command.)
4. Import the data  :
:
LOAD DATA INFILE '/tmp/zips.csv'
INTO TABLE zip_codes
FIELDS TERMINATED BY ','
ENCLOSED BY '"'
LINES TERMINATED BY '\n';
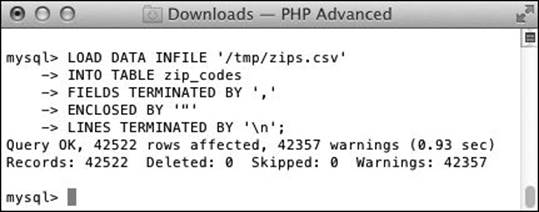
Importing the data into the table.
It may take you a while to get this step working properly (you may also have more luck using phpMyAdmin for this). The LOAD DATA INFILE query takes the contents of a text file and inserts them into the given table. For this step to work, the number of columns in the table must match the number of values on each row in the text file. You might also need to change the FIELDS TERMINATED BY, ENCLOSED BY, and LINES TERMINATED BY values to match the text file you have. See the MySQL manual for more information on this syntax.
The name of the text file should match the absolute path to the file on your computer.
Using the downloaded data that includes a header line , I also had to remove that line from the CSV file prior to this point.
5. Drop any columns you will not need:
ALTER TABLE zip_codes DROP COLUMN location_type, DROP COLUMN location, DROP COLUMN decommisioned, DROP COLUMN taxreturnsfiled, DROP COLUMN population, DROP COLUMN wages;
Some data sources may contain information you don’t need, which you can then get rid of by running an ALTER query.
6. Add indexes and update the data, if necessary  .
.
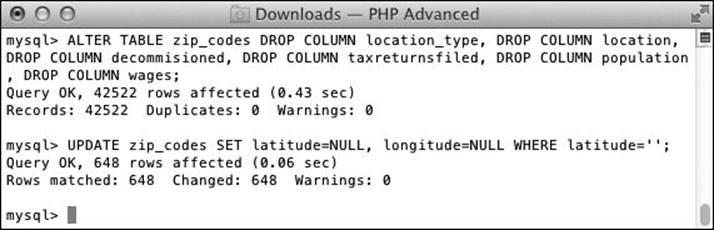
Cleaning up the table to make the data more usable.
In terms of updating the data, you could, for example, turn empty latitude and longitude values into formal NULL values. That query is
UPDATE zip_codes SET latitude=NULL, longitude=NULL WHERE latitude='';
7. Check the information for your (or any) zip code  :
:
SELECT * FROM zip_codes
WHERE zip_code=63501;
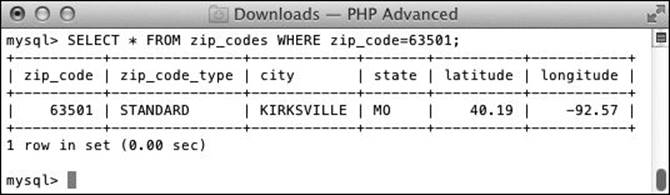
The information for a single zip code.
Tip
Run the command SHOW WARNINGS within the mysql client to see reported warnings  .
.
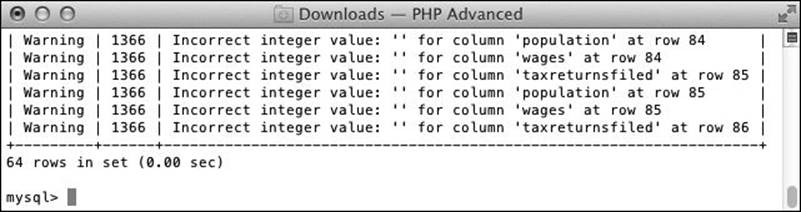
Some of the warnings from the recent query (the data import).
Creating the stores table
After creating the zip code table, it’s time to create the other required table. For this example, I’ll want to be able to calculate the distance between a given zip code (like a user’s home address) and a list of stores. Therefore, a stores table is necessary.
This table can contain whatever information you want. Likely, it would be something like Table 3.3.
Table 3.3. A Store’s Information
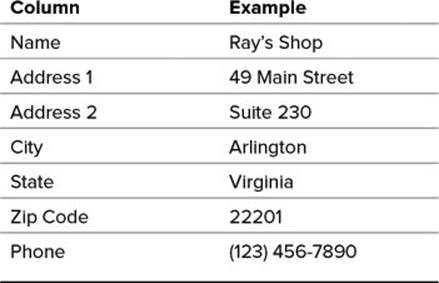
Since the city and state are tied to the zip code, and that information is already in the zip_codes table, those columns can be removed. I’ll also make the Address 2 column allow for a NULL option, as not all stores will use this field.
To create the stores table
1. Access the zips database using the mysql client or another interface.
2. Create the stores table  :
:
CREATE TABLE stores (
store_id SMALLINT(5) UNSIGNED NOT NULL AUTO_INCREMENT,
name VARCHAR(60) NOT NULL,
address1 VARCHAR(100) NOT NULL,
address2 VARCHAR(100) default NULL,
zip_code INT(5) UNSIGNED ZEROFILL NOT NULL,
phone VARCHAR(15) NOT NULL,
PRIMARY KEY (store_id),
KEY (zip_code)
);
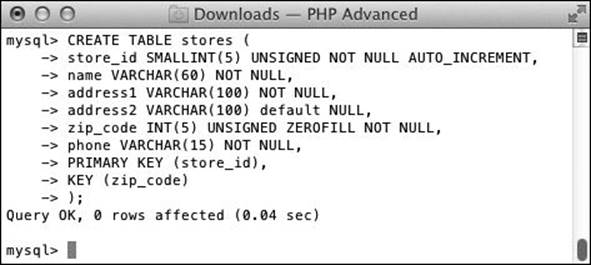
Creating the second, and final, table.
The table models the data suggested in Table 3.3, except for the omission of the city and state (which are present in the zip_codes table). The zip_code column here should be defined exactly like that in the zip_codes table because the two fields will be used in a join (see the sidebar “Optimizing Joins”).
3. Populate the stores table  :
:
INSERT INTO stores (name, address1, address2, zip_code, phone) VALUES
('Ray''s Shop', '49 Main Street', NULL, '63939', '(123) 456-7890'),
('Little Lulu''s', '12904 Rockville Pike', '#310', '10580', '(123) 654- 7890');
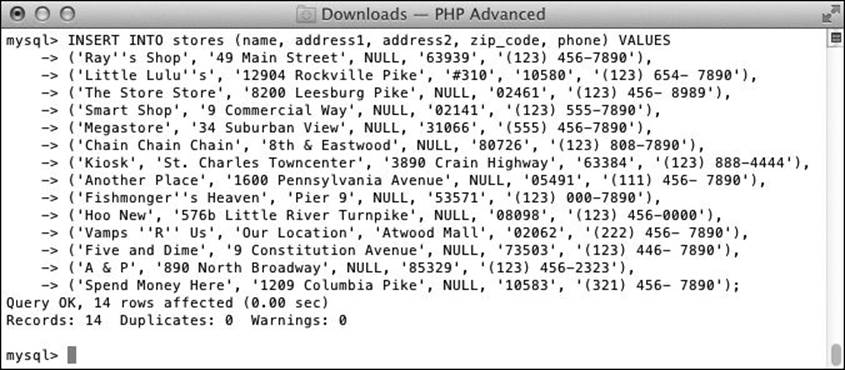
Putting some sample records into the stores table.
You can enter whatever records you’d like. Or you can download the full SQL command from the book’s corresponding Web site (www.LarryUllman.com).
4. Select the complete address for a couple of stores  :
:
SELECT stores.*, zip_codes.city, zip_codes.state FROM stores LEFT JOIN zip_codes USING (zip_code) LIMIT 2\G
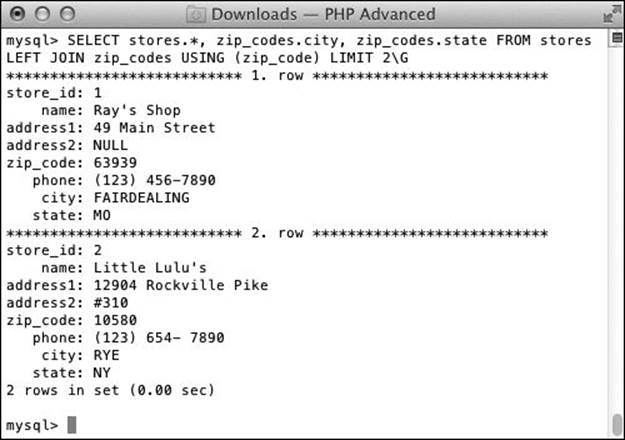
By performing a join on the two tables, you can fetch a store’s complete address.
To get a store’s complete address, including the city and state, a join must be made across the two tables, using the zip_code column, which is common to both. If you’re not familiar with it, using the \G closing character in the mysql client just returns the results in vertical groupings, not horizontal rows.
Performing distance calculations
Now that two tables exist and are populated with data, it’s time to perform the distance calculations. In PHP, the formula for doing so is
$distance = sin(deg2rad($a_latitude))
* sin(deg2rad($b_latitude))
+ cos(deg2rad($a_latitude))
* cos(deg2rad($b_latitude))
* cos(deg2rad($a_longitude - $b_longitude));
$distance = (rad2deg(acos($distance))) * 69.09;
I could explain that formula in detail, except I don’t really understand it (or, in truth, haven’t tried to). All I know is that this works, and sometimes that’s enough.
In MySQL, that same formula (requiring a couple of different functions) is
SELECT (DEGREES(ACOS(SIN(RADIANS(lat_a))
* SIN(RADIANS(lat_b))
+ COS(RADIANS(lat_a))
* COS(RADIANS(lat_b))
* COS(RADIANS(long_a - long_b))))) * 69.09
For example, taking the latitude and longitude for two random zip codes  , this calculation returns a value of approximately 1,626 miles
  .
.
SELECT (DEGREES(ACOS (SIN(RADIANS(31.84))
* SIN(RADIANS(34.31))
+ COS(RADIANS(31.84))
* COS(RADIANS(34.31))
* COS(RADIANS(-106.43 - -78.40))))) * 69.09 AS distance;
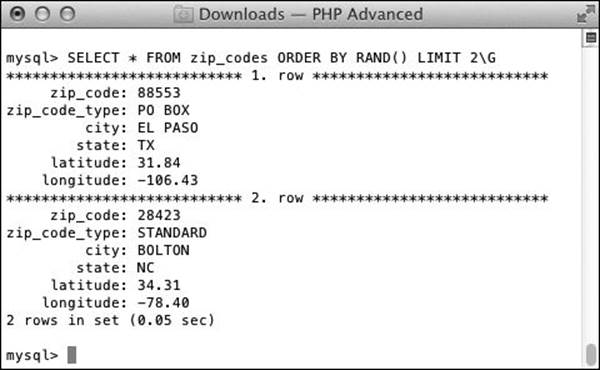
To check the distance between two points, I select the information for two random zip codes.
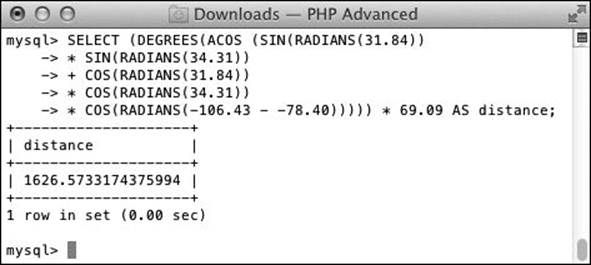
 The result of the distance calculation, using the latitudes and longitudes from
  .
.
Optimizing Joins
The MySQL database application does a lot of work to improve efficiency, often unbeknownst to the common user. This may involve changing the definition of a column or secretly altering how a query is run. But sometimes MySQL needs a little help.
Joins are expensive queries (in terms of database resources) because they require conditional matches to be made across two or more tables. In this example, a join will occur between the zip_codes and stores tables, using the zip_code column from both. To encourage MySQL to perform these joins faster, you should do two things.
First, an index should exist on both columns. Second, both columns should be defined in exactly the same way. If one column is a TINYINT and the other is an INT, MySQL will not use any indexes (which is bad).
To finally put all of this good knowledge into action, I’ll create a PHP script that returns the three closest stores to a given zip code.
To calculate distances in MySQl
1. Begin a new PHP script in your text editor or IDE, to be named distance.php, starting with the HTML (Script 3.3):
<!doctype html>
<html lang="en">
<head>
<meta charset="utf-8">
<title>Distance Calculator</title>
<link rel="stylesheet" href="style.css">
</head>
<body>
<?php # Script 3.3 - distance.php
Script 3.3. This PHP script will return the three closest stores, using a zip code calculation, to a given zip code.
1 <!doctype html>
2 <html lang="en">
3 <head>
4 <meta charset="utf-8">
5 <title>Distance Calculator</title>
6 <link rel="stylesheet" href="style.css">
7 </head>
8 <body>
9 <?php # Script 3.3 - distance.php
10
11 /* This page uses the zips database to
12 * calculate the distance between a given
13 * point and some stores.
14 * The three closest stores are returned.
15 */
16
17 $zip = 64154; //User's zip code.
18
19 // Print a caption:
20 echo "<h1>Nearest stores to $zip:</h1>";
21
22 // Connect to the database:
23 $dbc = mysqli_connect('localhost', 'username', 'password', 'zips');
24
25 // Get the origination latitude and longitude:
26 $q = "SELECT latitude, longitude FROM zip_codes WHERE zip_code='$zip' AND latitude IS NOT NULL";
27 $r = mysqli_query($dbc, $q);
28
29 // Retrieve the results:
30 if (mysqli_num_rows($r) == 1) {
31
32 list($lat, $long) = mysqli_fetch_array($r, MYSQLI_NUM);
33
34 // Big, main, complex, wordy query:
35 $q = "SELECT name, CONCAT_WS('<br>', address1, address2), city, state, stores.zip_code, phone, ROUND(DEGREES(ACOS(SIN(RADIANS($lat))
36 * SIN(RADIANS(latitude))
37 + COS(RADIANS($lat))
38 * COS(RADIANS(latitude))
39 * COS(RADIANS($long - longitude)))) * 69.09) AS distance FROM stores LEFT JOIN zip_codes USING (zip_code) ORDER BY distance ASC LIMIT 3";
40 $r = mysqli_query($dbc, $q);
41
42 if (mysqli_num_rows($r) > 0) {
43
44 // Display the stores:
45 while ($row = mysqli_fetch_array($r, MYSQLI_NUM)) {
46 echo "<h2>$row[0]</h2>
47 <p>$row[1]<br />" . ucfirst(strtolower($row[2])) . ", $row[3] $row[4]<br />
48 $row[5] <br />
49 (approximately $row[6] miles)</p>\n";
50
51 } // End of WHILE loop.
52
53 } else { // No stores returned.
54
55 echo '<p class="error">No stores matched the search.</p>';
56
57 }
58
59 } else { // Invalid zip code.
60
61 echo '<p class="error">An invalid zip code was entered.</p>';
62
63 }
64
65 // Close the connection:
66 mysqli_close($dbc);
67
68 ?>
69 </body>
70 </html>
2. Identify the point of origin:
$zip = 64154;
echo "<h1>Nearest stores to $zip:</h1>";
This value could also be taken from a form (after validating it, of course).
3. Connect to the database:
$dbc = mysqli_connect('localhost', 'username', 'password', 'zips');
4. Define and execute the first query:
$q = "SELECT latitude, longitude FROM zip_codes WHERE zip_code='$zip' AND latitude IS NOT NULL";
$r = mysqli_query($dbc, $q);
This first query—the script contains two—both validates the zip code (that it’s an actual U.S. zip code) and retrieves that zip code’s latitude and longitude. That information will be necessary for calculating distances between the given zip code and each store. Because the data I used lacks the latitude and longitude for some zip codes, I’ve added an AND latitude IS NOT NULL condition to the WHERE clause. This may not be necessary for all data sets.
5. Retrieve the results of the query:
if (mysqli_num_rows($r) == 1) {
list($lat, $long) = mysqli_fetch_array($r, MYSQLI_NUM);
If one row was returned, the zip code is valid and the returned data is assigned to these two variables.
6. Perform the main query:
$q = "SELECT name, CONCAT_WS ('<br>', address1, address2), city, state, stores.zip_code, phone, ROUND(DEGREES(ACOS(SIN (RADIANS($lat))
* SIN(RADIANS(latitude))
+ COS(RADIANS($lat))
* COS(RADIANS(latitude))
* COS(RADIANS($long - longitude)))) * 69.09) AS distance FROM stores LEFT JOIN zip_codes USING (zip_code) ORDER BY distance ASC LIMIT 3";
$r = mysqli_query($dbc, $q);
Getting to this main query is really the point of the whole script. This query returns a store’s name, full address, phone number, and distance from the given zip code  . The two addresses lines are concatenated using CONCAT_WS(), which will place a <br> between the lines if address2has a value, but return just address1 otherwise. The store’s city and state values come from the zip_codes table, and the zip_code could come from either. The phone number is also returned.
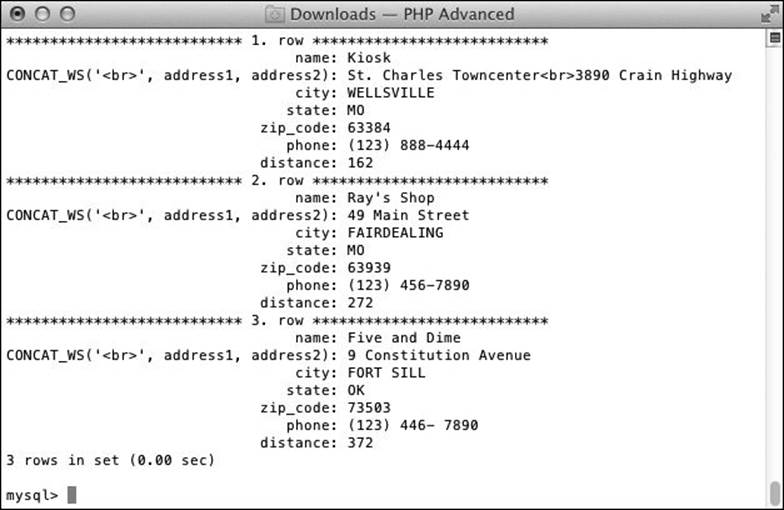
The result of the main, rather unwieldy, query.
The big, complex calculation is also selected. For the “A” latitude and longitude, the values for the original zip code are used (already retrieved by the earlier query). For the “B” latitude and longitude, values from this query will be used. Only three stores are going to be returned, and they are ordered by the distance value, from smallest to largest. Whew!
7. Print the results:
if (mysqli_num_rows($r) > 0) {
while ($row = mysqli_fetch_array($r, MYSQLI_NUM)) {
echo "<h2>$row[0]</h2>
<p>$row[1]<br />" . ucfirst (strtolower($row[2])) . ", $row[3] $row[4]<br />
$row[5] <br />
(approximately $row[6] miles) </p>\n";
} // End of WHILE loop.
} else {
echo '<p class="error">No stores matched the search.</p>';
}
The results are going to be printed with just a modicum of formatting. If no store was returned for some reason (which shouldn’t happen), that message is displayed.
8. Complete the conditional begun in Step 5:
} else {
echo '<p class="error">An invalid zip code was entered.</p>';
}
This message applies if an invalid zip code is provided  .
.
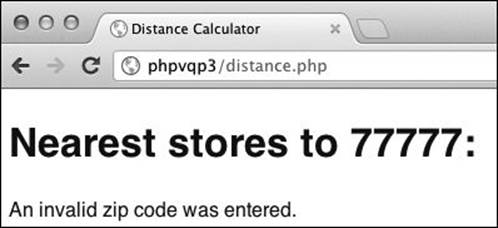
The result should an invalid zip code (like 77777 here) be used.
9. Complete the page:
mysqli_close($dbc);
?>
</body>
</html>
10. Save the file as distance.php, place it in your Web directory, and test in your Web browser  .
.
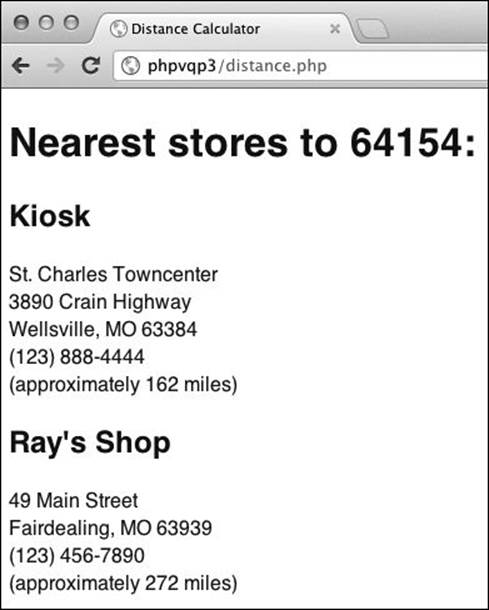
 The closest stores to the 64154 zip code.
11. Change the zip code and test again  . To use a zip code that begins with a 0, put it in quotes:
$zip = '01026';
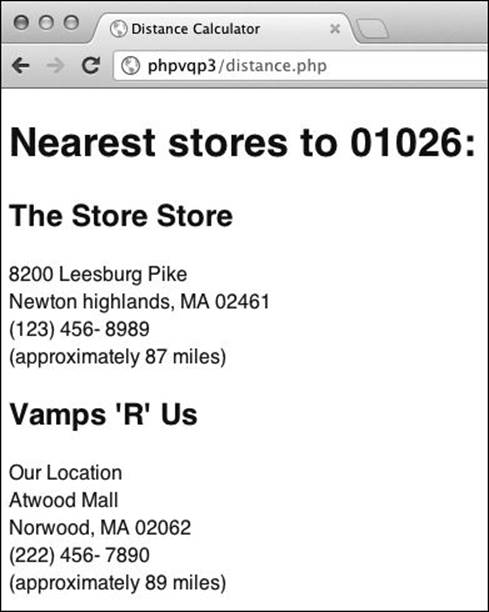
The closest stores to the 01026 zip code.
If you don’t, PHP will think you’re using another number format and translate it.
Tip
You could easily limit the stores returned to a certain area by adding WHERE distance<=X to the main query.
Creating Stored Functions
Stored functions are half of a larger concept called stored routines (the other half are stored procedures). Present in many database applications but new to MySQL as of version 5, stored routines allow you to save a set sequence of code in the MySQL server, and then call that sequence as needed. Think of it like being able to write your own PHP functions but in SQL.
The topic of stored routines can be expansive, but I want to give you a little taste here. For more information, see the MySQL manual or my MySQL: Visual QuickStart Guide (Peachpit Press, 2006), where I dedicate many more pages to the subject.
Declaring Local Variables
Stored routines are like small programs, and they can even have their own variables. To do so, use the DECLARE statement:
DECLARE var_name var_type
The naming rules are pretty much the same as for everything else, but you absolutely want to make sure that your variables have unique identifiers. The types correspond to the MySQL data types:
DECLARE var1 INT
DECLARE var2 DECIMAL(5,2)
DECLARE var3 VARCHAR(20)
The only restrictions to declaring variables are as follows:
• The declarations must take place within a BEGIN...END code block.
• The declarations must take place before any other statements (i.e., declarations must be immediately after the BEGIN).
Once you’ve declared a variable, you can assign it a value using SET:
SET name = value
Note as well that unlike variables in PHP, these stored routine variables do not begin with a dollar sign.
The basic syntax for creating stored functions is
CREATE FUNCTION name (arguments) RETURNS type code
For the routine’s name, you should not use an existing keyword, SQL term, or function name. As with most things you name in MySQL, you should stick to alphanumeric characters and the underscore.
The arguments section is used to pass values to the routine. The listed arguments are named and given types that correspond to the available data types in MySQL:
CREATE FUNCTION myfunc (myvar1 INT, myvar2 CHAR) RETURNS type code
The code section of this syntax is the most important. Because your routines will normally contain multiple lines, you’ll want to create a block by using BEGIN and END:
CREATE FUNCTION name (arguments) RETURNS type
BEGIN
statement1;
statement2;
END
Within the code block, each statement ends with a semicolon. This can cause a problem: when you go to add this stored function using the mysql client or phpMyAdmin, the interface will think that the semicolon indicates the end of a command to be executed immediately  . To prevent this, you can change the delimiter, which is the character used to mark the end of a query (the semicolon by default):
DELIMITER $$
You have to be careful when attempting to create stored routines within the mysql client.
You can change the delimiter to anything, as long as it’s not going to appear in the subsequent commands. I normally use two dollar signs together.
Once you’re done defining the function, you can change the delimiter back to the semicolon you’re used to:
DELIMITER ;
Stored function definitions must contain a RETURNS clause, indicating the type of value returned by the function. Functions return scalar (single) values, like a number or a string. To do so, use
RETURN data
within the function’s code body. The type of the data returned must match the type indicated in the function’s initial definition line. You cannot return a list of values from a stored function, but because stored functions return scalar values, they can be used in queries like any of the existing MySQL functions.
All of this information, along with the blip in the accompanying sidebar “Declaring Local Variables,” is the 5-minute guide to stored functions. In the next sequence of steps, I’ll show you how to turn the complicated distance calculation formula (see Script 3.3) into a callable stored function.
To create a stored function
1. Access your MySQL database using the mysql client.
You can also use phpMyAdmin or any other interface you prefer.
2. Select the database where you want to define the function:
USE zips;
3. Change the delimiter:
DELIMITER $$
Again, this is necessary so that the semicolons within the function definition don’t trigger immediate execution of the code written to that point.
4. Start defining the function:
CREATE FUNCTION return_distance (lat_a DOUBLE, long_a DOUBLE, lat_b DOUBLE, long_b DOUBLE) RETURNS DOUBLE
This code will wrap the complicated calculation within a stored function. The function is called return_distance. The function takes four arguments, all of type DOUBLE. It will return a DOUBLE value as well.
5. Create a local variable to store the calculated distance:
BEGIN
DECLARE distance DOUBLE;
The first step in the function is to create a variable of type DOUBLE. Doing so will simplify the calculation to a degree (pardon the pun).
6. Assign an initial value to the distance variable:
SET distance = SIN(RADIANS(lat_a)) * SIN(RADIANS(lat_b))
+ COS(RADIANS(lat_a))
* COS(RADIANS(lat_b))
* COS(RADIANS(long_a - long_b));
The variable is assigned the value of most of the calculation.
7. Return the final calculation:
RETURN((DEGREES(ACOS(distance))) * 69.09);
The variable is then run through a couple more functions and some arithmetic, and then returned.
8. Complete the function definition :
END $$
DELIMITER ;
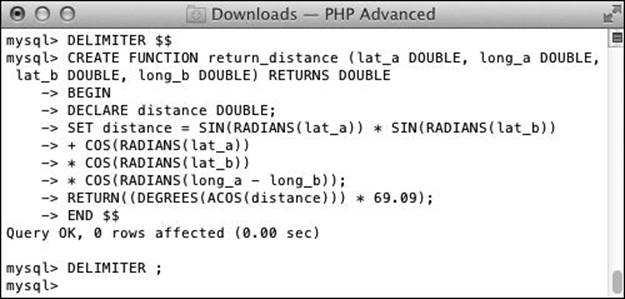
The stored function has been created in the database.
9. Test the function by running the following query in the mysql client or phpMyAdmin :
SELECT return_distance(31.84, -106.43, 34.31, -78.40);
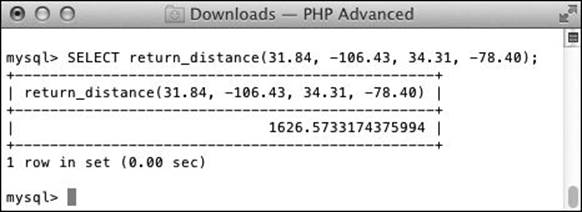
The stored function is used to simplify the SQL query.
This is the same test query run earlier in the chapter, except now it calls the stored function.
10. If you want, modify distance.php (Script 3.3) to call the stored procedure.
To do so, just change the main query to
SELECT name, CONCAT_WS('<br>', address1, address2), city, state, stores.zip_code, phone, ROUND(return_distance($lat, $long, latitude, longitude)) AS distance FROM stores LEFT JOIN zip_codes USING (zip_code) ORDER BY distance ASC LIMIT 3
Tip
All stored routines are associated with a specific database. This also means that you cannot have a stored routine select a database.
Tip
Because stored routines are linked with databases, if you drop the database, you’ll also drop any associated stored routine.
Displaying Results Horizontally
Another of the common questions I see involves displaying query results horizontally. It’s quite easy to fetch a query’s results and display them vertically , but creating a horizontal output does stymie some programmers. To achieve a horizontal layout, you have to create an HTML table. The trick, truly, is knowing when to create new rows in that table.
A traditional vertical display of some records.
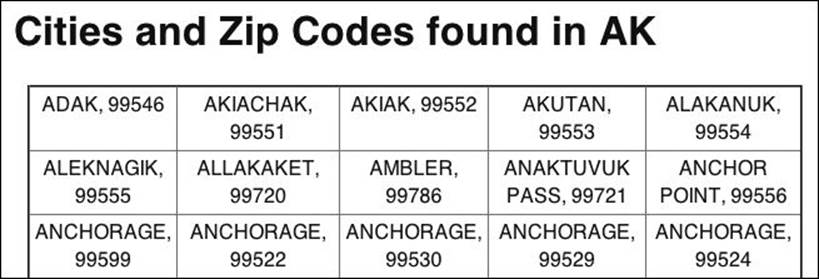
The same data as in  , laid out in table form.
To achieve this effect using PHP, you need a counter that tracks how many records have been placed on a row (i.e., how many columns have been created). When zero records have been placed, the new row should be started. When the maximum number of records has been placed, the old row should be concluded. That’s the premise, which I’ll develop in this next script. For the data, I’ll use the zip_codes table in the zips database (but you could use anything).
To display results horizontally
1. Begin a new PHP script in your text editor or IDE, to be named display.php, starting with the HTML (Script 3.4):
<!doctype html>
<html lang="en">
<head>
<meta charset="utf-8">
<title>Cities and Zip Codes</title>
<link rel="stylesheet" href="style.css">
</head>
<body>
<?php # Script 3.4 - display.php
Script 3.4. All of the cities and zip codes for a given state are retrieved by this PHP script. Instead of appearing as a vertical list, they’ll be displayed in a table with five cells per row.
1 <!doctype html>
2 <html lang="en">
3 <head>
4 <meta charset="utf-8">
5 <title>Cities and Zip Codes</title>
6 <link rel="stylesheet" href="style.css">
7 </head>
8 <body>
9 <?php # Script 3.4 - display.php
10
11 /* This page retrieves and displays all of the
12 * cities and zip codes for a particular state.
13 * The results will be shown in a table.
14 */
15
16 // Abbreviation of state to show:
17 $state = 'AK';
18
19 // Items to display per row:
20 $items = 5;
21
22 // Print a caption:
23 echo "<h1>Cities and Zip Codes found in $state</h1>";
24
25 // Connect to the database:
26 $dbc = mysqli_connect ('localhost', 'username', 'password', 'zips');
27
28 // Get the cities and zip codes, ordered by city:
29 $q = "SELECT city, zip_code FROM zip_codes WHERE state='$state' ORDER BY city";
30 $r = mysqli_query($dbc, $q);
31
32 // Retrieve the results:
33 if (mysqli_num_rows($r) > 0) {
34
35 // Start a table:
36 echo '<table border="2" width="90%" cellspacing="3" cellpadding="3" class="center">';
37
38 // Need a counter:
39 $i = 0;
40
41 // Retrieve each record:
42 while (list($city, $zip_code) = mysqli_fetch_array($r, MYSQLI_NUM)) {
43
44 // Do we need to start a new row?
45 if ($i == 0) {
46 echo '<tr>';
47 }
48
49 // Print the record:
50 echo "<td align=\"center\">$city, $zip_code</td>";
51
52 // Increment the counter:
53 $i++;
54
55 // Do we need to end the row?
56 if ($i == $items) {
57 echo '</tr>';
58 $i = 0; // Reset counter.
59 }
60
61 } // End of while loop.
62
63 if ($i > 0) { // Last row was incomplete.
64
65 // Print the necessary number of cells:
66 for (;$i < $items; $i++) {
67 echo "<td> </td>\n";
68 }
69
70 // Complete the row.
71 echo '</tr>';
72
73 } // End of ($i > 0) IF.
74
75 // Close the table:
76 echo '</table>';
77
78 } else { // Bad state abbreviation.
79
80 echo '<p class="error">An invalid state abbreviation was used.</p>';
81
82 } // End of main IF.
83
84 // Close the database connection:
85 mysqli_close($dbc);
86
87 ?>
88 </body>
89 </html>
2. Establish the necessary variables and print a caption:
$state = 'AK';
$items = 5;
echo "<h1>Cities and Zip Codes found in $state</h1>";
The number of items to show per row is an important variable here. Just changing this one value will allow the script to output the results in fewer or more columns.
3. Connect to and query the database:
$dbc = mysqli_connect ('localhost', 'username', 'password', 'zips');
$q = "SELECT city, zip_code FROM zip_codes WHERE state='$state' ORDER BY city";
$r = mysqli_query($dbc, $q);
if (mysqli_num_rows($r) > 0) {
The query will return every city and zip code in the state in alphabetical order by city.
4. Begin a table and initialize a counter:
echo '<table border="2" width="90%" cellspacing="3" cellpadding="3" class="center">';
$i = 0;
The $i counter will track how many items have already been placed on a row.
5. Retrieve each record:
while (list($city, $zip_code) = mysqli_fetch_array($r, MYSQLI_NUM)) {
6. Start a new row, if necessary:
if ($i == 0) {
echo '<tr>';
}
Every time, within this while loop, the first item on a row is to be placed, a new row should be created by printing the <tr>. This applies the first time the loop is entered (because $i is initially 0) and after $i is reset (upon completing a row).
7. Print the record and increment the counter:
echo "<td align=\"center\">$city, $zip_code</td>";
$i++;
8. Complete the row, if necessary:
if ($i == $items) {
echo '</tr>';
$i = 0;
}
Once the counter equals the number of items to be placed on a row, it’s time to end that row by printing </tr>. Then the counter needs to be reset so that the next time the loop is entered, a new row will be started.
9. Complete the while loop:
} // End of while loop.
10. Complete the last row, if necessary:
if ($i > 0) {
for (;$i < $items; $i++) {
echo "<td> </td>\n";
}
echo '</tr>';
}
This is a step that’s easy to miss. Unless the number of items displayed is easily divisible by the number to be displayed per row (i.e., there’s no remainder of that division), the last row will be incomplete .
If $i has a value other than 0, some extra cells must be added (if it has a value of 0, then the last row was completed). A for loop can accomplish this task easily, starting with the current value of $i and stopping when $i equals $items. A little-known trick with the for loop is that each of the three parts is optional. Since no initial expression must be evaluated (like setting $i to some value), the loop begins with (;.

The last row had only four items in it, so one blank table cell had to be created.
11. Close the table and complete the conditional started in Step 3:
echo '</table>';
} else {
echo '<p class="error">An invalid state abbreviation was used.</p>';
} // End of main IF.
12. Complete the page:
mysqli_close($dbc);
?>
</body>
</html>
13. Save the file as display.php, place it in your Web directory, and test in your Web browser.
14. Change the value of $items, change the value of $state, and retest in your Web browser .
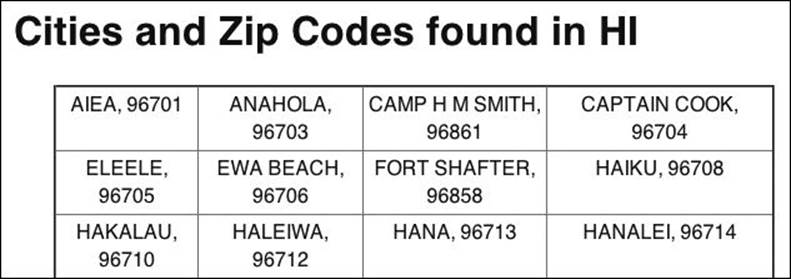
With two quick changes, the script now displays all the cities for another state (here, Hawaii), four per row.
Review and Pursue
If you have any problems with these sections, either in answering the questions or pursuing your own endeavors, turn to the book’s supporting forum (www.LarryUllman.com/forums/).
Review
• What are the benefits to storing session data in a database instead of the file system? (See page 82.)
• What PHP function is invoked to change how sessions are handled? (See page 84.)
• What do you have to do differently in your other session-related PHP scripts when storing session data in the database? (See pages 91 and 94.)
• How do you import CSV data into a database table? (See page 98.)
• What are stored functions? How do you create them? (See page 108.)
• How do you change the delimiter used by the mysql client? Why is that sometimes necessary? (See page 109.)
Pursue
• Update db_sessions.inc.php so that the functions return an appropriate Boolean indicating the success of each operation.
• Try using database-stored sessions on one of your own projects.
• If you have a familiarity with OOP already, check out the SessionHandler class in the PHP manual.
• If you need the most accurate, up-to-date zip code information, look into purchasing a commercial data set.
• Learn more about using the LOAD DATA INFILE SQL command.
• Create a form that submits a user-provided zip code to the distance.php script (instead of using a hard-coded value).
• Expand the distance.php script (after you’ve created a corresponding form) to let the user select a maximum range to search, too.
• Learn more about stored functions and procedures in MySQL.
All materials on the site are licensed Creative Commons Attribution-Sharealike 3.0 Unported CC BY-SA 3.0 & GNU Free Documentation License (GFDL)
If you are the copyright holder of any material contained on our site and intend to remove it, please contact our site administrator for approval.
© 2016-2026 All site design rights belong to S.Y.A.
In This Chapter
Storing Sessions in a Database
Working with U.S. Zip Codes
Creating Stored Functions
Displaying Results Horizontally
Review and Pursue
In this book, I wanted to do a couple of things. First, I wanted to demonstrate and explain some advanced concepts and approaches. Second, I wanted to present solutions to common problems. This chapter addresses both of those goals equally.
For the first example, you’ll see how to use a database to store session data. Doing so offers many advantages, with improved security at the forefront. Next, you’ll find a thorough discussion on working with U.S. zip codes, including how to calculate the distances between two. The third example introduces stored functions, a useful database concept. The chapter ends by answering a common question: how do you lay out query results horizontally as opposed to the standard vertical layout?
Storing Sessions in a Database
By default, PHP stores all session data in text files in the server. Normally, these files are stored in a temporary folder (like /tmp on Unix and Mac OS X) with filenames matching the session IDs (e.g., ei26b4i2nup742ucho9glmbh84). However, PHP provides a mechanism for you to manage sessions in other ways, such as storing the session data in a database.
The main reason I recommend making this change is improved security. On shared hosting servers, without extra steps being taken every Web site uses the same temporary directory for its sessions. This means that dozens upon dozens of applications are all reading and writing in the same place. Knowing this, you’d find it easy to create a script that reads all the data from all the files in the sessions folder, thereby accessing the stored user data from other sites.
A second benefit to moving session data to a database is that it allows you to easily retrieve more information about your Web site’s sessions in general. Queries could be run indicating the number of active sessions and session data can even be backed up.
A third reason to store session data in a database is if you have a site running on multiple servers. When this is the case, the same user may be fed pages from different servers over the course of the same session. The session data stored in a file on one server would be unavailable to the pages on other servers. This isn’t a situation that the majority of developers face, but if you do, there’s really no other option but to go the database route.
With an understanding of why you might want to store session data in a database, let’s go through the steps you’d need to take to implement that approach.
Tip
Another fix for the security concern on a shared host is to change the session directory for your site. To do so, call the session_save_path() function prior to every session_start() call. You’ll also need to make sure that the new directory exists, of course, and that it has the proper permissions.
Creating the session table
To store session data in a database, you must first create a special database table for that express purpose. This table can be part of an already existing database (like the rest of your application) or in its own database. At a bare minimum, the table needs three columns (Table 3.1).
Table 3.1. Session Table Columns
The session table can have more than those three columns, but it must have those three. Keep in mind, though, that many things you might be inclined to represent in another column—a user’s ID, for example—would likely be stored in the session data column.
To create the sessions table
1. Access your MySQL database using the mysql client.
You can also use phpMyAdmin or whatever other interface you prefer.
2. Select the test database ![]() .
.
USE test;
Since this is just an example, I’ll create the table within the test database.
![]() I’ll put the sessions table within the test database for this example.
I’ll put the sessions table within the test database for this example.
3. Create the sessions table ![]() :
:
CREATE TABLE sessions (
id CHAR(32) NOT NULL,
data TEXT,
last_accessed TIMESTAMP NOT NULL,
PRIMARY KEY (id)
);
![]() This one table will handle all the session data.
This one table will handle all the session data.
The table contains the basic three fields. The id is the primary key. It will always contain a string 32 characters long and can never be NULL. The data column is a TEXT type and it can be NULL (when the session is first started, there is no data). The last_accessed column is a TIMESTAMP. It will therefore always be updated when the session is created (on INSERT) or modified (on UPDATE).
4. Confirm the sessions table structure ![]() : DESCRIBE sessions;
: DESCRIBE sessions;
![]() Confirming the table’s structure.
Confirming the table’s structure.
Tip
If your application stores a lot of data in sessions, you’d want to change the size of the session data column to MEDIUMTEXT or LONGTEXT.
Defining the session functions
After creating the database table, storing session data in a database is a two-part process (from a PHP perspective):
1. Define the functions for interacting with the database.
2. Tell PHP to use these functions.
For this second step, the session_set_save_handler() function is used. This function should be called with six arguments, each a function name (Table 3.2).
Table 3.2. session_set_save_handler() Arguments
I’ll briefly discuss what each function should receive (as arguments) and do while creating them in the next script. I’ll say up front that all of the functions must return a Boolean value, except for the “read” function. That function must always return a string, even if that means an empty string.
Before getting into the script, it helps to understand when the different functions will be called ![]() . Every time a session is started, the “open” and “read” functions are called automatically and immediately. When the “read” function is called, garbage collection may take place (depending on various factors).
. Every time a session is started, the “open” and “read” functions are called automatically and immediately. When the “read” function is called, garbage collection may take place (depending on various factors).
![]() The logical flow of using sessions and the various session-handling functions.
The logical flow of using sessions and the various session-handling functions.
When a script terminates, the write function is called, and then the “close” function is called. If the session is destroyed, then the “write” function won’t be invoked, but the “destroy” function will be, followed by the “close” function.
To create new session handlers
1. Begin a new PHP script in your text editor or IDE, to be named db_sessions.inc.php (Script 3.1):
<?php # Script 3.1 - db_sessions.inc.php
$sdbc = NULL;
The $sdbc variable will store the database connection. I initialize it here and then make it global in each function. Note that I’m specifically giving this variable a different name than a standard database connection variable (e.g., $dbc), so as to minimize bugs. Normally, you’d want to use only a single database connection, in which case you’d change some of this code accordingly.
Script 3.1. This script defines all the functionality required to store session data in a database. It can be included by any page that wants that feature.
1 <?php # Script 3.1 - db_sessions.inc.php
2
3 /*
4 * This page creates the functional interface for
5 * storing session data in a database.
6 * This page also starts the session.
7 */
8
9 // Global variable used for the database
10 // connections in all session functions:
11 $sdbc = NULL;
12
13 // Define the open_session() function:
14 // This function takes no arguments.
15 // This function should open the database connection.
16 // This function should return true.
17 function open_session() {
18 global $sdbc;
19
20 // Connect to the database:
21 $sdbc = mysqli_connect ('localhost', 'username', 'password', 'test');
22
23 return true;
24 } // End of open_session() function.
25
26 // Define the close_session() function:
27 // This function takes no arguments.
28 // This function closes the database connection.
29 // This function returns the closed status.
30 function close_session() {
31 global $sdbc;
32
33 return mysqli_close($sdbc);
34 } // End of close_session() function.
35
36 // Define the read_session() function:
37 // This function takes one argument: the session ID.
38 // This function retrieves the session data.
39 // This function returns the session data as a string.
40 function read_session($sid) {
41 global $sdbc;
42
43 // Query the database:
44 $q = sprintf('SELECT data FROM sessions WHERE id="%s"', mysqli_real_escape_string($sdbc, $sid));
45 $r = mysqli_query($sdbc, $q);
46
47 // Retrieve the results:
48 if (mysqli_num_rows($r) == 1) {
49 list($data) = mysqli_fetch_array($r, MYSQLI_NUM);
50
51 // Return the data:
52 return $data;
53
54 } else { // Return an empty string.
55 return '';
56 }
57 } // End of read_session() function.
58
59 // Define the write_session() function:
60 // This function takes two arguments:
61 // the session ID and the session data.
62 function write_session($sid, $data) {
63 global $sdbc;
64
65 // Store in the database:
66 $q = sprintf('REPLACE INTO sessions (id, data) VALUES ("%s", "%s")', mysqli_real_escape_string($sdbc, $sid), mysqli_real_escape_string($sdbc, $data));
67 $r = mysqli_query($sdbc, $q);
68
69 return true;
70 } // End of write_session() function.
71
72 // Define the destroy_session() function:
73 // This function takes one argument: the session ID.
74 function destroy_session($sid) {
75 global $sdbc;
76
77 // Delete from the database:
78 $q = sprintf('DELETE FROM sessions WHERE id="%s"', mysqli_real_escape_string($sdbc, $sid));
79 $r = mysqli_query($sdbc, $q);
80
81 // Clear the $_SESSION array:
82 $_SESSION = array();
83
84 return true;
85 } // End of destroy_session() function.
86
87 // Define the clean_session() function:
88 // This function takes one argument: a value in seconds.
89 function clean_session($expire) {
90 global $sdbc;
91
92 // Delete old sessions:
93 $q = sprintf('DELETE FROM sessions WHERE DATE_ADD(last_accessed, INTERVAL %d SECOND) < NOW()', (int) $expire);
94 $r = mysqli_query($sdbc, $q);
95
96 return true;
97 } // End of clean_session() function.
98
99 # **************************** #
100 # ***** END OF FUNCTIONS ***** #
101 # **************************** #
102
103 // Declare the functions to use:
104 session_set_save_handler('open_session', 'close_session', 'read_session', 'write_session', 'destroy_session', 'clean_session');
105
106 // Make whatever other changes to the session settings, if you want.
107
108 // Start the session:
109 session_start();
2. Define the function for opening a session:
function open_session() {
global $sdbc;
$sdbc = mysqli_connect ('localhost', 'username', 'password', 'test');
return true;
}
This function takes no arguments (which is to say that when PHP does something to open a session, it will call this function without sending any values to it). The intent of this function is merely to establish a database connection.
In a real application, without the constraints of a book’s limited pages, I would update the function so that it would return a Boolean indicating the success of the given operation instead of always returning true.
3. Define the function for closing a session:
function close_session() {
global $sdbc;
return mysqli_close($sdbc);
}
This function also takes no arguments. It will close the database connection, returning the success of that operation.
4. Define the function for reading the session data:
function read_session($sid) {
global $sdbc;
$q = sprintf('SELECT data FROM sessions WHERE id="%s"', mysqli_real_escape_string ($sdbc, $sid));
$r = mysqli_query($sdbc, $q);
if (mysqli_num_rows($r) == 1) {
list($data) = mysqli_fetch_array($r, MYSQLI_NUM);
return $data;
} else {
return '';
}
}
This function will receive one argument: the session ID (e.g., ei26b4i2nup742ucho9glmbh84). The function needs to retrieve the data for that session ID from the database and return it. If the function can’t do that, it should return an empty string instead. Although the session ID should be safe to use in a URL, you shouldn’t make assumptions when it comes to security, so the mysqli_real_escape_string() function is used to make it safe (alternatively, you could use prepared statements).
If you’re not familiar with the sprintf() function, which I use to compile the query, see Chapter 1, “Advanced PHP Techniques.”
5. Define the function for writing data to the database:
function write_session($sid, $data) {
global $sdbc;
$q = sprintf('REPLACE INTO sessions (id, data) VALUES ("%s", "%s")', mysqli_real_escape_string($sdbc, $sid), mysqli_real_escape_string ($sdbc, $data));
$r = mysqli_query($sdbc, $q);
return true;
}
This function receives two arguments: the session ID and the session data. The session data is a serialized version of the $_SESSION array ![]() . For the query, an INSERT must be run the first time the session record is created in the database and an UPDATE query every time thereafter. The lesser-known REPLACE query will achieve the same result. If a record exists whose primary key is the same as that given a value in this query (i.e., the session ID), an update will occur. Otherwise, a new record will be made.
. For the query, an INSERT must be run the first time the session record is created in the database and an UPDATE query every time thereafter. The lesser-known REPLACE query will achieve the same result. If a record exists whose primary key is the same as that given a value in this query (i.e., the session ID), an update will occur. Otherwise, a new record will be made.
![]() Session data is stored in the database (or in a file) as a serialized array. This serialized value says that indexed at blah is a string six characters long with a value of umlaut. Indexed at this is a decimal with a value of 3615684.4500 (and so on). Indexed at that is a string four characters long with a value of blue.
Session data is stored in the database (or in a file) as a serialized array. This serialized value says that indexed at blah is a string six characters long with a value of umlaut. Indexed at this is a decimal with a value of 3615684.4500 (and so on). Indexed at that is a string four characters long with a value of blue.
6. Create the function for destroying the session data:
function destroy_session($sid) {
global $sdbc;
$q = sprintf('DELETE FROM sessions WHERE id="%s"', mysqli_real_escape_string ($sdbc, $sid));
$r = mysqli_query($sdbc, $q);
$_SESSION = array();
return true;
}
This function, which will be called when the PHP session_destroy() function is invoked, receives one argument, the session ID. This function then runs a DELETE query in the database and clears the $_SESSION array.
As an example of changing the returned value, you could have this function return the number of affected rows: 1 would effectively be true and 0 would be false.
7. Define the garbage collection function:
function clean_session($expire) {
global $sdbc;
$q = sprintf('DELETE FROM sessions WHERE DATE_ADD (last_accessed, INTERVAL %d SECOND) < NOW()', (int) $expire);
$r = mysqli_query($sdbc, $q);
return true;
}
Garbage collection is something most PHP programmers do not think about. Garbage collection is a language or application’s tool for cleaning up resources that are no longer needed. With sessions, PHP’s garbage collection can wipe out old sessions that weren’t formally destroyed.
There are two relevant settings in PHP: what is considered to be “old” and how likely it is that garbage collection is performed. For all session activity in a site, there is an X percent chance that PHP will go into garbage collection mode (the exact percent is a PHP setting; the default value is 1%). If it does, then all “old” session data will be destroyed. So garbage collection is triggered by any session but attempts to clean up every session.
As for the garbage collection function, it will receive a time, in seconds, as to what is considered to be old. This can be used in a DELETE query to get rid of any session that hasn’t been accessed in more than the set time.
8. Tell PHP to use the session-handling functions:
session_set_save_handler ('open_session', 'close_session', 'read_session', 'write_session', 'destroy_session', 'clean_session');
9. Start the session:
session_start();
Two important things to note here: First, the session_set_save_handler() function does not start a session. You still have to invoke session_start(). Second, you must use these two lines in this order. Calling session_start() prior to session_set_save_handler() will result in your handlers being ignored.
The reason I’m choosing to start the session within this file is that this file will be included by any script that needs sessions. My concern is that were you to start the sessions separately in each script, it would allow for the possibility that a script could start a session without including this file first, thereby using the file system for that page’s session and creating bugs.
10. Save the file as db_sessions.inc.php and place it in your Web directory.
As is my rule for all PHP scripts being included by other scripts, this one does not have a terminating PHP tag.
Tip
Note that the “write” session function is never called until all of the output has been sent to the Web browser ![]() . Then the “close” function is called.
. Then the “close” function is called.
Tip
If session.auto_start is turned on in your PHP configuration (meaning that sessions are automatically started for each page), then you cannot use the session_set_save_handler() function.
Tip
As of PHP 5.4, you can provide the session_set_save_handler() function with a single argument: an object of any class type that implements SessionHandlerInter-face. For example, you can use the Session-Handler class. This will mean more after the chapters on object-oriented programming.
Using the new session handlers
Using the newly created session handlers is only a matter of invoking the session_set_save_handler() function, as discussed in the preceding section. Almost everything else you would do with sessions is unchanged, from storing data in them to accessing stored data to destroying a session.
To demonstrate this, the next script will create some session data if it doesn’t exist, show all the session data, and even destroy the session data if a link back to this same page is clicked. As is often the case, there is one little tricky issue...
All of the session activity requires the database and, therefore, the database connection. The connection is opened when the session is started and closed when the session is closed. No problem there except that the “write” and “close” functions will be called after a script has finished running ![]() .
.
As you may already know, PHP does you the favor of automatically closing any database connections when a script stops running. For this next script, this means that after the script runs, the database connection is automatically closed, and then the session functions attempt to write the data to the database and close the connection. The result will be some confusing errors (and a—trust me on this—long “Where in the World Is My Database Connection?” search).
To avoid this sequential problem, the session_write_close() function should be called before the script terminates. This function will invoke the “write” and “close” functions, while there’s still a good database connection.
To use the new session handlers
1. Begin a new PHP script in your text editor or IDE, to be named sessions.php (Script 3.2):
<?php # Script 3.2 - sessions.php
Script 3.2. This script includes the db_sessions.inc.php page (Script 3.1) so that session data is stored in a database.
1 <?php # Script 3.2 - sessions.php
2
3 /* This page does some silly things with sessions.
4 * It includes the db_sessions.inc.php script
5 * so that the session data will be stored in a database.
6 */
7
8 // Include the sessions file:
9 // The file already starts the session.
10 require('db_sessions.inc.php');
11 ?><!doctype html>
12 <html lang="en">
13 <head>
14 <meta charset="utf-8">
15 <title>DB Session Test</title>
16 <link rel="stylesheet" href="style.css">
17 </head>
18 <body>
19 <?php
20 // Store some dummy data in the session, if no data is present:
21 if (empty($_SESSION)) {
22
23 $_SESSION['blah'] = 'umlaut';
24 $_SESSION['this'] = 3615684.45;
25 $_SESSION['that'] = 'blue';
26
27 // Print a message indicating what's going on:
28 echo '<p>Session data stored.</p>';
29
30 } else { // Print the already-stored data:
31 echo '<p>Session Data Exists:<pre>' . print_r($_SESSION, 1) . '</pre></p>';
32 }
33
34 // Log the user out, if applicable:
35 if (isset($_GET['logout'])) {
36
37 session_destroy();
38 echo '<p>Session destroyed.</p>';
39
40 } else { // Otherwise, print the "Log Out" link:
41 echo '<a href="sessions.php?logout=true">Log Out</a>';
42 }
43
44 // Reprint the session data:
45 echo '<p>Session Data:<pre>' . print_r($_SESSION, 1) . '</pre></p>';
46
47 // Complete the page:
48 echo '</body>
49 </html>';
50
51 // Write and close the session:
52 session_write_close();
53 ?>
2. Include the db_sessions.inc.php file:
require('db_sessions.inc.php');
?>
The session_start() function, which is in db_sessions.inc.php, must be called before anything is sent to the Web browser, so this file must be included prior to any HTML.
3. Create the initial HTML:
<!doctype html>
<html lang="en">
<head>
<meta charset="utf-8">
<title>DB Session Test</title>
<link rel="stylesheet"
href="style.css">
</head>
<body>
The style sheet can be downloaded along with all of the other code from www.LarryUllman.com.
4. Store some dummy data in a session if it is currently empty:
<?php
if (empty($_SESSION)) {
$_SESSION['blah'] = 'umlaut';
$_SESSION['this'] = 3615684.45;
$_SESSION['that'] = 'blue';
echo '<p>Session data stored.</p>';
Storing data in a database-managed session is no different than the regular method. This conditional is being used to replicate sessions on multiple pages. The first time the page is loaded, new data will be stored in the session.
5. Otherwise, print the currently stored data:
} else {
echo '<p>Session Data Exists: <pre>' . print_r($_SESSION, 1) . '</pre></p>';
}
The second time the page is loaded, the existing data will be available. As a quick way to print the session data, the print_r() function will be used.
6. Create the logout functionality:
if (isset($_GET['logout'])) {
session_destroy();
echo '<p>Session destroyed.</p>';
} else {
echo '<a href="sessions.php? logout=true">Log Out</a>';
}
Again, this conditional is used to fake a multipage site. When the page is accessed, a “Log Out” link is displayed. If the user clicks that link, ?logout=true is passed in the URL, telling this page to destroy the session.
7. Print the session data:
echo '<p>Session Data:<pre>' . print_r($_SESSION, 1) . '</pre></p>';
This is mostly a repeat of the code in Step 5. Unlike that line, this one will apply the first time the page is loaded. It will also be used to reveal the effect of destroying the session.
8. Complete the HTML:
echo '</body>
</html>';
9. Call the session_write_close() function and complete the page:
session_write_close();
?>
It really doesn’t matter where in the script this function is called, as long as all the modifications to the session data are over. If you don’t use this function, you might see some ugly results ![]() .
.
![]() Because PHP is nice enough to close open database connections after a script runs, the write_session() and close_session() functions—called after that point—would be without a database connection.
Because PHP is nice enough to close open database connections after a script runs, the write_session() and close_session() functions—called after that point—would be without a database connection.
10. Save the file as sessions.php, place it in your Web directory (in the same folder as db_sessions.inc.php), and test in your Web browser ![]() ,
, ![]() , and
, and ![]() .
.
![]() The result the first time the page is loaded.
The result the first time the page is loaded.
![]() Reloading the page allows it to access the already-stored session data.
Reloading the page allows it to access the already-stored session data.
![]() Clicking the “Log Out” link ends up destroying the session.
Clicking the “Log Out” link ends up destroying the session.
Tip
You should also call session_write_close() before redirecting the browser with a header() call. This only applies when you’re using your own session handlers.
Working with U.S. Zip Codes
A common need on many Web sites is to be able to perform distance calculations between addresses. Although you can always go the full MapQuest or Google Maps route, simple distance estimates can be managed using just zip codes (in the United States, that is).
For every zip code, there is an associated longitude and latitude (technically, zip codes represent multiple longitudes and latitudes, but one pair can be considered centrally located). Take two of these points on the earth, throw in some complicated math, and you have an approximate distance. In this section, I’ll discuss how to obtain the necessary zip code data, create a “store locator” table that will provide one of the two points, and then go over the formula used to calculate distances.
Creating the zip code table
This whole example is predicated on having a database with the latitude and longitude points for every zip code in the United States. You’ll find three types of sources for this information:
• Commercial zip code databases
• Free zip code databases
• Free zip code tabulation area (ZCTA) databases
The first option will provide you with the most accurate, up-to-date information, but you’ll have to pay for it (not a terrible amount, normally). The second option is free (free!) but harder to find and less likely to be current. You can search the Web for “free zip code database” to find free options.
The last option, ZCTA, is a database created by the U.S. Census Bureau for its own purposes. This database ignores around 10,000 zip codes that are used internally by the U.S. Post Office or by specific corporations. It also groups some zip codes together and uses characters to represent others. But for some uses, this information will do just fine. One source of a ZCTA database is http://zips.sourceforge.net, found by searching SourceForge.net for “zip code.”
Although having a zip code database will be necessary for subsequent examples in this chapter, what these next series of steps also convey is how to turn a comma-separated value (CSV) list of data into a usable database table.
To create the zip code database
1. Find your data source.
Which source (of the types and specific ones outlined) you use depends on your situation. How important is accuracy? How much are you willing to spend? As a secondary consideration, what resources exist as you’re reading this (search the Web and SourceForge)?
I’ll use the version from www.federalgovernmentzipcodes.us for my example. The only real criticism of this source is that the latitude and longitude are only precise to a bit more than a half mile, but the data is current, and free! For the following steps, I specifically downloaded the “primary location only” version.
2. Create the database ![]() :
:
CREATE DATABASE zips;
USE zips;
![]() Creating a new database to be used in this example.
Creating a new database to be used in this example.
I’m creating a database called zips, in MySQL, using the mysql command-line client. You could do most of the following using phpMyAdmin, the MySQL Administrator, or another tool.
3. Create a table that matches the data in the data file ![]() :
:
CREATE TABLE zip_codes (
zip_code INT(5) UNSIGNED ZEROFILL NOT NULL,
zip_code_type VARCHAR(10),
city VARCHAR(60) NOT NULL,
state VARCHAR(14) NOT NULL,
location_type VARCHAR(10),
latitude DECIMAL(4,2),
longitude DECIMAL(5,2),
location VARCHAR(30),
decommisioned VARCHAR(30),
taxreturnsfiled INT,
population INT,
wages INT,
PRIMARY KEY (zip_code)
);
![]() The main table, whose structure is based on the data to be inserted
The main table, whose structure is based on the data to be inserted ![]() .
.
Some sources may already provide the necessary SQL commands to create the table and even insert the data, in which case you could skip Steps 3 and 4. If not, you should create a table whose structure matches the data to be inserted ![]() .
.
![]() Part of the data file I’m working with.
Part of the data file I’m working with.
The zip code column, which is the primary key, should be an unsigned, zero-filled integer five digits in length. The latitude and longitude columns should be some type of fixed-point number.
My data set contains several other columns, most of which I won’t actually need after the data has been imported but must be initially created in order for the import to work.
(As an aside, the word decommissioned is misspelled that way in the data file, hence the matching misspelling in the SQL command.)
4. Import the data ![]() :
:
LOAD DATA INFILE '/tmp/zips.csv'
INTO TABLE zip_codes
FIELDS TERMINATED BY ','
ENCLOSED BY '"'
LINES TERMINATED BY '\n';
![]() Importing the data into the table.
Importing the data into the table.
It may take you a while to get this step working properly (you may also have more luck using phpMyAdmin for this). The LOAD DATA INFILE query takes the contents of a text file and inserts them into the given table. For this step to work, the number of columns in the table must match the number of values on each row in the text file. You might also need to change the FIELDS TERMINATED BY, ENCLOSED BY, and LINES TERMINATED BY values to match the text file you have. See the MySQL manual for more information on this syntax.
The name of the text file should match the absolute path to the file on your computer.
Using the downloaded data that includes a header line ![]() , I also had to remove that line from the CSV file prior to this point.
, I also had to remove that line from the CSV file prior to this point.
5. Drop any columns you will not need:
ALTER TABLE zip_codes DROP COLUMN location_type, DROP COLUMN location, DROP COLUMN decommisioned, DROP COLUMN taxreturnsfiled, DROP COLUMN population, DROP COLUMN wages;
Some data sources may contain information you don’t need, which you can then get rid of by running an ALTER query.
6. Add indexes and update the data, if necessary ![]() .
.
![]() Cleaning up the table to make the data more usable.
Cleaning up the table to make the data more usable.
In terms of updating the data, you could, for example, turn empty latitude and longitude values into formal NULL values. That query is
UPDATE zip_codes SET latitude=NULL, longitude=NULL WHERE latitude='';
7. Check the information for your (or any) zip code ![]() :
:
SELECT * FROM zip_codes
WHERE zip_code=63501;
![]() The information for a single zip code.
The information for a single zip code.
Tip
Run the command SHOW WARNINGS within the mysql client to see reported warnings ![]() .
.
![]() Some of the warnings from the recent query (the data import).
Some of the warnings from the recent query (the data import).
Creating the stores table
After creating the zip code table, it’s time to create the other required table. For this example, I’ll want to be able to calculate the distance between a given zip code (like a user’s home address) and a list of stores. Therefore, a stores table is necessary.
This table can contain whatever information you want. Likely, it would be something like Table 3.3.
Table 3.3. A Store’s Information
Since the city and state are tied to the zip code, and that information is already in the zip_codes table, those columns can be removed. I’ll also make the Address 2 column allow for a NULL option, as not all stores will use this field.
To create the stores table
1. Access the zips database using the mysql client or another interface.
2. Create the stores table ![]() :
:
CREATE TABLE stores (
store_id SMALLINT(5) UNSIGNED NOT NULL AUTO_INCREMENT,
name VARCHAR(60) NOT NULL,
address1 VARCHAR(100) NOT NULL,
address2 VARCHAR(100) default NULL,
zip_code INT(5) UNSIGNED ZEROFILL NOT NULL,
phone VARCHAR(15) NOT NULL,
PRIMARY KEY (store_id),
KEY (zip_code)
);
![]() Creating the second, and final, table.
Creating the second, and final, table.
The table models the data suggested in Table 3.3, except for the omission of the city and state (which are present in the zip_codes table). The zip_code column here should be defined exactly like that in the zip_codes table because the two fields will be used in a join (see the sidebar “Optimizing Joins”).
3. Populate the stores table ![]() :
:
INSERT INTO stores (name, address1, address2, zip_code, phone) VALUES
('Ray''s Shop', '49 Main Street', NULL, '63939', '(123) 456-7890'),
('Little Lulu''s', '12904 Rockville Pike', '#310', '10580', '(123) 654- 7890');
![]() Putting some sample records into the stores table.
Putting some sample records into the stores table.
You can enter whatever records you’d like. Or you can download the full SQL command from the book’s corresponding Web site (www.LarryUllman.com).
4. Select the complete address for a couple of stores ![]() :
:
SELECT stores.*, zip_codes.city, zip_codes.state FROM stores LEFT JOIN zip_codes USING (zip_code) LIMIT 2\G
![]() By performing a join on the two tables, you can fetch a store’s complete address.
By performing a join on the two tables, you can fetch a store’s complete address.
To get a store’s complete address, including the city and state, a join must be made across the two tables, using the zip_code column, which is common to both. If you’re not familiar with it, using the \G closing character in the mysql client just returns the results in vertical groupings, not horizontal rows.
Performing distance calculations
Now that two tables exist and are populated with data, it’s time to perform the distance calculations. In PHP, the formula for doing so is
$distance = sin(deg2rad($a_latitude))
* sin(deg2rad($b_latitude))
+ cos(deg2rad($a_latitude))
* cos(deg2rad($b_latitude))
* cos(deg2rad($a_longitude - $b_longitude));
$distance = (rad2deg(acos($distance))) * 69.09;
I could explain that formula in detail, except I don’t really understand it (or, in truth, haven’t tried to). All I know is that this works, and sometimes that’s enough.
In MySQL, that same formula (requiring a couple of different functions) is
SELECT (DEGREES(ACOS(SIN(RADIANS(lat_a))
* SIN(RADIANS(lat_b))
+ COS(RADIANS(lat_a))
* COS(RADIANS(lat_b))
* COS(RADIANS(long_a - long_b))))) * 69.09
For example, taking the latitude and longitude for two random zip codes ![]() , this calculation returns a value of approximately 1,626 miles
, this calculation returns a value of approximately 1,626 miles ![]() .
.
SELECT (DEGREES(ACOS (SIN(RADIANS(31.84))
* SIN(RADIANS(34.31))
+ COS(RADIANS(31.84))
* COS(RADIANS(34.31))
* COS(RADIANS(-106.43 - -78.40))))) * 69.09 AS distance;
![]() To check the distance between two points, I select the information for two random zip codes.
To check the distance between two points, I select the information for two random zip codes.
![]() The result of the distance calculation, using the latitudes and longitudes from
The result of the distance calculation, using the latitudes and longitudes from ![]() .
.
Optimizing Joins
The MySQL database application does a lot of work to improve efficiency, often unbeknownst to the common user. This may involve changing the definition of a column or secretly altering how a query is run. But sometimes MySQL needs a little help.
Joins are expensive queries (in terms of database resources) because they require conditional matches to be made across two or more tables. In this example, a join will occur between the zip_codes and stores tables, using the zip_code column from both. To encourage MySQL to perform these joins faster, you should do two things.
First, an index should exist on both columns. Second, both columns should be defined in exactly the same way. If one column is a TINYINT and the other is an INT, MySQL will not use any indexes (which is bad).
To finally put all of this good knowledge into action, I’ll create a PHP script that returns the three closest stores to a given zip code.
To calculate distances in MySQl
1. Begin a new PHP script in your text editor or IDE, to be named distance.php, starting with the HTML (Script 3.3):
<!doctype html>
<html lang="en">
<head>
<meta charset="utf-8">
<title>Distance Calculator</title>
<link rel="stylesheet" href="style.css">
</head>
<body>
<?php # Script 3.3 - distance.php
Script 3.3. This PHP script will return the three closest stores, using a zip code calculation, to a given zip code.
1 <!doctype html>
2 <html lang="en">
3 <head>
4 <meta charset="utf-8">
5 <title>Distance Calculator</title>
6 <link rel="stylesheet" href="style.css">
7 </head>
8 <body>
9 <?php # Script 3.3 - distance.php
10
11 /* This page uses the zips database to
12 * calculate the distance between a given
13 * point and some stores.
14 * The three closest stores are returned.
15 */
16
17 $zip = 64154; //User's zip code.
18
19 // Print a caption:
20 echo "<h1>Nearest stores to $zip:</h1>";
21
22 // Connect to the database:
23 $dbc = mysqli_connect('localhost', 'username', 'password', 'zips');
24
25 // Get the origination latitude and longitude:
26 $q = "SELECT latitude, longitude FROM zip_codes WHERE zip_code='$zip' AND latitude IS NOT NULL";
27 $r = mysqli_query($dbc, $q);
28
29 // Retrieve the results:
30 if (mysqli_num_rows($r) == 1) {
31
32 list($lat, $long) = mysqli_fetch_array($r, MYSQLI_NUM);
33
34 // Big, main, complex, wordy query:
35 $q = "SELECT name, CONCAT_WS('<br>', address1, address2), city, state, stores.zip_code, phone, ROUND(DEGREES(ACOS(SIN(RADIANS($lat))
36 * SIN(RADIANS(latitude))
37 + COS(RADIANS($lat))
38 * COS(RADIANS(latitude))
39 * COS(RADIANS($long - longitude)))) * 69.09) AS distance FROM stores LEFT JOIN zip_codes USING (zip_code) ORDER BY distance ASC LIMIT 3";
40 $r = mysqli_query($dbc, $q);
41
42 if (mysqli_num_rows($r) > 0) {
43
44 // Display the stores:
45 while ($row = mysqli_fetch_array($r, MYSQLI_NUM)) {
46 echo "<h2>$row[0]</h2>
47 <p>$row[1]<br />" . ucfirst(strtolower($row[2])) . ", $row[3] $row[4]<br />
48 $row[5] <br />
49 (approximately $row[6] miles)</p>\n";
50
51 } // End of WHILE loop.
52
53 } else { // No stores returned.
54
55 echo '<p class="error">No stores matched the search.</p>';
56
57 }
58
59 } else { // Invalid zip code.
60
61 echo '<p class="error">An invalid zip code was entered.</p>';
62
63 }
64
65 // Close the connection:
66 mysqli_close($dbc);
67
68 ?>
69 </body>
70 </html>
2. Identify the point of origin:
$zip = 64154;
echo "<h1>Nearest stores to $zip:</h1>";
This value could also be taken from a form (after validating it, of course).
3. Connect to the database:
$dbc = mysqli_connect('localhost', 'username', 'password', 'zips');
4. Define and execute the first query:
$q = "SELECT latitude, longitude FROM zip_codes WHERE zip_code='$zip' AND latitude IS NOT NULL";
$r = mysqli_query($dbc, $q);
This first query—the script contains two—both validates the zip code (that it’s an actual U.S. zip code) and retrieves that zip code’s latitude and longitude. That information will be necessary for calculating distances between the given zip code and each store. Because the data I used lacks the latitude and longitude for some zip codes, I’ve added an AND latitude IS NOT NULL condition to the WHERE clause. This may not be necessary for all data sets.
5. Retrieve the results of the query:
if (mysqli_num_rows($r) == 1) {
list($lat, $long) = mysqli_fetch_array($r, MYSQLI_NUM);
If one row was returned, the zip code is valid and the returned data is assigned to these two variables.
6. Perform the main query:
$q = "SELECT name, CONCAT_WS ('<br>', address1, address2), city, state, stores.zip_code, phone, ROUND(DEGREES(ACOS(SIN (RADIANS($lat))
* SIN(RADIANS(latitude))
+ COS(RADIANS($lat))
* COS(RADIANS(latitude))
* COS(RADIANS($long - longitude)))) * 69.09) AS distance FROM stores LEFT JOIN zip_codes USING (zip_code) ORDER BY distance ASC LIMIT 3";
$r = mysqli_query($dbc, $q);
Getting to this main query is really the point of the whole script. This query returns a store’s name, full address, phone number, and distance from the given zip code ![]() . The two addresses lines are concatenated using CONCAT_WS(), which will place a <br> between the lines if address2has a value, but return just address1 otherwise. The store’s city and state values come from the zip_codes table, and the zip_code could come from either. The phone number is also returned.
. The two addresses lines are concatenated using CONCAT_WS(), which will place a <br> between the lines if address2has a value, but return just address1 otherwise. The store’s city and state values come from the zip_codes table, and the zip_code could come from either. The phone number is also returned.
![]() The result of the main, rather unwieldy, query.
The result of the main, rather unwieldy, query.
The big, complex calculation is also selected. For the “A” latitude and longitude, the values for the original zip code are used (already retrieved by the earlier query). For the “B” latitude and longitude, values from this query will be used. Only three stores are going to be returned, and they are ordered by the distance value, from smallest to largest. Whew!
7. Print the results:
if (mysqli_num_rows($r) > 0) {
while ($row = mysqli_fetch_array($r, MYSQLI_NUM)) {
echo "<h2>$row[0]</h2>
<p>$row[1]<br />" . ucfirst (strtolower($row[2])) . ", $row[3] $row[4]<br />
$row[5] <br />
(approximately $row[6] miles) </p>\n";
} // End of WHILE loop.
} else {
echo '<p class="error">No stores matched the search.</p>';
}
The results are going to be printed with just a modicum of formatting. If no store was returned for some reason (which shouldn’t happen), that message is displayed.
8. Complete the conditional begun in Step 5:
} else {
echo '<p class="error">An invalid zip code was entered.</p>';
}
This message applies if an invalid zip code is provided ![]() .
.
![]() The result should an invalid zip code (like 77777 here) be used.
The result should an invalid zip code (like 77777 here) be used.
9. Complete the page:
mysqli_close($dbc);
?>
</body>
</html>
10. Save the file as distance.php, place it in your Web directory, and test in your Web browser ![]() .
.
![]() The closest stores to the 64154 zip code.
The closest stores to the 64154 zip code.
11. Change the zip code and test again ![]() . To use a zip code that begins with a 0, put it in quotes:
. To use a zip code that begins with a 0, put it in quotes:
$zip = '01026';
![]() The closest stores to the 01026 zip code.
The closest stores to the 01026 zip code.
If you don’t, PHP will think you’re using another number format and translate it.
Tip
You could easily limit the stores returned to a certain area by adding WHERE distance<=X to the main query.
Creating Stored Functions
Stored functions are half of a larger concept called stored routines (the other half are stored procedures). Present in many database applications but new to MySQL as of version 5, stored routines allow you to save a set sequence of code in the MySQL server, and then call that sequence as needed. Think of it like being able to write your own PHP functions but in SQL.
The topic of stored routines can be expansive, but I want to give you a little taste here. For more information, see the MySQL manual or my MySQL: Visual QuickStart Guide (Peachpit Press, 2006), where I dedicate many more pages to the subject.
Declaring Local Variables
Stored routines are like small programs, and they can even have their own variables. To do so, use the DECLARE statement:
DECLARE var_name var_type
The naming rules are pretty much the same as for everything else, but you absolutely want to make sure that your variables have unique identifiers. The types correspond to the MySQL data types:
DECLARE var1 INT
DECLARE var2 DECIMAL(5,2)
DECLARE var3 VARCHAR(20)
The only restrictions to declaring variables are as follows:
• The declarations must take place within a BEGIN...END code block.
• The declarations must take place before any other statements (i.e., declarations must be immediately after the BEGIN).
Once you’ve declared a variable, you can assign it a value using SET:
SET name = value
Note as well that unlike variables in PHP, these stored routine variables do not begin with a dollar sign.
The basic syntax for creating stored functions is
CREATE FUNCTION name (arguments) RETURNS type code
For the routine’s name, you should not use an existing keyword, SQL term, or function name. As with most things you name in MySQL, you should stick to alphanumeric characters and the underscore.
The arguments section is used to pass values to the routine. The listed arguments are named and given types that correspond to the available data types in MySQL:
CREATE FUNCTION myfunc (myvar1 INT, myvar2 CHAR) RETURNS type code
The code section of this syntax is the most important. Because your routines will normally contain multiple lines, you’ll want to create a block by using BEGIN and END:
CREATE FUNCTION name (arguments) RETURNS type
BEGIN
statement1;
statement2;
END
Within the code block, each statement ends with a semicolon. This can cause a problem: when you go to add this stored function using the mysql client or phpMyAdmin, the interface will think that the semicolon indicates the end of a command to be executed immediately ![]() . To prevent this, you can change the delimiter, which is the character used to mark the end of a query (the semicolon by default):
. To prevent this, you can change the delimiter, which is the character used to mark the end of a query (the semicolon by default):
DELIMITER $$
![]() You have to be careful when attempting to create stored routines within the mysql client.
You have to be careful when attempting to create stored routines within the mysql client.
You can change the delimiter to anything, as long as it’s not going to appear in the subsequent commands. I normally use two dollar signs together.
Once you’re done defining the function, you can change the delimiter back to the semicolon you’re used to:
DELIMITER ;
Stored function definitions must contain a RETURNS clause, indicating the type of value returned by the function. Functions return scalar (single) values, like a number or a string. To do so, use
RETURN data
within the function’s code body. The type of the data returned must match the type indicated in the function’s initial definition line. You cannot return a list of values from a stored function, but because stored functions return scalar values, they can be used in queries like any of the existing MySQL functions.
All of this information, along with the blip in the accompanying sidebar “Declaring Local Variables,” is the 5-minute guide to stored functions. In the next sequence of steps, I’ll show you how to turn the complicated distance calculation formula (see Script 3.3) into a callable stored function.
To create a stored function
1. Access your MySQL database using the mysql client.
You can also use phpMyAdmin or any other interface you prefer.
2. Select the database where you want to define the function:
USE zips;
3. Change the delimiter:
DELIMITER $$
Again, this is necessary so that the semicolons within the function definition don’t trigger immediate execution of the code written to that point.
4. Start defining the function:
CREATE FUNCTION return_distance (lat_a DOUBLE, long_a DOUBLE, lat_b DOUBLE, long_b DOUBLE) RETURNS DOUBLE
This code will wrap the complicated calculation within a stored function. The function is called return_distance. The function takes four arguments, all of type DOUBLE. It will return a DOUBLE value as well.
5. Create a local variable to store the calculated distance:
BEGIN
DECLARE distance DOUBLE;
The first step in the function is to create a variable of type DOUBLE. Doing so will simplify the calculation to a degree (pardon the pun).
6. Assign an initial value to the distance variable:
SET distance = SIN(RADIANS(lat_a)) * SIN(RADIANS(lat_b))
+ COS(RADIANS(lat_a))
* COS(RADIANS(lat_b))
* COS(RADIANS(long_a - long_b));
The variable is assigned the value of most of the calculation.
7. Return the final calculation:
RETURN((DEGREES(ACOS(distance))) * 69.09);
The variable is then run through a couple more functions and some arithmetic, and then returned.
8. Complete the function definition ![]() :
:
END $$
DELIMITER ;
![]() The stored function has been created in the database.
The stored function has been created in the database.
9. Test the function by running the following query in the mysql client or phpMyAdmin ![]() :
:
SELECT return_distance(31.84, -106.43, 34.31, -78.40);
![]() The stored function is used to simplify the SQL query.
The stored function is used to simplify the SQL query.
This is the same test query run earlier in the chapter, except now it calls the stored function.
10. If you want, modify distance.php (Script 3.3) to call the stored procedure.
To do so, just change the main query to
SELECT name, CONCAT_WS('<br>', address1, address2), city, state, stores.zip_code, phone, ROUND(return_distance($lat, $long, latitude, longitude)) AS distance FROM stores LEFT JOIN zip_codes USING (zip_code) ORDER BY distance ASC LIMIT 3
Tip
All stored routines are associated with a specific database. This also means that you cannot have a stored routine select a database.
Tip
Because stored routines are linked with databases, if you drop the database, you’ll also drop any associated stored routine.
Displaying Results Horizontally
Another of the common questions I see involves displaying query results horizontally. It’s quite easy to fetch a query’s results and display them vertically ![]() , but creating a horizontal output
, but creating a horizontal output ![]() does stymie some programmers. To achieve a horizontal layout, you have to create an HTML table. The trick, truly, is knowing when to create new rows in that table.
does stymie some programmers. To achieve a horizontal layout, you have to create an HTML table. The trick, truly, is knowing when to create new rows in that table.
![]() A traditional vertical display of some records.
A traditional vertical display of some records.
![]() The same data as in
The same data as in ![]() , laid out in table form.
, laid out in table form.
To achieve this effect using PHP, you need a counter that tracks how many records have been placed on a row (i.e., how many columns have been created). When zero records have been placed, the new row should be started. When the maximum number of records has been placed, the old row should be concluded. That’s the premise, which I’ll develop in this next script. For the data, I’ll use the zip_codes table in the zips database (but you could use anything).
To display results horizontally
1. Begin a new PHP script in your text editor or IDE, to be named display.php, starting with the HTML (Script 3.4):
<!doctype html>
<html lang="en">
<head>
<meta charset="utf-8">
<title>Cities and Zip Codes</title>
<link rel="stylesheet" href="style.css">
</head>
<body>
<?php # Script 3.4 - display.php
Script 3.4. All of the cities and zip codes for a given state are retrieved by this PHP script. Instead of appearing as a vertical list, they’ll be displayed in a table with five cells per row.
1 <!doctype html>
2 <html lang="en">
3 <head>
4 <meta charset="utf-8">
5 <title>Cities and Zip Codes</title>
6 <link rel="stylesheet" href="style.css">
7 </head>
8 <body>
9 <?php # Script 3.4 - display.php
10
11 /* This page retrieves and displays all of the
12 * cities and zip codes for a particular state.
13 * The results will be shown in a table.
14 */
15
16 // Abbreviation of state to show:
17 $state = 'AK';
18
19 // Items to display per row:
20 $items = 5;
21
22 // Print a caption:
23 echo "<h1>Cities and Zip Codes found in $state</h1>";
24
25 // Connect to the database:
26 $dbc = mysqli_connect ('localhost', 'username', 'password', 'zips');
27
28 // Get the cities and zip codes, ordered by city:
29 $q = "SELECT city, zip_code FROM zip_codes WHERE state='$state' ORDER BY city";
30 $r = mysqli_query($dbc, $q);
31
32 // Retrieve the results:
33 if (mysqli_num_rows($r) > 0) {
34
35 // Start a table:
36 echo '<table border="2" width="90%" cellspacing="3" cellpadding="3" class="center">';
37
38 // Need a counter:
39 $i = 0;
40
41 // Retrieve each record:
42 while (list($city, $zip_code) = mysqli_fetch_array($r, MYSQLI_NUM)) {
43
44 // Do we need to start a new row?
45 if ($i == 0) {
46 echo '<tr>';
47 }
48
49 // Print the record:
50 echo "<td align=\"center\">$city, $zip_code</td>";
51
52 // Increment the counter:
53 $i++;
54
55 // Do we need to end the row?
56 if ($i == $items) {
57 echo '</tr>';
58 $i = 0; // Reset counter.
59 }
60
61 } // End of while loop.
62
63 if ($i > 0) { // Last row was incomplete.
64
65 // Print the necessary number of cells:
66 for (;$i < $items; $i++) {
67 echo "<td> </td>\n";
68 }
69
70 // Complete the row.
71 echo '</tr>';
72
73 } // End of ($i > 0) IF.
74
75 // Close the table:
76 echo '</table>';
77
78 } else { // Bad state abbreviation.
79
80 echo '<p class="error">An invalid state abbreviation was used.</p>';
81
82 } // End of main IF.
83
84 // Close the database connection:
85 mysqli_close($dbc);
86
87 ?>
88 </body>
89 </html>
2. Establish the necessary variables and print a caption:
$state = 'AK';
$items = 5;
echo "<h1>Cities and Zip Codes found in $state</h1>";
The number of items to show per row is an important variable here. Just changing this one value will allow the script to output the results in fewer or more columns.
3. Connect to and query the database:
$dbc = mysqli_connect ('localhost', 'username', 'password', 'zips');
$q = "SELECT city, zip_code FROM zip_codes WHERE state='$state' ORDER BY city";
$r = mysqli_query($dbc, $q);
if (mysqli_num_rows($r) > 0) {
The query will return every city and zip code in the state in alphabetical order by city.
4. Begin a table and initialize a counter:
echo '<table border="2" width="90%" cellspacing="3" cellpadding="3" class="center">';
$i = 0;
The $i counter will track how many items have already been placed on a row.
5. Retrieve each record:
while (list($city, $zip_code) = mysqli_fetch_array($r, MYSQLI_NUM)) {
6. Start a new row, if necessary:
if ($i == 0) {
echo '<tr>';
}
Every time, within this while loop, the first item on a row is to be placed, a new row should be created by printing the <tr>. This applies the first time the loop is entered (because $i is initially 0) and after $i is reset (upon completing a row).
7. Print the record and increment the counter:
echo "<td align=\"center\">$city, $zip_code</td>";
$i++;
8. Complete the row, if necessary:
if ($i == $items) {
echo '</tr>';
$i = 0;
}
Once the counter equals the number of items to be placed on a row, it’s time to end that row by printing </tr>. Then the counter needs to be reset so that the next time the loop is entered, a new row will be started.
9. Complete the while loop:
} // End of while loop.
10. Complete the last row, if necessary:
if ($i > 0) {
for (;$i < $items; $i++) {
echo "<td> </td>\n";
}
echo '</tr>';
}
This is a step that’s easy to miss. Unless the number of items displayed is easily divisible by the number to be displayed per row (i.e., there’s no remainder of that division), the last row will be incomplete ![]() .
.
If $i has a value other than 0, some extra cells must be added (if it has a value of 0, then the last row was completed). A for loop can accomplish this task easily, starting with the current value of $i and stopping when $i equals $items. A little-known trick with the for loop is that each of the three parts is optional. Since no initial expression must be evaluated (like setting $i to some value), the loop begins with (;.
![]() The last row had only four items in it, so one blank table cell had to be created.
The last row had only four items in it, so one blank table cell had to be created.
11. Close the table and complete the conditional started in Step 3:
echo '</table>';
} else {
echo '<p class="error">An invalid state abbreviation was used.</p>';
} // End of main IF.
12. Complete the page:
mysqli_close($dbc);
?>
</body>
</html>
13. Save the file as display.php, place it in your Web directory, and test in your Web browser.
14. Change the value of $items, change the value of $state, and retest in your Web browser ![]() .
.
![]() With two quick changes, the script now displays all the cities for another state (here, Hawaii), four per row.
With two quick changes, the script now displays all the cities for another state (here, Hawaii), four per row.
Review and Pursue
If you have any problems with these sections, either in answering the questions or pursuing your own endeavors, turn to the book’s supporting forum (www.LarryUllman.com/forums/).
Review
• What are the benefits to storing session data in a database instead of the file system? (See page 82.)
• What PHP function is invoked to change how sessions are handled? (See page 84.)
• What do you have to do differently in your other session-related PHP scripts when storing session data in the database? (See pages 91 and 94.)
• How do you import CSV data into a database table? (See page 98.)
• What are stored functions? How do you create them? (See page 108.)
• How do you change the delimiter used by the mysql client? Why is that sometimes necessary? (See page 109.)
Pursue
• Update db_sessions.inc.php so that the functions return an appropriate Boolean indicating the success of each operation.
• Try using database-stored sessions on one of your own projects.
• If you have a familiarity with OOP already, check out the SessionHandler class in the PHP manual.
• If you need the most accurate, up-to-date zip code information, look into purchasing a commercial data set.
• Learn more about using the LOAD DATA INFILE SQL command.
• Create a form that submits a user-provided zip code to the distance.php script (instead of using a hard-coded value).
• Expand the distance.php script (after you’ve created a corresponding form) to let the user select a maximum range to search, too.
• Learn more about stored functions and procedures in MySQL.
All materials on the site are licensed Creative Commons Attribution-Sharealike 3.0 Unported CC BY-SA 3.0 & GNU Free Documentation License (GFDL)
If you are the copyright holder of any material contained on our site and intend to remove it, please contact our site administrator for approval.
© 2016-2026 All site design rights belong to S.Y.A.