Expert MySQL: Second Edition (2012)
Part I. Getting Started with MySQL Development
Chapter 3. A Tour of the MySQL Source Code
This chapter presents a complete introduction to the MySQL source, along with an explanation of how to obtain and build the system. I introduce you to the mechanics of the source code as well as coding guidelines and best practices for how to maintain the code. I focus on the parts of the code that deal with processing queries; this will set the stage for topics introduced in Chapter 11 and beyond. I also give you a short overview of the plugin system for dynamically loading libraries containing features.
Getting Started
In this section, I examine the principles behind modifying the MySQL source code and how you can obtain the source code. Let’s begin with a review of the available licensing options.
Understanding the Licensing Options
When planning your modifications to open-source software, consider how you’re going to use those modifications. More specifically, how are you going to acquire the source code and work with it? Depending on your intentions for the modifications, your choices will be very different from others. There are three principal ways you may want to modify the source code:
· To gain insight on how MySQL is constructed; therefore, you are following the examples in this book or working on your own experiments.
· To develop a capability for you or your organization that will not be distributed outside your organization.
· To build an application or extension that you plan to share or market to others.
In the first chapter, I discussed the responsibilities of an open-source developer who is modifying software under an open-source license. Since MySQL released under GPLv2 and also under a commercial license (a dual license), we must consider these uses of the source code under bothlicenses. I’ll begin our discussion with the GPLv2.
Modifying the source code in a purely academic session is permissible under the GPL, which clearly gives you the freedom to change the source code and experiment with it. The value of your contribution may determine whether your code is released under the GPL. For example, if your code modifications are considered singular in focus (they only apply to a limited set of users for a special purpose), the code may not be included in the source-code base. In a similar way, if your code was focused on the exploration of an academic exercise, the code may not be of value to anyone other than yourself. Few would consider an academic exercise in which you test options and features implemented in the source code as adding value to the MySQL system. On the other hand, if your experiments lead to a successful and meaningful addition to the system, most would agree that you’re obligated to share your findings. For the purposes of this book, you’ll proceed with modifying the source code as if you will not be sharing your modifications. Although I hope that you find the experiments in this book enlightening and entertaining, I don’t think they would be considered for adoption into the MySQL system without further development. If you take these examples and make something wonderful out of them, you have my blessing. Just be sure to tell everyone where you got the idea.
![]() Caution If you are planning a project that you plan to share in any way with anyone, contact Oracle’s MySQL Sales for clarification of your current license and the availability of licensing options to support your goals.
Caution If you are planning a project that you plan to share in any way with anyone, contact Oracle’s MySQL Sales for clarification of your current license and the availability of licensing options to support your goals.
If you’re modifying the MySQL source code for use by you or your organization, and you do not want to share your modifications, you should purchase the appropriate MySQL commercial license. MySQL’s commercial-licensing terms allow you to make modifications (and even getting Oracle to help you) and keep them to yourself.
Similarly, if you’re modifying the source code and intend to distribute the modifications, you’re required by the GPL to distribute the modified source code free of charge (but you may charge a media fee). You should consult Oracle before doing so.
Furthermore, your changes cannot be made proprietary, and you cannot own the rights to the modifications under the GPL. If you choose not to publish your changes yourself, you should contribute the code to Oracle for consideration. If it is accepted, it becomes the property of Oracle. On the other hand, if you want to make proprietary changes to MySQL for use in an embedded system or similar installation, contact Oracle and discuss your plans before launching your project.
Getting the Source Code
You can obtain the MySQL source code by downloading it from the MySQL developers’ Web site (http://dev.mysql.com/downloads). At that site, you’ll see links to download all MySQL open-source products. (For use with this book, you need the MySQL Community Edition.) You will also see several links for downloading different versions of the server, including:
· The current release (also called the generally available or GA) for production use
· Older releases of the software
· Documentation for each version
If you scroll down, you will see a dropdown box that permits you to choose your platform. This will download a binary version of the server, including everything you need to install and run it on your system. You will also see an entry named “Source Code.” This is the link you will use to download the source code.
You can also download the source code for newer versions of the server, called “Development Releases.” You can click on the tab and see a similar list for selecting the platform or the source code. As a reminder, development releases are cutting-edge feature previews that may or may not contain final production code and, as such, they should not be considered for use in a production environment. For the purposes of this book, you can use development release versions 5.6.5 or later.
To follow the examples in this book, download version 5.6.5 or higher from the Web site. I provide instructions for installing MySQL in the next section. The site contains all the binaries and source code for all of the environments supported. Many different platforms are supported. You’ll find the source code located near the bottom of the page. Download both the source code and the binaries (two downloads) for your platform. In this book, I’ll use examples from both Ubuntu and Microsoft Windows 7.
![]() Tip If you’re using Windows, download the MSI installer. In fact, consider downloading the MySQL Windows installer instead. This contains all of the MySQL components and makes installing MySQL on Windows a simple and fast process. It is the best way to install MySQL on your Windows system.
Tip If you’re using Windows, download the MSI installer. In fact, consider downloading the MySQL Windows installer instead. This contains all of the MySQL components and makes installing MySQL on Windows a simple and fast process. It is the best way to install MySQL on your Windows system.
OLDER PLATFORM SUPPORT
If you do not see your platform listed for the binary distribution of your choice, it is likely your platform is either too new, is no longer supported, or has yet to be included. If this happens, you can still download the source code and build it yourself.
![]() Note Unless otherwise stated, the examples in this book are taken from the Linux source-code distribution (mysql-5.6.5. While most of the code is the same for Linux and Windows distributions, I highlight differences as they occur. Most notably, the Windows platform has a slightly different vio implementation.
Note Unless otherwise stated, the examples in this book are taken from the Linux source-code distribution (mysql-5.6.5. While most of the code is the same for Linux and Windows distributions, I highlight differences as they occur. Most notably, the Windows platform has a slightly different vio implementation.
The MySQL Source Code
Once you have downloaded the source code, unpack the files into a folder on your system. You can unpack them into the same directory if you want. When you do this, notice that there are a lot of folders and many source files. The main folder you’ll need to reference is the /sql folder. This contains the main source files for the server. Table 3-1 lists the most commonly accessed folders and their contents.
Table 3-1. MySQL Source Folders
|
Folder |
Contents |
|
/BUILD |
The compilation configuration and make files for all platforms supported. |
|
/client |
The MySQL command-line client tools. |
|
/cmake |
The configuration files for the CMake cross-platform build system. |
|
/dbug |
Utilities for use in debugging (see Chapter 5 for more details). |
|
/include |
The base system include files and headers. |
|
/libmysql |
The C client API used for MySQL client applications as well as creating embedded systems. (See Chapter 6 for more details.) |
|
/libmysqld |
The core server API files. Also used in creating embedded systems. (See Chapter 6 for more details.) |
|
/mysql-test |
The MySQL system test suite. (See Chapter 4 for more details.) |
|
/mysys |
The majority of the core-operating-system API wrappers and helper functions. |
|
/plugin |
A folder containing the source code for all of the provided plugins. |
|
/regex |
A regular expression library. Used in the query optimizer and execution to resolve expressions. |
|
/scripts |
A set of shell script-based utilities. |
|
/sql |
The main system code. You should start your exploration from this folder. |
|
/sql-bench |
A set of benchmarking utilities. |
|
/storage |
The MySQL pluggable-storage-engine source code is located inside this folder. Also included is the storage engine example code. (See Chapter 7 for more details.) |
|
/strings |
The core string-handling wrappers. Use these for all of your string-handling needs. |
|
/support-files |
A set of preconfigured configuration files for compiling with different options. |
|
/tests |
A set of test programs and test files. |
|
/vio |
The network and socket layer code. |
|
/zlib |
Data compression tools. |
I recommend taking some time now to dig your way through some of the folders and acquaint yourself with the location of the files. You will find many types of files and a variety of Perl scripts dispersed among the folders. While not overly simplistic, the MySQL source code is logically organized around the functions of the source code rather than the core subsystems. Some subsystems, such as the storage engines and plugins, are located in a folder hierarchy, but most are located in several places in the folder structure. For each subsystem discussed while examining the source code, I list the associated source files and their locations.
Getting Started
The best way to understand the flow and control of the MySQL system is to follow the source code along from the standpoint of a typical query. I presented a high-level view of each of the major MySQL subsystems in Chapter 2. I use the same subsystem view now as I show you how a typical SQL statement is executed. The sample SQL statement I use is:
SELECT lname, fname, DOB FROM Employees WHERE Employees.department = 'EGR'
This query selects the names and dates of birth for everyone in the engineering department. While not very interesting, the query will be useful in demonstrating almost all subsystems in the MySQL system. Let’s begin with the query arriving at the server for processing.
Figure 3-1 shows the path the example query would take through the MySQL source code. I have pulled out the major lines of code that you should associate with the subsystems identified in Chapter 2. I have also abbreviated and omitted some of the parameter lists to make the graphic easier to read. Although not part of a specific subsystem, the mysqld_main() function is responsible for initializing the server and setting up the connection listener. The mysqld_main() function is in the file /sql/mysqld.cc.
![]() Note Windows systems execute the win_main() method,also located in mysqld.cc.
Note Windows systems execute the win_main() method,also located in mysqld.cc.
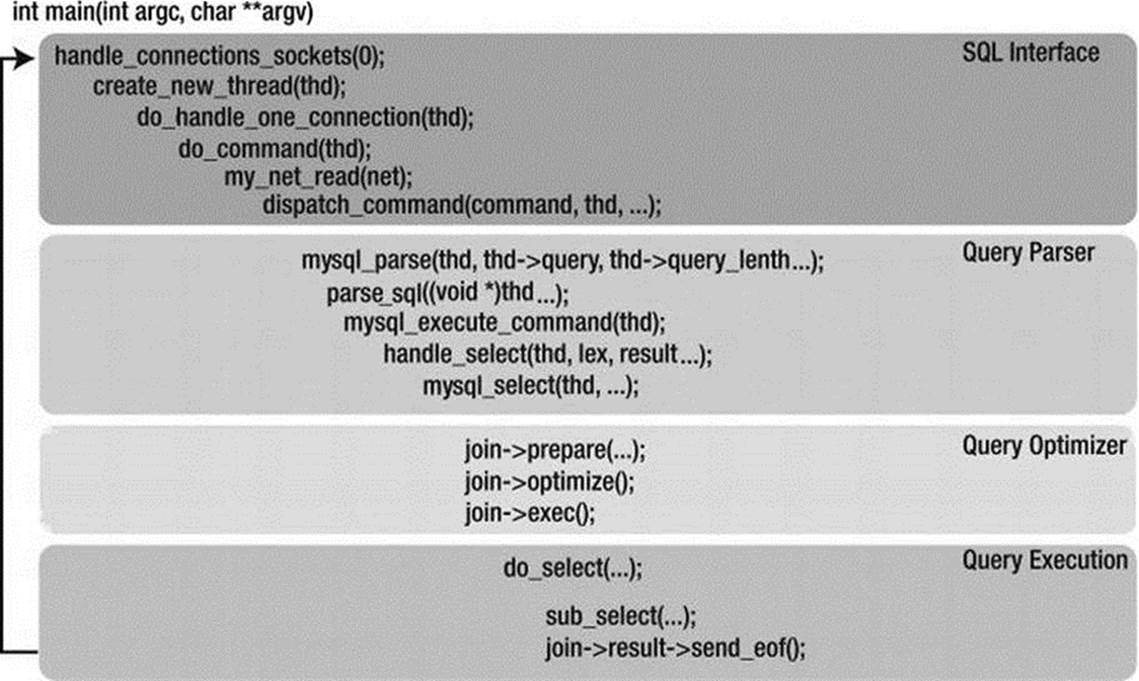
Figure 3-1. Overview of the query path
The path of the query, once it arrives at the server, begins in the SQL Interface subsystem (like most of the MySQL subsystems, the SQL Interface functions are distributed over a loosely associated set of source files). I tell you which files the methods are in as you go through this and the following sections. The handle_connections_socket() method (located in /sql/mysqld.cc) implements the listener loop, creating a thread for every connection detected. Once the thread is created, control flows to the do_handle_one_connection() function. Thedo_handle_one_connection() function identifies the command, then passes control to the do_command switch (located in /sql/sql_parse.cc). The do_command switch routes control to the proper network reading calls to read the query from the connection and passes the query to the parser via the dispatch_command() function (located in /sql/sql_parse.cc).
The query passes to the query parser subsystem, where the query is parsed and routed to the correct portion of the optimizer. The query parser is built in with Lex and YACC. Lex is used to identify tokens and literals as well as syntax of a language. YACC is used to build the code to interact with the MySQL source code. It captures the SQL commands storing the portions of the commands in an internal query representation and routes the command to a command processor called mysql_execute_command() (somewhat misnamed). This method then routes the query to the proper subfunction, in this case, mysql_select(). These methods are located in /sql/sql_parse.cc and /sql/sql_select.cc. This portion of the code enters the SELECT-PROJECT parts of the SELECT-PROJECT-JOIN query optimizer.
![]() Tip A project or projection is a relational database term describing the query operation that limits the result set to those columns defined in the column list on a SQL command. For example, the SQL command SELECT fname, lname FROM employee would “project” only thefname and lname columns from the employee table to the result set.
Tip A project or projection is a relational database term describing the query operation that limits the result set to those columns defined in the column list on a SQL command. For example, the SQL command SELECT fname, lname FROM employee would “project” only thefname and lname columns from the employee table to the result set.
It is at this point that the query optimizer is invoked to optimize the execution of the query via the functions join->prepare() located in /sql/sql_resolver.cc and join->optimize() located in /sql/sql_optimizer.cc. Query execution occurs next in join->exec() located in /sql/sql_executor.cc, with control passing to the lower-level do_select() function located in /sql/sql_executor.cc that carries out the restrict and projection operations. Finally, the sub _select() function invokes the storage engine to read the tuples, process them, and return results to the client. These methods are located in /sql/sql_executor.cc. After the results are written to the network, control returns to the handle_connections_sockets loop (located in /sql/mysqld.cc).
![]() Tip Classes, structures, classes, structures—it’s all about classes and structures! Keep this in mind while you examine the MySQL source code. For just about any operation in the server, there is at least one class or structure that either manages the data or drives the execution. Learning the commonly used MySQL classes and structures is the key to understanding the source code, as you’ll see in “Important Classes and Structures” later in this chapter.
Tip Classes, structures, classes, structures—it’s all about classes and structures! Keep this in mind while you examine the MySQL source code. For just about any operation in the server, there is at least one class or structure that either manages the data or drives the execution. Learning the commonly used MySQL classes and structures is the key to understanding the source code, as you’ll see in “Important Classes and Structures” later in this chapter.
You may be thinking that the code isn’t as bad as you may have heard. That is largely true for simple SELECT statements such as the example I am using, but as you’ll soon see, it can become more complicated than that. Now that you have seen this path and have had an introduction to where some of the major functions fall in the path of the query and the subsystems, open the source code and look for those functions. You can begin your search in /sql/mysqld.cc.
OK, so that was a whirlwind introduction, yes? From this point on, I slow things down a bit (OK, a lot) and navigate the source code in more detail. I also list the specific source files where the examples reside, in the form of a table at the end of each section. So tighten those safety belts, we’re going in!
I leave out sections that are not relevant to our tour. These could include conditional compilation directives, ancillary code, and other system-level calls. I annotate the missing sections with the following: .... I have left many of the original comments in place, because I believe that they will help you follow the source code and offer you a glimpse into the world of developing a world-class database system. Finally, I highlight the important parts of the code in bold so that you can find them more easily while reading.
The mysqld_main() Function
The mysqld_main() function, where the server begins execution, is located in /sql/mysqld.cc. It is the first function called when the server executable is loaded into memory. Several hundred lines of code in this function are devoted to operating-system-specific startup tasks, and there’s a good amount of system-level initialization code. Listing 3-1 shows a condensed view of the code, with the essential points in bold.
Listing 3-1. The main() Function
int mysqld_main(int argc, char **argv)
{
...
if (init_common_variables())
...
if (init_server_components())
...
/*
Initialize my_str_malloc() and my_str_free()
*/
my_str_malloc= &my_str_malloc_mysqld;
my_str_free= &my_str_free_mysqld;
...
if (mysql_rm_tmp_tables() || acl_init(opt_noacl) ||
my_tz_init((THD *)0, default_tz_name, opt_bootstrap))
...
create_shutdown_thread();
...
handle_connections_sockets();
...
(void) mysql_mutex_lock(&LOCK_thread_count);
...
(void) mysql_mutex_unlock(&LOCK_thread_count);
...
}
The first interesting function is init_common_variables(). This uses the command-line arguments to control how the server will perform; it is where the server interprets the arguments and starts the server in a variety of modes. This function takes care of setting up the system variables and places the server in the desired mode. The init-server-components() function initializes the database logs for use by any of the subsystems. These are the typical logs you see for events, statement execution, and so on.
Two of the most important my_ library functions are my_str_malloc() and my_str_free(). It is at this point in the server startup code (near the beginning) that these two function pointers are set. You should always use these functions in place of the traditional C/C++ malloc()functions, because the MySQL functions have additional error handling and therefore are safer than the base methods. The acl_init() function’s job is to start the authentication-and-access-control subsystem. This key system appears early in the server startup code.
Now you’re getting to what makes MySQL tick: threads. Two important helper threads are created. The create-shutdown-thread() function creates a thread whose job is to shut down the server on signal. I discuss threads in more detail in the “Process vs. Thread” sidebar.
At this point in the startup code, the system is just about ready to accept connections from clients. To do that, the handle-connections-sockets() function implements a listener that loops through the code waiting for connections. I discuss this function in more detail next.
The last thing I want to point out to you in the code is an example of the critical-section protection code for mutually exclusive access during multithreading. A critical section is a block of code that must execute as a set and can be accessed only by a single thread at a time. Critical sections are usually areas that write to a shared memory variable, and they therefore must complete before another thread attempts to read the memory. Oracle has created an abstract of a common concurrency protection mechanism called a mutex (short for mutually exclusive). If you find an area in your code that you need to protect during concurrent execution, use the following functions to protect the code.
The first function you should call is mysql_mutex_lock([resource reference]. This places a lock on the code execution at this point in the code. It will not permit another thread to access the memory location specified until your code calls the unlocking functionmysql_mutex_unlock([resource reference]). In the example from the mysqld_main() function, the mutex calls are locking the thread-count global variable.
Well, that’s your first dive under the hood. How did it feel? Do you want more? Keep reading—you’ve only just begun. In fact, you haven’t seen where our example query enters the system. Let’s do that next.
PROCESS VS. THREAD
The terms process and thread are often used interchangeably. This is incorrect, because a process is an organized set of computer instructions that has its own memory and execution path. A thread is also a set of computer instructions, but threads execute in a host’s execution path and do not have their own memory. (Some call threads lightweight processes. While a good description, calling them that doesn’t help make the distinction.) They do store state (in MySQL, it is via the THD class). Thus, when talking about large systems that support processes, I mean systems that permit sections of the system to execute as separate processes and have their own memory. When talking about large systems that support threads, I mean systems that permit sections of the system to execute concurrently with other sections of the system, and they all share the same memory space as the host.
Most database systems use the process model to manage concurrent connections and helper functions. MySQL uses the multithreaded model. There are a number of advantages to using threads over processes. Most notably, threads are easier to create and manage (no overhead for memory allocation and segregation). Threads also permit very fast switching, because no context switching takes place. Threads do have one severe drawback, however. If things go wonky (a highly technical term used to describe strange, unexplained behavior; in the case of threading, they are often very strange and harmful events) during a thread’s execution, it is likely that if the trouble is severe, the entire system could be affected. Fortunately, Oracle and the global community of developers have worked very hard to make MySQL’s threading subsystem robust and reliable. This is why it is important for your modifications to be thread safe.
Handling Connections and Creating Threads
You saw in the previous section how the system is started and how the control flows to the listener loop that waits for user connections. The connections begin life at the client and are broken down into data packets, placed on the network by the client software, then flow across the network communications pathways, where they are picked up by the server’s network subsystems and re-formed into data on the server. (A complete description of the communication packets is available in the MySQL Internals Manual.) This flow can be seen in Figure 3-2. I show more details about network-communication methods in the next chapter. I also include examples of how to write code that returns results to the client using these functions.
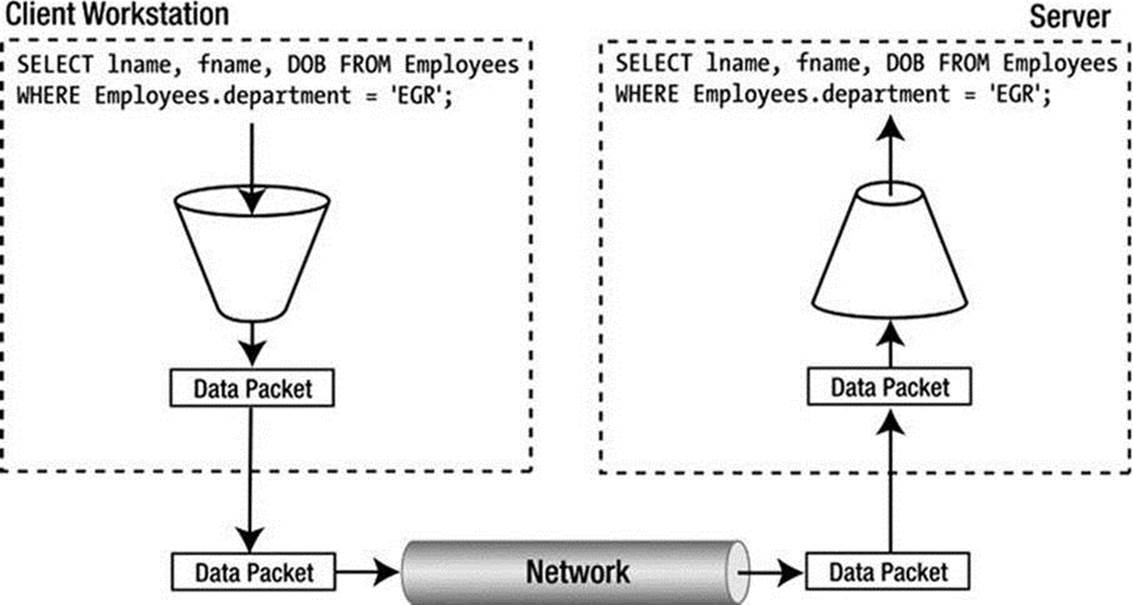
Figure 3-2. Network communications from client to server
At this point the system is in the SQL interface subsystem. That is, the data packets (containing the query) have arrived at the server and are detected via the handle_connections_sockets() function. This function enters a loop that waits until the variable abort_loop is set toTRUE. Table 3-2 shows the location of the files that manage the connection and threads.
Table 3-2. Connections and Thread Management
|
Source File |
Description |
|
/sql/net_serv.cc |
Contains all of the network communications functions. Look here for information on how to communicate with the client or server via the network. |
|
/include/mysql_com.h |
Contains most of the structures used in communications. |
|
/sql/sql_parse.cc |
Contains the majority of the query routing and parsing functions except for the lexical parser. |
|
/sql/mysqld.cc |
Besides the mysqld_main and server startup functions, this file also contains the methods for creating threads. |
Listing 3-2 offers a condensed view of the connection-handling code. When a connection is detected (I’ve hidden that part of the code, because it isn’t helpful in learning how the system works), the function creates a new thread calling the aptly named create_new_thread()function. It is in this function that the first of the major structures is created. The THD class is responsible for maintaining all of the information for the thread. Although not allocated to the thread in a private memory space, the THD class allows the system to control the thread during execution. I’ll expose some of the THD class in a later section.
Listing 3-2 The Handle-Connection-Sockets Functions
void handle_connections_sockets()
{
...
DBUG_PRINT("general",("Waiting for connections."));
...
while (!abort_loop)
{
...
/*
** Don't allow too many connections
*/
if (!(thd= new THD))
...
create_new_thread(thd);
}
...
}
OK, the client has connected to the server. What happens next? Let’s see what happens inside the create_new_thread() function. Listing 3-3 shows a condensed view of that function. The first thing you see is the mutex call to lock the thread count. As you saw in themysqld_main() function, this is necessary to keep other threads from potentially competing for write access to the variable. When the thread is created, the associated unlock mutex call is made to unlock the resource.
Listing 3-3 The create_new_thread() Function
static void create_new_thread(THD *thd)
{
...
/*
Don't allow too many connections. We roughly check here that we allow
only (max_connections + 1) connections.
*/
mysql_mutex_lock(&LOCK_connection_count);
if (connection_count >= max_connections + 1 || abort_loop)
{
mysql_mutex_unlock(&LOCK_connection_count);
...
close_connection(thd, ER_CON_COUNT_ERROR);
delete thd;
...
}
++connection_count;
if (connection_count > max_used_connections)
max_used_connections= connection_count;
mysql_mutex_unlock(&LOCK_connection_count);
/* Start a new thread to handle connection. */
mysql_mutex_lock(&LOCK_thread_count);
...
thd->thread_id= thd->variables.pseudo_thread_id= thread_id++;
MYSQL_CALLBACK(thread_scheduler, add_connection, (thd));
...
}
A very interesting thing occurs early in the function. Notice the MYSQL_CALLBACK() macro. The macro is designed to reuse a thread that may be residing in the connection pool. This helps speed things up a bit, because creating threads, while faster than creating processes, can take some time. Having a thread ready to go is a sort of caching mechanism for connections. The saving of threads for later use is called a connection pool.
If there isn’t a connection (thread) ready for to reuse, the system creates one with the pthread_create() function call. Something really strange happens here. Notice the third parameter for this function call. What seems like a variable is actually the starting address of a function (a function pointer). pthread_create() uses this function pointer to associate the location in the server where execution should begin for the thread.
Now that the query has been sent from the client to the server and a thread has been created to manage the execution, control passes to the do_handle_one_connection() function. Listing 3-4 shows a condensed view of the do_handle_one_connection() function. In this view, I have commented out a large section of the code that deals with initializing the THD class for use. If you’re interested, take a look at the code more closely later (located in /sql/sql_connect.cc). For now, let’s look at the essential work that goes on inside this function.
Listing 3-4 The do_handle_one_connection() Function
void do_handle_one_connection(THD *thd_arg)
{
THD *thd= thd_arg;
...
while (thd_is_connection_alive(thd))
{
mysql_audit_release(thd);
if (do_command(thd))
break;
}
end_connection(thd);
...
}
In this case, the only function call of interest for our exploration is the do_command(thd) function. It is inside a loop that is looping once for each command read from the networking-communications code. Although somewhat of a mystery at this point, this is of interest to those of us who have entered stacked SQL commands (more than one command on the same line). As you see here, this is where MySQL handles that eventuality. For each command read, the function passes control to the function that begins reads in the query from the network.
It is at this point that the system reads the query from the network and places it in the THD class for parsing. This takes place in the do_command() function. Listing 3-5 shows a condensed view of the do_command() function. I left some of the more interesting comments and code bits in to demonstrate the robustness of the MySQL source code.
Listing 3-5. The do_command() Function
bool do_command(THD *thd)
{
bool return_value;
char *packet = 0;
ulong packet_length;
NET *net= &thd->net;
enum enum_server_command command;
...
net_new_transaction(net);
...
packet_length= my_net_read(net);
...
if (packet_length == packet_error)
{
DBUG_PRINT("info",("Got error %d reading command from socket %s",
net->error,
vio_description(net->vio)));
...
command= (enum enum_server_command) (uchar) packet[0];
if (command >= COM_END)
command= COM_END; // Wrong command
DBUG_PRINT("info",("Command on %s = %d (%s)",
vio_description(net->vio), command,
command_name[command].str));
...
my_net_set_read_timeout(net, thd->variables.net_read_timeout);
DBUG_ASSERT(packet_length);
return_value= dispatch_command(command, thd, packet+1,
(uint) (packet_length-1));
...
}
The first thing to notice is the creation of a packet buffer and a NET structure. This packet buffer is a character array and stores the raw query string as it is read from the network and stored in the NET structure. The next item that is created is a command structure, which will be used to route control to the appropriate parser functions. The my_net_read() function reads the packets from the network and stores them in the NET structure. The length of the packet is also stored in the packet_length variable of the NET structure. The last thing you see occurring in this function is a call to dispatch_command(), the point at which you can begin to see how commands are routed through the server code.
OK, you’re starting to get somewhere. The job of the dispatch_command() function is to route control to a portion of the server that can best process the incoming command. Since you have a normal SELECT query on the way, the system has identified it as a query by setting thecommand variable to COM_QUERY. Other command types are used to identify statements, change user, generate statistics, and many other server functions. For this chapter, I will only look at query commands (COM_QUERY). Listing 3-6 shows a condensed view of the function. I have omitted the code for all of the other commands in the switch for the sake of brevity (I’m omitting the comment break too) but I’m leaving in the case statements for most of the commands. Take a moment and scan through the list. Most of the names are self-explanatory. If you were to conduct this exploration for another type of query, you could find your way by looking in this function for the type identified and following the code along in that case statement. I have also included the large function comment block that appears before the function code. Take a moment to look at that. I’ll be getting more into that later in this chapter.
Listing 3-6. The dispatch_command() Function
/**
Perform one connection-level (COM_XXXX) command.
@param command type of command to perform
@param thd connection handle
@param packet data for the command, packet is always null-terminated
@param packet_length length of packet + 1 (to show that data is
null-terminated) except for COM_SLEEP, where it
can be zero.
...
@retval
0 ok
@retval
1 request of thread shutdown, i. e. if command is
COM_QUIT/COM_SHUTDOWN
*/
bool dispatch_command(enum enum_server_command command, THD *thd,
char* packet, uint packet_length)
{
...
switch (command) {
case COM_INIT_DB:
...
case COM_REGISTER_SLAVE:
...
case COM_TABLE_DUMP:
...
case COM_CHANGE_USER:
...
case COM_STMT_EXECUTE:
...
case COM_STMT_FETCH:
...
case COM_STMT_SEND_LONG_DATA:
...
case COM_STMT_PREPARE:
...
case COM_STMT_CLOSE:
...
case COM_STMT_RESET:
...
case COM_QUERY:
{
if (alloc_query(thd, packet, packet_length))
break; // fatal error is set
...
if (opt_log_raw)
general_log_write(thd, command, thd->query(), thd->query_length());
...
mysql_parse(thd, thd->query(), thd->query_length(), &parser_state);
...
}
case COM_FIELD_LIST: // This isn't actually needed
...
case COM_QUIT:
...
case COM_BINLOG_DUMP_GTID;
...
case COM_BINLOG_DUMP:
...
case COM_REFRESH:
...
case COM_SHUTDOWN:
...
case COM_STATISTICS:
...
case COM_PING:
...
case COM_PROCESS_INFO:
...
case COM_PROCESS_KILL:
...
case COM_SET_OPTION:
...
case COM_DEBUG:
...
case COM_SLEEP:
...
case COM_DELAYED_INSERT:
...
case COM_CONNECT;
case COM_TIME;
...
case COM_END:
...
default:
...
}
The first thing that happens when control passes to the COM_QUERY handler is that the query is copied from the packet array to the thd->query member variable via the alloc _query() function. In this way, the thread now has a copy of the query, which will stay with it all through its execution. Notice also that the code writes the command to the general log. This will help with debugging system problems and query issues later on. The last function call of interest in Listing 3-6 is the mysql_parse() function call. At this point, the code can officially transfer from the SQL Interface subsystem to the Query Parser subsystem. As you can see, this distinction is one of semantics rather than syntax.
Parsing the Query
Finally, the parsing begins. This is the heart of what goes on inside the server when it processes a query. The parser code, like so much of the rest of the system, is located in a couple of places. It isn’t that hard to follow if you realize that while it is highly organized, the code is not structured to match the architecture.
The function you’re examining now is the mysql_parse() function (located in /sql/sql_parse.cc). Its job is to check the query cache for the results of a previously executed query that has the same result set, then pass control to the lexical parser (parse_sql()), and finally, route the command to the query optimizer. Listing 3-7 shows a condensed view of the mysql_parse() function.
Listing 3-7 The mysql_parse() Function
/**
Parse a query.
@param thd Current thread
@param rawbuf Begining of the query text
@param length Length of the query text
@param[out] found_semicolon For multi queries, position of the character of
the next query in the query text.
*/
void mysql_parse(THD *thd, char *rawbuf, uint length,
Parser_state *parser_state)
{
int error __attribute__((unused));
...
if (query_cache_send_result_to_client(thd, rawbuf, length) <= 0)
{
LEX *lex= thd->lex;
...
bool err= parse_sql(thd, parser_state, NULL);
...
error= mysql_execute_command(thd);
...
}
...
}
else
{
/*
Query cache hit. We need to write the general log here.
Right now, we only cache SELECT results; if the cache ever
becomes more generic, we should also cache the rewritten
query string together with the original query string (which
we'd still use for the matching) when we first execute the
query, and then use the obfuscated query string for logging
here when the query is given again.
*/
thd->m_statement_psi= MYSQL_REFINE_STATEMENT(thd->m_statement_psi,
sql_statement_info[SQLCOM_SELECT].m_key);
if (!opt_log_raw)
general_log_write(thd, COM_QUERY, thd->query(), thd->query_length());
parser_state->m_lip.found_semicolon= NULL;
}
...
}
The first thing to notice is the call to check the query cache. The query cache stores all the most frequently requested queries, complete with the results. If the query is already in the query cache, we skip to the else and you’re done! All that is left is to return the results to the client. No parsing, optimizing, or even executing is necessary. How cool is that?
For the sake of our exploration, let’s assume the query cache does not contain a copy of the example query. In this case, the function creates a new LEX structure to contain the internal representation of the query. This structure is filled out by the Lex/YACC parser, shown in Listing 3-8. This code is in the sql/sql_yacc.yy.
Listing 3-8 The SELECT Lex/YACC Parsing Code Excerpt
/*
Select : retrieve data from table
*/
select:
select_init
{
LEX *lex= Lex;
lex->sql_command= SQLCOM_SELECT;
}
;
/* Need select_init2 for subselects. */
select_init:
SELECT_SYM select_init2
| '(' select_paren ')' union_opt
;
select_paren:
SELECT_SYM select_part2
{
if (setup_select_in_parentheses(Lex))
MYSQL_YYABORT;
}
| '(' select_paren ')'
;
/* The equivalent of select_paren for nested queries. */
select_paren_derived:
SELECT_SYM select_part2_derived
{
if (setup_select_in_parentheses(Lex))
MYSQL_YYABORT;
}
| '(' select_paren_derived ')'
;
select_init2:
select_part2
{
LEX *lex= Lex;
SELECT_LEX * sel= lex->current_select;
if (lex->current_select->set_braces(0))
{
my_parse_error(ER(ER_SYNTAX_ERROR));
MYSQL_YYABORT;
}
if (sel->linkage == UNION_TYPE &&
sel->master_unit()->first_select()->braces)
{
my_parse_error(ER(ER_SYNTAX_ERROR));
MYSQL_YYABORT;
}
}
union_clause
;
select_part2:
{
LEX *lex= Lex;
SELECT_LEX *sel= lex->current_select;
if (sel->linkage != UNION_TYPE)
mysql_init_select(lex);
lex->current_select->parsing_place= SELECT_LIST;
}
select_options select_item_list
{
Select->parsing_place= NO_MATTER;
}
select_into select_lock_type
;
select_into:
opt_order_clause opt_limit_clause {}
| into
| select_from
| into select_from
| select_from into
;
select_from:
FROM join_table_list where_clause group_clause having_clause
opt_order_clause opt_limit_clause procedure_analyse_clause
{
Select->context.table_list=
Select->context.first_name_resolution_table=
Select->table_list.first;
}
| FROM DUAL_SYM where_clause opt_limit_clause
/* oracle compatibility: oracle always requires FROM clause,
and DUAL is system table without fields.
Is "SELECT 1 FROM DUAL" any better than "SELECT 1" ?
Hmmm :) */
;
select_options:
/* empty*/
| select_option_list
{
if (Select->options & SELECT_DISTINCT && Select->options & SELECT_ALL)
{
my_error(ER_WRONG_USAGE, MYF(0), "ALL", "DISTINCT");
MYSQL_YYABORT;
}
}
;
select_option_list:
select_option_list select_option
| select_option
;
select_option:
query_expression_option
| SQL_NO_CACHE_SYM
{
/*
Allow this flag only on the first top-level SELECT statement, if
SQL_CACHE wasn't specified, and only once per query.
*/
if (Lex->current_select != &Lex->select_lex)
{
my_error(ER_CANT_USE_OPTION_HERE, MYF(0), "SQL_NO_CACHE");
MYSQL_YYABORT;
}
else if (Lex->select_lex.sql_cache == SELECT_LEX::SQL_CACHE)
{
my_error(ER_WRONG_USAGE, MYF(0), "SQL_CACHE", "SQL_NO_CACHE");
MYSQL_YYABORT;
}
else if (Lex->select_lex.sql_cache == SELECT_LEX::SQL_NO_CACHE)
{
my_error(ER_DUP_ARGUMENT, MYF(0), "SQL_NO_CACHE");
MYSQL_YYABORT;
}
else
{
Lex->safe_to_cache_query=0;
Lex->select_lex.options&= ∼OPTION_TO_QUERY_CACHE;
Lex->select_lex.sql_cache= SELECT_LEX::SQL_NO_CACHE;
}
}
| SQL_CACHE_SYM
{
/*
Allow this flag only on the first top-level SELECT statement, if
SQL_NO_CACHE wasn't specified, and only once per query.
*/
if (Lex->current_select != &Lex->select_lex)
{
my_error(ER_CANT_USE_OPTION_HERE, MYF(0), "SQL_CACHE");
MYSQL_YYABORT;
}
else if (Lex->select_lex.sql_cache == SELECT_LEX::SQL_NO_CACHE)
{
my_error(ER_WRONG_USAGE, MYF(0), "SQL_NO_CACHE", "SQL_CACHE");
MYSQL_YYABORT;
}
else if (Lex->select_lex.sql_cache == SELECT_LEX::SQL_CACHE)
{
my_error(ER_DUP_ARGUMENT, MYF(0), "SQL_CACHE");
MYSQL_YYABORT;
}
else
{
Lex->safe_to_cache_query=1;
Lex->select_lex.options|= OPTION_TO_QUERY_CACHE;
Lex->select_lex.sql_cache= SELECT_LEX::SQL_CACHE;
}
}
;
select_lock_type:
/* empty */
| FOR_SYM UPDATE_SYM
{
LEX *lex=Lex;
lex->current_select->set_lock_for_tables(TL_WRITE);
lex->safe_to_cache_query=0;
}
| LOCK_SYM IN_SYM SHARE_SYM MODE_SYM
{
LEX *lex=Lex;
lex->current_select->
set_lock_for_tables(TL_READ_WITH_SHARED_LOCKS);
lex->safe_to_cache_query=0;
}
;
select_item_list:
select_item_list ',' select_item
| select_item
| '*'
{
THD *thd= YYTHD;
Item *item= new (thd->mem_root)
Item_field(&thd->lex->current_select->context,
NULL, NULL, "*");
if (item == NULL)
MYSQL_YYABORT;
if (add_item_to_list(thd, item))
MYSQL_YYABORT;
(thd->lex->current_select->with_wild)++;
}
;
select_item:
remember_name table_wild remember_end
{
THD *thd= YYTHD;
if (add_item_to_list(thd, $2))
MYSQL_YYABORT;
}
| remember_name expr remember_end select_alias
{
THD *thd= YYTHD;
DBUG_ASSERT($1 < $3);
if (add_item_to_list(thd, $2))
MYSQL_YYABORT;
if ($4.str)
{
if (Lex->sql_command == SQLCOM_CREATE_VIEW &&
check_column_name($4.str))
{
my_error(ER_WRONG_COLUMN_NAME, MYF(0), $4.str);
MYSQL_YYABORT;
}
$2->item_name.copy($4.str, $4.length, system_charset_info, false);
}
else if (!$2->item_name.is_set())
{
$2->item_name.copy($1, (uint) ($3 - $1), thd->charset());
}
}
;
I have included an excerpt from the Lex/YACC parser that shows how the SELECT token is identified and passed through the YACC code to be parsed. To read this code (in case you don’t know Lex or YACC), watch for the keywords (or tokens) in the code (they are located flush left with a colon, such as select:). These keywords are used to direct flow of the parser. The placement of tokens to the right of these keywords defines the order of what must occur in order for the query to be parsed. For example, look at the select: keyword. To the right of that, you will see aselect_init2 keyword, which isn’t very informative. If you look down through the code, however, you will see the select_init: keyword on the left. This allows the Lex/YACC author to specify certain behaviors in a sort of macro-like form. Also, notice that there are curly braces under the select_init keyword. This is where the parser does its work of dividing the query into parts and placing the items in the LEX structure. Direct symbols, such as SELECT, are defined in a header file (/sql/lex.h) and appear in the parser as SELECT_SYM. Take a few moments now to skim through the code. You may want to run through this several times. It can be confusing if you haven’t studied compiler construction or text parsing.
If you’re thinking, “What a monster,” then you can rest assured that you’re normal. The Lex/YACC code is a challenge for most developers. I’ve highlighted a few of the important code statements that should help explain how the code works. Let’s go through it. I’ve repeated the exampleSELECT statement again here for convenience:
SELECT lname, fname, DOB FROM Employees WHERE Employees.department = 'EGR'
Look at the first keyword again. Notice how the select_init code block sets the LEX structure’s sql_command to SQLCOM_SELECT. This is important, because the next function in the query path uses this in a large switch statement to further control the flow of the query through the server. The example SELECT statement has three fields in the field list. Let’s try and find them in the parser code. Look for the add_item_to_list() function call. That is where the parser detects the fields and places them in the LEX structure. You will also see a few lines up from that call the parser code that identifies the * option for the field list. Now you’ve got the sql_command member variable set and the fields identified. So where does the FROM clause get detected? Look for the code statement that begins with FROM join_table_list where_clause. This code is the part of the parser that identifies the FROM and WHERE clause (and others). The code for the parser that processes these clauses is not included in Listing 3-8, but I think you get the idea. If you open the sql_yacc.yy source file (located in /sql), you should now be able to find all those statements and see how the rest of the LEX structure is filled in with the table list in the FROM clause and the expression in the WHERE clause.
I hope that this tour of the parser code has helped mitigate the shock and horror that usually accompanies examining this part of the MySQL system. I return to this part of the system later on when I demonstrate how to add your own commands the MySQL SQL lexicon (see Chapter 8 for more details). Table 3-3 lists the source files associated with the MySQL parser.
Table 3-3. The MySQL Parser
|
Source File |
Description |
|
/sql/lex.h |
The symbol table for all of the keywords and tokens supported by the parser |
|
/sql/lex_symbol.h |
Type definitions for the symbol table |
|
/sql/sql_lex.h |
Definition of LEX structure |
|
/sql/sql_lex.cc |
Definition of Lex classes |
|
/sql/sql_yacc.yy |
The Lex/YACC parser code |
|
/sql/sql_parse.cc |
Contains the majority of the query routing and parsing functions except for the lexical parser |
![]() Caution Do not edit the files sql_yacc.cc, sql_yacc.h, or lex_hash.h. These files are generated by other utilities. See Chapter 7 for more details.
Caution Do not edit the files sql_yacc.cc, sql_yacc.h, or lex_hash.h. These files are generated by other utilities. See Chapter 7 for more details.
Preparing the Query for Optimization
Although the boundary delineating where the parser ends and the optimizer begins is not clear from the MySQL documentation (there are contradictions), it is clear from the definition of the optimizer that the routing and control parts of the source code can be considered part of the optimizer. To avoid confusion, I am going to call the next set of functions the preparatory stage of the optimizer.
The first of these preparatory functions is the mysql_execute_command() function (located in /sql/sql_parse.cc). The name leads you to believe that you are actually executing the query, but that isn’t the case. This function performs much of the setup steps necessary to optimize the query. The LEX structure is copied, and several variables are set to help the query optimization and later execution. You can see some of these operations in a condensed view of the function shown in Listing 3-9.
Listing 3-9. The mysql_execute_command() Function
/**
Execute command saved in thd and lex->sql_command.
@param thd Thread handle
...
@retval
FALSE OK
@retval
TRUE Error
*/
int
mysql_execute_command(THD *thd)
{
int res= FALSE;
int up_result= 0;
LEX *lex= thd->lex;
/* first SELECT_LEX (have special meaning for many of non-SELECTcommands) */
SELECT_LEX *select_lex= &lex->select_lex;
/* first table of first SELECT_LEX */
TABLE_LIST *first_table= select_lex->table_list.first;
/* list of all tables in query */
TABLE_LIST *all_tables;
/* most outer SELECT_LEX_UNIT of query */
SELECT_LEX_UNIT *unit= &lex->unit;
#ifdef HAVE_REPLICATION
/* have table map for update for multi-update statement (BUG#37051) */
bool have_table_map_for_update= FALSE;
#endif
DBUG_ENTER("mysql_execute_command");
...
switch (lex->sql_command) {
...
case SQLCOM_SHOW_STATUS_PROC:
case SQLCOM_SHOW_STATUS_FUNC:
case SQLCOM_SHOW_DATABASES:
case SQLCOM_SHOW_TABLES:
case SQLCOM_SHOW_TRIGGERS:
case SQLCOM_SHOW_TABLE_STATUS:
case SQLCOM_SHOW_OPEN_TABLES:
case SQLCOM_SHOW_PLUGINS:
case SQLCOM_SHOW_FIELDS:
case SQLCOM_SHOW_KEYS:
case SQLCOM_SHOW_VARIABLES:
case SQLCOM_SHOW_CHARSETS:
case SQLCOM_SHOW_COLLATIONS:
case SQLCOM_SHOW_STORAGE_ENGINES:
case SQLCOM_SHOW_PROFILE:
case SQLCOM_SELECT:
{
thd->status_var.last_query_cost= 0.0;
thd->status_var.last_query_partial_plans= 0;
if ((res= select_precheck(thd, lex, all_tables, first_table)))
break;
res= execute_sqlcom_select(thd, all_tables);
break;
}
...
A number of interesting things happen in this function. You will notice another switch statement that has as its cases the SQLCOM keywords. In the case of the example query, you saw the parser set the lex->sql_command member variable to SQLCOM_SELECT. I have included a condensed view of that case statement for you in Listing 3-9. What I did not include are the many other SQLCOM case statements. This is a very large function. Since it is the central routing function for query processing, it contains a case for every possible command. Consequently, the source code is tens of pages long.
Let’s see what this case statement does. Notice the select_precheck() method call. This method executes the privilege checking to see if the user can execute the command using the list of tables to verify access. If the user has access, processing continues to the execute_sqlcom_select() method, as shown in Listing 3-10. I leave the part of the code concerning the DESCRIBE (EXPLAIN) command for you to examine and figure out how it works.
Listing 3-10. The execute_sqlcom_command() Function
static bool execute_sqlcom_select(THD *thd, TABLE_LIST *all_tables)
{
LEX *lex= thd->lex;
select_result *result= lex->result;
bool res;
/* assign global limit variable if limit is not given */
{
SELECT_LEX *param= lex->unit.global_parameters;
if (!param->explicit_limit)
param->select_limit=
new Item_int((ulonglong) thd->variables.select_limit);
}
if (!(res= open_and_lock_tables(thd, all_tables, 0)))
{
if (lex->describe)
{
/*
We always use select_send for EXPLAIN, even if it's an EXPLAIN
for SELECT ... INTO OUTFILE: a user application should be able
to prepend EXPLAIN to any query and receive output for it,
even if the query itself redirects the output.
*/
if (!(result= new select_send()))
return 1; /* purecov: inspected */
res= explain_query_expression(thd, result);
delete result;
}
else
{
if (!result && !(result= new select_send()))
return 1; /* purecov: inspected */
select_result *save_result= result;
select_result *analyse_result= NULL;
if (lex->proc_analyse)
{
if ((result= analyse_result=
new select_analyse(result, lex->proc_analyse)) == NULL)
return true;
}
res= handle_select(thd, result, 0);
delete analyse_result;
if (save_result != lex->result)
delete save_result;
}
}
return res;
}
![]() Note Once when I was modifying the code, I needed to find all the locations of the EXPLAIN calls so that I could alter them for a specific need. I looked everywhere until I found them in the parser. There, in the middle of the Lex/YACC code, was a comment that said something to the effect that DESCRIBE was left over from an earlier Oracle compatibility issue and that the correct term was EXPLAIN. Comments are useful, if you can find them.
Note Once when I was modifying the code, I needed to find all the locations of the EXPLAIN calls so that I could alter them for a specific need. I looked everywhere until I found them in the parser. There, in the middle of the Lex/YACC code, was a comment that said something to the effect that DESCRIBE was left over from an earlier Oracle compatibility issue and that the correct term was EXPLAIN. Comments are useful, if you can find them.
The next interesting function call is one to handle_select(). You may be thinking, “Didn’t we just do the handle thing?” The handle_select() is a wrapper for another function, mysql_select(). Listing 3-11 shows the complete code for the handle_select() function. Near the top of the listing is the select_lex->next_select() operation, which is checking for the UNION command that appends multiple SELECT results into a single set of results. Other than that, the code just calls the next function in the chain, mysql_select(). It is at this point that you are finally close enough to transition to the query optimizer subsystem. Table 3-4 lists the source files associated with the query optimizer.
![]() Note This is perhaps the part of the code that suffers most from ill-defined subsystems. While the code is still very organized, the boundaries of the subsystems are fuzzy at this point in the source code.
Note This is perhaps the part of the code that suffers most from ill-defined subsystems. While the code is still very organized, the boundaries of the subsystems are fuzzy at this point in the source code.
Listing 3-11 The handle_select() Function
bool handle_select(THD *thd, select_result *result,
ulong setup_tables_done_option)
{
bool res;
LEX *lex= thd->lex;
register SELECT_LEX *select_lex = &lex->select_lex;
DBUG_ENTER("handle_select");
MYSQL_SELECT_START(thd->query());
if (lex->proc_analyse && lex->sql_command != SQLCOM_SELECT)
{
my_error(ER_WRONG_USAGE, MYF(0), "PROCEDURE", "non-SELECT");
DBUG_RETURN(true);
}
if (select_lex->master_unit()->is_union() ||
select_lex->master_unit()->fake_select_lex)
res= mysql_union(thd, lex, result, &lex->unit, setup_tables_done_option);
else
{
SELECT_LEX_UNIT *unit= &lex->unit;
unit->set_limit(unit->global_parameters);
/*
'options' of mysql_select will be set in JOIN, as far as JOIN for
every PS/SP execution new, we will not need reset this flag if
setup_tables_done_option changed for next rexecution
*/
res= mysql_select(thd,
select_lex->table_list.first,
select_lex->with_wild, select_lex->item_list,
select_lex->where,
&select_lex->order_list,
&select_lex->group_list,
select_lex->having,
select_lex->options | thd->variables.option_bits |
setup_tables_done_option,
result, unit, select_lex);
}
DBUG_PRINT("info",("res: %d report_error: %d", res,
thd->is_error()));
res|= thd->is_error();
if (unlikely(res))
result->abort_result_set();
MYSQL_SELECT_DONE((int) res, (ulong) thd->limit_found_rows);
DBUG_RETURN(res);
}
Table 3-4. The Query Optimizer
|
Source File |
Description |
|
/sql/sql_parse.cc |
The majority of the parser code resides in this file |
|
/sql/sql_select.cc |
Contains some of the optimization functions and the implementation of the select functions |
|
/sql/sql_prepare.cc |
Contains the preparation methods for the optimizer. |
|
/sql/sql_executor.cc |
Contains the execution methods for the optimizer. |
Optimizing the Query
At last! You’re at the optimizer. You won’t find it if you go looking for a source file or class by that name, however. Although the JOIN class contains a method called optimize(), the optimizer is actually a collection of flow control and subfunctions designed to find the shortest path to executing the query. What happened to the fancy algorithms and query paths and compiled queries? Recall from our architecture discussion in Chapter 2 that the MySQL query optimizer is a nontraditional hybrid optimizer utilizing a combination of known best practices and cost-based path selection. It is at this point in the code that the best-practices part kicks in.
An example of one of those best practices is standardizing the parameters in the WHERE clause expressions. The example query uses a WHERE clause with an expression, Employees.department = 'EGR', but the clause could have been written as 'EGR' = Employees.department and still be correct (it returns the same results). This is an example of where a traditional cost-based optimizer could generate multiple plans—one for each of the expression variants. Just a few examples of the many best practices that MySQL uses are:
· Constant propagation—The removal of transitive conjunctions using constants. For example, if you have a=b='c', the transitive law states that a='c'. This optimization removes those inner equalities, thereby reducing the number of evaluations. For example, the SQL command SELECT * FROM table1 WHERE column1 = 12 AND NOT (column3 = 17 OR column2 = column1) would be reduced to SELECT * FROM table1 WHERE column1 = 12 AND column3 <> 17 AND column2 <> 12.
· Dead code elimination—The removal of always-true conditions. For example, if you have a=b AND 1=1, the AND 1=1 condition is removed. The same occurs for always- false conditions in which the false expression can be removed without affecting the rest of the clause. For example, the SQL command SELECT * FROM table1 WHERE column1 = 12 AND column2 = 13 AND column1 < column2 would be reduced to SELECT * FROM table1 WHERE column1 = 12 AND column2 = 13.
· Range queries—The transformation of the IN clause to a list of disjunctions. For example, if you have an IN (1,2,3), the transformation would be a = 1 or a = 2 or a = 3. This helps simplify the evaluation of the expressions. For example, the SQL command SELECT * FROM table1 WHERE column1 = 12 OR column1 = 17 OR column1 = 21 would be reduced to SELECT * FROM table1 WHERE column1 IN (12, 17, 21).
I hope this small set of examples has given you a glimpse into the inner workings of one of the world’s most successful nontraditional query optimizers. In short, it works really well for a surprising amount of queries.
Well, I spoke too fast. There isn’t much going on in the mysql_select() function in the area of optimization, either. It seems the mysql_select() function just locks tables then calls the mysql_execute_select() function. Once again, you are at another fuzzy boundary.Listing 3-12 shows an excerpt of the mysql_select() function.
Listing 3-12 The mysql_select() Function
/**
An entry point to single-unit select (a select without UNION).
@param thd thread handler
@param tables list of all tables used in this query.
The tables have been pre-opened.
@param wild_num number of wildcards used in the top level
select of this query.
For example statement
SELECT *, t1.*, catalog.t2.* FROM t0, t1, t2;
has 3 wildcards.
@param fields list of items in SELECT list of the top-level
select
e.g. SELECT a, b, c FROM t1 will have Item_field
for a, b and c in this list.
@param conds top level item of an expression representing
WHERE clause of the top level select
@param order linked list of ORDER BY agruments
@param group linked list of GROUP BY arguments
@param having top level item of HAVING expression
@param select_options select options (BIG_RESULT, etc)
@param result an instance of result set handling class.
This object is responsible for send result
set rows to the client or inserting them
into a table.
@param unit top-level UNIT of this query
UNIT is an artificial object created by the
parser for every SELECT clause.
e.g.
SELECT * FROM t1 WHERE a1 IN (SELECT * FROM t2)
has 2 unions.
@param select_lex the only SELECT_LEX of this query
@retval
false success
@retval
true an error
*/
bool
mysql_select(THD *thd,
TABLE_LIST *tables, uint wild_num, List<Item> &fields,
Item *conds, SQL_I_List<ORDER> *order, SQL_I_List<ORDER> *group,
Item *having, ulonglong select_options,
select_result *result, SELECT_LEX_UNIT *unit,
SELECT_LEX *select_lex)
{
bool free_join= true;
uint og_num= 0;
ORDER *first_order= NULL;
ORDER *first_group= NULL;
DBUG_ENTER("mysql_select");
if (order)
{
og_num= order->elements;
first_order= order->first;
}
if (group)
{
og_num+= group->elements;
first_group= group->first;
}
if (mysql_prepare_select(thd, tables, wild_num, fields,
conds, og_num, first_order, first_group, having,
select_options, result, unit,
select_lex, &free_join))
{
if (free_join)
{
THD_STAGE_INFO(thd, stage_end);
(void) select_lex->cleanup();
}
DBUG_RETURN(true);
}
if (! thd->lex->is_query_tables_locked())
{
/*
If tables are not locked at this point, it means that we have delayed
this step until after the prepare stage (i.e. this moment). This allows us to
do better partition pruning and avoid locking unused partitions.
As a consequence, in such a case, the prepare stage can rely only on
metadata about tables used and not data from them.
We need to lock tables now in order to proceed with the remaining
stages of query optimization and execution.
*/
if (lock_tables(thd, thd->lex->query_tables, thd->lex->table_count, 0))
{
if (free_join)
{
THD_STAGE_INFO(thd, stage_end);
(void) select_lex->cleanup();
}
DBUG_RETURN(true);
}
/*
Only register query in cache if it tables were locked above.
Tables must be locked before storing the query in the query cache.
Transactional engines must have been signalled that the statement started,
which external_lock signals.
*/
query_cache_store_query(thd, thd->lex->query_tables);
}
DBUG_RETURN(mysql_execute_select(thd, select_lex, free_join));
}
Where are all of those best practices? They are in the JOIN class! A detailed examination of the optimizer source code in the JOIN class would take more pages than this entire book to present in any meaningful depth. Suffice it to say that the optimizer is complex, and it is also difficult to examine. Fortunately, few will ever need to venture that far down into the bowels of MySQL. You’re welcome to do so, however! I will focus on a higher-level review of the optimizer from the mysql_execute_select() function.
The next major function call in this function is the join->exec() method. First, though, let’s take a look at what happens in the mysql_execute_select() method in Listing 3-13.
Listing 3-13. The mysql_execute_select() Function
/**
Execute stage of mysql_select.
@param thd thread handler
@param select_lex the only SELECT_LEX of this query
@param free_join if join should be freed
@return Operation status
@retval false success
@retval true an error
@note tables must be opened and locked before calling mysql_execute_select.
*/
static bool
mysql_execute_select(THD *thd, SELECT_LEX *select_lex, bool free_join)
{
bool err;
JOIN* join= select_lex->join;
DBUG_ENTER("mysql_execute_select");
DBUG_ASSERT(join);
if ((err= join->optimize()))
{
goto err; // 1
}
if (thd->is_error())
goto err;
if (join->select_options & SELECT_DESCRIBE)
{
join->explain();
free_join= false;
}
else
join->exec();
err:
if (free_join)
{
THD_STAGE_INFO(thd, stage_end);
err|= select_lex->cleanup();
DBUG_RETURN(err || thd->is_error());
}
DBUG_RETURN(join->error);
}
Now we can see entry to the optimizer code in the mysql_execute_select() function. We see a reference to an existing JOIN class that was created in the prepare methods. A little farther down in the code, we see the method we’ve expected—the optimize() call. Shortly after that, we see the exec() method that executes the query via the JOIN class. Table 3-5 lists the more-important source files associated with query optimization.
Table 3-5. Query Optimization
|
Source File |
Description |
|
/sql/abstract_query_plan.cc |
Implements an abstract-query-plan interface for examining certain aspects of query plans without accessing mysqld internal classes (JOIN_TAB, SQL_SELECT, etc.) directly. |
|
/sql/sql_optimizer.cc |
Contains the optimizer-core functionality |
|
/sql/sql_planner.cc |
Contains classes to assist the optimizer in determining table order for retrieving rows for joins. |
|
/sql/sql_select.h |
The definitions for the structures used in the select functions to support the SELECT commands |
|
/sql/sql_select.cc |
Contains some of the optimization functions and the implementation of the select functions |
|
/sql/sql_union.cc |
Code for performing UNION operations. |
Executing the Query
In the same way as the optimizer, the query execution uses a set of best practices for executing the query. For example, the query execution subsystem detects special clauses, such as ORDER BY and DISTINCT, and routes control of these operations to methods designed for fast sorting and tuple elimination.
Most of this activity occurs in the methods of the JOIN class. Listing 3-14 presents a condensed view of the join::exec() method. Notice that there is yet another function call to a function called by some name that includes select. Sure enough, there is another call that needs to be made to a function called do_select(). Take a look at the parameters for this function call. You are now starting to see things such as field lists. Does this mean you’re getting close to reading data? Yes, it does. In fact, the do_select() function is a high-level wrapper for exactly that.
Listing 3-14 The join::exec() Function
void
JOIN::exec()
{
Opt_trace_context * const trace= &thd->opt_trace;
Opt_trace_object trace_wrapper(trace);
Opt_trace_object trace_exec(trace, "join_execution");
trace_exec.add_select_number(select_lex->select_number);
Opt_trace_array trace_steps(trace, "steps");
List<Item> *columns_list= &fields_list;
DBUG_ENTER("JOIN::exec");
...
THD_STAGE_INFO(thd, stage_sending_data);
DBUG_PRINT("info", ("%s", thd->proc_info));
result->send_result_set_metadata(*fields,
Protocol::SEND_NUM_ROWS | Protocol::SEND_EOF);
error= do_select(this);
/* Accumulate the counts from all join iterations of all join parts. */
thd->inc_examined_row_count(examined_rows);
DBUG_PRINT("counts", ("thd->examined_row_count: %lu",
(ulong) thd->get_examined_row_count()));
DBUG_VOID_RETURN;
}
There is another function call that looks very interesting. Notice the code statement result->send_result_set_metadata (). This function does what its name indicates. It is the function that sends the field headers to the client. As you can surmise, there are also other methods to send the results to the client. I will look at these methods later in Chapter 4. Notice the thd->inc_examined_row_count= assignments. This saves the record-count values in the THD class. Let’s take a look at that do_select() function.
You can see in the do_select() method shown in Listing 3-15 that something significant is happening. Notice the last highlighted code statement. The statement join->result->send_eof() looks as if the code is sending an end-of-file flag somewhere. It is indeed sending an end-of-file signal to the client. So where are the results? They are generated in the first_select() function (which is mapped to the sub_select()). Let’s look at that function next.
Listing 3-15 The do_select() Function
static int
do_select(JOIN *join)
{
int rc= 0;
enum_nested_loop_state error= NESTED_LOOP_OK;
DBUG_ENTER("do_select");
...
else
{
JOIN_TAB *join_tab= join->join_tab + join->const_tables;
DBUG_ASSERT(join->tables);
error= join->first_select(join,join_tab,0);
if (error >= NESTED_LOOP_OK)
error= join->first_select(join,join_tab,1);
}
join->thd->limit_found_rows= join->send_records;
/* Use info provided by filesort. */
if (join->order)
{
// Save # of found records prior to cleanup
JOIN_TAB *sort_tab;
JOIN_TAB *join_tab= join->join_tab;
uint const_tables= join->const_tables;
// Take record count from first non constant table or from last tmp table
if (join->tmp_tables > 0)
sort_tab= join_tab + join->tables + join->tmp_tables - 1;
else
{
DBUG_ASSERT(join->tables > const_tables);
sort_tab= join_tab + const_tables;
}
if (sort_tab->filesort &&
sort_tab->filesort->sortorder)
{
join->thd->limit_found_rows= sort_tab->records;
}
}
{
/*
The following will unlock all cursors if the command wasn't an
update command
*/
join->join_free(); // Unlock all cursors
}
if (error == NESTED_LOOP_OK)
{
/*
Sic: this branch works even if rc != 0, e.g. when
send_data above returns an error.
*/
if (join->result->send_eof())
rc= 1; // Don't send error
DBUG_PRINT("info",("%ld records output", (long) join->send_records));
}
...
}
Now you’re getting somewhere! Take a moment to scan through Listing 3-16. This listing shows a condensed view of the sub_select() function. Notice that the code begins with an initialization of a structure named READ_RECORD. The READ_RECORD structure contains the tuple read from the table. The system initializes the tables to begin reading records sequentially, and then it reads one record at a time until all the records are read.
Listing 3-16 The sub_select() Function
enum_nested_loop_state
sub_select(JOIN *join,JOIN_TAB *join_tab,bool end_of_records)
{
DBUG_ENTER("sub_select");
join_tab->table->null_row=0;
if (end_of_records)
{
enum_nested_loop_state nls=
(*join_tab->next_select)(join,join_tab+1,end_of_records);
DBUG_RETURN(nls);
}
READ_RECORD *info= &join_tab->read_record;
...
join->thd->get_stmt_da()->reset_current_row_for_warning();
enum_nested_loop_state rc= NESTED_LOOP_OK;
bool in_first_read= true;
while (rc == NESTED_LOOP_OK && join->return_tab >= join_tab)
{
int error;
if (in_first_read)
{
in_first_read= false;
error= (*join_tab->read_first_record)(join_tab);
}
else
error= info->read_record(info);
DBUG_EXECUTE_IF("bug13822652_1", join->thd->killed= THD::KILL_QUERY;);
if (error > 0 || (join->thd->is_error())) // Fatal error
rc= NESTED_LOOP_ERROR;
else if (error < 0)
break;
else if (join->thd->killed) // Aborted by user
{
join->thd->send_kill_message();
rc= NESTED_LOOP_KILLED;
}
else
{
if (join_tab->keep_current_rowid)
join_tab->table->file->position(join_tab->table->record[0]);
rc= evaluate_join_record(join, join_tab);
}
}
if (rc == NESTED_LOOP_OK && join_tab->last_inner && !join_tab->found)
rc= evaluate_null_complemented_join_record(join, join_tab);
DBUG_RETURN(rc);
}
![]() Note The code presented in Listing 3-16 is more condensed than the other examples I have shown. The main reason is that this code uses a fair number of advanced programming techniques, such as recursion and function pointer redirection. The concept as presented is accurate for the example query, however.
Note The code presented in Listing 3-16 is more condensed than the other examples I have shown. The main reason is that this code uses a fair number of advanced programming techniques, such as recursion and function pointer redirection. The concept as presented is accurate for the example query, however.
Control returns to the JOIN class for evaluation of the expressions and execution of the relational operators. After the results are processed, they are transmitted to the client and then control returns to the sub_select() function, where the end-of-file flag is sent to tell the client there are no more results. I hope that this tour has satisfied your curiosity and, if nothing else, that it has boosted your appreciation for the complexities of a real-world database system. Feel free to go back through this tour again until you’re comfortable with the basic flow. I discuss a few of the more important classes and structures in the next section.
Supporting Libraries
There are many additional libraries in the MySQL source tree. Oracle has long worked diligently to encapsulate and optimize many of the common routines used to access the supported operating systems and hardware. Most of these libraries are designed to render the code both operating system and hardware agnostic. These libraries make it possible to write code so that specific platform characteristics do not force you to write specialized code. Among these libraries are libraries for managing efficient string handling, hash tables, linked lists, memory allocation, and many others. Table 3-6 lists the purposes and location of a few of the more common libraries.
![]() Tip The best way to discover if a library exists for a routine that you’re trying to use is to look through the source-code files in the /mysys directory using a text search tool. Most of the wrapper functions have a name similar to their original function. For example, my_alloc.cimplements the malloc wrapper.
Tip The best way to discover if a library exists for a routine that you’re trying to use is to look through the source-code files in the /mysys directory using a text search tool. Most of the wrapper functions have a name similar to their original function. For example, my_alloc.cimplements the malloc wrapper.
Table 3-6. Supporting Libraries
|
Source File |
Utilities |
|
/mysys/array.c |
Array operations |
|
/include/hash.h and /mysys/hash.c |
Hash tables |
|
/mysys/list.c |
Linked lists |
|
/mysys/my_alloc.c |
Memory allocation |
|
/strings/*.c |
Base memory and string manipulation routines |
|
/mysys/string.c |
String operations |
|
/mysys/my_pthread.c |
Threading |
Important Classes and Structures
Quite a few classes and structures in the MySQL source code can be considered key elements to the success of the system. To become fully knowledgeable about the MySQL source code, learn the basics of all of the key classes and structures used in the system. Knowing what is stored in which class or what the structures contain can help you make your modifications integrate well. The following sections describe these key classes and structures.
The ITEM_ Class
One class that permeates throughout the subsystems is the ITEM_ class. I called it ITEM_ because a number of classes are derived from the base ITEM class and even classes derived from those. These derivatives are used to store and manipulate a great many data (items) in the system. These include parameters (as in the WHERE clause), identifiers, time, fields, function, num, string, and many others. Listing 3-17 shows a condensed view of the ITEM base class. The structure is defined in the /sql/item.h source file and implemented in the /sql/item.cc source file. Additional subclasses are defined and implemented in files named after the data it encapsulates. For example, the function subclass is defined in /sql/item_func.h and implemented in /sql/item_func.cc.
Listing 3-17 The ITEM_ Class
class Item
{
Item(const Item &); /* Prevent use of these */
void operator=(Item &);
/* Cache of the result of is_expensive(). */
int8 is_expensive_cache;
virtual bool is_expensive_processor(uchar *arg) { return 0; }
public:
static void *operator new(size_t size) throw ()
{ return sql_alloc(size); }
static void *operator new(size_t size, MEM_ROOT *mem_root) throw ()
{ return alloc_root(mem_root, size); }
static void operator delete(void *ptr,size_t size) { TRASH(ptr, size); }
static void operator delete(void *ptr, MEM_ROOT *mem_root) {}
enum Type {FIELD_ITEM= 0, FUNC_ITEM, SUM_FUNC_ITEM, STRING_ITEM,
INT_ITEM, REAL_ITEM, NULL_ITEM, VARBIN_ITEM,
COPY_STR_ITEM, FIELD_AVG_ITEM, DEFAULT_VALUE_ITEM,
PROC_ITEM,COND_ITEM, REF_ITEM, FIELD_STD_ITEM,
FIELD_VARIANCE_ITEM, INSERT_VALUE_ITEM,
SUBSELECT_ITEM, ROW_ITEM, CACHE_ITEM, TYPE_HOLDER,
PARAM_ITEM, TRIGGER_FIELD_ITEM, DECIMAL_ITEM,
XPATH_NODESET, XPATH_NODESET_CMP,
VIEW_FIXER_ITEM};
enum cond_result { COND_UNDEF,COND_OK,COND_TRUE,COND_FALSE };
enum traverse_order { POSTFIX, PREFIX };
/* Reuse size, only used by SP local variable assignment, otherwize 0 */
uint rsize;
/*
str_values's main purpose is to be used to cache the value in
save_in_field
*/
String str_value;
Item_name_string item_name; /* Name from select */
Item_name_string orig_name; /* Original item name (if it was renamed)*/
/**
Intrusive list pointer for free list. If not null, points to the next
Item on some Query_arena's free list. For instance, stored procedures
have their own Query_arena's.
@see Query_arena::free_list
*/
Item *next;
uint32 max_length; /* Maximum length, in bytes */
/**
This member has several successive meanings, depending on the phase we're
in:
- during field resolution: it contains the index, in the "all_fields"
list, of the expression to which this field belongs; or a special
constant UNDEF_POS; see st_select_lex::cur_pos_in_all_fields and
match_exprs_for_only_full_group_by().
- when attaching conditions to tables: it says whether some condition
needs to be attached or can be omitted (for example because it is already
implemented by 'ref' access)
- when pushing index conditions: it says whether a condition uses only
indexed columns
- when creating an internal temporary table: it says how to store BIT
fields
- when we change DISTINCT to GROUP BY: it is used for book-keeping of
fields.
*/
int marker;
uint8 decimals;
my_bool maybe_null; /* If item may be null */
my_bool null_value; /* if item is null */
my_bool unsigned_flag;
my_bool with_sum_func;
my_bool fixed; /* If item fixed with fix_fields */
DTCollation collation;
Item_result cmp_context; /* Comparison context */
protected:
my_bool with_subselect; /* If this item is a subselect or some
of its arguments is or contains a
subselect. Computed by fix_fields
and updated by update_used_tables. */
my_bool with_stored_program; /* If this item is a stored program
or some of its arguments is or
contains a stored program.
Computed by fix_fields and updated
by update_used_tables. */
/**
This variable is a cache of 'Needed tables are locked'. True if either
'No tables locks is needed' or 'Needed tables are locked'.
If tables are used, then it will be set to
current_thd->lex->is_query_tables_locked().
It is used when checking const_item()/can_be_evaluated_now().
*/
bool tables_locked_cache;
public:
// alloc & destruct is done as start of select using sql_alloc
Item();
/*
Constructor used by Item_field, Item_ref & aggregate (sum) functions.
Used for duplicating lists in processing queries with temporary
tables
Also it used for Item_cond_and/Item_cond_or for creating
top AND/OR structure of WHERE clause to protect it from
optimization changes in prepared statements
*/
Item(THD *thd, Item *item);
virtual ∼Item()
{
#ifdef EXTRA_DEBUG
item_name.set(0);
#endif
} /*lint -e1509 */
void rename(char *new_name);
void init_make_field(Send_field *tmp_field,enum enum_field_types type);
virtual void cleanup();
virtual void make_field(Send_field *field);
virtual Field *make_string_field(TABLE *table);
virtual bool fix_fields(THD *, Item **);
...
};
The LEX Structure
The LEX structure is responsible for being the internal representation (in-memory storage) ofa query and its parts. It is more than that, though. The LEX structure is used to store all parts of a query in an organized manner. There are lists for fields, tables, expressions, and all of the parts that make up any query.
The LEX structure is filled in by the parser as it discovers the parts of the query. Thus, when the parser is done, the LEX structure contains everything needed to optimize and execute the query. Listing 3-18 shows a condensed view of the LEX structure. The structure is defined in the/sql/sql_lex.h source file.
Listing 3-18 The LEX Structure
struct LEX: public Query_tables_list
{
SELECT_LEX_UNIT unit; /* most upper unit */
SELECT_LEX select_lex; /* first SELECT_LEX */
/* current SELECT_LEX in parsing */
SELECT_LEX *current_select;
/* list of all SELECT_LEX */
SELECT_LEX *all_selects_list;
char *length,*dec,*change;
LEX_STRING name;
char *help_arg;
char* to_log; /* For PURGE MASTER LOGS TO */
char* x509_subject,*x509_issuer,*ssl_cipher;
String *wild;
sql_exchange *exchange;
select_result *result;
Item *default_value, *on_update_value;
LEX_STRING comment, ident;
LEX_USER *grant_user;
XID *xid;
THD *thd;
/* maintain a list of used plugins for this LEX */
DYNAMIC_ARRAY plugins;
plugin_ref plugins_static_buffer[INITIAL_LEX_PLUGIN_LIST_SIZE];
const CHARSET_INFO *charset;
...
};
The NET Structure
The NET structure is responsible for storing all information concerning communication to and from a client. Listing 3-19 shows a condensed view of the NET structure. The buff member variable is used to store the raw communication packets (that when combined form the SQL statement). As you will see in later chapters, helper functions fill in, read, and transmit the data packets to and from the client. Two examples are:
· my_net_write(),which writes the data packets to the network protocol from theNET structure
· my_net_read(), which reads the data packets from the network protocol into theNET structure
You can find the complete set of network communication functions in /include/mysql_com.h.
Listing 3-19 The NET Structure
typedef struct st_net {
#if !defined(CHECK_EMBEDDED_DIFFERENCES) || !defined(EMBEDDED_LIBRARY)
Vio *vio;
unsigned char *buff,*buff_end,*write_pos,*read_pos;
my_socket fd; /* For Perl DBI/dbd */
/*
The following variable is set if we are doing several queries in one
command ( as in LOAD TABLE ... FROM MASTER ),
and do not want to confuse the client with OK at the wrong time
*/
unsigned long remain_in_buf,length, buf_length, where_b;
unsigned long max_packet,max_packet_size;
unsigned int pkt_nr,compress_pkt_nr;
unsigned int write_timeout, read_timeout, retry_count;
int fcntl;
unsigned int *return_status;
unsigned char reading_or_writing;
char save_char;
my_bool unused1; /* Please remove with the next incompatible ABI change */
my_bool unused2; /* Please remove with the next incompatible ABI change */
my_bool compress;
my_bool unused3; /* Please remove with the next incompatible ABI change. */
/*
Pointer to query object in query cache, do not equal NULL (0) for
queries in cache that have not stored its results yet
*/
#endif
/*
Unused, please remove with the next incompatible ABI change.
*/
unsigned char *unused;
unsigned int last_errno;
unsigned char error;
my_bool unused4; /* Please remove with the next incompatible ABI change. */
my_bool unused5; /* Please remove with the next incompatible ABI change. */
/** Client library error message buffer. Actually belongs to struct MYSQL. */
char last_error[MYSQL_ERRMSG_SIZE];
/** Client library sqlstate buffer. Set along with the error message. */
char sqlstate[SQLSTATE_LENGTH+1];
/**
Extension pointer, for the caller private use.
Any program linking with the networking library can use this pointer,
which is handy when private connection specific data needs to be
maintained.
The mysqld server process uses this pointer internally,
to maintain the server internal instrumentation for the connection.
*/
void *extension;
} NET;
The THD Class
In the preceding tour of the source code, you saw many references to the THD class. In fact, there is exactly one THD object for every connection. The thread class is paramount to successful thread execution, and it is involved in every operation from implementing access control to returning results to the client. As a result, the THD class shows up in just about every subsystem or function that operates within the server. Listing 3-20 shows a condensed view of the THD class. Take a moment and browse through some of the member variables and methods. As you can see, this is a large class (I’ve omitted a great many of the methods). The class is defined in the /sql/sql_class.h source file and implemented in the /sql/sql_class.cc source file.
Listing 3-20. The THD Class
class THD :public MDL_context_owner,
public Statement,
public Open_tables_state
{
private:
...
String packet; // dynamic buffer for network I/O
String convert_buffer; // buffer for charset conversions
struct rand_struct rand; // used for authentication
struct system_variables variables; // Changeable local variables
struct system_status_var status_var; // Per thread statistic vars
struct system_status_var *initial_status_var; /* used by show status */
THR_LOCK_INFO lock_info; // Locking info of this thread
/**
Protects THD data accessed from other threads:
- thd->query and thd->query_length (used by SHOW ENGINE
INNODB STATUS and SHOW PROCESSLIST
- thd->mysys_var (used by KILL statement and shutdown).
Is locked when THD is deleted.
*/
mysql_mutex_t LOCK_thd_data;
...
};
The READ_RECORD structure
As we saw earlier, the READ_RECORD structure is used to contain a tuple from the storage engine once the optimizer has identified it as a row to be returned to the user. We leave discussion of the storage engine until Chapter 10. Listing 3-21 shows the READ_RECORD structure. Notice that there are function pointers to callback to the JOIN class methods as well as variables to reference the THD class, record length, as well as a pointer to the record buffer itself. Examine the many methods in this class if you are interesting in learning how rows are stored in the system.
Listing 3-21. The READ_RECORD Structure
struct READ_RECORD
{
typedef int (*Read_func)(READ_RECORD*);
typedef void (*Unlock_row_func)(st_join_table *);
typedef int (*Setup_func)(JOIN_TAB*);
TABLE *table; /* Head-form */
TABLE **forms; /* head and ref forms */
Unlock_row_func unlock_row;
Read_func read_record;
THD *thd;
SQL_SELECT *select;
uint cache_records;
uint ref_length,struct_length,reclength,rec_cache_size,error_offset;
uint index;
uchar *ref_pos; /* pointer to form->refpos */
uchar *record;
uchar *rec_buf; /* to read field values after filesort */
uchar *cache,*cache_pos,*cache_end,*read_positions;
struct st_io_cache *io_cache;
bool print_error, ignore_not_found_rows;
...
Copy_field *copy_field;
Copy_field *copy_field_end;
public:
READ_RECORD() {}
};
MySQL Plugins
A tour of the MySQL system would not be complete without mentioning one of the most important and newest innovations in the architecture. MySQL now supports a plugin facility that permits dynamic loading of system features. Not only does this mean that the user can tailor her system by loading only what she needs, it also means the developers of MySQL can develop features in a more modular design. The storage-engine subsystem is an example of one subsystem redesigned to use the new plugin mechanism. There are many others. We will see how plugins work in more detail in later chapters. For now, let us discuss how plugins are loaded and unloaded as well as how to determine the status of your plugins.
The plugins table in the mysql database is used load plugins at startup. The table contains only two columns, name and dl, which store the plugin name and the library name. On startup, unless the user has turned off the plugin, the system loads each library specified in the dl column and initiates each plugin specified in the name column for its respective library. It is possible, then, to modify this table manually to manage plugins, but that is not recommended, because some libraries can contain more than one plugin. You will see this concept in action later, when we examine the mysql_plugin client application.
Some plugins are considered “built in” and are available by default and in some cases loaded (installed) automatically. This includes many of the storage engines as well as the standard authentication mechanism, binary log, and others. Other plugins can be made available by installing them, and likewise, they can be disabled by uninstalling them. You can find complete documentation on managing plugins in the “Server Plugins” section of the online reference manual.
Installing and Uninstalling Plugins
Plugins can be loaded and unloaded either with special SQL commands, as startup options, or via the mysql_plugin client application. To load a plugin, you first need to place the correct libraries into the plugin directory specified by the path in the system variable plugin_dir. You can find the current value of that variable from MySQL as:
mysql> SHOW VARIABLES LIKE 'plugin_dir';
+---------------+------------------------------+
| Variable_name | Value |
+---------------+------------------------------+
| plugin_dir | /usr/local/mysql/lib/plugin/ |
+---------------+------------------------------+
1 row in set (0.00 sec)
You can see that the path is /usr/local/mysql/lib/plugin/. When you build your plugin or to install an existing plugin, you must first place your libraries into the plugin directory. Then you can execute an INSTALL PLUGIN command similar to:
mysql> INSTALL PLUGIN something_cool SONAME some_cool_feature.so;
Here, we are loading a plugin named something_cool that is contained in the compiled library module named some_cool_feature.so.
Uninstalling the plugin is easier and is shown next. Here, we are unloading the same plugin we just installed.
mysql> UNINSTALL PLUGIN something_cool;
Plugins can also be installed at startup using the --plugin-load option. This option can either be listed multiple times—once for each plugin—or, it can accept a semicolon separated list (no spaces). Examples of how to use this option include:
mysqld ... --plugin-load=something_cool=some_cool_feature.so
mysqld ... --plugin-load=something_cool=some_cool_feature.so;something_even_better=even_better.so
![]() Note The MySQL documentation uses the terms install and uninstall for dynamically loading and unloading plugins. The documentation uses the term load for specifying a plugin to use via a startup option.
Note The MySQL documentation uses the terms install and uninstall for dynamically loading and unloading plugins. The documentation uses the term load for specifying a plugin to use via a startup option.
Plugins can also be loaded and unloaded using the mysql_plugin client application. This application requires the server to be down to work. It will launch the server in bootstrap mode, load or unload the plugin, and then shut down the bootstrapped server. The application is used primarily for maintenance of servers during downtime or as a diagnostic tool for attempts to restart a failed server by eliminating plugins (to simplify diagnosis).
The client application uses a configuration file to keep pertinent data about the plugin, such as the name of the library and all of the plugins contain within. Yes, it is possible that a plugin library can contain more than one plugin. The following is an example of the configuration file for thedaemon_example plugin:
#
# Plugin configuration file. Place the following on a separate line:
#
# library binary file name (without .so or .dll)
# component_name
# [component_name] - additional components in plugin
#
libdaemon_example
daemon_example
To use the mysql_plugin application to install (enable) or uninstall (disable) plugins, specify the name of the plugin: ENABLE or DISABLE, basedir, datadir, plugin-dir, and plugin-ini options at a minimum. You may also need to specify the my-print-defaultsoption if the mysql_plugin application is not on your path. The application runs silently, but you can turn on verbosity to see the application in action. (Use the option: -vvv). The following shows how to load the daemon_example plugin using the mysql_plugin client application. The example is being run from the bin folder of the MySQL installation.
cbell$ sudo ./mysql_plugin --datadir=/mysql_path/data/ --basedir=/mysql_path/ --plugin-dir=../plugin/daemon_example/ --plugin-ini=../plugin/daemon_example/daemon_example.ini --my-print-defaults=../extra daemon_example ENABLE -vvv
# Found tool 'my_print_defaults' as '/mysql_path/bin/my_print_defaults'.
# Command: /mysql_path/bin/my_print_defaults mysqld > /var/tmp/txtdoaw2b
# basedir = /mysql_path/
# plugin_dir = ../plugin/daemon_example/
# datadir = /mysql_path/data/
# plugin_ini = ../plugin/daemon_example/daemon_example.ini
# Found tool 'mysqld' as '/mysql_path/bin/mysqld'.
# Found plugin 'daemon_example' as '../plugin/daemon_example/libdaemon_example.so'
# Enabling daemon_example...
# Query: REPLACE INTO mysql.plugin VALUES ('daemon_example','libdaemon_example.so');
# Command: /mysql_path/bin/mysqld --no-defaults --bootstrap --datadir=/mysql_path/data/ --basedir=/mysql_path/ < /var/tmp/sqlft1mF7
# Operation succeeded.
Notice from the output that I had to rely upon super-user privileges. You will need to use such privileges if you are attempting to install or uninstall plugins from a server installed on platforms that isolate access to the mysql folders, such as Linux and Mac OS X.
Notice also that the verbose output shows you exactly what the application is doing. In this case, it is replacing any rows in the mysql.plugin table with the information for the plugin we specified. Similarly, delete queries would be issued for disabling a plugin.
Discovering Status of Available Plugins
You can discover the plugins available on your system by examining the INFORMATION_SCHEMA PLUGINS view. Listing 3-22 is an excerpt of the output from this view. Notice that there are entries for each storage engine, as well as for the version and status of each plugin. The view also contains fields for storing the plugin type version (the version of the system when the plugin was created), and the author. You can see all of the fields for this view by using the EXPLAIN command.
Listing 3-22. INFORMATION_SCHEMA.PLUGINS View
mysql> SELECT plugin_name, plugin_version, plugin_status, plugin_type
FROM INFORMATION_SCHEMA.PLUGINS;
+-----------------------+----------------+---------------+--------------------+
| plugin_name | plugin_version | plugin_status | plugin_type |
+-----------------------+----------------+---------------+--------------------+
| binlog | 1.0 | ACTIVE | STORAGE ENGINE |
| mysql_native_password | 1.0 | ACTIVE | AUTHENTICATION |
| mysql_old_password | 1.0 | ACTIVE | AUTHENTICATION |
| CSV | 1.0 | ACTIVE | STORAGE ENGINE |
| MEMORY | 1.0 | ACTIVE | STORAGE ENGINE |
| MyISAM | 1.0 | ACTIVE | STORAGE ENGINE |
| MRG_MYISAM | 1.0 | ACTIVE | STORAGE ENGINE |
| ARCHIVE | 3.0 | ACTIVE | STORAGE ENGINE |
| BLACKHOLE | 1.0 | ACTIVE | STORAGE ENGINE |
| FEDERATED | 1.0 | DISABLED | STORAGE ENGINE |
| InnoDB | 1.1 | ACTIVE | STORAGE ENGINE |
| INNODB_TRX | 1.1 | ACTIVE | INFORMATION SCHEMA |
| INNODB_LOCKS | 1.1 | ACTIVE | INFORMATION SCHEMA |
| INNODB_LOCK_WAITS | 1.1 | ACTIVE | INFORMATION SCHEMA |
| INNODB_CMP | 1.1 | ACTIVE | INFORMATION SCHEMA |
| INNODB_CMP_RESET | 1.1 | ACTIVE | INFORMATION SCHEMA |
| INNODB_CMPMEM | 1.1 | ACTIVE | INFORMATION SCHEMA |
| INNODB_CMPMEM_RESET | 1.1 | ACTIVE | INFORMATION SCHEMA |
| PERFORMANCE_SCHEMA | 0.1 | ACTIVE | STORAGE ENGINE |
| partition | 1.0 | ACTIVE | STORAGE ENGINE |
+-----------------------+----------------+---------------+--------------------+
20 rows in set (0.00 sec)
Now that you have had a tour of the source code and have examined some of the important classes and structures used in the system, I shift the focus to items that will help you implement your own modifications to the MySQL system. Let’s take a break from the source code and consider the coding guidelines and documentation aspects of software development.
Coding Guidelines
If the source code I’ve described seems to have a strange format, it may be because you have a different style than the authors of the source code. Consider the case in which there are many developers writing a large software program such as MySQL, each with their own style. As you can imagine, the code would quickly begin to resemble a jumbled mass of statements. To avoid this, Oracle has published coding guidelines in various forms. As you will see when you begin exploring the code yourself, it seems that there are a few developers who aren’t following the coding guidelines. The only plausible explanation is that the guidelines have changed over time, which can happen over the lifetime of a large project. Thus, some portions of the code were written using one set of rules, while others perhaps used a different version of the rules. Regardless of this consequence, the developers did strive to follow the guidelines.
The coding guidelines have a huge bulleted list containing the do’s and don’ts of writing C/C++ code for the MySQL server. I have captured the most important guidelines and summarized them for you in the following paragraphs.
General Guidelines
One of the most stressed aspects of the guidelines is that you should write code that is as optimized as possible. This goal is counter to agile development methodologies, in which you code only what you need and leave refinement and optimization to refactoring. If you develop using agile methodologies, you may want to wait to check in your code until you have refactored it.
Another very important overall goal is to avoid the use of direct API or operating-system calls. You should always look in the associated libraries for wrapper functions. Many of these functions are optimized for fast and safe execution. For example, never use the C malloc() function. Instead, use the sql_alloc () or my _alloc() function.
All lines of code must be fewer than 80 characters long. If you need to continue a line of code onto another line, align the code so that parameters are aligned vertically or the continuation code is aligned with the indention space count.
Comments are written using the standard C-style comments, for example, /* this is a comment */. You should use comments liberally through your code.
![]() Tip Resist the urge to use the C++ // comment option. The MySQL coding guidelines specifically discourage this technique.
Tip Resist the urge to use the C++ // comment option. The MySQL coding guidelines specifically discourage this technique.
Documentation
The language of choice for the source code is English. This includes all variables, function names, constants, and comments. The developers who write and maintain the MySQL source code are located throughout Europe and the United States. The choice of English as the default language in the source code is largely due to the influence of American computer science developments. English is also taught as a second language in many primary and secondary education programs in many European countries.
When writing functions, use a comment block that describes the function, its parameters, and the expected return values. The content of the comment block should be written in sections, with section names in all caps. You should include a short descriptive name of the function on the first line after the comment and, at a minimum, include the sections, synopsis, description, and return value. You may also include optional sections such as WARNING, NOTES, SEE ALSO, TODO, ERRORS, and REFERENCED_BY. The sections and content are described here:
· SYNOPSIS (required)—Presents a brief overview of the flow and control mechanisms in the function. It should permit the reader to understand the basic algorithm of the function. This helps readers understand the function and provide an at-a-glance glimpse of what it does. This section also includes a description of all of the parameters (indicated by IN for input, OUT for output, and IN/OUT for referenced parameters whose values may be changed).
· DESCRIPTION (required)—A narrative of the function. It should include the purpose of the function and a brief description of its use.
· RETURN VALUE (required)—Presents all possible return values and what they mean to the caller.
· WARNING—Include this section to describe any unusual side effects that the caller should be aware of.
· NOTES—Include this section to provide the reader with any information you feel is important.
· SEE ALSO—Include this section when you’re writing a function that is associated with another function, or that requires specific outputs of another function, or that is intended to be used by another function in a specific calling order.
· TODO—Include this section to communicate any unfinished features of the function. Remove the items from this section as you complete them. I tend to forget to do this, and it often results in a bit of head scratching to figure out that I’ve already completed the TODO item.
· ERRORS—Include this section to document any unusual error handling that your function has.
· REFERENCED_BY—Include this section to communicate specific aspects of the relationship this function has with other functions or objects—for example, whenever your function is called by another function, the function is a primitive of another function, or the function is a friend method or even a virtual method.
![]() Tip Oracle suggests that it isn’t necessary to provide a comment block for short functions that have only a few lines of code, but I recommend writing a comment block for all of the functions you create. You will appreciate this advice as you explore the source code and encounter numerous small (and some large) functions with little or no documentation.
Tip Oracle suggests that it isn’t necessary to provide a comment block for short functions that have only a few lines of code, but I recommend writing a comment block for all of the functions you create. You will appreciate this advice as you explore the source code and encounter numerous small (and some large) functions with little or no documentation.
A sample of a function comment block is shown in Listing 3-23.
Listing 3-23 Example Function Comment Block
/**
Find tuples by key.
SYNOPSIS
find_by_key()
string key IN A string containing the key to find.
Handler_class *handle IN The class containing the table to be searched.
Tuple * OUT The tuple class containing the key passed.
Uses B Tree index contained in the Handler_class. Calls Index::find()
method then returns a pointer to the tuple found.
DESCRIPTION
This function implements a search of the Handler_class index class to find
a key passed.
RETURN VALUE
SUCCESS (TRUE) Tuple found.
!= SUCCESS (FALES) Tuple not found.
WARNING
Function can return an empty tuple when a key hit occurs on the index but
the tuple has been marked for deletion.
NOTES
This method has been tested for empty keys and keys that are greater or
less than the keys in the index.
SEE ALSO
Query:;execute(), Tuple.h
TODO
* Change code to include error handler to detect when key passed in exceeds
the maximum length of the key in the index.
ERRORS
-1 Table not found.
1 Table locked.
REFERENCED_BY
This function is called by the Query::execute() method.
*/
Functions and Parameters
I want to call these items out specifically, because some inconsistencies exist in the source code. If you use the source code as a guide for formatting, you may wander astray of the coding guidelines. Functions and their parameters should be aligned so that the parameters are in vertical alignment. This applies to both defining the function and calling it from other code. In a similar way, variables should be aligned when you declare them. The spacing of the alignment isn’t such an issue as the vertical appearance of these items. You should also add line comments about each of the variables. Line comments should begin in column 49 and not exceed the maximum 80-column rule. In the case in which a comment for a variable exceeds 80 columns, place that comment on a separate line. Listing 3-24 shows examples of the type of alignment expected for functions, variables, and parameters.
Listing 3-24 Variable, Function, and Parameter Alignment Examples
int var1; /* comment goes here */
long var2; /* comment goes here too */
/* variable controls something of extreme interest and is documented well */
bool var3;
return_value *classname::classmethod(int var1,
int var2
bool var3);
if (classname->classmethod(myreallylongvariablename1,
myreallylongvariablename2,
myreallylongvariablename3) == -1)
{
/* do something */
}
![]() Warning If you’re developing on Windows, the line-break feature of your editor may be set incorrectly. Most editors in Windows issue a CRLF (/r/n) when you place a line break in the file. Oracle requires you to use a single LF (/n), not a CRLF. This is a common incompatibility between files created on Windows versus files created in UNIX or Linux. If you’re using Windows, check your editor and make the appropriate changes to its configuration.
Warning If you’re developing on Windows, the line-break feature of your editor may be set incorrectly. Most editors in Windows issue a CRLF (/r/n) when you place a line break in the file. Oracle requires you to use a single LF (/n), not a CRLF. This is a common incompatibility between files created on Windows versus files created in UNIX or Linux. If you’re using Windows, check your editor and make the appropriate changes to its configuration.
Naming Conventions
Oracle prefers that you assign your variables meaningful names using all lowercase letters with underscores instead of initial caps. The exception is the use of class names, which are required to have initial caps. Enumerations should be prefixed with the phrase enum_. All structures and defines should be written with uppercase letters. Examples of the naming conventions are shown in Listing 3-25.
Listing 3-25 Sample Naming Conventions
class My_classname;
int my_integer_counter;
bool is_saved;
#define CONSTANT_NAME 12;
int my_function_name_goes_here(int variable1);
Spacing and Indenting
The MySQL coding guidelines state that spacing should always be two characters for each indention level. Never use tabs. If your editor permits, change the default behavior of the editor to turn off automatic formatting and replace all tabs with two spaces. This is especially important when using documentation utilities such as Doxygen (which I’ll discuss in a moment) or line-parsing tools to locate strings in the text.
When spacing between identifiers and operators, include no spaces between a variable and an operator and a single space between the operator and an operand (the right side of the operator). In a similar way, no space should follow the open parenthesis in functions, but include one space between parameters and no space between the last parameter name and the closing parenthesis. Last, include a single blank line to delineate variable declarations from control code, and control code from method calls, and block comments from other code, and functions from other declarations. Listing 3-26 depicts a properly formatted excerpt of code that contains an assignment statement, a function call, and a control statement.
Listing 3-26 Spacing and Indention
return_value= do_something_cool(i, max_limit, is_found);
if (return_value)
{
int var1;
int var2;
var1= do_something_else(i);
if (var1)
{
do_it_again();
}
}
The alignment of the curly braces is also inconsistent in some parts of the source code. The MySQL coding guidelines state that the curly braces should align with the control code above it, as I have shown in all of our examples. If you need to indent another level, use the same column alignment as the code within the curly braces (two spaces). It is also not necessary to use curly braces if you’re executing a single line of code in the code block.
An oddity of sorts in the curly braces area is the switch statement. A switch statement should be written to align the open curly brace after the switch condition and align the closing curly brace with the switch keyword. The case statements should be aligned in the same column as the switch keyword. Listing 3-27 illustrates this guideline.
Listing 3-27 Switch Statement Example
switch (some_var) {
case 1:
do_something_here();
do_something_else();
break;
case 2:
do_it_again();
break;
}
![]() Note The last break in the previous code is not needed. I usually include it in my code for the sake of completeness.
Note The last break in the previous code is not needed. I usually include it in my code for the sake of completeness.
Documentation Utilities
Another useful method of examining source code is to use an automated documentation generator that reads the source code and generates function- and class-based lists of methods. These programs list the structures used and provide clues as to how and where they are used in the source code. This is important for investigating MySQL because of the many critical structures that the source code relies on to operate and manipulate data.
One such program is called Doxygen. The nice thing about Doxygen is that it, too, is open source and governed by the GPL. When you invoke Doxygen, it reads the source code and produces a highly readable set of HTML files that pull the comments from the source code preceding the function, and it also lists the function primitives. Doxygen can read programming languages such as C, C++, and Java, among several others. Doxygen can be a useful tool for investigating a complex system such as MySQL—especially when you consider that the base library functions are called from hundreds of locations throughout the code.
Doxygen is available for both UNIX and Windows platforms. To use the program on Linux, download the source code from the Doxygen Web site at http://www.doxygen.com.
Once you have downloaded the installation, follow the installation instructions (also on the Web site). Doxygen uses configuration files to generate the look and feel of the output as well as what gets included in the input. To generate a default configuration file, issue the command:
doxygen -s -g /path_to_new_file/doxygen_config_filename
The path specified should be the path you want to store the documentation in. Once you have a default configuration file, you can edit the file and change the parameters to meet your specific needs. See the Doxygen documentation for more information on the options and their parameters. You would typically specify the folders to process, the project name, and other project-related settings. Once you have set the configurations you want, you can generate documentation for MySQL by issuing this command:
doxygen </path_to_new_file/Doxygen_config_filename>
![]() Caution Depending on your settings, Doxygen could run for a long time. Avoid using advanced graphing commands if you want Doxygen to generate documentation in a reasonable time period.
Caution Depending on your settings, Doxygen could run for a long time. Avoid using advanced graphing commands if you want Doxygen to generate documentation in a reasonable time period.
The latest version of Doxygen can be run from Windows using a supplied GUI. The GUI allows you to use create the configuration file using a wizard that steps you through the process and creates a basic configuration file, an expert mode that allows you to set your own parameters, and the ability to load a config file. I found the output generated by using the wizard interface sufficient for casual to in-depth viewing.
I recommend spending some time running Doxygen and examining the output files prior to diving into the source code. It will save you tons of lookup time. The structures alone are worth tacking up on the wall next to your monitor or pasting into your engineering logbook. A sample of the type of documentation Doxygen can generate is shown in Figure 3-3.
Figure 3-3. Sample MySQL Doxygen output
Keeping an Engineering Logbook
Many developers keep notes of their projects. Some are more detailed than others, but most take notes during meetings and phone conversations, thereby providing a written record for verbal communications. If you aren’t in the habit of keeping an engineering logbook, you should consider doing so. I have found a logbook to be a vital tool in my work. Yes, it does require more effort to write things down, and the log can get messy if you try to include all of the various drawings and emails you find important (mine are often bulging with clippings from important documents taped in place like some sort of engineer’s scrapbook). The payoff is potentially huge, however.
This is especially true when you’re doing the sort of investigative work you will be doing while studying the MySQL source code. Keep a logbook of each discovery you make. Write down every epiphany, important design decision, snippets from important paper documents, and even the occasional ah-ha! Over time, you will build up a paper record of your findings (a former boss of mine called it her paper brain!) that will prove invaluable for reviews and your own documentation efforts. If you do use a logbook and make journal entries or paste in important document snippets, you will soon discover that logbooks of the journal variety do not lend themselves to being organized well. Most engineers (such as I) prefer lined, hardbound journals that cannot be reorganized (unless you use lots of scissors and glue). Others prefer loose-leaf logbooks that permit easy reorganization. If you plan to use a hardbound journal, consider building a “living” index as you go.
![]() Tip If your journal pages aren’t numbered, take a few minutes and place page numbers on each page.
Tip If your journal pages aren’t numbered, take a few minutes and place page numbers on each page.
There are many ways to build the living index. You could write any interesting keywordsat the top of the page or in a specific place in the margin. This would allow you to quickly skim through your logbook and locate items of interest. What makes a living index is the ability to add references over time. The best way I have found to create the living index is to use a spreadsheet to list all of the terms you write on the logbook pages and to write the page number next to it. I update the spreadsheet every week or so, print it out, and tape it into my logbook near the front. I have seen some journals that have a pocket in the front, but the tape approach works too. Over time you can reorder the index items and reference page numbers to make the list easier to read; you can also place an updated list in the front of your logbook so you can locate pages more easily.
Consider using an engineering logbook. You won’t be sorry when it comes time to give your report on your progress to your superiors. It can also save you tons of rework later, when you are asked to report on something you did six months or more ago.
Tracking Your Changes
Always use comments when you create code that is not intuitive to the reader. For example, the code statement if (found) is pretty self-explanatory. The code following the control statement will be executed if the variable evaluates to TRUE. The code if (func_call_17(i, x, lp)) requires some explanation, however. Of course, you want to write all of your code to be self-explanatory, but sometimes that isn’t possible. This is particularly true when you’re accessing supporting library functions. Some names are not intuitive, and the parameter lists can be confusing. Document these situations as you code them, and your life will be enhanced.
When writing comments, you can use inline comments, single-line comments, or multiline comments. Inline comments are written beginning in column 49 and cannot exceed 80 columns. A single-line comment should be aligned with the code it is referring to (the indention mark) and also should not exceed 80 columns. Likewise, multiline comments should align with the code they are explaining and should not exceed 80 columns, but they should have the opening and closing comment markers placed on separate lines. Listing 3-28 illustrates these concepts.
Listing 3-28. Comment Placement and Spacing Examples
if (return_value)
{
int var1; /* comment goes here */
long var2; /* comment goes here too */
/* this call does something else based on i */
var1= do_something_else(i);
if (var1)
{
/*
This comment explains
some really interesting thing
about the following statement(s).
*/
do_it_again();
}
}
![]() Tip Never use repeating *s to emphasize portions of code. It distracts the reader from the code and makes for a cluttered look. Besides, it’s too much work to get all those things to line up—especially when you edit your comments later.
Tip Never use repeating *s to emphasize portions of code. It distracts the reader from the code and makes for a cluttered look. Besides, it’s too much work to get all those things to line up—especially when you edit your comments later.
If you are modifying the MySQL source code using a source-control application such as bazaar, you don’t have to worry about tracking your changes. Bazaar provides several ways for you to detect and report on which changes are yours versus others. If you are not using a source-control application, you could lose track of which changes are yours, particularly if you make changes directly to existing system functions. In this case, it becomes difficult to distinguish what you wrote from what was already there. Keeping an engineering logbook helps immensely with this problem, but there is a better way.
You could add comments before and after your changes to indicate which lines of code are your modifications. For example, you could place a comment such as /* BEGIN CAB MODIFICATION */ before the code and a comment such as /* END CAB MODIFICATION */ after the code. This allows you to bracket your changes and helps you search for the changes easily using a number of text and line parsing utilities. An example of this technique is shown in Listing 3-29.
Listing 3-29 Commenting Your Changes to the MySQL Source Code
/* BEGIN CAB MODIFICATION */
/* Reason for Modification: */
/* This section adds my revision note to the MySQL version number. */
/* original code: */
/*strmov(end, "."); */
strmov(end, "-CAB Modifications");
/* END CAB MODIFICATION */
Notice that I have also included the reason for the modification and the commented-out lines of the original code (the example is fictional). Using this technique will help you quickly access your changes and enhance your ability to diagnose problems later.
This technique can also be helpful if you make modifications for use in your organization and you are not going to share the changes with Oracle. If you do not share the changes, you will be forced to make the modifications to the source code every time Oracle releases a new build of the system you want to use. Having comment markers in the source code will help you quickly identify which files need changes and what those changes should be. Chances are that if you create some new functionality, you will eventually want to share that functionality, if for no other reason than to avoid making the modifications every time a new version of MySQL is released.
![]() Caution Although this technique isn’t prohibited when using source code under configuration control (BitKeeper), it is usually discouraged. In fact, developers may later remove your comments altogether. Use this technique only when you make changes that you are not going to share with anyone.
Caution Although this technique isn’t prohibited when using source code under configuration control (BitKeeper), it is usually discouraged. In fact, developers may later remove your comments altogether. Use this technique only when you make changes that you are not going to share with anyone.
Building the System for the First Time
Now that you’ve seen the inner workings of the MySQL source code and followed the path of a typical query through the source code, it is time for you to take a turn at the wheel. If you are already working with the MySQL source code, and you are reading this book to learn more about the source code and how to modify it, you can skip this section.
I recommend, before you get started, that you download the source code if you haven’t already and then download and install the executables for your chosen platform. It is important to have the compiled binaries handy in case things go wrong during your experiments. Attempting to diagnose a problem with a modified MySQL source-code build without a reference point can be quite challenging. You will save yourself a lot of time if you can revert to the base compiled binary when you encounter a difficult debugging problem. I cover debugging in more detail in Chapter 5. If you ever find yourself with that system problem, you can always reinstall the binaries and return your MySQL system to normal.
Compiling the source is easy. If you are using Linux, open a command shell, change to the root of your source tree, and run the cmake and make commands. The cmake script will check the system for dependencies and create the appropriate makefiles. The following outlines a typical build process for building the source code on Linux for the first time:
$ cmake .
-- The C compiler identification is GNU
-- The CXX compiler identification is GNU
-- Check for working C compiler: /usr/bin/gcc
-- Check for working C compiler: /usr/bin/gcc -- works
-- Detecting C compiler ABI info
-- Detecting C compiler ABI info - done
-- Check for working CXX compiler: /usr/bin/c++
-- Check for working CXX compiler: /usr/bin/c++ -- works
-- Detecting CXX compiler ABI info
-- Detecting CXX compiler ABI info - done
-- Looking for SHM_HUGETLB
-- Looking for SHM_HUGETLB - found
-- Looking for sys/types.h
-- Looking for sys/types.h - found
-- Looking for stdint.h
-- Looking for stdint.h - found
-- Looking for stddef.h
-- Looking for stddef.h - found
...
-- Configuring done
-- Generating done
-- Build files have been written to: /source/mysql-5.6.6
$ make
[ 0%] Built target INFO_BIN
[ 0%] Built target INFO_SRC
[ 0%] Built target abi_check
[ 0%] Building C object zlib/CMakeFiles/zlib.dir/adler32.c.o
[ 0%] Building C object zlib/CMakeFiles/zlib.dir/compress.c.o
[ 0%] Building C object zlib/CMakeFiles/zlib.dir/crc32.c.o
[ 0%] Building C object zlib/CMakeFiles/zlib.dir/deflate.c.o
[ 0%] Building C object zlib/CMakeFiles/zlib.dir/gzio.c.o
[ 0%] Building C object zlib/CMakeFiles/zlib.dir/infback.c.o
[ 0%] Building C object zlib/CMakeFiles/zlib.dir/inffast.c.o
[ 0%] Building C object zlib/CMakeFiles/zlib.dir/inflate.c.o
[ 0%] Building C object zlib/CMakeFiles/zlib.dir/inftrees.c.o
[ 0%] Building C object zlib/CMakeFiles/zlib.dir/trees.c.o
[ 0%] Building C object zlib/CMakeFiles/zlib.dir/uncompr.c.o
[ 1%] Building C object zlib/CMakeFiles/zlib.dir/zutil.c.o
Linking C static library libzlib.a
[ 1%] Built target zlib
[ 1%] Building CXX object extra/yassl/CMakeFiles/yassl.dir/src/buffer.cpp.o
...
Linking CXX executable my_safe_process
[100%] Built target my_safe_process
$
![]() Tip For more information about setting conditionals for complication, see http://www.cmake.org/cmake/help/documentation.html. You can also use the cmake-gui application to set options with a graphical interface. You can download both cmake and cmake-gui from the cmake.org site. The online reference manual also contains some good examples of using conditionals for compiling MySQL.
Tip For more information about setting conditionals for complication, see http://www.cmake.org/cmake/help/documentation.html. You can also use the cmake-gui application to set options with a graphical interface. You can download both cmake and cmake-gui from the cmake.org site. The online reference manual also contains some good examples of using conditionals for compiling MySQL.
You can compile the Windows platform source code using Microsoft Visual Studio. To compile the system on Windows, open a Visual Studio command window (to ensure the vcvarsall.bat batch file is run to load the paths needed), and then issue the cmake . command followed bydevenv mysql.sln /build debug.
![]() Note You must include the dot that tells cmake to start work in the current directory.
Note You must include the dot that tells cmake to start work in the current directory.
This will build a debug version of the server. If you wish to install the server from the source tree, see the “Source Installation Overview” section in the MySQL Reference Manual at http://dev.mysql.com/doc/refman/5.6/en/source-installation.html).
You can also open the mysql.sln project workspace in the root of the source distribution tree from Visual Studio after the cmake command is run. From there, you set the active project to mysqld classes and the project configuration to mysqld - Win32 nt. When you click Build mysqld, the project is designed to compile any necessary libraries and link them to the project that you specified. Take along a fresh beverage to entertain yourself, as it can take a while to build all the libraries the first time. Regardless of which platform you use, your compiled executable will be placed in the client_release or client_debug folder, depending on which compile option you chose.
![]() Caution Most compilation problems can be traced to improperly configured development tools or missing libraries. Consult the MySQL forums for details on how to resolve the most common compilation problems.
Caution Most compilation problems can be traced to improperly configured development tools or missing libraries. Consult the MySQL forums for details on how to resolve the most common compilation problems.
The first thing you will notice about your newly compiled binary (unless there were problems) is that you cannot tell that the binary is the one you compiled! You could check the date of the file to see that the executable is the one you just created, but there isn’t a way to know that from the client side. Although this approach is not recommended by Oracle, and it is probably shunned by others as well, you could alter the version number of the MySQL compilation to indicate that it is the one you compiled.
Let’s assume you want to identify your modifications at a glance. For example, you want to see in the client window some indication that the server is your modified version. You could change the version number to show that. Figure 3-4 is an example of such a modification.
Figure 3-4. Sample MySQL command cient with version modification
Notice in both the header and the result of issuing the command, SELECT Version();, the version number returned is the same version number of the server you compiled plus an additional label that I placed in the string. To make this change yourself, simply edit theset_server_version() function in the mysqld.cpp file, as shown in Listing 3-30. In the example, I have bolded the one line of code you can add to create this effect.
Listing 3-30 Modified set_server_version Function
/*
Create version name for running mysqld version
We automaticly add suffixes -debug, -embedded and -log to the version
name to make the version more descriptive.
(MYSQL_SERVER_SUFFIX is set by the compilation environment)
*/
static void set_server_version(void)
{
char *end= strxmov(server_version, MYSQL_SERVER_VERSION,
MYSQL_SERVER_SUFFIX_STR, NullS);
#ifdef EMBEDDED_LIBRARY
end= strmov(end, "-embedded");
#endif
#ifndef DBUG_OFF
if (!strstr(MYSQL_SERVER_SUFFIX_STR, "-debug"))
end= strmov(end, "-debug");
#endif
if (opt_log || opt_slow_log || opt_bin_log)
strmov(end, "-log"); // This may slow down system
/* BEGIN CAB MODIFICATION */
/* Reason for modification: */
/* This section adds my revision note to the MySQL version number. */
strmov(end, "-CAB MODIFICATION");
/* END CAB MODIFICATION */
}
Note also that I have included the modification comments I referred to earlier. This will help you determine which lines of code you have changed. This change also has the benefit that the new version number will be shown in other MySQL tools, such as the MySQL Workbench. Figure 3-5 shows the results of running the SELECT @@version query in MySQL Workbench against the code compiled with this change.
Figure 3-5. Accessing the modified MySQL server using MySQL Workbench
![]() Caution Did I mention that this isn’t an approved method? If you are using MySQL to conduct your own experiments or you are modifying the source code for your own use, you can get away with doing what I have suggested. If, however, you are creating modifications that will be added to the base source code at a later date, you should not implement this technique.
Caution Did I mention that this isn’t an approved method? If you are using MySQL to conduct your own experiments or you are modifying the source code for your own use, you can get away with doing what I have suggested. If, however, you are creating modifications that will be added to the base source code at a later date, you should not implement this technique.
Summary
In this chapter, you learned several methods of getting the source code. Whether you choose to download a snapshot of the source tree or a copy of the GA release source code, or to use the developer-milestone releases to gain access to the latest and greatest version, you can get and start using the source code. That is the beauty of open source!
Perhaps the most intriguing aspect of this chapter is your guided tour of the MySQL source code. I hope that by following a simple query all the way through the system and back, you gained a lot of ground on your quest to understand the MySQL source code. I also hope that you haven’t tossed the book down in frustration if you’ve encountered issues with compiling the source code. Much of what makes a good open-source developer is her ability to systematically diagnose and adapt her environment to the needs of the current project. Do not despair if you had issues come up. Solving issues is a natural part of the learning cycle.
You also explored the major elements from the MySQL Coding Guidelines document and saw examples of some code formatting and documentation guidelines. While not complete, the coding guidelines I presented are enough to give you a feel for how Oracle wants you to write the source code for your modifications. If you follow these simple guidelines, you should not be asked to conform later.
In the next two chapters, I take you through two very important concepts of software development that are often overlooked. The next chapter shows you how to apply a test-driven development methodology to exploring and extending the MySQL system, and the chapter that follows discusses debugging the MySQL source code.
All materials on the site are licensed Creative Commons Attribution-Sharealike 3.0 Unported CC BY-SA 3.0 & GNU Free Documentation License (GFDL)
If you are the copyright holder of any material contained on our site and intend to remove it, please contact our site administrator for approval.
© 2016-2026 All site design rights belong to S.Y.A.