Learning MySQL (2007)
Part IV. Web Database Applications with PHP
Chapter 13. Web Database Applications
MySQL’s most common use is in wePHPMyb database applications. It’s often teamed with PHP—a web-enabled scripting language—and the Apache web server to develop powerful applications including online shopping, news, sports, and blogs. Indeed, the Apache web server, MySQL, and PHP together form three of the four components of the most popular of all web development platforms, LAMP. The “L” stands for Linux, but the material we cover here works with all three operating systems we look at in this book: Linux, Windows, and Mac OS X.
The LAMP acronym is increasingly interpreted rather loosely as representing any open source development platform for web database applications. The “P” is alternatively taken to stand for Perl, which we introduce in Chapter 16; Python; or another of the popular web programming languages. Similarly, MySQL can be replaced by another open source database system, PostgreSQL (http://www.postgresql.org). PostgreSQL is less popular than MySQL, but it has strong standards compliance, is rich in features, and has looser licensing conditions, making it more appropriate for some applications.
We introduce the following concepts in this chapter:
§ Components of a web database application
§ An overview of the Apache web server
§ An overview of the PHP language, including short examples
The final section of this chapter lists resources where you can find out more about Apache and PHP. We’ll look at several PHP examples but will leave detailed explanation of using PHP and MySQL to Chapter 14, and will build a complete application with these in Chapter 15.
Building a Web Database Application
This section gives an overview of web database applications, drawing analogies and contrasts to the conventional software that you use on your computer. As an overview, it doesn’t discuss technical details in depth; we get to the details later. How Web Software Works” briefly explains how web software works and shows you the steps that occur when a user clicks on a link in his web browser. In Three-Tier Architectures,” we discuss web database applications more formally, describing the three-tier architecture model and how MySQL, PHP, and Apache fit that model.
We’ll assume in this and the next two chapters that you’re familiar with basic programming concepts, including loops, conditionals, and expressions. We’ll also assume you’re familiar with the Web and, in particular, that you understand the basic principles of HTML markup. It doesn’t matter if you don’t know the details of the HTML standard, but we expect you’ll understand HTML when it’s shown to you. If you’ve never programmed or don’t know HTML, then we advise you to use one of the resources listed in Resources” at the end of this chapter before reading this and the next two chapters.
How Web Software Works
Web software is very different from a conventional application. To understand, consider the word processing software on your computer, an example of a traditional, conventional tool. You start the program, then interact with it: you move between typing, clicking on menus and widgets, and between open windows. When you’re finished, you save your files and close the application. The software is an integrated, interactive package: you work with your documents, surrounded by the application’s tools and windows. The software developer has customized the environment to support only word processing, and the tool is tailored carefully to that need; it has special-purpose tools—such as floating toolbars—that are designed to help you when you’re editing a document. Also, usually, you’re the only person using your word processor on your computer.
The interface to most web software isn’t specialized in the same way as a word processor. Instead, you use a conventional web browser—probably Mozilla Firefox, Internet Explorer, or Safari—that sends requests and receive responses from standardized, distributed web servers. The web servers process your requests, run scripts, and return the output to your browser; they serve the many users that are authorized to use the software. The interface environment is constrained: you usually move back and forward through HTML documents—much like using a setup wizard—entering data into HTML forms or clicking on HTML widgets. The tools you use are general-purpose browser tools—such as the Back, Forward, Refresh, and Home buttons, and the Bookmarks or Favorites menu—that don’t vary with the application.
Web software itself is also different. It’s distributed: a small part of it—the simple web browser interface with its limited capabilities—resides on the user’s computer, while the majority of the application logic is captured in scripts that are on a remote web server. The scripts aren’t an integrated, large package: they are simple parts—each performs a specific function—that together provide the application functionality when the user follows a series of steps. Because of this, web software is limited. It isn’t very interactive, it must be fault-tolerant, it’s limited by network speed bottlenecks, and it must work with generic browsers. The relatively recent Ajax technique relies heavily on client-side programming to deliver a more customized user interface. However, the basic building blocks remain the same.
The advantage of web software is its flexibility. Any user, anywhere, with almost any browser on any platform, can use the software. Importantly, no configuration is required, and training isn’t usually needed. Web software is predictable: there are a limited number of ways you can build an application, and most users have seen the paradigms before and know where to start. With web software, deployment is as simple as setting up your web server, installing scripts on it, and publishing the address of your web application page.
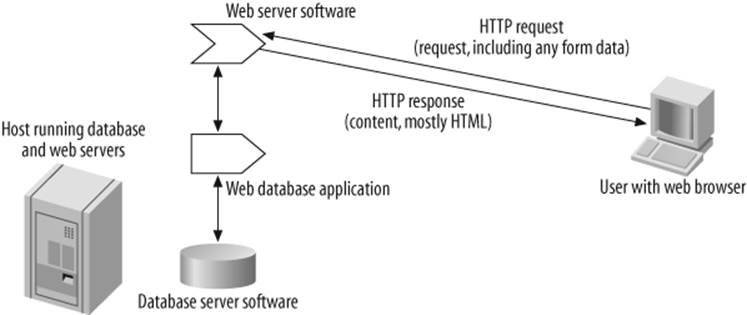
Figure 13-1. Running a web script
Figure 13-1 shows how web software works. When a user clicks on a link (or submits a form, or types a URL), a request is sent from her web browser to a web server identified by the URL. The web server extracts path, resource, and other information from the URL and uses this to identify what script to run and what parameters to give it. The script is then executed and its output sent to the browser, along with a status message that indicates whether the operation was successful. If the request was successful, then (usually) an HTML resource is displayed, and the request process starts again when the user makes her next click in their browser.
Consider an example. You’ve decided to build an online store and have started to write the scripts that compose the application. Suppose you’ve authored one script, shop.php, which allows a user to add an item to his shopping cart. The script expects two parameters to capture what the user wants to purchase: a productID number that identifies the product, and a quantity value that is the amount of the product. The script outputs a success message in HTML when everything works, and an error message in HTML when it doesn’t.
To test your shop.php script, you can save it in a directory from which your Apache web server serves scripts (the document root). If you’re using a Linux or Mac OS X system, you also need to make sure that the file can be read by everyone, since the web server is generally configured as a minimally privileged user who can access only those files that everyone else can access. (We explained how to find the document root in The Apache Document Root” and how to set the correct file permissions in Checking Whether Your Apache Installation Supports PHP,” both inChapter 2.
Now, you’re ready to test the script by requesting it with a web browser. Suppose the web server serves pages for the domain http://www.invyhome.com. You can request shop.php by loading the URL http://www.invyhome.com/shop.php with your web browser. If you’re trying things out on your own development system (localhost), you can use http://localhost/shop.php.
To supply the required parameters, you (or typically, another script) can add them after a question-mark character in the URL, as in http://www.invyhome.com/shop.php?productID=12&quantity=4 and send a request for this address to the server. The request asks for 4 units of productID 12 to be added to the cart. When you request the URL, the web server looks in the directory /var/www/html/, finds the script shop.php, starts the PHP script processor, runs the script and supplies the parameters, and captures the output. The output is then sent to the browser, which displays the response: in this case, an HTML success message that shows 4 units of productID 12 have been successfully added to the cart. Figure 13-2 illustrates these steps.
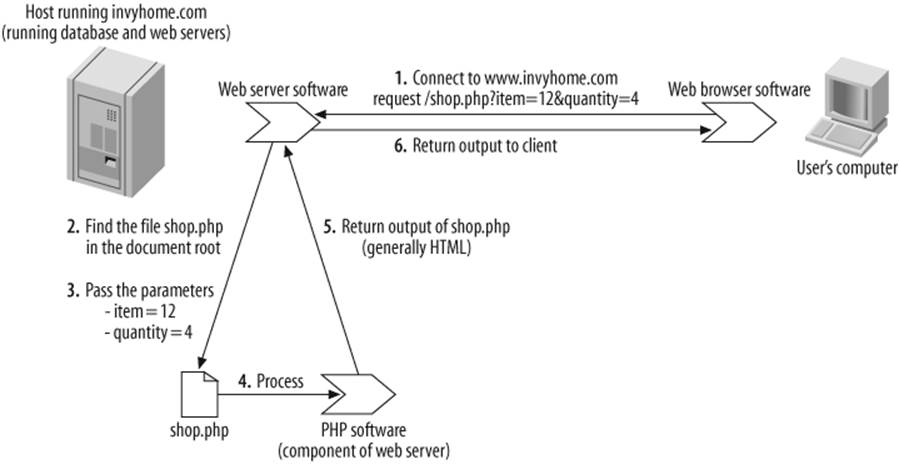
Figure 13-2. The steps to run shop.php
Three-Tier Architectures
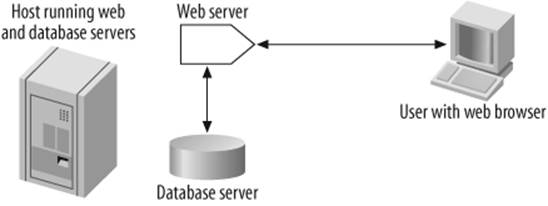
Figure 13-3. A three-tiered web database application
Figure 13-3 shows the architecture of a typical web database application. The web browser is the client tier, providing the interface to the application but very little of the application logic itself. The middle tier is the web server, the script processor, and the scripts; most of the application logic resides here, typically including user authentication, security features, input validation, user session management, the database access library, SQL queries, and other functionality. The database tier is the database server itself, along with its databases, indexes, and utilities. For the applications we discuss in this chapter, the MySQL server is the database tier, and the Apache web server and PHP are the middle tier. Any popular browser can be used as a client.
We’ve previously broadly discussed what makes three-tier-architecture software—that is, web database applications—different from conventional software. In the context of a three-tier architecture, the browser is a very thin client—that is, very little of the application logic resides there. Instead, the middle tier carries out almost all of the application functions, and the browser usually displays only static HTML content. The exception is when the HTML page contains embedded JavaScript—or scripts written in another client-side language—that adds basic interactive features to the web pages; for example, JavaScript is often used to animate menus, highlight options as the mouse passes over them, alert the user with pop-up windows, and perform other simple tasks. We don’t discuss client-side scripting further in this book; there are several good resources listed on the topic at the end of this chapter.
Most of the application logic is captured in PHP scripts in the middle tier. These are invoked when a user requests a resource from the web server, and the web server calls the PHP engine that runs the script. Of course, because all the scripts are accessible with a web browser, users can request any script, any time, from anywhere. This creates unique problems. Web database applications must robustly handle users making unexpected requests; bookmarking and returning to pages later; reloading or refreshing pages when they shouldn’t; or simply disappearing, never to be seen again. Applications must also protect against the threat of accidental damage or malicious attacks. All this is made more difficult by the HTTP protocol that’s used for communication between web browsers and servers. HTTP has no high-level concept of state. Every request from a browser must contain all information needed to answer the request, since the server forgets all about it once the request is answered. We explain solutions to some of these problems in Chapter 14.
The database tier is very similar to that in nonweb applications. The MySQL server listens for connections from clients, such as the MySQL monitor, and authenticates users when they connect. Once the connection is established, the user can run queries, disconnecting when she’s finished. Using MySQL from a PHP script is conceptually similar to using it through the MySQL monitor. The key difference is that you don’t type queries into an interface but instead use PHP library functions to carry out actions such as connecting to the database server, choosing a database, running a query, and retrieving the results. We show you an example later in this chapter.
The Apache Web Server
The LAMP platform includes the Apache web server. While it isn’t necessary to use Apache—PHP and MySQL can be used with other web servers—it’s our server of choice in this book. There are several reasons for this: it’s free in a monetary and open source sense, it’s the most popular server on the Web, it’s robust and scalable, it is the web server most commonly used with PHP, and it works on all popular platforms, including Linux, Windows, and Mac OS X. This section briefly explains web servers and Apache. We discussed how to configure Apache in Chapter 2.
Web servers are also known as HTTP servers. This describes their function: a web browser or other web client makes a request for a web resource to a web server using the HTTP protocol; the web server then serves this request and sends an HTTP response to the browser. There are essentially two classes of request that web servers can handle: first, requests for static resources, such as HTML, XML, or PDF documents, and, second, requests to run a script—often with parameters provided by the browser request—and return the output in a response. The latter class is central to web database applications.
Web browsers send textual requests to web servers. An HTTP request is a text description of a required resource. For example, the following is what the Lynx browser sends as a request for the resource http://www.invyhome.com/artist.php on the web server:
GET /artist.php HTTP/1.0
Host: www.invyhome.com
Accept: text/html, text/plain, audio/mod, image/*, video/*, video/mpeg,
application/pgp, application/pgp, application/pdf, message/partial,
message/external-body, application/postscript, x-be2,
application/andrew-inset, text/richtext, text/enriched
Accept: x-sun-attachment, audio-file, postscript-file, default, mail-file,
sun-deskset-message, application/x-metamail-patch, application/msword,
text/sgml, */*;q=0.01
Accept-Encoding: gzip, compress
Accept-Language: en
User-Agent: Lynx/2.8.4dev.16 libwww-FM/2.14 SSL-MM/1.4.1 OpenSSL/0.9.6
The request lists all information required to serve the request: a method to use (GET), the required resource, the HTTP version, the host server, and details of the browser and what types of responses it can receive.
In response, the web server returns an HTTP header, and then the requested resource if the request is satisfied. Continuing the example, the server looking after http://www.invyhome.com returns the following response:
HTTP/1.1 200 OK
Date: Wed, 02 Aug 2006 14:55:15 GMT
Server: Apache/2.2.3 (Mandriva Linux/PREFORK-1mdv2007.0)
Last-Modified: Tue, 27 Jul 2006 18:27:45 GMT
ETag: "3fc424-1e5-be72aa40"
Accept-Ranges: bytes
Content-Length: 1485
Content-Type: text/html
X-Pad: avoid browser bug
<!DOCTYPE HTML PUBLIC
"-//W3C//DTD HTML 4.01 Transitional//EN"
"http://www.w3.org/TR/html401/loose.dtd">
<html>
<head>
<meta http-equiv="Content-Type" content="text/html; charset=iso-8859-1" />
<title>Artists</title>
</head>
<body>
<h1>Artists</h1>
<table>
<tr>
<th>artist_id</th>
<th>artist_name</th>
</tr>
...
</table>
</body>
</html>
As with a request, the response includes the HTTP standard version, whether the request was satisfied (200 OK), server details, the response type, and then the response itself.
A key feature of HTTP is that each request and response is self-contained. You’ll notice that the request includes all the information needed to respond to the request, and the response includes all information needed for the browser to process it. If a browser makes subsequent requests to the same server, it will again provide all of the information. The process is unlike traditional communications protocols where a handshaking phase establishes the credentials and then communication takes place until the line is closed. When we talk about HTTP lacking state, this is what we mean: nothing is assumed when a browser and server communicate, each exchange is separate, and everything is specified exhaustively each time.
Lack of state means speed. Since servers don’t have to remember anything, they can process a request and respond immediately without having to restore information about the client. This means they adapt to changes in load and can handle very large numbers of requests on modest hardware. The stateless model is ideal for fast, one-off communications where you want to retrieve a document or run one script.
At the same time, lack of state makes application development harder. If you need state, then you have to add it programmatically so that it can be restored with subsequent requests. For example, if you want to lead a user through a series of steps, ensure they don’t access certain parts of the web site without logging in, or make sure they only run a script once, then you need state. PHP provides tools for this purpose—embedded in the sessions functions and features discussed in Chapter 14—but they need to be used carefully. Adding state to web database applications isn’t straightforward, and it must carefully follow rules so that it’s robust and secure.
Web Server Index Files
The browser may simply request a directory rather than a specific filename. For example, the address http://www.invyhome.com/ corresponds to the document root directory, while the address http://www.invyhome.com/shop/ corresponds to the the shop directory under the document root. When the web server receives such a request, it searches for an index file in the directory. The index file is typically used as the starting point for a web site or web application and has the filename index.html (for plain HTML), index.php (for a PHP script), or index.pl (for a Perl script). If there is no index file present in the directory, the web server returns a listing of all files in the directory, or, if the server has been configured for greater security, tells the browser that access to the directory contents is denied.
You can check what filenames your Apache server treats as index files by looking inside the Apache configuration file and searching for the DirectoryIndex directive. For example, you might see:
DirectoryIndex default.htm Default.htm index.cgi index.htm index.html index.php
index.php3 index.php4 index.php5 index.phtml index.pl index.xml
If there are multiple index files in a directory, the server will use the one that appears first in its DirectoryIndex list.
If the requested address doesn’t end with a forward slash symbol (/), the web server has to first check if the address corresponds to a file or a directory. For example, for the address http://www.invyhome.com/shop, the server needs to check whether it should return the file shop in the document root, or the index file in the shop directory under the document root.
Introducing PHP
PHP is a scripting language that is designed to be embedded into the HTML markup used for web pages; it can be used for other purposes, but that’s outside the scope of our discussions. It works on almost all Unix platforms—including Linux and Mac OS X—and with Windows 32-bit environments, such as Windows 2000, XP, and Vista. Web pages that contain PHP scripts are preprocessed by the PHP scripting engine, and the source code is replaced with the output of the script. Indeed, the acronym PHP obliquely suggests just that—PHP: Hypertext Preprocessor.
PHP is extremely popular for several reasons: it’s easy to include PHP scripts in HTML documents, PHP is free in a monetary and open source sense, it has a large number of powerful but easy-to-use function libraries, and it shares syntax with C or Perl-like languages. PHP is also widely supported; there are a very large number of books, web sites, and add-on products available. You’ll find that moving from simple examples to advanced material is made easy by this wide-ranging support.
Example 13-1 shows simple PHP script embedded in an HTML document:
Example 13-1. PHP Script to say “Hello, world!”
<!DOCTYPE HTML PUBLIC
"-//W3C//DTD HTML 4.0 Transitional//EN"
"http://www.w3.org/TR/html4/loose.dtd" >
<html>
<head>
<title>Hello, world</title>
</head>
<body>
<?php echo "Hello, world"; ?>
</body>
</html>
When preprocessed by the PHP scripting engine, the short (and not very useful) script:
<?php echo "Hello, world"; ?>
is replaced with its output:
Hello, world
The text before and after the script is HTML; the first three lines define that HTML version 4 is being used. Any number of PHP scripts can be embedded in an HTML document, as long as each PHP script is surrounded by the begin tag <?php and the end tag ?>. Other tags can also be used to delimit PHP scripts, but the tags we use are the most common and reliable.
One of the best language features of PHP is how it decodes user data and automatically initializes variables. Consider a sample script stored in the file printuser.php:
<!DOCTYPE HTML PUBLIC
"-//W3C//DTD HTML 4.0 Transitional//EN"
"http://www.w3.org/TR/html4/loose.dtd" >
<html>
<head>
<title>Saying hello</title>
</head>
<body>
<?php
echo "Hello, {$_GET["username"]}";
?>
</body>
</html>
Let’s assume that the file is stored on the web server in the document root of the web server. The script can be retrieved using a web browser—in the case where it is running on the same machine as the web server (localhost)—by requesting the URL http://localhost/printuser.php?username=Selina. In response to the request, the PHP engine replaces the script:
<?php
echo "Hello, {$_GET["username"]}";
?>
with the output:
Hello, Selina
In this example, the URL is automatically decoded and an array variable $_GET initialized. The array contains an element username, which matches the name of the attribute in the URL, and its value is set to the value in the URL, Selina. This automatic registration of variables is an excellent feature; we explain how to use it securely in Untainting User Data” in Chapter 14, and we revisit the issue of how to pass information to scripts using the URL in Passing a Message to a Script” in Chapter 15. Don’t worry too much now about arrays, elements, and the PHP syntax; we’ll return to the details in the next two chapters.
Files that contain PHP scripts usually have the extension .php instead of the HTML file extension of .html or .htm. The .php extension is the trigger for the web server to invoke the PHP scripting engine to preprocess the file. This is controlled by a directive in the web server’s configuration file, which we discussed briefly in Configuring and Controlling the Apache Web Server” in Chapter 2.
Passing variables and values using a URL is one way of transferring data from a web browser to a web server. However, the most common technique is to use an HTML form such as the following:
<!DOCTYPE HTML PUBLIC
"-//W3C//DTD HTML 4.0 Transitional//EN"
"http://www.w3.org/TR/html4/loose.dtd" >
<html>
<head>
<title>Saying hello</title>
</head>
<body>
<form method="GET" action="printuser.php" />
Enter your name: <input type="text" name="username" />
<br /><input type="submit" value="Show it!" />
</form>
</body>
</html>
When this HTML document is rendered by a web browser, as shown in Figure 13-4, the user is able to enter their name into an input widget.
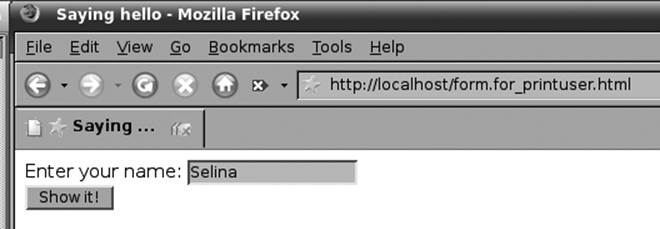
Figure 13-4. A form that requests the script printuser.php
Below the widget is a button labeled “Show it!”. When the user presses the button, the script listed as the action attribute of the form element is requested, and the data in the input widget is sent to the server as part of the URL.
For example, if the user enters the name Selina into the input widget and presses the “Show it!” button, then the URL http://localhost/printuser.php?username=Selina is requested. The web server runs the script printuser.php and passes the submitted data to it. This script takes the submitted name and uses the echo statement to generate the message “Hello,” followed by the text typed into the form. The web server returns any output produced by the PHP script to the user’s browser, which then displays it. In our example, the user would see the message:
Hello, Selina
Example: Displaying the Artists from the Music Collection
We now look at another example that illustrates how you can use a PHP script, which is accessible with a web browser, to run a query on a MySQL server and return a list of artists from the music database; the script then formats this list as an HTML table for display on the browser. We don’t discuss the details of the process here, or the syntax of the language; these are covered in the next two chapters. The aim of this section is to give you a taste for how PHP and the web environment fit together with MySQL to build a web database application.
You used the MySQL monitor in Chapter 5 to run basic queries on the music database. Using it, you know how to display all artists:
mysql> USE music;
Database changed
mysql> SELECT * FROM artist;
+-----------+---------------------------+
| artist_id | artist_name |
+-----------+---------------------------+
| 1 | New Order |
| 2 | Nick Cave & The Bad Seeds |
| 3 | Miles Davis |
| 4 | The Rolling Stones |
| 5 | The Stone Roses |
| 6 | Kylie Minogue |
+-----------+---------------------------+
6 rows in set (0.00 sec)
Example 13-2 uses PHP to do the same thing: use the music database, run the SELECT query, and display the results formatted in a table.
Example 13-2. Querying the music database with PHP
<!DOCTYPE HTML PUBLIC
"-//W3C//DTD HTML 4.01 Transitional//EN"
"http://www.w3.org/TR/html401/loose.dtd">
<html>
<head>
<meta http-equiv="Content-Type" content="text/html;
charset=iso-8859-1" />
<title>Artists</title>
</head>
<body>
<h1>Artists</h1>
<table>
<tr>
<th>artist_id</th>
<th>artist_name</th>
</tr>
<?php
// Connect to the MySQL server
if (!($connection = @ mysql_connect("localhost", "root",
"the_mysql_root_password")))
die("Cannot connect");
if (!(mysql_select_db("music", $connection)))
die("Couldn't select music database");
// Run the query on the connection
if (!($result = @ mysql_query("SELECT * FROM artist", $connection)))
die("Couldn't run query");
// Until there are no rows in the result set, fetch a row into
// the $row array and ...
while ($row = @ mysql_fetch_array($result, MYSQL_ASSOC))
{
// Start a table row
print "<tr>\n";
// ... and print out each of the columns
foreach($row as $data)
print "\t<td>{$data}</td>\n";
// Finish the row
print "</tr>\n";
}
?>
</table>
</body>
</html>
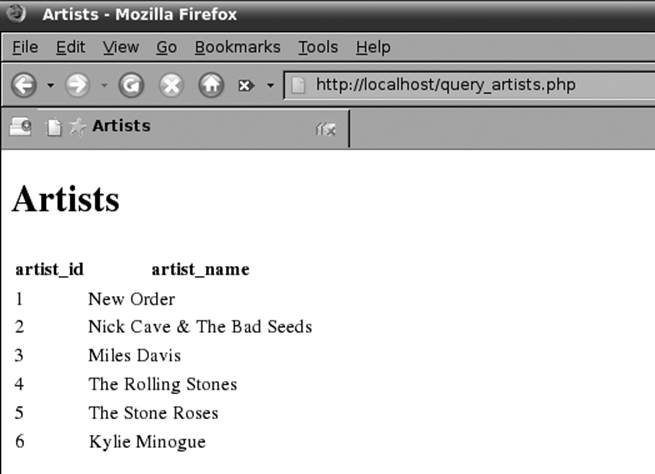
Figure 13-5. Output of query_artists.php shown in a web browser
This script doesn’t take parameters, and so returns the same results every time unless you change the data. Its output is shown in Figure 13-5.
To edit the file, you can use any text editor. See Using a Text Editor” in Chapter 2 for a discussion of text editors for different operating systems. Once you’ve typed in the contents and saved this as the file query_artists.php in the document root of our Apache web server installation, you can test that it works by loading the URL http://localhost/query_artists.php in a web browser.
If you do so and get a message like:
Fatal error: Call to undefined function mysql_connect()
you should ensure that your installation of PHP has the MySQL libraries installed. If you’re using RPMs, the libraries are typically in the php-mysql package.
The first 16 lines of the file are HTML. Of these, the first eight lines of the script are the preamble, which starts an HTML document, defines the content type, and sets the page title. The following eight lines start a table, displaying column headings for the data that follows. The final three lines of the file close the HTML document. The remainder of the file—producing the content inside the HTML table—is the PHP script.
The PHP script is encapsulated in the <?php and ?> tags. The script itself carries out four main steps:
1. Connect to MySQL, using the mysql_connect() MySQL library function
2. Select the database, using the mysql_select_db() MySQL library function
3. Run the SQL query, using the mysql_query() MySQL library function
4. Retrieve and display the data, using a while loop, the mysql_fetch_array() MySQL library function, the print statement, and a foreach loop
With the exception of the last step, you already know how to carry out these steps using the MySQL monitor.
The first step in the PHP script is to connect to MySQL. This is performed with the following fragment:
if (!($connection = @ mysql_connect("localhost", "root", "the_mysql_root_password")))
die("Cannot connect");
The function mysql_connect() opens a connection, and the three parameters to the function—"localhost", "root", and "the_mysql_root_password"—are the hostname of the server, the MySQL user, and the user’s password, respectively. The function does the same thing as running the MySQL monitor: it authenticates you, giving you access to the MySQL server so that you can run SQL statements. The other important feature is that a connection resource handle is returned and saved in a PHP variable $connection; this is used in the following two steps. The at symbol (@) tells PHP not to display its own error messages. If we discover a critical error, we call the die() function to display an error message and stop processing the script. We look at error handling in detail in Handling MySQL Errors” in Chapter 4.
The second step is to use a database. This occurs through this fragment:
if (!(mysql_select_db("music", $connection)))
die("Couldn't select music database");
The function mysql_select_db() is the PHP library equivalent of the USE command. In this fragment, the music database is selected as the current database. The second parameter to the function, $connection, is the database connection resource handle returned from the first step; it’s used to identify the connection to the database server.
The third step runs the query. It performs the same function as typing it into the MySQL monitor does, but it doesn’t retrieve or display the results. Here’s the code fragment:
if (!($result = @ mysql_query("SELECT * FROM artist", $connection)))
die("Couldn't run query");
The function that does the actual work is mysql_query(), and it takes two parameters: first, the SQL query, and, second, the database connection resource handle that identifies the connection to use. It returns a database result resource that is used to identify the rows to be retrieved in the next step; in this example, it’s saved in the variable $result. Unlike with the MySQL monitor, there’s no need to add a semicolon symbol (;) at the end of the query.
The fourth step retrieves and displays the results; it’s the most complicated step and spans 14 lines in the script:
// Until there are no rows in the result set, fetch a row into
// the $row array and ...
while ($row = @ mysql_fetch_array($result))
{
// Start a table row
print "<tr>\n";
// ... and print out each of the columns
foreach($row as $data)
print "\t<td>{$data}</td>\n";
// Finish the row
print "</tr>\n";
}
It works as follows:
§ The while loop fetches each result row, one by one, from the MySQL server using mysql_fetch_array(). The parameter to the function is $result, which references the results from the query that was executed in the third step. Each row returned by the function is saved in the variable $row and then processed in the loop body as detailed next. The loop stops when there are no more rows to retrieve.
§ Inside the body of the while loop, three steps occur for each retrieved row:
1. The first print statement produces an HTML <tr> tag to start a new table row.
2. The foreach loop processes each column value for the row and uses a print statement to surround each column value with <td> and </td> tags.
3. The last print statement produces an HTML </tr> tag to end the row.
Because there are always two columns in every row of output—and they’re always in the same order—the artist_id and artist_name column values line up with the headings, as shown in Figure 13-5. When all of the artists have been printed, the while loop ends, and the script finishes.
We haven’t discussed many of the features of PHP that we’ve used. For example, the script has error-handling capabilities, so it’ll report a message to the user when something goes wrong. Statements such as foreach require some explanation, but don’t worry about the details for now. The next two chapters explain all you need to build a basic application.
Using a PHP-Enabled Web Hosting Site
There are a large number of companies that offer low-cost or free web hosting packages with PHP and MySQL support. To start looking for one, perform a web search for “php mysql web hosting.” These hosting packages usually include FTP access to copy files to your web directory, and a web-based MySQL client such as phpMyAdmin.
To get your site up and running on such a site, first copy your files across to the server using FTP. Under Linux, the KDE Konqueror and GNOME Nautilus file managers both support FTP. Under Mac OS X, select “Connect to Server” from the Finder Go menu; you can also use the free Cyberduck program. Under Windows, you’ll need to download an FTP tool such as FileZilla (http://sourceforge.net/projects/filezilla).
To connect to the server, enter your username and the name of your FTP server—for example, ftp://adam@isp_ftp_server.net. If you’re a power user and want command-line control, including possibly scripting file transfers, you can use the ncftp tool set (http://www.ncftp.com/ncftp), especially the ncftpput program. This is the tool we use ourselves, and is available for Linux, Windows, and Mac OS X.
Now, how do you set up the database? Well, there are two ways. You could create the database on the web host; this is likely to be tedious. A better solution is to create the database on your own machine and then export it to the web host.
You can export data from a database into an SQL dump file using the mysqldump command discussed in Chapter 10. Once you have the dump file, you can upload it to the server as an SQL query text file. The server will run all the SQL queries in the file and re-create the database.
Hosting companies generally don’t give subscribers access to the MySQL server root account and instead allocate each subscriber a non-root username and password. You’ll need to modify your scripts to use the authentication details provided to you.
Most web-hosting packages with MySQL support allow you to access the MySQL server using the phpMyAdmin web-based MySQL administration tool. As you can see from Figure 13-6, phpMyAdmin allows you to perform common operations such as creating, browsing, editing, and dropping database tables by clicking on links in your browser.
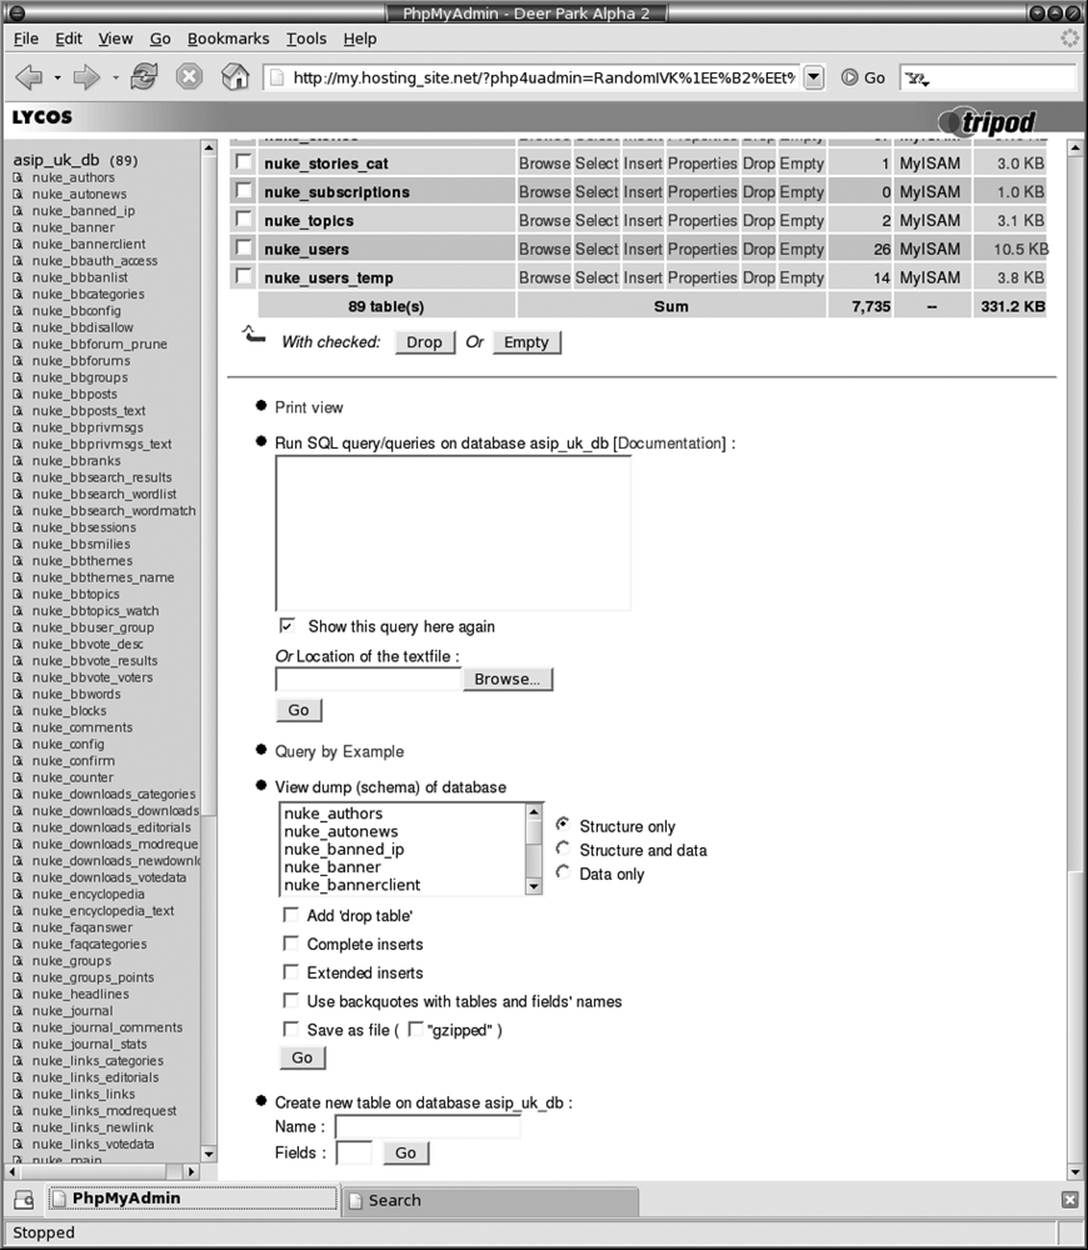
Figure 13-6. The phpMyAdmin graphical MySQL administration tool
You can run SQL queries on the database by typing them into the phpMyAdmin text box or by uploading a text file that contains the query. You can upload a complete database in this way by telling phpMyAdmin to run the queries in a database dump file created using mysqldump.
Similarly, you can download a dump file of selected tables or the complete database by selecting the “Save as file” option under the “View dump” section.
The XAMPP integrated package includes an installation of phpMyAdmin. Note that if you configure web tools such as phpMyAdmin to access the server, you should take great care to authenticate users, since you are effectively publishing your database on the Web.
Resources
To learn more about the origins of LAMP, and related technologies, visit the http://www.onlamp.com web site run by O’Reilly Media.
To learn more about PHP and PHP programming, we recommend the following books:
§ Learning PHP 5 by David Sklar (O’Reilly). This is an excellent introductory book.
§ Programming PHP by Rasmus Lerdorf et al. (O’Reilly). A reference-style book that covers the core libraries.
§ PHP Pocket Reference by Rasmus Lerdorf (O’Reilly).
§ PHP Cookbook by David Sklar and Adam Trachtenberg (O’Reilly). This contains solutions to tricky PHP problems.
§ PHP Essentials by Julie Meloni (Premier Press). A good introductory book covering programming basics.
Other books are listed on the http://www.php.net/books.php web page.
To learn more about Apache, we recommend:
§ The Apache web site (http://httpd.apache.org).
§ Apache: The Definitive Guide by Ben Laurie and Peter Laurie (O’Reilly). This really is the definitive guide to Apache configuration.
§ Apache Cookbook by Ken Coar and Rich Bowen (O’Reilly). Solutions to problems with Apache.
To learn more about building web database applications that use PHP, Apache, and MySQL, read Hugh’s other book:
§ Web Database Applications with PHP and MySQL by Hugh E. Williams and David Lane (O’Reilly).
You might also find it interesting to learn about the relatively new Ajax programming paradigm, which relies heavily on client-side processing: (http://en.wikipedia.org/wiki/AJAX)
To learn more about client-side programming with JavaScript, see:
§ The W3Schools JavaScript tutorial at http://www.w3schools.com/js.
§ JavaScript: The Definitive Guide by David Flanagan (O’Reilly).
To learn more about phpMyAdmin, see the program’s web site at http://www.phpmyadmin.net.
You might also be interested in Ruby on Rails, which is designed for easy development of web database applications using the Ruby scripting language; to learn more, visit the Ruby on Rails web site at: http://www.rubyonrails.org.
Exercises
1. What does the acronym LAMP stand for?
2. Draw a diagram that explains a three-tier architecture. For each tier, list the LAMP components that make up that tier.
3. HTTP is a stateless protocol. What does this mean? What are the advantages and disadvantages of statelessness?
4. How does Apache know when to start the PHP engine? What steps would you take if PHP code itself were displayed in the browser rather than the result of running the PHP code?
All materials on the site are licensed Creative Commons Attribution-Sharealike 3.0 Unported CC BY-SA 3.0 & GNU Free Documentation License (GFDL)
If you are the copyright holder of any material contained on our site and intend to remove it, please contact our site administrator for approval.
© 2016-2026 All site design rights belong to S.Y.A.