PHP and MySQL: The Missing Manual (2011)
Part 3. From Web Pages to Web Applications
Chapter 8. Handling Images and Complexity
You’ve come to a real watershed moment in your programming career. Up until now, you’ve been using a lot of PHP constructs—from if statements to some basic functions to constants and even error handling—and have gotten familiar with the basic MySQL interactions you’ll need in typical PHP scripts. With what you already know, you’re ready to take on most of the basic programming problems you’ll run across in a typical web application, as long as you’re thinking on a single-page level.
In other words, if you’ve got a form that gathers information, you can handle that. You can grab information from a table, and put information into a table, too. No problems there; you can respond to errors, redirect users, and even distinguish between a good user experience and a bad one.
But you know that web applications are greater than the sum of their single-page interactions. Ten different pages that interact with ten different tables is a lot simpler than a complete web application that has ten pages, but also has those ten tables interacting, connecting to each other, and even relating information in one table to information in another. Then, add to that image handling (something you’ve got to dig into to finish your user form), some interaction with Facebook and Twitter, and letting users log in, and things just got a lot trickier.
And that’s what’s next: the jump from thinking about single forms and single scripts to thinking about entire systems. You’re definitely ready to begin interacting with the file system—the place where your scripts and files and images live. You’re ready to start thinking not just about a single table like users but working with multiple tables. And custom functions? No worries. You’ve already built two—debug_print (Now You See Me, Now You Don’t) and handle_error (redirect is Path-Insensitive)—so you should have no problem.
Along the way, though, the decisions get trickier. Complexity brings with it not just the question of “What do I do next?” but also “Of the two or three ways I could solve this problem, which one is the best way?” So get ready: you’re diving into deeper programming waters, which tend to be mixed with as much critical thinking and philosophy as new PHP and MySQL language features.
NOTE
Up till now, the changes to your code have become fast and furious. In fact, you may be a little unsure if you’ve got everything right. You can always hop online and visit www.missingmanuals.com/cds/phpmysqlmm to get the chapter-by-chapter examples, and make sure you’re caught up and ready to keep programming.
Images Are Just Files
The big glaring omission in your work with users is that pesky profile image. You probably remember that the user’s profile is pretty incomplete right now. The difference between your mock-up from Chapter 6 (shown in Figure 8-1) and where your code is (shown in Figure 8-2) is pretty easy to spot: it’s all in that image.

Figure 8-1. Here’s where a mock-up really comes in handy. You’ve got a marker indicating what you want… and it’s really easy to compare your mock-up to your current progress. So in this mock-up, almost all the interest is in the image of the user. It’s also the area where users can really personalize their profile page. (Have you seen some of the avatar images on Facebook and Twitter? Folks love expressing themselves through their profile pictures!)
So it’s obvious: you need an image for the user. That’s pretty easy, right? Well, you’ve seen a thousand img tags in HTML by now:
<img src="images/cj_wilson.jpg" class="user_pic" />
The value of the src attribute may have gotten your attention. It’s a reference to a file, but you don’t have any image files yet. You’ve got the user’s name and information in your users table, but there’s no image on your web server to which you can point. That seems like a different sort of problem; you don’t just need a string of text, like “Ryan Geyer” or “@trenspot,” but an actual file, and then a reference to a file.
Your task now is to get something other than text information from a user, and then decide what do you do with that information once you’ve got it.
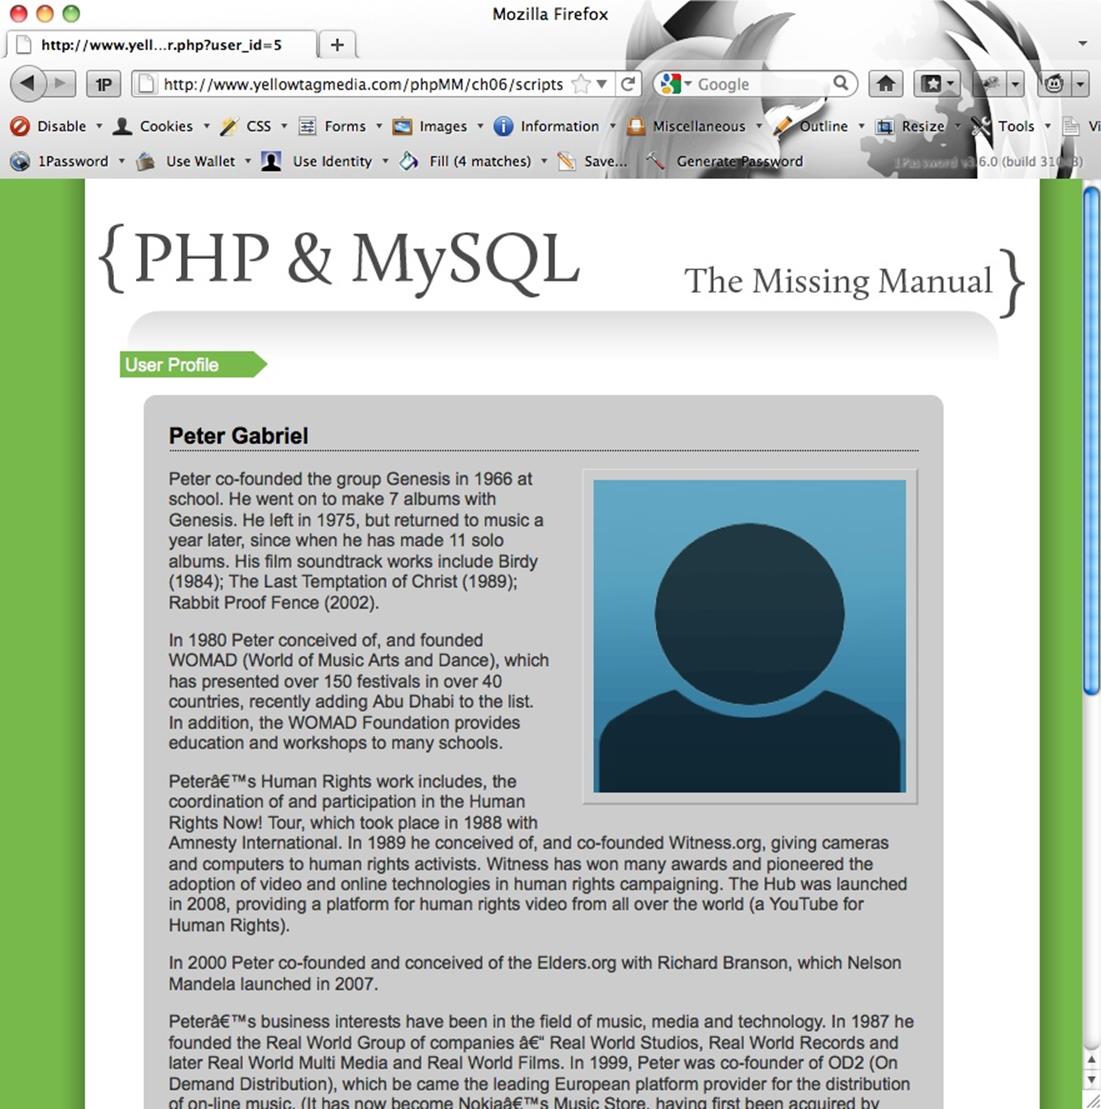
Figure 8-2. Wow. Take away one image, and what a change. This is a pretty dull page… the long bio makes it worse. Long bios aren’t bad, but they just make the lack of any imagery glaringly obvious.
UP TO SPEED: FILES, FILE SYSTEMS, AND CLIENT VERSUS SERVER
This may be the first time you’ve had to get a clear understanding of the difference between what’s on your user’s machine and what’s on the web server. First, you know what a file is: it’s just a collection of bits and bytes that your computer knows how to handle. Your scripts, HTML, CSS, and JavaScript are ultimately just text: characters strung together and interpreted by a web browser or the PHP program. In the case of PHP, your web server interprets that PHP, turns it into HTML and CSS and JavaScript for your browser, and then lets the browser take over. For the browser, it takes HTML and CSS and JavaScript—whether in a static file or returned by a web server that’s processed a PHP script—and renders those to your user’s screen.
Images, on the other hand, are binary data. The same bits and bytes that make up your text files are used to indicate location and color of pixels. And you need a different type of interpretation to read a binary file. Fortunately, web browsers are perfectly capable of taking an image file—be it a JPEG (.jpg), GIF (.gif), or PNG (.png)—and displaying it. Still, the process of getting a binary file is a bit different.
When users type in the URL of your web application into their browser, they’re running your program, which lives on a web server somewhere and is available via the Internet. They’re running that program using their web browser, which is a program that lives on their computer. And there’s a big difference between what’s on their computer, and what’s on your web server. So your web server can’t reach into their computer and grab images, for example. To see one of their images in your program, users have to upload that image to your web server.
Of course, most users don’t know how to upload a file using a program like FTP. Why should they? They just want to use programs, not write them or learn lots of weird command-line tools. (They just haven’t seen the geeky yet beautiful light of programming!) So it’s up to you to get their file from their computer onto your file system. A file system is just a fancy word that means your own web server’s system of files. It can also mean your user’s computer. Another way to put this is that your user’s computer is a client—a machine that is accessing your program. And your program runs on the server. So the interaction is called a client-server interaction. Your job, then, is to get an image file from the client to the server. Then, your server can give your PHP scripts access to that image file to be used in your programs…and of course, most importantly, in the user profile page.
HTML Forms Can Set the Stage
In this situation, HTML does much more than play a bit part to your PHP program. You need to make sure that the HTML form is working and is set up correctly to help your users upload their images. Not only does that form need to give the user a place to select an image, but it needs to set up the process by which that image is uploaded correctly.
Copy create_user.html from your Chapter 6 examples folder (page xvii) into the directory where you’re working now. Here’s how things were left (Updating Your User Signup Form); there are several steps already in place for uploading an image:
<html>
<head>
<link href="../css/phpMM.css" rel="stylesheet" type="text/css" />
</head>
<body>
<div id="header"><h1>PHP & MySQL: The Missing Manual</h1></div>
<div id="example">User Signup</div>
<div id="content">
<h1>Join the Missing Manual (Digital) Social Club</h1>
<p>Please enter your online connections below:</p>
<form action="create_user.php" method="POST"
enctype="multipart/form-data">
<fieldset>
<label for="first_name">First Name:</label>
<input type="text" name="first_name" size="20" /><br />
<label for="last_name">Last Name:</label>
<input type="text" name="last_name" size="20" /><br />
<label for="email">E-Mail Address:</label>
<input type="text" name="email" size="50" /><br />
<label for="facebook_url">Facebook URL:</label>
<input type="text" name="facebook_url" size="50" /><br />
<label for="twitter_handle">Twitter Handle:</label>
<input type="text" name="twitter_handle" size="20" /><br />
<label for="user_pic">Upload a picture:</label>
<input type="file" name="user_pic" size="30" />
<label for="bio">Bio:</label>
<textarea name="bio" cols="40" rows="10"></textarea>
</fieldset>
<br />
<fieldset class="center">
<input type="submit" value="Join the Club" />
<input type="reset" value="Clear and Restart" />
</fieldset>
</form>
</div>
<div id="footer"></div>
</body>
</html>
NOTE
You also should change the action of the form to reflect that you’re no longer using a scripts/ directory. This HTML is in the ch08/ example directory in the book’s downloadable examples.
The key parts here are the enctype attribute on the form tag, and the “file” input type for the user_pic. These lines set up the form to upload not just text, but also a binary image file.
Figure 8-3 shows that the page already lets users select an image. But there’s something else this HTML needs: a size limit on the image. You’ve gotten that email from a friend that’s 22MB and has a picture of a cat blown up to 100 times its normal size, right? You want to avoid that in yourforms. No 22MB cat images; a single megabyte or two is plenty for any reasonable profile picture.
NOTE
MB stands for megabyte, which is one million bytes. That’s what the mega prefix represents: 1,000,000 of something. To get an idea of sizes, a 20 or 30 page Word document is only about 1 MB. So a 20MB image is a large image.
In general, the only reason you’d want image files that big is for high-end photography sites or image sharing sites like Flickr (www.flickr.com) that really value tons of detail. You don’t need anything like that for a simple profile picture.
You can limit the size of an uploaded file by adding a hidden input element, and give it the name “MAX_FILE_SIZE.” For the value, just give the maximum size of the uploaded image you’ll allow, in bytes. So if you wanted to allow a 1MB image, that’s 1,000,000 bytes. Here’s the HTML to allow a 2MB image:
<input type="hidden" name="MAX_FILE_SIZE" value="2000000" />
<label for="user_pic">Upload a picture:</label>
<input type="file" name="user_pic" size="30" />
WARNING
Make sure you put this input before the input that’s a “file” type. You should also avoid any comments in the value attribute. Just count those zeroes carefully, or you’ll be back to shockingly large cats again. (And for those concerned, no felines were harmed in the making of this book.)
The form doesn’t look any different with this input element, but now you’re ready to let users upload an image, and actually do something with that image (see Figure 8-3).
Try it: select an image, and then click “Join the Club.” Even though there’s no PHP script waiting to receive this information, you’ll see your browser slowly uploading…something. Check out Figure 8-4 for Chrome’s response: a bit-by-bit indication of how things are going.
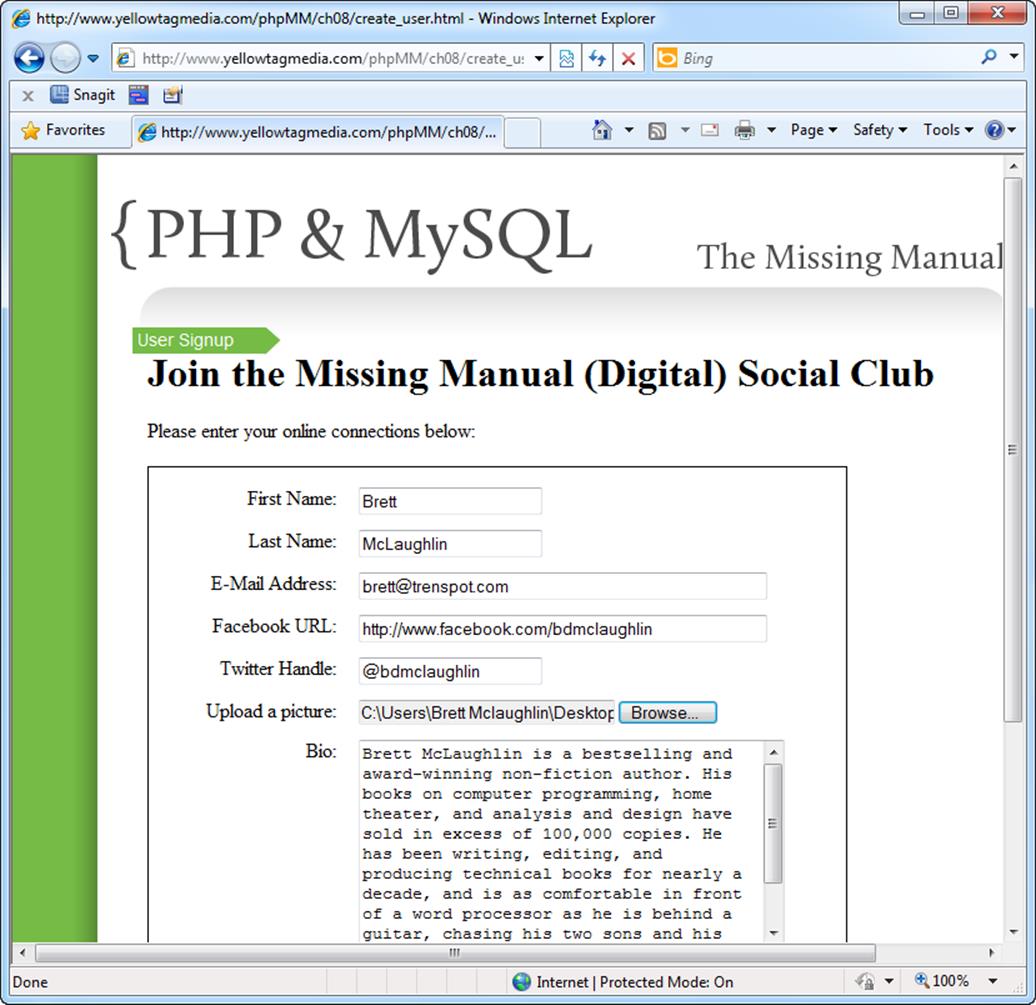
Figure 8-3. With much of your HTML already in place, a lot of the changes you’re starting to make are invisible just by looking at the web page. Nothing looks different about this form. But it’s imposing limits on what your users can do—limits that you’ve set. That’s a good thing.

Figure 8-4. It’s hard to imagine just how much the web browser does for you. Here’s a case where, just by using the input file type, you get a progress indicator, network connections, and an image upload…all for free. Now you’ve got time to write great PHP.
Uploading a User’s Image to Your Server
So now you’ve got to get that image and do something with it. Start by copying your old version of create_user.php into your current directory. Your script should look like this:
<?php
require_once '../scripts/app_config.php';
require_once '../scripts/database_connection.php';
$first_name = trim($_REQUEST['first_name']);
$last_name = trim($_REQUEST['last_name']);
$email = trim($_REQUEST['email']);
$bio = trim($_REQUEST['bio']);
$facebook_url = str_replace("facebook.org", "facebook.com", trim($_
REQUEST['facebook_url']));
$position = strpos($facebook_url, "facebook.com");
if ($position === false) {
$facebook_url = "http://www.facebook.com/" . $facebook_url;
}
$twitter_handle = trim($_REQUEST['twitter_handle']);
$twitter_url = "http://www.twitter.com/";
$position = strpos($twitter_handle, "@");
if ($position === false) {
$twitter_url = $twitter_url . $twitter_handle;
} else {
$twitter_url = $twitter_url . substr($twitter_handle, $position + 1);
}
$insert_sql = "INSERT INTO users (first_name, last_name, email, " .
"bio, facebook_url, twitter_handle) " .
"VALUES ('{$first_name}', '{$last_name}', '{$email}', " .
"'{$bio}', '{$facebook_url}', '{$twitter_handle}');";
// Insert the user into the database
mysql_query($insert_sql);
// Redirect the user to the page that displays user information
header("Location: show_user.php?user_id=" . mysql_insert_id());
exit();
?>
NOTE
You need to make a few changes to get your script to this point. Update the path to app_config.php and database_connection.php, and use require_once instead of require.
Setting Up Some Helper Variables
First, you need to add some basic information you’ll use for getting at the file, and for storing it. Add these variables to the top of your page:
<?php
require_once '../scripts/app_config.php';
require_once '../scripts/database_connection.php';
$upload_dir = SITE_ROOT . "uploads/profile_pics/";
$image_fieldname = "user_pic";
$first_name = trim($_REQUEST['first_name']);
// Other variables
// Get request information
// Insert into MySQL
?>
Pretty basic stuff. That constant in app_config.php you defined, SITE_ROOT, comes in handy. Using it, you can define a directory in which you want to save uploaded files. Go ahead and create that directory on your web server, using a Terminal, command-line tool, or your FTP program. So if your SITE_ROOT is just /, then create /uploads/profile_pics. If your SITE_ROOT is yellowtagmedia_com/phpMM, you’d create yellowtagmedia_com/phpMM/uploads/profile_pics.
Now, you need to add an array of potential errors, like this:
$upload_dir = SITE_ROOT . "uploads/";
$image_fieldname = "user_pic";
// Potential PHP upload errors
$php_errors = array(1 => 'Maximum file size in php.ini exceeded',
2 => 'Maximum file size in HTML form exceeded',
3 => 'Only part of the file was uploaded',
4 => 'No file was selected to upload.');
You’ve used arrays before, but here you’re doing something new. You’re creating a new array with the array keyword, and then defining the values that go in that array.
Since an array is basically a list of values, you could do something like this just as easily:
// Potential PHP upload errors
$php_errors = array('Maximum file size in php.ini exceeded',
'Maximum file size in HTML form exceeded',
'Only part of the file was uploaded',
'No file was selected to upload.');
With this array, each value is automatically numbered, starting at 0. So $php_errors[0] would have the value “‘Maximum file size in php.ini exceeded”, for instance.
WARNING
Don’t forget: almost every programming language you’ll ever work with starts counting at 0, rather than 1 (see the box on Programming Languages Like Zeroes).
So then what are those numbers and funny arrows (=>)? Well, PHP arrays are associative arrays. That’s why you can say, for example, $_REQUEST[‘user_pic’]. The $_REQUEST array doesn’t just have values, but it actually has an association between those values (the information in an HTML form, usually) and the name of the fields in which those values appeared.
You can think of the mapping between the field name user_pic and the value of that field—something like profile_pic.jpg, for example—as being defined like this:
$_REQUEST = array('user_pic' => 'profile_pic.jpg');
NOTE
PHP is actually doing things in a much trickier way—that’s why you can define any form field you want, of any type you want, with any name you want, and PHP handles it. Still, what ends up happening boils down to a simple creation of an associative array, with field names associated with, or mapped to, field values.
So back to your array of PHP errors:
// Potential PHP upload errors
$php_errors = array(1 => 'Maximum file size in php.ini exceeded',
2 => 'Maximum file size in HTML form exceeded',
3 => 'Only part of the file was uploaded',
4 => 'No file was selected to upload.');
This array takes numbering into your own hands, rather than letting PHP define its own numbers. So $php_errors[1] is now “‘Maximum file size in php.ini exceeded”, rather than letting the 0-based numbering of PHP assign that same string value to $php_errors[0].
But why in the world would you want to mess with PHP’s numbering? It’s generally a bad idea, because you’re essentially messing with behavior that all PHP programmers expect. In this case, though, it’s for a worthy cause.
You see, PHP does more than give you a $_REQUEST array. When there are files involved, it gives you a $_FILES array. And that array, just like $_REQUEST, is keyed to your field. So $_FILES[$image_fieldname] is associated with the image uploaded (hopefully) from your form. (Remember, you defined $image_fieldname nearer the top of create_user.php.)
But there’s more. $_FILES[$image_fieldname] is itself an array, with information about the file uploaded, and any errors that might have occurred in the process. One of those pieces of information is $_FILES[$image_fieldname][‘error’]. This field returns a number: 0 for “Everything went OK,” and a number other than zero if there was a problem. The text in the array indicates what each non-zero number means:
1 => 'Maximum file size in php.ini exceeded'
2 => 'Maximum file size in HTML form exceeded'
3 => 'Only part of the file was uploaded'
4 => 'No file was selected to upload.'
Now renumbering the $php_errors array makes sense: you’ve got a map of error codes that $_FILES[$image_fieldname][‘error’] might return, and the human-readable errors that go with them.
So now you’ve got all the information you need; time to start using it.
Did the File Upload with Any Errors?
You know what to do: check that particular piece of the $_FILES array and see if any errors occurred. If the value is non-zero, something went wrong, and you need to handle the problem. Luckily, you’ve got a handy-dandy function for just that: handle_error.
<?php
// Require utility scripts
// Set up variables
// Get everything from the form aside from the image
// Make sure we didn't have an error uploading the image
($_FILES[$image_fieldname]['error'] == 0)
or handle_error("the server couldn't upload the image you selected.",
$php_errors($_FILES[$image_fieldname]['error']));
// Interact with MySQL
// Redirect to show_error.php
?>
So if the error field ($_FILES[$image_fieldname][‘error’]) is zero, things are great; just keep going. If it’s non-zero, show an error to the user, and then use the error code to look up the exact problem in your $php_errors associative array, and hand it off for view if debugging is on.
NOTE
Now would be a good time to check app_config.php, and make sure you have DEBUG_MODE set to true.
There’s also a new little wrinkle in here that you may have just skipped right over: This is basically an if statement without an if. PHP will evaluate this line…
($_FILES[$image_fieldname]['error'] == 0)
…and if that line is true, it will continue. If the line isn’t true, it runs the or part of the code, on the next line; in this case, that’s handle_error.
So this line is essentially like writing this code:
if ($_FILES[$image_fieldname]['error'] != 0) {
handle_error("the server couldn't upload the image you selected.",
$php_errors[$_FILES[$image_fieldname]['error']]);
}
WARNING
Watch your square brackets ([ ]) and parentheses carefully here; it’s really easy to get them mixed up and cause a hard-to-find error.
But this code is a little longer, while the code without the if is just a little clearer. Every bit of complexity you can save helps, so this is a nice trick to add to your growing PHP toolkit.
You can actually check your code in action at this point. Visit create_user.html and find an image file that’s bigger than 2 MB. Look for a photo in iPhoto or something you’ve pulled straight off your camera. Select that image, and then try and submit your form. You should get something likeFigure 8-5 back.
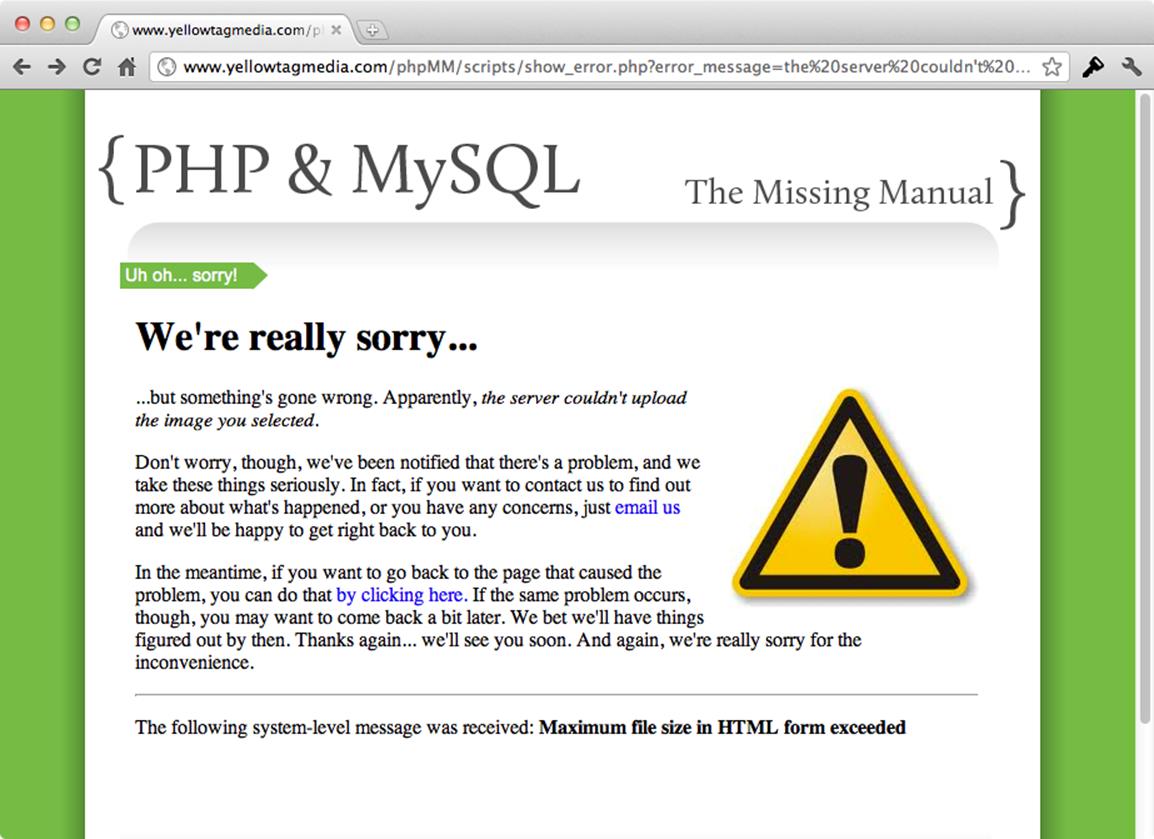
Figure 8-5. Here’s one of those beautiful situations where a lot of hard work earlier pays off later. Rather than wading through your code or even writing custom PHP, you were able to quickly hand off an error to your handle_error function and get a nice response. Now multiply that by the hundreds (thousands?) of times you’ll use handle_error, and you’ll start to see the value of having that utility function written early on in your PHP life.
NOTE
You might have noticed that even though the image was rejected, your browser still uploads the image—regardless of how big the image is, or what your maximum file size is. That’s because it’s only after the image is uploaded that the size comparison is made. Sort of a bummer, but that’s a browser issue, and not something you can fix with PHP.
This page is the result of your code finding an error code, and that error code being matched up to an error in $php_errors—in this case, the image was larger than your HTML allowed.
Is this Really an Uploaded File?
The next thing you need to do is left out of more PHP instructions and books than you can imagine, but it’s critical. At this point, despite whether or not you have a real file, what your program has to work with is a file name. And that name is controlled entirely by what your users put into their file input box. So if they’re tricky, malicious, and thoroughly dishonest, they might try and put in a filename that does upload a file on their system, but also just so happens to match one of the special files on web servers that control things like, say, the passwords for users. (That file is usually /etc/passwd).
You might think you must get your regular expressions on here and check for all kinds of fancy filename characters, but there’s an easier way. PHP gives you a function called is_uploaded_file that ensures that for a given name, that name references a file uploaded with HTTP (the language of web browsers and HTML forms). In other words, if the supplied name targets a file on your web server, this function will return false, and you know that something’s fishy.
So you want to do something like this:
// Make sure we didn't have an error uploading the image
// Is this file the result of a valid upload?
is_uploaded_file($_FILES[$image_fieldname]['tmp_name'])
or handle_error("you were trying to do something naughty. Shame on you!",
"Uploaded request: file named " .
"'{$_FILES[$image_fieldname]['tmp_name']}'");
// Interact with MySQL
POWER USERS’ CLINIC: BREATHING AND SLEEPING MATTER
Any good programmer will tell you stories of at least a few all-night hacking sessions. And odds are, those stories will be tinged rosy, full of victories and excitement. But the truth of the matter is that fatigue slows the brain down, and no programmer is as effective on two hours of sleep as she is on six.
Bottom line: a tired brain isn’t as useful as a rested one. And, because if you’ve been swimming in the pool of PHP programming for seven chapters before this one, now you’re well into the deep end. Chances are that you’re having to read at least a few things twice, and some of this new code introduces not just one or two new things, but three or four or five.
There’s nothing at all wrong with this, but if you’re getting worn out, nobody wins by you plowing ahead. Take a few hours off, ride your bike, jog a mile, or just set PHP aside for the night. You’ll be stunned at how much clearer things seem after a bit of rest from programming. Don’t think that rest and taking a few moments to breathe out of sight of the keyboard are a sign of weakness; rather, just the opposite.
This code uses another property of ($_FILES[$image_fieldname]): the temporary name of the file. So you get the name of the file as it currently stands, and make sure it’s an uploaded file.
But there’s a problem here: is_uploaded_file fires off an error if the file isn’t uploaded. That sounds good, except that you’ve done a lot of work to handle errors your own way. You don’t want is_uploaded_file to generate an error; you just want its return value, even if there’s a problem.
You can tell PHP to run a function and suppress errors with @ directly before the function (for more, see the box below), and that’s exactly what you need here:
// Is this file the result of a valid upload?
@is_uploaded_file($_FILES[$image_fieldname]['tmp_name'])
or handle_error("you were trying to do something naughty. Shame on you!",
"Uploaded request: file named " .
"'{$_FILES[$image_fieldname]['tmp_name']}'");
Now, the function is run, and if there’s a problem, handle_error takes over, rather than your script throwing out some unintelligible error of its own. One more hacker thwarted; so nice work in adding this in, and avoiding a nasty security hole.
POWER USERS’CLINIC: SUPPRESS ERRORS AT YOUR OWN PERIL
There’s perhaps no more intriguing operator in PHP than @. With one keystroke, all the problems that might come about from a user entering invalid data, or a SQL query having an incorrect column, or even just a poorly formed URL can be banished. Your code can continue without having to check for every possible mistake your users, you, and your code might make, and that’s a lot of potential mistakes.
But @ really is an atomic bomb waiting to turn your code into a smoldering slag heap. Use it frequently, and you’ll quickly find that your code is riddled with potential problems. You’ll never really be sure if your problem is something your user did, something you did, or a legitimate bug you need to fix.
Regardless of what’s causing the error, if you’ve gotten around it with @, then you’ve got a legitimate bug. Make a rule for yourself: when you use @ (as in the very next line), pair it with an or and explicit error handling. You’ll be much better for the discipline.
But there’s an exception. (There always is, isn’t there?) The exception in this situation is a high-volume, production website. Production sites often use @ because they simply can’t crash or stop working. In those cases, you’ve usually got to go with some sort of hybrid solution. On the one hand, use @, but then pair it with or triggered by a flag, like the debugging flag discussed on Now You See Me, Now You Don’t. So in “normal” mode, things run without spewing tons of errors (or perhaps by only logging those errors). Then, by flipping on the debugging mode, you start to see what’s really going on, and can track down problems and fix them.
Is the Uploaded File Really an Image?
So you’ve got a file uploaded, and you know it’s not some fake file with a name that points to a protected file on your server’s file system. But there’s one more step: make sure that file is an image. There’s nothing preventing a user from accidentally uploading a Word document, or a malicious user uploading some JavaScript or an executable file.
Thankfully PHP, makes checking for image files pretty easy. You use the getimagesize function, which checks to see the size of a given image file. And, best of all, this function kicks out an error if it’s given a non-image file. Perfect!
// Is this actually an image?
@getimagesize($_FILES[$image_fieldname]['tmp_name'])
or handle_error("you selected a file for your picture " .
"that isn't an image.",
"{$_FILES[$image_fieldname]['tmp_name']} " .
"isn't a valid image file.");
Moving the File to a Permanent Location
You’re almost to the big finish. You’ve got a valid HTTP upload that’s an image. All that’s left is to move this image from the temporary location that browsers use for uploaded files to someplace permanent. Here’s where your variable from long ago comes into use:
$upload_dir = SITE_ROOT . "uploads/profile_pics/";
NOTE
Create this directory now if you haven’t already.
At this point, it’s important to know what’s happened to your user’s uploaded file. When the server uploads this file, it uses a preconfigured location for the file. It’s also quite likely to use a name that isn’t identical to what the user’s file was originally called. Sometimes the name is completely changed, and other times something is prepended or appended to the name.
Additionally, the file isn’t in a place you want to leave it. It’ll often be stuck into some sort of temporary storage, and that storage is often cleared out every so often. So you need to not only assign the file a name, but you also need to move it somewhere more permanent—that’s why you have$upload_dir.
Now, there are lots of different approaches to naming. You could come up with something related to the user who uploaded the file, but often, it’s just easiest to give the file a unique numeric name. And the easiest way to do that is to get the current time, and create a file name based on that—an almost surefire way to end up with a unique filename.
NOTE
Take a look at the image names on a site like Flickr or Facebook. Unless users have renamed their images, the names are often just a string of letters and numbers.
So you need a unique name, and then you can finally move the file from its current location to a permanent one.
First, figure out a name for the soon-to-be permanent image:
// Name the file uniquely
$now = time();
while (file_exists($upload_filename = $upload_dir . $now .
'-' .
$_FILES[$image_fieldname]['name'])) {
$now++;
}
Step through this bit by bit, and it will make perfect sense:
1. Create a new variable called $now and assign it the current time, using PHP’s time function.
2. Start a loop using while. So while a certain condition is true, keep doing the loop. As soon as that condition isn’t true, stop looping.
3. As part of the while condition, assign a value to $upload_filename: the $upload_dir plus the current time, and then a dash (-), and then finally the name of the original file. So this is a combination of a part that will be unique (the time) and the user’s file’s original name (which is in$_FILES[$image_fieldname][‘name’]).
4. Then, to complete the while condition, pass that calculated file name to file_exists. If that file exists, then the while loop runs. If not, you have a unique file name, so the loop will not run (or, run anymore, if it’s already been looping).
5. Within the loop, you must come up with a way to change the file name. Since the while loop is only going to run if you’ve got a file name that’s already in use, just add to $now, and try again.
And here’s the beauty of PHP: you can do all of that in just a few lines of code. So when this code finishes running, you’ve got a unique file name for the user’s file.
Now, move the file from its old temporary location to the permanent one:
// Finally, move the file to its permanent location
@move_uploaded_file($_FILES[$image_fieldname]['tmp_name'], $upload_filename)
or handle_error("we had a problem saving your image to " .
"its permanent location.",
"permissions or related error moving " .
"file to {$upload_filename}");
You’ve put in a lot of work, but you finally have your file in a permanent location—and you know that file is a valid image. Try it for yourself. Visit create_user.php, select an image from your hard drive that’s under your size limit, and upload it. Then navigate to that directory in your web browser. If you’ve got permissions set to view directories on your server, you’ll see something like Figure 8-6.
Don’t be disappointed if you can’t see the directory, or you get a message saying that Directory Listings are denied. That’s a common web server practice, and doesn’t necessarily mean that something’s gone wrong.
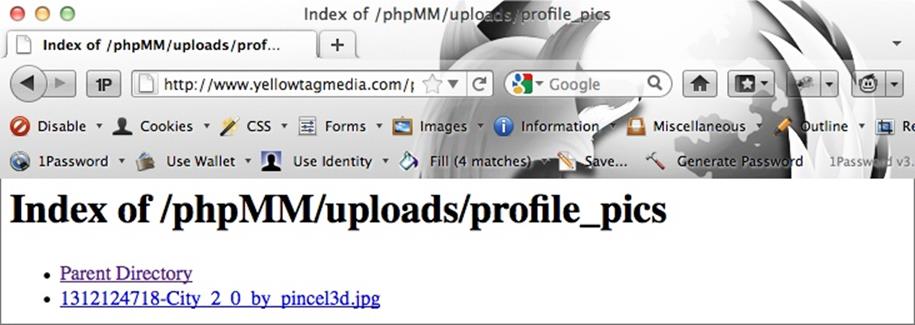
Figure 8-6. Honestly, it’s probably not a great thing if you can look at files like this. It basically means that anyone with a web browser can navigate your site’s directory structure. So while this is great for debugging, it’s not something you want to leave on, and you may want to email or call your web server provider or hosting company and ask them to turn off directory listings through the Internet.
Instead, open back up create_user.php, and make two changes. First, add an echo command to print out your file’s location:
// Name the file uniquely
$now = time();
while (file_exists($upload_filename = $upload_dir . $now .
'-' .
$_FILES[$image_fieldname]['name'])) {
$now++;
}
echo $upload_filename;
echo "<br />";
echo $_FILES[$image_fieldname]['tmp_name'];
Now comment out the redirect, so you can see this echo:
// Redirect the user to the page that displays user information
//header("Location: show_user.php?user_id=" . mysql_insert_id());
Upload an image again, and you’ll get a path back from your echo, assuming things went well. Figure 8-7 is an example of the output you should expect.
Now (finally!) you can drop that file path into your URL bar, adding your domain name, and you should get a glorious image from your user’s machine to your web server. Check out an example in Figure 8-8.
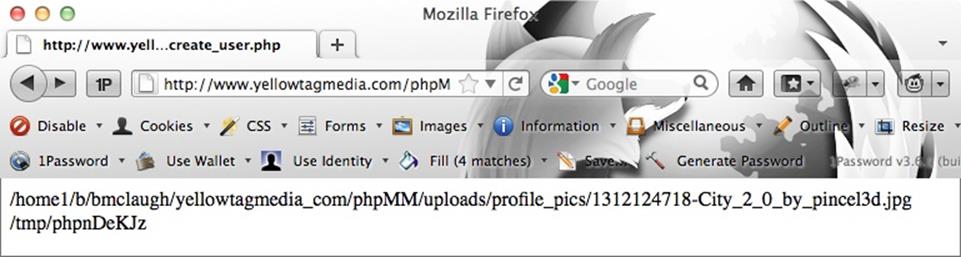
Figure 8-7. There are some cleaner ways to figure this out, as opposed to essentially breaking your code. You could log the file name, or write to a text file, or even the command line. Still, there really are times when the simplest solution is the best.
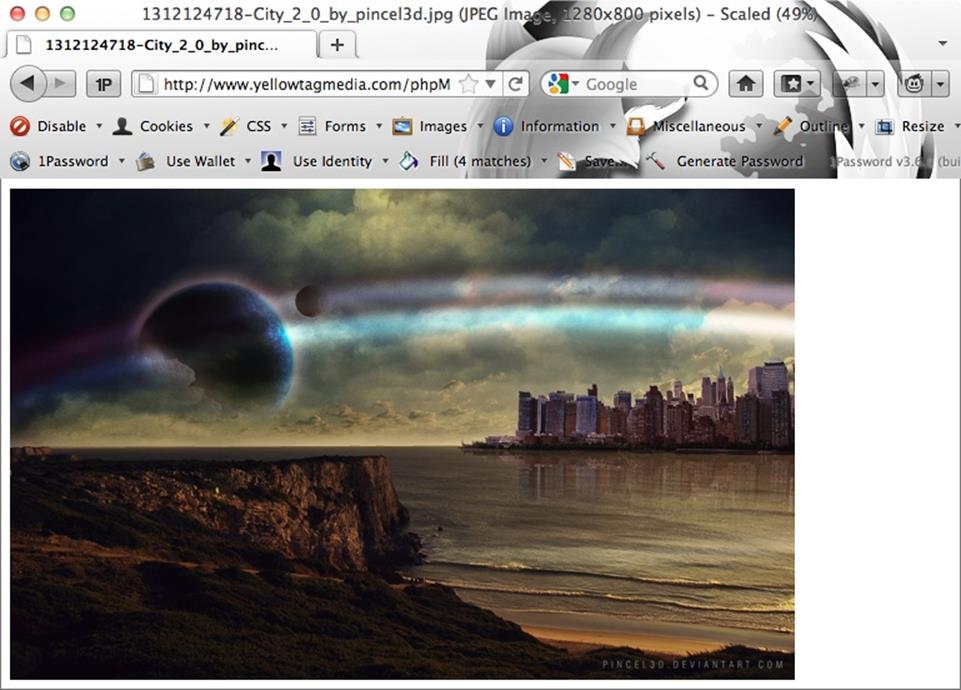
Figure 8-8. Yes! The image has landed. It’s taken some work, but think about the best web applications out there: they all allow for custom images to be uploaded. Now you can do it, too. Nice work.
Storing the Image Location in the Database
It’s taken some time, but you’re finally ready to save this image—or at least its location—in your database table. You’ve already got a query built:
$insert_sql = "INSERT INTO users (first_name, last_name, email, " .
"bio, facebook_url, twitter_handle) " .
"VALUES ('{$first_name}', '{$last_name}', '{$email}', " .
" '{$bio}', " . '{$facebook_url}', " .
"'{$twitter_handle}');";
// Insert the user into the database
mysql_query($insert_sql);
Creating a New Database Column
All you need to do, then, is add a column in which you can store the image location. This is a matter of another ALTER command, something with which you’re already comfortable:
ALTER TABLE users
ADD user_pic_path varchar(200);
Go ahead and run this statement. You may want to DESCRIBE your users table just to make sure things took:
mysql> describe users;
+----------------+--------------+------+-----+---------+----------------+
| Field | Type | Null | Key | Default | Extra |
+----------------+--------------+------+-----+---------+----------------+
| user_id | int(11) | | PRI | NULL | auto_increment |
| first_name | varchar(20) | | | | |
| last_name | varchar(30) | | | | |
| email | varchar(50) | | | | |
| facebook_url | varchar(100) | YES | | NULL | |
| twitter_handle | varchar(20) | YES | | NULL | |
| bio | text | YES | | NULL | |
| user_pic_path | varchar(200) | YES | | NULL | |
+----------------+--------------+------+-----+---------+----------------+
8 rows in set (0.00 sec)
This user_pic_path field is just a text column, because all you’re storing is the path to the image, rather than the image itself.
NOTE
If you’re starting to get curious about what it would look like to store the actual image in your database, go ahead and nurture that curiosity. In the next section, that’s exactly what you’ll do (and work through whether or not that’s a good idea).
Inserting the Image Path into Your Table
The update to the INSERT query isn’t difficult at all, now:
$insert_sql = "INSERT INTO users (first_name, last_name, email, " .
"bio, facebook_url, twitter_handle, " .
"user_profile_pic) " .
"VALUES ('{$first_name}', '{$last_name}', '{$email}', " .
" '{$bio}', " . '{$facebook_url}', " .
"'{$twitter_handle}', '{$upload_filename}');";
// Insert the user into the database
mysql_query($insert_sql);
Things are definitely starting to flow quickly now. With all your existing work already in place, adding a new column is pretty simple. But before you dive back into your HTML, there’s one more thing left to do.
Checking Your Work
This query should work…but how can you know? If you were just a PHP programmer, you’d have to try this code out and then either write a new script to select data from the users table, or jump right back into show_user.php. But why go to all that trouble? You know SQL and how to interact with MySQL.
First, create a new user, and use a name you’ve not used before. Then, jump back into your SQL command-line tool and check the results of your work for yourself. Just SELECT the user you just inserted, focusing on its picture path:
SELECT user_pic_path
FROM users
WHERE last_name = 'Roday';
You should see something like this:
mysql> select user_pic_path from users where last_name = 'Roday';
+------------------------------------+
| user_pic_path |
+------------------------------------+
| /yellowtagmedia_com/phpMM/uploads/profile_pics/1312127661-City_2_0_by_pince-
l3d.jpg |
+------------------------------------+
1 row in set (0.00 sec)
Perfect. The image is on your server, and now you’ve got the path to that image, indelibly stored in your database. Now you’re ready to show your users their glorious image-selves.
If you’ve had any issues, you may want to check out the completed version of create_user.php below. There have been a ton of additions, so just make sure everything is right where it belongs:
<?php
require_once '../scripts/app_config.php';
require_once '../scripts/database_connection.php';
$upload_dir = SITE_ROOT . "uploads/profile_pics/";
$image_fieldname = "user_pic";
// Potential PHP upload errors
$php_errors = array(1 => 'Maximum file size in php.ini exceeded',
2 => 'Maximum file size in HTML form exceeded',
3 => 'Only part of the file was uploaded',
4 => 'No file was selected to upload.');
$first_name = trim($_REQUEST['first_name']);
$last_name = trim($_REQUEST['last_name']);
$email = trim($_REQUEST['email']);
$bio = trim($_REQUEST['bio']);
$facebook_url = str_replace("facebook.org", "facebook.com", trim($_
REQUEST['facebook_url']));
$position = strpos($facebook_url, "facebook.com");
if ($position === false) {
$facebook_url = "http://www.facebook.com/" . $facebook_url;
}
$twitter_handle = trim($_REQUEST['twitter_handle']);
$twitter_url = "http://www.twitter.com/";
$position = strpos($twitter_handle, "@");
if ($position === false) {
$twitter_url = $twitter_url . $twitter_handle;
} else {
$twitter_url = $twitter_url .
substr($twitter_handle, $position + 1);
}
// Make sure we didn't have an error uploading the image
($_FILES[$image_fieldname]['error'] == 0)
or handle_error("the server couldn't upload the image you selected.",
$php_errors[$_FILES[$image_fieldname]['error']]);
// Is this file the result of a valid upload?
@is_uploaded_file($_FILES[$image_fieldname]['tmp_name'])
or handle_error("you were trying to do something naughty. " .
"Shame on you!",
"Uploaded request: file named " .
"'{$_FILES[$image_fieldname]['tmp_name']}'");
// Is this actually an image?
@getimagesize($_FILES[$image_fieldname]['tmp_name'])
or handle_error("you selected a file for your picture that " .
"isn't an image.",
"{$_FILES[$image_fieldname]['tmp_name']} " .
"isn't a valid image file.");
// Name the file uniquely
$now = time();
while (file_exists($upload_filename = $upload_dir . $now .
'-' .
$_FILES[$image_fieldname]['name'])) {
$now++;
}
// Finally, move the file to its permanent location
@move_uploaded_file($_FILES[$image_fieldname]['tmp_name'],
$upload_filename)
or handle_error("we had a problem saving your image " .
"to its permanent location.",
"permissions or related error moving " .
"file to {$upload_filename}");
$insert_sql = "INSERT INTO users (first_name, last_name, email, " .
"bio, facebook_url, twitter_handle, user_pic_path) " .
"VALUES ('{$first_name}', '{$last_name}', '{$email}', " .
"'{$bio}', '{$facebook_url}', '{$twitter_handle}', " .
"'{$upload_filename}');";
// Insert the user into the database
mysql_query($insert_sql);
// Redirect the user to the page that displays user information
header("Location: show_user.php?user_id=" . mysql_insert_id());
exit();
?>
Images Are For Viewing
Finally! It’s time to show your users the fruit of all your hard work. They’ll probably never realize how long you slaved to get one single image showing up—and protecting all their other information in the process—but you know, and sometimes that’s enough.
Make sure you have a copy of show_user.php alongside create_user.html and create_user.php. You need to update show_user.php to select the user’s picture path from the users table, and then display that picture.
NOTE
As with all scripts that you’re updating, make sure you change require to require_once, include a reference to app_config.php, and update your paths to reflect you’re not using chapter-specific scripts/ directories. In any scripts that have HTML—like show_user.php—you should also check paths for things like CSS stylesheet and external JavaScript references.
SELECT the Image and Display It
This step turns out to be pretty easy. First, you’ve already got a SELECT that grabs everything for a particular user:
// Build the SELECT statement
$select_query = "SELECT * FROM users WHERE user_id = " . $user_id;
Next, you can just add a line grabbing the image path in the code you already have pulling information out of the result of running this SQL INSERT:
if ($result) {
$row = mysql_fetch_array($result);
$first_name = $row['first_name'];
$last_name = $row['last_name'];
$bio = preg_replace("/[\r\n]+/", "</p><p>", $row['bio']);
$email = $row['email'];
$facebook_url = $row['facebook_url'];
$twitter_handle = $row['twitter_handle'];
$user_image = $row['user_pic_path'];
// Turn $twitter_handle into a URL
$twitter_url = "http://www.twitter.com/" .
substr($twitter_handle, $position + 1);
} else {
handle_error("there was a problem finding your " .
"information in our system.",
"Error locating user with ID {$user_id}");
}
NOTE
Take this opportunity to move from using die in the else block of your if statement to the much cooler handle_error function.
Be sure you remove this old code entirely:
// To be added later
$user_image = "../../images/missing_user.png";
Finally, you already have a place in this script’s HTML that references the $user_image variable:
<div id="content">
<div class="user_profile">
<h1><?php echo "{$first_name} {$last_name}"; ?></h1>
<p><img src="<?php echo $user_image; ?>" class="user_pic" />
<!-- and so on... -->
So try things out. Hit your show_user.php page with an existing user’s ID in your browser’s address bar, or create a new user with a picture and let create_user.php redirect you. You should see something like Figure 8-9. Hardly the trumpets blaring and angels dancing you were hoping for.

Figure 8-9. When you get an unexpected result like a missing image, start out by either viewing the source (under the View menu, or by right-clicking the page and selecting View Source) or using a plug-in like Firebug to inspect the offending element. That’s almost always a good first step toward tracking down what’s going wrong.
If you view the source for this page, and figure out what the image path being used is, you’ll probably have something like Figure 8-10.
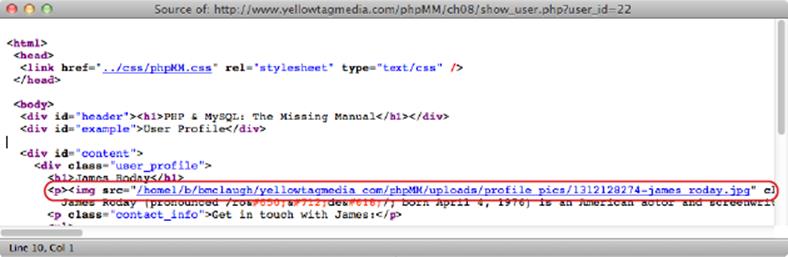
Figure 8-10. According to this HTML source, the img element has the correct absolute path to the image. But is this what paths in HTML pages should look like? How does the absolute path on a file system relate to the path on a web server?
Now, you checked earlier to make sure this is a valid image. So you know the path to the image isn’t the problem…or is it?
Converting File System Paths to URLs
What you have is a path on your web server’s file system, but what you need is a path that your web server recognizes. Every web server has something called a document root. That’s the directory into which you place files so that they can be seen on the browser.
NOTE
Old school programmers and HTML geeks will remember that public_html/ used to be the almost universal standard for a document root.
Close out show_user.php and create a new script, called test.php. Type a single command between the opening and closing PHP syntax:
<?php
echo "DOCUMENT ROOT: {$_SERVER['1G']}";
?>
$_SERVER is another one of those helpful associative arrays that PHP gives you. The DOCUMENT_ROOT key tells you your web server’s document root.
TIP
Visit www.php.net/manual/en/reserved.variables.server.php to see all the various things you can find out from $_SERVER.
Now hit this script with a browser. You’ll get something like Figure 8-11. In this example, the root is /home1/b/bmclaugh/yellowtagmedia_com. So what this means is that the web path / is really mapping to the file system path /home1/b/bmclaugh/yellowtagmedia_com.
This test script gives you the sort of hook you need: a mapping that relates a file system path to an actual web path. And it’s a pretty easy mapping, too. For any file path, you want to strip away everything from the beginning of the path up to and including yellowtagmedia_com (or whatever the end of your document root is).
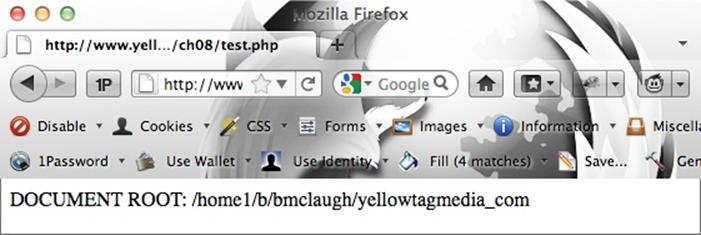
Figure 8-11. According to this HTML source, the img element has the correct absolute path to the image. But is this what paths in HTML pages should look like? How does the absolute path on a file system relate to the path on a web server?
So now you need to put that into action. First, add a sample image path you’re currently storing in your database to your test.php script:
<?php
echo "DOCUMENT ROOT: {$_SERVER['DOCUMENT_ROOT']}";
$image_sample_path =
"/home1/b/bmclaugh/yellowtagmedia_com/phpMM/" .
"uploads/profile_pics/1312128274-james_roday.jpg";
?>
Now, you can use str_replace, a handy function you know quite well by now. You simply want to replace the file path equivalent of the document root with…nothing. You want to remove it:
<?php
echo "DOCUMENT ROOT: {$_SERVER['DOCUMENT_ROOT']}";
$image_sample_path =
"/home1/b/bmclaugh/yellowtagmedia_com/phpMM/" .
"uploads/profile_pics/1312128274-james_roday.jpg";
$web_image_path = str_replace($_SERVER['DOCUMENT_ROOT'],
'', $image_sample_path);
?>
Finally, echo the result back out:
<?php
echo "DOCUMENT ROOT: {$_SERVER['DOCUMENT_ROOT']}";
$image_sample_path =
"/home1/b/bmclaugh/yellowtagmedia_com/phpMM/" .
"uploads/profile_pics/1312128274-james_roday.jpg";
$web_image_path = str_replace($_SERVER['DOCUMENT_ROOT'],
'', $image_sample_path);
echo "<br /><br />CONVERTED PATH: {$web_image_path}";
?>
Now hit your test.php again. Hopefully, you’ll get something like Figure 8-12.

Figure 8-12. This path conversion is exactly what you want: a move from the file system path that you need when working with the image directly, to the web path that your user’s browser needs. In actuality, you really shouldn’t be spreading around your file system path in the first place (like, say, publishing it in a book?).
Take this path and drop it right into your browser, following the slash after your domain name. Then hit Enter and, if all is well, you’ll see that image you’ve been after for so long. Figure 8-13 shows the magic in action.
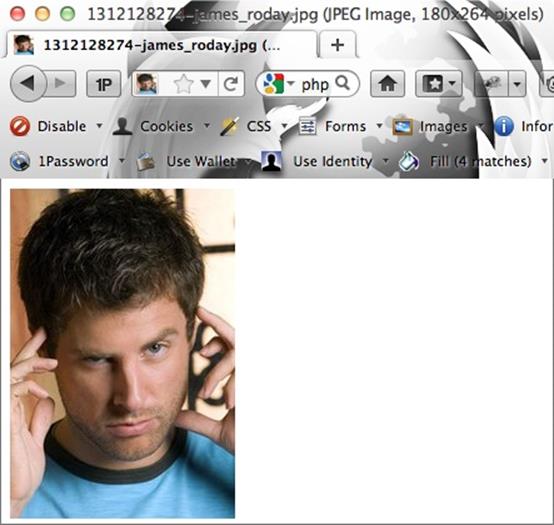
Figure 8-13. Finally! Image uploading is a common, but tricky exercise… kind of like error handling. Just think how much has to go on to get one image into the right place, and easily viewable by your thousands (millions?) of users.
Now you can turn the code in test.php into…you guessed it: yet another helpful utility function. Open up your old friend app_config.php, and create a generic version of your code in test.php:
function get_web_path($file_system_path) {
return str_replace($_SERVER['DOCUMENT_ROOT'], '', $file_system_path);
}
Pretty close, isn’t it? Make sure you understand exactly what’s going on here. This short bit of code:
1. Defines a new function, using function, that you can call from any script the requires or includes app_config.php.
2. Names the function: get_web_path.
3. Defines a single piece of information that the function gets from whatever script calls it: $file_system_path. This will be the complete path on the web server to the file that needs to be converted into a web path.
4. Takes $file_system_path and replaces the document root in the path with nothing (‘ ‘).
5. Returns the result of running str_replace using return.
The only thing new here is return. return is a part of the PHP language, and it does just what you’d expect: return something to the program or script that called this function. So if you passed in /usr/bbentley/web/images/profile.jpg, and your document root was /usr/bbentley/web, then the string /images/profile.jpg would be returned from a call to get_web_path.
POWER USERS’CLINIC: PROTOTYPE WITH SIMPLE SCRIPTS
Some languages and frameworks, like Ruby on Rails in particular, offer a means to run commands within the context of your programming or web environment. This is sort of like a command-line-plus, where you get all the benefits of a running web server, logging, your scripts loaded, and even a few additional bells and whistles.
Unfortunately, PHP isn’t one of those languages. When it comes to testing out a bit of new functionality, then, your choices are typically to either just start coding in one of your existing scripts, or to create a simple script like test.php, and work with it until you get your functionality figured out.
Although using a simple command-line script can seem like a bit of a drag compared to a nice CSS-styled web environment, it’s often the better choice. You can test things and get your code just right without having to worry about HTML or interactions across scripts. Then, once you’ve got your code like you want it, it’s easy to drop into your full-blown web scripting environment.
WARNING
There is one fairly serious gotcha to this function. The function assumes you’re sending it an absolute path, not a relative path. So ../../../web/images/profile.jpg isn’t going to match your document root in any form or fashion. Fortunately, the code that generates the path to an image uses absolute paths. That means that at least for your particular needs, this function works just fine.
Displaying Your User’s Image: Take Two
To display your user’s image, go back to show_user.php. This time, though, you’re armed with a utility function. Use that function to convert the absolute path stored in your database into a web-safe path for viewing:
if ($result) {
$row = mysql_fetch_array($result);
$first_name = $row['first_name'];
$last_name = $row['last_name'];
$bio = preg_replace("/[\r\n]+/", "</p><p>", $row['bio']);
$email = $row['email'];
$facebook_url = $row['facebook_url'];
$twitter_handle = $row['twitter_handle'];
$user_image = get_web_path($row['user_pic_path']);
// Turn $twitter_handle into a URL
$twitter_url = "http://www.twitter.com/" .
substr($twitter_handle, $position + 1);
} else {
handle_error("there was a problem finding your " .
"information in our system.",
"Error locating user with ID {$user_id}");
}
It really doesn’t get much easier than that. Fire up your browser, and try either creating a user again (with create_user.php) or visiting show_user.php and supplying a user_id parameter as part of the URL string. You should see show_user.php the way it’s always been intended: resplendent with imagery, as seen in Figure 8-14.

Figure 8-14. It’s taken a while, but now you can be sure that you’ve got the most secure, well-built image-handling script around. (Well, okay, those guys from Facebook and Google+ might have a few additional tricks, but you’re close.) Enjoy profile pictures for a moment, and then get ready for the next evolution.
A Few Quick Revisions to app_config.php
At this point, you’ve got a new tool: $_SERVER[‘DOCUMENT_ROOT’]. And, really, you’ve got another tool based on that: your get_web_path function. This function is helpful in terms of cleaning up app_config.php right now. Currently, you’ve got your site root defined something like this:
// Site root
define("SITE_ROOT", "/phpMM/");
WARNING
Your exact value for SITE_ROOT is probably different. Still, you should have something that looks like a path from the root of your web directory to where all your site’s files are hosted. It may be as simple as /, which is a pretty common site root.
But that’s sort of misleading. That’s a web path, not the site root. The site root is more like a file-system specific path. It’s really the path on your hosting provider’s machine to your site’s root. So it might be something like /home1/b/bmclaugh/yellowtagmedia_com. Then, the web path happens to be /, or /phpMM, or whatever your particular directory structure from the root is.
But wait a second. You already have something that looks like that: $_SERVER[‘DOCUMENT_ROOT’]. Not only that, but now with get_web_path, you can turn that into a web path, and then add the path from the root of your web server to your site. So if your SITE_ROOT was /phpMM, then you really want something more like this:
// Site root - in actual filesystem path form
define("SITE_ROOT", $_SERVER['DOCUMENT_ROOT'] . "/phpMM/");
That’s going to turn into the file system path to your web server, and then add the path from your web server to the files for this app, resulting in, for example, /home1/b/bmclaugh/yellowtagmedia_com/phpMM. So now you’ve got a much cleaner setup. You’re dealing with real files on a real file system, and then when you need to convert those files and their paths into the web domain, you use get_web_path.
To see how this works, check out your script in handle_error. Here’s the version as you should have it now:
function handle_error($user_error_message, $system_error_message) {
header("Location: " . SITE_ROOT . "scripts/show_error.php" .
"?error_message={$user_error_message}" .
"&system_error_message={$system_error_message}");
}
FREQUENTLY ASKED QUESTION: WHY NOT STORE A WEB PATH IN THE DATABASE?
Every single time you load an image from the database, you’re going to have to call get_web_path on that image path—at least if you want to show the image on the Web. And since you’re writing web applications, isn’t that sort of the point? It might seem like you could just cut that conversion step out, and simply store the image in the database as a web path from the beginning.
There are a couple of reasons that’s not a great idea, though. First, an absolute path is just that: it’s absolute. Your web server software can change; your home directory can change; you can switch from PHP to Ruby to Perl and back to PHP; but short of you actually moving an image, it’s absolute path remains unchanged. Most importantly, you can change the entire document root of your site, and an absolute path will still work.
So why is that so significant? Because you really might need to change the document root of your site at some point. And if you stored a web path in the database—a path related to your document root—and then your document root changed, all of your image paths would be invalid! You’d have to change every single one of them from being relative to your old document root to relative to your new document root. What a mess.
On top of that, a web path really is a relative path, even if it begins with a /. That’s because it’s relative to your document root. An absolute path is fixed in relation to a machine, regardless of that machine’s software. And as a general rule, you want to store things in a database that are as absolute and fixed as possible. Given the choice between a piece of information in an absolute form and one in a relative form, always go for the absolute form. It’s usually easy to change from one form to the other, so store the more “reliable” one. You won’t regret it.
But SITE_ROOT isn’t a web path anymore, and you do need a web path in this case. You’re sending a redirect to the browser, and the browser speaks web paths, not file systems.
The remedy is simple, since you have the real path in place in SITE_ROOT. You just need to convert that to a web path:
function handle_error($user_error_message, $system_error_message) {
header("Location: " . get_web_path(SITE_ROOT) .
"scripts/show_error.php" .
"?error_message={$user_error_message}" .
"&system_error_message={$system_error_message}");
}
Now all your paths are based on real, actual files on the file system. Then, when you have to deal with web requests, you convert those real file paths to web paths. And of course, this was key in getting images to work, another bonus. So about those images…
And Now for Something Completely Different
Everything works now. Your users can upload images. You can get those images securely into a permanent location that you choose. You’ve got a way to store the location in a database and to convert that location into a URL that works with your website and your personal document root. And then, to top it all off, you can show your users their images when they visit show_user.php.
What else is there to do?
Suppose that you’re using multiple web servers that share a single database. Are you really going to store the same image on each of those web servers?
Suppose you’re using a temporary machine for a web server, or think you may change to a higher-end hosting solution as your business expands. Do you want to copy not just your site—which might only be 10 or 20 MB zipped up—but all of your user’s images, perhaps 1 or 2 MB each? Probably not.
These are just a few reasons why the solution you’ve got in place might not be the best one for your particular web application. And there’s another option, equally complex, but just as useful: you can store images not on the file system, but directly in your database.
You’ve got a solution that works…but there may be a better solution around the corner. That’s a common situation in programming. In this case, there’s a different solution, and it’s in the next chapter. So turn the page, and see why you might just want your entire image stored in the database, rather than just the path to that image.
All materials on the site are licensed Creative Commons Attribution-Sharealike 3.0 Unported CC BY-SA 3.0 & GNU Free Documentation License (GFDL)
If you are the copyright holder of any material contained on our site and intend to remove it, please contact our site administrator for approval.
© 2016-2026 All site design rights belong to S.Y.A.