Modern PHP (2015)
Part I. Language Features
Chapter 2. Features
The modern PHP language has many exciting new features. Many of these features will be brand new to PHP programmers upgrading from earlier versions, and they’ll be a nice surprise to programmers migrating to PHP from another language. These new features make the PHP language a powerful platform and provide a pleasant experience for building web applications and command-line tools.
Some of these features aren’t essential, but they still make our lives easier. Some features, however, are essential. Namespaces, for example, are a cornerstone of modern PHP standards and enable development practices that modern PHP developers take for granted (e.g., autoloading). I’ll introduce each new feature, explain why it is useful, and show you how to implement it in your own projects.
TIP
I encourage you to follow along on your own computer. You can find all of the text’s code examples in this book’s companion GitHub repository.
Namespaces
If there is one modern PHP feature I want you to know, it is namespaces. Introduced in PHP 5.3.0, namespaces are an important tool that organizes PHP code into a virtual hierarchy, comparable to your operating system’s filesystem directory structure. Each modern PHP component and framework organizes its code beneath its own globally unique vendor namespace so that it does not conflict with, or lay claim to, common class names used by other vendors.
NOTE
Don’t you hate it when you walk into a coffee shop and this one obnoxious person has a mess of books, cables, and whatnot spread across several tables? Not to mention he’s sitting next to, but not using, the only available power outlet. He’s wasting valuable space that could otherwise be useful to you. Figuratively speaking, this person is not using namespaces. Don’t be this person.
Let’s see how a real-world PHP component uses namespaces. The Symfony Framework’s own symfony/httpfoundation is a popular PHP component that manages HTTP requests and responses. More important, the symfony/httpfoundation component uses common PHP class names like Request, Response, and Cookie. I guarantee you there are many other PHP components that use these same class names. How can we use the symfony/httpfoundation PHP component if other PHP code uses the same class names? We can safely use thesymfony/httpfoundation component precisely because its code is sandboxed beneath the unique Symfony vendor namespace. Visit the symfony/httpfoundation component on GitHub and navigate to the Response.php file. It looks like Figure 2-1.
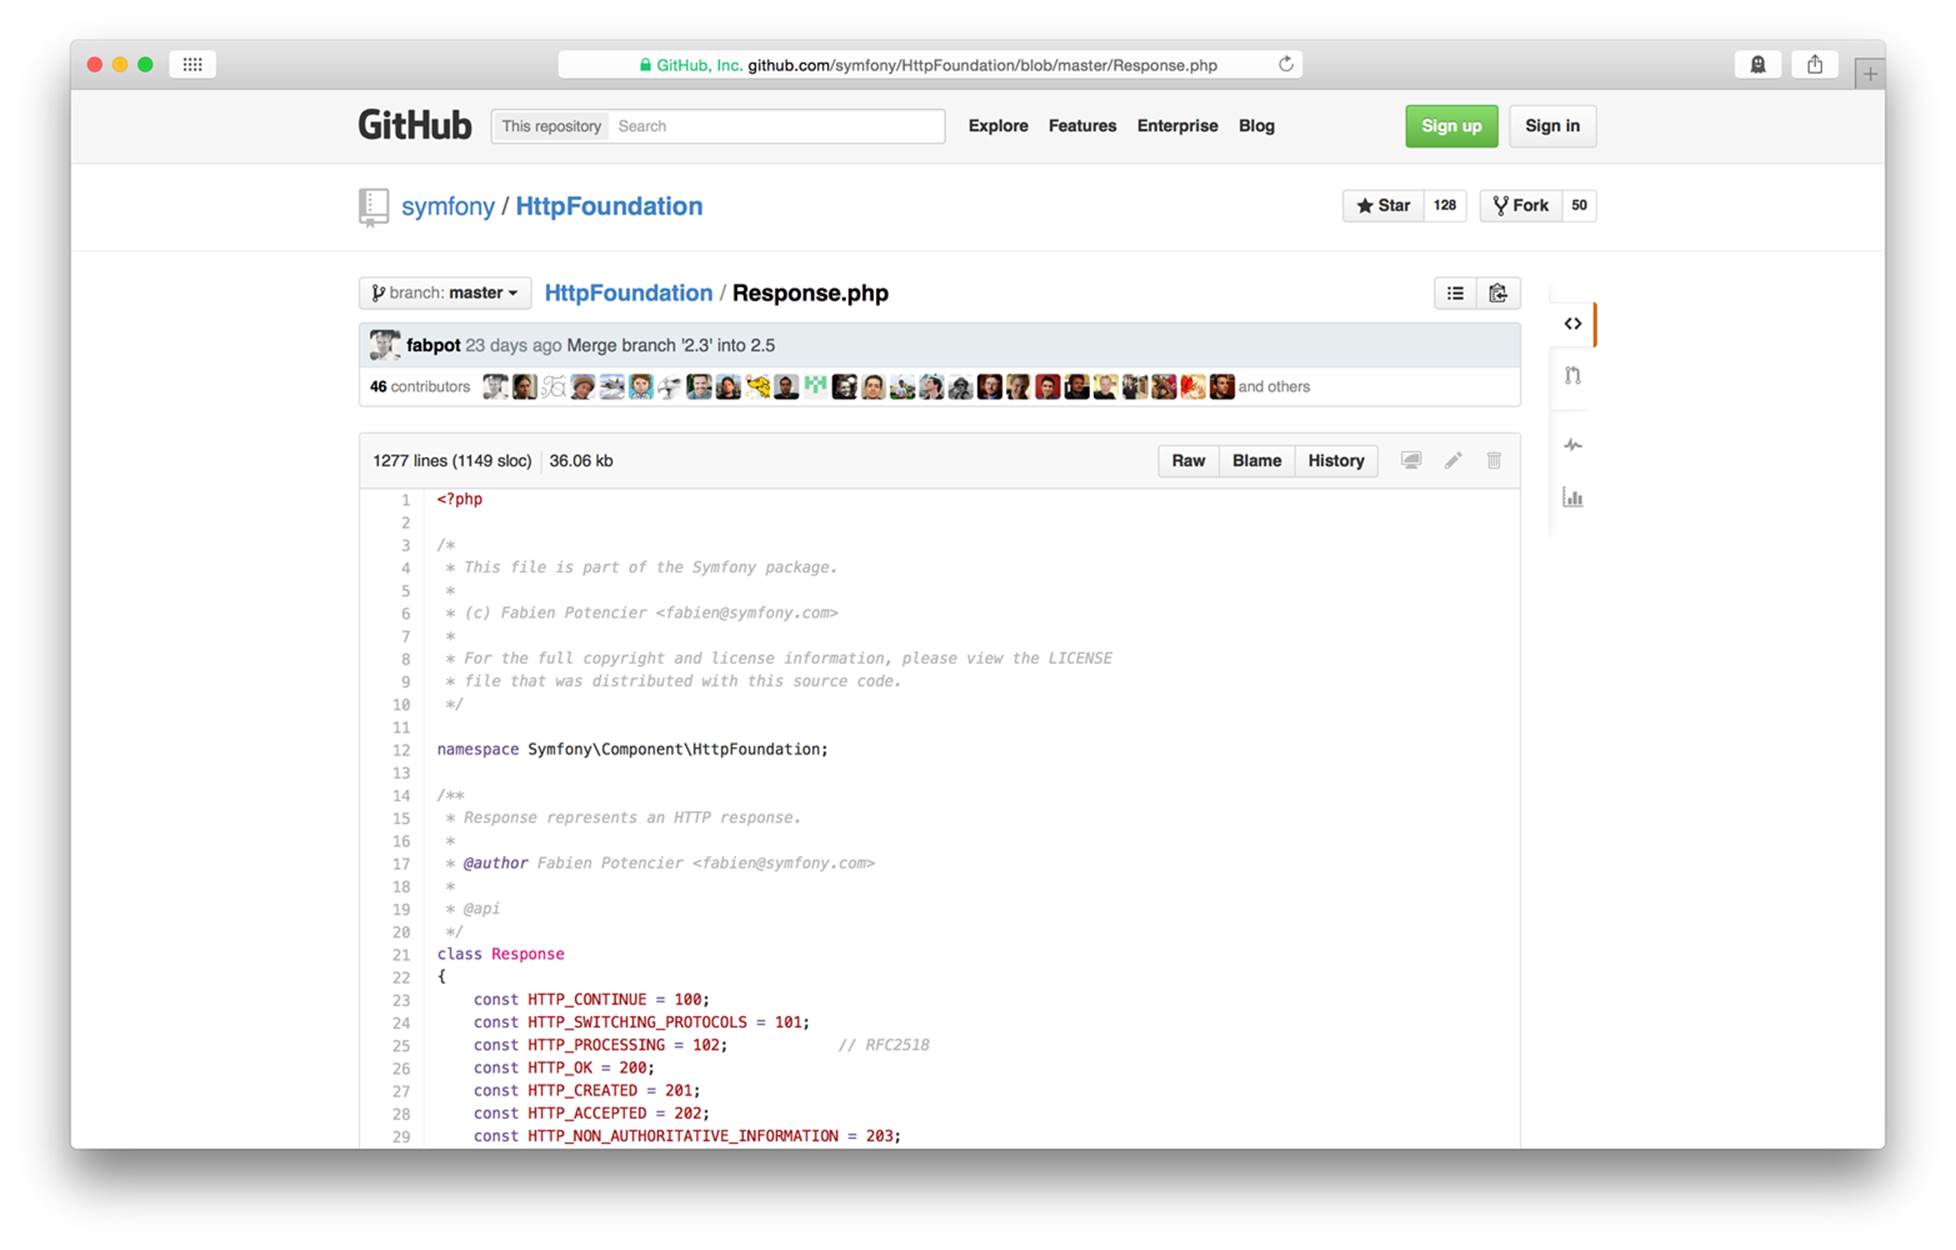
Figure 2-1. GitHub symfony/httpfoundation screenshot
Look closely at line 12. It contains this code:
namespace Symfony\Component\HttpFoundation;
This is a PHP namespace declaration, and it always appears on a new line immediately after the opening <?php tag. This particular namespace declaration tells us several things. First, we know the Response class lives beneath the Symfony vendor namespace (the vendor namespace is the topmost namespace). We know the Response class lives beneath the Component subnamespace. We also know the Response class lives beneath yet another subnamespace named HttpFoundation. You can view other files adjacent to Response.php, and you’ll see they use the same namespace declaration. A namespace (or subnamespace) encapsulates and organizes related PHP classes, just as a filesystem directory contains related files.
TIP
Subnamespaces are separated with a \ character.
Unlike your operating system’s physical filesystem, PHP namespaces are a virtual concept and do not necessarily map 1:1 with filesystem directories. That being said, most PHP components do, in fact, map subnamespaces to filesystem directories for compatibility with the popular PSR-4 autoloader standard (we’ll talk more about this in Chapter 3).
NOTE
Technically speaking, namespaces are merely a PHP language notation referenced by the PHP interpreter to apply a common name prefix to a set of classes, interfaces, functions, and constants.
Why We Use Namespaces
Namespaces are important because they let us create sandboxed code that works alongside other developers’ code. This is the cornerstone concept of the modern PHP component ecosystem. Component and framework authors build and distribute code for a large number of PHP developers, and they have no way of knowing or controlling what classes, interfaces, functions, and constants are used alongside their own code. This problem applies to your own in-house projects, too. If you write custom PHP components or classes for a project, that code must work alongside your project’s third-party dependencies.
As I mentioned earlier with the symfony/httpfoundation component, your code and other developers’ code might use the same class, interface, function, or constant names. Without namespaces, a name collision causes PHP to fail. With namespaces, your code and other developers’ code can use the same class, interface, function, or constant name assuming your code lives beneath a unique vendor namespace.
If you’re building a tiny personal project with only a few dependencies, class name collisions probably won’t be an issue. But when you’re working on a team building a large project with numerous third-party dependencies, name collisions become a very real concern. You cannot control which classes, interfaces, functions, and constants are introduced into the global namespace by your project’s dependencies. This is why namespacing your code is important.
Declaration
Every PHP class, interface, function, and constant lives beneath a namespace (or subnamespace). Namespaces are declared at the top of a PHP file on a new line immediately after the opening <?php tag. The namespace declaration begins with namespace, then a space character, then the namespace name, and then a closing semicolon ; character.
Remember that namespaces are often used to establish a top-level vendor name. This example namespace declaration establishes the Oreilly vendor name:
<?php
namespace Oreilly;
All PHP classes, interfaces, functions, or constants declared beneath this namespace declaration live in the Oreilly namespace and are, in some way, related to O’Reilly Media. What if we wanted to organize code related to this book? We use a subnamespace.
Subnamespaces are declared exactly the same as in the previous example. The only difference is that we separate namespace and subnamespace names with the \ character. The following example declares a subnamespace named ModernPHP that lives beneath the topmost Oreilly vendor namespace:
<?php
namespace Oreilly\ModernPHP;
All classes, interfaces, functions, and constants declared beneath this namespace declaration live in the Oreilly\ModernPHP subnamespace and are, in some way, related to this book.
All classes in the same namespace or subnamespace don’t have to be declared in the same PHP file. You can specify a namespace or subnamespace at the top of any PHP file, and that file’s code becomes a part of that namespace or subnamespace. This makes it possible to write multiple classes in separate files that belong to a common namespace.
TIP
The most important namespace is the vendor namespace. This is the topmost namespace that identifies your brand or organization, and it must be globally unique. Subnamespaces are less important, but they are helpful for organizing your project’s code.
Import and Alias
Before we had namespaces, PHP developers solved the name collision problem with Zend-style class names. This was a class-naming scheme popularized by the Zend Framework where PHP class names used underscores in lieu of filesystem directory separators. This convention accomplished two things: it ensured class names were unique, and it enabled a naive autoloader implementation that replaced underscores in PHP class names with filesystem directory separators to determine the class file path.
For example, the PHP class Zend_Cloud_DocumentService_Adapter_WindowsAzure_Query corresponds to the PHP file Zend/Cloud/DocumentService/Adapter/WindowsAzure/Query.php. A side effect of the Zend-style naming convention, as you can see, is absurdly long class names. Call me lazy, but there’s no way I’m typing that class name more than once.
Modern PHP namespaces present a similar problem. For example, the full Response class name in the symfony\httpfoundation component is \Symfony\Component\HttpFoundation\Response. Fortunately, PHP lets us import and alias namespaced code.
By import, I mean that I tell PHP which namespaces, classes, interfaces, functions, and constants I will use in each PHP file. I can then use these without typing their full namespaces.
By alias, I mean that I tell PHP that I will reference an imported class, interface, function, or constant with a shorter name.
TIP
You can import and alias PHP classes, interfaces, and other namespaces as of PHP 5.3. You can import and alias PHP functions and constants as of PHP 5.6.
The code shown in Example 2-1 creates and sends a 400 Bad Request HTTP response without importing and aliasing.
Example 2-1. Namespace without alias
<?php
$response = new \Symfony\Component\HttpFoundation\Response('Oops', 400);
$response->send();
This isn’t terrible, but imagine you have to instantiate a Response instance several times in a single PHP file. Your fingers will get tired quickly. Now look at Example 2-2. It does the same thing with importing.
Example 2-2. Namespace with default alias
<?php
use Symfony\Component\HttpFoundation\Response;
$response = new Response('Oops', 400);
$response->send();
We tell PHP we intend to use the Symfony\Component\HttpFoundation\Response class with the use keyword. We type the long, fully qualified class name once. Then we can instantiate the Response class without using its fully namespaced class name. How cool is that?
Some days I feel really lazy. This is a good opportunity to use an alias. Let’s extend Example 2-2. Instead of typing Response, maybe I just want to type Res instead. Example 2-3 shows how I can do that.
Example 2-3. Namespace with custom alias
<?php
use Symfony\Component\HttpFoundation\Response as Res;
$r = new Res('Oops', 400);
$r->send();
In this example, I changed the import line to import the Response class. I also appended as Res to the end of the import line; this tells PHP to consider Res an alias for the Response class. If we don’t append the as Res alias to the import line, PHP assumes a default alias that is the same as the imported class name.
TIP
You should import code with the use keyword at the top of each PHP file, immediately after the opening <?php tag or namespace declaration.
You don’t need a leading \ character when importing code with the use keyword because PHP assumes imported namespaces are fully qualified.
The use keyword must exist in the global scope (i.e., not inside of a class or function) because it is used at compile time. It can, however, be located beneath a namespace declaration to import code into another namespace.
As of PHP 5.6, it’s possible to import functions and constants. This requires a tweak to the use keyword syntax. To import a function, change use to use func:
<?php
use func Namespace\functionName;
functionName();
To import a constant, change use to use constant:
<?php
use constant Namespace\CONST_NAME;
echo CONST_NAME;
Function and constant aliases work the same as classes.
Helpful Tips
Multiple imports
If you import multiple classes, interfaces, functions, or constants into a single PHP file, you’ll end up with multiple use statements at the top of your PHP file. PHP accepts a shorthand import syntax that combines multiple use statements on a single line like this:
<?php
use Symfony\Component\HttpFoundation\Request,
Symfony\Component\HttpFoundation\Response,
Symfony\Component\HttpFoundation\Cookie;
Don’t do this. It’s confusing and easy to mess up. I recommend you keep each use statement on its own line like this:
<?php
use Symfony\Component\HttpFoundation\Request;
use Symfony\Component\HttpFoundation\Response;
use Symfony\Component\HttpFoundation\Cookie;
You’ll type a few extra characters, but your code is easier to read and troubleshoot.
Multiple namespaces in one file
PHP lets you define multiple namespaces in a single PHP file like this:
<?php
namespace Foo {
// Declare classes, interfaces, functions, and constants here
}
namespace Bar {
// Declare classes, interfaces, functions, and constants here
}
This is confusing and violates the recommended one class per file good practice. Use only one namespace per file to make your code simpler and easier to troubleshoot.
Global namespace
If you reference a class, interface, function, or constant without a namespace, PHP assumes the class, interface, function, or constant lives in the current namespace. If this assumption is wrong, PHP attempts to resolve the class, interface, function, or constant. If you need to reference a namespaced class, interface, function, or constant inside another namespace, you must use the fully qualified PHP class name (namespace + class name). You can type the fully qualified PHP class name, or you can import the code into the current namespace with the use keyword.
Some code might not have a namespace and, therefore, lives in the global namespace. The native Exception class is a good example. You can reference globally namespaced code inside another namespace by prepending a \ character to the class, interface, function, or constant name. For example, the \My\App\Foo::doSomething() method in Example 2-4 fails because PHP searches for a \My\App\Exception class that does not exist.
Example 2-4. Unqualified class name inside another namespace
<?php
namespace My\App;
class Foo
{
public function doSomething()
{
$exception = new Exception();
}
}
Instead, add a \ prefix to the Exception class name, as shown in Example 2-5. This tells PHP to look for the Exception class in the global namespace instead of the current namespace.
Example 2-5. Qualified class name inside another namespace
<?php
namespace My\App;
class Foo
{
public function doSomething()
{
throw new \Exception();
}
}
Autoloading
Namespaces also provide the bedrock for the PSR4 autoloader standard created by the PHP Framework Interop Group (PHP-FIG). This autoloader pattern is used by most modern PHP components, and it lets us autoload project dependencies using the Composer dependency manager. We’ll talk about Composer and the PHP-FIG in Chapter 4. For now, just understand that the modern PHP ecosystem and its emerging component-based architecture would be impossible without namespaces.
Code to an Interface
Learning how to code to an interface changed my life as a PHP programmer, and it profoundly improved my ability to integrate third-party PHP components into my own applications. Interfaces are not a new feature, but they are an important feature that you should know about and use on a daily basis.
So what is a PHP interface? An interface is a contract between two PHP objects that lets one object depend not on what another object is but, instead, on what another object can do. An interface decouples our code from its dependencies, and it allows our code to depend on any third-party code that implements the expected interface. We don’t care how the third-party code implements the interface; we care only that the third-party code does implement the interface. Here’s a more down-to-earth example.
Let’s pretend I just arrived in Miami, Florida for the Sunshine PHP Developer Conference. I need a way to get around town, so I head straight for the local car rental place. They have a tiny Hyundai compact, a Subaru wagon, and (much to my surprise) a Bugatti Veyron. I know I need a way to get around town, and all three vehicles can help me do that. But each vehicle does so differently. The Hyundai Accent is OK, but I’d like something with a bit more oomph. I don’t have kids, so the wagon has more seating than I need. I’ll take the Bugatti, please.
The reality is that I can drive any of these three cars because they all share a common and expected interface. Each car has a steering wheel, a gas pedal, a brake pedal, and turn signals, and each uses gasoline for fuel. The Bugatti is probably more power than I can handle, but the driving interface is the same as the Hyundai’s. Because all three cars share the same expected interface, and I have the opportunity to choose my preferred vehicle (and if we’re being honest, I’d probably go with the Hyundai).
This is the exact same concept in object-oriented PHP. If I write code that expects an object of a specific class (and therefore a specific implementation), my code’s utility is inherently limited because it can only use objects of that one class, forever. However, if I write code that expects an interface, my code immediately knows how to use any object that implements that interface. My code does not care how the interface is implemented; my code cares only that the interface is implemented. Let’s drive this home with a demo.
I have a hypothetical PHP class named DocumentStore that collects text from different sources: it fetches HTML from remote URLs; it reads stream resources; and it collects terminal command output. Each document stored in a DocumentStore instance has a unique ID. Example 2-6shows the DocumentStore class.
Example 2-6. DocumentStore class definition
class DocumentStore
{
protected $data = [];
public function addDocument(Documentable $document)
{
$key = $document->getId();
$value = $document->getContent();
$this->data[$key] = $value;
}
public function getDocuments()
{
return $this->data;
}
}
How exactly does this work if the addDocument() method only accepts instances of the Documentable class? That’s a good observation. However, Documentable is not a class. It’s an interface, and it looks like Example 2-7.
Example 2-7. Documentable interface definition
interface Documentable
{
public function getId();
public function getContent();
}
This interface definition says that any object implementing the Documentable interface must provide a public getId() method and a public getContent() method.
So how exactly is this helpful? It’s helpful because we can create separate document-fetching classes with wildly different implementations. Example 2-8 shows an implementation that can fetch HTML from a remote URL with curl.
Example 2-8. HtmlDocument class definition
class HtmlDocument implements Documentable
{
protected $url;
public function __construct($url)
{
$this->url = $url;
}
public function getId()
{
return $this->url;
}
public function getContent()
{
$ch = curl_init();
curl_setopt($ch, CURLOPT_URL, $this->url);
curl_setopt($ch, CURLOPT_RETURNTRANSFER, 1);
curl_setopt($ch, CURLOPT_CONNECTTIMEOUT, 3);
curl_setopt($ch, CURLOPT_FOLLOWLOCATION, 1);
curl_setopt($ch, CURLOPT_MAXREDIRS, 3);
$html = curl_exec($ch);
curl_close($ch);
return $html;
}
}
Another implementation (Example 2-9) can read a stream resource.
Example 2-9. StreamDocument class definition
class StreamDocument implements Documentable
{
protected $resource;
protected $buffer;
public function __construct($resource, $buffer = 4096)
{
$this->resource = $resource;
$this->buffer = $buffer;
}
public function getId()
{
return 'resource-' . (int)$this->resource;
}
public function getContent()
{
$streamContent = '';
rewind($this->resource);
while (feof($this->resource) === false) {
$streamContent .= fread($this->resource, $this->buffer);
}
return $streamContent;
}
}
And another implementation (Example 2-10) can fetch the result of a terminal command.
Example 2-10. StreamDocument class definition
class CommandOutputDocument implements Documentable
{
protected $command;
public function __construct($command)
{
$this->command = $command;
}
public function getId()
{
return $this->command;
}
public function getContent()
{
return shell_exec($this->command);
}
}
Example 2-11 shows how we can use the DocumentStore class with our three document-collecting implementations.
Example 2-11. DocumentStore
<?php
$documentStore = new DocumentStore();
// Add HTML document
$htmlDoc = new HtmlDocument('https://php.net');
$documentStore->addDocument($htmlDoc);
// Add stream document
$streamDoc = new StreamDocument(fopen('stream.txt', 'rb'));
$documentStore->addDocument($streamDoc);
// Add terminal command document
$cmdDoc = new CommandOutputDocument('cat /etc/hosts');
$documentStore->addDocument($cmdDoc);
print_r($documentStore->getDocuments());
This is really cool because the HtmlDocument, StreamDocument, and CommandOutputDocument classes have nothing in common other than a common interface.
At the end of the day, coding to an interface creates more-flexible code that delegates implementation concerns to others. Many more people (e.g., your office buddies, your open source project’s users, or developers you’ve never met) can write code that works seamlessly with your code by knowing nothing more than an interface.
Traits
Many of my PHP developer friends are confused by traits, a new concept introduced in PHP 5.4.0. Traits behave like classes but look like interfaces. Which one are they? Neither and both.
A trait is a partial class implementation (i.e., constants, properties, and methods) that can be mixed into one or more existing PHP classes. Traits work double duty: they say what a class can do (like an interface), and they provide a modular implementation (like a class).
NOTE
You may be familiar with traits in other languages. For example, PHP traits are similar to Ruby’s composable modules, or mixins.
Why We Use Traits
The PHP language uses a classical inheritance model. This means you start with a single generalized root class that provides a base implementation. You extend the root class to create more specialized classes that inherit their immediate parent’s implementation. This is called an inheritance hierarchy, and it is a common pattern used by many programming languages.
TIP
If it helps, picture yourself back in grade school Biology. Remember how you learned about the biological classification system? There are six kingdoms. Each kingdom is extended by phyla. Each phylum is extended by biological classes. Classes are extended by orders, orders by families, families by genera, and genera by species. Each hierarchy extension represents further specialization.
The classical inheritance model works well most of the time. However, what do we do if two unrelated PHP classes need to exhibit similar behavior? For example, a PHP class RetailStore and another PHP class Car are very different classes and don’t share a common parent in their inheritance hierarchies. However, both classes should be geocodable into latitude and longitude coordinates for display on a map.
Traits were created for exactly this purpose. They enable modular implementations that can be injected into otherwise unrelated classes. Traits also encourage code reuse.
My first (bad) reaction is to create a common parent class Geocodable that both RetailStore and Car extend. This is a bad solution because it forces two otherwise unrelated classes to share a common ancestor that does not naturally belong in either inheritance hierarchy.
My second (better) reaction is to create a Geocodable interface that defines which methods are required to implement the geocoding behavior. The RetailStore and Car classes can both implement the Geocodable interface. This is a good solution that allows each class to retain its natural inheritance hierarchy, but it requires us to duplicate the same geocoding behavior in both classes. This is not a DRY solution.
NOTE
DRY is an acronym for Do not repeat yourself. It’s considered a good practice never to duplicate the same code in multiple locations. You should not need to change code in one location because you changed code in another location. Read more on Wikipedia.
My third (best) reaction is to create a Geocodable trait that defines and implements the geocodable methods. I can then mix the Geocodable trait into both the RetailStore and Car classes without polluting their natural inheritance hierarchies.
How to Create a Trait
Here’s how you define a PHP trait:
<?php
trait MyTrait {
// Trait implementation goes here
}
TIP
It is considered a good practice to define only one trait per file, just like class and interface definitions.
Let’s return to our Geocodable example to better demonstrate traits in practice. We agree both RetailStore and Car classes need to provide geocodable behavior, and we’ve decided inheritance and interfaces are not the best solution. Instead, we create a Geocodable trait that returns latitude and longitude coordinates that we can plot on a map. Our complete Geocodable trait looks like Example 2-12.
Example 2-12. The Geocodable trait definition
<?php
trait Geocodable {
/** @var string */
protected $address;
/** @var \Geocoder\Geocoder */
protected $geocoder;
/** @var \Geocoder\Result\Geocoded */
protected $geocoderResult;
public function setGeocoder(\Geocoder\GeocoderInterface $geocoder)
{
$this->geocoder = $geocoder;
}
public function setAddress($address)
{
$this->address = $address;
}
public function getLatitude()
{
if (isset($this->geocoderResult) === false) {
$this->geocodeAddress();
}
return $this->geocoderResult->getLatitude();
}
public function getLongitude()
{
if (isset($this->geocoderResult) === false) {
$this->geocodeAddress();
}
return $this->geocoderResult->getLongitude();
}
protected function geocodeAddress()
{
$this->geocoderResult = $this->geocoder->geocode($this->address);
return true;
}
}
The Geocodable trait defines only the properties and methods necessary to implement the geocodable behavior. It does not do anything else.
Our Geocodable trait defines three class properties: an address (string), a geocoder object (an instance of \Geocoder\Geocoder from the excellent willdurand/geocoder component by William Durand), and a geocoder result object (an instance of \Geocoder\Result\Geocoded). We also define four public methods and one protected method. The setGeocoder() method is used to inject the Geocoder object. The setAddress() method is used to set an address. The getLatitude() and getLongitude() methods return their respective coordinates. And thegeocodeAddress() method passes the address string into the Geocoder instance to retrieve the geocoder result.
How to Use a Trait
Using a PHP trait is easy. Add the code use MyTrait; inside a PHP class definition. Here’s an example. Obviously, replace MyTrait with the appropriate PHP trait name:
<?php
class MyClass
{
use MyTrait;
// Class implementation goes here
}
TIP
Both namespaces and traits are imported with the use keyword. Where they are imported is different. We import namespaces, classes, interfaces, functions, and constants outside of a class definition. We import traits inside a class definition. The difference is subtle but important.
Let’s return to our Geocodable example. We defined the Geocodable trait in Example 2-12. Let’s update our RetailStore class so that it uses the Geocodable trait (Example 2-13). For the sake of brevity, I do not provide the complete RetailStore class implementation.
Example 2-13. The RetailStore class definition
<?php
class RetailStore
{
use Geocodable;
// Class implementation goes here
}
That’s all we have to do. Now each RetailStore instance can use the properties and methods provided by the Geocodable trait, as shown in Example 2-14.
Example 2-14. Traits
<?php
$geocoderAdapter = new \Geocoder\HttpAdapter\CurlHttpAdapter();
$geocoderProvider = new \Geocoder\Provider\GoogleMapsProvider($geocoderAdapter);
$geocoder = new \Geocoder\Geocoder($geocoderProvider);
$store = new RetailStore();
$store->setAddress('420 9th Avenue, New York, NY 10001 USA');
$store->setGeocoder($geocoder);
$latitude = $store->getLatitude();
$longitude = $store->getLongitude();
echo $latitude, ':', $longitude;
WARNING
The PHP interpreter copies and pastes traits into class definitions at compile time, and it does not protect against incompatibilities introduced by this action. If your PHP trait assumes a class property or method exists (that is not defined in the trait itself), be sure those properties and methods exist in the appropriate classes.
Generators
PHP generators are an underutilized yet remarkably helpful feature introduced in PHP 5.5.0. I think many PHP developers are unaware of generators because their purpose is not immediately obvious. Generators are simple iterators. That’s it.
Unlike your standard PHP iterator, PHP generators don’t require you to implement the Iterator interface in a heavyweight class. Instead, generators compute and yield iteration values on-demand. This has profound implications for application performance. Think about it. A standard PHP iterator often iterates in-memory, precomputed data sets. This is inefficient, especially with large and formulaic data sets that can be computed instead. This is why we use generators to compute and yield subsequent values on the fly without commandeering valuable memory.
NOTE
PHP generators are not a panacea for your iteration needs. Because generators never know the next iteration value until asked, it’s impossible to rewind or fast-forward a generator. You can iterate in only one direction—forward. Generators are also a once-and-done deal. You can’t iterate the same generator more than once. However, you are free to rebuild or clone a generator if necessary.
Create a Generator
Generators are easy to create because they are just PHP functions that use the yield keyword one or more times. Unlike regular PHP functions, generators never return a value. They only yield values. Example 2-15 shows a simple generator.
Example 2-15. Simple generator
<?php
function myGenerator() {
yield 'value1';
yield 'value2';
yield 'value3';
}
Pretty simple, huh? When you invoke the generator function, PHP returns an object that belongs to the Generator class. This object can be iterated with the foreach() function. During each iteration, PHP asks the Generator instance to compute and provide the next iteration value. What’s neat is that the generator pauses its internal state whenever it yields a value. The generator resumes internal state when it is asked for the next value. The generator continues pausing and resuming until it reaches the end of its function definition or an empty return; statement. We can invoke and iterate the generator in Example 2-15 like this:
<?php
foreach (myGenerator() as $yieldedValue) {
echo $yieldedValue, PHP_EOL;
}
This outputs:
value1
value2
value3
Use a Generator
I like to demonstrate how a PHP generator saves memory by implementing a simple range() function. First, let’s do it the wrong way (Example 2-16).
Example 2-16. Range generator (bad)
<?php
function makeRange($length) {
$dataset = [];
for ($i = 0; $i < $length; $i++) {
$dataset[] = $i;
}
return $dataset;
}
$customRange = makeRange(1000000);
foreach ($customRange as $i) {
echo $i, PHP_EOL;
}
Example 2-16 makes poor use of memory. The makeRange() method in Example 2-16 allocates one million integers into a precomputed array. A PHP generator can do the same thing while allocating memory for only one integer at any given time, as shown in Example 2-17.
Example 2-17. Range generator (good)
<?php
function makeRange($length) {
for ($i = 0; $i < $length; $i++) {
yield $i;
}
}
foreach (makeRange(1000000) as $i) {
echo $i, PHP_EOL;
}
This is a contrived example. However, just imagine all of the potential data sets that you can compute. Number sequences (e.g., Fibonacci) are an obvious candidate. You can also iterate a stream resource. Imagine you need to iterate a 4 GB comma-separated value (CSV) file and your virtual private server (VPS) has only 1 GB of memory available to PHP. There’s no way you can pull the entire file into memory. Example 2-18 shows how we can use a generator instead!
Example 2-18. CSV generator
<?php
function getRows($file) {
$handle = fopen($file, 'rb');
if ($handle === false) {
throw new Exception();
}
while (feof($handle) === false) {
yield fgetcsv($handle);
}
fclose($handle);
}
foreach (getRows('data.csv') as $row) {
print_r($row);
}
This example allocates memory for only one CSV row at a time instead of reading the entire 4 GB CSV file into memory. It also encapsulates the iteration implementation into a tidy package; this lets us quickly change how we get data (e.g., CSV, XML, JSON) without interrupting our application code that iterates the data.
Generators are a tradeoff between versatility and simplicity. Generators are forward-only iterators. This means you cannot use a generator to rewind, fast-forward, or seek a data set. You can only ask a generator to compute and yield its next value. Generators are most useful for iterating large or numerically sequenced data sets with only a tiny amount of system memory. They are also useful for accomplishing the same simple tasks as larger iterators with less code.
Generators do not add functionality to PHP. You can do what generators do without a generator. However, generators greatly simply certain tasks while using less memory. If you require more versatility to rewind, fast-forward, or seek through a data set, you’re better off writing a custom class that implements the Iterator interface, or using one of PHP’s prebuilt Standard PHP Library (SPL) iterators.
TIP
For more generator examples, read What Generators Can Do For You by Anthony Ferrara (@ircmaxell on Twitter).
Closures
Closures and anonymous functions were introduced in PHP 5.3.0, and they’re two of my favorite and most used PHP features. They sound scary (at least I thought so when I first learned about them), but they’re actually pretty simple to understand. They’re extremely useful tools that every PHP developer should have in the toolbox.
A closure is a function that encapsulates its surrounding state at the time it is created. The encapsulated state exists inside the closure even when the closure lives after its original environment ceases to exist. This is a difficult concept to grasp, but once you do it’ll be a life-changing moment.
An anonymous function is exactly that—a function without a name. Anonymous functions can be assigned to variables and passed around just like any other PHP object. But it’s still a function, so you can invoke it and pass it arguments. Anonymous functions are especially useful as function or method callbacks.
NOTE
Closures and anonymous functions are, in theory, separate things. However, PHP considers them to be one and the same. So when I say closure, I also mean anonymous function. And vice versa.
PHP closures and anonymous functions use the same syntax as a function, but don’t let them fool you. They’re actually objects disguised as PHP functions. If you inspect a PHP closure or anonymous function, you’ll find they are instances of the Closure class. Closures are considered first-class value types, just like a string or integer.
Create
So we know PHP closures look like functions. You should not be surprised, then, that you create a PHP closure like Example 2-19.
Example 2-19. Simple closure
<?php
$closure = function ($name) {
return sprintf('Hello %s', $name);
};
echo $closure("Josh");
// Outputs --> "Hello Josh"
That’s it. Example 2-19 creates a closure object and assigns it to the $closure variable. It looks like a standard PHP function: it uses the same syntax, it accepts arguments, and it returns a value. However, it does not have a name.
TIP
We can invoke the $closure variable because the variable’s value is a closure, and closure objects implement the \__invoke() magic method. PHP looks for and calls the __invoke() method whenever () follows a variable name.
I typically use PHP closure objects as function and method callbacks. Many PHP functions expect callback functions, like array_map() and preg_replace_callback(). This is a perfect opportunity to use PHP anonymous functions! Remember, closures can be passed into other PHP functions as arguments, just like any other value. In Example 2-20, I use a closure object as a callback argument in the array_map() function.
Example 2-20. array_map closure
<?php
$numbersPlusOne = array_map(function ($number) {
return $number + 1;
}, [1,2,3]);
print_r($numbersPlusOne);
// Outputs --> [2,3,4]
OK, so that wasn’t that impressive. But remember, before closures PHP developers had no choice but to create a separate named function and refer to that function by name. This was slightly slower to execute, and it segregated a callback’s implementation from its usage. Old-school PHP developers used code like this:
<?php
// Named callback implementation
function incrementNumber ($number) {
return $number + 1;
}
// Named callback usage
$numbersPlusOne = array_map('incrementNumber', [1,2,3]);
print_r($numbersPlusOne);
This code works, but it’s not as succinct and tidy as Example 2-20. We don’t need a separate incrementNumber() named function if we use the function only once as a callback. Closures used as callbacks create more concise and legible code.
Attach State
So far I’ve demonstrated nameless (or anonymous) functions used as callbacks. Let’s explore how to attach and enclose state with a PHP closure. JavaScript developers might be confused by PHP closures because they do not automatically enclose application state like true JavaScript closures. Instead, you must manually attach state to a PHP closure with the closure object’s bindTo() method or the use keyword.
It’s far more common to attach closure state with the use keyword, so let’s look at that first (Example 2-21). When you attach a variable to a closure via the use keyword, the attached variable retains the value assigned to it at the time it is attached to the closure.
Example 2-21. Attaching closure state with use keyword
<?php
function enclosePerson($name) {
return function ($doCommand) use ($name) {
return sprintf('%s, %s', $name, $doCommand);
};
}
// Enclose "Clay" string in closure
$clay = enclosePerson('Clay');
// Invoke closure with command
echo $clay('get me sweet tea!');
// Outputs --> "Clay, get me sweet tea!"
In Example 2-21, the enclosePerson() named function accepts a $name argument, and it returns a closure object that encloses the $name argument. The returned closure object preserves the $name argument’s value even after the closure exits the enclosePerson() function’s scope. The $name variable still exists in the closure!
TIP
You can pass multiple arguments into a closure with the use keyword. Separate multiple arguments with a comma, just as you do with any PHP function or method arguments.
Don’t forget, PHP closures are objects. Each closure instance has its own internal state that is accessible with the $this keyword just like any other PHP object. A closure object’s default state is pretty boring; it has a magic __invoke() method and a bindTo() method. That’s it.
However, the bindTo() method opens the door to some interesting possibilities. This method lets us bind a Closure object’s internal state to a different object. The bindTo() method accepts an important second argument that specifies the PHP class of the object to which the closure is bound. This lets the closure access protected and private member variables of the object to which it is bound.
You’ll find the bindTo() method is often used by PHP frameworks that map route URLs to anonymous callback functions. Frameworks accept an anonymous function and bind it to the application object. This lets you reference the primary application object inside the anonymous function with the $this keyword, as shown in Example 2-22.
Example 2-22. Attaching closure state with the bindTo method
01. <?php
02. class App
03. {
04. protected $routes = array();
05. protected $responseStatus = '200 OK';
06 protected $responseContentType = 'text/html';
07. protected $responseBody = 'Hello world';
08.
09. public function addRoute($routePath, $routeCallback)
10. {
11. $this->routes[$routePath] = $routeCallback->bindTo($this, __CLASS__);
12. }
13.
14. public function dispatch($currentPath)
15. {
16. foreach ($this->routes as $routePath => $callback) {
17. if ($routePath === $currentPath) {
18. $callback();
19. }
20. }
21.
22. header('HTTP/1.1 ' . $this->responseStatus);
23. header('Content-type: ' . $this->responseContentType);
24. header('Content-length: ' . mb_strlen($this->responseBody));
25. echo $this->responseBody;
26. }
27. }
Pay close attention to the addRoute() method. It accepts a route path (e.g., /users/josh) and a route callback. The dispatch() method accepts the current HTTP request path and invokes the matching route callback. The magic happens on line 11 when we bind the route callback to the current App instance. This lets us create a callback function that can manipulate the App instance state:
<?php
$app = new App();
$app->addRoute('/users/josh', function () {
$this->responseContentType = 'application/json;charset=utf8';
$this->responseBody = '{"name": "Josh"}';
});
$app->dispatch('/users/josh');
Zend OPcache
Bytecode caches are not new to PHP. We’ve had optional standalone extensions like Alternative PHP Cache (APC), eAccelerator, ionCube, and XCache. But none of these was built into the PHP core distribution until now. As of PHP 5.5.0, PHP has its own built-in bytecode cache called Zend OPcache.
First, let me explain what a bytecode cache is and why it is important. PHP is an interpreted language. When the PHP interpreter executes a PHP script, the interpreter parses the PHP script code, compiles the PHP code into a set of existing Zend Opcodes (machine-code instructions), and executes the bytecode. This happens for each PHP file during every request. This is a lot of overhead, especially if PHP must parse, compile, and execute PHP scripts over and over again for every HTTP request. If only there were a way to cache precompiled bytecode to reduce application response times and reduce stress on our system resources. You’re in luck.
A bytecode cache stores precompiled PHP bytecode. This means the PHP interpreter does not need to read, parse, and compile PHP code on every request. Instead, the PHP interpreter can read the precompiled bytecode from memory and execute it immediately. This is a huge timesaver and can drastically improve application performance.
Enable Zend OPcache
Zend OPcache isn’t enabled by default; you must explicitly enable Zend OPcache when you compile PHP.
NOTE
If you choose a shared web host, be sure you choose a good hosting company that provides PHP 5.5.0 or newer with Zend OPcache enabled.
If you compile PHP yourself (i.e., on a VPS or dedicated server), you must include this option in your PHP ./configure command:
--enable-opcache
After you compile PHP, you must also specify the path to the Zend OPcache extension in your php.ini file with this line:
zend_extension=/path/to/opcache.so
The Zend OPcache extension file path is displayed immediately after PHP compiles successfully. If you forget to look for this as I often do, you can also find the PHP extension directory with this command:
php-config --extension-dir
WARNING
If you use the popular Xdebug profiler by the incomparable Derick Rethans, your php.ini file must load the Zend OPcache extension before Xdebug.
After you update the php.ini file, restart the PHP process and you’re ready to go. You can confirm Zend OPcache is working correctly by creating a PHP file with this content:
<?php
phpinfo();
View this PHP file in a web browser and scroll down until you see the Zend OPcache extension section shown in Figure 2-2. If you don’t see this section, Zend OPcache is not running.
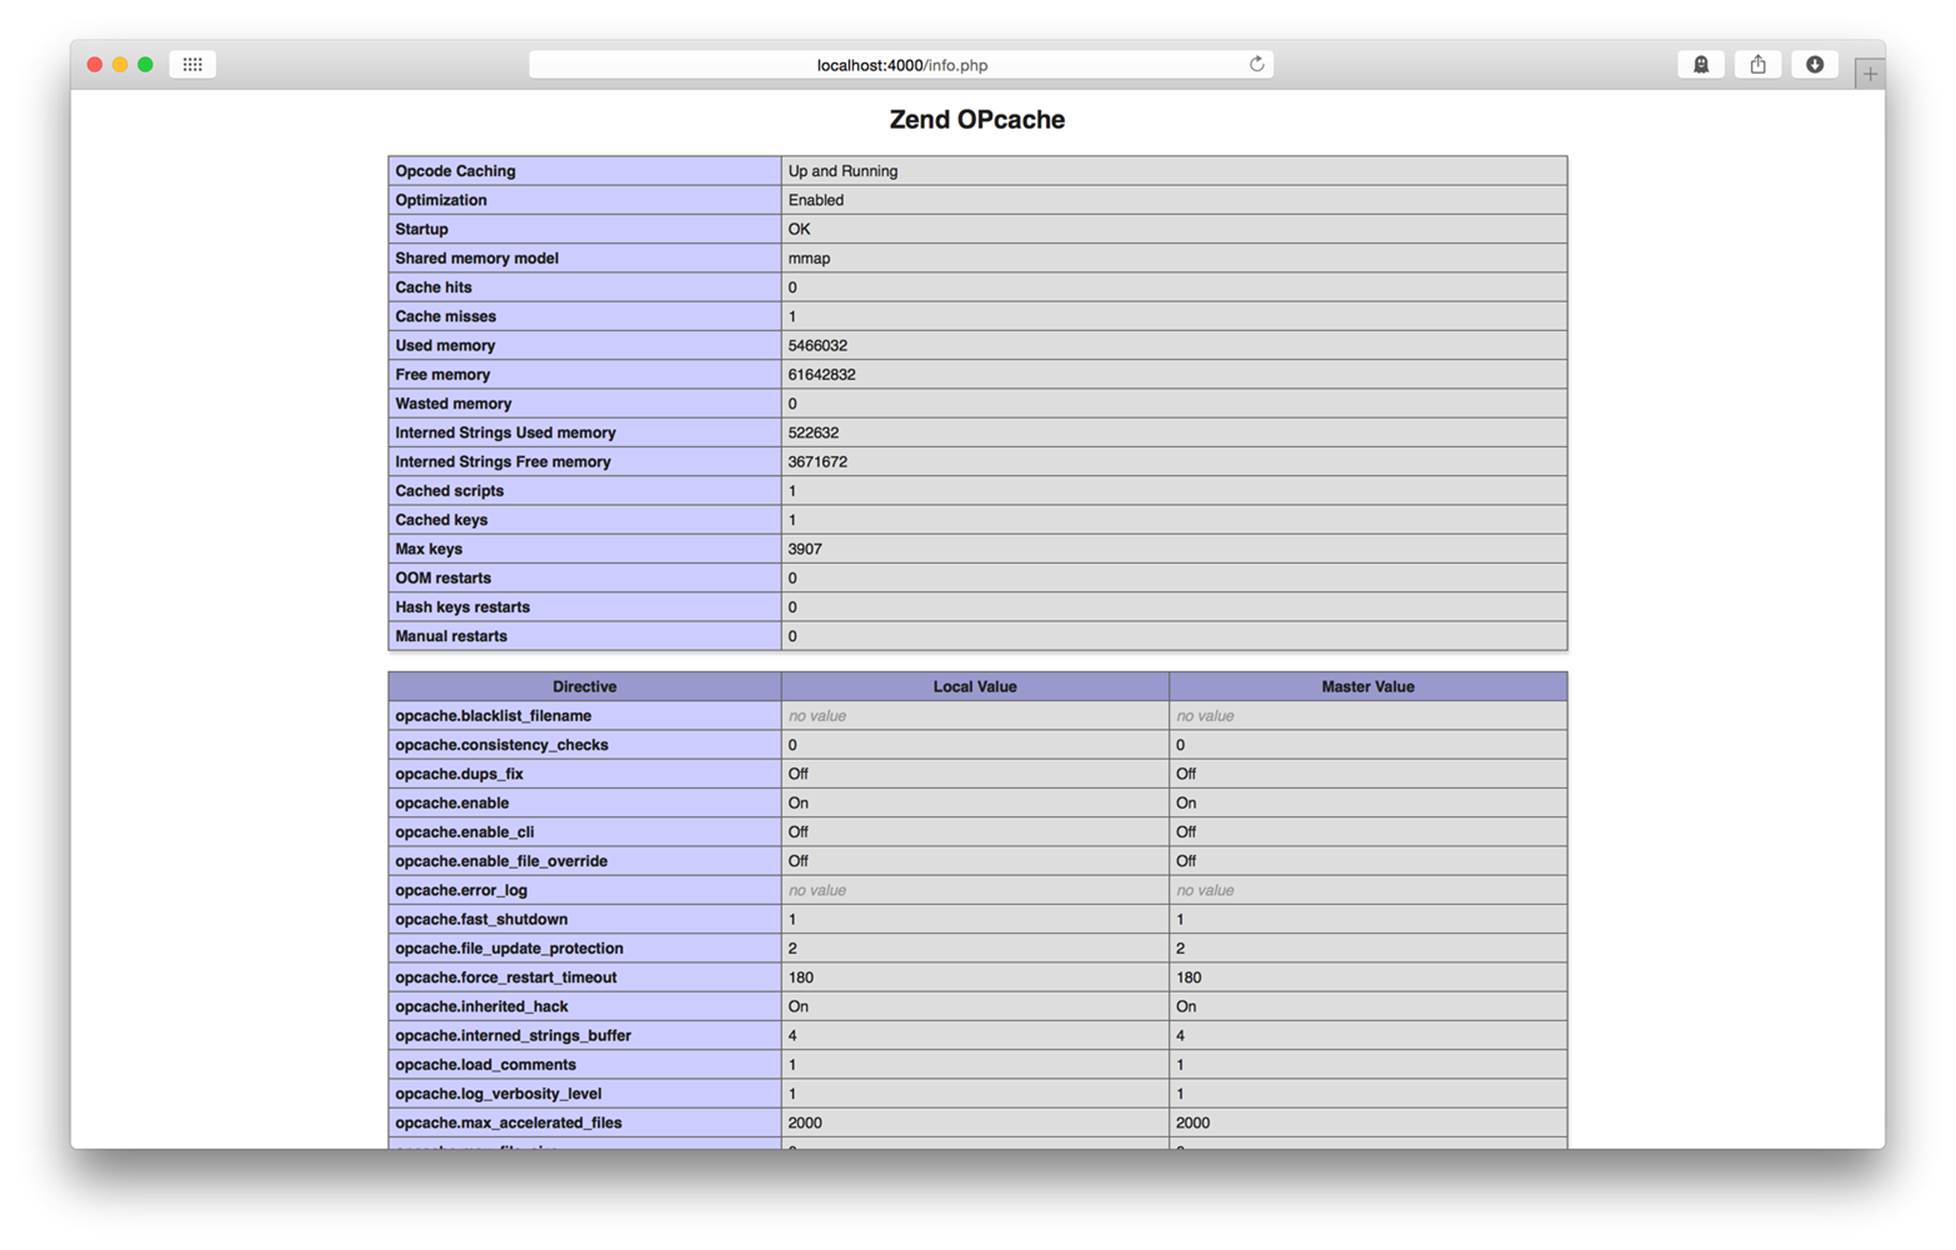
Figure 2-2. Zend OPcache INI settings
Configure Zend OPcache
When Zend OPcache is enabled, you should configure the Zend OPcache settings in your php.ini configuration file. Here are the OPcache settings I like to use:
opcache.validate_timestamps = 1 // "0" in production
opcache.revalidate_freq = 0
opcache.memory_consumption = 64
opcache.interned_strings_buffer = 16
opcache.max_accelerated_files = 4000
opcache.fast_shutdown = 1
TIP
Learn more about these Zend OPcache settings in Chapter 8. Find a complete list of Zend OPcache settings at PHP.net.
Use Zend OPcache
This part’s easy because the Zend OPcache works automatically when enabled. Zend OPcache automatically caches precompiled PHP bytecode in memory and executes the bytecode if available.
Be careful if the opcache.validate_timestamps INI directive is false. When this setting is false, the Zend OPcache does not know about changes to your PHP scripts, and you must manually clear Zend OPcache’s bytecode cache before it recognizes changes to your PHP files. This setting is good for production but inconvenient for development. You can enable automatic cache revalidation with these php.ini configuration settings:
opcache.validate_timestamps=1
opcache.revalidate_freq=0
Built-in HTTP server
Did you know that PHP has a built-in web server as of PHP 5.4.0? This is another hidden gem unknown to PHP developers who assume they need Apache or nginx to preview PHP applications. You shouldn’t use it for production, but PHP’s built-in web server is a perfect tool for local development.
I use PHP’s built-in web server every day, whether I’m writing PHP or not. I use it to preview Laravel and Slim Framework applications. I use it while building websites with the Drupal content-management framework. I also use it to preview static HTML and CSS if I’m just building out markup.
TIP
Remember, the PHP built-in server is a web server. It speaks HTTP, and it can serve static assets in addition to PHP files. It’s a great way to write and preview HTML locally without installing MAMP, WAMP, or a heavyweight web server.
Start the Server
It’s easy to start the PHP web server. Open your terminal application, navigate to your project’s document root directory, and execute this command:
php -S localhost:4000
This command starts a new PHP web server accessible at localhost. It listens on port 4000. Your current working directory is the web server’s document root.
You can now open your web browser and navigate to http://localhost:4000 to preview your application. As you browse your application in your web browser, each HTTP request is logged to standard out in your terminal application so you can see if you application throws 400 or 500responses.
Sometimes it’s useful to access the PHP web server from other machines on your local network (e.g., for previewing on your iPad or local Windows box). To do this, tell the PHP web server to listen on all interfaces by using 0.0.0.0 instead of localhost:
php -S 0.0.0.0:4000
When you are ready to stop the PHP web server, close your terminal application or press Ctrl+C.
Configure the Server
It’s not uncommon for an application to require its own PHP INI configuration file, especially if it has unique requirements for memory usage, file uploads, profiling, or bytecode caching. You can tell the PHP built-in server to use a specific INI file with the -c option:
php -S localhost:8000 -c app/config/php.ini
TIP
It’s a good idea to keep the custom INI file beneath the application’s root directory and, optionally, version-control the INI file if it should be shared with other developers on your team.
Router Scripts
The PHP built-in server has one glaring omission. Unlike Apache or nginx, it doesn’t support .htaccess files. This makes it difficult to use front controllers that are common in many popular PHP frameworks.
NOTE
A front controller is a single PHP file to which all HTTP requests are forwarded (via .htaccess files or rewrite rules). The front-controller PHP file is responsible for routing the request and dispatching the appropriate PHP code. This is a common pattern used by Symfony and other popular frameworks.
The PHP built-in server mitigates this omission with router scripts. The router script is executed before every HTTP request. If the router script returns false, the static asset referenced by the current HTTP request URI is returned. Otherwise, the output of the router script is returned as the HTTP response body. In other words, if you use a router script you’re effectively hardcoding the same functionality as an .htaccess file.
Using a router script is easy. Just pass the PHP script file path as a an argument when you start up the PHP built-in server:
php -S localhost:8000 router.php
Detect the Built-in Server
Sometimes it’s helpful to know if your PHP script is served by PHP’s built-in web server versus a traditional web server like Apache or nginx. Perhaps you need to set specific headers for nginx (e.g., Status:) that should not be set for the PHP web server. You can detect the PHP web server with the php_sapi_name() function. This function returns the string cli-server if the current script is served with the PHP built-in server:
<?php
if (php_sapi_name() === 'cli-server') {
// PHP web server
} else {
// Other web server
}
Drawbacks
PHP’s built-in web server should not be used for production. It is for local development only. If you use the PHP built-in web server on a production machine, be prepared for a lot of disappointed users and a flood of Pingdom downtime notifications.
§ The built-in server performs suboptimally because it handles one request at a time, and each HTTP request is blocking. Your web application will stall if a PHP file must wait on a slow database query or remote API response.
§ The built-in server supports only a limited number of mimetypes.
§ The built-in server has limited URL rewriting with router scripts. You’ll need Apache or nginx for more advanced URL rewrite behavior.
What’s Next
The modern PHP language has a lot of powerful features that can improve your applications. I’ve talked about my favorite features in this chapter. You can learn more about PHP’s latest features on the PHP website.
I’m sure you’re excited to start using these fun features in your applications. However, it’s important that you use these features correctly according to PHP community standards. And that’s exactly what we talk about in the next chapter.
All materials on the site are licensed Creative Commons Attribution-Sharealike 3.0 Unported CC BY-SA 3.0 & GNU Free Documentation License (GFDL)
If you are the copyright holder of any material contained on our site and intend to remove it, please contact our site administrator for approval.
© 2016-2026 All site design rights belong to S.Y.A.