Oracle PL/SQL by Example, Fifth Edition (2015)
Chapter 1. PL/SQL Concepts
In this chapter, you will learn about
![]() PL/SQL Architecture
PL/SQL Architecture
![]() PL/SQL Development Environment
PL/SQL Development Environment
![]() PL/SQL: The Basics
PL/SQL: The Basics
PL/SQL stands for “Procedural Language Extension to SQL.” Because of its tight integration with SQL, PL/SQL supports the great majority of the SQL features, such as SQL data manipulation, data types, operators, functions, and transaction control statements. As an extension to SQL, PL/SQL combines SQL with programming structures and subroutines available in any high-level language.
PL/SQL is used for both server-side and client-side development. For example, database triggers (code that is attached to tables—discussed in Chapters 13 and 14) on the server side and the logic behind an Oracle Form on the client side can be written using PL/SQL. In addition, PL/SQL can be used to develop web and mobile applications in both conventional and cloud environments when used in conjunction with a wide variety of Oracle development tools.
Lab 1.1: PL/SQL Architecture
After this lab, you will be able to
![]() Describe PL/SQL Architecture
Describe PL/SQL Architecture
![]() Discuss PL/SQL Block Structure
Discuss PL/SQL Block Structure
![]() Understand How PL/SQL Gets Executed
Understand How PL/SQL Gets Executed
Many Oracle applications are built using multiple tiers, also known as N-tier architecture, where each tier represents a separate logical process. For example, a three-tier architecture would consist of three tiers: a data management tier, an application processing tier, and a presentation tier. In this architecture, the Oracle database resides in the data management tier, and the programs that make requests against this database reside in either the presentation tier or the application processing tier. Such programs can be written in many programming languages, including PL/SQL. An example of a three-tier architecture is shown in Figure 1.1.

Figure 1.1 Three-Tier Architecture
PL/SQL Architecture
While PL/SQL is just like any other programming language, its main distinction is that it is not a stand-alone programming language. Rather, PL/SQL is a part of the Oracle RDBMS as well as various Oracle development tools such as Oracle Application Express (APEX) and Oracle Forms and Reports. As a result, PL/SQL may reside in any layer of the multitier architecture.
No matter which layer PL/SQL resides in, any PL/SQL block or subroutine is processed by the PL/SQL engine, which is a special component of various Oracle products. As a result, it is very easy to move PL/SQL modules between various tiers. The PL/SQL engine processes and executes any PL/SQL statements and sends any SQL statements to the SQL statement processor. The SQL statement processor is always located on the Oracle server. Figure 1.2 illustrates the PL/SQL engine residing on the Oracle server.
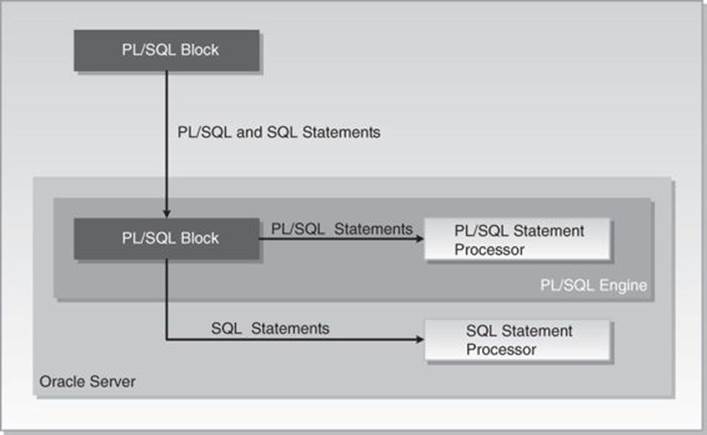
Figure 1.2 The PL/SQL Engine and Oracle Server
When the PL/SQL engine is located on the server, the whole PL/SQL block is passed to the PL/SQL engine on the Oracle server. The PL/SQL engine processes the block according to the scheme depicted in Figure 1.2.
When the PL/SQL engine is located on the client, as it is in Oracle development tools, the PL/SQL processing is done on the client side. All SQL statements that are embedded within the PL/SQL block are sent to the Oracle server for further processing. When PL/SQL block contains no SQL statements, the entire block is executed on the client side.
Using PL/SQL has several advantages. For example, when you issue a SELECT statement in SQL*Plus or SQL Developer against the STUDENT table, it retrieves a list of students. The SELECT statement you issued at the client computer is sent to the database server to be executed. The results of this execution are then returned to the client. In turn, rows are displayed on your client machine.
Now, assume that you need to issue multiple SELECT statements. Each SELECT statement is a request against the database and is sent to the Oracle server. The results of each SELECT statement are sent back to the client. Each time a SELECT statement is executed, network traffic is generated. Hence, multiple SELECT statements will result in multiple round-trip transmissions, adding significantly to the network traffic.
When these SELECT statements are combined into a PL/SQL program, they are sent to the server as a single unit. The SELECT statements in this PL/SQL program are executed at the server. The server sends the results of these SELECT statements back to the client, also as a single unit. Therefore, a PL/SQL program encompassing multiple SELECT statements can be executed at the server and have all of the results returned to the client in the same round trip. This is obviously a more efficient process than having each SELECT statement execute independently. This model is illustrated in Figure 1.3.
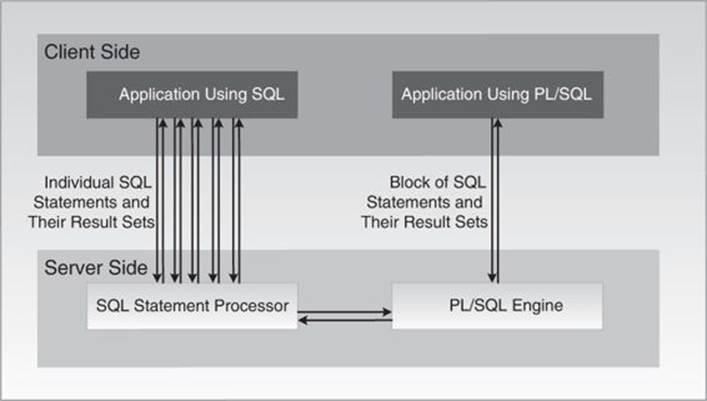
Figure 1.3 PL/SQL in Client–Server Architecture
Figure 1.3 compares two applications. The first application uses four independent SQL statements that generate eight trips on the network. The second application combines SQL statements into a single PL/SQL block, which is then sent to the PL/SQL engine. The engine sends SQL statements to the SQL statement processor and checks the syntax of the PL/SQL statements. As you can see, only two trips are generated on the network with the second application.
In addition, applications written in PL/SQL are portable. They can run in any environment that Oracle products can run in. Because PL/SQL does not change from one environment to the next, different tools can use a PL/SQL script.
PL/SQL Block Structure
A block is the most basic unit in PL/SQL. All PL/SQL programs are combined into blocks. These blocks can also be nested within one another. Usually, PL/SQL blocks combine statements that represent a single logical task. Therefore, different tasks within a single program can be separated into blocks. With this structure, it is easier to understand and maintain the logic of the program.
PL/SQL blocks can be divided into two groups: named and anonymous. Named PL/SQL blocks are used when creating subroutines. These subroutines, which include procedures, functions, and packages, can be stored in the database and referenced by their names later. In addition, subroutines such as procedures and functions can be defined within the anonymous PL/SQL block. These subroutines exist as long as the block is executing and cannot be referenced outside the block. In other words, subroutines defined in one PL/SQL block cannot be called by another PL/SQL block or referenced by their names later. Subroutines are discussed in Chapters 19 through 21. Anonymous PL/SQL blocks, as you have probably guessed, do not have names. As a result, they cannot be stored in the database or referenced later.
PL/SQL blocks contain three sections: a declaration section, an executable section, and an exception-handling section. The executable section is the only mandatory section of the block; both the declaration and exception-handling sections are optional. As a result, a PL/SQL block has the structure illustrated in Listing 1.1.
Listing 1.1 PL/SQL Block Structure
DECLARE
Declaration statements
BEGIN
Executable statements
EXCEPTION
Exception-handling statements
END;
Declaration Section
The declaration section is the first section of the PL/SQL block. It contains definitions of PL/SQL identifiers such as variables, constants, cursors, and so on. PL/SQL identifiers are covered in detail throughout this book.
For Example
DECLARE
v_first_name VARCHAR2(35);
v_last_name VARCHAR2(35);
This example shows the declaration section of an anonymous PL/SQL block. It begins with the keyword DECLARE and contains two variable declarations. The names of the variables, v_first_name and v_last_name, are followed by their data types and sizes. Notice that a semicolon terminates each declaration.
Executable Section
The executable section is the next section of the PL/SQL block. It contains executable statements that allow you to manipulate the variables that have been declared in the declaration section.
For Example
BEGIN
SELECT first_name, last_name
INTO v_first_name, v_last_name
FROM student
WHERE student_id = 123;
DBMS_OUTPUT.PUT_LINE ('Student name: '||v_first_name||' '||v_last_name);
END;
This example shows the executable section of the PL/SQL block. It begins with the keyword BEGIN and contains a SELECT INTO statement from the STUDENT table. The first and last names for student ID 123 are selected into two variables: v_first_name and v_last_name.Chapter 3 contains a detailed explanation of the SELECT INTO statement. Next, the values of the variables, v_first_name and v_last_name, are displayed on the screen with the help of the DBMS_OUTPUT.PUT_LINE statement. This statement will be covered later in this chapter in greater detail. The end of the executable section of this block is marked by the keyword END.
By the Way
The executable section of any PL/SQL block always begins with the keyword BEGIN and ends with the keyword END.
Exception-Handling Section
Two types of errors may occur when a PL/SQL block is executed: compilation or syntax errors and runtime errors. Compilation errors are detected by the PL/SQL compiler when there is a misspelled reserved word or a missing semicolon are the end of the statement.
For Example
BEGIN
DBMS_OUTPUT.PUT_LINE ('This is a test')
END;
This example contains a syntax error: The DBMS_OUTPUT.PUT_LINE statement is not terminated by a semicolon.
Runtime errors occur while the program is running and cannot be detected by the PL/SQL compiler. These types of errors are detected or handled by the exception-handling section of the PL/SQL block. It contains a series of statements that are executed when a runtime error occurs within the block.
Once a runtime error occurs, control is passed to the exception-handling section of the block. The error is then evaluated, and a specific exception is raised or executed. This is best illustrated by the following example. All changes are shown in bold.
For Example
BEGIN
SELECT first_name, last_name
INTO v_first_name, v_last_name
FROM student
WHERE student_id = 123;
DBMS_OUTPUT.PUT_LINE ('Student name: '||v_first_name||' '||v_last_name);
EXCEPTION
WHEN NO_DATA_FOUND
THEN
DBMS_OUTPUT.PUT_LINE ('There is no student with student id 123');
END;
This example shows the exception-handling section of the PL/SQL block. It begins with the keyword EXCEPTION. The WHEN clause evaluates which exception must be raised. In this example, there is only one exception, called NO_DATA_FOUND, and it is raised when the SELECTstatement does not return any rows. If there is no record for student ID 123 in the STUDENT table, control is passed to the exception-handling section and the DBMS_OUTPUT.PUT_LINE statement is executed. Chapters 8, 9, and 10 contain detailed explanations of the exception-handling section.
You have seen examples of the declaration section, executable section, and exception-handling section. These examples may be combined into a single PL/SQL block.
For Example ch01_1a.sql
DECLARE
v_first_name VARCHAR2(35);
v_last_name VARCHAR2(35);
BEGIN
SELECT first_name, last_name
INTO v_first_name, v_last_name
FROM student
WHERE student_id = 123;
DBMS_OUTPUT.PUT_LINE ('Student name: '||v_first_name||' '||v_last_name);
EXCEPTION
WHEN NO_DATA_FOUND
THEN
DBMS_OUTPUT.PUT_LINE ('There is no student with student id 123');
END;
How PL/SQL Gets Executed
Every time an anonymous PL/SQL block is executed, the code is sent to the PL/SQL engine, where it is compiled. A named PL/SQL block is compiled only at the time of its creation, or if it has been changed. The compilation process includes syntax and semantic checking, as well as code generation.
Syntax checking involves checking PL/SQL code for syntax or compilation errors. As stated previously, a syntax error occurs when a statement does not exactly correspond to the syntax of the programming language. A misspelled keyword, a missing semicolon at the end of the statement, and an undeclared variable are all examples of syntax errors. Once syntax errors are corrected, the compiler can generate a parse tree.
By the Way
A parse tree is a tree-like structure that represents the language rules of a computer language.
Semantic checking involves further processing on the parse tree. It determines whether database objects such as table names and column names referenced in the SELECT statements are valid and whether you have privileges to access them. At the same time, the compiler can assign a storage address to program variables that are used to hold data. This process, which is called binding, allows Oracle software to reference storage addresses when the program is run.
Code generation creates code for the PL/SQL block in interpreted or native mode. Code created in interpreted mode is called p-code. P-code is a list of instructions to the PL/SQL engine that are interpreted at run time. Code created in a native mode is a processor-dependent system code that is called native code. Because native code does not need to be interpreted at run time, it usually runs slightly faster.
The mode in which the PL/SQL engine generates code is determined by the PLSQL_CODE_TYPE database initialization parameter. By default, its value is set to INTERPRETED. This parameter is typically set by the database administrators.
For named blocks, both p-code and native code are stored in the database, and are used the next time the program is executed. Once the process of compilation has completed successfully, the status of a named PL/SQL block is set to VALID, and it is also stored in the database. If the compilation process was not successful, the status of the named PL/SQL block is set to INVALID.
Watch Out!
Successful compilation of the named PL/SQL block on one occasion does not guarantee successful execution of this block in the future. If, at the time of execution, any one of the stored objects referenced by the block is not present in the database or not accessible to the block, execution will fail. At such time, the status of the named PL/SQL block will be changed to INVALID.
Lab 1.2: PL/SQL Development Environment
After this lab, you will be able to
![]() Get Started with SQL Developer
Get Started with SQL Developer
![]() Get Started with SQL*Plus
Get Started with SQL*Plus
![]() Execute PL/SQL Scripts
Execute PL/SQL Scripts
SQL Developer and SQL*Plus are two Oracle-provided tools that you can use to develop and run PL/SQL scripts. SQL*Plus is an old-style command-line utility tool that has been part of the Oracle platform since its infancy. It is included in the Oracle installation on every platform. SQL Developer is a free graphical tool used for database development and administration. It is a fairly recent addition to the Oracle tool set and is available either as a part of the Oracle installation or via download from Oracle’s website.
Due to its graphical interface, SQL Developer is a much easier environment to use than SQL*Plus. It allows you to browse database objects, run SQL statements, and create, debug, and run PL/SQL statements. In addition, it supports syntax highlighting and formatting templates that become very useful when you are developing and debugging complex PL/SQL modules.
Even though SQL*Plus and SQL Developer are two very different tools, their underlying functionality and their interactions with the database are very similar. At run time, the SQL and PL/SQL statements are sent to the database. Once they are processed, the results are sent back from the database and displayed on the screen.
The examples used in this chapter are executed in both tools to illustrate some of the interface differences when appropriate. Note that the primary focus of this book is learning PL/SQL; thus these tools are covered only to the degree that is required to run PL/SQL examples provided by this book.
Getting Started with SQL Developer
If SQL Developer has been installed as part of the Oracle installation, you can launch it by accessing Start, All Programs, Oracle, Application Development, SQL Developer on Windows 7 and earlier versions. On Windows 8, SQL Developer is invoked by accessing Start, All Apps, Oracle, SQL Developer. Alternatively, you can download and install this tool as a separate module.
Once SQL Developer is installed, you need to create connection to the database server. This can be accomplished by clicking on the Plus icon located in the upper-left corner of the Connections tab. This activates the New/Select Database Connection dialog box, as shown in Figure 1.4.

Figure 1.4 Creating a Database Connection in SQL Developer
In Figure 1.4, you need to provide a connection name (StudentConnection), user name (student), and password (learn).
By the Way
Starting with Oracle 11g, the password is case sensitive.
In the same dialog box, you need to provide database connection information such as the hostname (typically the IP address of the machine or the machine name where the database server resides), the default port where that database listens for the connection requests (usually 1521), and the SID (system ID) or service name that identifies a particular database. Both the SID and service name would depend on the names you picked up for your installation of Oracle. The default SID is usually set to orcl.
Watch Out!
If you have not created the STUDENT schema yet, you will not be able to create this connection successfully. To create the STUDENT schema, refer to the installation instructions provided on the companion website.
Once the connection has been successfully created, you can connect to the database by double-clicking on the StudentConnection. By expanding the StudentConnection (clicking on the plus sign located to the left of it), you are able to browse various database objects available in theSTUDENT schema. For example, Figure 1.5 shows list of tables available in the STUDENT schema.
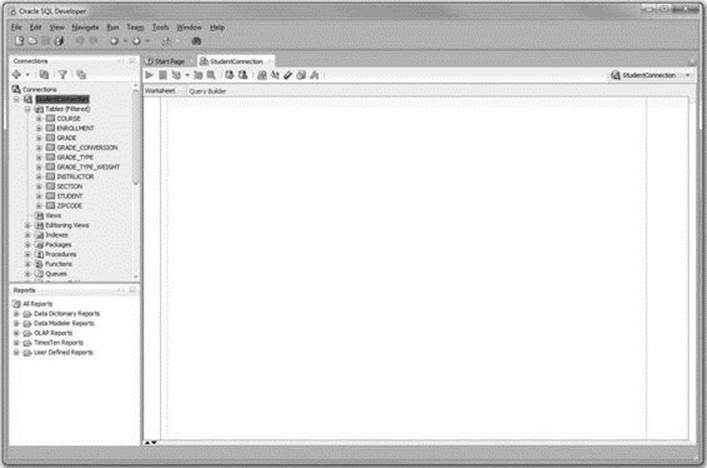
Figure 1.5 List of Tables in the STUDENT Schema
At this point you can start typing SQL or PL/SQL commands in the Worksheet window, shown in Figure 1.5.
To disconnect from the STUDENT schema, you need to right-click on the StudentConnection and click on the Disconnect option. This is illustrated in Figure 1.6.
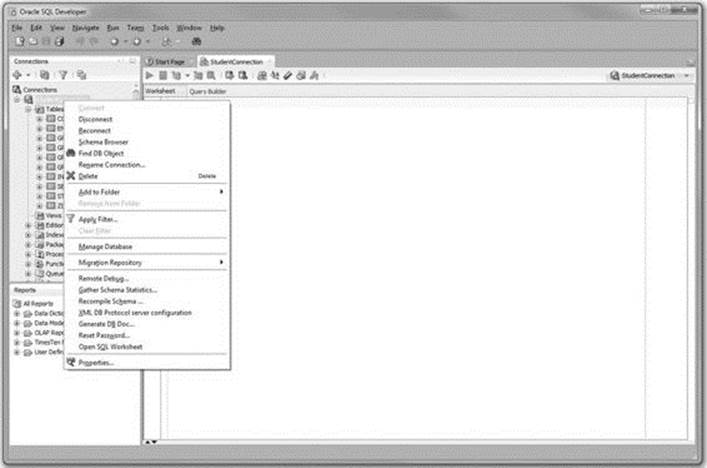
Figure 1.6 Disconnecting from a Database in SQL Developer
Getting Started with SQL*Plus
On Windows 7 and earlier versions, you can access SQL*Plus by choosing Start, All Programs, Oracle, Application Development, SQL*Plus under the Start button. On Windows 8, SQL*Plus is invoked by accessing Start, All Apps, Oracle, SQL*Plus.
When you open SQL*Plus, you are prompted to enter your user name and password (“student” and “learn,” respectively). In addition, you can invoke SQL*Plus by typing sqlplus in the command prompt window.
By the Way
In SQL*Plus, the password is not displayed on the screen, even as a masked text.
After successful login, you are able to enter your commands at the SQL> prompt. This is illustrated in Figure 1.7.
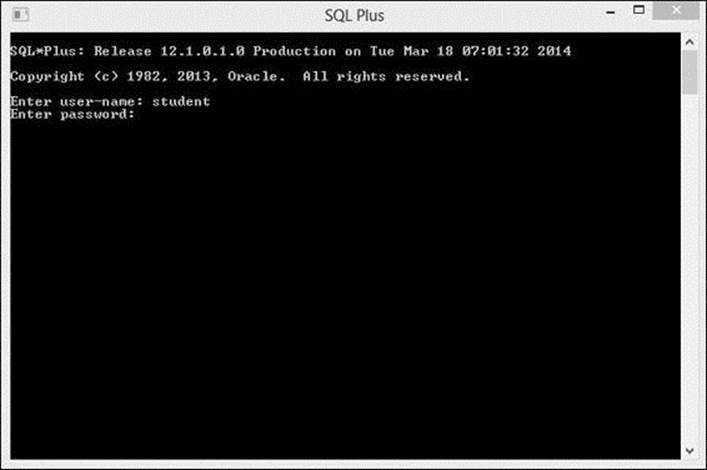
Figure 1.7 Connecting to the Database in SQL*Plus
To terminate your connection to the database, type either EXIT or QUIT command and press Enter.
Did You Know?
Terminating the database connection in either SQL Developer or SQL*Plus terminates only your own client connection. In a multiuser environment, there may be potentially hundreds of client connections to the database server at any time. As these connections terminate and new ones are initiated, the database server continues to run and send various query results back to its clients.
Executing PL/SQL Scripts
As mentioned earlier, at run time SQL and PL/SQL statements are sent from the client machine to the database. Once they are processed, the results are sent back from the database to the client and are displayed on the screen. However, there are some differences between entering SQL and PL/SQL statements.
Consider the following example of a SQL statement.
For Example
SELECT first_name, last_name
FROM student
WHERE student_id = 102;
If this statement is executed in SQL Developer, the semicolon is optional. To execute this statement, you need to click on the triangle button in the StudentConnection SQL Worksheet or press the F9 key on your keyboard. The results of this query are then displayed in the Query Result window, as shown in Figure 1.8.
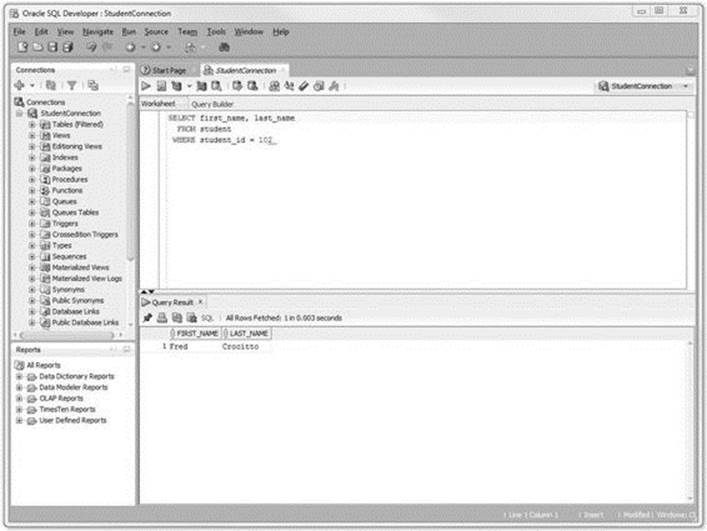
Figure 1.8 Executing a Query in SQL Developer
When the same SELECT statement is executed in SQL*Plus, the semicolon is required. It signals SQL*Plus that the statement is terminated. As soon as you press the Enter key, the query is sent to the database and the results are displayed on the screen, as shown in Figure 1.9.
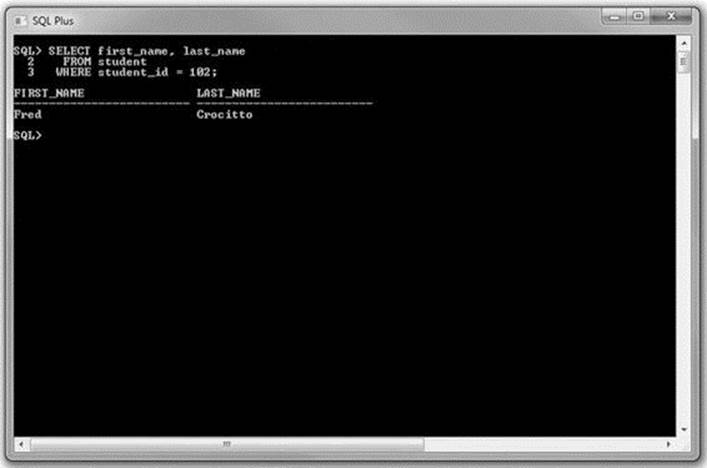
Figure 1.9 Executing a Query in SQL*Plus
Now, consider the example of the PL/SQL block used in the previous lab.
For Example ch01_1a.sql
DECLARE
v_first_name VARCHAR2(35);
v_last_name VARCHAR2(35);
BEGIN
SELECT first_name, last_name
INTO v_first_name, v_last_name
FROM student
WHERE student_id = 123;
DBMS_OUTPUT.PUT_LINE ('Student name: '||v_first_name||' '||v_last_name);
EXCEPTION
WHEN NO_DATA_FOUND
THEN
DBMS_OUTPUT.PUT_LINE ('There is no student with student id 123');
END;
Note that each individual statement is this script is terminated by a semicolon. Each variable declaration, the SELECT INTO statement, both DBMS_OUTPUT.PUT_LINE statements, and the END keyword are all terminated by the semicolon. This syntax is necessary because in PL/SQL the semicolon marks termination of an individual statement within a block. In other words, the semicolon is not a block terminator.
Because SQL Developer is a graphical tool, it does not require a special block terminator. The preceding example can be executed in SQL Developer by clicking on the green triangle button in the StudentConnection SQL Worksheet or pressing the F9 key on your keyboard, as shown inFigure 1.10.
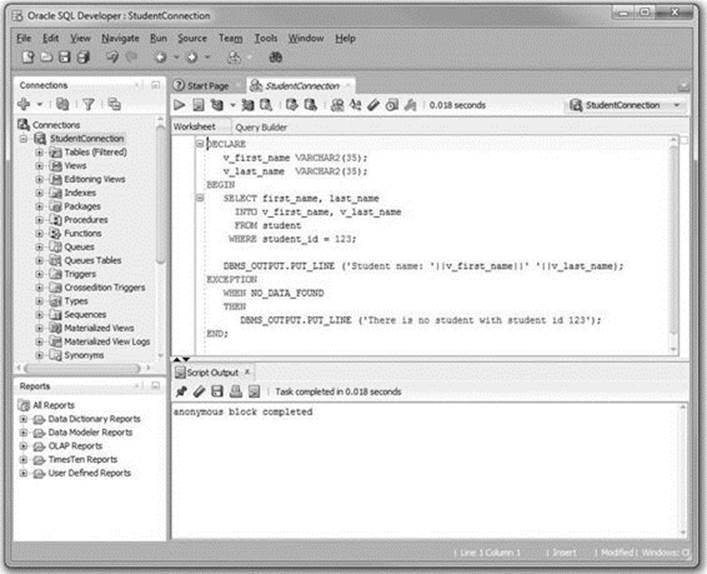
Figure 1.10 Executing a PL/SQL Block in SQL Developer
The block terminator becomes necessary when the same example is executed in SQL*Plus. Because it is a command-line tool, SQL*Plus requires a textual way of knowing when the block has terminated and is ready for execution. The “/” is interpreted by SQL*Plus as a block terminator. Once you press the Enter key, the PL/SQL block is sent to the database and the results are displayed on the screen. This is shown in Figure 1.11a.
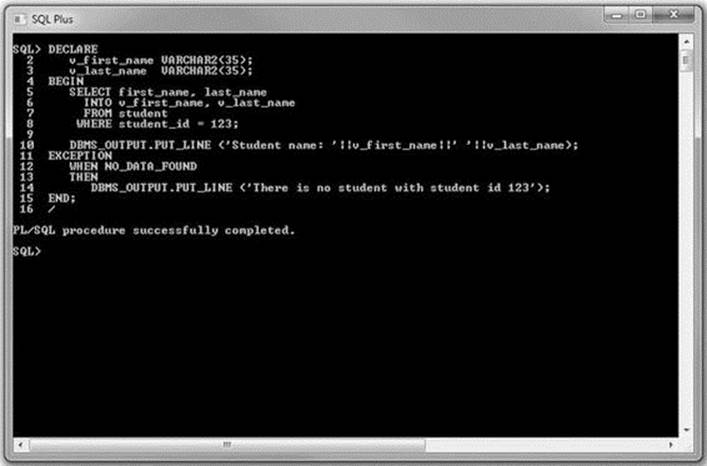
Figure 1.11a Executing a PL/SQL Block in SQL*Plus with a Block Terminator
If you omit “/”, SQL*Plus will not execute the PL/SQL script. Instead, it will simply add a blank line to the script when you press the Enter key. This is shown in Figure 1.11b.
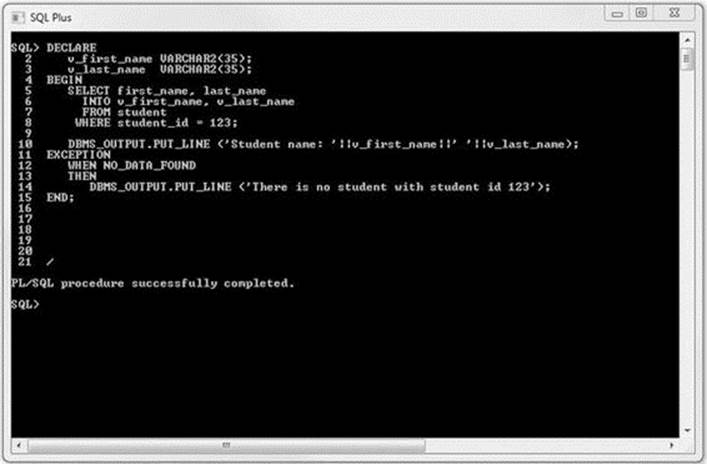
Figure 1.11b Executing a PL/SQL Block in SQL*Plus without a Block Terminator
Lab 1.3: PL/SQL: The Basics
After this lab, you will be able to
![]() Use the DBMS_OUTPUT.PUT_LINE Statement
Use the DBMS_OUTPUT.PUT_LINE Statement
![]() Use the Substitution Variable Feature
Use the Substitution Variable Feature
We noted earlier that PL/SQL is not a stand-alone programming language; rather, it exists only as a tool within the Oracle environment. As a result, it does not really have any capabilities to accept input from a user. This is accomplished with the special feature of the SQL Developer and SQL*Plus tools called a substitution variable.
Similarly, it is often helpful to provide the user with some pertinent information after the execution of a PL/SQL block, and this is accomplished with the help of the DBMS_OUTPUT.PUT_LINE statement. Note that unlike the substitution variable, this statement is part of the PL/SQL language.
DBMS_OUTPUT.PUT_LINE Statement
You already have seen some examples of how the DBMS_OUTPUT.PUT_LINE statement can be used—that is, to display information on the screen. The DBMS_OUTPUT.PUT_LINE is a call to the procedure PUT_LINE. This procedure is a part of the DBMS_OUTPUT package that is owned by the Oracle user SYS.
The DBMS_OUTPUT.PUT_LINE statement writes information to the buffer for storage. Once a program has completed, the information from the buffer is displayed on the screen. The size of the buffer can be set between 2000 and 1 million bytes.
To see the results of the DBMS_OUTPUT.PUT_LINE statement on the screen, you need to enable it. In SQL Developer, this is accomplished by selecting the View menu option and then choosing the Dbms Output option, as shown in Figure 1.12a.
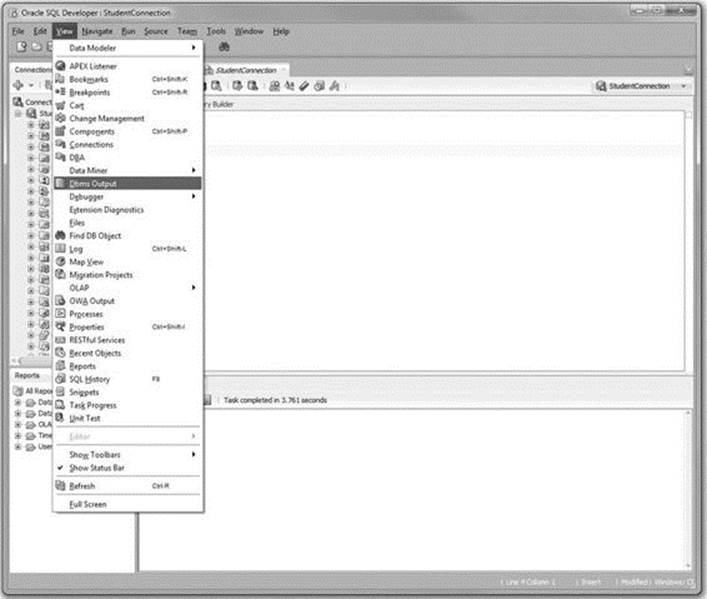
Figure 1.12a Enabling DBMS_OUTPUT in SQL Developer: Step 1
Once the Dbms Output window appears in SQL Developer, you need to click on the green plus button, as shown in Figure 1.12b.
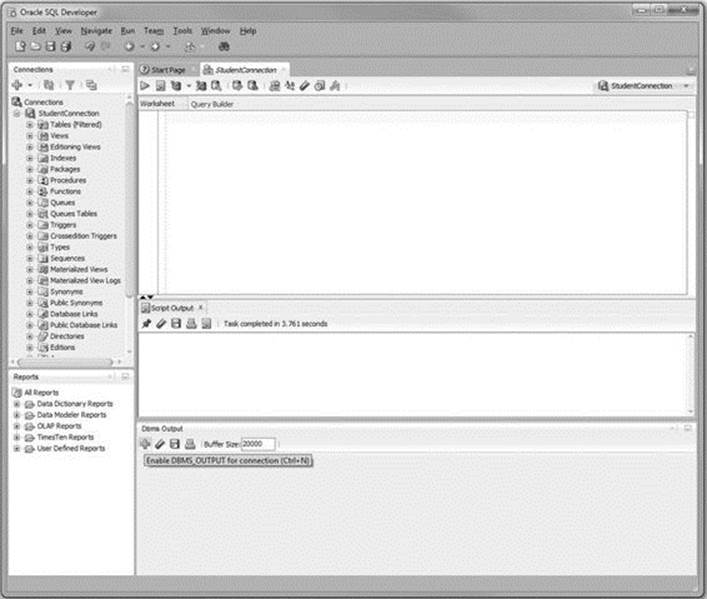
Figure 1.12b Enabling DBMS_OUTPUT in SQL Developer: Step 2
Once you click on the plus button, you will be prompted with the name of the connection for which you want to enable the statement. You need to select StudentConnection and click OK. The result of this operation is shown in Figure 1.12c.
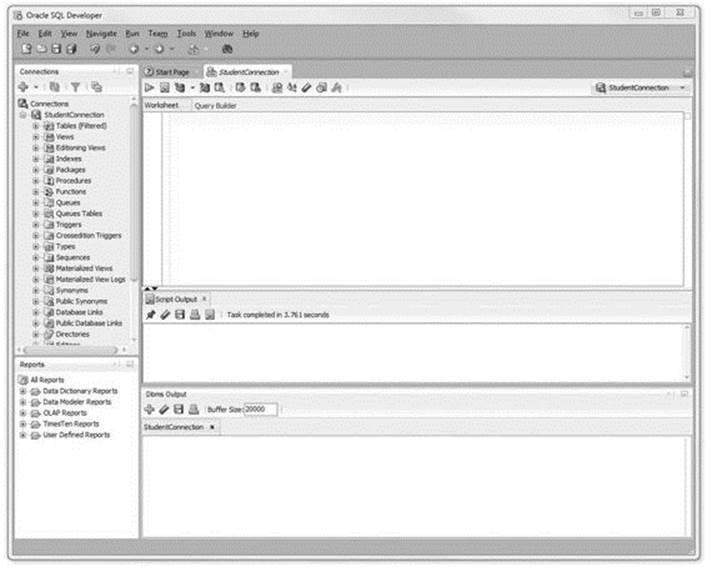
Figure 1.12c Enabling DBMS_OUTPUT in SQL Developer: Step 3
To enable the DBMS_OUTPUT statement in SQL*Plus, you enter one of the following statements before the PL/SQL block:
SET SERVEROUTPUT ON;
or
SET SERVEROUTPUT ON SIZE 5000;
The first SET statement enables the DBMS_OUTPUT.PUT_LINE statement, with the default value for the buffer size being used. The second SET statement not only enables the DBMS_OUTPUT.PUT_LINE statement, but also changes the buffer size from its default value to 5000 bytes.
Similarly, if you do not want information to be displayed on the screen by the DBMS_OUTPUT.PUT_LINE statement, you can issue the following SET command prior to the PL/SQL block:
SET SERVEROUTPUT OFF;
Substitution Variable Feature
Substitution variables are a special type of variables that enable PL/SQL to accept input from a user at a run time. They cannot be used to output values, however, because no memory is allocated for them. Substitution variables are replaced with the values provided by the user before the PL/SQL block is sent to the database. The variable names are usually prefixed by the ampersand (&) or double ampersand (&&) character.
Consider the following example.
For Example ch01_1b.sql
DECLARE
v_student_id NUMBER := &sv_student_id;
v_first_name VARCHAR2(35);
v_last_name VARCHAR2(35);
BEGIN
SELECT first_name, last_name
INTO v_first_name, v_last_name
FROM student
WHERE student_id = v_student_id;
DBMS_OUTPUT.PUT_LINE ('Student name: '||v_first_name||' '||v_last_name);
EXCEPTION
WHEN NO_DATA_FOUND
THEN
DBMS_OUTPUT.PUT_LINE ('There is no such student');
END;
When this example is executed, the user is asked to provide a value for the student ID. The student’s name is then retrieved from the STUDENT table if there is a record with the given student ID. If there is no record with the given student ID, the message from the exception-handling section is displayed on the screen.
In SQL Developer, the substitution variable feature operates as shown in Figure 1.13.
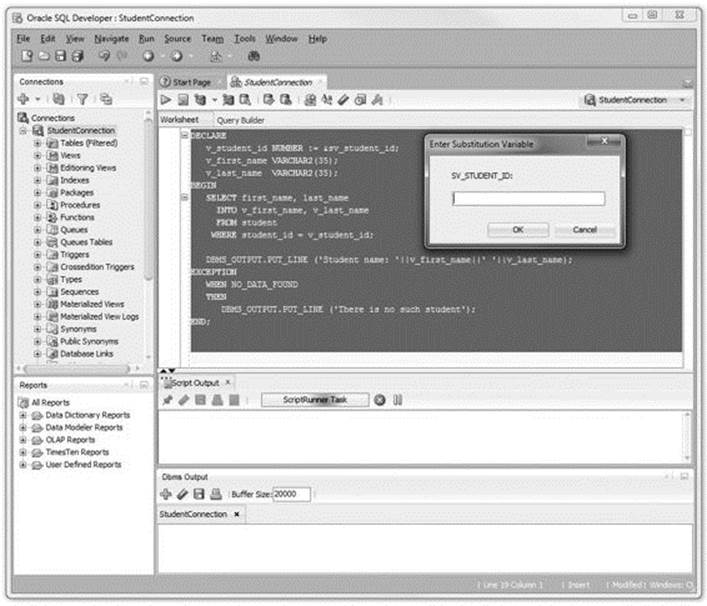
Figure 1.13 Using Substitution Variable in SQL Developer
Once the value for the substitution variable is provided, the results of the execution are displayed in the Script Output window, as shown in Figure 1.14.
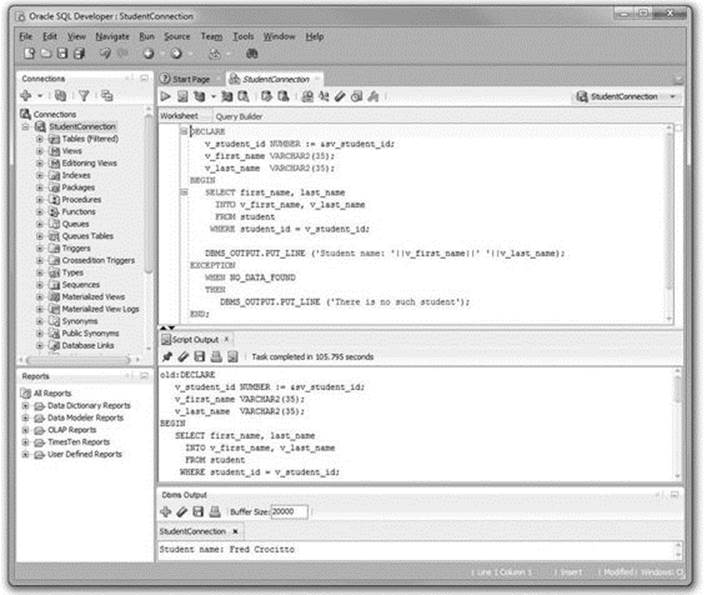
Figure 1.14 Using Substitution Variable in SQL Developer: Script Output Window
In Figure 1.14, the substitution of the variable is shown in the Script Output window and the result of the execution is shown in the Dbms Output window.
In SQL*Plus, the substitution variable feature operates as shown in Figure 1.15.
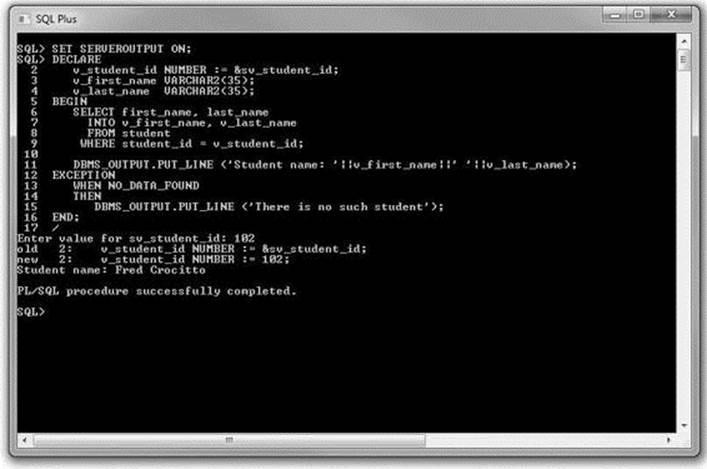
Figure 1.15 Using Substitution Variable in SQL*Plus
Note that SQL*Plus does not list the complete PL/SQL block in its results, but rather displays the substitution operation only.
The preceding example uses a single ampersand for the substitution variable. When a single ampersand is used throughout the PL/SQL block, the user is asked to provide a value for each occurrence of the substitution variable.
For Example ch01_2a.sql
BEGIN
DBMS_OUTPUT.PUT_LINE ('Today is '||'&sv_day');
DBMS_OUTPUT.PUT_LINE ('Tomorrow will be '||'&sv_day');
END;
When executing this example in either SQL Developer or SQL*Plus, you are prompted twice to provide the value for the substitution variable. This example produces the following output:
Today is Monday
Tomorrow will be Tuesday
Did You Know?
When a substitution variable is used in the script, the output produced by the program contains the statements that show how the substitution was done.
If you do not want to see these lines displayed in the output produced by the script, use the SET command option before you run the script:
SET VERIFY OFF;
This command is supported by both SQL Developer and SQL*Plus.
As demonstrated earlier, when the same substitution variable is used with a single ampersand, the user is prompted to provide a value for each occurrence of this variable in the script. To avoid this task, you can prefix the first occurrence of the substitution variable by the double ampersand (&&) character, as highlighted in bold in the following example.
For Example ch01_2b.sql
BEGIN
DBMS_OUTPUT.PUT_LINE ('Today is '||'&&sv_day');
DBMS_OUTPUT.PUT_LINE ('Tomorrow will be '||'&sv_day');
END;
In this example, the substitution variable sv_day is prefixed by a double ampersand in the first DBMS_OUTPUT.PUT_LINE statement. As a result, this version of the example produces different output:
Today is Monday
Tomorrow will be Monday
From the output shown, it is clear that the user is asked only once to provide the value for the substitution variable sv_day. In turn, both DBMS_OUTPUT.PUT_LINE statements use the value of Monday entered by the user.
When a substitution variable is assigned to the string (text) data type, it is a good practice to enclose it with single quotes. You cannot always guarantee that a user will provide text information in single quotes. This practice, which will make your program less error prone, is illustrated in the following code fragment.
For Example
DECLARE
v_course_no VARCHAR2(5) := '&sv_course_no';
As mentioned earlier, substitution variables are usually prefixed by the ampersand (&) or double ampersand (&&) characters; these are the default characters that denote substitution variables. A special SET command option available in SQL Developer and SQL*Plus also allows you to change the default character to any other character or disable the substitution variable feature. This SET command has the following syntax:
SET DEFINE character
or
SET DEFINE ON
or
SET DEFINE OFF
The first SET command option changes the prefix of the substitution variable from an ampersand to another character. Note, however, that this character cannot be alphanumeric or white space. The second (ON option) and third (OFF option) control whether SQL*Plus will look for substitution variables. In addition, the ON option changes the value of the character back to the ampersand.
Summary
In this chapter, you learned about PL/SQL architecture and how it may be used in a multitier environment. You also learned how PL/SQL is able to interact with users via substitution variables and the DBMS_OUTPUT.PUT_LINE statement. Finally, you learned about two PL/SQL development tools, SQL Developer and SQL*Plus. The examples shown in this chapter were executed in both tools to illustrate the differences between them. The main difference between the two is that SQL Developer has a graphical user interface and SQL*Plus has a command-line interface. The PL/SQL examples used throughout this book may be executed in either tool with the same results. Depending on your preference, you may choose one tool over the other. However, it is a good idea to become familiar with both, as these tools are part of almost every Oracle database installation.
By the Way
The companion website provides additional exercises and suggested answers for this chapter, with discussion related to how those answers resulted. The main purpose of these exercises is to help you test the depth of your understanding by utilizing all of the skills that you have acquired throughout this chapter.
All materials on the site are licensed Creative Commons Attribution-Sharealike 3.0 Unported CC BY-SA 3.0 & GNU Free Documentation License (GFDL)
If you are the copyright holder of any material contained on our site and intend to remove it, please contact our site administrator for approval.
© 2016-2026 All site design rights belong to S.Y.A.