Sams Teach Yourself PHP, MySQL and Apache All in One (2012)
Part IV. PHP and MySQL Integration
Chapter 18. Interacting with MySQL Using PHP
In this chapter, you learn the following:
• How to connect to MySQL using PHP
• How to insert and select data through PHP scripts
Now that you have learned the basics of PHP and the basics of working with MySQL, you are ready to make the two interact. Think of PHP as a conduit to MySQL: The commands you learned in the previous chapter are the same commands that you send to MySQL in this chapter, only this time you send them with PHP.
MySQL or MySQLi Functions?
If you are returning to PHP from working with it years earlier, or have worked with current versions of PHP but with very old versions of MySQL, you might have used the mysql_* family of functions. You might also find code examples all over the Internet that use the mysql_* family of functions.
However, since MySQL 4.1.3 (well over 7 years ago at this point), the database system includes functionality necessitating new communications methods in PHP, all encompassed in the mysqli_* family of functions.
All code in this chapter, and throughout the rest of this book, uses the mysqli_* family of functions. For more information, see the PHP Manual chapter “MySQL Improved Extension,” at http://www.php.net/mysqli.
Connecting to MySQL with PHP
To successfully use the PHP functions to talk to MySQL, you must have MySQL running at a location to which your web server can connect (not necessarily the same machine as your web server). You also must have created a user (with a password), and you must know the name of the database to which you want to connect. If you followed the instructions in Chapter 2, “Installing and Configuring MySQL,” and Chapter 4, “Installing and Configuring PHP,” you should already have taken care of this. If you are using PHP and MySQL as part of a hosting package at an Internet service provider, make sure that you have either been given or have created a username, password, and database name before proceeding.
In all script examples in this chapter, the database name is testDB, the user is joeuser, and the password is somepass. Substitute your own information when you use these scripts.
Note
All code in this chapter (as well as other chapters moving forward) reflect the procedural use of the mysqli_* family of functions. You can also use these functions in an object-oriented way. For more information on that, visit the PHP Manual at http://www.php.net/mysqli.
If you are coming to PHP from an object-oriented programming language or have an object-oriented mindset, I recommend reviewing the object-oriented functionality in the PHP Manual and substituting it where appropriate—conceptually, these processes are all quite similar.
However, if you are new to programming, or have not yet embraced an object-oriented mindset, there is nothing wrong with learning the procedural style or using it in your daily work. I continue to use procedural programming throughout this book because it has proven the best way for new programmers to understand the processes.
Making a Connection
The basic syntax for a connection to MySQL is as follows:
$mysqli = mysqli_connect("hostname", "username", "password", "database");
The value of $mysqli is the result of the function and is used in later functions for communicating with MySQL.
With sample values inserted, the connection code looks like this:
$mysqli = mysqli_connect("localhost", "joeuser", "somepass", "testDB");
Listing 18.1 is a working example of a connection script. It creates a new connection in line 2 and then tests to see whether an error occurred. If an error occurred, line 5 prints an error message and uses the mysqli_connect_error() function to print the message. If no error occurs, line 8 prints a message that includes host information resulting from calling the mysqli_get_host_info() function.
Listing 18.1 A Simple Connection Script
1: <?php
2: $mysqli = new mysqli("localhost", "joeuser", "somepass", "testDB");
3:
4: if (mysqli_connect_errno()) {
5: printf("Connect failed: %s\n", mysqli_connect_error());
6: exit();
7: } else {
8: printf("Host information: %s\n", mysqli_get_host_info($mysqli));
9: }
10: ?>
Save this script as mysqlconnect.php and place it in the document area of your web server. Access the script with your web browser and you will see something like the following, if the connection was successful:
Host information: localhost via TCP/IP
You might also see this:
Host information: Localhost via UNIX socket
If the connection fails, an error message is printed. Line 5 generates an error via the mysqli_connect_error() function. An example is shown here:
Connect failed: Access denied for user 'joeuser'@'localhost' (using password:
YES)
However, if the connection is successful, line 8 prints the output of
mysqli_get_host_info(), such as examples above.
Although the connection closes when the script finishes its execution, it is a good practice to close the connection explicitly. You can see how to do this in line 9 of Listing 18.2, using the mysqli_close() function.
Listing 18.2 The Modified Simple Connection Script
1: <?php
2: $mysqli = new mysqli("localhost", "joeuser", "somepass", "testDB");
3:
4: if (mysqli_connect_errno()) {
5: printf("Connect failed: %s\n", mysqli_connect_error());
6: exit();
7: } else {
8: printf("Host information: %s\n", mysqli_get_host_info($mysqli));
9: mysqli_close($mysqli);
10: }
11: ?>
We did not use the mysql_close() function after line 5 because if line 5 is executed, it is because no connection was made in the first place.
That’s all there is to basic connectivity to MySQL using PHP. The next section covers the query execution functions, which are much more interesting than simply opening a connection and letting it sit there.
Executing Queries
Half the battle in executing MySQL queries using PHP is knowing how to write the SQL—and you’ve already learned the basics of this in previous chapters. The mysqli_query() function in PHP is used to send your SQL query to MySQL.
In your script, first make the connection and then execute a query. The script in Listing 18.3 creates a simple table called testTable.
Listing 18.3 A Script to Create a Table
1: <?php
2: $mysqli = mysqli_connect("localhost", "joeuser", "somepass", "testDB");
3:
4: if (mysqli_connect_errno()) {
5: printf("Connect failed: %s\n", mysqli_connect_error());
6: exit();
7: } else {
8: $sql = "CREATE TABLE testTable
9: (id INT NOT NULL PRIMARY KEY AUTO_INCREMENT,
10: testField VARCHAR(75))";
11: $res = mysqli_query($mysqli, $sql);
12:
13: if ($res === TRUE) {
14: echo "Table testTable successfully created.";
15: } else {
16: printf("Could not create table: %s\n", mysqli_error($mysqli));
17: }
18:
19: mysqli_close($mysqli);
20: }
21: ?>
Note
When you issue queries via a script, the semicolon at the end of the SQL statement is not required.
In lines 8–10, the text that makes up the SQL statement is assigned to the variable $sql. This is arbitrary, and you do not even need to place the content of your SQL query in a separate variable. (It appears as such in the example so that the different parts of this process are clear.)
The mysqli_query function returns a value of true or false, and this value is checked in the if...else statement beginning in line 13. If the value of $res is true, a success message is printed to the screen. If you access MySQL through the command-line interface to verify the creation of thetestTable table, you will see the following output of DESCRIBE testTable:
+-----------+-------------+------+-----+---------+----------------+
| Field | Type | Null | Key | Default | Extra |
+-----------+-------------+------+-----+---------+----------------+
| id | int(11) | | PRI | NULL | auto_increment |
| testField | varchar(75) | YES | | NULL | |
+-----------+-------------+------+-----+---------+----------------+
If this is the case, congratulations; you have successfully created a table in your MySQL database using PHP.
However, if the value of $res is not true and the table was not created, an error message appears, generated by the mysqli_error() function.
Retrieving Error Messages
Take some time to familiarize yourself with the mysqli_error() function; it will become your friend. When used in conjunction with the PHP die() function, which simply exits the script at the point at which it appears, the mysqli_error() function returns a helpful error message when you make a mistake.
For example, now that you have created a table called testTable, you cannot execute that script again without an error. Try to execute the script again; when you execute the script, you should see something like the following in your web browser:
Could not create table: Table 'testtable' already exists
How exciting! Move on to the next section to start inserting data into your table, and soon you’ll be retrieving and formatting it via PHP.
Working with MySQL Data
Inserting, updating, deleting, and retrieving data all revolve around the use of the mysqli_query() function to execute the basic SQL queries you learned about in Chapter 16, “Learning Basic SQL Commands.” For INSERT, UPDATE, and DELETE queries, no additional scripting is required after the query has been executed because you’re not displaying any results (unless you want to). When using SELECT queries, you have a few options for displaying the data retrieved by your query. After an important message about SQL Injection, we start with the basics and insert some data so that you’ll have something to retrieve later.
Avoiding SQL Injection
In the table-creation script in Listing 18.3, the data used in the SQL query was hard-coded into the script. However, in the types of dynamic websites or web-based applications that you are likely to build, you will most often be INSERTing data into a table or SELECTing from a table based on user input from a form or other process. If you do not pay attention to this user input and sanitize it before using it in your queries, you are vulnerable to SQL injection.
SQL injection happens when nefarious individuals take the opportunity to type full or partial SQL queries in your form fields, with the assumption that when the script processes these queries, security will be breached and data potentially exposed.
Note
A famous XKCD comic strip, informally known as the “Little Bobby Tables” strip, perfectly illustrates the issue of SQL injections. This strip is often referenced in discussion forums and other programming-related help sites, with respondents saying “Don’t forget Little Bobby Tables!” when providing answers to form input and query-related questions. You can see the strip at http://xkcd.com/327/.
Take the following example, which attempts to gather user information from a table called users where the name field matches a value completed in a form; this is much like a web-based login process:
SELECT * FROM users
WHERE name = '".$_POST['username_from_form']."';
Imagine the value entered in the username_from_form field is something like this:
' or '1'='1
This results in a full query as follows:
SELECT * FROM users
WHERE name = ' ' or '1'='1';
This query always results in a valid response, because 1 = 1 always returns true.
You probably get the idea, but if not, the PHP Manual has several more examples on the SQL Injection page at http://www.php.net/manual/en/security.database.sql-injection.php. Throughout this book, the code examples limit vulnerability to SQL injection, with one exception: displaying error messages. While you are learning, and operating in a development rather than production environment, I support the printing of error messages to the screen so that you understand what is happening (or not). In a production environment, you should suppress error messages, especially when they show the names of database users or tables.
Tip
After you have mastered the concepts involved with working with MySQL and PHP in the procedural ways as indicated throughout this book, take a look at the PDO (PHP Data Objects) abstraction layer for further hardening of your production applications:http://www.php.net/manual/en/book.pdo.php. A good place to start would be the section on prepared statements and stored procedures: http://www.php.net/manual/en/pdo.prepared-statements.php.
Inserting Data with PHP
The easiest (and safest) method for inserting data at this stage in the game is to simply hard-code the INSERT statement, as shown in Listing 18.4.
Listing 18.4 A Script to Insert a Record
1: <?php
2: $mysqli = mysqli_connect("localhost", "joeuser", "somepass", "testDB");
3:
4: if (mysqli_connect_errno()) {
5: printf("Connect failed: %s\n", mysqli_connect_error());
6: exit();
7: } else {
8: $sql = "INSERT INTO testTable (testField) VALUES ('some value')";
9: $res = mysqli_query($mysqli, $sql);
10:
11: if ($res === TRUE) {
12: echo "A record has been inserted.";
13: } else {
14: printf("Could not insert record: %s\n", mysqli_error($mysqli));
15: }
16:
17: mysqli_close($mysqli);
18: }
19: ?>
The only change between this script—for record insertion—and the script in Listing 18.3 for table creation is the SQL query stored in the $sql variable on line 8 and text modifications on lines 12 and 14. The connection code and the structure for issuing a query remain the same. In fact, most procedural code for accessing MySQL falls into this same type of code template.
Call this script mysqlinsert.php and place it on your web server. Running this script results in the addition of a row to the testTable table. To enter more records than the one shown in the script, you can either make a long list of hard-coded SQL statements and use mysqli_query() multiple times to execute these statements or you can create a form-based interface to the record addition script, which we do next.
To create the form for this script, you need only one field, because the id field can automatically increment. The action of the form is the name of the record-addition script; let’s call it insert.php. Your HTML form might look something like Listing 18.5.
Listing 18.5 An Insert Form
1: <!DOCTYPE html>
2: <html>
3: <head>
4: <title>Record Insertion Form</title>
5: </head>
6: <body>
7: <form action="insert.php" method="POST">
8: <p><label for="testfield">Text to Add:</label><br/>
9: <input type="text" id="testfield" name="testfield" size="30" /></p>
10: <button type="submit" name="submit" value="insert">Insert Record</button>
11: </form>
12: </body>
13: </html>
Save this file as insert_form.html and put it in the document root of your web server. Next, create the insert.php script shown in Listing 18.6. The value entered in the form replaces the hard-coded values in the SQL query with a variable called $_POST['testfield'] (guarded against SQL injection, of course).
Listing 18.6 An Insert Script Used with the Form
1: <?php
2: $mysqli = mysqli_connect("localhost", "joeuser", "somepass", "testDB");
3:
4: if (mysqli_connect_errno()) {
5: printf("Connect failed: %s\n", mysqli_connect_error());
6: exit();
7: } else {
8: $clean_text = mysqli_real_escape_string($mysqli, $_POST['testfield']);
9: $sql = "INSERT INTO testTable (testField)
10: VALUES ('".$clean_text."')";
11: $res = mysqli_query($mysqli, $sql);
12:
13: if ($res === TRUE) {
14: echo "A record has been inserted.";
15: } else {
16: printf("Could not insert record: %s\n", mysqli_error($mysqli));
17: }
18:
19: mysqli_close($mysqli);
20: }
21: ?>
The only changes between this script and the script in Listing 18.4 is line 8, where the form input is sanitized to avoid SQL injection, and in line 10, where we use the sanitized string $clean_text in place of the hard-coded text string from the previous example. To sanitize the input, we use the mysqli_real_escape_string() function; this function requires that a connection has already been made, and so it is placed in this position within the else portion of the if...else statement.
Save the script as insert.php and put it in the document root of your web server. In your web browser, access the HTML form that you created. It should look something like Figure 18.1.
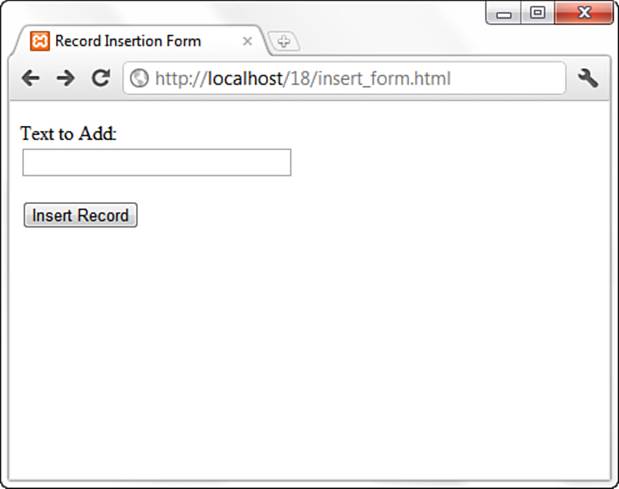
Figure 18.1 The HTML form for adding a record.
Enter a string in the Text to Add field, as shown in Figure 18.2.
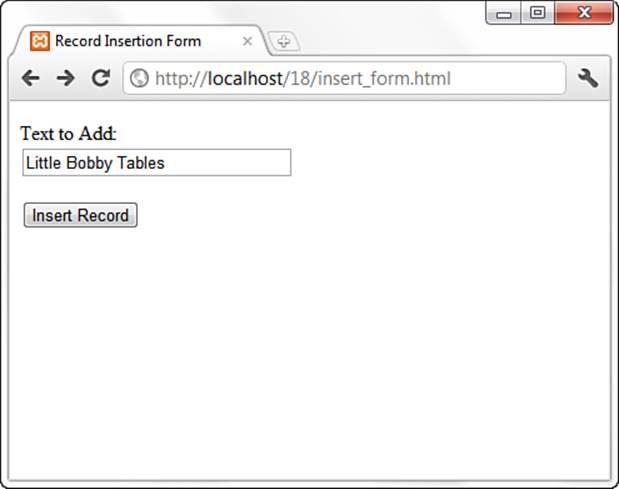
Figure 18.2 Text typed in the form field.
Finally, click the Insert Record button to execute the insert.php script and insert the record. If successful, you will see results similar to Figure 18.3.

Figure 18.3 The record has been successfully added.
To verify the work that has been done with PHP, you can use the MySQL command-line interface to view the records in the table using a SELECT query:
SELECT * FROM testTable;
The output should be as follows:
+----+---------------------+
| id | testField |
+----+---------------------+
| 1 | some value |
| 2 | Little Bobby Tables |
+----+---------------------+
2 rows in set (0.00 sec)
Next you learn how to retrieve and format results with PHP, and not just the command-line interface.
Retrieving Data with PHP
Because you have a few rows in your testTable table, you can write a PHP script to retrieve that data. Starting with the basics, we write a script that issues a SELECT query but doesn’t overwhelm you with result data. Let’s just get the number of rows. To do this, use the mysqli_num_rows()function; see line 12 of Listing 18.7.
Listing 18.7 A Script to Retrieve Data
1: <?php
2: $mysqli = mysqli_connect("localhost", "joeuser", "somepass", "testDB");
3:
4: if (mysqli_connect_errno()) {
5: printf("Connect failed: %s\n", mysqli_connect_error());
6: exit();
7: } else {
8: $sql = "SELECT * FROM testTable";
9: $res = mysqli_query($mysqli, $sql);
10:
11: if ($res) {
12: $number_of_rows = mysqli_num_rows($res);
13: printf("Result set has %d rows.\n", $number_of_rows);
14: } else {
15: printf("Could not retrieve records: %s\n", mysqli_error($mysqli));
16: }
17:
18: mysqli_free_result($res);
19: mysqli_close($mysqli);
20: }
21: ?>
Save this script as count.php, place it in your web server document directory, and access it through your web browser. You should see a message like this (the actual number will vary depending on how many records you inserted into the table):
Result set has 4 rows.
Line 12 uses the mysqli_num_rows() function to retrieve the number of rows in the resultset ($res), and it places the value in a variable called $number_of_rows. Line 13 prints this number to your browser. The number should be equal to the number of records you inserted during testing.
There’s a new function in this listing that was not in previous listings. Line 18 shows the use of the mysqli_free_result() function. Using mysqli_free_result() before closing the connection with mysqli_close() ensures that all memory associated with the query and result is freed for use by other scripts.
Now that you know there are some records in the table (four, according to the output), you can get fancy and fetch the actual contents of those records. You can do this in a few ways, but the easiest method is to retrieve each row from the table as an array.
You use a while statement to go through each record in the resultset, placing the values of each field into a specific variable and then displaying the results onscreen. The syntax of mysqli_fetch_array() is as follows:
$newArray = mysqli_fetch_array($result_set);
Follow along using the sample script in Listing 18.8.
Listing 18.8 A Script to Retrieve Data and Display Results
1: <?php
2: $mysqli = mysqli_connect("localhost", "joeuser", "somepass", "testDB");
3:
4: if (mysqli_connect_errno()) {
5: printf("Connect failed: %s\n", mysqli_connect_error());
6: exit();
7: } else {
8: $sql = "SELECT * FROM testTable";
9: $res = mysqli_query($mysqli, $sql);
10:
11: if ($res) {
12: while ($newArray = mysqli_fetch_array($res, MYSQLI_ASSOC)) {
13: $id = $newArray['id'];
14: $testField = $newArray['testField'];
15: echo "The ID is ".$id." and the text is: ".$testField."<br/>";
16: }
17: } else {
18: printf("Could not retrieve records: %s\n", mysqli_error($mysqli));
19: }
20:
21: mysqli_free_result($res);
22: mysqli_close($mysqli);
23: }
24: ?>
Save this script as select.php, place it in your web server document directory, and access it through your web browser. You should see a message for each record entered into testTable, as shown in Figure 18.4. This message is created in the while loop in lines 12 through 15.
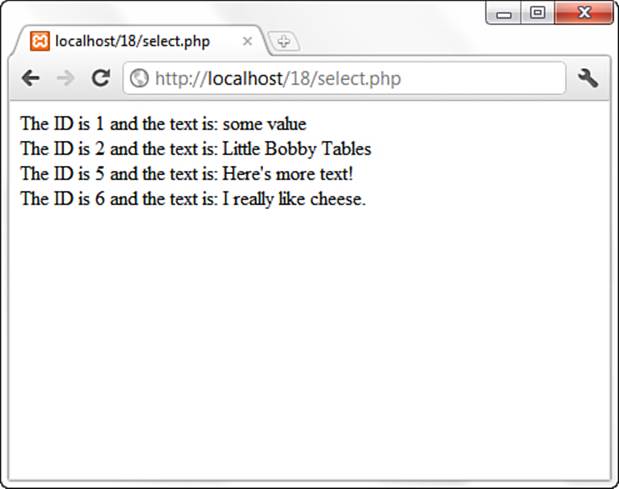
Figure 18.4 Selecting records from MySQL.
As you can see, you can create an entire database-driven application using just four or five MySQLi functions. This chapter barely scratched the surface of using PHP with MySQL; there are many more MySQLi functions in PHP.
Additional MySQL Functions in PHP
More than 100 MySQL-specific functions are available through the MySQLi interface in PHP. Most of these functions are simply alternative methods of retrieving data or are used to gather information about the table structure in question. Throughout this book, especially in the project-related chapters a little later, you’ll gradually be introduced to more of the MySQL-specific functions in PHP. However, for a complete list of functions, with practical examples, visit the MySQLi section of the PHP Manual at http://www.php.net/mysqli.
Summary
Using PHP and MySQL to create dynamic, database-driven websites is a breeze. Just remember that the PHP functions are essentially a gateway to the database server; anything you can enter using the MySQL command-line interface, you can use with the mysqli_query() function. You also learned how to avoid SQL injections when receiving user input from a form.
To connect to MySQL with PHP, you need to know your MySQL username, password, and database name. When connected, you can issue standard SQL commands with the mysqli_query() function. If you have issued a SELECT command, you can use mysqli_num_rows() to count the records returned in the resultset. If you want to display the data found, you can use mysqli_fetch_array() to get all the results during a loop and display them onscreen.
Q&A
Q. Is it possible to use both mysql_* and mysqli_* functions in one application?
A. If PHP was built with both libraries enabled, you can use either set of functions to talk to MySQL. However, be aware that if you use the mysql_* set of functions with a version of MySQL later than 4.1.3, you cannot access certain new functionality. In addition, if you are inconsistent with your usage throughout your application, maintenance and upkeep of your application will be time-consuming and produce less-than-optimal results.
Workshop
The workshop is designed to help you review what you’ve learned and begin putting your knowledge into practice.
Quiz
1. What is the primary function used to make the connection between PHP and MySQL, and what information is necessary?
2. Which PHP function retrieves the text of a MySQL error message?
3. Which PHP function counts the number of records in a resultset?
Answers
1. The mysqli_connect() function creates a connection to MySQL and requires the hostname, username, and password.
2. The mysqli_error() function returns a MySQL error message.
3. The mysqli_num_rows() function counts the number of records in a resultset.
Activities
1. Using an HTML form and PHP script, create a table that contains fields for a person’s first and last names. Create another script that adds records to the table.
2. Once you have records in your table, create a PHP script that retrieves and displays these records in alphabetical order by last name.
All materials on the site are licensed Creative Commons Attribution-Sharealike 3.0 Unported CC BY-SA 3.0 & GNU Free Documentation License (GFDL)
If you are the copyright holder of any material contained on our site and intend to remove it, please contact our site administrator for approval.
© 2016-2026 All site design rights belong to S.Y.A.