Scaling PHP Applications (2014)
Load Balancing with HAProxy
The load balancer is the nervous system of your application, it takes all of the incoming requests and fairly distributes them to your application servers where your PHP code is executed. The configuration we’re going to talk about is a called a reverse proxy. It’s fairly common, but I’m going to show you a few new tricks that you may not have seen before.
One note before we get started—remember that all incoming AND outgoing data goes through the load balancer. The app servers never speak directly to your users, they only respond back to the load balancer, which then responds back to your users.
There are many load balancer options to choose from, both software and hardware. I don’t recommend hardware load balancers for a few reasons: 1) they are extremely expensive (easily over $40,000—not exactly budget friendly for a startup, especially when you could use open-source software and put that money toward the salary for another engineer); and 2) hardware load balancers tend to be “black boxes,” they don’t provide you with the same kind of visibility that you’d get with open-source software. Remember—own your stack!
It’s smart to have multiple load balancers, because just one would create a single point of failure. You need to have enough spares to handle all of the traffic when a single load balancer fails. For instance, if you have enough traffic to require two load balancers, you’ll need to have a third hot-spare ready for action; otherwise, if one of the primary two fail, the remaining load balancer will not be able to handle all of the traffic on its own. And don’t sweat, we will also cover how to setup the necessary DNS records to split traffic between multiple load balancers in this chapter.
HAProxy
HAProxy is a great solution for software load balancing. It’s written in C, event-based and built for the sole purpose of running a reverse proxy, so it’s extremely fast and lightweight. HAProxy has a small memory and CPU footprint, meaning it’s able to squeeze a lot of traffic through low-powered hardware. HAProxy’s website shows some benchmarks from 2009 where they were able to hit 108,000 HTTP requests per second and fully saturate a 10GbE network, which is pretty impressive if you ask me.
Additionally, HAProxy boasts an impressive record of being “show-stopper” bug-free since 2002. The quote below is from their website.
In single-process programs, you have no right to fail: the smallest bug will either crash your program, make it spin like mad, or freeze. There has not been any such bug found in the code nor in production for the last 10 years.
Advantages over Nginx
Nginx is no doubt an awesome piece of software and even includes its own reverse proxy module, making it able to run as a load balancer. Even though nginx makes a decent load balancer in its own right, HAProxy is an even better choice for a couple of reasons noted below.
HAProxy is a very bare-metal piece of software. It does one thing and it does it extremely well, which can be a significant benefit or a huge shortcoming depending on your load balancing needs. For most stacks, HAProxy will be a great fit, but if you need more flexibility, you shouldn’t hesitate to use nginx. While as a load balancer it’s not quite as good as HAProxy, it can still come close in exchange for a slightly higher CPU and Memory footprint.
Layer 4 vs Layer 7
HAProxy can run in two modes, TCP (Layer 4) and HTTP (Layer 7). In TCP mode, HAProxy simply forwards along the raw TCP packets from the clients to the application servers. This uses about 50% less CPU than HTTP (Layer 7) mode, which involves parsing the HTTP headers before forwarding them to the application servers. Since nginx is primarily a webserver, it only supports HTTP (Layer 7) load balancing.
You’ll surely read plenty of opinions saying “it doesn’t matter”— Layer 7, double-HTTP parsing, is a small overhead to pay unless you’re massive. There’s some truth to that, but like I said, let’s keep things simple.
One gotcha with TCP load balancing— it’s possible to lose the IP Address of the client. Consider this scenario: Client 192.168.25.19 hits your load balancer (which has the IP 10.0.9.1). The load balancer forwards this request onto your nginx servers, but when your PHP code looks at$_SERVER['REMOTE_ADDR'] it sees 10.0.9.1.. NOT 192.168.25.19.
No problem you think, a lot of load balancers put the “real ip” of the client into a different header like $_SERVER['X-Forwarded-For'], so you check that. No dice. Nothing. What’s going on? Well, since the TCP packet gets re-sent from the load balancer it obviously takes on the IP Address of the load balancer. Since we’re talking about Layer 4 Load Balancing, it’s never parsing and rebuilding the HTTP Headers, which means it can never inject a header like X-Forwarded-For into the HTTP Request.
Bummer! Are we out of options!? No! Luckily there is a very elegant solution that was created by the guys at HAProxy. They’ve created their own [PROXY Protocol] that let’s you attach some proxy information (like the REMOTE_ADDR) at the TCP layer.
The PROXY protocol -only- works with software that specifically includes support for it. Luckily, nginx does just that. In fact, it’s incredibly simple.. just add real_ip_header proxy_protocol to your nginx config (discussed in the next chapter) and you’re good to go. Bam.
SSL Termination
Another benefit that comes along for the ride with TCP (Layer 4) load balancing is delegating SSL termination to the application server. What this means is that the SSL negotiation/decryption process of an HTTPS request happens on your application servers, inside of your webserver, since the raw TCP packet is just forwarded along.
With a HTTP (Layer 7) load balancer such as nginx, it wouldn’t be able to parse the HTTP headers without first handling the SSL, forcing all SSL negotiation to happen on the load balancer. The downside is that SSL is expensive on the CPU—it’s better to spread the usage across your entire application cluster instead of centralizing it on your one or two load balancers.
Better health checks and distribution algorithms
When nginx is setup as a load balancer, the only method of performing health-checks on backend servers is by using a timeout. If an application server times out, it’s removed from the pool—otherwise, it’s considered healthy, even if it’s spitting out jibberish/php code/500 errors. HAProxy provides several better methods of performing health checks on your cluster, which we’ll cover below.
Additionally, nginx is limited to a single naive round-robin algorithm for choosing backend servers. HAProxy has several balancing methods, including one that sends new connections to the server with the least amount of existing connections. We’ll discuss the different algorithms available in the section below as well.
Installation
1 > apt-get install haproxy
2 > vi /etc/haproxy/haproxy.cfg
3
4 global
5 maxconn 50000
6 user haproxy
7 group haproxy
8 stats socket /tmp/haproxy
9 node lb1
10 nbproc 1
11 daemon
12
13 defaults
14 log global
15 retries 3
16 option dontlog-normal
17 option splice-auto
18 timeout connect 5000ms
19 timeout client 5000ms
20 timeout server 5000ms
21 maxconn 50000
22
23 backend application_servers
24 mode tcp
25 balance roundrobin
26 option httpchk HEAD / HTTP/1.1\r\nHost:\ example.com
27 option ssl-hello-chk
28 server web02 198.51.100.17:80 check
29 server web03 198.51.100.18:80 check
30
31 frontend example.com
32 bind *:80
33 bind *:443
34 mode tcp
35 default_backend application_servers
36
37 listen stats *:1936
38 mode http
39 stats enable
40 stats uri /
41 stats hide-version
42 stats auth Username:Password
HAProxy won’t run until you enable the init.d script, so let’s do that now.
1 > vi /etc/default/haproxy
2 # Set ENABLED to 1 if you want the init script to start haproxy.
3 ENABLED=1
4
5 > service haproxy start
Configuration options
Most of the configuration options in haproxy.cfg are pretty self-explanatory, but let’s go over the most important ones.
maxconn - The maximum number of connections that HAProxy will accept at a given time. This should be set as high as possible in most cases. Each connection held by HAProxy uses 33KB of memory, so it’s important to make sure that you have enough memory to support whatever value you use (i.e, on a 4GB system, about 127,000 connections).
timeout connect/client/server - Timeouts for different connections that are made during the lifecycle of a request, set in milliseconds.
options dontlognormal - Only log errors, timeouts and other issues. Used to separate the noise out, especially when dealing with high-volume web apps. Remember, you can still log normal requests in the nginx access log on the application servers.
options httpchk - Replace example.com with your domain. This checks that the application server returns a 200 status code, used to determine that your application servers are not only up, but healthy too.
option splice-auto - Enables TCP splicing if it thinks that it’ll improve performance. TCP splicing is a performance enhancement in the Linux Kernel which speeds up packet handling when proxying TCP connections. Important You must be using a kernel >= 2.6.29 for this feature.
Balancing Algorithms
HAProxy has several balancing algorithms that you can choose from. These algorithms determine the behavior that’s used to pick the backend application server to handle the incoming request.
roundrobin - The simplest. For each new connection, the next backend in the list is used. When the end of the list is reached, it will cycle back to the top. It distributes fairly, but does not take into consideration load or amount of connections.
leastconn - New connections go to servers with the least amount of existing connections. Useful for situations where your average request time/load varies significantly, or if you have long-polling connections.
source - Also know as sticky sessions. The IP of the client is hashed and used to determine the backend server. For example, a request from 203.0.113.100 will always be routed to appserver01 and one from 203.0.113.200 will always go to appserver02. Can be useful for A/B testing (by running different versions of the application on each appserver) or sharding users; however, the source algorithm is usually a bad long-term strategy and indicates a broken scaling strategy.
uri - Similar to the source algorithm except instead of hashing based on the client’s IP address, it uses the URL requested. This is great for running HTTP proxies because example.com/picture01.jpg will always be routed to backend01 and example.com/picture02.jpg will always be routed tobackend02, allowing you to maximize each backend server’s filesystem and in-memory cache. Typically, this should be used for serving static assets (images, css, js).
|
|
Sticky sessions (via the source algorithm) seem like a good idea at first, but it’s almost always a bad choice long-term. Having your users always routed to the same application servers can create hotspots and coldspots, depending on which users are currently active. In my experience, sticky sessions are used because of another area that hasn’t been scaled—for example, sessions being stored on the filesystem, tying each user to a particular application server. In other words, it gets the job done but it’s sloppy! Avoid the temptation and scale out the right way, it’ll pay off in the long run. |

Web-UI
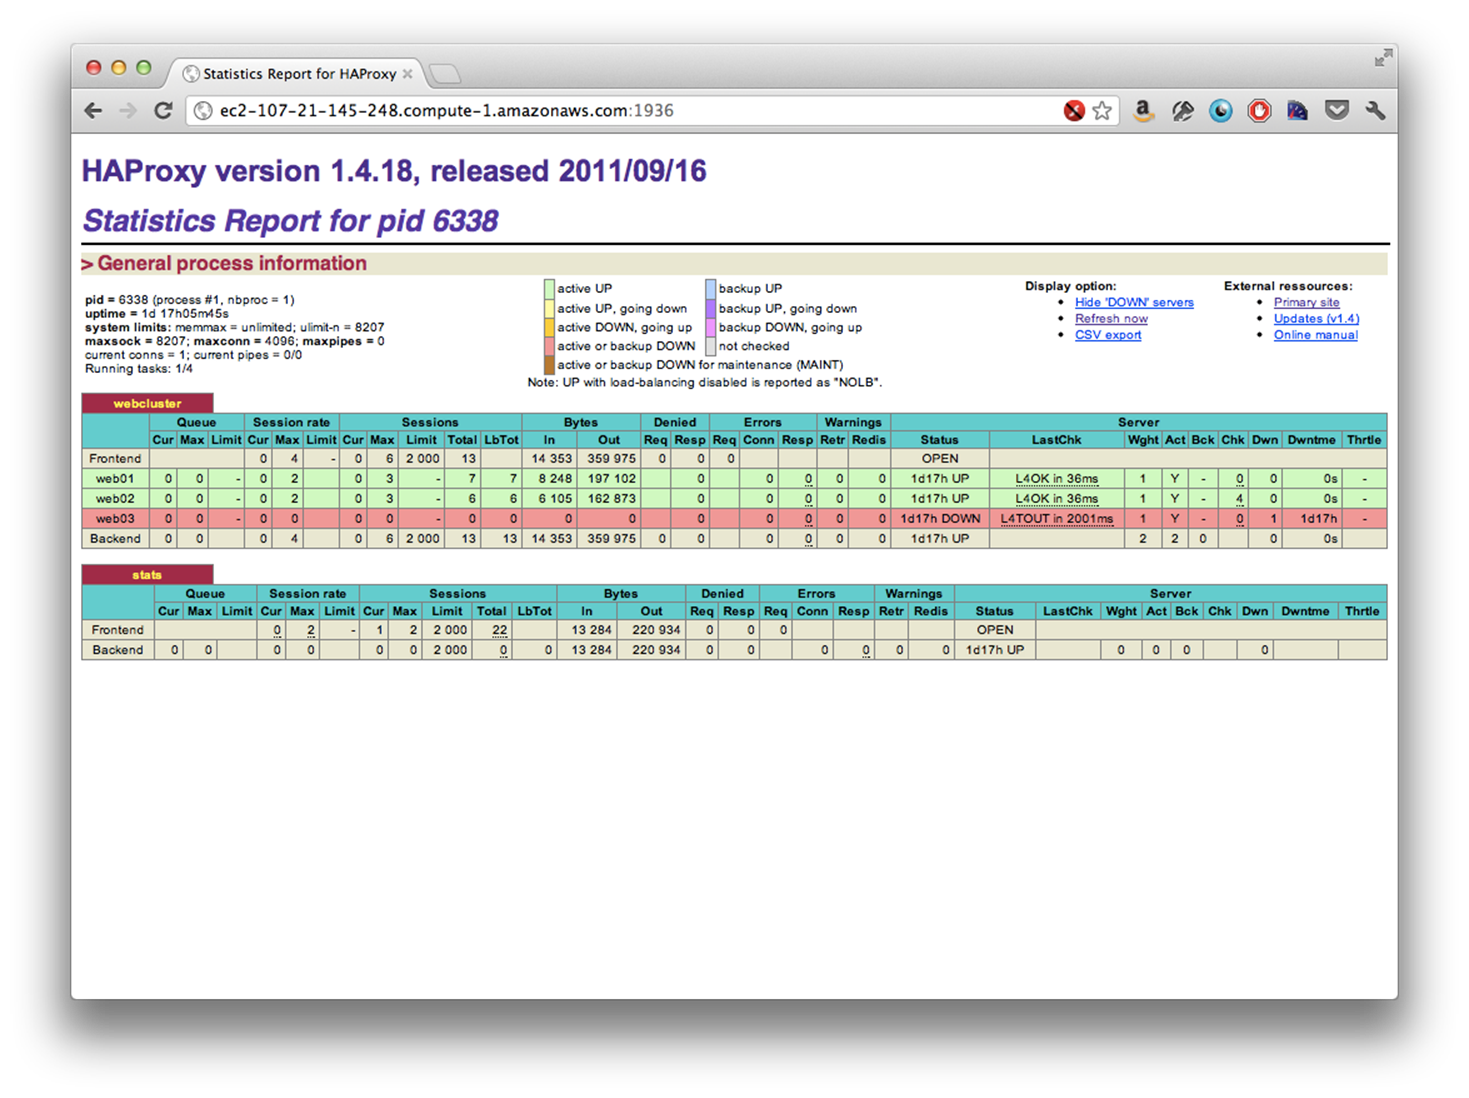
HAProxy comes with a helpful web-ui that provides some insights into your load balancer, as well as making general stats avaliable. It’s a quick way to see essential information such as number of connections, which application servers are up or down, number of errors and more.
Using the haproxy.cfg configuration provided above, the web-ui listens on port 1936 and is password protected with the username “Username” and the password “Password”. No doubt, you’ll probably want to change that (it’s defined by this line: stats auth Username:Password).
If you load up your-load-balancer.com:1936, you’ll be presented with a web-ui similar to the image below. Also worth noting, if you append ;csv to the URL, it’ll return the data in a comma-seperated format, making it easy to programmatically tie the data into your monitoring system.
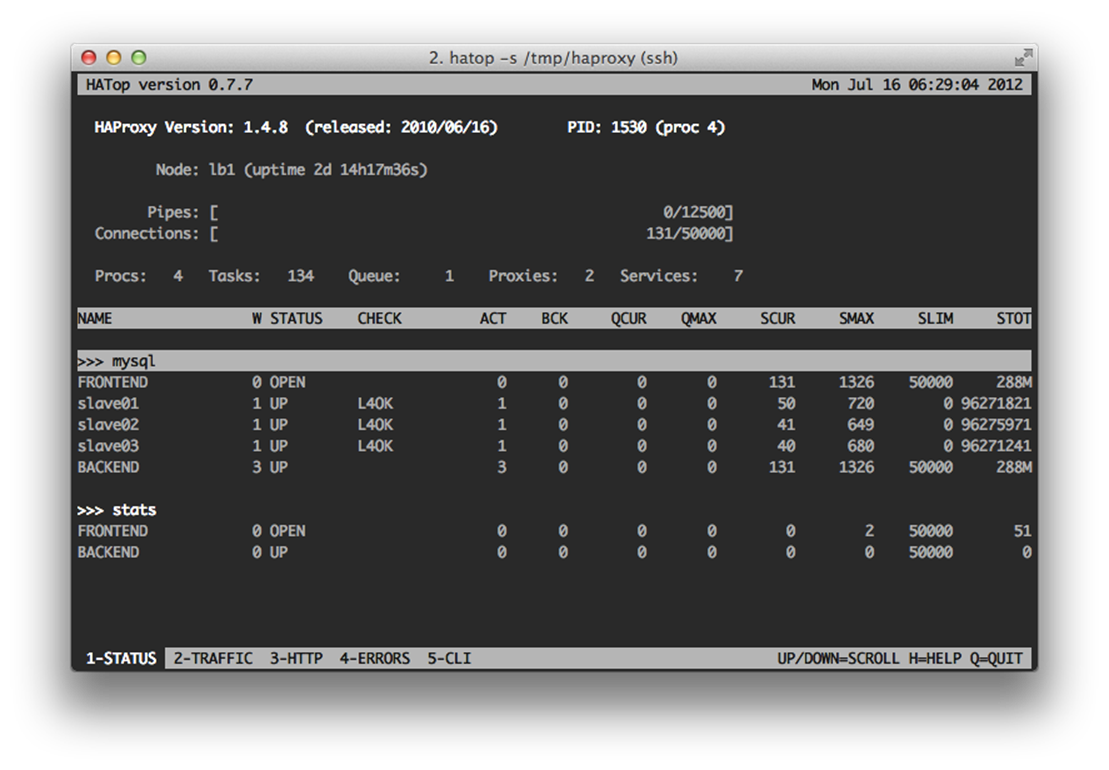
CLI access with hatop
There’s also a CLI monitor called hatop that’s avaliable. It provides the same data in the web interface as well as the ability to remove and add servers from the pool.
1 > apt-get install hatop
2 > hatop -s /tmp/haproxy
Choosing the best hardware
You’ll see the most gains with a high frequency, modern CPU and a moderate amount of memory. It’s tempting to choose an older CPU with more GHz, but the newer, lower-clocked Intel architectures are truly more powerful. For example, our standard build uses a single quad-core SandyBridge Xeon CPU, which we found to perform 2-3x better than a Dual Processor, Quad-Core build with an older architecture.
When in doubt, always consult Passmark CPU Benchmark, GHz and number of cores mean nothing without the context of CPU architecture.
HAProxy is usually run in single-process mode (configuration setting: nbproc 1), which means that it can only run on a single CPU core. What this means is that a faster CPU, not more cores, will directly correlate to the speed of your load balancer.
|
|
Don’t let the “single-process” thing scare you, though. Since HAProxy is event-based, it’s extremely well suited for an I/O bound (network, in this case) workload, and can easily handle 20-30,000 connections per second. It is possible to increase throughput by running HAProxy on multiple cores (simply increase the nbproc setting), but it’s discouraged unless you truly need the capacity. |
Our standard load balancer build is below for reference:
Intel Xeon 1270 (SandyBridge) 3.4GHz, Quad-Core 8GB ECC DDR3 Memory 500GB Hard Drive 2x 1gbps ethernet
Automatic failover with keepalived
keepalived is a daemon used in high-avaliabilty setups which monitors another server and steals its IP address if it stops responding to network requests. When you have it configured, it feels almost magical because it works so seemlessly.
We use keepalived to provide fault-tolerance in our load balancer setup and prevent against a single point of failure by keeping a hot-spare that can jump in if necessary.
|
Hosts |
IP |
|
virtual ip |
192.51.100.40 |
|
lb.example |
192.51.100.20 |
|
lbspare.example |
192.51.100.30 |
In this configuration, we have two load balancers, each with their own IP address, and a virtual IP (vip) that floats between lb.example and lbspare.example. Both load balancers should have HAProxy configured already.
First off, we need to make a configuration change to the linux kernel on both servers by changing an obscure option, net.ipv4.ip_nonlocal_bind, which tells the kernel it’s okay if services bind to non-existant IP addresses. It’s needed because HAProxy on lbspare.example will listen on192.51.100.40, even when that IP isn’t bound to the server.
1 > sysctl -w net.ipv4.ip_nonlocal_bind=1
2 > vi /etc/sysctl.d/keepalive.conf
3 net.ipv4.ip_nonlocal_bind=1
Next, we install keepalived on both servers.
1 > apt-get install keepalived
Setup the keepalived.conf file on lb.example
1 > vi /etc/keepalived/keepalived.conf
2 vrrp_instance VI_1 {
3 interface eth0
4 state MASTER
5 virtual_router_id 51
6 priority 101
7 virtual_ipaddress {
8 192.51.100.40
9 }
10 }
11 > service keepalived start
Lastly, setup the keepalived.conf file on lbspare.example
1 > vi /etc/keepalived/keepalived.conf
2 vrrp_instance VI_1 {
3 interface eth0
4 state MASTER
5 virtual_router_id 51
6 priority 100
7 virtual_ipaddress {
8 192.51.100.40
9 }
10 }
11 > service keepalived start
Notice the main difference between those two files, lbspare.example has a lower priority than lb.example. With the priority setting, you’re not limited to only a single hot-failover—you could have an entire chain of them!
Next, verify that you can ping the vip (192.51.100.40) and that it routes to lb.example.
At this point, you can modify haproxy.conf file on both load balancers to listen on the vip. HAProxy can bind to multiple IP addresses by simply giving a comma seperated list to the bind option, so it’s possible to listen on both the server’s ip and the vip by using the bind 192.51.100.20:80, 192.51.100.40:80 configuration setting.
How does it all work?
The keepalived daemon on lbspare.example will monitor the network and verify that lb.example is continuously announcing itself on the network. If lb.example stops announcing itself (reboot, crash, etc.), lbspare.example will send a gratuitous ARP message to the network, letting everyone know that lbspare.example is now the owner of the vip. The hosts on the network will update their routing tables and services continuously, almost undisturbed.
When lb.example comes back online, it will announce itself to the network and resume control of the vip. The best part? It all happens automatically without any interaction from you.
Tuning linux for a network heavy load
net.core.somaxconn
somaxconn defines the size of the kernel queue for accepting new connections. It’s usually only set to 128, which is too low and means you can only, at most, serve 128 concurrent users. Bump it up.
1 > sysctl -w net.core.somaxconn=100000
2 > vi /etc/sysctl.d/haproxy-tuning.conf
3 net.core.somaxconn=100000
net.ipv4.ip_local_port_range
ip_local_port_range defines the range of usable ports on your system. On my stock ubuntu installation, it’s set to 32768-61000. Increase the range to allow for more connections. The number of avaliable ports limits the number of simultanious open connections. Remember, even after a connection is closed it still eats a port in the TIME_WAIT state (though we mitigate this with some settings below).
1 > sysctl -w net.ipv4.ip_local_port_range="10000 65535"
2 > vi /etc/sysctl.d/haproxy-tuning.conf
3 net.ipv4.ip_local_port_range=10000 65535
net.ipv4.tcp_tw_reuse
Part of the TCP protocol is the TIME_WAIT state, which keeps the socket open for up to 4 minutes after the connection has been closed. On a busy server, this can cause issues with running out of ports/sockets. The net.ipv4.tcp_tw_reuse tells the kernel that it’s okay to reuse TCP sockets when it’s safe to do so, without waiting for the full timeout to happen. Additionally, net.ipv4.tcp_recycle and net.ipv4.tcp_fin_timeout can all be tweaked, but you should be leary to mess with either of these.
1 > sysctl -w net.ipv4.tcp_tw_reuse=1
2 > sysctl -w net.ipv4.netfilter.ip_conntrack_tcp_timeout_time_wait=1
3 > vi /etc/sysctl.d/haproxy-tuning.conf
4 net.ipv4.tcp_tw_reuse=1
5 net.ipv4.netfilter.ip_conntrack_tcp_timeout_time_wait=1
ulimit -n 999999
On a stock linux configuration, the maximum number of open files allowed per process is set very low (1024). Since sockets are considered files on a linux system, this limits the number of concurrent connections as well. Remember, each connection through your load balancer requires TWO sockets, one for the inbound connection from the client and another for the outbound connection to the backend, so out the gate you’re limited to, at most, 512 concurrent connections. Luckily, it’s an easy setting to change.
1 > vi /etc/security/limits.conf
2 * soft nofile 999999
3 * hard nofile 999999
4 > ulimit -n 999999
Note: You may have to restart HAProxy for this setting to take effect.
Issues at scale
Debugging load balancer issues can be frustrating, especially if you’re dealing with high load. Here are some issues to look for if you’re dealing with a slow or unresponsive load balancer.
Saturating the network
This seems like a no-brainer, but it’s happened to me before. I remember spending over an hour trying to figure out why one of our Twitpic load balancers was running like molasses and consistantly dropping connections. It ended up being that the network card was configurated at 100mbps and we were trying to push 150mbps through it. It’s easy to check, though. Using vnstat you can see the current bandwidth going through your network card. Remember to check your public AND private networks, since your load balancer will most likely be using both.
1 > vnstat -i eth1 -l

Running out of memory
Although unlikely with HAProxy, since the memory footprint is so low, it can happen if you have a high volume of incoming connections and slow/overwhelmed backends. Use free to check.
Lots of connections in TIME_WAIT
Like I talked about above, having lots of connections in the TIME_WAIT state can overwhelm your server. You can use the configuration options above to mitigate the issue—running netstat -n | grep TIME_WAIT | wc -l allows you to see the number of sockets sitting in TIME_WAIT.
All materials on the site are licensed Creative Commons Attribution-Sharealike 3.0 Unported CC BY-SA 3.0 & GNU Free Documentation License (GFDL)
If you are the copyright holder of any material contained on our site and intend to remove it, please contact our site administrator for approval.
© 2016-2026 All site design rights belong to S.Y.A.