Scaling PHP Applications (2014)
App Server: Horizontal Scaling with Nginx and PHP-FPM
The application cluster is the brain of your app, responsible for running your PHP code and serving static assets like images, css and javascript. Luckily, app servers are usually the easiet part of the stack to scale, because with the load balancer setup mentioned in Chapter 3, new app servers can be added to the pool and horizontally scaled to increase capacity. And when they fail (because they will fail), HAProxy will automatically remove them from the pool. No alerts, and no waking up in the middle of the night—they scale effortlessly.
Choosing the right version of PHP
The PHP community as a whole is really, really bad about updates. No joke, bad to the point of running releases that are years old. You need to make sure you’re running the latest version of PHP, which is PHP 5.4.4 (at the time of writing).
Update for 2014— use PHP 5.5! Everything I say here holds true, except the Dotdeb repositories are deb http://packages.dotdeb.org wheezy-php55 all and deb-src http://packages.dotdeb.org wheezy-php55 all.
Major releases for PHP keep getting faster and more efficient with memory, so it’s important to run the latest release to squeeze the most out of your hardware. 5.4 is substanially better, both in terms of features and speed when compared to 5.3, and likewise when comparing 5.3 to 5.2. PHP is getting better with every major release.
On Debian or Ubuntu, you can use Dotdeb to get almost immediate, hassle-free updates to PHP, as well as access to some other software that’s not kept up-to-date in the Ubuntu Repositories (Redis and nginx, for example). This saves you the hassle of having to wait for your distribution maintainers to update the packages, which often takes weeks, months or even an eternity in some cases.
If you’re using Ubuntu Quantal (12.10), PHP 5.4 is already in the apt repository so you don’t need to bother adding the php54 lines for Dotdeb.
Setting up Dotdeb is as easy as adding another apt source.
1 > vi /etc/apt/sources.list.d/dotdeb.list
2
3 deb http://packages.dotdeb.org squeeze all
4 deb-src http://packages.dotdeb.org squeeze all
5
6 # Only include these lines if you are using Ubuntu
7 # 12.04.
8 deb http://packages.dotdeb.org squeeze-php54 all
9 deb-src http://packages.dotdeb.org squeeze-php54 all
10
11 > wget http://www.dotdeb.org/dotdeb.gpg
12 > cat dotdeb.gpg | sudo apt-key add -
13 > apt-get update
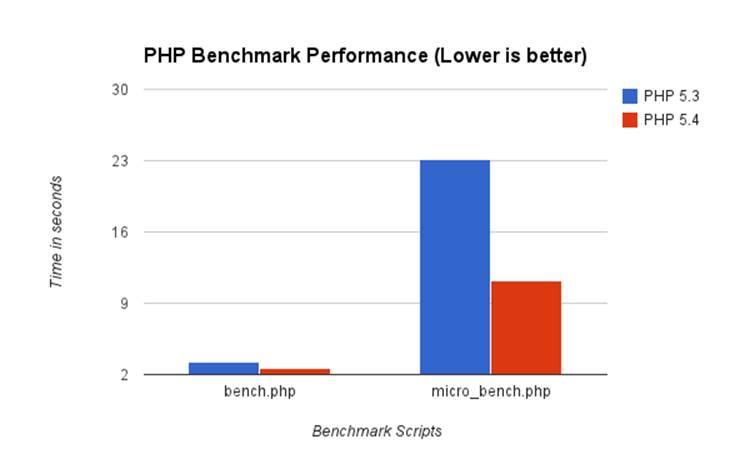
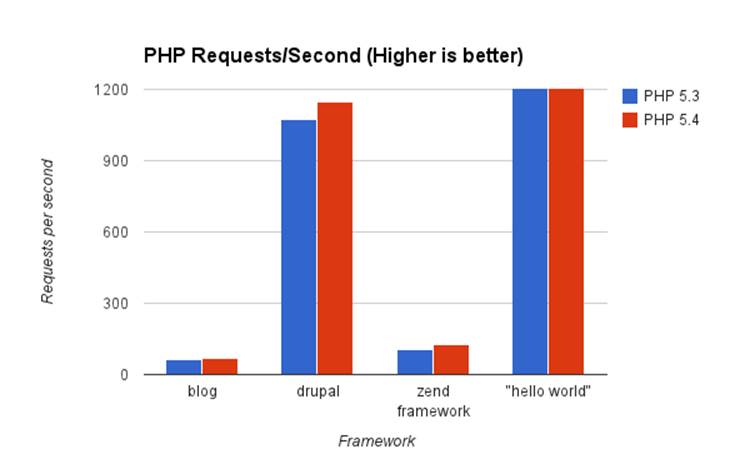
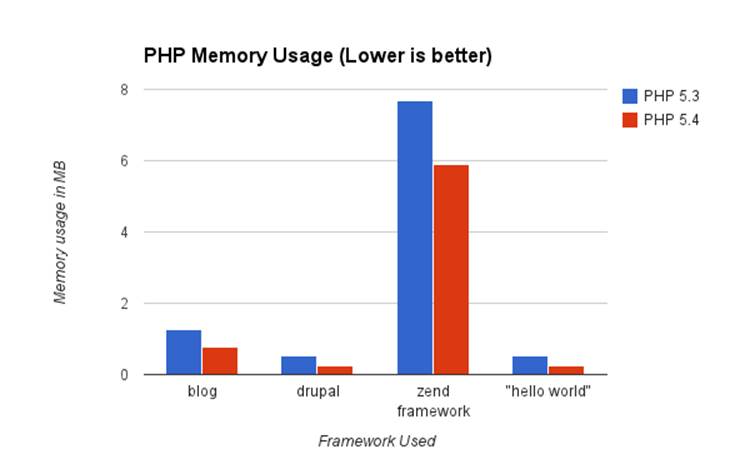
Benchmarking PHP 5.3 vs PHP 5.4
In every scenario I could find and test, PHP 5.4 outperformed PHP 5.3 in requests per second, as well as memory usage. Here are some graphs with my findings that will hopefully convince you to upgrade to the latest version of PHP!
Nginx and PHP-FPM
As discussed in Chapter 2, we’re going to swap out the typical Apache/mod_php for a very elegant nginx/PHP-FPM configuration. Yeah, yeah—you can try to keep Apache and scale it horizontally with HAProxy, but using nginx and PHP-FPM is a much better combination. Trust me, throw out Apache and replace it with nginx.
We moved Twitpic over to using this setup in 2010, and I was admittedly hesitant at first. Apache was all I knew and it was so easy to manage. I was scared that I wouldn’t be able to learn nginx or be comfortable with managing it. Boy was I wrong! Nginx is even easier to manage than Apache—the configuration files are very clean and readable. Plus nginx has an incredible wiki filled with full documentation on every configuration option.
Likewise, PHP-FPM is a solid piece of software and just as reliable as using mod_php. Prior to PHP 5.3, it was a patch developed by the same team that created nginx, but now it’s bundled with PHP by default. What that means is that you have the full backing and support of the entire PHP community. It’s a well-tested piece of software and will definitely get the job done.
Let’s assume you have a PHP application in /u/apps/my_app, with the main entry point to the app at /u/apps/my_app/www/index.php. Most frameworks (Zend, Kohana, Cake) should be compatable with this recipe.
Here’s how we’d set it up:
1 > apt-get install nginx
2 > vi /etc/nginx/nginx.conf
3
4 user www-data;
5 worker_processes 4;
6 pid /var/run/nginx.pid;
7
8 events {
9 worker_connections 768;
10 multi_accept on;
11 }
12
13 http {
14
15 sendfile on;
16 tcp_nopush on;
17 keepalive_timeout 65;
18 server_tokens off;
19
20 include /etc/nginx/mime.types;
21 default_type application/octet-stream;
22
23 access_log /var/log/nginx/access.log;
24 error_log /var/log/nginx/error.log;
25
26 gzip on;
27 gzip_disable "MSIE [1-6]\.";
28
29 include /etc/nginx/conf.d/*.conf;
30 include /etc/nginx/sites-enabled/*;
31 }
32
33
34 > vi /etc/nginx/sites-available/my_app.conf
35 upstream backend {
36 server unix:/u/apps/my_app/tmp/php.sock;
37 }
38
39 server {
40
41 listen 80 default;
42 root /u/apps/my_app/www;
43 index index.php;
44
45 access_log /u/apps/my_app/logs/access.log;
46 error_log /u/apps/my_app/logs/error.log;
47
48 location / {
49 try_files $uri $uri/ /index.php;
50 }
51
52 # This location block matches anything ending in .php and sends it to
53 # our PHP-FPM socket, defined in the upstream block above.
54 location ~ \.php$ {
55 try_files $uri =404;
56 fastcgi_pass backend;
57 fastcgi_index index.php;
58 fastcgi_param SCRIPT_FILENAME /u/apps/my_app/www$fastcgi_script_name;
59 include fastcgi_params;
60 }
61
62 # This location block is used to view PHP-FPM stats
63 location ~ ^/(php_status|php_ping)$ {
64 fastcgi_pass backend;
65 fastcgi_param SCRIPT_FILENAME $fastcgi_script_name;
66 include fastcgi_params;
67 allow 127.0.0.1;
68 deny all;
69 }
70
71 # This location block is used to view nginx stats
72 location /nginx_status {
73 stub_status on;
74 access_log off;
75 allow 127.0.0.1;
76 deny all;
77 }
78 }
Next, we need to create a symbolic link from the configuration file in /etc/nginx/sites-available to /etc/nginx/sites-enabled. Doing this allows us to quickly disable the application in nginx by removing the symbolic link and reloading nginx.
1 > mkdir -p /u/apps/my_app/{logs,tmp,www}
2 > ln -s /etc/nginx/sites-available/my_app.conf \
3 /etc/nginx/sites-enabled/my_app.conf
4 > service nginx start
Alright. Nginx is up and running now, but nginx doesn’t know how to run PHP. Unlike Apache with mod_php, PHP-FPM runs outside of the webserver in it’s own process- nginx just forwards requests to it using FastCGI. We need to install PHP-FPM and configure it.
1 > apt-get install php5-fpm
2
3 > vi /etc/php5/fpm/pool.d/my_app.conf
4
5 [my_app]
6 listen = /u/apps/my_app/tmp/php.sock
7 user = www-data
8 group = www-data
9 pm = dynamic
10 pm.max_children = 100
11 pm.start_servers = 10
12 pm.min_spare_servers = 5
13 pm.max_spare_servers = 15
14 pm.max_requests = 1000
15 pm.status_path = /php_status
16
17 request_terminate_timeout = 0
18 request_slowlog_timeout = 0
19 slowlog = /u/apps/my_app/logs/slow.log
20
21 > service php5-fpm start
That should be enough configuration to bootstrap your application. Here are a few things worth mentioning:
Use UNIX Sockets for FastCGI/PHP-FPM
You have the option of having nginx talk to PHP-FPM over a TCP socket or a UNIX socket. UNIX sockets are preferred for two reasons:
1. They are marginally faster than TCP sockets because they don’t have any network protocol overhead and can avoid hitting the network stack. Realistically, this doesn’t make much of a difference on modern hardware running a recent Linux kernel.
2. On extremely high-volume servers, it’s possible to run out of TCP sockets while the closed sockets are sitting in the TIME_WAIT state. There are ways to mitigate this, but it’s smarter to simply save yourself the trouble by using UNIX sockets, which are only limited by the maximum number of open files.
There are stats for nginx and PHP-FPM baked in
From each application server, you can run curl 127.0.0.1/php_status and curl 127.0.0.1/nginx_status. You should see some interesting data, similar to this:
1 > curl 127.0.0.1/php_status
2 pool: www
3 process manager: dynamic
4 accepted conn: 42244815
5 listen queue len: 0
6 max listen queue len: 128
7 idle processes: 45
8 active processes: 30
9 total processes: 75
10 max children reached: 3
11
12 > $ curl 127.0.0.1/nginx_status
13 Active connections: 57
14 server accepts handled requests
15 334341438 334335834 437990922
16 Reading: 0 Writing: 34 Waiting: 23
This data can be hooked up to a monitoring system such as Munin, Monit, Graphite, etc. There are plenty of open-source plugins available on GitHub as well. As you can see, the number of connections, PHP-FPM processes, etc. are available and can be useful when debugging load issues.
Using PHP-FPM’s dynamic process management
PHP-FPM works by spinning up some PHP processes to run your application—each process can only handle a single request at a time, so if you need to handle 50 concurrent requests, PHP-FPM must be running at least 50 processes. Without enough available processes, PHP-FPM will have to queue the requests and wait until some become free to handle them.
With this configuration, PHP-FPM dynamically starts and stops processes to handle increased or decreased load, but you need to provide hints and sane limits for it. It’s possible to configure a static number of processes that will never change, but it’s not worth covering. The dynamic process manager is very robust and handles both high and low load situations extremely well.
The configuration variable pm.max_children controls the maximum number of FPM processes that can be run at the same time. Effectively, this setting controls the maximum number of requests that each application server can handle. It should be tuned depending on the memory footprint of your application and the amount of total memory on the server. A good place to start is using this formula:
1 pm.max_children = (MAX_MEMORY - 500MB) / 20MB
For example, if your application server has 4GB of memory, you’d want to set pm.max_children at 180, allowing PHP-FPM to use a maximum of roughly 3.5GB of memory. Remember—you want to leave some memory for nginx to use, as well as any other services you may have running on the system.
The worst thing you can do is set pm.max_children too high! Under heavy load, PHP-FPM could very possibly require more memory then is available and begin to swap, likely crashing the server or grinding it to a halt.
pm.start_servers is the number of PHP-FPM children that are forked when it first starts up. I recommend 10% of your maximum capacity.
pm.min_spare_servers is the minimum number of unused PHP-FPM children that should hang around at any given time. For example, if pm.min_spare_servers is set to 5 and you have 40 busy PHP-FPM processes, it will make sure that there are always 45 child processes, with 5 available to handle any new incoming requests.
pm.max_spare_servers is the maximum number of unused PHP-FPM children that can hang around before they start getting killed off. This usually happens when your load spikes and drops down after awhile—for example, if PHP-FPM spikes to 55 child processes, but load drops and it is only using 30, there will be 25 processes sitting around doing nothing but waiting for a new web request to come in. With pm.max_spare_servers set at 15, we’d kill off 10 of those spare children once they aren’t needed anymore.
pm.max_requests is the number of requests that a single child process is allowed to serve before it’s killed and recycled. This is used to prevent memory leaks, since PHP’s garbage collector isn’t designed to be long-running. PHP 5.3 includes some improvements to the memory management, so this can be set fairly high. I recommend setting it to atleast 1000, but it depends on your code and which, if any, PHP extensions you are using, as some leak memory more than others.
Choosing the best hardware for your application server
Fast CPU, Lots of memory
Expect each PHP-FPM process to use up to 20MB of memory each, figuring that if pm.maxchildren is set at 100 you’ll need atleast 2GB of memory for your server.
Nginx, on the other hand, sips on memory—even a loaded application server will only see nginx using 60-80MB of memory total.
You’ll want the fastest CPU with the greatest number of cores you can get your hands on. Although PHP is single threaded, as long as you have more PHP-FPM processes than you have cores, you’ll be able to take full advantage of each core.
At the time of writing, the Intel Xeon SandyBridge 26xx series seem to be the best bang for your buck. They can run in a dual-cpu configuration, with up to 8-cores for each CPU. With HyperThreading, this effectively gives your application server 32 cores to take advantage of.
Using a PHP Opcode cache
PHP is an interpreted programming language. Every time a PHP application is run, the interpreter needs to read your PHP source code, translate it into an internal opcode program, and then run those opcodes. You can think of the opcode program as an intermediate programming language that the interpreter can understand better—it’s really a virtual machine.
Translating your PHP source code to the opcodes has a non-trivial amount of overhead that can be saved by caching the output of the PHP -> opcode translation process and re-using for future executions. So how do we accomplish this? Well, we use an opcode cache extension. If you’re not already using one, you can easily see a 200-300% reduction in CPU usage. It’s an easy win!
As of PHP 5.5, Zend OpCache is bundled with PHP. To enable it, just add opcache.enable=1 into your php.ini. Super easy. The downside is that the user-land memcache-type component that used to be part of APC is not part of Zend Opcache. If you depend on this shared cache, you can install something like APCu, which brings the user-land cache part of APC back to PHP 5.5. I go into more detail about Zend OpCache and heartaches it caused me while transitioning from APC in the CakePHP Cache Files Case Study.
If you’re using PHP 5.4 or below, are a couple of different opcode cache alternatives, and I’ll discuss them below.
Are there any downsides to using an opcode cache? For most setups, there are absolutely NO disadvantages. The only gotcha that you should know about is that if you’re using a PHP encoder/obfuscator, such as ionCube or Zend Guard, you won’t be able to use an opcode cache. That being said, this limitation only impacts a small portion of people running closed-source, licensed PHP code.
Tuning Zend Opcache (PHP 5.5 only)
A common pain: “I really want to use Zend Optimizer but I have NO IDEA what settings to use.”
Have you ever noticed how you can spend hours reading docs, but without an example or real world case study, you have NO IDEA what the settings actually do?
Like, you understand what opcache.memory_consumption MEANS, but who knows what to set it at? Is 32 too much? Too little? Who the heck knows, nothing comes up on Google, so you just go with your gut.
But what about when your gut is wrong? Do you want to bet your uptime on a guess?
Not me.
I have a bad habit of researching like a maniac. It’s awful because I’ll start off googling some weird setting and find myself digging through PHP source code three hours later.
Instead of letting this knowledge go to waste, I want to share it with you. I had to spend the time figuring out the best REAL WORLD settings for Zend Optimizer.
These settings are straight from my php.ini file from one of my apps that does 117 million HTTP requests per day. I’ll explain what each one does and why it’s important so you can tweak it for your setup.
opcache.revalidate_freq - Basically put, how often (in seconds) should the code cache expire and check if your code has changed. 0 means it checks your PHP code every single request (which adds lots of stat syscalls). Set it to 0 in your development environment. Production doesn’t matter because of the next setting.
opcache.validate_timestamps - When this is enabled, PHP will check the file timestamp per your opcache.revalidate_freq value.
When it’s disabled, opcache.revaliate_freq is ignored and PHP files are NEVER checked for updated code. So, if you modify your code, the changes won’t actually run until you restart or reload PHP (you force a reload with kill -SIGUSR2).
Yes, this is a pain in the ass, but you should use it. Why? While you’re updating or deploying code, new code files can get mixed with old ones— the results are unknown. It’s unsafe as hell.
opcache.max_accelerated_files - Controls how many PHP files, at most, can be held in memory at once. It’s important that your project has LESS FILES than whatever you set this at. My codebase has 6000 files, so I use the prime number 7963 for max_accelerated_files.
You can run find . -type f -print | grep php | wc -l to quickly calculate the number of files in your codebase.
opcache.memory_consumption - The default is 64MB, I set it to 192MB because I have a ton of code. You can use the function opcache_get_status() to tell how much memory opcache is consuming and if you need to increase the amount (more on this next week).
opcache.interned_strings_buffer - A pretty neat setting with like 0 documentation. PHP uses a technique called string interning to improve performance— so, for example, if you have the string “foobar” 1000 times in your code, internally PHP will store 1 immutable variable for this string and just use a pointer to it for the other 999 times you use it. Cool. This setting takes it to the next level— instead of having a pool of these immutable string for each SINGLE php-fpm process, this setting shares it across ALL of your php-fpm processes. It saves memory and improves performance, especially in big applications.
The value is set in megabytes, so set it to “16” for 16MB. The default is low, 4MB.
opcache.fast_shutdown - Another interesting setting with no useful documentation. “Allows for faster shutdown”. Oh okay. Like that helps me. What this actually does is provide a faster mechanism for calling the deconstructors in your code at the end of a single request to speed up the response and recycle php workers so they’re ready for the next incoming request faster. Set it to 1 and turn it on.
TL;DR-
in php.ini
1 opcache.revalidate_freq=0
2 opcache.validate_timestamps=0 (comment this out in your dev environment)
3 opcache.max_accelerated_files=7963
4 opcache.memory_consumption=192
5 opcache.interned_strings_buffer=16
6 opcache.fast_shutdown=1
APC (PHP 5.4 and below only)
APC is the tried and true opcode cache. It’s going to be included with PHP at some point in the future, so it’s usually the best choice. APC is distributed as a PHP extension and is easy to install with PECL.
1 > pecl install apc
2 > service php5-fpm restart
Seriously, it’s that easy. On a busy server, you’d see an instantaneous drop in CPU usage. And I’m not talking about a dip, I mean it would seriously fall off a cliff.
|
|
There’s one gotcha with APC. Make sure to set the configuration value apc.stat_ctime=1 in php.ini if you deploy your code using git, svn, capistrano, or rsync. Otherwise, you may see errors or stale code whenever you push new code to your application servers. Why? Because in most deployment setups—especially with capistrano—when new code is deployed, only the file metadata gets updated. This causes only the ctime, not the mtime to get updated as well. Out of the box, APC only checks for code changes by comparing the mtime, so even if you deploy new code APC will look at the mtime and think it’s the same as what it has cached in memory. Using apc.stat_ctime tells APC to also check the ctime, and fixes the problem entirely. |

XCache
An alternative to APC is XCache, which more or less provides the same functionality, though it’s written by an independent developer and is not bundled with PHP. That said, it gets frequent releases—for example, a PHP 5.4 compatible version was released as stable long before APC had support for PHP 5.4 in their stable version.
The only reason I’m mentioning it here is because it’s what we use at Twitpic, the reasons why are covered in the case study at the end of this chapter.
1 > apt-get install php5-xcache
2 > service php5-fpm restart
Alternatives
A new trend that we might see more of in the future is using long-running application servers in PHP—that is, the PHP application is started once and sits in a loop waiting for new HTTP requests (this is similar to somethig like unicorn for Ruby or gunicorn for Python). This type of approach does not need an opcode cache because the PHP process is not restarted for each request, so code only needs to be interpreted once.
I haven’t had a chance to play with Photon yet, but it’s one very promising example of this type of PHP application server. It looks very interesting.
Tuning Linux for PHP
Out of the box, Linux can run a fairly high volume of PHP requests without much tuning. Nonetheless, we can tweak it a bit to improve communication between nginx and PHP-FPM, as well as improve I/O performance in situations where PHP might have to hit the disk.
I’m also going to talk about some anti-patterns, or things that might at first seem like a good idea to improve performance, but either have negative side-effects or negligible performance improvements.
Max open files
Similar to our load balancer, the maximum number of open files allowed per process is set very low (1024). Since nginx communicates with PHP-FPM using Unix sockets, and sockets are considered files on a Linux system, this effectively limits the number of concurrent connections nginx can use to talk to PHP-FPM.
1 > vi /etc/security/limits.conf
2 * soft nofile 100000
3 * hard nofile 100000
4 > ulimit -n 100000
Turning off filesystem access times
By default, in most Linux distributions, the filesystem keeps track of the last time a file was accessed or read. It’s rarely useful to have this information and it causes an I/O operation every single time a file is read, such as the PHP interpreter reading your source code. We can disable this behavior by modifying the partition where your PHP files are stored. Open up /etc/fstab and look for your main partition. Mine looks like this:
1 /dev/sdb1 / ext4 errors=remount-ro 0 1
Change it to
1 /dev/sdb1 / ext4 noatime,nodiratime,errors=remount-ro 0 1
noatime tells the filesystem to not track when individual files are read, and likewise, nodiratime tells the filesystem to not track when directories are read from.
You can remount the filesystem (without a reboot!) with the command mount -o remount /dev/sdb1 (replace /dev/sdb1 with whatever filesystem that you had to edit in your /etc/fstab file).
Storing temporary files in tmpfs
If your application is user-upload heavy, you can reduce some of the I/O overhead by using tmpfs, an in-memory filesystem, for the /tmp directory, which is where both PHP and nginx buffer uploaded files until they are processed by your application.
Using an in-memory filesystem for temporary files is a great idea because it allows file uploads to be buffered in memory without having to hit disk. This is a great idea for handling small image uploads (like avatars or pictures), but a bad idea if your users are uploading very big files such as videos.
Put this line in your /etc/fstab file:
1 tmpfs /tmp tmpfs defaults,nosuid,noatime 0 0
And mount the new filesystem with mount /tmp. If you run df -h, you will see the new tmpfs filesystem in the output.
1 tmpfs 2.0G 4.0K 2.0G 1% /tmp
Tweaking your php.ini for improved performance
Out of the box, the php.ini file is huge and includes every configuration setting known to man. Delete that! You don’t need all of those default settings.
1 > vi /etc/php5/fpm/php.ini
2 [PHP]
3 engine = On
4 expose_php = Off
5
6 max_execution_time = 5
7 memory_limit = -1
8 error_reporting = E_ALL & ~E_DEPRECATED
9 display_errors = Off
10 display_startup_errors = Off
11 html_errors = Off
12 default_socket_timeout = 5
13
14 file_uploads = On
15 upload_tmp_dir = /tmp/php
16 upload_max_filesize = 50M
17 post_max_size = 50M
18 max_file_uploads = 20
19
20 date.timezone = 'UTC'
21
22 cgi.fix_pathinfo = 0
Notice that we set the max_execution_time reasonably low, to only 5 seconds. For a fast web application, we don’t really want any long-running web requests—in our application, having a web request last longer than 5 seconds usually means that something is wrong. Our goal is for pages to respond in 300-500ms tops!
Anti-Pattern: Storing your code on a Ramdisk
A logical train of thought: Well, if my code is stored on disk, and the PHP interpreter has to read in the source code from the disk every web request, I can speed up the process by storing my code on a Ramdisk (that is, a portion of memory that is mapped directly to a filesystem). It makes logical sense and I’ve seen it asked on StackOverflow by well intentioned developers more than a few times.
The reason it’s an anti-pattern is pretty simple. Linux already does this for you! The Linux kernel will seemlessly use almost all of its free, unused memory to cache files after the first time they’re read from the filesystem. It’s totally transparent and accomplishes exactly what storing your code in a Ramdisk would do.
Better yet, it doesn’t come with any of the extra complexity, and the kernel will free up it’s cache under heavy memory pressure, which wouldn’t be possible using a Ramdisk.
Anti-Pattern: Turning off access and error logs
The nginx access logs and error logs are very valuable. Not only are they helpful for debugging problems in production, but they’re also useful for aggregating stats on your traffic, tracking abusers (think DDoS), and making sure that everything is running as it should.
Still, on a busy server it’s tempting to disable these logs in the name of performance. Writing to the disk for every single web request can’t be good, right? Wrong! The benefits of having live logs FAR outweigh the marginal performance gain you’d see by disabling them.
1. Hard drives, even rotational non-ssd drives, are very good at sequential writes. Well over 100MB/s.
2. On the busiest servers (think 20,000+ connections per second), nginx only generates 1-2MB of log data/second, which ends up being less than 1% of I/O utilization.
3. Nginx is evented, so it’ll never block on writing the log files. Also worth mentioning is that nginx buffers log writes in order to make them more efficient.
Remember, in the Load Balancer chapter we disabled the log files completely because the signal-to-noise ratio is far too high. But, on the application servers each server is only handling a portion of your traffic and the logs become far more valuable and helpful in real-time.
Scaling session handling
Sessions are an important part of every web application—they allow you to keep state between requests and remember your users. The default PHP configuration for sessions is to store the session data in files on your application server. Each user session is assigned a unique token, stored in a cookie within the browser, and this token is subsequently used as the filename to store the session data on the filesystem.
Filesystem based sessions don’t scale for two reasons.
The first is because it creates a bunch of unnecessary I/O overhead. For every request, PHP needs to hit the filesystem to read the session data, and at the end of the web request, re-write the file with any new session data that was added or changed during the web request.
The second reason is that it locks you into a single server. Since the session data files are stored individually on a single application server, the session won’t be visible to any other servers in your application cluster. For example, if a user logged into his account on app01, when he refreshes the page and HAProxy routes him to app02, he’ll be taken back to the login page because he won’t have a valid session data file on app02.
There are ways around this, such as storing sessions on a network file system or using sticky sessions on your load balancer, but these are ultimately bad choices—think of them as a crutch more than a long term solution. Network file systems are very slow and sticky sessions will cause hot-spots and cold-spots throughout your application cluster.
Another horrible piece of advice that’s often recommended on forums and sites like StackOverflow is to store session data in a relational database, like MySQL. Database-backed sessions will let you scale a little bit further, but will eventually create an enormous amount of I/O pressure for something you shouldn’t be storing in a database to begin with (again, because you’re reading from and writing to the database for every single web request). Sessions are snippets of time-limited throwaway data—not relational data.
Lucky for us, PHP has a plug-and-play session interface that we can set with the ini setting session.save_handler. This interface allows PHP extensions to provide plugins that look and act like native PHP sessions, letting us use the familiar $_SESSION variable in a scalable fashion.
There are three pluggable backends worth mentioning, and I’ll talk about them below.
Memcached
By far the easiest way to scale your sessions is to setup a memcache server or two and use the session handler provided by the memcached extension.
Important: I said memcached extension and not memcache. There are two different extensions, the memcached extension being FAR superior for a variety of reasons, mostly because it uses libmemcached, which I’ll cover more extensively in Chapter 7.
Recently, there has been some criticism for storing sessions in memcache because it’s an in-memory, non-filesystem backed storage system. That means if memcache crashes or is restarted, you’ll lose all of your session data, effectively logging all of your users out and deleting anything stored in their session. This could be a big downside if you store valuable data in the session, such as shopping cart data or anything else that’s important.
The real tradeoff here is speed. Memcache is extremely fast and easy to setup—we use it at Twitpic to store our sessions, and a single server can provide a session backend for tens-of-thousands of simultaneous users on our site. Since it’s a central resource, all of our application servers have access to the same session data, and we can scale horizontally without being tied to the filesystem again!
Before we can can use memcache to store sessions though, we’ll first need to install the PECL Memcached extension. Fortunately, it’s pretty easy.
1 > apt-get install php5-memcached
Session save handlers can be registered in php.ini, but it’s better to do it within your application code. If you set it in php.ini, it’ll be globally shared with any PHP code running on your application server, even other apps, which can cause undesired behavior.
1 ini_set('session.save_handler', 'memcached');
2 ini_set('session.save_path', '192.0.2.25:11211,192.0.2.26:11211');
3
4 # A session token will get stored in the users web-browser as normal,
5 # but instead of the session data getting stored on the filesystem, it'll
6 # be stored for us automagically inside of memcache.
7 session_start();
8 $_SESSION['foo'] = 'bar';
Redis
If your session data is more valuable to you, and the off-chance of losing it all due to a server crash is a deal breaker, you should consider using Redis as a backend for your session data. Redis is a data-structure server (covered extensively in Chapter 7) that’s similar to memcache because the working data is kept in memory, though it persists its data to disk with the save and appendfsync configuration options.
You will need the phpredis extension.
1 ini_set('session.save_handler', 'redis');
2 ini_set('session.save_path',
3 'tcp://192.0.2.5:6379?timeout=0.5,tcp://192.0.2.6:6379?timeout=0.5');
4
5 # A session token will get stored in the users web-browser as normal, but
6 # instead of the session data getting stored on the filesystem, it'll be
7 # stored for us automagically inside of redis.
8 session_start();
9 $_SESSION['foo'] = 'bar';
Cookies
Another method of storing session data is to use a custom session handler that stores all of the session data in a cookie within the user’s browser. It’s a scalable solution as long as you aren’t storing a ton of data in the session—remember, cookies have to be sent back to the server on every single HTTP request, so it’s best to only use the cookie-session storage for storing less than 1kb of session data. Additionally, most browsers limit the size of a single cookie to around 4kb, so there’s a hard limit on the amount of data you can store in a session.
One concern with a cookies is private data—the session data (as opposed to just the token) will be stored in the user’s browser and will be visible to the user with a tool such as Firebug, so it’s not a good idea to store anything you don’t want your users to see inside of cookie-backed sessions. Likewise, unless you’re using SSL, the cookie data will be visible to all going across the wire.
But can’t the users modify the cookie data? No, not if you do it right. We use a technique called HMAC (Hash-based message authentication code) to sign the cookie data, so that when we get the session data back from the user, we can verify with 100% certainty that it has not been tampered with.
Cookie-backed sessions aren’t built into PHP, but using the SessionHandlerInterface in PHP 5.4, it’s easy to integrate. SessionHandlerInterface’s behavior can be ported to older versions of PHP with session_set_save_handler(), but that’s an exercise for the reader.
I’ve provided a working example class below to show how we’d implement our own SessionHandlerInterface. Additionally, I’ve open-sourced this code on GitHub (because I love sharing and giving back) and released it on Packagist for easy installation.
Note: In order for this technique to be secure, you absolutely must change the HASH_SECRET to a 128+ character random string before deploying the code
1 <?php
2
3 class SessionHandlerCookie implements SessionHandlerInterface {
4
5 private $data = array();
6 private $save_path = null;
7
8 const HASH_LEN = 128;
9 const HASH_ALGO = 'sha512';
10 const HASH_SECRET = "YOUR_SECRET_STRING";
11
12 public function open($save_path, $name) {
13 $this->save_path = $save_path;
14 return true;
15 }
16
17 public function read($id) {
18
19 // Check for the existance of a cookie with the name of the session id
20 // Return an empty string if it's invalid.
21 if (! isset($_COOKIE[$id])) return '';
22
23 // We expect our cookie to be base64 format, so decode it.
24 $raw = base64_decode($_COOKIE[$id]);
25 if (strlen($raw) < self::HASH_LEN) return '';
26
27 // The cookie data contains the actual data w/ the hash concatonated
28 // to the end, since the hash is a fixed length, we can extract the
29 // last HMAC_LENGTH chars to get the hash.
30 $hash = substr($raw, strlen($raw)-self::HASH_LEN, self::HASH_LEN);
31 $data = substr($raw, 0, -(self::HASH_LEN));
32
33 // Calculate what the hash should be, based on the data. If the data
34 // has not been tampered with, $hash and $calculated
35 // will be the same
36 $calculated = hash_hmac(self::HASH_ALGO, $data, self::HASH_SECRET);
37
38 // If we calculate a different hash, we can't trust the data.
39 // Return an empty string.
40 if ($calculated !== $hash) return '';
41
42 // Return the data, now that it's been verified.
43 return (string)$data;
44
45 }
46
47 public function write($id, $data) {
48
49 // Calculate a hash for the data and append it to the end of the
50 // data string
51 $hash = hash_hmac(self::HASH_ALGO, $data, self::HASH_SECRET);
52 $data .= $hash;
53
54 // Set a cookie with the data
55 setcookie($id, base64_encode($data), time()+3600);
56 }
57
58 public function destroy($id) {
59 setcookie($id, '', time());
60 }
61
62 public function gc($maxlifetime) {}
63 public function close() {}
64
65 }
66
67 $handler = new SessionHandlerCookie;
68 session_set_save_handler($handler, true);
69 session_start();
All materials on the site are licensed Creative Commons Attribution-Sharealike 3.0 Unported CC BY-SA 3.0 & GNU Free Documentation License (GFDL)
If you are the copyright holder of any material contained on our site and intend to remove it, please contact our site administrator for approval.
© 2016-2026 All site design rights belong to S.Y.A.