Professional Microsoft SQL Server 2014 Integration Services (Wrox Programmer to Programmer), 1st Edition (2014)
Chapter 17. SSIS Software Development Life Cycle
WHAT’S IN THIS CHAPTER?
· Understanding the different types of SDLCs
· Versioning and source control overview
· Working with Subversion (SVN)
· Working with Visual Studio Team System
The software development life cycle (SDLC) plays an important role in any type of application development. Many SQL Server database administrators and ETL developers have little experience with source control tools because the tools themselves have been less than “database project-friendly.”
In addition, many SQL Server DBAs have not been involved with SDLCs beyond executing scripts attached to change control documentation. Legislation around the world has changed the role of the SQL Server DBA in the enterprise because of new requirements for tracking changes. Regarding software development life cycles, DBAs now must participate in ever-earlier phases of the project’s development.
In addition, SQL Server DBAs — especially SSIS developers — will realize greater productivity and development cycle fault tolerance as they employ source-controlled development practices. These practices produce code that is auditable, an added benefit in the current corporate climate.
This chapter provides an overview of some of the available features in the source control offerings you have to choose from. It includes a brief description of how to store a project in Subversion (SVN), a common open-source tool, and a detailed walkthrough describing how to create a Team Project using Visual Studio 2013 Team System. In practice, Team Projects will most likely be created by someone else in the software development enterprise.
NOTE Chapter 22 on SSIS administration reviews how to deploy projects to the SSIS Server.
Because the line between database administrator and software developer has blurred and blended over the years, the Team Project walkthrough is built in Visual Studio 2013. In order to demonstrate working with the tool and complying with your SDLC process, in the Team Project walkthrough you will put together a project that uses the source control and collaboration functionality provided by Visual Studio Team System.
NOTE A detailed examination of Team System is beyond the scope of this book but can be found in Professional Team Foundation Server 2012 by Ed Blankenship, Martin Woodward, Grant Holliday, and Brian Keller (Wrox, 2013).
Included is a discussion regarding development and testing, with an emphasis on the agile development methodology, which is very well suited for SSIS development because of the methodology’s ability to adapt to changes — a common occurrence in ETL development.
ETL TEAM PREPARATION
ETL planning is critical in any project. For smaller projects, this may just be a simple mapping document that identifies the sources and destinations and describes how the data needs to be transformed.
Projects with more than one ETL developer need more structured planning. Besides the mapping and lineage, the work breakout needs to be mapped. This, of course, means that you need to have the logical grouping of ETL processes defined. This logical grouping needs to be at the package level because ETL developers need to have exclusive access to a package.
Here are a few more considerations as you are planning the ETL portion of your project:
· In order to dive right into ETL development, the data architect needs to have the destination schema defined and implemented on the destination relational database. In addition, it needs to be stable. Nothing is more difficult for an ETL developer than to find the destination schema changing while he or she is working! Table schemas will need to change, but once the ETL effort is underway, a change process needs to be in place so all affected developers are notified.
· The second most important aspect that needs to be in place is the source data access. ETL cannot be developed without source data. This means that ETL developers can run extractions from a test source system or have source files to work with. It is not acceptable to have dummy data from the source — this approach never works and results in major rework once the data is available. When source data is not available, flag this as a major risk in the project and you will need to put the ETL portion of the project on hold. It’s that serious.
· Effective coordinated SSIS package design, especially with a team of developers, involves having modular packages. This means you need to define your SSIS packages with smaller increments of work that each package handles. Packages with too much logic in them are hard to troubleshoot, are more difficult to develop, and don’t work well in a team when more than one person needs to be working on the same package at the same time — it doesn’t work. A good rule of thumb is to limit packages to no more than two to three Data Flows and to try to have all the Control Flow Tasks visible at one time on your monitor.
· Another important step in planning your ETL is to make sure you have designed a configuration and logging framework for your SSIS packages. ETL developers need to have template SSIS packages to start with that have all the logging in place. If you are deploying your packages to the SSIS Server in SSIS 2014, the server will handle your logging, but you still need to plan out your project parameters and shared connections beforehand. (See Chapter 22 for more on deployment and the SSIS server.) If you don’t have these basics defined, you will have a lot of retrofitting later on, which will slow down your ETL development, introduce risk, and probably affect your project at a critical time of testing. Not to mention, having all of this in place during development will give you more insight into your ETL processes while you are developing them!
· Finally, be sure to set up your source control environment. This is a great lead-in to this chapter since you will learn how to use two source control tools, Subversion (SVN) and Visual Studio Team System.
INTRODUCTION TO SOFTWARE DEVELOPMENT LIFE CYCLES
Software Development Life Cycles (SDLCs) represent a systematic approach to each component of application development — from the initial idea to a functioning production application. A step (or phase) is a unit of related work in an SDLC. A methodology is a collection of SDLC steps in action, applied to a project. Artifacts are the recorded output from steps.
For example, the first step of an SDLC is analysis. The methodology requires a requirements document as an analysis artifact.
SDLCs: A Brief History
Software development life cycles have existed in some form or other since the first software applications were developed. The true beginning of what is now termed “software” is debatable. For our purposes, the topic is confined to binary operations based on boolean algebra.
In 1854, mathematician George Boole published An Investigation of the Laws of Thought, on which Are Founded the Mathematical Theories of Logic and Probabilities. This work became the foundation of what is now called boolean algebra. Some 80 years later, Claude Shannon applied Boole’s theories to the computing machines of Shannon’s era. Shannon later went to work for Bell Labs.
Another Bell Labs employee, Dr. Walter Shewhart, was tasked with quality control. Perhaps the pinnacle of Dr. Shewhart’s work is statistical process control (SPC). Most quality control and continuous improvement philosophies in practice today utilize SPC. Dr. Shewhart’s work produced a precursor to software development life cycles, a methodology defined by four principles: Plan, Do, Study, and Act (PDSA).
Dr. Shewhart’s ideas influenced many people at Bell Labs, making an accurate and formal trace of the history difficult. Suffice it to say that Dr. Shewhart’s ideas regarding quality spread throughout many industries; one industry influenced was the software industry.
Types of Software Development Life Cycles
SQL Server Integration Services provides integrated support for many SDLC methodologies. This chapter touches on a few of them. In general, SDLCs can be placed into one of two categories: waterfall and iterative.
Waterfall SDLCs
The first type of formal software development life cycles is sequential, or linear. That is, it begins with one step and proceeds through subsequent steps until reaching a final step. A typical example of linear methodology steps is the following:
1. Analysis: Review the business needs and develop requirements.
2. Design: Develop a plan to meet the business requirements with a software solution.
3. Development: Build the software solution.
4. Implementation: Install and configure the software solution.
5. Maintenance: Address software issues identified after implementation.
This type of methodology is referred to as a waterfall methodology because information and software “fall” one way from plateau to plateau (step to step).
The waterfall methodology has a lot of appeal for project managers. It is easier to determine the status and completeness of a linear project: It’s either in analysis, in development, in implementation, or in maintenance.
A potential downside to the waterfall methodology is that the analysis and design steps are traditionally completed in a single pass at the beginning of the project. This does not allow much flexibility should business needs change after the project starts. In addition, the development and implementation steps are expected to be defined prior to any coding.
Iterative SDLCs
An iterative methodology begins with the premise that it’s impossible to know all requirements for a successful application before development starts. Conversely, iterative development holds that software is best developed within the context of knowledge gained during earlier development of the project. Development therefore consists of several small, limited-scope, feature-based iterations that deliver a product ever closer to the customer’s vision.
The following are examples of iterative SDLCs:
· Spiral: Typified by ever-expanding scope in hopes of identifying large design flaws as soon as possible
· Agile: A collection of methodologies fall into this category, including Scrum, Feature-Driven Development, Extreme Programming, Test-Driven Design, and others.
· Microsoft Solutions Framework: Microsoft’s own practice gleaned from a sampling of best practices from different methodologies
What happens if, hypothetically, an iteration fails to produce the desired functionality? The developer or DBA must remove the changes of the last iteration from the code and begin again. This is much easier to accomplish if the developer or DBA has stored a copy of the previous version someplace safe — hence, the need for source control.
Source control is defined as preserving the software source code in a format that enables recovery to a previous state of development or version, and it is a basic tenet of all iterative software development life cycles.
SSIS and SDLCs
As mentioned, SSIS is very suitable for applying different SDLCs. This is because SSIS is broken down to units of work that can be planned out for longer waterfall projects or designed in a more iterative agile project. While an agile project approach is most appropriate for business intelligence solutions, if you are working on a big system migration, this is usually a waterfall type project effort, and your ETL most commonly is for data migration to the new system.
A few of the common ways that SSIS integrates into SDLCs includes:
· ETL tasks can be included as part of a product backlog
· Packages can be assigned to developers
· Packages can be checked into source control through the file system or through Visual Studio
· Packages can be grouped together and deployed as a set
VERSIONING AND SOURCE CODE CONTROL
SQL Server 2014 and SQL Server Integration Services (SSIS) integrate with source control products such as Subversion (SVN) and Visual Studio Team System. SVN is an open-source control product commonly used on many types of development platforms. Given the open-source nature of the product, several people have written extensions and integration points into different tools, such as Visual Studio. Visual Studio Team System is part of Microsoft’s Team Foundation Server, a suite of SDLC management tools — which includes a source control engine.
Subversion (SVN)
SVN is an open-source product that you can download and install. The easiest version to work with on the Windows platform is from www.visualsvn.com because it includes a SVN server management UI. You can download and install the server repository VisualSVNServer from the site just mentioned. This section also uses a Visual Studio plug-in for SVN called AhnkSVN, which is available from http://ankhsvn.open.collab.net. This integrates Visual Studio with the SVN repository. In this section, you’ll create a project in SQL Server Data Tools (SSDT) that demonstrates integrated source control with SVN.
To begin, install VisualSVNServer and AhnkSVN from the sites just mentioned.
To configure SSIS source control integration with SVN, open the SQL Server Business Intelligence Development Studio. You don’t need to connect to an instance of SQL Server to configure integrated source control.
To configure SVN as your SSIS source control, click Tools ⇒ Options. Click Source Control and select Plug-in Selection. Select “Ankh - Subversion Support for Visual Studio” for the Current source control plug-in, as shown in Figure 17-1.
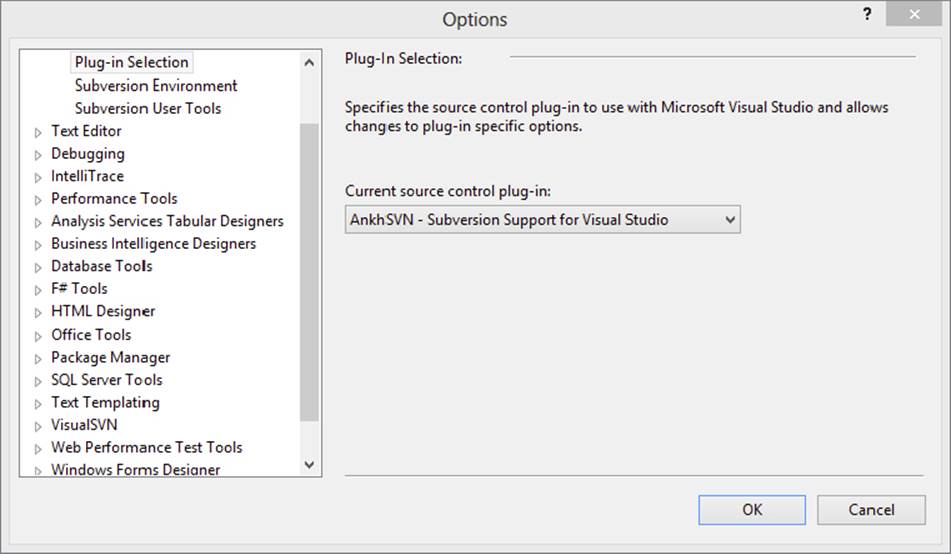
FIGURE 17-1
For the purposes of this example, use “AnkhSVN – Subversion Support for Visual Studio” from the Source Control Environment Settings dropdown list and use the source control default options (refer to Figure 17-1). This SVN walkthrough assumes that you have installed SVN server and AnkhSVN on your local machine.
1. Open SQL Server Business Intelligence Development Studio. Because SSDT uses the Visual Studio Integrated Development Environment (IDE), opening SQL Server Business Intelligence Development Studio will open Visual Studio 2013.
2. When the SSDT IDE opens, click File ⇒ New ⇒ Project to start a new project. Enter a project name in the New Project dialog. For now, do not check the Add to source control checkbox, as shown in Figure 17-2.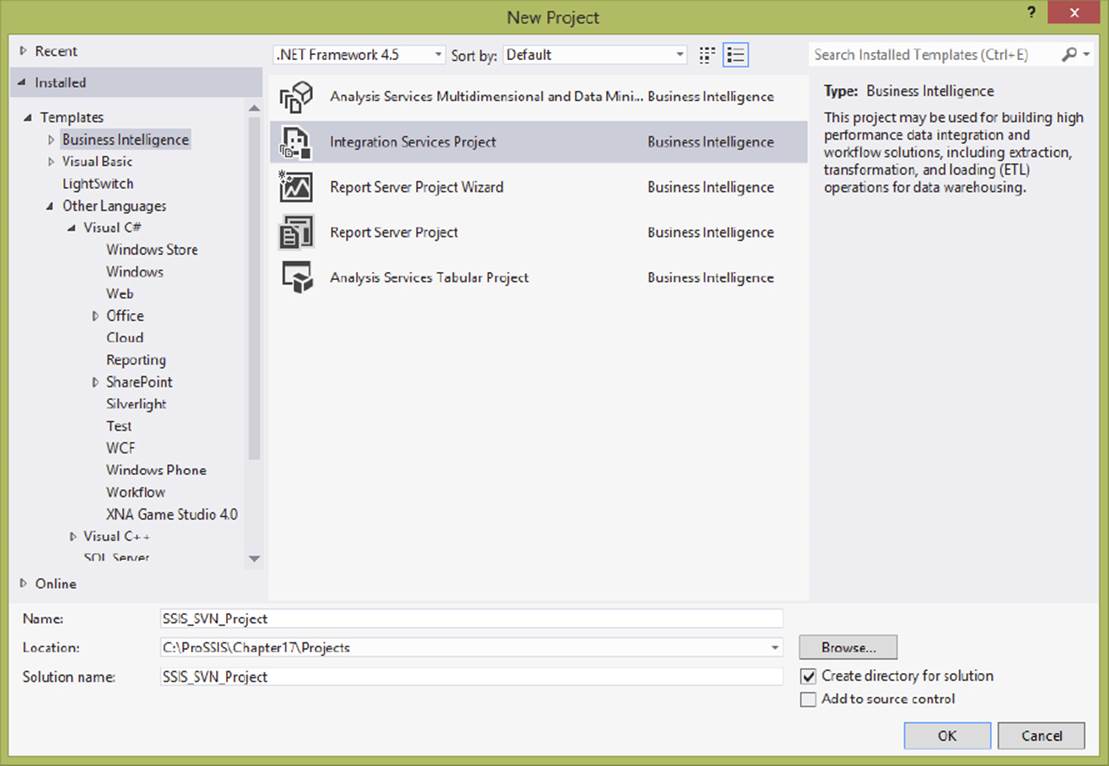
FIGURE 17-2
3. Click OK to proceed, and a new project is created in the SSDT IDE.
4. Add the project to SVN by right-clicking the project name in Solution Explorer and selecting Add Selected Projects to Subversion.
5. You will be prompted to choose the Subversion repository and folders.
a. The Project Name is what will be named within the SVN repository.
b. The Repository Url is the location of the Project within your SVN repository. Figure 17-3 shows a new folder created in the ProSSIS repository within SVN.
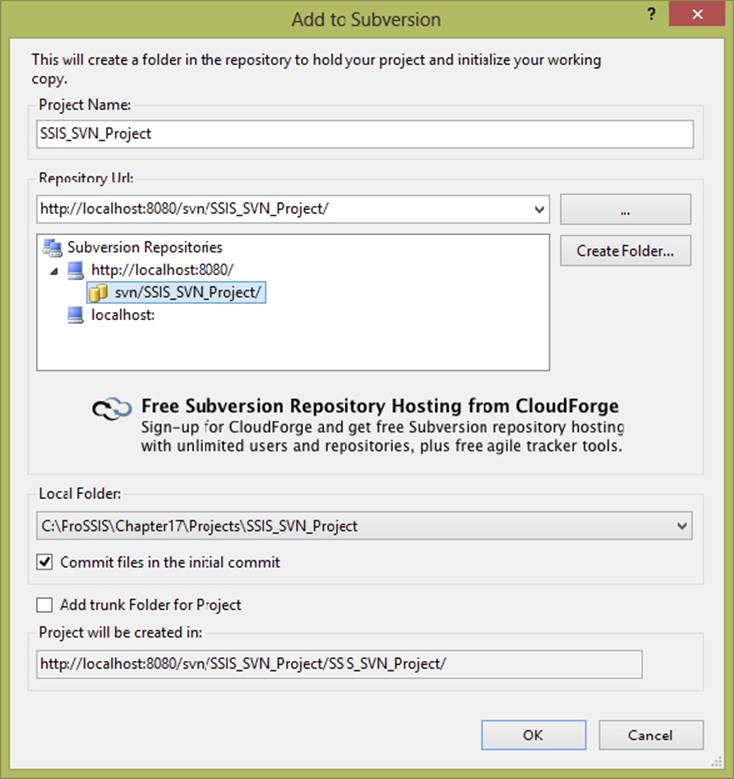
FIGURE 17-3
NOTE You will have to have a repository created to go through this exercise. This is done through the Visual SVN Server application.
6. Select OK to add your project to the SVN repository.
7. In the next screen, specify a log message, which is created as part of any operation with SVN so that changes can be documented, as shown in Figure 17-4. Click OK.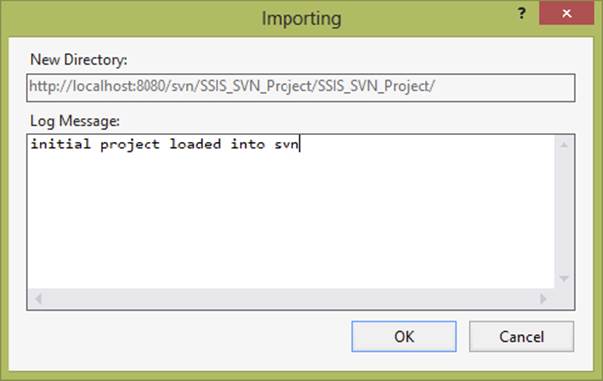
FIGURE 17-4
8. The final dialog asks if you would like to mark the project as managed by Subversion. Click Yes.
After successfully connecting the project to SVN, you will notice a few new indicators in Visual Studio that demonstrate the integration. Figure 17-5 shows the Solution Explorer on the right with a few indicators next to the files. The blue plus symbol indicates that a file is pending initial addition to the Subversion project. The Pending Changes window at the bottom shows all the operations that need to be committed to SVN. SVN uses a commit process to save all changes.

FIGURE 17-5
The project shown here has a few packages added for demonstration purposes. You can add any existing packages to your project to test the source control integration.
To complete the connection of the project with SVN, click the Commit button within the Pending Changes window. This will add all the files to the SVN repository. To confirm this, open the VisualSVN Server component from the Start ⇒ All Programs menu. Drill into the local server repository and the folder you created for the project. You should now see all the files from the project listed in the details window (see Figure 17-6). You may need to right-click on the Repository in Visual SVN Server and click “Refresh” to see the files.
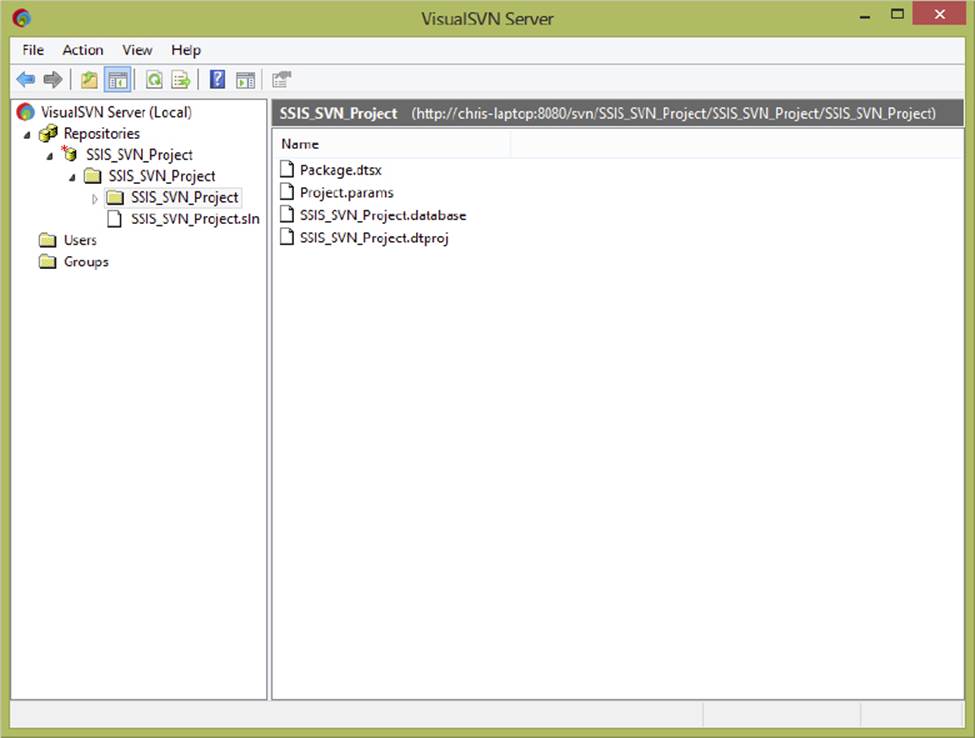
FIGURE 17-6
In addition to the files being added to the SVN repository, note that the files shown in the Solution Explorer in Visual Studio now have a blue checkbox next to them (instead of a blue plus symbol). This indicates that the files have now been added to the SVN repository.
To test SVN integration with your new SSIS project, manually lock one of the packages in your project for editing by right-clicking the package in Solution Explorer and choosing Subversion ⇒ Lock, as shown in Figure 17-7.
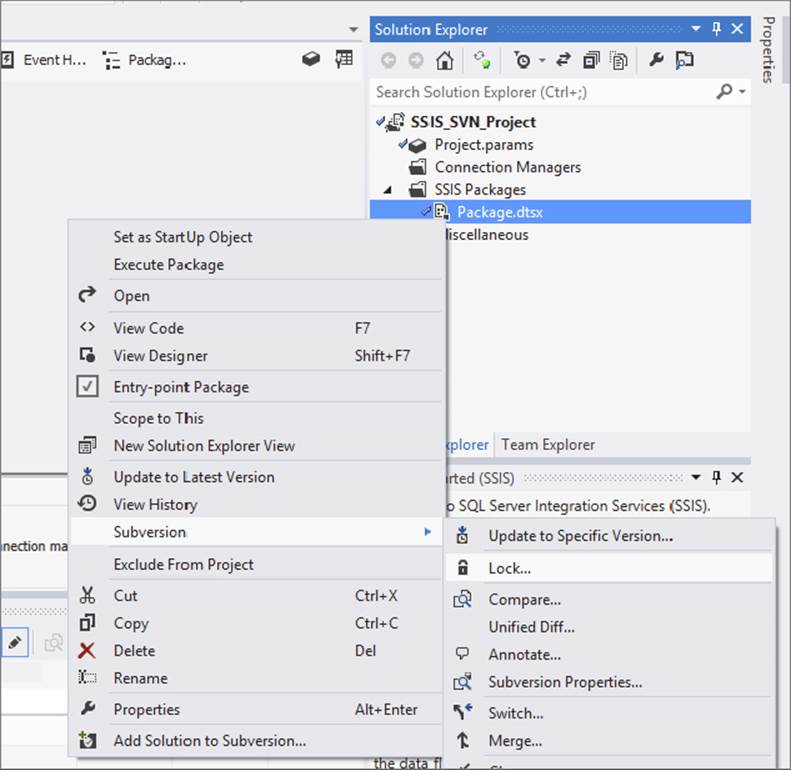
FIGURE 17-7
When you lock a file for editing, you prevent other people from checking in any edits of the file until you have completed your edits. The Select Files to Lock dialog appears, as shown in Figure 17-8. You can enter a comment to identify why you are locking the package.
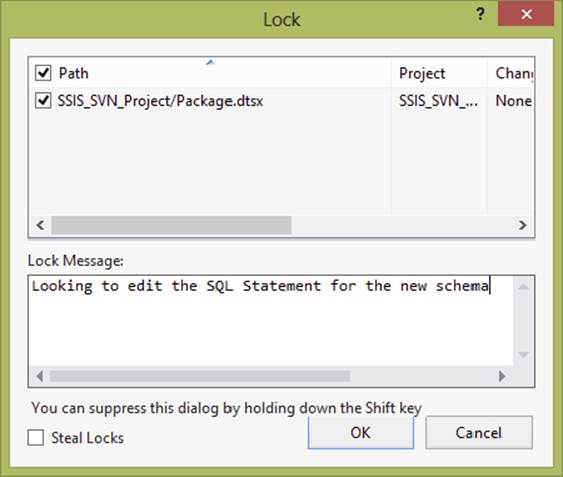
FIGURE 17-8
After you edit and save the package, the file is displayed in the Pending Changes list, and it has updated icons in Solution Explorer to indicate both that it has been changed and that it is locked (see Figure 17-9).
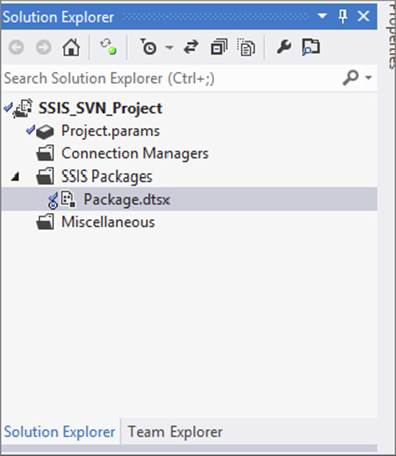
FIGURE 17-9
NOTE This is a good location for change control documentation references or meaningful notes. Although it may seem obvious what change you have made in the code, documenting the change will help you in the future if you need to roll back a change or remember what changes were made!
You can now commit your changes by clicking the Commit button in the Pending Changes window, and the packages will be checked in and unlocked for the next operation.
Like many source control tools, SVN comes with several valuable features for working in a team situation and for code and process management. One of those features is versioning.
Every check-in operation preserves the previous version, so the entire version history can be acted upon. Figure 17-10 shows the version history of a file with the right-click context menu displayed. Older versions can be restored and compared with current versions, logs can be updated, and changes can be highlighted.
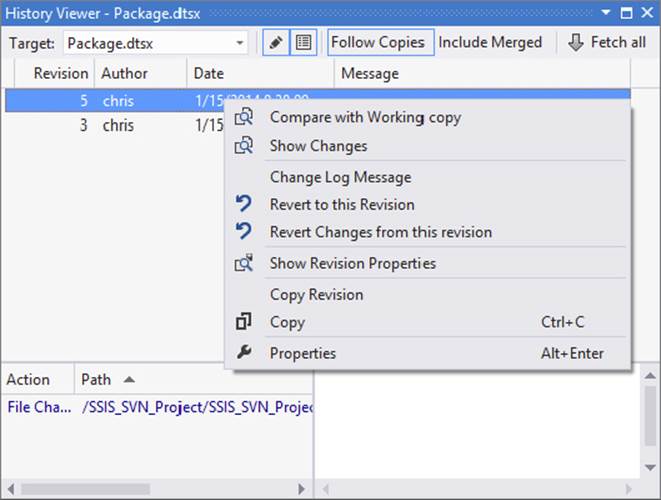
FIGURE 17-10
Now that you’ve taken a look at what a common open-source tool (SVN) can do in terms of source code management and team coordination, it’s time to look at an enterprise tool in the Microsoft technology stack. The next section provides a brief introduction to Microsoft’s source control server and client tools known collectively as Visual Studio Team System.
Team Foundation Server, Team System, and SSIS
When Visual Studio 2010 was released, Microsoft updated Team System and Team Foundation Server — a powerful enterprise software development life cycle suite and project management repository consisting of collaborative services, integrated functionality, and an extensible application programming interface (API). Team System seamlessly integrates software development, project management, testing, and source control into the IDE for Visual Studio 2013.
Using Team System with SSDT and SSIS requires that you have at least Visual Studio Team System 2010 on your network and have installed at least Team Explorer 2010 on your development machine. For the purposes of this chapter we’ve installed TFS 2013 and Visual Studio 2013. Also keep in mind that in order to create Projects and Team Collections the version of TFS must match the version of Visual Studio that is being used. For instance, Visual Studio 2013 cannot create Projects and Team Collections in TFS 2010, but Visual Studio 2010 can.
· Visual Studio Team System 2013 (VSTS) can be purchased for use, but if you would like to evaluate the software, Microsoft provides a virtual machine that you can download and used for a period of time. Trial versions are available for both virtual PC and Hyper-V images and can be found at http://download.microsoft.com. Search for VSTS 2013 Trial on the Microsoft download page, and the results will include both virtual machines that can be used for testing. The examples in this section use the same trial version of VSTS.
· Visual Studio Team Explorer 2013 is the client tool that integrates with Visual Studio and allows you to connect to the Team System server and explore the development items and work with the source control environment built into VSTS. The source control used by VSTS is a robust source control environment. You can search for and download Visual Studio Team Explorer from http://download.microsoft.com.
After satisfying the preceding requirements, follow these steps to use the VSTS source control. In the next section, you will also see how to create bug tracking tickets and work items in the VSTS Team Explorer.
1. To configure Team Foundation Server as your SSIS source control, open SSDT (or close any existing open projects) and click Tools ⇒ Options. Choose Source Control and select Visual Studio Team Foundation Server. Expand the Source Control node for detailed configuration, as shown in Figure 17-11.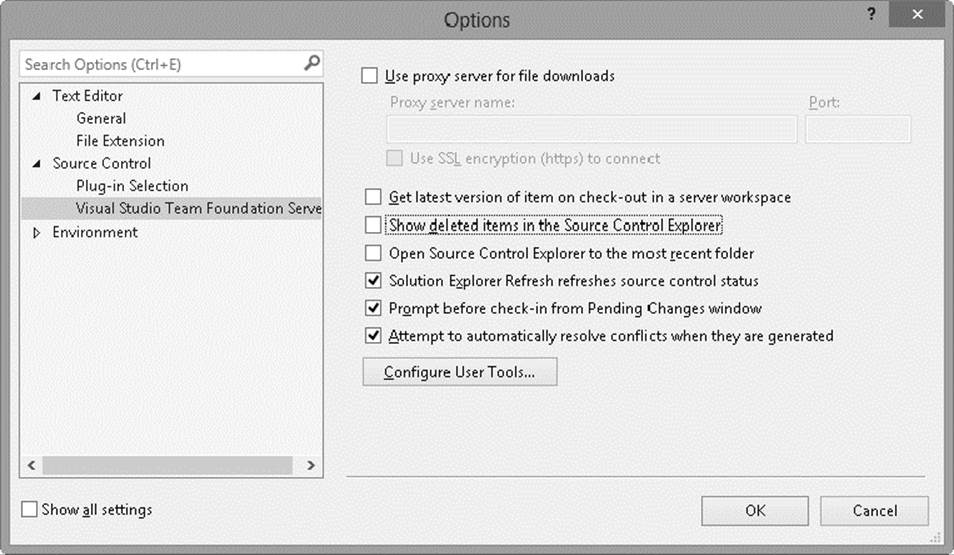
FIGURE 17-11
This section discusses the relationship between Team System and SQL Server Integration Services. The walkthrough is shown using SQL Server Data Tools (SSDT). If the SQL Server 2014 client tools are installed or Visual Studio 2013 is installed, opening SSDT will open Visual Studio 2013. If Team System is specified as the source controller for either environment, the environment, upon opening, will attempt to connect to a Team Foundation Server.
2. Once Visual Studio 2013 is configured to use Visual Studio Team Foundation Server as the source control, press Ctrl+\, Ctrl+M, or click the Team Explorer tab to view the Team System properties (or choose Team Explorer under the View menu).
3. In the Team Explorer window, click the “Select Team Projects...” link to connect to the Team System server.
4. Click the “Servers...” button as shown in Figure 17-12 to browse for a Team Foundation Server. Alternatively, any Team Foundation Server that has already been added will be available to select from the dropdown list. In the Add/Remove Team Foundation Server dialog, click the “Add” button to add a new server. Figure 17-13 shows the name of the trial version server to be added to the list.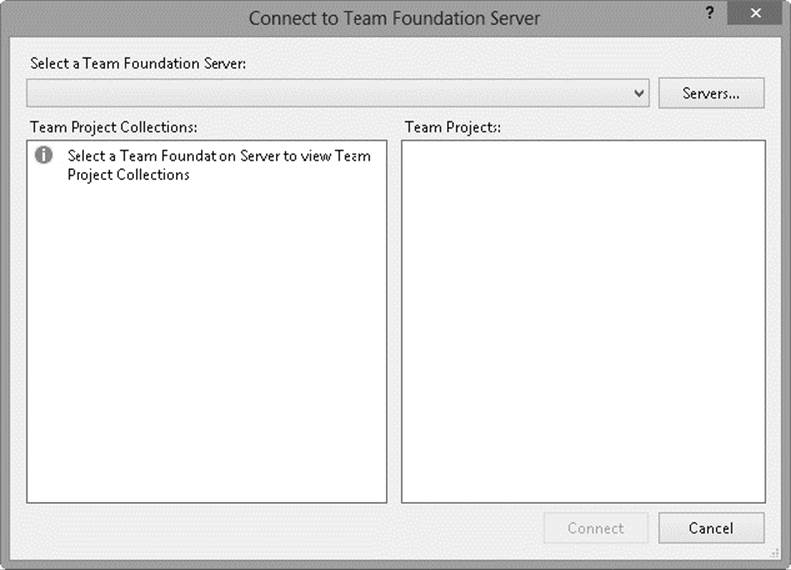
FIGURE 17-12
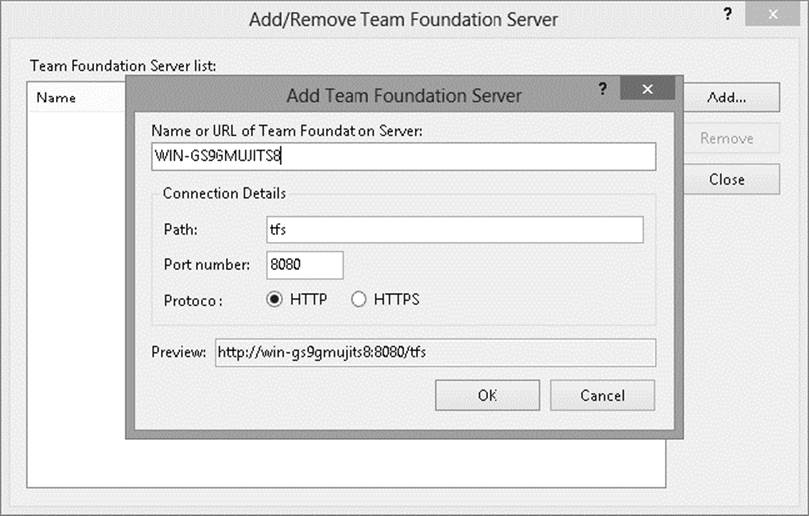
FIGURE 17-13
5. After adding the server (you will be prompted to log in using the credentials provided with the VSTS trial), close the server list dialog and choose the new server from the dropdown list. Click OK to save your server selection changes.
6. Once you have connected to the Team Foundation Server, open the Team Explorer panel, click the “Connect” icon and then click the “Create Team Project...” link to launch the New Team Project Wizard. Enter a name (such as SSIS VSTS Project) and an optional description for the new Team Project, and then click the “Next” button to continue.
7. Select a Process Template on the next step as shown in Figure 17-14, and then click the “Next” button to continue.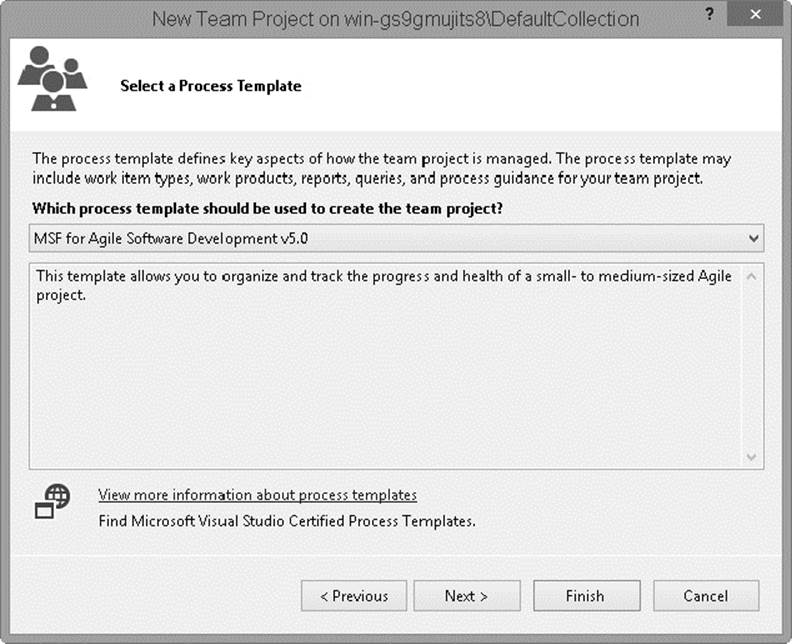
FIGURE 17-14
8. Select a version control system on the next step, as shown in Figure 17-15, and then click the “Next” button to continue.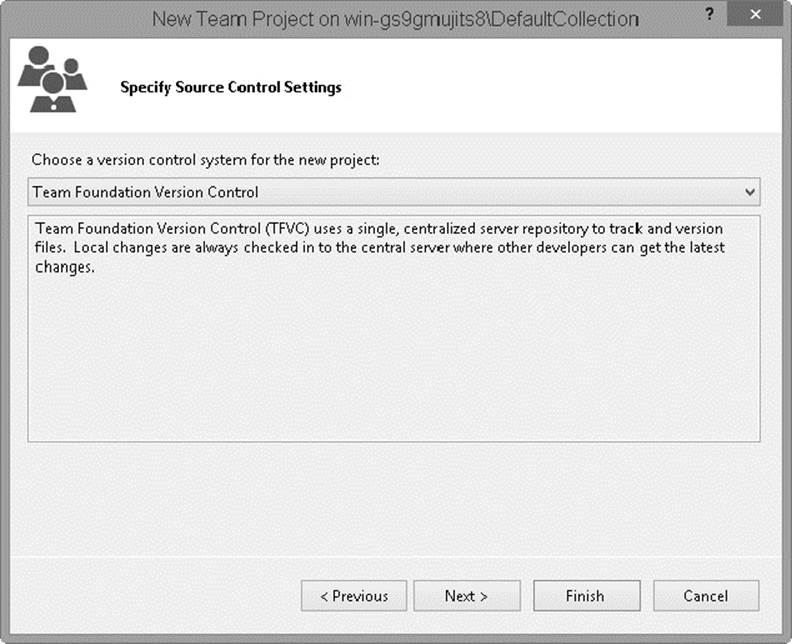
FIGURE 17-15
9. The final step of the wizard presents a brief summary of the Team Project’s settings, and a new Team Project will be defined according to the specified configurations. Creation status is indicated by a progress bar as setup scripts are executed. If all goes as expected, the wizard will display a Team Project Created dialog, as shown in Figure 17-16.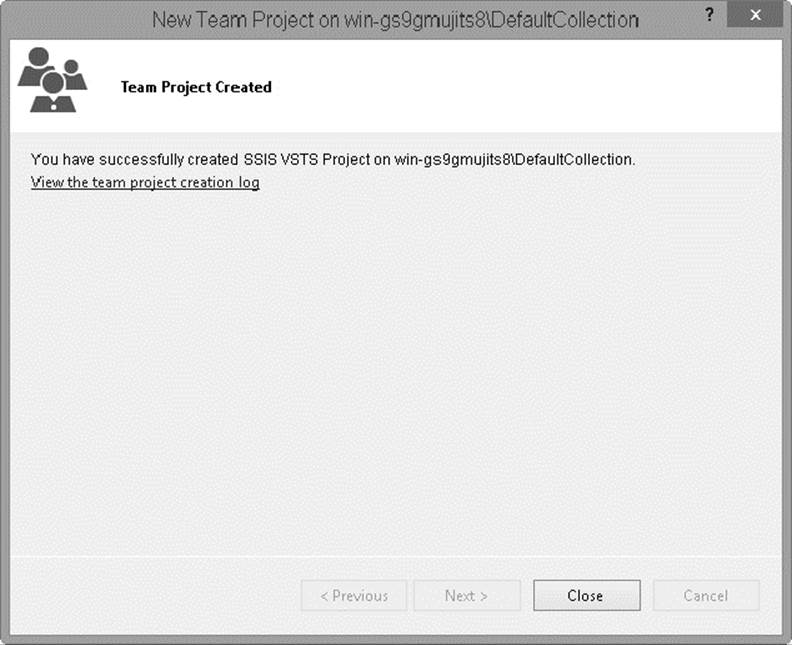
FIGURE 17-16
NOTE At this point, you have created a Team Project container for your SSIS projects. A Team Project is similar to a Visual Studio solution in that you can add several SSIS projects (or any other type of project) to it.
NOTE “Why create a Team Project?” you ask. The short answer is because the practice of database development is changing. Team development is becoming practical, even required, for DBAs in software shops of all sizes. It is no longer confined to the enterprise with dozens or hundreds of developers.
Team System provides a mechanism for DBAs to utilize team-based methodologies, perhaps for the first time. The Team Project is the heart of Team System’s framework for the database developer. Figure 17-17 shows the Visual Studio Team Project and all the containers of objects that can be created in the Team Project (such as Work Items, Documents, Reports, and Builds).
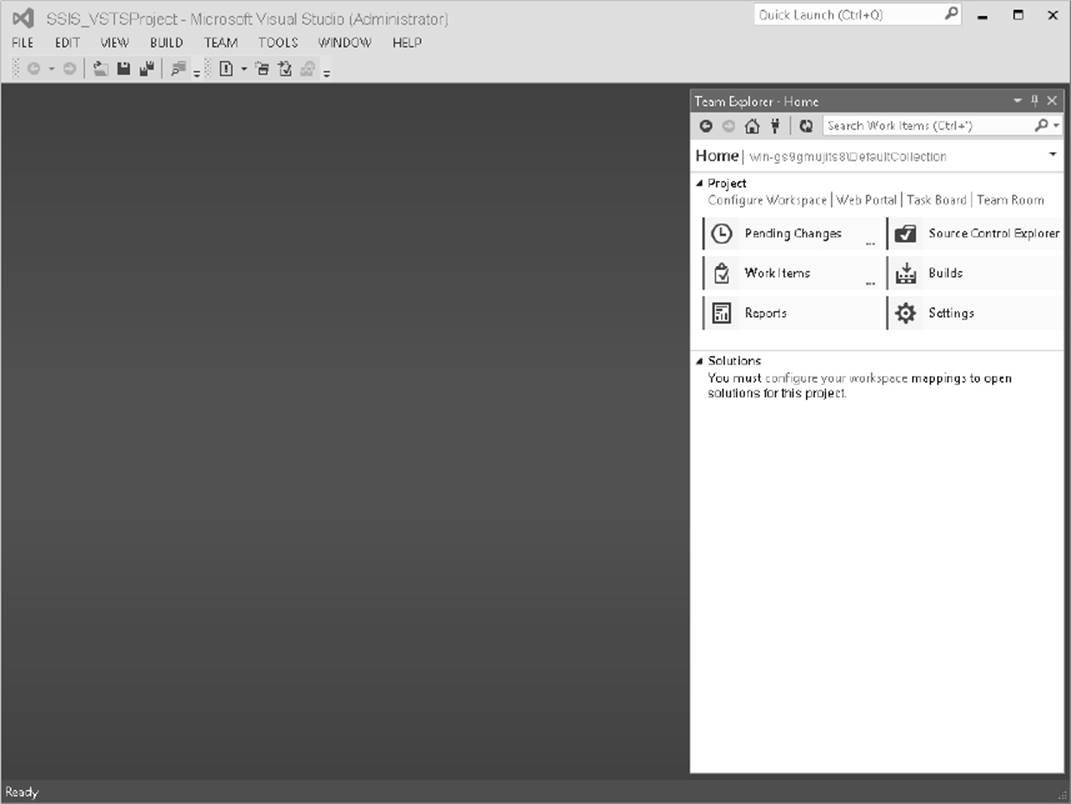
FIGURE 17-17
MSF Agile and SSIS
MSF Agile is an iterative methodology template included with Team System. In a typical agile software project, a time- and scope-limited project — called an iteration — is defined by collaboration with the customer. Deliverables are established, but they may be de-scoped in the interests of delivering a completed feature-set at the end of the iteration. An important aspect of agile iterations is that features slip, but timelines do not. In other words, if the team realizes that all features cannot be developed to completion during the time allotted, the time is not extended, and features that cannot be developed to completion are removed from the feature-set.
NOTE Agile methodologies are very suitable to SSIS and BI development projects because they allow more flexibility; changes can be readily adopted to provide an end solution that is suited to the user’s needs.
No one uses a single methodology alone. There are facets of waterfall thinking in any iterative project. In practice, your methodology is a function of the constraints of the development environment imposed by regulatory concerns, personal style, and results.
Once an MSF Agile Team Project hierarchy has been successfully created, the following subitems are available under the project in Team Explorer (refer to Figure 17-17):
· Work Items
· Documents
· Reports
· Team Builds
· Source Control
The next sections cover what’s available to you in each of these subitems.
Work Items
In MSF Agile projects, work items consist of tasks, bugs, scenarios, and Quality of Service (QoS) requirements.
· Bugs are self-explanatory — they are deficiencies or defects in the code or performance of the application.
· Scenarios map to requirements and are akin to use cases in practice.
· Quality of Service (QoS) requirements include acceptable performance under attack or stress. QoS includes scalability and security.
· Tasks are a catchall category for work items that includes features yet to be developed.
To create a work item, right-click the Work Item folder, select Add Work Item, and choose one of the work item types. Figure 17-18 shows the work item Bug template, which enables bugs to be tracked and handled for your SSIS project.
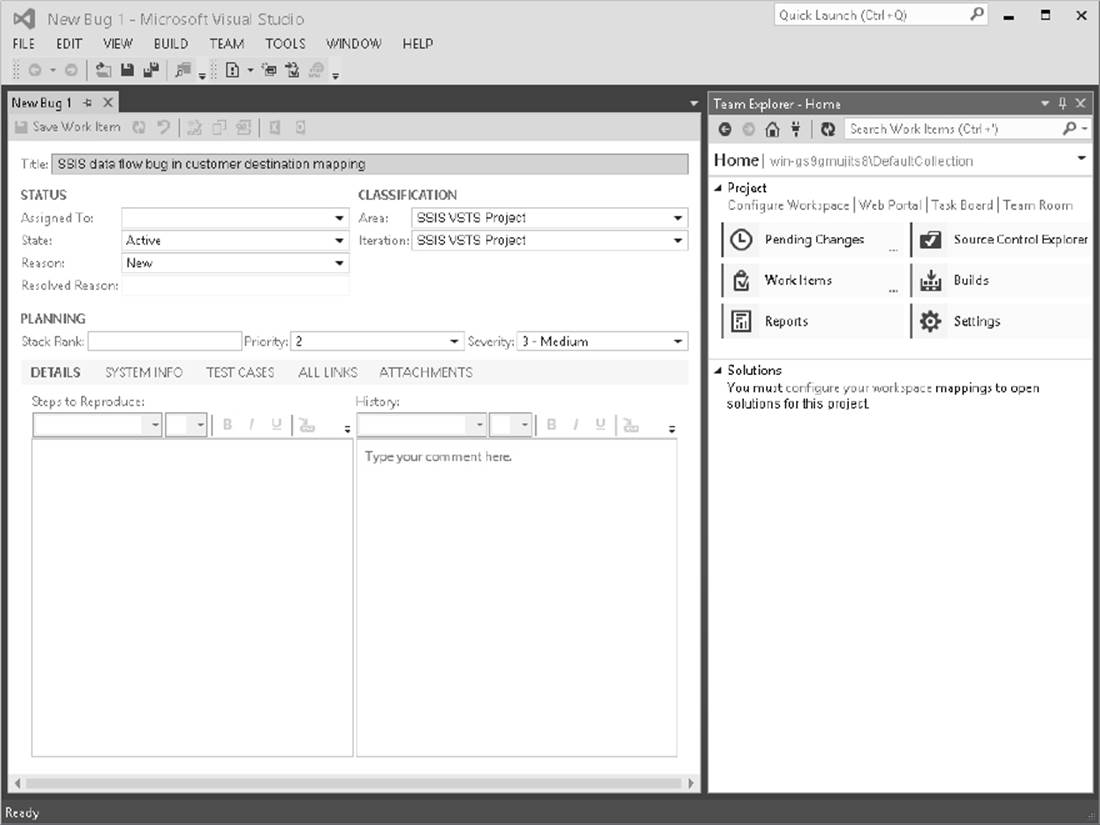
FIGURE 17-18
Documents
The MSF Agile template includes several document templates to get you started with project documentation. Included are the following:
· Development: Microsoft Project templates for development and testing efforts
· Process Guidance: An HTML document that describes the MSF Agile process
· Project Management: An Excel template containing a project “to do” list and an issues and triage spreadsheet
· Requirements: Listing requirements for validation scenarios and a Quality of Service (QoS) Requirements list
· Security: Document sample defining the security plan for functional areas in the solution
· Shared Documents: A repository for miscellaneous project documents
· Test: Test plans for unit and integration testing
Reports
The MSF Agile template contains several built-in Reporting Services project status reports. These reports are accessible directly from Reporting Services or from the Project Portal (SharePoint Portal Services) website.
The Reporting Services home page contains links to several reports grouped by report type, as shown in Figure 17-19.
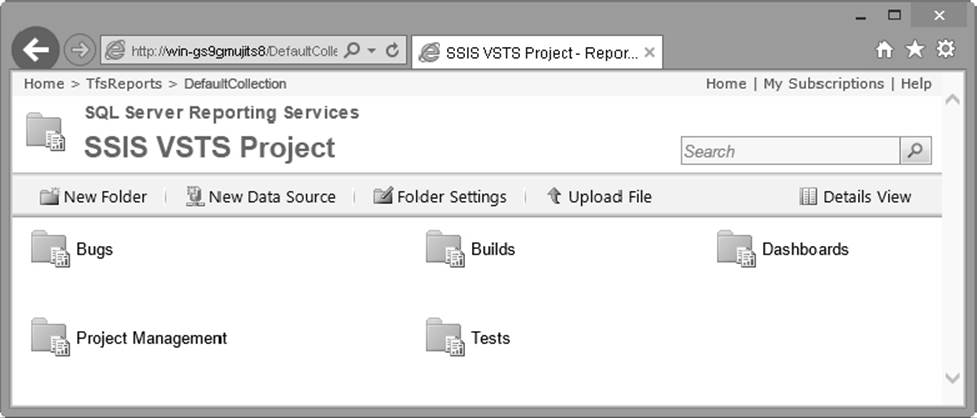
FIGURE 17-19
A few examples of valuable reports include:
· Capacity Chart with Work Assigned gives a snapshot of the capacity of the amount of work that can be performed given the current team and the development velocity.
· Burn Rate Chart shows the amount of work that can’t be performed given the number of hours left and the current trend of work velocity. This report shows hours completed, hours remaining, ideal trend, and actual trend.
· Remaining Work report shows the teams progress on a current iteration by highlighting the work completed versus the work remaining trended over time. The Remaining Work report is part of the larger reporting solution provided by the Project Portal (discussed later in this chapter).
Team Builds
A Team Build is the compilation of the code together to be used for deployment. For SSIS, this would be packages in your project that are deployed to the server. If you will be using the SSIS 2014 and deploying your packages to the SSIS Server, then you will be using the deployment functionality in Project Deployment Model in SSIS. This is covered in Chapter 22.
Source Control
Source control within Visual Studio Team System is very similar to the SVN functionality walked through earlier in the chapter. You are able to check items into the source control, revert to a prior version of a package, keep notes as to what was changed, and so on. The section “Version and Source Control with Team System” later in the chapter covers the VSTS source control features.
The Project Portal
The Project Portal is implemented in SharePoint Portal Services and contains several helpful portals, including the following:
· Announcements
· Shared documents and Wiki sites
· Reports (Bug Rates, Builds, and Quality Indicators)
The Project Portal provides a nice interface for the development team, but project managers are the target audience. The Project Portal can also serve to inform business stakeholders of project status. To navigate to the Project Portal home page, right-click the Team Project in Team Explorer and click Show Project Portal. Figure 17-20 shows an example of the Project Portal with one of the reports viewed.
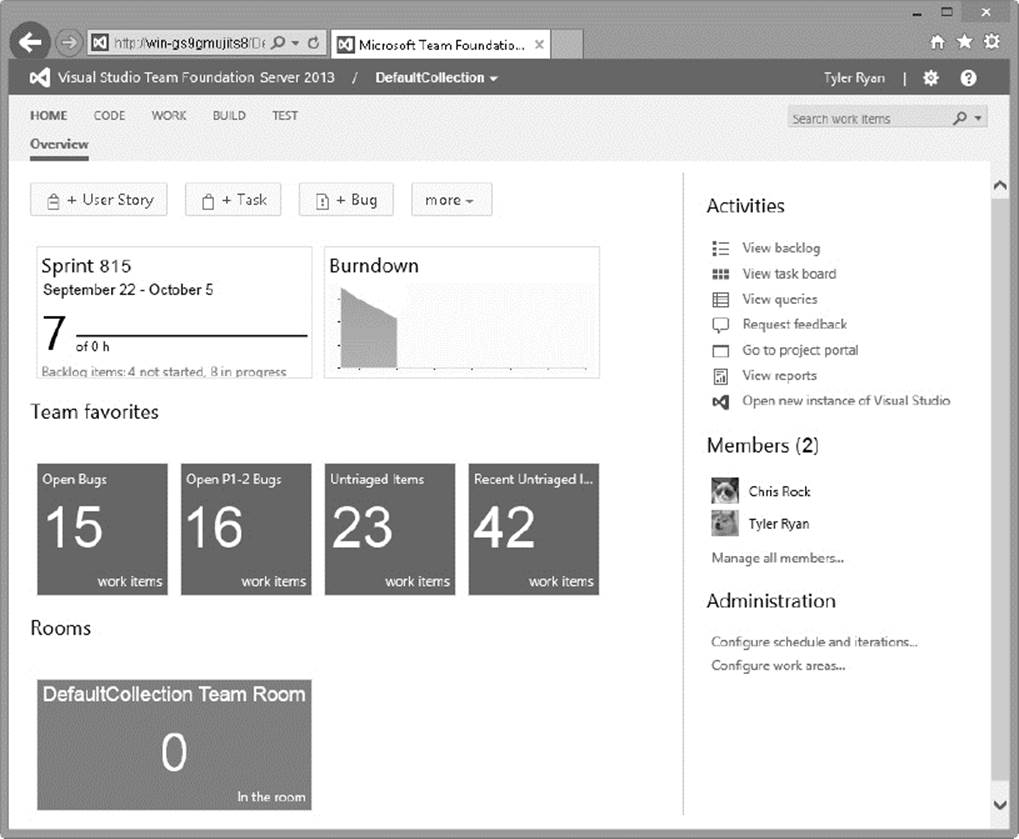
FIGURE 17-20
Putting Team System to Work
In this section, you’ll create a small SSIS package to demonstrate some fundamental Team System features.
1. Create a new SSIS project in SSDT by clicking File ⇒ New ⇒ Project. From the Project Types tree view, select Business Intelligence Projects. From the Templates list view, select Integration Services Project. Do not check the Add to Source Control checkbox. EnterSSIS VSTS Integration Example as the project name in the Name text box, as shown in Figure 17-21.
FIGURE 17-21
2. Click OK to create the new project. Drag a Data Flow Task onto the Control Flow workspace.
3. Right-click in the Connection Managers tab and select New OLE DB Connection to add a database connection. Click the New button to create a new OLE DB Connection.
4. Select your local server from the Server Name dropdown list. Configure the connection for Windows or SQL Server authentication. Select AdventureWorks as the database name. You can click the Test Connection button to test the connectivity configuration. Click OK to close the Connection Manager dialog, and OK again to continue.
5. Double-click the Data Flow Task to edit it. Drag an OLE DB source onto the Data Flow workspace. Double-click the OLE DB source to edit it.
6. In the OLE DB Source Editor window, select the AdventureWorks connection in the OLE DB Connection Manager dropdown list. Select Table or View in the Data Access Mode dropdown list. Select [Sales].[SalesOrderHeader] in the “Name of the table or the view” dropdown list. Click OK to continue.
7. Drag an Aggregate Transformation onto the Data Flow workspace. Connect the output of the OLE DB source to the Aggregate Transformation by dragging the blue arrow from the source to the transformation. From the Available Input Columns table, select OrderDate and SubTotal. In the grid below, ensure that the operation for OrderDate is Group by, and the operation for SubTotal is Sum, as shown in Figure 17-22.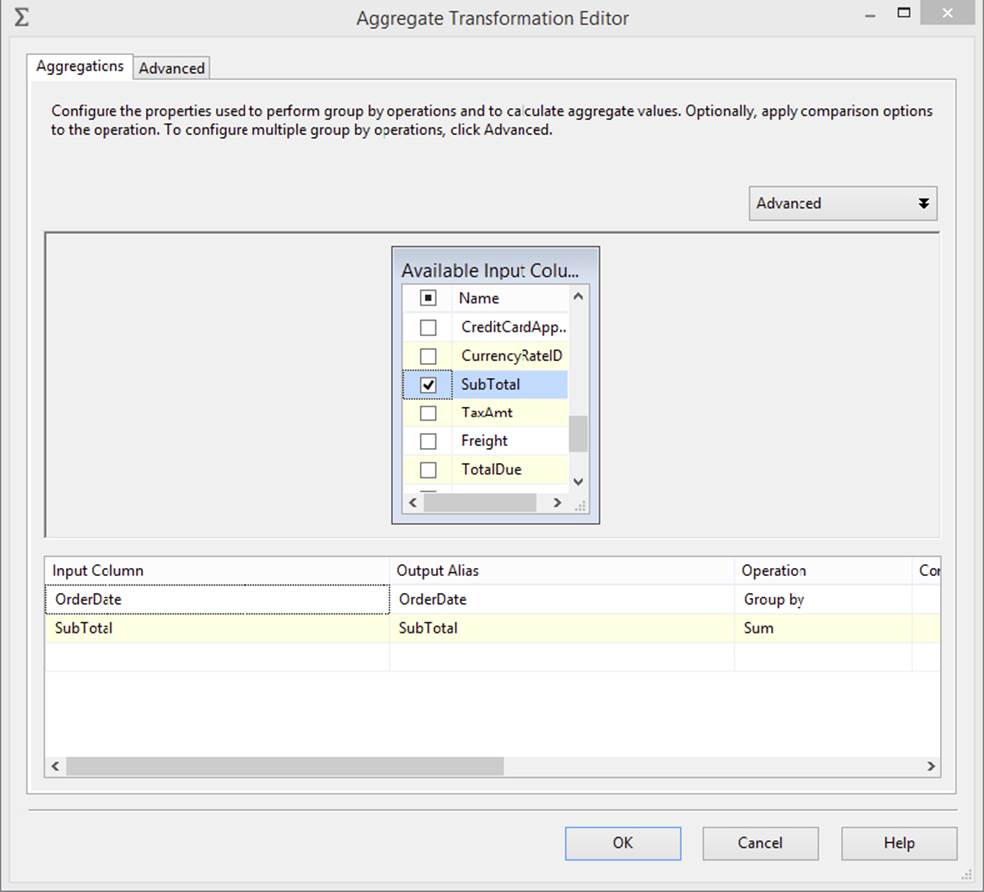
FIGURE 17-22
8. Click OK to close the Aggregate Transformation Editor.
9. Drag an Excel Destination onto the Data Flow workspace and connect the Aggregate output to it. Double-click the Excel Destination to open the Excel Destination Editor. Click the New button beside the OLE DB Connection Manager dropdown list to create a new Excel connection object. Enter c:\SSIS_output.xlsx in the Excel file path text box. Click OK to continue.
10.You can create an Excel spreadsheet in this step. If you enter the desired name of a spreadsheet that does not yet exist, the Excel Destination Editor will not be able to locate a worksheet name. In this case, the “No tables or views could be loaded” message will appear in the Name of Excel Worksheet dropdown list.
11.To create a worksheet, click the New button beside the Name of the Excel Sheet dropdown list. A Create Table dialog will appear. Click OK to accept the defaults and create the worksheet and Excel workbook.
12.Click Mappings in the Excel Destination Editor to configure column-to-data mappings. Accept the defaults by clicking OK.
13.Click File ⇒ Save All to save your work.
Now that you have created a simple SSIS package, you will use this package to test the Team System functionality with SSIS.
Version and Source Control with Team System
The objective in this section is to walk you through integrating your SSIS project and package with Team System source control and versioning functionality.
1. To add your SSIS project to the Team Project, open Solution Explorer, right-click the project, and click Add Project to Source Control.
2. The Add Solution SSIS VSTS Integration Example to Source Control dialog appears, containing a list of Team Projects. Select the SSIS VSTS Project you created earlier, as shown in Figure 17-23.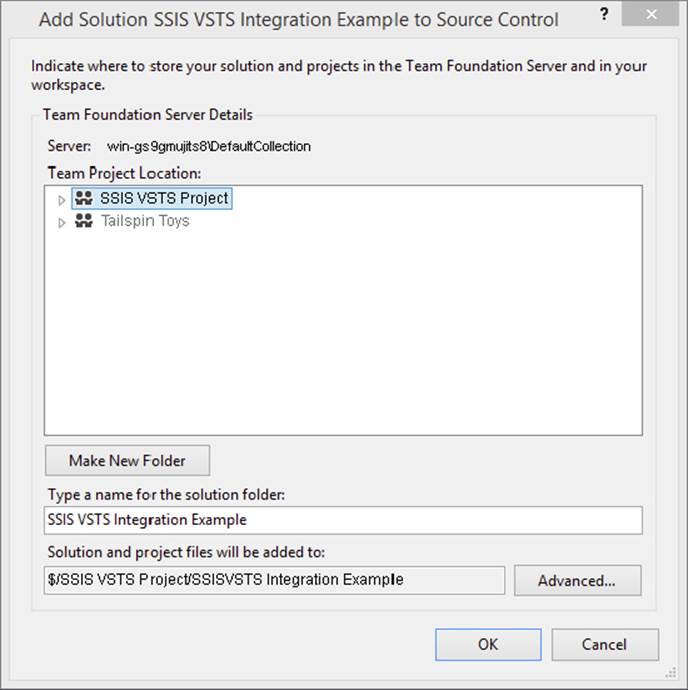
FIGURE 17-23
3. Click OK to continue. You have successfully created a Team Project and an SSIS project. The Team Project contains version control information — even now.
4. Click View ⇒ Other Windows ⇒ Pending Changes to view the current source control status for the SSIS project, as shown in Figure 17-24.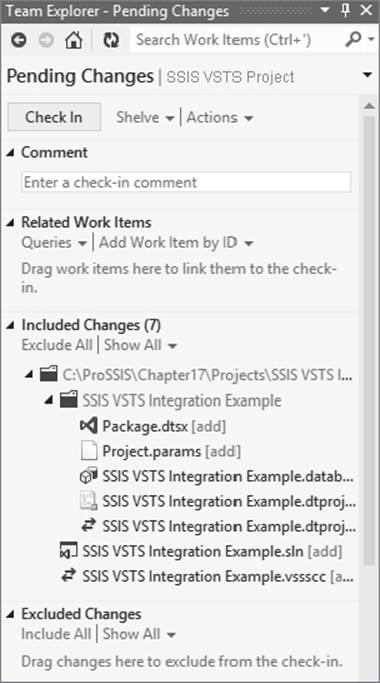
FIGURE 17-24
The Change column indicates that the files are currently in an Add status. This means the files are not yet source-controlled but are ready to be added to source control.
5. Click the Check In button to add the current SSIS VSTS Integration Example project to the SSIS VSTS Project’s source control. This clears the Pending Checkin list. Editing the SSIS VSTS Integration Example project will cause the affected files to reappear in the Pending Checkin list.
NOTE Any change made to the SSIS VSTS Integration Example project is now tracked against the source-controlled version maintained by the SSIS VSTS Project. Seemingly insignificant changes count: For instance, moving any item in the Data Flow workspace is considered an edit to the package item and is tracked.
The default behavior for source control in Visual Studio is that checked-in items are automatically checked out when edited.
6. You can view the current status of all Team Projects on your Team Foundation Server in the Source Control Explorer, as shown in Figure 17-25. To access the Source Control Explorer, double-click Source Control in the Team Explorer or click View ⇒ Other Windows ⇒ Source Control Explorer.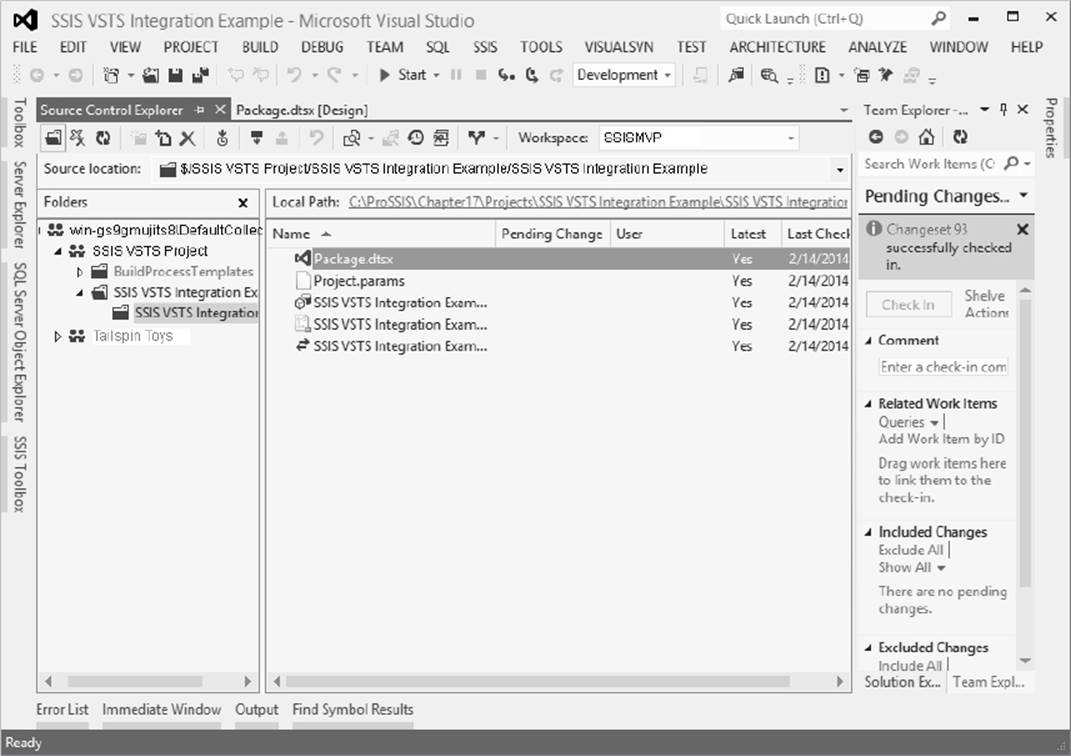
FIGURE 17-25
This next example implements a larger change to demonstrate practical source control management, before moving into some advanced source control functionality.
1. In your SSIS project, add an Execute SQL Task to the Control Flow workspace. Configure the task by setting the Connection Type to OLE DB, the Connection to your AdventureWorks connection, and the SQLSourceType to Direct input. Set the SQL Statement to the following:
2. 1. if not exists(select * from sysobjects where id = object_id('Log') and
3. ObjectProperty(id, 'IsUserTable') = 1)
4. begin
5. CREATE TABLE Log (
6. LogDateTime datetime NOT NULL,
7. LogLocation VarChar(50) NOT NULL,
8. LogEvent VarChar(50) NOT NULL,
9. LogDetails VarChar(1000) NULL,
10. LogCount Int NULL
11. ) ON [Primary]
12. ALTER TABLE Log ADD CONSTRAINT DF_Log_LogDateTime DEFAULT (getdate()) FOR
13. LogDateTime
14. end
15. INSERT INTO Log
16. (LogLocation, LogEvent, LogDetails, LogCount)
17. VALUES('SSISDemo', 'DataFlow', 'Completed','1st Run')
18.It is always a good practice to check your SQL before execution. Do so by clicking the Parse Query button, and correct the SQL if necessary. Then click OK to continue.
19.Connect the Data Flow Task to the Execute SQL Task by dragging the output (green arrow) of the Data Flow Task over to the Execute SQL Task.
20.Save your changes by clicking the Save button on the toolbar. You now have updated your SSIS project and saved the changes to disk, but you have not committed the changes to source control. You can verify this in the Pending Changes window by clicking View ⇒ Other Windows ⇒ Pending Changes.
21.The Change column indicates that Package.dtsx is in an Edit status. This means that changes to the existing source-controlled Package.dtsx file have been detected. Click the Check In button to publish your changes to source control.
Shelving and Unshelving
Shelving is a concept used in Microsoft source control technology since the release of VSTS. It enables you to preserve a snapshot of the current source state on the server for later retrieval and resumed development. You can also shelve code and pass it to another developer as part of a workload reassignment. In automated nightly build environments, shelving provides a means to preserve semi-complete code in a source control system without fully checking it into the build.
1. Shelving a package requires that you have a pending check-in. If no packages are pending a check-in, first make a change to the package such as moving the Data Flow Task. To shelve code, click the Shelve link at the top of the Pending Change panel. The Shelve dialog appears, as shown in Figure 17-26.
FIGURE 17-26
The “Preserve pending changes locally” checkbox enables you to choose between rolling back or keeping the edits since the last source code check-in. Checking the checkbox will keep the changes. Unchecking the checkbox will roll changes back to the last source-controlled version.
NOTE The rollback will effectively “undo” all changes — even changes saved to disk.
2. Leave the “Preserve pending changes locally” checkbox checked, provide a Shelveset name, and click Shelve to proceed.
The shelving process stores the code changes for later use, and you or other developers on your team can resume the development process from the point of the original code check-in before the modified version was shelved. At some point you may need to go back and unshelve the code. This can be handled with the following steps, but before unshelving, you need to have all pending code checked in.
1. To unshelve code, click the Actions link at the top of the Pending Changes dialog. Click the Find Shelvesets action. You should see the Shelveset you just created in the previous step.
2. Right-click on the shelveset and select Unshelve. This will unshelve the changes.
Note that an administrator or the user who created the shelving can now delete the shelved files after the code is checked back in.
Unshelving code with conflicts will roll the project back to its state at the time of shelving. For this reason, you may wish to consider shelving your current version of the code prior to unshelving a previous version.
If you are prompted to reload objects in your Visual Studio project, respond by clicking Yes or Yes to All. Your current version will be rolled back to the shelve set version.
Branching
The capability to branch code provides a mechanism to preserve the current state of a SSIS project and modify it in some fashion. Think of it as driving a stake in the ground of a project by marking the status of the current change set as “good.” In other words, you’ve come to a point where all the SSIS packages are working together and checked in and you want to be able to identify this point for stability and have the opportunity to branch the code for some new development or to test some new approaches without affecting the main code.
To branch, open Source Control Explorer by clicking View ⇒ Other Windows ⇒ Source Control Explorer. Right-click the project name you wish to branch and click Branching and Merging ⇒ Branch from the context menu, which brings up the Branch dialog shown in Figure 17-27. Select a name for the branched project and enter it into the To text box. Note the option to lock the new branch — thus preserving it indefinitely from accidental modification. You can further secure the branched code by including the option to not create local working copies for the new branch.
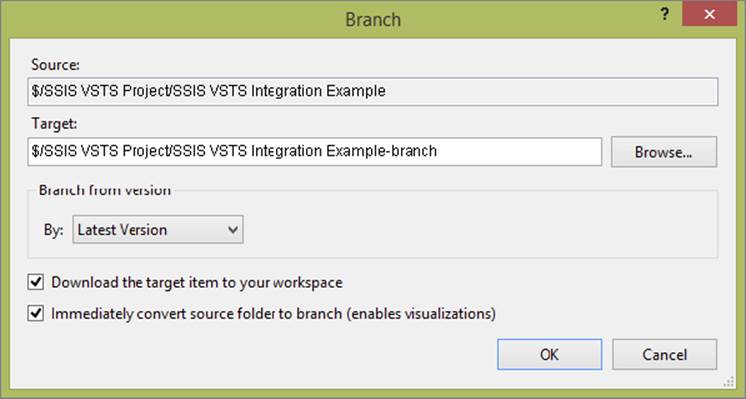
FIGURE 17-27
Merging
Merging is the inverse operation for branching. It involves recombining code that has been modified with a branch that has not been modified. A merge operation requires that the code has first been changed and checked-in. Follow these steps to merge two branches:
1. To merge projects, open Source Control Explorer. Right-click the name of the branched project containing the changes and click Branching and Merging ⇒ Merge.
2. The project you right-clicked in the previous step should appear in the Source Branch text box of the Version Control Merge Wizard. Select the Target branch (the branch containing no changes) from the Target Branch dropdown. Note the options to merge all or selected changes from the Source branch into the Target branch. Click Next to proceed.
3. The Source Control Merge Wizard enables users to select the version criteria during merge. The options are Latest Version (default), Workspace, Label, Date, and Change Set. Click Finish to proceed.
If the Version Control Merge Wizard encounters errors while attempting the merge, the Resolve Conflicts dialog is displayed. Click Auto-Merge All to attempt an automatic merge. Click Resolve to manually merge branches. When all conflicts have been resolved, the Resolve Conflicts dialog will reflect that.
NOTE Never merge the XML code within a package file from different versions. This could corrupt the file. Therefore, when merging projects, always merge the list of objects, not the files themselves.
Labeling (Striping) Source Versions
Labeling provides a means to mark (or “stripe”) a version of the code. Generally, labeling is the last step performed in a source-controlled version of code — marking the version as complete. Additional changes require a branch.
1. To label a version, open Source Control Explorer. Right-click the project and click Advanced ⇒ Apply Label. Enter a name for the Label and an optional comment. Click the Add button to select files or project(s) to be labeled. This will invoke the New Label dialog, as shown in Figure 17-28.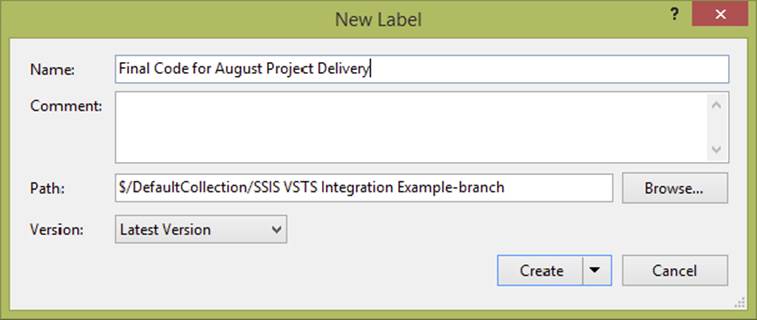
FIGURE 17-28
2. Click OK to complete labeling.
There has been much debate about when to shelve, branch, or label. To standardize your SSIS development process, use the following recommended advice:
· Shelve: Use when your code is not code complete. In other words, if your code isn’t ready for the nightly or weekly build, shelve it for now.
· Branch: Use when you need to add functionality and features to an application that can be considered complete in some form. Some shops will have you branch if the code can be successfully built; others insist on no branching unless the code can be labeled.
· Label: Use when you wish to mark a version of the application as “complete.” In practice, labels are the version, for instance, “1.2.0.2406.”
SUMMARY
Having worked through the several examples in this chapter, you should now have a clearer picture of software development life cycles and planning your ETL team development with SSIS. In addition to learning how to use Visual Studio to add SSIS projects to Subversion (SVN), you also learned how to do the following in Visual Studio Team System (VSTS):
· Create a Team Project in Team System
· Add an SSIS project to the Team Project
· Manage and report project status
· Manage SSIS packages with the VSTS source control functionality
You also looked at some common software development methodologies and saw how Team Foundation Server enables you to customize Team System to clearly reflect your methodology of choice.
Armed with these tools, you are now ready to begin down the path of code development. Whether you come from a DBA background and SDLCs are a new world or you come from a development background and you need to apply your SDLC experience to SSIS, this chapter should have helped you move forward to your next level of skill.
All materials on the site are licensed Creative Commons Attribution-Sharealike 3.0 Unported CC BY-SA 3.0 & GNU Free Documentation License (GFDL)
If you are the copyright holder of any material contained on our site and intend to remove it, please contact our site administrator for approval.
© 2016-2026 All site design rights belong to S.Y.A.