Professional Microsoft SQL Server 2014 Integration Services (Wrox Programmer to Programmer), 1st Edition (2014)
Chapter 2. The SSIS Tools
WHAT’S IN THIS CHAPTER?
· Working with the Import and Export Wizard
· Using the SQL Server Data Tools application
· Examining the windows used to create packages
· Utilizing Management Studio to administer your packages
As with any Microsoft product, SQL Server ships with a myriad of wizards and tools to make your life easier and reduce your time to market. In this chapter you will learn about some of the tools of the trade that are available to you and how to create your first basic package. These wizards make transporting data and deploying your packages much easier and can save you hours of work in the long run, but they’re only a starting point in most cases. In the first part of this chapter, you’ll look at the Import and Export Wizard, which enables you to create a package for importing or exporting data quickly with minimal transformations. As a matter of fact, you may run this tool in your day-to-day work without even knowing that SSIS is the back end for the wizard. The latter part of this chapter explores other, more powerful, tools that are available to you, such as SQL Server Data Tools (SSDT). By the time this chapter is complete, you will have created your first SSIS package.
IMPORT AND EXPORT WIZARD
The Import and Export Wizard is the easiest method to move data from sources like Oracle, DB2, SQL Server, Excel, and text files to nearly any destination, and it is available across all versions of SQL Server — even those that don’t include SSIS. This wizard uses SSIS as a framework and can optionally save a package as its output prior to executing. The package it produces may not be the most elegant, but it can eliminate a lot of tedious package development work and it provides the building blocks that are necessary for building the remainder of the package. Oftentimes as an SSIS developer, you’ll want to relegate the grunt work and heavy lifting to the wizard when you want to just move data for a onetime load, and then do the more complex coding yourself.
As with any of the SSIS tools, there are numerous ways to open the tool. To open the Import and Export Wizard, right-click the database you want to import data from or export data to in SQL Server Management Studio and select Tasks ⇒ Import Data (or Export Data based on what task you’re performing). You can also open the wizard by right-clicking the SSIS Packages folder in SSDT and selecting SSIS Import and Export Wizard. Another common way to open it is from the Start menu under SQL Server 2014, where it’s called Import and Export Data. The last way to open the wizard is by typing dtswizard.exe at the command line or Run prompt. Regardless of whether you need to import or export data, the first few screens in the wizard look very similar.
When the wizard appears, you’ll see the typical Microsoft wizard welcome screen. Click Next to begin specifying the source connection. If you had opened the wizard from Management Studio by selecting Export Data, this screen is pre-populated. In this screen you specify where your data is coming from in the Source dropdown box. Once you select the source, the rest of the options on the dialog may vary based on the type of connection. The default source is .Net Framework Data Provider for Odbc. Out of the box, you have ODBC and OLE DB sources that connect to SQL Server, Oracle, and Access. You can also use text files, Excel files, and XML files. Traditionally, the SQL Native Client is the provider used in SSIS because it gives additional functionality during design time. Change the data source to use the SQL Server Native Client 11.0 provider.
For SQL Server, you must enter the server name, as well as the user name and password you’d like to use. If you’re going to connect with your Windows account, simply select Use Windows Authentication. Windows Authentication will pass your Windows local or domain credentials into the data source. Lastly, choose a database to which you want to connect. For most of the examples in this book, you’ll use the AdventureWorksDW database or a variation of that DW database, shown in Figure 2-1. This database can be downloaded at www.wrox.com.
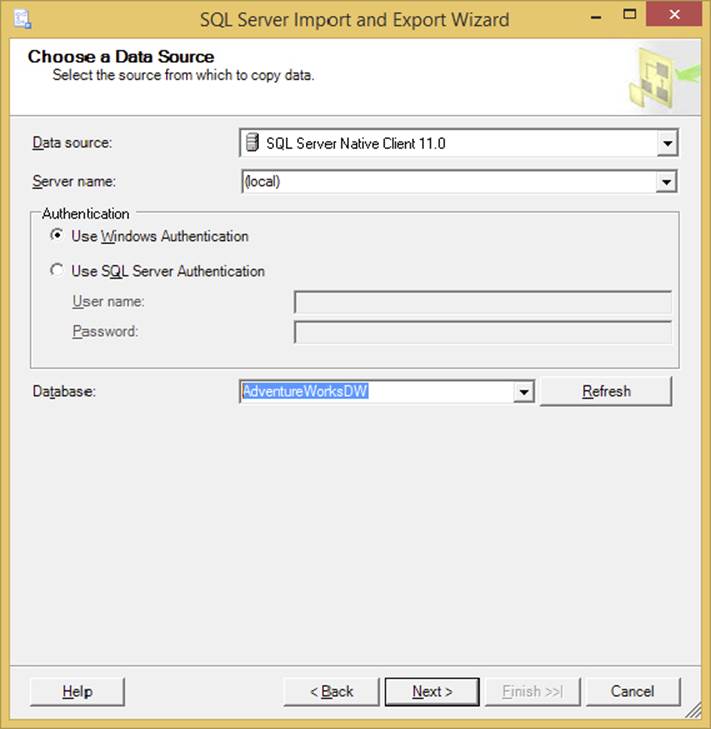
FIGURE 2-1
NOTE Additional sources such as Sybase and DB2 are also available if you install the vendor’s OLE DB providers. You can download the OLE DB provider for DB2 free if you’re using Enterprise Edition by going to the SQL Server Feature Pack on the Microsoft website. (As of this writing, the SQL Server 2014 Feature Pack has not be released. However, the SQL 2012 Feature Pack will work for 2014 as well.)
NOTE In 2011, Microsoft released information regarding the appropriate provider types to use for new development. It was recommended that any new development should be done with ODBC providers rather than OLE DB. This rule should only be followed for home grown applications for now. SSIS developers should continue using OLE DB because ODBC does not have full feature parity yet to complete some ordinary tasks.
After you click Next, you are taken to the next screen in the wizard, where you specify the destination for your data. The properties for this screen are identical to those for the previous screen with the exception of the database. Change the Destination provider to SQL Server Native Client 11.0, then select TempDB from the Database dropdown. This will create and load the tables into a temporary space, which will disappear once you restart your instance of SQL Server. Click Next again to be taken to the Specify Table Copy or Query screen (see Figure 2-2). Here, if you select “Copy data from one or more tables or views,” you can simply check the tables you want. If you select “Write a query to specify the data to transfer,” you can write an ad hoc query (after clicking Next) that defines where to select the data from, or what stored procedure to use to retrieve your data.
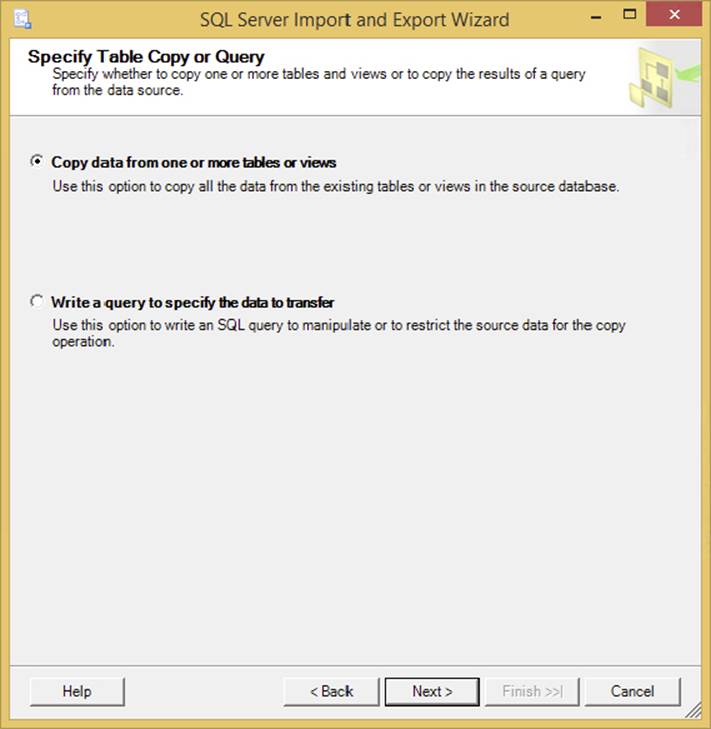
FIGURE 2-2
For the purpose of this example, select “Copy data from one or more tables or views” and click Next. This takes you to the Select Source Tables and Views screen, where you can check the tables or views that you want to transfer to the destination (see Figure 2-3). For this tutorial, check a couple of tables such as FactResellerSales and FactInternetSales in the AdventureWorksDW database.
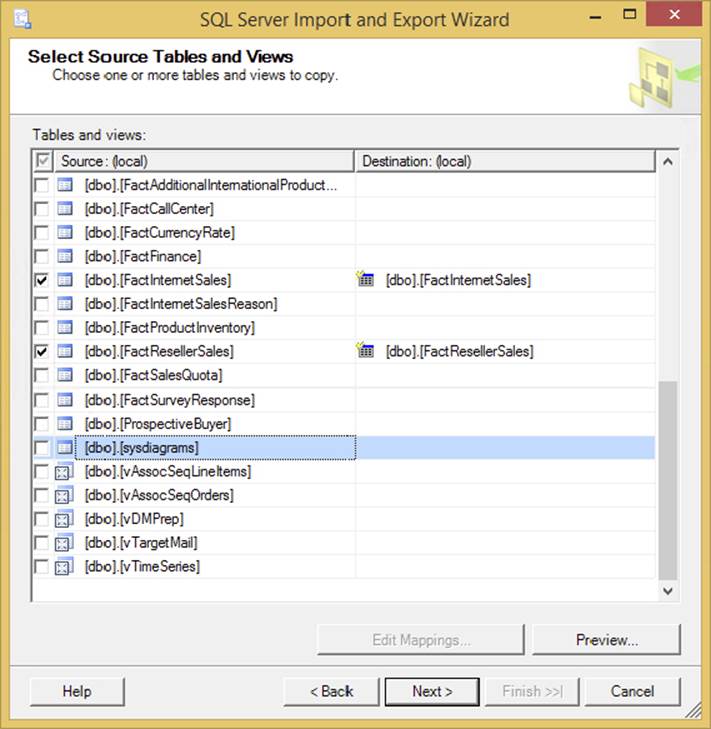
FIGURE 2-3
If you wish, you can click the Edit buttons to access the Column Mappings dialog for each table (see Figure 2-4). Here you can change the mapping between each source and destination column. For example, if you want the ProductKey column to go to the ProductKey2 column on the destination, simply select the Destination cell for the ProductKey column and point it to the new column, or select <ignore> to ignore the column altogether.
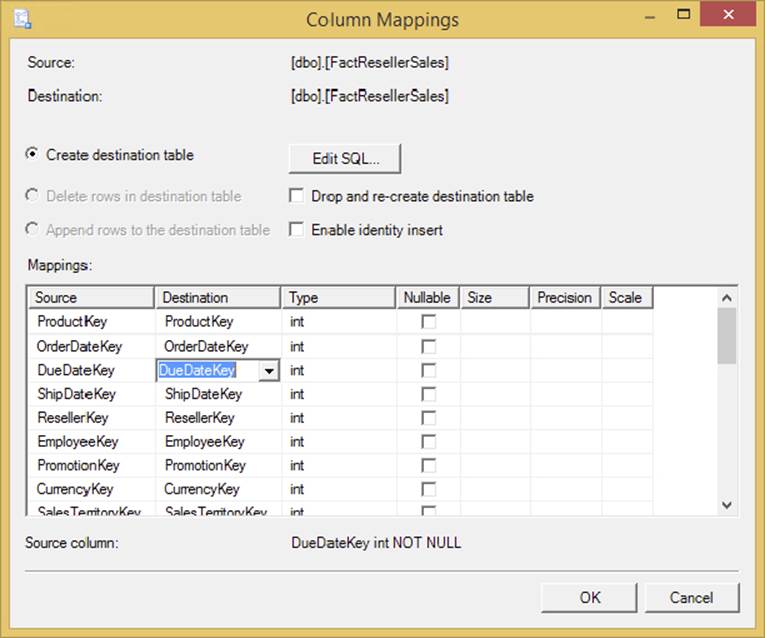
FIGURE 2-4
Note that because you’re moving the data to a new database that doesn’t already contain the FactInternetSales table, the “Create destination table” option is one of the few options enabled by default. This will create the table on the destination before populating it with data from the source. If the table already existed, the data will append existing records but you could specify that all rows in the destination table should be deleted before populating it.
Finally, you can check the “Enable identity insert” option if the table into which you are moving data has an identity column. If the table does have an identity column, the wizard automatically enables this option. If you don’t have the option enabled and you try to move data into an identity column, the wizard will fail to execute.
For the purpose of this example, don’t change any of the settings in this screen. Click OK to apply the settings from the Column Mappings dialog and then click Next to proceed.
If no errors are found, you are taken to the Save and Run Package screen (Figure 2-5). Here you can specify whether you want the package to execute only once, or whether you’d like to save the package for later use. As shown earlier, it isn’t necessary to execute the package here. You can uncheck Run Immediately and just save the package for later modification and execution. For this example, check the options for Run Immediately, Save SSIS Package, and File System. This collection of options will execute the package and save it as a .dtsx file to your computer. You learn more about where to save your SSIS packages later in this chapter. Note that if you save the package to SQL Server or to the file system, you’re saving the package with the Package Deployment Model. We’ll discuss more about the package deployment model in Chapter 22.
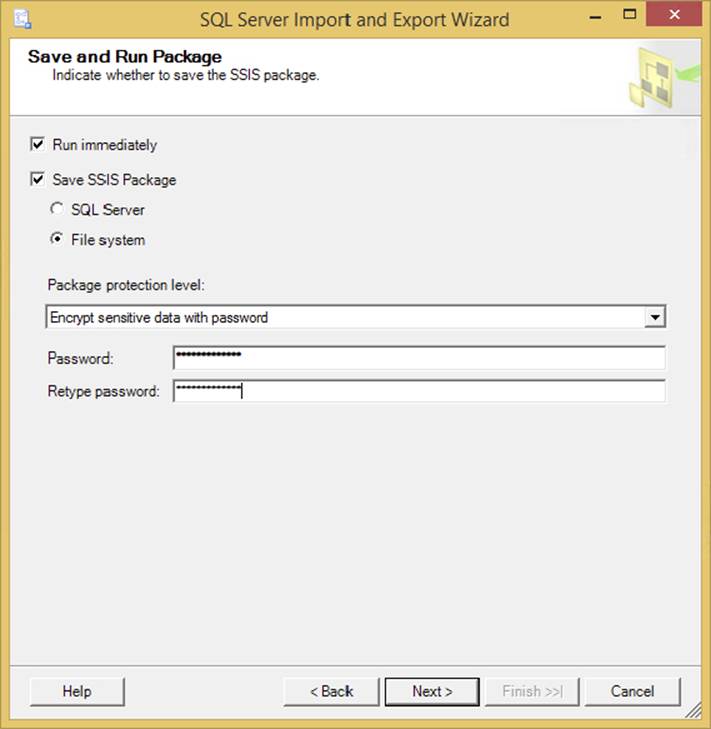
FIGURE 2-5
In this screen, you’re also asked how you wish to protect the sensitive data in your package. SSIS packages are essentially large XML files behind the scenes, and encryption of sensitive data, such as passwords, is critical to ensuring that no one sees that information by opening the XML manually. Again, you learn more about this later in this chapter, so for now just change the Package Protection Level property to “Encrypt sensitive data with password” to protect your sensitive data with a password, and give the dialog a password (as shown in Figure 2-5).
You are then taken to the Save SSIS Package screen, where you can type the name of the package and the location to which you want to save it (see Figure 2-6).
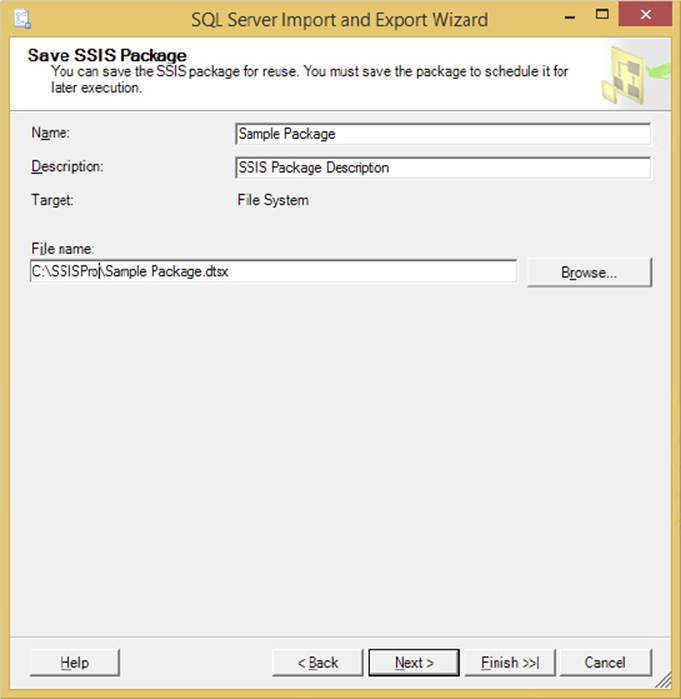
FIGURE 2-6
Click Next and confirm what tasks you wish the wizard to perform. The package will then execute when you click Finish, and you’ll see the page shown in Figure 2-7. Any errors are displayed in the Message column. You can also see how many rows were copied over in this column, and you can double-click an entry that failed to see why, in the event that there are errors during execution.
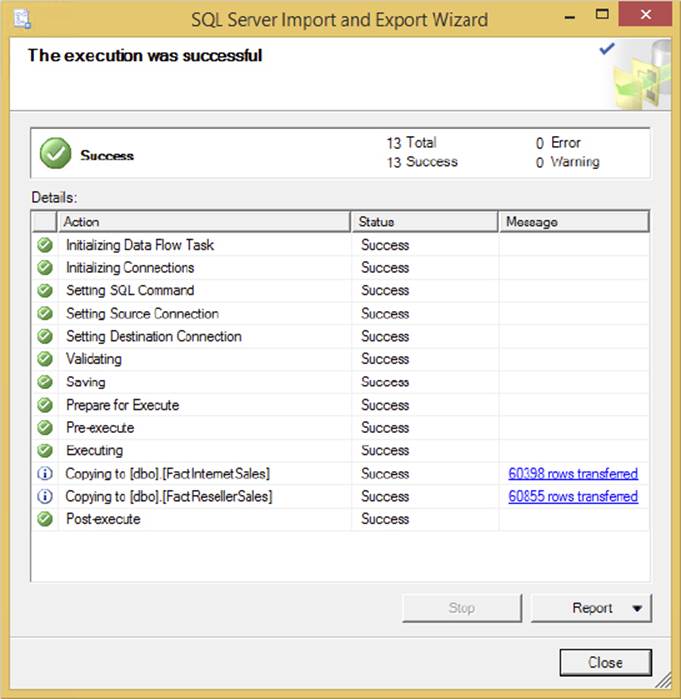
FIGURE 2-7
After the wizard executes, the package can be found in the location that you have specified, but the default is the My Documents directory. You can open the package that executed in SSDT by creating a project in SSDT and copying and pasting the package into the project or by right-clicking on Packages and selecting Add Existing Package.
SQL SERVER DATA TOOLS
The SQL Server Data Tools (SSDT) is where you’ll spend most of your time as an SSIS developer. It is where you create and deploy your SSIS projects. SSDT uses a subset of the full version of Visual Studio 2013. If you have the full version of Visual Studio 2013 and SQL Server 2014 installed, you can create business intelligence projects there as well as in the full interface, but as far as SSIS is concerned, there’s no added value in using the full version of Visual Studio. Either way, the user experience is the same. In SQL Server 2014, the SSIS development environment is detached from SQL Server, so you can develop your SSIS solution offline and then deploy it wherever you like in a single click.
In prior versions of Integration Services, SSDT was part of the SQL Server installation, but with the release of SQL Server 2014, SSDT has been decoupled from SQL Server installer. This means to develop new SSIS packages you must go download SSDT from the Microsoft download site. The benefit of this change is that developers will now see more frequent enhancements to the development environment. Use a search engine with the term “SQL Server Data Tools for Visual Studio 2013” to find the most recent release.
After you download and install SSDT you’ll find SSDT in the root of the Microsoft SQL Server 2014 program group from the Start menu. Once you start SSDT, you are taken to the Start Page, an example of which is shown in Figure 2-8, before you open or create your first project. You can open more windows (you learn about these various windows in a moment) by clicking their corresponding icon in the upper-right corner of SSDT or under the View menu. Please note that some of the screenshots in this book, such as Figures 2-8, 2-9, and 2-10, were shot using Visual Studio 2012, which also works with SQL Server 2014. You may also choose to use Visual Studio 2013 if you prefer, and the screenshot may be slightly different.
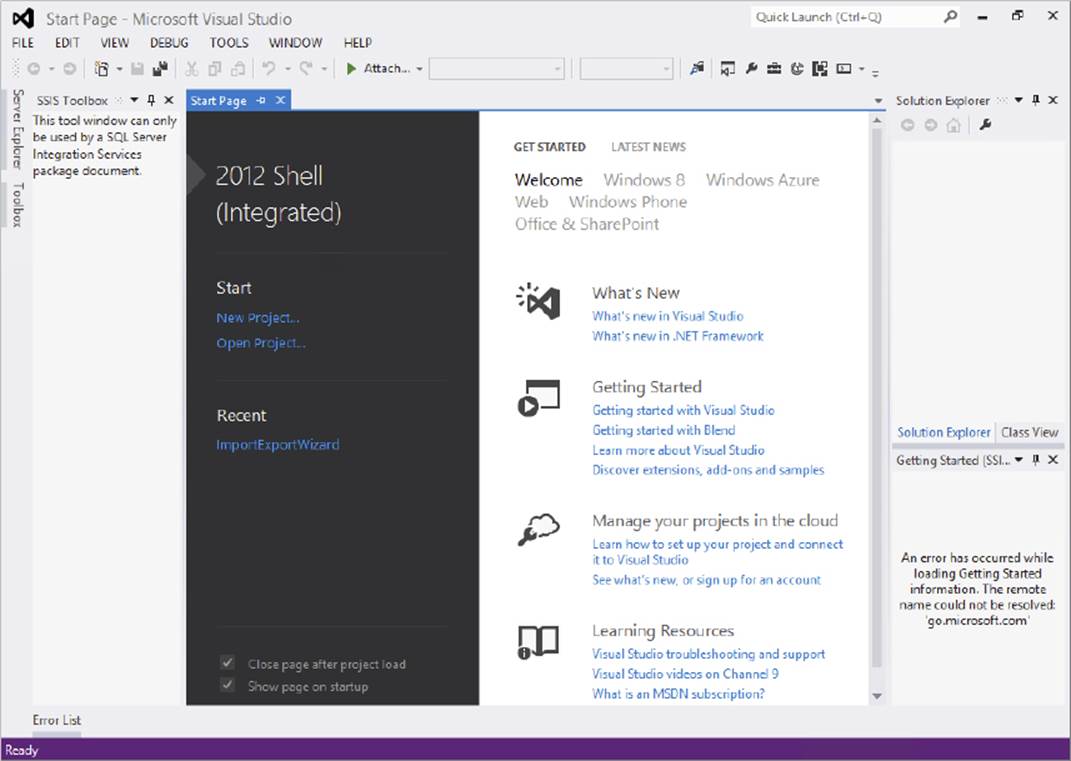
FIGURE 2-8
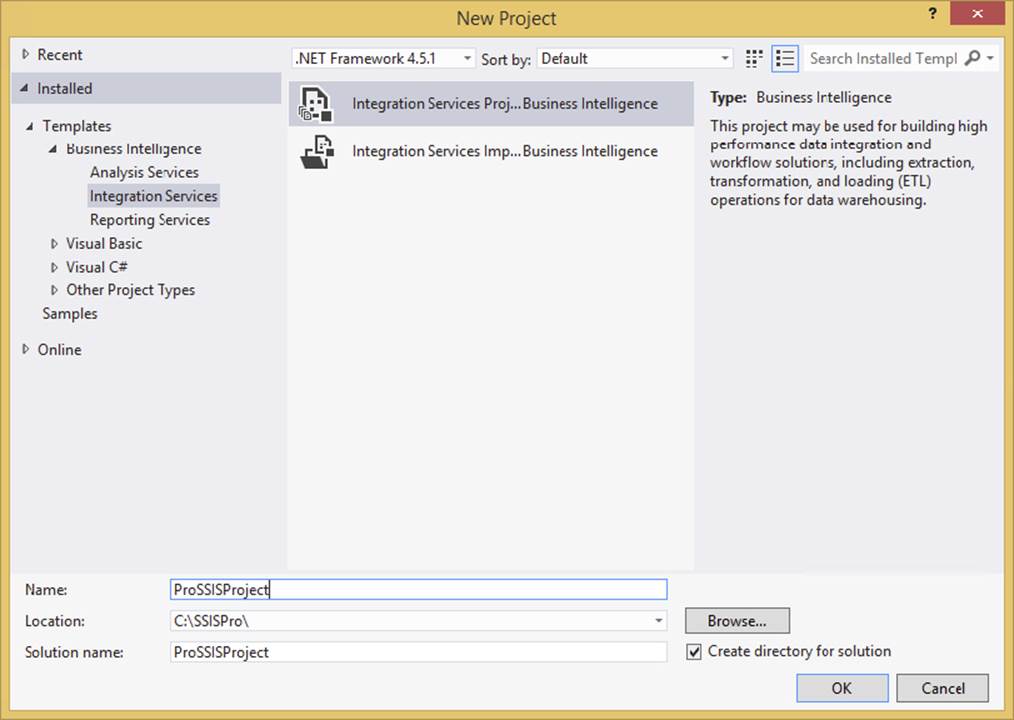
FIGURE 2-9
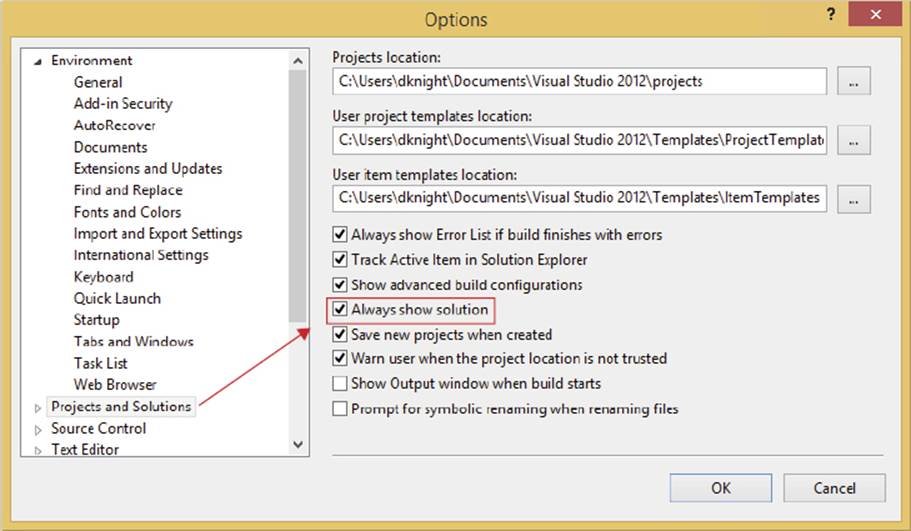
FIGURE 2-10
The Start Page contains key information about your SSDT environment, such as the last few projects that you had open (under the Recent Projects section). You can also see the latest MSDN news under the Get Started section from the Latest News box. By clicking the Latest News box, you can also set the RSS feed that you’re consuming as well.
The Visual Studio environment is that it gives you full access to the Visual Studio feature set, such as debugging, automatic integration with source code control systems, and integrated help. It is a familiar environment for developers and makes deployments easy.
The starting point for SSIS is to create a solution and project.
· A solution is a container in Visual Studio that holds one or many projects.
· A project in SSIS is a container of one or many packages and related files. You can also create projects for Analysis Services, Reporting Services, C#, and so on. All of these projects can be bundled together with a single solution, so a C# developer is in the same environment as an SSIS developer. Make sure you put packages that belong together into a single project since the project is the unit of deployment in SQL Server 2014.
To start a new SSIS project, you first need to open SSDT and select File ⇒ New ⇒ Project. Note a series of new templates (shown in Figure 2-9) in your template list now that you’ve installed SSDT for Visual Studio 2013. From the Installed Templates pane on the left, select Integration Services and then select Integration Services Project. Name your project and solution whatever you like (I named the solution ProSSISSolution and the project ProSSISProject). Also shown in Figure 2-9 is another type of SSIS project called the Integration Services Import Project Wizard, which is used to bring packages into a project from another deployed project. Click OK at this point to create the solution, the project, and your first package.
Typically, you want to align your projects into solutions that fit the business requirement that you’re trying to meet. For example, you may be assigned to a business project for the creation of a data warehouse. That warehouse project would probably have ETL, an SSAS cube, and Reporting Services reports. You could place all of these into a single solution so you could manage them from a unified interface. Note that once you begin work in Visual Studio, if your solution contains only a single project, the solution will be hidden by default. If you want to always see the solution name, go to Tools ⇒ Options and check Always Show Solution from the Projects and Solutions group (shown in Figure 2-10). If you’re doing any type of source control, this option should always be turned on so you can check in the solution easily. Otherwise, once a second project is added to the solution, you’ll see the solution and both projects under the solution.
THE SOLUTION EXPLORER WINDOW
The Solution Explorer window is where you can find all your created SSIS packages, project connection managers, project parameters, and any other miscellaneous files needed for the project, such as installation documents. As mentioned earlier, a solution is a container that holds a series of projects. Each project holds a myriad of objects for whatever type of project you’re working on. Once you create a solution, you can store many projects inside of it. For example, you may have a solution that has your VB.NET application and all the SSIS packages that support that application. In this case, you would have two projects: one for VB and another for SSIS contained within the single solution.
After creating a new project, your Solution Explorer window will contain a series of empty folders. Figure 2-11 shows a partially filled Solution Explorer. In this screenshot, there’s a solution named ProSSISSolution with two projects: SSASProject and ProSSISProject. Inside that project are two SSIS packages.
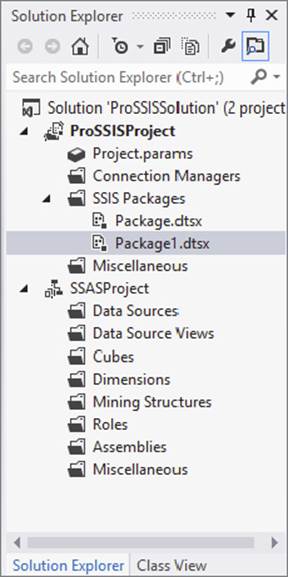
FIGURE 2-11
To create a new project inside an existing open solution, right-click the solution name in the Solution Explorer window and select Add ⇒ New Project. To add a new item to your project in the folder, right-click the folder that holds the type of item that you wish to add and select New Connection Manager or New SSIS Package. You can also drag or copy and paste files into the project if they are of a similar type, like .dtsx files.
If you look in the directory that contains your solution and project files, you’ll see all the files that are represented in the Solution Explorer window. Some of the base files you may see will have the following extensions:
· .dtsx: An SSIS package, which uses its legacy extension from the early beta cycles of SQL Server 2005 when SSIS was still called DTS
· .conmgr: A connection manager that can be shared across any package in the entire project
· .sln: A solution file that contains one or more projects
· .dtproj: An SSIS project file
· .params: An SSIS project parameter file
If you copy any file that does not match the .params, .conmgr, or .dtsx extension, it will be placed in the Miscellaneous folder. This folder is used to hold any files that describe the installation of the package, such as Word documents or requirements documents. You can put anything you like in that folder, and it can potentially all be checked into a source control system like Team Foundation Server (TFS) or SourceSafe with the code. You’ll learn more about source control systems in Chapter 17.
The SSIS Toolbox
The SSIS Toolbox contains all the items that you can use in the particular tab’s design pane at any given point in time. For example, the Control Flow tab has a list of tasks (a partial list is shown in Figure 2-12). This list may grow depending on what custom tasks are installed, and the list will be completely different when you’re in a different tab, such as the Data Flow tab. All the tasks shown in Figure 2-12 are covered in Chapter 3 in much more detail.
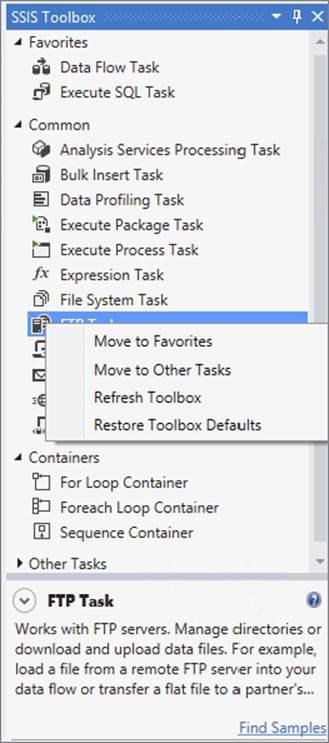
FIGURE 2-12
In the Control Flow tab, the Toolbox is organized into tabs such as Favorites, Common, Containers, and Other Tasks. These tabs can be collapsed and expanded for usability. As you use the Toolbox, you may want to customize your view by removing tasks or tabs from the default view. You can move or customize the list of items in your Toolbox by right-clicking on a given component (refer to Figure 2-12). You can also reset the entire Toolbox to its defaults by right-clicking and selecting Restore Toolbox Defaults. As you install third-party components, those tasks will now automatically appear in the Toolbox after you refresh the Toolbox or when you reopen SSDT.
The Properties Windows
You can use the Properties window (shown in Figure 2-13) to customize any item that you have selected in the Control Flow or Data Flow tabs. For example, if you select a task in the design pane of those tabs, you’ll be shown a list of properties to configure, such as the task’s name and what query it’s going to use. The view varies widely based on what item you have selected. Figure 2-13 shows the properties of the Execute Process task you created earlier in this chapter.

FIGURE 2-13
Most tasks can be configured through the user interface of the tasks or by going to the Properties pane when the task is selected. Note that the Properties pane may contain some advanced properties not shown in the user interface for the component. To edit the properties for the package, simply select the design pane in the background. If the Properties pane is closed, you can press F4 to reopen it or select the Properties Window button under View.
THE SSIS PACKAGE DESIGNER
The SSIS Package Designer contains the design panes that you use to create an SSIS package. This tool contains all the items you need to move data or create a workflow with minimal or no code. The great thing about SSIS is that it is like programming with building blocks. The Package Designer contains five tabs: Control Flow, Data Flow, Parameters, Event Handlers, and Package Explorer. One additional tab, Progress, also appears when you execute packages. This Progress tab is renamed to Execution Results after the package stops running and you click Stop.
This chapter focuses on exploring the Control Flow tab, and the bulk of the next chapter dives into details about this tab. In SSIS, the Control Flow contains tasks and the workflow of the package and is separated from most of the movement of data in the Data Flow tab. This usability feature gives you greater control when creating and editing packages. The task that binds the Control Flow and Data Flow together is the Data Flow Task, which you study in depth over the next two chapters.
Understanding the difference between the Control Flow and Data Flow tabs represents one of the largest learning curves for a new SSIS developer. The easiest way to keep them straight is to think of the Data Flow tab as simply a way to configure the Data Flow Task. This separation gives you a huge amount of power when configuring the task. The other way to differentiate the two tabs is that the Control Flow tab handles the workflow of the package and ties the tasks together, whereas the Data Flow tab handles a data load.
Control Flow
The Control Flow contains the workflow parts of the package, which include the tasks, containers, and precedence constraints. SSIS has introduced the new concept of containers, which was briefly discussed in Chapter 1 and is covered in detail in Chapter 6. In the Control Flow tab, you can click and drag a task from the SSIS Toolbox into the Control Flow design pane. Once you have a task created, you can double-click the task to configure it. Until the task is configured, you may see a yellow warning or red error indicator on the task.
After you configure the task, you can link it to other tasks by using precedence constraints. Once you click the task, you’ll notice a green arrow pointing down from it, as shown in Figure 2-14.
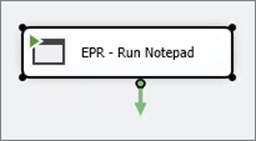
FIGURE 2-14
For example, to create an On Success precedence constraint, click the green arrow coming out of the task and drag it to the task you wish to link to the first task. In Figure 2-15, you can see the On Success precedence constraint between an Execute Process task called EPR - Run Notepad and an Execute Process task called EPR - Run Calc.
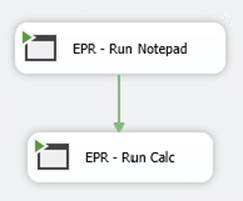
FIGURE 2-15
In the Data Flow tab, when you click a source or a transformation, you’ll also see a blue and red arrow pointing down, enabling you to quickly direct your good (blue) or bad (red) data to a separate output. Therefore, if you run a formula that returns an error in the Data Flow, that single row could be outputted to a different table, and then all other rows could continue down the proper path.
In the Control Flow, though, you need to use a different approach. If you want the next task to execute only if the first task has failed, create a precedence constraint as shown earlier for the On Success constraint. After the constraint is created, double-click the constraint arrow. You’ll be taken to the Precedence Constraint Editor (see Figure 2-16).
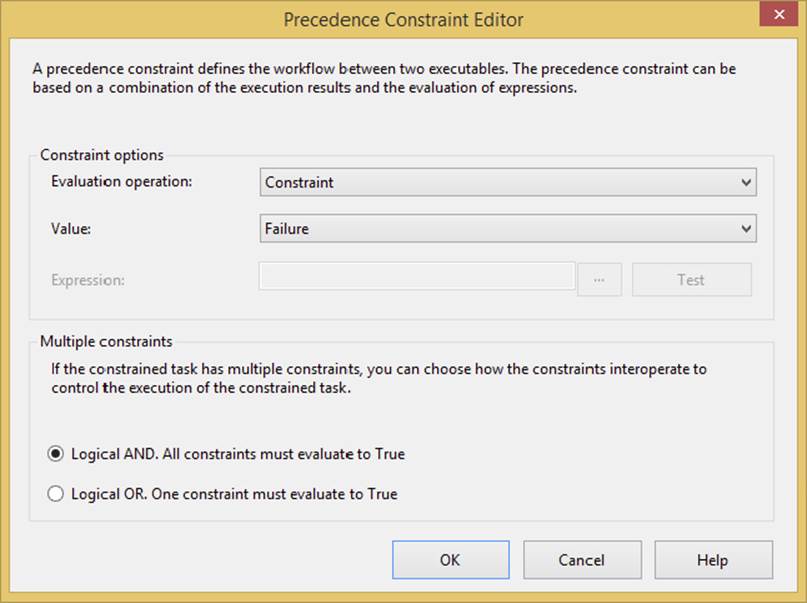
FIGURE 2-16
Use this editor to set what type of constraint you’ll be using. Three options are available in the Value dropdown field: Success, Failure, or Completion. A success constraint will fire the second task or container only when the first task or container succeeds. A failure constraint executes the second task or container only when the first task fails. The last scenario is a completion constraint, which will execute the second task or container whether the first task succeeds or fails.
In SSIS, you have the option to add a logical AND or OR when a task has multiple constraints. In the Precedence Constraint Editor in SSIS, you can configure the task to execute only if the group of predecessor tasks has completed (AND), or if any one of the predecessor tasks has completed (OR).
If a constraint is a logical AND, the precedence constraint line is solid. If it is set to OR, the line is dotted. This is useful if you want to be notified when any one of the tasks fails by using the logical OR constraint.
In the Evaluation Operation dropdown, you can edit how the task will be evaluated:
· Constraint: Evaluates the success, failure, or completion of the predecessor task or tasks
· Expression: Evaluates the success of a customized condition that is programmed using an expression
· Expression and Constraint: Evaluates both the expression and the constraint before moving to the next task
· Expression or Constraint: Determines whether either the expression or the constraint has been successfully met before moving to the next task
If you select Expression or one of its variants as your option, you’ll be able to type an expression in the Expression box. An expression is usually used to evaluate a variable before proceeding to the next task. For example, if you want to ensure that InputFileVariablevariable is equal to the Variable2 variable, you would use the following syntax in the Expression box:
@InputFileVariable == @Variable2
You can also single-click the constraint and use the Properties window on the right to set these properties, if you prefer not to use the editor.
Now that you know more about constraints, it’s a good time to look at a scenario and how the constraints apply to your environment. The example shown in Figure 2-17 demonstrates how flexible precedence constraints can be. The first Script Task runs a script to determine whether the file exists. An expression on the precedence constraint coming out of the Script Task determines whether the answer returned from the script is set to true or false. If the file exists, then Task A is run; otherwise, Task B is run. After that, note that regardless of whether Task A or B is run, the Archive Script Task always runs because of the Logical Or constraint. Finally, if the Sequence Container succeeds, then Task C is run, and if it does not, then the Alert Script Task is run.
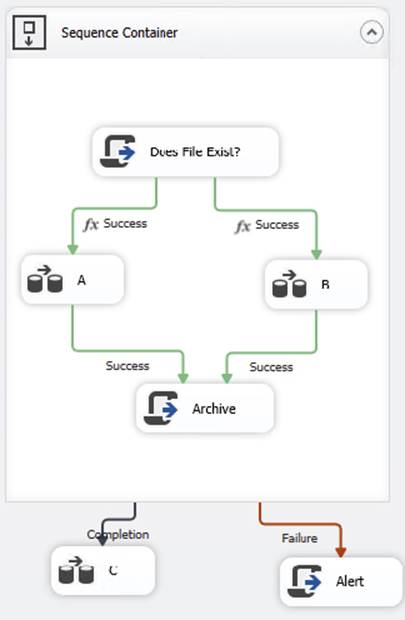
FIGURE 2-17
You may have noticed that in Figure 2-17, I added the names of the precedence constraints (success, failure, completion) to each of the arrows. This may be necessary for those who are color-blind (and is required for this book because it’s printed in black and white). To do this in SSDT, select Tools ⇒ Options, and then check “Show precedence constraint labels” under the Business Intelligence Designers ⇒ Integration Services Designers tab, as shown in Figure 2-18.
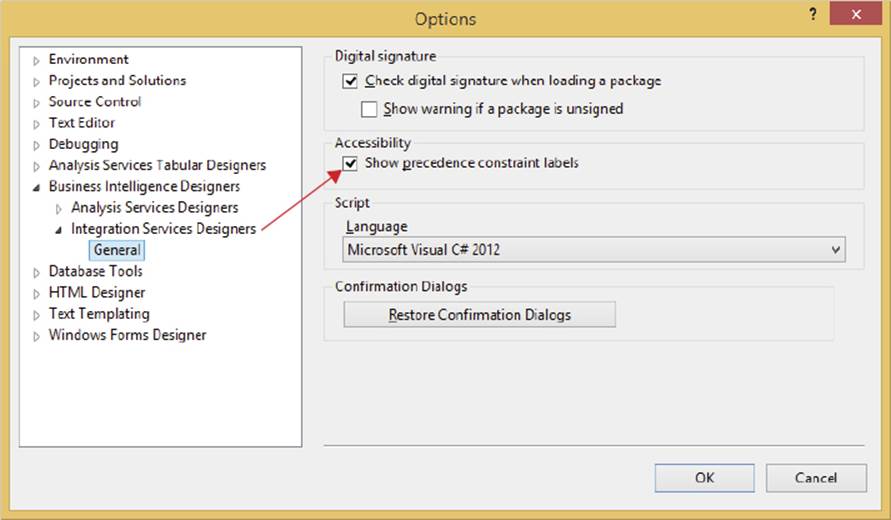
FIGURE 2-18
Task Grouping
A very nice usability feature in SSIS is the capability to group tasks or transforms logically in containers. For example, if you have a group of tasks that create and purge the staging environment, you can group them together so that your package is not cluttered visually. For example, in Figure 2-19 there are two tasks to load data and send a message. To group them, select both tasks by clicking one task and holding the Ctrl key down while you select the second task. Then, right-click the tasks and select Group.
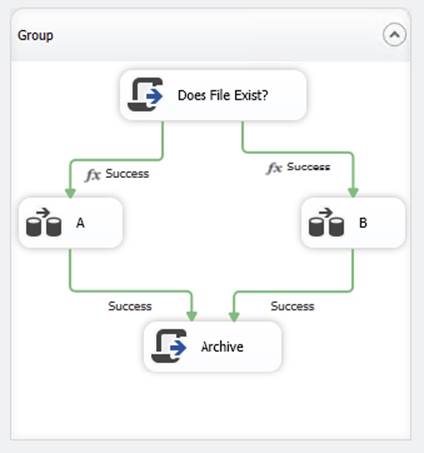
FIGURE 2-19
NOTE Groups and containers are not the same. Groups are a usability feature to bring together components. Containers on the other hand allow you to pass properties into them. You can read more about groups, containers, and their differences in Chapter 6.
After you have the two tasks grouped, you’ll see a box container around them. A group is not the same as a container. It only gives you a usability feature to bring tasks together. They don’t share properties like transactions. To rename the group, simply double-click the container and type the new name over the old one. You can also collapse the group so that your package isn’t cluttered. To do this, just click the arrows that are pointing downward in the group. Once collapsed, your grouping will look like Figure 2-20. You can also ungroup the tasks by right-clicking the group and selecting Ungroup.

FIGURE 2-20
This same type of group can be created in the Data Flow tab to logically group sources, transformations, and destinations together. You’ll learn more about containers in Chapter 6.
Annotation
Annotations are a key part of any package, and a good developer won’t fail to include them. An annotation is a comment that you place in your package to help others and yourself understand what is happening in the package. To add an annotation, right-click where you want to place the comment, select Add Annotation, and begin typing. You can resize the box if you need more room. It is a good idea to always add an annotation to your package that shows the title and version of your package. Most SSIS developers also add a version history annotation note to the package, so that they can see what has changed in the package between releases and who performed the change. You can see an example of this in Figure 2-21.
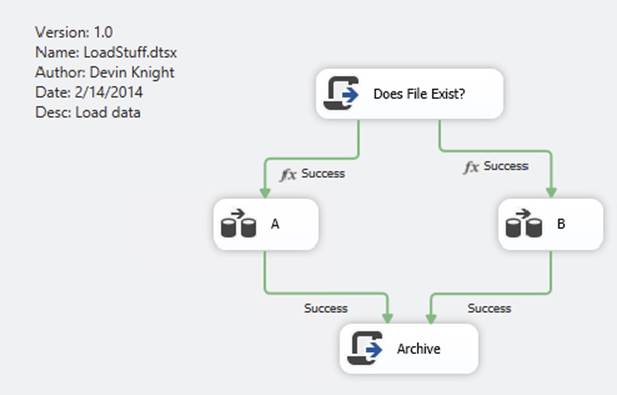
FIGURE 2-21
Connection Managers
You may have already noticed the Connection Managers tab at the bottom of your Package Designer pane. This tab contains a list of connections that both Control Flow and Data Flow Tasks can use. Whether the connection is an FTP address or a connection to an Analysis Services server, you’ll see a reference to it here. These connections can be referenced as either sources or targets in any of the operations, and they can connect to relational or Analysis Services databases, flat files, or other data sources. They’re also used in many of the SSIS tasks.
When you create a new package, no connections are defined. You can create a connection by right-clicking in the Connections area and choosing the appropriate data connection type. Once the connection is created, you can rename it to fit your naming conventions or to better describe what is contained in the connection. Nearly any task or transformation that uses data or references a file will require a Connection Manager. Figure 2-22 shows a few connections: two to relational databases (AdventureWorksDW and Stage), an SMTP reference, and a directory.

FIGURE 2-22
Notice the two Connection Managers that refer to the AdventureWorksDW database and the staging database. The one with a database icon is a local Connection Manager that can be seen only inside the current package. The Connection Manager with (project) in front is a project connection that can be seen in any package. Any local Connection Manager can be converted to a project connection by right-clicking it and selecting Convert to Project Connection. Note that we have used a naming convention so the designer can easily recognize what type of connection it is.
Variables
Variables are a powerful piece of the SSIS architecture; they enable you to dynamically control the package at runtime, much like you do in any .NET language. There are two types of variables: system and user. System variables are those built into SSIS, such as a package name or the package’s start time; user variables are created by the SSIS developer. Variables can also have varying scope, with the default scope being the entire package. They can also be set to be in the scope of a container, a task, or an event handler inside the package.
One of the optional design-time windows can display a list of variables. To access the Variables window, right-click in the design pane and select Variables, or select Variables from the SSIS menu. The Variables window (shown in Figure 2-23) will appear in the bottom of SSDT by default. Also by default, you will see only the user variables; to see the system variables as well, click Grid Options and then select the Show System Variables icon in the top of the window. To add a new variable, click the Add Variable icon in the Variables window and type the variable name.
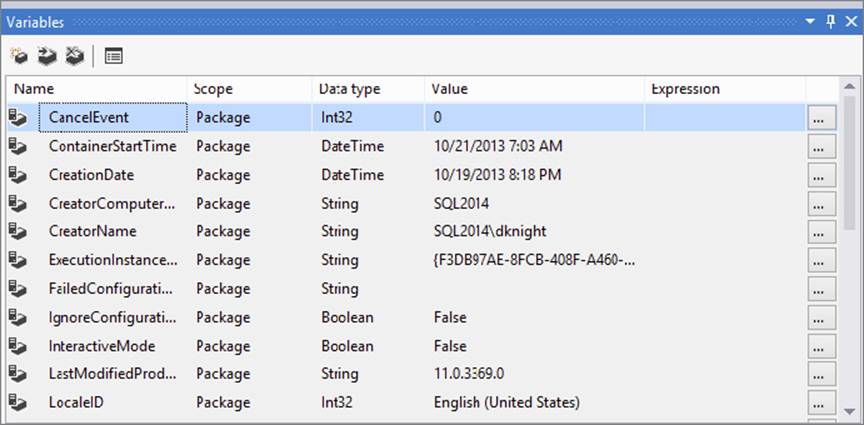
FIGURE 2-23
When you click the Add Variable icon, whatever task or container you select at the time will be the scope for the variable. Once the scope was set for a variable in the past SQL Server 2005 and 2008 releases, it could not be changed. Now a nice little feature in 2014 is you can change the variable scope at any time. Some of the additional columns are the Namespace and Raise Event on Variable Change properties. Lastly, you can select a variable and go to the Properties pane to see extended properties on the variable. We discuss these properties in more depth in Chapter 3.
You’ll find yourself regularly using system variables throughout your package for auditing or error handling. Some of the package-scoped system variables that you may find interesting for auditing purposes are listed in the following table.
|
VARIABLE NAME |
DATA TYPE |
DESCRIPTION |
|
CreationDate |
DateTime |
Date when the package was created |
|
InteractiveMode |
Boolean |
Indicates how the package was executed. If the package was executed from SSDT, this would be set to true. If it was executed from a SQL Server Agent job, it would be set to false. |
|
MachineName |
String |
Computer on which the package is running |
|
PackageID |
String |
Globally unique identifier (GUID) for the package |
|
PackageName |
String |
Name of the package |
|
StartTime |
DateTime |
Time when the package started |
|
UserName |
String |
User who started the package |
|
VersionBuild |
Int32 |
Version of the package |
Variables are discussed in greater detail in each chapter. For a full list of system variables, please refer to Books Online under “System Variables.”
Data Flow
Most of your time in SSIS is spent in the Data Flow tab. When you add a Data Flow Task to the Control Flow design surface, a subsequent Data Flow is created in the Data Flow tab. Whereas a package has a single Control Flow, it can have many Data Flows. You can expand the Data Flow by double-clicking the task or by going to the Data Flow tab and selecting the appropriate Data Flow Task from the top dropdown box (shown in Figure 2-24). In the Data Flow, the key components are sources, destinations transformations (which appear in the SSIS Toolbox), and paths. Unlike in the Control Flow, where tasks and containers are connected by precedence constraints that define the package’s execution workflow; in the Data Flow, sources, transformations, and destinations are connected by paths that define the flow of data between these components. As you make a connection, the metadata (information about the columns and their data types) becomes available to the next component in the Data Flow path. Everything after the source is performed in memory with a very few exceptions.
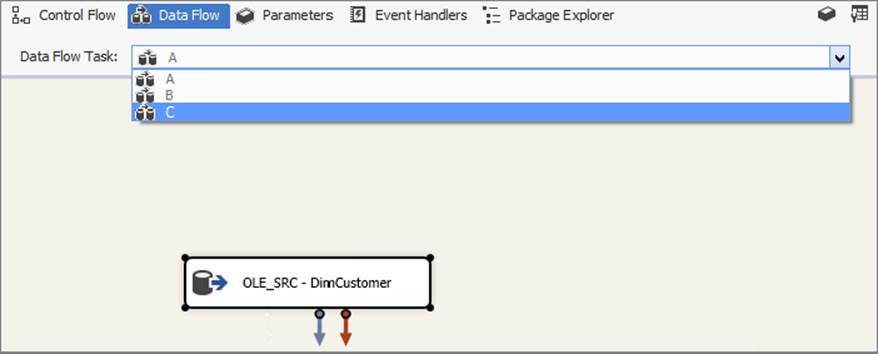
FIGURE 2-24
When you first start defining the Data Flow, you add a source component to connect to a data source, and then a destination to go to. The transformations (also known as transforms throughout this book) modify the data before it is written to the destination. As the data flows through the path from transform to transform, the data changes based on what transform you have selected. This entire process is covered in much more detail in Chapter 4.
Parameters
The Parameters tab enables you to create input parameters for a package. These are different from variables in that they can easily be passed in from a DBA or a job. If you’re familiar with SQL Server 2005 or 2008 SSIS, these best resemble configuration files and are indeed replacements for configuration files and tables. You can find parameters in the list of tabs in SSIS. This tab identifies project level parameters but you can also have parameters that are specific to individual packages. Parameters can be made secure by setting the Sensitive property to True, as shown in Figure 2-25, and they can be used to override nearly any property in SSIS. Some parameters can also be set to Required by setting the corresponding property to True, meaning the package won’t run without passing in this parameter. Using parameters will be discussed in more detail in Chapter 5.

FIGURE 2-25
Event Handlers
The Event Handlers tab enables you to create workflows to handle errors, warnings, or completion in tasks, containers, or packages. For example, if you want to trap any errors and have them e-mailed to you, you could create an OnError event handler that is scoped to the entire package and configure it to send a message out to an operator.
You can configure the event handler’s scope under the Executable dropdown box. An executable can be a package, a Foreach Loop container, a For Loop container, a Sequence container, or a task. In the Event Handler box, you can specify the event you wish to monitor. The events you can select are described in the following table:
|
EVENT |
WHEN EVENT IS RAISED |
|
OnError |
When an error occurs |
|
OnExecStatusChanged |
When an executable’s status changes |
|
OnInformation |
When an informational event is raised during the validation and execution of an executable |
|
OnPostExecute |
When an executable completes |
|
OnPostValidate |
When an executable’s validation is complete |
|
OnPreExecute |
Before an executable runs |
|
OnPreValidate |
Before an executable’s validation begins |
|
OnProgress |
When measurable progress has happened on an executable |
|
OnQueryCancel |
When a query has been instructed to cancel |
|
OnTaskFailed |
When a task fails |
|
OnVariableValueChanged |
When a variable is changed at runtime |
|
OnWarning |
When a warning occurs in your package |
Event handlers are critically important to developing a package that is “self-healing” — that is, it can correct its own problems. The key events to handle are OnError, OnWarning, OnPreExecute, and OnPostExecute. You will learn more about event handlers in Chapter 18.
Package Explorer
The final tab in the SSIS Package Designer is the Package Explorer tab, shown in Figure 2-26. This tab consolidates all the design panes into a single view, and lists all the tasks, connections, containers, event handlers, variables, and transforms in your package. You can double-click any item here to configure it easily. You can also modify the properties for the item in the Properties window on the right after selecting the item you wish to modify.
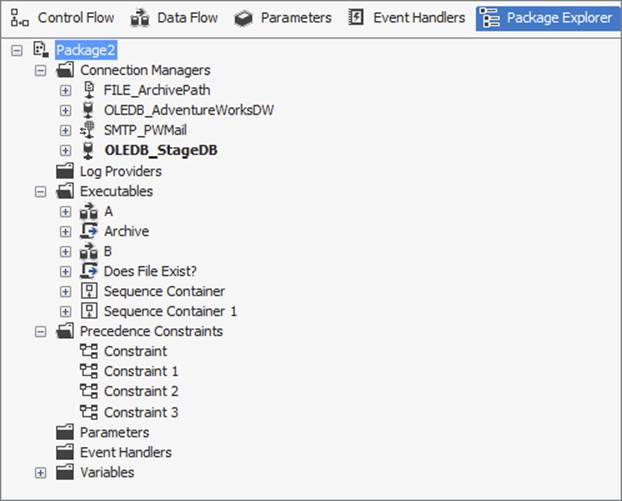
FIGURE 2-26
This tab is useful if you have a task that is throwing an error and you can’t find it to remove or fix it. This problem happens sometimes when you have tasks that accidentally fall behind a container or another task.
Executing a Package
When you want to execute a package, you can click the Play icon on the toolbar, or press F5, or choose Debug ⇒ Start. You can also execute packages by right-clicking the package in Solution Explorer and selecting Execute Package. This last technique may be a better habit to get into because clicking the Play button initiates a build, and if your packages are in a solution that has multiple projects, it may also deploy SSRS reports or SSAS cubes if those projects are included in the solution. This puts the design environment into execution mode, opens several new windows, enables several new menu and toolbar items, and begins to execute the package. When the package finishes running, SSDT doesn’t immediately go back to design mode but rather stays in execution mode to allow you to inspect any runtime variables or view any execution output. This also means that you can’t make some changes to the objects within the package. You may already be familiar with this concept from executing .NET projects.
To return to design mode, you must click the Stop icon on the debugging toolbar, or press Shift+F5, or choose Debug ⇒ Stop Debugging.
MANAGEMENT STUDIO
SSIS delineates between the SSIS developer and the administrator. SQL Server Management Studio is where administrators do most of their work — executing, securing, and updating packages. From the Management Studio interface, the administrator is not able to design packages, however. This function is reserved for SSDT only.
You can open SQL Server Management Studio under the Microsoft SQL Server program group on the Start menu. Then, in the Object Browser pane (which can be opened from the View menu if it’s closed), select Connect ⇒Database Engine. Type your SQL Server instance name and click Connect. If you receive an error, you may want to jump ahead to Chapter 22, which explains how to correct connectivity issues. There’s also an SSIS service you can connect to, but this is for packages running in legacy mode. You’ll learn much more about this in Chapter 22 as well.
SUMMARY
This chapter provided an overview of the main SSIS wizards and core tools. The Import and Export Wizard is a quick way to create a package that does a simple import or export of data. The wizard is capable of producing a package that can be run multiple times.
You were then taken on a tour of the SQL Server Data Tools (SSDT), which is where you’ll be spending most of your time as you develop packages. You looked at the key parts of the interface. Don’t worry if you don’t yet understand all the components of SSIS. Now that you have been exposed to the basic concepts, you’ll dive deeper into SSIS as you look at each component.
Now that you’ve gotten your feet wet, it’s time to explore the real power of SSIS, which lies in the multitude of tasks you can use in your packages. You will learn about some of the more common ones in Chapter 3, and containers are covered in depth in Chapter 6.
All materials on the site are licensed Creative Commons Attribution-Sharealike 3.0 Unported CC BY-SA 3.0 & GNU Free Documentation License (GFDL)
If you are the copyright holder of any material contained on our site and intend to remove it, please contact our site administrator for approval.
© 2016-2026 All site design rights belong to S.Y.A.