Professional Microsoft SQL Server 2014 Integration Services (Wrox Programmer to Programmer), 1st Edition (2014)
Chapter 20. Adding a User Interface to Your Component
WHAT’S IN THIS CHAPTER?
· Outlining key steps to create a UI for your component
· Using the IDtsComponentUI interface
· Creating your first custom user UI
WROX.COM DOWNLOADS FOR THIS CHAPTER
You can find the wrox.com code downloads for this chapter at www.wrox.com/go/prossis2014 on the Download Code tab.
Now that you have learned how to extend the pipeline with your own custom components, the next step is to improve the user experience and efficiency by adding a user interface (Ul). This will be demonstrated using the Reverse String example from the previous chapter.
Pipeline Components do not require the developer to provide a user interface, because the components ship with a default interface called the Advanced Editor. Although this saves time and resources, the overall user experience can be poor. It can increase package development time and requires the user to have an intimate knowledge of the component in order to be able to correctly set the required columns and properties. Using the default interface can lead to data integrity problems, because the more complex the configuration required, the more acute the lack of suitable prompts and real-time validation becomes, making configuration tedious and error prone. For simple components, however, the built-in Advanced Editor, used by several stock components, is perfectly acceptable. For complex components with multiple inputs, the Advanced Editor will not be suitable.
If you want to add that extra style and guidance for the end user, though, this chapter is for you. You will learn how to add a user interface to a component, looking in detail at each of the stages. By the end of this chapter, you will be ready to apply these techniques to your own components.
NOTE Note that this chapter deals exclusively with managed components, that is, components written in .NET code.
THREE KEY STEPS FOR DESIGNING THE UI: AN OVERVIEW
There are three steps to adding a user interface to any component, and each will be examined in detail. However, it is essential that you build the actual component first; get the functionality working properly, iron out any problems, tweak the performance, and make sure it installs properly. Once those core tasks are complete, you can add the polish to the solution by designing the UI. Trying to build anything other than a simple UI at the same time you are building the component can create unnecessary overhead in keeping the two projects working well in tandem. With that said, here’s a summary of each of the three key UI steps.
1. The first step is to add a class that implements the IDtsComponentUI interface. This defines the methods needed for the designer to interact with your user interface class. This class is not the visible UI itself; rather, it provides a way for the designer to request what it needs when it needs it and exposes several methods that enable you to hook into the life cycle of your UI. For example, you have a New method, which is called when a component is first added to a package, and an Edit method, which is called when you open an existing component inside your package. The interface is expanded on in the following paragraphs.
2. The second step is to actually build the visible interface, normally a Windows Form. The form is invoked from the IDtsComponentUI.Edit method; by customizing the constructor, you can pass through references to the base component and supporting services. The form then displays details such as component properties or data-handling options, including inputs, outputs, and columns within each.
3. The final stage is to update the component itself to tell the designer that you have provided a user interface and where to find it, or specifically where to find the IDtsComponentUI implementation. You do this through the UITypeName property of theDtsPipelineComponent attribute, which decorates the component, your existing PipelineComponent inheriting class. The UITypeName is the fully qualified name of the class implementing your user interface, enabling the designer to find the assembly and class to invoke the user interface when required through the interface methods mentioned previously.
In summary, you need a known interface with which the designer can interact along with a form that you display to the user through the relevant interface method; the component also needs to advertise that it has a user interface and provide instructions about where to find the UI when required.
BUILDING THE USER INTERFACE
Now that the key stages have been explained, you can examine each of them in detail. This guide makes very few assumptions about your current level of development experience, explaining all the actions required, so as long as you can open Visual Studio on your own, you should be able to follow these steps and, perhaps more important, understand why you are performing each one.
Adding the Project
If you followed the example in the previous chapter, you currently have an existing solution in Visual Studio that contains the Pipeline Component project (Wrox.Pipeline). Therefore, your first step is to add a new Class Library project to host the UI, as shown inFigure 20-1. Although the UI can be implemented within the Pipeline Component project, for performance reasons this is not the recommended approach. Because SSIS has distinct runtime versus design-time elements, combining the two functions leads to a larger assembly, which requires more memory and consequently results in lower runtime performance. When you deploy your components in production, the component UI is never shown, so it is important that your components can operate without a UI. To support this use, you should ensure the core component code does not have any dependencies on UI code. The practice of separating the UI and component projects allows for easier code development and maintenance, reducing confusion and conflicts within the areas of code.
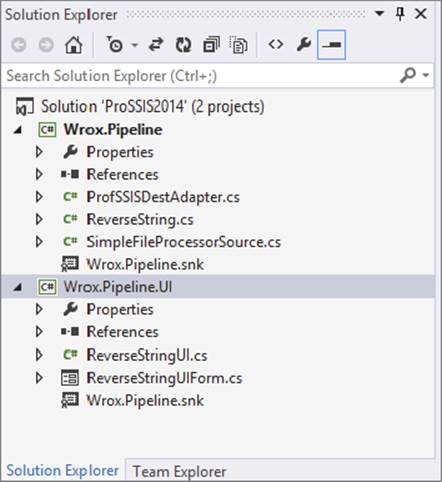
FIGURE 20-1
As you start with the empty project, the first task is to configure any project properties, so you need to set the Assembly Name and Default Namespace to be consistent with your development practices, as shown in Figure 20-2.
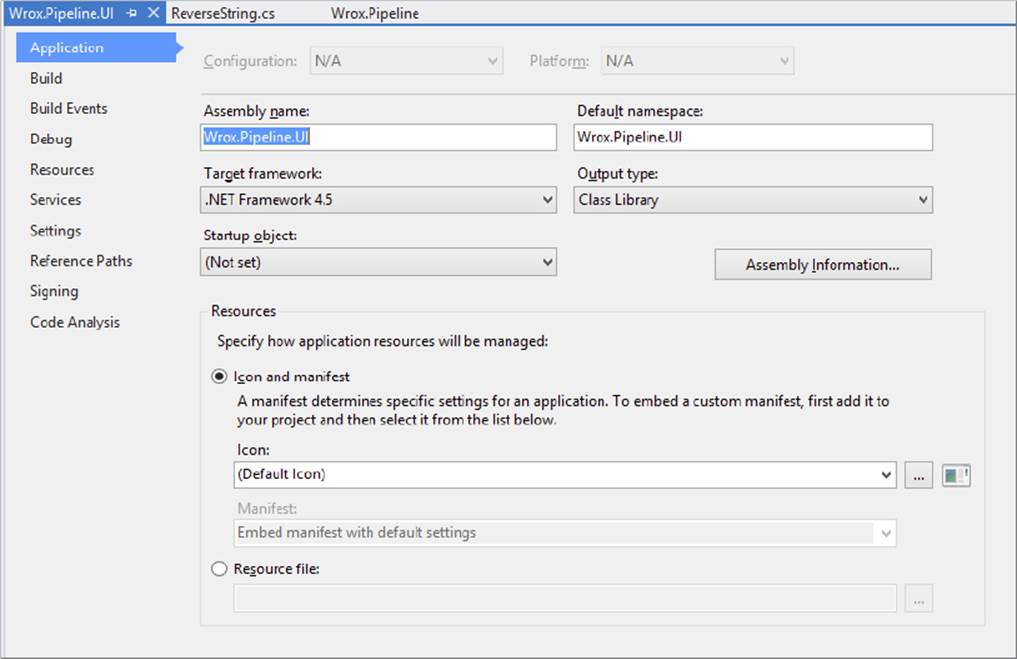
FIGURE 20-2
The user interface assembly does not need to be placed in a defined location like components and tasks (%Program Files%\Microsoft SQL Server\120\DTS\PipelineComponents or %Program Files%\Microsoft SQL Server\120\DTS\Tasks, respectively), but it does need to be installed within the global assembly cache (GAC). Therefore, within the project properties, you can leave the build output path location as the default value, but for ease of development you can add a post-build event command on the Build Events page, as shown inFigure 20-3. Refer to Chapter 19 for more details on what this command should look like.
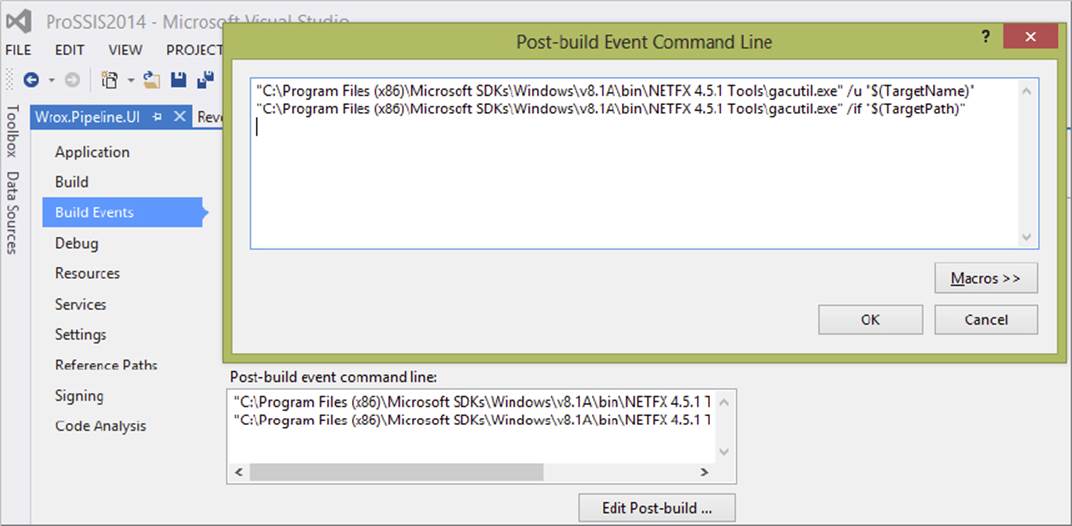
FIGURE 20-3
Because the assembly will be installed in the GAC, you need to sign the assembly using a strong name key, which can be configured from the Signing page, shown in Figure 20-4. For more information about strong names and their importance in .NET, see “Security Briefs: Strong Names and Security in the .NET Framework”:
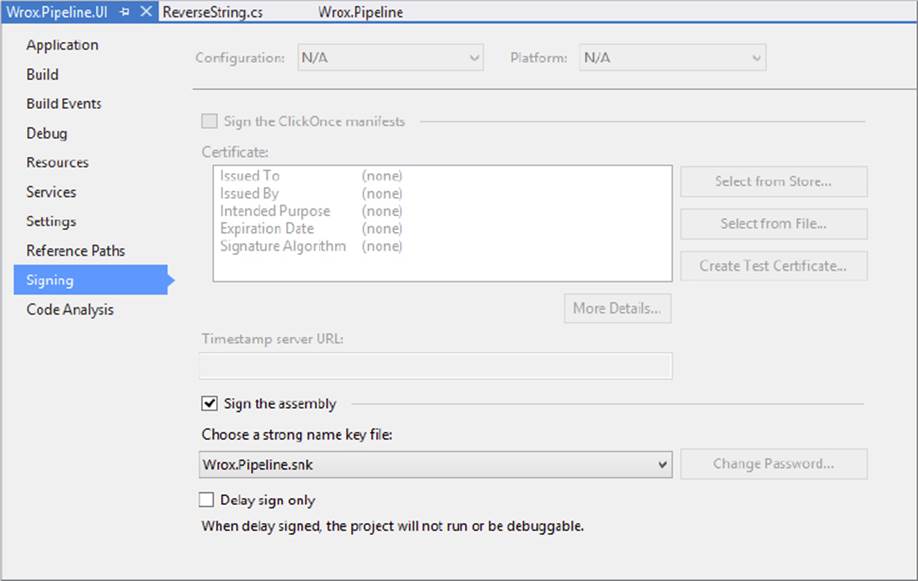
FIGURE 20-4
http://msdn.microsoft.com/en-us/library/aa302416.aspx
Although most assembly attributes can now be set through the Assembly Information dialog, accessed from the Application page of Project Properties, you still need to manually edit AssemblyInfo.cs (AssemblyInfo.cs file of the Wrox.Pipeline.UI project), which can be seen by clicking on the arrow next to Properties in the Solution Explorer, adding the CLSCompliant attribute, as described in Chapter 19 and shown here:
#region Using directives
using System;
using System.Security.Permissions;
using System.Reflection;
using System.Runtime.CompilerServices;
using System.Runtime.InteropServices;
#endregion
[assembly: AssemblyTitle("Wrox.Pipeline.UI")]
[assembly: AssemblyDescription("UI for Wrox.Pipeline")]
[assembly: AssemblyConfiguration("")]
[assembly: AssemblyProduct("Wrox.Pipeline")]
[assembly: AssemblyTrademark("")]
[assembly: AssemblyCulture("")]
[assembly: AssemblyVersion("1.0.0.0")]
[assembly: AssemblyFileVersion("1.0.0.0")]
[assembly: CLSCompliant(true)]
[assembly: PermissionSet(SecurityAction.RequestMinimum)]
[assembly: ComVisible(false)]
NOTE The AssemblyVersion will form part of the UITypeName property, described later in this chapter; therefore, it is important that this is not allowed to auto-increment using the ∗ token, because this will break the linkage between the component and its user interface.
You also need a Windows Form to actually display your component’s interface to the user in addition to the default class you have in your project, so one will be added at this stage.
The final preparatory task is to add some additional references to your project. The recommended five are listed here:
· Microsoft.SqlServer.Dts.Design
· Microsoft.SqlServer.DTSPipelineWrap
· Microsoft.SQLServer.ManagedDTS
· System.Windows.Forms
· Microsoft.SqlServer.DTSRuntimeWrap
Implementing IDtsComponentUI
You now have the empty framework for the UI assembly, and you can start coding. The first step is to implement the Microsoft.SqlServer.Dts.Pipeline.Design.IDtsComponentUI interface. Using the default class in the project, you can add the interface declaration and take advantage of the Visual Studio context menu features, as well as use the Implement Interface command to quickly generate the five method stubs, saving you from manually typing them out.
The methods are documented in detail in the following sections; however, it is useful to understand the scenarios in which each method is called, highlighting how the Initialize method is usually called before the real action method:
· Adding a new component to the package:
· Initialize
· New
· Editing the component, either through a double-click or by selecting Edit from the context menu:
· Initialize
· Edit
· Deleting the component, through the Delete key or by selecting Delete from the context menu:
· Delete
The following sections describe each method in more detail and demonstrate how they are implemented in the example.
IDtsComponentUI.Delete
The Delete method is called when a component is deleted from the SSIS designer. It enables you to perform any cleaning operations that may be required or warn users of the consequences. This is not normally required, because the consequences should be fairly obvious, but the opportunity is available. For this example, simply remove the placeholder exception, leaving an empty method.
IDtsComponentUI.Help
The Help method has not been implemented in SQL Server 2014. For this example, simply remove the placeholder exception. The method will not be called, but this should prevent any surprises in case of a service pack introducing the functionality, although this is unlikely.
IDtsComponentUI.New
The New method is called when a component is first added to your package through the SSIS designer. Use this method to display a user interface specific to configuring the component for the first time, such as a wizard to help configure the component, or an option dialog that gathers some information that will influence the overall use of the component. The Script Transformation uses this method to display a dialog asking for the type, source, destination, or transformation.
The New method is not widely used, because configuration of the component usually requires you to have wired up the Data Flow paths for the component. In addition, most people start by laying out the package and adding most or all of the components together, enabling them to visualize and validate their overall Data Flow design before configuring each component in detail, but in specialized circumstances you have this option.
For this example, simply remove the placeholder exception, leaving an empty method.
IDtsComponentUI.Initialize
Initialize is the first method to be called when adding or editing a component; although you do not actually perform any actions at this stage, the parameters provided are normally stored in private member variables for later use. At a minimum, you will store theIDTSComponentMetaData100 reference, because a UI always needs to interact with the underlying component, and this is done through the IDTSComponentMetaData100 reference.
For components that use connections or variables, you would also store a reference to IServiceProvider. This enables you to access useful services, like the connection service (IDtsConnectionService) and the variable service (IDtsVariableService). These designer services enable you to create new connections and variables, respectively. For connections, the service will invoke the Connection Manager user interface, provided by the connection author; for variables, you use the dialog built into the SSIS designer. This is a good example of how Microsoft has made life easier for component developers, offering access to these services, saving you time and effort. Two other services are available: IErrorCollectionService for retrieving error and warning event messages, and IDtsClipboardService, which enables component developers to determine whether a component was created by a copy-and-paste operation.
In the Wrox.Pipeline example, these services are not required, but you would follow the same pattern as you do with IDTSComponentMetaData100 here (ReverseStringUI.cs file of the Wrox.Pipeline.UI project):
private IDTSComponentMetaData100 _dtsComponentMetaData;
[CLSCompliant(false)]
public void Initialize(IDTSComponentMetaData100 dtsComponentMetadata,
IServiceProvider serviceProvider)
{
// Store ComponentMetaData for later use
_dtsComponentMetaData = dtsComponentMetadata;
}
IDtsComponentUI.Edit
The Edit method is called by the designer when you edit the component, and this is the place where you actually display the visible window or form of the user interface component. The purpose of the Edit method is to display the form, passing through any references you need, stored in private variables during Initialize. The Edit method also has a Boolean return value that notifies the designer whether changes have been made.
This is perhaps one of the most useful features of the component UI pattern, as it enables you to make changes directly to the component, but they are persisted only if the return value is true. In other words, users can make as many changes as they want in the custom UI, but none of those changes are saved into the component unless the return value is true. You get commit or rollback functionality free, rather than having to write additional code to cache changes within the UI, and apply them only when a user clicks the OK button.
It also enables you to benefit from validation routines you have written into the component itself. For example, the ReverseString.SetUsageType method checks data types and the UsageType property for the column being selected, because this component supports only string types. Putting the validation into the component, rather than the UI, ensures that if a user bypasses your UI and uses the built-in Advanced Editor or the Visual Studio Properties instead, the same validation takes place.
Therefore, your UI should focus on the display side and leave as much validation as possible to the component. Inevitably, some validation will be implemented in the UI, but always bear in mind that you can use the existing component code in a modularized manner, saving time and simplifying maintenance through reuse.
For ease of implementation, you can use the DialogResult functionality of the form to indicate the return value for the form. This is illustrated in the example implementation of Edit (ReverseStringUI.cs file of the Wrox.Pipeline.UI project):
public bool Edit(IWin32Window parentWindow, Variables variables,
Connections connections)
{
Try
{
// Create UI form and display
ReverseStringUIForm ui = new ReverseStringUIForm(_dtsComponentMetaData);
DialogResult result = ui.ShowDialog(parentWindow);
// Set return value to represent DialogResult. This tells the
// managed wrapper to persist any changes made
// on the component input and/or output, or properties.
If
(result == DialogResult.OK)
{
return true;
}
}
catch (Exception ex)
{
MessageBox.Show(ex.ToString());
}
return false;
}
The Edit method also provides references to the Variables and Connections collections, which you can use to list the available variables and connections. The Variables collection is already limited to those in scope for the current Data Flow Task.
If your component uses connections or variables, you would modify the form constructor to accept these, as well as the System.IServiceProvider reference you captured during Initialize. This enables you to offer the option of selecting an existing item or creating a new one as needed. These are not required for the Reverse String Component, but an example of an Edit method implementation using them is shown here (ReverseStringUI.cs file of the Wrox.Pipeline.UI project):
public bool Edit(IWin32Window parentWindow,
Variables variables, Connections connections)
{
Try
{
TraceSourceUIForm ui = new TraceSourceUIForm(_dtsComponentMetaData,
variables, connections, _serviceProvider);
DialogResult result = ui.ShowDialog(parentWindow);
if (result == DialogResult.OK)
{
return true;
}
}
catch (Exception ex)
{
Konesans.Dts.Design.ExceptionDialog.Show(ex);
}
return false;
}
Setting the UITypeName
This section deals with changes to the Reverse String Component itself, rather than the user interface project. This is listed as the last of the three key steps for providing a user interface, but it is generally done fairly early on, because once it is complete, you can actually test your UI in the designer itself.
You need to tell the designer that your component has a user interface, in effect overriding the Advanced Editor dialog provided by default. To do this, set the UITypeName property of the DtsPipelineComponentAttribute, which already decorates the component class in the transformation project. The required format of the property value is as follows:
<Full Class Name>,
<Assembly Name>,
Version=<Version>,
PublicKeyToken=<Token>
NOTE You may recognize the format as being very similar to an assembly strong name, because apart from the additional <Full Class Name> at the beginning, it is the assembly strong name. Using the strong name, the designer can find and load the assembly, and then using the class name, it knows exactly where to go for its entry point, the IDTSComponentUI implementation.
Setting this property often causes developers problems, but if you know where to look, it is quite easy:
...
namespace Wrox.Pipeline.UI
{
public class ReverseStringUI : IDtsComponentUI
{
...
This code snippet from the main UI class file shows the namespace and the class name, so the first token on the UITypeName is Wrox.Pipeline.UI.ReverseStringUI.
The remainder is just the strong name of the assembly. The simplest way to obtain this is to compile the project; if you set the post-build events as described previously, your assembly will have been installed in the GAC. Open a command window and run the command gacutil /l Wrox.Pipeline.UI to get the full string name of the assembly. Figure 20-5 shows the full path on my machine.
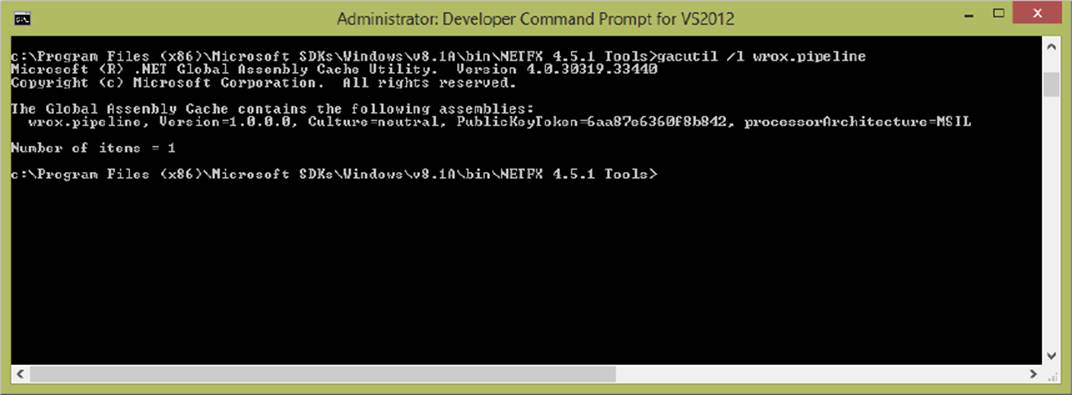
FIGURE 20-5
The GACUTIL executable should be available in the %programfiles%\Microsoft SDKs\Windows\v8.1A\Bin\NETFX 4.5.1 Tools\ directory.
If the gacutil call fails, make sure you change directory (CD) into the NETFX 4.5.1 Tools directory that contains the gacutil executable. Now that you can see the PublicKeyToken property, the UITypeName property can be set.
If you make a mistake when setting this property, you will get an error such as the following when you use the component UI:
Could not load file or assembly 'Wrox.Pipeline.UI.ReverseStringUI,
Version=2.0.0.0, Culture=neutral, PublicKeyToken=b8351fe7752642cc' or one of its
dependencies. The system cannot find the file specified. (mscorlib)
The completed attribute for the Wrox.Pipeline Component, referencing the ReverseStringUI assembly, is illustrated as follows (ReverseString.cs file of the Wrox.Pipeline.UI project):
[DtsPipelineComponent(
DisplayName = "Wrox Reverse String",
ComponentType = ComponentType.Transform,
UITypeName = "Wrox.Pipeline.UI.ReverseStringUI,
Wrox.Pipeline.UI, Version=1.0.0.0, Culture=neutral,
PublicKeyToken=6aa87e6360f8b842")]
public class ReverseString : PipelineComponent
...
Building the Form
The final development stage is building the form itself, enabling it to capture the user input and apply the selections to the component. Before you start building the form, however, review the following summary of the progress so far.
You have implemented IDTSComponentUI, providing the methods required by the designer to support a custom user interface. The IDTSComponentUI.Edit method is used to display the form, passing through a reference to the base component (IDTSComponentMetaData100). This was gained using the IDTSComponentUI.Initialize method and stored in a private class-level variable.
Finally, you have updated the component itself to include the UITypeName property for the DtsPipelineComponentAttribute. This enables the designer to detect and then find your user interface class, thereby calling the IDTSComponentUI methods you have now implemented, leading to the display of the form.
The sample form for the user interface is shown in Figure 20-6.
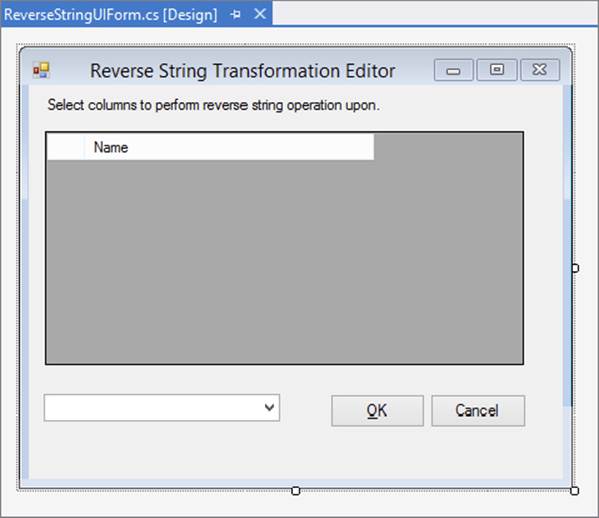
FIGURE 20-6
Modifying the Form Constructor
As previously mentioned, the default form constructor is modified to accept the references you will need, such as the component and support objects, variables, and connections. For this example, you just have the component reference, IDTSComponentMetaData100. You should store these constructor parameters in private member variables for later use elsewhere in the form, as well as use the member variables directly in the constructor itself.
The commit and rollback feature discussed in the “IDtsComponentUI.Edit” section has one specific requirement: any changes made must be done through a wrapper class, rather than applied directly to the IDTSComponentMetaData100 reference. This wrapper, theIDTSDesigntimeComponent100 design-time interface, is created within the constructor and stored in a private member variable for later use.
Changes can be made directly to IDTSComponentMetaData100, but they will be permanent; so even if you return false from IDtsComponentUI.Edit, the changes will persist. Users like recognizable and intuitive user interfaces, and the capability to recover from a mistake using the Cancel button is a design pattern that all users have been grateful for on numerous occasions. Writing code to implement this yourself would be a considerable amount of work, so make sure you issue changes only through the design-time interface.
The complete form constructor is shown as follows (ReverseStringUIForm.cs file of the Wrox.Pipeline.UI project), including the call to the SetInputVirtualInputColumns method, covered later in the chapter:
private IDTSComponentMetaData100 _dtsComponentMetaData;
private IDTSDesigntimeComponent100 _designTimeComponent;
private IDTSInput100 _input;
public ReverseStringUIForm(IDTSComponentMetaData100 dtsComponentMetaData)
{
InitializeComponent();
// Store constructor parameters for late
_dtsComponentMetaData = dtsComponentMetaData;
// Get design-time interface for changes and validation
_designTimeComponent = _dtsComponentMetaData.Instantiate();
// Get Input
_input = _dtsComponentMetaData.InputCollection[0];
// Set any form controls that host component properties or connections here
// None required for ReverseString component
// Populate DataGridView with columns
SetInputVirtualInputColumns();
}
Column Display
Once all the constructor parameters have been stored and the initial preparation is complete, you can begin to interrogate the component and other objects that may have been supplied on the constructor to populate the form controls.
The Reverse String Transformation will operate on any column the user selects, so the user interface will simply consist of a way to allow columns to be selected. For this example, you should use a DataGridView control. Using the control designer, you’ll preconfigure two columns: a checkbox column for the selection state (DataGridViewCheckBoxColumn) and a text column for the column name (DataGridViewTextBoxColumn). The individual form controls are not covered in detail; rather, the focus is on their use and interaction with the component, because the choice of control is entirely up to you as the user interface developer.
NOTE To see exactly how the controls have been configured, review the completed project available at www.wrox.com/go/prossis2014.
Because you allow users to select columns, the initial requirement is to enumerate the columns and determine their current selection state. To do this, you need to understand the architecture of a component in relation to data movement. For a simple synchronous transformation such as this one, you have a single input. The input has a collection of input columns, which at runtime hold the data provided in the pipeline buffer, so the transformation itself operates on these columns.
NOTE For more details on pipeline architecture, see Chapter 16.
In the Reverse String Component, the presence of an input column means that the user wants the operation to be performed on that column. By default, the input contains no columns, because no columns have been selected for transformation. To select a column, you set the column usage type to something other than DTSUsageType.UT_IGNORED. For this component, because you do an in-place transformation on the column value, you require both read and write access as indicated by DTSUsageType.UT_READWRITE. This allows you to read the column value and reverse it before writing it back into the buffer.
NOTE It is important that you select only those columns that are required for any transformation and minimize excess columns through all stages of the pipeline for performance reasons. The designer will display a warning like this when it detects unused columns:
[DTS.Pipeline] Warning: The output column "ProductPrice"; (36) on
output
"OLE DB Source Output" (10) and component "Products" (1) is not
subsequently used in the Data Flow task. Removing this unused
output
column can increase Data Flow task performance.
Because the input column collection is empty by default, you actually work on the virtual input column collection instead. The virtual input represents all the upstream columns available to the transformation, enabling you to enumerate columns, as well as interrogate the virtual input column’s UsageType property.
Calling GetVirtualInput to get the collection of virtual columns is a potentially expensive operation, depending on the number of upstream columns. You should therefore call it only once and cache the result for later use in other methods. You should also be aware that because a virtual input is very much a snapshot of current state, it can become invalid. Simple changes to the current component do not affect the virtual columns, but deeper changes like ReinitializeMetaData can invalidate it. You should therefore plan the lifetime of the cached reference and periodically refresh it after major changes.
The use of the virtual input and the column usage type is the basis for the SetInputVirtualInputColumns helper method included in the form. This populates the DataGridView with a list of columns and their current selection state. This method is the final call in the form constructor and completes the initialization of the form (ReverseStringUIForm.cs file of the Wrox.Pipeline.UI project). As a separate exercise you may wish to augment this procedure with logic to hide (or gray-out) nonstring columns, so that users do not inadvertently try to reverse numeric values.
private void SetInputVirtualInputColumns()
{
_virtualInput = _input.GetVirtualInput();
IDTSVirtualInputColumnCollection100 virtualInputColumnCollection =
_virtualInput.VirtualInputColumnCollection;
IDTSInputColumnCollection100 inputColumns =
_input.InputColumnCollection;
int columnCount = virtualInputColumnCollection.Count;
for (int i = 0; i Đ columnCount; i++)
{
IDTSVirtualInputColumn100 virtualColumn = virtualInputColumnCollection[i];
int row;
if (virtualColumn.UsageType == DTSUsageType.UT_READONLY ||
virtualColumn.UsageType == DTSUsageType.UT_READWRITE)
{
row = this.dgColumns.Rows.Add( new object[]
{CheckState.Checked, " " + virtualColumn.Name });
}
Else
{
row = this.dgColumns.Rows.Add(new object[]
{
CheckState.Unchecked, " " + virtualColumn.Name });
}
this.dgColumns.Rows[rowIndex].Tag = i;
DataGridViewCheckBoxCell cell =
(DataGridViewCheckBoxCell)dgColumns.Rows[row].Cells[0];
cell.ThreeState = false;
}
}
The pipeline engine is implemented in native code for performance, so calls to pipeline objects normally use a wrapper class and incur the overhead of COM Interop. You should therefore minimize such calls through efficient coding practices. In the preceding example, the count from the virtual input column collection is retrieved only once, as opposed to being interrogated within the for loop test itself.
Column Selection
The next task to complete in building the user interface is to react to user input and reflect any changes back to the component. In this example, the only option offered is the selection of columns, made through the DataGridView, as captured through theCellContentClick event. You use this event, rather than one of the others available such as CellValueChanged, because this is raised immediately and you can give timely feedback to the user.
Through the DataGridViewCellEventArgs, you can obtain the row and column indices for the cell. This is first used to validate that the row exists and that the column is the first column, because this column contains the checkboxes used for managing selection. You then use the virtual input again and set the usage type as indicated by the checkbox or cell value.
Because the example component includes validation within the overridden SetUsageType method, you need to ensure that you catch any exceptions thrown and can react and provide feedback to the component user, as shown here (ReverseStringUIForm.cs file of theWrox.Pipeline.UI project):
private void dgColumns_CellContentClick(object sender, DataGridViewCellEventArgs e)
{
if (e.ColumnIndex == 0 && e.RowIndex > = 0)
{
// Get current value and flip boolean to get new value
bool newValue = !Convert.ToBoolean(dgColumns.CurrentCell.Value);
// Get the virtual column to work with
IDTSVirtualInputColumn100 virtualColumn =
_virtualInput.VirtualInputColumnCollection[e.RowIndex];
Try
{
// Set the column UsageType to indicate the column is selected or not
if (newValue)
_designTimeComponent.SetUsageType(_input.ID, _virtualInput,
virtualColumn.LineageID,
DTSUsageType.UT_READWRITE);
Else
_designTimeComponent.SetUsageType(_input.ID, _virtualInput,
virtualColumn.LineageID, DTSUsageType.UT_IGNORED);
}
catch(Exception ex)
{
// Catch any error from base class SetUsageType here.
// Display simple error message from exception
MessageBox.Show(ex.Message, "Invalid Column", MessageBoxButtons.OK,
MessageBoxIcon.Error);
// Rollback UI selection
dgColumns.CancelEdit();
}
}
}
To complete the description of the user interface example, there are two button controls on the form, OK and Cancel, each with its respective DialogResult property values set. By using the dialog results in this way, you do not need any event handler bound to theclick event, and no additional code is required to close the form. The dialog result is then used within IDTSComponentUI.Edit to commit or roll back any changes made to the component wrapper, as shown previously.
This concludes the example; if you have been building the UI as you read, the only remaining task is to compile the project. If you configured the build events that were described at the beginning, the assemblies should be in the correct locations ready for use.
You need to start a new instance of Visual Studio and open an SSIS project. Before you can use the component, you need to verify the new components are part of the SSIS Toolbox tab. The components are added automatically after they are copied to the DTS directories, as explained in the “Installing the Components” section of Chapter 19. If the components are not present in the SSIS Toolbox, this is usually a sign that the assemblies have not been copied to those directories.
NOTE The completed example is available for download from www.wrox.com/go/prossis2014.
EXTENDING THE USER INTERFACE
The simple component that was used in the preceding example lacks some of features you may require in your project. For example, components can use runtime connections or have properties. These would generally be represented through additional form controls, and their values would be interrogated, and controls initialized in the form constructor. You will now look at these other methods in greater detail.
Runtime Connections
As previously discussed, components can use connections and the System.IServiceProvider from IDtsComponentUI.Initialize and the Connections collection from IDtsComponentUI.Edit enable you to provide meaningful UI functions around them. You have seen examples of passing these as far as the form constructor, so now you will be shown what you do with them. This example shows a modified constructor that accepts the additional connection-related parameters, performs some basic initialization, and stores them for later use. You would perform any column- or property-related work as shown in the previous examples, but for clarity none are included here. The final task is to initialize the combo box that will list the runtime connections.
For this example, you will presume that the component accepts one connection, which would have been defined in the ProvidedComponentProperties method of the component. You will use a ComboBox control to offer the selection options, as well as the capability to create a new connection through the IDtsConnectionService. The component expects an ADO.NET SqlClient connection, so the list will be restricted to this, and the current connection, if any, will be preselected in the list. The preparatory work for this is all shown here (ReverseStringUIForm.cs file of the Wrox.Pipeline.UI project):
private IDTSComponentMetaData100 _dtsComponentMetaData;
private IDTSDesigntimeComponent100 _designTimeComponent;
private IDtsConnectionService _dtsConnectionService;
private Microsoft.SqlServer.Dts.Runtime.Connections _connections;
// Constant to define the type of connection we support and wish to work with
private const string Connection_Type =
"ADO.NET:System.Data.SqlClient.SqlConnection, System.Data, Version=2.0.0.0,
Culture=neutral, PublicKeyToken=b77a5c561934e089";
public ConnectionDemoUIForm(IDTSComponentMetaData100 dtsComponentMetaData,
IServiceProvider serviceProvider, Connections connections)
{
InitializeComponent();
// Store constructor parameters for later.
_dtsComponentMetaData = dtsComponentMetaData;
connections = connections;
// Get IDtsConnectionService and store.
IDtsConnectionService dtsConnectionService =
serviceProvider.GetService(typeof(IDtsConnectionService))
as IDtsConnectionService;
_dtsConnectionService = dtsConnectionService;
// Get design-time interface for changes and validation.
_designTimeComponent = _dtsComponentMetaData.Instantiate();
// Perform any other actions, such as column population or
// component property work.
// Get Connections collection, and get name of currently selected connection.
string connectionName = "";
if (_dtsComponentMetaData.RuntimeConnectionCollection[0] != null)
{
IDTSRuntimeConnection100 runtimeConnection =
_dtsComponentMetaData.RuntimeConnectionCollection[0];
if (runtimeConnection != null
&& runtimeConnection.ConnectionManagerID.Length> 0
&&connections.Contains(runtimeConnection.ConnectionManagerID))
{
connectionName = _connections[runtimeConnection.ConnectionManagerID].Name;
}
}
// Populate connections combo.
PopulateConnectionsCombo(this.cmbSqlConnections, Connection_Type,
connectionName);
}
The final command in the constructor is to call your helper function, PopulateConnectionsCombo, to populate the combo box. The parameters for this are quite simple: the combo box to populate, the type of connection you wish to list, and the name of the currently selected connection. Using these three items, you can successfully populate the combo box as shown here (ReverseStringUIForm.cs file of the Wrox.Pipeline.UI project):
private void PopulateConnectionsCombo(ComboBox comboBox,
string connectionType, string selectedItem)
{
// Prepare combo box by clearing, and adding the new connection item.
comboBox.Items.Clear();
comboBox.Items.Add("<New connection...>");
// Enumerate connections, but for type supported.
foreach (ConnectionManager connectionManager in
_dtsConnectionService.GetConnectionsOfType(connectionType))
{
comboBox.Items.Add(connectionManager.Name);
}
// Set currently selected connection
comboBox.SelectedItem = selectedItem;
}
The ADO.NET connection is slightly different from most connections in that it has what can be thought of as subtypes. Because you need a specific subtype, the System.Data.SqlClient.SqlConnection, you must use the full name of the connection, as opposed to the shorter creation name moniker, ADO.NET, which you may see elsewhere and which is the pattern used for other simpler types of Connection Managers.
If you have any problems with this sample code, perhaps because you have different versions of SQL Server on the same box, then change the relevant line of the preceding code to the following. This alternative code lists any Connection Manager in the combo box (ReverseStringUIForm.cs file of the Wrox.Pipeline.UI project):
// Enumerate connections, but for any connection type.
foreach (ConnectionManager connectionManager in
_dtsConnectionService.GetConnections())
{
comboBox.Items.Add(connectionManager.Name);
}
Now that you have populated the combo box, you need to handle the selection of an existing connection or the creation of a new connection. When you author a Connection Manager yourself, you can provide a user interface by implementing theIDtsConnectionManagerUI, which is analogous to the way you have implemented IDtsComponentUI to provide a user interface for your component. The connection service will then display this user interface when you call the CreateConnection method.
The following example (ReverseStringUIForm.cs file of the Wrox.Pipeline.UI project) shows the event handler for the connections combo box, which supports new connections and existing connections and ensures that the selection is passed down to the component:
private void cmbSqlConnections_SelectedValueChanged(object sender, EventArgs e)
{
ComboBox comboxBox = (ComboBox)sender;
// Check for index 0 and <New Item...>
if (comboxBox.SelectedIndex == 0)
{
// Use connection service to create a new connection.
ArrayList newConns = _dtsConnectionService.CreateConnection(Connection_Type);
if (newConns.Count > 0)
{
// A new connection has been created, so populate and select
ConnectionManager newConn = (ConnectionManager)newConns[0];
PopulateConnectionsCombo(comboxBox, Connection_Type, newConn.Name);
}
Else
{
// Create connection has been cancelled
comboxBox.SelectedIndex = −1;
}
}
// An connection has been selected. Verify it exists and update component.
if (_connections.Contains(comboxBox.Text))
{
// Get the selected connection
ConnectionManager connectionManager = _connections[comboxBox.Text];
// Save selected connection
_dtsComponentMetaData.RuntimeConnectionCollection[0].ConnectionManagerID =
_connections[comboxBox.Text].ID;
_dtsComponentMetaData.RuntimeConnectionCollection[0].ConnectionManager =
DtsConvert.ToConnectionManager100(_connections[comboxBox.Text]);
}
}
By following the examples shown here, you can manage connections from within your user interface, allowing the user to create a new connection or select an existing one, and ensure that the selection is persisted through to the component’sRuntimeConnectionCollection, thereby setting the connection.
You can also use variables within your UI. Normally, the selected variable is stored in a component property, so by combining the property access code from the component properties section and following the pattern for runtime connections, substituting theIDtsVariableService instead, you can see how this can be done.
Component Properties
As an example of displaying and setting component-level properties, you may have a string property that is displayed in a simple TextBox control and an enumeration value that is used to set the selected index for a ComboBox control. The following example assumes that the two component properties, StringProp and EnumProp, have been defined in the overridden ProvideComponentProperties method of your component class. You would then extend the form constructor to include some code to retrieve the property values and display them in the form controls. This assumes that you have added two new form controls, a TextBox control called MyStringTextBox, and a ComboBox called MyEnumValComboBox. An example of the additional form constructor code is shown here (ReverseStringUIForm.cs file of theWrox.Pipeline.UI project):
MyStringTextBox.Text =
_dtsComponentMetaData.CustomPropertyCollection["StringProp"].Value.ToString();
MyEnumValComboBox.SelectedIndex =
Convert.ToInt32(_dtsComponentMetaData.CustomPropertyCollection["EnumProp"].Value);
The appropriate events for each control would then be used to set the property value of the component, ensuring that this is done through the design-time interface. A variety of events could be used to capture the value change within the Windows Form control, depending on the level of validation you wish to apply within the form or whether you wish to rely solely on validation routines within an overridden SetComponentProperty method in your component class. Capturing these within the control’s validating event would then enable you to cancel the change in the form, as well as display information to the user. A simple example is shown here for the two properties (ReverseStringUIForm.cs file of the Wrox.Pipeline.UI project):
private void MyStringTextBox_Validating(object sender, CancelEventArgs e)
{
// Set the property, and capture any validation errors
// thrown in SetComponentProperty try
{
_designTimeComponent.SetComponentProperty("StringProp",
MyStringTextBox.Text);
}
catch(Exception ex)
{
// Display exception message
MessageBox.Show(ex.Message);
// Cancel event due to error
e.Cancel = true;
}
private voidMyEnumValComboBox_SelectedIndexChanged(object sender, EventArgs e)
{
Try
{
_designTimeComponent.SetComponentProperty("EnumProp ",
((ComboBox)sender).SelectedIndex);
}
catch(Exception ex)
{
// Display exception message
MessageBox.Show(ex.Message);
// Cancel event due to error
e.Cancel = true;
}
}
Providing an overridden SetComponentProperty is a common requirement. The most obvious reason is that component properties are stored through the object type, but you may require a specific type, such as integer, so the type validation code would be included inSetComponentProperty. A simple example of this is shown here (ReverseStringUIForm.cs file of the Wrox.Pipeline.UI project), where the property named IntProp is validated to ensure that it is an integer:
public override IDTSCustomProperty100 SetComponentProperty(string propertyName,
object propertyValue)
{
int result; if (propertyName == "IntProp" &&
int.TryParse(propertyValue.ToString(), out result) == false)
{
bool cancel;
ComponentMetaData.FireError(0, ComponentMetaData.Name, "The IntProp property
is required to be a valid integer.", "", 0, out cancel);
throw new ArgumentException("The value you have specified for IntProp is not
a numeric value");
}
return base.SetComponentProperty(propertyName, propertyValue);
}
In the next section, you build on this example by learning how to handle the exceptions and events.
Handling Errors and Warnings
The previous example and the column selection method in the main example both demonstrated how you can catch exceptions thrown from the base component when you apply settings. Although it is recommended that you use managed exceptions for this type of validation and feedback, you may also wish to use the component events such as FireError or FireWarning. In Chapter 19 you saw an example of the FireError method in the Validation function. The example below gives an overview of how the FireError method is called. Usually, these would be called immediately prior to the exception and used to provide additional information in support of the exception. Alternatively, you could use them to provide the detail and throw the exception only as a means of indicating that an event has been raised. To capture the event information, you can use the IErrorCollectionService. This service can be obtained through System.IServiceProvider, and the preparatory handling is identical to that of IDtsConnectionService, as illustrated in the previous example. For the following examples, assume that a class-level variable containing the IErrorCollectionService has been declared, _errorCollectionService, and populated in the form constructor.
ComponentMetaData.FireError(ERROR_NUMBER, "Where did the error occur?", "What error
occurred?", "Where is the help file location?", HELP_FILE_INDEX,
CANCEL_EXECUTION?);
In the example above, ERROR_NUMBER references an error number if one is available. HELP_FILE_INDEX references the index of where the help topic for this error can be found in the help file. CANCEL_EXECUTION is a Boolean value that can be used to tell the SSIS Engine to stop execution of the package.
The following example (ReverseStringUIForm.cs file of the Wrox.Pipeline.UI project) demonstrates how you can use the GetErrorMessage method of the IErrorCollectionService to retrieve details about an event. This will also include details about any exception thrown. The validating method of a TextBox control is illustrated, and SetComponentProperty is based on the overridden example shown previously, to validate that the property value is an integer:
private void txtIntPropMessage_Validating(object sender, CancelEventArgs e)
{
// Clear any existing errors in preparation for setting property
_errorCollectionService.ClearErrors();
Try
{
// Set property through IDTSDesigntimeComponent100
_designTimeComponent.SetComponentProperty("IntProp",
this.txtIntPropMessage.Text);
}
Catch
{
// Display message
MessageBox.Show(_errorCollectionService.GetErrorMessage());
// Cancel event due to error
e.Cancel = true;
}
}
If a noninteger value is entered, the following message is displayed:
Error at Data Flow Task [ReverseString]: The IntProp property is required to be a
valid integer.
Error at Data Flow Task [ReverseString [84]]: System.ArgumentException: The value
you have specified for IntProp is not a numeric value
at Wrox.Pipeline.ReverseString.ReverseString.SetComponentProperty(String
propertyName, Object propertyValue)
at Microsoft.SqlServer.Dts.Pipeline.ManagedComponentHost.HostSetComponentProperty(
IDTSDesigntimeComponent100 wrapper,
String propertyName, Object propertyValue)
The following example (ReverseStringUIForm.cs file of the Wrox.Pipeline.UI project) demonstrates the GetErrors method and how to enumerate through the errors captured by the service individually:
private void txtIntPropErrors_Validating(object sender, CancelEventArgs e)
{
// Clear any existing errors in preparation for setting property
_errorCollectionService.ClearErrors();
Try
{
// Set property through IDTSDesigntimeComponent100
_designTimeComponent.SetComponentProperty("IntProp",
this.txtIntPropErrors.Text);
}
Catch
{
// Get ICollection of IComponentErrorInfo and cast into
// IList for accessibility
IList<IComponentErrorInfo> errors =
_errorCollectionService.GetErrors() as IList<IComponentErrorInfo>;
// Loop through errors and process into message
string message = "";
for (int i = 0; i < errors.Count; i++)
{
IComponentErrorInfo errorInfo = errors[i] as IComponentErrorInfo;
message += "Level: " + errorInfo.Level.ToString() + Environment.NewLine
"Description : " +
Environment.NewLine + errorInfo.Description + Environment.NewLine +
Environment.NewLine;
}
// Display message
MessageBox.Show(message);
// Cancel event due to error
e.Cancel = true;
}
}
If a noninteger value is entered, the following message is displayed:
Level: Error
Description :
The IntProp property is required to be a valid integer.
Level: Error
Description :
System.ArgumentException:
The value you have specified for IntProp is not a numeric value
at Wrox.Pipeline..ReverseString.ReverseString.SetComponentProperty
(String propertyName, Object propertyValue)
at Microsoft.SqlServer.Dts.Pipeline.ManagedComponentHost.HostSetComponentProperty(
IDTSDesigntimeComponent100 wrapper, String propertyName, Object propertyValue)
As you can see, both the event and the exception information are available through the IErrorCollectionService. This example also demonstrates the use of the Level property, which can be useful for differentiating between errors and warnings. For a complete list ofIComponentErrorInfo properties, please refer to the SQL Server documentation.
Column Properties
When you require column-level information, beyond the selection state of a column, it is a best practice to store this as a custom property on the column. This applies to all column types. An example of this can be seen with the stock Character Map Transformation. If you select a column and perform an in-place operation, such as the Lowercase operation, this is stored as a custom property on that input column. To confirm this, select a column as described and view the component through the Advanced Editor (to open the Advanced Editor, right-click the Character Map Transformation and select Show Advanced Editor). If you then navigate to the Input and expand to select the column, you will see a custom property called MapFlags. This stores the operation enumeration, as shown inFigure 20-7.
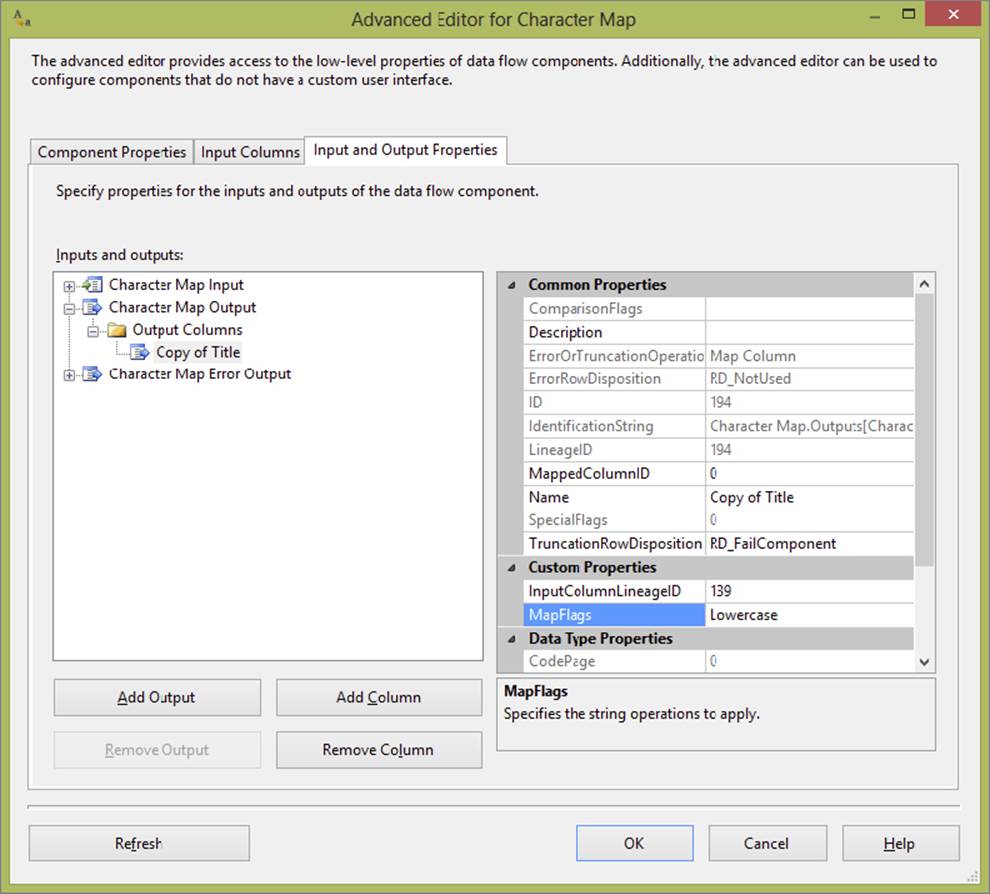
FIGURE 20-7
If your component uses custom column properties in this way, these are perhaps the best candidates for a custom user interface. Using the Advanced Editor to navigate columns and set properties correctly carries a much higher risk of error and is more time-consuming for the user than a well-designed user interface. Unfortunately, this does raise the complexity of the user interface somewhat, particularly from the Windows Forms programming perspective, as the effective use of form controls is what determines the success of such a UI. However, if you are still reading this chapter, you are probably comfortable with such challenges.
To persist these column-level properties, simply call the appropriate SetColumnTypeProperty method on the design-time interface, IDTSDesigntimeComponent100. Obviously, you want to ensure that you previously created the actual properties. For example, in the following code, a property is being set on an input column:
IDTSInput100 _input = ComponentMetadata.InputCollection[0];
IDTSInputColumn100 inputColumn = _input.InputColumnCollection.GetByColumnName("",
"MyColumnName");
_designTimeComponent.SetInputColumnProperty(_input.ID, inputColumn.ID,
"PropertyName", propertyValue);
OTHER UI CONSIDERATIONS
Any good user interface should be designed with usability, accessibility, localization, and other such principles in mind. That means that the user interface should not require a mouse to be configured — the user should be able to navigate using only the keyboard just as easily. Descriptions should be clear, and strings and controls should be tested to ensure that any resizing operation does not truncate them. If the component is intended to be sold to customers, localization (and globalization) may be something you want to think about. You can find a lot of information on http://msdn.microsoft.com/en-us/ on these topics, but as a start you should ensure that string literals live in resource files and that right-to-left language users are not confused by the interface.
Test the component and ensure that it does not crash when receiving invalid input, that any error messages are descriptive, and that exception recovery is graceful. Also keep in mind that users may intentionally or mistakenly use the default UI (Advanced Editor) for the component and corrupt the state that may otherwise have been protected by your UI. If the component is designed correctly, validation is modularized and shared by the component and its UI; however, if this is not possible, then try to ensure that the UI does not break if the metadata is corrupt.
Remember that both the component and its UI may need to be deployed together to other machines (depending on their intended use). If this is the case, consider building an installation script to place the files in the right folders and install them in the GAC as necessary.
SUMMARY
You should now have a good understanding of what is required to implement your own custom user interface for a Pipeline Component. Here’s what you’ll need to do to create a custom UI for your component:
· Build a form that will be used as the UI.
· Add a UI class that implements the IDTSComponentUI interface. This class will instantiate and display the custom UI.
· Add the UITypeName attribute to your custom component that points to the UI class in Step 2, for example: UITypeName=Wrox.Pipeline.UI.ReverseStringUI,Wrox.Pipeline.UI, Version=1.0.0.0, Culture=neutral,PublicKeyToken=6aa87e6360f8b842".
· Write the necessary code to interact with the MetaData and Runtime Connections for your component.
With the lessons learned in this chapter, you should now have the knowledge to apply this guidance for yourself and, perhaps more important, should understand why certain practices are to be followed, enabling you to confidently develop your own components. The functionality described in this chapter enables you to truly exploit the power and extensibility of SQL Server Integration Services.
All materials on the site are licensed Creative Commons Attribution-Sharealike 3.0 Unported CC BY-SA 3.0 & GNU Free Documentation License (GFDL)
If you are the copyright holder of any material contained on our site and intend to remove it, please contact our site administrator for approval.
© 2016-2026 All site design rights belong to S.Y.A.