Professional Microsoft SQL Server 2014 Integration Services (Wrox Programmer to Programmer), 1st Edition (2014)
Chapter 21. External Management and WMI Task Implementation
WHAT’S IN THIS CHAPTER?
· Managing SSIS in SQL Server 2014
· The Managed Object Model code library
· Using the Project class
· Using the Application and Package classes
· WMI operations
WROX.COM DOWNLOADS FOR THIS CHAPTER
You can find the wrox.com code downloads for this chapter at www.wrox.com/go/prossis2014 on the Download Code tab.
Throughout this book, you’ve been exposed to different ways to manage the development and administration of SSIS packages using the Visual Studio IDE and SQL Server Management Studio. This chapter expands on those operations by providing an overview of the ways in which you perform these same management and administrative functions programmatically through managed code. You learn how to use the Project and Parameter classes that have been added to the Microsoft.SqlServer.Dts.Runtime class, as well as theMicrosoft.SqlServer.Management.IntegrationServices class also known as the Managed Object Model. You will also learn how to perform legacy package management operations using the managed Application and Package classes exposed in the dynamic-linked libraryMicrosoft.SQLServer.ManagedDTS.dll by the .NET Microsoft.SqlServer.Dts.Runtime namespace.
The second half of this chapter details the capabilities of the WMI Data Reader Task and the WMI Event Watcher Task. These tasks provide access to system information via the Windows Management Interface model, better known as WMI. Through a query-based language called WQL, similar to SQL in structure and syntax, you can obtain information about a wide variety of system resources to assist you in your SQL Server administrative responsibilities. With WMI, you can mine system-based metrics to look for hardware and operating system trends. In SSIS, using WMI, you can also work more proactively to monitor a Windows-based system for notable events that occur in the system, and even trigger responsive actions.
EXTERNAL MANAGEMENT OF SSIS WITH MANAGED CODE
The SSIS development team has exposed a robust architecture to manage SSIS through managed code. Managed code in this case refers to the use of the .NET Framework Common Language Runtime (CLR), which hosts code written in C# or VB.NET.
Through a rich object model, you can customize your applications to control almost every aspect of managing an SSIS project and package. This section provides a brief overview of the SSIS programming model as it applies to externally managing SSIS projects and packages.
Setting Up a Test SSIS Package for Demonstration Purposes
For this chapter, we’ll be adding a new SSIS package to the project created in Chapter 19 named ProSSIS2014_SSIS. Note that all the code in this chapter can be downloaded from www.wrox.com/go/prossis2014. The package you will set up for this chapter is designed specifically to highlight some of the capabilities of using the managed code libraries.
To start, open the ProSSIS2014_SSIS and add a new package. Name the package package.dtsx. This package will contain a simple Script Task that runs for 10 seconds.
Add two variables to the package as follows:
|
VARIABLE NAME |
TYPE |
VALUE |
EXPRESSION |
|
MyExpression |
String |
@[System::PackageName] |
|
|
MyVariable |
String |
Hello World |
Now drop a Script Task on the Control Flow surface. For the Script Task, set the script language to C# and set the code like this (see the testSSISPackage project):
public void Main()
{
bool ret = false;
Dts.Events.FireInformation(0, "TestPackage",
"Running C# Script Task" " + Dts.Variables[0].Value.ToString(),
"", 0, ref ret);
System.Threading.Thread.Sleep(10000);
Dts.TaskResult = (int)ScriptResults.Success;
}
Test the package to ensure that everything is working correctly. Your results should resemble Figure 21-1.
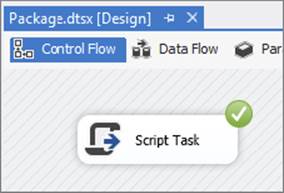
FIGURE 21-1
Now that you have a working test package, you can use it to examine the management capabilities of the DTS runtime managed code library.
The Managed Object Model Code Library
To start with the external management examples in this chapter, you need to have SQL Server installed (with SSIS). You also need the Visual Studio project templates for developing console, windows, and web applications. The code is simple enough to follow along, and as always you can download it from www.wrox.com/go/prossis2014. If you have installed SSIS, you will find a DLL registered in the global assembly cache (GAC) named Microsoft.SQLServer.Management.IntegrationServices.dll (version 11 or higher). In this DLL is a namespace called Microsoft.SqlServer.Management.IntegrationServices nicknamed “MOM,” which stands for Managed Object Model. To access the classes in this namespace, you must first create a project in Visual Studio and then add a reference to the namespace for Microsoft.SQLServer.Management.IntegrationService.dll. To avoid typing the full namespace reference, you’ll want to add either an Imports or a Using statement to include the namespace in your code classes like this:
C#
using Microsoft.SqlServer.Management.IntegrationServices;
VB
Imports Microsoft.SqlServer.Management.IntegrationServices
The Managed Object Model relies on the use of SMO (Server Management Objects), which means you will need to reference the Microsoft.SqlServer.Smo.dll, Microsoft.SqlServer.ConnectionInfo.dll, and Microsoft.SqlServer.Management.Sdk.Sfc.dll. All of these assemblies can be found in the GAC. If you try to compile a project without these references, you will receive an error stating the references will need to be added. For the Managed Object Model examples you will also need to add the Imports or Using statement for SMO like this:
C#
using Microsoft.SqlServer.Management.SMO;
VB
Imports Microsoft.SqlServer.Management.SMO
The Managed Object Model contains the classes used to manage SSIS server instances for SQL Server 2014. This includes managing SSIS catalogs, projects, packages, parameters, environments, and operations.
The IntegrationServices class is the gateway to a SQL Server 2014 SSIS instance. Its primary feature is to be used as the programmatic reference to an SSIS instance.
The Catalog class is used to create and manage the single catalog allowed in SQL Server 2014. The following are typical operations of the Catalog class:
· Create, manage, and remove an SSIS catalog.
· Provide the Folders property, which contains a collection of CollectionFolder objects.
· Provide the Operations property, which contains a collection of Operation objects. Operations include log messages, validation results, and so on.
· Provide the Executions property, which contains a collection of ExecutionOperation objects. Executions are log events of when a package executed or will show that a package is executing.
The CatalogFolder class represents a folder that belongs to a catalog. Typical operations performed by the CatalogFolder are:
· Create, manage, and remove folders
· Deploy and remove projects
· Manage permissions to folders
· Create, manage, and remove environments
· Provide the Projects property, which is a collection of projects for the folder
Now that you’ve been introduced to the core classes you’ll be using, it’s time to go ahead and write some code.
Catalog Management
Our first example (from the MomDemo project) is simply connecting to the local instance of SQL Server 2014 and creating a new catalog. Even though the Managed Object Model provides a CatalogCollection class, there can be only one catalog in an SSIS instance. A side effect of having only one catalog is that if you try to execute the code example that follows more than once against an SSIS instance, you will receive an error stating that SSIS supports only one catalog.
// create an SMO Server instance to the local sql server instance
Server server = new Server("localhost");
// create an instance of the "MOM" class and initialize it with the SMO Server
IntegrationServices isServer = new IntegrationServices(server);
// create an instance of the Catalog class. The parameters are (server, name of
catalog, password for catalog)
Catalog catalog = new Catalog(isServer, "SSISDB", "password");
// now call create
catalog.Create();
As mentioned previously, the IntegrationServices class represents an instance of SSIS in SQL Server 2014. One of the benefits of the IntegrationServices class is it has more than one constructor that allows you to pass in an SMO Server object, a SqlConnection object, or a SqlStoreConnection object from the Microsoft.SqlServer.Management.Sdk.Sfc class. This flexibility allows the management of the SSIS instance from a variety of different project types.
After the example is executed, you should see the new SSISDB catalog in SSMS under the Integration Services Catalogs folder (see Figure 21-2).

FIGURE 21-2
To remove a catalog from an SSIS instance, you would call the Drop method on a Catalog class. However, because there is only one instance of a catalog, the Drop method shouldn’t be used unless you want to recreate your whole catalog.
Folder Management
In this next example (from the MomDemo project) you are going to create a folder in the newly created catalog by using the CatalogFolder class. The CatalogFolder class allows you to create and manage folders that belong to an SSIS catalog. The catalog created in the last example is being retrieved by using the CatalogCollection class.
// create an SMO Server instance to the local sql server instance
Server server = new Server("localhost");
// create an instance of the "MOM" class and initialize it with the SMO Server
IntegrationServices isServer = new IntegrationServices(server);
// retrieve the catalog we created in the last example
Catalog catalog = isServer.Catalogs["SSISDB"];
// create an instance of the Folder class passing in the catalog, name of the
folder and description of the folder
CatalogFolder folder = new CatalogFolder(catalog, "ProSSIS", "Description");
// now call create
folder.Create();
You saw in this example that you’re able to access the CatalogCollection class by using the Catalogs property that is part of the IntegrationServices class. To retrieve an instance of the Catalog class, you have to either know the name of the catalog or iterate through the collection in the Catalogs property. If you don’t know the name, you will iterate through the collection and grab the first (and only) catalog in the Catalogs property like this:
Catalog catalog = null;
foreach(Catalog c in isServer.Catalogs)
catalog = c;
After running the preceding example, you should have a ProSSIS folder underneath the SSISDB catalog in SSMS (see Figure 21-3).
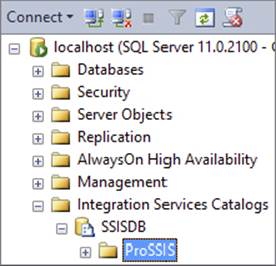
FIGURE 21-3
If you’re copying the examples from the book and not using the examples downloaded from www.wrox.com/go/prossis2014, you need to be aware of an issue when calling Create on the CatalogFolder class that you may run into. You may receive an error stating “Mixed mode assembly is built against version ‘v.2.0.50727’ of the runtime and cannot be loaded in the 4.0 runtime without additional configuration information.” If you receive this error, then you will need to add the following section to the App.Config of your project:
<startup useLegacyV2RuntimeActivationPolicy="true">
<supportedRuntime="v4.0" />
</startup>
Environments
Environments are containers that store parameters to be used in your packages deployed to an SSIS catalog. They are covered more extensively in Chapter 22. Imagine you have a project that runs on a schedule. On weekdays, the packages in the project need to run with a certain set of parameter values, but on weekends, they need a different set of values. This is a project with several packages, and each package has several parameters. All the packages in the project need to use the same parameter values when they run. Environments make it easy to run these packages with different sets of parameter values.
The next example (from the MomDemo project) will show you how to retrieve a catalog folder by name, create an environment, and add variables to the environment by using the EnvironmentInfo and EnvironmentVariables classes.
// create an SMO Server instance to the local sql server instance
Server server = new Server("localhost");
// create an instance of the "MOM" class and initialize it with the SMO Server
IntegrationServices isServer = new IntegrationServices(server);
// retrieve the catalog we created in the last example
Catalog catalog = isServer.Catalogs["SSISDB"];
// grab the "ProSSIS" folder. You will need to
CatalogFolder folder = catalog.Folders["ProSSIS"];
// create a new Environment
EnvironmentInfo env = new EnvironmentInfo(folder, "Environment1", "Description");
env.Create();
// create a non sensitive, integer variable
// the add function parameters are (name of variable, type code, value, is
sensitive, description)
e.Variables.Add("IntVar1", TypeCode.Int32, 1, false, "Description of IntVar1");
// create a sensitive (secure), string variable
e.Variables.Add("SecureVar1", TypeCode.String, "securevalue", true,
"Description of SecureVar1");
// now call alter to save the environment
env.Alter();
After the example is run, a new SSIS environment will be created under the ProSSIS folder with two variables, as seen in Figure 21-4.
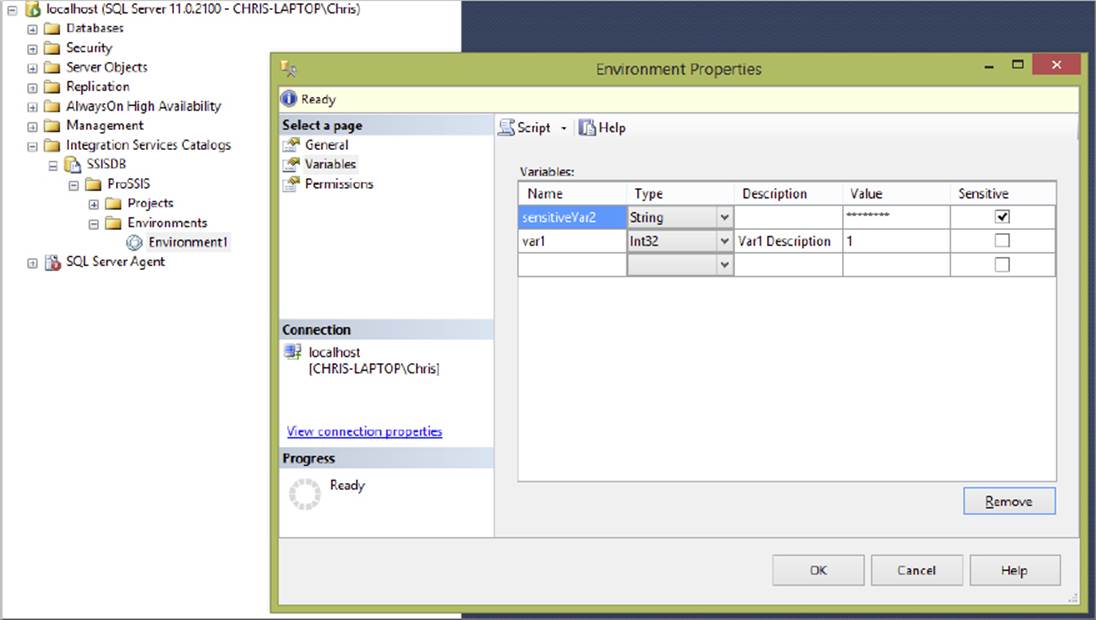
FIGURE 21-4
Environments can be used when executing packages on the server to inject parameter values into a package. This is especially useful when your package needs to be executed against different environments like development and production environments.
To remove a folder you’d simply call the Drop method and the folder. If the folder contains any projects or environments, those projects and environments have to be removed before dropping the folder. The next example (from the MomDemo project) shows how to iterate through any folder contents and remove them before dropping the folder from the catalog.
CatalogFolder folder = catalog.Folders["Test"];
// must use ToArray() to avoid an error for "Collection was modified after
enumeration"
foreach(EnvironmentInfo env in folder.Environments.ToArray())
{
env.Drop();
}
foreach(ProjectInfo p in folder.Projects.ToArray())
{
p.Drop();
}
folder.Drop();
This section covered the basics of the Managed Object Model that can be used to manipulate SSIS server instances. At this point you need to be introduced to the DTS Runtime library that will be used to create projects that can be deployed using the Managed Object Model.
The DTS Runtime Managed Code Library
Now that you’ve been introduced to the server management libraries, the next step is to learn about the classes in the Microsoft.SqlServer.Dts.Runtime namespace. For this section you need to have the SQL Server SDK or SSIS installed. If you have installed the SQL Server SDK or SSIS, you will find a DLL registered in the global assembly cache named Microsoft.SQLServer.ManagedDTS.dll (version 11 or higher). In this DLL is a namespace called Microsoft.SqlServer.Dts.Runtime. To access the classes in this namespace, you must first create a project in Visual Studio and then add a reference to the namespace for Microsoft.SQLServer.ManagedDTS.dll. To avoid having to type the full namespace reference, you’ll want to add either an Imports or a Using statement to include the namespace in your code classes like this:
C#
using Microsoft.SqlServer.Dts.Runtime;
VB
Imports Microsoft.SqlServer.Dts.Runtime
SSIS Deployment Projects
Prior to SQL Server 2012, an SSIS project was only a basic container in BIDS to store all of your single packages and configurations in a logical group on your development system. The concept of a development environment project did not go away with SQL Server 2012, but the deployment project model alleviates some of the headaches that went along with the deployment of SSIS packages. Chapter 22 covers the deployment model, but this chapter covers how to create the new project files programmatically.
The deployment package is created automatically when you build an Integration Services project in SQL Server Data Tools (SSDT). The type of file that is created is known as an .ispac file. An .ispac file is basically a zip file with an .ispac extension that stores all of the packages, parameters, project configurations, and so on for easy portability. Because the file is stored in zip format, the only way to create an .ispac file is by either using the SQL Server Data Tools to build the file or creating the file using the Project class.
The Project class was created to allow you to manipulate SSIS deployment projects. The following are typical operations that can be performed with the Project class.
· Create, open, and save SSIS deployment project files
· Add and remove packages to SSIS project files
· Set project level properties like ProtectionLevel and Password
· Add parameters to and remove parameters from projects
The following is a simple example (from the MomDemo project) of how to create an SSIS deployment project, add a SSIS package, and then save it as an .ispac file. I copied the Package.dtsx file from the testSSISProject to the MomDemo project for the following example.
string projectFileName = @"c:\ssis\MOMDemo\myproject.ispac";
//Create a new project and specify the project file name as the project storage
using (Project project = Project.CreateProject(projectFileName))
{
project.Name = "My ProSSIS Project";
//Set the project property
project.Description = "This is a new project";
//Add a package to the project
project.PackageItems.Add(new Package(), "package.dtsx"); // copies from
testSSISproject
//Get the package and modify its description property
project.PackageItems[0].Package.Description = "Package description ";
//Save the project
project.Save();
}
The CreateProject method can be used like it is in the preceding example by passing in a path to a file or by passing in a System.IO.Stream object. A package is added to the project by calling the PackageItems.Add method.
The first parameter accepts a Microsoft.SqlServer.Dts.Runtime.Package object. Because "package.dtsx" already existed on the local machine, instantiating an empty Package class (new Package()) is done to simply create a placeholder object. If you’re creating packages programmatically using the Microsoft.SqlServer.Dts.Runtime.Package class, those packages can be passed into the first parameter instead of the placeholder.
The second parameter is the name of the package being added to the project. In the example the path of an existing SSIS package was passed into the Add method (package.dtsx).
Parameter Objects
Chapter 5 earlier in the book introduces parameters. Parameters were added to the SQL Server 2012 version of SSIS to be used in expressions throughout your project and packages. Because project level parameters are supported, this makes it very easy for a single value to be used across your whole project in several packages.
This is an important feature that was added to allow the reuse of packages across several environments with just a simple change to the parameter. For instance, you could pass in the connection string for an OLE DB connection using a parameter and reuse the same package to execute against your development and production servers.
This next example (from the MomDemo project) takes part of the last example and expands on it by adding a few package parameters and setting the parameter values, as well as saving the project after all the package settings have been added.
using (Project project = Project.CreateProject())
{
project.Name = "My ProSSIS Project";
//Add a package to the project
project.PackageItems.Add(new Package(), "package.dtsx");
Package package = project.PackageItems[0].Package;
//Add a package parameter with name "PackageParameter1" and type string
package.Parameters.Add("PackageParameter1", TypeCode.String);
//Add a project parameter with name "ProjectParameter2" and type String
project.Parameters.Add("ProjectParameter2", TypeCode.String);
//Get parameter by name
package.Parameters["PackageParameter1"].Value = "Value for a package
parameter";
//Get parameter by index
project.Parameters[0].Value = " Value for a project parameter ";
//Use parameters in expression
package.Properties["Description"].SetExpression(package,
"@[$Project::ProjectParameter2]");
project.Save();
}
In this example you saw how to add parameters to both the SSIS project and the package that was added to the project. When you are creating parameters, both the name of the parameter and the data type need to be specified. Most data types are supported, but the following data types cannot be used for parameters: Object, DBNull, Char, and UInt16. Ideally the parameters should have unique names, but the same parameter name can be used in both a project and a package level parameter, meaning you could have a project parameter named “Connection” and a package level parameter named “Connection.”
The line of code in the preceding example above that calls SetExpression shows you how to access the $Project parameter object that is used to access project level parameters when using SSIS expressions. Both the project and the package level parameters can be accessed through namespace objects, which are named $Project and $Package, respectively.
Any of the parameters, whether they are stored on the project and parameter level, can be accessed using the $Namespace::ParameterName format (for example, $Package::PackageParameter1 or $Project::ProjectParameter2).
Server Deployment
As mentioned earlier in the chapter, deployment in SQL Server 2012 changed from a single package deployment to a project deployment model. You can still use the previous deployment model by right-clicking on the SSIS project in SQL Server Data Tools and clicking the “Convert to Package Deployment Model” (see Figure 21-5), which will revert the deployment model to the pre-2012 model of storing the packages in the MSDB database or Integration Services store. Keep in mind that if you’re using project or package level parameters in your packages or any task like the Execute Package Task that uses project references, you cannot use the package deployment model.
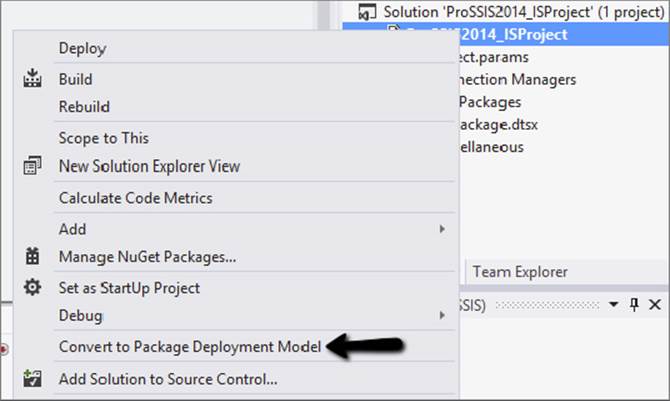
FIGURE 21-5
The next example (from the MomDemo project) opens the project created in the previous example (myproject.ispac) and deploys it to the ProSSIS folder in the SSIS catalog on the local SQL Server 2014 server.
// create an SMO Server instance to the local sql server instance
Server server = new Server("localhost");
// create an instance of the "MOM" class and initialize it with the SMO Server
IntegrationServices isServer = new IntegrationServices(server);
// retrieve the catalog we created in the last example
Catalog catalog = isServer.Catalogs["SSISDB"];
// grab the prossis folder
CatalogFolder folder = catalog.Folders["ProSSIS"];
string projectFileName = "C:\ssis\ExtMgt\MomDemo\myproject.ispac";
using (Project project = Project.OpenProject(projectFileName))
{
// deploy the project
folder.DeployProject(project);
// call "Alter" to save the project to the folder
folder.Alter();
}
In the preceding example DeployProject was called using the CatalogFolder class. When you are deploying a project to a catalog, a folder must be used to store the project. In this case the "ProSSIS" folder was used. The Alter method was called to save the changes made to the folder, which in this example was simply adding a new project.
Executing SSIS Packages Deployed to the SSIS Catalog
Now that a project has been deployed, you can execute a package on the server and grab the execution messages (see the MomDemo project). This is a powerful way of executing a package on the server and easily grabbing any messages that were outputted during execution. We are assuming a reference to the "ProSSIS" catalog folder was already obtained.
// folder was obtained already
ProjectInfo p = folder.Projects["My ProSSIS Project"];
// get a reference to the package.dtsx package store in the project
PackageInfo pkg = p.Packages["package.dtsx"];
// execute the project. The parameters are (run as 64 bit, Environment reference)
// Environment reference can be used to tell the package to use an environment
created
// in the current catalog
// We're grabbing the "operation id" for this execution
long operationId = pkg.Execute(false, null);
// refresh the operations in the catalog. This will assure we are getting the
messages for our package execution
catalog.Operations.Refresh();
StringBuilder messages = new StringBuilder();
// iterate through each operation.
foreach (Operation op in catalog.Operations)
{
// make sure we're only looking at the operation for this execution
if (operationId == op.Id)
{
op.Refresh();
foreach (OperationMessage msg in op.Messages)
{
messages.AppendLine(msg.Message);
}
}
}
LogFileTextbox.Text = "Package executed: " + messages.ToString();
When calling the Execute method from the PackageInfo class, you’re able to object the Id of the operation by assigning it to the operationId variable. This is later used in the method when iterating through the Operations property of the Catalog class to retrieve only theOperationMessage references for the package that was just executed.
At the end of the example, we used the Message property of the OperationMessage class to build the messages string builder.
Environment References
We mentioned earlier in the chapter that environments can be used when executing a package stored in an SSIS catalog. The second parameter of PackageInfo.Execute method accepts an EnvironmentReference object, not an EnvironmentInfo object that was used to create the environment. To use an environment you must add an environment reference to the project either in SSMS (see Chapter 22) or programmatically using the ProjectInfo.References.Add method. An environment reference is basically a pointer to an existing environment.
This next example (from the MomDemo project) expands on an earlier example where an environment was added to a project by adding an environment reference to a project.
CatalogFolder folder = catalog.Folders["ProSSIS"];
// create a new Environment
EnvironmentInfo env = new EnvironmentInfo(folder, "Environment1", "Description");
env.Create();
// create a non sensitive, integer variable
// the add function parameters are (name of variable, type code, value, is
sensitive, description)
e.Variables.Add("IntVar1", TypeCode.Int32, 1, false, "Description of IntVar1");
// create a sensitive (secure), string variable
e.Variables.Add("SecureVar1", TypeCode.String, "securevalue", true,
"Description of SecureVar1");
// now call alter to save the environment
env.Alter();
ProjectInfo p = folder.Projects["My ProSSIS Project"];
// add the reference. Parameters are: name of environment, folder where
environment is stored.
p.References.Add("Environment1", folder.Name);
p.Alter(); // save the project
The last few lines of code in this example show you how to add a reference to an environment by utilizing the EnvironmentReference.Add method. Now that a reference has been added, you can use it when executing a package on the server. This next example (from the MomDemo project) shows you how to retrieve an EnvironmentReference object and pass it into the Package.Execute method.
ProjectInfo p = folder.Projects["My ProSSIS Project"];
PackageInfo pkg = p.Packages["package.dtsx"];
// you must use the name of the Environment and foldername to get the reference
EnvironmentReference reference = p.References["Environment1", folder.Name];
reference.Refresh();
pkg.Execute(false, reference);
PACKAGE OPERATIONS
The Application object is the core class that exposes methods used to connect to and interface with an SSIS service instance for pre-SQL 2012 instances of SQL Server or when the deployment model of your SSIS project is set to use the package deployment model. The following are typical management operations that can be performed using this class:
· Load, save, and delete SSIS packages on the Windows files system, SQL Server, or Integration Services repository
· Construct and execute packages either from a storage facility or in memory
· Add, remove, and rename folders in SQL Server or Integration Services repository folders
· Control package permissions stored within a SQL Server
· Obtain state information and status regarding the execution of packages in SQL Server or the SSIS package repository
The Package object represents an instance of a single SSIS package. Although this object exposes many methods that enable you to control every aspect of a package, this chapter deals only with functionality that applies to maintenance-type operations. Here are the maintenance-based operations that the Package object exposes:
· Configuring log providers
· Managing package configurations
· Managing Connection Managers in SQL Server and Integration Services
Now that you have an overview of the managed class library for the DTS runtime, the following sections dig deeper into each of the primary classes and demonstrate some useful examples.
APPLICATION OBJECT MAINTENANCE OPERATIONS
SSIS packages can be stored on either the Windows file system or the SSIS catalog. For pre-2012 SQL Server instances and SSIS 2014 projects using the package deployment model, packages can also be stored in the SSIS package store or within SQL Server. The methods of the Application object enable you to manage SSIS packages in each of these storage scenarios excluding the SSIS catalog, including management of packages in other server instances. Once the package is loaded or constructed in the Application object, it may be run or executed. The flexibility to store, load, and run packages in separate machine spaces expands the scaling capabilities of SSIS packages.
The convention that the SSIS team chose to employ in naming the methods on this Application class is to use DtsServer in their names when the operation applies to packages in the SSIS package store and SqlServer in their names when storage is in SQL Server. If you don’t see either of these in the method name, typically this means that the operation is for packages stored in the file system.
In terms of the operations that the Application object supports, you’ll find methods for general package, folder, and role maintenance.
Package Operations
The Application object exposes the following methods to manage packages in the Windows file system, the SSIS package store, and the SQL Server database instance. The SSIS package store has been replaced by the SSIS catalog, so any of the LoadFrom... andSaveTo... methods (with exception of SaveToXML) are now obsolete if you’re using the SSIS catalog. These methods can still be used if you prefer to use the pre-SQL Server 2012 storage methods, which are still supported in SQL Server 2014.
· LoadPackage: Loads a package from the file system
· LoadFromDtsServer: Loads a package from the specified SSIS package store
· LoadFromSqlServer: Loads a package from the specified SQL Server instance
· LoadFromSqlServer2: Loads a package from the specified SQL Server instance by supplying a valid connection object
· SaveToXML: Saves a package object to the file system with a dtsx file extension
· SaveToDtsServer: Saves a package to the SSIS package store
· SaveToSqlServer: Saves a package to the specified SQL Server instance
· SaveToSqlServerAs: Saves a package as a different name to the specified SQL Server instance
· RemoveFromDtsServer: Removes a package from the SSIS package store
· RemoveFromSqlServer: Removes a package from the specified SQL Server instance
· ExistsOnDtsServer: Indicates whether a specified package already exists in the SSIS package store at the specified path
· ExistsOnSqlServer: Indicates whether a specified package already exists on a specified SQL Server
Now armed with the basic capabilities of the Application class, you can put together some real-world examples. First you’ll put together an example that examines the variables in a package, and then you’ll look at how you can programmatically deploy packages to a DTS package store.
A Package Maintenance Example
At the most basic level, you need to understand how to access a package programmatically to examine its internals. This is where the Package object class is used. This class mirrors the structure of the SSIS packages and allows them to be loaded into a navigable object model. Once the package is deep copied into this Package structure, you can look at anything in the package. The following C# code snippet is just a partial example of how to load your demonstration package into a Package object variable from the file system. Notice that because the package exists on the file system, you are using the LoadPackage method of the Application object instead of the methods that apply to DTS or SQL Server package stores. Note that this snippet assumes you have the references toMicrosoft.SQLServer.ManagedDTS.dll. Code can be found in the ExtMgt folder in the CSharp_LoadPackage or vb_LoadPackage.
C#
using Microsoft.SqlServer.Dts.Runtime;
public void LoadPackage()
{
Application dtsApp = new Application();
string TestPackageFullPath =
@"C:\SSIS\extmgt\TestSSISPackage\TestSSISPackage\Package.dtsx";
Package pac = dtsApp.LoadPackage(TestPackageFullPath, null);
...
}
VB
Imports Microsoft.SqlServer.Dts.Runtime
Public Sub LoadPackage()
Dim dtsApp as new Application()
Dim TestPackageFullPath as String = _
"C:\SSIS\extmgt\TestSSISPackage\TestSSISPackage\Package.dtsx"
Dim package As Package = dtsApp.LoadPackage(TestPackageFullPath, Nothing)
...
End Sub
Once the Application class is created and the Package object is loaded, you can interrogate the Package object to perform many different tasks. A useful example involves examining the variables within a package. You can do this easily by iterating the variables collection to look for user variables or system variables. The following code snippet (from the ExtMgt folder in CSharp_LoadPackage or vb_LoadPackage) is in the form of a function that you can add to your solution to perform this task:
C#
private static void DisplayFilePackageVariables(string FullPath,
bool ShowOnlyUserVariables)
{
Application app = new Application()
Package package = app.LoadPackage(FullPath, null);
string sMsg = "Variable:[{0}] Type:{1} Default Value:{2}
IsExpression?:{3}\n";
foreach(Variable var in package.Variables)
{
if ((var.Namespace != "System") &&
ShowOnlyUserVariables) ||
!ShowOnlyUserVariables)
{
Console.WriteLine(String.Format(sMsg, var.Name,
var.DataType.ToString(),
var.Value.ToString(),
var.EvaluateAsExpression.ToString()));
}
}
}
VB
Private Sub DisplayFilePackageVariables(ByVal FullPath As String, ByVal
ShowOnlyUserVariables As Boolean)
Dim app As New Application()
Dim package As Package = app.LoadPackage(FullPath, Nothing)
Dim sMsg As String
sMsg = "Variable:[{0}] Type:{1} Default Value:{2} IsExpression?:{3}"
+ vbCrLf
For Each Variable In package.Variables
If ((Variable.Namespace <> "System" And _
ShowOnlyUserVariables = True) Or _
ShowOnlyUserVariables = False) Then
Console.WriteLine(String.Format(sMsg, Variable.Name, _
Variable.DataType.ToString(), _
Variable.Value.ToString(), _
Variable.EvaluateAsExpression.ToString()))
End If
Next
End Sub
If you run this code using the full file path of the demonstration SSIS package and set the option to show only the user variables, the console results will look like Figure 21-6.
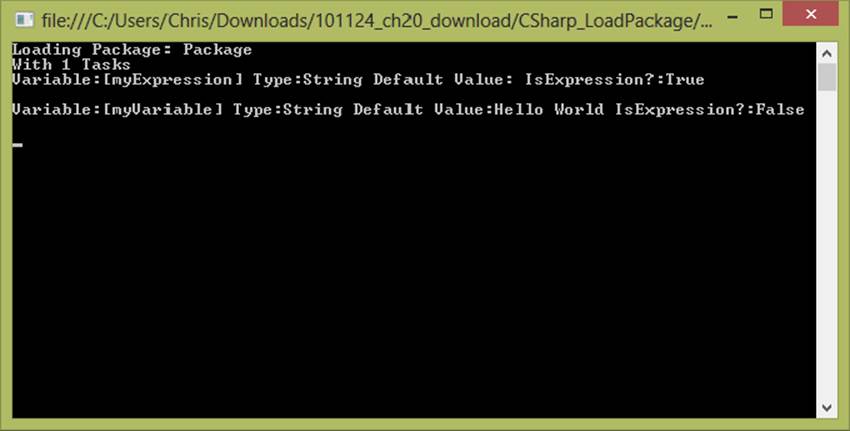
FIGURE 21-6
You can see in the console that this correctly shows the two user variables that you set up earlier in the Test SSIS package at the start of this chapter. The results also correctly show that the myExpression variable is an expression-based variable using theEvaluateAsExpression property. The power of the application and package objects don’t stop there. You can also move packages from one store to another, as shown in this next example.
Package Monitoring
You saw an example earlier how the Catalog class exposes a property named Executions, which is a collection of ExecutionOperation objects. You can iterate through the ExecutionOperation objects to get a list of the packages that previously ran or a list of currently running packages. The ExecutionOperation class has properties that give you the details of the execution operation such as the package name, the project name, when the package starting running, whether or not the package is completed, when the package completed running, and other useful information about the execution.
The following example (from the MomDemo folder) shows you how to list the packages that are currently running in an SSIS catalog.
Catalog catalog = isServer.Catalogs["SSISDB"];
StringBuilder messages = new StringBuilder();
foreach(ExecutionOperation exec in catalog.Executions)
{
catalog.Executions.Refresh();
if (!exec.Completed)
{
messages.AppendLine("Package " + exec.PackageName " is running.
The project name is " + exec.ProjectName);
}
}
LogFileTextbox.Text = messages.ToString();
For previous versions of SQL Server or if you’re using the package deployment model, the Application class exposes a method to enumerate all the packages that are currently being executed on an SSIS server. By accessing a running package, you can view some general properties of the package’s execution status, and you can even stop a package’s execution status. The following methods can be used:
· GetRunningPackages: Returns a RunningPackages object that enumerates all the packages currently running on a server
· RunningPackages: A collection of RunningPackage objects
· RunningPackage: An informational object that includes such information as package start time and current running duration
The following code (from the ExtMgt folder in CSharp_GetRunningPkgs or vb_GetRunningPkgs) uses the GetRunningPackage object to enumerate information about each running package, such as the package’s start time and running duration.
C#
private static void GetRunningPackageInformation(string Server)
{
Application app = new Application();
RunningPackages runPkgs = app.GetRunningPackages(Server);
Console.WriteLine("Running Packages Count is {0}", runPkgs.Count);
foreach(RunningPackage pkg in runPkgs)
{
Console.WriteLine("Instance ID: {0}", pkg.InstanceID);
Console.WriteLine("Package ID: {0}", pkg.PackageID);
Console.WriteLine("Package Name: {0}", pkg.PackageName);
Console.WriteLine("User Name Running Package: {0}", pkg.UserName);
Console.WriteLine("Execution Start Time: {0}",
pkg.ExecutionStartTime.ToString());
Console.WriteLine("Execution Duration: {0} secs",
pkg.ExecutionDuration.ToString());
}
}
VB
Private Sub GetRunningPackageInformation(ByVal Server As String)
Dim app As New Application()
Dim runPkgs As RunningPackages = app.GetRunningPackages(Server)
Console.WriteLine("Running Packages Count is {0}", runPkgs.Count)
For Each RunningPackage In runPkgs
Console.WriteLine("Instance ID: {0}", RunningPackage.InstanceID)
Console.WriteLine("Package ID: {0}", RunningPackage.PackageID)
Console.WriteLine("Package Name: {0}",-
RunningPackage.PackageName)
Console.WriteLine("User Name Running Package: {0}", _
RunningPackage.UserName)
Console.WriteLine("Execution Start Time: {0}", _
RunningPackage.ExecutionStartTime.ToString())
Console.WriteLine("Execution Duration: {0} secs", _
RunningPackage.ExecutionDuration.ToString())
Next
End Sub
To see this in action, run your SSIS package, and then run this code to see any package that is currently running. This type of code can be useful for monitoring your server to determine whether any packages are running prior to shutting down the server. For example, you may need to get an inventory of the packages on a server. If so, you’ll want to review the next section, which shows you how to do that programmatically.
Project, Folder, and Package Listing
When you want to see a listing of the projects, folders, and packages for a catalog, this is easily achieved by iterating through a few collection classes. The first Collection class that you need to iterate through is the FolderCollection class, which is accessed through theFolders property on the Catalog class. Next, you will iterate through the ProjectsCollection class that is accessed through the Projects property on the Folder class. Finally you’ll iterate through the PackageCollection class, which is accessed through the Packages property on the Project class. This is useful for taking an inventory of all the packages that exist on a server. Here is the code (from the MomDemo folder) that will do this for a catalog on a 2014 SSIS Instance by adding the catalog, catalog folders, projects, and packages to a TreeView.
Server server = new Server(@"localhost");
IntegrationServices isServer = new IntegrationServices(server);
Catalog catalog = null;
// we're assuming we don't know the name of the catalog here
foreach (Catalog c in isServer.Catalogs)
catalog = c;
TreeNode catalogNode = new TreeNode("Catalog: " + catalog.Name);
treeView1.Nodes.Add(catalogNode);
foreach (CatalogFolder f in catalog.Folders)
{
TreeNode folderNode = new TreeNode("Folder: " + f.Name);
catalogNode.Nodes.Add(folderNode);
foreach (ProjectInfo p in f.Projects)
{
TreeNode projectNode = new TreeNode("Project: " + p.Name);
folderNode.Nodes.Add(projectNode);
foreach (Microsoft.SqlServer.Management.IntegrationServices
.PackageInfo pkg in p.Packages)
{
TreeNode packageNode = new TreeNode("Package: " +
pkg.Name);
projectNode.Nodes.Add(packageNode);
}
}
}
The result is information about the packages stored on the server instance, as shown in Figure 21-7.
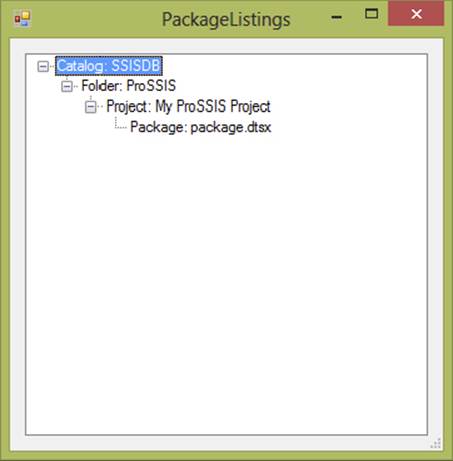
FIGURE 21-7
This is only the tip of the iceberg in terms of what you can do with the DTS runtime libraries. To get an idea of what you can do using this library, in the next section you build a simple UI that enables you to use some of the code techniques described so far.
A Package Management Example
The following example demonstrates how to incorporate package management operations in a web-based application. It shows how to enumerate the catalog, folder, and project structure of a SQL Server SSIS instance; enumerate the packages that are contained in a selected project; and then execute a package from the web page itself. This chapter demonstrates with a C# version of the project. However, you can download a VB.NET version of the project, as well as the source shown in this chapter, fromwww.wrox.com/go/prossis2014.
To start, first create a new web project in Visual Studio. Launch Visual Studio and select File ⇒ New ⇒ Web Site. In the New Web Site dialog (see Figure 21-8), select ASP.NET Web Forms Site and then choose Visual C# or Visual Basic as the language. Leave the rest of the fields as shown.
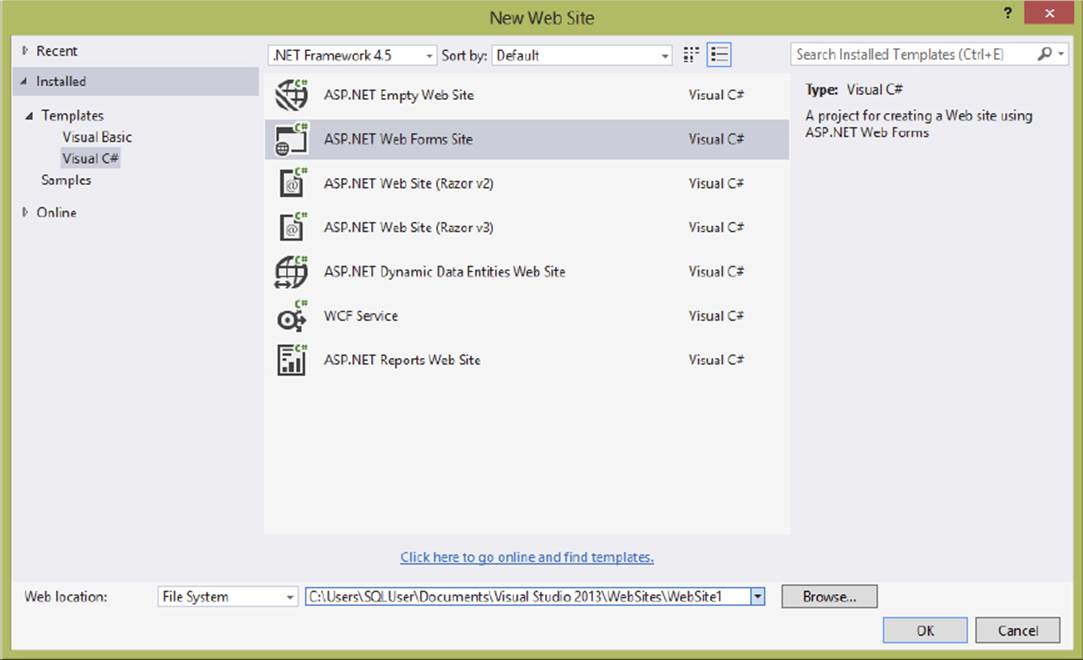
FIGURE 21-8
Click the OK button, and the Web Site project will be initialized. By default, the Default.aspx page is created and displayed automatically. Now you can start building the page that will display the information you want. First, you must add the web controls to the page.
To do this, select the Design view from the bottom-left corner of the Default.aspx tab. This puts the interface into graphics designer mode. From the Toolbox on the left-hand side of the window, drag a TreeView control onto the page. The TreeView control is in the Navigation group of the Toolbox. Now drag a GridView control onto the page. The GridView is located in the Data group of the Toolbox. Finally, drag over a Button control from the Toolbox. The Button control can be found in the Standard group. Click the Button control, and in the Properties tab change the Text property to the word “Refresh.”
Now you need to add some supporting HTML in the source view of the page to configure the columns of the GridView control. To do so, click the Source button on the bottom left of the Default.aspx tab. This switches the view to show you the HTML code that defines this page. Add the following HTML code between the <asp:GridView1> elements. The <asp:BoundField> elements you’re adding configure the GridView to display three data columns and a button column. You could do this through the Design interface, but this is a bit quicker for your purposes:
<Columns>
<asp:BoundField DataField="PackageName" HeaderText="Name" />
<asp:BoundField DataField="PackageFolder" HeaderText="Folder" />
<asp:BoundField DataField="Status" HeaderText="Status" />
<asp:ButtonField Text="Execute" ButtonType=Button/>
</Columns>
Select GridView1 in design mode to show the properties. If your properties bar isn’t visible, press F4. Now set the “AutoGenerateColumns” property of GridView1 to false.
The page should now look like Figure 21-9.

FIGURE 21-9
Before you leave this screen, you need to create a few event handlers on these controls. To do this, select the TreeView control. Go to the Properties tab in the bottom right of the Visual Studio IDE. On the toolbar of the Properties window, select the lightning bolt symbol that signifies the Events view. The Events view enables you to configure the event handlers you need to handle for this page. With the TreeView selected and the Events view shown in the Properties window, double-click in the SelectedNodeChanged event in the Behavior group. Notice that the Default.aspx.cs code-behind page is automatically loaded, and the event handler code for the SelectedNodeChanged event is automatically created. Switch back to the Default.apsx tab and do the same thing for the TreeView Load event. Now repeat the same process for the GridView RowCommand event and the Button Click events. To view a description of what these events do, you can search for the event name in the Help screen.
The full HTML code of the page (see the CSharp_Website2014 project) should now look something like this:
<%@ Page Language="C#" AutoEventWireup="true" CodeFile="Default.aspx.cs"
Inherits="_Default2" %>
<!DOCTYPE html PUBLIC "-//W3C//DTD XHTML 1.1//EN"
"http://www.w3.org/TR/xhtml11/DTD/xhtml11.dtd">
<html xmlns="http://www.w3.org/1999/xhtml">
<head runat="server">
<title>Untitled Page</title>
</head>
<body>
<form id="form1" runat="server">
<div>
<asp:TreeView ID="TreeView1" runat="server" ShowLines="True"
OnLoad="TreeView1_Load" OnSelectedNodeChanged=
"TreeView1_SelectedNodeChanged">
</asp:TreeView>
<br />
<asp:GridView ID="GridView1" runat="server" AutoGenerateColumns=False
OnRowCommand="GridView1_RowCommand">
<Columns>
<asp:BoundField DataField="PackageName" HeaderText="Name" />
<asp:BoundField DataField="PackageFolder" HeaderText="Folder" />
<asp:BoundField DataField="Status" HeaderText="Status" />
<asp:ButtonField Text="Execute" ButtonType=Button/>
</Columns>
</asp:GridView>
<br />
<asp:Button ID="Button1" runat="server" OnClick="Button1_Click"
Text="Refresh" />
</div>
</form>
</body>
</html>
Now you need to start adding the code behind the page that makes this page work. For this example, you will be creating a few custom classes to support code you will be writing in the code-behind page of the Web Form. First, you need to add two new class files. To do this, select File ⇒ New ⇒ File from the main menu. In the Add New File dialog that appears, select a new Class object and name it PackageGroup.cs. The PackageGroup object will be used to wrap a PackageInfo object and enhance its functionality. Next, add another Class object and call this one PackageGroupCollection.cs. Notice that these two files have been added to the App_Code directory of the solution. In Visual Studio, your code external modules are stored in the App_Code directory. Add the following references to your project:
Microsoft.SQLServer.ManagedDTS.dll
Microsoft.SqlServer.Management.IntegrationServices.dll
Microsoft.SqlServer.Smo.dll
Microsoft.SqlServer.ConnectionInfo.dl
Microsoft.SqlServer.Management.Sdk.Sdf.dll
Next, open the PackageGroup.cs file and add the following code to it (see the CSharp_Website2014 project). You can overwrite the code that was automatically generated with this code:
using System;
using System.Data;
using System.Configuration;
using System.Web;
using System.Web.Security;
using System.Web.UI;
using System.Web.UI.WebControls;
using System.Web.UI.WebControls.WebParts;
using System.Web.UI.HtmlControls;
using Microsoft.SqlServer.Management.IntegrationServices ;
using Microsoft.SqlServer.Management.Smo;
///
<summary>
///
Summary description for PackageGroup
///
</summary>
///
public
class PackageGroup
{
public PackageGroup(PackageInfo packageInfo, string server, string catalog,
string folder, string project)
{
_packageinfo = packageInfo;
_server = server;
_folder = folder;
_catalog = catalog;
_project = project;
}
private PackageInfo _packageinfo;
private string _server;
private string _catalog;
private string _folder;
private string _project;
public string PackageName
{
get { return _packageinfo.Name; }
}
public string PackageCatalog
{
get { return _catalog; }
}
public string PackageFolder
{
get { return _folder; }
}
public string PackageProject
{
get { return _project; }
}
public string Status
{
get { return GetPackageStatus(); }
}
public void ExecPackage()
{
Server server = new Server(_server);
IntegrationServices service = new IntegrationServices(server);
Catalog catalogObject = service.Catalogs[_catalog];
CatalogFolder folderObject = catalogObject.Folders[_folder];
ProjectInfo projectObject = folderObject.Projects[_project];
PackageInfo p = projectObject.Packages[_packageinfo.Name];
p.Execute(false, null);
}
private string GetPackageStatus()
{
Server server = new Server(_server);
IntegrationServices service = new IntegrationServices(server);
Catalog catalog = service.Catalogs[_catalog];
foreach (ExecutionOperation exec in catalog.Executions)
{
if (exec.FolderName == _folder && exec.PackageName == _packageinfo.Name)
{
catalog.Executions.Refresh();
if (!exec.Completed)
{
return "Executing";
}
}
}
return "Sleeping";
}
As you can see, this object stores the information about a package and wraps a PackageInfo object. You could just link the PackageInfo objects to the GridView, but this method codes a wrapper with additional functionality to determine a package’s execution status and execute a package. The ExecutePackage method can be called to execute the package, and the GetPackageStatus method searches the currently running packages on the server and returns an execution status to the calling object.
To store information about multiple packages, you need to roll all the PackageGroup objects you create into a collection object. To do this, you created a strongly typed collection class called PackageGroupCollection to house very concrete PackageGroup objects. Open thePackageGroupCollection file and add the following code (see the CSharp_Website2014 project). Once again, you can overwrite the code that was automatically created when the file was created with this example code:
using System;
using System.Data;
using System.Configuration;
using System.Web;
using System.Web.Security;
using System.Web.UI;
using System.Web.UI.WebControls;
using System.Web.UI.WebControls.WebParts;
using System.Web.UI.HtmlControls;
///<summary>
///Summary description for PackageGroupCollection
///</summary>
///
Public class PackageGroupCollection : System.Collections.CollectionBase
{
public PackageGroupCollection()
{
}
public void Add(PackageGroup aPackageGroup)
{
List.Add(aPackageGroup);
}
public void Remove(int index)
{
if (index > Count - 1 || index < 0)
{
throw new Exception("Index not valid!");
}
else
{
List.RemoveAt(index);
}
}
public PackageGroup Item(int Index)
{
return (PackageGroup)List[Index];
}
}
This class simply inherits from the System.CollectionBase class to implement a basic IList interface. To learn more about strongly typed collections and the CollectionBase class, search the Help files. Next you will add the code-behind page of the Default.aspx page. Select the Default.aspx.cs tab and add the following code (see the CSharp_Website2014 project) to this page:
using System;
using System.Data;
using System.Data.SqlClient;
using System.Configuration;
using System.Web;
using System.Web.Security;
using System.Web.UI;
using System.Web.UI.WebControls;
using System.Web.UI.WebControls.WebParts;
using System.Web.UI.HtmlControls;
using System.Threading;
using Microsoft.SqlServer.Dts.Runtime;
using Microsoft.SqlServer.Management.IntegrationServices;
using Microsoft.SqlServer.Management.Smo;
public partial class _Default : System.Web.UI.Page
{
PackageGroupCollection pgc;
string ssisServer = @"localhost ";
protected void Page_Load(object sender, EventArgs e)
{
}
protected void TreeView1_Load(object sender, EventArgs e)
{
//Clear TreeView and Load root node
//Load the SqlServer SSIS catalog, folder and project structure into
tree view and show all
//nodes
TreeView1.Nodes.Clear();
Server server = new Server(ssisServer);
IntegrationServices isServer = new IntegrationServices(server);
Catalog catalog = null;
foreach (Catalog c in isServer.Catalogs)
catalog = c;
LoadTreeView(catalog);
TreeView1.ExpandAll();
}
protected void TreeView1_SelectedNodeChanged(object sender, EventArgs e)
{
// does the current node have 2 / slashes in the valuepath
// (e.g. SSISDB/ProSSIS/My ProSSIS Project)
System.Text.RegularExpressions.Regex regEx = new
System.Text.RegularExpressions.Regex(@"\/");
if (regEx.Matches(TreeView1.SelectedNode.ValuePath).Count == 2)
{
// were in a project node
PackageGroupCollection pgc = BuildPackageGroupCollection
(TreeView1.SelectedNode.ValuePath);
LoadGridView(pgc);
Session.Add("pgc", pgc);
}
}
protected void GridView1_RowCommand(object sender, GridViewCommandEventArgs e)
{
if (e.CommandName == "Execute")
{
pgc = (PackageGroupCollection)Session["pgc"];
PackageGroup pg = pgc.Item(Convert.ToInt32(e.CommandArgument));
Thread oThread = new System.Threading.Thread(new
System.Threading.ThreadStart(pg.ExecPackage));
oThread.Start();
LoadGridView(pgc);
}
}
protected void LoadTreeView(Catalog catalog)
{
TreeNode catalogNode = new TreeNode(catalog.Name);
TreeView1.Nodes.Add(catalogNode);
foreach (CatalogFolder f in catalog.Folders)
{
TreeNode folderNode = new TreeNode(f.Name);
catalogNode.ChildNodes.Add(folderNode);
foreach (ProjectInfo p in f.Projects)
{
TreeNode projectNode = new TreeNode( p.Name);
folderNode.ChildNodes.Add(projectNode);
}
}
}
protected void LoadGridView(PackageGroupCollection pgc)
{
GridView1.DataSource = pgc;
GridView1.DataBind();
}
protected PackageGroupCollection BuildPackageGroupCollection(string
pathToProject)
{
// split the ValuePath by /
string[] path = pathToProject.Split('/');
string catalog = path[0];
string folder = path[1];
string project = path[2];
Server server = new Server(ssisServer);
IntegrationServices service = new IntegrationServices(server);
Catalog catalogObject = service.Catalogs[catalog];
CatalogFolder folderObject = catalogObject.Folders[folder];
ProjectInfo projectObject = folderObject.Projects[project];
PackageGroupCollection collection = new PackageGroupCollection();
foreach (Microsoft.SqlServer.Management.IntegrationServices.PackageInfo
p in projectObject.Packages)
{
PackageGroup g = new PackageGroup(p, server.Name, catalog, folder,
project);
collection.Add(g);
}
return collection;
}
// refresh button
protected void Button1_Click(object sender, EventArgs e)
{
LoadGridView((PackageGroupCollection)Session["pgc"]);
}
}
When the page is processed, several additional methods are called. The TreeView_Load method is called, which in turn calls the LoadTreeView method, which accepts a Catalog collection. The folders and projects of the catalog are iterated, and each folder and project is added to the TreeView. When the page is first loaded, just the TreeView is displayed. By selecting a project in the TreeView, the page is posted back to the server, and the TreeView1_SelectedNodeChanged method is called. This method calls another method in this page called BuildPackageGroupCollection, which accepts a string value that contains the ValuePath of the selected tree node. The string is split by a forward slash, which stores the value of the catalog, folder, and project. Before iterating through the collection of packages, theIntegrationServices, Catalog, CatalogFolder, and ProjectInfo objects are instantiated. Then the Packages property of the ProjectInfo class is iterated to list the packages stored in the selected project. Once the collection is built, the LoadGridView method is called to link the PackageGroupCollection to the GridView. In the LoadGridView method, the collection is bound to the GridView object. This action automatically loads all the objects in the PackageGroupCollection into the GridView.
How does the GridView know which columns to display? Remember back in the beginning of this example when you added the «asp:BoundColumn» elements to the GridView object. Notice that the DataField attributes are set to the properties of the PackageGroup objects in the PackageGroupCollection object. Therefore, in your walkthrough of the code, the page is basically finished processing, and the results would be displayed to the user in the web page. Try it and inspect what you have so far. Go ahead and build and then run the project. Figure 21-10 shows a sample of what you may see when you run the web page. Your results may vary depending on the folders and packages you have configured in your server.
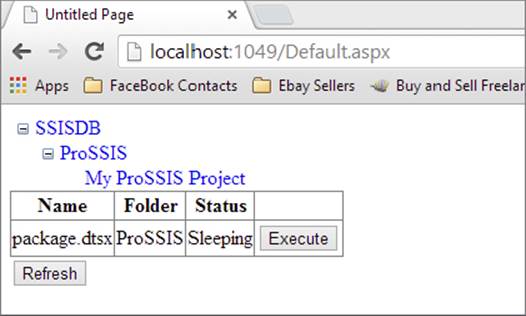
FIGURE 21-10
NOTE You’ll need to click the My ProSSIS Project node to see the packages in the grid.
Now take a look at how the status field and Execute button work. When the GridView is loaded with PackageGroup objects, the status property of the PackageGroup class is called. Look in the PackageGroup.cs file and you will see that when the status property is called, the code iterates through a collection of ExecutionOperation objects to determine whether a package is currently running or not. The ExecutionOperation stores the name of the folder and package, and those two properties are compared to the internal _folder and_packageInfo.Name values of the current PackageGroup object. If a match is found, the Completed property of the ExecutionOperation object is checked for a value of False. If False is returned from the Completed property, a string value of “Executing” is returned to the GridView. If the Completed property returns True or nothing is found in the iteration of the ExecutionOperationCollection object, the value of “Sleeping” is returned. The Execute button works in a similar fashion.
When the Execute button is clicked, the GridView1_RowCommand method is called in the page’s code-behind file. This method re-instantiates the PackageGroup object from the page’s viewstate cache. When found, the package is executed by calling the Execute method of thePackageGroup object. Notice that this call is done in a newly created thread. By design, a web page is processed synchronously. This means that if the package were executed in the same thread, the Execute method would not return until the package was finished executing. Therefore, by starting the package in a new thread, the page can return, and the status of the package can be displayed in the GridView. Give it a try. Make sure your package runs long enough for you to refresh the web page and see the status value change.
That’s just a basic implementation of some of the functionality exposed by the Microsoft.SqlServer.Dts.Runtime and Microsoft.SqlServer.Management.Integration namespaces to manage your SSIS packages through managed code. You saw how to obtain a collection ofPackageInfo objects and how to leverage the functionality of the objects in an application. In addition, you learned how to run a package and determine which packages are currently running. Obviously, this is a simple application and could stand to be greatly improved with error handling and additional functionality. For example, you could add functionality to cancel a package’s execution, load or delete package files to SQL Server through the website, or modify the code to support the viewing of packages in the SSIS file storage hierarchy.
PACKAGE LOG PROVIDERS
Log providers are used to define the destination for the log information that is generated when a package executes. For instance, if you require a record of the execution of your package, a log provider could persist the events and actions that had transpired into a log file, recording not only the execution but also, if required, the values and results of the execution.
Defining what should be logged during a package’s execution is a two-step process. First, you must define which log providers to use. You can define multiple providers in a single package. Second, you need to define what information should be sent to the defined log providers.
Keep in mind that if you’re executing a package store in a SQL Server 2014 catalog that the logging of events is done automatically and can be seen in the catalog.executions, catalog.operations, and catalog.operationmessages tables. To programmatically retrieve the logs, you will use the Executions and Operations properties of the Catalog class. We will see an example of that in this section.
To demonstrate how you would do this using the UI, open the MomDemo project and make sure package.dtsx is loaded. Then to configure logging for the test SSIS package you’ll select SSIS ⇒ Logging from the menu. The Configure SSIS Logs dialog that is displayed shows all the containers that currently exist in the package. The first step is completed by configuring SSIS Log Providers on the Providers and Logs tab, shown in Figure 21-11.
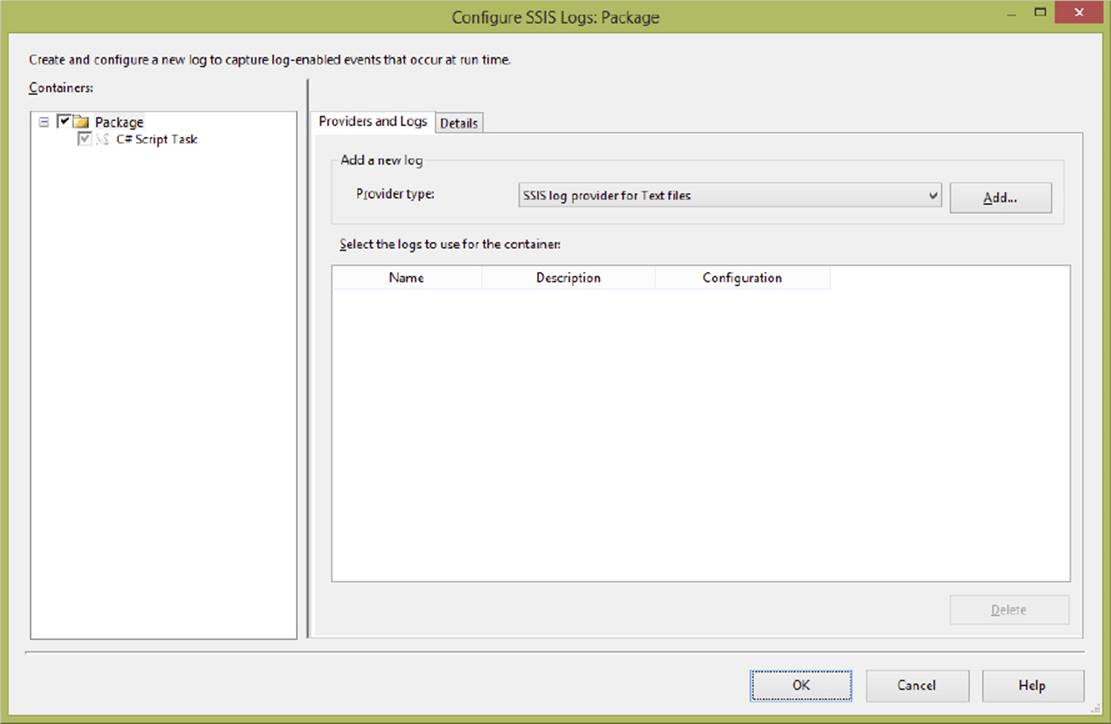
FIGURE 21-11
SQL Server Integration Services includes several default log providers. These providers are selected in the Provider Type combo box and are defined as follows:
· SSIS Log Provider for Text Files: Used to store log information to a CSV file on the file system. This provider requires you to configure a File Connection object that defines the location of the file. Storing log information in a text file is the easiest way to persist a package’s execution. Text files are portable, and the CSV format is a simple-to-use industry-wide standard.
· SSIS Log Provider for SQL Profiler: This provider produces a SQL Provider trace file. The file must be specified with a trc file extension so that you can open it using the SQL Profiler diagnostic tool. Using SQL Profiler trace files is an easy way for DBAs to view log information. Using Profiler, you could view the execution of the package step-by-step, even replaying the steps in a test environment.
· SSIS Log Provider for SQL Server: This provider sends package log events to a table in the specified SQL Server database. The database is defined using an OLE DB connection. The first time this package is executed, a table called sysssislog is created automatically. Storing log information in a SQL Server database inherits the benefits of persisting information in a relational database system. You could easily retrieve log information for analysis across multiple package executions.
· SSIS Log Provider for Windows Event Log: This provider sends log information to the Application event store. The entries created are under the Source name SQLISPackage. No additional configuration is required for this provider. Logging package execution to the Windows Event Log is possibly the easiest way to store log events. The Windows Event Log is easy to view and can be viewed remotely if required.
· SSIS Log Provider for XML Files: This provider stores log information in a specified XML file on the file system. The file is specified through a File Connection object. Make sure you save the file with an xml file extension. Logging events to XML inherits the advantages of the XML specification. XML files are very portable across systems and can be validated against a Schema definition.
Specifying Events to Log
Once you have configured the log providers you wish to employ, you must define what events in the package to log. This is done in the Details tab (see Figure 21-12) of the log configuration dialog. To enable an event to be logged, check the box next to its name. For instance, in Figure 21-12, the OnError event for the package has been selected for logging. By selecting other containers on the left-hand side of the dialog, additional events can be selected, down to an individual task or Data Flow event level. To select all events at once, check the box in the header row of the table. By selecting individual containers in the tree view on the left, you can configure the logging of events on an individual task level. By configuring logging at the task level, the special events exposed by a task can additionally be included in the log.
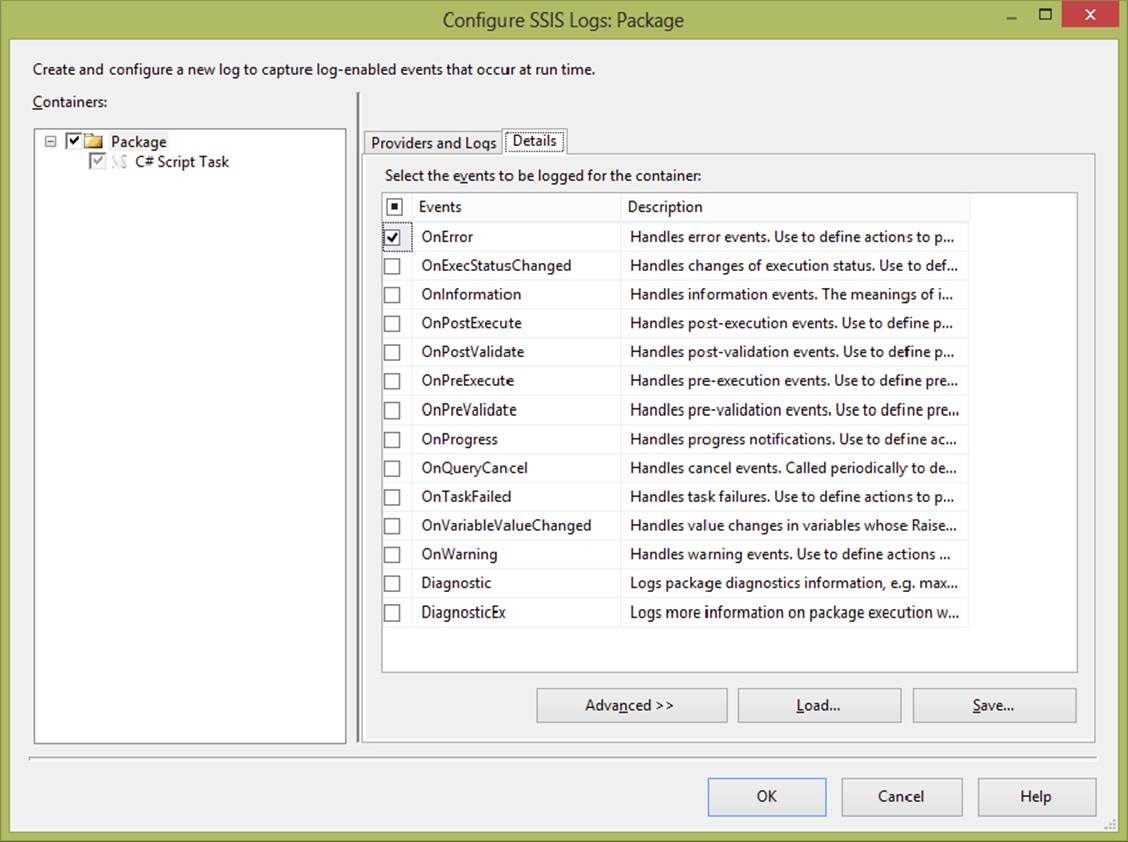
FIGURE 21-12
This is the way to set up a log file using the UI. The next section describes how to examine log providers programmatically.
Programming to Log Providers
The Package object exposes the LogProviders collection object, which contains the configured log providers in a package. The LogProvider object encapsulates a provider’s configuration information.
The LogProvider object exposes the following key properties:
· Name: This is a descriptive name for the log provider.
· ConfigString: This is the name of a valid Connection object within the package that contains information about how to connect to the destination store.
· CreationName: This is the ProgID of the log provider. This value is used in the creation of log providers dynamically.
· Description: This describes the type of provider and optionally the destination to which it points.
The next two examples (see the CSharp_GetPkgLogs folder) enumerate all the log providers that have been configured in a package and write the results to the console window. To get extra mileage out of these examples, the C# version loads the package from a file; the VB.NET version loads the package from an Integration Server:
C#
private static void GetPackageLogsForPackage(string PackagePath)
{
Application dtsapp = new Application();
Package p = dtsapp.LoadPackage(PackagePath, null);
Console.WriteLine("Executing Package {0}", PackagePath);
p.Execute();
Console.WriteLine("Package Execution Complete");
Console.WriteLine("LogProviders");
LogProviders logProviders = p.LogProviders;
Console.WriteLine("LogProviders Count: {0}", logProviders.Count);
LogProviderEnumerator logProvidersEnum = logProviders.GetEnumerator();
while (logProvidersEnum.MoveNext())
{
LogProvider logProv = logProvidersEnum.Current;
Console.WriteLine("ConfigString: {0}", logProv.ConfigString);
Console.WriteLine("CreationName {0}", logProv.CreationName);
Console.WriteLine("DelayValidation {0}", logProv.DelayValidation);
Console.WriteLine("Description {0}", logProv.Description);
Console.WriteLine("HostType {0}", logProv.HostType);
Console.WriteLine("ID {0}", logProv.ID);
Console.WriteLine("InnerObject {0}", logProv.InnerObject);
Console.WriteLine("Name {0}", logProv.Name);
Console.WriteLine("------------------");
}
}
You can, of course, dynamically configure a package’s log providers. To do so, a valid connection must initially be created to support the communications to the database. In the following code (see the CSharp_GetPkgLogs folder), first a package is loaded into memory. Then the connection is created for the mytext.xml file and named. This name is used later as the ConfigString for the log provider to connect the output to the file Connection Manager.
C#
public static void CreatePackageLogProvider(string PackagePath)
{
Application dtsapp = new Application();
Package p = dtsapp.LoadPackage(PackagePath, null);
ConnectionManager myConnMgr = p.Connections.Add("FILE");
myConnMgr.Name = "mytest.xml";
myConnMgr.ConnectionString = "c:\\ssis\\mytest.xml";
LogProvider logProvider = p.LogProviders.Add("DTS.LogProviderXMLFile.2");
logProvider.ConfigString = "mytest.xml";
p.LoggingOptions.SelectedLogProviders.Add(logProvider);
p.LoggingOptions.EventFilterKind = DTSEventFilterKind.Inclusion;
p.LoggingOptions.EventFilter = new string[] { "OnError", "OnWarning",
"OnInformation" };
p.LoggingMode = DTSLoggingMode.Enabled;
logProvider.OpenLog();
p.Execute();
}
Next, the log provider is instantiated by passing the ProgID of the provider you wish to create. The following is a list of the ProgIDs for each type of log provider available:
· Text File Log Provider: DTS.LogProviderTextFile.3
· SQL Profiler Log Provider: DTS.LogProviderSQLProfiler.3
· SQL Server Log Provider: DTS.LogProviderSQLServer.3
· Windows Event Log Provider: DTS.LogProviderEventLog.3
· XML File Log Provider: DTS.LogProviderXMLFile.3
SQL Server 2014 Operation Logs
As mentioned earlier in the chapter, the execution log and messages for packages executed on a SQL Server 2014 server within a catalog are automatically stored to log tables in the catalog database (for example, SSISDB). To retrieve the execution logs and message, you can either query the table via views or use the properties available within the Catalog class.
If you’d like to see the execution results and message, you can query the following views in the catalog table:
· catalog.executions: This view retrieves the execution logs of any package executed on the catalog. The Id column from this view is also stored with the operation messages. The other key columns are project, packagename, and folder.
· catalog.operations: This view stores all of the operations performed for a project or execution. The operation_type column stores the operation performed for the record. Some of the most common operations are
· 101: Deploy project
· 200: Create execution or start execution
· 201: Validate package
· 202: Stop operation
The Id column in the catalog.operations will match the Id column from the catalog.executions view if the operation is from an execution of a package.
· catalog.operationmessages: This view stores all of the operational messages from an operation. For execution this includes the common messages you’re used to seeing when executing a package, like “Validation has started.”
In the example that follows (see the MomDemo folder), you’re going to retrieve the execution results of packages programmatically. To do so you will iterate the Executions property of the Catalog class. The Executions property is a collection of ExecutionOperationobjects. Then, you will use a LINQ query on the Operations property to match the Id property from the ExecutionOperation class to the Id property of the Operation class. Finally, you will iterate through the Messages property of the Operation class to show the logged messages of the package execution.
Catalog catalog = isServer.Catalogs["SSISDB"];
CatalogFolder folder = catalog.Folders["ProSSIS"];
ProjectInfo p = folder.Projects["My ProSSIS Project"];
catalog.Operations.Refresh();
StringBuilder messages = new StringBuilder();
foreach(ExecutionOperation exec in catalog.Executions)
{
// execution complete?
if (exec.Completed)
{
messages.AppendLine(exec.PackageName + " completed " +
exec.EndTime.ToString());
// query the operations property using the
// Id property and match it to the exec.Id
var ops = from a in catalog.Operations where a.Id == exec.Id select a;
foreach(Operation op in ops)
{
op.Refresh();
foreach (OperationMessage msg in op.Messages)
{
messages.AppendLine("\t" + msg.Message);
}
}
}
}
LogFileTextbox.Text = messages.ToString();
After running this example you should see a window similar to Figure 21-13.
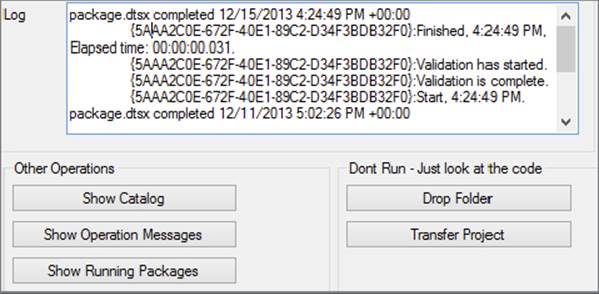
FIGURE 21-13
PACKAGE CONFIGURATIONS
Prior to SQL Server 2012 a package configuration was the optimal method to store configurable values that could be used in your package without altering the package. The introduction of parameters, which you can read about in Chapter 5 and see in the earlier examples in this chapter, means they are now the preferred method of storing configurable values that can be injected into packages at runtime.
Package configurations are still a valid way to store configurable values in other locations where parameters cannot be stored, such as XML files, SQL Server tables, and registry entries.
Package configurations are a flexible method of dynamically configuring a package at runtime. This gives you a high degree of flexibility in the execution of SSIS packages, enabling you to design the package to run in different environments without having to modify the package file itself. When a package is written, not all operational parameters may be known, such as the location of a file or the value of a variable. By supplying this information at runtime, the user does not have to hardcode these values into a package. When a package is run, the values stored in the specified configuration store are loaded for use during the package’s execution. The configuration capabilities of SSIS support the storage of data in five different data stores. The following list describes each type of data store and its capabilities:
· XML File Configuration: The XML File Configuration option stores package information in an XML file on the file system. This configuration provider enables you to store multiple configuration settings in a single file. As an alternative to hardcoding the path to the XML file, the path can be stored in a user-defined environment variable. Using this option, you can easily both modify the XML file and distribute the configuration with the package.
· Environment Variable: This option enables you to store a configuration value in an environment variable. Using this option, you are allowed to save only a single configuration parameter. By specifying an environment variable that is available on each machine on which the package will run, you can ensure that the package configuration is valid for each environment. Also, setup of the environment variable can be done once during initial setup of the package’s environment.
· Registry Entry: This option allows you to store a configuration value in a registry value. Only a single value can be specified. Optionally, you can specify an environment variable that contains a registry key where the value is stored. Configuration entries in the registry are a secure and reliable way to store configuration values.
· Parent Package Variable: This option enables you to specify a fully qualified variable in a different package as the source for the configuration value. Only a single value can be stored in a specified configuration store. This is a good way to link packages and pass values between packages at runtime. When one package depends on the results from another package, this option is perfect.
· SQL Server: This option creates an SSIS Configuration table in a database that you specify. Because this table could hold the configurations for multiple packages, a configuration filter value should be specified to enable the system to return the correct configuration values. This option allows you to specify multiple configuration values that will be stored under the filter name specified. Optionally, you can specify the database, table, and filter in an environment variable in the following format:
<database connection>;<configuration table>;<filter>;
For example:
VSTSB2.WroxTestDB;[dbo].[SSIS Configurations];Package1;
Creating a Configuration
To create a configuration for a package, select SSIS ⇒ Package Configurations. In the dialog that is displayed, select the “Enable package configurations” checkbox. From here, you must define which package configuration provider to use. This can be accomplished through the Package Configuration Wizard that is started when you click the Add button.
On the first page of the wizard, shown in Figure 21-14, you must specify which configuration provider you wish to use to store the configuration information. For this example, choose the XML File Configuration option. Now specify the path where the configuration file will reside. Having a standard location to store your configuration files helps to ensure that as a package is moved from environment to environment, the links to the configuration are not broken. If the path to the configuration is not standard, you can store the path to the configuration file in an environment variable and then reference the environment variable in the package wizard. Remember that if you have recently added the environment variable to your system, you may need to reboot in order for it to be available for use in your package.
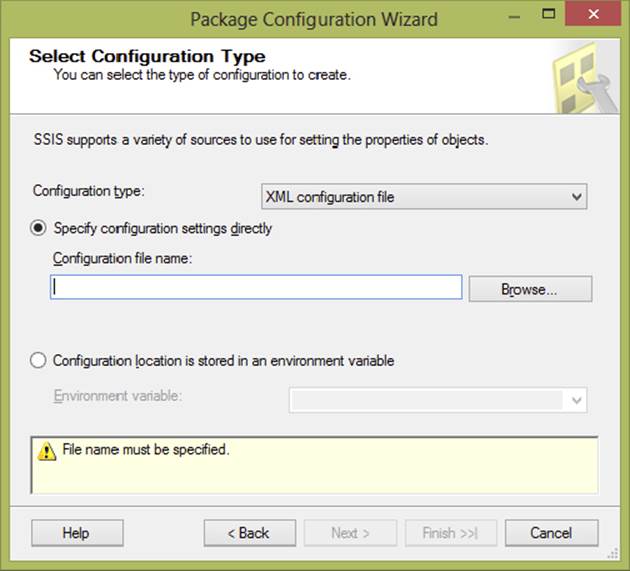
FIGURE 21-14
After you have chosen a configuration storage provider, the next step is to specify the properties to save in the configuration store, as shown in Figure 21-15. You can either select a single value from the property tree view or select multiple values at one time. Because you selected the XML File Configuration provider, you can select multiple values to store.
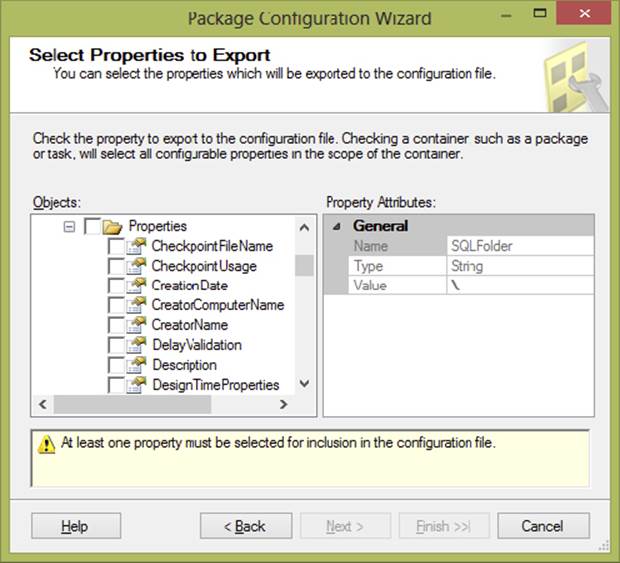
FIGURE 21-15
Notice that not only can you store default values to load at the time the package is executed, but you can also load entire object definitions at runtime. This is useful if you just want to load a variable’s value or actually specify an entire variable configuration at runtime. For example, you may want to configure the actual properties of a variable. Almost every aspect of a package can be persisted to a configuration store, including package properties, configured values in defined tasks, configuration information for log providers, and Connection Manager information. About the only thing you can’t store in a package configuration store is specific data about the package configurations.
When it is complete, the package configuration information is stored in the package. When the package is executed, the configuration providers load the values from the specified data stores and substitute the values found for the default values saved in the package.
Programming the Configuration Object
You can also programmatically configure a package’s configuration through the Configuration object. This is useful if you would like to configure a package through managed code as shown at the beginning of this chapter. All package configurations can be accessed through the Configurations collection of the package object.
The Configuration object exposes functionality to dynamically configure a package’s configuration settings. This enables you to programmatically configure a package based on the environment in which it will run. Because a package can contain multiple configuration sources, you can discover all the configurations in a package by enumerating the Configuration objects contained in a Package.Configurations property.
Configuration Object
The Configuration object exposes the following members:
· ConfigurationString: This is the path describing where the physical configuration store is located.
· ConfigurationType: This sets the configuration provider to be used to interface to the configuration data store. The configuration type is referenced from the DTSConfigurationType enumeration. Note that a DTSConfigurationType that starts with an “I” denotes that theconfigurationstring is stored in an environment variable.
· Name: This is the unique name for the configuration object in the package.
· PackagePath: This defines the path of the actual data that is being accessed.
The following example (see the CSharp_ConfigPkg folder) details how to add an existing configuration store to a package. First, the EnableConfiguration property is set to true. Then, an empty configuration object is added to the package. The configuration object is then set to the Config File type, which directs the configuration to expect a valid dtsconfig file to be specified in the configurationstring property. Finally, the path to the configuration information is supplied, and the package’s path is stored. The package is then saved, thus persisting the configuration setup to the package file.
private static void CreatePackageConfig(string PackagePath)
{
Application app = new Application();
Package pkg = app.LoadPackage(PackagePath, null);
Variable var = pkg.Variables.Add("myConfigVar", false, "", "Test");
string packagePathToVariable = var.GetPackagePath();
pkg.EnableConfigurations = true;
Configuration config = pkg.Configurations.Add();
config.ConfigurationString = "ConfigureMyConfigVar";
config.ConfigurationType = DTSConfigurationType.EnvVariable;
config.Name = "ConfigureMyConfigVar";
config.PackagePath = packagePathToVariable;
app.SaveToXml(@"C:\SSIS\extmgt\TestSSISPackage\TestSSISPackage\" +
"myTestSSISPackageConfig.xml", pkg, null);
Console.WriteLine("Configuration Created and Saved");
}
If you run this code against the Test SSIS package for this chapter, you’ll see a new myTestSSISPackageConfig.xml file in the TestSSISPackage directory with the additional variable that was added and a configuration for the variable.
This section has described how you can use the DTS runtime code library to perform many of your mundane administrative tasks programmatically. The next section looks at another feature of SSIS that you can use in your administrative Toolbox — Windows Management Instrumentation.
WINDOWS MANAGEMENT INSTRUMENTATION TASKS
SSIS includes two special tasks that enable you to query system information and monitor system events: the WMI Data Reader Task and the WMI Event Watcher Task. These tasks are especially useful for system management, as you will discover with examples later in this chapter. WMI uses a specialized query language known as WQL, which is similar to SQL, to obtain information about a Windows system. WMI has many features and capabilities, so we won’t be able to cover all of them, but here are a few common uses:
· You can get information about files and directories, such as file size, or enumerate the files in a folder. You can also monitor the file system for events, such as whether a file has been modified recently. This could be required in a package if your package is importing data from a CSV or XML file. A change in the file could trigger tasks to fire in your package.
· You can determine whether an application is currently running. In addition, you can find out how much memory that application is using or how much processor time it has used. This is useful if your package needs to know whether a companion process is running before creating some sort of output result.
· You can obtain information about users in Active Directory, such as whether a user is active or has certain permissions to a resource. This is useful in a package if information about a user or machine on the network is required for your package’s execution.
· You can control services that are running on a computer system and actually start and stop them as required. This is useful if your package needs to stop a service during a data transfer.
This is just a small sample of the information you can glean from a computer system. You can obtain information not only about the current system but also about remote systems. As you can see, this gives you access to a great deal of information that could be used in the execution of an SSIS package. For example, you could determine if enough disk space existed on a drive before copying a backup file from a remote system to the current system. You could also monitor a file for updates and automatically import the changes into a database table. Later in this chapter you will see how to actually implement these two examples. For more information on the WMI system, visit http://msdn.microsoft.com/en-us/library/windows/desktop/aa394582(v=vs.85).aspx.
WMI Reader Task Explained
The WMI Data Reader Task has the following parameters that must be configured properly for the task object to work:
· WmiConnection: This is a configured WMI Connection object.
· WqlQuerySourceType: This setting specifies where the WQL query is referenced. The query can be manually typed in or stored in a file or a variable.
· WqlQuerySource: This field sets the actual source of the WQL query source selected in the WqlQuerySourceType.
· OutputType: This parameter sets the structure in which the results of the WQL query are stored after execution.
· Overwrite Destination: This determines whether the previous results are retained or overwritten when the task is executed.
· Destination Type: This enables you to specify how the results will be stored.
· Destination: This enables you to specify the location of the destination type.
To start configuration of the WMI Data Reader Task, you must first create a WMI Connection Manager object. The WMI Connection Manager specifies the WMI namespace that the query will run against. The WMI class used in the query must be contained within that namespace. The standard namespace for most machines is the \root\cimv2 namespace. This namespace contains the majority of WMI classes that can be called to get system information. The connection object specifies the target computer system that the query will be run against. By default, the SSIS WMI Connection points to the localhost machine, but remote systems can be specified as well by using the NetBIOS, IP address, or DNS name of the remote machine. Because security is always an issue, the WMI Connection object specifies the user that the query will be run against. Whether it is Windows Authentication or a specified user, the user must have permissions to query the WMI repository on the system for it to work.
Next, the WQL query must be designed. Because WMI is so extensive a subject, this chapter can’t explain the intricacies of the model. We suggest that you locate a good book on WMI scripting to learn the details of how WMI works. Another resource for free WMI tools is the MSDN downloads site. Two applications that are helpful for WQL query generation are the Scriptomatic V2 application available at http://www.microsoft.com/download/en/details.aspx?id=12028, which enables you to browse the classes in WMI namespace and generate WMI queries in several different scripting formats, and the WMI Administrative tools package available at http://www.microsoft.com/download/en/details.aspx?id=24045. This package includes several sample apps to enumerate the classes in various namespaces and monitor WMI filter events, among other useful features. These two tools can help you derive WMI queries quickly and easily.
Once you have figured out the structure of your query, you must decide into which object type to store your query results. The WMI Data Reader Task object gives you basically two options: a string or a data table. Either object can be stored in a user-defined variable or in a file on the file system. When storing the result in a user-defined variable, the variable must be defined as a String data type or Object data type. This means that when you’re obtaining numeric information from the system, you must convert the resultant string to the appropriate data type for use in a mathematical expression. The file transfer example suggests one way to accomplish this transformation, but this is not the only way. When storing a data table to file, the result is a basic comma-separated file with the properties listed in the first row and the actual values returned in the second row.
WMI Data Reader Example
The best way to explain the WMI Data Reader Task is to see an example of it in action. The idea of this example is to query the file system for the size of a database file and the amount of free space on a drive. With this information, you can then determine if the drive has enough space to handle the new file. For simplicity, this example will copy from directories on the same drive. At the end of the example, you will learn how to modify the WMI queries to query the same information from remote systems.
To set up this example, you must first create a file you would like to copy. This example uses a backup of the AdventureWorks database (but any large file will do). If you don’t know how to create a backup of the AdventureWorks database, you can create any large file or use a file from one of many examples in this book. If you do use the AdventureWorks backup, it will tie into the WMI Event Watcher Task example later in this chapter. As always, you can also download the complete samples for this chapter fromwww.wrox.com/go/prossis2014.
Open a new Integration Services project and call it WMI_DataReader. Drag a new WMI Data Reader Task object from the Toolbox to the Control Flow page of the package. First, give this task a unique name; in this case, call it “WMI Data Reader Task - Read Free Space on C.” Now, right-click the task and select Edit from the pop-up menu to bring up the WMI Data Reader Task Editor. Click the WMI Options tab to render the editor, as shown in Figure 21-16.
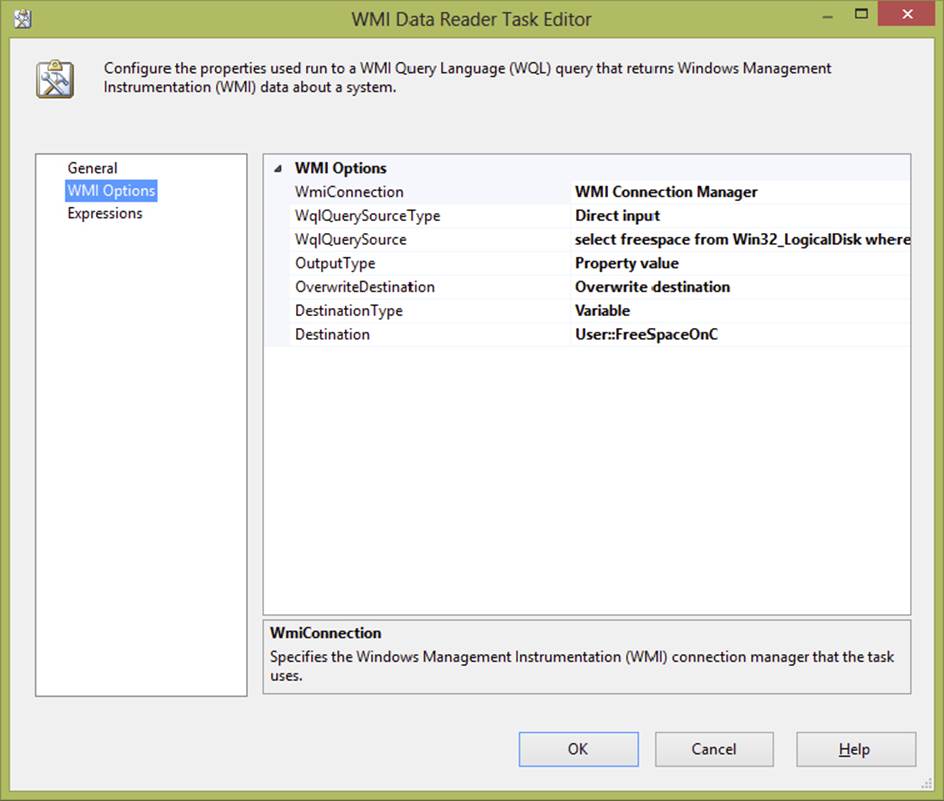
FIGURE 21-16
Click in the WmiConnection parameter field and select the button to the right. Select <New WMI Connection . . . > from the dropdown list. The dialog shown in Figure 21-17 will be displayed.

FIGURE 21-17
Give the new WMI connection a name and enter a description. You can also enter the computer system you wish to query. Leave the server name set to the default of \\LocalHost to query the local computer, and leave the default namespace as \root\cimv2. The setting of cimv2 is the main WMI repository that contains the core WMI classes to access information on the system. Finally, check the box to use Windows Authentication or enter a user name and password that has rights to query the CIM repository on this computer. Click the Test button to verify the settings, and then click OK to close the dialog. This completes the WMI connection and adds it automatically to the WMIConnection property in the editor.
Back in the WMI Data Reader Task Editor dialog, leave the WqlQuerySourceType as DirectInput. Next, select the WqlQuerySource field and click the ellipsis button on the right. In the dialog that appears, enter the following WQL query in the WqlQuerySource window:
SELECT FreeSpace FROM Win32_LogicalDisk Where DeviceID ='C:'
This query will return the amount of free space that exists on drive C. Next, change the OutputType to Property Value and leave the OverwriteDestination field set to Overwrite Destination. Set the DestinationType property to Variable. Click in the Destination field and choose the ellipsis button to the right and select <New variable...>. In the Add Variable dialog that appears (shown in Figure 21-18), enter FreeSpaceOnC in the Name field, set the data type to string, and give the variable a default of zero. Leave the rest of the fields at their default values and click OK to close the dialog. We’ll explain the string data type in a minute.
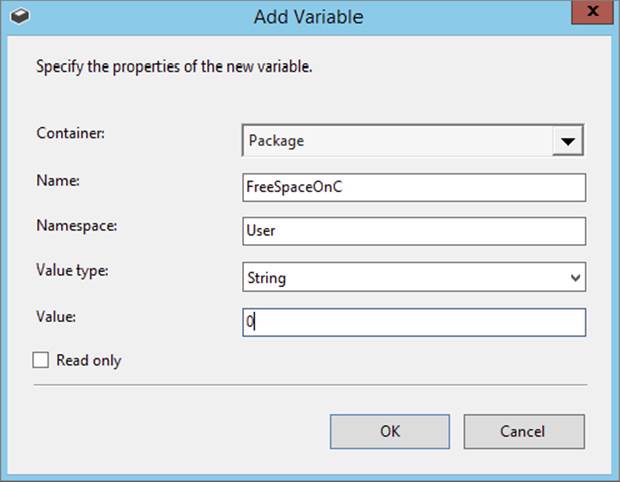
FIGURE 21-18
Now you’ll add another WMI Data Reader Task and configure it to return the size of the AdventureWorks backup file. Call this task “WMI Data Reader Task - Read DB File Size.” Open the WMI Data Reader Task dialog for this new task. Click in the WMI Connector field and choose the WMI Connection Manager connection. Because the CIM class you will be using to obtain the file size of the backup file is in the same CIM namespace, you can reuse the same WMI Connection object.
Leave the WqlQuerySourceType as DirectInput. Now, click the SqlQuerySource field and click the ellipsis to the right to open the query editor dialog. Enter the following query:
Select FileSize FROM CIM_Datafile WHERE Name =
"C:\\SSIS\\EXTMGT\\WMI_DataReader\\AdventureWorks.bak"
In the OutputType field, choose Property Value. In the DestinationType field, choose Variable, and then click in the Destination field and choose <New variable...>. Call the new variable DBBackupFileSize, with a data type of string and an initial value set to zero (0).
That’s all there is to configuring the tasks themselves. Hook them together so that you can add some logic to handle the data the WQL query will return. It was stated previously that the WMI Data Reader could only write to strings and Data Table objects. Well, when a string is returned, it has several extraneous characters at the end that cause a data conversion from String to Integer to fail. You can see these characters by setting a breakpoint on the PostExecute event of one of the WMI Data Reader Tasks and running the package. When the task turns green, go to the Variables tab and look at the data in the two user-defined variables. The value looks like this: “FileSize\r\n45516800\r\n.”
To massage this data into a usable form suitable for conversion to an Integer data type, you will create a Script Task to strip the extra characters from the string, leaving just numeric digits. To start, click the Event Handler tab of the package. In the Executables dropdown box, choose the WMI Data Reader Task called “WMI Data Reader Task - Read Free Space on C.” Next, select the OnPostExecute event handler and click the hyperlink in the middle of the page to create the event. Drag a Script Task object from the Toolbox onto the page. Change the name of the object to “FileSizeOnC Data Massage.” Right-click the task and select Edit from the pop-up menu. On the left-hand side of the Script Editor dialog, choose the Script page. In the ReadWriteVariables property, select the variable User::FreeSpaceOnC. This will give you read/write access to the variable from within the Script Task.
Now, click the Edit Script button in the bottom-right corner of the window. In the Script Host editor that appears, add the following code immediately after the start of the Main subroutine (see the WMI_DataReader folder):
C#
string s = System.Convert.ToString(Dts.Variables["User::FreeSpaceOnC"].Value);
s = System.Text.RegularExpressions.Regex.Replace(s, "\\D", "");
Dts.Variables["User::FreeSpaceOnC"].Value = Int64.Parse(s);
VB
Dim s As String
s = CType(Dts.Variables("User::FreeSpaceOnC").Value, String)
s = System.Text.RegularExpressions.Regex.Replace(s, "\\D", "")
Dts.Variables("User::FreeSpaceOnC").Value = Int64.Parse(s).ToString()
As you can see, this code parses the string and uses the RegularExpressions library to strip the characters from the returned value. Then the cleaned-up string is cast to return an Int64 value as a string. In short, this code will strip all the extraneous characters from the string and return a numerical result into the same variable. As a result, the contents of the string are ready to be used in a mathematical expression. To finish, close the Script Host windows and click OK to close the Script Task Editor dialog. Repeat this same setup for the ReadDBFileSize Task, making sure to change the variable references to the appropriate variable names.
You’re now in the home stretch of this example. The final steps are to set up the file transfer and add the precedence constraint that ensures you have enough space on the drive before you initiate the transfer. First, drag a File System Task onto the Control Flow page. Name this task Copy Db File. Right-click the task and click Edit in the pop-up menu. In the File System Task Editor, set the following properties as shown in Figure 21-19.
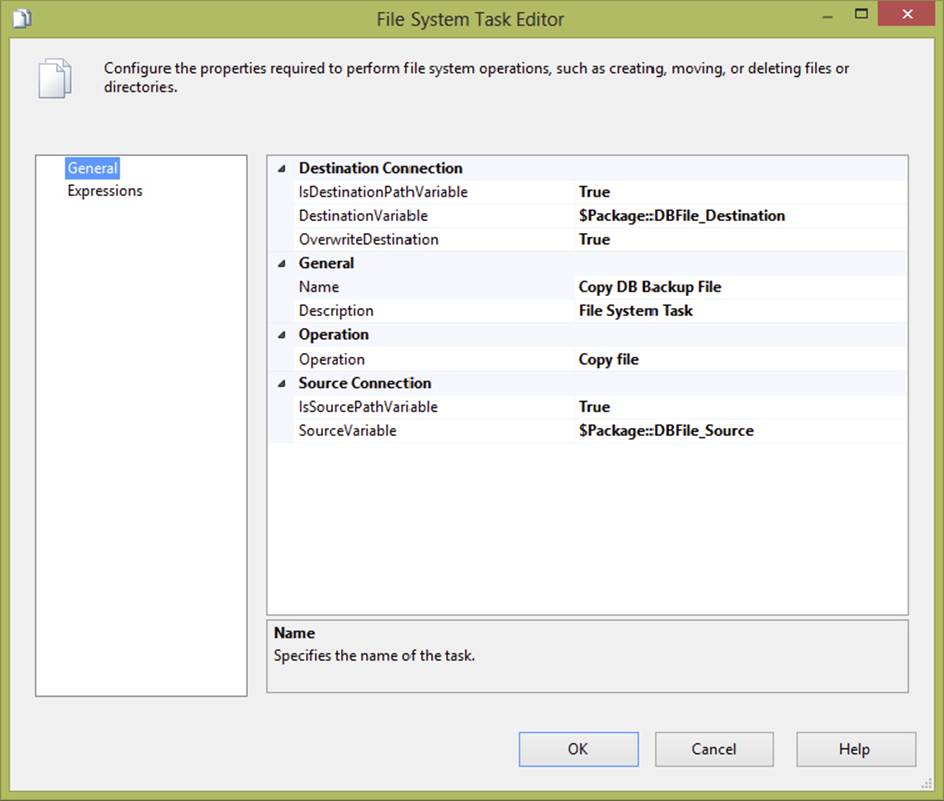
FIGURE 21-19
In the Parameters tab of the package, create two new parameters with a string data type called DBFile_Source and DBFile_Destination. Set the DBFile_Source parameter to the AdventureWorks backup file. If you are using the file structure from the download files, this will be c:\ssis\extmgt\WMI_DataReader\AdventureWorks.bak. In the DBFile_Destination parameter, enter the backup folder or c:\ssis\extmgt\WMI_DataReader\Backup\AdventureWorks.bak. Set the DestinationVariable value to the DBFile_Destination parameter ($Package::DBFile_Destination) and set the SourceVariable to the DBFile_Source parameter ($Package::DBFile_Source). Click OK to close the dialog. If you are not using the download sample files, make sure you create the directory in which you intend to back up the file. The File System Task will not create the directory automatically.
The final step is to link these tasks with precedence constraints. Link the tasks as shown in Figure 21-20.
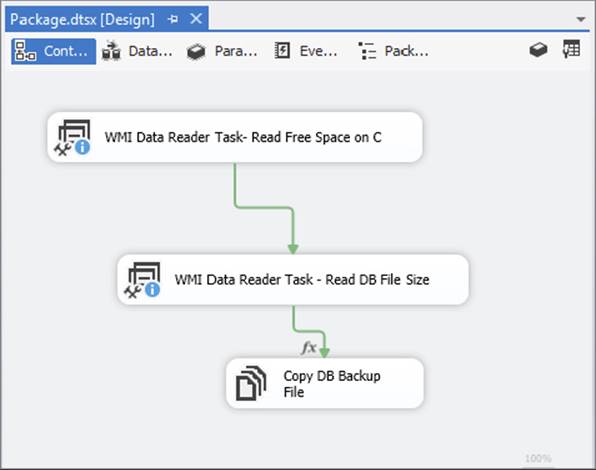
FIGURE 21-20
After adding the links, right-click the constraint between the Read DB File Size Task and the Copy Db File Task. Click the Edit option in the pop-up menu to open the Precedence Constraint Editor. Set the Evaluation option to Expression and Constraint and then enter the following line of code in the Expression field:
(DT_I8)@FreeSpaceOnC > (DT_I8)@DBBackupFileSize
As you can see, this is where the massaging of the data in the Script Task pays off. If you had not stripped the extraneous characters from the string, then the cast from the String data type to the Integer data type would fail. Click OK to close the Precedence Constraint Editor dialog.
Now you are ready for the moment of truth: running the package. If all went well, all the tasks should run successfully and have a green check mark icon on the top-right corner of the task, and the file should have been copied to the backup directory (assuming you had enough space available on the drive).
We mentioned earlier about ways you could improve this example. It seems a waste that you have to hardcode the WQL query with the path to the file being checked for size, especially since the path to the file is already stored in the DBFile_Source parameter. One option is to build the WQL query on the fly with a Script Task. This would enable you to construct the path in the WQL in the proper format — namely, changing the single backslash in the path to double backslashes. Also, in a more advanced scenario, the file could be located on another computer system. This could easily be handled by creating a separate WMI Connection object pointing to the second system and assigning it to the WmiConnection property in the WMI Data Reader Task - Read DB File Size Task. For remote machines, use the NetBIOS name, the IP address, or the DNS name in the ServerName property instead of the \\localhost default setting.
WMI Event Watcher Task
As outlined earlier, not only can WMI obtain information about a computer system, it can also monitor that system for certain events to occur. This capability enables you to monitor the file system for a change in a file or monitor the Windows system for the start of an application. The WMI Event Watch Task has the following options to configure:
· WmiConnection: This is a configured WMI Connection Manager.
· WqlQuerySourceType: This setting specifies where the WQL query is referenced. The query can be manually typed in or stored in a file or a variable.
· WqlQuerySource: This field sets the actual source of the WQL Query Source selected in the WqlQuerySourceType.
· ActionAtEvent: This option sets the actions that should occur when the WMI event being monitored occurs. This option has two settings: Log the Event and Fire the SSIS Event, or just Log the Event.
· AfterEvent: This field is used to specify what should happen after the WMI event occurs. The options are Return with Success, Return with Failure, or Watch for the Event Again.
· ActionAtTimeout: This defines the action that should be taken if the task times out waiting for the WMI event to occur. Options are Log the Time-Out and Fire the SSIS event, or just Log the Time-Out.
· AfterTimeout: This defines what action should be taken after the task times out. This option sets what should happen after the ActionAtTimeout occurs. The options are Return with Failure, Return with Success, or Watch for the Event Again.
· NumberOfEvents: This option specifies how many events must occur before the specified action is taken.
· Timeout: This sets how long the task should wait, in seconds, before the specified time-out action is taken. A setting of zero (0) denotes that the task will never time-out.
The WMI Event Watcher Task is similar to the WMI Data Reader Task in that the basic query setup is the same in both cases. You must define a WMI Connection object and create a WMI query to monitor for an event. The specific options available in this task define how the task reacts when the event occurs.
There are two basic types of actions: what should happen when the event actually occurs, and what should happen if the event does not occur within a specified time. Both these actions can either log the event to the package log or, in addition to logging the event, fire an event that can be used to perform additional specified tasks. Also, both actions can dictate what happens after the event occurs or the task times out. These after-events can be passing to subsequent tasks a success or failure of the WMI Event Watcher Task or simply continuing to monitor for the event to occur again.
WMI Event Watcher Task Example
In the WMI Data Reader example, you used WMI to check the size of a file before you copied it to the drive. You would most likely perform this type of task after some other process created the backup of the database. In some cases, you can execute the package manually when you are ready to perform the actions in the package. However, if you need certain tasks to be performed in response to an event like the backup file being created, then use the WMI Event Watcher Task. This task can monitor any system event, including the creation of a file like the backup file you used in the WMI reader example.
In this example, you’ll use the WMI Event Watcher Task to look for the file, and then kick off the WMI Data Reader package created earlier. You could also use this example to look for incoming data files that need to be processed. You can see an example of this use of the WMI Task in Chapter 3.
To use this task to determine when the backup has completed from our first WMI example, create a new SSIS package called WMI Event Watcher Package. Add a WMI Event Watcher Task to the Control Flow page of the package. Name this task “WMI Event Watcher Task - Monitor DB File.” Right-click the task and select Edit from the pop-up menu. You are now presented with the WMI Event Watcher Task Editor. Select WMI Options from the pane on the left and configure the properties as outlined in this section.
First, create a WmiConnection pointing to the machine where the backup file would normally be created. In this example that will be the root directory of the WMI_DataReader project. You can use the same connection properties as outlined in the previous example. Next, enter the WqlQuerySource that will monitor the file system for changes to the AdventureWorks.bak file:
Select * from __InstanceModificationEvent within 30 where targetinstance isa
"CIM_DataFile" and targetinstance.name =
"C:\\SSIS\\extmgt\\WMI_DataReader\\AdventureWorks.bak"
As you can see, this query monitors the AdventureWorks.bak file for changes every 30 seconds.
The rest of the properties are specific to the WMI Event Watcher Task. Set the ActionAtEvent property to Log the Event and Fire the SSIS Event. As you’ll see in a moment, this event is used to launch the “Db Data File Copy” package created in the previous example. Next, set the AfterEvent property to Watch for this Event Again. This setting essentially sets up a monitoring loop that perpetually watches the file for changes as long as the package is running. Because you don’t care if the task times out, leave the time-out settings at their default values. The editor should look like Figure 21-21. Click the OK button to close the dialog.
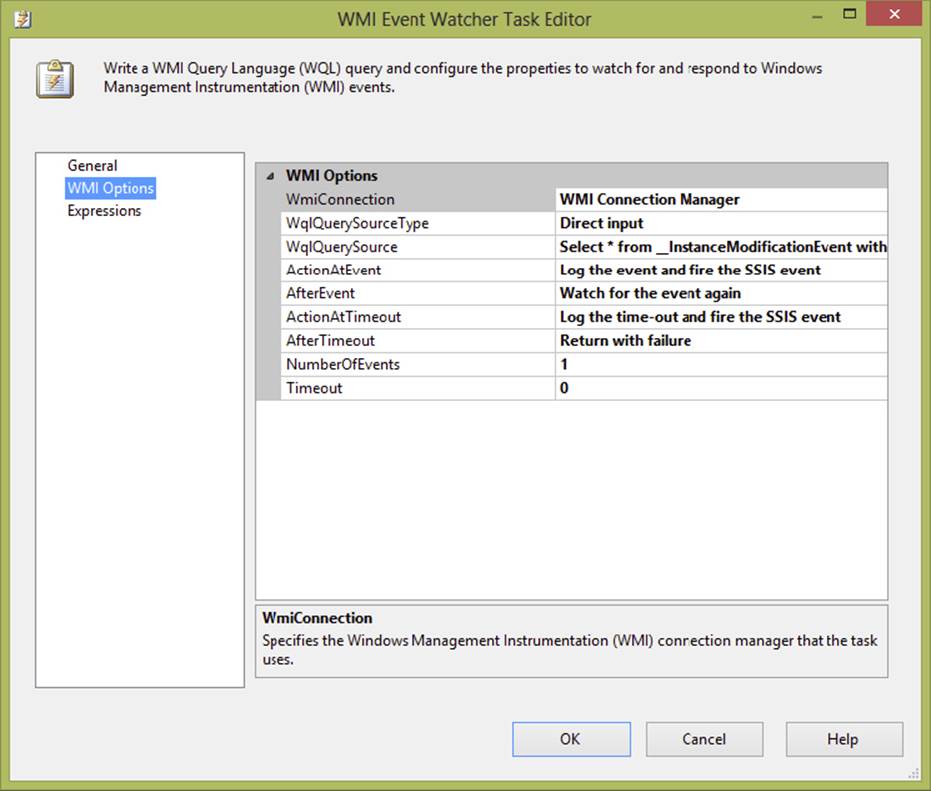
FIGURE 21-21
Now that the task is configured, you need to configure the event handler that will be fired when a file change is detected. Click the Event Handler tab and select the WMI Event Watcher Task - Monitor DB File in the executable combo box, and then the WMIEventWatcherEventOccurred in the Event Handlers combo box. Click the hyperlink in the middle of the page to create this event. Now drag an Execute Package Task from the Toolbox to the event page. Rename this task Execute WMI Data Reader Package. The Execute Package Task event handler should look like Figure 21-22.
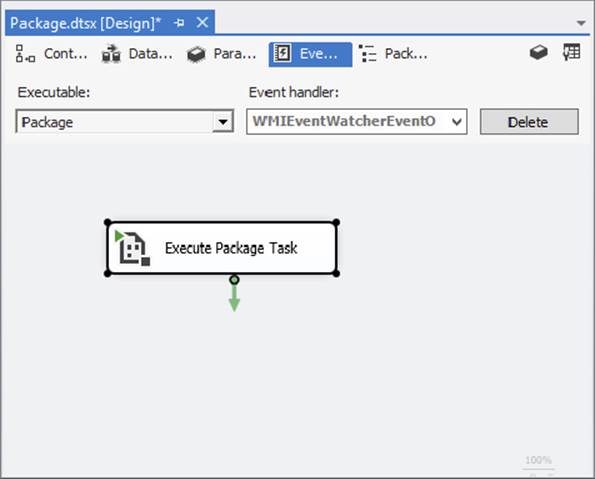
FIGURE 21-22
Right-click the task and select Edit from the pop-up menu. In the Execute Package Task Editor dialog, click the Package item in the listbox. For this example, you will be referencing the package via the file system, but in real life you would probably be calling a package that had been deployed to a SQL Server instance. For demonstration purposes, the WMI Data Reader Package file will be referenced so that you can see the package execute in the Visual Studio IDE. Therefore, in the Location property, choose File System. In the Connection property, create a new file connection pointing to the WMI Data Reader Package.dtsx file. Leave the rest of the properties at their default values. The Execute Package Task Editor should look like Figure 21-23. Click OK to finish configuration of this example.
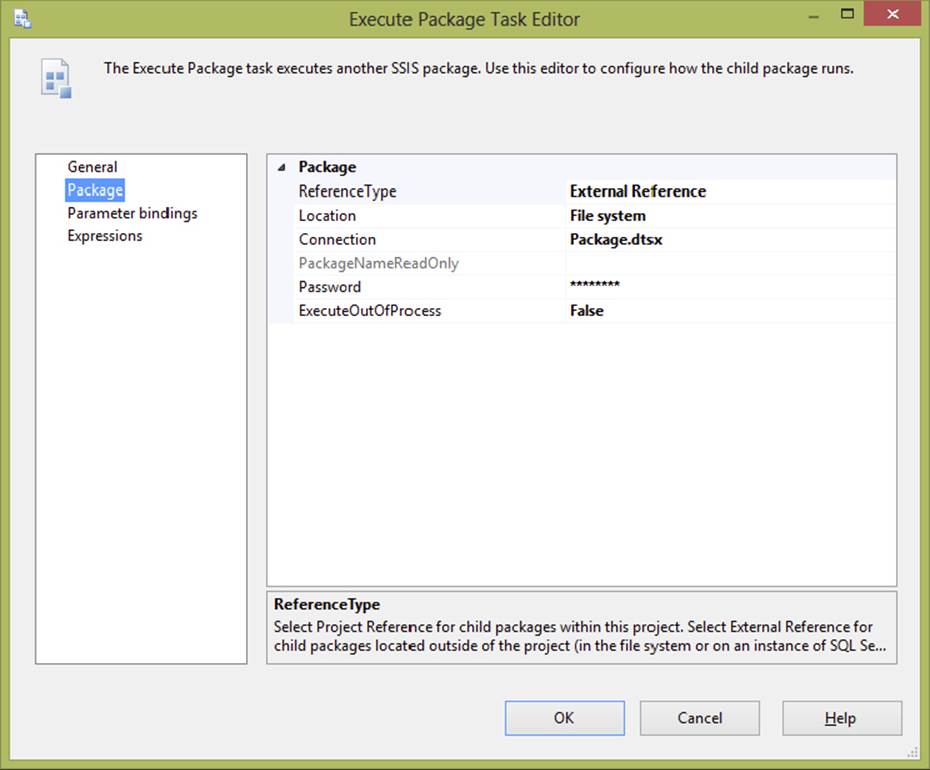
FIGURE 21-23
Now test out your new package by first removing the AdventureWorks.bak backup file from the c:\ssis\extmgt\WMI_DataReader directory. Then run the WMI Event Watcher Package. The WMI Event Watcher Task should turn yellow. The WMI Event Watcher is now monitoring the file location where it expects to find the AdventureWorks.bak file for changes. Next, copy the AdventureWorks.bak file into the root WMI_DataReader directory to simulate the SQL Server process of creating a backup of the AdventureWorks database. In fact, you can also test this package by going into SSMS and creating a backup in this root directory. At some point during the backup process, you should see the WMI Data Reader Package kick off and copy the backup file to the c:\ssis\extmgt\WMI_DataReader\Backupdirectory.
When the copy is complete, the package will continue to monitor the backup file for change. When the next backup is found in the root WMI_DataReader directory, the package will initiate another file copy of the backup. The package is responding to WMI events that detect the change to the directory to copy the file. As you can see, these WMI features provide an extremely powerful capability that SSIS does a great job of abstracting for you in these WMI Tasks.
SUMMARY
This chapter has provided you with the basic information you need to manage and administer your SSIS packages in both the SSIS catalog and the pre-2012 storage model. You were exposed to the DTS runtime libraries, and you have seen how easy it is to manipulate package information, make changes programmatically, and transfer packages between your environments. You have also learned how to create and maintain package configurations to customize packages at runtime. In addition, you now know how to configure log providers, which enable you to apply logging to existing packages at runtime for diagnostic purposes.
In the second half of the chapter, you learned how to use the WMI Reader Task and WMI Event Watcher Task in your packages. Using these two tasks, you discovered how you can gain access to a huge amount of system information to use in your packages. With the WMI Event Watcher, you learned how to monitor the system for events that occur and then perform actions in your SSIS package in response. With both the DTS runtime libraries and the WMI Tasks, you should be able to enhance your system administrative capabilities working with SSIS. In Chapter 22, you’ll learn more about administering SSIS packages.
All materials on the site are licensed Creative Commons Attribution-Sharealike 3.0 Unported CC BY-SA 3.0 & GNU Free Documentation License (GFDL)
If you are the copyright holder of any material contained on our site and intend to remove it, please contact our site administrator for approval.
© 2016-2026 All site design rights belong to S.Y.A.