Professional Microsoft SQL Server 2014 Integration Services (Wrox Programmer to Programmer), 1st Edition (2014)
Chapter 22. Administering SSIS
WHAT’S IN THIS CHAPTER?
· Using the SSIS catalog
· Choosing and using the different deployment models
· Using T-SQL with SSIS
· Managing security in SSIS
· Scheduling and monitoring packages
WROX.COM DOWNLOADS FOR THIS CHAPTER
You can find the wrox.com code downloads for this chapter at www.wrox.com/go/prossis2014 on the Download Code tab.
Welcome to the most exciting chapter in this book, the administration chapter. Okay, it is probably the most dreaded chapter, as administration tends to be a dry subject, but this chapter is a must read for anyone who needs to execute, manage, and administer SSIS packages. You will learn how to parameterize, deploy, and administer the SSIS service. You will see the SSIS catalog and how it will make executing packages much easier. You will also learn how to create a standalone ETL server, about some of the command-line utilities, and the T-SQL commands you can use to make your job easier. After reading this chapter, you’ll be able to create a package that doesn’t require any effort to migrate from development to production after the first deployment.
USING THE SSIS CATALOG
The SSIS catalog was introduced in SQL Server 2012. It is the central storage location for SSIS. Here you will administer projects, packages, parameters, and environments. Log in to the database engine in SSMS to work with the SSIS catalog, which is shown inFigure 22-1.
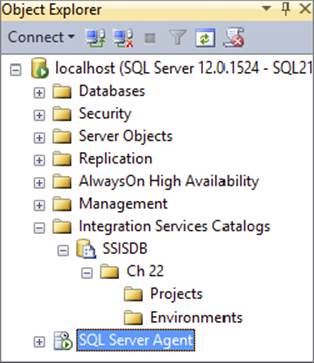
FIGURE 22-1
When you first install Integration Services, the SSIS catalog will need to be created. Create it manually by right-clicking on the Integration Services folder in the Database Engine in SSMS and selecting Create Catalog. The Create Catalog prompt will ask for a password. This password creates a database master key, and the master key encrypts sensitive data in the catalog.
The SSIS catalog is implemented as a SQL Server database named SSISDB. This database contains tables, views, stored procedures, and other objects. Queries can be written to the SSISDB just as you would to any other SQL database. In the SSIS catalog, every object is stored in a folder. Folders can be used to set up security that controls which users can see the objects in the catalog folders. For example, if you want users to have administrative rights over the folders, then grant them MANAGE_OBJECT_PERMISSIONS in the SSISDB. The SSISDB is the storage location for all Integration Services objects. The SSIS catalog is used to administer this database. Security is covered in depth later in this chapter.
Setting the SSIS Catalog Properties
The SSIS catalog has several properties that you can modify to change its behavior. Right-click on the SSISDB under the Integration Services Catalogs folder and select Properties. Figure 22-2 shows this Catalog Properties window.
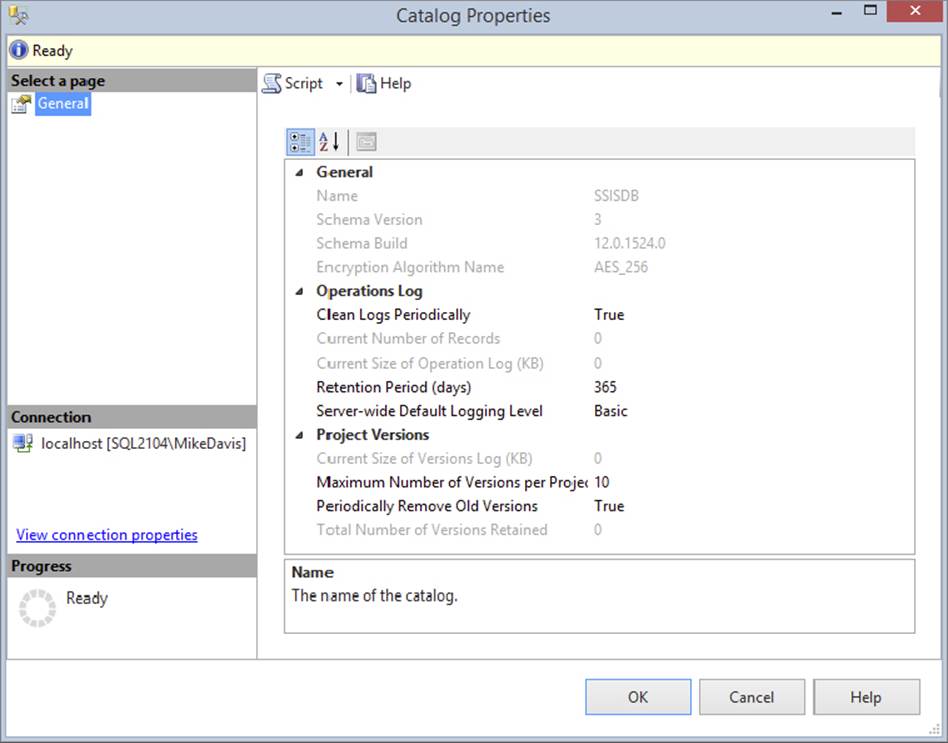
FIGURE 22-2
The SSIS catalog holds the information about all of your package executions, whether the package failed or succeeded. It contains a list of all the packages in your catalog and the executable tasks in those packages. Parameters and their values are stored in the SSIS catalog. Just about any object or property associated with your SSIS packages is housed in the SSIS catalog. The stored procedures are the tools used to control and manage the SSIS catalog. There is also a library of views that make it easier to view the information in the SSISDB. It will make the information in this chapter easier to understand if you take a few minutes to look at some of the views and the tables in the SSISDB. Go to SSMS and browse through the tables and views to become familiar with the objects in the SSISDB.
When you execute a package, the package execution is written to the SSISDB. In fact just about anything you do to the SSIS catalog is going to write or at least alter data in the SSISDB. There are even built-in reports now that query from the executions saved in the SSISDB. The properties of the SSIS catalog are stored in the SSISDB also.
You can alter the SSIS catalog properties using the catalog’s built-in stored procedures. To view the properties, run the stored procedure catalog.catalog_property. To change the properties, run the stored procedure catalog.configure_catalog. However, note that the properties shown in Figure 22-2 have different names than the properties used by the stored procedure. Table 22-1 resolves these differences.
TABLE 22-1: SSIS Catalog Properties
|
PROPERTY NAME (PROPERTIES WINDOW) |
PROPERTY NAME (STORED PROCEDURES) |
|
Encryption Algorithm Name |
ENCRYPTION_ALGORITHM |
|
Clean Logs Periodically |
OPERATION_CLEANUP_ENABLED |
|
Retention Period (days) |
RETENTION_WINDOW |
|
Periodically Remove Old Versions |
VERSION_CLEANUP_ENABLED |
|
Maximum Number of Versions per Project |
MAX_PROJECT_VERSIONS |
|
Validation Timeout (Seconds) |
VALIDATION_TIMEOUT |
That is right; you can now use T-SQL to control the SSIS environment. The SSIS catalog includes a wide range of stored procedures that represent a T-SQL API for managing the SSIS server. In fact, this chapter has an entire section on using T-SQL with SSIS. Here is an example of running the stored procedure to set the cleanup property to false:
EXEC [SSISDB].[catalog].[configure_catalog]
@property_name=N'OPERATION_CLEANUP_ENABLED', @property_value=N'FALSE'
Parameters can be encrypted in the SSIS catalog. This enables you to store connection strings with a password without any fear of a plain-text password, unlike previous versions. To set the encryption algorithm, use the Encrypt_Algorithm property. To do so, first you must put the catalog in single-user mode. Then run the catalog.configure_catalog stored procedure to set the algorithm to one of the following options:
· DES
· TRIPLE_DES
· TRIPLE_DES_3KEY
· DESX
· AES_128
· AES_192
· AES_256 (default)
The encryption algorithm AES_256 is the default level. No one encryption level is perfect for all situations. AES stands for Advanced Encryption Standard, and DES stands for Data Encryption Standard. DES was the standard since 1977, and now AES has been the standard since 2001. AES is generally the faster encryption. A thorough encryption explanation is beyond the scope of this book; in fact, there are entire books on just encryption. However, here are some basics to keep in mind:
· The stronger the encryption, the more the CPU is used.
· Longer keys give better encryption than shorter keys.
· Long passwords are stronger than short passwords.
Executing and deploying packages writes data to the SSISDB, and as you can imagine, after many package deployments and executions there will be a lot of data stored in the SSISDB. This data will need to be cleaned up. A SQL Agent job is run to clean up old data from package executions and project deployments. Two properties are used to control this operation:
· Operation_Cleanup_Enabled: Setting this to true enables the operation job.
· Retention_Window: Set this to specify the maximum number of days to keep data.
You can control some operations using stored procedures like catalog.operations and catalog.extended_operations_info.
Another great feature of SSIS is project versioning. Gone are the days of deploying a project and overwriting packages and losing them forever. Now when you deploy a project there is a version number assigned, and you can retrieve old versions of projects.
After you have deployed a project dozens of times, you will want to clean up the old versions. The version cleanup job deletes old versions of your projects. Two properties control the behavior of the version cleanup job:
· Version_Cleanup_Enabled: Set this to true to enable the version cleanup job.
· Max_Project_Versions: Set this to specify the maximum number of versions to keep in history.
You can use the stored procedure catalog.object_version to view versioning information. You can also right-click on a project in the catalog and select Versions to see the versions of a particular project (see Figure 22-3). Toward the bottom-right corner of this window is a button for restoring old versions of projects.
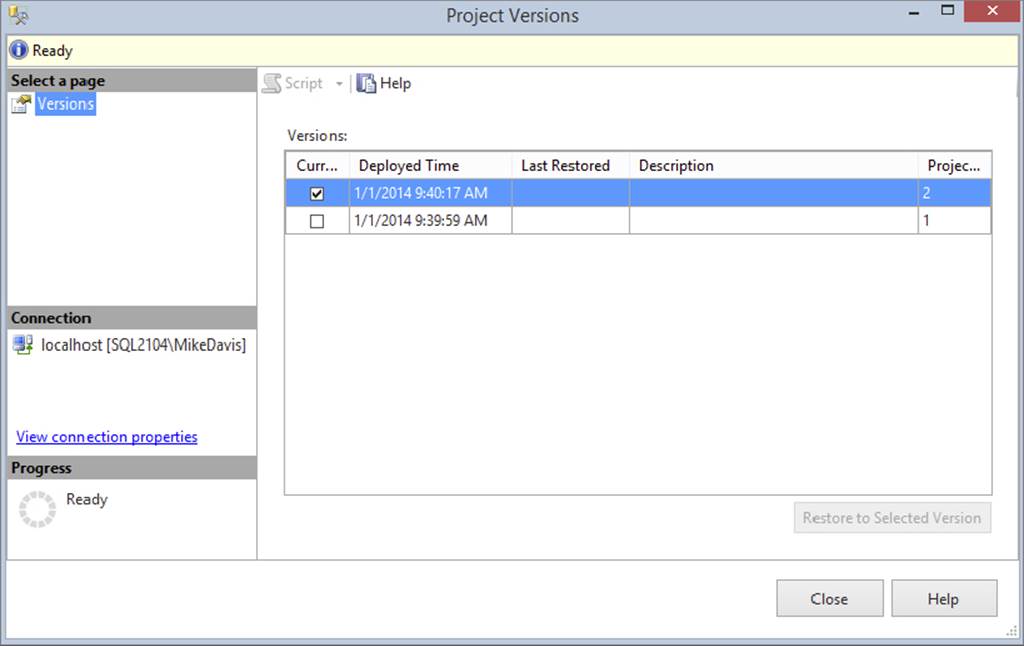
FIGURE 22-3
Another property of the SSIS catalog is the validation timeout. Validation is the process of checking the connections in an SSIS package. The time it takes to run this validation varies according to your servers. Validation runs asynchronously and has a timeout property that controls how long the service will wait for a response. Packages with more connections take longer to validate. The Validation_Timeout property is set in seconds, with a default of 300 seconds (5 minutes). You can also run validation on a project by running the stored procedure catalog.validate_project or on a package by running catalog.validate_package. Alternately, you can right-click on a project or package in SQL Server Management Studio and select Validate.
SSISDB
When you install Integration Services 2014, it will not automatically install the database named SSISDB. To create this database you will need to right-click on |the SSIS catalog in SSMS and select Create Catalog. Figure 22-4 shows an image of this database and some of its tables.

FIGURE 22-4
This database contains all the information and objects for the SSIS catalog. You will administer Integration Services using the SSIS catalog, but your DBA will back up and secure the SSISDB just like any other database. Because of the encryption key specified when creating the catalog, backup and restoring, particularly restoring to a different server, is more involved than a typical database.
There are several tables and stored procedures in the SSISDB. When you execute a package, deploy a project (in the project deployment model), delete a project, or do any other work with Integration Services, you are making changes to the SSISDB. Therefore, you can control your Integration Services instance using T-SQL. This is discussed in more detail in the “Using T-SQL with SSIS” section.
DEPLOYMENT MODELS
You can deploy packages using the project deployment model or the package deployment model. The project deployment model, enables you to use the parameters and deploy to the Integration Services catalog.
There are several differences between the project deployment model and the package deployment model, as shown in Table 22-2.
TABLE 22-2: Deployment Models
|
PROJECT DEPLOYMENT MODEL |
PACKAGE DEPLOYMENT MODEL |
|
Project is deployed. |
Package is deployed. |
|
Project uses parameters. |
Package uses configuration files/tables. |
|
Project is located in an .ispac file and packages have .dtsx extensions. |
Packages have a .dtsx extension. |
|
Project is deployed to Integration Services Catalog. |
Packages are deployed to the MSDB or file system. |
|
CLR integration is required. |
CLR integration is not required. |
|
New environments in the SSIS catalog can be used with parameters. |
System environment variables can be used with configurations. |
|
Projects and packages can be validated before execution with T-SQL or managed code. |
Packages are validated just before execution and can be validated with dtexec or managed code. |
|
Packages are executed with T-SQL. Parameters and environments can be set with T-SQL. |
Packages are executed with dtexe and dtexecui. Command parameters can be passed to the command prompt. |
|
Robust logging is built in with several reports. |
Logging is built in with no reports. |
Project Deployment Model
In previous versions of SSIS, you deployed packages to either a server or a file system. Those options are still available but are not the recommended practice since SQL Server 2012. The project deployment model is the standard and makes deployment much easier, as you will see in this chapter. Parameters and environments are great features also and will be the standard for your SSIS development replacing configuration files and tables. The old configuration methods are still available though not recommended. This project deployment method along with the parameters and environments is a big change in the way you think about SSIS package deployments. You will now consider deploying projects as a group of work not individual packages. Think of a project as a body of work that needs to be completed together. This may include just one package or several. This section will cover the project deployment model.
When choosing a deployment model, you should consider the administration options and the deployment options. The project deployment model provides some development features, such as parameters and environments.
The Integration Services catalog is the location where packages and all SSIS objects are stored in SQL Server 2014 if the project deployment model is selected. An instance of SQL Server can have one catalog, and a catalog can contain folders for organizing your instance. Folders hold the SSIS projects and environments. As mentioned earlier, the folders in the catalog can also be used for security.
Parameters are covered briefly in Chapter 2. In this chapter you will learn how they work from the administration side. When you create a parameter, you can scope it to either the package level or the project level. Parameters work much like variables. They can be used in expressions and tasks. You can assign parameters at runtime with T-SQL or let the package use the default value set during development.
Once you have a package deployed with numerous parameters, you may want to control them with different sets of values. Environments give you this capability. Environments store a set of variable values that can be referenced during package execution. You can store values for different runtimes. For example, you might have different values for weekend runtimes versus weekday runtimes. By storing all the parameter values in an environment, you can execute your package and point it to the correct set of parameter values, rather than set each value individually.
After you have completed your package development, you are ready to deploy the project to the SSIS catalog. In this example you have a package that contains an Execute SQL Task. You will have one parameter on the package, and deploy the package to the SSIS catalog and set up an environment. This sample package is available with the code download for this book.
In this example package you will simply use the Execute SQL Task to write a row to a table in AdventureWorks. Use the following code to create this example table:
USE [AdventureWorks]
GO
CREATE TABLE [dbo].[InsertTest](
[StringCol] [varchar](50) NULL
) ON [PRIMARY]
GO
NOTE All code samples in this chapter are available as part of the Chapter 22 code download for the book at www.wrox.com/go/prossis2014.
The SQL statement in the Execute SQL Task in the package is as follows:
INSERT INTO [dbo].[InsertTest]
([StringCol])
VALUES
(?)
The project will contain one package with an Execute SQL Task that will write a value to the InsertTest table. The value that is inserted into this table is the parameter value. This parameter value will be changed using the environments. This first example uses a package level parameter. The example package has a package level parameter on it named strInput with a data type of String and a value of PackageParam, as shown in Figure 22-5.

FIGURE 22-5
Now that you are familiar with the package, you are going to deploy it to the SSIS catalog.
1. To start the deployment, right-click on the project name in Solution Explorer in SQL Server Data Tools, and select Deploy (see Figure 22-6). In the middle of this menu you should see the option Convert to Package Deployment Model. If you instead see Convert to Project Deployment Model, then your project is in the package deployment model, and you will need to click this option to convert it to the project deployment model.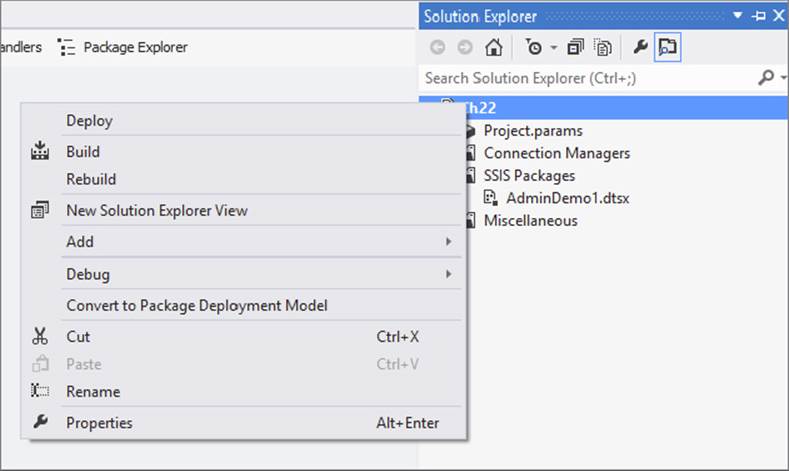
FIGURE 22-6
2. The first window of the SSIS Deployment Wizard is the basic information screen. Read this and then click the checkbox at the bottom to hide the screen in the future, and then click Next.
3. The next window asks for the server name and the path. Enter your server name. This example uses LocalHost as the server name.
4. Now click the Browse button next to Path and select a folder into which the package should be deployed. You can create a new folder by clicking the New Folder button at the bottom of the window. You must deploy the project into a folder; you cannot put it in the SSISDB root. For this example, use the folder named AdminDemo, as shown in Figure 22-7, and click Next.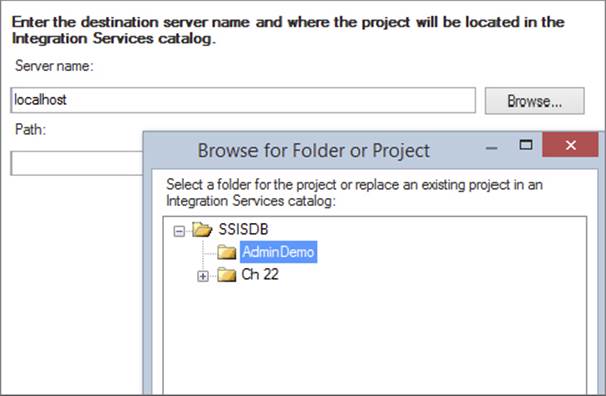
FIGURE 22-7
5. This next window is the Review window. Check the source and destination here to ensure everything is correct, and then click Deploy.
6. The last window is the Results window. You should see a passed result for every step, as shown in Figure 22-8.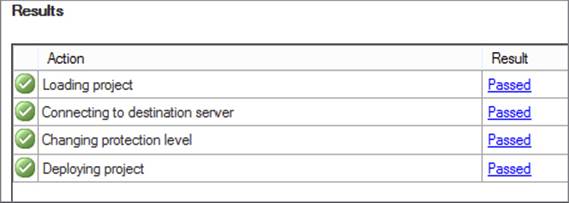
FIGURE 22-8
Congratulations. You have successfully deployed your first project to your SSIS catalog. The next section describes the package deployment model. Then we will return to this project in the T-SQL section of this chapter, where you will learn how to execute the package and set the parameter values and environments.
Package Deployment Model
The package deployment model is the older version of deployment, and you should be changing your methods to take full advantage of the newer method. Because of the fact that some users will still want to use the old model, either because of large frameworks they have in place or just because changing can be difficult, this model is covered in this section.
In the package deployment model, you can create a deployment utility that helps users install your project of packages and any dependencies. This deployment utility is similar to creating a program like InstallShield, and it is for times when you want to pass a set of packages to a customer or a production DBA who may not know how to install SSIS packages manually. When you create a deployment utility, all the files necessary to install the project are copied into a centralized directory, and an .SSISDeploymentManifest file is created for the installer to run, which opens the Package Installation Wizard.
Creating the Deployment Manifest
To create a deployment utility, simply right-click the SSIS project in SQL Server Data Tools and select Properties. In the Property Pages dialog, go to the Deployment Utility page and change the CreateDeploymentUtility property to True, as shown in Figure 22-9. This is set to False by default. The AllowConfigurationChanges property is a key setting as well, and when set to True, it asks installers whether they would like to change any settings that may be exposed via a configuration file at installation time. The DeploymentOutputPath property specifies where the deployment utility will be outputted to underneath the project folder.
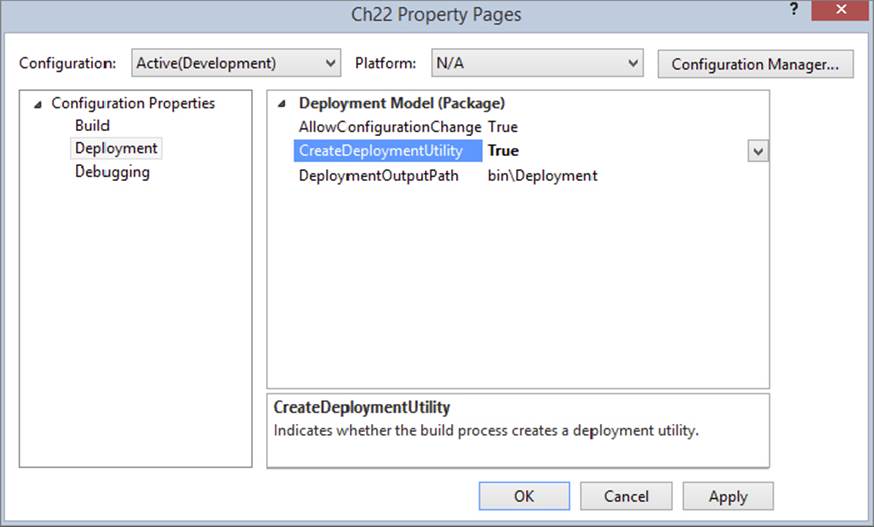
FIGURE 22-9
Next, under the Build menu, select Build <Project Name>, where <Project Name> represents your project’s name. You should see “(package deployment model)” next to the package name, as shown in Figure 22-10. If you don’t see this, then you are in project deployment model. If so, right-click on the project in Solution Explorer to convert to the package deployment model.
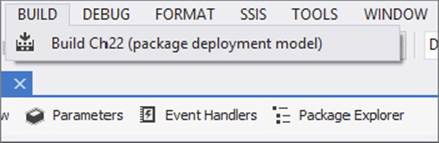
FIGURE 22-10
Clicking Build will open each package and build the project. If there are any errors in the package, you will see them at this point. As it builds the project, each package, and the project’s .SSISDeploymentManifest file, is validated and then outputted into the\bin\deployment directory under your project’s folder.
NOTE After building the deployment utility, you should change the CreateDeploymentUtility option to False again. Otherwise, each time you click the Play button to execute the package, each package will be validated and executed, which could take an enormous amount of time for a large project. Instead of using the green debug arrow at the top of SQL Server Data Tools, the best practice is to right-click on the package in Solution Explorer and then click Execute package. This ensures that only the package is executed.
The Package Deployment Wizard
Now that you have created a deployment .SSISDeploymentManifest file, you’re ready to send the contents of the «project location»\bin\deployment folder to the installation person. The installation person would then need to copy the contents of the folder to the server he or she wishes to deploy to and double-click the .SSISDeploymentManifest file. The installer could also run it remotely, but it is recommended that you run it on the same server as the target deployment server to simplify the installation. You can also modify the.SSISDeploymentManifest file in your favorite XML editor to specify which packages should be deployed. If the wizard does not open on double-clicking the mainfest file, choose dtsinstall found in program files as the program to open it.
After the introduction screen, you are asked where you want to deploy the packages, as shown in Figure 22-11. You can choose either a file system deployment or a SQL Server deployment. A file system deployment just copies the packages, which are the .dtsx files, to a directory on the server. A SQL Server deployment stores the packages in the MSDB database on the target server. Select the SQL Server deployment option if you are following this example, and then click Next. You can also have the wizard validate each package after you install it. This ensures that the package delivered to you is valid on your machine, including the Data Sources.
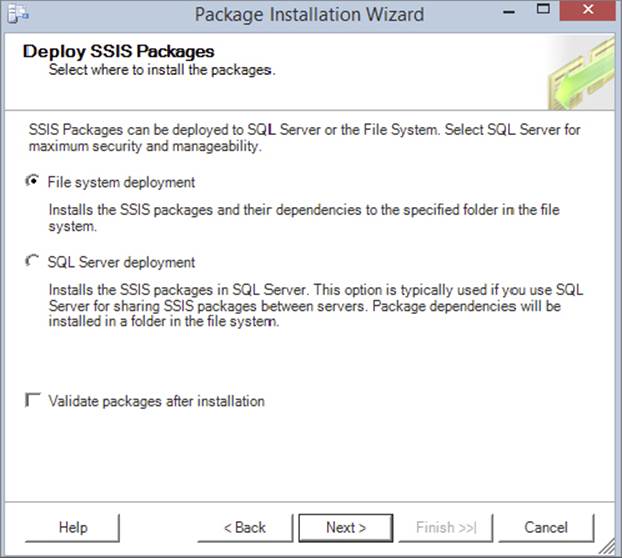
FIGURE 22-11
The following table lists the pros and cons of the MSDB versus File System Deployment. Security is usually the defining factor here.
|
Functionality |
Best in File System |
Best in MSDB |
|
Security |
|
|
|
Backup and recovery |
|
|
|
Deployment |
|
|
|
Troubleshooting |
|
|
|
Availability |
|
|
|
Execution speed |
|
|
If you selected SQL Server deployment, the next screen prompts you for the SQL Server 2014 instance to which you wish to deploy the packages. Additionally type “/” (without the quotes) for the Package Path property. This specifies that the packages will be installed into the root path. If you had selected a file system deployment, the next screen prompts you for the file path to which you wish to deploy the packages. The last option in the SQL Server deployment screen enables you to specify whether you want to rely on the SQL Server to protect the package by encrypting it. This is the recommended option, and it will change the ProtectionLevel package property to ServerStorage as it installs each package. You’ll learn more about the ProtectionLevel property later in this chapter.
Even though you selected a SQL Server deployment, you may still need to deploy files such as configuration files and readme files. The next screen enables you to specify where you want these files. Generally, they’ll be located in a subfolder named after the project under the C:\Program Files\Microsoft SQL Server\120\DTS\Packages folder.
After you click Next, the packages will be installed in the package store on the server. After the packages are installed, if the developer selected True for the AllowConfigurationChanges option in SQL Server Data Tools (refer to Figure 22-9), then an additional screen appears, giving you, as installer, a chance to edit the values in the configuration file at deployment time. This is shown in Figure 22-12, and you can click the dropdown menu to see multiple configuration files. Unfortunately, it does not show the packages to which these files are associated.
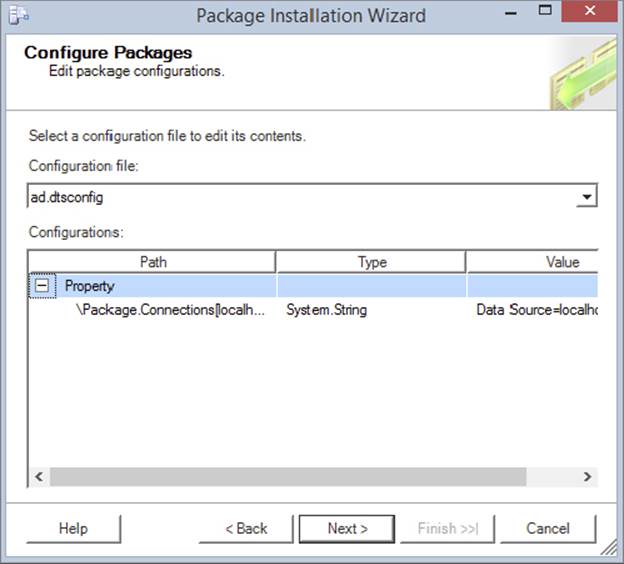
FIGURE 22-12
The only other additional screen you might see is a pop-up if there were a user password on any package.
After the packages have been deployed, they are validated, as shown in Figure 22-13. Any problems will appear in this Packages Validation screen, and you can redeploy after correcting the problem. The last screen is a summary screen to complete the wizard.
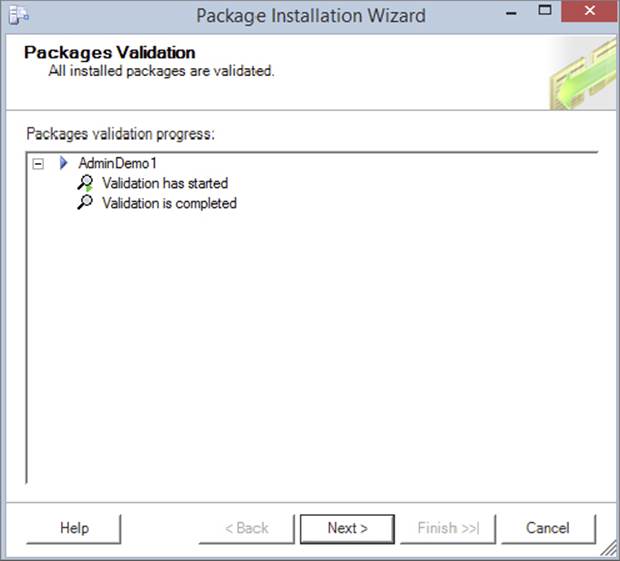
FIGURE 22-13
If you wish to deploy a package in Management Studio, as shown later in this chapter, you have to do it one package at a time. The file system, however, is much easier. With this method of storage, you can just copy the .dtsx and supporting files manually into a directory that is monitored by the SSIS service, and the packages can be seen immediately from Management Studio.
The main point to remember about using the deployment utility is that every package and all project dependencies are deployed. If you don’t want to deploy that many packages, you can edit the .SSISDeploymentManifest file in a text editor to remove any extra files you don’t want to migrate. Some find it useful to create a project in the same solution that contains a subset of the packages that they wish to deploy, if deploying all packages and dependencies is too aggressive for them.
If you did want to edit the .SSISDeploymentManifest XML file before sending the folder to a client, you could just remove one of the «Package» lines, as shown in the following XML example. The header of the XML file indicates who created the deployment tool and when. This information is useful if the project doesn’t install correctly. If you don’t wish to deploy a configuration file with the wizard, you can remove the «ConfigurationFile» line in order to prevent the configuration file from overwriting the older configuration files that may already be on the server file.
<?xml version="1.0" ?>
<DTSDeploymentManifest GeneratedBy="MikeDavis\MDavis"
GeneratedFromProjectName="Pro SSIS"
GeneratedDate="2011-10-15T23:39:54.7343750-05:00"
AllowConfigurationChanges="true">
<Package>EventHandler.dtsx</Package>
<Package>Package1.dtsx</Package>
<Package>Restartability.dtsx</Package>
<Package>ConfigFiles.dtsx</Package>
<Package>Chapter1.dtsx</Package>
<Package>RawFile.dtsx</Package>
<Package>DBSnapshots.dtsx</Package>
<Package>Logging.dtsx</Package>
<Package>FileWatcher.dtsx</Package>
<Package>ConfigRepository.dtsx</Package>
<ConfigurationFile>configuration.xml</ConfigurationFile>
</DTSDeploymentManifest>
Using the SSIS Package Store
The other option for deploying your packages is the SSIS Package Store. This is the older option now, and you should be moving your packages to the SSIS catalog to take advantage of features like parameters and environments. In some cases, the Package Store will actually physically store the package, such as the MSDB database option. If you’re using file system storage, the Package Store just keeps a pointer to the top-level directory and enumerates through the packages stored underneath that directory. In order to connect to the Package Store, the SSIS service must be running. This service is called SQL Server Integration Services, or MSDTSServer120. There is only one instance of the service per machine or per set of clustered machines.
You can configure the SSIS service in the Services applet (select Control Panel ⇒ Administrative Tools ⇒ Services). Double-click SQL Server Integration Services. The service is set to automatically start by default, under the NT AUTHORITY\NetworkService account. In the Recovery tab, you can specify that the service should automatically start up again in the event of a failure, as shown in Figure 22-14. You can specify what action should be taken if the service fails the first, second, and subsequent times. In this case, the service has been changed to restart if a failure occurs two times. The failure count is also reset after two days.
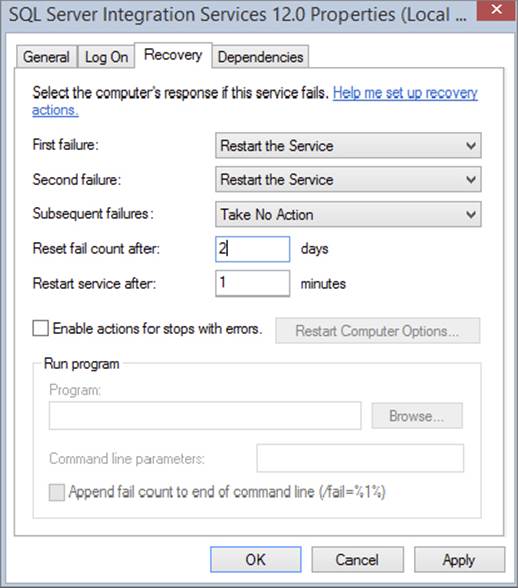
FIGURE 22-14
Although you can run and stop packages programmatically without the service, the service makes running packages more manageable. For example, if you have the service run the package, it tracks package execution, and users with the proper permission can interrogate the service to find out which packages are running. Those who are in the Windows Administrators group can stop all running packages. Otherwise, you can stop only packages that you have started. It can also aid in importing and exporting packages into the Package Store. We cover other uses for the service throughout this chapter, but another benefit is that it enables you to create a centralized ETL server to handle the execution of your packages throughout your enterprise.
The MSDTSServer120 service is configured through an XML file that is located by default in the following path: C:\Program Files\Microsoft SQL Server\120\DTS\Binn\MsDtsSrvr.ini.xml. This path varies if your servers are in a cluster. If you cannot find the path, go to theHKEY_LOCAL_MACHINE\SOFTWARE\Microsoft\Microsoft SQL Server\120\SSIS\ServiceConfigFile registry key. By default, the XML file should look like the following:
<?xml version="1.0" encoding="utf-8" ?>
- <DtsServiceConfiguration xmlns:xsd=http://www.w3.org/2001/XMLSchema"
xmlns:xsi=http://www.w3.org/2001/XMLSchema-instance>
<StopExecutingPackagesOnShutdown>true</StopExecutingPackagesOnShutdown>
- <TopLevelFolders>
-<Folder xsi:type="SqlServerFolder">
<Name>MSDB</Name>
<ServerName>.</ServerName>
</Folder>
- <Folder xsi:type="FileSystemFolder">
- <Name>File System</Name>
<StorePath>..\Packages</StorePath>
</Folder>
</TopLevelFolders>
</DtsServiceConfiguration>
There isn’t much to really configure in this file, but it does have some interesting uses. The first configuration line tells the packages how to react if the service is stopped. By default, packages that the service is running will stop if the service stops or fails over. You could also configure the packages to continue to run until they complete after the service is stopped by changing the StopExecutingPackagesOnShutdown property to False, as shown here:
<StopExecutingPackagesOnShutdown>false</StopExecutingPackagesOnShutdown>
The next configuration sections are the most important. They specify which paths and servers the MSDTSServer120 service will read from. Whenever the service starts, it reads this file to determine where the packages are stored. The default file contains a single entry for a SQL Server that looks like the following SqlServerFolder example:
<Folder xsi:type="SqlServerFolder">
<Name>MSDB</Name>
<ServerName>.</ServerName>
</Folder>
The «Name» line represents how the name will appear in Management Studio for this set of packages. The «ServerName» line represents where the connection will point to. There is a problem, however: if your SQL Server is on a named instance, this file will still point to the default non-named instance (.). If you do have a named instance, simply replace the period with your instance name.
The next section shows you where your file system packages will be stored. The «StorePath» property specifies the folder from which all packages will be enumerated. The default path is C:\program files\microsoft sql server\120\dts\Packages, which is represented as..\Packages in the default code that follows. That part of the statement goes one directory below the SSIS service file and then into the Packages folder.
<Folder xsi:type="FileSystemFolder">
<Name>File System</Name>
<StorePath>..\Packages</StorePath>
</Folder>
Everything in the Packages folder, and below that folder, will be enumerated. You can create subdirectories under this folder, and they will immediately show up in Management Studio; you don’t have to modify the service configuration file. Each time you make a change to the MsDtsSrvr.ini.xml file, you must stop and start the MSDTSServer120 service.
In this section you learned how to use the SSIS Package store. Again keep in mind that this is an older method that you should move away from. Using the SSIS catalog and SSISDB gives you the ability to take advantage of the features like versioning, parameters, and environments.
USING T-SQL WITH SSIS
One of the most exciting features of SSIS is the fact that you can use T-SQL to interact with your packages and projects natively (if you are using the project deployment model). You can write stored procedures or just open SSMS and type in the T-SQL code you need to execute or validate your packages. In this section you will be using the project from the “Project Deployment Model” section earlier in this chapter. The code and projects can be downloaded from the book’s website at www.wrox.com/go/prossis2014.
Executing Packages
This first item to learn in the world of T-SQL and SSIS is how to execute a package using T-SQL. If you right-click on the package in the SSIS catalog and click the script button at the top of the execution window, you can copy the script into a new query window. The script window has been available for other SQL commands in past versions of SQL Server, but now you can use this same feature in the SSIS catalog. In just about all of the SSIS windows you see in the catalog, you will have this automatic scripting option. This can do two things for you: speed up your writing of the T-SQL you need and help you learn the T-SQL commands used in this version of SSIS. By scripting out commands and looking at the names of the stored procedures, you can start noting procedures you will use frequently. The following script is an example of this code:
Declare @execution_id bigint
EXEC [SSISDB].[catalog].[create_execution] @package_name=N'AdminDemo1.dtsx',
@execution_id=@execution_id OUTPUT,
@folder_name=N'AdminDemo',
@project_name=N'Ch22',
@use32bitruntime=False,
@reference_id=Null
Select @execution_id
EXEC [SSISDB].[catalog].[start_execution] @execution_id
GO
You need to understand four sections of this code. The first line is a simple variable declaration that is used to hold the execution ID that you will create in the next section of the T-SQL code.
The next section of the code is the meat of the work. You are using the EXEC command to call the stored procedure in the SSISDB named Catalog.Create_Execution. This command creates an execution ID, which is a unique ID for executing the package. The execution ID is saved in a table in the SSISDB. You won’t usually need to manually touch the internal table in the SSISDB; management should be done from the SSIS catalog using T-SQL, but because this is a professional-level SSIS book, you will get to see some of the work done by the stored procedure on the SSISDB.
The stored procedure that creates the execution inserts a row on the internal.operations table. Keep in mind that the stored procedures work like any other, so with proper permissions you can read through them. If you look at the create_execution stored procedure, you will see it calls another stored procedure named internal.insert_operation, which does the actual inserting of the row into the internal.operations table.
In the preceding execution code, the catalog.create_execution stored procedure takes a few parameters: the package name, an output parameter with the execution ID, the folder name in which the package resides, the project name of the package, whether the package should be executed in 32-bit mode, and a reference ID.
The next line of the code is a SELECT statement. This is included just to show you the execution ID in the results pane. You can run the execution without this line.
The last line executes the package by calling another stored procedure: catalog.start_execution. This stored procedure calls another stored procedure named internal.start_execution_internal. As shown in Figure 22-15, this stored procedure has a small icon of a lock on it in the SSISDB. This indicates that the stored procedure is a SQL CLR stored procedure. If you right-click on the stored procedure, you will see that the modify option is grayed out. As mentioned earlier, you are probably never going to alter these stored procedures. They are calling the internal workings of the SSIS catalog. You can see the code in this stored procedure by right-clicking on it and selecting “Script Stored Procedure as” ⇒ “Alter to” ⇒ “New Query Editor Window.” This shows you the API call to the internal SSIS code.
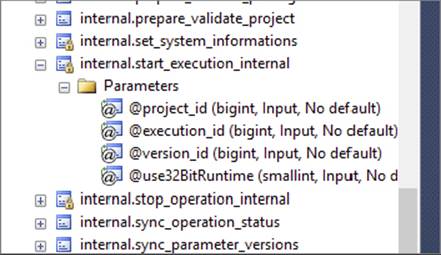
FIGURE 22-15
Executing the preceding code will insert a row into the InsertTest table. The value inserted will be PackageParam, which is the default value of the package parameter saved in the package. The next section demonstrates how to change the value of this parameter.
Using Parameters
Now that you have the AdminDemo package deployed to the SSIS catalog, you are ready to set the parameter value and execute the package using T-SQL. The previous section showed the execution query, but it was incomplete because the AdminDemo package has a parameter whose value you want to set. To do so, just add the following lines to the execution query:
Declare @execution_id bigint
EXEC [SSISDB].[catalog].[create_execution] @package_name=N'AdminDemo1.dtsx',
@execution_id=@execution_id OUTPUT, @folder_name=N'AdminDemo',
@project_name=N'Ch22', @use32bitruntime=False, @reference_id=Null
Select @execution_id
DECLARE @var0 sql_variant = N'PackageParam'
EXEC [SSISDB].[catalog].[set_execution_parameter_value] @execution_id,
@object_type=30,
@parameter_name=N'strInput',
@parameter_value=@var0
EXEC [SSISDB].[catalog].[start_execution] @execution_id
GO
The two new lines in the query are the variable declaration, which holds the value of the parameter, and the stored procedure to set the parameter value. The DECLARE creates a variable and sets the value to a string value — in this case, PackageParam.
The next line calls the stored procedure named catalog.set_execution_parameter_value. This stored procedure has a few parameters: the execution ID of the package created in the create execution procedure, the object type, the parameter name, and the parameter value, which is set to the previously created variable. The object type is set to either 20 (for a project parameter) or 30 (for a package parameter).
If you run the preceding script and then query the InsertTest table in AdventureWorks, you will see a new row added to the table. To ensure that the parameter is working, change the parameter value in the script from PackageParam to Changed with T-SQL. Then run the script again. You should see this row added to the table.
Querying Tables for Parameter Values
The T-SQL statements work great for changing the default value of a parameter for a package execution. The value is still basically hardcoded into a script. It would be nice if you could query a table and set the value of a parameter based on the results of the query.
The next bit of code shows how to do that. It’s very similar to the previous T-SQL. The only difference is that the value is selected from a table from AdventureWorks.
Declare @execution_id bigint
EXEC [SSISDB].[catalog].[create_execution] @package_name=N'AdminDemo1.dtsx',
@execution_id=@execution_id OUTPUT,
@folder_name=N'AdminDemo',
@project_name=N'Ch22',
@use32bitruntime=False,
@reference_id=Null
Select @execution_id
DECLARE @var0 sql_variant = (
Select top(1) FirstName from
[AdventureWorks].[Person].[Contact]
Order by LASTNAME
)
EXEC [SSISDB].[catalog].[set_execution_parameter_value] @execution_id,
@object_type=30,
@parameter_name=N'strInput',
@parameter_value=@var0
EXEC [SSISDB].[catalog].[start_execution] @execution_id
GO
On the line where the parameter value is set, the hardcoded value of PackageParam has been replaced with a query from AdventureWorks, as shown here:
Select top(1) FirstName from
[AdventureWorks].[Person].[Contact]
Order by LASTNAME
This query returns the results of someone’s first name — in this case, “Syed.” You can run this query separately from the package execution to see if your results differ.
NOTE Note that Microsoft may have altered the AdventureWorks sample database after publication of this book.
Now you have the tools to set parameter values using queries. This can be very useful in terms of controlling many packages, even in different projects or on different machines. You can update a table, and all the package executions querying the table to set their parameters will be altered, but if you want to change sets of parameter values easily, then you will want to use environments.
Using Environments
Imagine you have a project that runs on a schedule. On weekdays, the packages in the project need to run with a certain set of parameter values, but on weekends, they need a different set of values. This is a project with several packages, and each package has several parameters. All the packages in the project need to use the same parameter values when they run. Environments make it easy to run these packages with different sets of parameter values.
This example project, named EnvironmentDemo, contains three packages: EnvironDemo1, EnvironDemo2, and EnvironDemo3. The project has two project level parameters. You can download this project from the website for this book atwww.wrox.com/go/prossis2014.
Creating and Configuring Project Level Parameters
If you want to create project level parameters, double-click on Project.params under the project in SQL Server Data Tools in Solution Explorer, as shown in Figure 22-16. Here, you can see the two project level parameters that already exist in this project: strRunType and intNumber. Each has a default value set, but you do not want to use the default value.
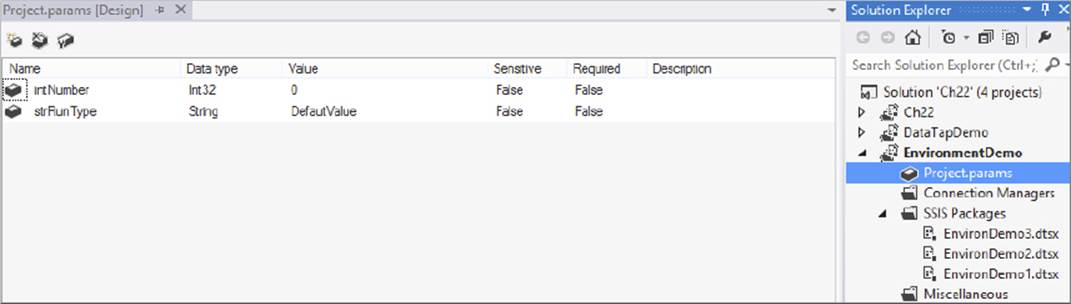
FIGURE 22-16
This package will simply write the two parameter values to a table named EnvironmentDemo in AdventureWorks. Following is the script to create this table. Deploy this project to a folder named EnvironmentDemo in the SSIS catalog.
CREATE TABLE [dbo].[EnvironmentDemo](
[RunType] [varchar](50) NULL,
[IntParamValue] [nchar](10) NULL
) ON [PRIMARY]
Setting Up Your Environments
Now deploy your project using the project deployment model as described in the “Project Deployment Model” section earlier in this chapter. After the project is deployed, you are ready to set up your environments. In the SSIS catalog, right-click on the Environments folder and click Create Environment. Name the first environment Week Days and then create a second environment and name it Weekends. When you are done, you should see two environments in the EnvironmentDemo folder, as shown in Figure 22-17.
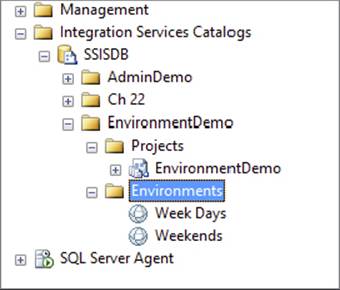
FIGURE 22-17
To set variable values in the environments, you can right-click on the environment and select Properties. Then click the Variables option on the left. Set the name, type, and value of the variables as shown in Figure 22-18.
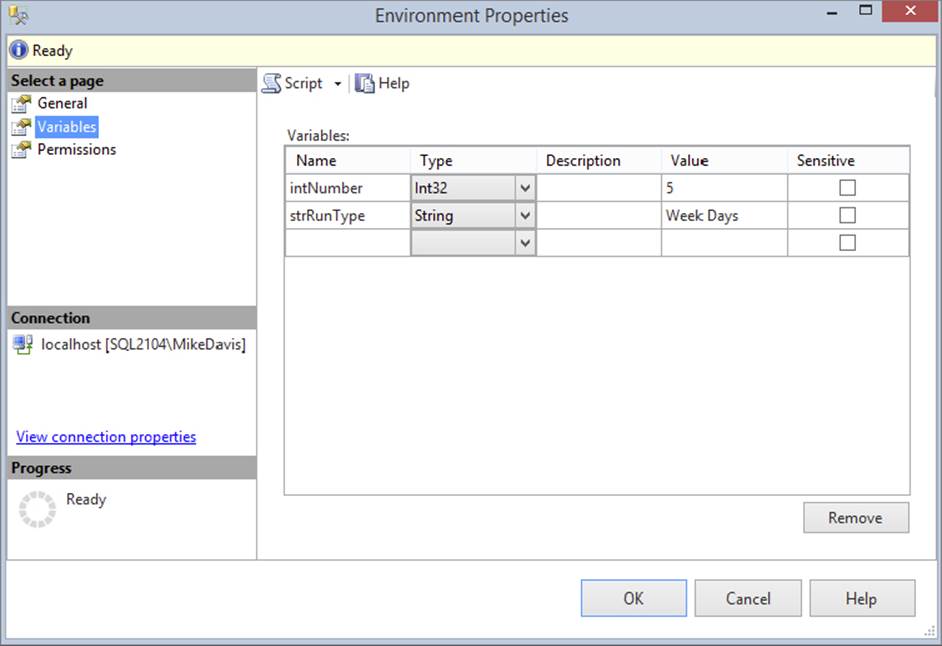
FIGURE 22-18
You can also set the value of the environments using T-SQL queries. The following code shows how this is done. The stored procedure named catalog.create_environment_variable creates a variable in the environment. This stored procedure takes six parameters: variable name, whether the variable is sensitive and therefore needs to be encrypted, the name of the environment, the folder name where the project is found, the value of the variable, and the data type.
DECLARE @var int = N'2'
EXEC [SSISDB].[catalog].[create_environment_variable] @variable_name=N'intNumber',
@sensitive=False,
@description=N'',
@environment_name=N'Weekends',
@folder_name=N'EnvironmentDemo',
@value=@var,
@data_type=N'Int32'
GO
DECLARE @var sql_variant = N'Weekends'
EXEC [SSISDB].[catalog].[create_environment_variable] @variable_name=N'strRunType',
@sensitive=False,
@description=N'',
@environment_name=N'Weekends',
@folder_name=N'EnvironmentDemo',
@value=@var,
@data_type=N'String'
GO
Once you have the variables created in the environments, ensure that the values are set.
Configuring the Project to Use Environments
The next step is to configure the SSIS project to use the environments you just created. Right-click on the EnvironDemo1 package and select Configure. In the Scope dropdown menu, select EnvironmentDemo, which is the project. You could create package level parameters and use the package level scope here, but because you want all your packages to use the same value, you will use the project scope.
Click the References option on the right. Then click Add at the bottom and select the Week Days environment. Add the Weekends environment the same way. When you are done, your window should look like Figure 22-19. Click OK to close the window.
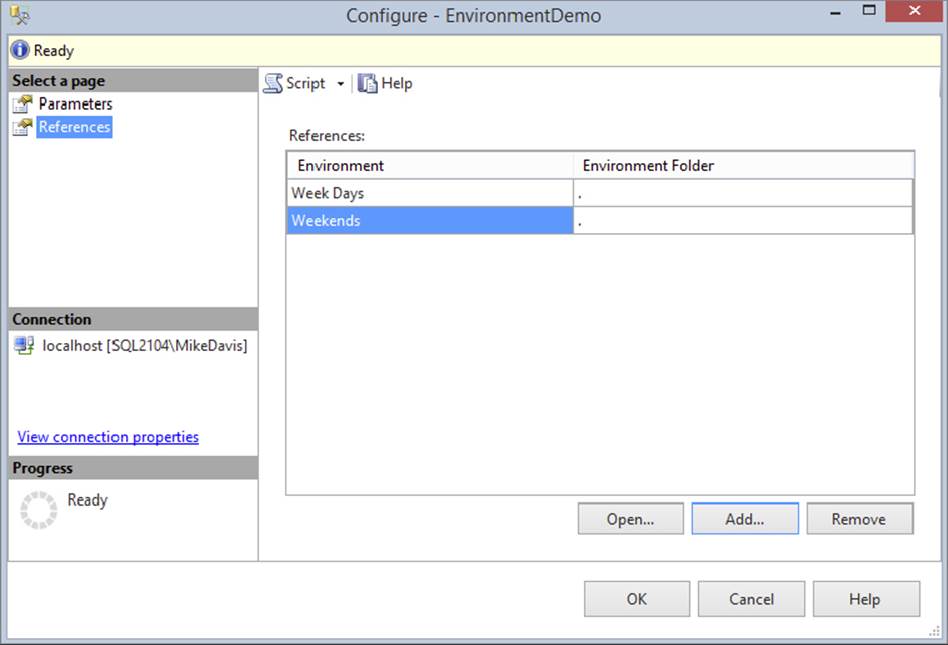
FIGURE 22-19
Now that the packages have references to the environments, you need to configure the project to use the variables from the environments. Right-click on the EnvironmentDemo project and then click configure. Ensure that the scope is set to All Packages and Project. Click the ellipses next to the intNumber variable. This will open the Set Parameter Value dialog. At the bottom are three options: Edit value, Use default value from package, and Use environment variable. Select the third option and choose the intNumber variable from the dropdown menu, as shown in Figure 22-20. Repeat the same steps for the strRunType variable.
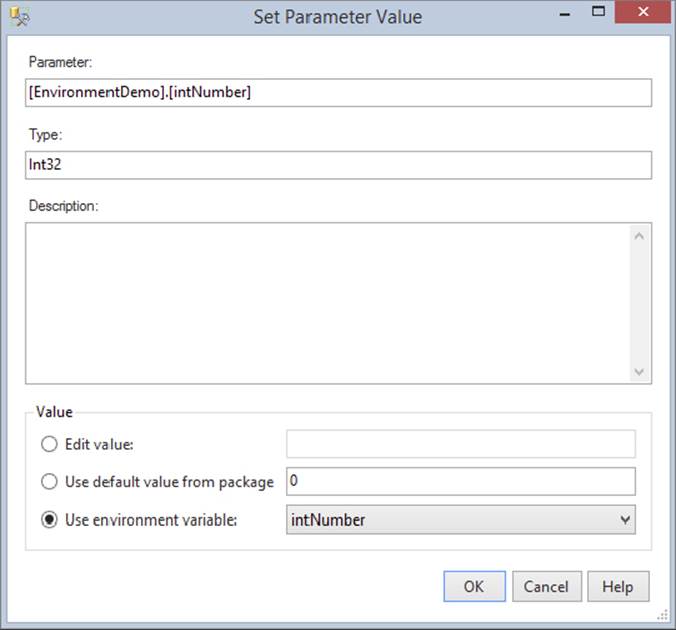
FIGURE 22-20
As stated before, all this work in the GUI can be done with T-SQL. If you click the script button before clicking OK and send the script to a new query window, you will see the following code (the stored procedure used here is catalog.set_object_parameter_value):
EXEC [SSISDB].[catalog].[set_object_parameter_value] @object_type=20,
@parameter_name=N'intNumber',
@object_name=N'EnvironmentDemo',
@folder_name=N'EnvironmentDemo',
@project_name=N'EnvironmentDemo',
@value_type=R,
@parameter_value=N'intNumber'
GO
EXEC [SSISDB].[catalog].[set_object_parameter_value] @object_type=20,
@parameter_name=N'strRunType',
@object_name=N'EnvironmentDemo',
@folder_name=N'EnvironmentDemo',
@project_name=N'EnvironmentDemo',
@value_type=R,
@parameter_value=N'strRunType'
GO
The only new parameter here is value_type, which is set to R in this example. This indicates that the parameter value is a referenced value and is using an environment variable. You can also set the value_type parameter to V, to indicate the parameter is a literal value.
Now you are ready to execute the package. Right-click on the EnvironDemo1 package in the SSMS Object Explorer window and select Execute. At the bottom of the Execute Package dialog is an environment option. Place a check next to Environment and select Week Days from the dropdown. Click OK to execute the package. When a message box appears asking if you would like to open the overview report, click No.
Query the EnvironmentDemo table in AdventureWorks and you will see the row with the value of Week Days and the number 5. You can truncate or delete from this table if you prefer. Now repeat the same steps to execute the EnvironDemo2 package. Another row with the same values will be inserted.
Right-click on the EnvironDemo3 package and select Execute. Select the Weekends environment this time. Instead of letting the GUI execute the package, click the script button and send the script to a new query window. Click Cancel to close the Execute window. In the newly created query window you will see the following code:
Declare @execution_id bigint
EXEC [SSISDB].[catalog].[create_execution]
@package_name=N'EnvironDemo3.dtsx',
@execution_id=@execution_id OUTPUT,
@folder_name=N'EnvironmentDemo',
@project_name=N'EnvironmentDemo',
@use32bitruntime=False,
@reference_id=5
Select @execution_id
EXEC [SSISDB].[catalog].[start_execution] @execution_id
GO
The new parameter in this code is the reference_id. This is an internal reference to the environment. The only way to find this ID is to create the script as you just did.
NOTE Note that there is an identifier number on each environment. This is not the same as the reference_id, even though they might match by coincidence sometimes.
Setting Environment References
When you create an environment, you may want to use it so that if the package is moved it still points to the same environment. This can be accomplished by creating an absolute environment reference. Basically, environment references can be set to either relative or absolute.
· Absolute references always point to the same environment, no matter where the project or package is moved.
· Relative references point to the place to which a project or package is moved.
Right-click on the EnvironmentDemo project and select Configure. Click the Reference option on the left, and then click the Add button at the bottom. Note that the Browse Environments window contains a local folder and a duplicate beneath it. In this case the local folder is the EnvironmentDemo folder, as shown in Figure 22-21. If you select the local folder environment, the reference is set as a relative reference. If you select the folder below, the reference is set to absolute.
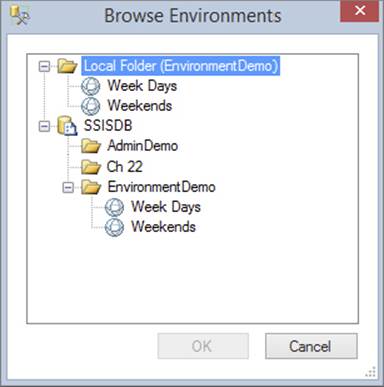
FIGURE 22-21
In most situations you will use relative references so that packages moved from development to production will use the environments in production. Absolute references are useful when you have several packages using the same set of parameters in an environment. You can point different projects to the same environments using absolute references.
Using Data Taps
Data viewers are great tools to use while working in SQL Server Data Tools to view data in a Data Flow. In this release of SQL Server Integration Services you can now place a data tap in a package executing on the server. A data tap acts like a data viewer from SQL Server Data Tools because it lets you see data in a Data Flow, although with different methods. It enables you to see a sample of the rows moving through a Data Flow sent to a file for review.
The sample code included with this book at www.wrox.com/go/prossis2014 contains a project named DataTapDemo. Deploy this project to a folder named DataTapDemo on the SSIS catalog. Once you have the project deployed to the server, you are ready to execute and add a data tap to the package.
The code to add a data tap is just like all the other commands discussed already; it uses a stored procedure. The stored procedure to add the data tap is catalog.add_data_tap. The following code shows how to add a data tap to the sample package:
exec [SSISDB].[catalog].[add_data_tap]
@execution_id= @execution_id,
@task_package_path = '\Package\Get Person Data',
@dataflow_path_id_string = 'Paths[Person Source.OLE DB Source Output]',
@data_filename = datatap.csv'
The preceding code adds a data tap to the Data Flow in the package. The parameters are those you will probably need to retrieve while you have the package open in SQL Server Data Tools. The execution ID comes from the execution creation, which is done before this code. The task package path is the path of the Data Flow in the package. To find this, open the package in SQL Server Data Tools, right-click on the Data Flow, and select Properties. The package path is the property you need.
The Data Flow path ID is found in the Data Flow. Open the Data Flow of the package in SQL Server Data Tools. Then right-click on the Data Flow line where you want to add the data tap and select Properties. The IdentificationString property is the property you need for the Data Flow path_id_string parameter. The last parameter is the filename where you want the rows written. The file path cannot be changed; the data tap files are always created in the data dumps folder in the SQL Server install directory.
The following example shows the complete execution code to run a package with a data tap. There is no GUI interface to create data taps. Creating data taps is a manual process.
Declare @execution_id bigint
EXEC [SSISDB].[catalog].[create_execution] @package_name=N'DataTap1.dtsx',
@execution_id=@execution_id OUTPUT,
@folder_name=N'DataTapDemo',
@project_name=N'DataTapDemo',
@use32bitruntime=False,
@reference_id=Null
Select @execution_id
exec [SSISDB].[catalog].[add_data_tap]
@execution_id= @execution_id,
@task_package_path = '\Package\Get Person Data',
@dataflow_path_id_string = 'Paths[Person Source.OLE DB Source Output]',
@data_filename = 'Cdatatap.csv'
EXEC [SSISDB].[catalog].[start_execution] @execution_id
GO
CREATING A CENTRAL SSIS SERVER
This is another section that applies only to the package deployment model. If you can, you should be changing your SSIS methods to take advantage of the project deployment model.
Many enterprises have so many packages that they decide to separate the service from SQL Server and place it on its own server. When you do this, you must still license the server just as if it were running SQL Server. The advantages of this separation are that your SSIS packages will not suffocate the SQL Server’s memory during a large load and you have a central management location. The disadvantages are that you must license the server separately and you add an added layer of complexity when you’re debugging packages. You have a fantastic way to easily scale packages by adding more memory to your central server, but you also create an added performance hit because all remote data must be copied over the network before entering the Data Flow buffer.
To create a centralized SSIS hub, you only need to modify the MsDtsSrvr.ini.xml file and restart the service. The service can read a UNC path like \ServerName\Share, and it can point to multiple remote servers. In the following example, the service enumerates packages from two servers, one that is local and another that is a named instance. After restarting the service, you will see a total of six folders to expand in Management Studio. We cover the Management Studio aspect of SSIS in much more detail later in this chapter.
<? xml version="1.0" encoding="utf-8" ?>
<DtsServiceConfiguration xmlns:xsd="http://www.w3.org/2001/XMLSchema" xmlns:xsi=
"http://www.w3.org/2001/XMLSchema-instance">
<StopExecutingPackagesOnShutdown<true</StopExecutingPackagesOnShutdown>
<TopLevelFolders>
<Folder xsi:type="SqlServerFolder">
<Name>Server A MSDB</Name>
<ServerName>localhost</ServerName>
</Folder>
<Name>Server B MSDB</Name>
<ServerName>SQLServerB</ServerName>
</Folder>
<Name>Server C MSDB</Name>
<ServerName>SQLServerC\NamedInstance</ServerName>
</Folder>
<Folder xsi:type="FileSystemFolder">
<Name>Server A File System</Name>
<StorePath>P:\Packages</StorePath>
</Folder>
<Folder xsi:type="FileSystemFolder">
<Name<Server B File System</Name>
<StorePath>\SQLServerB\Packages</StorePath>
</Folder>
<Folder xsi:type="FileSystemFolder">
<Name>Server C File System</Name>
<StorePath>\SQLServerC\Packages</StorePath>
</Folder>
</TopLevelFolders>
</DtsServiceConfiguration>
To schedule packages when using a centralized SSIS hub as in this example, you have two options. You can schedule your packages through SQL Server Agent or through a scheduling system like Task Scheduler from Windows. Because you’re already paying for a SQL Server license, it’s better to install SQL Server on your server and use Agent, because it gives you much more flexibility, as you will see later in this chapter. Keep in mind that packages run from the machine that executes the package. Therefore, if you have a package stored on Server A but execute it from Server B, it will use Server B’s resource. You can also store configuration tables and logging tables on this SQL Server to centralize its processing as well. Both scheduling mechanisms are covered later in this chapter.
CLUSTERING SSIS
This is another section that applies only to the package deployment model. If you can, you should be changing your SSIS methods to take advantage of the project deployment model.
Unfortunately, SSIS is not a clustered service by default. Microsoft does not recommend that you cluster SSIS, because it can lead to unpredictable results. For example, if you place SSIS in the same cluster group as SQL Server and the SQL Server fails over, it would cause SSIS to fail over as well. Even though it does not cluster in the main SQL Server setup, it can still be clustered manually through a series of relatively easy steps. If you decide you must cluster SSIS, this section walks you through those steps, but it assumes that you already know how to use Windows clustering and understand the basic clustering architecture. Essentially, the steps to setting up SSIS as a clustered service are as follows:
1. Install SSIS on the other nodes that can own the service.
2. Create a new cluster group (optionally).
3. If you created a new group, create a virtual IP, name, and drive as clustered resources.
4. Copy over the MsDtsSrvr.ini.xml file to the clustered drive.
5. Modify the MsDtsSrvr.ini.xml file to change the location of the packages.
6. Change the registry setting to point to the MsDtsSrvr.ini.xml file.
7. Cluster the MSDTSServer120 service as a generic service.
You need to make a minor decision prior to clustering. You can choose to cluster the MSDTSServer120 service in the main SQL Server cluster group for a given instance or you can create its own cluster group. You will find that while it’s easier to piggyback the main SQL Server service, it adds complexity to management.
The SSIS service has only a single instance in the entire Windows cluster. If you have a four-instance SQL Server cluster, where would you place the SSIS service then? This is one scenario that demonstrates why it makes the most sense to move the SSIS service into its own group. The main reason, though, is manageability. If you decided that you needed to fail over the SSIS service to another node, you would have to fail over the SQL Server as well if they shared a cluster group, which would cause an outage. Moving the SSIS service into its own cluster group ensures that only the SSIS service fails over and does not cause a wider outage.
Placing the service in its own group comes at a price, though. The service will now need a virtual IP address, its own drive, and a name on the network. Once you meet those requirements, however, you’re ready to go ahead and cluster. If you decided to place SSIS into its own group, you would not need the drive, IP, or name.
The first step to clustering is installing SSIS on all nodes in the Windows cluster. If you installed SSIS as part of your SQL Server install, you’ll see that SSIS installed only on the primary node. You now need to install it manually on the other nodes in the cluster. Make the installation simple by installing SSIS on the same folder on each node.
If you want to have the SSIS service in a different group than the database engine, you first have to create a new group called SSIS in Cluster Administrator for the purpose of this example (although it can be called something else). This group needs to be shared by whichever nodes you would like to participate in the cluster. Then, add to the group a physical drive that is clustered, an IP address, and a network name. The IP address and network name are virtual names and IPs.
From whichever node owns the SSIS group, copy the MsDtsSrvr.ini.xml file to the clustered physical drive that’s in the SSIS cluster group. We generally create a directory called «Clustered Drive Letter»\SSISSetup for the file. Make a note of wherever you placed the file for a later configuration step. You’ll also want to create a folder called Packages on the same clustered drive for storing your packages. This directory will store any packages and configuration files that will be stored on the file system instead of the SSIS catalog database.
Next, open the Registry editing tool and change the HKEY_LOCAL_MACHINE\SOFTWARE\Microsoft\Microsoft SQL Server\120\SSIS\ServiceConfigFile key to point to the new location (including the filename) for the MsDtsSrvr.ini.xml file. Make sure you backup the registry before making this change.
After that, you’re ready to cluster the MSDTSServer120 service. Open Cluster Administrator again and right-click the SSIS cluster group (if you’re creating it in its own group) and select New ⇒ Resource. This will open the Resource Wizard, which clusters nearly any service in Windows. On the first screen, type Integration Services for the name of the clustered resource, and select Generic Service. This name is a logical name that is going to be meaningful only to the administrator and you.
Next, on the Possible Owner screen, add any node that you wish to potentially own the SSIS service. On the Dependencies page, add the group’s Network Name, IP Address, and Drive as dependencies. This ensures that the SSIS service won’t come online before the name and drives are online. Also, if the drive fails, the SSIS service will also fail.
The next screen is Generic Service Parameters, where you should enter MSDTSServer120 for the service to cluster. The last screen in the wizard is the Registry Replication screen, where you want to ensure that the SOFTWARE\Microsoft\Microsoft SQL Server\120\SSIS\ServiceConfigFile key is replicated. If a change is made to this registry key, it will be replicated to all other nodes. After you finish the wizard, the SSIS service is almost ready to come online and be clustered.
The final step is to move any packages that were stored on the file system over to the clustered drive in the Packages folder. The next time you open Management Studio, you should be able to see all the packages and folders. You also need to edit the MsDtsSrvr.ini.xmlfile to change the SQL Server to point to SQL Server’s virtual name, not the physical name, which allows failovers of the database engine. In the same file, you need to change the path in the StorePath to point to the «Clustered Drive»:\Packages folder you created earlier as well. After this, you’re ready to bring the service online in Cluster Administrator.
Now that your SSIS service is clustered, you will no longer connect to the physical machine name to manage the packages in Management Studio. Instead, you will connect to the network name that you created in Cluster Administrator. If you added SSIS as a clustered resource in the same group as SQL Server, you would connect to the SQL Server’s virtual network name.
PACKAGE CONFIGURATION
This section covers older configurations. You will need this information if you decide to run your packages with the package model and use configuration files or tables, rather than upgrade your packages to use parameters and environments in the project deployment model.
Now that you have a set of packages complete, the challenge is trying to deploy those packages to your testing environment or production without having to manually configure the packages for that environment. For example, your production server may not have the same directory to pull extract files from or the same user name for connecting to the database. Configuration files and tables help you make the migrations seamless and automated to reduce your risk of errors. In this section you’ll see how to create a configuration repository for files and how to set up a configuration table.
The SSIS Package Configuration option allows you to write any SSIS property for the package, connection, container, variable, or any task into an XML file or a table, for example, and then read the setting at runtime. You could deploy the configuration file to multiple servers and point the setting inside the file to a new SQL Server database on the second server, and when the package runs, it will automatically shift its connection to the new database. Configurations also come in handy later when you deploy the packages to production using the deployment utility.
The following short example demonstrates the strengths and weaknesses of package configurations. In this example, you’re going to create a simple package with a Script Task that will pop up a message with the configuration value instead of its normal, hardcoded value. You’ll then create multiple configuration files and see which configuration file is used by the package.
First, create a new package called ConfigFiles.dtsx in a project set to package deployment model. Drag a new Script Task onto the Control Flow tab in the newly created package and name the task Popup Value. Next, create a new string variable called strMessagethat is scoped to the package, not the Script Task. Seed a default value of “Hard Coded Value” for the string variable.
Double-click the Script Task to configure it. In the Script page, type strMessage for the ReadOnlyVariables property. Change the ScriptLanguage property to Microsoft Visual Basic 2012. Click Edit Script to add your code to the task. Double-click the ScriptMain.vbfile in the Project Explorer window if it isn’t already open. The code you’re going to add will pop up the value from the strMessage variable by using the following code in the Main() subroutine:
Public Sub Main()
'
'Add your code here
MsgBox(Dts.Variables("strMessage").Value)
Dts.TaskResult = ScriptResults.Success
End Sub
NOTE For more information about the Script Task, see Chapter 9.
Close the task. If you execute the package at this point, you should see a pop-up dialog that states “Hard Coded Value.” If so, you’re now ready to set this variable from a configuration file instead.
Select Package Configurations either from the SSIS menu or by right-clicking in the background of the Control Flow tab. This opens the Package Configurations Organizer, where you will create and arrange the priority of your package configurations. Click Enable Package Configurations to enable this feature.
To add your first package configuration, click Add. This will open the Package Configuration Wizard. You can set your package configuration to use an XML file, a SQL Server table, an environment variable, or a registry setting or to read a variable from a parent package. Most people choose to use XML files or a SQL Server table. XML files are generally easier to implement because the files are portable and easy to transport from environment to environment. In this example, you’ll use an XML file. TypeC:\ProSSIS\Data\Ch22\Configuration.xml for the Configuration File name property. The default extension for configuration XML files is .dtsConfig, but we prefer to use an XML extension so it is easily registered to most XML editors.
You can even make the path and filename of the XML file dynamic by reading it from an environment variable. Otherwise, the file must be in the C:\ProSSIS\Data\Ch22\ folder on each server to which you want to deploy the package, which may not be allowed in your production environment. You can also change this later during deployment, as discussed earlier in the “Package Deployment Model” section.
Click Next to go to the Select Properties to Export screen of the wizard. If the C:\ProSSIS\Data\Ch22\configuration.xml file already existed on your server, you would be prompted to specify whether you wish to reuse the existing file or overwrite the file. If you choose to reuse an existing file, the next screen is the final summary screen. This option is fantastic if you want all the packages in your project to reuse the same configuration file, but to do this the property names have to match exactly.
In this screen, you can check any property that you wish to have read from the configuration file. In this case, you want to drill down to Variables ⇒ strMessage ⇒ Properties and check the Value option (as shown in Figure 22-22). Click Next to proceed to the next screen.
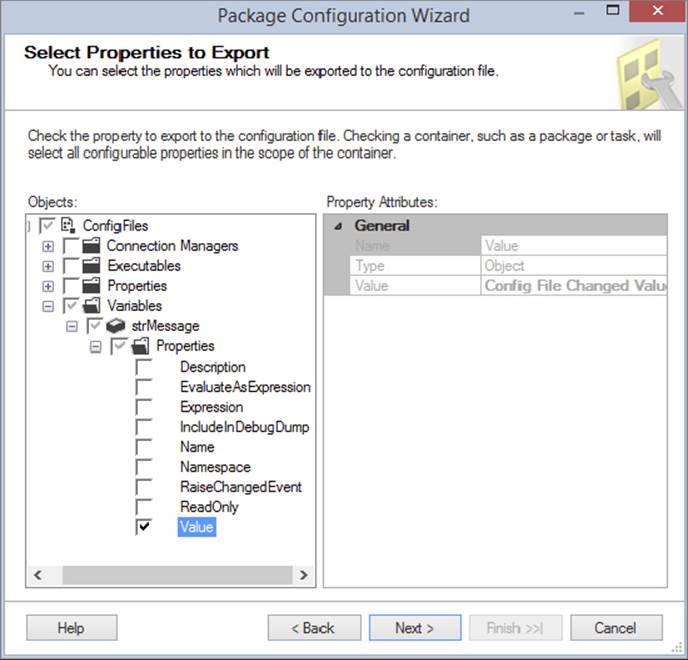
FIGURE 22-22
You are then taken to the summary screen, where you should name the configuration strMessage and click Finish, which takes you back to the Package Configurations Organizer. Click Close to exit the organizer and execute the package. If you run the package again, you’ll see that the pop-up still has the same old message. The configuration file now has been created and contains the same value as the package.
Open the configuration.xml file in your favorite XML editor or Notepad, and replace the old variable value of “Hard Coded Value” with a new value of “Config File Changed Value,” as shown in the following code. The other pieces of the configuration file contain a lot of metadata about who created the configuration file and from what package.
<?xml version="1.0"?>
<DTSConfiguration>
<DTSConfigurationHeading>
<DTSConfigurationFileInfo GeneratedBy="SSISMVP\MVP" GeneratedFromPackageName=
"ConfigFiles"
GeneratedFromPackageID=
"{D1A65B15-5EB7-486D-B396-B204B0D2CB42}"
GeneratedDate=
"9/26/2011 12:24:09 PM"/>
</DTSConfigurationHeading>
<Configuration ConfiguredType="Property"
Path=
"\Package.Variables[User::strMessage].Properties[Value]"
ValueType="String">
<ConfiguredValue>Config File Changed Value</ConfiguredValue
></Configuration>
</DTSConfiguration>
When you execute the package again, notice this time the message has changed to “Config File Changed Value.”
You can also create multiple configuration files. For example, you may want a configuration file that contains your corporate logging database for all of your packages to use, and then another configuration file for the individual package. As you add more package configurations, they stack on top of each other in the Configurations Organizer screen. At runtime, if there is a conflict between two configurations, the last configuration on the bottom will win.
To demonstrate this, create one additional configuration. This time, when you’re asked for the configuration type, select SQL Server. For the Connection property, select New and point the connection to the AdventureWorks database, which will create a Connection Manager. Lastly, click New for the Configuration Table property. The table can be called whatever you’d like as long as you have the core four columns. Name the table ctrlConfigurations, as shown in the following script:
CREATE TABLE [dbo].[ctrlConfigurations]
(
ConfigurationFilter NVARCHAR(255) NOT NULL,
ConfiguredValue NVARCHAR(255) NULL,
PackagePath NVARCHAR(255) NOT NULL,
ConfiguredValueType NVARCHAR(20) NOT NULL
)
Type Development for the Configuration Filter. When the package reads from the ctrlConfigurations table, it will read all the properties where the ConfigurationFilter column is equal to “Development,” as shown in Figure 22-23. Typically, you would want to set this filter to either the package name or the group of packages that you wish to share the same configuration settings. This is because all configurations in SQL Server are stored in the same table.
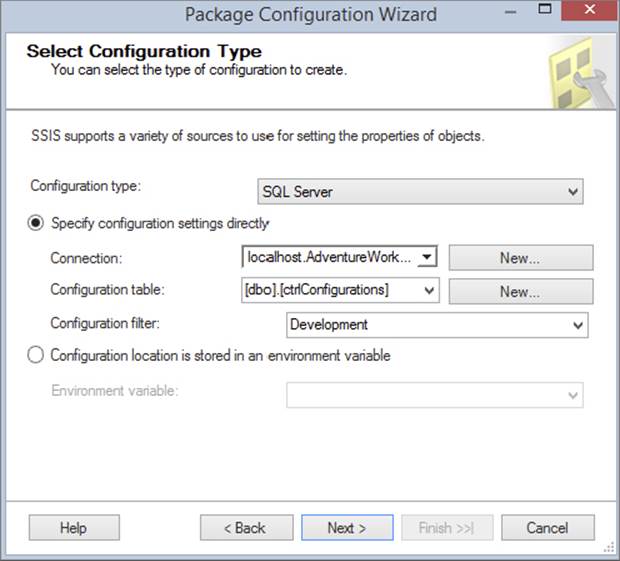
FIGURE 22-23
In the next screen, select the value property of the strMessage variable. Click Next to go to the next screen and name this configuration “SQL Server Config.” You should now have two package configurations, as shown in Figure 22-24. Set the variable’s value by going to the ctrlConfigurations table in the AdventureWorks database and setting the ConfiguredValue column to “SQL Server Config Value,” as shown in the following query:
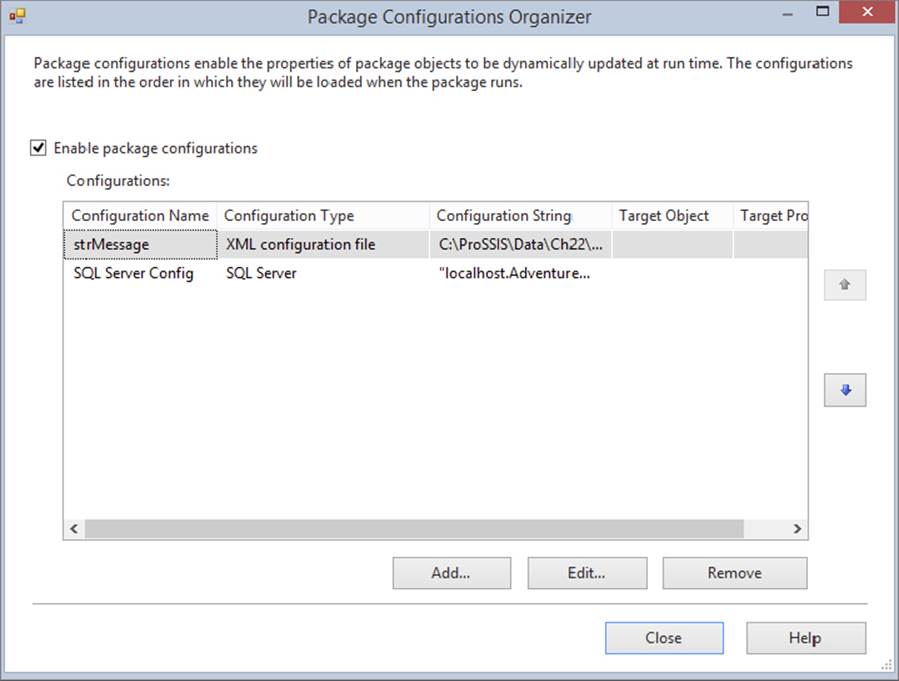
FIGURE 22-24
Update ctrlConfigurations
SET ConfiguredValue = 'SQL Server Config Value'
where ConfiguredValue = 'Hard Coded Value'
When you execute the package, notice that the value that pops up now is “SQL Server Config Value.” This is because even though there were two configurations that set the same variable, the one at the bottom (see Figure 22-24) set the value last.
Package configurations make it easy to migrate a package from environment to environment. For the most part, it’s going to be easier to store your configurations in the SQL Server because you can write some sort of front-end to modify the settings, and you can create reports to view the settings. The main problem with package configurations is that data is not encrypted, so you should not store anything that must be secure inside package configurations.
There are a few methodologies you can employ when you use configuration files. One is to group all the like configuration properties together into files or with filters if you choose to store the settings in a table. The other option, which many prefer, is to store each property in its own file or with its own filter. The latter option requires more work in terms of creating your package because you may have to create dozens of files, but it enables you to pick which settings you like and reuse them repeatedly.
In this section you learned how to use configuration files and configuration tables to make deployment easier in the older package deployment model. However, at the risk of my sounding like a broken record, I’ll say that you should be updating your methods to take full advantage of the SSIS catalog features.
COMMAND-LINE UTILITIES
The SSIS command-line tools are still available, but you should be using the T-SQL functions to execute and manage your packages. However, DTExec and DTUtil have been updated to work with the SSIS catalog.
So far, the bulk of this chapter has focused on the GUI tools you can use to administer SSIS. There is also a set of tools that can be used from a command line that serves as a Swiss Army knife to an SSIS administrator: DTExec.exe and DTUtil.exe. DTExec is a tool you use to execute your packages from a command line, and DTUtil can help you migrate a package or change the security of a package, just to name a couple of its functions. In this release of SQL Server, the command-line tools have been enhanced to support executing packages in the SSIS catalog.
DTExec
DTExec is a command-prompt tool included with SQL Server. This command is used to configure and execute SSIS packages. It gives access to all the package configuration and execution options, like connections, properties, variables, logging, and progress indicators. It also supports packages from three different sources: SQL Server databases, the SSIS package store, and the file system.
DTExecUI is a powerful tool that wraps the command-line utility DTExec. A shortcut here is to use DTExecUI to create the command for you. You can see the list of switches, minus three optional switches, for this utility by typing the following:
dtexec.exe /?
For example, to execute a package that is stored in the MSDB database on your localhost, you could use the following command. This command is more verbose than is required. In reality, you only need to type the /DTS and /SERVER switches to find and execute the package.
DTExec.exe /DTS "\MSDB\DBSnapshots" /SERVER localhost /MAXCONCURRENT " -1 "
/CHECKPOINTING OFF /REPORTING V
Table 22-3 describes three optional arguments not included in the command-line list you generated previously for DTExec. You can see these include the parameters and environments. A complete list of all the arguments can be found on Microsoft’s Books Online.
TABLE 22-3: DTEXEC Options
|
OPTION |
DESCRIPTION |
|
/ISServer package_path |
(Optional) Loads a package that is on an SSIS server. The package_path points to the path and filename of the package. |
|
/Par[ameter] parameter_name (Type);Value |
(Optional) Sets a parameter value. This can be a project level or package level parameter. |
|
/Envreference reference_id |
(Optional) Sets the environment to be used by the package. |
DTExecUI
In older versions of SQL Server, the primary way to execute a package was with DTExecUI.exe. With the integration of T-SQL to execute the packages, these tools will not be needed as often. This utility is a graphical wrapper for DTExec.exe, and it provides an easier way to produce the necessary switches to execute the package. You can open the utility by selecting Start ⇒ Run and typing DTExecui.exe.
Before we begin working with this utility, note that it’s a 32-bit utility. It will run on a 64-bit machine, but it will wrap the 32-bit version of DTExec.exe. In the “64-Bit Issues” section later in this chapter, you will learn some tricks to use to run the package in 64-bit mode.
The first screen in DTExecUI is shown in Figure 22-25. Here you point to the package you wish to execute and specify where the package is located. If you select the Package Store to connect to from the Package Source dropdown menu, you can view all the packages stored on the server. Notice you do not have an option for SSIS catalog. The SSIS catalog is not supported by the command-line tool DTExecUI. There are windows in SSMS for running the packages in the catalog. Your other options are SQL Server or the File System. With the SQL Server option, you will see only packages stored in the MSDB of the server that you name. The File System option allows you to point to a .dtsx file to execute.
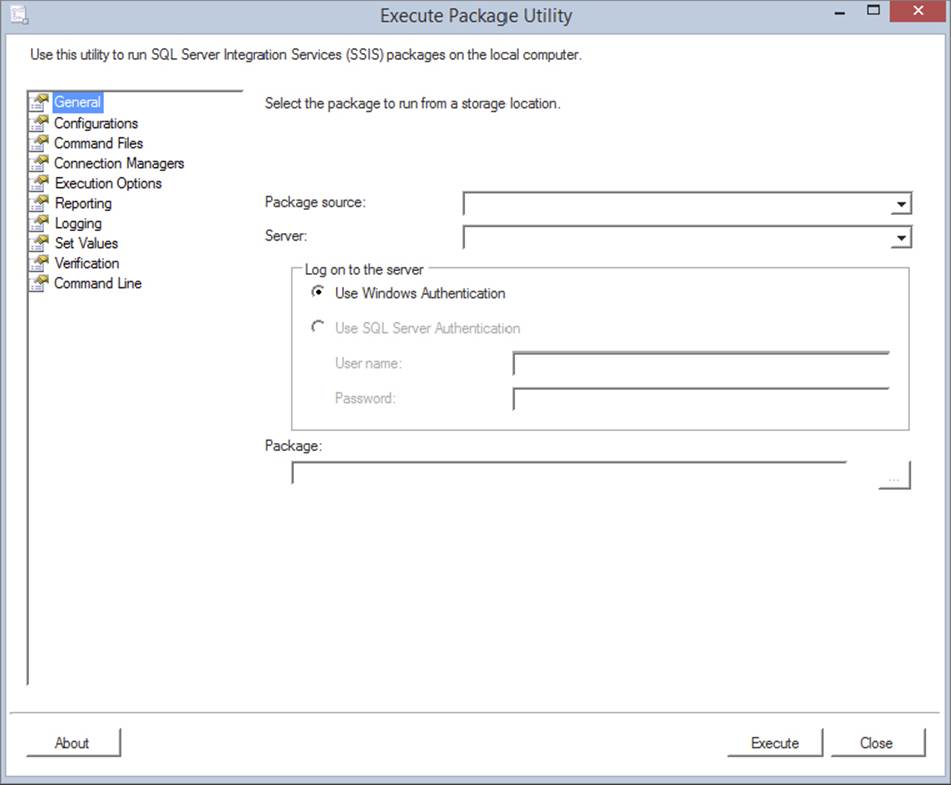
FIGURE 22-25
The next page in the Execute Package Utility is the Configurations page. Here, you can select additional configuration files that you wish to include for this execution of the package. If you don’t select an additional configuration file, any configuration files already on the server will be used. You will not be able to see existing configuration files that are being used in the package.
The Command Files page provides links to files that contain a series of additional switches you can use during execution. Remember that this tool wraps DTExec, which is a command-line utility. With a command file, you can place part of the standard DTExec switches in a file and then reuse them repeatedly for every package.
The Connection Managers page shows the power of Connection Managers. This page allows you to change the Connection Manager settings at runtime to a different setting than what the developer originally intended. For example, perhaps you’d like to move the destination connection for a package to a production server instead of a QA server (see Figure 22-26). Another typical example is when the drive structure differs between production and development, and you need to move the Connection Manager to a different directory.

FIGURE 22-26
The Execution Options page (shown in Figure 22-27) provides advanced settings for the package execution. For example, you can force the package to fail upon the first package warning, which would normally be ignored. You can also simply validate the package without executing it. An especially powerful setting in this page is the Maximum Concurrent Executables option, which simply controls how many concurrent tasks will run in parallel. For example, it is common to migrate a package to a different environment with fewer processors, which could cause performance issues until you lower this setting. The setting of -1 means that two tasks plus the number of CPUs will run concurrently. You can use the last set of options on this page to enable checkpoints on the package, if they are not already enabled, by checking the Enable Package Checkpoints option and specifying a name.
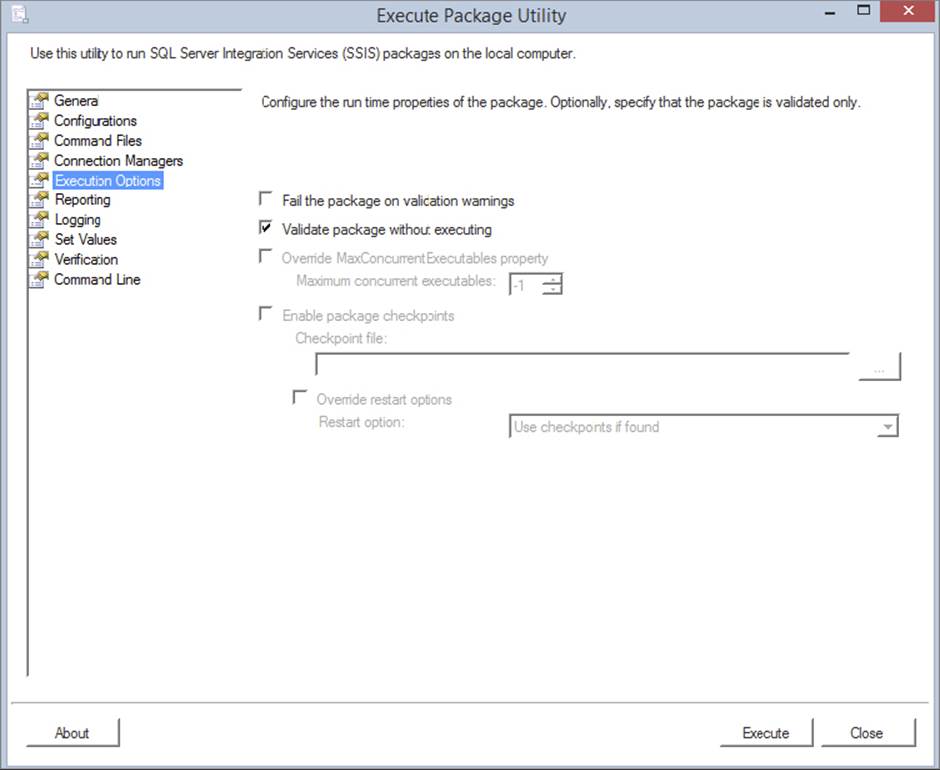
FIGURE 22-27
The Reporting page (shown in Figure 22-28) controls the amount of detail shown in the console. The default option is Verbose, which may be too detailed for you. You may decide that you want to see only errors and warnings, for example, which allows slightly better performance than the verbose setting. You can also control which columns will be displayed in the console.
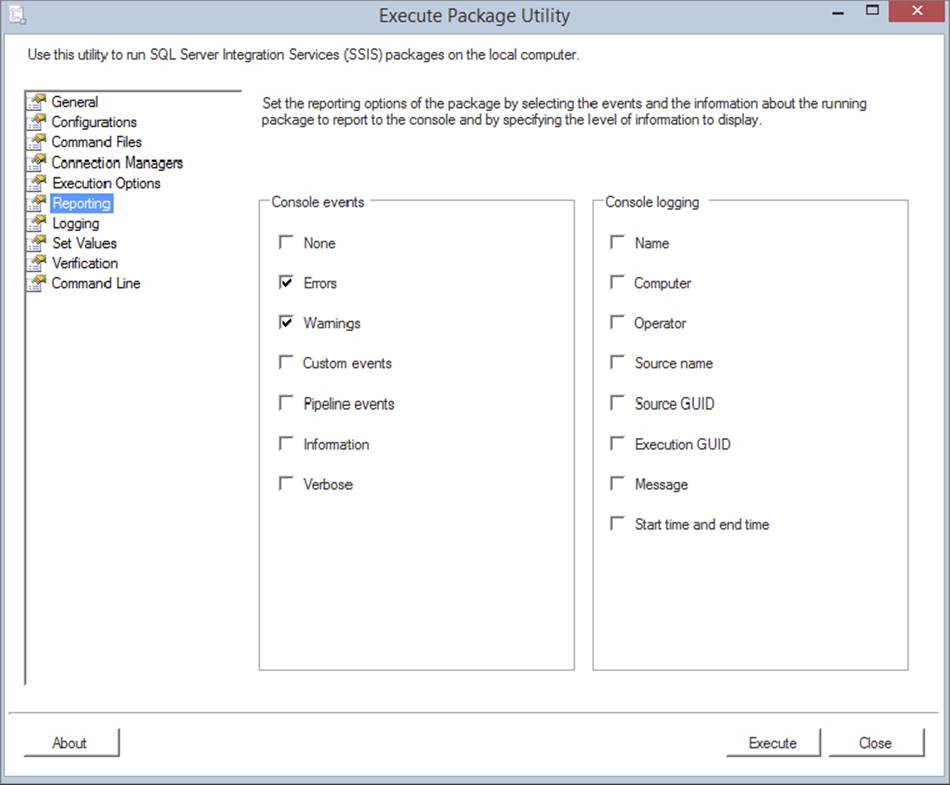
FIGURE 22-28
Another powerful page is the Set Values page (shown in Figure 22-29). This page allows you to override nearly any property you wish by typing the property path for the property. The most common use for this would be to set the value of a variable. To do this, you would use a property path that looked like this: \Package.Variables[VariableName].Value. Then type the value for the variable in the next column. This page also provides a workaround for properties that can’t be set through expressions. With those properties, you generally can access them through the property path.
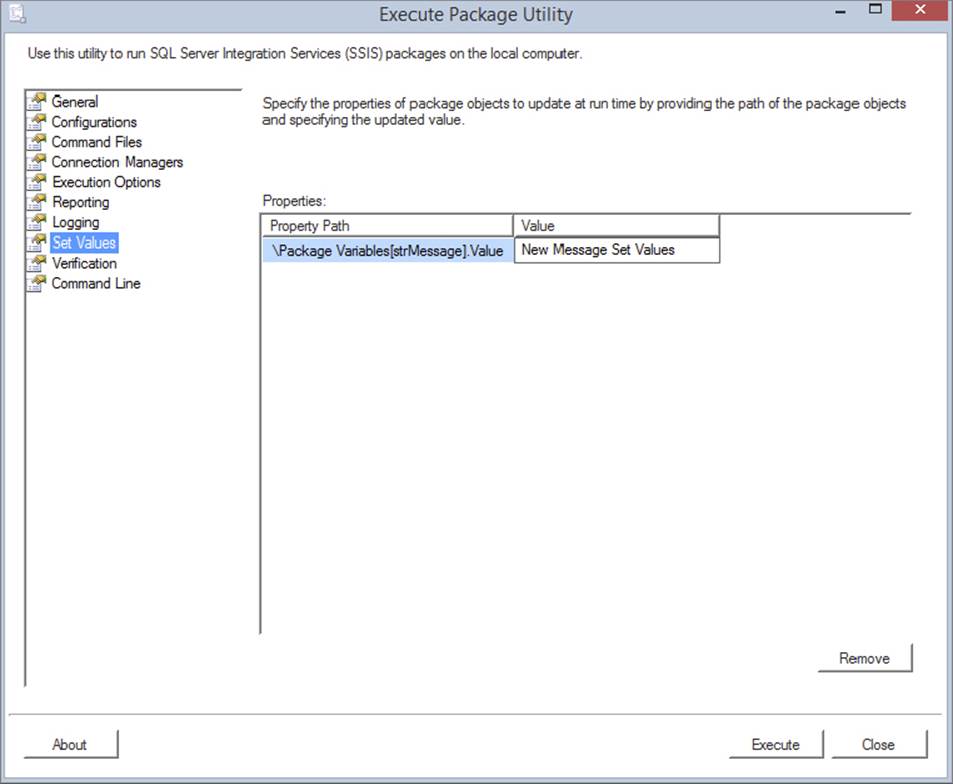
FIGURE 22-29
In the Verification page (shown in Figure 22-30), you can ensure that you execute only those packages that meet your criteria. For example, you may want to ensure that you execute only signed packages or packages with a certain build number. This could be handy for Sarbanes-Oxley compliance, for which you must guarantee that you don’t execute a rogue package.
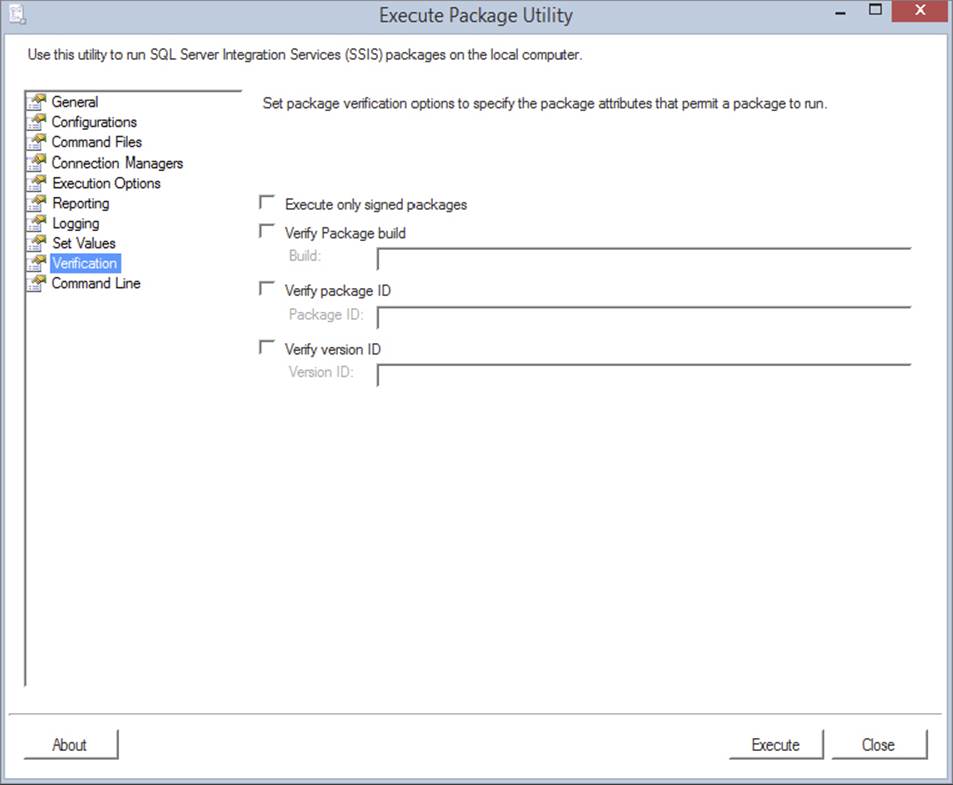
FIGURE 22-30
The Command Line page (shown in Figure 22-31) is one of the most important pages. This page shows you the exact DTExec.exe command that will be executing. You can also edit the command here. When you have the command you want, you can copy and paste it in a command prompt after the command DTExec.exe.
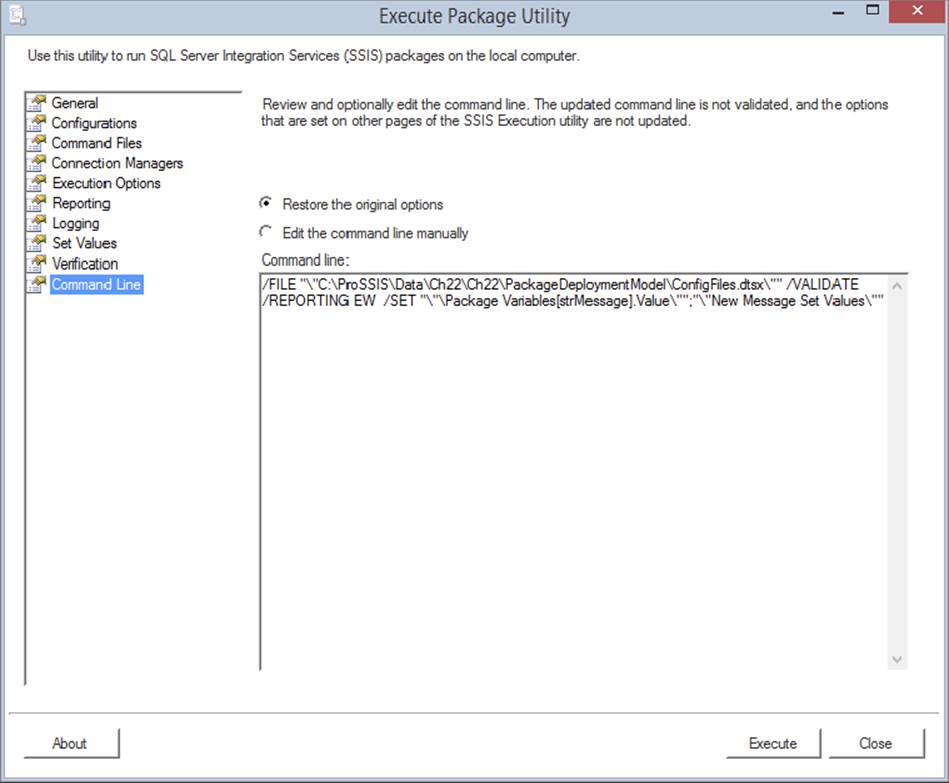
FIGURE 22-31
You can also execute the package by clicking the Execute button at any time from any page. After you click the Execute button, you will see the Package Execution Progress window, which displays any warnings, errors, and informational messages, as shown in Figure 22-32. In some cases, you’ll see only a fraction of the message; just hover the cursor over the text to see the full message.
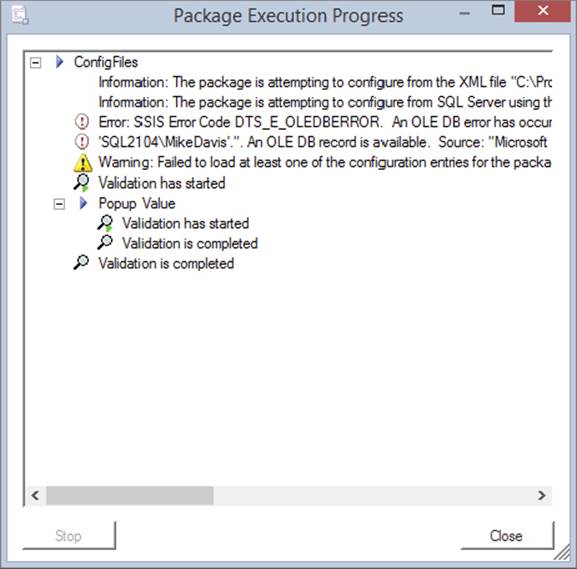
FIGURE 22-32
DTUtil
One of the best undiscovered command-line tools in your administrator kit is DTUtil.exe. This is also a good tool for developers. It performs a number of functions, including moving packages, renumbering the PackageID, re-encrypting a package, and digitally signing a package. To see everything this tool can do, type the following command from a command prompt:
DTUtil.exe /?
Essentially, this tool can be used to do many of the things that you do in Management Studio, and to a lesser extent in SQL Server Data Tools. The next sections describe creative ways to use DTUtil.exe.
Re-encrypting All Packages in a Directory
By default, SSIS files in development are encrypted to prevent an unauthorized person from seeing your SSIS package. The type of encryption is seamless behind the scenes and is applied at a workstation and user level. Earlier in development you can set the ProtectionLevel property to EncryptSensitiveWithUserKey (default option) to lock down password information in Connection Managers and other sensitive data. You can also set a password on the package by changing the ProtectionLevel property to EncryptSensitiveWithPassword.
By default, if you were to send a package that you’re developing to another developer on your team, he or she would not be able to open it. The same would apply if you logged in with a different user account. You would receive the following error:
There were errors while the package was being loaded. The package might be
corrupted. See the Error List for details.
This error message is very misleading. In truth, you can’t open the package, because the originating user encrypted it, whether intentionally or not. To fix this, the owner of the package can open it and select a different option in the Properties pane (like a package password) for the ProtectionLevel option. The default option is EncryptSensitiveWithUserKey. To protect the entire package with a password, select the EncryptAllWithPassword option.
Another useful option enables SSIS designers to encrypt all packages with the default option, and when it is time to send them to production, they can develop a batch file to loop through a directory’s .dtsx file and set a password. The batch file would use DTUtil.exe and look like this:
for %%f in (*.dtsx) do Dtutil.exe /file %%f /encrypt file;%%f;3;newpassword
This would loop through each .dtsx file in your directory and assign the password of newpassword. The production support group could then use the same batch file to reset the password to a production password. The number 3 before the word newpassword sets the ProtectionLevel property of the package to EncryptAllWithPassword.
Handling a Corrupt Package
Occasionally when you copy objects in and out of a container, you may corrupt a given task in the package. In that case, you can’t delete the task or move it outside the container or link it in the container. This doesn’t happen often, but when you suspect you have a corrupt package or object, you can use DTUtil.exe to regenerate the package’s XML. To do so, you can use the -I switch to generate a new PackageID and regenerate the XML, like this:
DTUtil.exe -I -File dbsnapshots.dtsx
After you do this, the package may look different when you open it because the XML has been regenerated. For example, some of your containers may be smaller than they were originally and placed in areas they weren’t originally located. You can also use this command to generate a new PackageID when you find that the developer has copied and pasted the package in SQL Server Data Tools.
You can also create a batch file to loop through the directory and regenerate the ID for every package in the directory. The batch file will loop through every .dtsx file and execute DTUtil.exe. The batch file looks like this:
for %%f in (*.dtsx) do dtutil.exe /I /FILE "%%f"
SECURITY
The security of SSIS packages has changed because of the architecture changes in Integration Services. In the previous version of SSIS you could deploy to the MSDB or the file system. These options are still available but are older techniques that should be changed to use the project deployment model to take advantage of the security options. The SSIS catalog can be found in the standard database connection in SSMS, as shown in Figure 22-33. At the top you can see the SSIS catalog and the folder structure. The bottom section of the figure shows the Integration Services connection and the packages in the MSDB. You can also see the file system folder here.
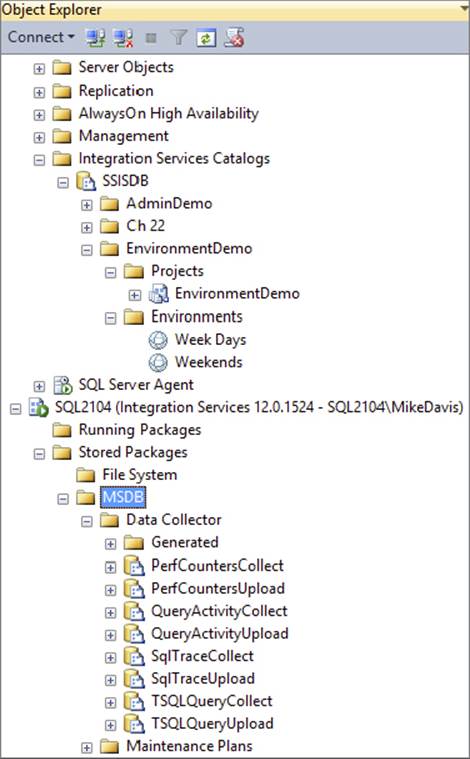
FIGURE 22-33
Securing the SSIS Catalog
It is easy to set and control security in the SSIS catalog either with the GUI interface or using T-SQL. The types of authentication supported by SSIS are Windows Authentication and SQL Server Authentication.
The SQL Server Integration Services administration role is named ssis_admin. This role has permission to view and modify all the objects in the SSIS catalog. Members of this role can create folders, move objects, delete objects, create and modify environments, and perform configuration changes to the catalog.
The SSIS catalog separates all the projects and objects into folders. Although these folders are great for organizing SSIS objects, they are also securable objects. You can grant users permission to a folder without adding them to the ssis_admin role. To give a user access to a folder, grant the user Manage_Object_Permissions on the appropriate folder.
Managing Security with the GUI
You can control the security of the folder in the SSIS catalog using the SSMS GUI. If you have been following along with the previous examples in this chapter, you should have at least two folders in the SSIS catalog, one named AdminDemo and the other named DataTapDemo.
Right-click on the DataTapDemo folder and select Properties. Click the Permissions option on the left side. In the top-right corner, click Browse and select the user or role to whom you want to give access to the folder. In the bottom section you can control the permissions at a granular level, as shown in Figure 22-34. Users and roles can be added at the top of this dialog. If you want to grant a group of users in a role access to the folder, you can do it here. Place a check next to all the permissions you want to grant or deny for the user or role.
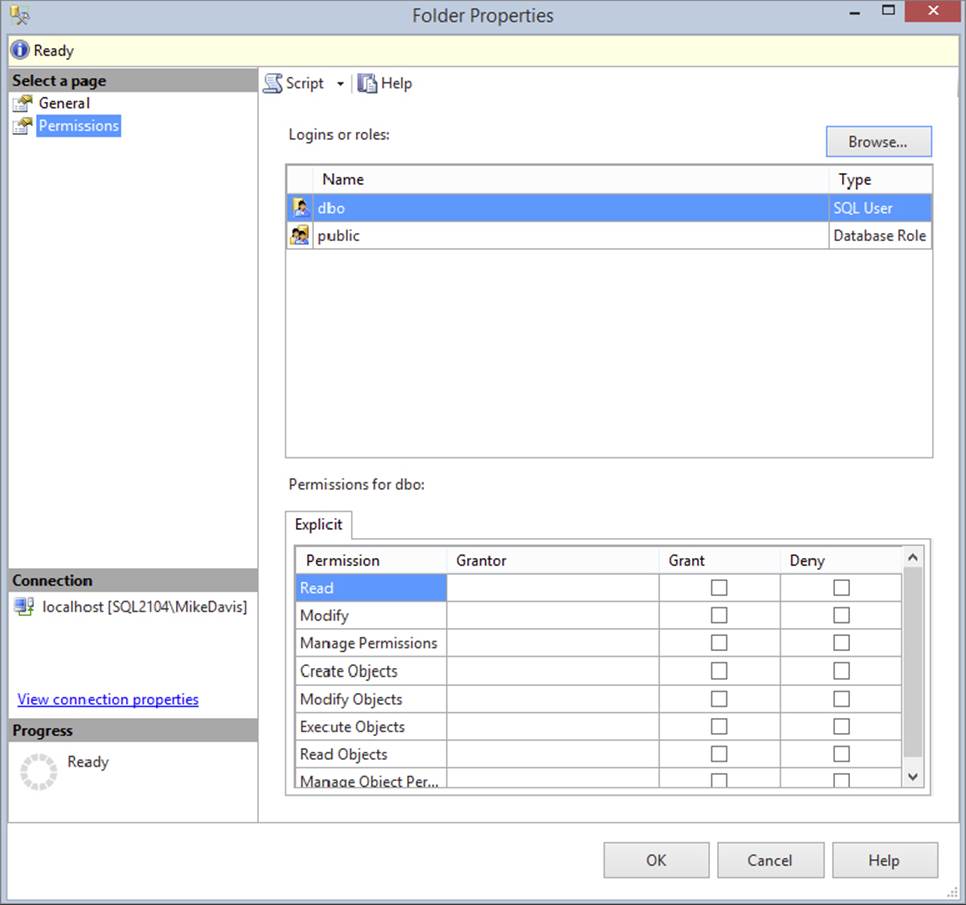
FIGURE 22-34
The permissions available at the bottom of the dialog are explained in Table 22-4.
TABLE 22-4: SSIS Catalog Permissions
|
PERMISSION |
ALLOW DESCRIPTION |
SUPPORTED OBJECT TYPES |
VALUE |
|
Read |
Read information, such as properties |
Folder, Project, Environment, Operation |
1 |
|
Modify |
Change information in the object, such as properties |
Folder, Project, Environment, Operation |
2 |
|
Execute |
Run the packages in the project |
Project |
3 |
|
Manage Permissions |
Change permissions of an object |
Folder, Project, Environment, Operation |
4 |
|
Create Objects |
Create objects in a folder |
Folder |
100 |
|
Read Objects |
Read every object in a folder |
Folder |
101 |
|
Modify Objects |
Make changes to objects in a folder |
Folder |
102 |
|
Execute Objects |
Run all packages in all projects in a folder |
Folder |
103 |
|
Manage Object Permissions |
Change permissions on all objects in a folder |
Folder |
104 |
There are only five securable objects in the SSIS catalog (see Table 22-5). The permissions in the preceding table can be applied to these objects. The Supported Object Types column shows which objects can receive which permissions. The following table contains the list of objects, their types, and a description of the permissions it controls.
TABLE 22-5: SSIS Catalog Object Security
|
OBJECT |
TYPE |
PERMISSION DESCRIPTION |
|
Folder |
Container |
This holds permissions for itself and the objects inside. Objects in the folder can have independent security. |
|
Project |
Object |
This holds permissions for the project and objects in the project. |
|
Environment |
Object |
This holds the permissions for the environment and the variables contained within it. |
|
Operation |
Object |
This holds the permissions for instances of executions, operational messages, and all other operations. |
|
Catalog |
Container |
The ssis_admin role is required. |
Encryption of the catalog is handled with a master key. The SSISDB is just like any other database and therefore uses a master key, which is created when the catalog is created. This was covered in the “Setting the SSIS Catalog Properties” section earlier in this chapter.
Package level and project level parameters have a Boolean-sensitive property. When this property is set to true, the parameter value is encrypted in the SSISDB. When you query a sensitive parameter, it will show a null value. Other than this, the parameters behave like any nonsensitive parameters. The sensitive parameters work great for storing passwords or entire connection strings.
Managing Security with T-SQL
Five stored procedures can be used to manage security in the SSIS catalog. If you prefer running T-SQL, or you have a custom application you want to use to manage security, then scripting out your security changes is the way to go. Table 22-6 shows the five stored procedures used to manage security.
TABLE 22-6: SSIS Catalog Security Stored Procedures
|
STORED PROCEDURE NAME |
DESCRIPTION |
|
catalog.effective_object_permissions |
Shows the effective permissions for all objects |
|
catalog.explicit_object_permissions |
Shows only explicitly set permissions |
|
catalog.grant_permission |
Grants permission to an object |
|
catalog.deny_permission |
Denies permission to an object |
|
catalog.revoke_permission |
Removes a permission on an object |
Legacy Security
If you decide to deploy your packages to the MSDB or file system, then you are using the package deployment model and the older version of security. The only login option for connecting to the SSIS service is to use your Active Directory account. Once you connect, you’ll see only the packages that you are allowed to see. This protection is accomplished based on package roles. Package roles are available only on packages stored in the MSDB database. Packages stored on the file system must be protected with a password.
Package roles can be accessed in Management Studio by right-clicking a package that you wish to protect and selecting Package Roles. The Package Roles dialog, shown in Figure 22-35, enables you to choose the MSDB role that will be in the writer role and reader role. The writer role can perform administrative-type functions such as overwriting a package with a new version, deleting a package, managing security, and stopping the package from running. The reader role can execute packages, view packages, and export packages from Management Studio.
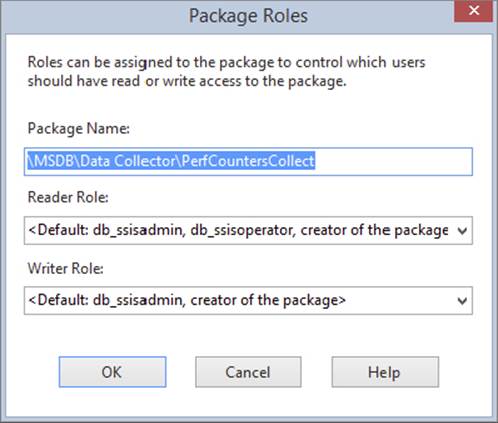
FIGURE 22-35
Package roles use database roles from the MSDB database. By default, the creator of the package and people who are in the db_dtsadmin or db_dtsoperator database roles can be a reader. The writer role is held by members of the db_dtsadmin database role or the creator of the package by default. When you select the dropdown box in the Package Roles dialog, you can change the package role from the default to another customized role from the MSDB database.
You may want to assign a group of people to a customized role to ensure that they are the only ones who can execute a set of packages. For instance, the following short example secures a package to a role called Accounting for the writer and reader package role.
First, open Management Studio and connect to your development or local database engine instance. Then, expand System Databases ⇒ MSDB ⇒ Security and right-click Roles, selecting New Role. This opens the New Database Role dialog (shown in Figure 22-36). Of course, you need the appropriate security to create a new database role.
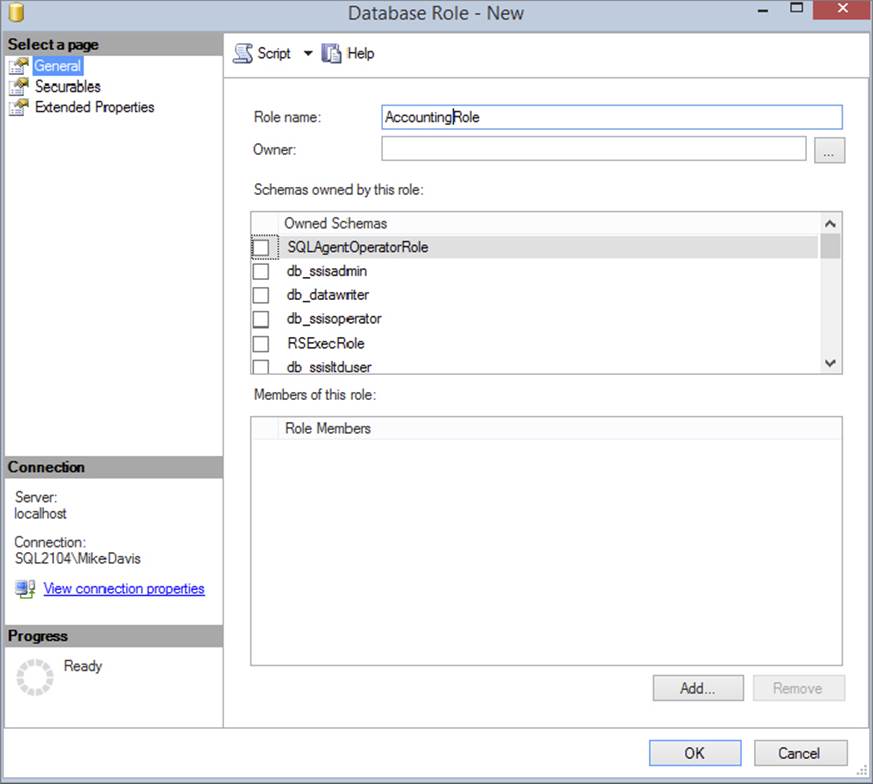
FIGURE 22-36
Name the role AccountingRole and make your own login a member of the role by clicking the Add button. Additionally, make your own user name an owner of the role. You may have to add your login as a user to the MSDB database prior to adding the role if it isn’t there already.
You’re now ready to tie this role to a package. In Management Studio, connect to Integration Services. Right-click any package stored in the MSDB database and select Package Role to secure the package. For the writer and reader roles, select the newly created AccountingRole role and click OK. Now, packages of the AccountingRole role will be able to perform actions on the package. If you’re a member of the sysadmin role for the server, you will be able to perform all functions in SSIS, such as execute and update any package, and bypass the package role.
If your packages are stored on the file system, you must set a package password on the package to truly secure it. You can also enforce security by protecting the directory with Windows Active Directory security on the file or folder where your packages are stored. To set a package password in SQL Server Data Tools, set the ProtectionLevel property to EncryptSensitiveWithPassword and type a password for the PackagePassword property. You can also set a package password using a utility called DTUtil.exe, which was covered in the “Command-Line Utilities” section earlier in this chapter.
To connect to a package store, the SSIS service must be started on the given server. Additionally, you must have TCP/IP port 135 open between your machine and the server. This is a common port used for DCOM, and many network administrators will not have this open by default. You also need to have the SQL Server database engine port open (generally TCP/IP port 1433) to connect to the package store in the MSDB database.
SCHEDULING PACKAGES
Now you have your packages deployed and are ready to set up a schedule to run them on a regular basis. The typical tool used is the SQL Server Agent. Although you can use other third-party tools instead of the SQL Server Agent, discussing them is beyond the scope of this book.
SQL Server Agent
The primary way to schedule packages in SSIS is with SQL Server Agent, which ships with the SQL Server database engine. If you don’t have a database engine in your environment, then you must use something like Task Scheduler, which ships with Windows. Scheduling a package with SQL Server Agent is much simpler and gives you much more flexibility.
The first step to scheduling a package is to connect to the database engine. Ensure that the SQL Server Agent service is started. Right-click Jobs under the SQL Server Agent tree and select New Job. The New Job dialog will open.
On the General page, name your job Execute Package. On the Steps page, click New, which opens the New Job Step dialog. Type Execute Sample Package for the Step Name property in the General page, as shown in Figure 22-37. Then, select SQL Server Integration Services Package as the type of step. For the time being, use the default SQL Agent Service Account as the Run As account. This means that the account that starts SQL Server Agent will execute the package, and sources and destinations in your package will use Windows Authentication with that account if they are set up to do so.
FIGURE 22-37
For the Package Source, select the SSIS catalog and point to a valid SSIS server. Pick any test package that won’t have an impact on production by clicking the ellipsis button. When you click the ellipsis button, you’ll see all the folders in the SSIS catalog. You still have the older options of File System, SSIS Package Store, and SQL Server for those using the package deployment model.
Under Package Source is the SSIS Package Store. This is the older location, and it is where you would find the packages that you may have deployed to the MSDB or file system.
If you select the SSIS Package Store and choose a package there, the rest of the options are identical to those shown earlier in DTExecUI.exe, with the exception of the Reporting tab because there is no console to report to from a job. You can also optionally go to the Advanced page to set the Include Step Output in History option to get more information about the job when it succeeds or fails. Click OK to go back to the New Job dialog. You can then go to the Schedules page to configure when you want the job to run. Click OK again to go back to the main Management Studio interface.
After you have the SSIS catalog selected and a package selected, you can click the Configurations tab and make changes to any parameters or select an environment. You can also make changes to any Connection Managers by selecting the Connection Managers tab. The Advanced tab allows you to add any other package properties, but these should have been handled with parameters during development. If you need to run the package in 32-bit mode, there is an option for that also.
With the job now scheduled, right-click the newly created job and select Start Job at Step. A status box will open that starts the job. When you see a success message, it does not mean the job passed or failed; it just means that the job was started successfully. You can right-click the job and select View History to see if it was successful. This opens the Log File Viewer, which shows you each execution of the package. You can drill into each execution to see more details about the steps in the job. The information this step gives you is adequate to help you identify a problem, but you may need package logs to truly diagnose the problem.
Proxy Accounts
A classic problem in SSIS and DTS is that a package may work in the design environment but not work once scheduled. Typically, this is because you have connections that use Windows Authentication. At design time, the package uses your credentials, and when you schedule the package, it uses the SQL Server Agent service account by default. This account may not have access to a file share or database server that is necessary to successfully run the package. Proxy accounts in SQL Server enable you to circumvent this problem.
With a proxy account, you can assign a job to use an account other than the SQL Server Agent account. Creating a proxy account is a two-step process. First, you must create a credential that allows a user to use an Active Directory account that is not his or her own, and then you specify how that account may be used.
To create a credential, open Management Studio and right-click Credentials under the Security tree and select New Credential. For this example, you’ll create a credential called AdminAccess (see Figure 22-38). The credential will allow users to temporarily gain administrator access. For the Identity property, type the name of an administrator account or an account with higher rights. Lastly, type the password for the Windows account, and click OK.
FIGURE 22-38
NOTE As you can imagine, because you’re typing a password here, be aware of your company’s password expiration policies. Credential accounts should be treated like service accounts.
The next step is to specify how the credential can be used. Under the SQL Server Agent tree, right-click Proxies and select New Proxy, which opens the New Proxy Account dialog (shown in Figure 22-39). Type Admin Access Proxy for the Proxy Name property, and AdminAccess as the Credential Name. Check SQL Server Integration Services Package for the subsystem type allowed to use this proxy.

FIGURE 22-39
Optionally, you can go to the Principals page in the New Proxy Account dialog to specify which roles or accounts can use your proxy from SSIS. You can explicitly grant server roles, specific logins, or members of given MSDB roles rights to your proxy. Click Add to grant rights to the proxy one at a time.
Click OK to save the proxy. Now if you create a new SSIS job step as shown earlier, you’ll be able to use the new proxy by selecting the Admin Access Proxy from the Run As dropdown box. Any connections that use Windows Authentication will then use the proxy account instead of the standard account.
64-BIT ISSUES
As mentioned before, DTExecUI.exe is a 32-bit application. Therefore, whenever you execute a package from DTExecUI.exe, it will execute in 32-bit mode and potentially take longer to execute than if you were executing it on your development machine. Much of the reason for this is data must be marshaled back and forth between 32-bit mode and 64-bit mode, and the amount of memory available differs. Also, Visual Studio is a 32-bit process, so you will need to run your packages out of the Visual Studio debug mode to get a true 64-bit run. To get around this problem, you can go to the Command Line page of this tool, copy the command out of the window, and paste it into a command prompt, prefixing dtexec.exe in front of it.
DTExec comes in two flavors: 32-bit and 64-bit. The 32-bit version is stored in the \Program Files (x86) directory, and the 64-bit version is stored in the main \Program Files directory. Occasionally, we have seen issues where the environment variables used in configurations have issues and point to the wrong C:\Program Files\Microsoft SQL Server\100\DTS\Binn\ directory. You can fix this issue by right-clicking My Computer from your desktop and selecting Properties. From the Advanced tab, select Environment Variables. In the System Variables window, select the Path variable and click Edit. In the window that appears, you will see the path to the Binn directory. Ensure that the path is set to \Program Files and not \Program Files (x86), and click OK. After doing that, you can feel confident when typing DTExec at a command prompt that you’re executing the 64-bit version (the version of DTExec is shown in the first few lines of package execution). Note that this applies only to 64-bit machines.
A particularly annoying quirk (at the time of publication) is the lack of an MDAC driver for the 64-bit architecture. The impact of this is that you can’t execute packages in 64-bit mode if they refer to anything that uses a Jet driver, in particular Access and Excel. If you need to do this, you can execute the package using the 32-bit version of DTExec.exe. Another option in SQL Server Data Tools is to right-click the project, select Properties, and set the Run64BitRuntime to false in the Debugging page. This will set packages inside the project to run in 32-bit mode when debugging.
Aside from the few quirks of the 64-bit architecture and SSIS, the benefits are incredible. Keep in mind that SSIS is very memory intensive. If you’re able to scale up the memory on demand with a 64-bit architecture, you have a truly compelling reason to upgrade. Even though tools like DTExecUI are not 64-bit ready, scheduled packages will run under 64-bit mode. If you want a package to run under 32-bit mode, you have to add the step to run the 32-bit DTExec from the scheduled job by going to the runtime option in the Execution Options tab in SQL Server Agent.
MONITORING PACKAGE EXECUTIONS
Auditing SSIS packages in the previous version of SQL Server is a pain. If you don’t have a third-party tool like BI xPress from Pragmatic Works, you have to manually set up auditing or use the built-in logging, which is very limited. Reporting is built into the SSIS catalog in SQL Server. You don’t need to create any reports at all — that is, unless you want a custom report from the SSIS catalog or want a central SSIS auditing database. The auditing built into SSIS is on the SSIS server where SSIS is running, so if you have ten different SSIS servers, you will need to look at each server to read the reports. This reporting is a part of the project deployment model. If you use the older package deployment model, you will need to use the older logging methods.
Built-in Reporting
Several reports are built into SSMS and query the SSIS catalog. The easiest way to view the reports for a package is to right-click on the package and select Reports ⇒ Standard Reports ⇒ All Executions (see Figure 22-40).
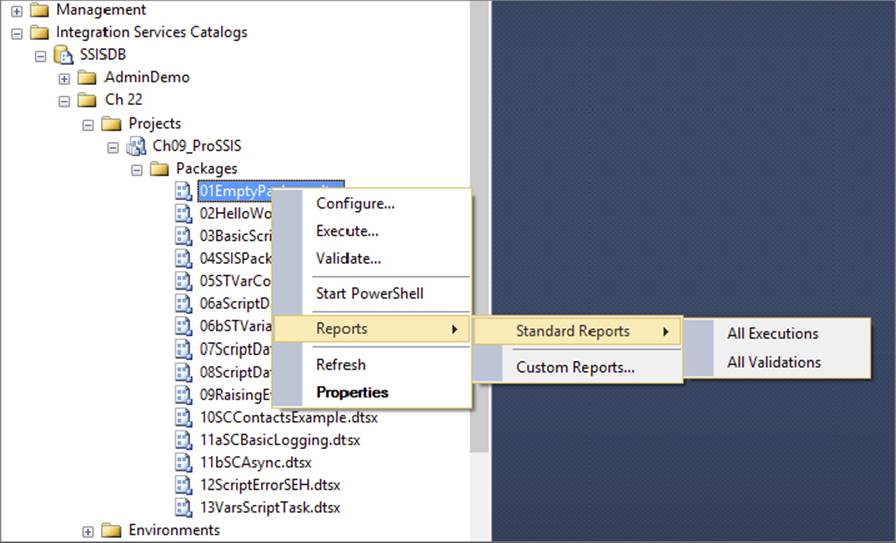
FIGURE 22-40
The All Executions report shows the package execution history. This report includes the execution ID, whether it succeeded or failed, the folder in which the package is located, project name, package name, start time, end time, and duration of the package, in seconds. An example is shown in Figure 22-41.
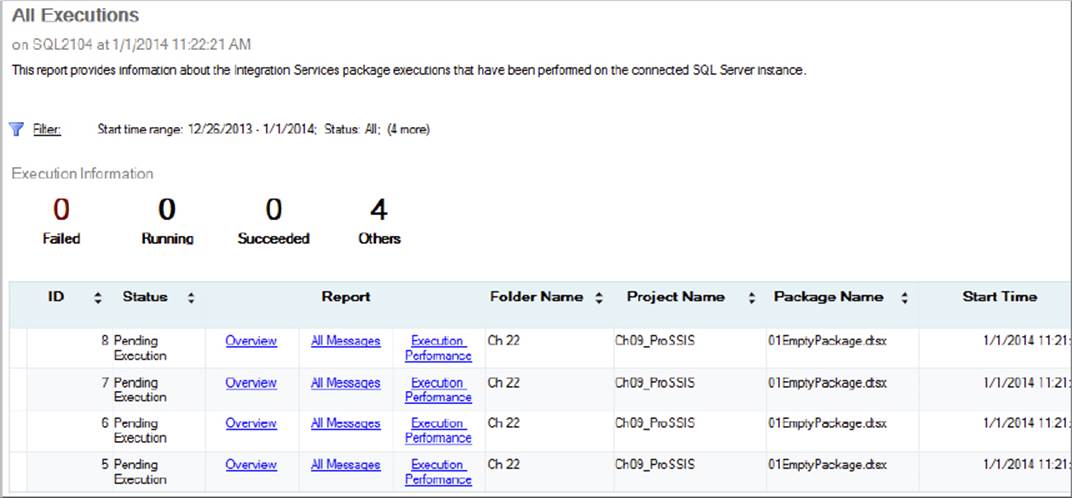
FIGURE 22-41
One of the nicest features of the SSIS reports is the capability to drill through to more detailed reports using the hyperlinks. The first link in the All Executions report is the Overview link. Clicking this link opens the Overview report, which provides a summary of the package’s execution. This report shows each task in the package, including its duration. After drilling down for more detailed information, you can click the back link in the top-left corner of a report to return to the previous report (see Figure 22-42).
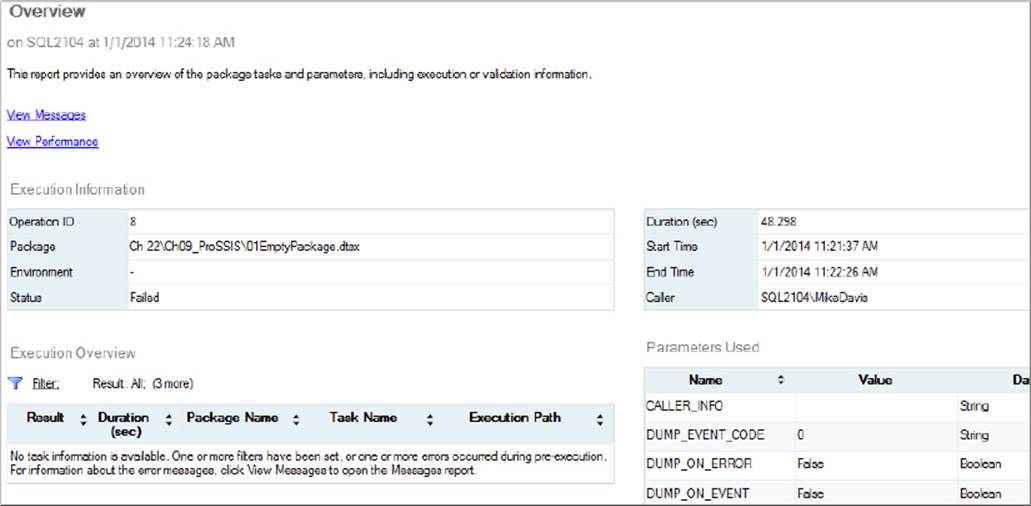
FIGURE 22-42
The Overview report has two links at the top that you can use to drill down for more detailed information. The first is the View Messages report, which includes details about the package down to the event level. The Messages report is great for troubleshooting a package that has errors. The other link on the Overview report is View Performance. This link opens the Execution Performance report, which shows the trending of the package in terms of duration. You can see this report in Figure 22-43.
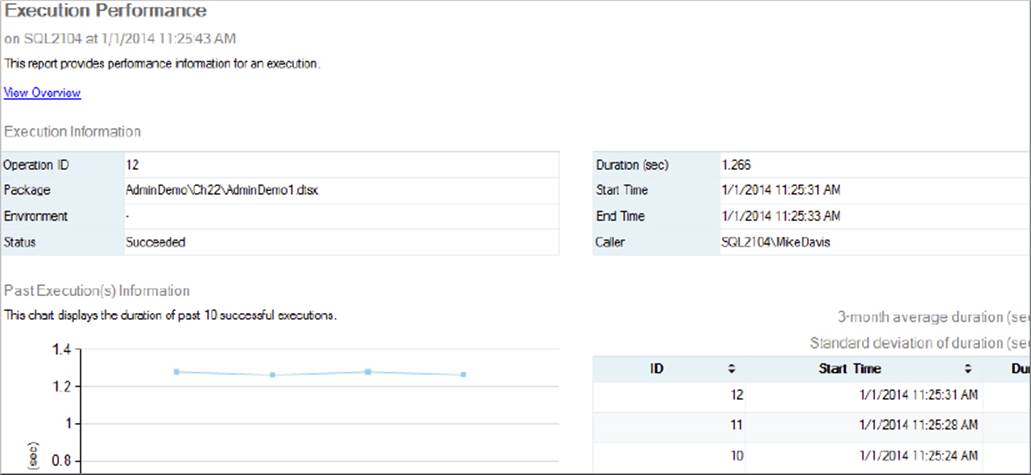
FIGURE 22-43
If you return to the All Executions report, you will see that the message and execution performance links are also on this report. Therefore, you can drill through from this report directly to those reports, without going through the Overview report.
A Dashboard report is available also. To open it, right-click on the SSISDB in the SSIS catalog and navigate to Reports ⇒ Standard Reports ⇒ Integration Services Dashboard, as shown in Figure 22-44.
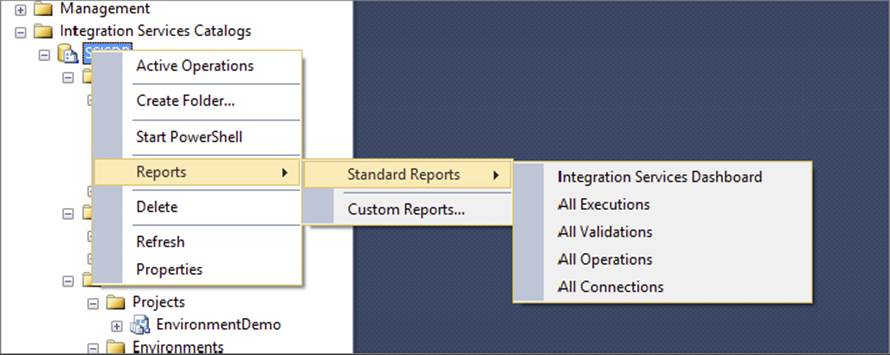
FIGURE 22-44
This Dashboard report provides a high-level overview of the entire SSIS catalog. Using this report, you can quickly see the number of packages failed, running, or succeeded, and other status information. You can drill through to the detail reports by clicking the links on the right, as shown in Figure 22-45.
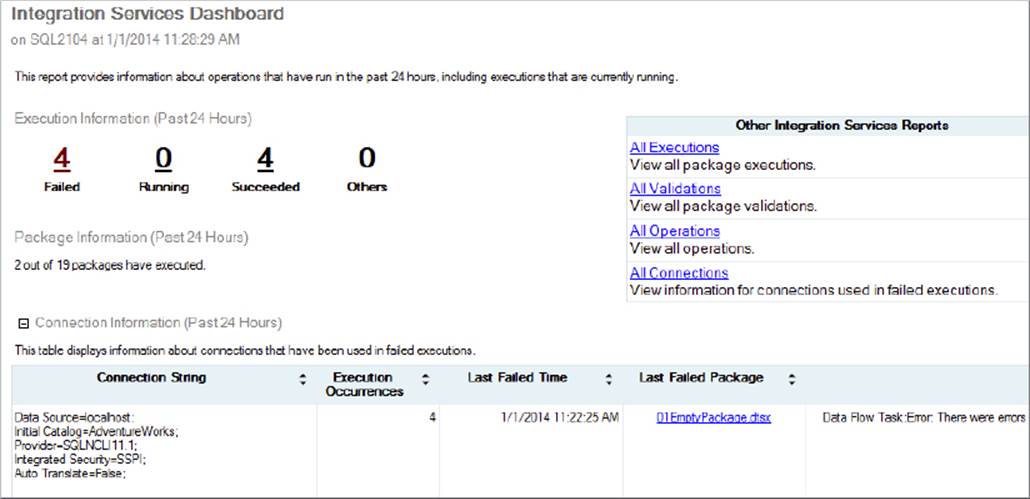
FIGURE 22-45
Four report options are available: All Executions, All Validations, All Operations, and All Connections. The names of these reports are self-explanatory, with each report showing details for that item. For example, if you run validation on a package, it will be displayed on the All Validations report. The All Connections report shows all connections used in the package executions or validations. The All Operations report shows any operation performed on the SSIS catalog, such as executing packages, deploying, and server start-up. Each report also has a filter link, which enables you to filter information based on date, status, package name, project name, ID, and folder name. You can see the Filter Settings dialog in Figure 22-46.
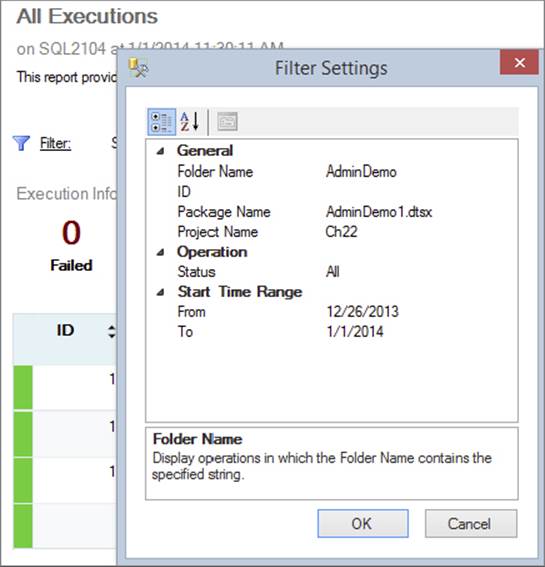
FIGURE 22-46
When you right-click on SSIS packages you will notice there is an option for custom reports. You can develop your own custom reports in Reports Services based on the SSISDB.
Custom Reporting
The reporting built into the SSIS catalog gives you an opportunity to view the execution results of your packages. It even gives you trending reports to compare current package runtimes to previous runtimes. Sometimes, however, you might want a report that isn’t provided by the SSIS catalog. In that case, you can either create your own report in Reporting Services or download an already existing report.
CodePlex.com offers a report pack containing a set of useful reports. You can download these reports at http://ssisreportingpack.codeplex.com/. Keep in mind that this is an open-source product, so it is not supported by Microsoft or any other vendor.
First download the SSIS Reporting Pack.msi from CodePlex.com. Install the report pack by double-clicking on the install file you downloaded. The default install directory is c:\SSIS Reporting Pack. You can change this location during the install.
After downloading the reports, you need to point them to your SSISDB. To do this, you must open them in a SSRS project in SQL Server Data Tools and adjust the Data Source. Then save the reports to a location you can access from the SSISDB. Now you can right-click on an object in the SSIS catalog and select Custom Reports. Browse to the location where you saved the reports, and you should be able to view them. When you receive a warning that you are about to run a custom report that could contain malicious queries, click Run to run the report. Keep in mind that if you receive an error, there is no support for these reports.
You can also run these reports outside of the SSIS catalog in Reporting Services. You can even schedule the reports to run on a subscription basis, to be delivered to the person responsible for monitoring package executions in your environment. In fact, this option is probably a better idea in terms of reporting. By having the reports delivered outside of SSMS, you don’t need to have access to the SSIS catalog to view the package history. This will be critical when developers need to monitor packages in a production environment and don’t have rights to the production SSIS catalog.
PERFORMANCE COUNTERS
There are a few key performance counters to watch when you’re trying to monitor the performance of your SSIS package. These counters greatly help you troubleshoot issues, if you have memory contention or you need to tweak your SSIS settings. Inside the System Monitor (also known to old-school administrators as perfmon) is a performance object called SQLServer: SSIS Pipeline. (There are quite a few other objects as well, but they are not useful enough to describe here.)
If you’re trying to benchmark how many rows are being read and written, you can use the Rows Read and Rows Written counters. These counters show you the number of rows since you starting monitoring the packages. It sums all rows in total across all packages and does not allow you to narrow the results down to a single package.
The most important counters are the buffer counters. The Buffer Memory counter shows you the amount of memory, in total, being used by all the packages. The Buffers In Use counter indicates how many buffers are actually in use. The critical counter here, though, is Buffers Spooled. This shows you how many buffers have been written from memory to disk. This is critical for the performance of your system. If you have buffers being spooled, you have a potential memory contention, and you may want to consider increasing the memory or changing your buffer settings in your package. This is covered in more detail in Chapter 16, but you should never see this number creep above a 5, if not 0.
SUMMARY
This chapter covered many aspects of the Integration Services 2014 release. From the SSIS catalog to parameters and environments, you should become familiar with the features. This is especially true if you are going to be administrating Integration Services. With the T-SQL tools and GUI tools, you have a massive amount of control over your Integration Services instance. The capability to use T-SQL and the built-in stored procedures enables you to create scripts and then reuse them, making administration a lot easier. Integration Services administration always seems like a daunting task, but if you become familiar with the items described in this chapter, you can rest assured that you have the right tools for the job.
All materials on the site are licensed Creative Commons Attribution-Sharealike 3.0 Unported CC BY-SA 3.0 & GNU Free Documentation License (GFDL)
If you are the copyright holder of any material contained on our site and intend to remove it, please contact our site administrator for approval.
© 2016-2026 All site design rights belong to S.Y.A.