PHP Solutions: Dynamic Web Design Made Easy, Third Edition (2014)
Chapter 13. Managing Content
Although you can use phpMyAdmin for a lot of database administration, you might want to set up areas where clients can log in to update some data without giving them full rein of your database. To do so, you need to build your own forms and create customized content management systems.
At the heart of every content management system lies what is sometimes called the CRUD cycle—Create, Read, Update, and Delete—which utilizes just four SQL commands: INSERT, SELECT, UPDATE, and DELETE. To demonstrate the basic SQL commands, this chapter shows you how to build a simple content management system for a table called blog.
Even if you don’t want to build your own content management system, the four commands covered in this chapter are essential for just about any database-driven page, such as user login, user registration, search form, search results, and so on.
In this chapter, you’ll learn about the following:
· Inserting new records in a database table
· Displaying a list of existing records
· Updating existing records
· Asking for confirmation before a record is deleted
Setting Up a Content Management System
Managing the content in a database table involves four stages, which I normally assign to four separate but interlinked pages: one each for inserting, updating, and deleting records, plus a list of existing records. The list of records serves two purposes: first, to identify what’s stored in the database and, more important, to link to the update and delete scripts by passing the record’s primary key through a query string.
The blog table contains a series of titles and text articles to be displayed in the Japan Journey site, as shown in Figure 13-1. In the interests of keeping things simple, the table contains just five columns: article_id (primary key), title, article, created, and updated.
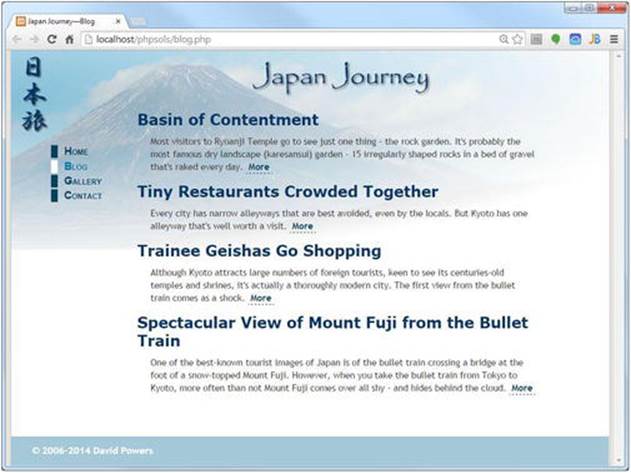
Figure 13-1. The contents of the blog table displayed in the Japan Journey website
Creating the Blog Database Table
If you just want to get on with studying the content management pages, import the table structure and data from blog.sql from the ch13 folder. Open phpMyAdmin, select the phpsols database, and import the table in the same way as in Chapter 10. The SQL file creates the table and populates it with four short articles.
If you would prefer to create everything yourself from scratch, open phpMyAdmin, select the phpsols database, and click the Structure tab if it’s not already selected. In the Create table section, type blog in the Name field and 5 in the Number of columns field. Then click Go. Use the settings shown in the following screenshot and Table 13-1.
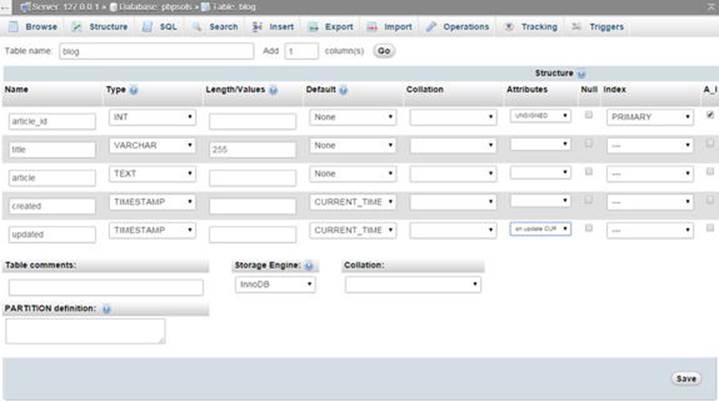
Table 13-1. Column definitions for the blog table

The default value of the created and updated columns is set to CURRENT_TIMESTAMP. So, both columns get the same value when a record is first entered. The Attributes column for updated is set to on update CURRENT_TIMESTAMP. This means it will be updated whenever a change is made to a record. To keep track of when a record was originally created, the value in the created column is never updated.
Creating the Basic Insert and Update Form
SQL makes an important distinction between inserting and updating records by providing separate commands. INSERT is used only for creating a brand-new record. Once a record has been inserted, any changes must be made with UPDATE. Since this involves working with identical fields, it is possible to use the same page for both operations. However, this makes the PHP more complex, so I prefer to create the HTML for the insert page first, save a copy as the update page, and then code them separately.
The form in the insert page needs just two input fields: for the title and the article. The contents of the remaining three columns (the primary key and the two timestamps) are handled automatically. The code for the insert form looks like this:
<form method="post" action="">
<p>
<label for="title">Title:</label>
<input name="title" type="text" id="title">
</p>
<p>
<label for="article">Article:</label>
<textarea name="article" id="article"></textarea>
</p>
<p>
<input type="submit" name="insert" value="Insert New Entry" id="insert">
</p>
</form>
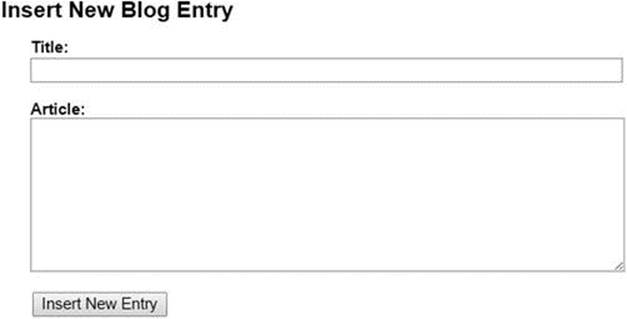
The form uses the post method. You can find the full code in blog_insert_01.php in the ch13 folder. The content management forms have been given some basic styling with admin.css, which is in the styles folder. When viewed in a browser, the form looks like this:
The update form is identical except for the heading and Submit button. The button code looks like this (the full code is in blog_update_mysqli_01.php and blog_update_pdo_01.php):
<input type="submit" name="update" value="Update Entry" id="update">
I’ve given the title and article input fields the same names as the columns in the blog table. This makes it easier to keep track of variables when coding the PHP and SQL later.
![]() Tip As a security measure, some developers recommend using different names from the database columns because anyone can see the names of input fields just by looking at the form’s source code. Using different names makes it more difficult to break into the database. This shouldn’t be a concern in a password-protected part of a site. However, you may want to consider the idea for publicly accessible forms, such as those used for user registration or login.
Tip As a security measure, some developers recommend using different names from the database columns because anyone can see the names of input fields just by looking at the form’s source code. Using different names makes it more difficult to break into the database. This shouldn’t be a concern in a password-protected part of a site. However, you may want to consider the idea for publicly accessible forms, such as those used for user registration or login.
Inserting New Records
The basic SQL for inserting new records into a table looks like this:
INSERT [INTO] table_name (column_names)
VALUES (values)
The INTO is in square brackets, which means that it’s optional. It’s purely there to make the SQL read a little more like human language. The column names can be in any order you like, but the values in the second set of parentheses must be in the same order as the columns they refer to.
Although the code is very similar for MySQLi and PDO, I’ll deal with each one separately to avoid confusion.
![]() Note Many of the scripts in this chapter use a technique known as “setting a flag.” A flag is a Boolean variable that is initialized to either true or false and used to check whether something has happened. For instance, if $OK is initially set to false and reset to true only when a database query executes successfully, it can be used as the condition controlling another code block.
Note Many of the scripts in this chapter use a technique known as “setting a flag.” A flag is a Boolean variable that is initialized to either true or false and used to check whether something has happened. For instance, if $OK is initially set to false and reset to true only when a database query executes successfully, it can be used as the condition controlling another code block.
PHP Solution 13-1: Inserting a New Record with MySQLi
This PHP solution shows how to insert a new record into the blog table using a MySQLi prepared statement. Using a prepared statement avoids problems with escaping quotes and control characters. It also protects your database against SQL injection (see Chapter 11).
1. Create a folder called admin in the phpsols site root. Copy blog_insert_01.php from the ch13 folder, and save it as blog_insert_mysqli.php in the new folder.
2. The code that inserts a new record should be run only if the form has been submitted, so it’s enclosed in a conditional statement that checks for the name attribute of the submit button (insert) in the $_POST array. Put the following above the DOCTYPE declaration:
<?php
if (isset($_POST['insert'])) {
require_once '../includes/connection.php';
// initialize flag
$OK = false;
// create database connection
// initialize prepared statement
// create SQL
// bind parameters and execute statement
// redirect if successful or display error
}
?>
After including the connection function, the code sets $OK to false. This is reset to true only if there are no errors. The five comments at the end map out the remaining steps that we’ll fill in below.
3. Create a connection to the database as the user with read and write privileges, initialize a prepared statement, and create the SQL with placeholders for data that will be derived from the user input like this:
// create database connection
$conn = dbConnect('write');
// initialize prepared statement
$stmt = $conn->stmt_init();
// create SQL
$sql = 'INSERT INTO blog (title, article)
VALUES(?, ?)';
The values that will be derived from $_POST['title'] and $_POST['article'] are represented by question mark placeholders. The other columns will be populated automatically. The article_id column is the primary key, which usesAUTO_INCREMENT, and the default for the created and updated columns is CURRENT_TIMESTAMP.
![]() Note The code is in a slightly different order from Chapter 11. The script will be developed further in Chapter 15 to run a series of SQL queries, so the prepared statement is initialized first.
Note The code is in a slightly different order from Chapter 11. The script will be developed further in Chapter 15 to run a series of SQL queries, so the prepared statement is initialized first.
4. The next stage is to replace the question marks with the values held in the variables—a process called binding the parameters. Insert the following code:
if ($stmt->prepare($sql)) {
// bind parameters and execute statement
$stmt->bind_param('ss', $_POST['title'], $_POST['article']);
$stmt->execute();
if ($stmt->affected_rows > 0) {
$OK = true;
}
}
This is the section that protects your database from SQL injection. Pass the variables to the bind_param() method in the same order as you want them inserted into the SQL query, together with a first argument that specifies the data type of each variable, once again in the same order as the variables. Both are strings, so this argument is 'ss'.
Once the values have been bound to the placeholders, call the execute() method.
The affected_rows property records how many rows were affected by an INSERT, UPDATE, or DELETE query.
![]() Caution If the query triggers a MySQL error, affected_rows returns –1. Unlike some computing languages, PHP treats –1 as true. So, you need to check that affected_rows is greater than zero to be sure that the query succeeded. If it is greater than zero,$OK is reset to true.
Caution If the query triggers a MySQL error, affected_rows returns –1. Unlike some computing languages, PHP treats –1 as true. So, you need to check that affected_rows is greater than zero to be sure that the query succeeded. If it is greater than zero,$OK is reset to true.
5. Finally, redirect the page to a list of existing records or display any error message. Add this code after the previous step:
// redirect if successful or display error
if ($OK) {
header('Location:
http://localhost/phpsols/admin/blog_list_mysqli.php');
exit;
} else {
$error = $stmt->error;
}
}
?>
6. Add the following code block in the body of the page to display the error message if the insert operation fails:
<h1>Insert New Blog Entry</h1>
<?php if (isset($error)) {
echo "<p>Error: $error</p>";
} ?>
<form method="post" action="">
The completed code is in blog_insert_mysqli.php in the ch13 folder.
That completes the insert page, but before testing it, create blog_list_mysqli.php, which is described in the PHP Solution 13-3.
![]() Note To focus on the code that interacts with the database, the scripts in this chapter don’t validate the user input. In a real-world application, you should use the techniques described in Chapter 5 to check the data submitted from the form and redisplay it if errors are detected.
Note To focus on the code that interacts with the database, the scripts in this chapter don’t validate the user input. In a real-world application, you should use the techniques described in Chapter 5 to check the data submitted from the form and redisplay it if errors are detected.
PHP Solution 13-2: Inserting a New Record with PDO
This PHP solution shows how to insert a new record in the blog table using a PDO prepared statement. If you haven’t already done so, create a folder called admin in the phpsols site root.
1. Copy blog_insert_01.php to the admin folder and save it as blog_insert_pdo.php.
2. The code that inserts a new record should be run only if the form has been submitted, so it’s enclosed in a conditional statement that checks for the name attribute of the submit button (insert) in the $_POST array. Put the following in a PHP block above theDOCTYPE declaration:
if (isset($_POST['insert'])) {
require_once '../includes/connection.php';
// initialize flag
$OK = false;
// create database connection
// create SQL
// prepare the statement
// bind the parameters and execute the statement
// redirect if successful or display error
}
After including the connection function, the code sets $OK to false. This is reset to true only if there are no errors. The five comments at the end map out the remaining steps.
3. Create a PDO connection to the database as the user with read and write privileges, and build the SQL like this:
// create database connection
$conn = dbConnect('write', 'pdo');
// create SQL
$sql = 'INSERT INTO blog (title, article)
VALUES(:title, :article)';
The values that will be derived from variables are represented by named placeholders consisting of the column name preceded by a colon (:title and :article). The value for the other columns will be generated by the database. The article_id primary key is incremented automatically, and the created and updated columns have their default values set to CURRENT_TIMESTAMP.
4. The next stage is to initialize the prepared statement and bind the values from the variables to the placeholders—a process known as binding the parameters. Add the following code:
// prepare the statement
$stmt = $conn->prepare($sql);
// bind the parameters and execute the statement
$stmt->bindParam(':title', $_POST['title'], PDO::PARAM_STR);
$stmt->bindParam(':article', $_POST['article'], PDO::PARAM_STR);
// execute and get number of affected rows
$stmt->execute();
$OK = $stmt->rowCount();
This begins by passing the SQL query to the prepare() method of the database connection ($conn) and storing a reference to the statement as a variable ($stmt).
Next, the values in the variables are bound to the placeholders in the prepared statement, and the execute() method runs the query.
When used with an INSERT, UPDATE, or DELETE query, the PDO rowCount() method reports the number of rows affected by the query. If the record is inserted successfully, $OK is 1, which PHP treats as true. Otherwise, it’s 0, which is treated as false.
5. Finally, redirect the page to a list of existing records or display any error message. Add this code after the previous step:
// redirect if successful or display error
if ($OK) {
header('Location: http://localhost/phpsols/admin/blog_list_pdo.php');
exit;
} else {
$errorInfo = $stmt->errorInfo();
if (isset($errorInfo[2])) {
$error = $errorInfo[2];
}
}
}
?>
Since the prepared statement has been stored as $stmt, you can access an array of error messages using $stmt->errorInfo(). The third element of the array will be set only if there’s a problem.
6. Add a PHP code block in the body of the page to display any error message:
<h1>Insert New Blog Entry</h1>
<?php if (isset($error)) {
echo "<p>Error: $error</p>";
} ?>
<form method="post" action="">
The completed code is in blog_insert_pdo.php in the ch13 folder.
That completes the insert page, but before testing it, create blog_list_pdo.php, which is described next.
Linking to the Update and Delete Pages
Before you can update or delete a record, you need to find its primary key. A practical way of doing this is to query the database and display a list of all records. You can use the results of this query to display a list of all records, complete with links to the update and delete pages. By adding the value of article_id to a query string in each link, you automatically identify the record to be updated or deleted. As Figure 13-2 shows, the URL displayed in the browser status bar (bottom left) identifies the article_id of the article Tiny Restaurants Crowded Together as 3.
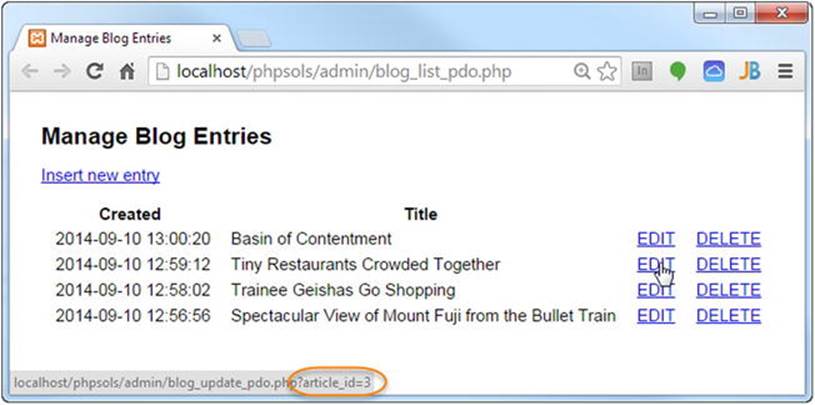
Figure 13-2. The EDIT and DELETE links contain the record’s primary key in a query string
The update page uses this to display the correct record ready for updating. The same information is conveyed in the DELETE link to the delete page.
To create a list like this, you need to start with an HTML table that contains two rows and as many columns as you want to display, plus two extra columns for the EDIT and DELETE links. The first row is used for column headings. The second row is wrapped in a PHP loop to display all the results. The table in blog_list_mysqli_01.php in the ch13 folder looks like this (the version in blog_list_pdo_01.php is the same, except that the links in the last two table cells point to the PDO versions of the update and delete pages):
<table>
<tr>
<th>Created</th>
<th>Title</th>
<th> </th>
<th> </th>
</tr>
<tr>
<td></td>
<td></td>
<td><a href="blog_update_mysqli.php">EDIT</a></td>
<td><a href="blog_delete_mysqli.php">DELETE</a></td>
</tr>
</table>
PHP Solution 13-3: Creating the Links to the Update and Delete Pages
This PHP solution shows how to create a page to manage the records in the blog table by displaying a list of all records and linking to the update and delete pages. There are only minor differences between the MySQLi and PDO versions, so these instructions describe both.
Copy blog_list_mysqli_01.php or blog_list_pdo_01.php to the admin folder and save it as blog_list_mysqli.php or blog_list_pdo.php, depending on which method of connection you plan to use. The different versions link to the appropriate insert, update, and delete files.
1. You need to connect to the database and create the SQL query. Add the following code in a PHP block above the DOCTYPE declaration:
require_once '../includes/connection.php';
// create database connection
$conn = dbConnect('read');
$sql = 'SELECT * FROM blog ORDER BY created DESC';
If you’re using PDO, add 'pdo' as the second argument to dbConnect().
2. Submit the query by adding the following code before the closing PHP tag.
For MySQLi, use this:
$result = $conn->query($sql);
if (!$result) {
$error = $conn->error;
}
For PDO, use this:
$result = $conn->query($sql);
$errorInfo = $conn->errorInfo();
if (isset($errorInfo[2])) {
$error = $errorInfo[2];
}
3. Add a conditional statement just before the table to display any error message, and wrap the table in the else block. The code before the table looks like this:
<?php if (isset($error)) {
echo "<p>$error</p>";
} else { ?>
The closing curly brace goes in a separate PHP block after the closing </table> tag.
4. You now need to enclose the second table row in a loop and retrieve each record from the result set. The following code goes between the closing </tr> tag of the first row and the opening <tr> tag of the second row.
For MySQLi, use this:
</tr>
<?php while($row = $result->fetch_assoc()) { ?>
<tr>
For PDO, use this:
</tr>
<?php while ($row = $result->fetch()) { ?>
<tr>
This is the same as in the previous chapter, so it should need no explanation.
5. Display the created and title fields for the current record in the first two cells of the second row, like this:
<td><?= $row['created']; ?></td>
<td><?= $row['title']; ?></td>
6. In the next two cells, add the query string and value of the article_id field for the current record to both URLs, as follows (although the links are different, the highlighted code is the same for the PDO version):
<td><a href="blog_update_mysqli.php?article_id=<?= $row['article_id']; ?>"
>EDIT</a></td>
<td><a href="blog_delete_mysqli.php?article_id=<?= $row['article_id']; ?>"
>DELETE</a></td>
What you’re doing here is adding ?article_id= to the URL and then using PHP to display the value of $row['article_id']. It’s important that you don’t leave any spaces that might break the URL or the query string. After the PHP has been processed, the opening <a> tag should look like this when viewing the page’s source code in a browser (although the number will vary according to the record):
<a href="blog_update_mysqli.php?article_id=2">
7. Finally, close the loop surrounding the second table row with a curly brace, like this:
</tr>
<?php } ?>
</table>
8. Save blog_list_mysqli.php or blog_list_pdo.php and load the page into a browser. Assuming that you loaded the contents of blog.sql into the phpsols database earlier, you should see a list of four items, as shown in Figure 13-2. You can now testblog_insert_mysqli.php or blog_insert_pdo.php. After inserting an item, you should be returned to the appropriate version of blog_list.php, and the date and time of creation, together with the title of the new item, should be displayed at the top of the list. Check your code against the versions in the ch13 folder if you encounter any problems.
![]() Tip This code assumes that there will always be some records in the table. As an exercise, use the technique in PHP Solution 11-2 (MySQLi) or 11-4 (PDO) to count the number of results, and use a conditional statement to display a message if no records are found. The solution is inblog_list_norec_mysqli.php and blog_list_norec_pdo.php.
Tip This code assumes that there will always be some records in the table. As an exercise, use the technique in PHP Solution 11-2 (MySQLi) or 11-4 (PDO) to count the number of results, and use a conditional statement to display a message if no records are found. The solution is inblog_list_norec_mysqli.php and blog_list_norec_pdo.php.
Updating Records
An update page needs to perform two separate processes, as follows:
1. Retrieve the selected record, and display it ready for editing
2. Update the edited record in the database
The first stage uses the $_GET superglobal array to retrieve the primary key from the URL, and then uses it to select and display the record in the update form, as shown in Figure 13-3.
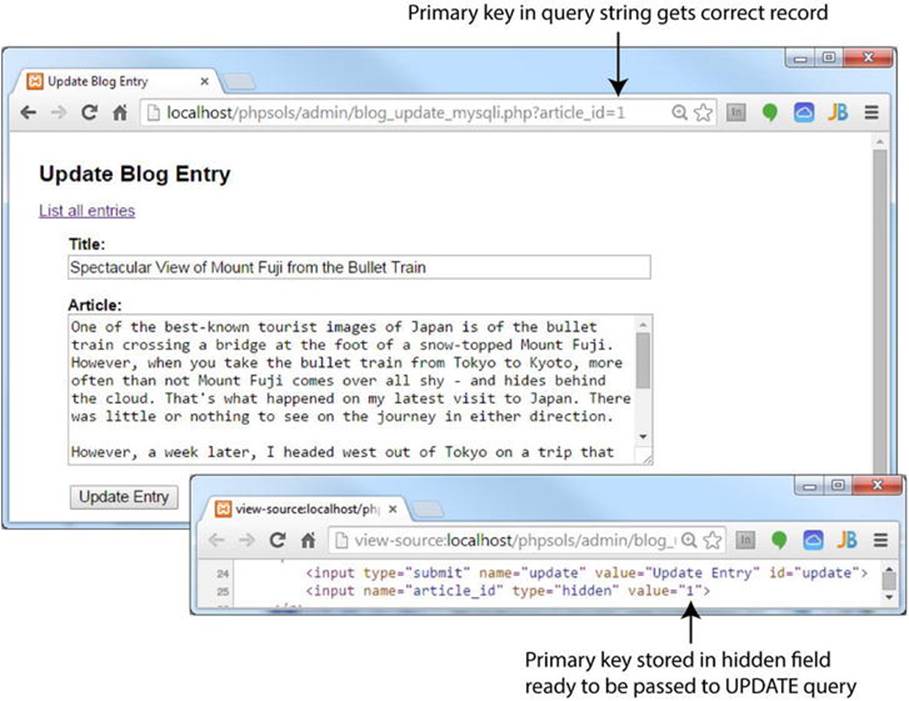
Figure 13-3. The primary key keeps track of a record during the update process
The primary key is stored in a hidden field in the update form. After you have edited the record in the update page, you submit the form using the post method to pass all the details, including the primary key, to an UPDATE command.
The basic syntax of the SQL UPDATE command looks like this:
UPDATE table_name SET column_name = value, column_name = value
WHERE condition
The condition when updating a specific record is the primary key. So, when updating article_id 3 in the blog table, the basic UPDATE query looks like this:
UPDATE blog SET title = value, article = value
WHERE article_id = 3
Although the basic principle is the same for both MySQLi and PDO, the code differs sufficiently to warrant separate instructions.
PHP Solution 13-4: Updating a Record with MySQLi
This PHP solution shows how to load an existing record into the update form and then send the edited details to the database for updating using MySQLi. To load the record, you need to have created the management page that lists all records, as described in PHP Solution 13-3.
1. Copy blog_update_mysqli_01.php from the ch13 folder and save it in the admin folder as blog_update_mysqli.php.
2. The first stage involves retrieving the details of the record that you want to update. Put the following code in a PHP block above the DOCTYPE declaration:
require_once '../includes/connection.php';
// initialize flags
$OK = false;
$done = false;
// create database connection
$conn = dbConnect('write');
// initialize statement
$stmt = $conn->stmt_init();
// get details of selected record
if (isset($_GET['article_id']) && !$_POST) {
// prepare SQL query
$sql = 'SELECT article_id, title, article
FROM blog WHERE article_id = ?';
if ($stmt->prepare($sql)) {
// bind the query parameter
$stmt->bind_param('i', $_GET['article_id']);
// execute the query, and fetch the result
$OK = $stmt->execute();
// bind the results to variables
$stmt->bind_result($article_id, $title, $article);
$stmt->fetch();
}
}
// redirect if $_GET['article_id'] not defined
if (!isset($_GET['article_id'])) {
header('Location: http://localhost/phpsols/admin/blog_list_mysqli.php');
exit;
}
// get error message if query fails
if (isset($stmt) && !$OK && !$done) {
$error = $stmt->error;
}
Although this is very similar to the code used for the insert page, the first few lines are outside the conditional statements. Both stages of the update process require the database connection and a prepared statement, so this avoids the need to duplicate the same code later. Two flags are initialized: $OK to check the success of retrieving the record, and $done to check whether the update succeeds.
The first conditional statement makes sure that $_GET['article_id'] exists and that the $_POST array is empty. So the code inside the braces is executed only when the query string is set, but the form hasn’t been submitted.
You prepare the SELECT query in the same way as for an INSERT command, using a question mark as a placeholder for the variable. However, note that instead of using an asterisk to retrieve all columns, the query specifies three columns by name like this:
$sql = 'SELECT article_id, title, article
FROM blog WHERE article_id = ?';
This is because a MySQLi prepared statement lets you bind the result of a SELECT query to variables, and to be able to do this, you must specify the column names and the order you want them to be in.
First, you need to initialize the prepared statement and bind $_GET['article_id'] to the query with $stmt->bind_param(). Because the value of article_id must be an integer, you pass 'i' as the first argument.
The code executes the query, and then binds the result to variables in the same order as the columns specified in the SELECT query before fetching the result.
The next conditional statement redirects the page to blog_list_mysqli.php if $_GET['article_id'] hasn’t been defined. This prevents anyone from trying to load the update page directly in a browser.
The final conditional statement stores an error message if the prepared statement has been created but both $OK and $done remain false. You haven’t added the update script yet, but if the record is retrieved or updated successfully, one of them will be switched totrue. So if both remain false, you know there was something wrong with one of the SQL queries.
3. Now that you have retrieved the contents of the record, you need to display them in the update form. If the prepared statement succeeded, $article_id should contain the primary key of the record to be updated, because it’s one of the variables you bound to the result set with the bind_result() method.
However, if there’s an error you need to display the message onscreen. But if someone alters the query string to an invalid number, $article_id will be set to 0, so there is no point in displaying the update form. Add the following conditional statements immediately before the opening <form> tag:
<p><a href="blog_list_mysqli.php">List all entries </a></p>
<?php if (isset($error)) {
echo "<p class='warning'>Error: $error</p>";
}
if($article_id == 0) { ?>
<p class="warning">Invalid request: record does not exist.</p>
<?php } else { ?>
<form name="form1" method="post" action="">
The first conditional statement displays any error message reported by the MySQLi prepared statement. The second wraps the update form in an else block, so the form will be hidden if $article_id is 0.
4. Add the closing curly brace of the else block immediately after the closing </form> tag, like this:
</form>
<?php } ?>
</body>
5. If $article_id is not 0, you know that $title and $article also contain valid values and can be displayed in the update form without further testing. However, you need to pass text values to htmlentities() to avoid problems with displaying quotes. Display $title in the value attribute of the title input field like this:
<input name="title" type="text" id="title" value="<?=
htmlentities($title); ?>">
6. Do the same for the article text area. Because text areas don’t have a value attribute, the code goes between the opening and closing <textarea> tags like this:
<textarea name="article" id="article"><?= htmlentities($article);?></textarea>
Make sure there is no space between the opening and closing PHP and <textarea> tags. Otherwise, you’ll get unwanted spaces in your updated record.
7. The UPDATE command needs to know the primary key of the record you want to change. You need to store the primary key in a hidden field so that it is submitted in the $_POST array with the other details. Because hidden fields are not displayed onscreen, the following code can go anywhere inside the form:
<input name="article_id" type="hidden" value="<?= $article_id; ?>">
8. Save the update page and test it by loading blog_list_mysqli.php into a browser and selecting the EDIT link for one of the records. The contents of the record should be displayed in the form fields, as shown in Figure 13-3.
The Update Entry button doesn’t do anything yet. Just make sure that everything is displayed correctly, and confirm that the primary key is registered in the hidden field. You can check your code, if necessary, against blog_update_mysqli_02.php.
9. The name attribute of the submit button is update, so all the update processing code needs to go in a conditional statement that checks for the presence of update in the $_POST array. Place the following code, highlighted in bold, immediately above the code in step 1 that redirects the page:
$stmt->fetch();
}
}
// if form has been submitted, update record
if (isset($_POST ['update'])) {
// prepare update query
$sql = 'UPDATE blog SET title = ?, article = ?
WHERE article_id = ?';
if ($stmt->prepare($sql)) {
$stmt->bind_param('ssi', $_POST['title'], $_POST['article'],
$_POST['article_id']);
$done = $stmt->execute();
}
}
// redirect page on success or if $_GET['article_id']) not defined
if ($done || !isset($_GET['article_id'])) {
The UPDATE query is prepared with question mark placeholders where values are to be supplied from variables. The prepared statement has already been initialized in the code outside the conditional statement, so you can pass the SQL to the prepare() method and bind the variables with $stmt->bind_param(). The first two variables are strings, and the third is an integer, so the first argument is 'ssi'.
If the UPDATE query succeeds, the execute() method returns true, resetting the value of $done. Unlike an INSERT query, using the affected_rows property has little meaning because it returns 0 if the user decides to click the Update Entry button without making any changes, so we won’t use it here. You need to add $done || to the condition in the redirect script. This ensures that the page is redirected if either the update succeeds or someone tries to access the page directly.
10.Save blog_update_mysqli.php and test it by loading blog_list_mysqli.php, selecting one of the EDIT links, and making changes to the record that is displayed. When you click Update Entry, you should be taken back toblog_list_mysqli.php. You can verify that your changes were made by clicking the same EDIT link again. Check your code, if necessary, with blog_update_mysqli_03.php.
PHP Solution 13-5: Updating a Record with PDO
This PHP solution shows how to load an existing record into the update form and then send the edited details to the database for updating using PDO. To load the record, you need to have created the management page that lists all records, as described in PHP Solution 13-3.
1. Copy blog_update_pdo_01.php from the ch13 folder and save it in the admin folder as blog_update_pdo.php.
2. The first stage involves retrieving the details of the record that you want to update. Put the following code in a PHP block above the DOCTYPE declaration:
require_once '../includes/connection.php';
// initialize flags
$OK = false;
$done = false;
// create database connection
$conn = dbConnect('write', 'pdo');
// get details of selected record
if (isset($_GET['article_id']) && !$_POST) {
// prepare SQL query
$sql = 'SELECT article_id, title, article FROM blog
WHERE article_id = ?';
$stmt = $conn->prepare($sql);
// pass the placeholder value to execute() as a single-element array
$OK = $stmt->execute([$_GET['article_id']]);
// bind the results
$stmt->bindColumn(1, $article_id);
$stmt->bindColumn(2, $title);
$stmt->bindColumn(3, $article);
$stmt->fetch();
}
// redirect if $_GET['article_id'] not defined
if (!isset($_GET['article_id'])) {
header('Location: http://localhost/phpsols/admin/blog_list_pdo.php');
exit;
}
// store error message if query fails
if (isset($stmt) && !$OK && !$done) {
$errorInfo = $stmt->errorInfo();
if (isset($errorInfo[2])) {
$error = $errorInfo[2];
}
}
Although this is very similar to the code used for the insert page, the first few lines are outside the first conditional statement. Both stages of the update process require the database connection, so this avoids the need to duplicate the same code later. Two flags are initialized: $OK to check the success of retrieving the record and $done to check whether the update succeeds.
The first conditional statement checks that $_GET ['article_id'] exists and that the $_POST array is empty. This makes sure that the code inside is executed only when the query string is set, but the form hasn’t yet been submitted.
When preparing the SQL query for the insert form, you used named placeholders for the variables. This time, let’s use a question mark, like this:
$sql = 'SELECT article_id, title, article FROM blog
WHERE article_id = ?';
There’s only one variable that needs to be bound to the anonymous placeholder, so pass it directly to the execute() method as a single-element array, like this:
$OK = $stmt->execute([$_GET['article_id']]);
![]() Caution This code uses the array shorthand syntax, so $_GET['article_id'] is wrapped in a pair of square brackets. Don’t forget the array’s closing square bracket.
Caution This code uses the array shorthand syntax, so $_GET['article_id'] is wrapped in a pair of square brackets. Don’t forget the array’s closing square bracket.
The results are then bound to $article_id, $title, and $article with the bindColumn() method. This time, I have used numbers (counting from 1) to indicate which column to bind each variable to.
There’s only one record to fetch in the result, so the fetch() method is called immediately.
The next conditional statement redirects the page to blog_list_pdo.php if $_GET['article_id'] hasn’t been defined. This prevents anyone from trying to load the update page directly in a browser.
The final conditional statement stores an error message if the prepared statement has been created, but both $OK and $done remain false. You haven’t added the update script yet, but if the record is retrieved or updated successfully, one of them will be switched totrue. So if both remain false, you know there was something wrong with one of the SQL queries.
3. Now that you have retrieved the contents of the record, you need to display them in the update form. If the prepared statement succeeded, $article_id should contain the primary key of the record to be updated, because it’s one of the variables you bound to the result set with the bindColumn() method.
However, if there’s an error you need to display that message onscreen. But if someone alters the query string to an invalid number, $article_id will be set to 0, so there is no point in displaying the update form. Add the following conditional statements immediately before the opening <form> tag:
<p><a href="blog_list_pdo.php">List all entries </a></p>
<?php if (isset($error)) {
echo "<p class='warning'>Error: $error</p>";
}
if($article_id == 0) { ?>
<p class="warning">Invalid request: record does not exist.</p>
<?php } else { ?>
<form name="form1" method="post" action="">
The first conditional statement displays any error message reported by the PDO prepared statement. The second wraps the update form in an else block, so the form will be hidden if $article_id is 0.
4. Add the closing curly brace of the else block immediately after the closing </form> tag, like this:
</form>
<?php } ?>
</body>
5. If $article_id is not 0, you know that $title and $article also exist and can be displayed in the update form without further testing. However, you need to pass text values to htmlentities() to avoid problems with displaying quotes. Display $titlein the value attribute of the title input field like this:
<input name="title" type="text" id="title" value="<?=
htmlentities($title); ?>">
6. Do the same for the article text area. Because text areas don’t have a value attribute, the code goes between the opening and closing <textarea> tags like this:
<textarea name="article" id="article"><?= htmlentities($article);?></textarea>
Make sure there is no space between the opening and closing PHP and <textarea> tags. Otherwise, you will get unwanted spaces in your updated record.
7. The UPDATE command needs to know the primary key of the record you want to change. You need to store the primary key in a hidden field so that it is submitted in the $_POST array with the other details. Because hidden fields are not displayed onscreen, the following code can go anywhere inside the form:
<input name="article_id" type="hidden" value="<?= $article_id; ?>">
8. Save the update page and test it by loading blog_list_pdo.php into a browser and selecting the EDIT link for one of the records. The contents of the record should be displayed in the form fields, as shown in Figure 13-3.
The Update Entry button doesn’t do anything yet. Just make sure that everything is displayed correctly, and confirm that the primary key is registered in the hidden field. You can check your code, if necessary, against blog_update_pdo_02.php.
9. The name attribute of the submit button is update, so all the update processing code needs to go in a conditional statement that checks for the presence of update in the $_POST array. Place the following code, highlighted in bold, immediately above the code in step 1 that redirects the page:
$stmt->fetch();
}
// if form has been submitted, update record
if (isset($_POST['update'])) {
// prepare update query
$sql = 'UPDATE blog SET title = ?, article = ?
WHERE article_id = ?';
$stmt = $conn->prepare($sql);
// execute query by passing array of variables
$done = $stmt->execute([$_POST['title'], $_POST['article'],
$_POST['article_id']]);
}
// redirect page on success or $_GET['article_id'] not defined
if ($done || !isset($_GET['article_id'])) {
Again, the SQL query is prepared using question marks as placeholders for values to be derived from variables. This time, there are three placeholders, so the corresponding variables need to be passed as an array to the execute() method. Needless to say, the array must be in the same order as the placeholders.
If the UPDATE query succeeds, the execute() method returns true, resetting the value of $done. You can’t use the rowCount() method here to get the number of affected rows because it returns 0 if the Update Entry button is clicked without making any changes. You’ll notice we have added $done || to the condition in the redirect script. This ensures the page is redirected if either the update succeeds or someone tries to access the page directly.
10.Save blog_update_pdo.php and test it by loading blog_list_pdo.php, selecting one of the EDIT links, and making changes to the record that is displayed. When you click Update Entry you should be taken back to blog_list_pdo.php. You can verify that your changes were made by clicking the same EDIT link again. Check your code, if necessary, against blog_update_pdo_03.php.
Deleting Records
Deleting a record in a database is similar to updating one. The basic DELETE command looks like this:
DELETE FROM table_name WHERE condition
What makes the DELETE command potentially dangerous is that it is final. Once you have deleted a record, there’s no going back—it’s gone forever. There’s no Recycle Bin or Trash to fish it out from. Even worse, the WHERE clause is optional. If you omit it, every single record in the table is irrevocably sent into cyber-oblivion. Consequently, it’s a good idea to display details of the record to be deleted and ask the user to confirm or cancel the process (see Figure 13-4).
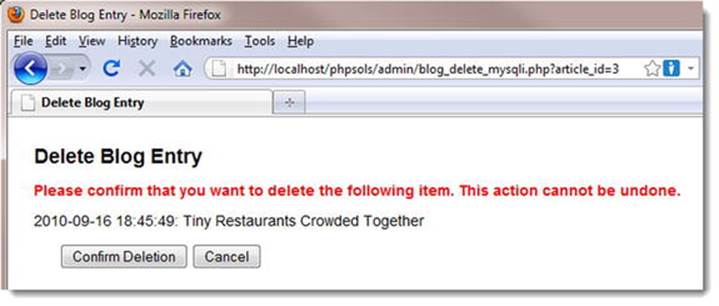
Figure 13-4. Deleting a record is irreversible, so get confirmation before going ahead
Building and scripting the delete page is almost identical to the update page, so I won’t give step-by-step instructions. However, here are the main points:
· Retrieve the details of the selected record.
· Display sufficient details, such as the title, for the user to confirm that the correct record has been selected.
· Give the Confirm Deletion and Cancel buttons different name attributes, and use each name attribute with isset() to control the action taken.
· Instead of wrapping the entire form in the else block, use conditional statements to hide the Confirm Deletion button and the hidden field.
The code that performs the deletion for each method follows.
For MySQLi:
if (isset($_POST['delete'])) {
$sql = 'DELETE FROM blog WHERE article_id = ?';
if ($stmt->prepare($sql)) {
$stmt->bind_param('i', $_POST['article_id']);
$stmt->execute();
if ($stmt->affected_rows > 0) {;
$deleted = true;
} else {
$error = 'There was a problem deleting the record.';
}
}
}
For PDO:
if (isset($_POST['delete'])) {
$sql = 'DELETE FROM blog WHERE article_id = ?';
$stmt = $conn->prepare($sql);
$stmt->execute([$_POST['article_id']]);
// get number of affected rows
$deleted = $stmt->rowCount();
if (!$deleted) {
$error = 'There was a problem deleting the record.';
}
}
You can find the finished code in blog_delete_mysqli.php and blog_delete_pdo.php in the ch13 folder. To test the delete script, copy the appropriate file to the admin folder.
Reviewing the Four Essential SQL Commands
Now that you have seen SELECT, INSERT, UPDATE, and DELETE in action, let’s review the basic syntax for MySQL and MariaDB. This is not an exhaustive listing, but it concentrates on the most important options, including some that have not yet been covered.
I have used the same typographic conventions as the MySQL online manual at http://dev.mysql.com/doc/refman/5.6/en (which you may also want to consult).
· Anything in uppercase is an SQL command.
· Expressions in square brackets are optional.
· Lowercase italics represent variable input.
· A vertical pipe (|) separates alternatives.
Although some expressions are optional, they must appear in the order listed. For example, in a SELECT query, WHERE, ORDER BY, and LIMIT are all optional, but LIMIT can never come before WHERE or ORDER BY.
SELECT
SELECT is used for retrieving records from one or more tables. Its basic syntax is as follows:
SELECT [DISTINCT] select_list
FROM table_list
[WHERE where_expression]
[ORDER BY col_name | formula] [ASC | DESC]
[LIMIT [skip_count,] show_count]
The DISTINCT option tells the database you want to eliminate duplicate rows from the results.
The select_list is a comma-separated list of columns that you want included in the result. To retrieve all columns, use an asterisk (*). If the same column name is used in more than one table, the references must be unambiguous, using the syntax table_name.column_name.Chapters 15 and 16 explain in detail about working with multiple tables.
The table_list is a comma-separated list of tables from which the results are to be drawn. All tables that you want to be included in the results must be listed.
The WHERE clause specifies search criteria, for example:
WHERE quotations.family_name = authors.family_name
WHERE article_id = 2
WHERE expressions can use comparison, arithmetic, logical, and pattern-matching operators. The most important ones are listed in Table 13-2.
Table 13-2. The main operators used in MySQL WHERE expressions
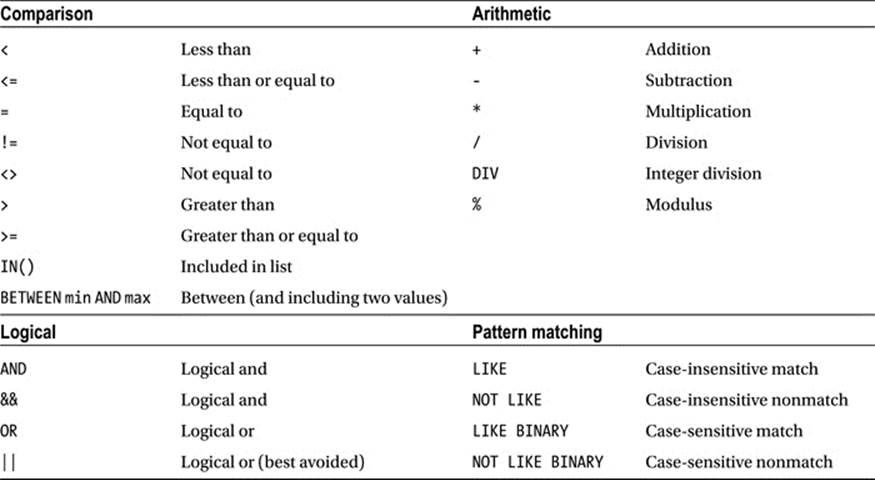
Of the two operators that mean “not equal to,” <> is standard SQL. Not all databases support !=.
DIV is the counterpart of the modulus operator. It produces the result of division as an integer with no fractional part, whereas modulus produces only the remainder.
5 / 2 /* result 2.5 */
5 DIV 2 /* result 2 */
5 % 2 /* result 1 */
I suggest you avoid using || because it’s actually used as the string concatenation operator in standard SQL. By not using it with MySQL, you avoid confusion if you ever work with a different relational database. To join strings, MySQL uses the CONCAT() function (seehttp://dev.mysql.com/doc/refman/5.6/en/string-functions.html#function_concat).
IN() evaluates a comma-separated list of values inside the parentheses and returns true if one or more of the values is found. Although BETWEEN is normally used with numbers, it also applies to strings. For instance, BETWEEN 'a' AND 'd' returns true for a, b, c, and d (but not their uppercase equivalents). Both IN() and BETWEEN can be preceded by NOT to perform the opposite comparison.
LIKE, NOT LIKE, and the related BINARY operators are used for text searches in combination with the following two wildcard characters:
· %: matches any sequence of characters, or none.
· _ (an underscore): matches exactly one character.
So, the following WHERE clause matches Dennis, Denise, and so on, but not Aiden:
WHERE first_name LIKE 'den%'
To match Aiden, put % at the front of the search pattern. Because % matches any sequence of characters, or none, '%den%' still matches Dennis and Denise. To search for a literal percentage sign or underscore, precede it with a backslash (\% or \_).
Conditions are evaluated from left to right but can be grouped in parentheses if you want a particular set of conditions to be considered together.
ORDER BY specifies the sort order of the results. This can be specified as a single column, a comma-separated list of columns, or an expression such as RAND(), which randomizes the order. The default sort order is ascending (a–z, 0–9), but you can specify DESC (descending) to reverse the order.
LIMIT followed by one number stipulates the maximum number of records to return. If two numbers are given separated by a comma, the first tells the database how many rows to skip (see “Selecting a subset of records” in Chapter 12).
See http://dev.mysql.com/doc/refman/5.6/en/select.html for more details on SELECT.
INSERT
The INSERT command is used to add new records to a database. The general syntax is as follows:
INSERT [INTO] table_name (column_names)
VALUES (values)
The word INTO is optional; it simply makes the command read a little more like human language. The column names and values are comma-delimited lists, and both must be in the same order. So, to insert the forecast for New York (blizzard), Detroit (smog), and Honolulu (sunny) into a weather database, this is how you would do it:
INSERT INTO forecast (new_york, detroit, honolulu)
VALUES ('blizzard', 'smog', 'sunny')
The reason for this syntax is to allow you to insert more than one record at a time. Each subsequent record is in a separate set of parentheses, with each set separated by a comma:
INSERT numbers (x,y)
VALUES (10,20),(20,30),(30,40),(40,50)
You’ll use this multiple insert syntax in Chapter 16. Any columns omitted from an INSERT query are set to their default value. Never set an explicit value for the primary key where the column is set to AUTO_INCREMENT; leave the column name out of the INSERT statement.
For more details, see http://dev.mysql.com/doc/refman/5.6/en/insert.html.
UPDATE
This command is used to change existing records. The basic syntax looks like this:
UPDATE table_name
SET col_name = value [, col_name = value]
[WHERE where_expression]
The WHERE expression tells MySQL which record or records you want to update (or perhaps in the case of the following example, dream about):
UPDATE sales SET q1_2015 = 25000
WHERE title = 'PHP Solutions, Third Edition'
See http://dev.mysql.com/doc/refman/5.6/en/update.html for more details on UPDATE.
DELETE
DELETE can be used to delete single records, multiple records, or the entire contents of a table. The general syntax for deleting from a single table is as follows:
DELETE FROM table_name [WHERE where_expression]
Although phpMyAdmin prompts you for confirmation before deleting a record, databases take you at your word and perform the deletion immediately. DELETE is totally unforgiving—once the data is deleted, it is gone forever. The following query will delete all records from a table called subscribers where the date in expiry_date has already passed:
DELETE FROM subscribers
WHERE expiry_date < NOW()
For more details, see http://dev.mysql.com/doc/refman/5.6/en/delete.html.
![]() Caution Although the WHERE clause is optional in both UPDATE and DELETE, you should be aware that if you leave WHERE out, the entire table is affected. This means that a careless slip with either of these commands could result in every single record being identical—or wiped out.
Caution Although the WHERE clause is optional in both UPDATE and DELETE, you should be aware that if you leave WHERE out, the entire table is affected. This means that a careless slip with either of these commands could result in every single record being identical—or wiped out.
Security and Error Messages
When developing a website with PHP and a database, it’s essential to display error messages so that you can debug your code if anything goes wrong. However, raw error messages look unprofessional in a live website. They can also reveal clues about your database structure to potential attackers. Therefore, before deploying your scripts live on the Internet, you should replace the error messages generated by the database with a neutral message of your own, such as “Sorry, the database is unavailable.”
Chapter Review
Content management with a database involves inserting, selecting, updating, and deleting records. Each record’s primary key plays a vital role in the update and delete processes. Most of the time, generating the primary key is handled automatically by the database when a record is first created. Thereafter, finding a record’s primary key is simply a matter of using a SELECT query, either by displaying a list of all records or by searching for something you know about the record, such as a title or words in an article.
MySQLi and PDO prepared statements make database queries more secure by removing the need to ensure that quotes and control characters are properly escaped. They also speed up your application if the same query needs to be repeated during a script using different variables. Instead of validating the SQL every time, the script needs do it only once with the placeholders.
Although this chapter has concentrated on content management, the same basic techniques apply to most interaction with a database. Of course, there’s a lot more to SQL—and to PHP. In the next chapter, I’ll address some of the most common problems, such as displaying only the first sentence or so of a long text field and handling dates. Then in Chapter 15 we’ll explore working with more than one table in a database.
All materials on the site are licensed Creative Commons Attribution-Sharealike 3.0 Unported CC BY-SA 3.0 & GNU Free Documentation License (GFDL)
If you are the copyright holder of any material contained on our site and intend to remove it, please contact our site administrator for approval.
© 2016-2026 All site design rights belong to S.Y.A.