PHP Solutions: Dynamic Web Design Made Easy, Third Edition (2014)
Chapter 14. Formatting Text and Dates
We have some unfinished business left over from the previous chapter. Figure 13-1 in Chapter 13 shows content from the blog table with just the first two sentences of each article displayed and a link to the rest of the article. However, I didn’t show you how it was done. There are several ways to extract a shorter piece of text from the beginning of a longer one. Some are rather crude and usually leave you with a broken word at the end. In this chapter, you’ll learn how to extract complete sentences.
The other unfinished business is that the full list of articles in blog_list_mysqli.php and blog_list_pdo.php displays the MySQL timestamp in its raw state, which isn’t very elegant. You need to reformat the date to look more user friendly. Handling dates can be a major headache because MySQL and MariaDB store them in a completely different way from PHP. This chapter guides you through the minefield of storing and displaying dates in a PHP/MySQL context. You’ll also learn about PHP date and time features that make complex date calculations, such as finding the second Tuesday of each month, child’s play.
In this chapter, you’ll learn about the following:
· Extracting the first section of a longer text item
· Using an alias in an SQL query
· Displaying text retrieved from a database as paragraphs
· Formatting dates with MySQL
· Selecting records based on temporal criteria
· Using the PHP DateTime, DateTimeZone, DateInterval, and DatePeriod classes
Displaying a Text Extract
There are many ways to extract the first few lines or characters from a longer piece of text. Sometimes you need just the first 20 or 30 characters to identify an item. At other times, it’s preferable to show complete sentences or paragraphs.
Extracting a Fixed Number of Characters
You can extract a fixed number of characters from the beginning of a text item either with the PHP substr() function or with the LEFT() function in an SQL query.
Using the PHP substr( ) Function
The substr() function extracts a substring from a longer string. It takes three arguments: the string you want to extract the substring from, the starting point (counted from 0), and the number of characters to extract. The following code displays the first 100 characters of$row['article']:
echo substr($row['article'], 0, 100);
The original string remains intact. If you omit the third argument, substr() extracts everything to the end of the string. This makes sense only if you choose a starting point other than 0.
Using the LEFT( ) Function in an SQL Query
The LEFT() function extracts characters from the beginning of a column. It takes two arguments: the column name and the number of characters to extract. The following retrieves article_id, title, and the first 100 characters from the article column of the blog table:
SELECT article_id, title, LEFT(article, 100)
FROM blog ORDER BY created DESC
Whenever you use a function in an SQL query like this, the column name no longer appears in the result set as article, but as LEFT(article, 100) instead. So it’s a good idea to assign an alias to the affected column using the AS keyword. You can either reassign the column’s original name as the alias or use a descriptive name as in the following example (the code is in blog_left_mysqli.php and blog_left_pdo.php in the ch14 folder):
SELECT article_id, title, LEFT(article, 100) AS first100
FROM blog ORDER BY created DESC
If you process each record as $row, the extract is in $row['first100']. To retrieve both the first 100 characters and the full article, simply include both in the query like this:
SELECT article_id, title, LEFT(article, 100) AS first100, article
FROM blog ORDER BY created DESC
Taking a fixed number of characters produces a crude result, as Figure 14-1 shows.

Figure 14-1. Selecting the first 100 characters from an article chops many words in half
Ending an Extract on a Complete Word
To end an extract on a complete word, you need to find the final space and use that to determine the length of the substring. So, if you want the extract to be a maximum of 100 characters, use either of the preceding methods to start with, and store the result in $extract. Then you can use the PHP string functions strrpos() and substr() to find the last space and end the extract like this (the code is in blog_word_mysqli.php and blog_word_pdo.php):
$extract = $row['first100'];
// find position of last space in extract
$lastSpace = strrpos($extract, ' ');
// use $lastSpace to set length of new extract and add ...
echo substr($extract, 0, $lastSpace) . '... ';
This produces the more elegant result shown in Figure 14-2. It uses strrpos(), which finds the last position of a character or substring within another string. Since you’re looking for a space, the second argument is a pair of quotes with a single space between them. The result is stored in $lastSpace, which is passed as the third argument to substr(), finishing the extract on a complete word. Finally, add a string containing three dots and a space, and join the two with the concatenation operator (a period or dot).

Figure 14-2. Ending the extract on a complete word produces a more elegant result
![]() Caution Don’t mix up strrpos(), which gets the last position of a character or substring, with strpos(), which gets the first position. The extra “r” stands for “reverse”—strrpos() searches from the end of the string.
Caution Don’t mix up strrpos(), which gets the last position of a character or substring, with strpos(), which gets the first position. The extra “r” stands for “reverse”—strrpos() searches from the end of the string.
Extracting the First Paragraph
Assuming that you have entered your text in the database using the Enter or Return key to indicate new paragraphs, this is very easy. Simply retrieve the full text, use strpos() to find the first new line character, and use substr() to extract the first section of text up to that point.
The following SQL query is used in blog_para_mysqli.php, and blog_para_pdo.php:
SELECT article_id, title, article
FROM blog ORDER BY created DESC
The following code is used to display the first paragraph of article:
<?= substr($row['article'], 0, strpos($row['article'], PHP_EOL)); ?>
If that makes your head spin, then let’s break it up and take a look at the third argument on its own:
strpos($row['article'], PHP_EOL)
This locates the first end of line character in $row['article'] in a cross-platform way using the PHP_EOL constant (see “Appending content with fopen()” in Chapter 7). You could rewrite the code like this:
$newLine = strpos($row['article'], PHP_EOL);
echo substr($row['article'], 0, $newLine);
Both sets of code do exactly the same thing, but PHP lets you nest a function as an argument passed to another function. As long as the nested function returns a valid result, you can frequently use shortcuts like this.
Using the PHP_EOL constant eliminates the problem of dealing with the different characters used by Linux, Mac OS X, and Windows to insert a new line.
Displaying Paragraphs
Since we’re on the subject of paragraphs, many beginners are confused by the fact that all the text retrieved from a database is displayed as a continuous block, with no separation between paragraphs. HTML ignores whitespace, including new lines. To get text stored in a database displayed as paragraphs, you have the following options:
· Store your text as HTML.
· Convert new lines to <br/> tags.
· Create a custom function to replace new lines with paragraph tags.
Storing Database Records as HTML
The first option involves installing an HTML editor, such as CK Editor (http://ckeditor.com/) or TinyMCE (www.tinymce.com) in your content management forms. Mark up your text as you insert or update it. The HTML is stored in the database, and the text displays as intended. Installing one of these editors is beyond the scope of this book.
Converting Newlines to <br/> Tags
The simplest option is to pass your text to the nl2br() function before displaying it, like this:
echo nl2br($row['article']);
Voilà!—paragraphs. Well, not really. The nl2br() function converts new line characters to <br/> tags (the closing slash is for compatibility with XHTML, and is valid in HTML5). As a result, you get fake paragraphs. It’s a quick and dirty solution, but not ideal.
Creating a Function to Insert <p> Tags
To display text retrieved from a database as genuine paragraphs, wrap the database result in a pair of paragraph tags, and then use the preg_replace() function to convert consecutive newline characters to a closing </p> tag, immediately followed by an opening <p> tag, like this:
<p><?= preg_replace('/[\r\n]+/', "</p>\n<p>", $row['article']); ?></p>
The regular expression used as the first argument matches one or more carriage returns and/or newline characters. You can’t use the PHP_EOL constant here because you need to match all consecutive newline characters and replace them with a single pair of paragraph tags. The pair of<p> tags is in double quotes, with \n between them to add a newline character, in order to make the HTML code easier to read. Remembering the pattern for a regex can be difficult, so you can easily convert this into a custom function, like this:
function convertToParas($text) {
$text = trim($text);
return '<p>' . preg_replace('/[\r\n]+/', "</p>\n<p>", $text) . "</p>\n";
}
This trims whitespace, including newline characters, from the beginning and end of the text, adds a <p> tag at the beginning, replaces internal sequences of newline characters with closing and opening tags, and appends a closing </p> tag and newline character at the end.
You can then use the function like this:
<?= convertToParas($row['article']); ?>
The code for the function definition is in utility_funcs.php in the ch14 folder. You can see it being used in blog_ptags_mysqli.php and blog_ptags_pdo.php.
Extracting Complete Sentences
PHP has no concept of what constitutes a sentence. Counting periods means you ignore all sentences that end with an exclamation point or a question mark. You also run the risk of breaking a sentence on a decimal point or cutting off a closing quote after a period. To overcome these problems, I have devised a PHP function called getFirst() that identifies the punctuation at the end of a normal sentence:
· A period, question mark, or exclamation point
· Optionally followed by a single or double quote
· Followed by one or more spaces
The getFirst() function takes two arguments: the text from which you want to extract the first section and the number of sentences you want to extract. The second argument is optional; if it’s not supplied, the function extracts the first two sentences. The code looks like this (it’s inutility_funcs.php):
function getFirst($text, $number=2) {
// use regex to split into sentences
$sentences = preg_split('/([.?!]["\']?\s)/', $text, $number+1,
PREG_SPLIT_DELIM_CAPTURE);
if (count($sentences) > $number * 2) {
$remainder = array_pop($sentences);
} else {
$remainder = '';
}
$result = [];
$result[0] = implode('', $sentences);
$result[1] = $remainder;
return $result;
}
All you really need to know about this function is that it returns an array containing two elements: the extracted sentences and any text that’s left over. You can use the second element to create a link to a page containing the full text.
If you’re interested in how the function works, read on. The line highlighted in bold uses a regex to identify the end of each sentence—a period, question mark, or exclamation point, optionally followed by a double or single quotation mark and a space. This is passed as the first argument to preg_split(), which uses the regex to split the text into an array. The second argument is the target text. The third argument determines the maximum number of chunks to split the text into. You want one more than the number of sentences to be extracted. Normally, preg_split()discards the characters matched by the regex, but using PREG_SPLIT_DELIM_CAPTURE as the fourth argument together with a pair of capturing parentheses in the regex preserves them as separate array elements. In other words, the elements of the $sentences array consist alternately of the text of a sentence followed by the punctuation and space, like this:
$sentences[0] = '"Hello, world';
$sentences[1] = '!" ';
It’s impossible to know in advance how many sentences there are in the target text, so you need to find out if there’s anything remaining after extracting the desired number of sentences. The conditional statement uses count() to ascertain the number of elements in the $sentencesarray and compares the result with $number multiplied by 2 (because the array contains two elements for each sentence). If there’s more text, array_pop() removes the last element of the $sentences array and assigns it to $remainder. If there’s no further text, $remainder is an empty string.
The final stage of the function uses implode() with an empty string as its first argument to stitch the extracted sentences back together and then returns a two-element array containing the extracted text and anything that’s left over.
Don’t worry if you found that explanation hard to follow. The code is quite advanced. It took a lot of experimentation to build the function, and I have improved it gradually over the years.
PHP Solution 14-1: Displaying the First Two Sentences of an Article
This PHP solution shows how to display an extract from each article in the blog table using the getFirst() function described in the preceding section. If you created the Japan Journey site earlier in the book, use blog.php. Alternatively, use blog_01.php from the ch14 folder and save it as blog.php in the phpsols site root. You also need footer.php, menu.php, title.php, and connection.php in the includes folder. There are copies of these files in the ch14 folder if you don’t already have them in the includes folder.
1. Copy utility_funcs.php from the ch14 folder to the includes folder, and include it in blog.php in the PHP code block above the DOCTYPE declaration. Also include connection.php and create a connection to the database. This page needs read-only privileges, so use read as the argument passed to dbConnect(), like this:
require_once './includes/connection.php';
require_once './includes/utility_funcs.php';
// create database connection
$conn = dbConnect('read');
Add ‘pdo’ as the second argument to dbConnect() if you’re using PDO.
2. Prepare an SQL query to retrieve all records from the blog table and then submit it, like this:
$sql = 'SELECT * FROM blog ORDER BY created DESC';
$result = $conn->query($sql);
3. Add the code to check for a database error.
For MySQLi, use this:
if (!$result) {
$error = $conn->error;
}
For PDO, call the errorInfo() method and check for the existence of the third array element, like this:
$errorInfo = $conn->errorInfo();
if (isset($errorInfo[2])) {
$error = $errorInfo[2];
}
4. Delete all the static HTML inside the <main> element in the body of the page, and add the code to display the error message if a problem arises with the query:
<main>
<?php if (isset($error)) {
echo "<p>$error</p>";
} else {
}
?>
</main>
5. Create a loop inside the else block to display the results:
while ($row = $result->fetch_assoc()) {
echo "<h2>{$row['title']}</h2>";
$extract = getFirst($row['article']);
echo "<p>$extract[0]";
if ($extract[1]) {
echo '<a href="details.php?article_id=' . $row['article_id'] . '">
More</a>';
}
echo '</p>';
}
The code is the same for PDO, except for this line:
while ($row = $result->fetch_assoc()) {
Replace it with this:
while ($row = $result->fetch()) {
The getFirst() function processes $row['article'] and stores the result in $extract. The first two sentences of article in $extract[0] are immediately displayed. If $extract[1] contains anything, it means there is more to display. So the code inside the if block displays a link to details.php, with the article’s primary key in a query string.
6. Save the page and test it in a browser. You should see the first two sentences of each article displayed as shown in Figure 14-3.

Figure 14-3. The first two sentences have been extracted cleanly from the longer text
7. Test the function by adding a number as a second argument to getFirst(), like this:
$extract = getFirst($row['article'], 3);
This displays the first three sentences. If you increase the number so that it equals or exceeds the number of sentences in an article, the More link won’t be displayed.
You can compare your code with blog_mysqli.php and blog_pdo.php in the ch14 folder.
We’ll look at details.php in Chapter 15. Before that, let’s tackle the minefield presented by using dates in a dynamic website.
Let’s Make a Date
Dates and time are so fundamental to modern life that we rarely pause to think how complex they are. There are 60 seconds to a minute and 60 minutes to an hour, but 24 hours to a day. Months range between 28 and 31 days, and a year can be either 365 or 366 days. The confusion doesn’t stop there, because 7/4 means July 4 to an American or Japanese person, but 7 April to a European. To add to the confusion, PHP handles dates differently from MySQL. Time to bring order to chaos . . .
![]() Note Maria DB handles dates the same way. To avoid unnecessary repetition, I’ll refer only to MySQL.
Note Maria DB handles dates the same way. To avoid unnecessary repetition, I’ll refer only to MySQL.
How MySQL Handles Dates
In MySQL, dates and time are always expressed in descending order from the largest unit to the smallest: year, month, date, hour, minutes, seconds. Hours are always measured using the 24-hour clock, with midnight expressed as 00:00:00. Even if this seems unfamiliar to you, it’s the recommendation laid down by the International Organization for Standardization (ISO).
MySQL allows considerable flexibility about the separator between the units (any punctuation symbol is acceptable), but there is no argument about the order—it’s fixed. If you attempt to store a date in any other format than year, month, date, MySQL inserts 0000-00-00 in the database.
I’ll come back later to the way you insert dates into MySQL, because it’s best to validate them and format them using PHP. First, let’s look at some of the things you can do with dates once they’re stored in MySQL. MySQL has many date and time functions, which are listed with examples at http://dev.mysql.com/doc/refman/5.6/en/date-and-time-functions.html.
One of the most useful functions is DATE_FORMAT(), which does exactly what its name suggests.
Formatting Dates in a SELECT Query with DATE_FORMAT( )
The syntax for DATE_FORMAT() is as follows:
DATE_FORMAT(date, format)
Normally, date is the table column to be formatted, and format is a string composed of formatting specifiers and any other text you want to include. Table 14-1 lists the most common specifiers, all of which are case-sensitive.
Table 14-1. Frequently used MySQL date format specifiers

As explained earlier, when using a function in an SQL query, assign the result to an alias using the AS keyword. Referring to Table 14-1, you can format the date in the created column of the blog table in a common U.S. style and assign it to an alias, like this:
DATE_FORMAT(created, '%c/%e/%Y') AS date_created
To format the same date in the European style, reverse the first two specifiers, like this:
DATE_FORMAT(created, '%e/%c/%Y') AS date_created
![]() Tip When using DATE_FORMAT(), don’t use the original column name as the alias, because the values are converted to strings, which plays havoc with the sort order. Choose a different alias, and use the original column name to sort the results.
Tip When using DATE_FORMAT(), don’t use the original column name as the alias, because the values are converted to strings, which plays havoc with the sort order. Choose a different alias, and use the original column name to sort the results.
PHP Solution 14-2: Formatting a MySQL Date or Timestamp
This PHP solution formats the dates in the blog entry management page from Chapter 13.
1. Open blog_list_mysqli.php or blog_list_pdo.php in the admin folder and locate the SQL query. It looks like this:
$sql = 'SELECT * FROM blog ORDER BY created DESC';
2. Change it like this:
$sql = 'SELECT article_id, title,
DATE_FORMAT(created, "%a, %b %D, %Y") AS date_created
FROM blog ORDER BY created DESC';
I used single quotes around the whole SQL query, so the format string inside DATE_FORMAT() needs to be in double quotes.
Make sure there is no gap before the opening parenthesis of DATE_FORMAT().
The format string begins with %a, which displays the first three letters of the weekday name. If you use the original column name as the alias, the ORDER BY clause sorts the dates in reverse alphabetical order: Wed, Thu, Sun, and so on. Using a different alias ensures that the dates are still ordered chronologically.
3. In the first table cell in the body of the page, change $row['created'] to $row['date_created'] to match the alias in the SQL query.
4. Save the page and load it into a browser. The dates should now be formatted as shown in Figure 14-4. Experiment with other specifiers to suit your preferences.
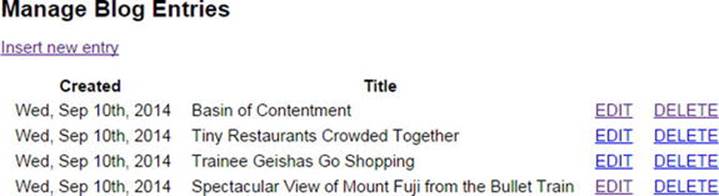
Figure 14-4. The MySQL timestamps are now nicely formatted
Updated versions of blog_list_mysqli.php and blog_list_pdo.php are in the ch14 folder.
Adding to and Subtracting from Dates
When working with dates, it’s often useful to add or subtract a specific time period. For instance, you may want to display items that have been added to the database within the past seven days or stop displaying articles that haven’t been updated for three months. MySQL makes this easy with DATE_ADD() and DATE_SUB(). Both functions have synonyms called ADDDATE() and SUBDATE(), respectively.
The basic syntax is the same for all of them and looks like this:
DATE_ADD(date, INTERVAL value interval_type)
When using these functions, date can be the column containing the date you want to alter, a string containing a particular date (in YYYY-MM-DD format), or a MySQL function, such as NOW(). INTERVAL is a keyword followed by a value and an interval type, the most common of which are listed in Table 14-2.
Table 14-2. Most frequently used interval types with DATE_ADD() and DATE_SUB()
|
Interval type |
Meaning |
Value format |
|
DAY |
Days |
Number |
|
DAY_HOUR |
Days and hours |
String presented as 'DD hh' |
|
WEEK |
Weeks |
Number |
|
MONTH |
Months |
Number |
|
QUARTER |
Quarters |
Number |
|
YEAR |
Years |
Number |
|
YEAR_MONTH |
Years and months |
String presented as 'YY-MM' |
The interval types are constants, so do not add “S” to the end of DAY, WEEK, and so on to make them plural.
One of the most useful applications of these functions is to display only the most recent items in a table.
PHP Solution 14-3: Displaying Items Updated within the Past Week
This PHP solution shows how to limit the display of database results according to a specific time interval. Use blog.php from PHP Solution 14-1.
1. Locate the SQL query in blog.php. It looks like this:
$sql = 'SELECT * FROM blog ORDER BY created DESC';
2. Change it like this:
$sql = 'SELECT * FROM blog
WHERE updated > DATE_SUB(NOW(), INTERVAL 1 WEEK)
ORDER BY created DESC';
This tells MySQL that you want only items that have been updated in the past week.
3. Save and reload the page in your browser. Depending on when you last updated an item in the blog table, you should see either nothing or a limited range of items. If necessary, change the interval type to DAY or HOUR to test that the time limit is working.
4. Open blog_list_mysqli.php or blog_list_pdo.php, select an item that isn’t displayed in blog.php, and edit it. Reload blog.php. The item that you have just updated should now be displayed.
You can compare your code with blog_limit_mysqli.php and blog_limit_pdo.php in the ch14 folder.
Inserting Dates into MySQL
MySQL’s requirement for dates to be formatted as YYYY-MM-DD presents a headache for online forms that allow users to input dates. As you saw in Chapter 13, the current date and time can be inserted automatically by using a TIMESTAMP column. You can also use the MySQL NOW()function to insert the current date in a DATE or DATETIME column. It’s when you need any other date that problems arise.
Using a text input field in a form relies on users being trusted to follow a set pattern for inputting dates, such as MM/DD/YYYY. If everybody complies, you can use the explode() function to rearrange the date parts, like this:
if (isset($_POST['theDate'])) {
$date = explode('/', $_POST['theDate']);
$mysqlFormat = "$date[2]-$date[0]-$date[1]";
}
If someone deviates from the format, you end up with invalid dates in your database.
The situation will eventually be a lot simpler when all browsers support the HTML5 date input field. There’s an example in date_test.php in the ch14 folder. The code in the body of the page looks like this:
<form method="post" action="">
<p>
<label for="date">Date:</label>
<input type="date" name="date" id="date">
</p>
<p>
<input type="submit" name="submit" id="submit" value="Submit">
</p>
</form>
<?php
if (isset($_POST['submit'])) {
echo 'The date you selected is: ' . htmlentities($_POST['date']);
}
?>
The real advantage of using date as the input type is that browsers often display a date picker as soon as the field gains focus, and the selected value is displayed according to the device’s user settings. So, Americans and Europeans see the date displayed in their preferred format. But when the form is submitted, the value is always in the ISO YYYY-MM-DD format. Figure 14-5 shows the output of date_test.php in Safari 7.1 on my iPhone 5. The date picker and date field use the UK date format, but the value submitted through the $_POST array is in the ISO format.
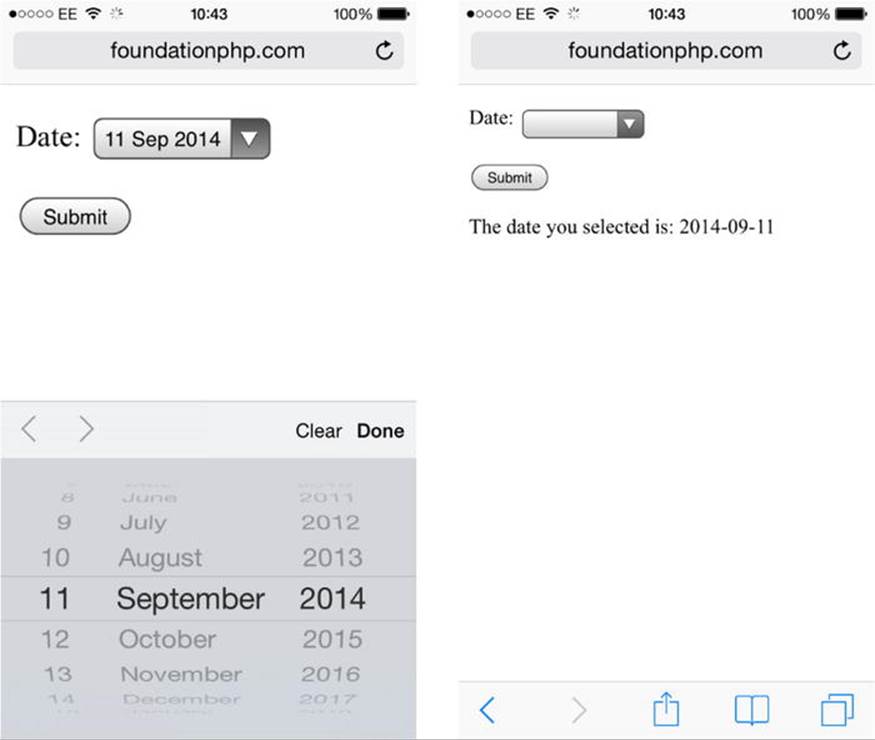
Figure 14-5. HTML5 date input fields display dates in local format, but submit them in the ISO format
Unfortunately, only 50 percent of browsers in use in September 2014 supported the date input type. At the time of this writing, there was no indication of when popular browsers, such as Internet Explorer and Firefox, planned to implement support.
Consequently, the most reliable method of gathering dates from an online form remains the use of separate input fields for month, day, and year.
PHP Solution 14-4: Validating and Formatting Dates for MySQL Input
This PHP solution concentrates on checking the validity of a date and converting it to MySQL format. It’s designed to be incorporated in an insert or update form of your own.
1. Create a page called date_converter.php and insert a form containing the following code (or use date_converter_01.php in the ch14 folder):
<form method="post" action="">
<p>
<label for="month">Month:</label>
<select name="month" id="month">
<option value=""></option>
</select>
<label for="day">Date:</label>
<input name="day" type="number" required id="day" max="31" min="1"
maxlength="2">
<label for="year">Year:</label>
<input name="year" type="number" required id="year" maxlength="4">
</p>
<p>
<input type="submit" name="convert" id="convert" value="Convert">
</p>
</form>
2. This code creates a drop-down menu called month and two input fields called day and year. The drop-down menu doesn’t have any values at the moment, but it will be populated by a PHP loop. The day and year fields use the HTML5 number type andrequired attribute. The day field also has the max and min attributes so as to restrict the range to between 1 and 31. Browsers that support the new HTML5 form elements display number steppers alongside the fields and restrict the type and range of input. Other browsers render them as ordinary text input fields. For the benefit of older browsers, both have maxlength attributes that limit the number of characters accepted.
3. Amend the section that builds the drop-down menu, like this:
<select name="month" id="month">
<?php
$months = ['Jan','Feb','Mar','Apr','May','Jun',
'Jul','Aug', 'Sep', 'Oct', 'Nov','Dec'];
$thisMonth = date('n');
for ($i = 1; $i <= 12; $i++) { ?>
<option value="<?= $i; ?>"
<?php
if ((!$_POST && $i == $thisMonth) ||
(isset($_POST['month']) && $i == $_POST['month'])) {
echo ' selected';
} ?>>
<?= $months[$i - 1]; ?>
</option>
<?php } ?>
</select>
This creates an array of month names and uses the date() function to find the number of the current month (the meaning of the argument passed to date() is explained later in this chapter).
A for loop then populates the menu’s <option> tags. I have set the initial value of $i to 1, because I want to use it for the value of the month. Inside the loop, the conditional statement checks two sets of conditions, both of which are enclosed in parentheses to ensure they’re evaluated in the correct sequence. The first set checks that the $_POST array is empty and the values of $i and $thisMonth are the same. But if the form has been submitted, $_POST['month'] will have been set, so the alternative set of conditions checks whether $i is the same as $_POST['month']. As a result, when the form is first loaded, selected is inserted into the <option> tag for the current month. But if the form has already been submitted, the month selected by the user is displayed again.
The name of the month is displayed between the <option> tags by drawing it from the $months array. Because indexed arrays begin at 0, you need to subtract 1 from the value of $i to get the right month.
4. Also populate the fields for the day and year with the current date or the value selected after the form has been submitted.
<label for="day">Date:</label>
<input name="day" type="number" required id="day" max="31" min="1"
maxlength="2" value="<?php if (!$_POST) {
echo date('j');
} elseif (isset($_POST['day'])) {
echo $_POST['day'];
} ?>">
<label for="year">Year:</label>
<input name="year" type="number" required id="year" maxlength="4"
value="<?php if (!$_POST) {
echo date('Y');
} elseif (isset($_POST['year'])) {
echo $_POST['year'];
} ?>">
5. Save the page and test it in a browser. It should display the current date, and look similar to Figure 14-6.
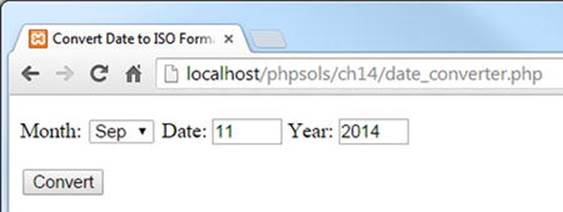
Figure 14-6. Using separate input fields for date parts helps eliminate errors
If you test the input fields, in most browsers the Date field should accept no more than two characters, and the Year field a maximum of four. Even though this reduces the possibility of mistakes, you still need to validate the input and format the date correctly.
6. The code that performs all the checks is a custom function in utility_funcs.php. It looks like this:
function convertDateToISO($month, $day, $year) {
$month = trim($month);
$day = trim($day);
$year = trim($year);
$result[0] = false;
if (empty($month) || empty($day) || empty($year)) {
$result[1] = 'Please fill in all fields';
} elseif (!is_numeric($month) || !is_numeric($day) ||
!is_numeric($year)) {
$result[1] = 'Please use numbers only';
} elseif (($month < 1 || $month > 12) || ($day < 1 || $day > 31) ||
($year < 1000 || $year > 9999)) {
$result[1] = 'Please use numbers within the correct range';
} elseif (!checkdate($month,$day,$year)) {
$result[1] = 'You have used an invalid date';
} else {
$result[0] = true;
$result[1] = sprintf('%d-%02d-%02d', $year, $month, $day);
}
return $result;
}
The function takes three arguments: month, day, and year, all of which should be numbers. The first three lines of code trim any whitespace from either end of the input, and the next line initializes the first element of an array called $result. If the input fails validation, the first element of the array is false, and the second element contains an error message. If it passes validation, the first element of $result is true, and the second element contains the formatted date ready for insertion into MySQL.
The series of conditional statements checks the input values to see if they are empty or not numeric. The third test looks for numbers within acceptable ranges. The range for years is dictated by the legal range for MySQL. In the unlikely event that you need a year out of that range, you must choose a different column type to store the data.
By using a series of elseif clauses, this code stops testing as soon as it meets the first mistake. Even though the form is prepopulated with values, there’s no guarantee that the input will come from your form. It could come from an automated script, which is why these checks are necessary.
If the input has survived the first three tests, it’s then subjected to the PHP function checkdate(), which is smart enough to know when it’s a leap year and prevents mistakes such as September 31.
Finally, if the input has passed all these tests, it’s rebuilt in the correct format for insertion into MySQL using the sprintf() function. This takes as its first argument a formatting string, in which %d represents an integer and %02d represents a two-digit integer padded with a leading zero if necessary. The hyphens are treated literally. The following three arguments are the values to be slotted into the formatting string. This produces the date in ISO format, with leading zeros on the month and day.
![]() Note See http://php.net/manual/en/function.sprintf.php for sprintf() details.
Note See http://php.net/manual/en/function.sprintf.php for sprintf() details.
7. For testing purposes, add this code just below the form in the main body of the page:
if (isset($_POST['convert'])) {
require_once 'utility_funcs.php';
$converted = convertDateToISO($_POST['month'], $_POST['day'],
$_POST['year']);
if ($converted[0]) {
echo 'Valid date: ' . $converted[1];
} else {
echo 'Error: ' . $converted[1] . '<br>';
echo 'Input was: ' . $months[$_POST['month']-1] . ' ' .
$_POST['day'] . ', ' . $_POST['year'];
}
}
This checks whether the form has been submitted. If it has been, it includes utility_funcs.php (there’s a copy in the ch14 folder) and passes the form values to the convertDateToISO() function, saving the result in $converted.
If the date is valid, $converted[0] is true, and the formatted date is found in $converted[1]. If the date cannot be converted to ISO format, the else block displays the error message stored in $converted[1], together with the original input. To display the correct value for the month, 1 is subtracted from the value of $_POST['month'], and the result is used as the key for the $months array.
8. Save the page and test it by entering a date and clicking Convert. If the date is valid, you should see it converted to ISO format, as shown in Figure 14-7.
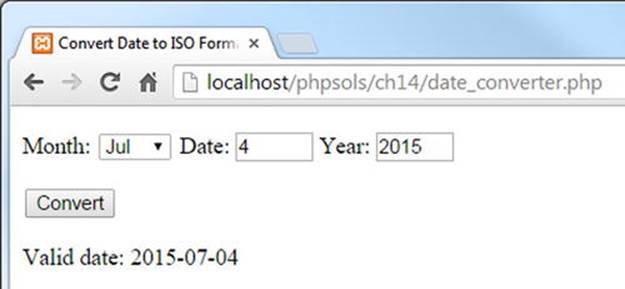
Figure 14-7. The date has been validated and converted to ISO format
If you enter an invalid date, you should see an appropriate message instead (see Figure 14-8).
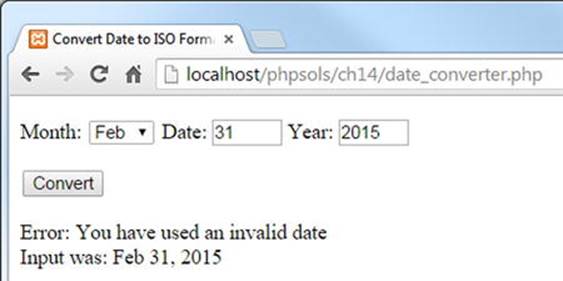
Figure 14-8. The convertDateToISO() function rejects invalid dates
You can compare your code with date_converter_02.php in the ch14 folder.
When creating a form for a table that requires a date from user input, add three fields for month, day, and year in the same way as in date_converter.php. Before inserting the form input into the database, include utility_funcs.php (or wherever you decide to store the function), and use the convertDateToISO() function to validate the date and format it for insertion into the database.
require_once 'utility_funcs.php';
$converted = convertDateToMySQL($_POST['month'], $_POST['day'], $_POST['year']);
if ($converted[0]) {
$date = $converted[1];
} else {
$errors[] = $converted[1];
}
If your $errors array has any elements, abandon the insert or update process and display the errors. Otherwise, $date is safe to insert in the SQL query.
![]() Note The rest of this chapter is devoted to handling dates in PHP. It’s an important but complex subject. I suggest that you skim through each section to familiarize yourself with PHP’s date-handling functionality and return to this section when you need to implement a particular feature.
Note The rest of this chapter is devoted to handling dates in PHP. It’s an important but complex subject. I suggest that you skim through each section to familiarize yourself with PHP’s date-handling functionality and return to this section when you need to implement a particular feature.
Working with Dates in PHP
The way PHP handles dates and time underwent major changes in PHP 5.2 with the introduction of the DateTime and DateTimeZone classes. Further changes were introduced in PHP 5.3 through the addition of new DateTime methods and the DateInterval and DatePeriodclasses. Yet another enhancement came in PHP 5.5 with the addition of the DateTimeImmutable class. Prior to these changes, dates and time were handled exclusively as Unix timestamps—the number of seconds since midnight UTC (Coordinated Universal Time) on January 1, 1970.
The new classes don’t entirely replace the original ways of handling date and time information, but they are more flexible. If PHP is compiled on a 32-bit processor, timestamps are stored as 32-bit integers, restricting the upper range limit of dates to January 2038. The new classes store date and time information internally as a 64-bit number, increasing the range from about 292 billion years in the past to the same number of years in the future.
![]() Note If PHP is compiled on a 64-bit processor, all dates and times are stored as 64-bit numbers, removing the January 2038 limit on timestamps and the date- and time-related functions inherited from PHP 4.
Note If PHP is compiled on a 64-bit processor, all dates and times are stored as 64-bit numbers, removing the January 2038 limit on timestamps and the date- and time-related functions inherited from PHP 4.
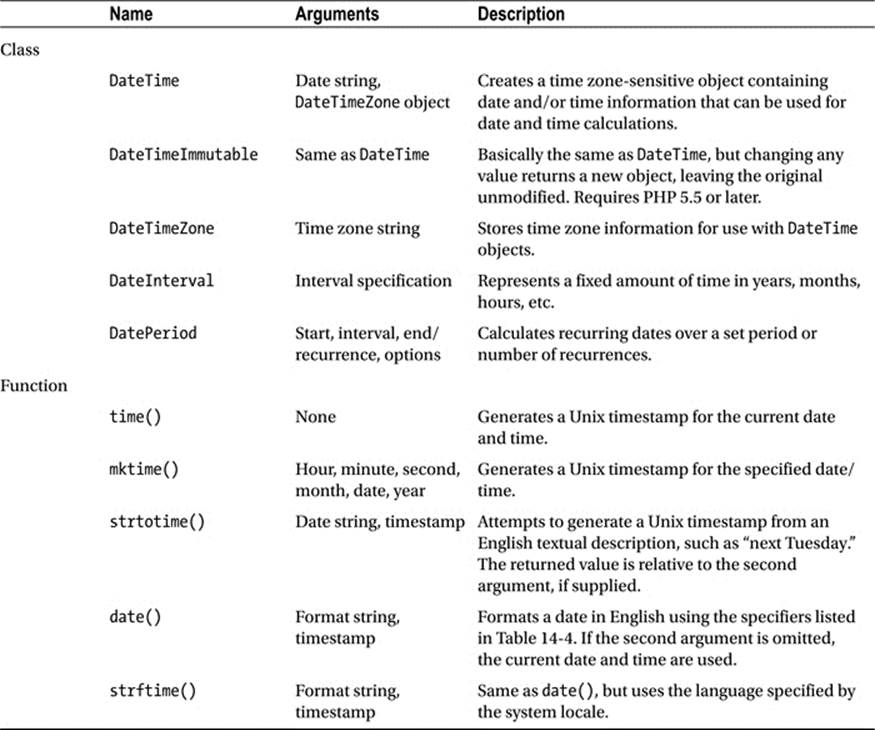
Table 14-3 summarizes the main date- and time-related classes and functions in PHP.
Table 14-3. PHP date- and time-related classes and functions
Setting the Default Time Zone
All date and time information in PHP is stored according to the server’s default time zone setting. It’s common for web servers to be located in a different time zone from your target audience, so it’s useful to know how to change the default.
The server’s default time zone should normally be set in the date.timezone directive in php.ini, but if your hosting company forgets to do so, or you want to use a different time zone, you need to set it yourself.
If your hosting company gives you control over your own version of php.ini, change the value of date.timezone there. That way, it’s automatically set for all your scripts.
If your server supports .htaccess or .user.ini files, you can change the time zone by adding the appropriate command in the site root. For .htaccess, use this:
php_value date.timezone 'timezone'
For .user.ini, the command looks like this:
date.timezone=timezone
Replace timezone with the correct setting for your location. You can find a full list of valid time zones at http://docs.php.net/manual/en/timezones.php.
If none of those options is available to you, add the following at the beginning of any script that uses date or time functions (replacing timezone with the appropriate value):
ini_set('date.timezone', 'timezone');
Creating a DateTime Object
To create a DateTime object, just use the new keyword followed by DateTime(), like this:
$now = new DateTime();
This creates an object that represents the current date and time according to the web server’s clock and default time zone setting.
The DateTime() constructor also takes two optional arguments: a string containing a date and/or time, and a DateTimeZone object. The date/time string for the first argument can be in any of the formats listed at http://php.net/manual/en/datetime.formats.php. Unlike MySQL, which accepts only one format, PHP goes to the opposite extreme. For example, to create a DateTime object for Christmas Day 2014, all the following formats are valid:
'12/25/2014'
'25-12-2014'
'25 Dec 2014'
'Dec 25 2014'
'25-XII-2014'
'25.12.2014'
'2014/12/25'
'2014-12-25'
'December 25th, 2014'
This is not an exhaustive list. It’s just a selection of valid formats. Where the potential confusion arises is in the use of separators. For example, the forward slash is permitted in American-style (12/25/2010) and ISO (2010/12/25) dates, but not when the date is presented in European order or when the month is represented by Roman numerals. To present the date in European order, the separator must be a dot, tab, or dash.
Dates can also be specified using relative expressions, such as “next Wednesday,” “tomorrow,” or “last Monday.” However, there’s potential for confusion here, too. Some people use “next Wednesday” to mean “Wednesday next week.” PHP interprets the expression literally. If today is Tuesday, “next Wednesday” means the following day.
![]() Note PHP 5.3 expanded this flexibility even further by introducing a method to create a DateTime object from a custom format. It’s described after the next section because the same technique is used for specifying both output and input formats.
Note PHP 5.3 expanded this flexibility even further by introducing a method to create a DateTime object from a custom format. It’s described after the next section because the same technique is used for specifying both output and input formats.
You can’t use echo on its own to display the value stored in a DateTime object. In addition to echo, you need to tell PHP how to format the output using the format() method.
Formatting Dates in PHP
The DateTime class’s format() method uses the same format characters as the original date() function. Although this makes for continuity, the format characters are often difficult to remember and seem to have no obvious reasoning behind them. Table 14-4 lists the most useful date and time format characters.
Table 14-4. The main date and time format characters
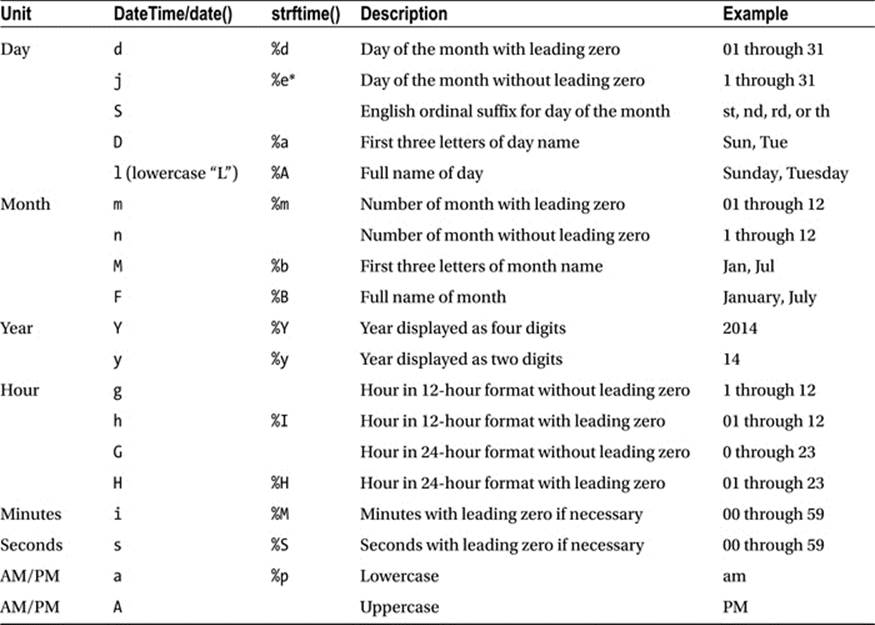
* Note: %e is not supported on Windows.
The DateTime class and date() function display the names of weekdays and months in English only, but the strftime() function uses the language specified by the server’s locale. So, if the server’s locale is set to Spanish, a DateTime object and date() display Saturday, butstrftime() displays sábado. In addition to the format characters used by both the DateTime class and the date() function, Table 14-4 lists the equivalent characters used by strftime(). Not all formats have an equivalent in strftime().
You can combine these format characters with punctuation to display the current date in your webpages according to your own preferences.
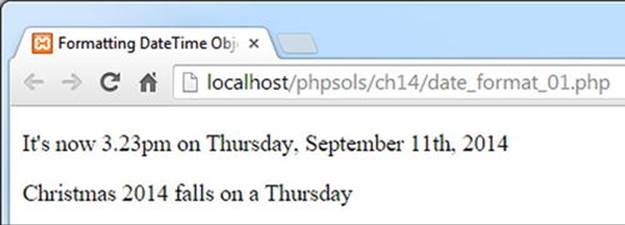
To format a DateTime object, pass the format string as an argument to the format() method like this (the code is in date_format_01.php in the ch14 folder):
<?php
$now = new DateTime();
$xmas2014 = new DateTime('12/25/2014');
?>
<p>It's now <?= $now->format('g.ia'); ?> on <?= $now->format('l, F jS, Y'); ?></p>
<p>Christmas 2014 falls on a <?= $xmas2014->format('l'); ?></p>
In this example, two DateTime objects are created: one for the current date and time, and the other for December 25, 2014. Using the format characters from Table 14-4, various date parts are extracted from the two objects, producing the output shown in the following screenshot:
The code in date_format_02.php produces the same output by using the date() and strtotime() functions, like this:
<?php $xmas2014 = strtotime('12/25/2014'); ?>
<p>It's now <?= date('g.ia'); ?> on <?= date('l, F jS, Y'); ?></p>
<p>Christmas 2014 falls on a <?= date('l', $xmas2014); ?></p>
The first line uses strtotime() to create a timestamp for December 25, 2014. There’s no need to create a timestamp for the current date and time, because date() defaults to them when used without a second argument.
If the timestamp for Christmas Day isn’t used elsewhere in the script, the first line can be omitted, and the last call to date() can be rewritten like this (see date_format_03.php):
date('l', strtotime('12/25/2014'));
Creating a DateTime Object From a Custom Format
You can specify a custom input format for a DateTime object using the format characters in Table 14-4. Instead of creating the object with the new keyword, you use the createFromFormat() static method, like this:
$date = DateTime::createFromFormat(format_string, input_date, timezone);
The third argument, timezone, is optional. If included, it should be a DateTimeZone object.
A static method belongs to the whole class, rather than to a particular object. You call a static method using the class name followed by the scope resolution operator (a double colon) and the method name.
![]() Tip Internally, the scope resolution operator is called PAAMAYIM_NEKUDOTAYIM, which is Hebrew for “double colon.” Why Hebrew? The Zend Engine that powers PHP was originally developed by Zeev Suraski and Andi Gutmans when they were students at the Technion–Israel Institute of Technology. Apart from earning points in a geek trivia quiz, knowing the meaning of PAAMAYIM_NEKUDOTAYIM could save you a lot of head scratching when you see it in a PHP error message.
Tip Internally, the scope resolution operator is called PAAMAYIM_NEKUDOTAYIM, which is Hebrew for “double colon.” Why Hebrew? The Zend Engine that powers PHP was originally developed by Zeev Suraski and Andi Gutmans when they were students at the Technion–Israel Institute of Technology. Apart from earning points in a geek trivia quiz, knowing the meaning of PAAMAYIM_NEKUDOTAYIM could save you a lot of head scratching when you see it in a PHP error message.
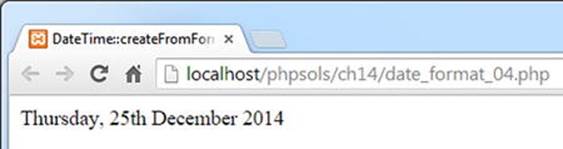
For example, you can use the createFromFormat() method to accept a date in the European format of day, month, year, separated by slashes, like this (the code is in date_format_04.php):
$xmas2014 = DateTime::createFromFormat('d/m/Y', '25/12/2014');
echo $xmas2014->format('l, jS F Y');
This produces the following output:
![]() Caution Attempting to use 25/12/2014 as the input to the DateTime constructor triggers a fatal error because the DD/MM/YYYY is not supported. If you want to use a format not supported by the DateTime constructor, you must use the createFromFormat() static method.
Caution Attempting to use 25/12/2014 as the input to the DateTime constructor triggers a fatal error because the DD/MM/YYYY is not supported. If you want to use a format not supported by the DateTime constructor, you must use the createFromFormat() static method.
Although the createFromFormat() method is useful, it can be used only in circumstances where you know the date will always be in a specific format.
Choosing Between Date( ) and the DateTime Class
When it comes to displaying a date, it’s always a two-step process with the DateTime class. You need to instantiate the object before you can call the format() method. With the date() function, you can do it in a single pass. Since they both use the same format characters, date()wins hands down when dealing with the current date and/or time.
For simple tasks like displaying the current date, time, or year, use date(). Where the DateTime class comes into its own is when working with date-related calculations and time zones using the methods listed in Table 14-5.
Table 14-5. The main DateTime methods
|
Method |
Arguments |
Description |
|
format() |
Format string |
Formats the date/time using the format characters in Table 14-4. |
|
setDate() |
Year, month, day |
Changes the date. The arguments should be separated by commas. Months or days in excess of the permitted range are added to the resulting date, as described in the main text. |
|
setTime() |
Hours, minutes, seconds |
Resets the time. Arguments are comma-separated values. Seconds are optional. Values in excess of the permitted range are added to the resulting date/time. |
|
modify() |
Relative date string |
Changes the date/time using a relative expression, such as ‘+2 weeks’. |
|
getTimestamp() |
None |
Returns the Unix timestamp for the date/time. |
|
setTimestamp() |
Unix timestamp |
Sets the date/time according to the Unix timestamp. |
|
setTimezone() |
DateTimeZone object |
Changes the time zone. |
|
getTimezone() |
None |
Returns a DateTimeZone object representing the DateTime object’s time zone. |
|
getOffset() |
None |
Returns the time zone offset from UTC, expressed in seconds. |
|
add() |
DateInterval object |
Increments the date/time by the set period. |
|
sub() |
DateInterval object |
Deducts the set period from the date/time. |
|
diff() |
DateTime object, Boolean |
Returns a DateInterval object representing the difference between the current DateTime object and the one passed as an argument. Using true as the optional second argument converts negative values to their positive equivalent. |
Adding out-of-range values with setDate() and setTime() results in the excess being added to the resulting date or time. For example, using 14 as the month sets the date to February of the following year. Setting the hour to 26 results in 2am on the following day.
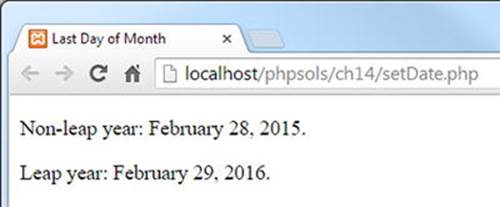
A useful trick with setDate() allows you to set the date to the last day of any month by setting the month value to the following month, and the day to 0. The code in setDate.php demonstrates this with the last day of February 2015 and 2016 (a leap year).
<?php
$format = 'F j, Y';
$date = new DateTime();
$date->setDate(2015, 3, 0);
?>
<p>Non-leap year: <?= $date->format($format); ?>.</p>
<p>Leap year: <?php $date->setDate(2016, 3, 0);
echo $date->format($format); ?>.</p>
The preceding example produces the following output:
Handling Overflows with Relative Dates
The modify() method accepts a relative date string, which can produce unexpected results. For example, if you add one month to a DateTime object that represents January 31, 2011, the resulting value is not the last day of February, but March 3.
This happens because adding one month to the original date results in February 31, but February has only 28 days in a non-leap year. So, the out-of-range value is added to the month, resulting in March 3. If you subsequently subtract one month from the same DateTime object, it brings you back to February 3, not to the original starting date. The code in date_modify_01.php illustrates this point, as Figure 14-9 shows.
<?php
$format = 'F j, Y';
$date = new DateTime('January 31, 2015');
?>
<p>Original date: <?= $date->format($format); ?>.</p>
<p>Add one month: <?php
$date->modify('+1 month');
echo $date->format($format);
$date->modify('-1 month');
?>
<p>Subtract one month: <?= $date->format($format); ?>
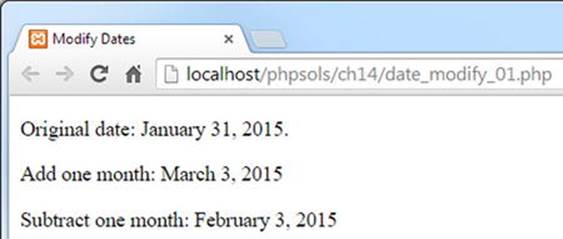
Figure 14-9. Adding and subtracting months can lead to unexpected results
The way to avoid this problem is to use 'last day of' in the relative expression, like this (the code is in date_modify_02.php):
<?php
$format = 'F j, Y';
$date = new DateTime('January 31, 2015');
?>
<p>Original date: <?= $date->format($format); ?>.</p>
<p>Add one month: <?php
$date->modify('last day of +1 month');
echo $date->format($format);
$date->modify('last day of -1 month');
?>
<p>Subtract one month: <?= $date->format($format); ?>
As Figure 14-10 shows, this now produces the desired result.
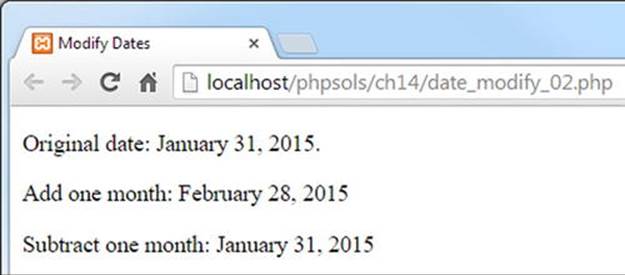
Figure 14-10. Using ‘last day of’ in the relative expression eliminates the problem
Using the DateTimeZone Class
A DateTime object automatically uses the web server’s default time zone unless you have reset the time zone using one of the methods described earlier. However, you can set the time zone of individual DateTime objects either through the optional second argument of the constructor or by using the setTimezone() method. In both cases, the argument must be a DateTimeZone object.
To create a DateTimeZone object, pass one of the supported time zones listed at http://php.net/manual/en/timezones.php as an argument to the constructor like this:
$UK = new DateTimeZone('Europe/London');
$USeast = new DateTimeZone('America/New_York');
$Hawaii = new DateTimeZone('Pacific/Honolulu');
When checking the list of supported time zones, it’s important to realize that they’re based on geographic regions and cities rather than on official time zones. This is because PHP automatically takes daylight saving time into account. Arizona, which doesn’t use daylight saving time, is covered by America/Phoenix.
The organization of time zones into geographic regions produces some surprises. America doesn’t mean the United States of America, but the continents of North and South America and the Caribbean. As a result, Honolulu is not listed in America, but as a Pacific time zone. Europe also means the European continent, including the British Isles but excluding other islands. So, Reykjavik and Madeira are listed as Atlantic time zones, and the Norwegian island of Longyearbyen has the exclusive privilege of being the only Arctic time zone.
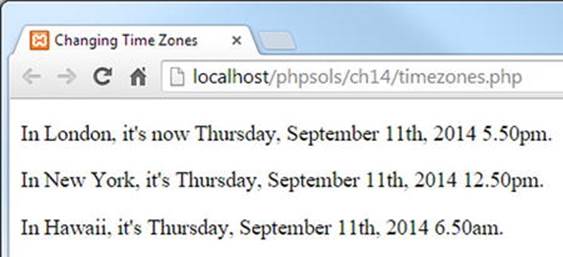
The code in timezones.php creates DateTimeZone objects for London, New York, and Honolulu, and then initializes a DateTime object using the first one, like this:
$now = new DateTime('now', $UK);
After displaying the date and time using echo and the format() method, the time zone is changed using the setTimezone() method, like this:
$now->setTimezone($USeast);
The next time $now is displayed, it shows the date and time in New York. Finally, setTimezone() is used again to change the time zone to Honolulu, producing the following output:
To find the time zone of your server, you can either check php.ini or use the getTimezone() method with a DateTime object. The getTimezone() method returns a DateTimeZone object, not a string containing the time zone. To get the value of the time zone, you need to use the DateTimeZone object’s getName() method, like this (the code is in timezone_display.php):
$now = new DateTime();
$timezone = $now->getTimezone();
echo $timezone->getName();
The DateTimeZone class has several other methods that expose information about a time zone. For the sake of completeness, they’re listed in Table 14-6, but the main use of the DateTimeZone class is to set the time zone for DateTime objects.
Table 14-6. DateTimeZone methods
|
Method |
Arguments |
Description |
|
getLocation() |
None |
Returns an associative array containing the country code, latitude, longitude, and comments about the time zone. |
|
getName() |
None |
Returns a string containing the geographic area and city of the time zone. |
|
getOffset() |
DateTime object |
Calculates the offset from UTC (in seconds) of the DateTime object passed as an argument. |
|
getTransitions() |
Start, end |
Returns a multidimensional array containing historical and future dates and times of switching to and from daylight saving time. Accepts two timestamps as optional arguments to limit the range of results. |
|
listAbbreviations() |
None |
Generates a large multidimensional array containing the UTC offsets and names of time zones supported by PHP. |
|
listIdentifiers() |
DateTimeZone constant, country code |
Returns an array of all PHP time zone identifiers, such as Europe/London, America/New_York, and so on. Accepts two optional arguments to limit the range of results. Use as the first argument one of the DateTimeZone constants listed athttp://php.net/manual/en/class.datetimezone.php. If the first argument is DateTimeZone::PER_COUNTRY, a two-letter country code can be used as the second argument. |
The last two methods in Table 14-6 are static methods. Call them directly on the class by using the scope resolution operator, like this:
$abbreviations = DateTimeZone::listAbbreviations();
Adding and Subtracting Set Periods with the DateInterval Class
The DateInterval class is used to specify the period to be added or subtracted from a DateTime object using the add() and sub() methods. It’s also used by the diff() method, which returns a DateInterval object. Using the DateInterval class feels rather odd to begin with, but it’s relatively simple to understand.
To create a DateInterval object, you need to pass to the constructor a string that specifies the length of the interval; this string must be formatted according to the ISO 8601 standard. The string always begins with the letter P (for period), followed by one or more pairs of integers and letters known as period designators. If the interval includes hours, minutes, or seconds, the time element is preceded by the letter T. Table 14-7 lists the valid period designators.
Table 14-7. ISO 8601 period designators used by the DateInterval class
|
Period designator |
Meaning |
|
Y |
Years |
|
M |
Months |
|
W |
Weeks—cannot be combined with days |
|
D |
Days—cannot be combined with weeks |
|
H |
Hours |
|
M |
Minutes |
|
S |
Seconds |
The following examples should clarify how to specify an interval:
$interval1 = new DateInterval('P2Y'); // 2 years
$interval2 = new DateInterval('P5W'); // 5 weeks
$interval3 = new DateInterval('P37D'); // 5 weeks 2 days
$interval4 = new DateInterval('PT6H20M'); // 6 hours 20 minutes
$interval5 = new DateInterval('P1Y2DT3H5M50S'); // 1 year 2 days 3 hours 5 min 50 sec
Note that $interval3 needs to specify the total number of days because weeks are automatically converted to days, so W and D cannot be combined in the same interval definition.
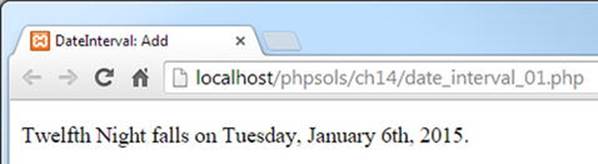
To use a DateInterval object with the add() or sub() method of the DateTime class, pass the object as an argument. For example, this adds 12 days to the date for Christmas Day 2014:
$xmas2014 = new DateTime('12/25/2014');
$interval = new DateInterval('P12D');
$xmas2014->add($interval);
If you don’t need to reuse the interval, you can pass the DateInterval constructor directly as the argument to add() like this:
$xmas2014 = new DateTime('12/25/2014');
$xmas2014->add(new DateInterval('P12D'));
The result of this calculation is demonstrated in date_interval_01.php, which produces the following output:
An alternative to using the period designators listed in Table 14-7 is to use the static createFromDateString() method, which takes as an argument an English relative date string in the same way as strtotime() does. Using createFromDateString(), the preceding example can be rewritten like this (the code is in date_interval_02.php):
$xmas2014 = new DateTime('12/25/2014');
$xmas2014->add(DateInterval::createFromDateString('+12 days'));
This produces exactly the same result.
![]() Caution Adding and subtracting months with DateInterval has the same effect as described earlier. If the resulting date is out of range, the extra days are added. For example, adding one month to January 31 results in March 3 or 2, depending on whether it’s a leap year. To get the last day of the month, use the technique described earlier in “Handling overflows with relative dates.”
Caution Adding and subtracting months with DateInterval has the same effect as described earlier. If the resulting date is out of range, the extra days are added. For example, adding one month to January 31 results in March 3 or 2, depending on whether it’s a leap year. To get the last day of the month, use the technique described earlier in “Handling overflows with relative dates.”
Finding the Difference Between Two Dates with the diff( ) Method
To find the difference between two dates, create a DateTime object for both dates, and pass the second object as the argument to the first object’s diff() method. The result is returned as a DateInterval object. To extract the result from the DateInterval object, you need to use the object’s format() method, which uses the format characters listed in Table 14-8. These are different from the format characters used by the DateTime class. Fortunately, most of them are easy to remember.
Table 14-8. Format characters used by the DateInterval format() method
|
Format character |
Description |
Examples |
|
%Y |
Years. At least two digits, with leading zero if necessary |
12, 01 |
|
%y |
Years, no leading zero |
12, 1 |
|
%M |
Months with leading zero |
02, 11 |
|
%m |
Months, no leading zero |
2, 11 |
|
%D |
Days with leading zero |
03, 24 |
|
%d |
Days, no leading zero |
3, 24 |
|
%a * |
Total number of days |
15, 231 |
|
%H |
Hours with leading zero |
03, 23 |
|
%h |
Hours, no leading zero |
3, 23 |
|
%I |
Minutes with leading zero |
05, 59 |
|
%i |
Minutes, no leading zero |
5, 59 |
|
%S |
Seconds with leading zero |
05, 59 |
|
%s |
Seconds, no leading zero |
5, 59 |
|
%R |
Display minus when negative, plus when positive |
-, + |
|
%r |
Display minus when negative, no sign when positive |
- |
|
%% |
Percentage sign |
% |
* A bug in PHP 5.3 on some Windows builds always returned 6015 as the total number of days.
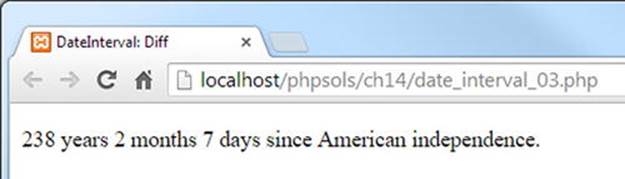
The following example in date_interval_03.php shows how to get the difference between the current date and the American Declaration of Independence using diff() and displaying the result with the format() method:
<p><?php
$independence = new DateTime('7/4/1776');
$now = new DateTime();
$interval = $now->diff($independence);
echo $interval->format('%Y years %m months %d days'); ?>
since American independence.</p>
If you load date_interval_03.php into a browser, you should see something similar to the following screenshot (of course, the actual period will be different).
The format characters follow a logical pattern. Uppercase characters always produce at least two digits with a leading zero if necessary. Lowercase characters have no leading zero.
![]() Caution With the exception of %a, which represents the total number of days, the format characters represent only specific parts of the overall interval. For example, if you change the format string to $interval->format('%m months'), it shows only the number of whole months that have elapsed since last July 4. It does not show the total number of months since July 4, 1776.
Caution With the exception of %a, which represents the total number of days, the format characters represent only specific parts of the overall interval. For example, if you change the format string to $interval->format('%m months'), it shows only the number of whole months that have elapsed since last July 4. It does not show the total number of months since July 4, 1776.
Calculating Recurring Dates with the DatePeriod Class
Working out recurring dates, such as the second Tuesday of each month, is now remarkably easy thanks to the DatePeriod class. It works in conjunction with a DateInterval.
The DatePeriod constructor is unusual in that it accepts arguments in three different ways. The first way of creating a DatePeriod object is to supply the following arguments:
· A DateTime object representing the start date
· A DateInterval object representing the recurring interval
· An integer representing the number of recurrences
· The DatePeriod::EXCLUDE_START_DATE constant (optional)
Once you have created a DatePeriod object, you can display the recurring dates in a foreach loop using the DateTime format() method.
The code in date_interval_04.php displays the second Tuesday of each month in 2015:
$start = new DateTime('12/31/2014');
$interval = DateInterval::createFromDateString('second Tuesday of next month');
$period = new DatePeriod($start, $interval, 12, DatePeriod::EXCLUDE_START_DATE);
foreach ($period as $date) {
echo $date->format('l, F jS, Y') . '<br>';
}
It produces the output shown in Figure 14-11.
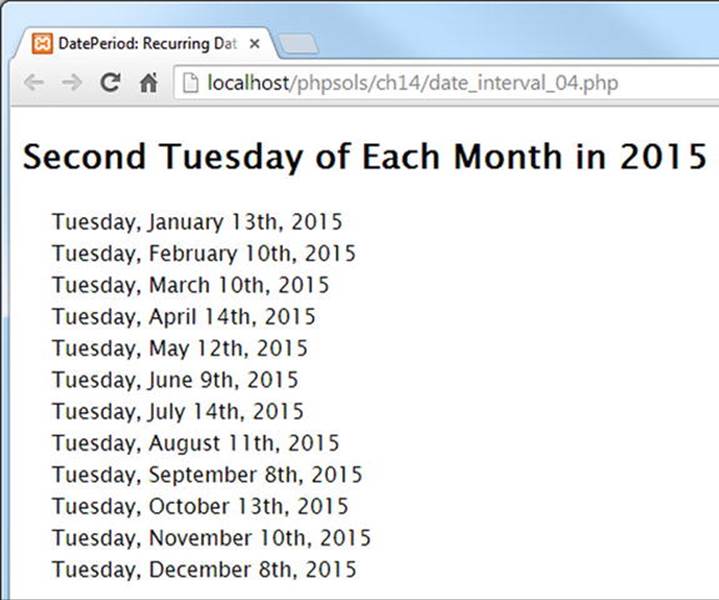
Figure 14-11. Calculating a recurring date is remarkably easy with the DatePeriod class
The first line of PHP code sets the start date as December 31, 2014. The next line uses the DateInterval static method createFromDateString() to set the interval at the second Tuesday of next month. Both values are passed to the DatePeriod constructor, together with 12 as the number of recurrences and the DatePeriod::EXCLUDE_START_DATE constant. The constant’s name is self-explanatory. Finally, a foreach loop displays the resulting dates using the DateTime format() method.
The second way of creating a DatePeriod object is to replace the number of recurrences in the third argument with a DateTime object representing the end date. The code in date_interval_05.php has been amended like this:
$start = new DateTime('12/31/2014');
$interval = DateInterval::createFromDateString('second Tuesday of next month');
$end = new DateTime('12/31/2015');
$period = new DatePeriod($start, $interval, $end, DatePeriod::EXCLUDE_START_DATE);
foreach ($period as $date) {
echo $date->format('l, F jS, Y') . '<br>';
}
This produces exactly the same output as shown in Figure 14-11.
You can also create a DatePeriod object using the ISO 8601 recurring time-interval standard (http://en.wikipedia.org/wiki/ISO_8601#Repeating_intervals). This is not as user-friendly, mainly because of the need to construct a string in the correct format, which looks like this:
Rn/YYYY-MM-DDTHH:MM:SStz/Pinterval
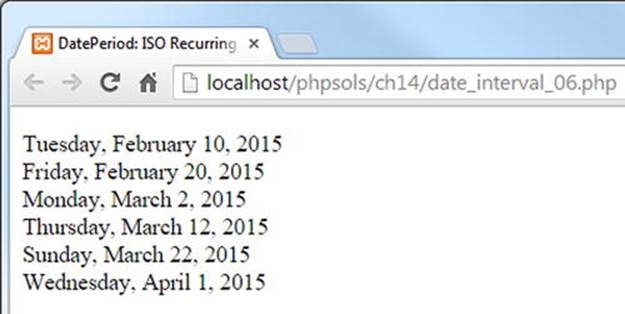
Rn is the letter R followed by the number of recurrences; tz is the time zone offset from UTC (or Z for UTC, as shown in the following example); and Pinterval uses the same format as the DateInterval class. The code in date_interval_06.php shows an example of how to useDatePeriod with an ISO 8601 recurring interval. It looks like this:
$period = new DatePeriod('R5/2015-02-10T00:00:00Z/P10D');
foreach ($period as $date) {
echo $date->format('l, F j, Y') . '<br>';
}
The ISO recurring interval sets five recurrences from midnight UTC on February 10, 2015 at an interval of 10 days. The recurrences are subsequent to the original date, so the preceding example produces six dates, as shown in the following output.
Chapter Review
A large part of this chapter has been devoted to the powerful date and time features introduced in PHP 5.2 and 5.3. I haven’t covered the DateTimeImmutable class that was introduced in PHP 5.5 because it’s identical to DateTime in every respect except one. ADateTimeImmutable object never modifies itself. Instead, it always returns a new object with the modified values. This can be useful if you have a date, such as a person’s date of birth, which never changes. Using the setDate() or add() methods with this type of object returns a new object, preserving the original details and providing a new object for the updated ones, such as start of employment, marriage, pensionable age, and so on.
You probably don’t need the date- and time-related classes every day, but they’re extremely useful and are a major improvement on the original PHP date and time functions. MySQL’s date and time functions also make it easy to format dates and execute queries based on temporal criteria.
Perhaps the biggest problem with dates is deciding whether to use SQL or PHP to handle the formatting and/or calculations. A useful feature of the PHP DateTime class is that the constructor accepts a date stored in the ISO format, so you can use an unformatted date or timestamp from your database to create DateTime objects. However, unless you need to perform further calculations, it’s more efficient to use the DATE_FORMAT() function as part of a SELECT query.
This chapter has also provided you with three functions for formatting text and dates. In the next chapter, you’ll learn how to store and retrieve related information in multiple database tables.
All materials on the site are licensed Creative Commons Attribution-Sharealike 3.0 Unported CC BY-SA 3.0 & GNU Free Documentation License (GFDL)
If you are the copyright holder of any material contained on our site and intend to remove it, please contact our site administrator for approval.
© 2016-2026 All site design rights belong to S.Y.A.