Building Web Apps with WordPress (2014)
Chapter 11. Mobile Apps with WordPress
Native mobile applications with WordPress like iOS and Android applications? Well, sure, why not? We are going to explore building a very simple mobile application for both iOS and Android devices. We will leverage what we are already doing in WordPress to offer the most functionality in the least amount of time. How is this possible? With a native app wrapper.
App Wrapper
An app wrapper is basically a native mobile application with a webview. This means that the native app is really just a web browser embedded within the app itself. The URL of this embedded browser points to your WordPress application, hopefully using a responsive mobile design so it looks like it belongs on the device. You can always extend your hybrid app with more native functionality like accessing the camera, GPS device, contacts, and more. If you want a downloadable app in various mobile app marketplaces and don’t have the time, money, or resources to build full-blown native apps, building a hybrid app may be the way to go. You will only have to build your web app once, and you can offer that same functionality in each mobile app. A hybrid mobile application like this is probably the fastest and most cost-effective way to get your app out there in the marketplace.
iOS Applications
To build a very basic iOS application and to deploy it in iTunes, you will need the following:
1. An Apple Computer running OS X 10.8.4 or later.
2. Xcode, Apple’s development environment for creating apps for Mac, iPhone, and iPad. Xcode is packed with an analysis tool, an iOS Simulator, and the latest SDKs for iOS.
3. Enrollment in the Apple Developer Program. You will need to do this if you want to distribute your apps in the App Store. It costs $99 per year for an active account, and once your account is activated, you can put as many apps in the App Store as you want.
Enrolling as an Apple Developer
You will want to start this process as soon as possible because it can take a while to get approved.
You will need to decide if you are going to enroll as an individual or a company/organization. If you register your company, the process will take a little bit longer because you will need to supply your company’s D-U-N-S number. A D-U-N-S number is a unique identifying number for a company provided by Dun & Bradstreet.
Enrolling is a six-step process:
1. Enter account info—After choosing to enroll as an individual or a company, you will need to log in with your Apple ID. If you don’t have an Apple ID, you will need to create one. Once logged in, you will need to read the Review Agreement and check off that you have read it and agree to its terms. You will then need to fill out a form with some basic information like what you will be developing and what other platforms you develop on. If you are enrolling your company or on behalf of a company, you will need to agree that you legally authorized to bind your company to Apple Developer Program legal agreements. Next you will need to submit basic information about you or about your company. When enrolling your company, you will need to enter your company’s D-U-N-S number. If you don’t have one, you will need to apply for one on the provided form. Getting a new D-U-N-S number is a separate process and can take several days.
2. Select program—You can also enroll in the Mac Developer Program, but make sure you enroll in the iOS Developer Program.
3. Review and submit—Once you have provided the required information, you can review and submit your enrollment application. Now the waiting begins, especially if you have to wait to get your D-U-N-S number from D&B. Apple will review your enrollment application and try to contact you to verify you are who you say you are.
4. Agree to license—Once Apple is able to verify your account, you will then have access to read and agree to its Licence Agreement. Make sure you read the entire thing because it is important to understand the Licence.
5. Purchase program—Get out your credit card. The time has come (finally) to where you can actually pay Apple for your iOS Developer Program Enrollment. Go ahead and do that. Once you pay, you will get an email receipt.
6. Activate program—In about a day after you make the program purchase, you will receive another email with an activation email in it. You are almost done; just click on the link to activate the program, and you are in. Welcome to the club!
Building Your App with Xcode
Go ahead and fire up Xcode and click on “Create a new Xcode project.” You should be taken to a screen where you can choose a template to use. There are many templates you can start a native iOS app with; but in the basic example, we are going to choose the Single View Application. This template provides a starting point for an application that uses a single view. It provides a view controller to manage the view and a storyboard or nib file that contains the view.
Next you will see a screen where you can enter in basic project information. Fill out the fields and click next. You will then be prompted to save your new project to a location on your hard drive. Once your new project is created, Xcode will open it for you, and you can begin poking around.
Storyboard
By default, all the way on the left of Xcode are the files that make up your new project. You should notice two files called Main_iPhone.storyboard and Main_iPad.storyboard. Storyboards allow an iOS developer to visually create an application. If you click on Main_iPhone.storyboard, you should see a blank outline of an iPhone popup. This is basically an empty canvas that you can drag any objects onto. Notice the Object Library on the bottom right. Scroll through all of the objects to get an idea of what is available. When you see the Web View object, drag and drop it onto the iPhone outline. The UIWebview class displays embedded web content. You can set it to the URL of your responsive WordPress web application by adding Objective-C code to the ViewController.h and ViewController.m files, aka the UIViewController class.
View controller
The UIWebView Class is made up of two files, ViewController.h and ViewController.m. The ViewController.h file is the view controller’s header file. Your ViewController.h file should look something like the following code example:
//
// XYZViewController.h
// SchoolPress
//
// Created by Brian Messenlehner on 6/16/13.
// Copyright (c) 2013 Building Web Apps with WordPress. All rights reserved.
//
#import <UIKit/UIKit.h>
@interface XYZViewController : UIViewController
@property (weak, nonatomic) IBOutlet UIWebView *webView;
@end
Notice that the only real difference in the code you started with and the preceding code is that we added the line:
@property (weak, nonatomic) IBOutlet UIWebView *webView;
which is basically defining the webView variable.
Now open up the ViewController.m file, and add these lines of code:
NSString *fullURL = @"http://bwawwp.com";
NSURL *url = [NSURL URLWithString:fullURL];
NSURLRequest *requestObj = [NSURLRequest requestWithURL:url];
[_webView loadRequest:requestObj];
under the line of code:
[super viewDidLoad];
Your ViewController.m file should end up looking similar to the following code:
//
// XYZViewController.m
// SchoolPress
//
// Created by Brian Messenlehner on 6/16/13.
// Copyright (c) 2013 Building Web Apps with WordPress. All rights reserved.
//
#import "XYZViewController.h"
@interface XYZViewController ()
@end
@implementation XYZViewController
- (void)viewDidLoad
{
[super viewDidLoad];
// the following URL can be any URL you would like to point your webview to.
NSString *fullURL = @"http://webdevstudios.com";
NSURL *url = [NSURL URLWithString:fullURL];
NSURLRequest *requestObj = [NSURLRequest requestWithURL:url];
[_webView loadRequest:requestObj];
}
- (void)didReceiveMemoryWarning
{
[super didReceiveMemoryWarning];
// Dispose of any resources that can be recreated.
}
@end
Basically, the code we added is telling the webView to open the URL we specified. Now you will need to make a connection between your webView variable and the actual UIWebView on your storyboard (the screenshot shown in Figure 11-1).
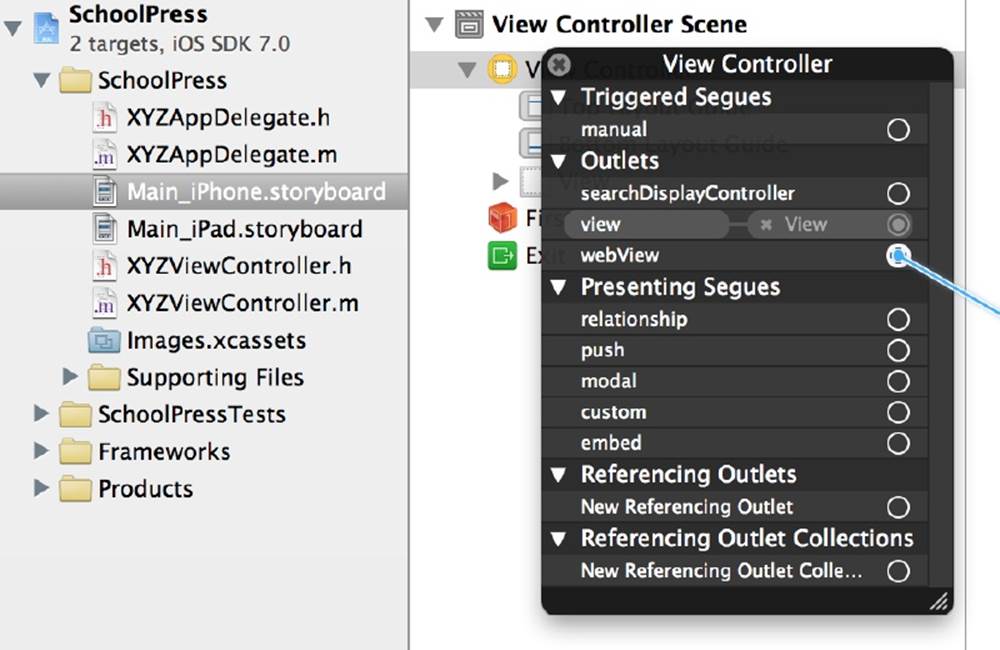
Figure 11-1. View controller outlet
To do this, click your storyboard file Main_iPhone.storyboard, expand View Controller Scene, and Control-click on View Controller. Under Outlets, you should see webView; and to the right, you should see an empty circle. Click on that circle and drag and drop it on top of the UIWebView in the iPhone outline. Repeat this process for the iPad storyboard if you plan on making an iPad version of your app.
That should be it! Your first very basic iOS app WordPress hybrid is done and ready to be tested.
NOTE
Check out the UIWebView Class Reference for more on the UIWebView class.
iOS simulator
Xcode comes packaged with an iOS simulator for both iPhones and iPads. You can test your iOS applications on this simulator at any time by clicking on the big play button at the top left of your Xcode screen. You can also toggle which iOS device you would like to run your app on. You can also test, run, and build your application builds from the Product menu. Go ahead and click Product → Run to fire up the simulator and run your new application. Figure 11-2 is a screenshot of the iPhone simulator displaying an app with a webView that is pointed to WebDevStudios.com.
App Distribution
So now that your app works runs in the iOS simulator, it’s time to add it to the marketplace. There are a few things you will need to do before you actually upload your app. Log in to https://developer.apple.com/account/ios/ with your Apple ID. There are a few steps you need to take to make your application available for download on iTunes:
1. Create a production certificate.
2. Create a provisioning profile for distribution.
3. Enable code signing in Xcode.
4. Create a ZIP file of your app and upload it to iTunes.
I recommend watching Dani Arnaout’s “How to upload an app to app store” video.
iOS Resources
§ “Deploying iPhone Apps to Real Devices” on mobiForge
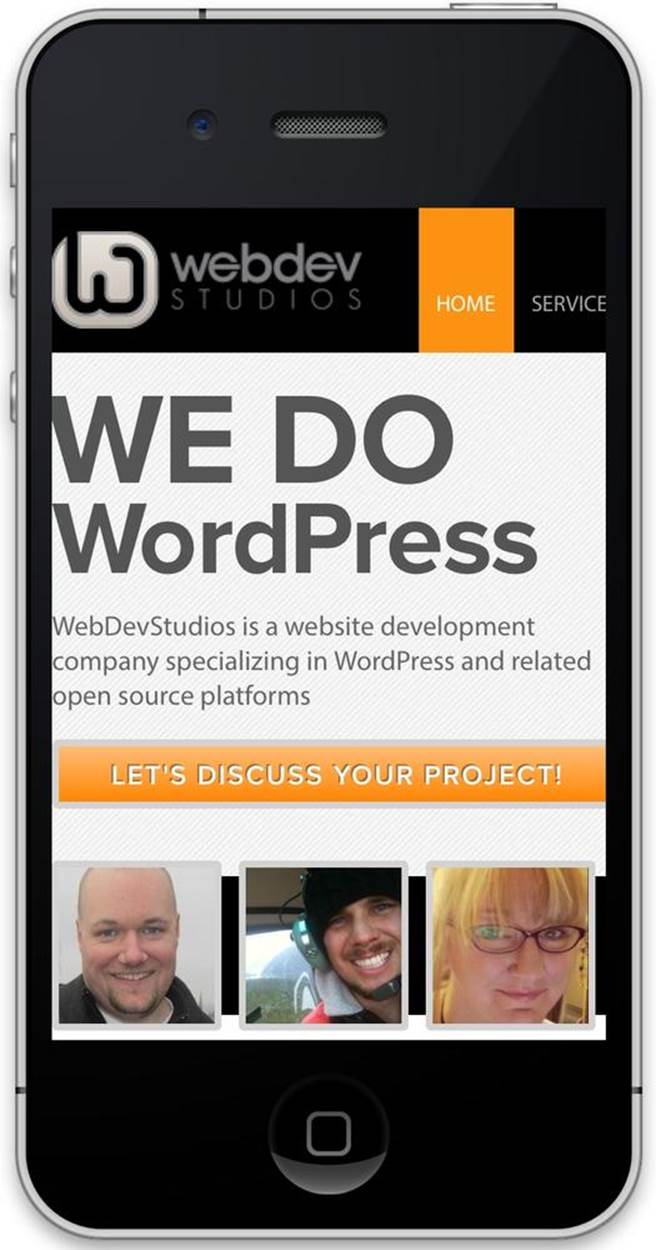
Figure 11-2. Device simulator
Android Applications
If you made a basic iOS app, deployed it, and thought to yourself, holy crap that was a lot of work, you will think deploying an Android app is a lot simpler.
To make a basic app, you will need:
1. Any computer that can run Eclipse
2. The Android SDK
You can download the ADT (Android Developer Tools) bundle. It comes with Eclipse and the ADT plugin, Android SDK Tools, Android Platform-tools, the latest Android platform, and the latest Android system image for the emulator. You can also choose to install Eclipse separately, then install the ADT Plugin and SDK Tools.
If you’ve installed the ADT Bundle, open up Eclipse, and you should have all of the Android tools already set up:
1. Go to File → New → Project and select Android Application Project. Then click Next.
2. Enter an Application Name, a Project Name, and a Package Name. Then choose your Minimum Required SDK, Target SDK, what API version you want to compile with, and the default theme. Click Next.
3. Choose a Workspace or the location of your project and click Next.
4. Select any of the default launcher icons (the icon people we will see for the app) and click Next.
5. Leave Create Activity checked and select Blank Activity. Then click Next.
6. Leave the defaults for Activity Name, Layout Name, and Navigation Type. Then click Finish.
That’s it. You’ve got a basic Android app; it really doesn’t do anything yet, but at least it’s a start.
AndroidManifest.xml
This file is required for any Android application. It contains information about how your application is set up, what actions to take, what permissions it requires, what API version to use, and more. Think of this file as your WordPress wp-config.php file, since it is like a basic configuration file for your Android application. For more information on AndroidManifest.xml, check out Apple’s Android guide.
You will need to add the following line of code to the AndroidManifest.xml file to tell your application that it will require permission to access the Internet:
<uses-permission android:name="android.permission.INTERNET" />
Your AndroidManifest.xml file should look something like the following code:
<?xml version="1.0" encoding="utf-8"?>
<manifest xmlns:android="http://schemas.android.com/apk/res/android"
package="com.oreilly.bwawwp"
android:versionCode="1"
android:versionName="1.0" >
<uses-permission android:name="android.permission.INTERNET" />
<uses-sdk
android:minSdkVersion="8"
android:targetSdkVersion="18" />
<application
android:allowBackup="true"
android:icon="@drawable/ic_launcher"
android:label="@string/app_name"
android:theme="@style/AppTheme" >
<activity
android:name="com.oreilly.bwawwp.MainActivity"
android:label="@string/app_name" >
<intent-filter>
<action android:name="android.intent.action.MAIN" />
<category android:name="android.intent.category.LAUNCHER" />
</intent-filter>
</activity>
</application>
</manifest>
activity_main.xml
This file can have other names, and you can have multiple activity XML files, but this file basically stores the information about your main app screen. Your activity XML files are usually located in /res/layout of your application project directory. If you used the default when creating your app, open up activity_main.xml and alter the code to look like this:
<RelativeLayout xmlns:android="http://schemas.android.com/apk/res/android"
xmlns:tools="http://schemas.android.com/tools"
android:layout_width="match_parent"
android:layout_height="match_parent"
tools:context=".MainActivity" >
<WebView
android:id="@+id/webView"
android:layout_width="match_parent"
android:layout_height="match_parent"
android:layout_centerHorizontal="true" />
</RelativeLayout>
MainActivity.java
This file is the Java-based code behind for your main activity XML file. Your XML file is for the layout of your app screen, and this Java file is what makes it functional. In the last code example, you may have noticed the tools:context parameter set to .MainActivity in theRelativeLayout node of the XML. This directly references the public class in this Java file. Your Java files are going to be located in the src directory:
package com.oreilly.bwawwp;
// make these classes available
import android.os.Bundle;
import android.app.Activity;
import android.view.Window;
import android.view.WindowManager;
import android.webkit.WebView;
import android.webkit.WebViewClient;
// extend Activity class
public class MainActivity extends Activity {
private WebView webView;
@Override
protected void onCreate(Bundle savedInstanceState) {
super.onCreate(savedInstanceState);
// make app full screen on device
requestWindowFeature(Window.FEATURE_NO_TITLE);
getWindow().setFlags(
WindowManager.LayoutParams.FLAG_FULLSCREEN,
WindowManager.LayoutParams.FLAG_FULLSCREEN
);
setContentView(R.layout.activity_main);
// set webView to the webView on activity_main.xml
// by its id
webView = (WebView) findViewById(R.id.webView);
// enable javascript which is essential for slick
//WP responsive designs
webView.getSettings().setJavaScriptEnabled(true);
// load any web url you like
webView.loadUrl("http://bwawwp.com");
// this makes sure that when links are clicked the user
// stays in the app
webView.setWebViewClient(new WebViewClient());
}
}
Creating an APK file
An .apk file is a compiled Android Application. You should be able to run an .apk file on any Android device.
Every time you run the Android emulator, you actually create an .apk file; but if you want to eventually list your Android App in the Google Play store, you will need to follow these extra steps in Eclipse:
§ Go to File → Export.
§ Click Export Android Application and then the Next button.
§ Choose the project you want to export and click the Next button.
§ Check Create new keystore, choose a name and location, then enter a password and click the Next button.
§ Fill out all of the Key Creation fields. Alias is the name people will see. For validity, put 25. When finished, click the Next button.
§ Choose a name and destination for the actual .apk file that will be generated and click the Finished button.
You can manually copy the exported .apk file to any Android device and start using it!
Getting Your App on Google Play
If you are going through the trouble of creating a basic Android app, you probably want to put it up in Google’s app store so people can download it. This process is easier and cheaper then getting an iOS app up on iTunes. You need to create an account online.
Android Resources
Here are some helpful links:
§ The ADT Plugin page
§ The Getting Started with Android Studio page
Extend Your App
Now that your app is out in the wild, try to spend some time making it better. Maybe add some cool native functionality. If you are not an iOS or Android developer, you could certainly learn the basics by picking up an O’Reilly iOS and/or Android book.
Once you know the basics of building simple native apps, you can pull in specific data from your WordPress app. The most simple method of pulling WordPress data into your app is pulling in a RSS feed. You can also push and pull data via XML-RPC, as we went over in the last chapter. XML-RPC can be used to interact with any WordPress website or web application. You can manage pretty much any data stored in a WordPress MySQL database remotely using XML-RPC.
Wait, what? Both the WordPress iOS and Android apps are open source. Dig through the code in these apps and see how they are built and try to reuse what you can in your own app. If you’re feeling up to it and already know how to build iOS and/or Android apps, try to contribute to these projects and make them better.
AppPresser
Want to easily build a hybrid mobile app for you or your client and don’t want to write the code for it yourself? Check out AppPresser; you can download a WordPress plugin that will allow you to build an iOS and/or Android app based off your own responsive mobile theme or a selected AppPresser theme. AppPresser is more than just a mobile theme; it can integrate with device hardware like the camera, geolocation, and more. AppPresser-created apps can be uploaded to iTunes and Google Play so you and your clients can have a real presence in the mobile app marketplace without touching a line of Objective-C or Java.
Mobile App Use Cases
OK, so we have mobile apps that can display content from my web app; how interactive can it really be? Hybrid WordPress mobile apps can be as interactive as you want them to be! Anything you can do with WordPress you can do in your hybrid mobile app.
You can force your app users to log into your app via Facebook, Twitter, or other social networks that allow single sign on.
Maybe your web app is an online store: your mobile app can give your customers the ability to browse and purchase products right from the app. Maybe your app allows multiple merchants to have their own stores on your network: your app can give them the ability to manage their inventory and upload photos of products in real time directly from their device.
Maybe you built a dating website with BuddyPress: making a branded mobile app for your dating service could really help boost your member base if you gain popularity in the marketplaces. You could utilize native device features like the camera to allow your social network members to take and upload selfies directly to their profile.
Maybe you are building a realtor site, and you want agents to be able to create new posts in a custom post type called “Homes” for a home they are trying to sell. You can give them the ability to snap some photos of the house and post them to the web application along with the longitude and latitude of the house so it will show up in Google Maps.
You could make a mobile app for construction contractors, plumbers, landscapers, electricians, or any other type of physical service–based business that could easily assist them in tracking jobs, accessing client details, uploading before-and-after photos or videos, tracking job locations via GPS, collaborating with coworkers, and more.
The possibilities of what you can build are limitless, especially the more you incorporate native functionality into your hybrid mobile application. If required, you could always build 100% native mobile apps and still make them access an online WordPress application so your content and user base is the same across all platforms.