Building Web Apps with WordPress (2014)
Chapter 7. Other WordPress APIs, Objects, and Helper Functions
In this chapter, we cover several WordPress APIs, objects, and helper functions that aren’t otherwise covered in the rest of the book but are still important pieces of a WordPress developer’s arsenal.
Shortcode API
Shortcodes are specially formatted pieces of text that can be used to insert dynamic output into your posts, pages, widgets, and other static content areas.
Shortcodes come in three main flavors.
1. A single shortcode like [myshortcode].
2. Shortcodes with attributes like [myshortcode id="1" type="text"].
3. Enclosing shortcodes like [myshortcode id="1"] ... some content here ... [/myshortcode].
In Chapter 3, we shared an example of how to use shortcodes to add arbitrary content into a WordPress post or page. In that example, like flavor number one, we simply swapped out the shortcode for our content. You can also add attributes to the shortcode to affect the callback function processing it or wrap some content in an opening and closing shortcode pair to filter some particular content.
The basics of creating shortcodes is to define the callback function for your shortcode using the add_shortcode() function. Any attributes are added to an array that is passed to the callback as the first $atts parameter. Any enclosed content is passed to the callback as the second$content parameter.
The following code creates a shortcode called msg and makes use of attributes and enclosed content:
<?php
/*
shortcode callback for [msg] shortcode
Example: [msg type="error"]This is an error message.[/msg]
Output:
<div class="message message-error">
<p>This is an error message.</p>
</div>
*/
function sp_msg_shortcode($atts, $content)
{
//default attributes
extract( shortcode_atts( array(
'type' => 'information',
), $atts ) );
$content = do_shortcode($content); //allow nested shortcodes
$r = '<div class="message message-' .
$type . '"><p>' . $content . '</p></div>';
return $r;
}
add_shortcode('msg', 'sp_msg_shortcode');
?>
Notice that the content you want displayed is returned from the callback function rather than echoed to the output buffer. This is because the shortcode filter is typically run before any content has been pushed to the screen. If there were any echo calls inside this function, the output would show up at the top of the page instead of inline where you want it.
Shortcode Attributes
The other important piece demonstrated in the preceding code is how the default attributes are set. The shortcode_atts() function takes three parameters: $pairs, $atts, and $shortcode.
$pairs is an array of default attributes, where each key is the attribute name and each value is the attribute value.
$atts is a similar array of attributes, usually passed in straight from the $atts parameter passed to the shortcode callback function. The shortcode_atts() function merges the default and passed attributes into one array.
The $shortcode parameter is optional. If set to match the shortcode name, it will trigger a filter shortcode_atts_{shortcode} that can be used by other plugins/etc. to override the default attributes.
The results of shortcode_atts() are then passed to the PHP function extract(), which creates a variable in the local scope for every key in the attributes array.
In this way, the variable $type in our example is available to the rest of the function and either contains the default value of message or whatever value was set in the shortcode itself.
Nested Shortcodes
Finally, we pass the inner $content through the do_shortcode() function to enable nested shortcodes. If you had a [help_link] shortcode that generated a link to your documentation depending on what section of a site you were on or the type of user logged in, you might might want to use that shortcode within the [msg] shortcode:
[msg type="error"]
An error has occured. Use the following link for help: [help_link].
[/msg]
As long as the callback function for the [msg] shortcode passes its results through do_shortcode(), the inner [help_link] shortcode will be filtered as intended.
CAUTION
While nested shortcodes of different types will work, nesting the same shortcode within itself will break. The regex parser that pulls the shortcodes out of content is engineered for speed. The parser only needs to scan through the content once. Handling nested shortcodes of the same type would require multiple passes through the content, which would slow the algorithm down. The solution to this is to either (1) avoid nesting the same shortcode within itself, (2) use differently named shortcodes that link to the same callback function, or (3) write a custom regex parser for your shortcode and parse the shortcodes out yourself.
The do_shortcode() function can also be used to apply shortcodes to custom fields, content pulled from custom tables, or other content that is not already being run through the the_content filter. In most cases outside of shortcode callback functions themselves, it will be more appropriate to use apply_filters(‘the_content’, $content), which will apply all filters on the the_content hook including the shortcode filter:
<?php
global $post;
$sidebar_content = $post->sidebar_content;
?>
<div class="post">
<?php the_content(); ?>
</div>
<div class="sidebar">
<?php
//echo do_shortcode($sidebar_content);
echo apply_filters('the_content', $sidebar_content);
?>
</div>
Removing Shortcodes
Like actions and filters, you can remove registered shortcodes to keep them from being applied to a certain post or on content you are passing directly to do_shortcode() or through the the_content filter. The remove_shortcode() function takes the shortcode name as its only parameter and will unregister the specified shortcode. remove_all_shortcodes() will unregister all shortcodes.
NOTE
When calling remove_shortcode(), make sure that the calls comes late enough in the execution of WordPress for the shortcode you want removed to have already been added. For example, if a plugin adds the shortcode during the init action on priority 10, you will want to put your call to remove_shortcode() during the init action on priority 11 or higher or through another hook that fires after init.
The array of registered shortcodes is stored in a global variable $shortcode_tags. It can be useful to make copies of this variable or edit it directly. For example, if you want to exclude certain shortcodes from a specific piece of content, you can make a backup copy of all shortcodes, remove the offending shortcodes, apply shortcodes, then restore the original list of shortcodes:
//make a copy of the original shortcodes
global $shortcode_tags;
$original_shortcode_tags = $shortcode_tags;
//remove the [msg] shortcode
unset($shortcode_tags['msg']);
//do shortcodes and echo
$content = do_shortcode($content);
echo $content;
//restore the original shortcodes
$shortcode_tags = $original_shortcode_tags;
Other Useful Shortcode-Related Functions
shortcode_exists($tag)
Checks if the shortcode $tag has been registered.
has_shortcode($content, $tag)
Checks if the shortcode $tag appears within the $content variable.
shortcode_parse_atts($text)
Pulls attributes out of a shortcode. This is done for you when parsing a shortcode, but can be called directly if you want to pull attributes out of other text like HTML tags or other templates.
strip_shortcodes($text)
Strips all shortcodes out of the $text variable and replace them with empty text instead of calling the callback function.
Other details about the Shortcode API can be found in the WordPress Codex.
Widgets API
Widgets allow you to place contained pieces of code and content in various widget areas throughout your WordPress site. The most typical use cases are to add widgets to a sidebar or footer area. You could always hardcode these sections on a website, but using widgets allows your nondevelopers to drag and drop widgets from one area to another or to tweak their settings through the widgets page in the admin dashboard. WordPress comes with many built-in widgets, including the basic text widget shown in Figure 7-1.
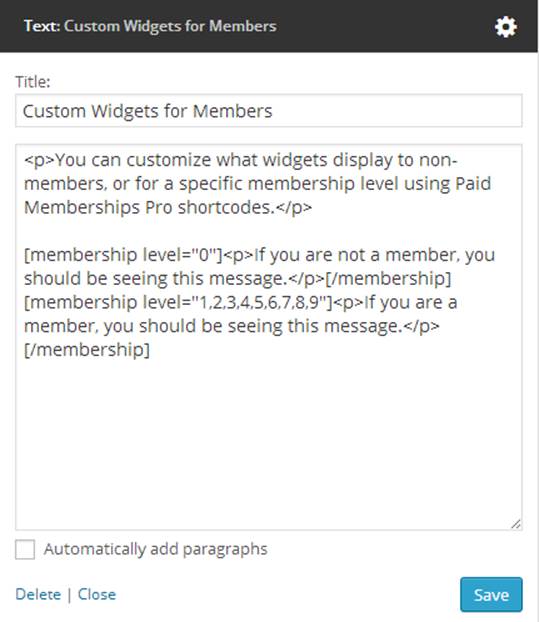
Figure 7-1. Text widget settings
Plenty of plugins also include widgets for showing various content. We won’t go into the use and styling of widgets here, since their use is covered well in the WordPress Codex page on widgets, but we will cover how to add widgets and widget areas to your plugins and themes.
NOTE
The UI of the widgets page in the admin dashboard is going through an overhaul for WordPress version 3.8; however the functions and API calls to add new widgets through code should not be affected much, if at all.
Before You Add Your Own Widget
Before you go about developing a new widget, it’s worth spending some time to see if an existing widget will work for you. If you get creative, you can sometimes avoid building a new widget.
Search the repository for plugins that may already have the widget you need. If so, double-check the code there and see if it will work.
Text widgets can be used to add arbitrary text into a widget space. You can also embed JavaScript code this way or add a shortcode to the text area and use a shortcode to output the functionality you want (you may have created the shortcode already for other use) instead of creating a new widget.
If your widget is displaying a list of links, it might make sense to build a menu of those links and use the Custom Menu widget that is built into WordPress. Other widgets that display recent posts from a category will often work with CPTs and custom taxonomies either out of the box or with a little bit of effort.
If you do need to add a brand-new widget, the following section will cover the steps required.
Adding Widgets
To add a new widget to WordPress, you must create a new PHP class for the widget that extends the WP_Widget class of WordPress. The WP_Widget class can be found in wp-includes/widgets.php and is a good read. The comments in the code explain how the class works and which methods you must override to build your own widget class. There are four main methods that you must override, shown clearly in the following code by the sample widget class from the WordPress Codex page for the Widgets API:
/*
Taken from the Widgets API Codex Page at:
http://codex.wordpress.org/Widgets_API
*/
class My_Widget extends WP_Widget {
public function __construct() {
// widget actual processes
}
public function widget( $args, $instance ) {
// outputs the content of the widget
}
public function form( $instance ) {
// outputs the options form on admin
}
public function update( $new_instance, $old_instance ) {
// processes widget options to be saved
}
}
add_action( 'widgets_init', function(){
register_widget( 'My_Widget' );
});
The add_action() call passes an anonymous function as the second parameter, which is only supported in PHP versions 5.3 and higher. Technically, WordPress only requires PHP version 5.2.4 or higher. The alternative is to use the create_function() function of PHP, which is slower and potentially less secure than using an anonymous function. However, if you plan to release your code to a wide audience, you might want to use the alternative method shown in the following code:
/*
Taken from the Widgets API Codex Page at:
http://codex.wordpress.org/Widgets_API
*/
add_action('widgets_init',
create_function('', 'return register_widget("My_Widget");')
);
Pulling this all together, Example 7-1 presents a new widget for the SchoolPress site. This widget will show either a globally defined note set in the widget settings or a note specific to the current BuddyPress group set by the group admins.
Example 7-1. SchoolPress note widget
<?php
/*
Widget to show the current class note.
Teachers (Group Admins) can change note for each group.
Shows the global note set in the widget settings if non-empty.
*/
class SchoolPress_Note_Widget extends WP_Widget
{
public function __construct() {
parent::__construct(
'schoolpress_note',
'SchoolPress Note',
array( 'description' => 'Note to Show on Group Pages' );
}
public function widget( $args, $instance ) {
global $current_user;
//saving a note edit?
if ( !empty( $_POST['schoolpress_note_text'] )
&& !empty( $_POST['class_id'] ) ) {
//make sure this is an admin
if(groups_is_user_admin($current_user->ID,intval($_POST['class_id']))){
//should escape the text and possibly use a nonce
update_option(
'schoolpress_note_' . intval( $_POST['class_id'] ),
$_POST['schoolpress_note_text']
);
}
}
//look for a global note
$note = $instance['note'];
//get class id for this group
$class_id = bp_get_current_group_id();
//look for a class note
if ( empty( $note ) && !empty( $class_id ) ) {
$note = get_option( "schoolpress_note_" . $class_id );
}
//display note
if ( !empty( $note ) ) {
?>
<div id="schoolpress_note">
<?php echo wpautop( $note );?>
</div>
<?php
//show edit for group admins
if ( groups_is_user_admin( $current_user->ID, $class_id ) ) {
?>
<a id="schoolpress_note_edit_trigger">Edit</a>
<div id="schoolpress_note_edit" style="display: none;">
<form action="" method="post">
<input type="hidden"
name="class_id"
value="<?php echo intval($class_id);?>" />
<textarea name="schoolpress_note_text" cols="30" rows="5">
<?php echo esc_textarea(get_option('schoolpress_note_'.$class_id))
;?>
</textarea>
<input type="submit" value="Save" />
<a id="schoolpress_note_edit_cancel" href="javascript:void(0);">
Cancel
</a>
</form>
</div>
<script>
jQuery(document).ready(function() {
jQuery('#schoolpress_note_edit_trigger').click(function(){
jQuery('#schoolpress_note').hide();
jQuery('#schoolpress_note_edit').show();
});
jQuery('#schoolpress_note_edit_cancel').click(function(){
jQuery('#schoolpress_note').show();
jQuery('#schoolpress_note_edit').hide();
});
});
</script>
<?php
}
}
}
public function form( $instance ) {
if ( isset( $instance['note'] ) )
$note = $instance['note'];
else
$note = "";
?>
<p>
<label for="<?php echo $this->get_field_id( 'note' ); ?>">
<?php _e( 'Note:' ); ?>
</label>
<textarea id="<?php echo $this->get_field_id( 'note' ); ?>"
name="<?php echo $this->get_field_name( 'note' ); ?>">
<?php echo esc_textarea( $note );?>
</textarea>
</p>
<?php
}
public function update( $new_instance, $old_instance ) {
$instance = array();
$instance['note'] = $new_instance['note'];
return $instance;
}
}
add_action( 'widgets_init', function() {
register_widget( 'SchoolPress_Note_Widget' );
} );
?>
Defining a Widget Area
In order to add widget areas or sidebar to your theme, you need to do two things. First, you need to register the widget area with WordPress. Then you need to add code to your theme at the point where you want your widget area to appear.
Registering a widget area is fairly straightforward using the register_sidebar() function, which takes an array of arguments as its only parameter. The available arguments are as follows, taken from the WordPress Codex page on the register_sidebar() function:
name
Sidebar name (defaults to \Sidebar#, where # is the ID of the sidebar)
id
Sidebar ID—must be all in lowercase, with no spaces (default is a numeric auto-incremented ID)
description
Text description of what/where the sidebar is. Shown on widget management screen since 2.9 (default: empty)
class
CSS class name to assign to the widget HTML (default: empty)
before_widget
HTML to place before every widget (default: <li id="%1$s" class="widget %2$s">); uses sprintf for variable substitution
after_widget
HTML to place after every widget (default: </li>\n)
before_title
HTML to place before every title (default: <h2 class="widgettitle">)
after_title
HTML to place after every title (default: </h2>\n)
To register a bare-bones sidebar for the assignment pages of our SchoolPress theme, we would add the following code to our theme’s functions.php or includes/sidebars.php file:
register_sidebar(array(
'name' => 'Assignment Pages Sidebar',
'id' => 'schoolpress_assignment_pages',
'description' => 'Sidebar used on assignment pages.',
'before_widget' => '',
'after_widget' => '',
'before_title' => '',
'after_title' => ''
));
The values for before/after_widget and before/after_title would be set based on how our theme styles widgets and titles. Some expect <li> elements; others use <div> elements. But if all of the styling is handled by our widget’s code, we can just set everything to empty strings.Next we need to actually embed the widget area into our theme. This is done using the dynamic_sidebar() function, which takes the ID of a registered sidebar as its only parameter:
if(!dynamic_sidebar('schoolpress_student_status'))
{
//fallback code in case my_widget_area sidebar was not found
}
The code will load the schoolpress_student_status sidebar if found. If it is not found, dynamic_sidebar() will return false and the code inside of the curly braces there will be executed instead. This can be used to show default content in a sidebar area if the sidebar area doesn’t have any widgets inside of it or doesn’t exist at all.
Historically, WordPress themes were developed with a sidebar area, and themes would hardcode certain features into them. Widgets were first introduced primarily to replace these static sidebars with dynamic sidebars that could be controlled through the Widgets page of the dashboard. This is why the term sidebar is used to define widget areas, even though widgets are used in places other than just sidebars.
If you need to know whether a sidebar is registered and in use (has widgets) without actually embedding the widgets, you can use the is_active_sidebar() function. Just pass in the ID of the sidebar, and the function will return true if the sidebar is registered or false if it is not. The Twenty Thirteen theme uses this function to check that a sidebar has widgets before rendering the wrapping HTML for the sidebar:
<?php
//from twenty-thirteen/sidebar.php
if ( is_active_sidebar( 'sidebar-2' ) ) : ?>
<div id="tertiary" class="sidebar-container" role="complementary">
<div class="sidebar-inner">
<div class="widget-area">
<?php dynamic_sidebar( 'sidebar-2' ); ?>
</div><!-- .widget-area -->
</div><!-- .sidebar-inner -->
</div><!-- #tertiary -->
<?php endif; ?>
Embedding a Widget Outside of a Dynamic Sidebar
The normal process to add widgets to your pages is described in the previous section, where you define a dynamic sidebar and then add your widget to the sidebar through the Widgets page in the admin dashboard.
Alternatively, if you know exactly which widget you want to include somewhere and don’t want the placement of the widget left up to the admins controlling the Widgets settings in the dashboard, you can embed a widget using the the_widget($widget, $instance, $args) function:
§ $widget—The PHP class name for your widget
§ $instance—An array containing the settings for your widget
§ $args—An array containing the arguments normally passed to register_sidebar()
Besides hardcoding the placement of the widget, using the the_widget() function also allows you to set the settings of the widget programmatically. In the following code, we embed the StudentPress Note widget directly into a theme page. We set the instance array to include an empty string for the $note value, ensuring that the group note is shown if available:
//show note widget, overriding global note
the_widget('SchoolPress_Note_Widget', //classname
array('note'=>''), //instance vars
array( //widget vars
'before_widget' => '',
'after_widget' => '',
'before_title' => '',
'after_title' => ''
)
);
Dashboard Widgets API
Dashboard widgets are the boxes that show up on the homepage of your WordPress admin dashboard (see Figure 7-2).
By default, WordPress includes a few different dashboard widgets. By adding and removing widgets from the dashboard using the Dashboard Widgets API, you can make your WordPress app more useful by placing the information and tools most required by your app right there on the dashboard homepage. It’s a nice touch that should be done by all WordPress apps with users who will be accessing the WordPress admin.
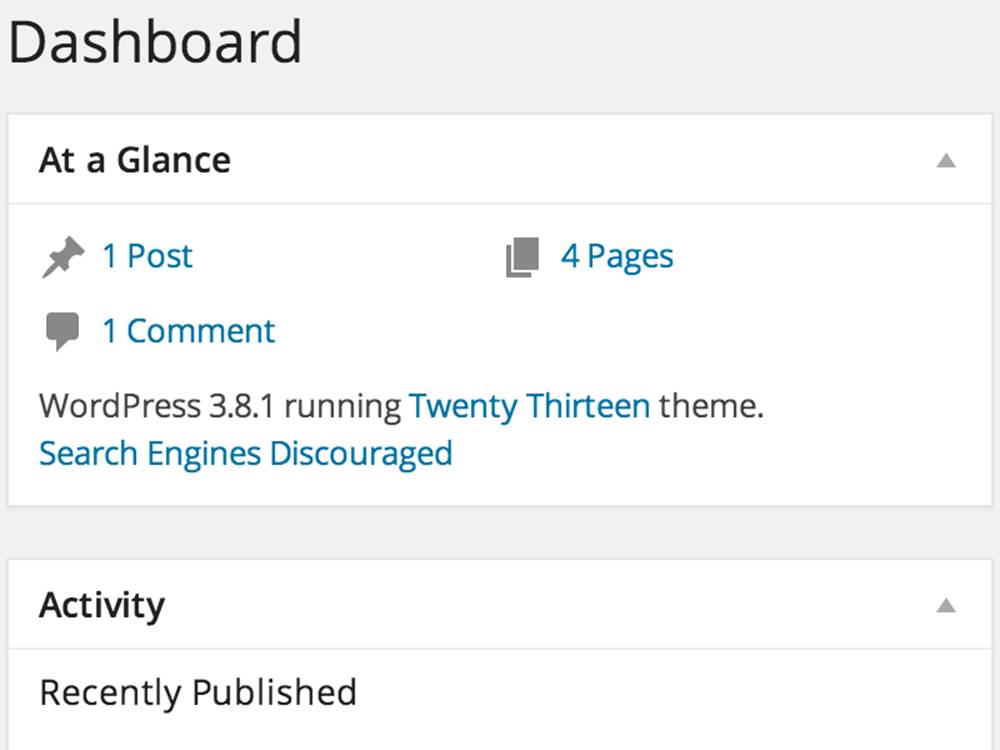
Figure 7-2. Dashboard widgets
Removing Dashboard Widgets
The dashboard widgets are really just meta boxes assigned to the dashboard page of the admin. The WordPress Codex page on the Dashboard Widgets API has a list of the default widgets shown on the WordPress dashboard:
// From the Dashboard Widgets API Codex Page
// Main column:
$wp_meta_boxes['dashboard']['normal']['high']['dashboard_browser_nag']
$wp_meta_boxes['dashboard']['normal']['core']['dashboard_right_now']
$wp_meta_boxes['dashboard']['normal']['core']['dashboard_recent_comments']
$wp_meta_boxes['dashboard']['normal']['core']['dashboard_incoming_links']
$wp_meta_boxes['dashboard']['normal']['core']['dashboard_plugins']
// Side Column:
$wp_meta_boxes['dashboard']['side']['core']['dashboard_quick_press']
$wp_meta_boxes['dashboard']['side']['core']['dashboard_recent_drafts']
$wp_meta_boxes['dashboard']['side']['core']['dashboard_primary']
$wp_meta_boxes['dashboard']['side']['core']['dashboard_secondary']
To remove widgets from the dashboard, you can use the remove_meta_box($id, $page, $context) function:
§ $id—The ID defined when the meta box was added. This is set as the id attribute of the <div> element created for the meta box.
§ $page—The name of the admin page the meta box was added to. Use dashboard to remove dashboard meta boxes.
§ $context—Either normal, advanced, or side, depending on where the meta box was added.
To remove all of the default widgets, you can hook into wp_dashboard_setup and make a call to remove_meta_box() for each widget you’d like to remove:
// Remove all default WordPress dashboard widgets
function sp_remove_dashboard_widgets()
{
remove_meta_box('dashboard_browser_nag', 'dashboard', 'normal');
remove_meta_box('dashboard_right_now', 'dashboard', 'normal');
remove_meta_box('dashboard_recent_comments', 'dashboard', 'normal');
remove_meta_box('dashboard_incoming_links', 'dashboard', 'normal');
remove_meta_box('dashboard_plugins', 'dashboard', 'normal');
remove_meta_box('dashboard_quick_press', 'dashboard', 'side');
remove_meta_box('dashboard_recent_drafts', 'dashboard', 'side');
remove_meta_box('dashboard_primary', 'dashboard', 'side');
remove_meta_box('dashboard_secondary', 'dashboard', 'side');
}
add_action('wp_dashboard_setup', 'sp_remove_dashboard_widgets');
There are a different set of widgets added to the multisite network dashboard, and a different hook must be used to remove the network dashboard widgets. The following code hooks on wp_network_dashboard_setup and removes the meta boxes added to the “dashboard-network”$page:
//Remove network dashboard widgets
function sp_remove_network_dashboard_widgets()
{
remove_meta_box('network_dashboard_right_now', 'dashboard-network', 'normal');
remove_meta_box('dashboard_plugins', 'dashboard-network', 'normal');
remove_meta_box('dashboard_primary', 'dashboard-network', 'side');
remove_meta_box('dashboard_secondary', 'dashboard-network', 'side');
}
add_action('wp_network_dashboard_setup', 'sp_remove_network_dashboard_widgets');
You could use similar code to remove default meta boxes from other dashboard pages, like the edit page and edit post pages. The $page value to use when removing meta boxes there are page and post, respectively.
Adding Your Own Dashboard Widget
The wp_add_dashboard_widget() function is a wrapper to add_meta_box() that will add a widget to your admin dashboard page. The wp_add_dashboard_widget() function takes four parameters:
§ $widget_id—An ID for your widgets that is added as a CSS class name to the wrapper for the widget and also used as the array key for the dashboard widgets array.
§ $widget_name—Name of the widget displayed in the widget heading.
§ $callback—Callback function that renders the widget.
§ $control_callback—Optional. Defaults to NULL. Callback function to handle the display and processing of a configuration page for the widget.
Example 7-2 adds a dashboard widget to show the status of current assignments (Figure 7-3). The code includes the call to wp_add_dashboard_widget() to register the dashboard widget and also includes the callback function to display that actual widget and another callback function to handle the configuration view (Figure 7-4) of that widget.
Example 7-2. Assignments dashboard widget
<?php
/*
Add dashboard widgets
*/
function sp_add_dashboard_widgets() {
wp_add_dashboard_widget(
'schoolpress_assignments',
'Assignments',
'sp_assignments_dashboard_widget',
'sp_assignments_dashboard_widget_configuration'
);
}
add_action( 'wp_dashboard_setup', 'sp_add_dashboard_widgets' );
/*
Assignments dashboard widget
*/
//widget
function sp_assignments_dashboard_widget() {
$options = get_option( "assignments_dashboard_widget_options", array() );
if ( !empty( $options['course_id'] ) ) {
$group = groups_get_group( array(
'group_id'=>$options['course_id']
) );
}
if ( !empty( $group ) ) {
echo "Showing assignments for class " .
$group->name . ".<br />...";
/*
get assignments for this group and list their status
*/
}
else {
echo "Showing all assignments.<br />...";
/*
get all assignments and list their status
*/
}
}
//configuration
function sp_assignments_dashboard_widget_configuration() {
//get old settings or default to empty array
$options = get_option( "assignments_dashboard_widget_options", array() );
//saving options?
if ( isset( $_POST['assignments_dashboard_options_save'] ) ) {
//get course_id
$options['course_id'] = intval(
$_POST['assignments_dashboard_course_id']
);
//save it
update_option( "assignments_dashboard_widget_options", $options );
}
//show options form
$groups = groups_get_groups( array( 'orderby'=>'name', 'order'=>'ASC' ) );
?>
<p>Choose a class/group to show assignments from.</p>
<div class="feature_post_class_wrap">
<label>Class</label>
<select name="assignments_dashboard_course_id">
<option value="" <?php selected( $options['course_id'], "" );?>>
All Classes
</option>
<?php
$groups = groups_get_groups( array( 'orderby'=>'name',
'order'=>'ASC' ) );
if ( !empty( $groups ) && !empty( $groups['groups'] ) ) {
foreach ( $groups['groups'] as $group ) {
?>
<option value="<?php echo intval( $group->id );?>"
<?php selected( $options['course_id'], $group->id );?>>
<?php echo $group->name;?>
</option>
<?php
}
}
?>
</select>
</div>
<input type="hidden" name="assignments_dashboard_options_save" value="1" />
<?php
}
?>
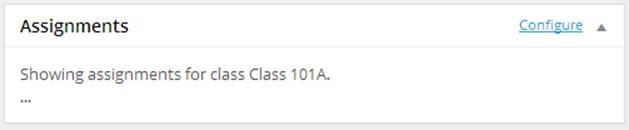
Figure 7-3. Our assignments widget
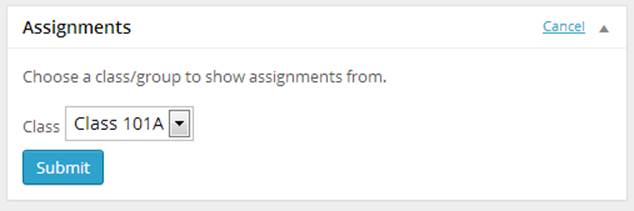
Figure 7-4. The configuration view of our assignments widget
Note that we hook into wp_dashboard_setup for the function that adds our widget. If we wanted our widget to show up on the network dashboard, we would need to use the wp_network_dashboard_setup hook.
The sp_assignments_dashboard_widget() function draws the actual widget shown on the dashboard page. This is where we would add our code to loop through assignments and show stats on what percentage of assignments have been turned in.
The sp_assignments_dashboard_widget_configuration() function draws the configuration form and also includes code to process the form submission and update the option we use to store the configuration.
Settings API
WordPress offers an API that can be used to generate options and settings forms for your plugins in the admin dashboard.
The Settings API is very thoroughly documented in the WordPress Codex. There is also a great tutorial by Tom Mcfarlin at Tutsplus called The Complete Guide to the WordPress Settings API. These resources cover the details of adding menu pages and settings within them for use in your plugins and themes. Below are some tips specific to app developers.
Do You Really Need a Settings Page?
Before spending the time to create a settings page and adding to the technical debt of your app, consider using a global variable to store an array of the options used by your plugin or app:
global $schoolpress_settings;
$schoolpress_settings = array(
'info_email' => 'info@schoolpress.me',
'info_email_name' => 'SchoolPress'
);
For apps that won’t be managed by nondevelopers and/or won’t be distributed, using a global of settings may be enough. Just store a global variable like the one in the preceding code at the top of your plugin file or inside of a includes/settings.php file. Why build the UI if you aren’t going to use it?
Even if your plugin or theme will eventually be distributed, we like to start with a global variable like this anyway. The settings that you think you need in the beginning may not be the ones you need at the end of your project. Settings may be added or removed throughout development. Settings you think need a dropdown may need a free text field instead. The Settings API makes it easy to add settings and update them later, but it is still much easier to change one element in a global array than it is to add or modify a handful of function calls and definitions.
If most of the statements below apply to you, consider using a global variable for your settings instead of building a settings UI:
§ This plugin is not going to be distributed outside my team.
§ The only people changing these settings are developers.
§ These settings do not need to be different across our different environments.
§ These settings are likely to change before release.
Could You Use a Hook or Filter Instead?
Another alternative to adding a setting to your plugin through the Settings API is to use a hook or filter instead. If a setting you are imagining would only be used by a minority of your users, consider adding a hook or filter to facilitate the setting.
For example, someone using our WP-Doc plugin may request the ability to restrict .doc generation to admins only or a specific subset of WordPress roles. We could add a settings page with a list of roles with checkboxes to enable or disable .doc downloads for that role. Maybe it should just be one checkbox to enable downloads for all roles or just admins. Maybe it should be a free text field to enter a capability name to check for before allowing the download.
A filter might be a better way to do this. We can add a capability check before the .doc is served and use a filter to let developers override the default array of capabilities checked. This code should be added to the wpdoc_template_redirect() function of the WP-Doc plugin, before the.doc page is rendered:
//don't require any caps by default, but allow developers to add checks
$caps = apply_filters('wpdoc_caps', array());
if(!empty($caps))
{
//guilty until proven innocent
$hascap = false;
//must be logged in to have any caps at all
if(is_user_logged_in())
{
//make sure the current user has one of the caps
foreach($caps as $cap)
{
if(current_user_can($cap))
{
$hascap = true;
break; //stop checking
}
}
}
if(!$hascap)
{
//don't show them the file
header('HTTP/1.1 503 Service Unavailable', true, 503);
echo "HTTP/1.1 503 Service Unavailable";
exit;
}
}
You could then override the wpdoc_caps array by adding actions like these:
//require any user account
add_filter('wpdoc_caps', function($caps) { return array('read'); });
//require admin account
add_filter('wpdoc_caps', function($caps) { return array('manage_options'); });
//authors only or users with a custom capability (doc)
add_filter('wpdoc_caps', function($caps) { return array('edit_post', 'doc'); });
NOTE
The preceding example uses anonymous functions, also known as closures, so the add_filter() call can be written on one line without using a separate callback function. This syntax requires PHP version 5.3 or higher.
To recap, the more the following statements are true, the more it makes sense to use a hook or filter instead of a settings UI:
§ Only a small number of people will want to change this setting.
§ The people changing this setting are likely to be developers.
§ The people changing this setting are likely to have custom needs.
§ This setting would require a large number of individual settings or more complicated UI.
Use Standards When Adding Settings
If and when you do need to add settings to your plugin or theme, be sure to use the tutorials listed earlier in this chapter to make sure you are using the Settings API correctly to add your settings.
Using the Settings API takes a little bit of up-front work, but does let you add and edit settings more easily later on. Also, since you are doing things the WordPress way, other developers will understand how your code works and will be able to hook into it. If a developer wants to make an add-on for your plugin, she will be able to hook into your existing menus and settings sections to add additional settings for her plugins.
Using the Settings API will also ensure that your settings look similar to the other settings through a user’s WordPress dashboard. You don’t want developers to have to learn a new UI just to use your plugin.
Ignore Standards When Adding Settings
While you typically want to use the Settings API and the WordPress standards when adding settings for your plugin, sometimes it make sense to ignore those standards.
The main case here is if you have a large number of settings that deserve a very custom UI. If you only have one or two settings, users won’t be spending a lot of time inside the settings screens. They will just want to change those two settings as fast as possible.
However, if your plugin requires dozens of settings, possibly across multiple tabs or screens, possibly related to one another, it makes sense to treat the settings for your app as an app itself. You should devote some attention to make sure that the UI and UX for your settings screen is as optimized as possible.
The WordPress Settings API is pretty flexible in terms of how things are displayed. You can control how each section is rendered and how each individual setting field is rendered. But in the end, it really is focused on one or more tabs with sections with fields on them. For applications with a large number of settings that interact with one another, you may want to use a different organization for your settings.
Don’t be scared to ignore the standards here. Add a menu to the dashboard, have the callback function for it include a set of organized .php files to generate the settings form and process it, and follow these tips if possible:
§ Add your menu sections and items per the standards, even if your settings pages themselves use a custom layout.
§ Remember to sanitize your inputs and use nonces when appropriate.
§ Use hooks and filters to whenever possible, if you’d like to allow others to extend your settings.
§ Use the same HTML elements and CSS classes whenever possible so the general style stays consistent with the rest of WordPress now and through future updates.
Due to the complexity of ecommerce software, it makes sense that ecommerce plugins often have complicated settings screens. Here are two examples of plugins doing custom settings pages well:
§ Paid Memberships Pro (whose code is posted on GitHub)
§ WooCommerce (whose code is posted on GitHub)
Rewrite API
Apache comes with a handy module called mod_rewrite that allows you to route incoming URLs to different URLs or file locations using rules that are typically added to an .htaccess file in your site root folder. Other Web servers have similar URL rewriting systems; here are the standard rules for WordPress:
# BEGIN WordPress
<IfModule mod_rewrite.c>
RewriteEngine On
RewriteBase /
RewriteRule ^index\.php$ - [L]
RewriteCond %{REQUEST_FILENAME} !-f
RewriteCond %{REQUEST_FILENAME} !-d
RewriteRule . /index.php [L]
</IfModule>
# END WordPress
David Walsh does an excellent line-by-line explanation of the WordPress .htaccess file on his blog if you’d like to understand more about Apache’s mod_rewrite module and how the WordPress rules work. Generally, these rules reroute all incoming traffic to any nondirectory or nonfile URL to the index.php file of your WordPress install.
WordPress then parses the actual URL to figure out which post, page, or other content to show. For example, under most permalink settings, the URL /about/ will route to the page or post with the slug “about.”
For the most part, you can let WordPress do its thing and handle permalink redirects on its own. However, if you need to add your own rules to handle certain URLs in particular ways, that can be done through the Rewrite API.
Adding Rewrite Rules
The basic function to add a rewrite rule is add_rewrite_rule($rule, $rewrite, $position):
§ $rule—A regular expression to match against the URL, just like you would use in an Apache rewrite rule.
§ $rewrite—The URL to rewrite to if the rule is matched. Matched groups from the rule regular expressions are contained in an array called $matches.
§ $position—Specifies whether to place the rules above the default WordPress rules (top) or below them (bottom).
Say we want to pass a subject line to our contact form through the URL. We could have URLs like /contact/special-offer/, which would load the contact page and prepopulate the subject to “special-offer.” We could add a rewrite rule like this:
add_rewrite_rule(
'/contact/([^/]+)/?',
'index.php?name=contact&subject=' . $matches[1],
'top'
);
add_rewrite_rule(
flush_rewrite_rules();
With this rule added to the rewrite rules, a visit to /contact/special-offer/ would redirect to the /contact/ page and populate the global $wp_query->query_vars[‘subject’] with the value “special-offer,” or whatever text was added after /contact/. Your contact form could use this value to prepopulate the subject value of the email sent.
Flushing Rewrite Rules
WordPress caches the rewrite rules. So when you add a rule like this, you need to flush the rewrite rules so they take effect. Flushing the rewrite rules can take some time, so it’s important that you don’t do it on every page load. To keep the rewrite rules in order, every plugin that affects the rewrite rules should do these three things:
1. Add the rule during plugin activation and immediately flush the rewrite rules using the flush_rewrite_rules() function.
2. Add the rule during the init hook in case the rules are flushed manually through the Permalinks Settings page of the dashboard or by another plugin.
3. Add a call to flush_rewrite_rules() during deactivation so the rule is removed on deactivation.
The following code shows how our contact subject rule should be added according to the three previous steps:
//Add rule and flush on activation.
function sp_activation()
{
add_rewrite_rule(
'/contact/([^/]+)/?',
'index.php?name=contact&subject=' . $matches[1],
'top'
);
flush_rewrite_rules();
}
register_activation_hook(__FILE__, 'sp_activation');
/*
Add rule on init in case another plugin flushes,
but don't flush cause it's expensive
*/
function sp_init()
{
add_rewrite_rule(
'/contact/([^/]+)/?',
'index.php?name=contact&subject=' . $matches[1],
'top'
);
}
add_action('init', 'sp_init');
//Flush rewrite rules on deactivation to remove our rule.
function sp_deactivation()
{
flush_rewrite_rules();
}
register_deactivation_hook(__FILE__, 'sp_deactivation');
Other Rewrite Functions
WordPress offers some other functions to insert special kinds of rewrite rules. These include:
add_rewrite_tag()
Another way to add custom querystring variables.
add_feed()
Add a new kind of feed to function like the RSS and ATOM feeds.
add_rewrite_endpoint
Add querystring variables to the end of a URL.
The Codex pages for each function explains things well. Some functions will make more sense for certain uses versus others. Example 7-3 shows how to use the add_rewrite_endpoint() function to detect when /doc/ is added to the end of a URL and to force the download of a .doc file. This code makes use of the fact that any HTML document with a .doc extension will be read by Microsoft Word as a .doc file.
The add_rewrite_endpoint() function takes two parameters:
§ $name*—Name of the endpoint, for example, 'doc'.
§ $places*—Specifies which pages to add the endpoint rule to. Uses the EP_* constants defined in wp-includes/rewrite.php.
Example 7-3. The WP DOC plugin
<?php
/*
Plugin Name: WP DOC
Plugin URI: http://bwawwp.com/wp-docx/
Description: Add /doc/ to the end of a page or post to download a .docx version.
Version: .1
Author: Stranger Studios
*/
/*
Register Rewrite Endpoint
*/
//Add /doc/ endpoint on activation.
function wpdoc_activation()
{
add_rewrite_endpoint('doc', EP_PERMALINK | EP_PAGES);
flush_rewrite_rules();
}
register_activation_hook(__FILE__, 'wpdoc_activation');
//and init in case another plugin flushes, but don't flush cause it's expensive
function wpdoc_init()
{
add_rewrite_endpoint('doc', EP_PERMALINK | EP_PAGES);
}
add_action('init', 'wpdoc_init');
//flush rewrite rules on deactivation to remove our endpoint
function wpdoc_deactivation()
{
flush_rewrite_rules();
}
register_deactivation_hook(__FILE__, 'wpdoc_deactivation');
/*
Detect /doc/ use and return a .doc file.
*/
function wpdoc_template_redirect()
{
global $wp_query;
if(isset($wp_query->query_vars['doc']))
{
global $post;
//double check this is a post
if(empty($post->ID))
return;
//headers for MS Word
header("Content-type: application/vnd.ms-word");
header('Content-Disposition: attachment;Filename='.
$post->post_name.'.doc');
//html
?>
<html>
<body>
<h1><?php echo $post->post_title; ?></h1>
<?php
echo apply_filters('the_content', $post->post_content);
?>
</body>
</html>
<?php
exit;
}
}
add_action('template_redirect', 'wpdoc_template_redirect');
?>
Note in the preceding example that we follow the three steps we used in the add_rewrite_rule() example to define our rule on activation and init and flush all rules on activation and deactivation.
We used EP_PERMALINK | EP_PAGES when defining our endpoint, which will add the endpoint to single post pages and page pages.[20] The full list of endpoint mask constants is shown below:
EP_NONE
EP_PERMALINK
EP_ATTACHMENT
EP_DATE
EP_YEAR
EP_MONTH
EP_DAY
EP_ROOT
EP_COMMENTS
EP_SEARCH
EP_CATEGORIES
EP_TAGS
EP_AUTHORS
EP_PAGES
EP_ALL
For more information on the Rewrite API, both the Codex page on the Rewrite API and the Codex page on the WP_Rewrite class are good sources of information. There is a lot more that can be done with the WP_Rewrite class that we didn’t get into here.
WP-Cron
A cron job is a script that is run on a server at set intervals. The WP-Cron functions in WordPress extend that functionality to your WordPress site. Cron jobs, sometimes called events, can be set up to run every few minutes, every few hours, every day, or on specific days of the week or month. Some typical uses of cron jobs include queueing up digest emails, syncing data with third-party APIs, and preprocessing CPU-intensive computations used in reports and comparative analysis.
There are three basic parts to adding a cron job to your app:
1. Schedule the cron event. This will fire a specific hook/action at the defined interval.
2. Hook a function to that action.
3. Place the code you actually want to run within the callback function.
This code can be added to a custom plugin file to schedule some cron jobs:[21]
//schedule crons on plugin activation
function sp_activation()
{
//do_action('sp_daily_cron'); will fire daily
wp_schedule_event(time(), 'daily', 'sp_daily_cron');
}
register_activation_hook(__FILE__, 'sp_activation');
//clear our crons on plugin deactivation
function sp_deactivation()
{
wp_clear_scheduled_hook('sp_daily_cron');
}
register_deactivation_hook(__FILE__, 'sp_deactivation');
//function to run daily
function sp_daily_cron()
{
//do this daily
}
add_action("sp_daily_cron", "sp_daily_cron");
The function wp_schedule_event($timestamp, $recurrence, $hook, $args) has the following attributes:
§ $timestamp—Timestamp for first time to run the hook. You can typically set it to time().
§ $recurrence—How often the event should run. You can pass hourly, daily, or twicedaily, or use the cron_schedules hook to add other intervals.
§ $hook—The name of the action to fire on each recurrence.
§ $args—Any arguments you’d like to pass along to the hook fired can be added to the end of the wp_schedule_event() call.
We like to give our cron events generic names based on the interval. This way, if we wanted to run another function daily, we could just add add_action(‘sp_daily_cron’, ‘new_function_name’); to our codebase.
Adding Custom Intervals
By default, the wp_schedule_event() function will only accept intervals of hourly, daily, or twicedaily. To add other intervals, you need to use the cron_schedules hook:
//add a monthly interval to use in cron jobs
function sp_cron_schedules($schedules)
{
$schedules['monthly'] = array(
'interval' => 60*60*24*30, //really 30 days
'display' => 'Once a Month'
);
}
add_filter( 'cron_schedules', 'sp_cron_schedules' );
Unlike Unix-based cron jobs, WP-Cron doesn’t support intervals based on day of the week. To do this, you can use a daily cron job and have the function called check the day of the week:
//run on Mondays
function sp_monday_cron()
{
//get day of the week, 0-6, starting with Sunday
$weekday = date("w");
//is it Monday?
if($weekday == "1")
{
//execute this code on Mondays
}
}
add_action("sp_daily_cron", "sp_monday_cron");
You could write similar code to check for a specific day of the month (date("j")) or even specific months (date("m"))
Scheduling Single Events
The preceding examples show how to execute code at some interval. You may also have times when you want to fire an event once at some point in the future. For example, you may want to schedule email delivery of new blog posts one hour after they are posted. This will give authors one hour to fix any issues with the blog posts before it gets pushed around the world. The wp_schedule_single_event() function can be used in these cases where we want schedule an event to fire just once.
Kicking Off Cron Jobs from the Server
In all of the previous examples, we assumed that events scheduled with wp_schedule_event() would actually run when they are scheduled. That’s almost true.
On Unix systems, the cron service runs every minute (generally) to check if there is a script to run. In WordPress, that check is done on every page load. So if no one loads your website in a given day, or only pages from a static cache are loaded, your cron jobs may not fire off that day. They will fire off with the next page load.
This setup is fine for casual WordPress sites, but our apps need reliability. Luckily, it is easy to disable the internal cron timer and set one up on your web server to fire when you need it to.
To disable the WordPress cron timer, simply add the following to your wp-config.php file:
define('DISABLE_WP_CRON', true);
This constant just enables or disables the check for events that are ready to fire. You still add and manage events as we did up above. We just need to manually hit the wp-cron.php file in our WordPress install often enough to fire our scripts when needed.
If all you have are daily scripts, you can add a cron job like this via the crontab -e command:
0 0 * * * wget -O - -q -t 1 http://yoursite.com/wp-cron.php?doing_wp_cron=1
Information on how to use cron can be found at its Wikipedia entry. Information on how to use wget can be found at the wget manual.
The 0 0 * * * part of the preceding entry tells cron to execute this script at 0 minutes on the 0th hour (midnight) every day of the week.
The wget -O - -q -t 1 http://yoursite.com/wp-cron.php?doing_wp_cron=1 part uses the wget command to load up the wp-cron.php page in your WordPress install. The -O - tells wget to send output to devnull, and the -q enables quiet mode. This will keep cron from adding files to your server or emailing you the outputs of each cron run. The -t 1 tells cron to try once. This will keep wget from hitting your server multiple times if the first try fails. If the call to wp-cron.php is failing, the rest of your website is probably failing too; hopefully you’ve already been notified.
Be sure to change yoursite.com to your actual site URL. And finally, the ?doing_wp_cron=1 on the end of the URL is needed since wp-cron.php will check for that $_GET parameter before running.
CAUTION
Make sure that the URL to wp-cron.php is excluded from any caching mechanisms you may have installed on your site.
This one cron job will fire every day, and any daily cron jobs you scheduled inside of WordPress will fire daily. If you need your crons to run more often, you can change the cron entry to run every hour or every few minutes. Note that a call to wp-cron.php is basically a hit to your website. A check every minute is effectively the same as an additional 1,440 users hitting your site. So schedule your cron jobs conservatively.
Using Server Crons Only
If you aren’t distributing your code or don’t mind telling your users that they have to set up server-side cron jobs, you don’t need to schedule your cron events in WordPress at all. You can just schedule a server-side cron job that calls a special URL to kick off your callback function. This is especially useful if you need to have more control over what times of day your crons run or otherwise just feel more comfortable managing your cron jobs in Unix instead of WordPress.
NOTE
The information on scheduling server-side cron jobs in this section can be used to replace WP-Cron for recurring events. Single events set using wp_schedule_single_event() will need to be handled using WP-Cron still or some other mechanism.
If we were running our Monday cron job from earlier, we would update the code in WordPress:
//run on Mondays
function sp_monday_cron()
{
//check that cron param was passed in
if(empty($_REQUEST['sp_cron_monday']))
return false;
//execute this code on Mondays
}
add_action("init", "sp_monday_cron");
And your cron job entry would look like this:
0 0 * * 1 wget -O - -q -t 1 http://yoursite.com/?sp_cron_monday=1
NOTE
Again, make sure that the URL to ?sp_cron_monday=1 is excluded from any caching mechanisms you may have installed on your site.
WP Mail
The wp_mail() function is a replacement for PHP’s built-in mail() function. It looks like this:
wp_mail($to, $subject, $message, $headers, $attachments)
and its attributes are:
§ $to—A single email address, comma-separated list of email addresses, or array of email addresses the email will be sent to (using the “To:” field).
§ $subject—The subject of the email.
§ $message—The body of the email. By default, the email is sent as a plain-text message and should not include HTML. However, if you change the content type (see the following example), you should include HTML in your message.
§ $headers—Optional array of mail headers to send with the message. This can be used to add CCs, BCCs, and other advanced mail headers.
§ $attachments—A single filename or array of filenames to be attached to the outgoing email.
There are two major improvements wp_mail() makes over mail().
1. The wp_mail() function is hookable. The wp_mail filter will pass an array of all of the parameters passed into the wp_mail() function for you to filter. You can also filter the sending address using the wp_mail_from and wp_mail_from_name filters.
2. The wp_mail() function can be passed a single filename or array of filenames in the $attachments parameters, which will be attached to the outgoing email. Attaching files to emails is very complicated, but wp_mail() makes it easy by wrapping around the PHPMailer class, which itself wraps around the default PHP mail() function.
Sending Nicer Emails with WordPress
By default, emails sent through the wp_mail() function are sent from the admin email address set on the General Settings page of the admin dashboard, with “WordPress” used as the name. This is not ideal. You can change these values using the wp_mail_from and wp_mail_from_namefilters.
Also by default, emails are sent using plain text. You can use the wp_mail_content_type filter to send your emails using HTML.
Finally, it is nice to add a styled header and footer to all of your outgoing emails. This can be done by filtering the email message using the wp_email filter.
The following code combines these techniques to pretty up the emails being sent by your WordPress app:
//Update from email and name
function sp_wp_mail_from($from_email)
{
return 'info@schoolpress.me';
}
function sp_wp_mail_from_name($from_name)
{
return 'SchoolPress';
}
add_filter('wp_mail_from', 'sp_wp_mail_from');
add_filter('wp_mail_from_name', 'sp_wp_mail_from_name');
//send HTML emails instead of plain text
function sp_wp_mail_content_type( $content_type )
{
if( $content_type == 'text/plain')
{
$content_type = 'text/html';
}
return $content_type;
}
add_filter('wp_mail_content_type', 'sp_wp_mail_content_type');
//add a header and footer from files in the active theme
function sp_wp_mail_header_footer($email)
{
//get header
$headerfile = get_stylesheet_directory() . "email_header.html";
if(file_exists($headerfile))
$header = file_get_contents($headerfile);
else
$header = "";
//get footer
$footerfile = get_stylesheet_directory() . "email_footer.html";
if(file_exists($footerfile))
$footer = file_get_contents($footerfile);
else
$footer = "";
//update message
$email['message'] = $header . $email['message'] . $footer;
return $email;
}
add_filter('wp_mail', 'sp_wp_mail_header_footer');
Sending emails from your server can present interesting network problems. Running a local SMTP server for sending emails can be time-consuming on top of the work of running a web server. Deliverability of your emails can be affected by spam filters that haven’t whitelisted your apps IP range. The Configure SMTP plugin can be used to send your outgoing email through an external SMTP server like a Google Apps account. Services like Mandril and Sendgrid, each with their own WordPress plugin, also offer ways to send email from their trusted servers with additional tracking of open and bounce rates.
File Header API
The comment block at the top of the main theme and plugin files are often referred to as headers. The File Header API consists of three functions, get_plugin_data(), wp_get_theme(), and get_file_data(), which allow you to parse these comment blocks.
As a reminder, here is what a plugin’s file header may look like:
/*
Plugin Name: Paid Memberships Pro
Plugin URI: http://www.paidmembershipspro.com
Description: Plugin to Handle Memberships
Version: 1.7.3.2
Author: Stranger Studios
Author URI: http://www.strangerstudios.com
*/
You can pull this data into an array by calling the get_plugin_data() function:
get_plugin_data($plugin_file, $markup = true, $translate = true)
Its attributes are:
§ $plugin_file—The absolute path to the main plugin file where the header will be parsed.
§ $markup—A flag, which if set to true, will apply HTML markup to some of the header values. For example, the plugin URI will be turned into a link.
§ $translate—A flag, which if set to true, will translate the header values using the current locale and text domain.
The following code loops through the plugins directory and will show data for most of the plugins there. It actually takes quite a bit of logic to find all plugins in all formats. For that you can use the get_plugins() function, which will return an array of all plugins or take a look at the code for that function found in wp-admin/includes/plugin.php. More information on get_plugins() can be found in the WordPress Codex:
//must include this file
require_once(ABSPATH . "wp-admin/includes/plugin.php");
//remember current directory
$cwd = getcwd();
//switch to themes directory
$plugins_dir = ABSPATH . "wp-content/plugins";
chdir($plugins_dir);
echo "<pre>";
//loop through theme directories and print theme info
foreach(glob("*", GLOB_ONLYDIR) as $dir)
{
$plugin = get_plugin_data($plugins_dir .
"/" . $dir . "/" . $dir . ".php", false, false);
print_r($plugin);
}
echo "</pre>";
//switch back to current directory just in case
chdir($cwd);
Similarly, you can use wp_get_theme() to get information out of a theme’s file header:
wp_get_theme($stylesheet, $theme_root)
Its attributes are:
§ $stylesheet—The name of the directory for the theme. If not set, this parameter will be the current theme’s directory.
§ $theme_root—The absolute path to the theme’s root folder. If not set, the value returned by get_raw_theme_root() is used.
The following code loops through the themes directory and will show data for most of the themes there. It actually takes quite a bit of logic to find all themes. For that you can use the wp_get_themes() function, which will return an array of all WP_Theme objects or take a look at the code for that function found in wp-includes/theme.php. More information on wp_get_themes() can be found in the WordPress Codex:
//remember current directory
$cwd = getcwd();
//switch to themes directory
$themes_dir = dirname(get_template_directory());
chdir($themes_dir);
echo "<pre>";
//loop through theme directories and print theme info
foreach(glob("*", GLOB_ONLYDIR) as $dir)
{
$theme = wp_get_theme($dir);
print_r($theme);
}
echo "</pre>";
//switch back to current directory just in case
chdir($cwd);
Adding File Headers to Your Own Files
Both the get_plugin_info() and wp_get_theme() functions make use of the get_file_data() function. You can access the get_file_data() function directly to pull file headers out any file. This can help you to create your own drop-ins or sub-plugins (often referred to as modules or add-ons) for your plugins.
get_file_data($file, $default_headers, $context = "") has the following attributes:
§ $file—The full path and filename of the file to pull data from.
§ $default_headers—An array of the header fields to look for. The keys of the array should be the header names, and the values of the array should be regex expressions for parsing the label that comes before the “:” in the comment. You can usually just enter the header name as the regex as well.
§ $context—A label to differentiate between different kinds of headers. This parameter determines which extra_{context}_headers filter is applied to the default headers passed in:
//set headers for our files
$default_headers = array(
"Title" => "Title",
"Slug" => "Slug",
"Version" => "Version"
);
//remember current directory
$cwd = getcwd();
//change to reports directory
$reports_dir = dirname(__FILE__) . "/reports";
chdir($reports_dir);
echo "<pre>";
//loop through .php files in reports directory
foreach (glob("*.php") as $filename)
{
$data = get_file_data($filename, $default_headers, "report");
print_r($data);
}
echo "</pre>";
//change back to the current directory in case someone expects the default
chdir($cwd);
Adding New Headers to Plugins and Themes
Example 7-4 adds an Allow Updates header to plugins. If this header is found and the value is no or false, then that plugin will not be flagged to update.
Example 7-4. The Stop Plugin Updates plugin
<?php
/*
Plugin Name: Stop Plugin Updates
Plugin URI: http://bwawwp.com/plugins/stop-plugin-updates/
Description: "Allow Updates: No" i a plugin's header keeps it from updating.
Version: .1
Author: Stranger Studios
Author URI: http://www.strangerstudios.com
*/
//add AllowUpdates header to plugin
function spu_extra_plugin_headers( $headers ) {
$headers['AllowUpdates'] = "Allow Updates";
return $headers;
}
add_filter( "extra_plugin_headers", "spu_extra_plugin_headers" );
/*
loop through plugins
check if updates are disallowed and if so remove it from list
*/
function spu_pre_set_site_transient_update_plugins( $update_plugins ) {
//see if there are any plugins needing updates
if ( !empty( $update_plugins ) && !empty( $update_plugins->response ) ) {
//loop through plugins
$new_plugins = array();
foreach ( $update_plugins->response as $pluginpath => $plugin ) {
//check if the plugin is allowed or not
$plugin_data = ABSPATH . '/wp-content/plugins/' . $pluginpath;
$plugin_data = get_plugin_data( $plugin_data );
if ( strtolower( $plugin_data['Allow Updates'] ) == "no" ||
strtolower( $plugin_data['Allow Updates'] ) == "false" ) {
//change checked version and don't add to the new response
$update_plugins->checked[$pluginpath] = $plugin_data['Version'];
}
else {
//not blocked. add plugin to new response
$new_plugins[$pluginpath] = $plugin;
}
}
$update_plugins->response = $new_plugins;
}
return $update_plugins;
}
add_action(
'pre_set_site_transient_update_plugins',
'spu_pre_set_site_transient_update_plugins'
);
?>
[20] Posts with post_type page.
[21] If you move this code into a subdirectory of your plugin, you will need to update the register_activation_hook() and register_deactivation_hook() calls to point to the main plugin file.
All materials on the site are licensed Creative Commons Attribution-Sharealike 3.0 Unported CC BY-SA 3.0 & GNU Free Documentation License (GFDL)
If you are the copyright holder of any material contained on our site and intend to remove it, please contact our site administrator for approval.
© 2016-2026 All site design rights belong to S.Y.A.