WordPress: The Missing Manual (2014)
Part III. Supercharging Your Blog
Chapter 9. Getting New Features with Plug-Ins
WordPress offers an impressive set of built-in features. In the previous chapters, you used them to write posts and pages, and to glam up your site. But serious WordPress fans have a way to get even more from the program—or, technically, about 30,000 ways to get more, because that’s how many free WordPress plug-ins you can use to supercharge your site.
Before you go any further, be aware of one critical point: WordPress plug-ins work on self-hosted WordPress sites only. If you use WordPress.com, you’re not allowed to install even a single plug-in. This restriction isn’t as bad as it seems, however, because WordPress.com already offers a number of extra features and preinstalled plug-ins, as chosen by the fine people at Automattic. For example, WordPress.com sites come with social media sharing buttons for Facebook and Twitter, while self-hosted WordPress sites need a plug-in to do the same thing. So even though WordPress.com users can’t pack on new features, they do start off slightly ahead.
If you’re a WordPress.com site builder, you don’t need to go any further in this chapter. Skip ahead to Chapter 10 to keep using what you’ve got. But if you’re running a self-hosted WordPress site, you need to know how to add plug-ins to make your site truly great. This chapter shows you how to find, evaluate, and install plug-ins, and then tweak their settings. You’ll also explore several of WordPress’s most popular and practical plug-ins, including:
§ Jetpack. Automattic created this plug-in to give WordPress self-hosters most of the features available to WordPress.com sites, all in one easy step.
§ WPtouch. This plug-in gives your site a mobile-friendly face-lift, so it looks great on smart devices, like iPhones and iPads.
§ Online Backup for WordPress. Use this plug-in to help crash-proof your site.
§ WP Super Cache. This popular plug-in uses clever caching tricks to boost the speed of heavily trafficked pages.
You’ll see plenty more plug-ins in the following chapters, where you’ll use them to solve problems, fill gaps, and add all sorts of frills.
Managing Plug-Ins
WordPress reserves a section of the dashboard for plug-ins: the predictably named Plugins menu. You get started by choosing Plugins→Installed Plugins to see a list of all the plug-ins installed on your website (Figure 9-1).
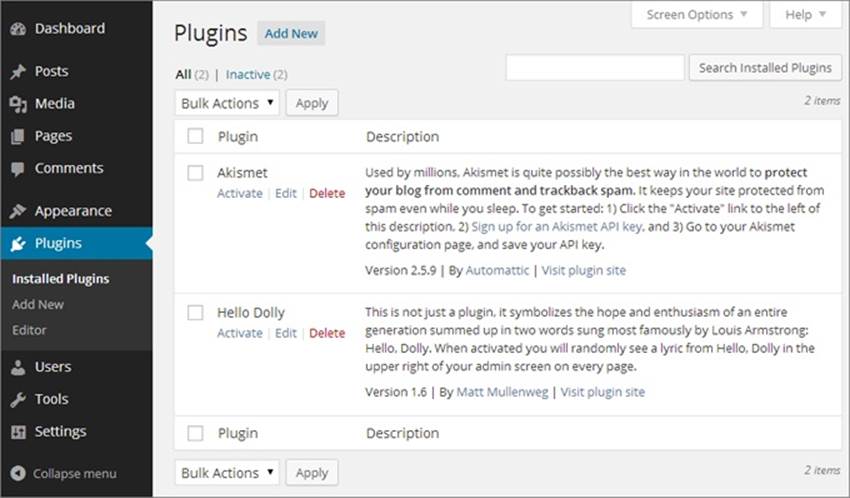
Figure 9-1. WordPress installations usually include these two plug-ins. The Akismet tool helps you catch comment spam (page 273), while the Hello Dolly plug-in doesn’t do much, other than let you test the plug-in system (page 293).
Usually, the self-hosted version of WordPress comes with two plug-ins that are installed but not active. That means the plug-ins are sitting on your website, ready to be called into service, but that they’re not actually doing anything yet. (It’s the same as when you install a theme but don’t activate it.) Some web hosts may top you up with a few extra plug-ins for security’s sake (such as the Limit Login Attempts plug-in discussed on 4. Prevent Password-Guessing Attacks). But to get the really good stuff, you need to install plug-ins on your own.
How Plug-Ins Work
Technically, a plug-in is a small program written in the same programming language (PHP) that runs the entire WordPress system.
Plug-ins work by inserting themselves into various WordPress operations. For example, before WordPress displays a post, it checks to see if you installed any plug-ins related to displaying posts. If you did, WordPress calls them into action. This sort of check is called a hook, and WordPress has a long list of hooks that launch plug-ins. A WordPress page can also use a special code, called a template tag, to ask a plug-in to insert something in a specific place on a page. Either way, the interaction between a WordPress site and its plug-ins happens behind the scenes, without your intervention.
Building plug-ins is a fairly ambitious task, because it requires programming skills and an intimate knowledge of the way WordPress works. Fortunately, there are plenty of good plug-ins you can use without writing a stitch of code. Most WordPress site owners spend a good deal of time picking the right plug-ins for their sites and tweaking them just so. Very few write their own.
NOTE
To learn more about creating plug-ins, you probably want to finish this book first, paying particular attention to Part 4, where you’ll take a peek at the PHP programming that holds WordPress together. Then you can continue with the somewhat terse WordPress plug-in documentation at http://tinyurl.com/write-plugin.
Searching for a Plug-In
The process of installing plug-ins is simply the process of copying the plug-in files to your site’s plug-in directory, which WordPress names /wp-content/plugins. For example, if you put WordPress on your site at http://pancakesforever.com/news, the plug-in folder ishttp://pancakesforever.com/news/wp-content/plugins. Of course, you don’t need to worry about the exact location of the plug-in directory, because WordPress always puts plug-ins in the right place.
To install a plug-in, choose Plugins→Add New, which takes you to the Install Plugins page. Five links at the top of the page let you decide how to find the mini-program you want. These are your options:
§ Search. If you can think of a keyword for the sort of WordPress plug-in you want (for example, “mobile” or “Twitter”), you can probably find it through a search. Type one or more keywords in the search box, and then click Search Plugins (as shown in Figure 9-2). Or click one of the links in the “Popular tags” section underneath, which displays the most common search keywords. Either way, WordPress scans its massive plug-in directory for matches.
NOTE
Don’t get confused by the fact that WordPress uses “plug-in directory” to refer to two things. First, there’s your website’s plug-in directory, which is the folder on your web server where WordPress stores the plug-in files for your website. Second, there’s the official WordPress plug-in directory, which is the giant catalog of thousands of plug-ins you can download and install on your site.
§ Upload. If you already downloaded a plug-in to your computer, all you need to do to use it is transfer it to your website. To do that, click the Upload link, browse to your plug-in ZIP file, and then choose Install Now. You use this technique if you create your own plug-in, or if you acquire a plug-in from somewhere other than WordPress’s plug-in directory (for example, if you bought a commercial plug-in from a third party).
§ Featured, Popular, or Newest. All these links let you browse the WordPress plug-in directory, which can help you discover plug-ins you might not know about. “Featured” shows useful plug-ins that WordPress has chosen to highlight, “Popular” includes the most downloaded plug-ins (ones that other people use), and “Newest” focuses on plug-ins that have been available for just a few days.
§ Favorites. This link shows any plug-ins you previously flagged as your personal favorites. This is a handy feature if you like to browse plug-ins in WordPress’s plug-in directory (http://wordpress.org/plugins), and install them later using your site’s trusty dashboard. To get WordPress.org to store your favorites, you need to register first, which you can do by clicking the Register link on the plug-in repository (it appears next to the user name and password boxes).
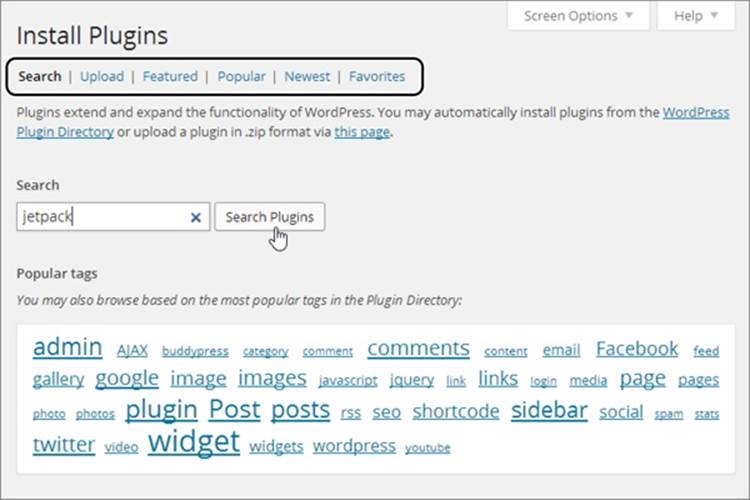
Figure 9-2. The Install Plugins page has five links to help you find plug-ins. In this example, you’re about to search for plug-ins that have the keyword “jetpack” in their name or description.
The WordPress plug-in directory, with its staggering collection of more than 30,000 mini-programs, is the place most WordPress experts look for plug-ins first. If you search for plug-ins, WordPress shows you a list of programs that match your keywords (Figure 9-3). If you browse by category, like Featured or Newest, WordPress lists relevant plug-ins.
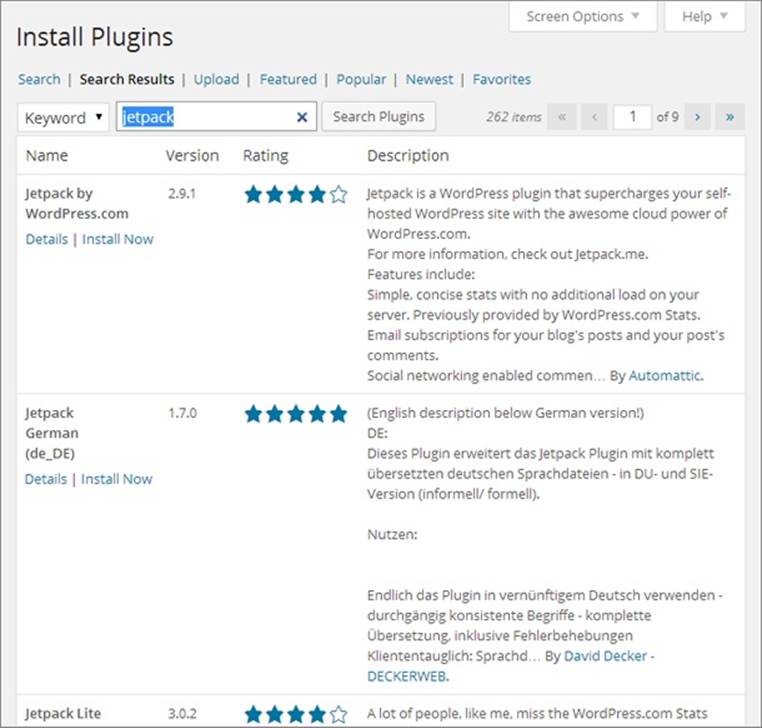
Figure 9-3. WordPress found 262 plug-ins that use the word “jetpack.” The first is the official Jetpack plug-in, which adds WordPress.com features to self-hosted sites (as described on page 297).
The next step is to determine if you actually want to install the plug-in you found. Before you decide, it’s worth clicking the Details link that appears under the plug-in name. That opens a window with extra information about the plug-in, including a more detailed list of its features, the current version number, the person who created it, its compatibility with different versions of WordPress, and the plug-in’s rating (Figure 9-4).
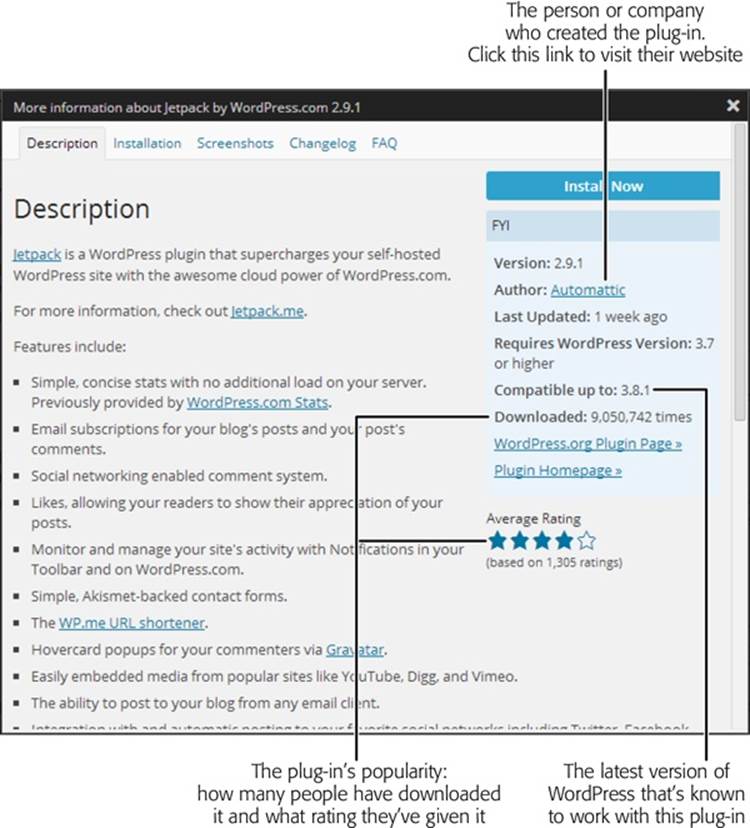
Figure 9-4. The Jetpack plug-in is up to date (it was last updated a week ago) and consistently popular (with a staggering 9 million downloads so far).
The most important information about a plug-in is its WordPress compatibility, which you determine by looking at three of the plug-in’s characteristics:
§ Requires WordPress Version. This tells you the minimum version of WordPress you need on your site to use this plug-in. Because you’re a security-conscious webmaster who always makes sure your site runs the latest WordPress updates, this part isn’t so important.
§ Compatible up to. This tells you the latest version of WordPress that the plug-in works with. Sometimes, people create plug-ins, maintain them for a while, and then abandon them. The result is that the old plug-ins keep kicking around the WordPress plug-in directory, even though they’re of no use to sites that use newer editions of WordPress. By checking the “Compatible up to” information, you can avoid these clunkers.
NOTE
The “Compatible up to” information reflects only the latest version of WordPress that the plug-in creator has tested. It’s not unusual for plug-ins to be slightly behind the times. For example, if WordPress 4.1 has just been released, a plug-in might claim support for up to WordPress 4.0 only. In this case, the plug-in is still likely to work on a WordPress 4.1 site.
§ Last Updated. You may want to check this date as you try to avoid old and out-of-date plug-ins. Although old plug-ins sometimes keep working, it’s best to stick with plug-ins that have been updated within the last year (at least). Regular maintenance also increases the chances that a plug-in is getting new features and fixes, which are two more attributes that make it a good candidate for your site.
If you’re still not satisfied, you can click one of the other tabs in the “More information” window to get still more information about your plug-in. Initially, you start at the Description tab (Figure 9-4), but you may want to check out other tabs, too: Screenshots to get a feel for what the plug-in looks like, Changelog to see what changes or fixes have recently been made, and FAQ to read the answers to common webmaster questions.
You may also want to look for information about the plug-in on the author’s page or website. You’ll often find the author’s blog, other plug-ins the author maintains, and some additional support information. To see, make sure you’re on the Description tab and then click the author’s name (which appears as a link in the information box, as shown in Figure 9-4).
TIP
Finding a good plug-in requires a bit of detective work. If you find a few plug-ins that seem to offer the feature you need, compare them to see which has the highest number of downloads, the best star rating, and the most recent updates.
POWER USERS’ CLINIC: WORDPRESS ISN’T THE LAST WORD ON PLUG-INS
The WordPress plug-in directory is the first and best place to look for plug-ins. It gives you thousands to choose from, and you can be reasonably certain they’re safe and stable. And they’ll always be free. (The most obvious disadvantage is that the WordPress plug-in repository is crowded with a number of out-of-date plug-ins, so you need to get good at sniffing out and avoiding these dead ends.)
However, there are also a number of companies that sell plug-ins. These for-pay plug-ins are sometimes called premium plug-ins, and they don’t appear in the WordPress plug-in directory. Instead, you find them though a Google search, a friend who’s in the know, a premium plug-in repository, or one of the many “Top WordPress Plug-In” articles. The problem with a premium plug-in (besides the fact that it costs money) is that you need to carefully scope out the company that makes it to make sure you aren’t paying for a mediocre product or, even worse, a bit of malicious spamware that will compromise your site.
In this book, you’ll stick to using free plug-ins from the WordPress directory. However, if you need something more (for example, if you’re a professional WordPress site designer who’s creating sites for other companies), you’ll eventually want to check out the high-end plug-in market. You can get more information from an advanced WordPress and web design site like Smashing Magazine (http://wp.smashingmagazine.com) or by browsing a premium plug-in site like WPMU DEV (http://premium.wpmudev.org) or CodeCanyon (http://codecanyon.net). But remember, even though premium plug-ins cost money, they aren’t necessarily better. Some of the best plug-ins in the industry are built by open-source developers and companies with WordPress-related businesses, and they don’t ask for anything more than an optional donation.
Installing a Plug-In
If you decide to go ahead with a particular plug-in, installing it is simple. Just click the Install Now link, which appears next to each plug-in in your search results (Figure 9-3) and in the “More information” window (Figure 9-4). When WordPress prompts you to confirm your installation, click OK.
Typically, the installation takes just a matter of seconds. WordPress gives you minimal feedback as it grabs the plug-in’s ZIP file, pulls all the plug-in files out of it, and transfers them to an ad hoc folder it creates on your website (Figure 9-5). For example, if you install Jetpack on the WordPress site http://magicteahouse.net, WordPress creates the folder http://magicteahouse.net/wp-content/plugins/jetpack for the plug-in files.
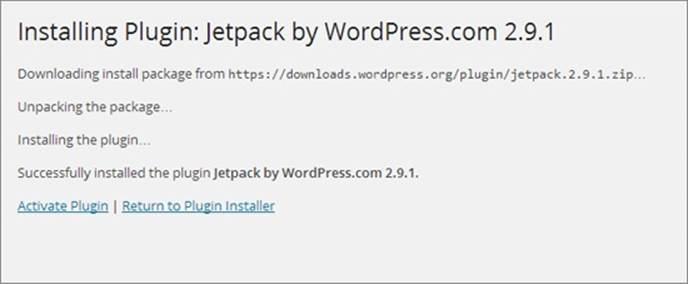
Figure 9-5. This is what you see when you install Jetpack. To start using it, click Activate Plugin. To search for another plug-in, choose Return to Plugin Installer.
Activating a Plug-In
Plug-ins are like themes—you can install as many as you want, but they have no effect until you turn them on. One way to activate a plug-in is to click the Activate Plugin link that appears when you first install the mini-program (Figure 9-5). But if you want to activate a plug-in you already installed, go to Plugins→Installed Plugins to see a list of available programs. Then click the Activate link under the name of the plug-in you want to use. (If the plug-in is already active, you’ll see a Deactivate link instead—click it to switch off the plug-in.)
You can’t always tell what a newly activated plug-in is up to. Often, there’ll be evidence that a plug-in is active somewhere in the dashboard, but every plug-in works differently. Some provide a new page of options in the dashboard menu, others add new widgets, some change the Add New Post or Edit Post pages, and some simply start doing their work quietly in the background.
In a newly created WordPress site, you start with two inactive plug-ins, as you saw back in Figure 9-1. To practice plug-in activation without risking anything on your site, you can activate the harmless (but also useless) Hello Dolly sample plug-in. When you switch it on, it adds a random lyric from Louis Armstrong’s song “Hello, Dolly” to the top of every dashboard page (Figure 9-6).
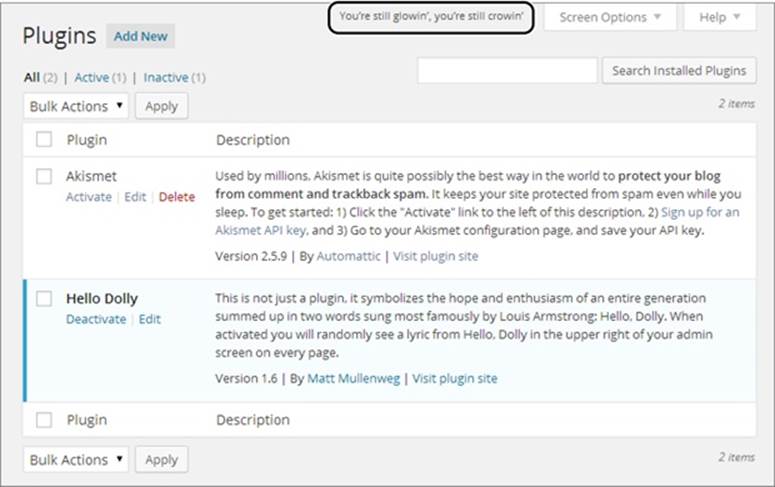
Figure 9-6. The Hello Dolly plug-in adds song lyrics to every dashboard page, which is just enough to let you know that the plug-in is active. However, it’s safe to assume that no one uses Hello Dolly for long on a real website.
The Hello Dolly plug-in needs no configuration. However, many plug-ins have their own page (or pages) of settings that you can adjust. Confusingly, different plug-ins put their settings in different places. Here are the three places to look:
§ The top-level items in the dashboard menu. Some plug-ins add an entirely new item to the dashboard menu. For example, if you install Jetpack, you see a Jetpack menu item near the top of the dashboard, just above the Posts menu (Figure 9-7). This is the most common place for plug-in settings, especially if the plug-in offers plenty of options. But there’s no surefire way to know where your plug-in’s link will appear. Some plug-ins put it near the top of the dashboard menu (as does Jetpack), while others put it at the bottom (WPtouch).
§ The Settings menu. Some plug-ins add a secondary menu under the Settings menu. For example, to configure the Limit Login Attempts plug-in, you choose Settings→Limit Login Attempts. Plug-ins are most likely to use this approach when they have a small group of settings that fit on a single page. (Although some plug-ins use tabs to cram a surprisingly large pile of settings into that one page.) You may even find a rogue plug-in that stashes itself in the Tools menu.
§ The Plugins page. As you know, WordPress lists every plug-in you install on the Plugins page. Underneath each plug-in are links that let you activate, deactivate, edit, and delete the plug-in. Some plug-ins add an additional Settings link that you can click to review and edit the plug-in’s options. Depending on the plug-in, this link may provide the only way to configure the plug-in, or it may duplicate a top-level menu heading or a command in the Settings menu.
For example, clicking the Settings link under the Jetpack plug-in has the same effect as clicking the Jetpack menu item (Figure 9-7).
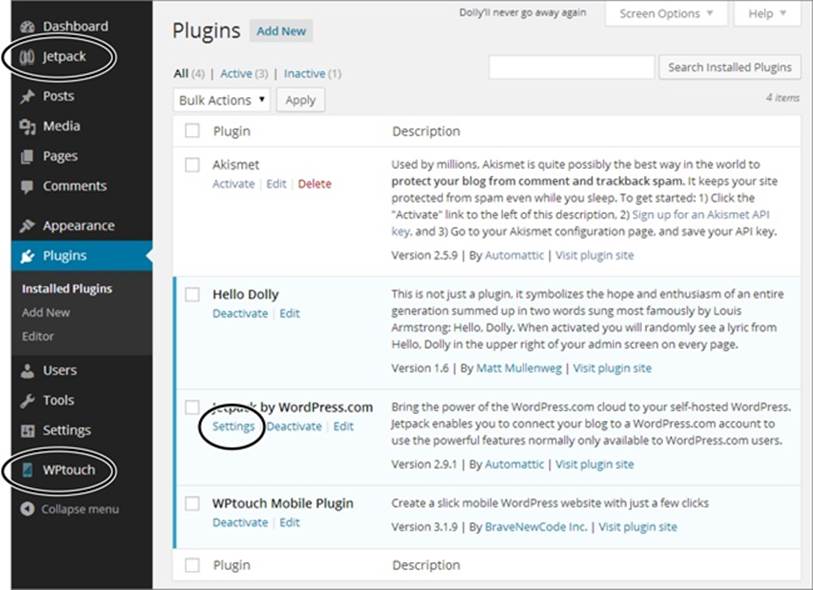
Figure 9-7. This site has three active plug-ins (highlighted). The Hello Dolly plug-in has no additional settings, but both the Jetpack and WPtouch plug-ins do, and you can get to them through dashboard menu headings (circled on the left). Jetpack also includes a Settings link on the Plugins page.
As you can see, different plug-ins often work in ways that are similar, but not the same. For that reason, you need to learn the way each plug-in works individually. In the remainder of this chapter, you’ll take a close look at several prime plug-in examples.
TIP
You don’t need to keep plug-ins you don’t use. If you decide to trash a particular plug-in, choose Plugins→Installed Plugins to call up the plug-in list, click Deactivate to switch a plug-in off (if it’s currently active), and then click Delete to remove it entirely.
UP TO SPEED: WHY YOU DON’T WANT TOO MANY PLUG-INS
When new WordPress users discover plug-ins, their first instinct is to load as much free goodness as they can onto their sites. After all, if one plug-in is great, two dozen must be mind-blowingly fantastic.
Before you get carried away, it’s worth pointing out the many reasons you don’t want to install every plug-in you find:
§ Performance. As you already learned, plug-ins use PHP code to carry out their tasks. The more plug-ins you activate, the more work you’re asking WordPress to do. Eventually, this work might add up to enough of an overhead that it begins to slow down your site. The plug-ins that do the most work (and are thus the most likely to hinder site performance) include those that back up your site, log your traffic, search for broken links, and perform search-engine optimization.
§ Maintenance. The more plug-ins you have, the more plug-ins you need to configure and update (when new versions come out). It’s a relatively small job, but pile on the plug-ins and you might find yourself with some extra work.
§ Security. Plug-ins can have security holes, especially if they’re poorly designed or out of date. More plug-ins can mean more risk.
§ Compatibility. Sometimes, one plug-in can mess up another. If your site uses a huge thicket of plug-ins, it’s difficult to track down which one is at fault. You need to resort to disabling all your plug-ins and then re-enabling them one at a time, until the problem recurs.
§ Obsolescence. Often, plug-ins are developed by helpful people in the WordPress community who need a given feature and are ready to share their work. But there’s a downside to this development model—it makes it more likely for an author to stop developing a plug-in (for example, when he doesn’t need it anymore or when he just doesn’t have the time). Eventually, a new version of WordPress may break an old plug-in you depend on, and you need to scramble to find a substitute.
The best way to avoid problems like these is to use popular, regularly updated plug-ins, make sure they’re always up to date, and keep the number of plug-ins you use small.
Keeping Your Plug-Ins Up to Date
Every time you install a plug-in, you extend WordPress’s features. If one of your plug-ins has a security vulnerability, it creates a chink in your website’s armor that exposes you to legions of cyber-attackers.
To avoid security problems, stick with well-used and well-loved plug-ins—those that have stood the test of time, are in widespread use, and are still regularly revised. And just as it’s important to keep WordPress secure and up to date, it’s also important to make sure you have the latest, most reliable versions of all your plug-ins.
Although WordPress can keep itself up to date, it’s up to you to keep your plug-ins current. The quickest way to spot an out-of-date plug-in is to look at the Plugins heading in the dashboard menu. If WordPress notices that there’s a new version of one or more of your plug-ins, it shows a number in a circle indicating how many updates await you. For example, if updates are available for three of your plug-ins, you see the number 3 in a circle (Figure 9-8, top). This happens regardless of whether your out-of-date plug-ins are active.

Figure 9-8. Top: WordPress wants you to know that your site has three out-of-date plug-ins. Bottom: When WordPress finds an update for a plug-in, it displays an “update now” link under it on the Plugins page.
You should always update your plug-ins as soon as possible. In fact, if you see the number-in-a-circle, you should probably stop what you’re doing and install the new plug-ins straightaway. Typically, updates take just a few seconds, so you won’t be stalled for long.
There are two easy ways to update a plug-in. You can do so from the Plugins page by clicking the “update now” link under the plug-in (Figure 9-8, bottom). Or, you can update numerous plug-ins at once using the Updates page (Dashboard→Updates), which lists all the out-of-date themes and plug-ins on your site. Check the box next to each plug-in you want to update and then click Update Plugins. Blink twice, and WordPress will let you know that everything is up to date.
NOTE
You must keep all your plug-ins up to date, even those that aren’t currently active. That’s because hackers can still access the inactive plug-ins on your site and exploit any security flaws they contain.
The Jetpack Plug-In
As you already know, WordPress.com sites don’t let you install plug-ins. But to keep people happy, Automattic adds extra frills with its own, carefully tested plug-ins. Every WordPress.com site gets these extras, and as a result, a stock WordPress.com site actually has more features than a newly installed self-hosted site. (But now that you know how to browse the plug-in directory, with its thousands of site enhancements, you can get your revenge pretty easily.)
If you don’t want to track down dozens of plug-ins, but you do want a simple way to get the same features that WordPress.com sites have, there’s a simple, all-in-one solution. It’s Jetpack, a plug-in developed by the folks who built WordPress.com, and equipped with almost all the same great features.
To learn about Jetpack’s features, visit http://jetpack.me. Highlights include a picture carousel (covered on Creating a Gallery), contact forms (Adding a Contact Form), enhanced comments (Chapter 8), Twitter and Facebook sharing (Chapter 12), and statistics about the people who visit your site (Chapter 12).
NOTE
The Jetpack plug-in is a useful way to get a pile of handy features in one package. You’ll use it on and off throughout this book. However, many WordPress experts avoid Jetpack’s cornucopia of plug-ins, preferring to pick and choose plug-ins that provide just the features they need. For example, they may use separate plug-ins for Facebook buttons, website statistics, and contact forms, rather than try to get them all through Jetpack. This is a bit more work, but it’s really up to you to decide what works best for your site.
Signing Up with WordPress.com
You already know how to install the Jetpack plug-in—just search the plug-in directory for “jetpack” and click the Install Now link.
However, Jetpack has one additional (and slightly irritating) setup requirement. To use it, you need a WordPress.com user ID and password, even though you don’t plan to host any sites on WordPress.com.
After you activate Jetpack, the plug-in notifies you about this extra requirement with a message above the plug-in list. Here’s how to get Jetpack to recognize your single-purpose WordPress.com account and get the plug-in working on your hosted site:
1. Click the “Connect to WordPress.com” button to set up the connection.
The Jetpack plug-in takes you to http://jetpack.wordpress.com and invites you to fill in your WordPress.com user name and password.
If you’ve ever created a site with WordPress.com, you already have these details—you don’t need to create a new account, because you can use the same one for as many Jetpack-enabled websites as you want. To finish the setup process, enter your information and click Authorize Jetpack.
If you’ve never used WordPress.com before, now is the time to create an account. Continue to the next step.
2. Click the “Need an account” link.
You see the standard WordPress.com sign-up page. The difference is that now WordPress.com assumes you want an account only, not a WordPress.com site. (If for some reason you do want a WordPress.com site, you could create it later, or you can click the “Sign up for a blog, too” link to get it as part of the sign-up process.)
3. Type in a user name, password, and email address.
Your user name can be any combination of letters and numbers, so long as there isn’t another WordPress.com member already using it.
Your password can be anything, but you should definitely make it different from the password you use for your self-hosted site or for your web host’s administrative interface.
Your email address is an essential detail, because WordPress.com sends you an activation email. If you don’t get it, you can’t activate your account.
4. Click the “Sign up” button.
Now you need to wait for the activation email message.
5. When the email arrives, click the activation link inside.
That brings you back to the Jetpack page, and the link logs you into your WordPress.com account automatically (Figure 9-9).
6. Click Authorize Jetpack.
WordPress brings you back to your self-hosted site, where Jetpack is now running.
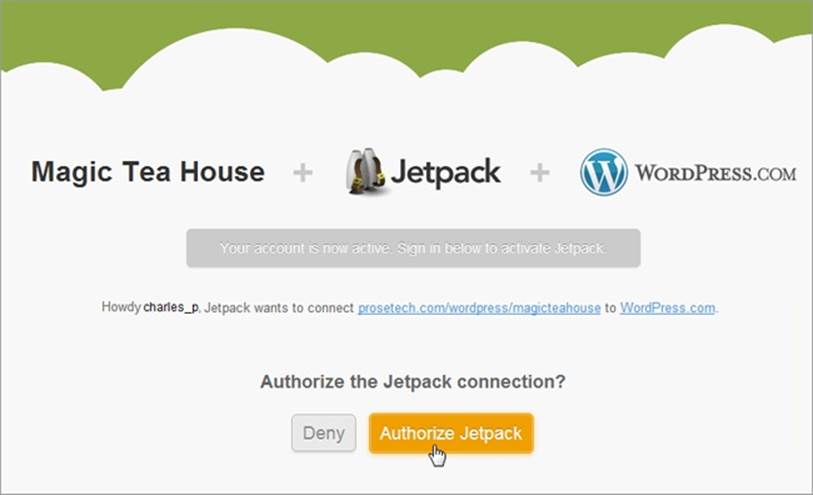
Figure 9-9. Before WordPress activates Jetpack, it asks if you want to use your WordPress.com user account (in this example, that’s charles_p’s account) to activate Jetpack on this site (Magic Tea House).
Some of Jetpack’s features need to be switched on before they become operational. To activate them (and to review everything Jetpack offers), choose Jetpack in the dashboard menu.
You’ll see many of Jetpack’s features in later chapters. In the following sections, you’ll try out three to get a taste of what the plug-in can do.
Using the Image Widget
You may remember from Chapter 6 that you can use the Text widget to display a picture in your site’s sidebar, using a tiny bit of HTML. The trick is to put an <img> element that points to your picture inside the Text widget (Adding Pictures to the Media Library).
WordPress.com users have an easier (albeit less flexible) tool: the Image widget. And now that you signed up with Jetpack, you’ve got the same advantage. Here’s how to put the Image widget to use:
1. Choose Appearance→Widgets.
This takes you to the familiar Widgets page in the dashboard. There you see a few new widgets that have Jetpack in the name, including one called “Image (Jetpack).”
2. Drag the Image widget to one of the widget areas on the right.
When you drop the widget into place, it expands to show a number of text boxes where you can fill in important details (Figure 9-10).
3. Fill in the information for your widget.
Obviously, the most important detail is the image URL—the location of the image you want to show. Usually, this is a file you uploaded to your site’s media library. If you don’t remember the address, you need to browse the Media→Library section of the dashboard, as explained onViewing the Media Library.
Along with the image URL, you can choose a title for the widget, give the picture a caption and alternate text, and turn it into a link that takes viewers to a web address you specify. You can also set a display size. If you don’t, WordPress displays the image as close as possible to its full, natural size, without exceeding the space available in the sidebar (or whatever widget area you placed it in).
4. Click Save.
Now the widget appears on your site, showing the image you picked.
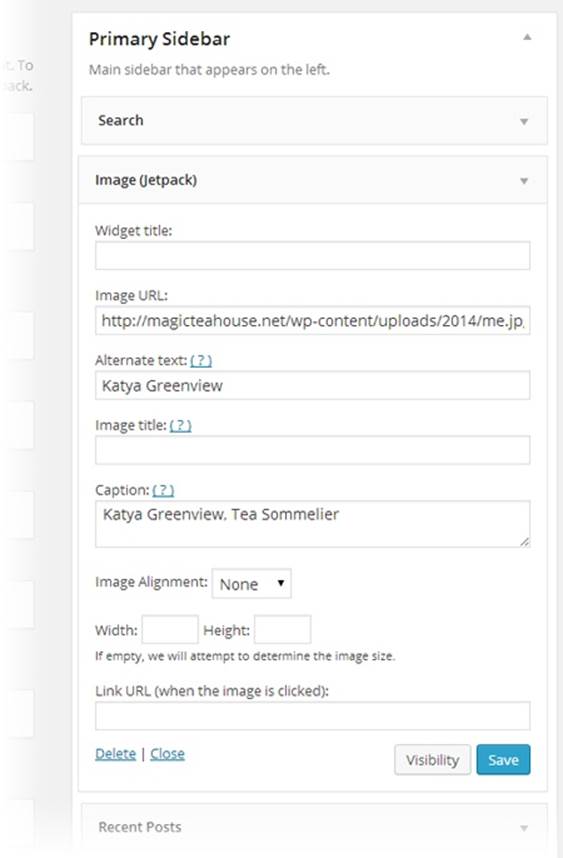
Figure 9-10. You can add the Jetpack Image widget to your site’s sidebar, just as you can add WordPress’s standard widgets.
Adding a Contact Form
The Image widget is far from an essential tool, but it is a real convenience, as are many of Jetpack’s features. However, Jetpack also includes some features that would be significantly more work to duplicate on your own. One is its contact form, which lets you solicit readers for any sort of information you want (Figure 9-11).
Often, you use contact forms to collect names, email addresses, postal addresses, or support questions. However, Jetpack is clever enough to let you build your own form, which you can edit to collect whatever information you want. To get started, you create a new post, and then click Add Contact Form (Figure 9-12) above the content box, to the right of the Add Media button.
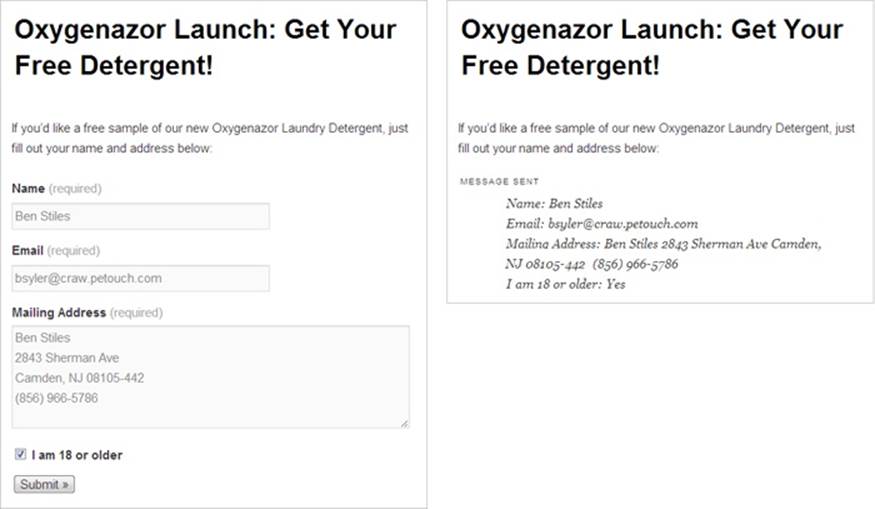
Figure 9-11. The idea behind a contact form is to solicit information from your guests. A reader fills in these blank text boxes (left), and then submits the form (right). WordPress collects the information, and passes it along to you in an email.
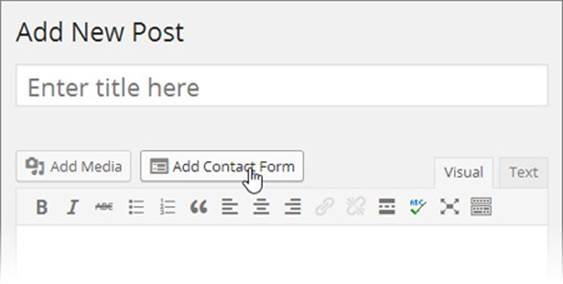
Figure 9-12. If you wonder why you haven’t noticed the Add Contact Form button before, it’s because you didn’t have it until you installed Jetpack. Clicking the button adds a contact form to any post.
Once you click Add Contact Form, the “Add a custom form” window opens (Figure 9-13) so you can design your survey. The window asks you to add “fields,” which is just a geeky way of saying that you need to specify the way a visitor can enter information, such as through a text box or drop-down list (see the box on Contact Form Field Types for a detailed explanation).
Here’s what you can do in the form builder:
§ Remove a field. Click the minus sign (-) on the right side of the field to delete it.
§ Add a new field. Click “Add a new field” and then enter the field information. Every field needs a label (the text above the field) and a “Field type” (the way the field collects information). Use Text for an ordinary single-line text box and Textarea for a big, multiline box, or pick one of the more specialized field types described in the box on Contact Form Field Types. Optionally, turn on the Required checkbox to force readers to complete a field before they can submit the form. When you finish, click “Save this field.”
§ Rearrange your fields. Point to the field you want to move until a “move” link appears in the top-right corner. Click the link and then drag the field up or down. (You can’t put fields side by side.)
§ Change your email settings. Ordinarily, WordPress sends the data from the form a visitor submits to your administrator email. If you want to use a different email account, click the “Email notifications” tab and fill in the new address.
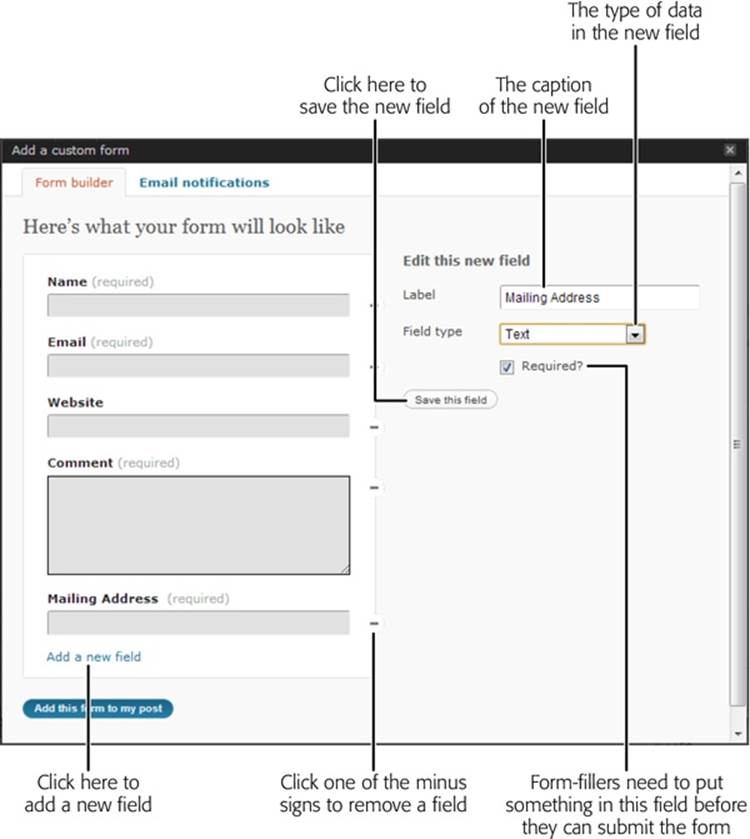
Figure 9-13. When you create a new form, Jetpack starts you out with four “fields,” in this case text boxes (Name, Email, Website, and Comment). You can remove the fields you don’t want and add new ones. Here, you added a field for a postal address.
UP TO SPEED: CONTACT FORM FIELD TYPES
WordPress’s contact form lets you choose from a small set of field types—the means by which you collect information. Here are your choices:
§ Text. This is your standard-issue single-line text box.
§ Textarea. This is a bigger text box that can hold whole paragraphs of information. Once you add a textarea box, you can drag the bottom-right corner to make it as big as you want.
§ Checkbox. This is a way to let guests turn options on or off.
§ Drop down. This is a list of values (which you specify) that you stuff into a drop-down list. The person filling out the form picks a single value from the list.
§ Radio. This is a list of values like the “Drop down” box, but the form-filler sees all his choices at once (they’re listed on the page). He clicks a small circle next to the option he wants. Usually, you use this field to list just a few choices, and use “Drop down” for a long list of options.
§ Email, Name, and Website. These field types look like ordinary text boxes, but WordPress is smart enough to automatically fill in the current guest’s email address and name if it knows those details (for example, if the person recently left a comment on your site). WordPress also performs some basic error checking to catch bad email addresses.
When you finish perfecting your form, click “Add this form to my post” at the bottom of the window. Jetpack inserts a series of strange-looking codes into your post, wrapped in square brackets (Figure 9-14).
TIP
You can edit a post’s form by clicking Add Contact Form while you edit the post, which loads the form builder with the form, just as you left it.
When someone submits a contact form, WordPress sends you an email. That person can fill out the form more than once (in which case WordPress sends you multiple messages). If you’re tired of juggling the notification emails, WordPress lets you review all the responses in a single place, the dashboard. Click Feedback in the dashboard menu to see a list of form submissions, arranged just like the dashboard’s comment list.
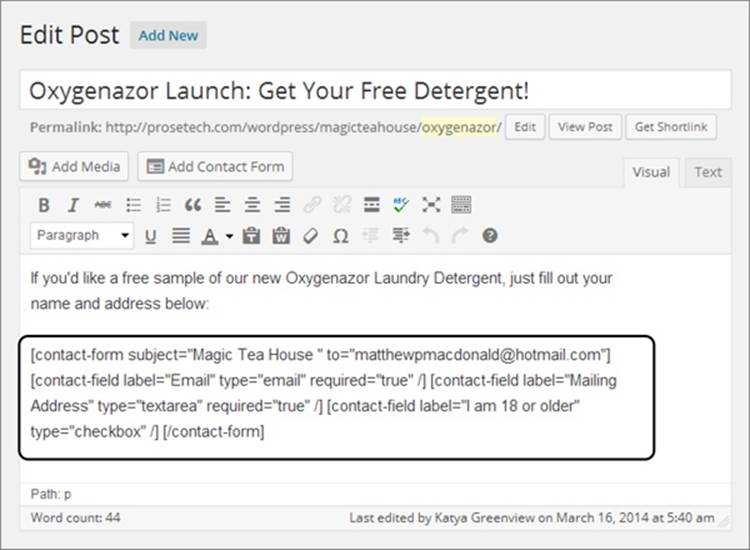
Figure 9-14. To create a contact form, Jetpack uses shortcodes, a WordPress feature you’ll learn about on page 323. However, you don’t need to pay them any attention—as long as you leave them alone, your form will appear in the published post just the way you want it. (Adding content above or below the form code, however, is perfectly acceptable.)
Adding a Mathematical Equation
The creators of WordPress also included some more specialized, quirkier plug-ins. One intriguing example is the mathematic equation feature demonstrated in Figure 9-15, which is the last Jetpack feature you’ll look at in this chapter.

Figure 9-15. This page mixes ordinary content with a properly formatted mathematical equation.
To create an equation with Jetpack, you use the LaTeX typesetting language, a standard in the technical publishing industry. For example, you write the equation in Figure 9-15 like this in LaTeX:
f(n) = n^5 + 4n^2 + 2 |_{n=17}
LaTeX isn’t a kind of HTML markup, and browsers don’t know anything about it. To turn a LaTeX expression into a formatted equation for your web page, you need a translation program. A variety of JavaScript libraries can do the job, with varying degrees of success, but if you use Jetpack, you don’t need to worry about another plug-in. Instead, you slip your LaTeX expression between two special codes: [latex] and [/latex].
For example, to create the post shown in Figure 9-15, you type the equation right into the post editor, as shown here:
To calculate the amount of steeping time, you need to know the weight of your
tea leaves, the surface area where the water meets the tea leaf, the volume
of water, the geometry of the tea pot, and the ambient temperature. For a
rough approximation, use this formula:
[latex]f(n) = n^5 + 4n^2 + 2 |_{n=17}[/latex]
When WordPress processes this page, the Jetpack plug-in notices the [latex] code, and interprets the content inside as a LaTeX expression. It replaces the expression’s text with a series of stitched-together image files. The result is a properly formatted equation that any mathematician can understand (and any browser can display).
NOTE
Technically, the [latex] and [/latex] syntax is part of a WordPress shortcode—a way of getting WordPress to insert special content using an instruction in square brackets. WordPress recognizes a few shortcodes automatically, and plug-ins can add their own. You’ll learn more about shortcodes in Chapter 10.
Of course, you can’t take advantage of Jetpack’s LaTeX wizardry unless you know a bit about the LaTeX standard (or you have a prewritten equation in LaTeX format). To learn more, start with the general tutorial at http://tinyurl.com/latexmath. If you find writing your own LaTeX expressions daunting, you can get some help from the LaTeX equation generator at http://tinyurl.com/latexequation. It lets you build a LaTeX expression by clicking your way through a mess of buttons. Finally, you can review WordPress’s documentation for the LaTeX feature athttp://support.wordpress.com/latex, which covers a few extra, WordPress-specific details (for example, it explains how to change the size of the generated equation, and how to adjust its background color if you want it to stand out on your page).
The next time you’ll use Jetpack is in Chapter 10, to give your site a photo carousel or slideshow. But now it’s time to review some other useful plug-ins.
Adding Mobile Support
In Chapter 5, you considered a thorny question—what does your carefully crafted WordPress site look like if someone views it on a mobile device, like a smartphone or tablet?
For self-hosted sites, the answer all depends on the theme you choose. If you use a mobile-aware theme (sometimes called a responsive theme), your site automatically adjusts its design when it detects a mobile device, substituting a simpler, streamlined layout that fits on the smaller display. The standard year themes, from Twenty Eleven on, are all mobile-aware.
If your theme doesn’t have these built-in smarts, you get a result that’s much less ideal. When people visit your site with a mobile device, they see the normal, full-size layout, which means they need to zoom and scroll around it awkwardly. The effect is a minor inconvenience on a midsized device like an iPad, but a serious aggravation on a small device like an iPhone. Readers may find that reading your site isn’t worth the finger cramps.
The solution is a plug-in that adds mobile support without disrupting your chosen theme. Several popular plug-ins handle the task, and they all work the same way, by swapping in a different theme when they detect a mobile device. The best plug-ins are smart enough to tailor the substitute theme for specific devices, so iPad owners see something a bit different from iPhone owners, for example.
TIP
Even if you do use a mobile-aware theme, you might still decide to use a mobile plug-in if the mobile representation of your site isn’t what you want. Maybe the mobile face of your site is too plain, performs sluggishly, or wastes too much space with a long post list. Perhaps the menus and widgets you chose for the desktop version don’t make sense in the cramped window of a smartphone, no matter how they’re arranged. Good mobile plug-ins give you a range of ways to tailor the appearance of your site on mobile devices. For example, you can change the menus, substitute a different home page, and even swap in smaller image files.
WPtouch, a wildly popular WordPress plug-in with millions of downloads to its name, lets you create a distinct mobile face for your site. You can find it at http://tinyurl.com/wptouch.
UP TO SPEED: USING THE PLUG-IN LINKS IN THIS BOOK
In this chapter (and throughout this book), you’ll frequently come across links to useful WordPress plug-ins. These links take you to WordPress’s plug-in directory, at http://wordpress.org/plugins. There, you get extensive information about the plug-in, including how it works, the number of times it’s been downloaded, its star rating, and its compatibility information (just as you can in the plug-in details window shown in Figure 9-4).
You can download a plug-in from the directory, presumably so you can upload it to your site later, from the Plugins→Add New page. But you don’t need to go through this two-step download-and-then-upload process. To install a plug-in discussed in this book, log in to your site’s dashboard, search for the plug-in by name, and then click the Install button to transfer it in one step.
The WPtouch Mobile Theme
WPtouch recognizes a range of smartphones and touch devices, including Apple products (that’s the iPhone, iPad, and iPod Touch), devices running the Google Android operating system, BlackBerry devices, and even old-school Palm gadgets. When one of these devices hits up your site, WPtouch steps in and displays your content using its slick mobile theme. It doesn’t matter whether your original site theme is mobile-aware or not. WPtouch bypasses it completely.
Once you install and activate WPtouch, you’re ready to try it out. Figure 9-16 shows what happens when a guest visits a WPtouch-enabled site with an iPhone.

Figure 9-16. Left: Although Twenty Twelve is a responsive theme, it’s not a perfect match for mobile devices. For one thing, the post list on the home page includes the whole text of every post, which makes for a lot of scrolling. Right: WPtouch’s mobile theme keeps the list of posts simple, highlighting the title, date, and number of comments, but leaving the content out.
The WPtouch mobile theme (Figure 9-17) departs from the average WordPress theme in several important ways:
§ WPtouch ignores widgets when it creates a mobile version of your site. This is quite different from the mobile version of the year themes, like Twenty Twelve. They retain all your widgets but place them before or after the main content. This ensures that the mobile view doesn’t sacrifice anything important from the desktop site, but it also creates a long and somewhat unwieldy page.
§ WPtouch doesn’t display any content in post listings. Instead, it simply shows the title, date, and number of comments for each post. Mobile surfers need to tap a title to read the post. Once again, this differs from the year themes like Twenty Twelve, which list all the content and forcemobile readers to scroll the day away. (Incidentally, you can tweak the way WPtouch shows posts using post excerpts, as described on Summarizing Posts with Excerpts.)
§ WPtouch doesn’t load all your posts at once. Instead, the page ends with a Load More Entries link. Click it, and the page fetches a new batch of posts and adds them to the bottom of the page. The page uses clever JavaScript code to stuff in just the new content without refreshing the whole page (Figure 9-17, right).

Figure 9-17. Left: If you use featured images, WPtouch shows them off in a slider at the top of the home page (to switch the slider off, see page 311). It also displays the images in a circle next to each post. Right: Scroll to the bottom of the screen and you see a link to load more posts, along with a button named Desktop that lets you turn the WPtouch mobile theme off. Click the button, and WPtouch refreshes the page, handing control back to your site’s original theme.
Configuring WPtouch
The WPtouch mobile theme overrides your standard theme completely. That means that even if your current theme has its own mobile-specific version, WPtouch replaces it. (If you do want to use the mobile version of your theme, deactivate the WPtouch plug-in on the Plugins page.)
That said, WPtouch does give you some leeway to customize the way it looks. To review your options, browse through the many pages in the WPtouch menu. For example, the WPtouch→Core Settings page includes these gems:
§ Site Title. Remember, WPtouch displays the title of your site but no header picture. If you want to change the site title that appears in the mobile theme without changing the site title for everyone else, you do that here. This is handy if you need to shorten a long title so it fits comfortably on smaller screens.
§ Landing Page. Ordinarily, WPtouch respects your WordPress settings, meaning that visitors start at the list of posts on your home page or on a static page, depending on your “Front page displays” setting (Creating a Brochure Site). But you might decide that mobile viewers should start somewhere other than that. Maybe you want them to bypass the ordinary home page because it’s too long and bloated with graphics. Or you want them to start with a page that provides links to specific posts (Figure 9-18).
§ Preview Theme. Click this button to open a tiny browser window with a preview of your site. Here’s the clever part: The preview window shows the mobile version of your site, which saves you the trouble of breaking out your iPhone to check out every change you make.
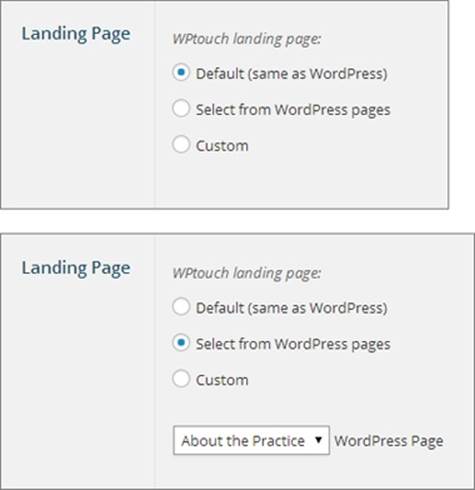
Figure 9-18. Top: Right now, the WPtouch home page uses WordPress’s “Front page displays” setting to decide what to put on the main page of your mobile site. Bottom: If that’s not what you want, choose “Select from WordPress pages” and pick a different front page for the mobile version of your site.
WPtouch has many more options in the WPtouch→Theme Settings page. Here are a just a few of the most noteworthy:
§ Number of posts in post listings. This determines how many posts appear on the home page before the Load More Entries link. It also sets the number of listings in the category-browsing and tag-browsing pages (Browsing Categories and Tags Using a Web Address), if you use them.
§ Excluded categories and excluded tags. Perhaps there are some posts on your site that aren’t appropriate for mobile viewing or aren’t likely to interest mobile users. As long as these posts belong to a specific category or have a specific tag, you can tuck them out of sight. Excluded posts won’t appear in the mobile site’s home page, in search results, or in category-browsing or tag-browsing pages. To exclude a category or tag, you need to enter its ID, which you can find in the Posts→Categories or Posts→Tags section of the dashboard. (To exclude several categories or tags, write the whole list in the text box, separating each ID with a comma.)
§ Show post categories and tags and Show post author. As you saw in Figure 9-16, WPtouch shows just a few essential details in its post list: title, date, and number of comments. Tick these checkboxes, and WPtouch adds the category, tag, and author information as well.
§ Enabled featured slider. Turn this option off to hide the featured image slider. Or tweak the settings underneath to control what pictures the slider shows and change whether the slider “slides” (cycles through its pictures) automatically.
You can play with plenty of other WPtouch settings. Dig around a bit, and you can change WPtouch’s color scheme or WPtouch’s mobile theme. Or visit the WPtouch→Menus page to modify the mobile version of your menus and give each menu item an eye-catching icon, which you choose from a gallery of ready-made pictures.
Clearly, WPtouch offers far more flexibility than you get with the average mobile-friendly theme. By comparison, the WordPress year themes don’t let you change any aspect of their mobile appearance.
Some WordPress developers are even more ambitious. They like the basic WPtouch theme but feel it’s a bit generic. They want to add touches of style and distinguish their site from competitors’. If you fall into that camp, the free version of WPtouch won’t completely satisfy you. However, the creators of WPtouch sell an enhanced version named WPtouch Pro. It offers more ready-made themes, more extensive theme customization, and with a pile of extra features (see http://tinyurl.com/wptouchpro). Currently, WPtouch Pro costs $49 for a single website, $99 for five. Although you certainly don’t need the Pro version, it’s money well spent if you expect that a large portion of your audience will visit your site using a mobile device.
Backing Up a WordPress Site
It’s easy to be casual about the safety of the files on your website. After all, even small web hosting companies take reliability seriously. They use systems that have a high level of redundancy—web servers with multiple hard drives, for example, and groups of computers that work together so that a hardware failure in one won’t sideline an entire website. Many web hosts also perform some sort of backup, copying the files they host to a storage location so they can recover them after catastrophes, like floods and fires.
But these measures, no matter how well-intentioned, aren’t enough to protect your WordPress site. Unless you do your own backups, your site is exposed to serious risks that your web hosting company can’t prevent. For example, an attacker could break into your administrator account and sneak some advertising or malware into your site. In some cases, these attacks are stealthy enough that you won’t notice any effect for weeks. By that point, the only backup your web host still has may be a copy of the infected site, making it useless and forcing you to rebuild from scratch. Other problems can occur, too. The Web has plenty of backup horror stories, including cases where a host’s backups go mysteriously missing, or an unexpected event puts a web host out of business, taking its websites with it.
To give your site a better chance of weathering crises like these, you need an independent backup solution. You have two choices:
§ You can use an automated backup service that visits your site every day and transfers its content to another set of servers elsewhere in the world.
§ You can do the work yourself, periodically downloading your content to your own personal computer for safekeeping.
In the following sections, you’ll consider both approaches.
Using an Automated Backup Service
This approach is the most convenient. Once you sign up with the right company, the process happens automatically, without another thought from you. The premiere example for WordPress is VaultPress (http://vaultpress.com), a backup service run by Automattic that stores every post, page, comment, and setting change from the moment you sign up. VaultPress gives you the ability to roll back to any point in the past if disaster strikes.
Automated backup services have a significant drawback—they aren’t free, and what you pay for backups can easily outweigh your hosting fee. The basic VaultPress package costs $15 per month, and its no-frills competitor blogValue, which stores just 30 days’ worth of backups, charges $10 per month.
If you have the money to sign up with an automated service, and you’re willing to pay to save a little time and a few headaches, check out VaultPress. It comes as part of Jetpack, although it’s not activated. To use it, you need to sign up at http://vaultpress.com/jetpack.
If you’re willing to take a slightly more hands-on approach, consider BackupBuddy (http://ithemes.com/purchase/backupbuddy). You can get a license for up to two sites for $80 per year, or a license for up to 10 business sites for $100 per year. However, BackupBuddy isn’t in the storage business, it’s just the tool that schedules and performs your backups. To use it, you need an account with a web storage service, so BackupBuddy has somewhere to store the backups it creates. BackupBuddy supports several such services, including Dropbox (www.dropbox.com), which is free for the first 2 GB of storage; Google Drive (http://drive.google.com), which is free for the first 15 GB; and Amazon S3 (http://aws.amazon.com/s3), which costs pennies per gigabyte. So if you have a modest-sized site (one that doesn’t include a library of 5,000 pictures or massive video files) and you don’t mind juggling a storage account, BackupBuddy is a reasonable compromise.
Backing Up with a Plug-In
If VaultPress is too pricey and you don’t want to fiddle with BackupBuddy, you need to take charge of backups on your own. Fortunately, plenty of free plug-ins can help you out. But before you get started with any of them, you need to understand one key fact. Every WordPress site needstwo types of backup:
§ A backup of your database. As you learned in Chapter 1, WordPress stores every post, page, comment, and stitch of content in a database on your web server. This is the most important part of your site, because without content all you have is an empty shell.
§ A backup of your files. These files include the contents of your media library, including every picture and resource you uploaded to your WordPress site, the theme files that tell WordPress how to lay out your content, and any plug-ins you installed.
NOTE
You back up theme files for two reasons. First, as you become a more advanced WordPress designer, you may begin customizing the themes (as explained in Part 4). Second, it’s always possible that the particular version of a theme you’re using will disappear from the Web, making it difficult to restore an old copy of a backed-up site.
If you’re handy with an FTP program, you can back up your files anytime. All you do is browse to your web hosting account and copy the contents of your WordPress folder to your computer. If you use Windows, this is as simple as firing up Windows Explorer, pointing it to your web host’s FTP site, logging in, and dragging the folder you want (the one with your WordPress site in it) onto your desktop.
However, even if you copy every file you see, you still won’t get the contents of your WordPress database, which is the heart of your WordPress site. To get that, you need a tool that can access the database, extract its contents, and put it in a file. (This tool also needs to be able to do the reverse, copying the data from a backup file into a new database, in case you need to re-create your site.) Unless you’re a MySQL guru, your best bet is to use a WordPress plug-in to help you out.
Many WordPress plug-ins concentrate on backing up a site’s database. They leave you to figure out an approach to copy the actual files on your site. Plug-ins that work this way include the popular WP-DB-Backup (http://tinyurl.com/wp-db-backup) and WP-DBManager (http://tinyurl.com/wp-dbmanager).
However, there are a few plug-ins that back up your site’s database and its files. Two good examples are BackWPup (http://tinyurl.com/backwpup) and Online Backup for WordPress (http://tinyurl.com/wponlineb), the plug-in described in the next section.
WARNING
There’s no perfect backup tool for everyone. (That’s why this book discusses so many backup plug-ins.) Every plug-in provides a different set of options, and some have strange quirks or don’t work well with certain web hosts. For example, your web host may restrict PHP email to fight spammers. If your backup tool works by sending backed-up data to an email account, it might not be able to finish its work. Backup tools also differ in their ability to deal with unexpected errors, like corrupted data or databases that appear to be locked. For all these reasons, you need to test whatever backup plug-in you pick, and regularly check to make sure it’s backing up your site.
The Online Backup for WordPress Plug-In
Online Backup for WordPress gives you two ways to back up your site:
§ Manually. You perform a complete backup via the dashboard, and then download the backed-up data in one big ZIP file.
§ Scheduled. You schedule a backup to run at certain times (for example, every night at midnight) and then have the backed-up ZIP file emailed to an account you specify. If you choose this route, you may as well create a dedicated Gmail account (at http://mail.google.com) for your back-up emails. With 15 GB of free storage, Gmail lets you stash quite a few backups without paying a penny.
The first thing you should do once you install Online Backup for WordPress is try a manual backup. That way, you’ll know if the plug-in works properly, and you’ll have at least one complete backup of your website to start you off. Here’s how:
1. Choose Online Backup from the dashboard menu.
This brings you to the control panel for Online Backup for WordPress, where you can start a manual backup, schedule a backup, or change back-up settings.
2. Click the Backup link at the top.
Choose what you want to back up (Figure 9-19).
3. Make sure you turn on both the Database and Filesystem checkboxes.
That way, you’ll back up the contents of your database and all the files on your website, packaged up in a single ZIP file.
4. Choose Local for the backup type.
Your other options are sending backups to the WordPress Vault or to an email address.
The WordPress Vault is a service offered by BackupTechnology, the creators of the Online Backup for WordPress plug-in. The catch is that the Vault grants you just 100 MB of space—to get more, you need to pay.
NOTE
If you want to use the WordPress Vault, you first need to sign up. You can get the process started by clicking the Online Backup Settings link.
The email option tells WordPress to send the backed-up data to the email address you supply. This option is more useful when you use scheduled backups, but you might use it with a manual backup if you’re backing up a huge site and you don’t want to stick around, waiting for the process to finish.
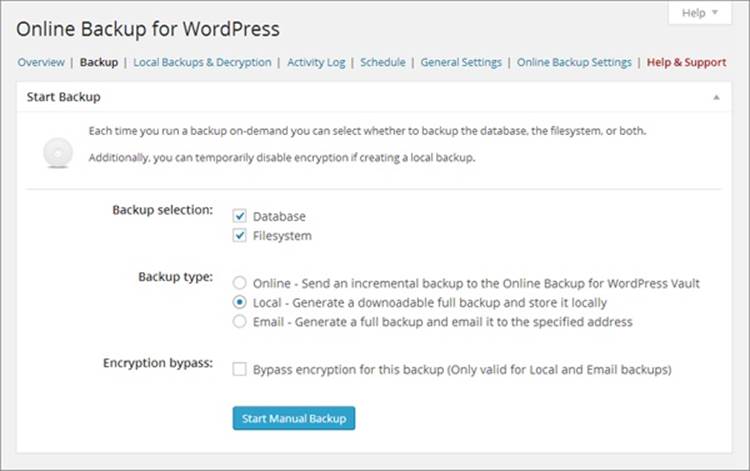
Figure 9-19. A manual backup lets you create an image of your entire website.
5. Click Start Manual Backup.
The Online Backup for WordPress plug-in starts gathering your website data and archiving it into a single compressed file, which it puts in a temporary location on your web server. While it works, you see a progress bar ticking away.
TIP
You don’t need to stay and supervise the backup—if you navigate to a different part of the dashboard, or log out of the dashboard altogether, the backup process continues. However, if you leave, you need to return eventually to download the final result—the file with your backup in it. When you’re ready, choose Online Backup from the dashboard menu and click the Local Backups & Decryption link, which shows you a list of all the backups Online Backup has stored on your web server.
When Online Backup for WordPress finishes the backup, it displays a new button, named Download (Figure 9-20).
6. Click Download.
Your browser may start downloading the file immediately, or it may first ask you where you want to store the backup and what you want to name it. The download process may take some time, depending on your Internet connection and the size of your site. Once you have the backup file safe and sound on your computer, your work is done.
If you need to reclaim space on your web server, you can delete the backup (once you copy it to a safe place) by clicking Delete. However, unless your site is gargantuan, there’s no reason to worry. The next time you perform a full backup, the Online Backup for WordPress plug-in overwrites your old backup with the new one.
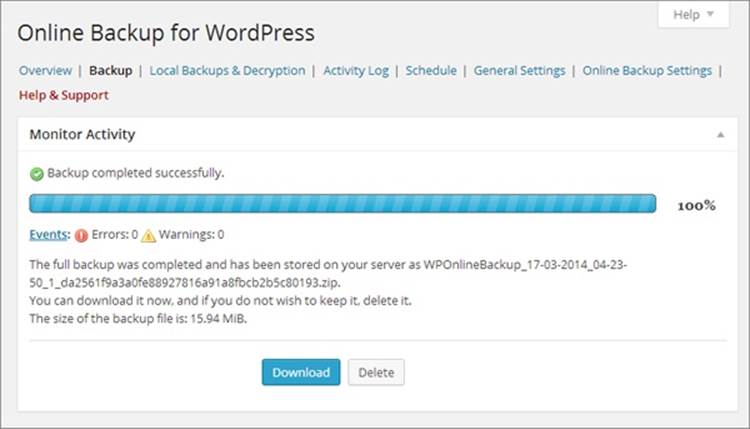
Figure 9-20. This website has a recent backup, which is stored on the web server in a single file that’s roughly 16 MB. You can download this file or delete it. To see all the backups that Online Backup has created, click the Local Backups & Decryption link at the top of the page.
TIP
It’s a good idea to peek inside the backup file to make sure it has everything it should. (Remember, it’s just an ordinary ZIP file that you can view on your computer.) Inside, you’ll find two folders. The Database folder includes a file that has the SQL instructions needed to rebuild your database and fill it with your data. The FileSystem folder holds all the folders and files from your website, exactly as if you’d downloaded them from your web host over FTP.
Better Performance with Caching
As you learned at the very beginning of this book, WordPress websites are powered by code. When a visitor arrives at one of your pages, the WordPress code grabs the necessary information out of your database, assembles it into a page, and sends the final HTML back to your guest’s browser. This process is so fast that ordinary people will be blissfully unaware of all the work that takes place behind the scenes.
However, even the fastest web server can’t do all that work (run code, call the database, and build a web page) instantaneously. When someone requests a WordPress page, it takes a few fractions of a second longer to create it than it would to send an ordinary HTML file. Normally, this difference isn’t noticeable. But if a huge crowd of hits your site at the same time, the WordPress engine will slow down slightly, making your entire website feel just a bit laggy.
POWER USERS’ CLINIC: SCHEDULING REGULAR BACKUPS
You can do a perfectly good job of disaster-proofing your site with manual backups. The problem is that it’s up to you to start every backup, download the final product, and keep your backed-up files somewhere smart. As time passes, you might find yourself forgetting to make backups, leaving your website at risk.
The solution is to tell your plug-in to do the backup work for you, at regularly scheduled intervals. For Online Backup for WordPress, you do this by choosing Online Backup from the dashboard menu and then clicking the Schedule link (at the top, just under the “Online Backup for WordPress” title). You can ask it to perform weekly, daily, twice-a-day, four-times-a-day, or hourly backups (which is probably excessive, and may earn you the ire of your web hosting company). You can then choose the type of backup—either an incremental backup that grabs the changed files only and stores them in the WordPress Online Vault, or a full backup that sends the results to an email address you supply. When you finish, click Apply Schedule.
You can keep an eye on your scheduled backups by clicking the Overview link (at the top). There, you’ll see basic information about when the last backup took place, whether it succeeded, how big the backup file was, and when the next backup will occur. You can get a more detailed summary of recent backup activity by clicking the Activity Log link, which is handy if you need to track down a mysterious error that interrupted one of your scheduled backups.
Finally, if you decide to send regular backups by email or store them on the WordPress Online Vault, it’s a good idea to encrypt them to make sure that Internet eavesdroppers can’t peek at your data. To do that, click the General Settings link, pick a type of encryption (the recommended AES128 algorithm is fine), and then type in an encryption key. This is a password used to encrypt your data, without which you can’t decrypt it. Writing this password down on paper is a very good idea, because it’s rather frustrating to have a crashed WordPress website and a full backup that you can’t open.
However, there’s a trick called caching that will satisfy even the most performance-obsessed WordPresser. The basic idea is this: The first time someone requests a page on your site, WordPress goes to work, running its code and generating the page dynamically. But once it delivers the page, the plug-in stores the result as an ordinary HTML file on your web server. Now here’s the ingenious part: The next time a visitor asks for the same page, the caching plug-in sends back the previously generated HTML, sidestepping the usual page-generating process and saving valuable microseconds (Figure 9-21). This shortcut works no matter how many people visit your site—as long as the plug-in has an ordinary HTML copy of the finished page, it uses that instead of creating a new copy all over again. Caching plug-ins can use other tactics, too, such as caching just part of the content, compressing the cached data, and discarding cached copies after a certain amount of time.
NOTE
Caching takes extra space on your website, because it stores extra HTML files. However, these files are rarely big enough to worry about. Caching plug-ins don’t attempt to cache your site’s pictures (or the other resources you uploaded to the media library).
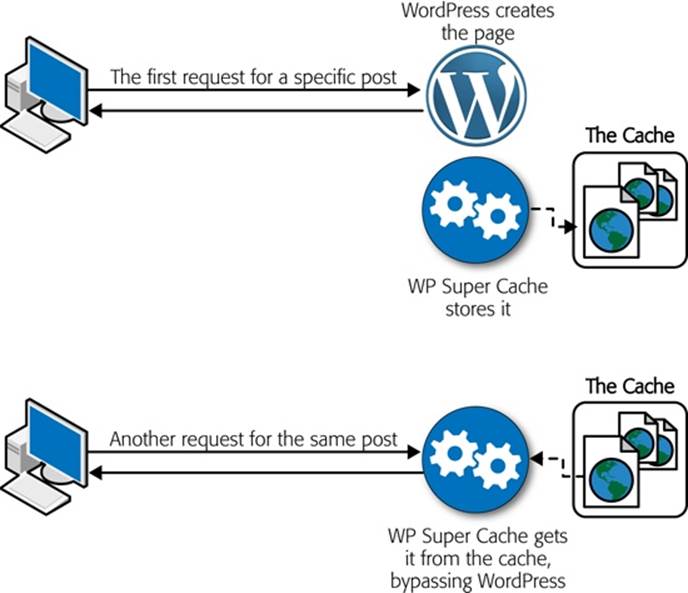
Figure 9-21. The idea behind caching is to generate a page once and reuse it for as many people as possible. That’s because sending back an already-generated page is always faster than building a new one (and less work for the web server, too).
There are several caching plug-ins in the WordPress directory, but by far the most popular is WP Super Cache (http://tinyurl.com/wpsupercache). To use it, install the plug-in, activate it in the usual way, and then turn on caching. To perform this last step, choose Settings→WP Super Cache, click the Caching On option at the top of the page, and then click the Update Status button (Figure 9-22).
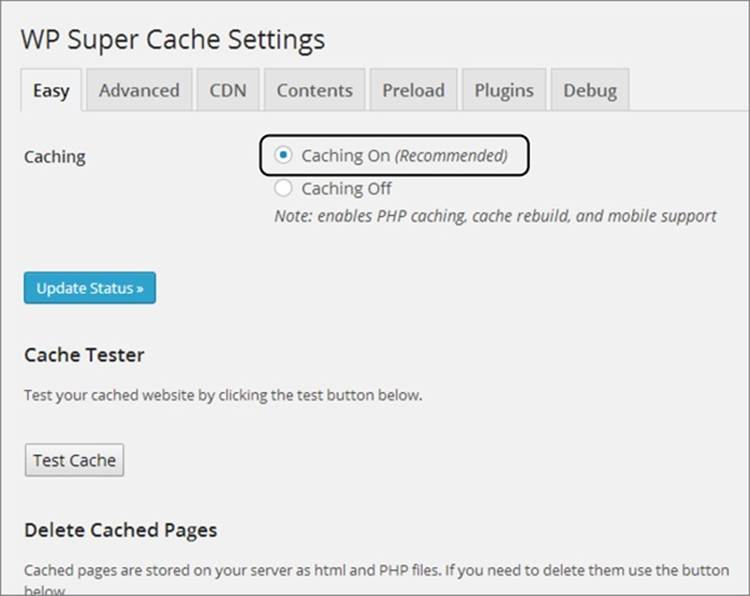
Figure 9-22. WP Super Cache packs in a pile of settings, but the most important is the Caching On option shown here—unless you turn it on, WP Super Cache sits idle.
To confirm that WP Super Cache is working, open a new browser window and look at a couple of posts. Then, return to the WP Super Cache settings and click the Contents tab. Finally, click the “Regenerate cache stats” link. WP Super Cache will report how many cached files it created (Figure 9-23). Even though these pages don’t look any different in a browser, WordPress sends them to your visitors more quickly, bypassing most of the processing the WordPress engine ordinarily does.

Figure 9-23. This site currently has four cached pages. To see them, click the “List all cached files” link. You can also use the Delete Cache button to discard every cached page, which is important when you test WP Super Cache or if you change the design of your site.
WORD TO THE WISE: WP SUPER CACHE’S EFFECT ON OTHER PLUG-INS
Caching changes the way your website works, and it can have unexpected side effects on other plug-ins. Here are some tips to help you steer clear of plug-in conflicts:
§ Check the documentation for your plug-ins. WP Super Cache is popular enough that other plug-in creators often test their plug-ins with it. To see if the plug-ins you use need special settings to get along with WP Super Cache, look up the plug-in in WordPress’s plug-in directory (http://wordpress.org/plugins) and check the FAQ tab.
§ Visit the Plugins tab in the WP Super Cache Settings. There are a few plug-ins that get special attention from WP Super Cache. If you have one of them, you can tell WP Super Cache to change the way the cache works to avoid disrupting the other plug-in. To do that, go to Settings→WP Super Cache, click the Plugins tab, find your plug-in, and then click the Enabled option next to it. (The WPtouch plug-in you used earlier in this chapter is in this list, for instance.)
§ Delay caching until you’re ready to go live. Switching on caching is the very last thing you should do with your WordPress site, after you polish your theme, tweak your layout, and start using your site for real.
§ Learn to troubleshoot. If something goes wrong, you need to be ready to track it down. Usually, the most recently activated plug-in is the culprit—try disabling it and seeing if your site returns to normal. If that doesn’t work, you need to deactivate every plug-in, and then activate them one at a time, testing your site after each step. Also, be on the lookout for theme vs. plug-in conflicts, which are less common but occasionally occur. If you change your theme and part of your site stops working, switch off all your plug-ins and then activate them one at a time.
You’ll notice that the cached pages appear in two lists in Figure 9-23, representing two slightly different types of caching. WP Super Cache automatically chooses the type of caching that makes sense for your page. For example, if you visit your site as a logged-in user, the plug-in uses less powerful WP Cache caching instead of WP Super Cache caching. But you don’t need to worry about these technical details, because WP Super Cache makes sure your pages are as fast as possible—which is always faster than they would be without caching.
NOTE
WP Super Cache is smart enough to know when it needs to regenerate the cached copy of a page, most of the time. For example, if you update a post or a visitor leaves a new comment, WP Super Cache takes notice and regenerates the page. However, WP Super Cache doesn’t pay attention to site design changes, so it won’t notice if you change the theme or rearrange your widgets. In this situation, you need to manually clear the cache to make sure your visitors see the latest version of your site. To do that, use the Delete Cache button shown in Figure 9-23.
Once you verify that your site still works properly, you’re ready to adjust a few WP Super Cache settings. Click the Advanced tab and look for settings that have “(Recommended)” next to them, in italics. This indicates a setting that improves the way WP Super Cache works for most people, but may cause problems in rare situations (and, for that reason, may be initially switched off). One example is the “Compress pages so they’re served more quickly to visitors” setting, which improves performance for most people but causes trouble with some web hosts that don’t support compression properly. You can try turning this setting on, but leave the other, more advanced options alone, unless you really think you know what you’re doing.
PLUG-IN POWER: EVEN MORE WORDPRESS PLUG-INS
In this chapter, you considered several of the most useful Word-Press plug-ins. However, in a directory of thousands, it’s no surprise that there are many more worth considering.
You’ll learn about some of these plug-ins in the following chapters (and some you’ll need to discover on your own). Here’s a list of some of the most popular:
§ Akismet. This spam-fighting tool is the only plug-in that ships preinstalled (but not activated) with WordPress. You learned about it in Chapter 8.
§ WordPress SEO by Yoast. Search-engine optimization (SEO) is the art of attracting the attention of web search engines like Google, so you can lure new visitors to your site. SEO plug-ins are among the most popular in the WordPress plug-in directory, and WordPress SEO by Yoast is an all-in-one package by one of the most renown developers in the WordPress community. You’ll take a closer look at it on Boosting SEO with a Plug-In.
§ WordPress Importer. Moving your WordPress site from one web host to another? The WordPress Importer handles the job with relatively few speed bumps. (In Appendix A, you’ll use WordPress Importer to migrate from WordPress.com to a self-hosted site.) Automattic developed WordPress Importer.
§ TinyMCE Advanced. You learned about this slick editor, suitable for beefing up your post-writing powers, on Getting a Better Post Editor.
§ WooCommerce. If you want to sell products on your site, complete with a professional shopping cart and checkout process, this could be the plug-in for you. Although you won’t use it in this book, you’ll try out a simpler shopping cart plug-in on Installing a Shopping Cart Plug-In.
§ BuddyPress. If your website is bringing together a tightly knit community—for example, the students of a school, the employees of a business, or the members of a sports team, you can use BuddyPress to add instant social networking features to your site. Users get profiles, the ability to message one another, add photos, create content, and talk together in groups. To learn more, visit http://buddypress.org.
§ WP-Optimize. This tool cleans up the junk that’s often left cluttering your database. It can remove unapproved junk comments (Fighting Spam with CAPTCHA), old post revisions (Revision Tracking), and other unnecessary data that can expand the size of your database, slowing down your site and bloating your backups.
§ Limit Login Attempts. This plug-in helps defend your site against hackers who use brute-force password-guessing attacks. You’ll learn more on 4. Prevent Password-Guessing Attacks.
All materials on the site are licensed Creative Commons Attribution-Sharealike 3.0 Unported CC BY-SA 3.0 & GNU Free Documentation License (GFDL)
If you are the copyright holder of any material contained on our site and intend to remove it, please contact our site administrator for approval.
© 2016-2026 All site design rights belong to S.Y.A.