WordPress: The Missing Manual (2014)
Part V. Appendixes
Appendix A. Migrating from WordPress.com
WordPress.com is a great place to start your WordPress venture, and many fans stay there forever. But there are several reasons to strike out on your own and set up a self-hosted WordPress site. Most commonly, it’s because you want to customize your site beyond what WordPress.com allows.
Here are the two features that can compel otherwise happy WordPress.com users to move on:
§ Themes. WordPress.com site owners can choose from a collection of barely 200 themes, while self-hosters get to pick from well over 1,000 themes in the WordPress theme repository (and still more if you’re willing to trawl the Web). More important, self-hosters can modify themes without restriction, which lets you do everything from swapping in your favorite Google font for headlines (Using Fancy Fonts) to redesigning the site so that it works like a product catalog (Chapter 14).
§ Plug-ins. You can’t add plug-ins to a WordPress.com site. You’re limited to a very small set of preinstalled plug-ins, chosen by Automattic. But on a self-hosted site, you have your choice of thousands of plug-ins that can extend your site with useful features, like better search optimization (Boosting SEO with a Plug-In), new tools for multiauthor collaboration (The Post Approval Process for Contributors), and money-making options like ads and donation buttons (Signing Up with PayPal).
Making the jump from WordPress.com to a self-hosted site can be awkward, but it’s nothing you can’t handle. Happily, WordPress has an import/export tool that does most of the work. In this appendix, you’ll learn how to make the shift and deal with some of the inevitable hiccups.
Before You Begin
Before you do anything, it helps to have an overview of the migration process. You need to complete several steps, in this order:
1. Sign up for a new site with a web host (for a monthly or annual fee).
This is also the point where you register a custom domain name (like www.supernovatattooparlor.com) if you don’t already own one. If you bought a domain name through WordPress.com, don’t worry—you can have it point to your new site when you finish the transfer process, as explained on Missing WordPress.com Features.
2. Install a fresh copy of WordPress on your new site.
Unfortunately, you can’t move a complete WordPress site as is. You need to start with a basic blank shell of a site and then load it up with the data from your old site.
3. Export the data from your old site.
You download this data to your computer as a single, compact file.
4. Import the data into your new site.
In this step, you add the downloaded content from step 3 to the empty WordPress site on your web host.
5. Configure and clean up your new site.
This is the part where you fiddle with your theme and install Jetpack, all in an attempt to make your new site function as much as possible like the old one.
6. Reroute your web visitors from the old WordPress.com site to your new self-hosted site.
This is optional, but you don’t want visitors going to an out-of-date copy of your site, missing your new posts. Ideally, visitors will be seamlessly redirected to your new site, without needing to click a link or type in a new web address.
The first two steps are covered in Chapter 3. Make sure you complete them before you continue any further in this appendix, because there’s no use trying to transfer a WordPress.com site if you don’t have a self-hosted site ready and waiting to receive it. The rest of this appendix covers everything else you need to do, beginning with step 3 above.
Transferring Your Data
Assuming you signed up with a web host and installed WordPress on your new site, the next step is to copy all the information from your WordPress.com site. That includes the posts and pages you wrote, the menus you created, and all the comments your readers submitted.
Transferring this data takes two steps. First, you download it from your WordPress.com site to your computer. Then, you upload it from your computer to your new site.
GEM IN THE ROUGH: GUIDED TRANSFERS
If this transition sounds like altogether too much work—or the thought of configuring anything to do with web hosting is enough to wake you, screaming, in the middle of the night—there’s an easier option. You can pay WordPress.com to perform a guided transfer, in which a nerd-for-hire at Automattic sets up your domain, transfers your site, and configures a few plug-ins that make the site run more like a standard WordPress.com site.
Unfortunately, there are two significant caveats: You need to cough up a one-time fee of $129, and you need to use one of WordPress’s recommended web hosts. To learn more, read up at http://tinyurl.com/guidedtransfer. To sign up, visit the Store section of the dashboard for your site, find the Guided Transfer box, and then click Buy Now.
Exporting Your Data from WordPress.com
Here’s how to get information out of your original WordPress.com site:
1. Log in to your WordPress.com site’s dashboard and choose Tools→Export.
The Export page opens, which gives you the option to export your data (described here) or to opt for the guided transfer process (described in the box above).
2. Click Export.
Now WordPress.com asks what data you want to extract (Figure A-1).
3. Choose “All content.”
If you want to create a significantly different site from your current one, you may want to bring over just some data; if so, choose one of the other options. Usually, though, you want to export everything.
4. Click Download Export File.
Depending on your web browser, you may be asked for a filename, or it may automatically save the exported file in your Downloads folder. The file will have a name like this:
therealestatediaries.wordpress.2015-01-17.xml
The first part is the name of your WordPress.com site (therealestatediaries), the second part is the date you performed the export (January 17, 2015), and the final part is the file extension that indicates it’s an XML file, which is a format computers often use to store structured data.
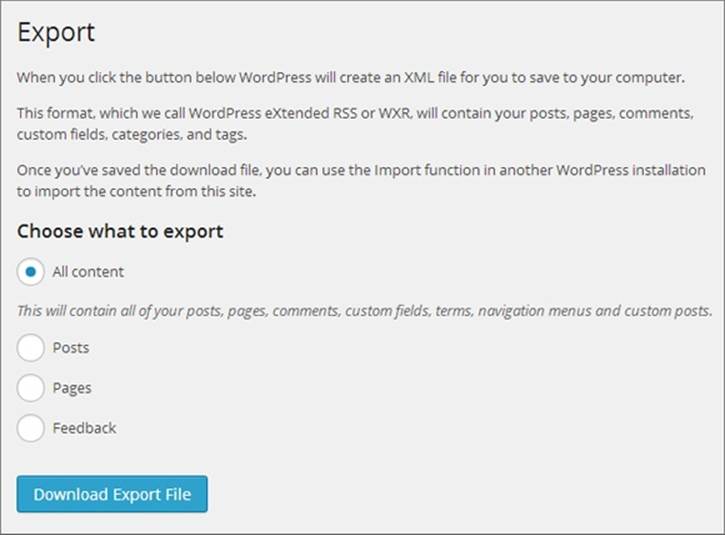
Figure A-1. WordPress.com’s “All content” option exports every exportable piece of site data: posts, pages, and comments.
FREQUENTLY ASKED QUESTION: WHERE ARE THE PICTURES?
My site uses plenty of pictures, but they aren’t in the export file. Where are they?
WordPress doesn’t attempt to put pictures and other post attachments in the export file. If it did, the export file could easily balloon to a gargantuan size. Instead, WordPress adds a link for each picture that belongs to an exported post or page. When you import your WordPress.com site to your new self-hosted site, the import tool processes these links, fetching the associated file from your old site and copying it to your new one. Problem solved!
Importing Your Data into a Self-Hosted Site
Although the exported file doesn’t look like much, it holds the nucleus of your site—the raw text of every post you’ve ever written. To add it to your new site, you need an import operation, as described in the following steps:
1. Log in to the dashboard of your new site, and choose Tools→Import.
WordPress lists the sites from which it can import data, including Blogger, LiveJournal, Movable Type, Tumblr, and several more.
2. Click the WordPress link to import the data you exported from your WordPress.com site.
The “Install importer” window opens (Figure A-2).
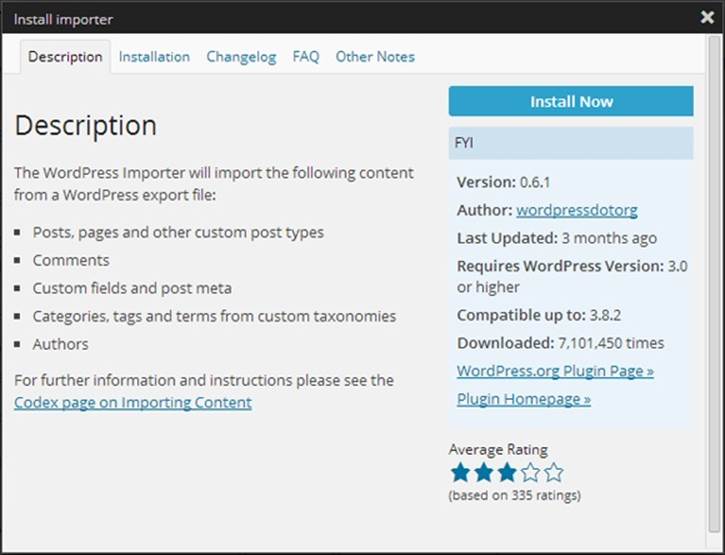
Figure A-2. WordPress self-hosters need to install the Importer plug-in before they can suck in any data. The first time you try to import something, you see this window, which describes the plug-in and lets you install it.
3. Click Install Now.
WordPress installs the plug-in in a fraction of second.
4. Click the “Activate Plugin & Run Importer” link to start the import process.
The Import WordPress window appears (Figure A-3).
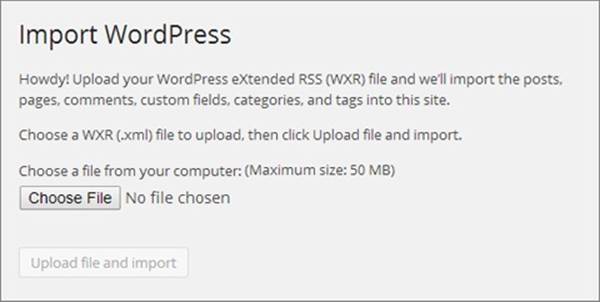
Figure A-3. Now you’re ready to pick the file that has the exported data.
5. Click Browse or Choose File (the exact name of the button depends on your browser). When the file selection window opens, browse to the exported XML file and select it.
That’s the file you created in the previous section, like therealestatediaries.wordpress.2015-01-17.xml.
6. Click “Upload file and import.”
If your export file is large, it’ll take a while for your browser to transfer it to your WordPress site. When it finishes, WordPress shows you a few more options (Figure A-4).
7. Optionally, you can change the author information for your posts.
Ordinarily, WordPress creates a new user for every author it finds in the export file. In the example in Figure A-4, WordPress will create a new user account for Charles M. Pakata and another one for lisachang2. When the WordPress importer adds a user, it keeps the original user name, display name, and email address. However, each author from the old site becomes a subscriber in the new site. (As you may remember from Adding People to Your Site, subscribers are severely limited in what they can do—they can add comments, but not create new posts or make changes to the site). Of course, you can change someone’s role after you import your old site from the Users→All Users section of the dashboard.
If you want to import your author information but give the authors new user names, type the name you want in the “create new user with login name” text box. For example, if you prefer to use the user name lisachang on the new site for the user formerly known as lisachang2, now is the time to make that change.
In some cases, you might want to assign imported posts to an author who already exists on your site. In this case, choose the author’s name from the “assign posts to an existing user” list. It doesn’t matter whether the author has the same user name on both your old and new sites; you still need to pick that name from the list to link up your imported posts.
NOTE
If you have the same user account on your new site and your old site, but you don’t bother to pick the author from the “assign posts” list, you’ll run into a strange problem. Say, for example, that you’re importing the user lisachang2 (and her posts) into a site that already has a lisachang2 user account. Unfortunately, the WordPress importer doesn’t know that these two accounts are meant to represent the same person, so it won’t create a new user account for lisachang2, nor will it assign her any posts. Instead, it will assign the posts that belong to lisachang2 to the currently logged-in person who is running the WordPress importer tool (that’s you), which probably isn’t what you want.

Figure A-4. In this example, the imported posts have two authors. You can choose to transfer this author information to your new site or assign the posts to different authors.
TIP
If you’re the only author on your site, you should assign all the posts you import to your administrator account on the new WordPress site—that’s the account you use to log in to the dashboard and write new posts.
8. Check the box next to “Download and import file attachments.”
This way, the WordPress importer copies all your old pictures and other media files from your old site to the new one. However, the copy process doesn’t include videos—if you’ve got any, WordPress.com’s VideoPress hosts them, and you need the Jetpack plug-in to display them on your new site (The Jetpack Plug-In).
9. Click Submit.
WordPress gets to work updating your site. If it needs to transfer a large number of pictures, it may take a bit of time before it finishes.
Cleaning Up Your New Site
Congratulations, your website is now under new management! As a self-hosted WordPress site owner, you’re in complete control of every setting, plug-in, and line of code in your theme.
However, life isn’t perfect yet. Right now, your new site probably doesn’t look a lot like your old site. Even though you have the same data, your new site sports the default theme (currently, that’s Twenty Fourteen). And its features and permalinks don’t quite match what you used in the old WordPress.com world, either. Read on to find out how to get your site closer to its previous incarnation.
Migrating Your Theme
Unfortunately, you can’t transfer a WordPress.com theme to a self-hosted site. However, most WordPress.com themes are also available to self-hosters. To check for your favorite theme, look in the WordPress theme repository. Choose Appearance→Themes, click the Install Themes tab, and then search for your theme by name.
If you can’t find the theme in the WordPress theme directory, you may be able to hunt it down online. Go to a web search engine like Google and search for the exact theme name, followed by the word “wordpress.” For example, the slick Imbalance2 theme is included with WordPress.com, but it’s not in the self-hosters’ theme directory. But if you search for “imbalance2 wordpress,” you’ll stumble across the freely downloadable theme files at http://wpshower.com/themes/imbalance-2.
Unfortunately, if you purchased a premium WordPress.com theme, you can’t port it over to your self-hosted site. However, you may be able to buy a second copy for your new site (usually for the same price). To look into this option, follow these steps:
1. Go to the WordPress.com theme gallery athttp://theme.wordpress.com.
2. Search for your theme, and then click it to see a page with more theme information.
3. Scroll down until you see the “Stats & Info” section at the bottom of the right-hand sidebar.
4. Look for a “More themes by” link, and then click it.
This takes you to a page with information about the theme creator. Look for a link to the theme creator’s site, and click that.
5. Finally, browse through the theme creator’s site.
Hopefully, you’ll find a self-hosted version of the theme you want, which you can buy and download. You can then add the theme to your site by visiting the Add Themes page and clicking the Upload Theme button (Installing a Theme on a Self-Hosted Site).
If you’re unlucky, you might not be able to find a version of your theme for your self-hosted site. In that case, you need to start over by choosing a new theme and customizing it to get the look you want. Chapter 5 has plenty of information that can help you find a good theme.
Even if you do find the theme you want, you may need to redo some of the basic customization you did before, when your site was running on WordPress.com. For example, you probably need to resubmit your site header (choose Appearance→Header) and add the widgets you want to the appropriate widget areas (Appearance→Widgets). And even though WordPress transfers your old menus, you need to reattach them to the right part of your theme (Appearance→Menus).
Missing WordPress.com Features
Although self-hosted sites and WordPress.com sites have most of the same features, they’re not identical. The chief culprit is WordPress.com’s built-in plug-ins, which provide features like slideshows, Facebook comments, web statistics, and sharing buttons. Throughout this book, we note what plug-ins you need to duplicate WordPress.com features. The best way to fill most of the gaps at once is to install the Jetpack plug-in. In fact, Automattic created Jetpack to help level the playing field between WordPress.com sites and self-hosted sites. You can learn more about it on The Jetpack Plug-In.
Permalinks
Every new self-hosted WordPress site starts out using ID-based permalinks. That means that when you click through to a specific post, you get sent to a page with a web address like this:
http://therealestatediaries.net/?p=299
By contrast, WordPress.com uses a permalink style that avoids IDs, instead combining the date and the post names to create links. They look like this:
http://therealestatediaries.wordpress.com/2014/07/30/know-the-law-before-it-
knows-you
As a result, when you transfer posts to your new site, they won’t have the same permalinks. You can easily fix this inconsistency. Choose Settings→Permalinks and pick a new permalink style. Permalinks on a Self-Hosted Site describes the options for self-hosted sites, but if you choose “Day and name,” you get the same web addresses that WordPress.com uses. Click Save Changes to make your selection permanent, and all your posts will automatically use the style you picked.
Redirecting Your Website Address
The last thing you want is to have two copies of your site on the Web. Not only will this thoroughly confuse visitors, but it’ll also baffle search engines. You need a single identity and a single web address for your site.
The exact steps you follow depend on your original website address—that’s the one you used with WordPress.com. If you bought a custom domain name when you originally signed up with WordPress.com, read the next section (Keeping Your Custom Domain). If your old site used a.wordpress.com address, jump to the second section (Moving from .wordpress.com).
Keeping Your Custom Domain
If you followed the good advice in Chapter 2 and bought a custom domain name when you first signed up with WordPress.com, the transfer process is easy. You can keep the same domain for your new site.
If you bought the custom name through a domain registrar, you already know what to do—log in to your account and point your domain to the new site (see Mapping an Entire Domain Name).
If you bought the custom name through WordPress.com, you have two choices:
§ Transfer your domain from WordPress.com to your new web host.
§ Keep it registered with WordPress.com but point it to your new site.
Both options have the same effect. The only difference is who charges you the yearly domain registration fee (either your web host or Automattic, the people who run WordPress.com). You might choose to transfer your domain if your web host charges you less, or if it offers a free domain with your website package.
No matter which option you choose, you need to configure your WordPress.com domain. To do that, log in to your old WordPress.com site and go to the Store→Domains section of the dashboard. Then follow the instructions at http://tinyurl.com/8ese4cp.
Moving from .wordpress.com
If your original site uses a .wordpress.com domain, you need to redirect guests to your new domain. Your best bet is to buy the Site Redirect upgrade, which costs $13 per year. To get it, log into your old WordPress.com site, visit the Store section, find the Site Upgrade box, and then click Buy Now. Tell WordPress.com about your new site, and it handles the redirection automatically, serving out a special sort of notice called an HTTP 301 code, which clearly tells search engines that you’ve moved to a new home (so they can update your listing).
In a year or so, when your readers (and the search engines of the world) have gotten used to your new address, you can cancel the upgrade and delete your WordPress.com site using the Tools→Delete Blog command in the dashboard.
NOTE
Instead of buying the Site Redirect upgrade, you could try to redirect traffic on your own. The basic technique is to change the home page on your old site to a static page that has a message explaining that you moved your site, along with a link to your new home. But this technique is fraught with problems, because readers may enter your site through bookmarks and miss your message, and search engines will continue funneling people to the wrong site (because it will have a higher ranking than your new site). So don’t do this unless your site has virtually no readers or search engine traffic to worry about.
All materials on the site are licensed Creative Commons Attribution-Sharealike 3.0 Unported CC BY-SA 3.0 & GNU Free Documentation License (GFDL)
If you are the copyright holder of any material contained on our site and intend to remove it, please contact our site administrator for approval.
© 2016-2026 All site design rights belong to S.Y.A.