WordPress: The Missing Manual (2014)
Part V. Appendixes
Appendix B. Securing a Self-Hosted Site
As you know, WordPress is one of the world’s most popular site-building tools. Thanks to its popularity, it attracts plenty of attention—and not all of it is good.
The uncomfortable truth is that the Internet is swarming with nefarious people who would love to get their hands on your site. The good news is that these enemies aren’t the sort of computer super-geniuses you see in movies, using semi-magical powers to hack into government sites faster than you can make a slice of toast. Instead, they’re the sort of riffraff you find loitering in the bushes near an empty house, or lurking around parked cars in an alleyway. They’re looking for low-hanging fruit—easy crimes of opportunity that become possible when someone leaves a door unlocked, forgets to close a window, or just plain stops paying attention. In the WordPress world, slip-ups like these occur when you forget to install a plug-in update, say, or fail to conceal your password. These attackers aren’t out to steal your stuff—usually, they just want to pull your site into their spam network by planting garish ads, dummy links, and other sorts of garbage.
Fortunately, you don’t need to make your WordPress site bulletproof; you just need to close the gaps and avoid the mistakes that allow 99 percent of the attacks. Do that, and hackers will move on from your site and find other places to cause trouble.
In this brief appendix, you’ll learn the five best security practices you can use to harden your site. Implement these techniques, and you’re sure to sleep soundly.
NOTE
Don’t underestimate the threat of a WordPress attack. Even though your site may not be large enough to attract a hacker’s personal attention, hackers run automated tools that can launch attacks against thousands of WordPress sites at a time.
1. Crash-Proof Your Site with Backups
If you take only one piece of advice from this appendix, it should be this: Back up your site regularly. It won’t prevent an attack, but it will let you recover from almost any catastrophe.
To keep your site safe, you need to create a proper backup schedule. You can’t just make an occasional backup whenever the thought crosses your mind. The ideal frequency depends on how often you add new content, the cost of recreating lost content, and the size of your site. A weekly backup is good—it ensures that you’ll never lose more than seven days’ worth of work. For frequently updated sites, a daily backup is better, because it limits your losses to a day or two.
You also need to think about how many old backups you save. Your goal is to keep enough to make sure you have a good copy of your site even if you don’t notice an attack immediately after it occurs. For example, if a hacker sneaks into your site and adds some subtle spam, you might not notice it for a couple of weeks. If you use a rolling backup strategy that keeps site snapshots from the last seven days, you’ll be left with a week’s worth of spam-compromised backups, and no good copy of your site. One way to avoid this problem is to combine a frequent, automated rolling backup (for example, 10 daily backups) with a less-frequent manual backup (every month or so).
Finally, you should think about where you store your backups. Usually, you put them in a private area on your website. But for the absolute best protection, you should download the occasional backup to your computer, so you have something to fall back on if a severe attack scrambles your entire hosting account.
If you installed your WordPress site with Softaculous, you’ve got easy access to the excellent backup feature described on Installing WordPress with Softaculous. If not, you can get a WordPress plug-in to do the same job, as described on Backing Up with a Plug-In.
2. Change Your Posting Account
When you install a new WordPress site, you start with a single account. This is an all-purpose administrator account that can do everything from writing posts to switching themes and installing plug-ins. This is exactly the sort of access a hacker would like to have, and every time you log into your site, you increase the chance that someone might steal your login details—whether that’s by snooping through network traffic or looking over your shoulder. And once hackers have those credentials, they can take complete control of your site, and even lock you out.
A safer strategy is to do all your posting using a more limited user account. That way, if a shady character gets your password, she can write posts (which you can easily delete after the fact), but she won’t be able to wreak real damage (like poisoning your plug-ins with malware). The only disadvantage to this approach is that you need to juggle two login credentials. Most of the time, you’ll use the more limited account to work with content. But if you want to reconfigure your site, you need to switch to the administrator account.
Putting this approach into practice is easy, provided that you rely on the user management skills you picked up in Chapter 11. Here’s what to do:
1. In the dashboard, choose Users→Add New.
Fill in the key details for your new account.
At a minimum, you need a user name, email address, and password. You can use the same email address as your administrator account, but you must choose a distinct user name (and you should definitely pick a different password). If you need some good password advice, seeCreating Your WordPress.com Account.
2. In the Role list, choose Editor.
An editor can do all the daily tasks necessary for a WordPress site. Editors have full control over every page and post, and they can moderate comments. However, they can’t change themes, plug-ins, and configuration of the site. This gives your site a wide margin of safety.
Alternatively, you can use the author role. The disadvantage is that you need to log in with different credentials to create pages or moderate comments. Adding People to Your Site details the different roles for a WordPress site.
3. Click Add New User.
This creates the user account. You can now log out of the dashboard and log back in as an editor.
Ideally, you should also make sure WordPress doesn’t display your user name as a byline, where a hacker’s screen scraping tool might grab it. (And besides, user names look ugly in posts.) To change how your name appears on the site, log in, visit Users→Your Profile, and choose a different name in the “Display name publicly as” setting. If you don’t see the exact name you want, type it into the Nickname box. WordPress automatically copies your nickname into the “Display name publicly as” list, where you can then select it.
NOTE
One last thing: Your admin account should never be named “admin”; that’s just too obvious. You already learned to avoid this rookie mistake when you installed your site, but if you failed to heed this good advice, you can fix the problem after the fact. Just create a new user that has the administrator role, log in under those new credentials, and then delete the original admin account.
3. Be Cautious When Extending Your Site
One of the great advantages of WordPress is its extensibility, which lets you change your site’s style and bolt on new features with themes and plug-ins. However, every theme and plug-in contains bits of PHP code that attackers can exploit. Most won’t bother (they’d rather use attacks that target every WordPress site, rather than hunt for sites with specific plug-ins). But some hackers are more devious. They create themes and plug-ins that contain spamware, and then attempt to get you to install them. If you do, there’s no need for a spammer to hack your site, because you just invited him in.
To steer clear of this danger, you need to stick to the official repositories for your plug-ins and themes. For example, you probably won’t go wrong on the official WordPress site, with its thousands of themes (http://wordpress.org/themes) and tens of thousands of plug-ins (http://wordpress.org/plugins). Most of the themes and plug-in links in this book are taken from WordPress repositories, although there are a few from other highly trustworthy sources. However, if you venture further afield, be careful. If you Google “free WordPress themes,” you’re almost certain to stumble across seemingly innocent offerings that have malware embedded in their code. So if you find an interesting theme or plug-in but have even a faint doubt about its provenance, stay safe and don’t install it.
Even respectable extensions from honest developers can have unexpected security vulnerabilities. Remember, all themes and plug-ins contain PHP code, which means there’s always a possible security flaw lurking in your files that’s waiting to be exploited. The more plug-ins and themes you have, the greater the risk you run. To keep the odds in your favor, use a small set of plug-ins—only ones that have proved to be truly valuable to your site. Always update your themes and plug-ins in the Dashboard→Updates page to make sure you’re protected should hackers discover a new security exploit. And remember to delete themes and plug-ins you don’t intend to use. As long as they’re installed on your site, an attacker can exploit them, even if you haven’t made them active.
NOTE
Several years ago, a number of WordPress site-builders ran into trouble thanks to an error in an image resizing script (called TimThumb), which turned up in a few dozen themes. Many site owners had one of the affected themes, and some assumed they were safe because the themes were inactive. But that wasn’t the case—the attackers were still able to use the inactive theme files to launch attacks and take over sites. The only defense was to upgrade or delete the flawed themes.
4. Prevent Password-Guessing Attacks
When you created your site, you learned about the dangers of bad passwords (Creating Your WordPress.com Account). But even the best passwords are just a combination of a letters, numbers, and a few other characters, which means they can all be guessed—eventually. To help with the guesswork, hackers use automated tools that attempt to log in to WordPress sites thousands of times a minute. Often, these tools use a long list of words and names, into which they substitute numbers and special characters.
Although password-guessing hacks aren’t the most common type of attack, they’re surprisingly easy to defend against. The Limit Login Attempts plug-in (http://tinyurl.com/limit-login-a) is the perfect tool. It notices suspicious activity—repeated failed login attempts—and temporarily locks up your account. This frustrates attackers and ties up their automated password-guessing tools, making it virtually impossible for them to gain access to your site by brute force.
To use the Limit Login Attempts plug-in, just install and activate it. You don’t need to perform any further customization. However, if you choose Settings→Limit Login Attempts, you can control how the lockout feature works (Figure B-1)
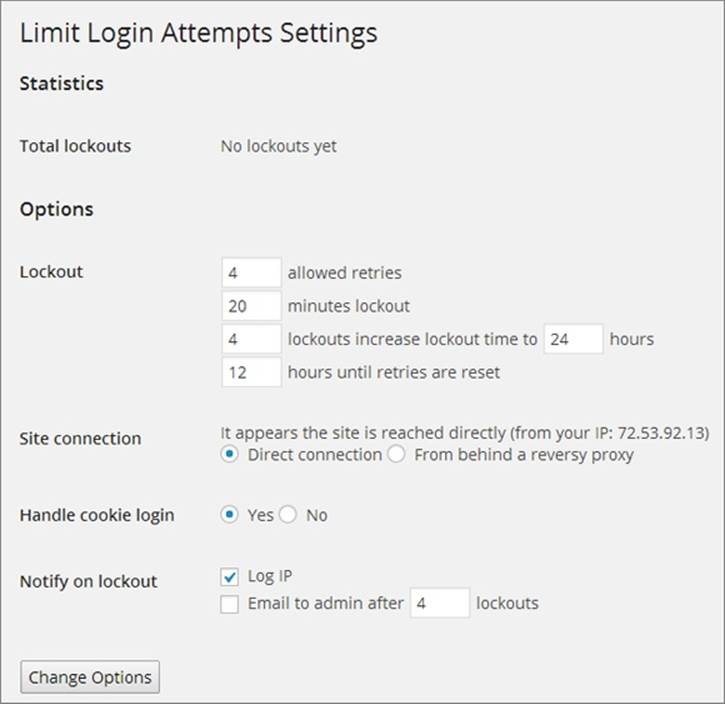
Figure B-1. The Limit Login Attempts plug-in lets you set how many consecutive failed logins you allow before the lockout applies (four is typical), how long the lockout should last (20 minutes to start), and whether the plug-in should notify you (by email) about the attempted incursion.
TIP
An alternate choice is the excellent (and very popular) Wordfence plug-in (http://tinyurl.com/w-fence). It provides a comprehensive suite of security features, including a configurable login lockout that works like Limit Login Attempts. Although it’s overkill for most small sites, Wordfence boasts some truly impressive features, including the ability to scan your WordPress files looking for malware, and real-time monitoring that checks your site for signs of an attack.
5. Hide Passwords with SSL
SSL (Secure Sockets Layer) is an Internet standard that encrypts information before it’s sent to a website. For example, when you make a purchase at Amazon, SSL encrypts your credit card details. The recipient of your message (Amazon) has no trouble decoding your secret message (the credit card number) and processing your payment. If Internet eavesdroppers intercept your message, they’ll find just a chunk of impenetrably scrambled data.
Wherever there’s ecommerce, and whenever you need to log in to a secure site (from Facebook to Gmail), SSL is at work. Browsers let you know when you’re visiting a secure site by displaying a tiny padlock in the address bar (Figure B-2), but if you’re in doubt, just look at the web address. If it starts with https://, your data is being encrypted; if it starts with http://, your information is travelling free and clear over the Internet.
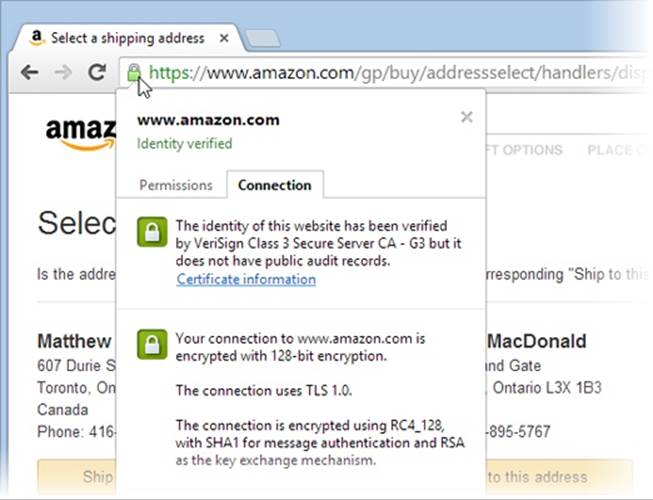
Figure B-2. Here, the padlock vouches for Amazon’s security. Click it and you get a pop-up balloon that describes your secure connection and identifies Amazon’s security certificate and the authority that issued it (VeriSign).
When you’re not using SSL, hackers have the opportunity to steal your data. All they need to do is watch the traffic as it flows over one of the network devices between your computer and the website you’re talking to. (If you’re curious to learn more, the detailed walkthrough athttp://tinyurl.com/steal-pass explains how a password can get stolen from an unsuspecting WordPress administrator.)
It comes as a great surprise to many WordPress fans to learn that a newly installed self-hosted WordPress site doesn’t use SSL. As a result, every time you log into the dashboard, your user name and password are exposed. A potential thief doesn’t need any special coding skills to steal your credentials, just good timing.
Although this vulnerability is disappointing, it’s not WordPress’s fault. In order to participate in an SSL-encrypted conversation, a website, like your newly launched WordPress site, needs to be able to prove its identity. And a site can do that only with a digital certificate—an electronic document from a trusted third party (known as a certificate authority) that vouches for the site’s identity.
For example, Amazon can accept your securely encrypted credit card details only because another organization has certified the Amazon site’s authenticity. Its digital certificate verifies that the www.amazon.com domain name truly belongs to Amazon. In other words, if you see a web address starting with https://www.amazon.com in your browser, you can be confident that you have a secure connection to the Amazon site, not another web server that’s attempting to impersonate it. If you want to have a secure conversation with your website, it needs a similar certificate. Think of the digital certificate as a license to use SSL.
UP TO SPEED: HOW DOES A CERTIFICATE AUTHORITY DECIDE TO TRUST A WEBSITE?
Obviously, there are massive numbers of websites with certificates, and in most cases the certificate authority doesn’t know much about them beyond their business name and address. And in recent years, certificate authorities have begun issuing cheaper certificates that simply guarantee that the certificate holder owns a certain domain. They don’t attempt to prove that there is a real person or business operating under that name.
However, the clever part about certificates is that they’re revocable. If it turns out that a business is defrauding people, misrepresenting itself, or engaged in spamware or illegal activity, the certificate authority can cancel the certificate immediately, rendering it useless. It’s much the same as a driver’s license—although the license itself can’t guarantee safe driving, a serious enough offense will lead to a suspended license.
The easiest way to get a certificate is to purchase it through your web hosting company. Typically, the cheapest type of certificate (called “domain-verified only”) requires an annual fee that falls between $50 and $150 per year, depending on your web host. To buy a certificate, contact your web host and file a certificate request.
Once your host certifies your site, you can log in to the dashboard with a secure connection—just modify your web address so that it starts with https://. You should see the comforting padlock icon in your browser’s address bar.
Even after you get a certificate, your site will still let people log in with normal, unencrypted connections. If they do, their passwords are just as vulnerable as they were before. To protect your site, you should force everyone (including yourself) to use SSL. In other words, you should tell WordPress to always demand an encrypted SSL connection for the dashboard. To do that, you need to change your site’s wp-config.php file.
You can do that two ways. Lazy administrators can use the WordPress HTTPS plug-in (http://tinyurl.com/wp-https). But if you’re comfortable using a text editor and an FTP program, you can make the change by hand:
1. Using an FTP program, download the wp-config.php file.
You find it in the root folder of your WordPress site.
2. Open the file you just downloaded in a text editor, and edit it.
Look for this comment:
/* That's all, stop editing! Happy blogging. */
Immediately before that comment, add this line (Figure B-3):
define('FORCE_SSL_ADMIN', true);
This tells WordPress that someone can manage your site only if she uses an SSL connection.
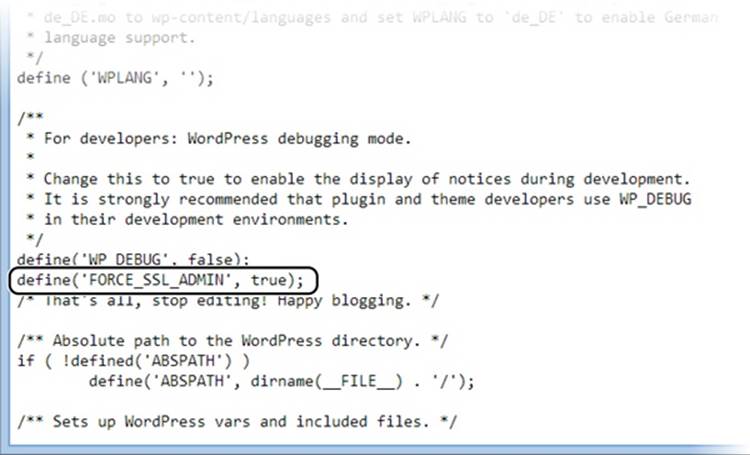
Figure B-3. Here’s the single line you need to add to your wp-config.php file to enforce an SSL connection, assuming your site has a digital certificate. Although some content appears after the “stop editing” comment, your SSL code should not.
NOTE
Don’t be intimidated if your site’s version of the wp-config.php file doesn’t look as tidy as the one in Figure B-3. The line breaks are optional, and some web hosts strip them out automatically, creating a more cluttered (but equally functional) configuration file. Just ignore the mess and add the SSL line above the “stop editing” comment.
3. Save your changes, and upload the new version of wp-config.php back to its original place.
Your FTP program will ask if you want to overwrite the old copy, which you do.
Now if you attempt to log in using an unsecured http:// connection, WordPress redirects you to the same page using the proper https:// encrypted connection. This means there’s no longer a way for passwords to slip out into the open during the login process.
All materials on the site are licensed Creative Commons Attribution-Sharealike 3.0 Unported CC BY-SA 3.0 & GNU Free Documentation License (GFDL)
If you are the copyright holder of any material contained on our site and intend to remove it, please contact our site administrator for approval.
© 2016-2026 All site design rights belong to S.Y.A.