WordPress: The Missing Manual (2014)
Part II. Building a WordPress Blog
Chapter 7. Adding Pages and Menus
In previous chapters, you focused most of your attention on WordPress posts—the blocks of dated, categorized content at the heart of most WordPress blogs. But WordPress has another, complementary way to showcase content, called pages. Unlike posts, pages aren’t dated, categorized, or tagged. They exist independently of posts. The easiest way to understand the role of WordPress pages is to think of them as ordinary web pages, like the kind you might compose in an HTML editor.
You’re likely to use pages for two reasons. First, even in a traditional blog, you may want to keep some content around permanently, rather than throw it into your ever-advancing sequence of posts. For example, personal blogs often include a page named About Me, where you provide biographical information. You don’t want to tie this page to a specific date—you want it easily accessible all the time. Similarly, businesses might use pages to provide contact information, a map, or a list of frequently asked questions. You can even create a fine-tuned home page to greet your visitors, instead of using the default reverse-chronological list of posts.
Another reason to use pages is to build simple sites that don’t feel like blogs. Some people call these sites brochure sites, and the description isn’t entirely complimentary. That’s because brochure sites present a collection of fixed information, while blogs feel live and interactive. However, there’s a wide range of possibility between these two extremes. For example, if you create a site for your small business, you might use pages to display the core content of your site (information about your company, your policies, the brands you carry, and so on), while adding a blog-powered section of posts for news and promotions. Is this a blog, a brochure-site, or something in between? No matter the answer, it’s a great solution for plenty of people.
In this chapter, you’ll learn to use pages to either supplement your blog or to create a brochure-style site. You’ll also learn to manage page navigation with menus, so your visitors can find the content they want. Lastly, you’ll consider some of the innovative ways that different themes exploit the pages feature.
Creating Pages
Although pages behave differently from posts, the process of creating and managing them is similar. Just as you work with posts in the dashboard’s Posts menu, so you work with pages in the Pages menu.
Here’s how to create a new page:
1. Choose Pages→Add New.
This takes you to a screen named Add New Page (Figure 7-1), which resembles a slightly simpler version of the Add New Post page.
TIP
If your site is on WordPress.com, you can take advantage of another path to page creation—the Copy Page shortcut, which creates a new page based on an old one. Choose Pages→Copy a Page (instead of Pages→Add New), find the page you want to duplicate in the resulting list of pages, and then click the Copy button next to it. You’ll still end up at the Add New Page screen, but you start out with an exact duplicate of the page you picked, which you can modify to suit your needs.
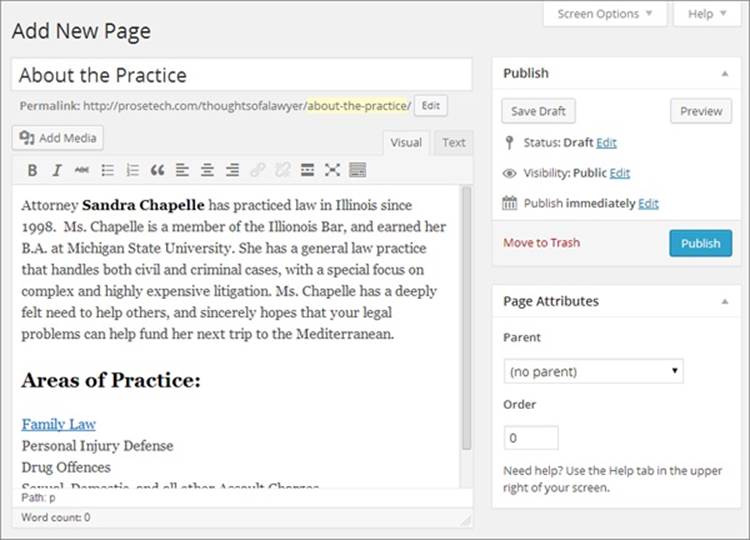
Figure 7-1. The form you use to create pages is similar to the one for creating posts. Both let you include pictures, fancy HTML markup, and featured images. But pages don’t let you add the classification details, like category and tag information, that posts do, which is why you don’t see those options here.
2. Give the page a title and some content.
You’ll see the same content-editing box you use to create posts, with the same two tabs. Choose the Visual tab to see the formatted text for your page, more or less the way it will appear on your site. Choose the Text tab to see the underlying HTML markup.
For now, don’t worry about the Page Attributes box—you’ll learn about the options there a bit later.
3. Finally, click Publish to make the page live on your site.
Or choose one of the other options in the Publish box. Just as with posts, you can save a page as a draft (Creating a New Post) or schedule it for future publication (Delayed Publishing).
When you publish a page, a “Page published” message appears at the top of the page, confirming that it’s up and open to the public. Now is a good time to click the “View page” link to take a look (Figure 7-2).
NOTE
Pages don’t have categories and tags, they aren’t listed in chronological order, and you can’t browse them by date. However, they still have some WordPress smarts. Most notably, they get their formatting instructions from WordPress themes, just like every other part of your site. In most themes, a basic page looks a lot like a basic post—for example, both use the same fonts for their title and text.
FREQUENTLY ASKED QUESTION: UNDERSTANDING PAGES
Why do some people call pages “static pages”?
Although WordPress calls this feature pages, many webheads find that confusing. After all, isn’t a page anything you view on the Web with a browser? And don’t posts appear in web pages?
For these reasons, WordPress experts—and WordPress itself, sometimes—often use a different term. They call WordPress pages static pages. Sadly, this term is almost as confusing. It stems from the old days of the Web, when designers distinguished between dynamic pages that could do incredible feats with the help of code, and static pages that showed fixed, unchanging content. That fits with the way most people use WordPress pages—they create them, fill them with content, and then publish them.
However, WordPress pages aren’t really static—they do change. Flip your blog over to a different theme, and all your posts and pages update seamlessly to match the new style. That’s because WordPress stores all the content for your pages—as well as the content for the rest of your site, including posts—in its database. And, finally, a static page changes anytime you decide to edit it.
If you’re still confused, here’s the bottom line: A WordPress site can hold both posts and pages, and you create, format, and manage them in much the same way. The key difference is that WordPress automatically dates, orders, and groups posts. WordPress also puts them on the home page and assumes that people will want to read them from newest to oldest. From WordPress’s point of view, posts are the lead actors on your site, while pages are supporting characters. But you’re not bound by that narrow definition of a site, as you’ll see on The Custom Menu Widget.
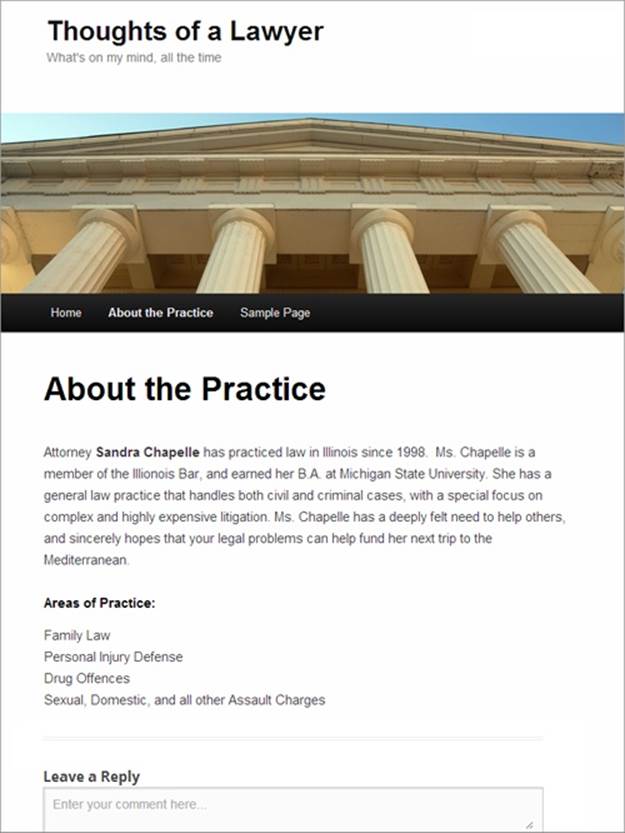
Figure 7-2. A page in WordPress looks suspiciously like a post. If you keep WordPress’s standard settings, your page even has room for comments, which you’ll learn to use in Chapter 8. (You can also turn comments off for your pages, as explained on page 230.)
To review a list of the pages on your site, choose Pages→All Pages. You see a familiar table of pages, which works the same way as WordPress’s list of posts and media files. Point to a page title, and you have the choice to view the page, edit it, or delete it (see Figure 7-3). And if you’re working with piles of pages, you can use the same bulk actions you use with posts to delete or change a whole group of pages in one step.
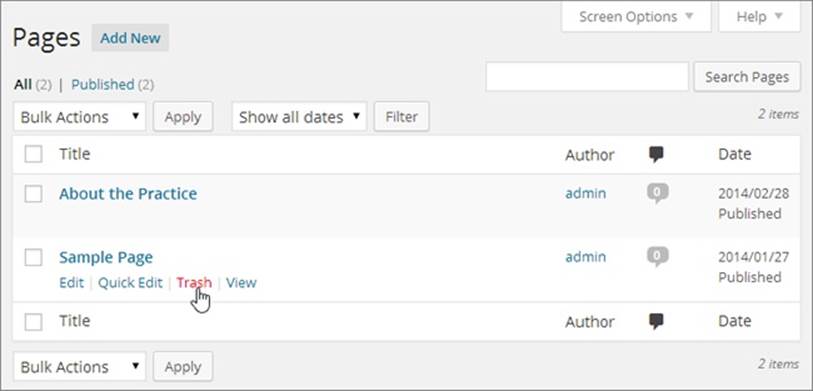
Figure 7-3. Every WordPress site starts with a sample page called, rather unimaginatively, Sample Page. Now is a good time to delete it. Just point to the title and then click Trash.
Viewing Pages
You can probably think of a couple of pages that would improve your site. If nothing else, you could add an About Me page with your biographical information in it. But a key question remains: How do your guests visit pages?
Like posts, every page gets a unique web address (URL), called a permalink. The permalink appears under the page’s title box as soon as you start entering the page content. WordPress uses the same rules to create page permalinks as it does to create post permalinks (as explained onPermalinks in WordPress.com), and you can edit the permalink for any page (Create Permalinks That Include the Category). But the important detail is that you can find a page by typing its address into your browser.
Of course, your readers aren’t likely to type in any URL other than the address for your home page, so you need to provide links so visitors can get to your pages. One way to do this is by putting links in posts and pages so you can connect them together. For example, you could add a link to the page shown in Figure 7-2 that takes readers to a new page when they click “Family Law” (Figure 7-4).
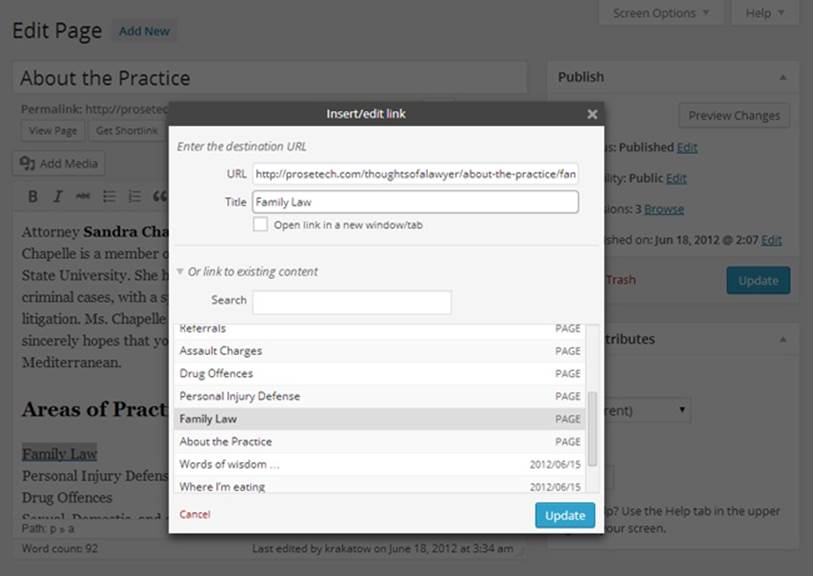
Figure 7-4. Clicking the Family Law link takes readers to the Family Law page. Making this happen is easy. You simply edit the “About the Practice” page, use the trusty Add Link toolbar button, and then find the Family Law page in the list of existing content.
Links are a decent way to join related posts and pages, but they aren’t much help if a guest wants to browse the pages on your site. That’s not a problem with posts—if your visitors want to read posts, they can browse them easily on the home page, starting with the most recent one and moving back in time. Or they can browse posts in a specific category or with a specific tag (Browsing Categories and Tags Using a Web Address). But WordPress doesn’t put pages in chronological order, feature them on the home page, or give them category or tag information. Visitors canfind pages through a keyword search (by typing something into the search box and then pressing the Enter key), because searches scan the content in both posts and pages. But guessing at keywords is a clumsy way to find a page, and it’s no substitute for a more convenient navigation system.
Fortunately, WordPress has several better, ready-made solutions to help visitors find your pages:
§ The Pages widget. Add this to your page, and visitors will always see a list of all your pages, in the order you want. This widget works best if you want to highlight all (or almost all) of your pages.
§ An automatic menu. Many themes automatically put all your pages in a menu on the home page. The only problem is that this auto-generated menu includes every page in your site. If that results in an overly cluttered or disorganized menu, you’ll prefer the next option.
§ A custom menu. You pick the pages you want to showcase and arrange them just so. You then display the menu somewhere prominent on your home page (often where the automatic menu used to go). Most people take this route.
You’ll explore all these options in the following sections.
Showing Pages in the Pages Widget
The Pages widget displays a simple list of links (Figure 7-5). Like any other widget, you can place it anywhere on your home page, such as in a sidebar. Choose Appearance→Widgets and then drag the widget where you want it.
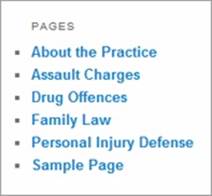
Figure 7-5. The Pages widget displays all the pages you create. Visitors can click a link to visit a page.
You may want to use the Pages widget to show just some of your pages. To do that, you need to explicitly indicate what pages you don’t want to show. Each page has a unique ID number, and you indicate the pages you want to exclude by creating a comma-separated list of ID numbers in theExclude box (Figure 7-6).
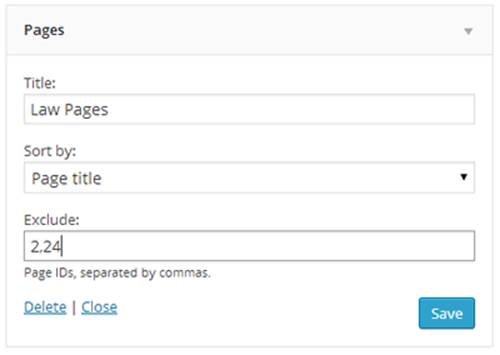
Figure 7-6. This Pages widget is configured to show every page except numbers 2 and 24.
The slightly tricky part is figuring out the page’s ID number. If you run a self-hosted blog and you haven’t changed WordPress’s permalink style (Permalinks on a Self-Hosted Site), the ID appears right in the URL. But if you use WordPress.com or you switched to more readable title-based permalinks, you need to take a different tack. First, go to Pages→All Pages to see all the pages in your site. Then point to the title of the page you want to exclude. The page’s URL appears in your browser’s toolbar, in this format:
http://prosetech.com/thoughtsofalawyer/wp-admin/post.php?post=24
&action=edit
In this example, the page ID is 24. (Don’t be confused that the URL actually calls the page a post—it’s an old but harmless WordPress quirk.)
TIP
If you have trouble seeing a page’s permalink in your browser, try copying the address. Right-click the page title and choose a command with a name like Copy Shortcut or Copy Link Address (the exact wording depends on your browser). You can paste the link into a text editor like Notepad and find the page ID there.
WORD TO THE WISE: USE THE EXCLUDE BOX SPARINGLY
It might occur to you that you could add several Pages widgets to different parts of your home page, each of which shows a different subset of pages. That’s an interesting idea, but a bad one, because of the way the exclusion list works.
If you use the Pages widget to create three page lists, for example, every time you add a new page that you want to leave off the lists, you need to add the page to the exclusion list of each menu. That extra work can cause a serious headache. To avoid this, use the Pages widget only when you want to show most or all of your pages. If you want to show a smaller group of just a few pages, create a custom menu and show it with the Custom Menu widget, as explained on The Custom Menu Widget.
The Pages widget also lets you sort your list of pages. You set the sort order using the drop-down list in the “Sort by” box. Ordinarily, the order is “Page title,” which means that WordPress organizes your pages alphabetically by title. Alternatively, you can choose “Page ID,” and WordPress lists pages from oldest to newest (because newer pages always get higher ID numbers). Lastly, you can choose “Page order,” which lets you pick the order, as you’ll see on Ordering Pages.
Showing Pages in a Menu
Most themes start out with a menu. In fact, menus are considered so important to the average WordPress site that most themes don’t let you remove the menu (at least not without resorting to the style editing tricks covered in Chapter 13).
Unlike desktop programs, which typically have strict, consistent rules about where menus go and what they look like, menus on the Web take many forms. The only consistent rule is that every menu is a set of links arranged as headings and subheadings. In WordPress, the way a menu looks is completely in the hands of your theme. For that reason, WordPress puts the menu management command in the dashboard’s Appearances menu, alongside the controls for other theme features.
Many themes put a site’s main links in a traditional menu bar, which it arranges horizontally near the top of each page. In the Twenty Twelve theme, for example, the menu sits above the list of posts (Figure 7-7). Other themes arrange the menu vertically and place it on the side, like WordPress’s dashboard menu.
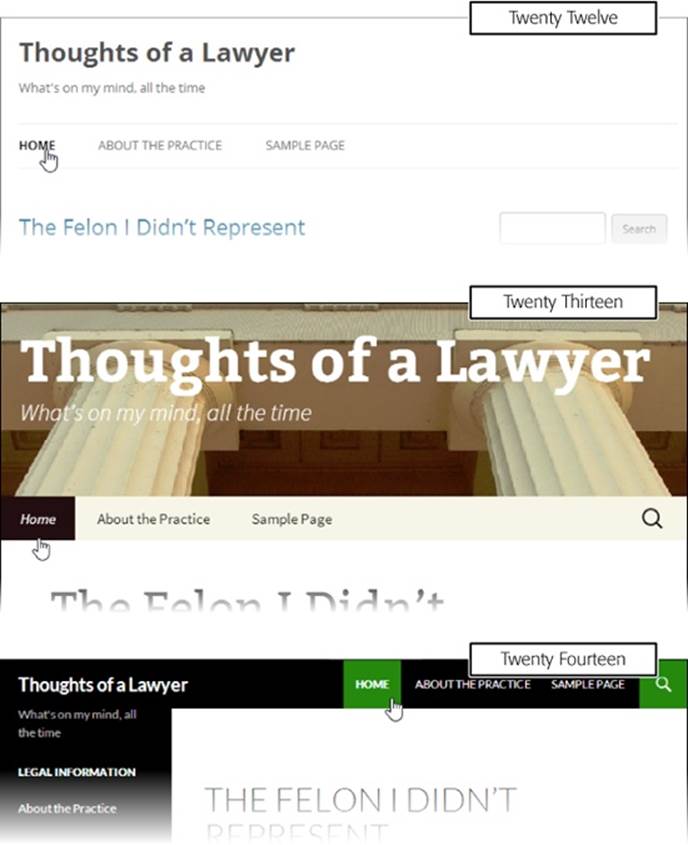
Figure 7-7. Every theme has its own distinct way of styling the main menu. Here are three examples from WordPress’s standard year themes.
When you create a new WordPress site, it starts out with an automatic menu, so named because WordPress creates it automatically. At first, the menu holds just two commands: a Home button that goes to your home page, and a Sample Page button that opens the WordPress sample page (unless you took our earlier advice and deleted it). But every time you add a new page, like the “About the Practice” page shown earlier, WordPress adds a matching link in the menu. It keeps the links ordered alphabetically by page name.
You can exert more control over how your theme arranges the page links in a menu, in one of two ways: You can use the ordering and grouping features described next, or you can create a custom menu (Custom Menus). The ordering and grouping approach works best if you just want to adjust the position of a few commands in the automatic menu but you’re happy letting WordPress run the show. By comparison, custom menus take slightly more work but pay off with far more flexibility and extra features.
Ordering Pages
Often, when you display a list of pages, you want to dictate which ones show up first and which ones are last. You can do this by typing in a number for the Order setting, which appears in the Page Attributes box when you create (or edit) a page.
The Order setting affects the order of your pages in two situations: when you display pages in an automatic menu and when you display them in the Pages widget with the “Sort by” box set to “Page order.”
Ordinarily, WordPress sets the order number of every page to 0. Technically, that means that each page is tied for first position, and the page order setting has no effect. But if you want to set the order (say you want “Our Story” followed by “Our Location” followed by “Contact Us”), you’d assign these pages steadily increasing page-order numbers (say, 0, 1, and 2). The actual numbers don’t really matter—the important thing is how they compare. WordPress always displays larger-numbered pages toward the bottom of the list or on the right end of a horizontal menu, with smaller-numbered pages closer to the top of a list or to the left of a menu bar. If two or more pages have the same order value, WordPress orders them alphabetically.
TIP
If you rearrange a bunch of pages, you need to change their page-order values. The easiest way to do that is to go to the Pages list (choose Pages→All Pages), point to a post, and click the Quick Edit link. This way, you can quickly modify some page information, including the order, without opening the whole page for editing.
There’s another way to group pages: You can designate some as child pages that belong to a specific parent page. (You may have used this type of organization before, to create subcategories for your posts, as described on Using Subcategories.) To create this hierarchy, you set the Parent setting in the Pages Attribute box when you create or edit the page.
For example, you could edit the Family Law page and change the Parent list box from “(no parent)” to “About the Practice.” Now, Family Law is a subpage in the “About the Practice” group.
To better understand the effect of ordering and grouping, imagine you have these pages:
|
PAGE TITLE |
ORDER |
PARENT |
|
About the Practice |
0 |
- |
|
Assault Charges |
3 |
About the Practice |
|
Drug Offenses |
2 |
About the Practice |
|
Family Law |
0 |
About the Practice |
|
Personal Injury Defense |
1 |
About the Practice |
|
Legal Disclaimers |
1 |
- |
|
Referrals |
0 |
- |
The order settings create the nicely styled menu and nested list shown in Figure 7-8. The menu displays subsidiary pages in submenus, while the Pages widget slightly indents nested pages.
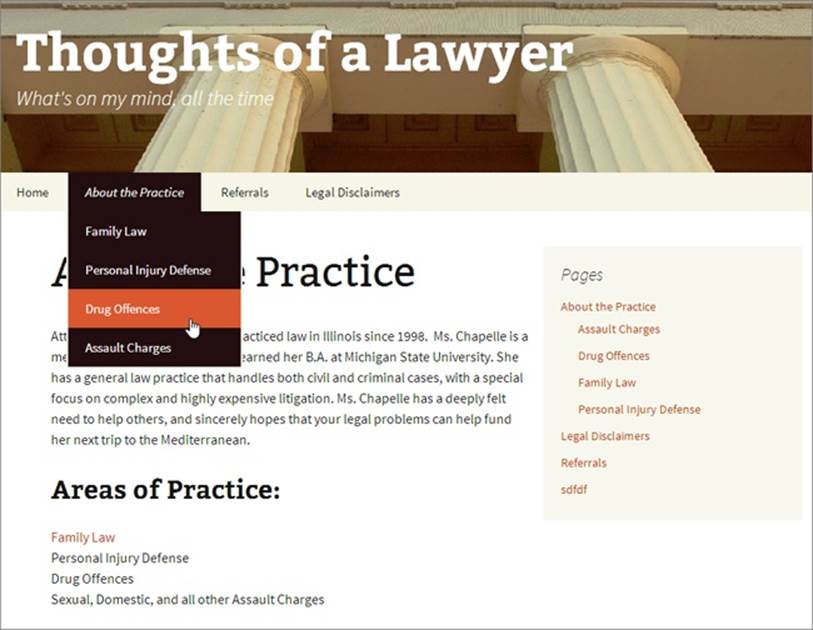
Figure 7-8. This site lists its pages in two places. At the top is the familiar menu bar, now with a submenu. On the right side, the Pages widget shows the same collection of pages, but sorted by title.
Life can get a bit confusing when you order and group pages. Just remember that when WordPress orders pages, it compares only the pages at the same level. For example, you can use the page order to adjust the position of the Assault Charges, Drug Offenses, Family Law, and Personal Injury Defense pages with respect to one another. However, WordPress won’t compare the order values of the Family Law and Legal Disclaimers pages, because they aren’t at the same level and won’t ever be shown next to each other.
NOTE
If you use post names in your permalinks (Permalinks in WordPress.com), child pages get their own permalink. It includes two posts titles: the name of the child page itself and the name of the parent page. For example, if the child page “Family Law” has the parent “About the Practice,” the full permalink might be something like http://thoughtsofalawyer.net/about-the-practice/family-law.
Custom Menus
WordPress’s ordering and grouping features give you enough flexibility to create a good-looking, well-ordered menu. However, there are a few good reasons why most WordPress developers eventually decide to build a custom menu:
§ To get more types of menu items. An automatic menu includes links to your pages, and that’s it. But a custom menu can include other types of links—for example, ones that lead to a particular post, a whole category of posts, or even another website.
§ To hide pages. An automatic menu always includes all your pages. This might not be a problem for a relatively new WordPress site, but as your site grows, you’ll probably add more and more pages and use them for different types of information. Eventually, you’ll create pages that you don’t want to include in your main menu (for example, you might want to add a page that readers can visit only by clicking a link in a post). The only way to hide a page from a menu is to abandon the automatic menu and build a custom menu.
§ To have multiple menus. Some themes support more than one home page menu. However, a site can have only one automatic menu. To take advantage of the multiple-menu feature, you need to create additional menus as custom menus.
§ Because sometimes automatic menus are hard. To get an automatic menu to look the way you want it to, you need to think carefully about the order and parent settings. If you have dozens of pages, this sort of planning can twist your brain into a pretzel. If you build a custom menu, you can drag and drop your way to a good-looking menu. It still takes time and work, but it requires a lot less planning and thinking.
Building a Custom Menu
When you’re ready to replace your theme’s automatic menu with a menu of your own creation, here are the steps to follow:
1. Choose Appearance→Menus.
This brings you to the sophisticated menu editor (Figure 7-9).
2. Click the “create a new menu” link at the top of the page to create a new, blank menu.
The next step is to give your menu a name.
3. Enter a name for your menu in the Menu Name box.
The name uniquely identifies the menu. Normally, you name the menu after its function (Main Menu, Navigation Menu, Page Menu, and so on). You shouldn’t name it based on its position (as in Top Menu Bar), because that detail may change if you switch themes.
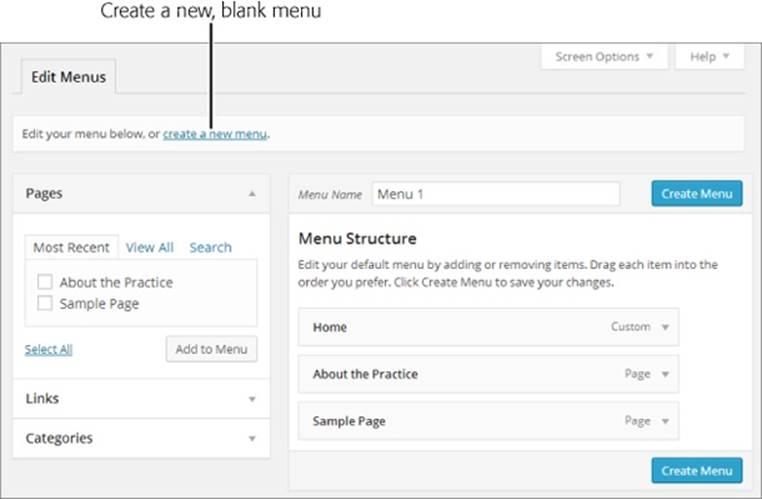
Figure 7-9. Depending on your theme, the menu editor may start out blank, or it may show you the commands that are currently part of the automatic menu, as it does here. Either way, you need to create a menu of your own before you can take control of its contents.
4. Click the Create Menu button.
WordPress stores the menu as part of your site, so you can edit it anytime. Now you’re ready to fill it up with useful commands (Figure 7-10).
5. Decide whether you want to add a page, link, or category to your menu. If necessary, click the heading to expand the Pages, Links, or Categories section (Figure 7-11).
A page is, obviously, a link to one of the pages you created.
A link goes to some location on the Web, either on your site or another site. For example, you could create a custom link that points to a specific post (using its permalink), a Wikipedia page, a friend’s blog, or something else.
A category is a link to a page that displays all the posts in a given category (in reverse-chronological order). It has the same effect as clicking a link in the Categories widget (Managing Categories).
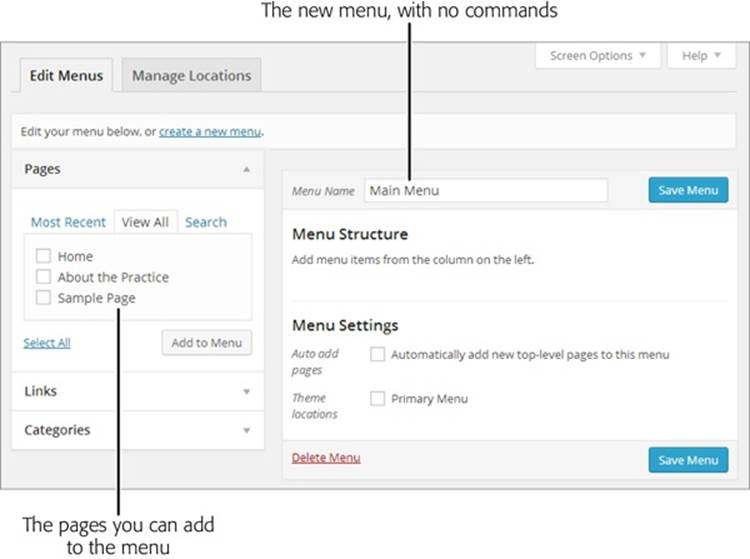
Figure 7-10. The left side of the menu editor has three sections (Pages, Links, and Categories) that let you add various links to your menu. Right now, the Pages section is expanded.
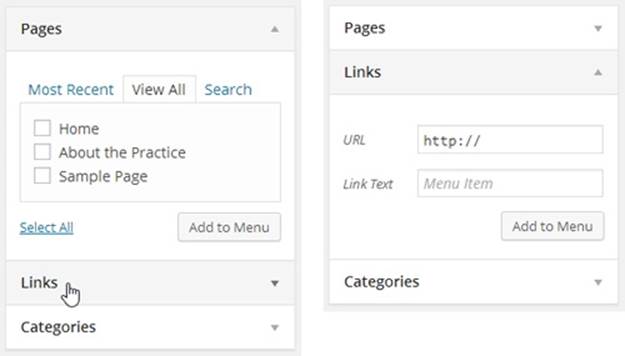
Figure 7-11. You can set options for only one menu section at a time. You choose which one by clicking the heading. For example, if you want to add a link but the Pages box is expanded (left), click the Links heading to open the Links box (right).
6. Enter the information for your menu item.
If you’re adding a page, click the checkbox for the page you want to add. You can tick several checkboxes to add a whole group of pages at once. The Pages box lets you choose your pages from three different tabs. Use Most Recent to choose from the newest pages you created, View All to browse through all your pages, and Search to find a page by name (which is useful if your site has dozens or more pages).
If you’re adding a link, fill in the address in the URL box and specify the link text in the Link Text box.
If you’re adding a category, click the checkbox for the category you want. Adding a category is similar to adding a page—you can browse a list of your categories, choose from your most frequently used categories, or search for the category you want by name, depending on what tab you pick. You can also add multiple categories at once by ticking multiple boxes.
TIP
It makes sense to add a link named “Home” or “Posts” to most new menus. That way, your guests always have a way to get back to your home page. To create a home page link, choose the View All tab in the Pages box, turn on the checkbox next to Home, and then continue with the next step.
GEM IN THE ROUGH: GETTING EVEN MORE MENU LINKS
The menu editor makes it easy to link to another page on your site, to a category of posts, or to another website entirely. But you can get even more menu-creating options if you click the Screen Options button (found in the top-right corner of the page) and turn on the Posts and Tags checkboxes.
If you do, you’ll get three more boxes for adding menu items. The Posts box shows a list of all your posts, letting you add a link to a specific post without needing to remember the permalink. The Tags box is similar to the Category box—it lets your visitors browse all the posts that have a specific tag. And the Format box lets you add links to different post formats (Post Formats), if you use the formats in your blog. For example, you can add a link that lets readers view all the Aside posts or all the Quote posts.
7. Once you make a choice, click the “Add to Menu” button.
Your new item appears in the menu section on the right.
8. Optionally, customize the label and tooltip (title) of your menu item.
When you first add an item, it shows up as a collapsed gray box. To change the options for that item, click the down-pointing arrow on the right side of the box. This expands the box so you can see (and edit) all the settings for that item (Figure 7-12).
Here are the settings you can change:
o Navigation Label, which is the link text that appears in the menu. If you add a page or a category, the navigation label is the name of that page or category, which keeps things simple. But you might want to edit the text if it’s too long to fit comfortably in your menu.
o Title Attribute, which sets the tooltip that pops up when someone points to a menu item. Usually, the title attribute is blank, and the tooltip displays the name of the menu item. But you could get fancy and use the Title attribute to supply a more detailed description.
o Remove, which does the obvious: deleting a menu item you don’t want anymore.
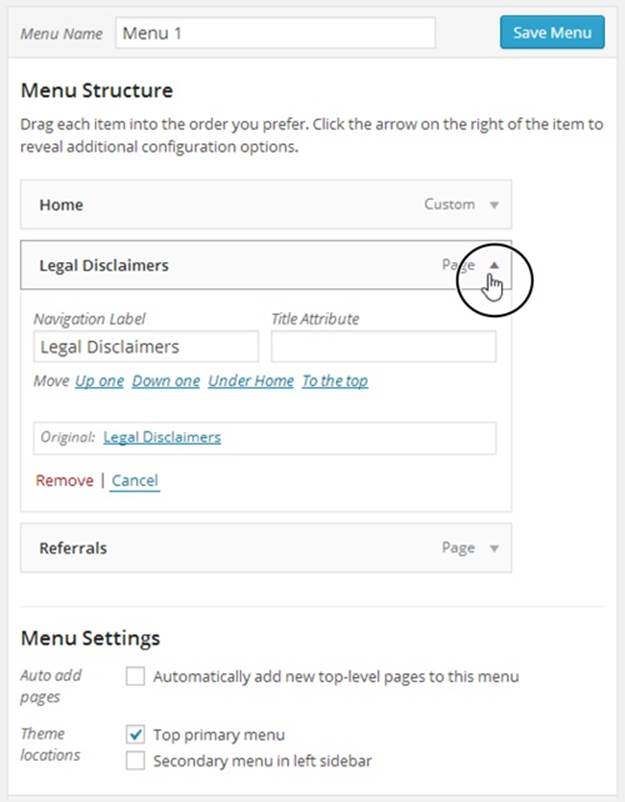
Figure 7-12. In the menu editor, WordPress represents each menu item with a separate gray box. To see the settings for an item, you must expand this box by clicking the down-pointing arrow in its right corner. In this example, the menu includes three links (Home, Legal Disclaimers, and Referrals), but only one (Legal Disclaimers) is expanded.
9. Return to step 5 to add another item to your menu, and repeat these steps until you stock your menu with all the items you want.
WordPress adds items to the menu in the order you add them. So the items you add first appear on the left of a horizontal menu, or at the top of a vertical menu. However, don’t worry about the order yet, because you’ll learn how to move everything around in the next step.
10.Now it’s time to arrange your menu items. Drag them around to position them and group them into submenus.
Unlike automatic menus, custom menus don’t pay attention to your pages’ order or parent settings. This is good for flexibility (because it means you can arrange the same commands in different menus in different ways), but it also means you need to do a little more work when you create the menu.
Fortunately, arranging menu items is easy. To move an item from one place to another, simply drag it, just as you move widgets in the Widgets page. WordPress displays items in top-to-bottom order, so if you use a horizontal menu (as the WordPress standard theme does), the topmost item is on the left, followed by the next menu item, and so on.
Creating submenus is just as convenient, once you know the trick. First, arrange your menu items so that the child items (the items you want to appear in the submenu) appear immediately after the parent menu item. Then, drag the child menu item slightly to the right, so that it looks like it’s indented one level. Figure 7-13 shows what the result should look like, and Figure 7-14 shows the formatted WordPress page.
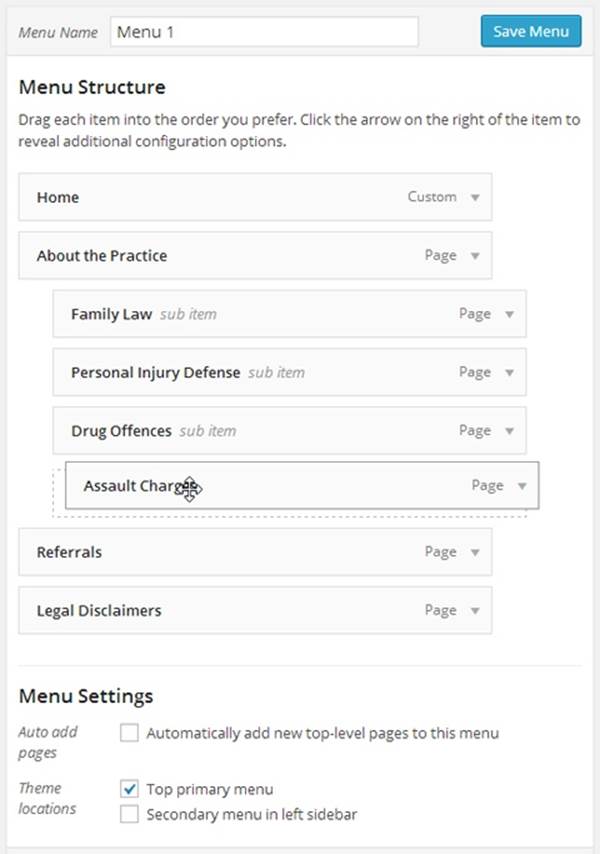
Figure 7-13. By dragging the Assault Charges page slightly to the right, it becomes a submenu item under the “About the Practice” page, along with several other pages. Figure 7-14 shows the result.
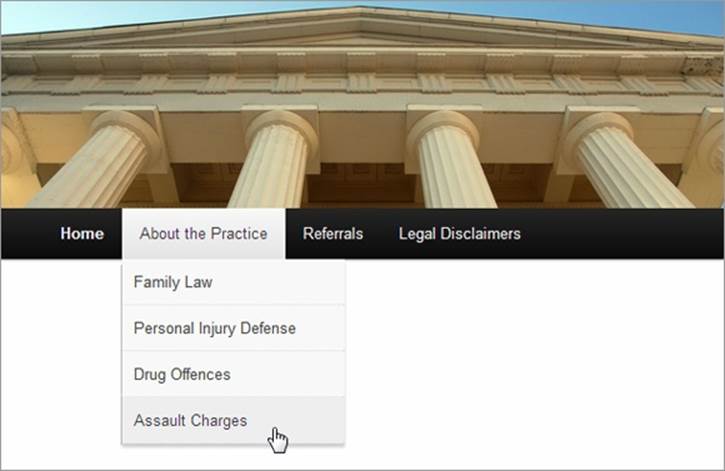
Figure 7-14. Now the “About the Practice” page has a submenu.
NOTE
You can easily create multilayered menus (menus with submenus inside of submenus). All you do is keep dragging items a bit more to the right. However, most well-designed WordPress sites stop at one level of submenus. Otherwise, guests may find it awkward to dig through all the layers without accidentally moving the mouse off the menu.
FREQUENTLY ASKED QUESTION: CREATING A MENU ITEM THAT DOES NOTHING
Can I make a submenu heading that visitors can’t click?
WordPress menus work a little differently from the menus in traditional desktop computer programs. When you have a submenu in a desktop program, you click the parent menu item to open the submenu, and then you click one of the items inside the submenu. But in WordPress, you just point to the parent menu item to open it. The parent item is still a real menu item that leads somewhere—if you click it, you go to a new page, category, or custom URL. For example, in Figure 7-14 you can point to “About the Practice” to open its submenu, or you can click the title to go to the About the Practice page.
But perhaps this isn’t the behavior you want. For example, you might want the “About the Practice” menu item to be a non-clickable heading, which exists solely to house the submenu underneath. To create an unlinked heading, add a new command from the Links box, set the label to “About the Practice,” and then set the URL to # (the number sign character—that’s all). To browsers, the # symbol represents the current page, so if you click the menu item (“About the Practice” in this example), you won’t go anywhere. In fact, you won’t even see the page flicker, which is exactly what you want.
11.Optionally, you can turn on the “Automatically add new top-level pages” setting.
If you do, every time you create a new page, WordPress automatically tacks it on to the end of your custom menu. This is similar to the way an automatic menu works, although you can edit your custom menu any time to move newly added items to a better place. Most WordPress experts avoid this setting, because they prefer to control what gets into their menu and where it goes.
12.Turn on one of the “Theme location” checkboxes at the bottom of the menu box.
Some themes let you decide where on a page your menu goes. For example, the Twenty Fourteen theme lets you put your menu at the top of the page (choose the “Top primary menu” checkbox) or the side (choose “Secondary menu in left sidebar”).
Many themes have just one location for menus, however. If that’s the case for your theme, you’ll see a single checkbox with a label like Primary Menu. Even though you have no real choice about where to put the menu, you still need to turn on the checkbox to add the menu to your site.
13.Click Save Menu to make your changes permanent.
Once you save your menu, you can try it out on your site’s home page.
Multiple Menus
Many themes support more than one menu. Consider, for example, the Oxygen theme you tried out in Chapter 6 (Figure 7-15). It allows no fewer than three menus. The primary menu appears under the page header, the secondary one shows up in the left-hand sidebar, and the tertiary menu appears below that, in the footer section. You can imagine using these menus for distinctly different tasks—using the top menu to navigate the whole site, for example, the side menu to drill into specific posts or categories, and the bottom menu to link to other sites with related content.
NOTE
You don’t need to use all the menus a theme provides. Initially, WordPress creates an automatic menu and uses it as the theme’s primary menu. Any additional menus start off hidden, and appear only if you attach custom menus to them.
To use the Oxygen theme’s three menus, you need to create three custom menus. Repeat the process described in the previous section three times, clicking the “create a new menu” link to add each additional menu.
Once you have more than one menu, WordPress adds a menu list to the top of the menu editor. Using it, you can choose which menu you want to see and edit (Figure 7-16).
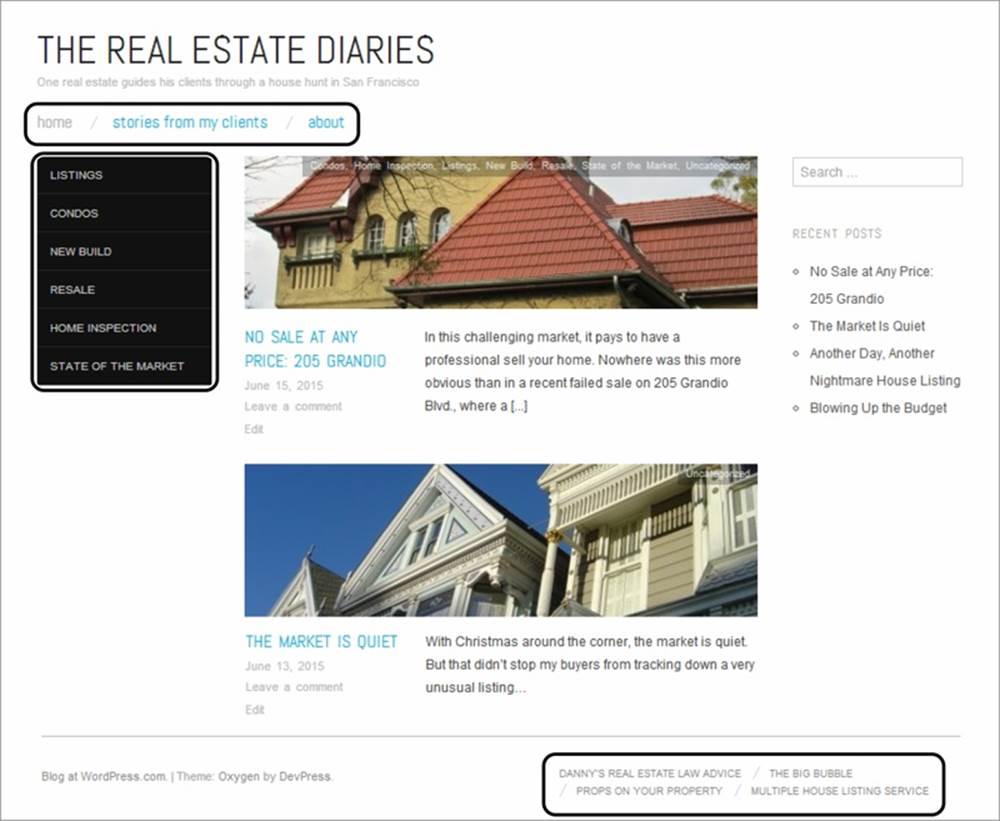
Figure 7-15. One page, three menus. All of them support pop-up submenus (not shown).
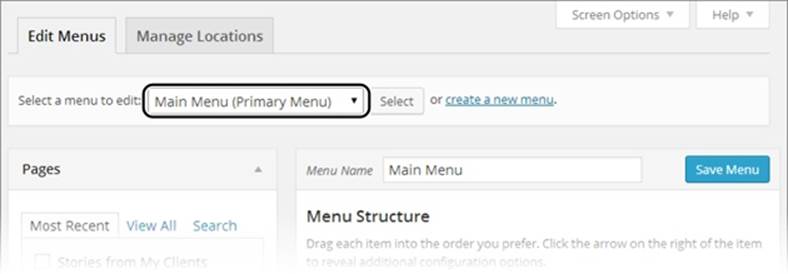
Figure 7-16. The menu editor forces you to edit one menu at a time. You choose the menu from the “Select a menu to edit” list and click Select to open it.
Once you create your custom menus, you need to put each one in the appropriate location in your theme. You do that using the checkboxes in the “Theme locations” section, under each menu. But if you have trouble remembering which menu goes where, you have another choice. Click theManage Locations tab to see a list of all the menu placeholders in your theme. Next to each is a drop-down list of the menus you created. You can specify a menu for each area and then click Save Changes to make your changes permanent in a single step.
The Custom Menu Widget
There’s one more way to display a custom menu: in the Custom Menu widget.
Now that you’ve played with menus in depth, the Custom Menu widget won’t impress you much. To use it, drag it onto your page (say, in a sidebar), give it a title (optional), and then pick the menu it should show. The Custom Menu widget shows a bulleted list of links, using nested bullets for submenu items. In fact, the Custom Menu widget looks a lot like the Pages widget, shown in Figure 7-8.
The advantage of the Custom Menu widget is that it’s more flexible than the Pages widget. The Pages widget shows all (or almost all) of your pages, but the Custom Menu widget shows just the pages you want and can optionally include other category links and links to other websites, provided that you add them to your custom menu.
TIP
One nifty way to use the Custom Menu widget is to create a blogroll—a list of blogs you recommend, blogs by people you know, or sites that have content similar to yours. For example, a cooking blog might have a blogroll with other food-related blogs in it. All you need is a new menu (you can name it “Blogroll”), which you can then fill with links.
Changing Your Home Page
Right now, your WordPress site has a home page dominated by a familiar feature: the reverse-chronological list of your posts. Visitors can use your site’s navigation menu to travel somewhere else, but they always begin with your posts.
This setup is perfectly reasonable—after all, your posts typically contain the newest, most relevant content, so it’s a good idea to showcase them up front. However, this design doesn’t fit all sites. If the list of posts is less important on your site, or if you want to show some sort of welcome message, or if you just want to direct traffic (in other words, give readers the option of reading posts or going elsewhere on your site), it makes sense to start by showing a page instead of a post.
In the following sections, you’ll find out how. First, you’ll use one of your custom-created pages as your site’s home page, all in the interest of building a brochure site. Next, you’ll see how to get the best of both worlds: a fixed home page with the content you want and a list of posts, tucked away in another place on your site.
Creating a Brochure Site
The simplest way to change your home page is to ditch the post system altogether, using pages instead of posts throughout your site. The resulting all-pages site is sometimes called a brochure site, because it resembles the sort of informational pamphlet you might pick up in a store (Figure 7-17).
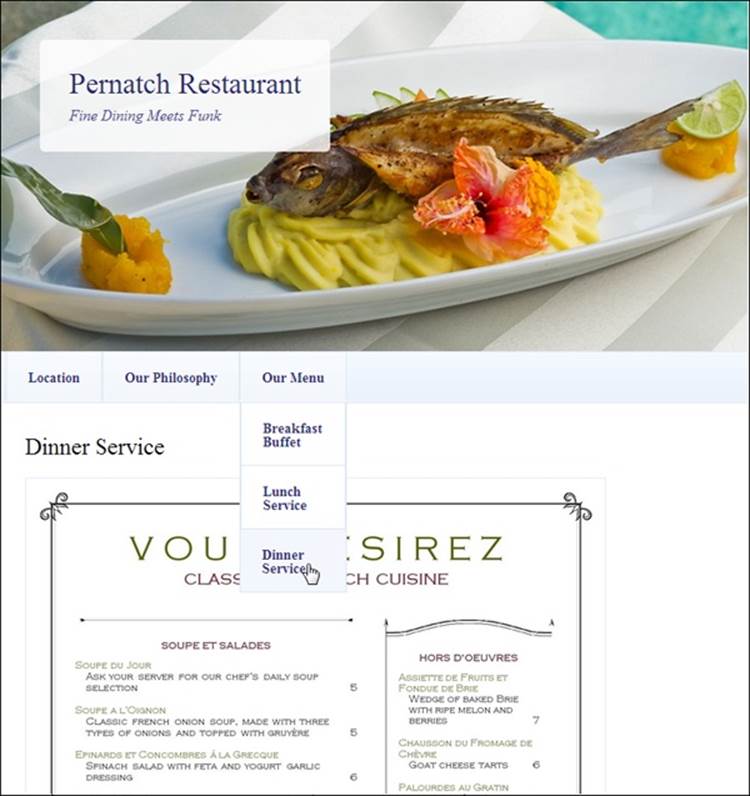
Figure 7-17. This restaurant website is a collection of WordPress pages, including those labeled Location, Our Philosophy, and Our Menu. Unlike posts, pages aren’t related in any obvious way, nor are they dated, categorized, or tagged.
To create a brochure site, you follow some simple principles:
§ Build a site that consists entirely of pages, each one hand-crafted by you.
§ Add these pages to a custom menu, and arrange the pages the way you want.
§ When visitors arrive at your site, the first thing they see is one of your pages and a navigation menu.
You already know how to perform each of these tasks, except the last one (changing the home page). That’s what you’ll learn next.
UP TO SPEED: SHOULD YOU BUILD A BROCHURE SITE?
A brochure site may make sense if you’re building a small site with very simple content. The restaurant site in Figure 7-17 is one example.
But if you’re trying to decide between a brochure site and a post-based site, consider two questions. First, would your site be more attractive to readers if you included posts? Even the bare-bones restaurant site might be more interesting with posts that chronicle restaurant news, menu experiments, and special events. Not only that, but the fact that posts are frequent, dated, and personal makes the site more vibrant. In addition, if you want to get people talking on your site—for example, posting comments about recent meals or sending in requests and off-the-wall recipe ideas—you’ll have more luck if you include posts. Think of it this way: A brochure site feels like a statement, while a blog feels like a constantly unfolding conversation.
Then again, you may decide that a brochure site is exactly what you want. Maybe you really don’t have time to spend updating and maintaining a site, so you simply want a place to publish some basic information on the Web and leave it at that. You can still take advantage of several of WordPress’s best features, like themes, which ensure that your pages look consistent. You’ll also get WordPress’s help if you want to track visitors (WordPress Site Statistics), add sharing buttons (Encouraging Your Readers to Share), or add any one of a number of features described in this book.
The key step in building a brochure site is changing your home page, replacing the traditional list of posts with a page of your own devising. So your first step is to create a substitute home page, using the familiar dashboard command Pages→Add New.
You might want to make a few changes to the home page, since it serves as the welcome mat to your site. For example, you may want to include navigation links in the home-page text that take visitors straight to important content. However, that’s not necessary. As long as your theme includes a menu, visitors can use it to click through to more content.
You may also want to tweak the comment settings for your custom home page. By default, all pages, just like all posts, allow comments. But it seems a bit unstructured to let people comment directly on the home page of your website. Fortunately, it’s easy enough to turn comments off for any page. First, use the Screen Options button (Customizing a Dashboard Page) to open the Discussion box, and then turn off the “Allow comments” checkbox.
Once you create your new, replacement home page, follow these steps:
1. Choose Settings→Reading.
2. In the “Front page displays” setting, choose “A static page” (rather than “Your latest posts”).
3. In the “Front page” list underneath, pick the page you want as your new home page.
4. Click Save Changes at the bottom of the page.
Now, when you surf to your site’s home page, WordPress automatically serves up the page you picked (although the URL won’t change in the browser’s address bar—it’s still the home page of your site). Similarly, when you click Home in the menu, you return to your custom home page.
TIP
If you use a custom page for your home page, you may want to jazz it up with a few more navigational features. Many themes provide page templates that can help you out by adding a widget-stocked sidebar beside your page content, for example. You’ll learn more on Page Templates.
Creating a Custom Entry Page
Even if you want to change your home page, you might not want to ditch the post system. In such a case, use a static home page (called a welcome page), and include a full complement of posts on another page.
The trick to doing this is specifying a URL for the page that displays your posts. Here’s where things get slightly bizarre. To get the URL for your posts, you create yet another page. This page is just a placeholder—its sole purpose is to provide the web address for the posts page. You don’t actually need to put any content on this page, because WordPress automatically creates the list of posts.
Here’s the process:
1. Decide on a URL for the posts section of your site.
For example, if your home page is at http://magicteahouse.net, you might put the posts at http://magicteahouse.net/posts or http://magicteahouse.net/blog.
NOTE
If you use the self-hosted version of WordPress, you need to make sure you changed your site’s permalink setting to use post titles rather than post IDs (Permalinks on a Self-Hosted Site). Otherwise, the link to your placeholder page will use the post’s ID, not its name. This is terribly confusing—it means you’ll end up with a permalink with a name likehttp://magicteahouse.net/?p=583 that actually shows your list of posts.
2. Create a page with a name that matches the URL you want.
For example, you can create a page named posts or blog.
3. Optionally, add some content.
You don’t need any content (and you probably don’t want any, either). But if you do add an introductory paragraph or two, WordPress displays it just above the list of posts.
Don’t put any content in this page—think of it as a placeholder for your old home page.
4. Publish your page.
Your placeholder page is ready. Now all you need to do is change your site settings.
5. Choose Settings→Reading.
Here, you specify your custom home page and your new posts page.
6. If you haven’t already set a custom home page, do that now.
In the “Front page displays” setting, choose “A static page” (rather than “Your latest posts”). In the “Front page” list underneath, pick the page you want to use for your new home page.
7. In the “Posts page” list, pick the page you created in step 2.
This step tells WordPress to start using your placeholder page to show the list of posts.
8. Click Save Changes at the bottom of the page.
Now visitors can see your old home page—the list of posts—using the URL for the placeholder page you created in step 2. So if you created a page named Posts, when you request that page (say, http://magicteahouse.net/posts), you see your list of posts. But if someone requests the home page (http://magicteahouse.net), they’ll see the custom home page you picked in step 5 instead of the list of posts.
9. Optionally, edit your menu and add a new menu item for your new posts page.
Even though you created a posts page, that doesn’t mean your visitors know about it. They need a way to get there, and the best option is a link in your site’s menu. Creating that is easy—you simply add a new menu item that points to your placeholder page (Figure 7-18).
In some cases, you may decide not to lump all your posts together in a single reverse-chronological stream. In that case, you don’t need to create the placeholder page. Instead, you can add category links to your menu so that visitors browse all the posts that fall into a particular category.
This is a great approach, but it may become less practical if you have a lot of categories, because you don’t want to burden your site with a crowded, clumsy menu. One solution—provided you have a self-hosted site—is to customize your home page with the theme-editing tricks described inChapter 14. For example, Building a Better Home Page shows a site that uses custom themes to create a hand-tailored home page with links that let you browse different categories.
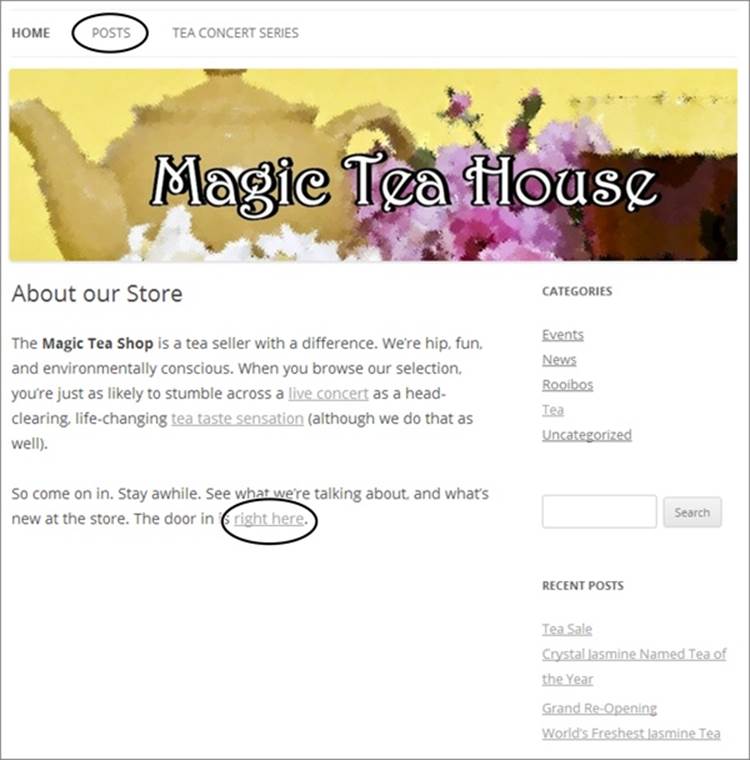
Figure 7-18. Here’s the new home page for the Magic Tea House. You can continue on to the site by using the text-based links on this page, or by using the menu above the header image. The Posts link takes you to the posts page, which looks the same as the old Tea House home page.
Page Templates
In Chapter 6, you learned about the underused post format feature (Post Formats), which applies different styles to different types of posts. Pages have an analogous feature called page templates, which change the way pages look.
Like post formats, page templates are an optional part of a WordPress theme. Your theme may include multiple page templates or none at all. For example, the Twenty Eleven, Twenty Twelve, and Twenty Fourteen themes all include a smattering of page templates, while Twenty Thirteen is unique in offering none. Table 7-1 shows the details.
Table 7-1. Page templates in the year themes
|
THEME |
ADDITIONAL PAGE TEMPLATES |
|
Twenty Eleven |
Sidebar Template Showcase Template |
|
Twenty Twelve |
Full-width Page Template, No Sidebar Front Page Template |
|
Twenty Thirteen |
(None) |
|
Twenty Fourteen |
Contributor Page Full Width Page |
When you create a new page, WordPress assumes that you want to use the standard template. But switching to something else is easy. When you create or edit a page, choose the template you want from the Template list in the Page Attributes box.
The page template feature faces the same challenge as the post format feature: Because a theme is designed to suit a variety of sites, and because there’s no way for a theme to understand the fine details of your site, it can’t provide templates tailored to your content. The WordPress year themes use page templates for two basic purposes: to control the appearance of your site’s sidebar, and to create improved home pages. The following sections explain how to do both.
NOTE
There’s one page template you won’t consider in this chapter: the Contributor Page template included with the Twenty Fourteen theme. It’s an unusual but innovative page that automatically gathers and displays author information in a site that has multiple contributors. You’ll try it out when you consider WordPress collaboration on Adding Author Information.
Pages With or Without Sidebars
With some themes, your site’s sidebar appears on every page, just as it appears next to every post. With other themes, WordPress displays pages without the sidebar. No approach suits everyone, and page templates let you change your theme’s built-in preference.
For example, if you use the Twenty Twelve theme, ordinary pages always get a sidebar. But if you assign a page Twenty Twelve’s “Full-width Page Template, No Sidebar” template, that page will appear sidebar-free, with extra space for your content. Similarly, the pages in Twenty Eleven start out with no sidebar, but switching to the Sidebar template changes that.
NOTE
If you start adding sidebars to your pages, be consistent. For example, if you decide not to show sidebars on, say, pages with pictures or photo galleries, make sure the other pages on your site follow suit. Otherwise, your visitors may feel that your site is unpredictable or poorly organized.
Better Home Pages
Another reason that themes use page templates is to create souped-up home pages. These specialized pages include a spot for your static content, just like any other page, along with some extras. The extras can include more widget areas, featured image sliders, and a customized post list. The goal is to give you a way to create a more attractive entryway to your site.
The Twenty Twelve theme includes a Front Page template that serves this purpose. It lets you add one or two columns of widgets below the page content. These widgets appear on the front page only (Figure 7-19). Your site’s standard sidebar widgets, which appear on the other posts and pages in your site, don’t appear on pages that use the Front Page template.
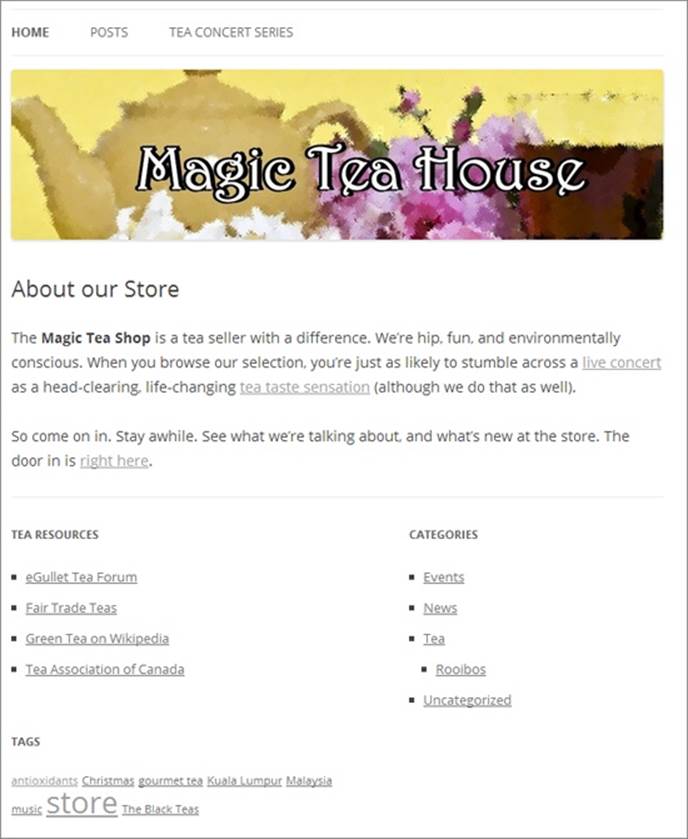
Figure 7-19. This version of the Magic Tea House home page uses the Front Page template on the Twenty Twelve theme, which gives the page a two-column footer of sidebar widgets.
You choose your front-page widgets using the familiar Appearance→Widgets section of the dashboard. Just drag the widgets to the theme’s First Front Page widget area and the Second Front Page widget area.
The Twenty Eleven theme takes the concept a bit further with its Showcase template (Figure 7-20). It combines page content (which appears at the top), a group of featured posts (underneath), and a list of recent posts (at the bottom).
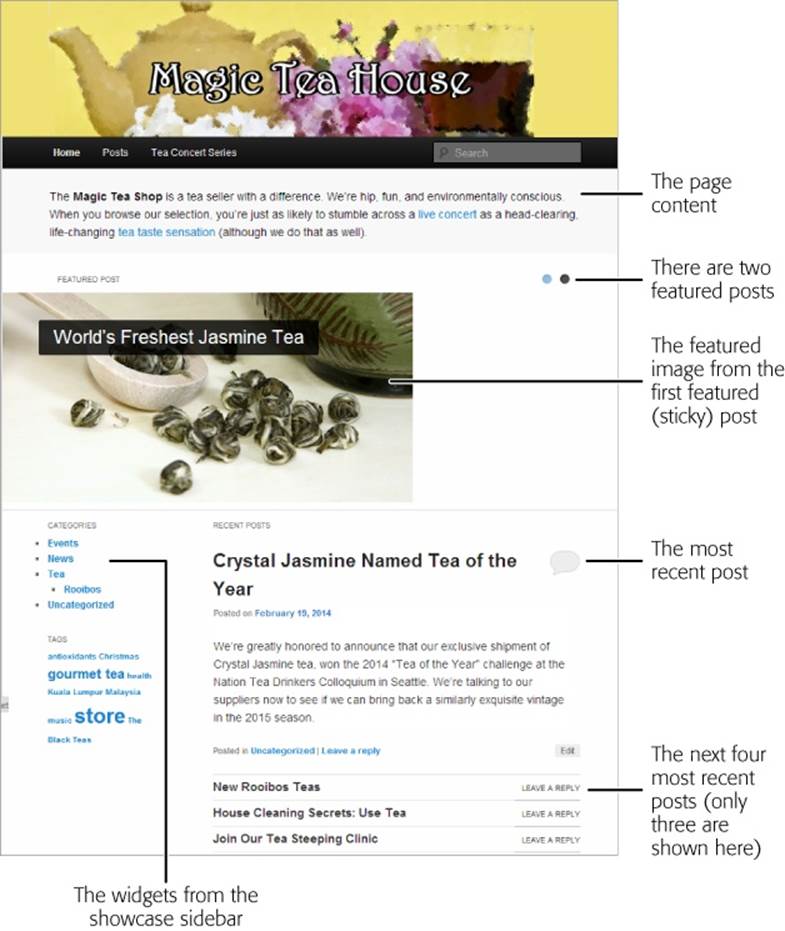
Figure 7-20. The showcase page in the Twenty Eleven theme fuses together your page content, a gallery of featured posts, a list of recent posts, and a showcase sidebar.
There’s no magic to creating a showcase page. You create a page, add the content you want, and then choose Showcase Template from the Template list. Finally, you publish your page. When someone requests a page that uses the showcase template, WordPress goes to work.
Here’s how WordPress assembles a showcase page for the Twenty Eleven theme:
§ First, it takes your sticky posts (Creating a Sticky Post), and adds them to the Featured Post gallery. To include a picture alongside a featured post, make sure you set a featured image (Featured Images).
§ Underneath the Featured Post gallery, WordPress shows the content for the most recent non-sticky post. If you want WordPress to show only a portion of the most recent post, you need to use the More quicktag (Displaying Teasers Using the “More” Quicktag).
§ Underneath that, WordPress lists the titles of the next four most recent posts (not including sticky posts). To view one, your guest must click its title.
§ WordPress adds a sidebar to the left side of the page, next to the list of your most recent posts. However, this isn’t the standard sidebar you see on your normal home page (and all the pages that use the sidebar template). Instead, it’s called the showcase sidebar, and it appears on showcase pages only. To fill it with widgets, choose Appearance→Widgets, and then drag the widgets you want to the Showcase Sidebar area.
It might occur to you that you like the showcase page, but you want to take the idea further. For example, maybe you want to control what posts appear in the list of recent posts, or you want to create several showcase pages that highlight different categories of posts, like the sections of a newspaper. Unfortunately, showcase pages don’t give you this flexibility. However, you can begin building a system like this if you’re running a self-hosted WordPress site and you’re not afraid to get your hands dirty. You’ll start exploring that option in Chapter 14.
All materials on the site are licensed Creative Commons Attribution-Sharealike 3.0 Unported CC BY-SA 3.0 & GNU Free Documentation License (GFDL)
If you are the copyright holder of any material contained on our site and intend to remove it, please contact our site administrator for approval.
© 2016-2026 All site design rights belong to S.Y.A.