Professional WordPress: Design and Development, 3rd Edition (2015)
Chapter 13. Securing WordPress
WHAT’S IN THIS CHAPTER?
· Common best practices for securing websites
· Keeping your WordPress site healthy and secure
· Delegating proper permissions to your users
The past few chapters have covered how to present your fabulous content in effective and beautiful ways, how to increase the likelihood of visitors finding your content, and how to move content from other sources into your WordPress website. What happens when (if?) this all succeeds and your site gets noticed? Well, now you have a live and active site, which opens up a whole range of other challenges you have to think about. In this chapter, you will look at mechanisms to deal with the resultant attention you will get in terms of unwanted content, malicious visitors, and other ne’er-do-wells. This chapter will address conceptual best practices for securing any online web property and also focus on specifics for WordPress.
SECURING YOUR WORDPRESS SITE
Unfortunately, with success and popularity, you also become a target. WordPress is a successful and popular platform for websites and with that brings the attention of the hackers and bad guys. It is simple economics that bad guys looking to build a network of sites will look to the most widespread applications and attack their vulnerabilities. Unfortunately, one of the vulnerabilities with WordPress (similar to PHP) is that, because of the low barrier of entry and ease of use, users who are generally not too tech savvy or security minded can utilize WordPress without recognizing the full security ramifications involved.
This portion of the chapter covers some of the basic security principles you should employ when using WordPress. Some of them seem like common sense, but surprisingly, they are not put into practice on the average site. Many of these options simply use WordPress functionality to change the defaults of your installation to make the job harder for the bad guys. Defaults are known and create an easy attack vector, but complicating the process can make it more work than the attacker would like to invest.
These are all preventative measures that you should put into place before you really need them. As Benjamin Franklin said, “An ounce of prevention is worth a pound of cure.” The time you spend protecting yourself will pay off should you have to work on cleaning up an exploited website.
Staying Up-to-Date
Rule number 1 is to always stay updated. WordPress developers are constantly working to make WordPress a better, more secure, and stable platform. This is one of the key advantages to open source software. Many developers, each with different skill sets, are looking over the code every day and performing various audits and updates to improve the overall codebase.
Updates often fix security concerns before there are exploits in the wild. Generally, exploits have been targeting outdated versions of WordPress while consistently updated sites are immune.
Several versions ago, WordPress implemented new notices in the Dashboard letting you know when there is a new version available. Once logged into your WordPress Dashboard, view the Updates Screen to see which components of your WordPress installation might have updates.
Another new feature is the ability to upgrade WordPress directly from the Dashboard. The WordPress team has been working to make upgrading as painless as possible. This new feature lets the site administrator update the WordPress core right from inside the web interface.
If your web server has the ability to write to the files in your WordPress directories, then the automatic upgrade functionality works. If not, WordPress prompts for your FTP credentials to update the files for you. Both of these situations are of concern. In general, your web user should not have write permissions to your entire web root. This is just asking for trouble, especially on a shared hosting platform, except, of course, certain directories such as the uploads folder that must be writable by the web user in order to function.
Second, it is not clear how this FTP credential information is stored or used. Although it is unlikely anything nefarious is happening, users are not encouraged to key in FTP (an unsecured protocol at that) credentials into any form that asks for it. However, if you do decide to go this route, you can set some WordPress configuration variables in your wp-config file that will further automate the FTP process.
There is definitely a balance here between the simplicity of keeping the WordPress core updated, which is of the utmost importance, and with keeping the web root security intact. As with all things security related, ease of use for the user is in direct opposition to security practices and to the goal of making it difficult for the bad guys.
Finally, another feature is the update notices in the Dashboard and changelogs. The notices alert you to pending updates to WordPress core, themes, and plugins that you have installed. Many of these updates include changelogs that let you keep tabs on what is actually changing in the new version. This can help you make a decision as to whether the update is critical and needs to be performed immediately, or whether it can wait until a scheduled maintenance window. It is up to the developer to keep the changelog information current.
Hiding WordPress Version Information
This section is about concealing which specific version of WordPress you are running from the public eye. Honestly, there are mixed opinions on this. WordPress evangelists would say leave it in there. Say it loud and say it proud. On the other hand, security-conscious users would say to take it out. It is a way for the bad guys to easily find vulnerable sites, so why give it up?
Then again, the WordPress developers have a good point. For a botnet scanning for vulnerable sites, it does not make sense to waste time looking for specific WordPress versions when a botnet can just run the attack against the site. It will take the same amount of time, so why take twice as long? If you are going to get hacked because of your old version of WordPress, hiding the version number is not going to stop it. You should have been upgrading anyway.
In a standard WordPress installation, the version number is shown in the HTML source code as a meta tag for anyone to view the source and see. However, if you want to remove this meta tag, there are several plugins that can do it for you. Or you can edit yourfunctions.php file and at the bottom add the following:
Remove_action('wp_head', 'wp_generator');
Also, be on the lookout for certain themes and plugins that also include version information in your header.
Never Use the Admin Username
WordPress used to always create a default administrative user with the username Admin. This is no longer the case, but older installations may have this username still in the system, or naïve users could create this username. Never use “admin” as a username. The bad guys attempt to brute force attack this username all the time. If you have this username in your WordPress Users Screen, remove it. Plain and simple.
Limit Login Attempts
Further precautions include limiting the number of login attempts on your WordPress Dashboard. This can prevent or discourage bad guys from brute-force attacking your site. By default, WordPress will allow unlimited invalid login attempts, meaning that an automated script could be, and probably is, whacking away at your site all day long.
There are several ways to accomplish limiting login attempts; most of the WordPress Security plugins mentioned later in this chapter have this feature. Slowing down the number of login attempts before an IP address is blocked reduces the attractiveness of your site to an automatic attack script. Note that generally these offer temporary IP address blocking, so that valid users who accidentally fat finger their password have an opportunity to log in after the ban has expired.
Using Good Passwords
Furthermore, use good passwords for your account—not just your WordPress accounts, all of your online accounts. Yes, we all have hundreds of passwords to remember, but there are tricks to using good passwords, including mnemonics and password safes. WordPress has a nice JavaScript indicator when you are setting your password to let you know the quality of the password you have chosen. Remember that you can pick a strong password that is something you remember or use a secure password-safe application to store it. Your password is your key to your kingdom, so make it a good key. You can always use a reputable online password generator to help create a strong password, for example https://identitysafe.norton.com/password-generator orhttps://lastpass.com/generatepassword.php.
Changing Your Table Prefix
This is another method to obscure a default attack vector. By default, new WordPress installations have a table prefix of wp_. That means every table in your WordPress database has a very predictable name, making it easier for attackers to form an assault on your site. If you are deploying a new site, set something unique for this prefix. This means that if a bad guy does manage to infiltrate your database, the normal attack vectors on predictable database tables are not available, and he will have to determine your custom schema.
If you are already on an existing site, plugins are available that can handle renaming your tables for you. The WP-Security Scan by Acunetix, which is covered later in this chapter, offers the functionality to change your table prefixes for you. Make sure you make a database backup before performing this task because the implications if it does not work are quite severe.
Moving Your Configuration File
By default, the WordPress configuration file is located in the root of your website. In the event that PHP stops functioning on your web server for any reason, you run the risk of this file being displayed in plaintext, which will give up your passwords and database information to visitors.
You can safely move the wp-config directory up out of the root directory. This will stop it from ever being accidentally served. WordPress has built-in functionality that will automatically check the parent directory if it cannot find a configuration file.
In some situations on certain hosts, this is not an option. An alternative on Apache web servers is to set your .htaccess to not serve up the wp-config file. Add the following line to your .htaccess file in the root directory:
<FilesMatch ^wp-config.php$>deny from all</FilesMatch>
Moving Your Content Directory
Since WordPress 2.6, you can move your wp-content directory. This way, you can take a large portion of your WordPress installation and move it to a non-default location. Again, this makes hoops for the bad guys to jump through, hopefully discouraging them.
Make two additions to your wp-config file:
define('WP_CONTENT_DIR',
$_SERVER['DOCUMENT_ROOT'].'/mysite/wp-content');
define('WP_CONTENT_URL',
'http://example.com/mysite/wp-content');
Some plugins may have difficulty dealing with a nonstandard directory structure. If you are experiencing problems with certain plugins, you can add the following lines to your wp-config file for compatibility:
define('WP_PLUGIN_DIR',
$_SERVER['DOCUMENT_ROOT']. '/mysite/wp-content/plugins');
define( 'WP_PLUGIN_URL',
'http://example.com/mysite/wp-content/plugins');
Moving your content directory does not in and of itself make your site more secure. What it does is prevent the automated tools used by attackers from working on your site. These automated tools are looking for the least common denominator of sites; so essentially, they are looking for stock WordPress configurations with default settings because that will give them the most bang for the buck. Security through obscurity is not security, but it does make your site a less attractive target.
Using the Security Key Feature
In your WordPress config file are secret key values for encrypting user cookies. There are four keys (since WordPress 2.6) to establish the secret, or private, key used by WordPress to protect session information stored in user cookies. Each key also has a “salt value,” which is used by the cryptography functions to reduce the likelihood that a directory-based attack will discover a password through brute-force. A potential attack would have to start with both the guessed password and the salt value. If you do not specify salt values, WordPress generates them.
You should set both the secret keys and salt values to make the encryption of user session data for your site stronger. Either make them up or visit https://api.wordpress.org/secret-key/1.1/salt and get randomly generated ones. If you make them up, make sure they are long and complicated.
You can change these keys at any time, but it will force anyone who is logged in to log in again.
define('AUTH_KEY',
'+Ic#]DCGrn<}=Vg]0n0;|C{mc7-G$g[VEc`ix(VhRLMvR]55`xmh+7l)gd;z3$KR');
define('SECURE_AUTH_KEY',
'BnArFk)y<*d?nd}_Nuvv5{a_q[0[FPC*-^mG: x{>WjKS._fY<B[pe0pN#@5#d>v');
define('LOGGED_IN_KEY',
'92CxK-u:Xj)x,{rQ)HXmx1Oi{zY$L;H}ueT|+ZC@rmrN(!R>g/iJw[ ^`n3`}bGO');
define('NONCE_KEY',
',#$@.%Ea9JTrF1jRGKP?aZ_!diTLo|dCf37Wz{7wioFnvwZIx{|dN+Ic[x%(Bql}');
define('AUTH_SALT',
'R@Y@:&jU1xnE4Oo0<@9n%XkHZ72Cv``<K$M53((~U3Dk43}[=Y~mRu$]H$Fy6KS^');
define('SECURE_AUTH_SALT',
'W-=-s}8E8-b{QBw*O=H,lH+)UxO@5[+FE$@dN}`8+G:^5yvab+YFj1h.z>MU_{(R');
define('LOGGED_IN_SALT',
'^ZTm{^1Mz!UpYF|U1qWv-OTUQv#F:Y|)hq5X$[mIUc@B6oJ}`_]w<B)/;6EK$iDz');
define('NONCE_SALT',
'%au=<O=V!:+ni/!c^_l`+&H|KapN>#cxL24w<KE^3C9x,F]i4bHwuw(0P9|O|.N+');
Do not use these values; set up your own. The easiest way is to use the provided generator and cut and paste into your wp-config.php file.
Forcing SSL on Login and Admin
You can force your visitors and administrators to log in via an SSL-encrypted page, assuming you have that set up already. Edit your WordPress config file and add the following flag:
define('FORCE_SSL_LOGIN', true);
You can also force the entire WordPress Dashboard to be served over HTTPS. Again, edit your config file and add the following line:
define('FORCE_SSL_ADMIN', true);
Please do not just blindly enable these features. This can be problematic if you are using a self-signed certificate on your site. Note that WordPress likes to build internal post links using the URL that you are accessing the Dashboard with. So if you forced SSL on the Dashboard and are using a server self-signed certificate, the internal post URLs will do the same and your visitor will be have to accept the certificate also. Generally, this is not a good practice. Work with your hosting provider to obtain a certificate from a respected certificate provider. SSL certificates have come down substantially in price and may be worth investigating.
Apache Permissions
Permissions will vary depending on your configuration, but a good rule of thumb is to set files to 644 and folders to 755. If you cannot upload to the uploads folder, adjust those privileges alone. Never assign a folder with 777 privileges. This opens this folder up as a massive attack target because anyone can now read and write to that directory. Generally, the files are set to be in the same group as the web server and owned by the local user. For example:
drwxr-xr-x 24 ddamstra staff 816 Sep 10 10:10 .
drwxr-xr-x 11 ddamstra staff 374 Jun 21 14:22 ..
-rw-r--r-- 1 ddamstra staff 418 Jun 13 21:06 index.php
-rwxrwxr-- 1 ddamstra staff 19930 Jun 13 21:06 license.txt
-rwxrwxr-- 1 ddamstra staff 7192 Sep 8 22:32 readme.html
-rw-r--r-- 1 ddamstra staff 4951 Aug 20 20:22 wp-activate.php
drwxr-xr-x 88 ddamstra staff 2992 Sep 10 09:21 wp-admin
-rw-r--r-- 1 ddamstra staff 271 Jun 13 21:06 wp-blog-header.php
-rw-r--r-- 1 ddamstra staff 4946 Jun 13 21:06 wp-comments-post.php
-rw-r--r-- 1 ddamstra staff 2726 Sep 8 22:32 wp-config-sample.php
-rw-r--r-- 1 ddamstra staff 1588 Jun 13 21:06 wp-config.php
drwxr-xr-x 8 ddamstra staff 272 Aug 21 11:19 wp-content
-rw-r--r-- 1 ddamstra staff 2956 Jun 13 21:06 wp-cron.php
drwxr-xr-x 125 ddamstra staff 4250 Sep 10 09:21 wp-includes
-rw-r--r-- 1 ddamstra staff 2380 Jun 13 21:06 wp-links-opml.php
-rw-r--r-- 1 ddamstra staff 2714 Jul 9 15:19 wp-load.php
-rw-r--r-- 1 ddamstra staff 33043 Sep 8 22:32 wp-login.php
-rw-r--r-- 1 ddamstra staff 8252 Jul 22 17:51 wp-mail.php
-rw-r--r-- 1 ddamstra staff 11115 Jul 22 17:51 wp-settings.php
-rw-r--r-- 1 ddamstra staff 26256 Jul 22 17:51 wp-signup.php
-rw-r--r-- 1 ddamstra staff 4026 Jun 13 21:06 wp-trackback.php
-rw-r--r-- 1 ddamstra staff 3032 Jun 13 21:06 xmlrpc.php
Note that this will most likely break some of the cool functionality such as one-click upgrades and theme and plugin installations from the control panel. In this case, you may have to provide WordPress with the FTP credentials to your site for this functionality to return. See the section “Staying Up-to-Date” in this chapter for more on why this is a concern.
MySQL Credentials
Set your MySQL login and permissions correctly. For the love of all things open source, do not connect your WordPress site to your database with the MySQL root user. Set up a special user for each WordPress site. Make sure it has access only to the database it needs, and make sure it has only the privileges it needs. For example, your WordPress database user never needs to grant access to another user. This helps contain any breach that might occur by limiting access through the principle of least privilege. Provide the least amount of access that you can for everything to work. In the next section, you will apply this same principle to user roles.
USING WORDPRESS ROLES
The WordPress role system allows you to assign different privileges to different user accounts. WordPress’s default roles cover the basics and start to establish a publishing workflow through the fundamental capabilities of each role. These can be further extended through various plugins to create new roles with additional capabilities for specific tasks.
In a security context, this is making sure that a particular user has only the access that he needs to complete his job. Whether that user goes rogue on you or the access is compromised, this contains the amount of damage that can be done. User Roles can also be useful for managing publishing workflows, as discussed in Chapter 15.
If you are the only person managing your site, you probably do not need roles. It boils down to you, the site administrator, and them, the unregistered masses. This setup, with no ability for a new user to register, is a secure way to operate your site. But it also discourages participation. Eventually, you may want to open it up to allow regular visitors to log in and reap some additional ease-of-use benefits.
You assign roles to users in the User Screen of the Dashboard. Each user must be assigned to a role, and your site will have a default role for registered users. Setting each of these appropriately in the Dashboard depends on your actual needs and the security permissions you need to delegate. To reduce your security footprint, you want to lower user permissions to the minimum level you can.
Subscriber Role
The Subscriber role is essentially the same as a non–logged in visitor. So why do you need it if this person can read posts and post comments the same as a guest visitor?
You may need the Subscriber role for a couple of reasons. First, you may want to allow this role for regularly returning visitors. If they are registered, they get some advantages such as not having to fill out all the fields to post a comment each time. Second, as a spam control measure, you may allow only registered Subscribers to post comments. This will weed out many of the automated spambots. Finally, certain plugins require this base level for functionality.
Contributor Role
The next step up is the Contributor role. The Contributor role is the first step in delegating responsibilities to your site users. The key privilege for Contributors is they can create new posts, but they cannot publish them to the site. That requires a higher role. This allows users to contribute information to your site, but you still maintain control over what is actually published.
In addition to creating draft posts, Contributors can also edit their own posts at any time and delete their own unpublished posts. Contributors cannot upload files and images to be used in their own draft posts.
Author Role
Authors are the next level up the hierarchy. Authors are more trusted individuals than Contributors in that they can upload files to be used in their posts and can publish their posts without approval. Likewise, Authors can edit and delete their own published posts.
Authors are restricted to working with their own posts. They can read and comment on any post just like any other user, but they can only modify their own content.
Editor Role
The Editor role introduces two new capabilities. Up until this role in the hierarchy, you have been restricted to posts, but the Editor role can also work with pages. In addition, the Editor is privileged enough to modify any content on the site.
This role cannot manage users or site settings such as themes and plugins, but the actual content is wide open. In practice, this is the role you assign to the client for a managed WordPress install. It provides enough capabilities that the client can manage the day-to-day content of the site, but not so much that he can muck around with the overall site settings and mess things up.
Note, however, that Editors cannot manage menus or widget areas, which thus limits the extent of the content they can manage.
Administrator Role
This is the root level role. Everything in the WordPress Dashboard is open to an Administrator so you want to assign this role carefully. This role can modify users, themes, plugins, and all of the content.
Make sure your Administrator users are security conscious and using good passwords. Should bad guys get access to your Administrator account, they will have full access to your site.
Super Admin Role
This role is only used on Multisite Networks. Essentially, the primary purpose of this role is to manage the different WordPress sites in the network and manage the network overall. WordPress Multisite is covered in Chapter 10.
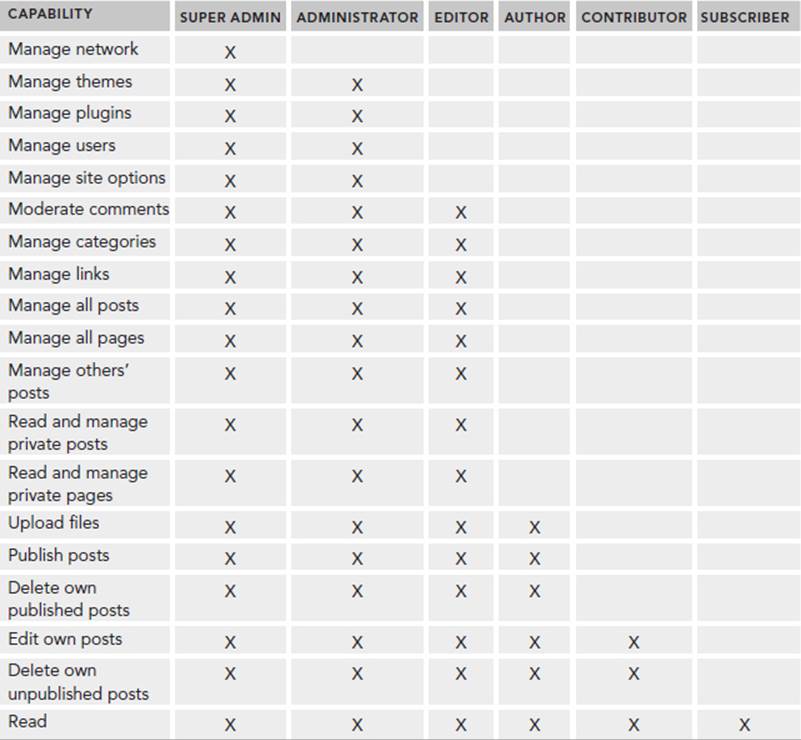
Role Overview
Table 13.1 shows a simplified overview of the capabilities assigned to each role. For more exact information about the capabilities of each role, visit the WordPress Codex at http://codex.wordpress.org/Roles_and_Capabilities.
Table 13.1 Capabilities of Each WordPress Role
Extending Roles
In most cases, the default roles will be enough. However, in certain circumstances you may need to extend roles to include more permissions or fine-grained control over content-editing capabilities.
The Role Scoper plugin by Kevin Behrens (http://wordpress.org/extend/plugins/role-scoper/) is a very powerful tool to manage these access control situations. With this plugin, user access is augmented beyond the default permissions covered previously, with specific access controls related to content-specific settings.
That is, any level of user can have escalated permissions to edit and manage content based on specific categories, pages, or posts. This access permission can go both ways to either enable content modification, or the reverse, to remove the ability for a role to read content.
For example, you created a multi–product line site. Each product line had a product manager responsible for its content. In this case, each product line became a WordPress category. With this plugin, you were able to restrict product managers to be able to post only new content within their respective categories.
Role Scoper is a very powerful plugin that allows you to build fine-grained controls. However, it may be more than you need for your particular situation. Many other plugins are available that allow you to supplement the built-in WordPress roles in other ways.
RECOMMENDED SECURITY PLUGINS
Being vigilant is an important step in security. You cannot expect what you do not inspect. That is, you cannot expect things to be working, if you do not check in on them periodically. Some plugins help with security maintenance and configuration on your WordPress installation. Just like antivirus and malware detection on workstations, these tools are here to assist in strengthening your security posture. The following are a few examples of WordPress security plugins that address many of the previously mentioned best practices. This is a burgeoning area for development so make sure to check out other plugins in the plugin repository.
BulletProof Security
BulletProof Security by Ed Alexander is an all-in-one security plugin for your WordPress installation. It incorporates intrusion detection scans and multiple types of logging to help in forensic analysis and discovery of attack attempts. This plugin will also assist in configuring your web server through .htaccess and PHP configurations.
You can find more information on BulletProof Security at http://wordpress.org/plugins/bulletproof-security/.
WP-Security Scan
WP-Security Scan by Acunetix provides an overall security scan of your WordPress installation. It checks many of the items listed previously, including WordPress version, table prefix, and absence of the admin account. It also includes a filesystem scanner to verify that the permissions are set to the recommended settings and includes some files to protect against directory browsing. WP-Security Scan provides a nice mechanism to make sure the base settings are in line with a good security posture as well, as this plugin has a tool for changing your database table prefix. We look forward to new features in future releases.
You can find more information on WP-Security Scan at http://wordpress.org/plugins/wp-security-scan/.
WordFence Security
WordFence Security by Mark Maunder is a comprehensive security plugin. This plugin checks your installed core files against the current revision in the WordPress repository. It checks both your core WordPress files as well as plugin files. WordFence Security is evaluating your core and plugin files for changes or variations from the source code, which can indicate a compromised site.
WordFence also scans your actual content for malware and phishing signatures looking for types of content injection. WordFence has a limit-login-attempt functionality to prevent brute force attacks as well as the capability to send notifications on logins so you can see who is and is not logging into your WordPress Dashboard. WordFence has many other security features covering a large spectrum of potential threats or attack vectors.
One of the more interesting features of WordFence is the live traffic information that ties into a software-level firewall. Using the live traffic and firewall features, you can block specific IP addresses or countries from accessing your site. This can help when an attacker is attempting to compromise your site. Furthermore, you can configure WordFence to automatically block or throttle access for IP addresses when usage from those traffic sources exceeds limits that you set. WordFence is also introducing a new caching mechanism to improve the speed of your site.
You can find more information about WordFence Security at http://wordpress.org/plugins/wordfence/.
SUMMARY
This chapter covered some of the challenges that can occur when your WordPress site begins to get noticed on the web. Popularity attracts attention so securing your WordPress installation is a fact of life for being on the web today. Security is an ongoing cat and mouse game between site administrators and the bad guys, and keeping on top of best practices and latest advancements is an important job skill for the professional developer. Choosing a security plugin and keeping your WordPress updated are now regularly occurring maintenance tasks for your site development and management process.
Finally, role definition is key in controlling the scope of permissions for your users. Contain when you can, and use the principle of least privilege to the fullest extent. Security is a fundamental component of using WordPress in the real world either as a website foundation or an application framework. You will tackle those topics in the next two chapters.
All materials on the site are licensed Creative Commons Attribution-Sharealike 3.0 Unported CC BY-SA 3.0 & GNU Free Documentation License (GFDL)
If you are the copyright holder of any material contained on our site and intend to remove it, please contact our site administrator for approval.
© 2016-2026 All site design rights belong to S.Y.A.