Professional WordPress: Design and Development, 3rd Edition (2015)
Chapter 15. WordPress in the Real World
WHAT’S IN THIS CHAPTER?
· Examining content management system tasks that are easily performed with WordPress
· Configuring WordPress to handle more complex content organization and display
· Integrating interaction vehicles such as forms, e-mail, and shopping carts
· Considering real-world challenges and how to address them with WordPress
In the real world, WordPress is generally used as the base for websites because of its extensive CMS capabilities. However, as you saw in the last chapter, WordPress can be so much more. Using WordPress as a content management system (CMS) seems to come up every month on the web. Run that phrase through a search engine and you will see countless results on the whys, why nots, and hows. It seems that WordPress is trapped with the stigma of being “only” a blogging engine when, as you have discovered by now, it is so much more. Since the first edition of this book, this topic and discussion around it have grown. WordPress is no longer pigeonholed in the “blog engine” space as it once was.
This chapter focuses on traditional content management from the perspective of a WordPress system, looks at the major functional areas associated with a CMS, shows you how to implement them via WordPress, and finally points out some areas where WordPress, despite its flexibility and simplicity, is potentially not the best tool for the task.
IS WORDPRESS THE RIGHT TOOL?
When is WordPress the right tool for the job? Making this determination can be challenging. Clearly, WordPress works for certain businesses and will most likely work for yours. Following are some reasons why.
Many of these reasons are well-known reasons to use WordPress, or reasons to use WordPress as a CMS, which are essentially one and the same. Look at all the functionality you receive out of the box when you use WordPress. WordPress, by its very nature, is easy to set up and use, and is search engine–optimized, security-aware, and well maintained, and countless other features have made it as popular as it is today.
This base functionality is what allows you to create fully functional, professional websites quickly, whether they are for one of your marketing initiatives, a new brand, or for a department or a client. This standardization, coupled with theme development consistency covered previously, ensures that your website infrastructure is predictable and manageable, thus making the development process more efficient and cost effective, all of which are enterprise-worthy goals.
WordPress could be the right solution for other reasons. The primary benefit is the capability to delegate content creation to subject matter experts. There is no way the development team can know the happenings and updates of every department company wide. Furthermore, even if these other teams provided content and relied on the web developers to perform the updates to the sites, the developers could be endlessly occupied with maintenance work. By using WordPress and some select plugins you are able to hand the updates back to the respective content owners to manage their own content creation, control, editing, and maintenance cycles.
WordPress is extensible. This has been covered throughout this entire book. You can extend WordPress in countless different ways by using plugins, and if the plugin that you need does not exist, you can use the plugin API to make your own. This allows you to integrate WordPress into your existing IT infrastructure.
The simplest form of integration is using RSS (really simple syndication), which does not require a plugin. We use RSS throughout our company as a way to organize content coming from different locations and reuse that content in new places. For example, press releases are syndicated from one central site, and by using tags and post categories, these content pieces are broadcast to the individual department sites as needed. This permits our content creators to post once and publish across a wide array of websites.
Furthermore, using RSS you are able to publish alerts and other timely news pieces from a central site to various locations around the country for use in their intranets and portals. This provides you with a one-stop location to publish from, and presents the consumers with a one-stop location from which to review the information.
Other integration pieces could include authorization with an existing identity provider, which is covered later in this chapter, calendaring applications, project management, or system status indicators. Because of the open API, you could integrate anything that you put your time and talents to.
In terms of cost, you cannot beat the price of WordPress. Given that the monetary outlay to try WordPress is so insignificant, your company can afford to give it a try and see if a proof of concept works (assuming, of course that you follow good security practices).
WordPress is open source software. That means that when you download it, you have everything. There are no magic compiled libraries of which you cannot see the direct functionality. Being open source and completely transparent prevents vendor lock in. Should you decide in the future that WordPress is not the right fit, all of your content is extractable. Sure, Automattic is a driving force behind WordPress, but with access to all the source code you can always maintain the code should Automattic go away. Or you could fork the codebase and make your own changes if you do not like the direction Automattic is taking, although other risks are involved here, such as disenfranchising the WordPress community by not respecting the spirit of the licensing. In other words, changes and improvements should be contributed to the greater community. Generally, a better approach would be to get involved with the development and direction of WordPress, which is covered in Chapter 16.
WHEN WORDPRESS IS NOT THE RIGHT TOOL
Depending on your circumstances, WordPress can be a good fit for your needs. But also consider the flip side. There are times when it does not match up with your goals, virtues, or culture, or the functionality does not match up with your needs or requirements. Here are some examples of when WordPress may not be the right fit.
WordPress may not have the exact functionality you require. It is not a panacea and cannot be all things to all people. For example, editorial workflows and default permissions are two places that may not line up directly. Plugins exist or are being developed that address these deficiencies, such as the Flow plugin (http://editflow.org) and the Members plugin covered later in the chapter. Should you find a requirement that a plugin does not address, perhaps you have actually stumbled across an opportunity to develop one yourself.
This next challenge is not WordPress-specific, but a common concern about free/open source software (FOSS) is that there is no single entity to hold accountable. Sadly, this is a reality for some developers. They want someone to hold accountable should something go wrong. In the worst circumstances, this could be you. At the same time, misconceptions about licensing, copyright, copyleft, and layering of software still persist in the business and technology communities. Some of these were touched on in Chapter 1. Likewise, there is no “go to” for support situations. But if you look around, you can find copious amounts of information on the Internet, both good and bad, and there are tons of consultants (possibly including you, after reading this book). Automattic also offers paid support through its WordPress VIP Program (http://vip.wordpress.com/our-services/#self-hosted) for clients that truly want to pay for accountability.
Because it is open source software, anyone and everyone can develop for it. When picking plugins, you are at the mercy of the developer. Short of doing it yourself, you do not know the quality of the plugin or the developer’s credentials and security awareness. So prepare to get your hands dirty and actually evaluate the code you are going to use on your site. Be sure you know what you are getting into with a plugin.
The last challenge is the development progression, which begins with local development, then moves to a staging or quality assurance server, and then finally deploys to a live production server. In most cases, this progression is not a big deal. Themes and plugins developed locally can easily be deployed through these stages. The challenge really comes into play when you are making drastic content changes on a production site, such as massive copy revisions to a set of product line pages. Aside from multiple imports and exports of the data or database syncing, a viable, low-maintenance solution for this challenge is still needed. As touched on in Chapter 3, however, there are smart people working on this, such as Crowd Favorite’s RAMP: https://crowdfavorite.com/ramp/.
DEFINING CONTENT MANAGEMENT
“Content management” has become hard to precisely define because it has been applied to a wide array of software tools and systems. On one end of the spectrum you have wikis, with explicit, multi-author editing and version control, but almost no page organization, navigation, or display mechanics. At the other extreme are commercial software packages aimed at the enterprise that handle access control, audit performance, repository functions, and community sharing of documents. Clearly there is a difference between the “transactional content management” realm of enterprise document control and self-directed publishing, but trying to pin the content management label on just one or the other ignores the richness of the software tools in those spaces. Since the rise of low-cost, easily used Internet tools, content management has more typically been applied to the systems used to build a site for Internet commerce, featuring online catalogs and customer interaction.
Where does WordPress fit on this spectrum? In the narrowest definition, blog engines are a form of CMS, handling a minimal number of content types (pages and discussion) in a chronological display order. Although WordPress started out as a blogging system, and some popular opinion still tries to narrowly describe it as such, it has the power, flexibility, and resources to perform most, if not all, of the tasks required of a package more typically marketed as a CMS. The mechanics of managing a site, administering users, and bucketing content for structure and distribution are not specific to blogs or any flavor of content; they require customization, design, and a multi-role delegation system. We hope this has been conveyed so far in this book, where we have liberally referred to the “content management” functions of WordPress, and now we can tie the pieces together in a more general CMS view.
Following are the CMS real-world challenges discussed in this chapter:
· Workflow and delegation—Often the holy grail of the CMS world is enabling multiple authors with minimal technical expertise to control the editing and publishing process. WordPress makes it simple for nontechnical users to add content and manage its distribution.
· Content organization—From mimicking a simple network portal to building complex page hierarchies, content organization involves handling multiple, complex types of content and choosing the appropriate display patterns for each.
· Interactivity—Mailing lists, forms, discussions, and commerce functions are typical CMS functions that require a bit of WordPress extension.
· Site statistics—Methods for reviewing the engagement of your visitors and the technology platform being used to access your site to determine what is working and where your focus needs to be.
· Scalability—Successful sites may need additional resources in order to provide acceptable user experience for your visitors.
· Cache management —Repeated processing either through database access or dynamic script parsing can slow down the responsiveness of your site. Caching at various levels can alleviate some of these bottlenecks.
· Load balancing—Once your site is scaled out to multiple servers, problem load balancing optimizes the utilization of the resources but also introduces some challenges.
· Dealing with spam—Unfortunately, spamming is a way of life on the web. However, there are some tools to mitigate the onslaught.
· Other content management systems—As a pure website management system, WordPress can be a powerful editing and content production platform, feeding other content management systems such as Drupal. This chapter also looks at areas in which WordPress is not the best choice.
At their core, blogging and content management may have come from different starting points and established their own functional lexicon, but the extensibility, design customization, and diverse developer community around WordPress has blurred the lines between what is “only blogging” and the now in-vogue “content management.”
The goal in covering WordPress in the real word is to highlight approaches to solving typical content management problems, building on the techniques and examples provided in previous chapters. Of course, no one wants every conversation to start out with a defense of WordPress, either in these pages or by you in a setting where you are choosing tools. Whatever your definition of content management, or your goals for creating a website that goes well beyond a list of blog entries, the content management process starts with simplifying the workflow.
WORKFLOW AND DELEGATION
One of the primary appeals of a classic CMS is that it simplifies content creation and management. Closely tied to that effort is a separation of duties, such that those users and administrators with editorial control over the content are given access, responsibility, and control over what is actually published through the CMS.
User Roles and Delegation
Just like in the real world, user management in a CMS has all of the separation of powers and policy creation complexity of politics, government, or standards bodies. You have to allocate roles based on the types and categorization of content you expect, as well as set boundaries on users’ abilities to publish and edit previously published content. In a purely multi-author website environment, the distinction may not appear that important, but if you are using WordPress as the face of an e-commerce site or for a company’s product catalog, multiple departments and approvers typically demand involvement.
Justin Tadlock’s Members plugin (https://wordpress.org/plugins/members/) was covered in Chapter 13 as part of the security and user management discussion. This plugin allows you to create new roles for your users and assign them very fine-grained permissions. In a CMS environment, this would permit you to delegate content generation to different departments and authorize them to make changes only in their respective areas.
Assignment of authority goes up the hierarchy of users, not down from an editor to an individual author. In a typical publishing environment, an editor will be able to dole out work to writers and composition experts, creating a workflow for the finished product that is organized in a tree structure similar to an organizational chart. WordPress mobilizes the leaves in that tree structure: Every user that has contributor or author privileges can create content (and upload files, in the case of authors) and manage publishing of their own posts. Deciding how and where to divide responsibilities is a key part of establishing a CMS framework with WordPress:
· Be diligent about administrator roles. Give them out like root or sudo passwords. At the same time, do not confuse editors with administrators. Editors may want to change the way a page appears, or aggregate content differently. Administrators are going to fix themes, core files, and plugins, and each has to be clear about the bounds on their domains.
· Treat editors as such. They will be given permission to edit pages, modify the content or status of any posts, and change metadata on the WordPress site. They should be using their editorial roles to manage the work of the authors and contributors as well.
· If you really want every piece of content reviewed before it hits the public web, separate contributors (who cannot publish) from authors (who can publish their own work but not edit that of others). Establishing a contributor class of users ensures that your editors will be busier, but also fully delegates the publishing decisions to those editors.
· Note that roles and delegation cover the creative process, not access control to content once published. As soon as the content is accessible as a published post, it is public until deleted (and even then, it may be cached or replicated elsewhere through a feed mechanism). In contrast to other content management systems, WordPress does not focus on a mechanism to control access to published content; it is not about intellectual property management or control in the same way a corporate document repository might track access, references, and provide auditing mechanisms.
A wrinkle on the multi-role and multi-user WordPress administration framework is WordPress Multisite, discussed in Chapter 10. WordPress Multisite powers WordPress.com because it allows multiple independent user trees to run independent but cohosted sites. This may be attractive if you have independent product groups or multiple brands that each want their own WordPress installations but you are limited (or want to be restrictive) in terms of administrator people power.
Workflow
Having established users and their roles, the next step is to clearly establish a workflow for getting content out of people’s heads and onto the web. After a simple editorial user structure, workflow is probably the next most matched term when asking what users associate with mainstream CMS. Two major components to workflow within WordPress exist: post revision history and post control.
Revision history is visible within the Post screen of the Dashboard, where entering edit mode on a post shows you the list of revisions. If you are running a system with multiple authors and editors, where the editors may fine-tune the first writing output, ensure that the editorial staff is using the revision feature to track content added, subtracted, or different between post revisions. It is effectively source code control for post content, managed within the MySQL database under WordPress.
Although many people are big fans of the simple Dashboard and find it compact yet powerful, some site administrators may find that the interface is too complicated given the technical background of their editor or administrator delegate. Some people freeze up when they have too many options or choices. You can use the WP-CMS Post Control plugin by Jonathan Allbut (http://wordpress.org/plugins/wp-cms-post-control/ to turn off unneeded features. This plugin installs a new control panel that allows you to configure the Write Panel to show only the fields you want them to see, as shown in Figure 15.1.
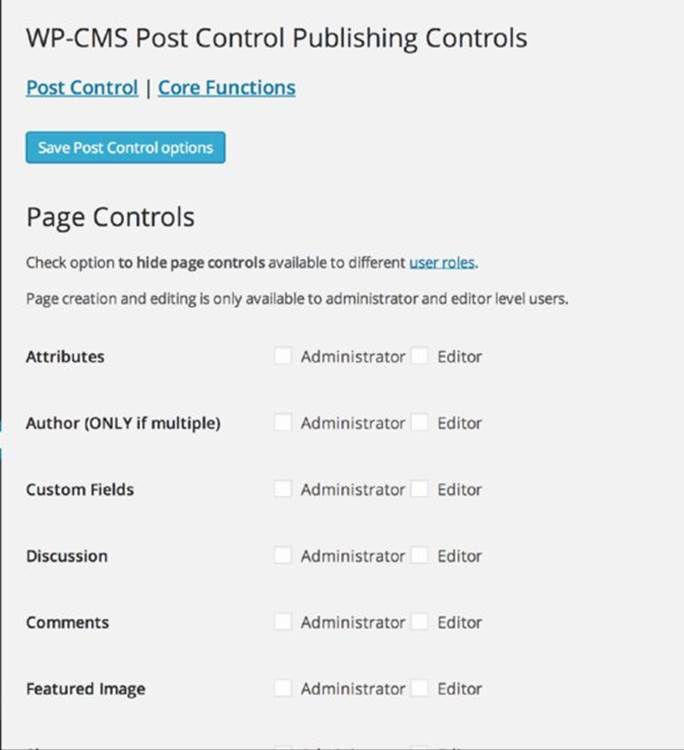
Figure 15.1 Using WP-CMS Post Control to set the Dashboard options
This plugin offers many options, but it is a simple management control. Using this plugin is the administrative control step that is complementary to creating simpler (or more specific) post editing panels, described later in this chapter.
The second part of content workflow is the process of taking posts from the draft state to published state, with stops at “private,” “future,” and “pending” along the way if warranted. A post written by a contributor will be held as “pending” until published by someone with that permission. Much of the post workflow happens through the Posts screen on the Dashboard, where the status of each post is clearly labeled, and there are menu items for publishing or making other post status changes such as marking a post as private or setting a future publication time.
If you are running a multi-writer WordPress site, remember that all of the content is stored in the same MySQL database, making it easy for other users to see the current state of the content. WordPress provides the wp_transition_post_status() function for plugins that want to catch individual post status changes, either to update a work-in-progress page or to otherwise signal to other users that a workflow change has propagated.
A particularly interesting plugin to watch is the Edit Flow plugin (http://editflow.org/). This plugin was designed to model a newspaper publishing workflow in WordPress. It includes several new post statuses, starting from pitching a story up to the traditional published post. It also includes special story budgeting calendars to make sure you have content spread out appropriately and assigned to writers and photographers for proper content completion. Additionally, this plugin includes behind-the-scenes notes between the editor of the site and the author to help with the publishing workflow with remote workers. It is definitely a niche plugin, but if your needs align, check it out.
CONTENT ORGANIZATION
There is an ongoing debate about posts in a WordPress site that is being used as a traditional, static content website. Posts are an indelible part of WordPress and absolutely have a place and use in any website, but the common argument is that posts are naturally chronological and that only time-based content fits this paradigm. Posts can represent any small content block that can be used multiple ways, as evidenced by the expansion of custom post types. Part of using WordPress as a CMS involves changing your strategic thinking about what types of content are used and to what effect they are used on the site.
Here are three simple examples of using posts for a commerce site:
· Create a post for each product that you sell. Comments on the post allow users to offer feedback and recommendations.
· Create a category or tag for each product on the site, and then organize posts about the product. The first post in each category should be the product information, and possibly a link to a shopping cart through which a user can purchase the product—something covered shortly. Now you can use the posts structure to provide deeper information about each product: Why are you offering it? How is it created, defined, or sourced? What other reviews, feedback, or public commentary exist?
· When creating a help section for a product, each help topic could be a post. Each help topic would be one small bite-sized piece of content that addresses a specific task or feature, using the tag and category mechanisms to sort and provide navigational guidance to users looking for self-directed help. Comments on the posts allow for users to describe the relative helpfulness of each post. Similarly, although not e-commerce, the jQuery team is using this method to document its API at http://api.jquery.com, creating a help resource and community resource via comments, all in one.
In every one of these simple examples, you want to change the default behavior of WordPress away from showing the most recent posts, and instead create a mix of static and dynamic homepage content reminiscent of a static website. You can see a variety of WordPress CMS application examples at http://wordpress.org/showcase/tag/cms.
Theme and Widget Support
Theme support for content management is key. Your goal may not be to make WordPress look decidedly non-blog-like but, rather, to find a theme that gives you the flexibility to display the types of content in the visual style that fits, whether it is a product sales site or an online newsletter. As an extreme case, the P2 theme (http://p2theme.com) developed by Automattic puts a posting panel, real-time updates, and inline editing right on the homepage, combining the best of Twitter, a blog, a discussion forum, and a news site. WordPress can be molded through themes to look completely different from any other WordPress site.
If you are going to be using a theme with widget areas and want to expand the content types available in those sidebar areas, you will want to leverage the TinyMCE JavaScript-based editor to turn HTML text areas into something more theme-appropriate. The Black Studio TinyMCE Widget plugin addresses the challenge that default text widgets support only plain old text. When you enable this plugin (http://wordpress.org/plugins/black-studio-tinymce-widget/), as shown in Figure 15.2, you have a new widget available in your widget screen. This widget has the built-in TinyMCE editor, so your content creators can put more than text in the sidebar.
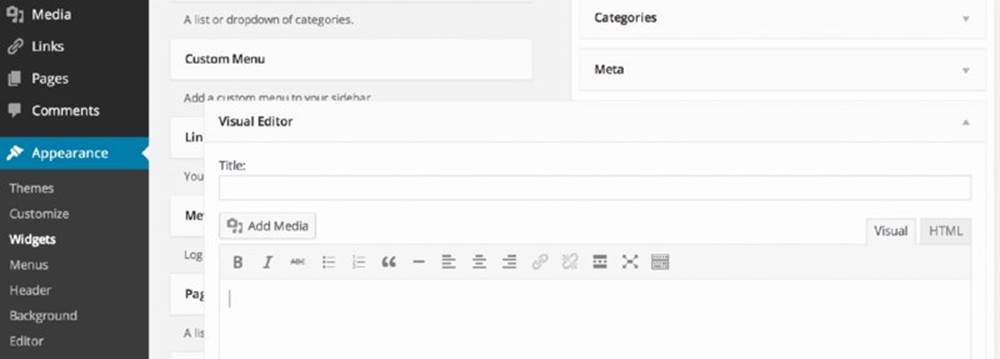
Figure 15.2 Editing a rich text widget
You do have to exercise some caution when using this plugin. Usually, your sidebar and other widget-ready areas have fixed widths. With this plugin, your content creator can upload anything into the widget and potentially break the layout of the site. However, this can be remedied with some proper training.
The bundled TinyMCE editor is workable but does not support some frequently used features such as adding tables. The TinyMCE Advanced plugin by Andrew Ozz (http://wordpress.org/extend/plugins/tinymce-advanced/) steps in and tries to address these shortcomings; however, be forewarned that the more elaborate your content, the more opportunity you create to break your site (again) with ill-formatted or rendered tables. Figure 15.3 shows the TinyMCE Advanced configuration panel.
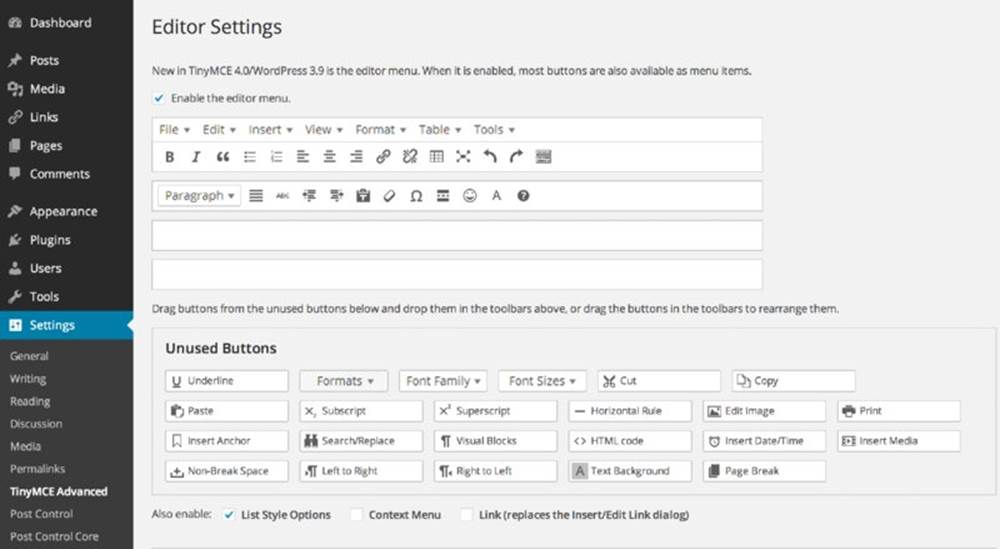
Figure 15.3 Using the TinyMCE Advanced configuration panel
Homepages
Remember high-school writing courses in which every story had to have a narrative hook? The hook was the point in the story where you established what made your story unique or interesting and encouraged your reader to keep going. A good narrative hook on a WordPress site will engage the reader and kick off the remainder of your storyline, whether it is product-related content or a mix of static and time-sensitive posts.
The common approach is to set a static front page. As discussed in Chapter 9, you can do this in several different ways. The easiest is to use the WordPress Reading Settings screen to set a static page for your front, or homepage. In addition, this page could use a page template to modify and distinguish the layout from the rest of your site. You will need to create a page (not a post) specifically for this purpose and then use the Dashboard to set it as the front page.
The other option is to use a special WordPress template file to serve as your front page, replacing the default listing of posts. WordPress looks for a template file named front-page.php in your theme, as discussed in Chapter 9. Using a template file will afford you more flexibility in the layout and functionality of your index page because you can edit the PHP code directly, choosing, for example, to list sticky posts or featured products first, and then related content or more recent chronological posts. Using a mix of additional page data fields and the custom loop query mechanisms described in Chapter 5, you can hand-tune the selection of content for your homepage as finely as you want.
Featured Content Pages
A good tool for your narrative hook on your static index page is a featured item. This is very common among the magazine-style themes in particular, as well as many other websites. Often, in the top third of the content area, you will see a large image area with a headline featuring content from elsewhere in the site. This position is sometimes called the “hero spot” and is featured prominently on popular websites. It is a frequently deployed device because it works.
Generally when you deploy a featured item on the index page, it is best to have several different images and use jQuery (or another JavaScript library) to cycle through them. That way, you are not relying on one hero item to save the day, but putting forth a couple of different ideas, and with luck, one will catch the visitor’s eye. The goal here is to feature items managed as posts, custom post types, or media by WordPress so that the editorial staff can control them rather than the site administrator.
The first thing to do is set up a system for the featured items. You can use a category named “Features” and use just those posts for the slideshow. But that means that in other parts of the site, if there is a news section that shows all posts, you will want to exclude this category from those Loops, which can be a pain. This is the old school way to manage this type of feature on a WordPress site, and some themes continue to do so.
However, as covered in Chapters 7 and 9, you can use custom post types to achieve this functionality without the extra loop overhead. Again, this is only one way to implement this content management element; there are many others. In this example, you are going to edit the theme template files directly, but this functionality could be built into a plugin also.
The plan is to showcase three random features from the “slides” custom post type for display. First, register a new custom post type, as discussed in Chapter 7. This code goes in your functions.php file. For this example, it might be something like this:
/*
* SLIDES FOR FEATURE
* Register post type for feature
*/
add_action( 'init', 'wppro_create_post_types' );
function wppro_create_post_types() {
register_post_type( 'slides',
array(
'labels' => array(
'name' => _x( 'Slides', 'post type general name' ),
'singular_name' => _x( 'Slide', 'post type singular name' ),
'add_new' => _x( 'Add New', 'Slide' ),
'add_new_item' => __( 'Add New Slide' ),
'edit_item' => __( 'Edit Slide' ),
'new_item' => __( 'New Slide' ),
'view_item' => __( 'View Slide' ),
'search_items' => __( 'Search Slides' ),
'not_found' => __( 'No Slides found' ),
'not_found_in_trash' => __( 'No Slides found in Trash' ),
'parent_item_colon' => ''
),
'public' => true,
'exclude_from_search' => true,
'supports' => array('title','thumbnail','editor'),
)
);
}
For the display on your site, you are either going to edit your front-page.php template file or make a new page template file for your index page. These code changes will go into that file.
Next, you have to get the slides from the database. You can get these posts with a simple WordPress WP_Query() object:
$feature_query = new WP_Query('post_type=slides');
This query will gather all of the slide custom post types; you could also pass in some limiting parameters to tune the result. Then, in the content area of the template file, you mix a little HTML for the jQuery to hook into and then loop over the result object:
<div id= "feature-container-container ">
<div id= "feature-container ">
<?php if (is_front_page() && $feature_query->have_posts() )
: while ($feature_query->have_posts()) : $feature_query->the_post();
?>
<div id= "slide_<?php echo $post->ID; ?> "
class= "entry-content slide " title= "<?php echo $post->post_title; ?> ">
<?php the_content();?>
<?php edit_post_link( 'Edit', '<span class= "edit-link ">', '</span>' ); ?>
</div>
<?php endwhile; endif;?>
</div>
<ul id= "feature-nav "> </ul>
</div>
What you are doing here is creating some wrapping divs to contain the slideshow, looping over each custom post type in the query result, and pulling out the content. When you put this to use, the content image should be specifically sized so as not to break your theme layout. This can be extremely convenient because you now have featured slides advertising on your index page that link to individual landing pages, which makes it handy for tracking success rates through your traffic analysis. Furthermore, you are not cluttering up your traditional post and page content with ephemeral advertising posts.
If you view your site now, you may see stacked images or content on top of each other, so the next step is to take these posts and use a little JavaScript magic to turn them into a slideshow or carousel. Many people are big fans of the jQuery Cycle plugin by Mike Alsup (http://malsup.com/jquery/cycle/). Note that this is a plugin for jQuery and not WordPress. This plugin is really easy to use and has several neat transition options. Using this plugin, you can convert the HTML into an autoscrolling slideshow. This JavaScript code goes into the bottom of your page template file or where you would normally place your JavaScript. The jQuery could be something like this:
$('#feature-container').cycle({
fx: 'fade',
speed: 1000, //time the transition lasts
timeout: 6000, //time between transitions
pause: 1, //stop the show on mouseover
random: 0, //random order (our mysql does this already)
delay: -1000, //delay before show starts first transition
next: '#next',
prev: '#previous',
pager: "#feature-nav ",
pagerEvent: 'mouseover', // name of event that drives the pager navigation
autostop: true, // true to end slideshow after X transitions
autostopCount: 100, // number of transitions
// callback fn that creates a thumbnail to use as pager anchor
pagerAnchorBuilder: function(idx, slide) {
var thetitle = slide.title;
var desc = jQuery('#'+slide.id+' img:first').attr("alt");
var href = jQuery('#'+slide.id+' a:first').attr("href");
return '<li><a href="'+ href +'" title= "Show: '+ desc +' "></a></li>';
}
});
Experiment with the different effects and timing using the other parameters you can set to create unique results. This same method could be used to showcase some testimonials. Either keep it in a slideshow pattern, as outlined previously, or pull a random post from the testimonial category. Rather than using images as your content, you can have the actual formatted post data. You are only limited by your imagination.
Content Hierarchy
In addition to the featured item concept to draw users’ attention, most content management systems will allow you to create a content hierarchy to improve navigation once you have hooked the user. A typical hierarchy for real-world websites contains content of different types in a tree-like structure to impose navigational patterns, and that allows you to mix static content features with more dynamic content.
One obvious path to a content hierarchy is to use categories and tags to sort posts into related groups. This is useful when you are using posts as the primary content type and organize equivalent classes of posts by category or unique tag information. In addition, you saw in the previous section of this chapter how custom post types can be used for featured image content on an index page carousel.
The custom taxonomy features discussed in Chapter 7 provide another way to organize and search posts, giving you even more flexibility when customizing a theme’s Loop. This section digs into these custom pages and post hierarchies more, providing examples of plugins that let you craft the content management aspects of WordPress to suit your desired site look and feel.
You can start with a complex navigation challenge: You have a hybrid site that has sections where pages are the obvious content type, but you also have some sections where post categories make more sense, which is often the case in live sites. You do not want to manage a hard-coded navigation tree, and implementing menus is not perfect because the post content is (intentionally) regularly changing.
One solution is the Page Links To plugin by Mark Jaquith (http://txfx.net/wordpress-plugins/page-links-to/). This plugin creates a new field on the page Write Panel. Using this field, you can create a page that functions as a redirect to another web page. This enables you to use the menu system as your site’s global navigation but still empowers you to create menu items that can redirect to offsite links. Or, more often, you can now create a menu item as a page but have it redirect to a post Loop page.
For example, pretend that under your About Us menu you have the traditional History (of your company) and Contact Us pages, and to further complicate matters, you also have a job posting page. But your company uses a third-party service for job postings, which creates a problem in your navigation. With this plugin, you can create a new page called Careers but have the page link to the third-party job-posting site instead. You can see how this would be set up in Figure 15.4.
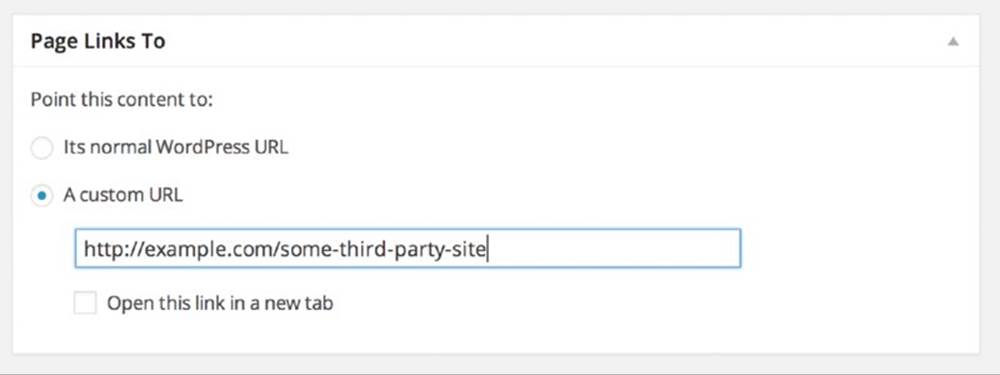
Figure 15.4 Creating a page that links to a third party with the Page Links To plugin
The next challenge with a large site is managing the pages. After a while, your site grows to have multiple pages, under multiple parent pages. This structure is necessary to make your site coherent, as discussed in Chapter 9. Themes have several ways to handle global navigation, and determining which method your theme uses is important. Most themes are moving toward using the WordPress menu system.
The built in WordPress menu system is nice and flexible, but it is disconnected from your actual content. With the menu system, you can automatically add pages to the navigation, but only at the top level. But when you remove a content page in the Dashboard, it does not affect the menu, leaving you with orphaned navigation links. This disconnect can be very baffling to inexperienced WordPress administrators, and it can be frustrating for experienced administrators that the two systems are not coupled. Make sure this is something you train your client on because it is not intuitive for them to be disconnected.
INTERACTIVITY FEATURES
The most basic interactivity feature is Search, discussed in Chapter 12. The other primary user interaction features found in real-world websites are forums, forms, and basic e-commerce features.
Forums
Comments on posts are the simplest content discussion type. At times, you may want to move from content that you create in an attempt to stimulate conversation into user-led and threaded conversation. A forum is an open discussion, most commonly called a bulletin board in the pre-broadband days of the Internet. The easiest way to add forums to WordPress is through bbPress (http://bbpress.org), a WordPress-related project also delivered by Automattic. bbPress will share user data with WordPress so registered users can participate in forum discussions. It is possible to load them both and have your forums simply appear as a section of your website.
If you want a simple forum feature as a content type, the plugin route is likely to produce an acceptable result. On the other hand, if you want to integrate multiple content management repositories into a single user experience, take a page (literally) from WordPress.org: bbPress powers the WordPress.org user-generated support area.
Forms
The next challenge for a website is creating and managing forms, such as contact forms and other similar web form to e-mail features. Countless plugins are available for contact forms, but for a full-featured site, you will eventually have to move beyond this. For the longest time, the cForms II plugin by Oliver Seidel (http://www.deliciousdays.com/cforms-plugin) has been the regular stand-in. CForms works very well and is extremely powerful. You can customize it to all ends of the Earth, but the user interface is very daunting at first. You cannot really hand off CForms to your content administrator to make new forms as needed.
An alternative to CForms is Gravity Forms by RocketGenius (http://www.gravityforms.com/). This is one of the few plugins mentioned in this book that costs money to use. But to be honest here, Gravity Forms is a very enticing prospect. Ask any WordPress developer what her favorite plugin is, and if she has used Gravity Forms, that is usually the answer. Gravity Forms lets you create any type of form you need with a simple, easy-to-use AJAXy interface. It is so easy to use that many content administrators are shown how to use it. Not to gush too much, but the clean, intuitive interface is truly one of the best among plugins.
In addition to the user interface side, the HTML rendering is top notch. It looks fantastic without any additional styling required. However, should you desire to change the look and feel, the HTML is filled with CSS class and ID hooks for you to use. In addition, this plugin is so popular that many themes include styling for it. A final, powerful feature of Gravity Forms is that, in addition to the traditional “e-mail the form contents to a specified address” functionality, Gravity Forms also adds a Dashboard module that tracks the forms submitted. Although CForms has similar functionality, the usability of Gravity Forms really justifies the cost.
E-Commerce
If you are building a site with featured products and pages, product tags, and categories, ideally you would like to sell something. Shopping cart and payment systems integration fill the last category of user interaction. If you search the plugin directory on WordPress.org, you will see at least a dozen different shopping cart and checkout plugins available. Rather than itemize them all, here is a quick checklist of things to look for:
· How hard is it to configure the shopping cart? Are you going to be burdening your administrators with minor details such as updated discounts, or can content managers handle that task?
· What kinds of statistics can you get from the cart? Learning how and why users abandon items will help you improve the site, whether through more product information or an easier checkout process.
· What payment systems are supported? If you are not looking for anything more complicated than the ability to accept PayPal payments with a specific product or item number filled in, you can use PayPal button templates and hand-edit them into your pages or sidebars.
The WP e-Commerce plugin (http://getshopped.org) combines nearly all of the extension mechanisms covered: It uses custom post types for product pages, organizes them in custom taxonomies, and adds plugin-specific database tables to maintain product attributes. It integrates with a variety of payment mechanisms and clearly demonstrates that you can give WordPress a hand-crafted look and feel.
SCALABILITY
At some point, the question arises—can WordPress scale? And the answer is, of course it can. Just look at WordPress.com statistics (http://en.wordpress.com/stats/traffic/). You can clearly see that it is capable. But the actual task of scaling a WordPress installation involves many layers, including the WordPress code, plugins and themes, the PHP version and settings, the web server software and the underlying operating system, and finally, the actual server hardware. The key to scaling a WordPress installation is to secure and tune each of these layers.
Performance Tuning
Securing and tuning your WordPress installation is covered in Chapter 13. Be sure to review that content. This chapter touches on more enterprise-specific issues, with the assumption that in a larger technology deployment, you will have access to the web, database, and file servers that form the bulk of your WordPress installation. We are big believers in DevOps, and you, as the developer, should have knowledge and access to all these layers to understand how all the moving parts work together. Sadly, in some organizations these levels remain in department silos.
Tuning your theme should be part of any theme development process. That process includes checking the file sizes of all images, making sure the JavaScript and CSS are as small as possible, perhaps even minified, and reducing the total number of HTTP requests a browser has to make. Using a tool such as YSlow! for Firebug, the Firefox add-on or Chrome developer tools (http://developer.yahoo.com/yslow/)can help isolate these problems. Our caution about YSlow! is that although it is a nice tool to assess slowdowns, it was designed by Yahoo! for Yahoo!, and even though this is talking about scalability, Yahoo!’s sense of scale is likely bigger than yours. So, take the results with a grain of salt and use some commonsense in weeding out the low-hanging fruit. Generally, good web development practices will help your theme scale.
For plugins, you have to look at the code. As mentioned previously, it is unlikely that you know the credentials or skill level of the plugin developer or the terms under which it was created. Some plugins are created in a straightforward, get-it-done style and may not be very efficient, even if they are effective. You can often see this style with multiple SQL queries to get the information required at any given time rather than a thought-out data access plan. If you are making improvements to existing code, notify the creator. Put your enhancements back into circulation so the entire community can prosper. Chapter 16 offers additional information on supporting the WordPress community.
Scalability really goes hand in hand with performance. The more efficient your website is, the easier it is to handle more requests and therefore scale. For the PHP layer of the application stack, turn off any PHP functionality you are not using. This is good for performance, security, and scaling. Much of this was covered in Chapter 13 under the subject of security and performance; here, the same rules apply for scalability.
In your php.ini file, disable any extensions you are not using, like all those extra database extensions. The default php.ini file is designed to work for most people in general circumstances. In other words, it is designed to just work for everyone. Here, we are referring to tuning PHP to meet your specific needs and requirements. The following are pretty safe settings to turn off:
;Hide PHP for security
expose_php = Off
;Turn off for performance
register_globals = Off
register_long_arrays = Off
register_argc_argv = Off
magic_quotes_gpc = Off
magic_quotes_runtime = Off
magic_quotes_sybase = Off
Set your memory allowances to the correct values for your server environment and needs. Make sure error reporting is configured properly for the environment—do not show errors on the production site.
The next layer up is the web server software. Apache is the most common, but WordPress can run on any number of web server applications, including Microsoft IIS and nginx. In general, do some research on your web server and the functionality it requires in order to tune its operation. Turn off any module or extra features you are not using. Like PHP, the stock Apache configuration file is designed to work for most people in typical usage situations. It is in the developer’s best interest to reduce the amount of effort to get something to work from the get-go. This can be a huge barrier to entry if too much tweaking is needed just to get something to work.
Tuning for scalability is the exact opposite of this general use case scenario. You want to disable as much as possible to make the software as lean as can be and still serve your sites properly with only the functionality your sites require. A side effect of slimming down your configurations is that you also increase your security posture by not having as many options to exploit.
Another option for scaling is to consider serving static content from an assets server or Content Delivery Network (CDN). This is a specific variant of throwing more hardware at the problem, which is looked at shortly. In short, using one web server for serving dynamic content and another for serving the static assets, such as images and CSS, can reduce the load across the board. Different web servers have different strengths. Moving your static content to a secondary URL on a web server using lighttpd or nginx, which are better at serving this type of content, may be more efficient because each web server can be tuned for a more specific function. This will also reduce the load on your dynamic content server, giving it more resources to perform its own duties.
A faux method is also available here to accomplish similar results. You can serve static assets from a subdomain, even if it is on the same server. Most web browsers are set to download two to four items in parallel at a time. By moving some of these requests to a subdomain, such as static.example.com, you can trick the browser into effectively doubling the number of items being fetched at a time.
Moving your static assets to a CDN accomplishes the same thing, but on a much larger scale. CDNs distribute your content across their network of servers, so this not only off-loads the transfer from your web server, but it can also make the content geographically closer to your visitor. However, you are also now relying on a third party for portions of your site. Many WordPress-specific hosting providers are incorporating CDN services into their hosting packages.
Database Optimizations
The database level also has several opportunities for optimizations. MySQL has two main storage types for tables: MyISAM and InnoDB. Others are available, but these are the two that MySQL installations have enabled by default.
The ISAM table type was the original storage engine for MySQL. The MySQL team later improved the engine and created MyISAM. MyISAM is a good general-purpose storage engine. It performs better with a table with many reads or many writes, but not both. That is, it is good for storing or retrieving data, but not ideal for a situation that requires frequent switching between the two. This is also the default table type for WordPress.
InnoDB, on the other hand, provides better concurrency through row locking and transactional support. InnoDB can use non-locking reads to maximize efficiency and performance. This makes InnoDB a good storage engine for large volumes of data and datasets that are used in both read and write contexts. If you’re going to use WordPress in an enterprise where you have many contributing users, or lively discussion of topics posted by a core group, the write and update load on the database will be significantly higher than that of an individual blogger who posts weekly thoughts on buildings and food or the Talking Heads.
Switching some of your WordPress tables, such as the highly dynamic ones like wp_comments, to the InnoDB storage type can create performance improvements, and therefore scalability benefits. Additionally, MySQL also has a configuration file that can be tuned to match your environment. Again, this is really enterprise-level tuning of your MySQL. The average site probably is not going to dive into the underlying database storage engines, but a high traffic site that has extensive infrastructure on MySQL may have the expertise to make the appropriate adjustments for scaling and performance.
Regular Database Maintenance
Finally, your MySQL database needs to be maintained. From time to time, you should run checks on your database tables and optimize and repair if needed. Maintaining your database is like changing the oil in your car or defragmenting your hard drive—you have to do it regularly to keep everything running smoothly. This can easily be done through PHPMyAdmin or another MySQL interface. Plugins such as WP-DBManager by Lester Chan (http://wordpress.org /plugins/wp-dbmanager/) allow you to schedule these tasks, as well as backups, and not have to worry about it again.
Hardware Scaling
The previous optimizations were all low cost software configurations. This next one is a more expensive option, adding more hardware. A default WordPress installation is all encapsulated on one machine. This machine functions as both the web server and database, as shown in Figure 15.5. This is the simplest and most basic WordPress hardware scenario. Many, if not most, sites run this way.
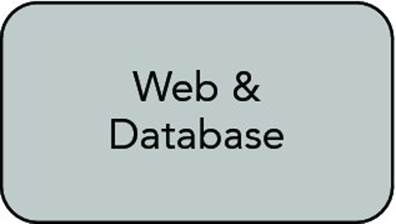
Figure 15.5 WordPress on one server
The next option is to split the database and web server functions into two servers, as shown in Figure 15.6. This allows each server to focus on a specific task and is the next logical step when your hardware starts to get taxed by the workload. At the same time, make sure that you account for the independent database and web hosts when you create your WordPress configuration files; you will need to know the name of the database host because it is no longer the “localhost” with respect to the web server. This is common web application architecture and is very easy to implement with only a few configuration changes. Again, make sure you re-tune your database and web server software to run on their now independent boxes.
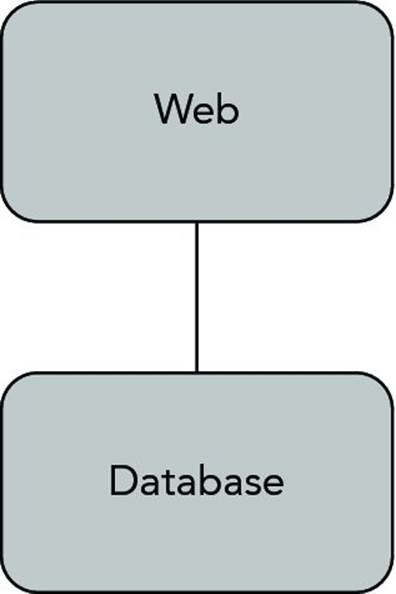
Figure 15.6 WordPress on two servers
Hardware scaling can quickly get complex, and the possibilities are endless, so you are only going to briefly review some common scenarios. Depending on your existing infrastructure, you may have other options available.
You may need to do some investigative forensics to determine your next step. That is, really figure out what the bottleneck is. Regrettably, this can be a reactive plan of attack rather than a proactive one. So, while preparing to scale out your site, invest some time in some server monitoring infrastructure. You can also do some load testing using tools such as Apache Benchmark to see how your current infrastructure performs and make some educated guesses on where the problems might develop.
Generally, the next step in scaling is to load-balance your front-end web servers, as shown in Figure 15.7. In this scenario, you deploy two web servers with identical copies of the WordPress installation and use a single database server to store all the data.
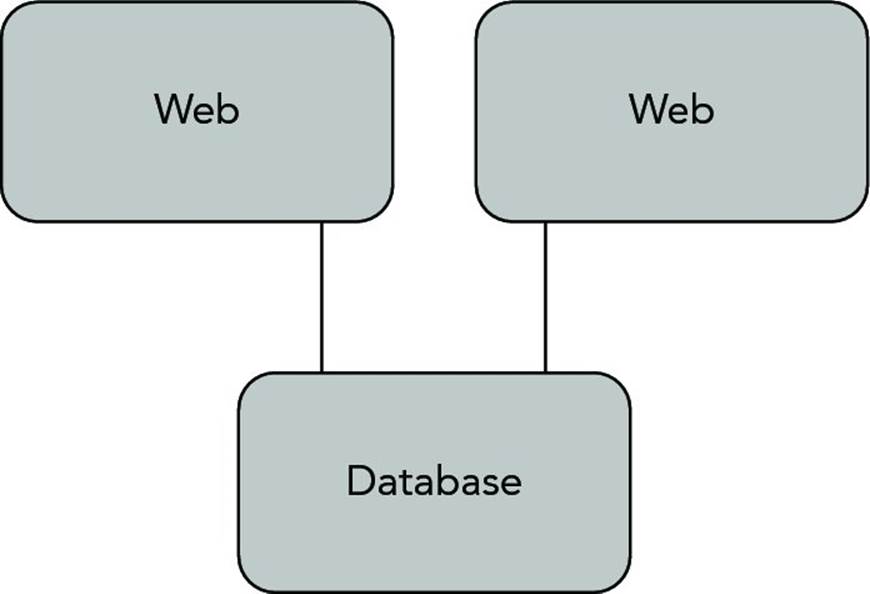
Figure 15.7 WordPress with load-balanced web servers
There are a couple of challenges with this approach. First, you need a load-balancing mechanism. This can be a hardware appliance or a software solution. There are many different load-balancing mechanisms to choose from, and your infrastructure will dictate which you choose. You may be deploying into an enterprise network, which typically will have well-established network infrastructure for virtual IP and load-balancing, and any horizontal scaling topology should fit into that IT approved plan.
The second challenge is that you will need to synchronize your wp-content/uploads folder. That is, if a content creator uploads media onto one server, because the front ends are load-balanced, the next request could pull from the other server where the file does not exist. You have the option of moving the uploads folder to a common location, perhaps on the shared database server, or you can set up a scheduled task to copy the files across. The rsync (http://rsync.samba.org/) utility is a good solution for this type of synchronization. You will have to accept that the files will not be there until after the copy has occurred. This means that there can be a lag between when new content is published and when it is available on both nodes of the web front-end. Some of this lag can be mitigated through a front-end caching mechanism such as the Super Cache plugin, which will be discussed later in this chapter.
The next scenario for scaling means adding a second database server and implementing MySQL replication. You continue to keep the load-balanced web servers, but now you have two database servers, as shown in Figure 15.8.

Figure 15.8 WordPress with a hot spare database server
Technically, this does not offer better performance, but it does offer the ability to failover should the database server have a problem. This standby database server is called a hot spare. That means it is on and up-to-date, but not in current use. Part of scalability is availability. Now, you have two web servers and two database servers, which means you can remove one server from each tier and still have a functioning site.
Putting that second database into active work on the website is the next layer up. You still have load-balanced web servers, but now you can distribute the load on the database servers using MySQL replication, as shown in Figure 15.9. In this situation, you want the writes to the database to be written to the master MySQL database, and all the reads to come from the slave MySQL database. This solves the MyISAM challenge, where the storage engine excels at reading or writing but not both.
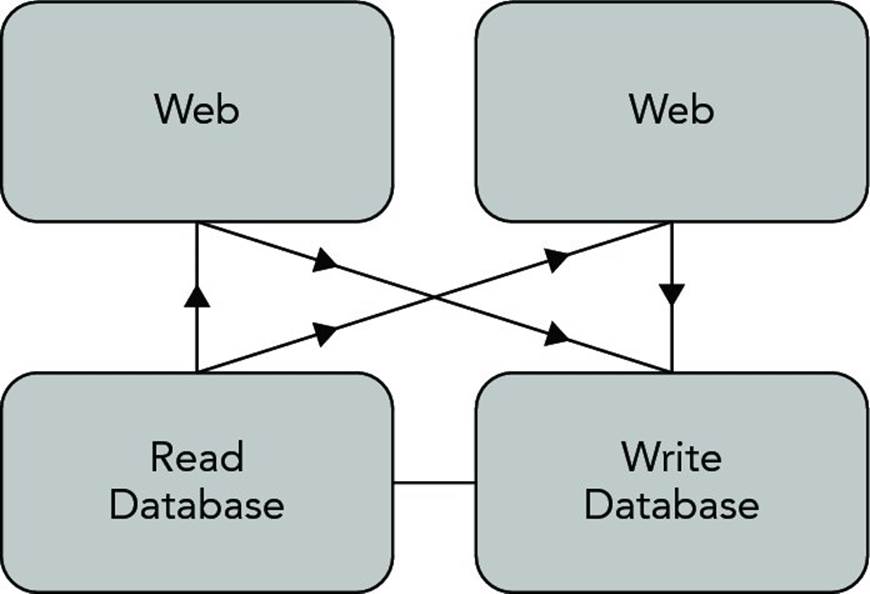
Figure 15.9 WordPress with load-balanced web and database servers
Finally, another WordPress-specific option to consider is HyperDB (http://codex.wordpress.org/HyperDB). HyperDB was designed by Automattic and is a drop-in replacement for the standard WordPress database access layer. It is, however, more powerful than the standard access objects because it can support sharding, or partitioning of the WordPress database information across multiple databases. This can permit you to move the highly dynamic data to a more robust server, while the content that is less in flux can be used on a database server with more aggressive caching. HyperDB also supports replication and failover functionality. However, the documentation is sparse, so implementing this solution is not for the faint of heart.
In the real world, this is how we run some high-traffic, higher-profile sites for our clients. We combine load-balanced web front-ends with caching plugins, each of which reads the content from its own individual slave database server. All writes to the database are written to the master database server and replicated to the slaves. All uploaded content is duplicated to the other web front-ends through an rsync-like process.
STATISTICS COUNTERS
Viewing traffic statistics allows you to see which content on your site is actually bringing visitors in. This shows you what content is working and what is not. In addition, traffic statistics can show you valuable information about your visitors and their hardware and software setups. This information enables you to tailor your site to accentuate the positive and support your visitors’ browsers to create a more pleasant and meaningful experience.
Statistics packages employ a couple of different methods for gathering data, and each has its own advantages and disadvantages. Likewise, each vendor puts its own spin on the traffic statistics.
You can gather traffic statistics in a couple of ways. The grandfather in this realm is to parse your log files. Your web server, if configured properly, will create log files for each and every request and error that it handles. Certain statistics packages can parse these logs and create human-consumable information. Some packages even let you download these logs to your local machine and let it do the busy work offline.
The second method is to put a snippet, nearly always JavaScript, on each page of your site that reports back to a central server, which then accumulates the data and makes it meaningful to you. This method is the current trend.
Each of these packages has an available WordPress plugin. Each package also varies in its specific vernacular. You will have to determine what the truly meaningful metrics are from each package; for example: visitors versus unique visitors, and hits versus page views versus unique page views. Deriving useful real-world information from statistics depends on your goals. If you want more viewers and are trying to attract attention from Google searches, social network recommendations, and other external aggregators, you may be happy with an increasing number of visitors who look at only one page or spend under a minute per visit on your site. A site that aims for more discussion and community feel should have more return visitors, a longer interval between visitor entry and exit, and multiple pages viewed by each visitor.
AWStats
AWStats is the granddaddy of web traffic statistics. Actually, there was a package that predated this but had many security problems, and AWStats took over as the main statistics package.
AWStats is of the log parsing variety of statistics counters. It can be run on the server, or you can download the log files to another machine and run it if you do not have access or permission to change the configuration of the server running your WordPress site. AWStats requires Perl to run, and it has been used successfully on both Apache and Microsoft IIS servers, although it requires a little configuration of the log file formats for IIS. To install and get AWStats up and running automatically for your site, you will need to be familiar with server administration tasks. As a log parsing package, AWStats is designed to run automatically in the background via a cron job on Unix systems.
Because AWStats is a server-side log parsing package, it easily tracks the actual request information of your website. You can extend the information gathered by adding in the special JavaScript tag for AWStats to catch browser-side information such as screen size and browser plugin support for various technologies.
One good thing about AWStats is that it is one of the original open source log parser statistics packages. It has survived so long because it is reliable and free and relatively easy to get going. This also includes many contributed scripts and tidbits of help and support from various sources around the web. Numerous hosts rely on AWStats, and like any good open source software package, there is a robust support community around it.
What is not so good about AWStats is that it sometimes loses track of dates, mainly because of an unintentional system admin error. In order to provide certain historical information and to process logs quicker, AWStats maintains cache files. If dates get out of order or other time problems exist, these cache files trump any new logs to be parsed and can provide inconsistent data. Basically, you have to go back and rebuild all the cache files. Fortunately, with some searching you can find some scripts to assist in this. Another complaint with AWStats is that the browser agents were not updated for a long time, but this does not appear to be the case anymore.
AWStats is a tried and true option and is good for those sites that want to remain self-contained. AWStats works in conjunction with your web server application, so WordPress integration is not part of the package or necessary. If you do not want to include statistics tracking JavaScript calls that make references to other sites, for performance or JavaScript avoidance reasons, AWStats is a venerable alternative.
You can find more information online at http://awstats.sourceforge.net/.
Google Analytics
Google Analytics is currently the big dog in hosted web traffic statistics. It has a clean and generally intuitive user interface for seeing the reported statistics. It works by injecting a special JavaScript tag into your rendered page, which reports traffic and browser information to Google for parsing.
And therein lies the rub with this free statistics package. You are reporting all of your traffic information to Google. Many people use Google for nearly everything these days—e-mail, calendar, and web traffic statistics included—although some distrust giving all this information to what could become Big Brother. While people have some trust in Google, in reality, the company could use the information they get for any number of purposes. Just think of the wealth of information Google has at its fingertips related to browser and OS share, and then combine this with the AdSense and keyword information from your site. Today, Google allows you to track campaigns and site “reach” by cross-referencing AdWords and AdSense traffic with Google Analytics data. The amount of data related to website use and marketing trends is staggering. The trade-off of data access is a business decision you will have to make.
Google Analytics is definitely marketing-oriented. Many powerful tools are built in and learning how to use them will greatly benefit the quality of the reported data, including advanced segmentation of your traffic and custom reporting data.
Many WordPress plugins are available for Google Analytics, which anecdotally serves as a barometer for the popularity of this service. Each offers slightly different functionality, but all essentially do the same thing, which is to inject the appropriate JavaScript into the page. Some offer additional features to track the extra events via the control panel. You can find more information online at http://google.com/analytics/.
For all practical purposes, Google Analytics is the de facto standard in web traffic statistics. Nearly every site uses it to some extent. But there are alternatives if you do not want to put all your eggs in Google’s basket. Check out StatCounter (http://statcounter.com/) and Mint (http://haveamint.com/) for other options. Mint is essentially a self-hosted Google Analytics–like system. There are also emergent players such as Woopra (http://woopra.com/), which includes real-time visitor information, that are popping up from time to time.
JetPack by WordPress.com
We would be remiss if we did not mention JetPack by WordPress.com. This is actually a super plugin that bundles several of the WordPress.com hosting features into a single plugin for use on self-hosted WordPress sites. This plugin has many features, including social media integrations, photo gallery enhancements and, obviously, because you are in the traffic statistics section, it has this functionality, too.
JetPack works the same as Google Analytics—by injecting some JavaScript into your rendered HTML template and reporting back to the WordPress.com servers for tracking. JetPack is built by WordPress developers for WordPress so it has some specificity about the way the statistics are presented with regard to posts and pages.
In addition, JetPack stats are presented right in the WordPress dashboard. Although there are plugins to make other statistics packages do this through iFrames, the in-Dashboard view is the default method for JetPack. Basically, JetPack was designed from the ground up to be included in the Dashboard. For some end users, it is nice to have everything to manage the site contained in the Dashboard.
Also, for quick reference, JetPack can enable a quick view of the last 48 hours in the admin toolbar at the top of the screen. You can find more information online at http://jetpack.me/.
If the statistics are giving you good news—your site is gaining in popularity, readers are actively participating in discussions, and search engines are sending new users your way—you will likely want to turn your attention to site scalability. Now you will look at ways to improve the overall performance of the WordPress system components.
CACHE MANAGEMENT
WordPress is a content management system, which by its very definition means it creates a dynamically driven site. In today’s technology environment, that essentially translates into managed content and all of its metadata is stored in a database. Every page request has to access the database to determine which content is to be displayed, versus, with a static site, simply fetching HTML files from the web server’s local directory. The trade-off in handing over content storage to a database is that you are going to take a speed hit in the individual page access in exchange for more powerful persistence, selection, and organization tools—those features used within the WordPress core. Basic computer science comes into play here: When you introduce a new abstraction layer that is slower than the layer above it, you typically introduce a caching mechanism as well to improve average access times.
It helps to think of caching in a sequence of access methods, starting closest to the user and working back to the MySQL database. Each point in the sequence has some caching and tuning that can be done; however, like all performance tuning work, your mileage varies depending upon the access patterns, content types, and actual workload moving through that point in the system. Here is one view of the WordPress caching hierarchy that the following sections walk you through:
· Browser—Most of your end users’ browser performance is going to come from optimized CSS, graphics, and JavaScript libraries. Because these affect the single-page load times, we covered them in Chapter 12’s exploration of user experience.
· Web Server—WordPress and its plugins are largely written in PHP, an interpreted language that relies on the web server for an execution container. Improving the web server’s PHP caching will speed up some portions of the WordPress user-to-database path.
· WordPress Core—Caching objects used by WordPress effectively build a database results cache, the same approach taken by highly scalable, MySQL-based sites such as Facebook. Changing some dynamic page generation to static HTML rendering speeds up page access at the expense of possible small windows of update inconsistency. In addition, you can use transients to cache external or complex data for quick retrieval.
· MySQL—Caching objects at the database layer prevents an eventual disk access, turning a query into a memory reference where possible. These options are independent of, and frequently complementary to, enabling a caching plugin within the WordPress core.
Again, the actual benefit provided by each or any of these approaches depends on many factors, including your hosting provider’s database layer; whether you can configure web and database servers yourself; the size, frequency, and complexity of database queries; and the overall load on your WordPress installation.
WordPress System Complexity
First and foremost, WordPress is a complex system, and honorably so. WordPress simplifies the process of content management and broadens its core feature set through the plugin system. But providing these various hooks and flexibility comes at the cost of database accesses, PHP processing, handling each plugin’s unique requirements, and any special theme prerequisites. Each plugin adds additional overhead to the page rendering, and the quality of code in plugins varies from author to author. Using an execution path analyzer such as WebGrind or KCacheGrind, which profiles your application to determine where bottlenecks in the code may occur, you can create a graphic representation of the complexity of a web application. Take, for instance, a plain vanilla WordPress installation using the default theme. Running a simple page load through this profiler and viewing the resulting execution graph, you will find more than 963 different functions called to render the index page, as shown in Figure 15.10.
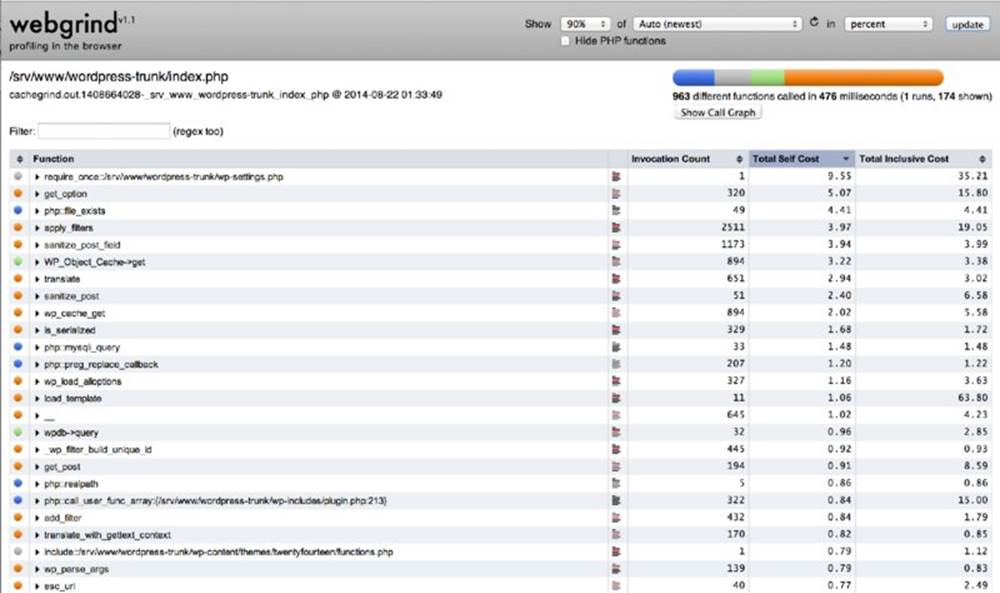
Figure 15.10 WebGrind visualization of WordPress complexity
Even without being able to zoom in and see the details, you can perceive the inherent complexity of WordPress. Each of those functions or actions is the WordPress core gathering the necessary data for your site, including action hooks for linking in plugin and theme functionality.
Each and every thing you add to your site, including that fancy theme control panel that lets you set particular runtime rendering characteristics of your site and plugins that parse your content for related posts, creates overhead and more boxes on the execution graph.
There is no need to be alarmist here and disable plugins and choose overly simple themes. This challenge is not unique to WordPress. The flexibility enabled through WordPress, especially the configurable runtime flexibility of WordPress, which is so powerful, is an expensive operation. The alternative is a statically fixed set of features that require new built-in code to accomplish new features, rather than the versatile plugin architecture of WordPress. Each of those plugins and theme hooks adds functionality and features to your WordPress installation. That is why you enabled them in the first place. Just accept that there are tradeoffs in features versus performance, some negligible and some larger.
In practice, your site does not really change that often. You are probably not running the next Twitter through a WordPress installation (although you can build a reasonable facsimile with the p2 theme) and the content does not change every 30 seconds. Leveraging the ideal situation in which your content is viewed significantly more frequently than it is updated, and allowing for minor windows of inconsistent updates, you will now look at caching layers from the web server back to the MySQL installation.
Web Server Caching and Optimization
Improving WordPress scalability through the web server layer involves PHP execution optimization and web server configuration changes. In both cases, you will need administrator-level access to the web server configuration files.
You will work your way back to the MySQL queries and object caching, but no matter how you end up with a list of pages, WordPress relies on PHP to pull the displayed page together and generate its HTML. PHP is an interpreted language. That means for every execution of the code, the code must be interpreted and compiled to machine code that a computer can use. This methodology has pros and cons, and the flame war over static versus dynamic typed languages that would ensue is completely outside the scope of this book. However, you can cache at the PHP execution level with an opcode cache.
A PHP opcode cache attempts to bridge the gap between runtime interpreting and full-on compiled code. APC (or Alternative PHP Cache) is one such implementation that works to cache and optimize the intermediate PHP code. This method is completely outside of WordPress and works on the underlying PHP layer of your server, making the actual configuration outside the scope of this book.
To get APC set up, you will need full access permissions on your server. Once APC is set up, it caches the compiled PHP files that make up the WordPress core. The biggest downside is that you have to restart the server every time you change a PHP page. If you are making theme changes, this means a restart each time you modify a template file. You can find more information about APC at http://us3.php.net/manual/en/book.apc.php. Again, the ability to enable APC and start/stop the web server depends on whether you have sufficient administrator privileges.
Caching can be further augmented by using memcache and memcached, both of which also require server administration level of implementation. memcache uses your server’s RAM to cache frequently used objects. RAM is significantly faster than file-based operations, and because memcached runs as a local daemon, it is also completely outside of your web server. You can find more information about memcache at http://us3.php.net/manual/en/book.memcache.php and http://memcached.org/. The key benefit provided by these in-memory systems is to add another layer of caching between WordPress and the MySQL database. As discussed in Chapter 6, WordPress caches the last results retrieved via SQL queries on its MySQL database, but if your site is consistently loading and then flushing the cache as users navigate between several popular sections of the site, this additional layer of caching will improve performance by keeping the result sets of several recent queries in memory. What is happening under the hood is that the WordPress object cache is mapped to objects managed by memcached, allowing repeat queries to be satisfied out of the cache rather than through another SQL query to the database. This level of caching is the PHP code level caching, which allows the PHP runtime to short-circuit previously cached information. As you will see, there are many locations in the execution pipeline where caching can be enabled.
While you are considering the PHP level of the WordPress stack, you should also optimize (and secure) your php.ini configuration. PHP has prospered by having so much built-in functionality that it lowers the barriers of entry and empowers developers to just get the task done. This has been the boon and the bane for PHP. Take a look at your php.ini file and disable extensions you are not using. You can always turn them back on if you need them in the future. Also take this opportunity to secure your PHP execution container and help it run faster.
Finally, on the system administration level, optimize your web server. In most cases, the stock configuration for your web server is designed to handle the most common basic use cases. Certainly, it has not been tweaked to match your specific server’s capabilities. Apache, for example, comes with tons of extra modules to handle general-case situations. If you do not use those modules, disable them. This will reduce the overall memory footprint of Apache.
In practice, it has been possible to tweak Apache to perform better under restricted resources (such as low-memory virtual private servers) by adjusting the Apache PreFork configuration. The default configuration is pretty generous, and depending on your site’s traffic and system configuration, you can usually pare this down. For example, on a low-traffic site hosted on a low-memory shared server, you could edit your Apache2 configuration file to the following, assuming you are using Apache2:
<IfModule mpm_prefork_module>
StartServers 3
MinSpareServers 3
MaxSpareServers 3
ServerLimit 50
MaxClients 50
MaxRequestsPerChild 1000
</IfModule>
These settings are for a relatively low-traffic site on a low-memory server. Your results will vary, but these changes anecdotally affected the web server’s response time for our WordPress installation. Of course, you will have to adjust these settings to meet your own requirements.
Realize that the LAMP stack has become so popular because often it just works when you install it. That is because the default configurations are general-purpose setups designed to work across a broad spectrum of situations. You will need to adjust the configurations to optimize to your specific situation when the time comes.
Tuning the individual components of the LAMP stack warrants a book unto itself. Like WordPress, the LAMP development stack is very popular because of its flexibility and capability to handle a multitude of different tasks. The management and administration of LAMP components are required skills for the full stack solution developer. Invest some time learning your tools and how to deploy them effectively.
WordPress Object Caching
The goal of web server caching is to keep frequently accessed files and popular chunks of code in memory and ready to serve or execute. Within WordPress, caching has to deliver a request for a page without going through additional code or database accesses, which really boils down to short-circuiting the PHP WordPress core and serving up a static representation of your page or parts of your page directly.
Object caching keeps certain frequently used and expensive data sets in memory. This is very similar to the transient cache discussed next, but while transients are set by you, the developer, object cache is set by the WordPress core. The flexibility of object caching means that when certain information does change, that does not affect the entire cache, but only the objects in the cache that actually changed. However, object caching still requires the plugin to execute PHP to determine which aspects of the cache are still valid and also for WordPress to execute the PHP to pull the parts of the page together for rendering. As previously discussed, optimizing your web server’s PHP environment and enabling WordPress level object caching are quasi-independent as a consequence.
There may be times when your content is static enough, or being served so frequently, that you need to short-circuit the whole PHP and object cache overhead—for example, when your page is being listed in the top echelons of Reddit and Slashdot. A good way to do this is to have your page rendered to static HTML and served directly by the web server. After all, this is what the web server was designed to do in the first place.
In our opinion, the best plugin for this is WP-Super Cache by Donncha Ó Caoimh. WP-Super Cache is based on and an improvement of the WP-Cache plugin. (See, this one is SUPER!) WP-Super Cache functions in various modes, including writing out static HTML files. However, it does require mod_rewrite for the static HTML files, so this plugin will only work on Apache servers.
WP-Super Cache has an extensive control panel that allows the site administrator to adjust the settings to meet specific needs. It even includes a full lockdown mode that prepares for a heavy traffic spike.
Other caching plugins such as W3 Total Cache are also viable options. Many caching plugins build on the basic theme of generating HTML for a page and caching it with the URL used to access the page as a key. Each plugin will have variations on cache invalidation and page lifetime policies, and all of them disrupt the general dynamic nature of WordPress page generation, intentionally. If you are going to change your theme, add new plugins, or otherwise alter the flow of data from MySQL to the user’s browser, either disable WordPress caching until you are sure all of your changes work, or frequently invalidate and flush the cache so that you can see the freshly generated pages as you test.
Transient Caches
Transient caches are developer-defined caches that you set up in your code. Transients are very similar to the WordPress Options feature discussed with plugins in Chapter 8. The major difference is that transients include an expiration time. By their very nature, they are available only for a defined period of time—you can think of this as though they are self-refreshing or self-updating. This makes them ideal for caching “expensive” data for a defined period of time.
What is expensive? Expensive data is data that takes longer to retrieve or calculate. In the upcoming example, you will look at how accessing a third-party API could be considered expensive, depending on network latency; most importantly, you do not want your site rendering to have to wait for a third-party access. However, it could also be a computationally intense query or calculation—for example, generating a complex menu for your site, or a query that spans a whole network of sites on MultiSite. What you are doing here is caching some data for quick retrieval, which is to say, having the information at WordPress’s fingertips.
What is a defined period of time? Here is the rub: You have to balance having data readily available but without it becoming stale. This is always the trade-off with any level of caching. In the real world, you may never know how often the data gets updated or needs to be refreshed. As you have seen, to further complicate this, there could be many levels of caching on your WordPress site.
The source of your data might have caching or be delayed in presenting the internal information to the API for you to consume. Your transient data has a caching expiration on it, and your WordPress HTML rendering might have a caching mechanism. Your visitor has browser caching and possibly even network-level proxy caching. This means that there are many factors that could affect the pipeline of getting data from an offsite source to your visitor’s browser. This can be a big, and sometimes frustrating, factor when developing and testing your integration but it also affects the time period you select for storing your transient data.
So what is the defined period of time? It depends. It depends on your data, your tolerance for stale data or requirements for up-to-date information, and the load on your site. As the developer, you have to set the expiration time to balance expectations of current data while reducing the access load. Your goal is to find the longest time period during which old or stale data will not produce an adverse user experience. To borrow from the world of non-SQL databases, you need to determine how you will make the data eventually consistent without introducing errors in user action due to inconsistent, cached data.
Here is an example using transients to locally cache some piece of information. In this case, you are going to access a third-party website that gives you a designated color of the week. In your functions.php file, you will modify the function to include the transient storage. The first thing to do is check if you already have any existing, non-expired data. If your transient data does not exist, or is expired, the get_transient() function will return false.
if (($color = get_transient('color_of_the_week')) === false) {
If this check returns false, that means you need to access the API and get new data. Again, this caching is separate from any HTML- or PHP-level caching your site is performing. This check is directly related to this specific piece of information. The following is the same code that accesses a third-party website to retrieve the color of the week:
$feed = file_get_contents('whatever URL');
if ($feed) {
$xml = simplexml_object($feed);
$color = $xml->color;
Now that you have the updated data, you need to store it in the transient and set the expiration time. This essentially works the same as the WordPress options API with the added expiration parameter.
set_transient('color_of_the_week', $color, 60*60*24*7);
For readability, you are presenting the expiration time as a calculation. WordPress expects this parameter in seconds. In this example, we want to hold this data for one week, so the calculation is 60 seconds × 60 minutes × 24 hours × 7 days giving us a week’s worth of seconds. You could also push 604,800 as the second parameter, but often it is easier to read the intent of the time with the calculation.
If you put this all together, the new function with transient caching might look like this:
function get_color_of_the_week() {
if (($color = get_transient('color_of_the_week')) === false) {
$feed = file_get_contents('whatever URL');
if ($feed) {
$xml = simplexml_object($feed);
$color = $xml->color;
} else {
$color= "white ";
}
set_transient('color_of_the_week', $color, 60*60*24*7);
}
echo $color;
}
Finally, to use this color in your HTML, you will need to inject its use into your WordPress template files. All of the new caching magic is encapsulated in the function from the previous code snippet. Your header.php template changes could look like this:
<body <?php body_class(); ?> style= "background-color: <?php echo
get_color_of_the_week();?> " >
As you can see, by adding a few simple lines of code to your custom feature, you have added caching functionality to reduce load time on your site, removed reliance on a third-party connection (during the caching period), and decreased the access load on that third-party server. It is a pretty simple process and can drastically affect your site performance for data that does not have to be immediately current.
Another use for transient caches is to store complex computed data. For example, you might have a function in your functions.php template that does a complicated query across your entire WordPress Multisite network to generate a network-wide navigational aid. This data likely does not change very often, but the computation of the query is significant enough that it may slow down page rendering.
You can perform the complicated query and store it in a transient cache so the next visitor does not have to wait for the SQL query to execute. Using a transient in this way improves site performance by reducing the queries to the database.
MySQL Query Cache
While conducting research for this book, we set up a stock WordPress installation using the TwentyFourteen theme and no additional plugins—essentially an out-of-the-box installation. To render the index page, WordPress used more than 31 MySQL queries. Try it yourself by adding these two PHP lines to your footer.php template file:
<?php echo get_num_queries(); ?> queries.
<?php timer_stop(1); ?> seconds.
Reload your page and you will see the number of queries and the time it took at the bottom of your page (see Figure 15.11).

Figure 15.11 Number of queries on initial page load of TwentyFourteen
You have to evaluate your site, but odds are the database-persisted content is not changing quickly enough that you need to make all these database calls for every page load. The translation of a URL into a MySQL query was covered in Chapter 5, and Chapter 6 looked at the underlying data models, so the volume of database traffic required for the basic index page should not be too surprising.
WordPress caching improves access times to content extracted from MySQL. If you want to further improve MySQL performance and make it more responsive to queries from the WordPress core, you will want to explore the MySQL query cache. The MySQL query cache stores the results of select statements so that if an identical query is submitted, the already retrieved results can be immediately pulled from the system RAM and returned. This will significantly increase your response time, as long as your data is not changing that much; under higher rates of change you may not see the updates immediately.
To enable the MySQL query cache, you will have to edit your MySQL configuration file on the server, assuming you have adequate permissions at your hosting company to do so. If you edit your MySQL configuration file, you can raise the memory limit. For example:
# enable 16 MB cache
query_cache_size = 16M
Be careful not to go overboard here. Allocating too much RAM to MySQL caching will adversely affect other subsystems on your server. It is always a balance. Even just enabling this cache creates a management overhead in MySQL, but generally speaking, this trade-off works in your favor.
LOAD BALANCING YOUR WORDPRESS SITE
At some point, you (let’s hope) hit the performance limit of a single software stack on one physical server. That is when you may want to load balance your WordPress site with one or more additional servers. As we discussed earlier in this chapter, you may decide to add servers either for scalability to handle more requests, or as a failover precaution to increase the availability of your site. Whatever the reason, load balancing your site gets you both of these features, but it is a complex issue. Now you will briefly consider some of the challenges you will encounter when attempting to load balance a dynamically generated site in the real world.
First and foremost, you need a means to load balance. The simple approach of using round-robin DNS to bounce successive HTTP requests between your servers as needed will cause problems, especially with session cookies. You will need a legitimate load balancer to handle this. The load balancer could be a software package such as Pound (http://www.apsis.ch/pound/) or a full hardware solution such as an F5 BIG-IP (http://www.f5.com/products/big-ip/). Both will handle the session stickiness and load balancing for you.
The second challenge is keeping your dynamic data in synchronization between your two (or more) web front-ends. Consider that your site administrator could effectively log in to either web front-end, post new content, and upload a graphic asset to the uploads directory. However, the next request could be load balanced to the other server, where this content may not exist.
Look at the uploads directory first. This content is uploaded from the WordPress Dashboard to the uploads directory of that WordPress installation. By default, content is uploaded into /wp-content/uploads/. However, you can change the uploads directory by editing your wp-config.php and defining a new location. Depending on where you set your uploads folder, you could also reap the benefit of having shorter asset URLs.
As we touched on earlier in this chapter, at this point you have options. One option is to have a shared folder that both web servers can access. Most likely this would be an NFS/Samba share on a third server, which could also serve as your MySQL server. A second option is to use rsync or a similar tool to coordinate uploads between the two servers and make sure each has the same assets in place. Using the shared folder makes the assets immediately available but introduces a single point of failure. Alternately, rsync’ing the assets to multiple locations replicates the data, removing a single point of failure, but introduces a time delay on when the asset is available at the remote locations. Pick your poison depending on your needs.
The second challenge is your dynamic data that is stored in the database. Assuming your database is not the bottleneck and the reason for load balancing, you could use a third server as your database server. Both web servers can then read and write from the same source. This can be a more secure deployment architecture when your database server is not directly addressable on the public Internet, but it also creates a potential single point of failure. Technically, you are only load balancing the front-end web servers in this situation.
Adding a second database server increases the redundancy but introduces the problem of keeping two MySQL database tables in synchronization. MySQL servers can be configured for replication in a master-slave setup. Technically, this again is not load balancing because only one server is being accessed at a time, but this type of configuration does provide additional redundancy. Changes to the master MySQL database are replicated to the slave database in near real time via a journaling log. Should the master database fail, the slave has a full set of data for a manual cut over.
Finally, there is also a special WordPress-specific solution for multiple database servers. HyperDB (http://codex.wordpress.org/HyperDB) was created by Automattic to handle the requirements of WordPress.com traffic. HyberDB is a full replacement for the built-in WordPress database access layer and includes functionality for using multiple databases, sharding or partitioning your database across multiple servers, and also replication and tiered failover. Unfortunately, the documentation is far from complete.
As you can see, load balancing for performance and high availability is an extremely complex topic. There are countless variations of systems in place to handle a vast expanse of needs and requirements. This short overview of the topic certainly skirts over many nuances and challenges being faced when deploying WordPress into a high-availability environment. Cloud computing and content delivery networks continue to be hot topics right now, and you should expect to see WordPress utilizing these services for critical aspects and redundancy as those technologies and services mature.
DEALING WITH SPAM
Spamming, unfortunately, is a fact of life. As your WordPress site gets noticed and generates traffic, it becomes a natural target for spammers. Most likely, your posts will accrete a variety of spam comments as a side effect of being popular.
You can recognize spam by a list of links within the comment, or content-free comments saying that the poster enjoyed your writing, with an attached URL or source address that invites you to a less-than-reputable destination. In either case, the goal of comment spam is to generate more web content that points back to the spammer’s site, taking advantage of the page popularity ranking algorithms used by Google and others that give weight to incoming links. The best way to deal with spam is to simply get rid of it, denying spammers the opportunity to use your site to boost their own visibility.
There are three basic approaches to dealing with the problem: Make it impossible for anyone to leave comments, increase the difficulty of a spammer sneaking a comment onto your site, and enable auto-detection of common spam patterns. Obviously, disabling comments (through the Dashboard) is a bit harsh and defeats the goals of establishing conversation with your readers. On the other hand, if you decide to take this drastic step, remember that changing the settings for posts on the control panel affects future posts only; anything already on your blog will still have comments enabled unless you go through the Dashboard and turn them off individually. If you do not mind an even greater bit of brute-force effort, you can remove the wp-comments.php file from the WordPress core, which somewhat unceremoniously puts an end to the ability to comment on your posts. We recommend something a bit more subtle.
Comment Moderation and CAPTCHAs
One approach to comment spam is to slow down the spammers; this simple approach, however, slows down valid commenters as well. You can require commenters to register as site users before being allowed to post comments, but that has the downside of preventing passing-by users from adding their thoughts. It also requires that you stay on top of the user registration, as you may see seemingly valid users that are created purely for the purpose of posting spam to your site.
Moderation is another tool in the slow-but-don’t-stop vein; you can hold all comments for moderation or require all commenters to have a previously approved comment. In effect, you are putting the burden of spam detection on yourself, looking at each comment as it appears and deciding whether to post it to your site or flush it. Again, an innocuous looking comment may be the approval stepping stone for an avalanche of spam later on from the same user. As with many security mechanisms, the bad guys are continually getting smarter and more automated, and testing the edge protection and response of the systems they want to infiltrate.
A variation of the brute-force and moderation method is to blacklist IP addresses that seem to be the primary sources of spam; the access controls can be put in your .htaccess file. Again, this is perhaps a bit like hunting bugs with an elephant gun, as you are likely to block valid IP sources from common carriers who are unfortunately home to some low-limit spammers. Also, spammers jump IP addresses easily using botnets and other resources, so this can be a never-ending war that you cannot keep up with.
Enter CAPTCHA methods—based on a phrase coined at Carnegie Mellon University that ostensibly stands for “Completely Automated Public Turing test for telling Computers and Humans Apart”—which impede spammers’ ability to post unwelcome comments by requiring them to enter some additional, dynamic piece of information. There are quite a few CAPTCHA-generating plugins for WordPress, all of which add a displayed word or math problem to the end of the comment posting form, requiring the user to enter the correct information before the form is submitted. The simplest of these displays a two-term addition problem that must be solved by the user. The basic idea is that an automated spamming process will not be able to recognize the distorted words or solve the problems, alleviating the spam at the point of insertion. There is some debate as to the effectiveness of CAPTCHAs, with their failure rates suggested to be as high as 20 percent. You are also adding a step for commenters, albeit a trivial one. If your site attracts a large, non-English speaking audience, CAPTCHAs that depend on wavy English words will be effective, but only in preventing valid comments from frustrated users.
The WP–SpamFree plugin is an inverse CAPTCHA; it tries to ensure that the commenter is using a browser, and not coming in via an automated process. This combination of JavaScript tricks is a variation on the spam impedance theme, and like the others, its effectiveness and user impact will vary depending upon the demographics of your site viewers.
Automating Spam Detection
The first step in automating spam detection is blacklisting certain types of posts or particular words. In the Dashboard, choose Settings ➢ Discussion. In the Comment Moderation box, you will find an option to block any comment that contains more than a particular number of links. Do not set this to zero, or anyone who includes his own site URL in a comment is going to be filtered. This cuts down on the obvious spam messages, however. Similarly, adding words to the blacklist like “Vicodin” will eliminate the faux-pharmacy spam, but if you are perturbed by offers of fake Rolexes, do not add “watches” to the blacklist or you will drop any comment that uses “watches” as a verb as well as a fake product noun. Word blacklists are universally effective in blocking comments with those words, irrespective of context.
Fortunately, WordPress has the Akismet plugin built in for dealing with comment spam, which relies on a crowd-sourced blacklist and is transparent to users. Go to http://akismet.com/ to register for an API key for the service; when you open up the Dashboard and configure the Akismet plugin, you will need this to make sure your instance of WordPress can connect to the Akismet service. Effectively, Akismet takes each comment as posted, runs it through a database of spam comments hosted by Automattic, and decides whether or not to mark the comment as spam. Statistics on the akismet.com site claim that upwards of 80 percent of all comments are spam, and that they have caught and marked more than 150 trillion spam comments.
There are other implementations of the Akismet service besides the built-in plugin, and Akismet works on other content management systems as well. Akismet is priced based on the size and type of your site, ranging from free to $50 per month. While the freely available nature of WordPress and most of its related plugins and themes has been highlighted, paying for Akismet spam protection is also highly recommended. Compared to the cost of a commercial WordPress hosting option, most low-end Akismet plans are minimal in cost. You remove a time-consuming administrative burden from your plate for a few dollars a month.
OTHER CONTENT MANAGEMENT SYSTEMS
You have seen how WordPress is so much more than a blogging platform. It can be used for a wide range of different types of websites, but aside from what a plugin can offer—which can be substantial—the functionality of the WordPress Core is what it is. Sometimes you want to complement your website with additional functionality found in other traditional web-based applications, such as forums like bbPress, social network features like BuddyPress, e-commerce applications, or other CMS solutions.
Given the range of content management systems available, and the fact that most enterprises already have one, if not several, content repositories up and running, it is often useful to integrate WordPress with another CMS. This section takes a brief look at when you should use WordPress as an external content consumer or producer and when you should not use WordPress as the core of a content management system solution.
WordPress Integration
Integrating an application like WordPress with another content-oriented application requires that you align user management, content packaging and, potentially, look-and-feel issues. It is not something easily accomplished with a plugin or theme extension, and typically requires custom bridge code. You will find building blocks in the plugin directory; this section presents a rough outline of the problems to be solved.
How does the external system provide content? Are you getting an RSS feed, in which case you can use an RSS as a starting point, or do you get raw JSON that requires editing and parsing before being turned into a post?
If you have a remote resource URL, can you embed it using an oEmbed (http://oembed.com) provider plugin? oEmbed takes a URL and returns a variety of content types that can be integrated into WordPress themes, allowing them to be displayed without WordPress having to parse the content type. WordPress does include several oEmbed renderings, so this could be a viable option.
Do you need to manage user credentials between the sites? Do you have to store user login information for the external site (in the WordPress MySQL database, using a table created by your plugin), and if so, how do you handle error conditions such as password changes or user deletion in the remote system?
It is possible to treat WordPress as a content-only engine, producing posts for consumption by a CMS like Drupal. In this case, WordPress becomes a component of Drupal, managing its content as the source of the posts but ceding presentation control to the Drupal configuration.
Where Not to Use WordPress
Not every content management problem is a nail waiting to be pounded home by the WordPress hammer. Sometimes you will need to pick a different tool, or set of tools, for the job:
· Handling rich media—Streaming video, audio, and images with copious quantities of metadata can be displayed and included in WordPress posts, but if you want to be able to tag and index video files or search images based on their EXIF (Exchangeable Image File Format) tags, you probably want to use a CMS designed for rich media management.
· Backend for Rich Internet Applications—The next generation of mobile clients is emerging. They usually expect to talk to a back-end data repository or service, rather than a full-featured website. WordPress eventually emits HTML, not JSON or other data packaging formats most likely consumed by APIs. WordPress can do it, but is it the right tool? It depends on your needs—as you read in Chapter 14, WordPress can be a viable application foundation.
· Simple network storefront—If you are just building a store, use a storefront builder with shopping cart, payment systems, and product catalog. You will miss the integration of product discussion, feedback, recommendations, and the ability to describe how and why you are carrying (or have built) a particular product, all of which are possible using the approaches described in this chapter, but sometimes you just need users to be able to click and buy.
· Event and calendar focus—Several types of sites manage calendars, event registrations, event materials, and notifications or reminders about upcoming calendared items. WordPress does not (yet) have a built-in highly functional calendar and event management plugins, making this an area where using Drupal or BuddyPress may be simpler out of the box. BuddyPress, in particular, has a fair number of features for calendar-driven activities and content, but gives you the context of a community management tool, similar to a private social network, rather than a pure content management system.
· Force-fitting a solution—If you have to make modifications or changes to the WordPress Core, either you are doing something wrong or, more likely, WordPress is not the right solution. When hacking the core WordPress code, you break your upgrade path, such that you overwrite any changes you made to the core package files that enabled your specific functionality to work as soon as a new version of WordPress was released. As stated in Chapter 4, do not hack the core.
· Plugin overload—Plugins rock, and a large portion of this book has been devoted to identifying appropriate plugins for specific functions or outlining how to create your own for those uses. But you can go overboard. If you are using too many plugins, you may hurt the performance of your site and probably make it more fragile as a result of unknown dependencies between the plugins. Each plugin also increases the resource requirements of your site, specifically, memory and processing power.
SUMMARY
WordPress is a powerful content management system with many of the features found in commercial systems that pre-date the blogging craze of the early 2000s. In equal parts tribute to its open source roots, strong developer community, and simple extensible design, WordPress has established itself as a tool that goes far beyond a simple blog engine. In the real world, WordPress can often be the right tool for the development project, though not every development project. In addition, common challenges experienced by most website operators also have solutions in the WordPress ecosystem. Chapter 16 discusses the WordPress ecosystem—specifically, community resources that are available as well as how to get involved.
All materials on the site are licensed Creative Commons Attribution-Sharealike 3.0 Unported CC BY-SA 3.0 & GNU Free Documentation License (GFDL)
If you are the copyright holder of any material contained on our site and intend to remove it, please contact our site administrator for approval.
© 2016-2026 All site design rights belong to S.Y.A.