Instant Building Multi-Page Forms with Yii How-to (2013)
Chapter 1. Instant Building Multi-Page Forms with Yii How-to
Welcome to Instant Building Multi-Page Forms with Yii How-to. This book is a simple how-to for generating multipage forms with the Yii framework. It covers simple form generation, CRUD generation with the graphical tool Gii, validation of forms, and use of AJAX to validate and submit forms. Additionally, we will use Twitter Bootstrap to change the default look of the forms/pages generated with Yii.
Getting started with Yii (Simple)
We will start with the basic setup of the Yii environment; that is, connecting to a database server and automated generation of Gii and forms with Yii.
Getting ready
This book assumes that you are familiar with the PHP development environment and have a basic development environment set up for PHP application development.
Download the Yii framework from http://www.yiiframework.com/ and extract its framework folder outside your Public_html folder or web root folder. Your application will refer to Yii Bootstrap, Yii.php, located inside the Framework folder.
How to do it...
Let's move to creating the web application. We will use the command-line utility of Yii to generate the new Yii application.
1. Open the command prompt or a console under Linux.
2. Change the current folder to where the framework has been extracted and enter the following command:
yii> framework/yiic webapp webRoot/sampleapp
3. Access the newly generated application at http://localhost/sampleapp/index.php.
How it works...
The command will ask you for confirmation and will then generate the basic structure of the Yii application. You can find the details of the directory structure at http://www.yiiframework.com/wiki/155/the-directory-structure-of-the-yii-project-site/.
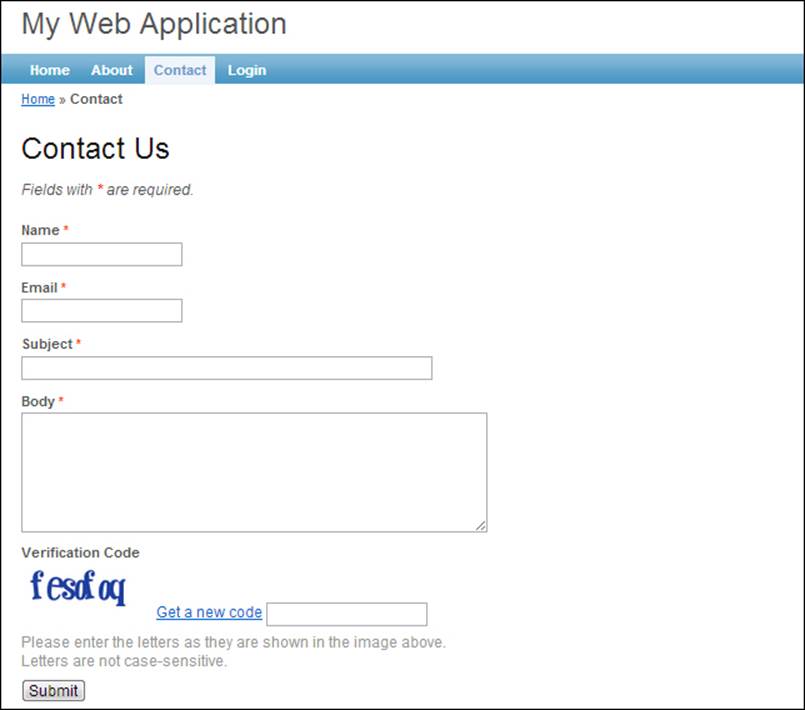
Yii has already created a few simple pages with a Contact Us form and a Login form. Following is the screenshot of the default Contact Us form:
Connecting to the database (Simple)
This recipe describes the steps required to set up database access in a Yii application.
Getting ready
We will use a sample application like the one created in the previous recipe. Additionally, we will need a database server like MySQL, PostgreSQL, or SQLite; also, we will need its credentials and some interface like PHPMyAdmin or command-line access to execute SQL statements against our database.
How to do it...
First of all, we need to create a database.
1. Create a new database in MySQL.
2. Now, go to the sample application and change the folder to protected/config. It contains the following three files:
· console.php: This is the configuration file to run applications in console mode
· main.php:This is the configuration file for web applications
· test.php: This is the configuration file for testing web applications
3. Open main.php and locate the following code:
4. 'db'=>array(
5. 'connectionString' =>
6. 'sqlite:'.dirname(__FILE__).'/../data/testdrive.db',
7. ),
8. // uncomment the following to use a MySQL database
9. */
10.'db'=>array(
11. 'connectionString' =>
12. 'mysql:host=localhost;dbname=sampleapp',
13. 'emulatePrepare' => true,
14. 'username' => 'root',
15. 'password' => '',
16. 'charset' => 'utf8',
17.),
18.
*/
Tip
Downloading the example code
You can download the example code files for all Packt books you have purchased from your account at http://www.packtpub.com. If you purchased this book elsewhere, you can visit http://www.packtpub.com/support and register to have the files e-mailed directly to you.
19. The basic application created uses the SQLite database. Remove the code for SQLite configuration and uncomment the MySQL configuration.
20. Change the connectionString, username, and password to match your environment. This is all you need to set the database connection.
There's more...
Yii provides the following three methods to work with database connections:
· Active Record
· Query Builder
· Data Access Objects (DAO)
Models in Yii generally extend the CActiveRecord class to provide database access using the Active Record method. This uses a complete object-oriented coding style and creates all the necessary SQL to deal with the database server. Additionally, we can set validation rules in models and also add pre- and post-save hooks. Yii provides the GUI tool named Gii to generate the models for database tables. Though the Active Record method is easy to use, it consumes more memory and needs more execution time than other methods. The sample code to get all records from a table (say, User) will go as follows:
$users = User::model()->findAll(array('status'=>'active'));
With Query Builder, we create a command object with Yii::app()->db->createCommand() and then add other parts of SQL query with methods such as select, from, where, and join. Query Builder is faster than Active Record and provides a clean API to query the database. For example:
$command = Yii::app()->db->createCommand();
$command->select(*)->from('user')->where(array(
'status'=>'active'
));
$users = $command->queryAll();
Finally, with a DAO we create the same command as in Query Builder, but instead of adding a query using methods, we pass the entire SQL statement to it as Yii::app()->db->createCommand($sql). This is the fastest method to access the database and also useful when we need to write complex queries such as the following:
$sql = 'select * from user where status = "active"';
$users = Yii::app()->db->createCommand($sql)->queryAll();
Both Query Builder and the DAO return data in the raw-array format, whereas Active Record returns an array of models with each representing a single row.
Using the Gii tool (Simple)
In this recipe we will take a look at the graphical tool Gii. With the Gii tool, we can generate the following:
· Controller
· CRUD
· Form
· Model
· Module
Getting ready
Set up a Yii environment and create a new web application. Set up the database connection for your database server.
How to do it...
We first need to create a database table.
1. Create a database table user with the following code. This will hold all the necessary information for user registration.
2. CREATE TABLE IF NOT EXISTS 'user' (
3. 'id' int(11) NOT NULL AUTO_INCREMENT,
4. 'first_name' varchar(50) NOT NULL,
5. 'last_name' varchar(50) NOT NULL,
6. 'gender' enum('male','female') NOT NULL,
7. 'dob' date NOT NULL,
8. 'address_1' varchar(255) NOT NULL,
9. 'address_2' varchar(255) DEFAULT NULL,
10. 'city' varchar(50) NOT NULL,
11. 'state' varchar(50) NOT NULL,
12. 'country' varchar(50) NOT NULL,
13. 'phone_number_1' varchar(50) NOT NULL,
14. 'phone_number_2' varchar(50) DEFAULT NULL,
15. 'email_1' varchar(255) NOT NULL,
16. 'email_2' varchar(255) DEFAULT NULL,
17. 'created' timestamp NOT NULL DEFAULT CURRENT_TIMESTAMP
18. ON UPDATE CURRENT_TIMESTAMP,
19. 'modified' timestamp NOT NULL DEFAULT '0000-00-0000:00:00',
20. PRIMARY KEY ('id')
) ENGINE=InnoDB DEFAULT CHARSET=latin1 AUTO_INCREMENT=1 ;
21. Next, enable the Gii tool. The Gii tool is related to the database system of our application. So, for security reasons this tool is disabled by default. We need to enable it from main.php.
22.'modules'=>array(
23. // uncomment the following to enable the Gii tool
24. /*
25. 'gii'=>array(
26. 'class'=>'system.gii.GiiModule',
27. 'password'=>'root',
28. // If removed, Gii defaults to localhost only. Editcarefully to taste.
29. 'ipFilters'=>array('127.0.0.1','::1'),
30. ), */
),
31. Uncomment the block to enable the Gii tool and set your password in place, and then you are done. The ipFilters line is used to restrict the access of the Gii tool to certain IP addresses only; in this case, it's localhost (127.0.0.1 OR ::1).
32. We need to create models and controllers. To log in to the Gii tool, enter http://localhost/sampleapp/index.php?r=gii in your address bar. You will be provided with the login screen. Enter your password to log in.
How it works...
After you log in, you can see all the tasks that can be done with the help of the Gii tool, as shown in the following screenshot:

The tasks shown in the previous screenshot are explained here:
· Controller Generator: It allows you to quickly generate a new controller class with one or more actions and the respective views. The default base class used is Controller.
· CRUD Generator: It generates a controller and views that implement CRUD operations for a specified model.
· Form Generator: It can be used to generate a view with form elements for a specified model.
· Model Generator: It generates a model class for a specified database table. The base class used is CActiveRecord.
· Module Generator: It provides a base code required by the Yii module
All these generators use the templates under the gii/generator folder. You can always customize them or use your own templates to modify the code according to your requirements.
Let's generate a model class for our table user as shown in the following screenshot:
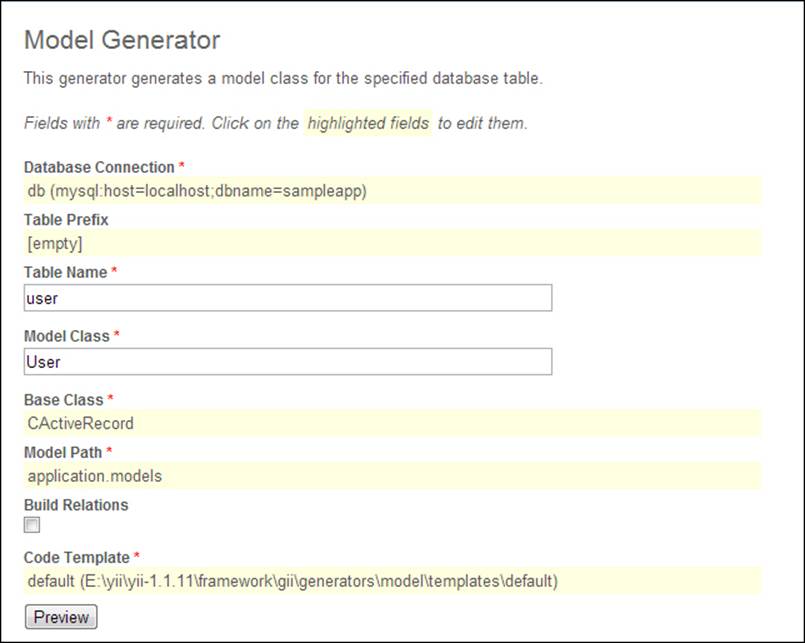
Fill in the Table Name field and the Model Class field will be automatically populated; change it if required. Now click on Preview. If the database connection is properly set and Yii finds the table user, it will create the preview of a model file.

Click on the filename to preview the file or click on the Generate button to generate the model class. The new class will be stored in the protected/models folder.
The model class has some automatically generated functions such as tableName(), which returns the name of the table. The function rules() is used to specify the validation rules, the function relations() is used to specify the relations between two or more model classes, the function attributeLabels specifies the names for the attribute/columns in the database table, and the function search() sets the criteria for searching through the table data.
In the same way, we can generate the CRUD (Create Retrieve Update Delete) operations for the model user. Type the name of the model class (User) and click on the Preview button. A list of files to be created will appear, as shown in the following screenshot:
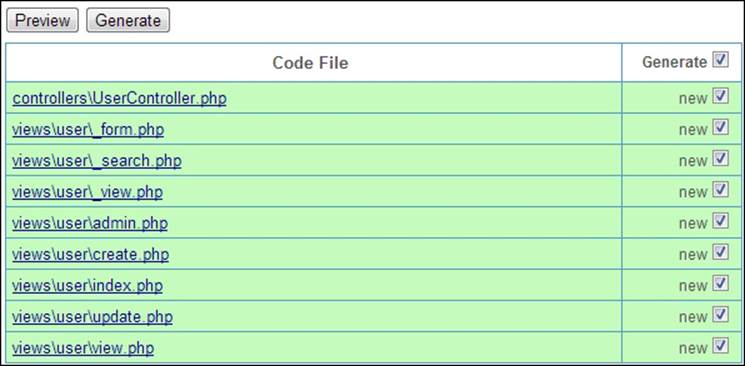
Click on the Generate button to generate files. UserController will be generated under protected/controllers and you can view the files under protected/view/user.
The generated controller contains some important functions, such as accessRules(), which is used to specify access control (user-level access) for each action in this controller, and filters(), which specifies the code to be executed before and/or after action execution. filters() can include access-control filters, performance filters, and other user-defined filters.
There's more...
To know more about filters(), visit the website http://www.yiiframework.com/doc/guide/1.1/en/basics.controller#filter.
Creating basic forms (Simple)
Now we will see the creation and working of basic forms in Yii. We will use the Gii tool to automatically generate CRUD operations and a form.
Getting ready
We will use the table user created in the Using the Gii tool recipe. Make sure you have enabled Gii under config/main.php.
How to do it...
1. Generate a new model for the table User.
2. Generate CRUD operations with the Gii tool as specified in the Using the Gii tool recipe.
Tip
As we need to create a simple form, we don't need additional functionality such as admin, index, and update. Feel free to uncheck them when generating CRUD.
How it works...
Yii creates some new files and folders, as follows:
· protected/models/User.php: This is a model class file. It deals with database-related tasks such as fetching and storing data, updating, and deleting. The User class is extended from the base class CActiveRecord.
· protected/controllers/UserController.php: This is a controller class extended from the base class Controller. This class holds all the code for fetching data using models, data manipulation according to requirements, and sending data to the respective views.
· protected/views/user: This folder holds views for all CRUD operations; names starting with _ are partial views that are used in multiple places. The remaining files are views for their respective action names in UserController.php.
Let's take a look at the generated controller file. Change access rules to enable any user to access our form as follows:
return array(
//allow all users to perform 'index' and 'view' actions
array('allow',
'actions'=>array('index','view', 'create'),
'users'=>array('*'),
),
All we need to do is add actionCreate() to the actions that all users can access.
Now move to actionCreate(). This is the action when we access the form with the URL ?r=user/create. At the first line of actionCreate, we instantiate the User model. As the POST variables are not set, the if block is skipped and the form is rendered with the view file create, with model passed to it as a parameter.
public function actionCreate()
{
$model=new User;
if(isset($_POST['User']))
{
$model->attributes=$_POST['User'];
if($model->save())
$this->redirect(array('view','id'=>$model->id));
}
$this->render('create',array('model'=>$model));
}
In the view of create.php, we simply render the partial view with the following lines:
<?php echo $this->renderPartial('_form', array(
'model'=>$model
)); ?>
This uses the file _form.php, which contains all the form elements and passes to it the model that we received from actionCreate. As we need the same form elements in actionCreate and actionUpdate, Yii has created a single file, _form.php, that contains all the form elements. This file is used by both the actions to render the form.
In _form.php, we start with creating an instance of the CActiveForm widget.
<?php $form=$this->beginWidget('CActiveForm', array(
'id'=>'user-form',
'enableAjaxValidation'=>false,
)); ?>
The HTML code in the following screenshot is created by this widget:

Next we create a space to render error details, if any, with following line:
<?php echo $form->errorSummary($model); ?>
This adds a DIV element to the page if there are any errors in the form fields.
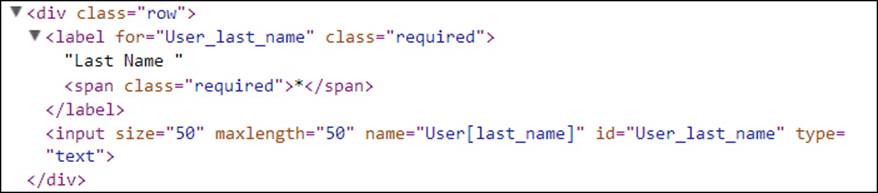
Next we render all necessary input elements as follows:
<div class="row">
<?php echo $form->labelEx($model,'last_name'); ?>
<?php echo $form->textField($model,'last_name',array(
'size'=>50,
'maxlength'=>50,
)); ?>
<?php echo $form->error($model,'last_name'); ?>
</div>
The HTML code generated can be seen in the following screenshot:
The $form->labelEx() method renders the label. It takes the parameter name from the model's attributeLabels function. If no label is set for this attribute, the attribute name is used as the label.
The $form->textField() method renders the actual form field. We use textField for input with the type set to text; dropDownList to select boxes, textArea to render text areas, hiddenField to render hidden fields respectively.
Note
Look at the name of the input field. It has the format User[last_name]; this enables us to get all related form fields in a single User array, which can be directly assigned to the models' attributes with a single line of code, $model->attributes = $_POST['User'], thereby reducing the number of lines of code.
The $form->error() method adds error messages in a separate div element if there is any error with the data in this field.
Finally, we have added a submit button with the echo CHtml::submitButton('Create'). It creates an input element with type set to submit and is attached to the parent form by default. We can end the form widget with $this->endWidget();.
When the user clicks on the create button, the form data is submitted to the same actionCreate function as POST data.
Now as the $_POST['User'] field is set, the code enters the if block. We assign all attributes marked as safe in the User variable of type POST to model with $model->attributes = $_POST['User']. This is called Mass Assignment.
Then on the next line, we save the model with $model->save(). The method save() internally validates the model to check if the user has entered the valid data. Here, the rules specified in the method rules under the User model are used to validate the form data.
public function rules()
{
return array(
array(
'first_name, last_name, gender, dob, address_1,
city, state, country, phone_number_1, email_1,
created', 'required'
),
array(
'first_name, last_name, city, state, country,
phone_number_1, phone_number_2',
'length', 'max'=>50
),
array('gender', 'length', 'max'=>6),
array(
'address_1, address_2, email_1, email_2',
'length', 'max'=>255
),
array('modified, dob', 'safe'),
array(
'id, first_name, last_name, gender, dob, address_1,
address_2, city, state, country, phone_number_1,
phone_number_2, email_1, email_2, created,
modified', 'safe', 'on'=>'search'
),
);
}
In the first array, we specify all the required fields; in the next three arrays, we set the maximum length of data for each field. In the fourth array, additionally, we mark the attributes dob and modified as safe. We also make several attributes as safe when the scenario is set to search.
If the validation is successful, the form data is persisted to the database and the page is redirected to the action view, which displays all the captured data.
If the validation fails, the same model is passed to the view but now with the respective validation errors set in it. The line $form->errorSummary($model) renders the summary of all errors in the form and the line $form->error() adds the error line below the respective fields.
There's more...
We have seen the automated creation of forms and CRUD operations with the Gii tool. If you want to write a custom code to process the form and you simply want to generate the form with all fields for the specified table, you can use the form generator tool provided by Gii.
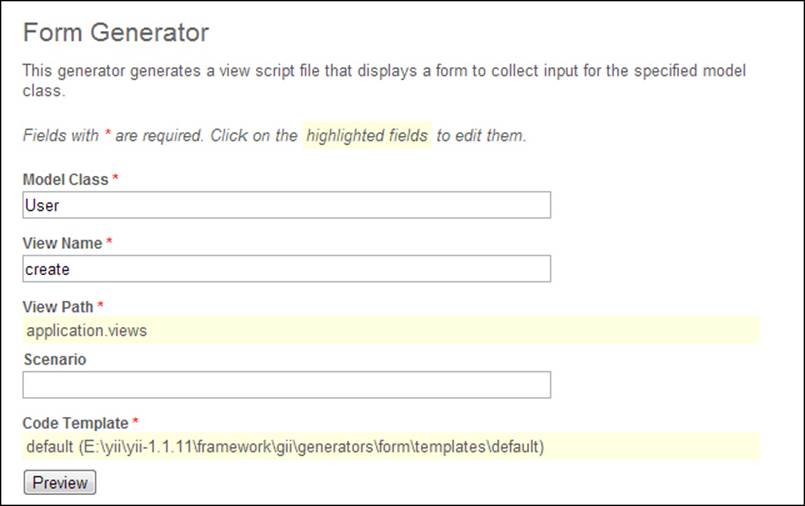
Enter the model's class and view name and click on the Preview button. You will see the same form generated by the Gii tool under the views folder. Click on the Generate button to generate the actual file.
For more information on safe attributes, visit http://www.yiiframework.com/doc/guide/1.1/en/form.model#securing-attribute-assignments.
For more information on validation rules, visit http://www.yiiframework.com/doc/guide/1.1/en/form.model#declaring-validation-rules.
Building multipage forms (Intermediate)
In this recipe, we will separate our lengthy registration form into multiple pages.
Why do we need multipage forms? Because we don't want our visitors to scroll too much and want to enable them to fill out forms as quickly as possible. Multipage forms look much shorter than a single form and fit better without much change in design; most importantly, we can group the form fields in logical sections.
Getting ready
We'll separate our existing user registration form created in the Creating basic forms recipe, to multipage forms. The sections will be for personal information, address details, and contact information.
How to do it...
1. All code related to the form is written in a file named _form under protected/views/user.
2. We are dividing the input fields into three sections, so create three separate files in the same folder with the names _page1, _page2, and _page3. Separate the code's respective files. Some sample lines are as follows:
3. <?php $form=$this->beginWidget('CActiveForm', array(
4. 'id'=>'user-form',
5. 'enableAjaxValidation'=>false,
6. 'stateful'=>true,
7. )); ?>
8.
9. <div class="row">
10. <?php echo $form->labelEx($model,'first_name'); ?>
11. <?php echo $form->textField($model,'first_name',
12. array(
13. 'size'=>50,
14. 'maxlength'=>50
15. )); ?>
16. <?php echo $form->error($model,'first_name'); ?>
17.</div>
18......
19......
20.<div class="row buttons">
21. <?php echo CHtml::submitButton('Next', array(
22. 'name'=>'page2'
23. )); ?>
24.</div>
25.<?php $this->endWidget(); ?>
26.....
27.<div class="row buttons">
28. <?php echo CHtml::submitButton('back', array(
29. 'name'=>'page1'
30. )); ?>
31. <?php echo CHtml::submitButton('Next', array(
32. 'name'=>'page3'
33. )); ?>
34.</div>
35.
36.<div class="row buttons">
37. <?php echo CHtml::submitButton('Back', array(
38. 'name'=>'page2'
39. )); ?>
40. <?php echo CHtml::submitButton('submit', array(
41. 'name'=>'submit'
42. )); ?>
</div>
43. Now, in the User controller, change the code for actionCreate as follows:
44.public function actionCreate()
45. {
46. if(isset($_POST['page1']))
47. {
48. $model = new User('page1');
49. $this->checkPageState($model, $_POST['User']);
50. $view = '_page1';
51. }
52. elseif(isset($_POST['page2']))
53. {
54. $model = new User('page1');
55. $this->checkPageState($model, $_POST['User']);
56. if($model->validate())
57. {
58. $view = '_page2';
59. $model->scenario = 'page2';
60. }
61. else
62. {
63. $view = '_page1';
64. }
65. }
66.
67. ....
68.
69. $this->render($view, array('model'=>$model));
}
70. And add a function, checkPageState(), as follows:
71.private function checkPageState(&$model, $data)
72.{
73. $model->attributes = $this->getPageState('page',array());
74. $model->attributes = $data;
75. $this->setPageState('page', $model->attributes);
}
76. Lastly, create scenarios in the model User to validate each page of the form separately. Add three arrays specifying all the required fields per page, as follows:
77.return array(
78. array('first_name, last_name, gender, dob',
79. 'required', 'on'=>'page1'
80. ),
81. array('address_1, city, state, country',
82. 'required', 'on'=>'page2'
83. ),
84. array('phone_number_1, email_1',
85. 'required', 'on'=>'page3'
),
How it works...
We have separated all our input fields into three forms. Each page contains an entire standalone form that accepts the input from the user, validates it from the server, and stores the data till we finally submit this form. The parameter stateful passed to theCactiveForm widget specifies the form needed to maintain the state across the pages. To do this, Yii creates a hidden field in each form with the name YII_PAGE_STATE, as shown in the following screenshot:

All the data submitted on the first page is stored in this hidden field and passed to the server with the second page.
To read the data from this field we have used the method getPageState(), and to write we have used setPageState(). We have added a private method checkPageState() to the User controller, which reads the page state, if any, and assigns it to $model->attributes, then assigns data from the current form using $model->attributes = $_POST['User'], and finally overwrites the page state with freshly combined data.
When we click on Next on _page1, we set the POST variable page2, which in turn executes the second block in the if-else ladder in actionCreate. In this recipe, we create an instance of the model User with scenario set to _page1 (as we need to validate the data received from _page1). With a call to checkPageState(), we check the current page state and add any new data from _page1 to the page state.
Then we check if the data filled is valid using $model->validate(). If the model passes the validation we set, apply view to _page2 and set $model->scenario to _page2, to mark the required fields on _page2. If the validation fails, we set the view to _page1 with the validation errors set in the model.
At the end of the action, we render the selected view with the current state of the model. If any validation errors are set, they are listed on the same page; else, the next page will be rendered. The same steps are repeated for _page2 as well.

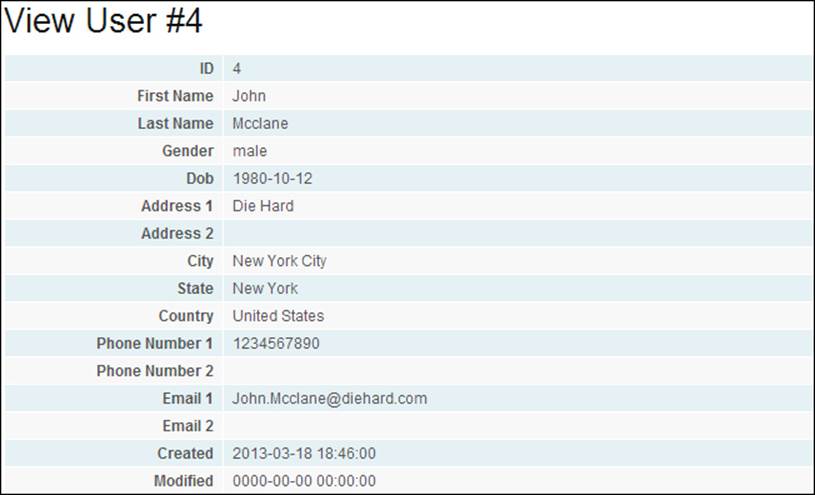
When the submit button is clicked on on _page3, we retrieve the previous data from the page state using getPageState(). Here we are not using checkPageState() as now we do not need to store any data to the page state. We simply assign the data from _page3to the model, and if the model validates we save all the data to the database with $model->save(). After saving, we are redirected to actionView(), where data from all three forms is listed as shown in the following screenshot:
Validating forms (Intermediate)
In this recipe we will look at the data-validation options provided by Yii.
Getting ready
We'll use the form we developed in the Building multipage forms recipe.
How to do it...
We have fields such as First Name, Last Name, Gender, Dob (date of birth), Phone Number 1, Phone Number 2, Email 1, and Email 2. Let's add data validation for these fields. First name and Last Name will be text-only fields, Gender will either bemale or female, and Dob will be a date string.
Open a User model from the protected/models folder. Look for the function named rules(). Following are the rules created for the Building multipage forms recipe:
public function rules()
{
return array(
array('first_name, last_name, gender, dob',
'required', 'on'=>'page1'
),
array('address_1, city, state, country',
'required', 'on'=>'page2'
),
array('phone_number_1, email_1',
'required', 'on'=>'page3'
),
array('first_name, last_name, city, state, country,
phone_number_1, phone_number_2',
'length', 'max'=>50
),
array('gender', 'length', 'max'=>6),
array('address_1, address_2, email_1, email_2',
'length', 'max'=>255
),
array('modified, dob', 'safe'),
array('first_name, last_name, gender, dob,
address_1, address_2, city, state,
country, phone_number_1, phone_number_2, email_1,
email_2, created, modified',
'safe', 'on'=>'search'
),
}
This function defines the validation rules used by the Yii forms. The Gii tool has already created some simple rules by reading the definition of the user table structure. For example, the maximum length for name, City, State, and so on is 50. The field's First Name, Last Name, Gender, Dob, Address 1, Address 2, and so on are the fields required while submitting the form. Let's customise the rules as per our requirements.
1. To generate the first_name, last_name, city, and state name strings:
2. array('first_name, last_name, city, state, country',
3. 'type', 'type'=>'string'
),
4. To make phone numbers numeric, add the following line to the rules array:
array('phone_number_1, phone_number_2', 'numeric'),
5. To check if the e-mail address is a valid address, use this:
array('email_1, email_2', 'email'),
6. To limit the values for gender, use this:
7. array('gender','in','range'=>array('male','female'),
8. 'allowEmpty'=>false
),
9. To check Dob (date of birth) for a valid date:
array('dob', 'date', 'format'=>'mm-dd-yyyy'),
Yii provides a range of validation options. For example:
· boolean: It checks for Boolean values; that is, true(1) or false(0)
· compare: It compares the values against the given constant
· captcha: For captcha code validation
· default: To set the default values if the field is empty
· file: To check the uploaded file's type, size, and number of files
There are many other options too.
How it works...
The rules() function returns a set of rules in a main array, with each rule specified in its separate array for one or more attributes. These rules are used by the validate() method of a model to determine validation of data on the server side. The save() method internally calls this validation and requires it to succeed before saving the record.
For client-side validation, Yii sends additional JavaScript with page contents that contain validation rules coded in JavaScript. With the following code, we can set the trigger to call client-side validation:
<?php $form=$this->beginWidget('CActiveForm', array(
'id'=>'user-form',
'enableAjaxValidation'=>false,
'clientOptions'=>array(
'validateOnSubmit'=>true,
'validateOnChange'=>true,
),
The validateOnSubmit method calls the client-side form field validation before actually submitting a form (on the click of a submit button), while validateOnChange triggers field validation on the onchange event of the respective field.
There's more...
You can visit the following website for various validation rules:
· http://www.yiiframework.com/wiki/56/
· http://www.yiiframework.com/wiki/168/create-your-own-validation-rule/
· http://www.yiiframework.com/wiki/266/understanding-scenarios/
AJAX forms (Advanced)
Yii provides some useful AJAX-based options to make your forms more responsive and interactive. You can set Yii forms to validate fields on change and/or on form submission. This validation is performed by an AJAX call to the server validating the input fields without refreshing the page.
In this recipe we will learn how to enable AJAX support for form validations and submissions.
Getting ready
To see this in action, we will use the simple form generated in the Creating basic forms recipe.
How to do it...
1. Open the file /protected/views/user/_form.php.
2. To enable AJAX-based server-side validation, change the property enableAjaxValidation to true with the following code:
3. <?php $form=$this->beginWidget('CActiveForm', array(
4. 'id'=>'user-form',
5. 'enableAjaxValidation'=>true,
)); ?>
6. To process AJAX validation requests, add the following lines to the action created in UserController.php:
7. ...
8. $model=new User;
9. if(isset($_POST['ajax']) && $_POST['ajax']==='user-form')
10.{
11. echo CActiveForm::validate($model);
12. Yii::app()->end();
13.}
14.if(isset($_POST['User']))
...
With this, we have enabled AJAX-based server-side validation for our form.
How it works...
When we set enableAjaxValidation to true, Yii automatically adds some JavaScript code to our form page. This code tracks the changes in the form fields and sends a request to the server to validate the changes. We can set the separate URL for validating the form data; by default, the validation requests are submitted to the action attribute of the form. In our case it is the same actionCreate attribute that is used to render the form.
In actionCreate, we have added some code to check for AJAX validation requests. If we receive an AJAX request, we simply call the CActiveForm::validate($model) method to validate the data. This method returns the validation results in JSON form, which is then passed to the client browser.
If the respective fields are valid, they will be marked with CSS for denoting class success (green color by default); else, it gets marked with red color for class error and the error description is displayed below the respective field as well as in the error-summary section.
The problem with enableAjaxValidation is that it sends validation requests for changes in any of the form fields, by default. This creates lot of traffic on the server.
To reduce server traffic with AJAX requests, add the following lines to the form definition:
<?php $form=$this->beginWidget('CActiveForm', array(
'id'=>'user-form',
'enableAjaxValidation'=>true,
'clientOptions'=>array(
'validateOnSubmit'=>true,
'validateOnChange'=>false,
),
)); ?>
With this line, we have disabled the validation requests on field-change events and enabled AJAX-based validations on submitting the form. This avoids the individual validation requests and sends a single request before final submission of the form. If this request fails, the form submission is cancelled with the error description added to the form. After successful validation, a regular POST request is sent to the server submitting the form.
With this additional code, you get complete AJAX-based form submission:
<?php $form=$this->beginWidget('CActiveForm', array(
'id'=>'user-form',
'enableAjaxValidation'=>true,
'clientOptions'=>array(
'validateOnSubmit'=>true,
'validateOnChange'=>false,
'afterValidate'=>'js:submitForm', //JS function
),
)); ?>
Add the following HTML code to _form.php. This will hold the result of form submission.
<span id="result"></span>
Add the following JavaScript to _form.php under protected/views/user:
<script type="text/javascript">
function submitForm (form, data, hasError){
//check for validation errors
if (!hasError){
var url = form.attr('action');
$.post(url, form.serialize(), function(res){
$('#result').html(res);
});
}
// return false to avoid traditional form submit
return false;
}
</script>
Set some additional code in the actionCreate method of UserController, as follows:
if(isset($_POST['ajax']) && $_POST['ajax']==='user-form')
{
echo CActiveForm::validate($model);
Yii::app()->end();
}
if(Yii::app()->request->isAjaxRequest)
{
//do stuff like validate or save model
//and set message accordingly
echo 'Registration successful!!';
Yii::app()->end();
}
What we did is set the forms afterValidate to submit AJAX request to actionCreate(). As we are not setting $_POST['ajax'], we track this event with Yii::app()->request->isAjaxRequest. If it's an AJAX request, simply save the model and return the success message. This is then displayed in the span tag on the form page.
Notice that we have set the submitForm function to always return false to avoid the traditional non-AJAX form submission.
There's more...
Additionally, Yii provides three static methods.
· CHTML::ajaxLink()
· CHTML::ajaxButton()
· CHTML::ajaxSubmitButton()
These methods automatically create the respective HTML elements and additionally add the jQuery code for AJAX-based requests/response handling.
The following lines demonstrate the use of AJAX using these helpers:
echo CHtml::ajaxLink(
'Submit',
array('user/view', 'id' => $id), // Yii URL
array('update' => '#result') // jQuery selector
);
This will create an HTML link element with the name Submit. On clicking this link, a request is posted to actionView of UserController. The first parameter provides a name or text to be used for the link. The second parameter specifies its target or href attribute. The third parameter specifies the AJAX option update that is set to replace the contents of the HTML element #result.
You can process the response data on the client script with following callback function:
echo CHtml::ajaxLink(
'Submit',
array('user/view', 'id' => $id),
array(
'dataType'=>'json',
'success' => 'js:function(data){
console.log(data);
alert(data.msg); //message element in response
}'),
);
You can find more information on AJAX forms at the following links:
· http://www.yiiframework.com/wiki/394/javascript-and-ajax-with-yii/
· http://www.yiiframework.com/doc/api/1.1/CActiveForm#clientOptions-detail
Uploading files (Advanced)
Let's add the upload functionality to our registration form. We'll add a file-upload dialog, asking the user to upload his image.
Getting ready
We'll use the form we have developed in the Creating basic forms recipe.
How to do it...
1. Let's start with editing our model User.php. Add a public attribute named $image.
2. public $image;
3.
4. public static function model($className=__CLASS__)
5. {
6. return parent::model($className);
}
7. Now add some validation rules for this attribute.
8. return array(
9. array('image', 'file', 'allowEmpty' => true,
10. 'types' => 'jpg, jpeg, gif, png'
11. ),
12....
);
13. Add the attribute's name to this attribute:
'image'=>'Upload Photo',
14. Edit _form.php under protected/views/user to add the following lines to enable this form to accept file uploads:
15.'htmlOptions' => array('enctype' => 'multipart/form-data'),
<code in uploads/_form.php>
16. Finally, add the following lines to the UserController.php action created, to save the uploaded file:
17.if(isset($_POST['User']))
18.{
19. $model->attributes=$_POST['User'];
20. $model->image=CUploadedFile::getInstance($model,'image');
21. if($model->save())
22. {
23. $path=Yii::getPathOfAlias(
24. 'webroot.images.'.$model->first_name
25. );
26. $model->image->saveAs($path);
27. $this->redirect(array('view','id'=>$model->id));
28. }
}
That's it, we are done. Now try to fill the form, select the file to be uploaded and you can find the uploaded file at the web_root/images folder.
How it works...
At the start, we set a public attribute to our User model to hold the file data. Next we set some validation rules to specify that the file upload is not compulsory and the user can upload only .jpg, .gif, and .png files.
Then we set our form to accept file uploads. As we are uploading the binary data in the form of a file, we need to enable our form to accept binary data. We did this with 'enctype' => 'multipart/form-data'. Additionally, the form method must be set to POST.
At this stage we are done with the upload part, but at the server side we need some logic to process the uploaded contents. We added this functionality with the following line:
$model->image=CUploadedFile::getInstance($model,'image');
To get the uploaded contents in $model->image, we add the following line:
$model->image->saveAs($path.$model->first_name);
We have saved and received data in a file with the same name as the user's first name. Alternatively, you can get the original filename with $model->image->getName().
We have used two components provided by Yii. Following are the two components:
· CUploadedFile: This represents the information for an uploaded file. It's a wrapper class for the $_FILE array that PHP uses to hold uploaded files. We have used its getInstance() method to get the uploaded file and then used saveAs() to save the data to the file. Additionally, we can get other information about the file, including the name, temporary name, type, size, and errors. Get more details on the website http://www.yiiframework.com/doc/api/1.1/CUploadedFile.
· CFileValidator: This verifies if an attribute is receiving a valid uploaded file. With the file validator, we can make the file field compulsory, specify the maximum number of files, and specify the minimum and maximum limits on the file size and a file type. We can also set the details of the errors to be displayed. By adding the following lines in the rules array of the model, we can enable the file field validation:
· return array(
· array('image', 'file', 'allowEmpty' => true,
· 'types' => 'jpg, jpeg, gif, png'
· ),
· ...
);
With these lines, we have set the image attribute to be optional and we have restricted the file types to image files.
You can get more details from the website http://www.yiiframework.com/doc/api/1.1/CFileValidator/.
Using multiple models (Intermediate)
This recipe explains how to use multiple models within a single form.
Getting ready
We'll use the form we have developed in the Building multipage forms recipe.
Create a new table order. This will represent the orders placed by the users.
CREATE TABLE IF NOT EXISTS 'order' (
'id' int(11) NOT NULL AUTO_INCREMENT,
'user_id' int(11) NOT NULL,
'product_name' varchar(255) NOT NULL,
'quantity' int(11) NOT NULL,
PRIMARY KEY ('id'),
KEY 'user_id' ('user_id')
) ENGINE=InnoDB DEFAULT CHARSET=latin1 AUTO_INCREMENT=1 ;
Create a model for this table using the Gii tool.
How to do it...
Let's add this new model to the actionCreate method developed for multiple forms. We will need to add one more step/page to the action as follows:
...
$this->checkPageState($model, Yii::app()->request->getPost('User',array()));
$this->setPageState('order', Yii::app()->request->getPost('Order', array()));
...
...
if($model->validate())
{
$view = '_page4';
$order = new Order();
$order->attributes = $this->getPageState(
'order', array()
);
}
...
else if(isset($_POST['submit']))
{
$model = new User('page3');
$order = new Order();
$model->attributes = $this->getPageState(
'page', array()
);
$order->attributes = $_POST['Order'];
if($model->validate())
{
$model->save();
$order->user_id = $model->id;
if($order->validate())
{
$order->save();
$this->redirect(array('view', 'id'=>$model->id));
}
}
$view = '_page4';
}
Next, create a view for _page4.
...
<div class="row">
<?php echo $form->labelEx($order,'product_name'); ?>
<?php echo $form->textField($order,'product_name'); ?>
<?php echo $form->error($order,'product_name'); ?>
</div>
<div class="row">
<?php echo $form->labelEx($order,'quantity'); ?>
<?php echo $form->numberField ($order,'quantity'); ?>
<?php echo $form->error($order,'quantity'); ?>
</div>
<div class="row buttons">
<?php echo CHtml::submitButton('Back', array(
'name'=>'page3')); ?>
<?php echo CHtml::submitButton('submit', array(
'name'=>'submit')); ?>
</div>
...
Change the submit button in the view of _page3 to the following:
<?php echo CHtml::submitButton('Next', array(
'name'=>'page4'
)); ?>
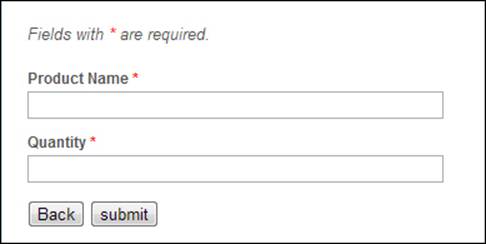
We are done; try the new form in your browser. It will look something like the following screenshot:
How it works...
We introduced an order model in the fourth page of our multipage form with the following code:
if($model->validate())
{
$view = '_page4';
$order = new Order();
$order->attributes = $this->getPageState('order', array());
}
First we check if the data we received in the third step for the model User is valid. If the model validates, we set our view page to _page4. Then we create a new model named Order. On the third line, we simply check if there's any saved state for the modelOrder; this is useful if the user moves back after filling the data of Order.
In the same way, we have added some code in the third step to check if the user has moved back from _page4 after filling the form fields. So we save the current state of _page4. Notice the use of Yii::app()->request->getPost('User', array()) line of code. ThegetPost() method is used to get the named POST value. The first parameter is the name of the POST field and the second parameter is the default value if the POST field with the given name is not set. Similarly, you can use the getParam() method to get the parameters of GET.
Next, in the final step, we assign the saved state to the User model, and $_POST data to the Order model. As we have already loaded a save state on the page, $_POST will hold the updated data (if any) or the data in that saved state.
Then we validate the User model with if($model->validate()). After successful validation, we save the User model and assign the user's ID to the Order model with $order->user_id = $model->id. Then we save the Order model too. If it's successful, we redirect to view the page; else, we redirect to the fourth page to solve the form errors.
There's more...
We could use the transactional feature of the database while storing the data; that is, if the saving of the order model fails, we could discard the User model entirely by rolling back the transaction as follows:
if($model->validate())
{
$transaction = Yii::app()->db->beginTransaction();
try
{
$model->save();
$order->user_id = $model->id;
if(!$order-> save())
throw new Exception('Order data invalid');
$transaction->commit();
$this->redirect(array('view', 'id'=>$model->id));
}
catch(Exception e)
{
$transaction->rollBack();
$view = 'page4';
}
}
For more details on database transaction visit the website en.wikipedia.org/wiki/Database_transaction.
Transactional queries support in Yii can be looked up on the website http://www.yiiframework.com/doc/guide/1.1/en/database.dao#using-transactions.
Customizing looks (Advanced)
In this recipe we will look at the various options to customize the look of page elements. Yii provides attributes such as htmlOptions, labelOptions, and cssFile to add your own CSS rules to the page elements.
How to do it...
1. Use your own class for the form as follows:
2. $form=$this->beginWidget('CActiveForm', array(
3. 'id'=>'user-form',
4. 'htmlOptions' => array('class' => 'myclass'),
));
5. Set the HTML options (name, ID, class, and so on) for elements as follows:
6. $htmlOptions = array('class'=>'myClass', 'id'=>'myId')
$form->textField($model, $attribute, $htmlOptions)
Using Skins, we can proceed as follows:
1. Enable Skins in the application configuration with the following code:
2. 'widgetFactory'=>array(
3. 'class'=>'CWidgetFactory',
4. 'enableSkin'=>true,
)
5. To create a new skin for a widget, create a file with the name of the widget in the Skins folder, that is, /protected/views/skins/CDetailView.php, with the following code:
6. return array(
7. 'default'=>array(
8. 'htmlOptions'=>array(
9. 'class'=>'class_1',
10. ),
11. 'template'=>'<span>{label}</span><span>{value}</span>',
12. ),
13. 'stripped'=>array(
14. 'htmlOptions'=>array(
15. 'class'=>'stripped',
16. ),
17. 'template'=>'<span>{label}</span><span>{value}</span>',
18. )
);
19. Use the widget with a Skin.
20. Use a default skin.
$this->widget('CDetailView);
21. Or, use our created Skin as follows:
$this->widget('CDetailView, array('skin'=>'stripped'));
How it works...
We can change the default CSS rules applied to the form elements with the parameter htmlOptions. Here we can specify a custom CSS class or provide inline styling rules as follows:
$htmlOptions => array('attribute' => 'value');
$form->textField($model, $attribute, $htmlOptions);
$form->dropDownList($model, $attribute, $data, $htmlOptions);
In the same way, elements such as textfield and dropdownlist and the label radioButtonsLists provide an optional parameter $htmlOptions to customize the look of a given element.
If all forms across your application are supposed to use the same styling rules, instead of repeating htmlOptions for each form, you can add these rules to widgetFactory in the application configuration. In protected/config/main.php, add the following lines:
...
'components'=>array(
'widgetFactory'=>array(
'class'=>'CWidgetFactory',
'widgets'=>array(
'CActiveForm'=>array(
'htmlOptions'=>array(
'class'=>'myClass1 myClass2',
),
),
),
)
...
)
Now you can specify the element with the following:
$form=$this->beginWidget('CActiveForm', array(
'id'=>'user-form',
));
If you want some forms to use different CSS rules than the ones specified in widgetFactory, you can do it by specifying the htmlOptions array for this form. Additionally, you can customize form styles with the following clientOption attributes:
$form=$this->beginWidget('CActiveForm', array(
'clientOptions'=>array(
'errorCssClass'=>'errorClass',
'successCssClass'=>'successClass',
'validatingCssClass'=>'inProgress',
'errorMessageCssClass'=>'msgClass',
)));
These attributes are explained as follows:
· The errorCssClass attribute allows you to set the CSS class to be assigned to the container whose associated input has the AJAX validation error
· With the successCssClass attribute, you can set the class for the container whose associated input passes AJAX validation
· The validatingCssClass attribute allows you to set the CSS class to be assigned to the container whose associated input is currently being validated via AJAX
· The errorMessageCssClass attribute sets the CSS class to the error message returned by AJAX validation
· You can also change the container element for an input field with the inputContainer attribute
For widgets such as detailView, gridView, and listView, you can specify the template to be used to change the way these widgets are rendered.
$this->widget('zii.widgets.CDetailView', array(
'htmlOptions'=>array( 'class'=>'myClass'),
'template'=>'<span>{label}</span><span>{value}</span>',
...
));
We can use Skins to customise the look of Yii widgets; all the rules we specified under widgetFactory in main.php can be moved to the Skin files. Additionally, we can specify multiple Skins for each widget and decide which Skin to use when we need it. When the enableSkin option for widgetFactory is set to true, Yii will try to find the Skins before rendering the widgets. If the Skins are not available, Yii's inbuilt styling will be used.
There's more...
You can find more details on customizing Yii widgets on the link http://danaluther.blogspot.in/2012/02/leveraging-widgets-widget-factory-and.html.
All materials on the site are licensed Creative Commons Attribution-Sharealike 3.0 Unported CC BY-SA 3.0 & GNU Free Documentation License (GFDL)
If you are the copyright holder of any material contained on our site and intend to remove it, please contact our site administrator for approval.
© 2016-2026 All site design rights belong to S.Y.A.